Embed Size (px)
Citation preview

ADAPT‐Floor Pro 2009 Tutorial Export Design Strip to ADAPT‐PT or ADPT‐RC – 2 (SI)
ADAPT-Floor Pro 2009 Tutorial
Export Design Strip to ADAPT-PT or ADAPT-RC
Update: May 2010
Copyright © ADAPT Corporation all rights reserved

ADAPT‐Floor Pro 2009 Tutorial Export Design Strip to ADAPT‐PT or ADPT‐RC – 2 (SI)
1 EXPORT DESIGN STRIP FROM ADAPT-FLOOR PRO TO ADAPT-PT OR ADAPT-RC AND BACKWARD TRANSFER OF TENDON LAYOUT FROM ADAPT-PT TO ADAPT-FLOOR PRO
1.1 Overview
This section explains how you can export input data from ADAPT-Floor Pro to ADAPT-PT and ADAPT-PRC, perform an optimal design for your post-tensioning project using ADAPT-PT or reinforced concrete project using ADAPT-RC, and have the details of your optimized post-tensioning design automatically transferred to ADAPT-Floor Pro from ADAPT-PT. The backward transfer of design information from PT to Floor Pro eliminates the guesswork involved in the tendon and force layout, that are prerequisite to the designs performed using finite element programs. The steps involved are:
Generate a three-dimensional model of your structure in ADAPT-Floor
Pro, including the material properties, design criteria and loads.
Define support lines and create design strips in ADAPT-Floor Pro.
Export the design strips to ADAPT-PT or ADAPT-RC.
Execute the imported design strips in ADAPT-PT or ADAPT-RC and obtain optimum designs for each.
Transfer the tendon profile and force obtained in ADAPT-PT to the associated design strip in ADAPT-Floor Pro. Design obtained in ADAPT-RC can’t the transferred back to ADAPT-Floor Pro.
Validate the tendons imported from ADAPT-PT in ADAPT-Floor Pro.
The procedure is detailed, using the simple example shown in Figure 1-1.
Figure 1-1

ADAPT‐Floor Pro 2009 Tutorial Export Design Strip to ADAPT‐PT or ADPT‐RC – 2 (SI)
When opening ADAPT-Builder 2009 Concrete Design Suite, check the options as shown in Figure 1-2 if you want to export the information to ADAPT-PT. If you want to export the information to ADAPT-RC, check the options as shown in Figure 1-3.
Figure 1-2

ADAPT‐Floor Pro 2009 Tutorial Export Design Strip to ADAPT‐PT or ADPT‐RC – 2 (SI)
Figure 1-3 Thickness of slab = 250 mm
(i) Material Properties o Concrete: Compressive strength, f’c = 28 MPa Weight = 2400 kg/m3 Modulus of Elasticity = 24870 MPa
o Prestressing:
Low Relaxation, Unbonded System Strand Diameter = 12.7 mm Strand Area = 98 mm2
Modulus of Elasticity = 200000 MPa Ultimate strength of strand, fpu = 1860 MPa Minimum strand cover
From top fiber = 40 mm

ADAPT‐Floor Pro 2009 Tutorial Export Design Strip to ADAPT‐PT or ADPT‐RC – 2 (SI)
From bottom fiber Interior spans = 40 mm
Exterior spans = 50 mm
o Nonprestressed Reinforcement: Yield stress, fy = 450 MPa Modulus of Elasticity = 200000 MPa
Minimum Rebar Cover = 25 mm (Top and Bottom)
(ii) Loading Superimposed Dead load = 1.5 kN/m2
Live load = 2.5 kN/m2
Add two Patch Load on the whole slab: 1.5 kN/m2 Superimposed Dead load and 2.5 kN/m2 Live load. Create the support lines in the model as shown in Fig. 1-4.
Figure 1-4
1.2 Edit the Material Properties
1.2.1 Enter the Properties of Concrete (Figure 1-5)
Select the Normal weight and enter the strength at 28 days for slab/beam and column as 28 MPa. Consider 24870 MPa as the Modulus of Elasticity.
For this tutorial, keep the value of creep coefficient as 2. The creep coefficient will be used in the calculation of long-term deflection. Consider Concrete strength at stressing as 22 MPa. Consider 28 MPa as unit weight of concrete.

ADAPT‐Floor Pro 2009 Tutorial Export Design Strip to ADAPT‐PT or ADPT‐RC – 2 (SI)
Figure 1-5
1.2.2 Enter the Properties of Reinforcement (Figure 1-6)
Enter Yield Stress of main bars and Modulus of Elasticity as 450 MPa and 29000 MPa respectively. These will be used when calculating the number of bars required. Yield stress of shear reinforcement to be entered as 450 MPa.
Figure 1-6
1.2.3 Enter the Post-Tensioning System Parameters
Select the Post-tensioning system as Unbonded and leave the default values of the other properties as they are as in Figure 1-7.

ADAPT‐Floor Pro 2009 Tutorial Export Design Strip to ADAPT‐PT or ADPT‐RC – 2 (SI)
Figure 1-7
1.3 Enter the Criteria
1.3.1 Enter the Criteria – General
1.3.1.1 Specify the Design Code
In the Design Code screen, set the code as BS8110 as shown in Figure 1-8.
Figure 1-8

ADAPT‐Floor Pro 2009 Tutorial Export Design Strip to ADAPT‐PT or ADPT‐RC – 2 (SI)
1.3.1.2 Specify Tendon Height Defaults for Strip Method
The cover for the prestressing steel is specified to the center of gravity of the strand (cgs). In Tendon Height Defaults for Strip Method, edit CGS of the tendon as 40 mm for both the top fiber and the interior spans of bottom fiber and 50 mm for the exterior spans for the bottom fiber as in Figure 1-9.
Figure 1-9 1.3.1.3 Specify Rebar Minimum Cover
In Rebar Minimum Cover for nonprestressed reinforcement, edit 25 mm cover for both the top and the bottom as shown in Figure 1-10.
Figure 1-10
ADAPT‐Floor Pro 2009 Tutorial Export Design Strip to ADAPT‐PT or ADPT‐RC – 2 (SI)
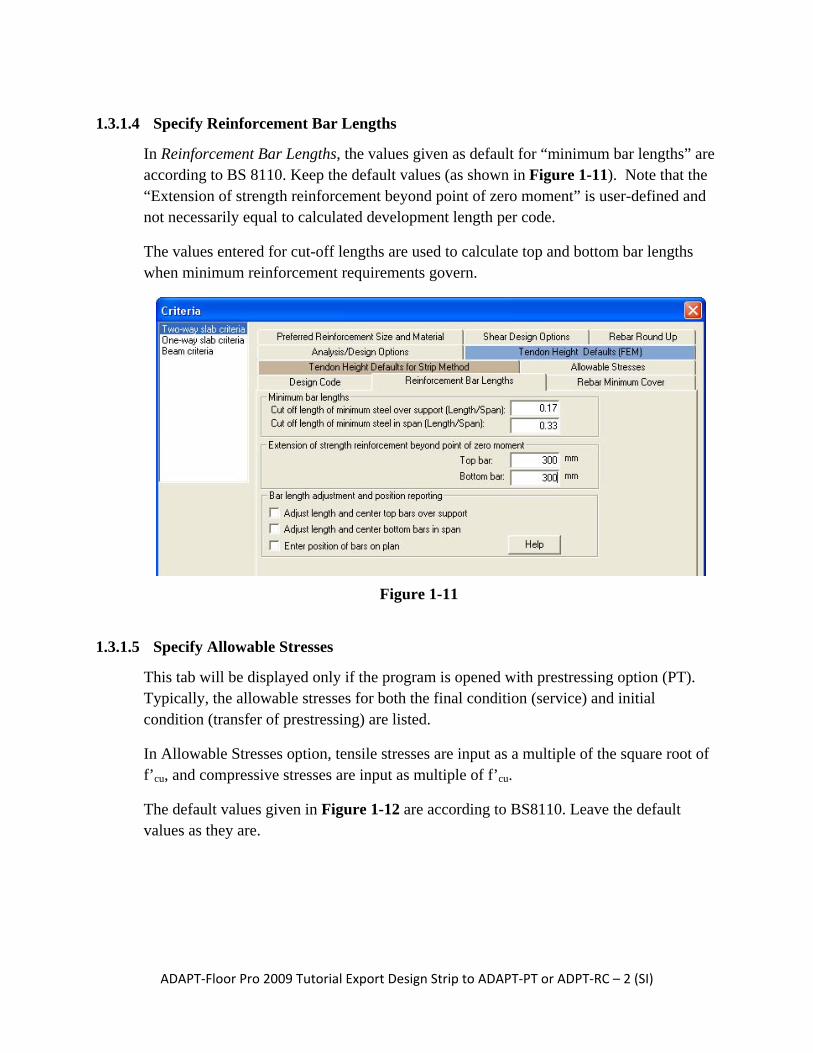
1.3.1.4 Specify Reinforcement Bar Lengths
In Reinforcement Bar Lengths, the values given as default for “minimum bar lengths” are according to BS 8110. Keep the default values (as shown in Figure 1-11). Note that the “Extension of strength reinforcement beyond point of zero moment” is user-defined and not necessarily equal to calculated development length per code.
The values entered for cut-off lengths are used to calculate top and bottom bar lengths when minimum reinforcement requirements govern.
Figure 1-11
1.3.1.5 Specify Allowable Stresses
This tab will be displayed only if the program is opened with prestressing option (PT). Typically, the allowable stresses for both the final condition (service) and initial condition (transfer of prestressing) are listed.
In Allowable Stresses option, tensile stresses are input as a multiple of the square root of f’cu, and compressive stresses are input as multiple of f’cu.
The default values given in Figure 1-12 are according to BS8110. Leave the default values as they are.

ADAPT‐Floor Pro 2009 Tutorial Export Design Strip to ADAPT‐PT or ADPT‐RC – 2 (SI)
Figure 1-12
1.3.1.6 Specify Shear Design Options
The shear design options are listed in a separate tab. For one-way shear (beams and one-way slabs), the program uses stirrups (links, ties), where needed. For punching shear reinforcement, you have the option to select between shear studs or stirrups. In Shear Design Options, select Stirrup and change Preferred Stirrup Bar Size as 12 mm for Two-way shear reinforcement as shown in Figure 1.1-9.
Figure 1-13

ADAPT‐Floor Pro 2009 Tutorial Export Design Strip to ADAPT‐PT or ADPT‐RC – 2 (SI)
1.3.2 Enter the Criteria for Strip Method of Analysis and Design
1.3.2.1 Effective Flange
In Effective Flange option, instruction to view and edit Effective Width is explained as shown in Figure 1-14.
Figure 1-14
1.3.2.2 Specify Loading Treatments Options (Figure 1-15)
Answer Yes to Skip live load and enter the Skip factor as 1. Answer No to Reduce live load option. In order to calculate the self-weight automatically, you must answer Yes to Include self-weight option.
Figure 1-15

ADAPT‐Floor Pro 2009 Tutorial Export Design Strip to ADAPT‐PT or ADPT‐RC – 2 (SI)
1.3.2.3 Post Tensioning Criteria
1.3.2.3.1 Specify Design Criteria for Strip Method (Figure 1-16)
In Design Criteria for Strip Method, you can select various calculation settings. First, select the Design options as Interactive.
Next, select Yes for Reduce Moments to face-of-support option.
Select No for the option to Redistribute moments.
Select Yes for the Equivalent Frame Modeling.
Figure 1-16
1.3.2.3.2 Specify Recommended Post-Tensioning Values for Strip Method
This screen is used to specify minimum and maximum values for average precompression (P/A: total prestressing divided by gross cross-sectional area) and percentage of dead load to balance (Wbal). These values are used by the program to determine the post-tensioning requirements and the status of the Pmin/Pmax and WBAL Min/ Max indicators on the Recycle window in ADAPT-PT.
The values shown in Figure 1-17 are according to the selected code and the experience of economical design.
Figure 1-17

ADAPT‐Floor Pro 2009 Tutorial Export Design Strip to ADAPT‐PT or ADPT‐RC – 2 (SI)
1.3.2.3.3 Specify Stress Loss Calculation for Strip Method
The two design options are Force Selection and Force or tendon selection/Friction calculation. Force Selection is the default option. Keep the default option, as in Figure 1-18.
Figure 1-18
In this option, a tendon will be assigned a final and constant effective force, equal to the jacking force minus all stress losses, expressed as a single value.
1.3.2.3.4 Specify Tendon Profile from Tendon Library
The program allows you to specify the profile for the tendon.
For this example, leave the default values as shown in Figure 1-19.
Figure 1-19
1.4 Generate Design Strips for Strip Method
Create design strips using the Generate Design Strips for Strip Method from the Strips pull-down menu as shown in Figure 1.1-16.

ADAPT‐Floor Pro 2009 Tutorial Export Design Strip to ADAPT‐PT or ADPT‐RC – 2 (SI)
Figure 1-20
1.5 Insert Strip Method Load Transfer
Insert Strip Method load transfer using the Insert Strip Method Load Transfer from the Strips pull-down menu as shown in Figure 1-21.
Figure 1-21
You need to select a support line and attach the Strip Method Load Transfer to it at the location of your choice. A window (as shown in Figure 1-22) gets opened after clicking on Insert Strip Method Load Transfer in which the use of inserting Strip Method Load Transfer is explained in detail.

ADAPT‐Floor Pro 2009 Tutorial Export Design Strip to ADAPT‐PT or ADPT‐RC – 2 (SI)
Figure 1-22
1.6 Export to ADAPT-PT or ADAPT-RC
1.6.1 Export to ADAPT-PT or ADAPT-RC through Strips Pull-down Menu
Once the design strips are successfully created, you can generate input data for ADAPT-PT for all support lines, one by one. You need to select a support line and click on Generate Input Data for ADAPT-PT in Strips pull-down menu as shown in Figure 1-23.
Figure 1-23
Similarly you can generate input data for ADAPT-RC for all support lines, one by one, once the design strips are successfully created. You need to select a support line and click on Generate Input Data for ADAPT-RC in Strips pull-down menu as shown in Figure 1-24.

ADAPT‐Floor Pro 2009 Tutorial Export Design Strip to ADAPT‐PT or ADPT‐RC – 2 (SI)
Figure 1-24
Once the design strips are successfully created, you can export them one by one to ADAPT-PT for execution. You need to select a support line and click on Execute in ADAPT-PT in Strips pull-down menu as shown in Figure 1-25.
Figure 1-25

ADAPT‐Floor Pro 2009 Tutorial Export Design Strip to ADAPT‐PT or ADPT‐RC – 2 (SI)
Similarly you can export input data for ADAPT-RC for all support lines, one by one, once the design strips are successfully created. You need to select a support line and click on Execute in ADAPT-RC in Strips pull-down menu as shown in Figure 1-26.
Figure 1-26
This opens ADAPT-PT or ADAPT-RC with the information associated with the selected support line as shown in Figure 1-27.
Figure 1-27
The input data generated or exported in ADAPT-PT or ADAPT-RC is saved in its own folder under the name “Support Line #_pt” or “Support Line #_rc” in the “STRIP_MODEL/Current_plane/Support Line #” folder. ADAPT-PT and ADAPT-RC

ADAPT‐Floor Pro 2009 Tutorial Export Design Strip to ADAPT‐PT or ADPT‐RC – 2 (SI)
recognizes that the loaded data is from ADAPT-Floor Pro and that the outcome of the design is likely to be sent back to ADAPT-Floor Pro.
1.6.2 Export to ADAPT-PT or ADAPT-RC through Support Line Property Box
Open the support line property box of (Figure 1-28) by double clicking on a support line.
Figure 1-28
Click on ‘Write PT Data’ button, to write the support line input data to a subdirectory, ready to be analyzed with ADAPT-PT or ADAPT-RC.
It saves two files with *.ADB extension to be opened in ADAPT-PT or ADAPT-RC and are saved in its own folder under the name “Support Line #_pt” and “Support Line #_rc” in the “STRIP_MODEL/Current_plane/Support Line #” folder. ADAPT-PT and ADAPT-RC recognize that the loaded data is from ADAPT-Floor Pro and that the outcome of the design is likely to be sent back to ADAPT-Floor Pro.
Click on ‘Rendering’ button, to obtain the idealized design tributary view in ‘ADAPT Solid Modeling’ window (Figure 1-29).

ADAPT‐Floor Pro 2009 Tutorial Export Design Strip to ADAPT‐PT or ADPT‐RC – 2 (SI)
Figure 1-29
You can click on ‘Generate Bitmap’ button, to generate the image of the idealized design tributary in bitmap format. You can modify the model using the view and editing tools on the right side of the screen, if needed. The tools and their functionalities are listed below:
• Restore - This button helps the user to restore all modifications done in ‘ADAPT Solid Modeling’ window.
• Edit Idealized Tributary - This button helps the user to edit the lengths, thicknesses of the spans as shown in Figure 1-30.
Figure 1-30
• Edit Support Above - This button helps the user to edit the supports above the slab as shown in Figure 1-31.
ADAPT‐Floor Pro 2009 Tutorial Export Design Strip to ADAPT‐PT or ADPT‐RC – 2 (SI)
Figure 1-31
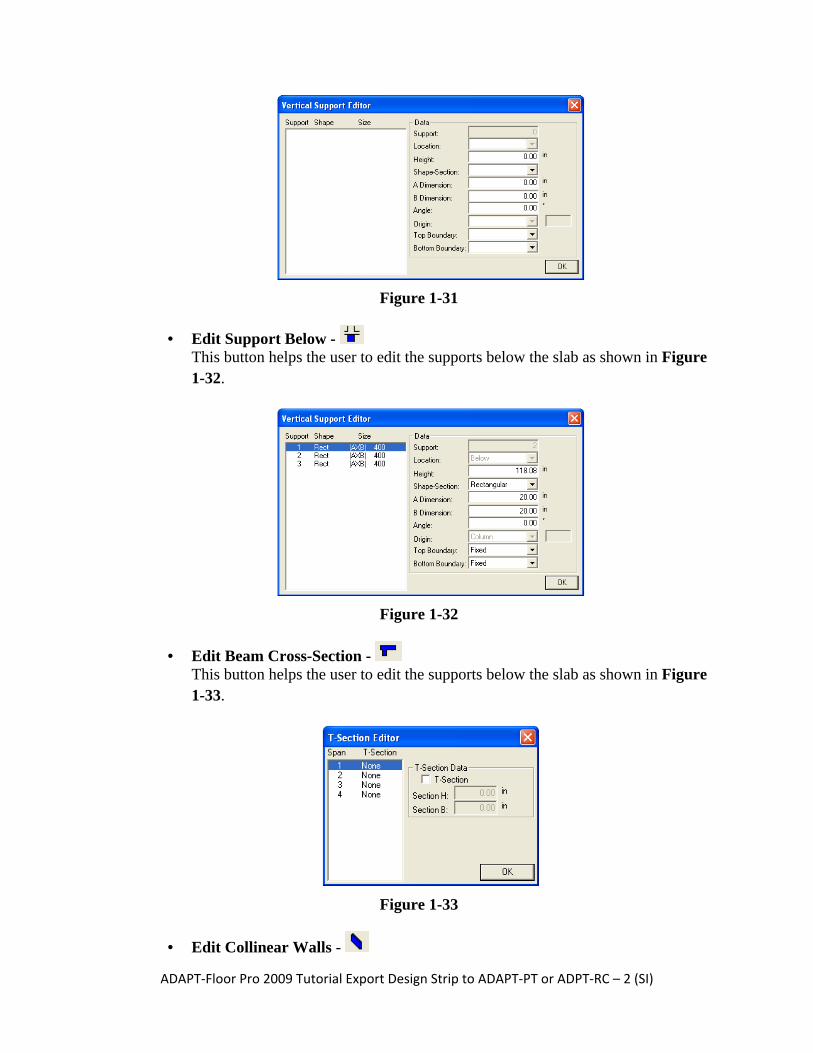
• Edit Support Below - This button helps the user to edit the supports below the slab as shown in Figure 1-32.
Figure 1-32
• Edit Beam Cross-Section - This button helps the user to edit the supports below the slab as shown in Figure 1-33.
Figure 1-33
• Edit Collinear Walls -

ADAPT‐Floor Pro 2009 Tutorial Export Design Strip to ADAPT‐PT or ADPT‐RC – 2 (SI)
This button helps the user to edit the supports below the slab as shown in Figure 1-34.
Figure 1-34
• Edit Drop Cap - This button helps the user to edit the supports below the slab as shown in Figure 1-35.
Figure 1-35
• Edit Load - This button helps the user to edit the loads in the spans as shown in Figure 1-36. Please note that at the time of export to ADAPT-PT or ADAPT-RC, the patch loads in ADAPT-Floor Pro gets converted to line loads and point loads.

ADAPT‐Floor Pro 2009 Tutorial Export Design Strip to ADAPT‐PT or ADPT‐RC – 2 (SI)
Figure 1-36
• Generates a Report of the Idealized Tributary - This button generates a MS-Word report of the idealized tributary.
• Go to PT - Once you are satisfied with the idealization of the design strip, click on the ‘Go to
PT’ button, to open ADAPT-PT with the information from the displayed design strip. This opens ADAPT-PT with the information associated with the selected support line.
• Go to RC - Once you are satisfied with the idealization of the design strip, click on the ‘Go to
RC’ button, to open ADAPT-RC with the information from the displayed design strip. This opens ADAPT-RC with the information associated with the selected support line.
This opens ADAPT-PT or ADAPT-RC with the information associated with the selected support line as shown in Figure 1-27. The data exported in ADAPT-PT is saved in its own folder under the name “Support Line name” in the “STRIP_MODEL/Current_plane/Support Line #” folder. ADAPT-PT and ADAPT-RC recognize that the loaded data is from ADAPT-Floor Pro and that the outcome of the design is likely to be sent back to ADAPT-Floor Pro.
1.7 Execution of Data in ADAPT-PT or ADAPT-RC
Once in ADAPT-PT or ADAPT-RC, the imported data fields will be grayed out, and will not be accessible for editing. The intent of locking certain data fields is to retain the compatibility of the imported data with its source in ADAPT-Floor Pro. Other

ADAPT‐Floor Pro 2009 Tutorial Export Design Strip to ADAPT‐PT or ADPT‐RC – 2 (SI)
information, necessary for the execution of ADAPT-PT or ADAPT-RC will be filled in with the program’s default and is available for editing. If necessary, you can unlock the data fields imported from ADAPT-Floor Pro, using the “Unlock” tool shown in Figure 1-27. Once you unlock the data, it is deemed to have lost its compatibility with ADAPT-Floor Pro and cannot be transferred back to ADAPT-Floor Pro (Figure 1-37).
Figure 1-37
Execution of the program in ADAPT-PT or ADAPT-RC is described in detail in User Manual of ADAPT-PT or ADAPT-RC. Once the design is completed in ADAPT-PT and you exit the program from ‘PT Recycling’ window, the message box shown in Figure 1-38 will advise you that your design is available to be imported in ADAPT-Floor Pro. The data for import of design values to ADAPT-Floor Pro is saved under the file name “Support Line #.tdn” in the folder “STRIP_MODEL/Current_plane/Support Line #”. You need not open ADAPT-Floor Pro for processing the data from ADAPT-PT immediately. You can continue with the optimization of the post-tensioning of other design strips, and recall the saved data in ADAPT-Floor Pro when it is convenient.
Figure 1-38 Please make a note that design optimized in ADAPT-RC imported from ADAPT-Floor Pro can’t be recalled in ADAPT-Floor Pro.

ADAPT‐Floor Pro 2009 Tutorial Export Design Strip to ADAPT‐PT or ADPT‐RC – 2 (SI)
1.8 Recall of PT Data from ADAPT-Floor Pro
To recall the optimized tendon design in ADAPT-Floor Pro, open the file of the floor system and display the support lines. Select the support line for which you intend to import the data. You may select more than one support line, if you wish to import data for multiple design strips. From the Strips pull-down menu (Figure 1-39) select Import Tendons From ADAPT-PT.
Figure 1-39
The program reads the data prepared by ADAPT-PT and displays the tendons overlapped on the support line. The design obtained in ADAPT-PT may consist of a continuous tendon over the entire length of the support line and/or a tendon that covered the part of some span and/or left/right cantilever. The short tendons terminating in middle of the spans are identified with a handle (short sloping line). The handle is a visual display intended to (a) indicate the location of terminated tendons, and (b) provide a graphic that you can select for editing the associated tendons. As an example, the data imported for design strip 1 is shown in Figure 1-40.
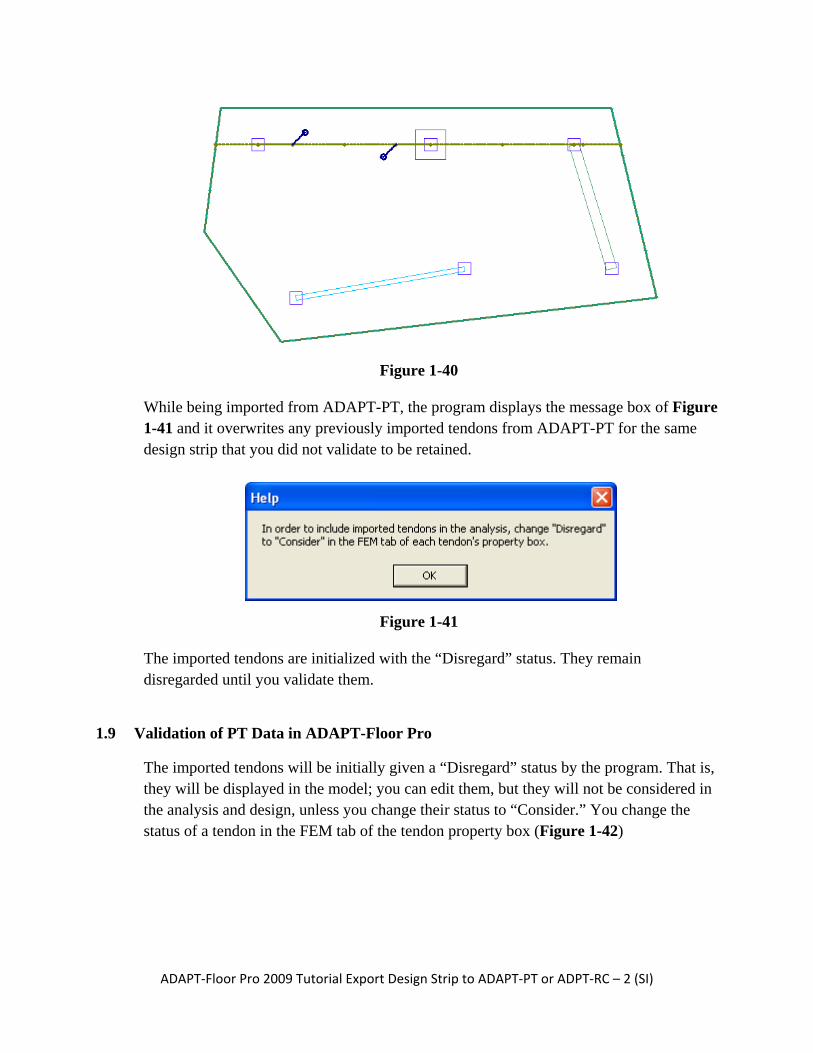
ADAPT‐Floor Pro 2009 Tutorial Export Design Strip to ADAPT‐PT or ADPT‐RC – 2 (SI)
Figure 1-40 While being imported from ADAPT-PT, the program displays the message box of Figure 1-41 and it overwrites any previously imported tendons from ADAPT-PT for the same design strip that you did not validate to be retained.
Figure 1-41
The imported tendons are initialized with the “Disregard” status. They remain disregarded until you validate them.
1.9 Validation of PT Data in ADAPT-Floor Pro
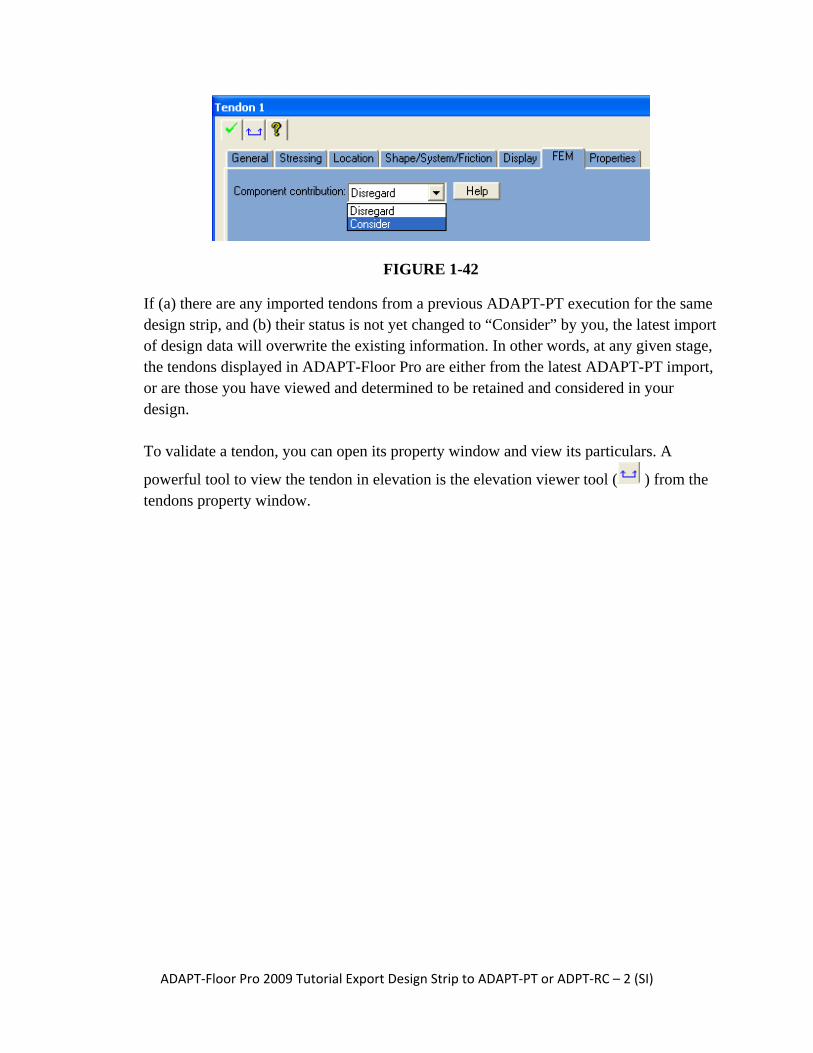
The imported tendons will be initially given a “Disregard” status by the program. That is, they will be displayed in the model; you can edit them, but they will not be considered in the analysis and design, unless you change their status to “Consider.” You change the status of a tendon in the FEM tab of the tendon property box (Figure 1-42)
ADAPT‐Floor Pro 2009 Tutorial Export Design Strip to ADAPT‐PT or ADPT‐RC – 2 (SI)
FIGURE 1-42
If (a) there are any imported tendons from a previous ADAPT-PT execution for the same design strip, and (b) their status is not yet changed to “Consider” by you, the latest import of design data will overwrite the existing information. In other words, at any given stage, the tendons displayed in ADAPT-Floor Pro are either from the latest ADAPT-PT import, or are those you have viewed and determined to be retained and considered in your design. To validate a tendon, you can open its property window and view its particulars. A
powerful tool to view the tendon in elevation is the elevation viewer tool ( ) from the tendons property window.