Embed Size (px)
Citation preview

081696OC ADC Part No. 182714
AD-830Installation Manual
For replacement parts, contact the reseller from which the machinewas purchased or
American Dispensing Company88 Currant Road
Fall River MA 02720-4781Telephone: (508) 678-9000 / Fax: (508) 678-9447
E-mail: [email protected]

Retain This Manual In A Safe Place For Future Reference
American Dispensing Company products embody advanced concepts in engineering, design, and safety. Ifthis product is properly maintained, it will provide many years of safe, efficient, and trouble-free operation.
ONLY properly licensed technicians should service this equipment.
OBSERVE ALL SAFETY PRECAUTIONS displayed on the equipment or specified in the installation manualincluded with the water vending machine.
WARNING: UNDER NO CIRCUMSTANCES should the pressure switch(es) or other safetydevices ever be disabled.
We have tried to make this manual as complete as possible and hope you will find it useful. ADC reserves theright to make changes from time to time, without notice or obligation, in prices, specifications, colors, and material,and to change or discontinue models.
AD-830
ImportantFor your convenience, log the following information:
DATE OF PURCHASE ____________________________ MODEL NO. __________________________________________
RESELLER’S NAME _______________________________________________________________________________________
Serial Number(s) ________________________________________________________________________________________
________________________________________________________________________________________
________________________________________________________________________________________
Replacement parts can be obtained from your reseller or the ADC factory. When ordering replacement partsfrom the factory, you can FAX your order to ADC at (508) 678-9447 or telephone your order directly to the ADCParts Departmentat (508) 678-9000. Please specify the water vending machine model number and serialnumber in addition to the description and part number, so that your order is processed accurately and promptly.
The illustrations on the following pages may not depict your particular water vending machine exactly. Theillustrations are a composite of the various water vending machine models. Be sure to check the descriptions ofthe parts thoroughly before ordering.

IMPORTANT
YOU MUST DISCONNECT and LOCKOUT THE ELECTRICSUPPLY BEFORE ANY COVERS or GUARDS ARE REMOVED FROMTHE MACHINE TO ALLOW ACCESS FOR CLEANING, ADJUSTING,INSTALLATION, or TESTING OF ANY EQUIPMENT per OSHA(Occupational Safety and Health Administration) STANDARDS.
CAUTIONNever look directly into the unprotected parts of the U.V. chamber when there is
power to the sterilizer. Serious burns to the eyes and skin may result. Always unplugpower to the sterilizer before working on it.
CAUTION
LABEL ALL WIRES PRIOR TO DISCONNECTION WHEN SERVICINGMACHINE. WIRING ERRORS CAN CAUSE IMPROPER and DANGEROUSOPERATION.
THE SYSTEM IS SHIPPED WITH A PRESERVATIVE SOLUTION MADEOF SODIUM BISULFITE (IN THE WINTER MONTHS) GLYCERINE. MAKESURE THE SYSTEM IS THOROUGHLY PURGED BEFORE LETTING ANYONEDRINK THE DISPENSED WATER.
REFER TO THE INSTALLATION SECTION ON PURGING PROCEDURE.
FOR YOUR SAFETY

IMPORTANT
IMPORTANT
The wiring diagram for the water vending machine is located on the inside rightwall of the machine.
Water vending machines must not be installed or stored in an area where it willbe exposed to water or weather.
Please observe ALL safety precautions displayed on the equipment and specifiedin this manual.

Table of ContentsSECTION IIMPORTANT INFORMATION ............................................................................... 3
A. Receiving and Handling ............................................................................................................... 3B. Safety Precautions ...................................................................................................................... 3
SECTION IISPECIFICATIONS/COMPONENT IDENTIFICATION .................................... 5
A. Specifications ............................................................................................................................. 5
SECTION IIIINSTALLATION PROCEDURES ........................................................................... 9
A. Location Requirements ............................................................................................................... 9B. System Description ..................................................................................................................... 9C. Water Supply ........................................................................................................................... 10D. Feed Water and Drain Plumbing ................................................................................................ 11E. Electrical Information ................................................................................................................ 11F. Unpacking/Setting Up ............................................................................................................... 12
SECTION IVSERVICE and PARTS INFORMATION .............................................................. 15
A. Resetting The Microprocessor .................................................................................................. 15B. Service ..................................................................................................................................... 15C. Parts ........................................................................................................................................ 15
SECTION VWARRANTY INFORMATION .............................................................................. 16
A. Returning Warranty Card(s) ...................................................................................................... 16B. Warranty .................................................................................................................................. 16C. Returning Warranty Part(s) ........................................................................................................ 16
SECTION VIMAINTENANCE SCHEDULE............................................................................... 18

SECTION VIIFILTER MAINTENANCE ...................................................................................... 22
A. Water Filter/Strainer Replacement ............................................................................................. 22B. Air Filter Inspection and Replacement ....................................................................................... 23
SECTION VIIIREVERSE OSMOSIS (R.O.) MEMBRANE ........................................................ 24
A. Product Water Flow Rate Measurement .................................................................................... 24B. Membrane Cleaning .................................................................................................................. 27C. Storage and Shipping of Membrane .......................................................................................... 30
SECTION IXULTRAVIOLET (U.V.) STERILIZER.................................................................... 32
A. Ultraviolet (U.V.) Lamp Replacemet Procedure ......................................................................... 32B. Quartz Sleeve and Cleaning Procedure ...................................................................................... 33C. Ultraviolet (U.V.) Probe Cleaning Procedure ............................................................................. 34
SECTION XMISCELLANEOUS MAINTENANCE TECHNIQUES ..................................... 35
A. Drain Bay Cleaning ................................................................................................................... 35B. Vending Nozzle Adjustment ....................................................................................................... 36C. Tubing and Fitting Replacement Technique ................................................................................. 36
SECTION XITROUBLESHOOTING ........................................................................................... 38

3
SECTION IIMPORTANT INFORMATION
A. RECEIVING and HANDLING
The water vending machine is shipped in a protective stretch wrap cover with protective cardboard corners andtop cover (or optional box) as a means of preventing damage in transit. Upon delivery, the water vendingmachine, packaging material, and wooden skid should be visually inspected for shipping damage. If any damageis noticed, inspect further before delivering carrier leaves.
Water vending machines damaged in shipment:
1. ALL water machines should be inspected upon receipt and before they are signed for.
2. If there is suspected damage or actual damage, the trucker’s receipt should be so noted.
3. If the water vending machine is damaged beyond repair, it should be refused. Those water vendingmachines, which were not damaged in a shipment should be accepted, but the number received and thenumber refused must be noted on the receipt.
4. If you determine that the water vending machine was damaged after the trucker has left your location, youshould call the delivering carrier’s freight terminal immediately and file a claim. The freight companyconsiders this concealed damage. This type of freight claim is very difficult to get paid and becomesextremely difficult when more than a day or two passes after the freight was delivered. It is your responsibilityto file freight claims. Water vending machines and parts damaged in transit cannot be claimed underwarranty.
5. Freight claims are the responsibility of the consignee, and claims must be filed at the receiving end. ADCassumes no responsibility for freight claims or damages.
6. If you need assistance in handling the situation, please contact the ADC Traffic Manager at (508)678-9000.
IMPORTANT: The water vending machine must be transported and handled in an upright position atALL times.
B. SAFETY PRECAUTIONS
IMPORTANT: Refer to this manual before making any repairs or adjustments, or doing anymaintenance on this machine.
IMPORTANT: For owners who DO NOT personally maintain the machine, it is their responsibilitythat the operator has been properly instructed and is fully aware of the manualcontents. This is important in the safe handling and efficient operation of the machine.

4
IMPORTANT: Follow maintenance schedule rigorously. Careless maintenance may lead tocomponent failure and increase operating costs significantly.
CAUTION: DO NOT make any alteration or modification in the wiring or plumbing of this machine.Such alterations may result in injury, illness, or death to maintenance personnel, operators,or users of this machine.
WARNING: DO NOT allow machine to freeze. Freezing will irreparably damage components in themachine.
NOTE: NEVER LOOK DIRECTLY INTO THE UNPROTECTED PARTS OF THE U.V.CHAMBER WHEN THERE IS POWER TO THE STERILIZER. SERIOUSBURNS TO THE EYES and SKIN MAY RESULT. ALWAYS UNPLUG POWER TOTHE STERILIZER BEFORE WORKING ON IT.
NOTE: THE SYSTEM IS SHIPPED WITH A PRESERVATIVE SOLUTION MADE OFSODIUM BISULFITE and (IN THE WINTER MONTHS) GLYCERINE. MAKESURE THE SYSTEM IS THOROUGHLY PURGED BEFORE LETTING ANYONEDRINK THE DISPENSED WATER. SEE SECTION III ON INSTALLATIONPROCEDURES.
DISCLAIMER
The information contained in this document is subject to change without notice.
American Dispensing Company shall not be liable for technical or editorial omissions made herein; nor incidentalor consequential damages resulting from the furnishing, performance, or use of this material.

5
SECTION IISPECIFICATIONS/COMPONENT IDENTIFICATION
A. SPECIFICATIONS
Reverse Osmosis (R.O.) MembraneCapacity 1,200 gallons* 4.542.2 liters*R.O. Pump 3/4 HP 0.55 kwDispensing Pump 3 gallon/minute 11.36 liters/minuteDrain Pump 3 gallon/minute 11.36 liters/minuteWater Vending Machines Per 20'/40 10/20Water Vending Machines Per 45'/48 24/26Voltage Available 115-240v 1Ø 50/60 HzApproximate Weight (Uncrated Empty) 1100 lbs. 498.9 kgApproximate Weight (Uncrated Full/Capacity) 1700 lbs. 771.1 kgApproximate Weight (Crated) 1200 lbs. 544.3 kgWater Inlet Size 1/2 N.P.T. **Drain Outlet Size 1/2 N.P.T. **Storage Tank Size 93 gallons 352 liters
* These specifications are calculated at 2,000 ppm, total sodium chloride solution at 77º F (25º C) feed watertemperature and 160 PSI (11.03 bars) reverse osmosis (R.O.) pump pressure.
** MUST BE CONNECTED TO A MINIMUM 3/4” N.P.T. INLET WATER SUPPLY.
1. Minimum Pressure Inlet Flow Rate
4 gallons (15.14 liters) a minute at 35 PSI. (2.41 bars) back pressure or the equivalent of 9 gallons (34.06liters) per minute at a free flowing 1/2” N.P.T. outlet at the intended location of the machine. This testshould be conducted with ALL other equipment connected to the same water line running to reflect trueflow.
2. Maximum Water Pressure
80 PSI. (5.51 bars). Install a pressure regulator if incoming water pressure exceeds this level. High inletpressure will irreparably damage filter housings and cause leaks in the system.

6

7
B. COMPONENT IDENTIFICATION

8
INLET VALVE
REAR ELECTRICAL
R.O. FILTER
POLISHING FILTER
SEDIMENT FILTER
CARBON FILTER
TRA VIOLET STERILIZE
HIGH PRESSURE SWITCH
TEST CELL
LOW PRESSURE SWITCH
VENDING SOLENOIDS
PROGRAMMING SWITCH
DISPLAYS
TRAP DOORS
DOUBLE CHECK VALVE
COMPUTER
R.O. PRESSURE REGULATOR
INLET SOLENOIDEXPANSION TANK

9
SECTION IIIINSTALLATION PROCEDURES
Installation should be performed by competent technicians in accordance with local and state codes. In theabsence of these codes, the installation must conform to applicable American National Standards: ANSIZ223.1-LATEST EDITION (National Fuel Gas Code) or ANSI/NFPA NO. 70-LATEST EDITION (National ElectricalCode) or in Canada, the installation must confirm to applicable Canadian Standards: CAN/CGA-B149.1-M91(Natural Gas) or CAN/CGA-B149.2-M91 (Liquid Propane [L.P.] Gas) or LATEST EDITION (for GeneralInstallation and Gas Plumbing) or Canadian Electrical Codes Parts 1 & 2 CSA C22.1-1990 or LATEST EDITION(for Electrical Connections).
A. LOCATION REQUIREMENTS
WARNING: Feed water must come from inspected, approved water system only. Source must bemicrobiologically safe drinking water.
1. The water vending machine must be installed on a sound level floor capable of supporting its weight. It isrecommended that carpeting be removed from the floor that the water vending machine is to rest on.
2. The water vending machine must not be installed or stored in an area where it will be exposed to water andweather.
3. Provisions for adequate water supply must be provided as noted in this manual. (Refer to Water Supplyin Section C).
4. Plumbing should be performed in accordance to local, state and federal codes. (Refer to Feed Water andDrain Plumbing in Section D).
5. Provisions must be made for adequate clearances for servicing and for operation as noted in this manual.(Refer to Enclosure Requirements in Section II).
B. SYSTEM DESCRIPTION
Thank you for purchasing the model AD-840 water vending machine. It is made by American DispensingCompany and is one (1) of the most advanced water vending machines on the market today. It is microprocessor-based and programmable. It interacts with the customer and owner through a light emitting diode (L.E.D.)display and a membrane keyboard (touch pad). The AD-830 purifies water through a five-step process:
Incoming water first passes through a 10-micron absolute SEDIMENT FILTER. This means that suspendedsolids larger than 0.01 mm (or about forty-thousands of 1-inch) such as slit and fine sand are removed.
Water then passes through a CARBON FILTER. This removes chlorine, odor, and a variety of organiccontaminants, such as chloroform and pesticide residue. The AD-830 uses a carbon filter with an extrudedcarbon core and an inner filtration wrap. This combination ensures that, unlike a conventional granular activatedcarbon (G.A.C.) filter, there is no channeling or bypassing, and no release of fine carbon particles.

10
Water is then pumped through a thin film composite reverse osmosis (R.O.) membrane at about 160 PSI (11.03bars). The R.O. membrane removes over ninety percent (90%) of a variety of salts and inorganic materialsfound in water, such as dissolved salts of sodium, lead, nitrate; it removes typically over ninety-nine percent(99%) of radioactivity, like radon. Actual rejection rate will depend on feed water chemistry, temperature, and itstotal dissolved solid content.
Water is then stored in an atmospheric water tank, sealed except for an air vent, which is protected from dust andairborne bacteria by a submicron air filter.
When your customer selects a vend, water will be pumped through a combination sediment/carbon POLISHINGFILTER which removes any remaining taste and sediment, and an ULTRAVIOLET (U.V.) STERILIZER whichsterilizes the water.
To keep the stored water fresh and sterilized, the water in the storage tank is recirculated through the polishingfilter and the U.V. sterilizer periodically.
Safety is our prime concern and it is designed into the machine. At the inlet and outlet of the R.O. membrane, acomparator reads the total dissolved solid rejection rate, an indicator of the performance of the membrane. If therejection rate falls below a certain level, the microprocessor will shut the machine down. The same logic appliesto the U.V. sterilizer, where a true U.V. sensor continually monitors the disinfecting power of the light and shutsdown the machine when the U.V. level is not high enough.
There is also overflow and leakage protection. The sensors are located on the base of the machine, in the draintank of the dispensing bay and in the water storage tank. These sensors detect overflow or leakage and will shutoff whatever components are necessary.
NOTE: The machine is approved by the NATIONAL AUTOMATIC MERCHANDISINGASSOCIATION (NAMA) in Chicago. In many states, this is a requirement for watervending machine installation.
C. WATER SUPPLY
The following conditions are required for optimum performance:
WARNING: FEED WATER MUST COME FROM INSPECTED, APPROVED WATERSYSTEMS ONLY. SOURCE MUST BE MICROBIOLOGICALLY SAFEDRINKING WATER.
1. Minimum Pressure/Inlet Flow Rate
4 gallons (15.14 liters) a minute at 35 PSI (2.41 bars) back pressure or the equivalent of 9 gallons (34.06liters) per minute at a free flowing 1/2” N.P.T. outlet at the intended location of the machine. This testshould be conducted with ALL other equipment connected to the same water line running to reflect trueflow.
2. Maximum Water Pressure
The maximum water pressure is 80 PSI (5.51 bars). Install a pressure regulator if incoming water pressuremay exceed this level. High inlet pressure will irreparably damage filter housing and cause leaks in thesystem.

11
3. Temperature
This machine should be kept in an environment between 40° F and 108º F (4.44° and 42.22°). Exposing themachine to freezing temperatures will irreparably damage the components.
4. Mineral Content
Pretreatment of incoming water is recommended if hardness exceeds 150 ppm or 9 grains per gallon, or ifiron levels exceed 0.05 ppm. Membrane will still function with high mineral content water, but yield will dropsubstantially, membrane cleaning is required more frequently, and membrane life will be shortened significantly,increasing overall operating costs.
D. FEED WATER and DRAIN PLUMBING
1. Inlet and outlet of the machine are 1/2” N.P.T., female threads. Use for connection only sanitary plumbingmaterials appropriate for drinking water.
NOTE: Minimum 3/4” N.P.T. inlet water supply.
2. Drain outlet should have a minimum of a 2-inch (5.08 cm) air gap at the point of discharge. Follow ALLapplicable plumbing codes when making connections.
E. ELECTRICAL INFORMATION
1. Electrical Requirements
It is your responsibility to have ALL electrical connections made by a properly licensed and competentelectrician to assure that the electrical installation is adequate and conforms to local and state regulations orcodes. In absence of such codes, ALL electrical connections, material, and workmanship must conformto the applicable requirements of the National Electrical Code ANSI/NFPA NO. 70-LATEST EDITION orin Canada, the Canadian Electrical Codes Parts 1 & 2 CSA C22.1-1990 or LATEST EDITION.
IMPORTANT: Failure to comply with these codes or ordinances and requirements stipulated in thismanual can result in personal injury or component failure.
NOTE: Component failure due to improper installation will VOID THE WARRANTY.
Each water vending machine should be connected to an independently protected branch circuit. Thewater vending machine must be connected with copper wire only. DO NOT use aluminum wire, whichcould cause a fire hazard. The copper conductor wire or cable must be of proper ampacity and insulationin accordance with electric codes for making ALL service connections.
NOTE: The use of aluminum wire will VOID THE WARRANTY.

12
2. Electrical Specifications
* AWG Stranded Type Wire for individual lengths less than 100 feet (31 meters).
IMPORTANT: The water vending machine must be connected to the electric supply shown on thedata label that is affixed to the back of the water vending machine, at the upper righthand corner. In the case of 208 VAC or 230/240 VAC, the supply voltage mustmatch the electric service specifications of the data label exactly.
WARNING: 208 VAC and 230/240 VAC ARE NOT THE SAME. Any damage done to watervending machine components due to improper voltage connections will automaticallyVOID THE WARRANTY.
NOTE: ADC reserves the right to make changes in specifications at any time without notice orobligation.
F. UNPACKING/SETTING UP
ATTENTION: CHECK STATE and LOCAL LAWS REGARDING THE OPERATION OFWATER VENDING MACHINES BEFORE INSTALLATION. SOMESTATES REQUIRE VENDORS TO NOTIFY THE DEPARTMENT OFPUBLIC HEALTH or WEIGHTS and MEASURES CONCERNING THEINSTALLATION OF THE MACHINE. FOLLOW ALL APPLICABLEFEDERAL, STATE and LOCAL STANDARDS FOR DRINKING WATERINSTALLATIONS.
ATTENTION: BE SURE THE INSTALLATION OF THIS MACHINE COMPLIES WITHALL LOCAL PLUMBING and ELECTRICAL CODES.
WARNING: DO NOT CONNECT ELECTRICAL POWER TO MACHINE UNTILREQUESTED.
AD-830ELECTRICAL SERVICE SPECIFICATIONS (PER WATER VENDING MACHINE)
IMPORTANT: 208 VAC and 230/ 240 VAC ARE NOT THE SAME. When ordering, specify exact voltage.
NOTES: A. Fuse ratings are dual element time delay current limiting, class RK1 or RK5 ONLY. B. Circuit breakers are thermal magnetic (industrial) type only. For others, calculate/verify correct breaker size according to appliance amp draw rating and type of breaker used.
SERVICEVOLTAGE PHASE WIRE
SERVICE
APPROX.AMP DRAW
MINIMUMWIRESIZE*
FUSINGDual ElementTime Delay
CIRCUITBREAKER
50 Hz 60 Hz115 1ø 2 15 14 12 25 30208 1ø 2 8 7 14 12 15
230/240 1ø 2 8 7 14 12 15

13
1. Remove the wrappings of the vending machine and check for transit damage. Notify carrier if there isdamage.
2. Skid can be removed by unscrewing four (4) 5/16” skid bolts at the legs of the machine.
3. Place machine at the intended location and, if required, adjust the 3/4” bolts at the legs until the machine islevel and stable.
4. Connect plumbing inlet and outlet lines. Refer to guidelines in the section “SITE REQUIREMENTS.”
5. Reconnect reverse osmosis (R.O.) membrane (refer to page 13).
ATTENTIONThe reverse osmosis (R.O.) membranein this machine is filled with a preservativesolution and plugged for shipping. Thetwo lengths of tubing illustrated below willhave to be reconnected before machinestart-up. (Refer to diagrams to right).Refer to “Miscellaneous MaintenanceTechnique, Section C” on page 35 ofthe installation manual for tubing removaland attachment technique. Push tubinginto fittings firmly to prevent leakage.
CAUTION: WEAR PROTECTIVE CLOTHING, GLOVES, and SAFETY GLASSES WHENRECONNECTING TUBING. THE PRESERVATIVE SOLUTION CONTAINSSODIUM BISULFITE and GLYCERINE and MAY CAUSE SKIN and EYEIRRITATION IN SOME INDIVIDUALS. WIPE UP ALL SPILLSIMMEDIATELY.
6. Open the main water ball valve located inside the cabinet at the water inlet of the machine.
7. Plug machine into the electrical outlet. (Refer to Electrical Information, Section E on page 11).
WARNING: THE MACHINE IS SHIPPED WITH A PRESERVATIVE SOLUTION MADEOF SODIUM BISULFITE and (IN THE WINTER MONTHS) GLYCERINE.MAKE SURE THE SYSTEM IS THOROUGHLY PURGED BEFORELETTING ANYONE DRINK THE DISPENSED WATER. (SEE STEP #9 andSTEP #10).
8. The display should blink the message: “SYSTEM” “PURGE” “DO NOT” “DRINK.” Purge cycle startsautomatically. Clear the dispensing bay of obstacles, as water will come out of the dispensing valve and intothe drain basin. Discard ALL water dispensed until purge cycle is over. Cycle is over when the displayblinks “INSERT” and “COIN” or the amount for 1 gallon (3.78 liters).

14
Several minutes into the purge cycle, check the following:
a. Pressure gauge at the reverse osmosis (R.O.) pump on the base of thecabinet should read between 140 and 180 PSI (9.65 and 12.41 bars)with the pump running (refer to diagram 1). If it is not within range,adjust back pressure valve to return reading to 160 PSI (11.03 bars).Back pressure valve is located near the drain outlet. Unscrew cap andloosen locknut. Turn adjusting bolt into valve for higher back pressureand vice versa. Tighten locknut and replace cap.
DIAGRAM 1
b. Visually note any leaks in the system. When the dispensing valve opens again during purge cycle, checkfor leaks on the dispensing side at this time.
9. Take a sample of the dispensed water after the purge cycle is over. Smell the water to ensure no odor ispresent. If there is, dispense water until water is free of odor.
10. The water is ready for vending.
ATTENTION: MEASURE THE INITIAL FLOW RATE OF THE PRODUCT WATERFROM THE R.O. MEMBRANE WITHIN 24 TO 48 HOURS OF NEWMACHINE OPERATION. REFER TO REVERSE OSMOSIS (R.O.)MEMBRANE IN SECTION VIII, FOR PROCEDURE. THIS ISIMPORTANT AS IT DETERMINES WHEN MEMBRANE NEEDS TO BECLEANED IN THE FUTURE.
ATTENTION: TO REDUCE BIOFOULING, IT IS RECOMMENDED THAT AMINIMUM OF 12 GALLONS (45.42 LITERS) BE VENDED EVERY 72HOURS. THE LESS THE IDLE TIME BETWEEN VENDS, THE LESSLIKELY BIOFOULING IS TO OCCUR IN THE R.O. MEMBRANE andTHE FILTERS.

15
SECTION IVSERVICE and PARTS INFORMATION
A. RESETTING THE MICROPROCESSOR
1. To reset the microprocessor, enter the following sequence into the keyboard (touch pad). The sequencemust be entered within a 3-second period: left 6 gallons, right 6 gallons, left 5 gallons, right 5 gallons, andleft 1/2 gallon (22.71 liters, 22.71 liters, 18.92 liters, 18.92 liters and 1.89 liters).
B. SERVICE
1. Service must be performed by a qualified trained technician, service agency. If service is required, contactthe reseller from whom the ADC equipment was purchased. If the reseller cannot be contacted or isunknown, contact the ADC Service Department for a reseller in your area.
NOTE: When contacting the ADC Service Department, be sure to give them the correct model andserial numbers so that your inquiry is handled in an expeditious manner.
C. PARTS
1. Replacement parts should be purchased from the reseller from whom the ADC equipment was purchased.If the reseller cannot be contacted or is unknown, contact the ADC Parts Department for a reseller in yourarea. Parts may also be purchased directly from the factory by calling the ADC Parts Department at (508)678-9000 or you may FAX in your order at (508) 678-9447.
NOTE: When ordering replacement parts from the ADC reseller or the ADC factory be sure to givethem the correct model and serial numbers so that your parts order can be processed in anexpeditious manner.
Serial DataLabel Placement

16
SECTION VWARRANTY INFORMATION
A. RETURNING WARRANTY CARD(S)
1. Before any water vending machine leaves the ADC factory test area, a warranty card is placed in a plasticbag behind the right control door. These warranty cards are intended to serve the customer in two ways.First, when ADC receives the warranty cards back from the customer, we mail appropriate parts manual(at no charge) to the address indicated on the returned card. Second, we record the individual installationdate and warranty information to better serve you should you file a warranty claim.
a. If a warranty card did not come with your water vending machine, contact the ADC Warranty orService Departments at (508) 678-9000.
B. PARTS
For a copy of the ADC commercial warranty covering your particular water vending machine, contact the ADCreseller from whom you purchased the equipment and request a water vending machine warranty form. If thereseller cannot be contacted or is unknown, warranty information can be obtained from the factory by contactingthe ADC Warranty Department at (508) 678-9000.
NOTE: Whenever contacting the ADC factory for warranty information, be sure to have the watervending machine’s model and serial numbers available so that your inquiry can be handled inan expeditious manner.
C. RETURNING WARRANTY PART(S)
ALL water vending machines, parts warranty claims, or inquires should be addressed to the ADC WarrantyParts Department. To expedite processing, the following procedures must be followed:
1. No parts are to be returned to ADC without prior written authorization ("Return Material Authorization"[R.M.A.]) from the factory.
NOTE: A R.M.A. is valid for only sixty (60) days from date of issue.
a. The R.M.A. issued by the factory, as well as any other correspondence pertaining to the returned parts,must be included inside the package with the failed merchandise.
2. Each part must be tagged with the following information:
a. Model and serial numbers of the water vending machine from which part was removed.

17
b. Nature of failure (be specific).
c. Date of water vending machine installation.
d. Date of part failure.
e. Specify whether the part(s) being returned is for a replacement, a credit, or a refund.
NOTE: If a part is marked for a credit or a refund, the invoice number covering the purchase of thereplacement part must be provided.
NOTE: Warranty tags (ADC Part No. 450064) are available at "no charge" from ADC upon request.
3. The company returning the part(s) must clearly note the complete company name and address on theoutside of the package.
4. ALL returns must be properly packaged to insure that they are not damaged in transit. Damage claimsare the responsibility of the shipper.
IMPORTANT: No replacements, credits, or refunds will be issued for merchandise damaged intransit.
5. ALL returns should be shipped to the ADC factory in such a manner that they are insured and a proof ofdelivery can be obtained by the sender.
6. Shipping charges are not the responsibility of ADC. ALL returns should be "prepaid" to thefactory. Any "C.O.D." or "COLLECT" returns will not be accepted.
IMPORTANT: No replacements, credits, or refunds will be issued if the claim cannot be processeddue to insufficient information. The party filing the claim will be notified in writing,either by "FAX" or "CERTIFIED MAIL - Return Receipt Requested," as to theinformation necessary to process claim. If reply is not received by the ADC WarrantyDepartment within thirty (30) days from the FAX/letter date, then no replacements,credits, or refunds will be issued, and the merchandise will be discarded.

18
SECTION VIMAINTENANCE SCHEDULE
Maintenance frequency of the vending machine depends on the use of the machine and the feed water quality.The best way to determine when filters and other components should be changed is to keep a log of tests doneand the date and gallon reading at which they are done. For additional information on maintenance of thecomponents, please refer to the appropriate sections in this manual.
WARNING: REPLACE COMPONENTS ONLY WITH ORIGINAL FACTORYREPLACEMENTS. COMPONENTS OF DIFFERENT BRANDS MAY NOTWORK PROPERLY WITH OTHER PARTS IN THE MACHINE and MAYCAUSE DAMAGE TO THEM and TO THE HEALTH OF YOURCUSTOMERS.
1. Strainer
Test: Monitor pressure drop at sediment filter. Clean or replace after 2 PSI (0.31 bars) drop.
Replace/Clean Establish frequency from test, clean at least once a month.Frequency:
Failure Mode: Clogged and caused a pressure drop large enough to shut off the reverse osmosis (R.O.) pump,reducing yield of the R.O. membrane to a trickle.
2. Sediment Filter
Test: Visual, change when dirt penetrates more than 2/3 of the filter or when pressure differential is10 PSI (0.68 bars) or more, whichever is first. CHECK WEEKLY.
Replace/Clean Establish frequency from test, clean at least once a month.Frequency:
Failure Mode: Clogged and caused a pressure drop large enough to shut off the R.O. pump, reducing yield ofthe R.O. membrane to a trickle.
3. Carbon Filter
Test: Use free chlorine test kit. Free chlorine level should be less than 0.1 ppm. Test at 5 gallons(18.92 liters), 10,000 gallons (37854.12 liters), 18,000 gallons (68137.41 liters), and after everyreplacement. Gallon reading is taken from the water meter. Collect water sample from valvelocated between inlet test cell and the water meter.
Replace/Clean Replace any traces of free chlorine (0.1 ppm or higher) but no less frequently than once every20,000 gallons (75708.24 liters) or every three (3) months, whichever comes first.Frequency:

19
Failure Mode: Any chlorine not contained by the carbon filter will leak to the R.O. membrane and causeirreparable damage to it. Always replace the carbon filter before it’s time. A damaged R.O.membrane costs over ten (10) times more to replace than a carbon filter.
4. Reverse Osmosis (R.O.) Membrane
Test: Microprocessor monitors totally dissolved solids (TDS) removal capability; owner needs toRECORD FLOW RATE OF PRODUCT WATER 24 TO 48 HOURS INTO NEW MACHINEOR MEMBRANE USE. EVERY TWO (2) MONTHS THE FLOW RATE IS TO BEMEASURED and if the rate is lower than the initial rate by at least fifteen percent (15%),temperature compensated, the membrane needs cleaning (refer to Reverse Osmosis [R.O.]Membrane in Section VIII on page 27).
Replace/Clean Clean at least once a year. (Refer to Membrane Cleaning on page 27). Replace if both acidFrequency: and alkaline cleaning DO NOT return the flow rate or TDS to normal levels, indicating membrane
damage.
Failure Mode: Clogged, either through mineral or biofouling, thereby reducing yields, or damaged by chlorine,thereby raising TDS level in the product water.
WARNING: FLUSH ALL REPLACEMENT MEMBRANES BEFORE USING. UNPLUGMACHINE and FOLLOW STEP #6 THROUGH STEP #10 OF THEINSTALLATION PROCEDURE REGARDING SYSTEM FLUSHING. (Referto page 12 and page13).
ATTENTION: TO REDUCE BIOFOULING, IT IS RECOMMENDED THAT AMINIMUM OF 12 GALLONS (45.42 LITERS) BE VENDED EVERY 72HOURS. THE LESS THE IDLE TIME BETWEEN VENDS, THE LESSLIKELY BIOFOULING IS TO OCCUR IN THE R.O. MEMBRANE andFILTERS.
5. Vent Filter
Test: Open cap on filter and visually inspect for dirt accumulation. Check monthly.
Replace/Clean Replace as required and at least once a year. KEEP FILTER DRY. A WET FILTER IS AFrequency: CLOGGED FILTER.
Failure Mode: Clogged caused the pump to create a vacuum in the water storage tank, which may collapseand crack the tank.
6. Polishing Filter
Test: Check by tasting the vended water; replace when odor is detected in the dispensed water.Check monthly.
Replace/Clean Replace as required and at least once every three (3) months.Frequency:

20
7. Ultraviolet (U.V.) Sterilizer
Test: Full automatic light emitting diode (L.E.D.) on side of sterilizer indicates strength andmicroprocessor will shut vending machine off if strength of sterilizer light is below the requiredlevel. CHECK LED MONTHLY.
Replace/Clean Clean quartz sleeve and U.V. probe when light emitting diode (L.E.D.) turns “yellow” or “red.”Frequently: If L.E.D. does not return to “green,” replace U.V. lamp. Quartz sleeve and U.V. probe should
also be cleaned once every four (4) months and the U.V. lamp replaced at least once a year(refer to Ultraviolet (U.V.) Sterilizer, Section IX for procedure).
WARNING: NEVER LOOK DIRECTLY INTO THE UNPROTECTED PARTS OF THEU.V. CHAMBER WHEN THERE IS POWER TO THE STERILIZER.SERIOUS BURNS TO THE SKIN and EYES MAY RESULT.
8. General Maintenance
Test: CHECK FOR LEAKS AFTER THE FIRST DAY OF OPERATION, THEN AFTER THEFIRST WEEK, THEN EVERY MONTH thereafter and reconnect with new Teflon tape ifnecessary. CHECK GENERAL OPERATION OF MACHINE EVERY TWO (2) WEEKS.
Replace/Clean CLEAN and DISINFECT CUSTOMER CONTACT SURFACES DAILY (vending bay, nozzleFrequency: protector, and keyboard (touch pad). CLEAN AND DISINFECT DRAIN BAY ONCE A
WEEK.
9. Water Quality Test
Test: COLIFORM TESTS OF INCOMING and VENDED WATER EVERY SIX (6) MONTHS.Have test done by a certified testing lab.
21
The following is a sample maintenance log that should be kept for this machine.
ecnanetniaMerudecorP
/tlusertseTgninaelc
demrofrep
lag/etaDgnidaer
/tlusertseTgninaelc
demrofrep
lag/etaDgnidaer
/tlusertseTgninaelc
demrofrep
lag/etaDgnidaer
/tlusertseTgninaelc
demrofrep
lag/etaDgnidaer
/tlusertseTgninaelc
demrofrep
lag/etaDgnidaer
reniartS)1
tnemideS)2 retlif
retlifnobraC)3
enarbmeM.O.R)4:ETARWOLFESAB
_________________
retliftneV)5
retlifgnihsiloP)6
reziliretS.V.U)7
tsetytilauqretaW)8

22
SECTION VIIFILTER MAINTENANCE
There are three (3) water filters, a strainer, and one (1) air filter in every machine. Observe the followingprocedure when changing filters:
A. WATER FILTER/STRAINER REPLACEMENT
WARNING: FILTER HOUSINGS ARE HEAVY. BE CAREFUL and ANTICIPATE THEWEIGHT WHEN REMOVING THEM.
1. Before unscrewing the filter/strainer housing to change a filter/strainer, shut off water supply to the filterand relieve line pressure by opening a nearby valve.
FOR STRAINER CLEANING and REPLACEMENT (refer todiagram 2). Shut off incoming water supply and relieve pressureby opening a nearby valve. Close valve after flow stops.
FOR SEDIMENT PREFILTER and CARBON FILTER replacement, shut off main water valve (refer todiagram 3) and relieve pressure by opening either one (1) of the PVC sampling valves near the filters.Close sampling valve after flow stops.
FOR POLISHING FILTER replacement, shut off the water tank PVC ball valve (refer to diagram 4) andrelieve pressure by vending 1/2 gallon (1.89 liters) of water. Unplug dispensing pump from the power outlet(refer to diagram 5) after vend stops.
main water valve
DIAGRAM 2
DIAGRAM 3
DIAGRAM 4 DIAGRAM 5
PVC Ball Valve
Strainer
Dispensing Pump
Drain Pump

23
2. Remove and discard old filter.
3. Scrub filter housing clean and rinse with clean water.
4. Insert the new cartridge. There are rubber washers on the top and bottom of the carbon filter. Make surethey stay in place.
5. Filter housing should be screwed on hand tight only. Make sure cartridge filter is lined up with the top andbottom posts in the housing and the O-Ring in the housing is clean, properly seated, and lubricated.
ATTENTION: O-RING SHOULD BE LUBRICATED WITH FOOD GRADE GREASEONLY.
6. Open the water supply valves previously shut off.
AFTER REPLACING THE POLISHING FILTER, plug the dispensing pump back into the power outletand reset the computer. Then purge air trapped in the system by vending water at both bays until the amountof water dispensed is what it should be. Air trapped in the tubings during filter replacement will causemachine to vend less than it should.
7. Run system and check for leaks around the housing. Perform a free chlorine test if the carbon filter isreplaced to check if any leakage around the cartridge is present.
B. AIR VENT FILTER INSPECTION and REPLACEMENT
1. Cap on filter housing can be snapped off for maintenance check. Remove the sponge-like coarse filter inthe housing and inspect filter paper inside for dirt (refer to diagram 6). Replace filter when the white filterpaper turns grayish or when coarse filter is clogged.
filter
filter cap
filter housing
DIAGRAM 6
2. To replace, unscrew the complete housing from the elbow fitting and discard. Wrap Teflon tape on thethreads of the new housing and screw housing on hand tight.

24
SECTION VIIIREVERSE OSMOSIS (R.O.) MEMBRANE
In normal operation, a R.O. membrane can become fouled by microorganisms, suspended solids, and minerals inthe water. It is time to clean the membrane when these elements cause a fifteen percent (15%) drop in theproduct water flow rate, after compensating for temperature differences. It is important, therefore, to establisha base flow rate of a new membrane so future measurements can be compared.
This base measurement is taken during the first 24 to 48 hours into the operation of a new membrane. Every two(2) months thereafter, the rate of flow of the product water from the membrane should be measured andcompared. It is also important to measure the temperature of the incoming water as the flow rate decreases withtemperature decrease. This is normal and should not be confused with membrane fouling.
A. PRODUCT WATER FLOW RATE MEASUREMENT
Tools required:Thermometer for measuring water temperature1 gallon (3.78 liter) containerStop watchcalculator
1. We need to establish the incoming water temperature. Check if the R.O. pump on the cabinet base isrunning. The pressure gauge at the pump should indicate about 160 PSI (11.03 bars). If the pump is notrunning, vend water until the pump starts. System does not produce water until water level is 10 gallons(37.85 liters) below fill. Wait until pump has run for at least 1 minute and then take a sample of water fromthe sampling valve prior to the sediment filter and measure its temperature.
2. Vend 3 gallons (11.35 liters) of water to allow the system to charge. During vend, have a stopwatch and agallon jug ready and disconnect the white 3/8" outside diameter (O.D.) tubing going into the water storagetank. To disconnect tubing, push down on the ring in the fitting and then pull at the tubing (refer to diagram7). The water coming out of this tube is the product water from the R.O. membrane. Start the stop watchand measure the time (in seconds) to fill the gallon container with this water.
3. Replace tubing by pushing it back into the fitting completely.
DIAGRAM 7

25
4. Find the temperature correction factor (TCF) from Table 1 on [page 26].
5. The base flow rate can be calculated as follows:
BASE FLOW RATE = (TIME IN SECONDS TO FILL 1 GALLON (3.78 LITERS)/(TCF)
EXAMPLE: If the temperature of the water is 68° F (20° C) and it takes 71 seconds to fill a gallon,
TCF from table 1 for 68º F (20° C) is 1.19Base flow rate = 71 / 1.19
= 59.66
The base flow rate is the flow rate during the first 24 to 48 hours of the operation of a new membrane andmachine. It may be different for every membrane. Write down the base flow rate for your particularmachine on your maintenance sheet.
6. We recommend that the product water flow be checked every two (2) months. Follow step #1 throughstep #4 and obtain a new TCF and a new time (in seconds) to fill 1 gallon (3.78 liters). With the new TCFfind the cleaning limit. The membrane needs cleaning when the new time to fill 1 gallon (3.78 liters) exceedsthe cleaning limit.
CLEANING LIMIT = (new TCF) x (BASE FLOW RATE) x 1.17
EXAMPLE: If the new temperature is 79º F (26° C) and it now takes 63-seconds to fill a gallon, TCF fromTable 1 for 79º F (26° C) is 0.97 and from the above example, the base flow rate for ourmembrane is 59.66.
CLEANING LIMIT = 0.97 x 59.66 x 1.17 = 67.71
Since it only takes 63-seconds to fill 1 gallon (3.78 liters) (less than cleaning limit of 67.71), cleaning is notrequired yet. It would, however, be prudent to order the cleaning kit at this time.

26
TABLE 1:TEMPERATURE CORRECTION FACTOR (TCF)
DEGREES F TCF DEGREES F TCF40 2.69 76 1.0241 2.58 77 1.0042 2.47 78 0.9843 2.36 79 0.9744 2.27 80 0.9545 2.20 81 0.9346 2.13 82 0.9247 2.07 83 0.9048 2.01 84 0.8849 1.95 85 0.8750 1.89 86 0.8551 1.83 87 0.8452 1.77 88 0.8253 1.71 89 0.8154 1.66 90 0.7955 1.63 91 0.7856 1.59 92 0.7657 1.55 93 0.7558 1.51 94 0.7459 1.47 95 0.7360 1.43 96 0.7261 1.38 97 0.7162 1.36 98 0.7063 1.33 99 0.6864 1.30 100 0.6765 1.27 101 0.6666 1.25 102 0.6567 1.22 103 0.6468 1.19 104 0.6369 1.17 105 0.6270 1.15 106 0.6171 1.12 107 0.6072 1.10 108 0.5973 1.09 109 0.5874 1.07 110 0.5775 1.04 111 0.56

27
B. MEMBRANE CLEANING
WARNING: HANDLE CARTRIDGES WITH CARE. WEAR EYE PROTECTION,GLOVES and PROTECTIVE CLOTHING WHEN INSTALLING andREMOVING CLEANING CARTRIDGES.
ATTENTION: WHETHER THE REVERSE OSMOSIS (R.O.) MEMBRANE NEEDSACID or ALKALINE CLEANING WILL DEPEND ON THE TYPE OFFOULANT. ACID CLEANING REMOVES MINERAL SCALING andALKALINE CLEANING REMOVES ORGANIC FOULING. IT ISRECOMMENDED THAT ACID CLEANING BE PERFORMED FIRSTEVEN IF ALKALINE CLEANING IS DESIRED. IF SYSTEMPERFORMANCE RECOVERS WITH ACID CLEANING, THENALKALINE CLEANING IS NOT NECESSARY.
ATTENTION: YOUR RESELLER SELLS A CLEANING STARTER KIT, WHICHINCLUDES A 20-INCH (50.8 cm) HOUSING, TUBING, AN ACIDCLEANING CARTRIDGE, and AN ALKALINE CLEANING CARTRIDGE,FOR SUBSEQUENT CLEANINGS YOU CAN REUSE THE HOUSING andTHE TUBING and ORDER ONLY THE CLEANING CARTRIDGES. ONTHE CLEANING CARTRIDGE, THE SIDE WITH THE WASHER IS THESIDE THAT FACES UP.
1. Remove the cap on the back pressure valve and loosen the locknut on the adjusting bolt (refer to diagram8).
2. Vend enough water from either bay to drop water level to at least 10 gallons (37.85 liters) below the fill level.This will cause the R.O. pump to operate.
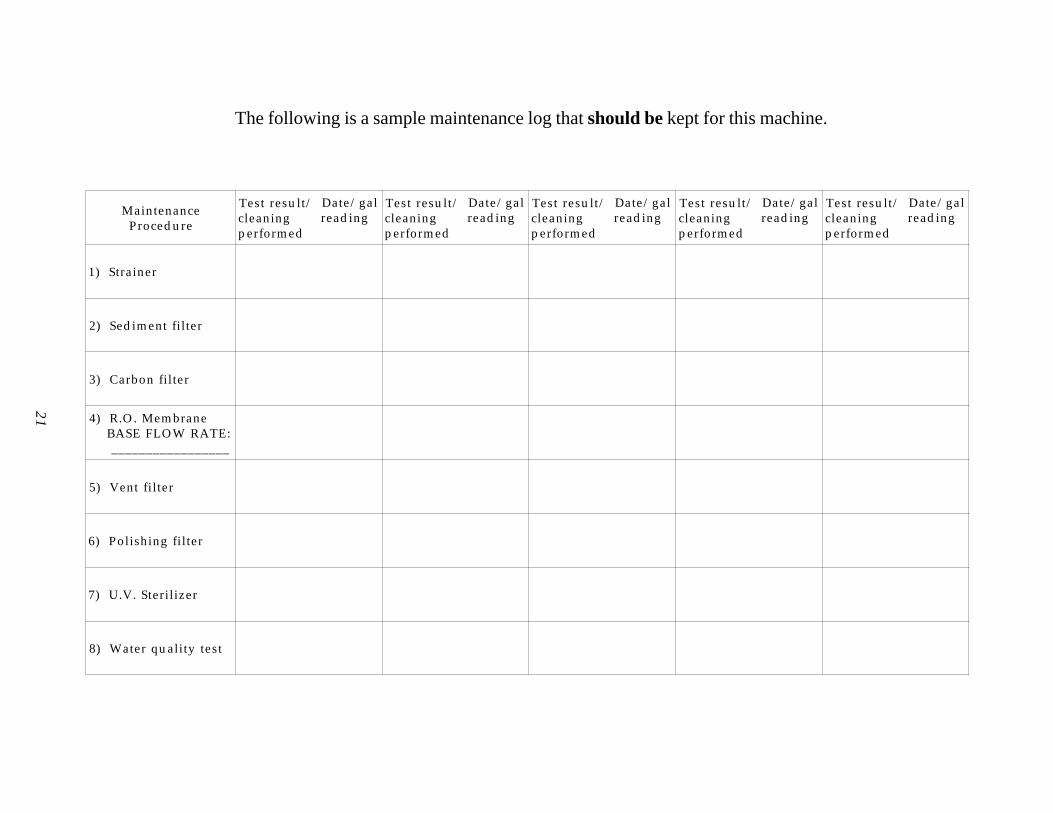
3. With the R.O. pump (located at the base of the cabinet, refer to diagram 9 on page 28) running, turnadjusting bolt on the back pressure valve until the pressure shown on the pump gauge drops to between 20(1.37 bars) and 50 PSI (3.44 bars). Tighten locknut and replace cap on the back pressure valve. (Refer todiagram 10 on page 28).
DIAGRAM 8
Dispensing Pump
Drain Pump
28
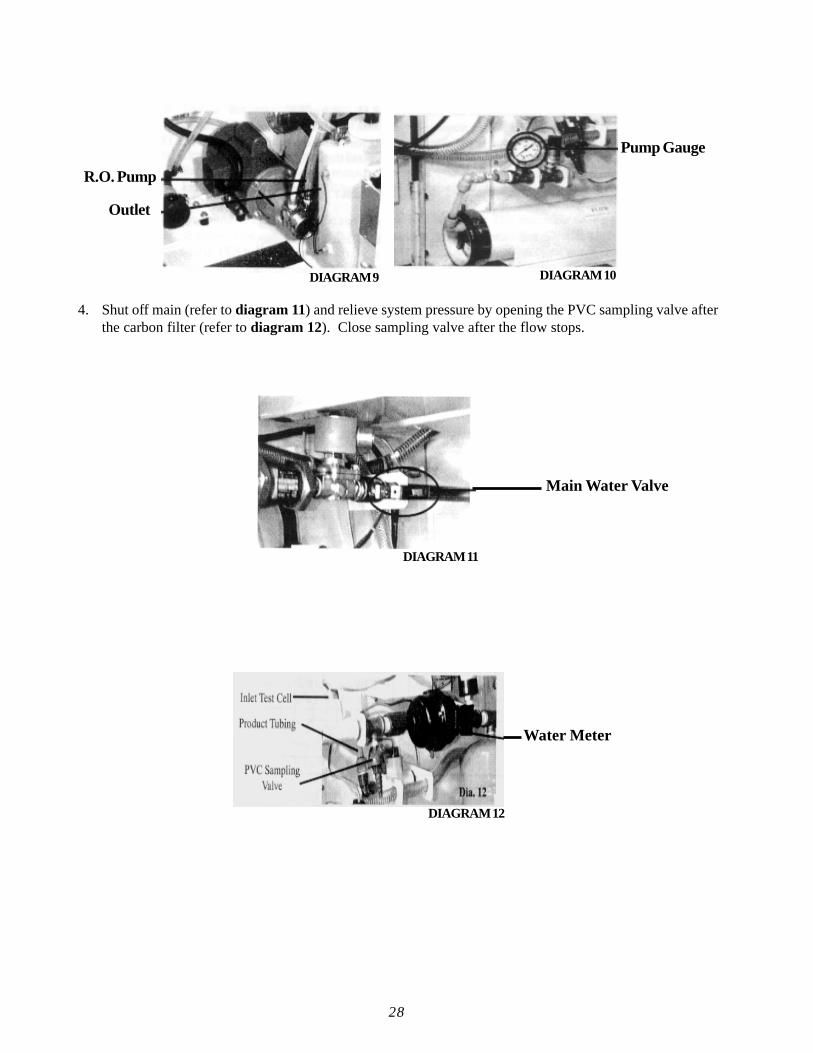
4. Shut off main (refer to diagram 11) and relieve system pressure by opening the PVC sampling valve afterthe carbon filter (refer to diagram 12). Close sampling valve after the flow stops.
DIAGRAM 9 DIAGRAM 10
DIAGRAM 11
DIAGRAM 12
R.O. Pump
Outlet
Pump Gauge
Main Water Valve
Water Meter

29
5. Unplug 1/2” outside diameter (O.D.) tubing at the outlet of the Reverse Osmosis (R.O.) pump and plug intothe OUTLET of the 20-inch (50.8 cm) filter housing. (Refer to Tubing and Fitting Replacement Techniqueon page 39) for instructions on tubing removal and assembly. Plug the 1/2” O.D. tubing at the INLET ofthe 20-inch (50.8 cm) filter housing into the outlet of the pump.
6. Detach the 3/8” O.D. tubing entering the water storage tank (product tubing). Attach the extended length3/8” O.D. tubing supplied in the kit to the cluster and direct the other end of this tubing into the drain bay.
7. Vend enough water from either bay to cause the R.O. pump to operate. The machine will not begin toproduce water until level is at least 10 gallons (37.85 liters) below full.
8. Open the main water valve and watch the R.O. pump. The pump will start in 30-seconds. Wait 30 to 40-seconds and shut off the main water valve.
9. Unplug the vending machine and put up a sign for "cleaning, DO NOT use." Let the membrane soak in thesolution for 8 to 16 hours.
10. Open PVC sampling valve after the carbon filter for a few seconds and close it. Remove the 20-inch (50.8cm) housing and reattach the original 1/2” tubing to the outlet of the R.O. pump. Clean and save the 20-inch(50.8 cm) housing for the next cleaning and discard the cartridge.
11. Plug vending machine back in and open main water valve. The machine will go through its purge cycleautomatically. Wait until the R.O. pump has run for AT LEAST TEN MINUTES before removing capand loosening the locknut on the back pressure valve. With the pump running, adjust the pressure valve untilthe pressure on the pump gauge reads 160 PSI (11.03 bars). Tighten the locknut and replace the cap on thevalve.

30
12. Shut off main water valve. Remove and save the extended length 3/8” outside diameter (O.D.) tubing forfuture cleanings. Reattach the original 3/8” O.D. tubing to the sampling valve cluster. Open main watervalve.
13. Reset the microprocessor.
14. Wait 24 to 48 hours and measure the base flow rate of the cleaned membrane as detailed in step #1 throughstep #5 (refer to Product Water Flow Rate Measurement on pages 23 and page 24). The new baseflow should be similar to the original one (1). If not, alkaline cleaning should be performed. The procedurefor alkaline cleaning is the same as for acid cleaning except an alkaline cleaning cartridge is used instead.
C. STORAGE and SHIPPING OF MEMBRANE
ATTENTION: IF THE MEMBRANE IS TO BE SHIPPED or IF THE MACHINE IS TO BELEFT IDLE FOR FIVE (5) DAYS or MORE, PRESERVATIVES MUST BEADDED TO THE REVERSE OSMOSIS (R.O.) MEMBRANE TO KEEP ITMOIST and FREE FROM BACTERIAL GROWTH.
WARNING: CHLORINE WILL IRREPARABLY DAMAGE THE R.O. MEMBRANE.
1. Vend 6 gallons (22.71 liters) of water into a container for mixing the preservative solution. Remember thiswater is going into the R.O. membrane and cannot contain chlorine. Water from the sampling valveAFTER the carbon filter is also acceptable.
WARNING: OBSERVE ALL RELEVANT PRECAUTIONS WHEN HANDLINGCHEMICALS. WEAR PROTECTIVE CLOTHING, GLOVES and EYEPROTECTION.
2. Disconnect electrical power to the machine.
3. Shut off main water valve at the inlet of the machine.
4. Relieve pressure in the system by opening the sampling valve after the carbon filter. Close it after flowstops.
5. Disconnect 1/2” O.D. tubing at the outlet of the R.O. pump (refer to diagram 13) and at the inlet of theback pressure regulator (refer to diagram 14 on page 31). Disconnect the tubing by depressing the ring onthe fitting and then pulling at the tubing. Water will begin to flow out from the bottom tubing. Drain the R.O.housing of water.
R.O. Pump
Outlet
DIAGRAM 13

31
DIAGRAM 14
6. Fill membrane and housing with a two percent (2%) by weight of food grade sodium bisulfite solution towater. In months when there is a possibility of freezing, add twenty percent (20%) by weight of glycerineto the solution. This is the equivalent of 2.7 ounces (76.54 grams) of sodium bisulfite and 27 fluid oz. (798.49milliliters) of glycerine for every gallon of water.
7. Plug ALL tubing and if shipping, put both membrane and housing into a sealed bag to prevent leakage.
WARNING: FLUSH ALL PRESERVATIVES IN THE MEMBRANE BEFORE USINGMEMBRANE AGAIN. UNPLUG MACHINE and FOLLOW STEP #6THROUGH STEP #10 OF THE INSTALLATION PROCEDURE (REFER TOPAGE 13 THROUGH PAGE 14) REGARDING SYSTEM FLUSHING. IT ISIMPERATIVE THAT THE PRESERVATIVES ARE COMPLETELY FLUSHEDand DISCARDED AS SOME INDIVIDUALS MAY BE ALLERGIC TO THEM.
Back PressureRegulator
Inlet

32
SECTION IXULTRAVIOLET (U.V.) STERILIZER
The U.V. sterilizer contains a true U.V. sensor that continually monitors the sterilization power of the unit. Whenthe light emitting diode (L.E.D.) display of the sensor changes from green to yellow or red, it is time to clean thequartz sleeve and U.V. probe. If the cleaning does not return the L.E.D. display to green, replace the U.V. lamp.The average life of a lamp is one (1) year of continuous use. It is also recommended that the quartz sleeve andU.V. sensor probe be cleaned once every four (4) months.
WARNING: NEVER LOOK DIRECTLY INTO THE UNPROTECTED PARTS OF THE UVCHAMBER WHEN THERE IS POWER TO THE UV STERILIZER. SERIOUSBURNS TO THE EYES and SKIN MAY RESULT. ALWAYS UNPLUG POWERTO THE UV STERILIZER BEFORE WORKING ON IT.
A. ULTRAVIOLET (U.V.) LAMP REPLACEMENT PROCEDURE
ATTENTION: STERILIZER WILL NOT OPERATE CORRECTLY WITHOUT THECOVER PROPERLY CLOSED.
1. Close the products shut-off (refer to diagram 18 on page 33) vend 1gallon (3.78 liters) or until water stops coming out of the vend nozzlewhichever comes first.
2. Disconnect the power from the machine.
3. Use a Phillips screwdriver to remove the top and bottom screws thatsecure the front cover in place. Pivot the front cover outward to theleft, then remove it from the aluminum case.
4. Disconnect the lamp harness (refer to the diagram 15). Insert asmall screwdriver into one of the slots at the side of the black plasticsleeve bolt and apply gentle pressure to pry open the snap-in cover ofthe lamp harness plug. DO NOT pull on the cord to remove the lampharness, as it will shorten the useful life.
5. Using a medium size screwdriver, loosen the sleeve bolt (refer todiagram 16). Unscrew by hand and carefully extract the lamp/sleevefrom the reactor chamber.
6. Remove the new lamp/sleeve from the packaging carefully. It isrecommended that the lamp/sleeve to be cleaned prior to assembly toensure maximum performance. Refer to the instructions for cleaningof the lamp/sleeve. Avoid touching the lamp/sleeve glass. Handle thelamp/sleeve by the ends only.
Diagram 15Apply pressure to pry open
the lamp harness
Diagram 16Lossening/Tighteningof the Sleeve Bolt

33
7. After the sterilizer has been in use for some time, the O-Ring may lose itsshape or may adhere to the lamp/Sleeve. A new O-Ring (originalmanufactures's replacement) is strongly recommended. Ensure the O-Ring and sealing area are clean prior to assembly.
8. Place the new O-Ring onto the Lamp/Sleeve approximately 2" from theelectrical pins of Lamp/Sleeve (refer to diagram 17).
9. Align the Lamp/Sleeve into sleeve bolt locking position, then insert into thereactor chamber. Thread the sleeve bolt by hand until it begins to seat onthe O-Ring, then tighten and additional 1/4 to 3/8 turn. DO NOT over-tighten, as over-compression of the O-Ring will not improve sealing.
10. Reconnect the Lamp/Harness. Secure the lamp harness in place by applyingpressure to the rigid black snap-in cover disk so that it snaps fully into thesleeve bolt.
11. Open the product shutoff valve. (Refer to diagram 18).
12. Reconnect the power supply. Reset the computer to end purge. Checkthe green light on the side of the case for a steady glow. Note that thealarm buzzer will sound for a few seconds until the lamp/sleeve reachesoperating conditions.
13. Enter the new lamp/sleeve replacement date on the replacement labelprovided and attach to the label to the reactor chamber. Replace the frontcover with the screws removed earlier. Water vending machine is nowoperational.
B. QUARTZ SLEEVE and CLEANING PROCEDURE
ATTENTION: IN MANY CASES AFTER THE STERILIZER HAS BEEN IN US FOR SOMETIME, THE O-RING WILL TEND TO ADHERE TO THE QUARTZ SLEEVE.THIS PRESENTS NO PROBLEM IF LEFT ALONE. HOWEVER, IF THEO-RING IS REMOVED FROM THE SLEEVE, A NEW REPLACEMENT ISSTRONGLY RECOMMENDED, AS THE SURFACE OF THE OLD O-RINGCOULD BE DAMAGED AND BE THE CAUSE OF LEAKAGE.
1. Follow steps in the Untraviolet Lamp Replacement Procedure section for removal of the Lamp/Sleeve.
2. Clean the Lamp/Sleeve with a commercial scale remover (such asLime-Away or CLR). When using acidic solution (scale remover) forcleaning follow the manufacturer's directions for safety. After theLamp/Sleeve is cleaned handle it by the ends only. Avoid touching theLamp/sleeve glass with fingers as skin oils will impair proper ultravioletradiations. (Refer to diagram 19).
Diagram 17
Diagram 18
Diagram 19

34
NOTE: The use of other type of cleaners may be necessary depending upon the minerals orcontaminants present. Vinegar and/or isopropyl alcohol are not recommended for cleaningbecause they can leave behind a residue that can block the ultraviolet rays from the Lamp/Sleeve.
NOTE: If the Lamp/Sleeve requires cleaning, the Ultraviolet (U.V.) Sensor probe will likely requirecleaning as well. (Refer to U.V. Probe Cleaning Procedures).
C. U.V. PROBE CLEANING PROCEDURE
1. Follow steps 1, 2, and 3 from the Ultraviolet Lamp/Sleeve Replacement section for accessing inside sterilizercase.
2. Undo the large brass nut holding the U.V. Sensor, (refer to diagram 20). A 5/16" wrench or adjustablewrench will be required to loosen it.
3. Clean the quartz window of the U.V. Sensor with a commercial scale remover (such as Lime-away orCLR) on a high quality lint-free cotton swab. When using acidic solution (scale remover) for cleaningfollow the manufacturer's directions for safety. Inspect the window visually to ensure it is clean, clear anddry (refer to diagram 21).
4. Inspect the rest of the U.V. Sensor and the metal fitting it inserts into. Perform any required cleaning. DONOT attempt to tighten, loosen or open the sealed U.V. sensor. Contamination or loss of function manyresult.
DIAGRAM 20 DIAGRAM 21
5. Inspect the O-Ring seal on the Ultraviolet (U.V. ) Sensor and replace it if damage or deteriorations is found.
6. Assemble the U.V. Sensor into the reactor chamber. Tighten the brass nut with fingers then an additional1/4 turn with a wrench or until the brass nut cannot be tightened further. DO NOT over-tighten, asdamage to the threads may result.
NOTE: Use of pliers, pipe wrench, channel locks or vice grips may damage the grass nut and thethreaded Probe Port in the Reactor chamber.
7. Follow step 10, step 11, and step 12 from the Ultraviolet Lamp/Sleeve Replacement Section.

35
SECTION XMISCELLANEOUS MAINTENANCE TECHNIQUES
A. DRAIN BAY CLEANING
1. Unplug power to vending machine.
2. Loosen the four (6) 1/4-20 Acron nuts that hold down the serving self. (Refer to).
3. Remove grate to gain access for cleaning.
4. Apply power to vending machine and reset microprocessor.
DIAGRAM 22

36
B. VENDING NOZZLE ADJUSTMENT
Dispensing nozzle can be adjusted to direct water into the center of the bay. Nozzles come from the factoryalready adjusted. If flow is severely off center, it may indicate the machine is not level. Check machine beforeadjusting nozzles.
1. Determine from the front of the machine, which way the nozzle is aiming at. Let’s say it is too far right andforward.
2. Open vending machine computer door and stand behind it. Facing the nozzle adjustment bolts, loosen theleft and right mounting bolts (refer to diagram 23). Tap solenoid mounting bracket to YOUR LEFT tocorrect a flow too far to the right. (When looking at flow from front of door) and vice versa.
3. Front and rear adjustments are corrected by loosening and tightening the front and rear bolts. Loosen thelocknuts on the adjusting bolts. If flow is too far forward, loosen the bolt FARTHER FROM YOU. If boltis already at the end of its adjustment, then tighten the other bolt. Tighten left and right mounting bolts beforechecking flow. Tighten locknuts when adjustment is completed.
C. TUBING and FITTING REPLACEMENT TECHNIQUE
There are two (2) types of tubing attachment methods used on this vending machine. One (1) is the push-in typeand the other is the plastic clamp type.
PUSH-IN TYPE:
To remove push-in tubing, push ring on fitting and pull on tubing. (Refer to diagram 24). To reattach, firmly pushtubing back in fitting. If tubing-fitting joint leaks because of frequent removal, cut 1/2” (1.27 cm) off the tubingand reattach.
DIAGRAM 23
Front Adjust
Left and RightAdjust
Rear Adjust
Left and RightAdjust

37
To reattech, firmly push tubing back into fitting. If tubing-fitting joint leaks because of frequent removal,cut 1/2" offthe tubing and reattach.
PIPE JOINTS:
There are pipe threads on a variety of components in the vending machine. The threads on them are sealed withTeflon tape to prevent water leakage. If any of these components have been taken out for servicing or if the jointleaks, new Teflon pipe thread seal tape needs to be put on.
ATTENTION: USE A STRAP WRENCH TO TIGHTEN or LOOSEN PLASTIC FITTINGS.DO NOT USE A PIPE WRENCH AS ITS TEETH MAY DAMAGE THEPART.
1. Remove old Teflon tape from components or fitting. Be careful not to allow any tape fragments to fall intotubings or fittings as they may get caught in solenoids and pumps, which cause damage to them.
2. Teflon tape should be wrapped around male threads only. Starting at the second thread from the edge,wrap new Teflon tape at a clockwise (CW) direction, (with the threaded end facing you). Overlap half thewidth of each wrap and circle the threads a minimum of two (2) times. (Refer to diagram ).
DIAGRAM 25
PushFirmlyThenPull
DIAGRAM 24
3. Screw component or fitting back in their place. For anything plastic, hand tight plus one to 1 1/2 turns isenough. Check for leaks.

38
SECTION XITROUBLESHOOTING
NOTE: WATER STORAGE TANK WILL NOT FILL UP COMPLETELY. THERE ARESEVERAL INCHES OF SPACE BETWEEN WATER TANK COVER and “FULL”WATER LEVEL.
NOTE: THERE IS A 30-SECOND TIME DELAY BETWEEN THE SIGNAL TO STARTTHE REVERSE OSMOSIS (R.O.) PUMP and THE ACTUAL RUNNING OF THEPUMP. THIS IS TO PROTECT THE PUMP FROM TURNING ITSELF ON andOFF REPEATEDLY IN A SHORT TIME and BURNING ITSELF OUT INSITUATIONS OF LOW INLET PRESSURE or HIGH OUTLET BACK PRESSURE.
PROBLEM
1. Water storage tank is not full, and R.O. pump is not running.
CAUSE
a. No water supplied to pump.
b. No power.
c. Excessive outlet pressure. Pressure gauge at the outlet of the pump will indicate 190 PSI (13.10 bars)or more.
CORRECTION
a. Check if there is water going into the machine. Open inlet ball valve if it is shut off, Check operation ofinlet solenoid and replace if necessary.
b. Check to see if the machine is plugged in. Check fuses. Also, machine will not run if any one (1) of thethree (3) safety switches is activated indicating overflow:
1) At the base of the machine.
2) At the top of the reservoir tank.
3) Closest to top in the water tank.
Correct overflow situation.
c. Check for obstructions in line beyond the pump. Check drain line.

39
WARNING: THE REVERSE OSMOSIS (R.O.) PUMP WILL NOT RUN IF THERE ISMORE THAN 190 PSI (13.10 BARS) IN THE LINES BEYOND IT. THISMEANS THAT BETWEEN THE PUMP and THE OBSTRUCTION THERE ISAT LEAST 190 PSI ( 13.10 BARS) IN THE TUBINGS. TAKE ALLPRECAUTIONS and WEAR EYE PROTECTION WHEN WORKING ONTHE PROBLEM.
NOTE: IF SAFETY SWITCH AT THE VERY TOP OF THE WATER TANK IS ACTIVATED,IT INDICATES THE NORMAL “TANK FULL” SWITCH IS NOT FUNCTIONINGPROPERLY. REPLACE “TANK FULL” SWITCH (SECOND FROM THE TOP OFTHE WATER TANK).
PROBLEM
2. R.O. pump turns on, but without completely filling the tank, shuts itself off and 30-seconds or more laterturns itself on again, and repeats the cycle. (Check this if machine is constantly running out of water eventhough not much is dispensed.)
3. Drain pump will not stop.
4. Drain pump will not run.
5. Drain pump runs but will not pump water.
CAUSE
a. Inadequate water inlet pressure or clogged strainer if the gauge before sediment filter is 25 PSI(1.72 bars) or less with the R.O. pump running.
b. Clogged filters, if gauge after sediment filter drops to 20 PSI (1.37 bars) or less after starting at a highervalue. Pressure differential between the two (2) gauges at the sediment filter is 10 PSI (0.68 bars) ormore.
c. Failed / jammed float switch at the bottom of the reservoir tank.
d. Drain pump needs about 1" of water before it is activated. If there is enough, check power to pump.
e. Failed / disconnected reservoir tank bottom float switch.
f. Failed pump.
CORRECTION
a. Clean strainer.
b. Unless pressure drop is transient, a bigger pipe may be needed to bring water to the machine. A boosterpump capable of 4 gallons (15.14 liters) per minute (gpm) at 35 PSI (2.41 bars) supplying water to themachine is also acceptable.

40
c. Replace sediment filter. If problem persists replace carbon filter.
d. Replace switch / remove obstacle.
e. Plug pump in.
f. Replace / reconnect float switch.
g. Replace pump.
PROBLEM
3. Drain pump runs but will not stop.
4. dispensing nozzle leak.
CAUSE
a. Water tank valve shut off
b. Failed pump.
c. Failed dispensing / recirculation solenoids.
d. Dirt in Solenoid.
CORRECTION
a. Open valve.
b. Replace pump.
c. Replace solenoids.
d. Clean solenoid.

ADC 182714 1- 09/12/96-4 2* 09/17/96-50 3- 12/04/96-504- 09/28/00-50 5- 07/17/98-5 6* 10/02/98-257- 09/29/00-10 8* 12/21/00-15