Embed Size (px)
Citation preview

Activities Guide
Workshop 4. Theory and Practice inChemical Systems
Water Softening Laboratory: Isoke Baptiste—Unit 4.2
Teacher’s Guide .................................................................................................................119
Students’ Guide .................................................................................................................121
Significant Figures Demonstration: Dr. Michael Clarke—Unit 4.3
Teacher’s Guide .................................................................................................................123
Investigating Mixtures Laboratory: Gannon Sugimura—Unit 4.4
Teacher’s Guide .................................................................................................................125
Students’ Guide .................................................................................................................126
Activity Series Laboratory: Tom Pratuch—Unit 4.4
Teacher’s Guide .................................................................................................................128
Students’ Guide .................................................................................................................130
Water Volumes in Equilibrium Demonstration: Irene Walsh—Unit 4.6
Teacher’s Guide .................................................................................................................132
Electrolytes in Solution Demonstrations: Irene Walsh—Unit 4.7
Teacher’s Guide .................................................................................................................134
Comment 1. All activities have been peer-reviewed but not tested.
2. Some safety considerations are suggested in the activities. For full safety information, consult the MSDSsheets (go to http://msds.pdc.cornell.edu/) before doing the experiment.
3. A concise source book for further assignments, activities, and background information is ChemSource,version 2.1 (Orna, Mary Virginia, O.S.U.; Schreck, James O. & Heikkinen, Henry, eds.), 1998. Visit the Web siteat http://intro.chem.okstate.edu/ChemSource/chemsource.html.
Appendix: Workshop 4 - 118 - Reactions in Chemistry
Reactions in Chemistry - 119 - Appendix: Workshop 4
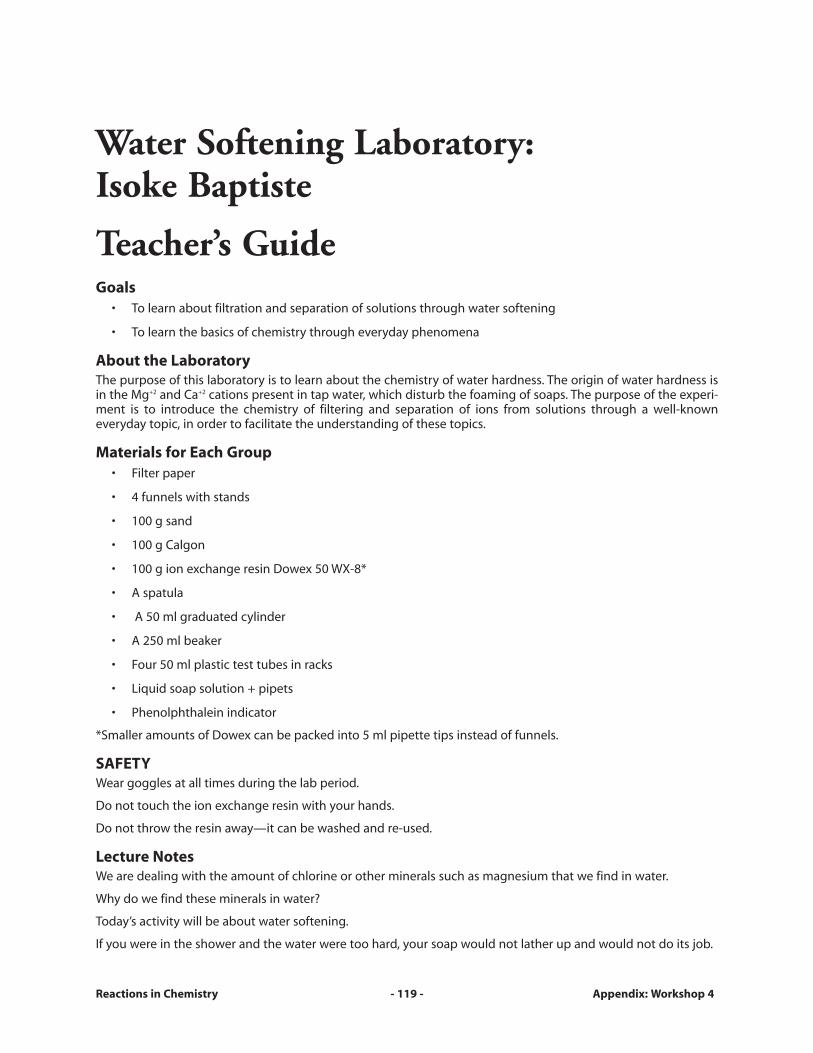
Water Softening Laboratory: Isoke Baptiste
Teacher’s GuideGoals
• To learn about filtration and separation of solutions through water softening
• To learn the basics of chemistry through everyday phenomena
About the Laboratory The purpose of this laboratory is to learn about the chemistry of water hardness. The origin of water hardness isin the Mg+2 and Ca+2 cations present in tap water, which disturb the foaming of soaps. The purpose of the experi-ment is to introduce the chemistry of filtering and separation of ions from solutions through a well-knowneveryday topic, in order to facilitate the understanding of these topics.
Materials for Each Group • Filter paper
• 4 funnels with stands
• 100 g sand
• 100 g Calgon
• 100 g ion exchange resin Dowex 50 WX-8*
• A spatula
• A 50 ml graduated cylinder
• A 250 ml beaker
• Four 50 ml plastic test tubes in racks
• Liquid soap solution + pipets
• Phenolphthalein indicator
*Smaller amounts of Dowex can be packed into 5 ml pipette tips instead of funnels.
SAFETY Wear goggles at all times during the lab period.
Do not touch the ion exchange resin with your hands.
Do not throw the resin away—it can be washed and re-used.
Lecture Notes We are dealing with the amount of chlorine or other minerals such as magnesium that we find in water.
Why do we find these minerals in water?
Today’s activity will be about water softening.
If you were in the shower and the water were too hard, your soap would not lather up and would not do its job.

Teaching Tips From Isoke Baptiste Having kids do chemistry and relate it to things that they see everyday definitely helps get them more intriguedby chemistry.
If you don’t teach them things that they can relate to, then they will not be interested in it.
I would definitely recommend letting the students do first and correct later, because if you keep giving them whatthey need they will never learn along the way.
The experiment is a great reference point because when they start learning things that we talked about todaythey can immediately refer to that experiment.
Even though they didn’t understand a lot of the terms that we used, once we go over it, they are able to see theprocess.
The good thing about the students coming to the experiment without prior knowledge was that they could bringtheir own outcomes. They had no clue what was supposed to happen so they were looking to do it correctly, andmake sure they got the correct outcome.
The students were eager to do more labs and were more interested as far as measurements and seeing specificoutcomes were concerned.
Some things that I would change: a prerequisite or a homework assignment. I would ask the students to gatherdifferent water samples. They could go to different friends’ houses and different regions of D.C., just to get dif-ferent samples. Add soap and see if there is any effect, and you don’t even tell them what the outcome should be.Have them record their results, go to the experiment and see similarities between this and their homeworkassignment.
Comment 1. There are commercial indicators for water hardness which may be useful for this activity.
2. It is possible to emphasize the role of the ion exchanger in filtration by measuring the pH of the water solu-tion before and after the ion-exchange column. A way to emphasize the analytical aspect of this experi-ment is by analyzing the cations in solution with EDTA and indicator. For more advanced students, add alsocomplexometric titrations, see reference: Ceretti, H.; Hughes, E. A.; and Zalts, A. (1999) “The Softening ofHard Water and Complexometric Titrations: An Undergraduate Experiment,” Journal of Chemical Education,Vol. 76, No.10, pp: 1420-1421.
3. Discuss distillation as a method for separation of cations from water. Demonstrate distillation of wine toillustrate.
4. Discuss zeolites in laundry powder and their water-softening property: Journal Staff (1999) “Cleaning UpWith Chemistry: Investigating the Action of Zeolite in Laundry Detergent,” Journal of Chemical Education,Vol. 76, No.10, pp: 1416A-1416B.
References: Linkshttp://www.ianr.unl.edu/pubs/housing/g946.htm A guide to water softeners for the home.
http://www.saltinstitute.org/42a.html A unit of study built around salt. Scroll down the page and click on "Unit 4" for a one-period class activity onwater softening from the Salt Institute.
References: ReadingsCeretti, H., Hughes, E.A., and Zalts, A. (1999) “The Softening of Hard Water and Complexometric Titrations: AnUndergraduate Experiment,” Journal of Chemical Education, Vol. 76, No. 10, p: 1420.
Appendix: Workshop 4 - 120 - Reactions in Chemistry
Water Softening Laboratory: Teacher’s Guide, page 2

Reactions in Chemistry - 121 - Appendix: Workshop 4
Water Softening Laboratory:Isoke Baptiste
Students’ GuideGoals
• To learn about filtration and separation of solutions through water softening
• To learn the basics of chemistry through everyday phenomena
About the Laboratory The purpose of this laboratory is to learn about the chemistry of water hardness. The origin of water hardness isin the Mg+2 and Ca+2 cations present in tap water, which disturb the foaming of soaps. The purpose of the experi-ment is to introduce the chemistry of filtering and separation of ions from solution through a well-knowneveryday issue, in order to facilitate the understanding of these topics.
Materials for Each Group • Filter paper
• 4 funnels with stands
• 100 g sand
• 100 g Calgon
• 100 g ion exchange resin Dowex 50 WX-8*
• A spatula
• A 50 ml graduated cylinder
• A 250 ml beaker
• Four 50 ml plastic test tubes in racks
• Liquid soap solution + pipete
• Phenolphthalein indicator
* Smaller amounts of Dowex can be packed into 5 ml pipette tips instead of funnels.
SAFETY Wear goggles at all times during the lab period.
Do not touch the ion exchange resin with your hands.
Do not throw the resin away—it can be washed and re-used.
Instructions1. Put funnels in stands and test tubes in a rack beneath them.
2. Put a piece of round filter paper in each funnel.
3. Leave one funnel empty, and put in the other three: sand, Calgon, and ion exchange resin, almost filling thefilter paper in the funnel.

Appendix: Workshop 4 - 122 - Reactions in Chemistry
If you are using a 5 ml tip for the Dowex, pack it up lightly, after inserting a small piece of absorbing paperin its lower end.
4. Measure 10 ml of hard water and filter it through one funnel. Repeat this for all funnels.
5. When the water stops dripping into the test tube, add several drops of liquid soap solution to it and shakewell. Notice what happens and record your observations:
a. Filter paper only: ______________________________________________________________________
b. Filter paper and sand: __________________________________________________________________
c. Filter paper and Calgon: ________________________________________________________________
d. Filter paper and resin: __________________________________________________________________
6. What chemical principles are responsible for these phenomena? ________________________________
______________________________________________________________________________________
______________________________________________________________________________________
7. How did the use of each filter influence the hardness of the water? Explain the filtering properties of:
a. Filter paper only: ______________________________________________________________________
b. Filter paper and sand: __________________________________________________________________
c. Filter paper and Calgon: ________________________________________________________________
d. Filter paper and resin: __________________________________________________________________
8. Which filters are physical filters only and which have also chemical properties? ____________________
_______________________________________________________________________________________
9. Which filter is the most effective for water softening? How does it filter the Mg+2 and Ca+2 cations?______
_______________________________________________________________________________________
10. Which filter serves as control? Why? ________________________________________________________
_______________________________________________________________________________________
_______________________________________________________________________________________
11. Based on the understanding of ion-exchange filtration, suggest another way to learn about the cation con-centration in the original water solution: ____________________________________________________
_______________________________________________________________________________________
_______________________________________________________________________________________
12. Filter another sample of water on the ion exchange column. Add several drops of universal indicator toboth water solutions: before and after filtration. Shake well, and observe what color you get. Explain:
_______________________________________________________________________________________
_______________________________________________________________________________________
SummaryWhy do we put Calgon in our washing machines? __________________________________________________
____________________________________________________________________________________________
____________________________________________________________________________________________
Water Softening Laboratory: Students’ Guide, page 2

Significant Figures Demonstration: Dr. Michael Clarke
Teacher’s GuideGoals
• To understand the meaning of making scientific measurements
• To learn to determine the significance of numbers that are measured
About the Demonstration In this class demonstration, students get acquainted with the significance of measuring. Fluctuations around thezero value of an empty balance are used to make students realize that not every number that you see on a scalehas significance for the measurement.
Materials • 2-3 electronic balances, if available
• 2-3 stopwatches
Instructions 1. Turn on two or three electronic balances.
2. Sit a student next to each empty balance with a stopwatch in hand.
3. Instruct them to write down the readings they receive, and the times of the readings, for about 5 minutes.
Lecture Notes—Discussion What should the balance read with nothing on it?
The true value, with nothing on the scale, should be 0.00 grams.
What are your conclusions from your observation?
What does that tell us about significant figures that we are reading?
Teaching Tips From Dr. Clarke We talk about the scientific process. It is a process of comparing thoughts, hypotheses, some empirical data, andthen evaluating your hypothesis as to whether it makes sense or not. It is about drawing logical conclusions.
Students can understand that if you buy something and it doesn’t work, you take it back. But if you have severalof them and they all don’t work, maybe you’re using them the wrong way, or maybe what you think it is supposedto do, is not really what it is supposed to do.
Our goal is to understand measurements. Students take words, which mean the same thing, but because theymeet the word in the context of an academic class, they don’t know how to deal with it.
What’s important in understanding measurements is to understand what it means when we talk about significantfigures. To understand that just because a number appears on the scale of a balance, it doesn’t mean that thisnumber is significant. Or more precisely, to understand the significance of that number.
Reactions in Chemistry - 123 - Appendix: Workshop 4

References: Linkshttp://lectureonline.cl.msu.edu/~mmp/applist/sigfig/sig.htm An interactive Java Applet that allows students to practice recognizing significant figures.
References: ReadingsDeLorenzo, R. (2001) “Presidential Elections and Significant Digits,” Journal of Chemical Education, Vol. 78, No. 3,p: 311.
Pacer, Richard A. (2000) “How Can an Instructor Best Introduce the Topic of Significant Figures to Students Unfa-miliar With the Concept?,” Journal of Chemical Education, Vol. 77, No. 11, pp: 1435-1439.
Appendix: Workshop 4 - 124 - Reactions in Chemistry
Significant Figures Demonstration: Teacher’s Guide, page 2

Reactions in Chemistry - 125 - Appendix: Workshop 4
Investigating Mixtures Activity:Gannon Sugimura
Teacher’s GuideGoals
• To learn from liquid mixtures about what happens in a chemical reaction
• To investigate a phenomenon and suggest chemically based explanations for it
The Laboratory In this laboratory, the students investigate the mixing of several pairs of different liquids. They predict what theythink will happen and then relate that to the results of mixing: what is the total volume after mixing and what additional phenomena they observe in the process.
Materials for Each Group • 150 ml water in three 50 ml portions
• 50 ml ethanol
• 50 ml 1M HCl
• 50 ml 1M NaOH
• 4 50 ml volumetric flasks
• 2 100 ml volumetric flasks
It is advisable to have a little extra of the liquids, so an exact volume can be measured.
SAFETY Wear goggles at all times in the laboratory.
HCl and NaOH are harmful. Do not spill them on your hands. Be careful when you mix them.
References: Linkshttp://dbweb.liv.ac.uk/ltsnpsc/workshop/reports/pblchem.htm Resource on problem-based learning in chemistry.
http://www.phys.virginia.edu/education/outreach/8thgradesol/MixSoln.htm Teacher background and lab activities on properties of solutions.
References: ReadingsOliver-Hoyo, M., Allen, D.D., Solomon, S., Brook, B., Ciraolo, J., Daly, S., and Jackson, L. (2001) “Qualitative Analysis of Fourteen WhiteSolids and Two Mixtures Using Household Chemicals,”Journal of Chemical Education,Vol. 78, No. 11, pp: 1475-1479.
Appendix: Workshop 4 - 126 - Reactions in Chemistry
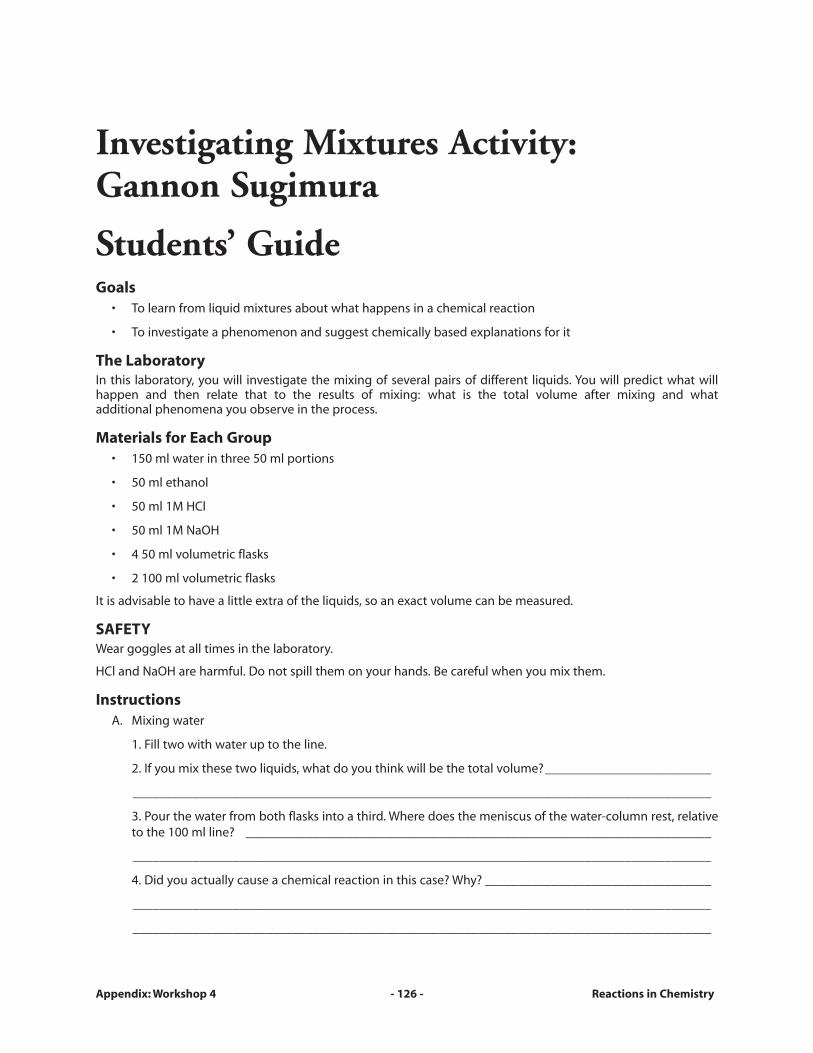
Investigating Mixtures Activity:Gannon Sugimura
Students’ GuideGoals
• To learn from liquid mixtures about what happens in a chemical reaction
• To investigate a phenomenon and suggest chemically based explanations for it
The Laboratory In this laboratory, you will investigate the mixing of several pairs of different liquids. You will predict what willhappen and then relate that to the results of mixing: what is the total volume after mixing and what additional phenomena you observe in the process.
Materials for Each Group • 150 ml water in three 50 ml portions
• 50 ml ethanol
• 50 ml 1M HCl
• 50 ml 1M NaOH
• 4 50 ml volumetric flasks
• 2 100 ml volumetric flasks
It is advisable to have a little extra of the liquids, so an exact volume can be measured.
SAFETY Wear goggles at all times in the laboratory.
HCl and NaOH are harmful. Do not spill them on your hands. Be careful when you mix them.
InstructionsA. Mixing water
1. Fill two with water up to the line.
2. If you mix these two liquids, what do you think will be the total volume?_________________________
_______________________________________________________________________________________
3. Pour the water from both flasks into a third. Where does the meniscus of the water-column rest, relativeto the 100 ml line? ______________________________________________________________________
_______________________________________________________________________________________
4. Did you actually cause a chemical reaction in this case? Why? __________________________________
_______________________________________________________________________________________
_______________________________________________________________________________________

Reactions in Chemistry - 127 - Appendix: Workshop 4
B. Mixing water and alcohol
1. Now fill up one 50 ml volumetric flask with water and the other with ethanol.
2. What do you expect that the total volume will be? __________________________________________
3. Again fill the 100 ml volumetric flask with both liquids, and note where the meniscus is, relative to the100 ml line. ____________________________________________________________________________
_______________________________________________________________________________________
4. Pour the liquids into a 100 ml graduated cylinder, and write down the total volume of the mixture:
_______________________________________________________________________________________
5. Is this what you expected to happen? ____________________________________________________
6. Suggest a molecular explanation for this phenomenon: ______________________________________
_______________________________________________________________________________________
7. Has a chemical reaction occurred? ________________________________________________________
C. Mixing acid and base
1. Fill one 50 ml volumetric flask with 1M HCl and the other with 1M NaOH.
2. What do you expect will happen? ________________________________________________________
_______________________________________________________________________________________
3. Mix the liquids and record your observations: ______________________________________________
_______________________________________________________________________________________
4. Do you think a chemical reaction has occurred? ____________________________________________
5. How do you know? ____________________________________________________________________
6. Write down the reaction: ________________________________________________________________
_______________________________________________________________________________________
7. Suggest an explanation for the water level that you have observed: ____________________________
_______________________________________________________________________________________
SummaryExplain the difference between the chemistry of mixing water and ethanol vs. mixing acid with base. Which chemical principles are involved in each process? __________________________________________________
____________________________________________________________________________________________
Investigating Mixtures Activity: Students’ Guide, page 2

Appendix: Workshop 4 - 128 - Reactions in Chemistry
Activity Series Laboratory: Tom Pratuch
Teacher’s GuideGoals
• To learn about the activity series of metals
• To make small scale batteries which give off currents
The Laboratory The students make little batteries from metals immersed in their ionic solutions, and connected by salt bridges.They measure which connections yield electricity and construct from this the electrochemical series, which theycompare to the literature.
Materials for Each Group • Well plate
• Filter paper and scissors
• Pieces of solid metals: Cu, Pb, Mg, Al, Ni, Zn, Fe, and carbon
• Ionic solutions of these metals (~0.5 M is sufficient)
• Quinone in 1M HCl for the carbon electrode
• Ampermeter/multimeter and crocodile wires
SAFETY Wear goggles, aprons, and gloves at all times.
Some of the metals are harmful—do not touch with bare hands.
Dispose of all metal solutions into appropriate chemical waste container for safe removal.
Lecture Notes Make sure that you use all safety supplies.
Make sure that you don’t put metals in solution before you start measuring.
Compare your results to the potential list in your textbook and see whether you got the electrochemical seriescorrect.
Conduct a discussion of the results: their meaning and causes for discrepancies.
Teaching Tips From Mr. Pratuch We saw two classes. One class nailed the activity series perfectly. The other botched the activity series.
We found out from talking with some of the students that it’s the wires they made the connections with. That’sthe only way that we could interpret the results that they got.
But the point is that it’s an explanation that we could look for, it was something we could talk about, which madesense.
To me that was important on two levels: one, that we could establish that there was not the flaw of the chemistry,which students are all the time willing to say. But equally important, we got them away from judging if it’s rightor wrong on their part...and to look for a systematic error.

Reactions in Chemistry - 129 - Appendix: Workshop 4
Discuss with the students the activity’s discrepant results.
Even if the results are not always consistent, try to make sense out of it. Which metal appears to be the most reac-tive one? Which is the least reactive?
When getting into sources of errors, try to stay away from right and wrong.
Emphasize that you are doing right so long as you are taking your data the way it occurs and you are recordingyour data.
The chart that we have created from this data in this class is completely reversed.
Today, some things contributed to a regular error, no matter which group it was.
You are trying to get away with right and wrong and I’m trying to go with: Are the instructions to this lab adequate?
References: Linkshttp://chemed.chem.purdue.edu/genchem/topicreview/bp/ch20/electroframe.htm Excellent resource on electrochemical reactions, with classroom activities.
References: ReadingsSchmidt, M.H. (1997) “Using ‘Household Chemistry Projects’ To Develop Research Skills and To Teach ScientificWriting,” Journal of Chemical Education, Vol. 74, No. 4, pp: 393-395.
Activity Series Laboratory: Teacher’s Guide, page 2

Activity Series Laboratory: Tom Pratuch
Students’ GuideGoals
• To learn about the activity series of metals
• To make small scale batteries which give off currents
The Laboratory You will make little batteries from metals immersed in their ionic solutions, and connected by salt bridges. You willmeasure which connections yield electricity and construct from this the electrochemical series, which you willcompare to the literature.
Materials for Each Group • Well plate
• Filter paper and scissors
• Solid metals: Cu, Pb, Mg, Al, Ni, Zn, Fe, and carbon as electrodes
• Ionic solutions of these metals (~0.5 M is sufficient)
• Quinone in 1M HCl for the carbon electrode
• Ampermeter/multimeter and crocodile wires
SAFETY Wear goggles, aprons, and gloves at all times.
Some of the metals are harmful—do not touch with bare hands.
Dispose of all metal solutions into appropriate chemical waste container for safe removal.
Instructions 1. Pour some of each metal solution into a separate well in a well plate.
2. Cut out a salt bridge from filter paper so that it dips into all wells.
3. Connect crocodile wires to a multimeter and put it on the mA scale.
4. ONLY when you’re ready to measure, put the same solid metal into each metal solution.
Appendix: Workshop 4 - 130 - Reactions in Chemistry

5. Measure the current between all metals and record your results in the following table:
Cu Pb Mg Al Ni Zn C(H2) Fe
Cu
Pb
Mg
Al
Ni
Zn
C(H2)
Fe
6. Every time you get current flow between the metals, count it as a reaction. How many reactions do youhave for each metal?
Cu Pb Mg Al Ni Zn C(H2) Fe
Write the metals from the most active to the least active: ____________________________________________
____________________________________________________________________________________________
____________________________________________________________________________________________
Summary Refer to the list of electric potentials of metals in your textbook. Is there a correlation between your results andthe list of potentials of the metals? ______________________________________________________________
____________________________________________________________________________________________
____________________________________________________________________________________________
____________________________________________________________________________________________
____________________________________________________________________________________________
Are there any discrepancies? If there are, discuss them, and explain: ____________________________________
____________________________________________________________________________________________
____________________________________________________________________________________________
____________________________________________________________________________________________
____________________________________________________________________________________________
____________________________________________________________________________________________
Reactions in Chemistry - 131 - Appendix: Workshop 4
Activity Series Laboratory: Students’ Guide, page 2

Water Volumes in EquilibriumDemonstration: Irene Walsh
Teacher’s GuideGoals
• To demonstrate the principles of chemical equilibrium
• To illustrate equilibrium reactions to the students
The Demonstration In this demonstration, two plastic aquariums filled up with water are used to model the reactants and products ofan equilibrium reaction. Students transfer water between the aquariums and see that at constant rates the systemwill no longer change, macroscopically, despite the constant exchange of water between them.
Materials • Two 5 liter plastic aquariums
• Two 250 ml beakers
• Two signs: “reactants” and “products” that you can hang next to the aquariums
Instructions 1. Fill one aquarium with water and leave the other empty.
2. Call up two students, and instruct each to take water from his or her own aquarium, in the beakers, andpour it into the second aquarium.
3. Follow what happens with the class.
Lecture Notes We are going to pretend that we have a reaction going on here. This is kind of a fake reaction that we are settingup.
One aquarium represents the reactants and the other represents the products. This is the beginning of the reaction.
The students will put the beaker down at the bottom [of the aquarium] and transfer whatever they have in thecontainer to the other aquarium.
Ask the students to predict what the water level will be in the aquariums, when the experiment is finished.
The volumes in the aquariums will not be equal.
If they were to do this until 4 o’clock in the afternoon, would the water levels change?
Why wouldn’t they change?
What kind of a condition have we achieved? Equilibrium.
Appendix: Workshop 4 - 132 - Reactions in Chemistry

Comment At the end of the demonstration, it should be related to the chemical mechanism which it represents:
A<->B, where only A is present at the beginning, and B is formed along the way. Emphasize that, in other cases,both reactants and products exist at the same time.
A system will reach a state of equilibrium when the reaction rates of both forward and reverse reactions are thesame.
Despite the molecular changes, the system always keeps a constant composition, and looks as if nothing changeson the macro scale. In the solid state you also have a relationship between macro and micro: The solid appears tobe static, despite the constant movement of the molecules within.
References: Linkshttp://www.chem.uncc.edu/faculty/murphy/1252/Chapter15/ A comprehensive slide show on equilibrium and LeChatelier’s Principle that can be used with students.
References: ReadingsRudd, J.A. II, Greenbowe, T.J., Hand, B.M., and Legg, M.J. (2001) “Using the Science Writing Heuristic To Move Towardan Inquiry-Based Laboratory Curriculum: An Example From Physical Equilibrium,” Journal of Chemical Education,Vol. 78, No. 12, p: 1680.
Reactions in Chemistry - 133 - Appendix: Workshop 4
Water Volumes in Equilibrium Demonstration: Teacher’s Guide, page 2
Electrolytes in SolutionDemonstrations: Irene Walsh
Teacher’s GuideGoals
• To show ways to give concrete examples of chemical concepts
• To improve students’ understanding by visual illustration of basic principles
The Demonstrations These demonstrations are intended to facilitate the teaching of concepts that are related to electrolytes in solu-tion: dissociation of strong and weak electrolytes, aquatic self-dissociation, concentration, and logarithmic scales.These demonstrations facilitate students’ understanding of new concepts. This should create the foundation formore abstract topics which are derived from these basic ones.
SAFETY Wear goggles at all times during demonstration as should all students observing it!
Demonstration #1—Studying Electrolytes With a Light Bulb Conductor
Materials • Mounted light bulb with two conductors, connected to a battery/electricity
• A 500 ml beaker
• 50 ml 1M HCl and 50ml 1M CH3COOH
Instructions Immerse the conductors of the lamp in a strong electrolyte solution inside the beaker. Discuss. Then, wash thebeaker and change the electrolyte to a weak electrolyte. Discuss the difference.
Lecture Notes Looking at what happened, explain what’s in the solution that allows it to conduct electricity.
What is an electrolyte? A substance that conducts electricity when dissolved in water.
What happened when we changed the solution? Is this an electrolyte? What’s the difference between the solutions?
What does that mean about the amount of ions in here? There are fewer ions.
Suppose I told you that the molar concentration of both solutions is the same (1M HCl and 1M acetic acid). Why,when we put a substance in water, do some conduct and some not?
It has to do with the dissociation. There is more dissociation in HCl.
Appendix: Workshop 4 - 134 - Reactions in Chemistry

Demonstration #2—Nuts and Bolts Analogy of Electrolytes
Materials • Overhead projector
• 5 bolts
• 5 nuts
• 5 bolts with nuts screwed on them
• A petri dish
Instructions Model a molecule by putting a screwed nut and bolt on the overhead projector. Then put the free nuts and boltsin the petri dish to represent a strong (completely dissociated) electrolyte in solution. Discuss. Then add somescrewed nuts and bolts to the petri dish and explain about weak electrolytes.
Lecture Notes This is a compound [nut and bolt]. We put it in water, and that happens [dissociation]—add free bolts and nuts.
What kind of electrolyte is this?
Add screwed bolts and nuts. Based on what we’ve just said, what can we say about this substance? It’s only par-tially dissociated.
Demonstration #3—Conductivity in Water
Materials • A neon glow-bulb
• A 500 ml beaker with water
Instructions Immerse neon light bulb in water.
Lecture Notes This is called a neon glow-bulb.
What did we see before, when we put a light bulb in water? It didn’t light.
Immerse the glow bulb in water. Can you see a little glow here? A purplish light.
If you see a little glow here, what does it mean? There are ions in water.
There are two kinds of ions in the water. If there were ions, what would the water be doing? Dissociating.
Which ions are these? Hydroxide and hydronium ions.
Reactions in Chemistry - 135 - Appendix: Workshop 4
Electrolytes in Solution Demonstrations: Teacher’s Guide, page 2
Appendix: Workshop 4 - 136 - Reactions in Chemistry
Demonstration #4—Water Dissociation
Materials • A stative and clamp
• A meter stick
• Picture clips
• Paper signs with [H+] and [OH-] written on them.
• Test tubes with 1M NaOH and 1M HCl.
• A piece of Zn metal
• Phenolphthalein (pp) indicator
Instructions Attach the paper signs on both ends of the meter stick. Hang the meter stick from its middle by the clamp on thestative. Raise or lower the sides of the stick like a seesaw to demonstrate higher or lower concentrations of ions insolution, respectively. To represent ionic interactions in solution, use two meter sticks which attach physically toone another, and pull them up or down. Relate the chemical properties of the solutions to the demonstration,such that the students understand the concepts of acidic and basic solutions.
Use pp indicator in base and in metal acid to demonstrate indicator.
Lecture Notes Show a test tube with base and add pp indicator into it. It turns red.
Tell me whether it’s got more hydroxide or more hydronium? More hydroxide.
What did we learn about pp indicator in our study? It turns pink in the presence of OH-.
Put a metal in the acidic solution. What happens in the presence of this? We get more hydronium ions.
How do we know that there is more hydronium in it? Because it’s releasing some hydrogen gas.
Demonstration #5—The Logarithmic Scale
Materials • A long string, on which little signs are hung to represent the powers of ten. The string should be marked
off with 1cm markings, beginning at 101, and going on to 103.
Lecture Notes When you first heard about acids and bases there was another term that you were introduced to: pH level.
Do you remember anything about pH level?
We really haven’t talked yet about pH, but I would like to tell you that pH=-log[H3O+]. What is a log?
Present your string and explain how you made it.
If I have a hydronium ion concentration which is 10-1M, it would be quite a lot bigger than a hydronium ion con-centration of 10-2M.
pH is based on a logarithmic scale. Do you know of any other thing that’s based on a logarithmic scale? It happensin Japan a lot: earthquakes.
When they say the earthquake had a magnitude of seven on the Richter scale, vs. an earthquake which had a mag-nitude of six on the Richter scale, it’s how many times stronger? 10 times stronger.
Electrolytes in Solution Demonstrations: Teacher’s Guide, page 3

Teaching Tips From Ms. Walsh One of the things about teaching is to be flexible. It is not their fault if they don’t get it. You need to think ofanother way to explain. This is provided that they’re working and that they are focused on what they are doing.
I spend a lot of time during the year thinking of ways to explain and present things.
I think that the nuts and bolts are effective. They are something that the kids can see when we start talking aboutdissociation and we start doing problem. They often have problem seeing that you have more parts than you hadin the beginning.
They say on the blackboard that if the hydronium ion concentration is greater, than the solution would be acidic.
I think that one thing that people should know in teaching, is that even though the students are tenth and elevengraders, a lot of them are still on the concrete operational level, and chemistry has abstract concepts connectedwith it. And I’ve found through the years, that if you can give them concrete examples of things, they really seemto understand it.
Even students who are very bright will sometimes be able to do the mathematics but not have a really goodunderstanding of what is going on. Sometimes just by using these little concrete analogies they get a much betterunderstanding. This is what I found in the past.
Comment These demonstrations may be very useful for a wide range of topics that relate to the chemistry of solutions. Theygive a proper introduction for a chemistry lesson: start off with a demonstration, and go on to the more compli-cated mathematics, after the students have a basic picture in their heads of what they’re dealing with.
References: Linkshttp://dbhs.wvusd.k12.ca.us/Chem-History/Arrhenius-dissociation.html Arrhenius’ 1867 paper on ions in solution.
References: ReadingsMorikawa, T., and Williamson, B.E. (2001) “Model for Teaching About Electrical Neutrality in Electrolyte Solutions,”Journal of Chemical Education, Vol. 78, No. 7, pp: 934-936.
Reactions in Chemistry - 137 - Appendix: Workshop 4
Electrolytes in Solution Demonstrations: Teacher’s Guide, page 4