Embed Size (px)
Citation preview

EBN-0099/14
Activities for Youth Education


Rainwater HarvestingActivities for Youth Education
by
Billy KniffenExtension Water Resource Associate
and
Ryan GerlichExtension Program Specialist
Acknowledgments
Brent Clayton co-produced this revised version of the Rainwater Harvesting Activities for Youth Education booklet
and the accompanying videos. The authors would like to thank the Menard Junior Master Gardeners for their participation in the
videotaped rainwater harvesting activities.

This document was developed by the Texas A&M AgriLife Extension Service through a grant provided by the Texas Water Development Board.
This information is provided courtesy of the Texas Water Development Board. Future reproduction and/or copying is freely granted subject to prior permission from,
and acknowledgment of, the Texas Water Development Board.
For more information about rainwater harvesting, go to http://rainwaterharvesting.tamu.edu/
This document may be found on the TWDB Conservation Education page athttp://www.twdb.texas.gov/conservation/education/

Contents
Introduction .................................................................................................................................... 1
Rainfall Simulator ......................................................................................................................... 2
Raindrop Splash ............................................................................................................................ 4
Soil Temperature........................................................................................................................... 5
Soil Infiltration Measurements with Rings ........................................................................... 6
Transpiration................................................................................................................................... 7
Mist to Heavy Rain ....................................................................................................................... 8
Corrugated Roof and Gutter ..................................................................................................... 9
Plastic Sheet Watershed Activity ...........................................................................................10
1-Gallon Jug Watering Device .................................................................................................12
Appendix: Obtaining or Building a Rainfall Simulator ....................................................14
Additional Resources
For more information, see http://rainwaterharvesting.tamu.edu/ for these demonstration videos:
Rainfall Simulator
Raindrop Splash
Soil Infiltration Measurements with Rings
Mist to Heavy Rain
Corrugated Roof and Gutter
Plastic Sheet Watershed Activity
1-Gallon Jug Watering Device/Water Cavity
Constructing a Rain Barrel
Using a Rain Barrel for Drip Irrigation


1
Introduction
This booklet was created to help educators teach students about the importance of water management and conservation, with a focus on rainwater harvesting. The activities included in this document can be used for students in grades K–12, 4-H, or Junior Master Gardener education. Videos for many of the activities are available at http://rainwaterharvesting.tamu.edu/. Educators can use these videos to learn how to present the activity, let the students watch the videos, or watch them as a group and then complete the activities.
Concern about water supply and water quality issues will continue to increase as our population grows and the demand for water increases. To meet our needs, we, as well as future generations, must learn to manage our aquifers, rainfall, rivers, runoff, and other water supplies. These activities are designed to help children visualize where water goes when it rains and how to be the best stewards of every drop.
The Plastic Sheet Watershed activity best explains the purpose of these training aids. The activity shows the kids how we must work together to take care of our watershed and water supply so their children can enjoy the abundance of water that they have.
To move the water around the sheet, the kids must raise their section of the sheet up high while the next one drops their section so the water moves around the sheet, passing by all so all can use it. But some raise it too high and others too low. The water moves too fast or too slow, splashing off the sheet or running out of the hole in the center, representing how water supplies are lost or wasted.
In the United States, there is abundant and safe water to use and play with. The average child in many other nations does not have that privilege. These activities help children realize that although we have the best water supply of any nation, if we do not take care of it, they and their children may not always get to enjoy this luxury.
Billy KniffenExtension Water Resource Associate

2
Rainfall Simulator
Objective • Understand the movement of water through the water cycle.
• Understand the concept of a watershed.
• Understand the effects of land cover and its management on rainwater infiltration and runoff.
• Understand the practical implementation measures of rainwater harvesting for water storage in the soil, groundwater, and surface reservoirs.
• Understand the effect that increased impervious areas have on water movement in the watershed.
• Understand water and land management options that decrease runoff and promote infiltration.
Materials • Rainfall simulator frame
• 4 landscape trays
• 4 rain trays
• 8 catch containers
• 2 buckets for water
• Towels
Procedure 1. Fill the rain trays with about 1 to 2 inches of water and watch to see where the rainfall goes.
2. Explain the three reasons why Texas landscapes do not look like they did before European settlement: 1) development 2) overgrazing 3) lack of fire. These factors caused a decrease in native grass prairies.
3. Then discuss how the resulting land covers cause different patterns in water infiltration and runoff.
4. Discuss how water movement and land management can affect water quality and what landowners can do to improve infiltration and the quality of water downstream.
The rainfall simulator shows how land cover and impervious surfaces affect the path of rainwater in a watershed.

3
5. After the rain has fallen for a few minutes, compare the water quantity and quality for the various catch containers.
6. Discuss the differences in water amounts between land covers and why some containers’ water is turbid while others are clear. On the tray with an urban landscape, use small cups and a sponge to simulate rainwater harvesting.
Questions to Ask
• What are three reasons there are not abundant native grassland prairies in Texas? Development, overgrazing, and lack of fire.
• Where do you think there will be the most surface runoff? Impervious areas in urban areas and bare soil in open-space land.
• How does overgrazing negatively affect the land? Overgrazing removes vegetation that slows runoff, kills roots that prevent infiltration, seals the soil, and removes organic matter.
• How does development negatively affect the land? Development increases impervious areas such as roads, streets, and buildings.
• How does lack of fire negatively affect the land? The lack of fire allows cedars and other vegetation that suppress grass to overtake the land. It also reduces water infiltration and increases evaporation and runoff.
• What are ways we can improve water infiltration? To increase water infiltration, allow grass to grow taller and thicker, suppress plants that inhibit grasses, and create more pervious sidewalks, rain gardens, and rainwater collection systems.
• Why does water not infiltrate into the overgrazed land cover? Overgrazed land does not have as much leaf matter or roots. The water has nothing to slow it down to give it time to infiltrate.
For more information on how to obtain or build a rainfall simulator, see page 14.

4
Raindrop Splash
Objective • Understand that a falling raindrop has energy and can detach soil particles.
• Understand how ground cover affects the energy in the raindrop.
Materials • 1 sprinkler can or 5-gallon bucket with holes punched in the bottom
• 1 poster board
• 1 ruler or measuring tape
Procedure 1. Simulate rainfall by holding a sprinkler can or 5-gallon can with holes punched in the bottom about 4 to 5 feet above the ground.
2. Pour a measured amount of water on the soil.
3. Record the splash using a poster board or sheet of white plastic placed next to where the rainfall strikes the soil.
4. Measure and compare the height of the splashes and the amount of soil splash (the color of water splashed on the poster board).
5. Repeat the test on grass or vegetated area. Select two or three different soil or vegetation conditions.
Questions to Ask
• Which surface will have the most splashing soil? Bare soil
• Why is there more splashing on bare soil? Bare soil has the most splashing soil because nothing protects the soil from the force of the raindrop.
• Why is this bad for the environment and the watershed? The raindrop kicks up soil that then runs off. This creates erosion and flooding and allows soil, seeds, and pollutants to go into our rivers and lakes.
The difference in splash patterns from an area of bare soil and a vegetated one shows how vegetation helps protect soil particles from erosion and runoff.

5
Soil Temperature
Objective • Understand the relationship between air temperature and soil temperature.
• Understand how ground cover affects the soil temperature.
Materials • 2 thermometers
Procedure 1. Take the soil temperature reading in the afternoon because it is usually the hottest time of the day. An inexpensive thermometer that will register up to 120 to 130 degrees should be sufficient.
2. Place the bulb of the thermometer about ½ inch below the soil surface on both the grassed (or shaded) and bare areas. (This is usually the depth of most seedling grass roots.)
3. Take the air temperature at least 4 feet above the ground to avoid soil heat radiation.
4. Have the students record the temperatures of the grassed and bare soil areas and the air.
5. Discuss the importance vegetation has on moderating temperature in the soil. (Because it helps hold in moisture.)
6. Discuss how the temperature in the soil greatly impacts the temperature of the air.
7. Explain how the hottest years in Texas were also the driest years when there were droughts (for example, in 2011).
Questions to Ask
• Which soil surface will have the greatest temperature? Bare soil will heat up faster and stay warmer longer.
• Why is the temperature in the bare soil greater? The bare soil is like a brick that has the density to heat up and cook organic matter. There is no blanket of grass to block the sun, insulate the soil, and keep it cooler.
• How does vegetation help the soil retain water? The vegetation insulates the soil to prevent the sun from drying it out and the wind from blowing the moisture away.
The thermometer on the top is in shade and in litter. The one on the bottom is in full sun and short grass with little litter.

6
Soil Infiltration Measurements with Rings
Use infiltration rings to demonstrate how quickly soils will absorb moisture. These rings can show the differences between soils or the effect range condition can have on infiltration rates on similar soils.
Objectives • Understand the relationship between land health and infiltration.
• Understand that if the rainfall rate exceeds the infiltration rate, runoff will occur.
Materials • 1 bucket with water
• 2 6-inch sections of 4-inch metal pipe
• 1 large hammer
Procedure 1. Select two or more different soil or vegetation conditions to measure.
2. Hammer the rings into the ground 1 to 3 inches so that water cannot seep out from under them.
3. Fill the rings with water.
4. Pour the water in as fast as possible without disturbing the soil surface.
5. Record the time it takes for the water to disappear.
6. Repeat with another container of water if time allows.
7. Check to see how far the water penetrated into the soil by digging a hole until you strike dry soil or parent material and then measure from the surface to the dry soil or parent material.
8. Then graph or chart the different soil condition measurements.
Questions to Ask
• Which land cover will have the greatest amount of infiltration? Lands covered with vegetation will have the greatest infiltration.
• Why does vegetation allow more water to infiltrate? The roots of vegetation create open spaces in the soil. This helps the water move down into the soil as it follows these open spaces.
Use infiltration rings to show how quickly soils absorb moisture, the differences in soils, and the effect range conditions have on infiltration rates.

7
Transpiration
Objectives • Define transpiration and describe its role in the water cycle.
Materials • 4 1-gallon-sized plastic bags
Procedure 1. Describe what transpiration is and its role in the water cycle.
2. Select four different types of plants and seal the bag over as much of the plant as possible.
3. Leave the bags alone and check them in 30 minutes.
4. Compare the amount of water that was transpired by each type of plant.
5. Discuss which plants had the most transpiration and why.
6. Explain how introduced or invasive plants may withdraw more water than native plants, leaving less water in the soil.
Questions to Ask
• Which plant will have the most transpiration? Plants that have the largest leaves generally transpire the most water.
• Why would that plant have the most? The bigger the leaves, the more stomata the plant will have.
• What other plants would have higher transpiration levels? Plants that live near water or in wet areas.
• What might be a disadvantage of transpiration? Plants that transpire a lot need more water.
• How can we control the amount of transpiration occurring on our land? We can control the amount of transpiration and reduce water demand by planting plants that need less water and creating landscapes in our yards with less turf and more xeriscaping.
Place a resealable plastic bag over leaves in the sun and another bag over leaves in the shade. After 30 minutes, check to see which bag has the most water accumulation.
8
Mist to Heavy Rain
Objectives • Understand that rainfall rates differ during each rainfall event.
Materials • 1 spraying water bottle that allows you to change the flow from a fine mist to a straight line
Procedure 1. Describe how rainfall rates affect the environment.
2. Demonstrate this by spraying the water bottle in front of the students and changing the flow to demonstrate the difference between a mist and a heavy rain.
3. Discuss how these differences can affect erosion on the soil surface. Demonstrate this by spraying both the mist and the larger drops into the students’ hands to show how the water runs off.
4. Discuss how the rate of rainfall can change the potential of water to infiltrate or become surface runoff.
Questions to Ask
• What rate of rainfall will cause the most erosion? The bigger the drops, the heavier the impact when it hits a surface and the greater the volume of the water.
• What rate of rainfall will lead to more water infiltration? The bigger the drop, the more volume of water falls with less evaporation. But if it falls too fast and too much, it causes more runoff.
• Why might heavy rain be important? Heavy rain provides the volume of water needed to infiltrate the soil but the mist is important for certain plants and animals. Some places receive little rainfall but only mist – and life has adapted to it. All forms are important.
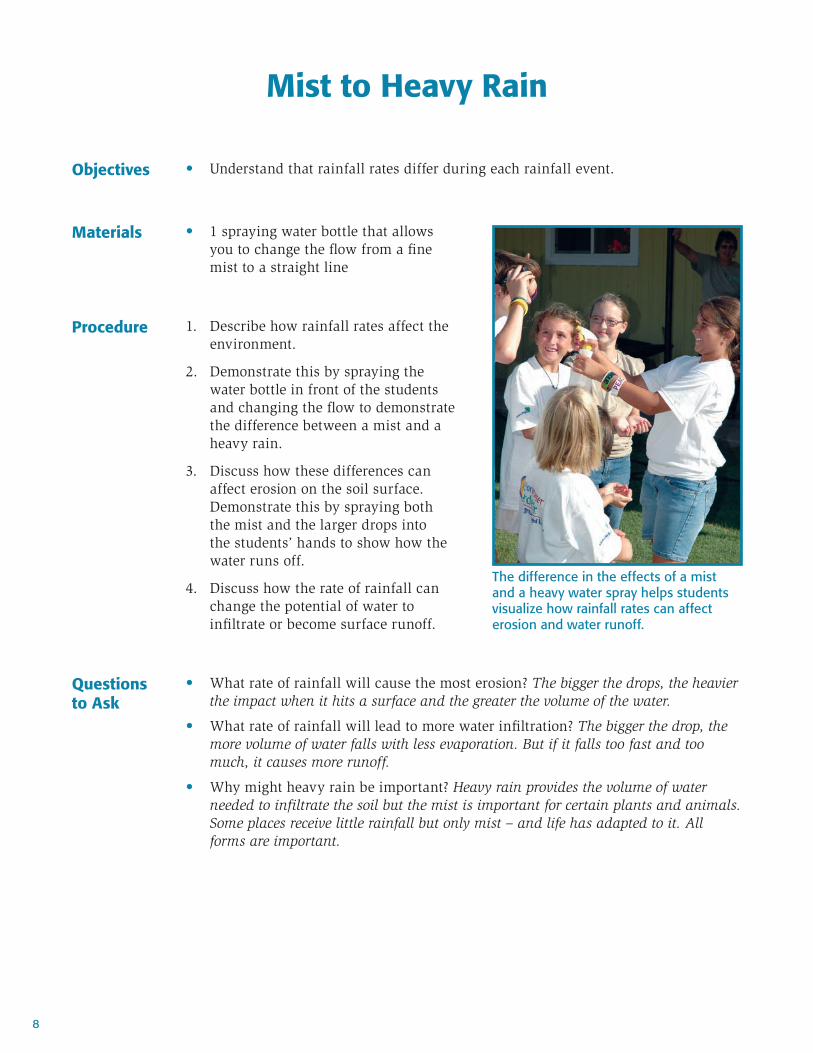
The difference in the effects of a mist and a heavy water spray helps students visualize how rainfall rates can affect erosion and water runoff.
9
Corrugated Roof and Gutter
Objectives • Identify where rainfall goes if it falls on a roof with and without gutters.
• Understand the role and purpose that gutters serve on a roof.
Materials • Short piece of corrugated plastic/tin/wood (2 feet × 2 feet)
• Sprinkling can to simulate a rain event
• Short piece of gutter to divert the water
• Container to hold water from the gutter
• Bucket or container to catch the water
Procedure 1. Have two students hold the short piece of corrugated plastic/tin (one on each side) and a third student to use the sprinkling can.
2. Sprinkle water onto the small roof to simulate a rain.
3. Discuss where this water is going—running off of the roof; splashing on the ground; and running off into a ditch, drain, and down the watershed.
4. Then slip the piece of gutter under the roof, slope it to one end, and have a container there to catch the water.
5. Discuss how much water per square foot of surface you can catch (measure your roof to determine the area and amount of water). Example: 2 feet × 2 feet = 4 square feet of surface. Approximately .6 gallons of water per square foot per 1 inch of rainfall. 4 × .6 = 2.4 gallons of runoff.
Questions to Ask
• Where is the water going when there are no gutters? When there are no gutters, water runs off the roof and all across the yard.
• What is the advantage of having gutters? Gutters channel water away from most of the yard into one spot.
• How much water can be captured from a roof with an inch of rain? 1 square foot of roof, 1 inch deep is approximately 0.6 gallons of water (0.623 gallons). If the roof is 2 feet × 3 feet, then 2 × 3 = 6 square feet. 6 × 0.6 = 3.6 gallons from 1 inch of rain.
• How can you use harvested rainwater? Rainwater can be used to water plants, provide water for pets, birds, wildlife, or other uses.
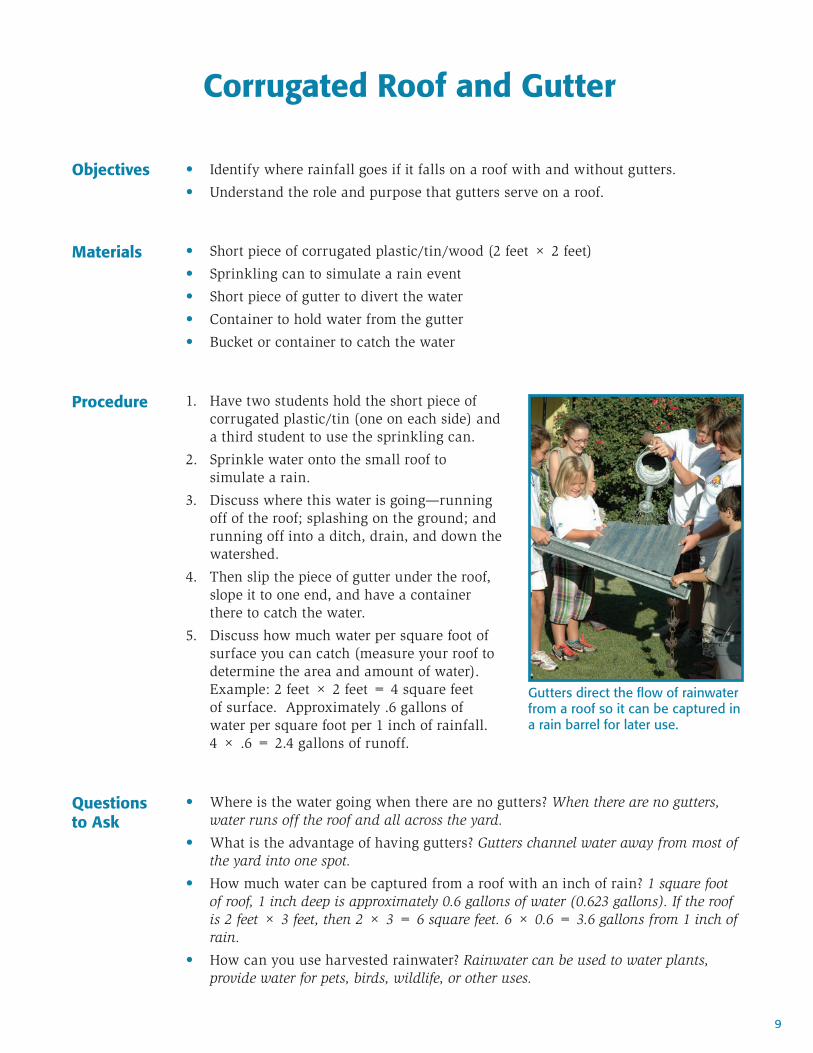
Gutters direct the flow of rainwater from a roof so it can be captured in a rain barrel for later use.
10
1. Have students open up the sheeting, stretch it out at waist level, and spread out uniformly or evenly spaced all the way around the sheeting.
2. Discuss that the sheeting represents their watershed and that water flows from the highest point to the lowest. This watershed includes their school and community and drains into the nearest creek, river, lake, or ocean.
3. Place about 2 gallons of water onto the sheeting and instruct the students to move the water in a circle all the way around the sheeting without it going
to the center and being lost in the center hole (leaving their watershed). Students learn to raise and lower their section to get the water to move around. Instruct them to work slowly at first.
4. Once they have moved the water in a circle two to three times (or after about five tries), let the water drain into the center hole to remove it.
5. Select a taller student and have him or her get into the center and raise the sheeting up as high as possible. Instruct all other students that it is going to rain on their new home and they can either be underneath it or on the outside.
Plastic Sheet Watershed Activity
Objective • Understand what a watershed is and how our activities impact water quality.
• Understand that everyone in a watershed is responsible for protecting water quality.
• Understand the importance of managing all of the water that falls on your property.
Materials • Heavier-gauge clear plastic sheeting (4 mil thickness or thicker), square or rectangle—about 8 feet × 8 feet as a minimum size up to 10 feet × 20 feet at the largest size. Cut a 4-inch diameter hole in the center.
• Water hose with spray nozzle on the end, if possible. For smaller groups, a 1-gallon pump-up sprayer that has been disinfected
• Water-holding container such as a 1- to 5-gallon container or bucket
• Open space, preferably outside
Procedure
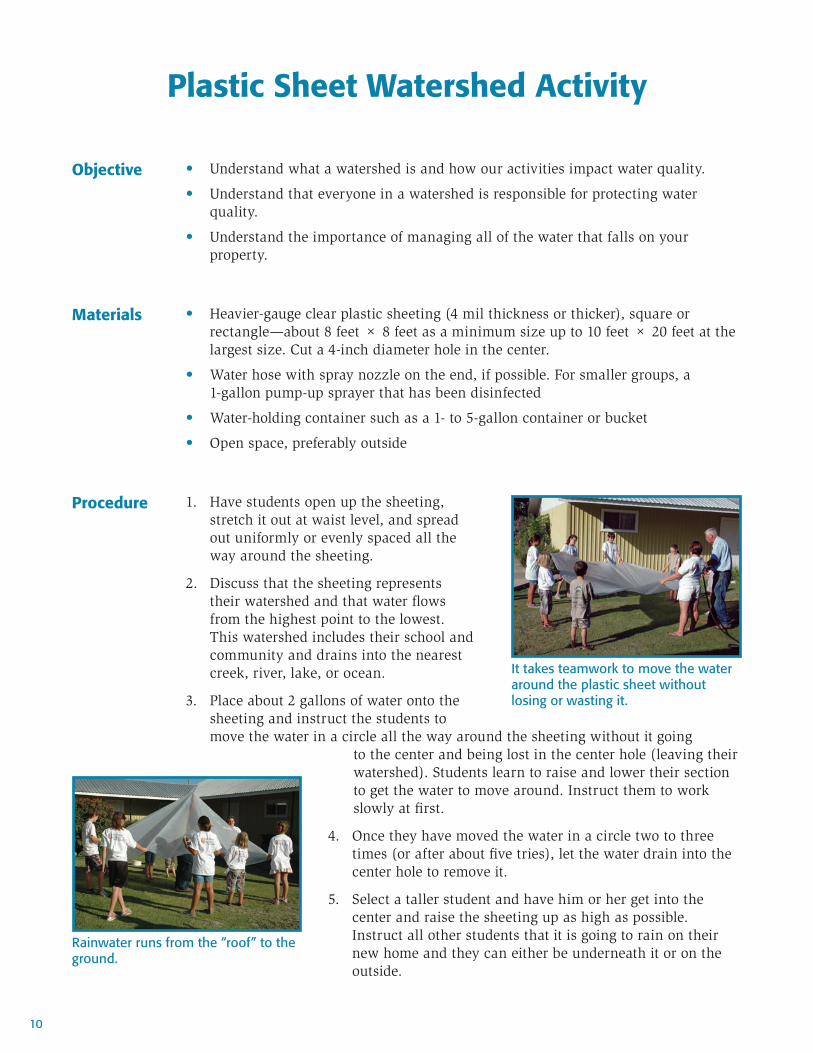
It takes teamwork to move the water around the plastic sheet without losing or wasting it.
Rainwater runs from the “roof” to the ground.

11
6. Spray water up high over the sheeting to create a rainfall event.
7. Once you have allowed it to rain for a few minutes, ask the students where the water went. (On the ground and will run off towards the bottom of their watershed.)
8. Have the student in the center bring the sheet low. Select another student to hold the bucket under the center hole of the sheet.
9. Spray water up high for a minute and wave the nozzle from end to end.
10. Explain that all the water went into the bucket and this is the process of rainfall capture. Discuss that we can capture and save that water for dry days and use it for all types of purposes outside the home. With proper treatment, it can also be used inside the home.
11. Repeat step 3 and have the students move the water faster and faster.
12. Once they are successful (three to ten circles, depending on time available), stop and discuss:
– Water is precious. Worldwide, children have only about 5 gallons of water per day to bathe, drink, cook, and use. In the United States, there is abundant and safe water to use and play with.
– We want our children and their children to be able to have the same privileges and fun playing and using water as we have. But it will take teamwork —just as it did to move the water around in a circle—for us to give that luxury to their children. We all live and play in our watershed; and, if we can work together to protect and conserve the water in our watershed, we can continue to have the fun we did today.
13. Finally, allow the students to shake the sheet dry. They will create a mist shaking it up and down and all will feel the cool spray. Have the students fold up the sheeting or lay it out for the next group.
Questions to Ask
• What is a watershed? A watershed is any place where water moves or drains.
• In your location, where does water go when it rains? (What river, lake, or low spot?) Name the stream or body of water.
• How large is the plastic sheet? If it rained 1 inch on it, how much water could we catch? Measure or estimate the length and width of the sheet and multiply to get the square footage. Then multiply by 0.6.
• Where does the rainfall go when the center of the sheet is held high? When the center is high, the rain runs off by our feet and then runs off – just like many buildings.
• Where does the water go when the center of the sheet is pulled down? When we pull the center down, it is like a gutter and downspout that channels the water into a rain barrel to be caught and saved for when the water is needed.
The “roof” can be a catchment area to harvest the water for later use.

12
1-Gallon Jug Watering Device
Objectives • Understand the importance of water to wildlife.
Materials • 1-gallon water or milk jug
• Adjustable drip emitter
• Drill and 3/16-inch drill bit or punch to make a hole for the emitter
• Spray paint
• Markers or other paint
• String or bungee cord to hang the watering device
Procedure Making the watering jug
1. Clean out the 1-gallon jug.
2. Spray a base coat of paint over the jug to prevent UV degradation.
3. Drill or punch a small hole in the bottom and opposite corner from where the jug would hang.
4. Paint or decorate the jug as desired.
5. Insert the drip emitter into the hole.
6. Attach a string or cord to the handle so it can hang in a tree or other support.
Making the concrete base
Method 1
1. Mix the concrete according to the directions on the bag.
2. Pour the concrete in the plastic pie container or mold and spread it out (use a spackle tool or protective gloves).
3. Put a bowl in the middle and push down until it is about an inch away from the bottom.
4. Let it sit for about 5 minutes.
5. Decorate the concrete around the bowl with shells or other items. (Be sure that they are firmly in the concrete.)
Add an adjustable drip emitter to a 1-gallon jug to make a watering device for wildlife.

13
6. Take out the bowl and see if there is an indention there; if not, keep the bowl there a few more minutes.
7. Remove the bowl and decorate the center indention.
8. Let it dry for 24 hours or until completely set.
9. Remove the concrete base from the mold or pie pan.
10. Place the concrete base under the watering jug.
Method 2
1. Mix the cement according to directions. Fast-setting concrete is preferred.
2. Lay a plastic sheet over the top of a table and cover it with 1 inch of sand.
3. Find a larger leaf (2 to 4 inches in diameter) and lay it on the sand.
4. Have the students, using a finger, outline the leaf in the sand down to the plastic sheet.
5. Place about 1 inch of cement over the leaf and into the trench outlining the leaf.
6. Have the students wear protective gloves and pat the cement until it is smooth over the top and settled into the trench.
7. Allow the cement to dry—about an hour.
8. Have the students roll the cement over and dig out the leaf.
9. The imprint can be left the color of concrete or painted.
10. Place the concrete base under the watering jug.
Questions to Ask
• How many drops are in a gallon of water? 10,400
• How many seconds are in a day? 86,400
• How are birds attracted to the watering device? They hear the sound of the dripping water.
• The drops keep the water moving and discourage what insect? Mosquito
Wildlife will drink from this concrete base that collects the water that drips from the watering jug.
14
Appendix:Obtaining or Building a Rainfall Simulator
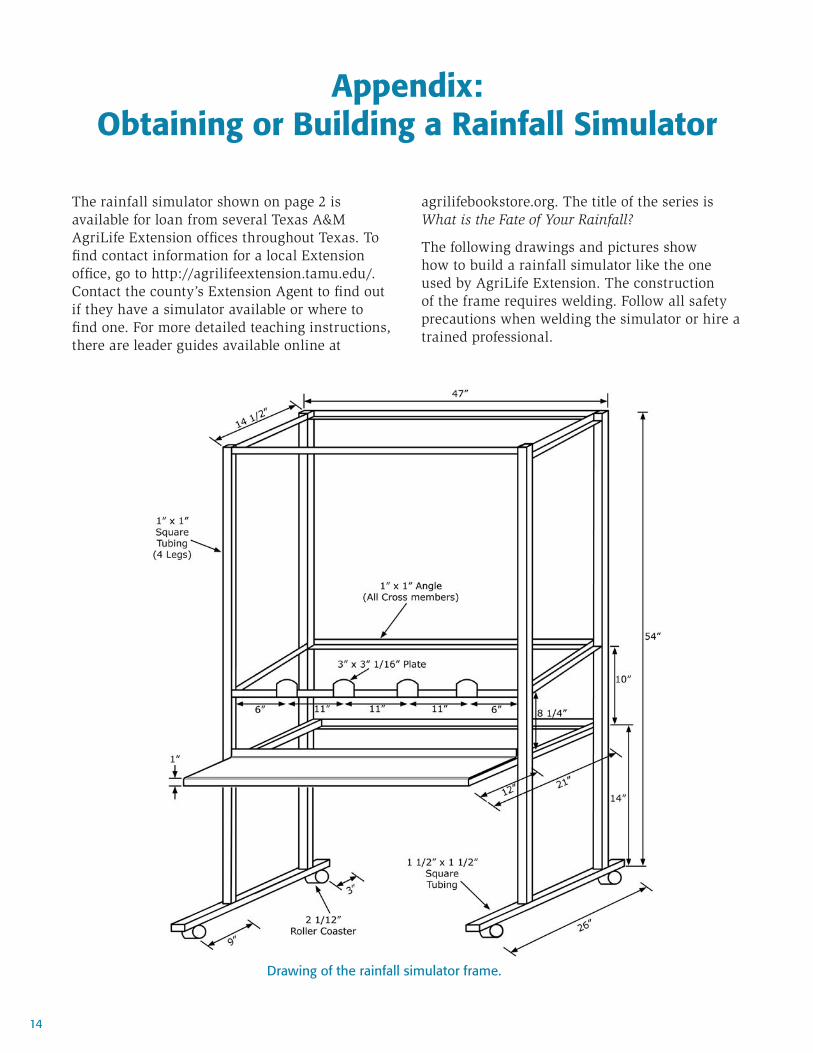
The rainfall simulator shown on page 2 is available for loan from several Texas A&M AgriLife Extension offices throughout Texas. To find contact information for a local Extension office, go to http://agrilifeextension.tamu.edu/. Contact the county’s Extension Agent to find out if they have a simulator available or where to find one. For more detailed teaching instructions, there are leader guides available online at
agrilifebookstore.org. The title of the series is What is the Fate of Your Rainfall?
The following drawings and pictures show how to build a rainfall simulator like the one used by AgriLife Extension. The construction of the frame requires welding. Follow all safety precautions when welding the simulator or hire a trained professional.
Drawing of the rainfall simulator frame.

15
Above are the surface water pipe components, which include 1-inch sizes of the following (starting at the bottom left and moving up and to the right): 4-inch long pipe, 90-degree elbow, 23⁄4-inch long pipe, and male adapter. The male adapter threads into the surface water hole at the top of the tray.
The plant tray for the simulator is made from a 15 inch × 11 inch × 6 inch plastic storage (15-quart volume) container.
There are two drains in the tray: one for groundwater and one for surface water runoff. The groundwater drain is made from 1⁄2-inch PVC pipe. As shown above, the pipe extends along the bottom of the tray to maximize groundwater capture. The surface water hole drilled into the tray is 1½ inches in diameter, and the hole for the groundwater pipe is 7⁄8 inch in diameter.
Above are the groundwater pipe components which include ½-inch sizes of the following (starting at the bottom left and moving up and to the right): 90-degree elbow, 2-inch long pipe, male adapter, two rubber washers, threaded 90-degree elbow and slip, 7-inch long pipe, and end cap. Also, there are four holes drilled in the section of pipe that will be in the container. The hole is 3⁄16 inch. The rubber washers go on both sides of the plant tray when the groundwater pipe is assembled.

16
Once the trays and piping have been assembled, they can be filled with “land uses.” In this picture, there are land uses of (from left to right) native grasses, overgrazed land, turfgrass, and urban landscape. Note that the water pipes in this example use 45-degree elbows.
The rain trays are the same size containers as the plant trays. They are drilled with 35 small holes (1⁄16 inch) across the bottom for the water to simulate rainfall.
Use clear plastic containers to collect the groundwater and surface runoff and label them (as seen above).
On the urban landscape tray, a small model house (a birdhouse) can represent roof surface. The impervious ground is a piece of plastic glued to the tray. Use small containers to simulate rain barrels and a sponge to simulate a rain garden. The gutters are made from 1⁄2-inch pipe cut in half.


Texas A&M AgriLife Extension Service
AgriLifeExtension.tamu.edu
More Extension publications can be found at AgriLifeBookstore.org
Educational programs of the Texas A&M AgriLife Extension Service are open to all people without regard to race, color, sex, religion, national origin, age, disability, genetic information, or veteran status.
The Texas A&M University System, U.S. Department of Agriculture, and the County Commissioners Courts of Texas Cooperating.