Embed Size (px)
Citation preview

Epicor Compass Installation Guide (ver 4.1 or higher)
Epicor Compass® Installation Guide For Upgrades to Version 4.1 or Higher
EPIC
OR
CO
MPA
SS 4
.1 O
R H
IGH
ER
EL2207-05

Epicor Compass Installation Guide (ver 4.1 or higher)
EL2207-05 9/18/2012
ii
This manual contains reference information about software products from Epicor Software Corporation.™ The software described in this manual and the manual itself are furnished under the terms and conditions of a license agreement. The software consists of software options that are separately licensed. It is against the law to copy the software on any medium, or to enable any software options, except as specifically permitted under the license agreement. In addition, no part of this manual may be copied or transmitted in any form or by any means without the prior written permission of Epicor Software Corporation.
From time to time, Epicor makes changes to its software products. Therefore, information in this manual is subject to change, and the illustrations and screens that appear in the manual may differ somewhat from the version of the software provided to you.
Created by Professional Services Team
Copyright: © 2012 Epicor Software Corporation. All rights reserved.
Epicor Software Corporation, the Epicor logo, and Epicor Eagle are trademarks of Epicor Software Corporation. All other trademarks are property of their respective owners.
Epicor Software Corporation 7683 Southfront Rd. Livermore, CA 94551
Document No. EL2207-05 Publication Date: September 2012
Epicor Compass Installation Guide (ver 4.1 or higher)
EL2207-05 9/18/2012
iii
Table of Contents
Preparing for Installation ........................................................................................ 4 Upgrading the Compass Clients ............................................................................. 6 Testing the Software .............................................................................................. 13 Updating Settings .................................................................................................. 14 Getting Further Support ........................................................................................ 15 Notes ....................................................................................................................... 16

Epicor Compass Installation Guide (ver 4.1 or higher)
EL2207-05 9/18/2012
4
Preparing for Installation
Who Should Use This Document Use this document if you want to upgrade your current version of Epicor Compass software to the latest version (version 4.1 or higher). If this is a new installation (not an upgrade), please contact Epicor support (the Advice Line) to arrange for a representative (an Epicor LPS) to perform tasks for a new installation and software setup.
Requirements You should be running a level of Compass lower than 4.1. It is recommended that the Compass Server and the first Compass Client PC be in the same physical location (store).
Compass version 4.1 (or higher) requires Eagle for Windows level 19 (or higher) on both the Compass and the Eagle Servers. This applies for both types of server set ups: Compass and Eagle Servers on the same system or on separate systems.
Client vs. Server Preparation You will complete the Compass upgrades in this guide on Compass Client PCs only. You must upgrade the Eagle Server with the most current Eagle software before you begin to upgrade Compass Clients.
When you upgrade the first Compass Client, the database (views) on the Compass Server updates automatically. The Compass Server profiles are also advanced when you upgrade the first Compass Client. It is important to make sure the upgrade on the first client has finished and all settings are correct before moving on to other clients. This ensures that two clients do not attempt to update the server at the same time.
Tips for Later: When you upgrade your Eagle software on your Eagle Server, it is a good time to also upgrade the Compass Server software. If the Compass Server is separate from the Eagle Server, you will need to upgrade the Compass Server separately. If you have the Compass Server software on the same server as Eagle, then you will only have to complete the upgrade on the one server.
Support During Installation If you have questions before or during the installation process, the Advice Line is available to help with the Compass installation. When contacting the Advice Line, be sure to have the following information handy:
Your customer number, store name, and your name
The business application you are using (Eagle for Windows, etc.)
The Compass version number (from the Menu bar, click Help, then select About)
Description of the problem, including any error messages
Then, call 800-322-3077. You can also send an email through the customer website at: http://www.activant.com/eaglecustomers/EmailAdviceLine.cfm
On the customer website, in the Type of Issue field, be sure to select “Eagle Compass.”
Epicor Compass Installation Guide (ver 4.1 or higher)
EL2207-05 9/18/2012
5
Duration of Installation You may install Compass upgrades during business hours because it will not affect Eagle while it is running. The upgrade affects Compass software only. There is no need to quiet the server or go into Offline POS during the upgrade process.
After you install the software on the first Compass Client PC, the other Compass Clients will no longer be able to access Compass until you upgrade them to the latest version of Compass.
The installation process could take 20 minutes or more to complete depending on where the Compass Server is located. Installation on the first Compass Client should take less than 20 minutes if it is in the same location (store) as the Compass Server. Each additional client will take about 10 minutes. Epicor recommends the first Compass Client to be in the same location (store) as the Compass Server. If the Compass Server is in another location, the installation could take longer, possibly an hour, because of remote access.
Before You Install the Upgrade
IMPORTANT Before you complete the procedures in the next section, you should always back up the Compass Server. Use the same back up procedures for the Compass Server as you would for Eagle. Refer to the Eagle online help or printed documentation for backup procedures. If your Compass Server and Eagle Server are on separate systems, you can back up the Compass Server while the Eagle and its daily functions are still active. If the Compass Server and Eagle Server are on the same system, you must quiet the system.

Epicor Compass Installation Guide (ver 4.1 or higher)
EL2207-05 9/18/2012
6
Upgrading the Compass Clients During the installation process, you will do the following:
On the first Compass Client, download the new software from the Compass Client Installation CD or from an installation link on the installation website.
Install the software on the first Compass Client (when you upgrade the first Compass Client, the database on the Compass Server also updates).
Test the software.
Install the software on all other clients.
Update settings.
To upgrade the first Compass Client, use the following procedure:
1. Stop the Eagle Listener and all Eagle for Windows applications.
2. On the first Compass Client PC, click the Start menu, then click the following menus: Start > Epicor > Epicor Compass > Utilities and open Set Hosts. The Host Configuration window displays.
3. Make a note of the three server IP addresses. Yours will be different than the ones
displayed in the above example. You may need these addresses later during the installation. Although the Compass Client should keep these addresses, it is a good idea to keep them handy.
4. Shut down all software that is running. For example, any antivirus software, business applications, etc.
5. Put the Compass Installation CD in the CD drive OR launch your Internet browser to download the software from the installation website. If you are installing Compass from the installation website, proceed with step 6.
6. If you are installing Compass from a CD, verify that you have the correct version of Compass. Once the CD loads, locate the file setupeagle.exe and double-click to start the installation. Skip to step 11.

Epicor Compass Installation Guide (ver 4.1 or higher)
EL2207-05 9/18/2012
7
7. On your Internet browser, click the URL address box, then type http://www.activant.com/eaglecustomers/compass/. Once you launch the installation site, the following window displays.
8. Enter your current Eagle server software level, and click Download. Note: You MUST
enter the software level of your Eagle Server, NOT the software level of Eagle for Windows. To obtain the current Eagle server software level, click Utilities from the Eagle Browser, and select OSPREY. From OSPREY, at “Selection,” type PCO, and press Enter. At “Programs,” the current Eagle server software level displays.
9. On the next screen, click Yes to continue with the download.
Note: If you receive a ‘Microsoft C++ Runtime’ error during the install, you should install .NET 2.0 Runtime directly from the following Microsoft web site: http://www.microsoft.com/downloads/details.aspx?FamilyID=0856EACB-4362-4B0D-8EDD-AAB15C5E04F5&displaylang=en
Epicor Compass Installation Guide (ver 4.1 or higher)
EL2207-05 9/18/2012
8
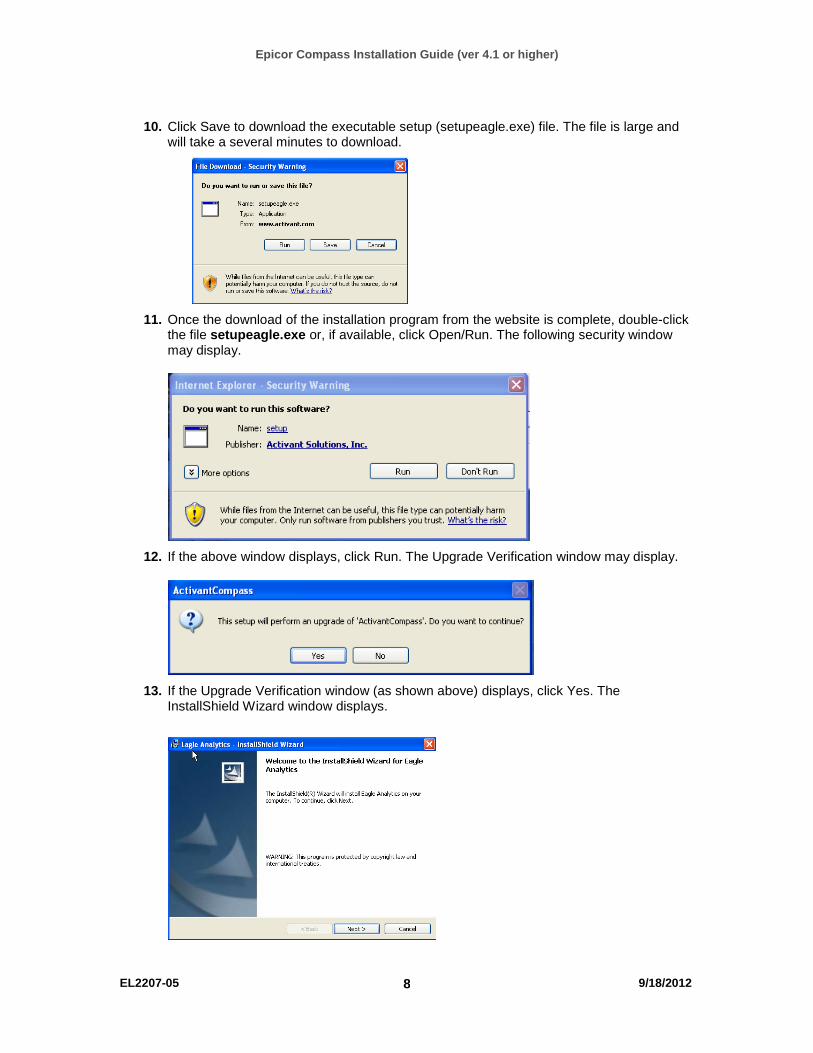
10. Click Save to download the executable setup (setupeagle.exe) file. The file is large and will take a several minutes to download.
11. Once the download of the installation program from the website is complete, double-click
the file setupeagle.exe or, if available, click Open/Run. The following security window may display.
12. If the above window displays, click Run. The Upgrade Verification window may display.
13. If the Upgrade Verification window (as shown above) displays, click Yes. The
InstallShield Wizard window displays.

Epicor Compass Installation Guide (ver 4.1 or higher)
EL2207-05 9/18/2012
9
14. Click Next. The License Agreement window displays.
15. Accept the terms, then click Next. The Customer Information window displays.
16. In the User Name and Organization fields, type the user name and organization. Then,
select the option for Anyone Who Uses This Computer.
17. Click Next. The Destination Folder window displays.

Epicor Compass Installation Guide (ver 4.1 or higher)
EL2207-05 9/18/2012
10
18. DO NOT make changes to the destination folder. Click Next. The Setup Type window displays.
19. Select Complete, then click Next. The Additional Tasks window displays.
image
20. If you would like to create a desktop shortcut, select the checkbox, then click Next. The Install window displays.

Epicor Compass Installation Guide (ver 4.1 or higher)
EL2207-05 9/18/2012
11
21. Click Install. The installation begins. This may take several minutes to complete. When the installation is complete, the Host Configuration window displays.
22. Check the addresses in the Host fields to make sure they match the addresses you noted
earlier in step 2. Eagle System Host – The IP address of the Eagle server. Profile Repository Host – The IP address of the Compass database server. Data Warehouse Host – The IP address of the Compass database server.
Note: If the Compass Server and Eagle Server are on the same system, all three of the IP addresses above will be the same. Tips for Later: You can change addresses later from the Start menu by selecting the following menus: Start > Programs > Epicor > Epicor Compass > Utilities > Set Hosts.
23. Click Test Connections to test the connectivity to the server.
24. When information displays that the test is successful, click OK. If the test is not successful, check the IP addresses again or contact Epicor to get the correct addresses. The client connects to the server to check the profiles. If the profiles are outdated and need to be advanced, the Advance Profiles window displays.
25. If an Advance Profiles window displays, click Yes. The process to advance profiles takes about 10 minutes to complete. Note: As stated earlier in this guide, it is recommended that the first Compass Client be in the same location (store) as the Compass Server to avoid having to complete a remote connection. If the Compass Server is in another location, the process to advance the profiles may take one hour or more to complete. Updating the profiles is only done once by the first client where you install the upgrade. If there are other clients that access Compass, you do not have to upgrade the profiles on them. After you upgrade the profiles on the first client, other Compass Clients on lower versions of Compass can no longer access the Compass Server until they are upgraded with the new version of Compass software.
26. Once the profiles have advanced (if needed), the Install Completion window displays.
Epicor Compass Installation Guide (ver 4.1 or higher)
EL2207-05 9/18/2012
12
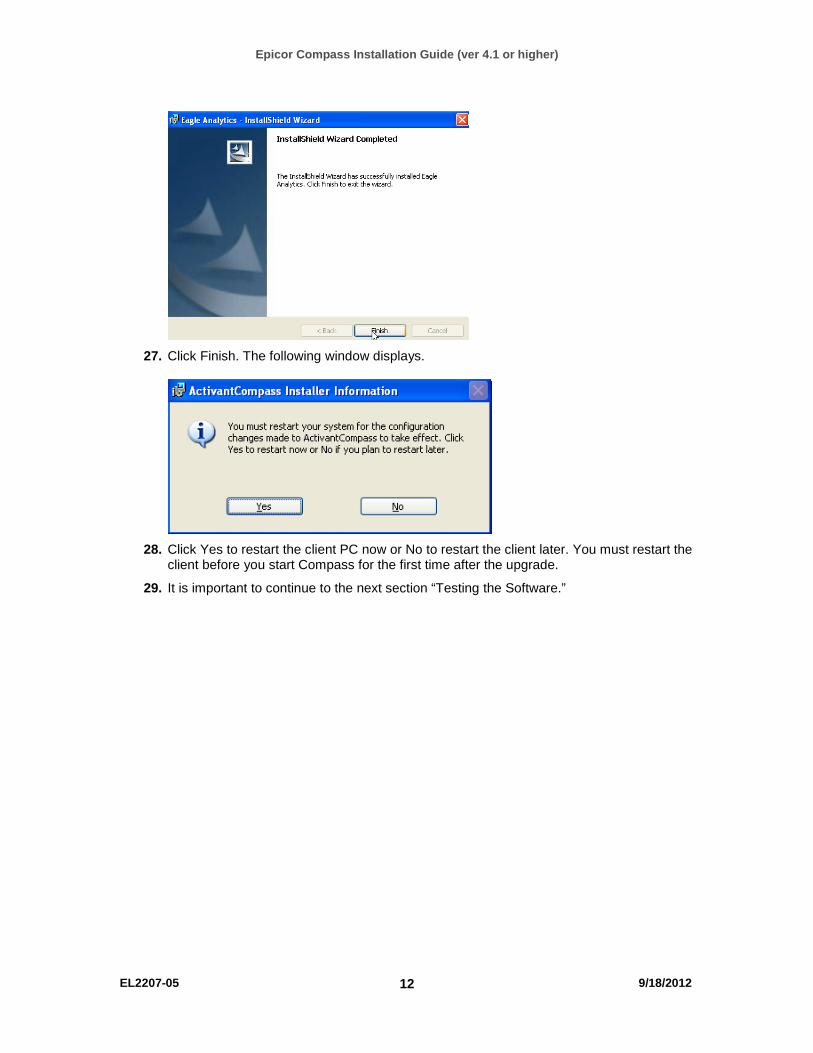
27. Click Finish. The following window displays.
28. Click Yes to restart the client PC now or No to restart the client later. You must restart the
client before you start Compass for the first time after the upgrade.
29. It is important to continue to the next section “Testing the Software.”
Epicor Compass Installation Guide (ver 4.1 or higher)
EL2207-05 9/18/2012
13
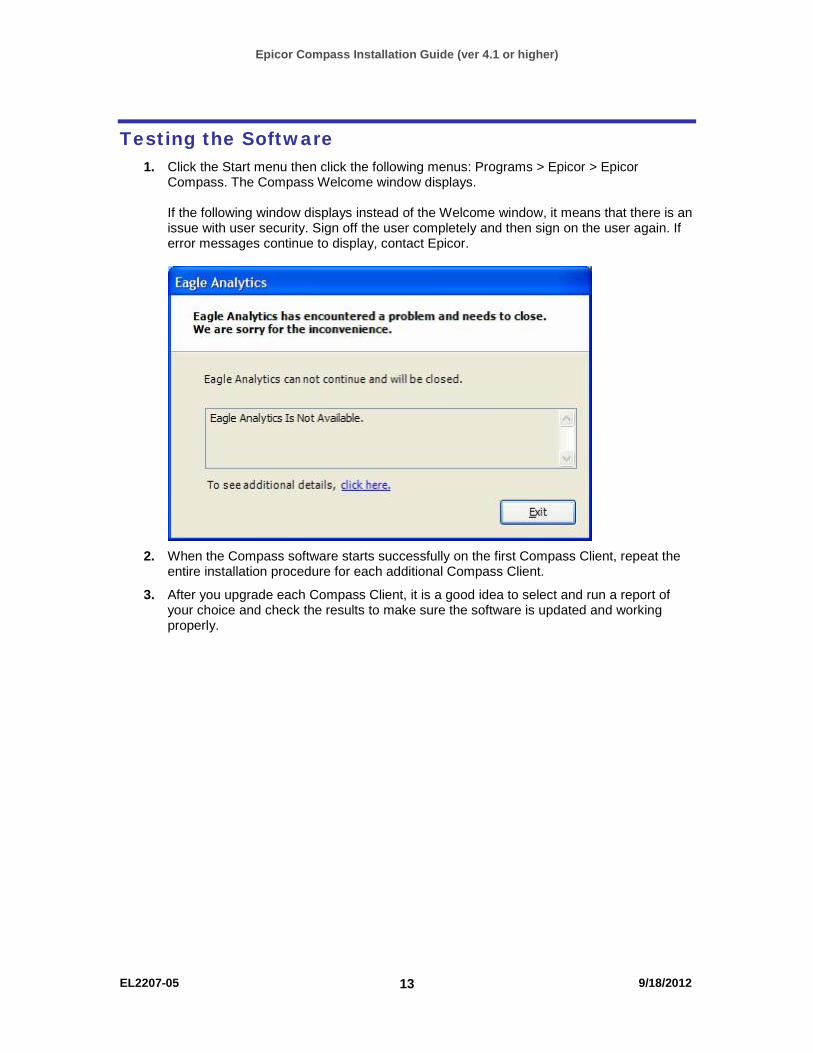
Testing the Software 1. Click the Start menu then click the following menus: Programs > Epicor > Epicor
Compass. The Compass Welcome window displays. If the following window displays instead of the Welcome window, it means that there is an issue with user security. Sign off the user completely and then sign on the user again. If error messages continue to display, contact Epicor.
2. When the Compass software starts successfully on the first Compass Client, repeat the
entire installation procedure for each additional Compass Client.
3. After you upgrade each Compass Client, it is a good idea to select and run a report of your choice and check the results to make sure the software is updated and working properly.

Epicor Compass Installation Guide (ver 4.1 or higher)
EL2207-05 9/18/2012
14
Updating Settings After upgrading, you will need to check and update the settings for the Email and Scheduler on the Compass Client that you designate as the Compass scheduler. This ensures that all automatically delivered reports will be delivered. You find the Email and Scheduler settings in the tabs on the Host Configuration window in Compass. This window allows you to schedule tasks to run then email the results to specific recipients. The Scheduler tab requires a user login and password.
To access this window, click the Start menu, then click the following menus: Epicor > Epicor Compass > Utilities. For more information on setting up scheduled tasks and emails, refer to the Compass Online Help System.

Epicor Compass Installation Guide (ver 4.1 or higher)
EL2207-05 9/18/2012
15
Getting Further Support
Compass Online Help System For instructions on setting up and using the features in Compass, access the Compass online help system. If you would like more information on the new features in the latest version, be sure to review the “What’s New” help topic in the Compass Online Help System.
Training To learn more about the Compass application, Epicor offers the following resources:
Eagle Training Browser—From the Eagle Browser, click the Training link to access the Training Browser. Click the "App Map" link to see what training materials are available for the Compass application. You can also check the web version of the Training Browser. This version of the Training Browser is on the Epicor web site and includes the most recently released training materials. To access the web version, go to www.activant.com and select Eagle from the Customer Login drop-down list. From the Epicor Eagle Customer page, click the link for Learning Solutions, and then click the link for Eagle Training Browser.
eLearning Solutions—Browse the eLearning Solutions pages on the Epicor web site to find any eLearning classes that are available for Compass. To get there, go to www.activant.com and select Eagle from the Customer Login drop-down list. From the Epicor Eagle Customer page, click the link for Learning Solutions.
Professional Services—The Professional Services organization is available to provide customized training for the Compass application and help you create custom Compass queries. To learn more, contact Epicor Direct at (800) 538-8597.

Epicor Compass Installation Guide (ver 4.1 or higher)
EL2207-05 9/18/2012
16
Notes Use this area for your own notes and reminders.