Embed Size (px)
Citation preview

Acquisition and Processing of Bone Mineral Density Scans
Keili Imola MRT(R), ADT

The first step to providing a quality
BMD service to your community…

Quality Technologists!

As a reading physician you should be supportive and demand the most from your technologists in
way of continuing education specific to DEXA. Insist on quality
imaging 100% of the time.

As a technologist, you must be detail oriented, practice your craft,
communicate with your reading physician, stay educated and know that you are not a “button pusher”. You are in control of the quality of
the BMD scans.

Critical Steps before Scanning
• Patient limitations
– Fractures, scoliosis, fusions, degenerative changes
• Previous surgeries
– Hip replacements or fixation hardware, lumbar spine surgeries with or without instrumentation
• Patients weight
– Will you need to change your scan mode to accommodate larger and smaller patients

Critical Steps before Scanning
• Patient Preparation
– Check clothing for metal zippers or button, hard plastic or thick elastic
– remove all items from pockets front and back

Critical Steps before Scanning
• Patient Questionnaire• Gives the technologist information needed prior to
scanning and the reading physician information for reporting
• Provide tech notes for serial exams
Future fracture risk cannot be determined with a DEXA scan alone. The reading physician must be given as much clinical history as possible to give the most accurate report.


Critical Steps before Scanning
Document, document, document!
• Height change
• Weight change over 10%
• Fractures – fragility vs trauma
• Check into patient history on PACS for fractures
• Steroid use – length of time and dosage
• Medications
• etc

Basic Anatomy
Lumbar Spine and Proximal Femur

Lumbar Spine
Transverse Process
Body
Iliac Crest
SpinousProcess
Intervertebral Disc Space
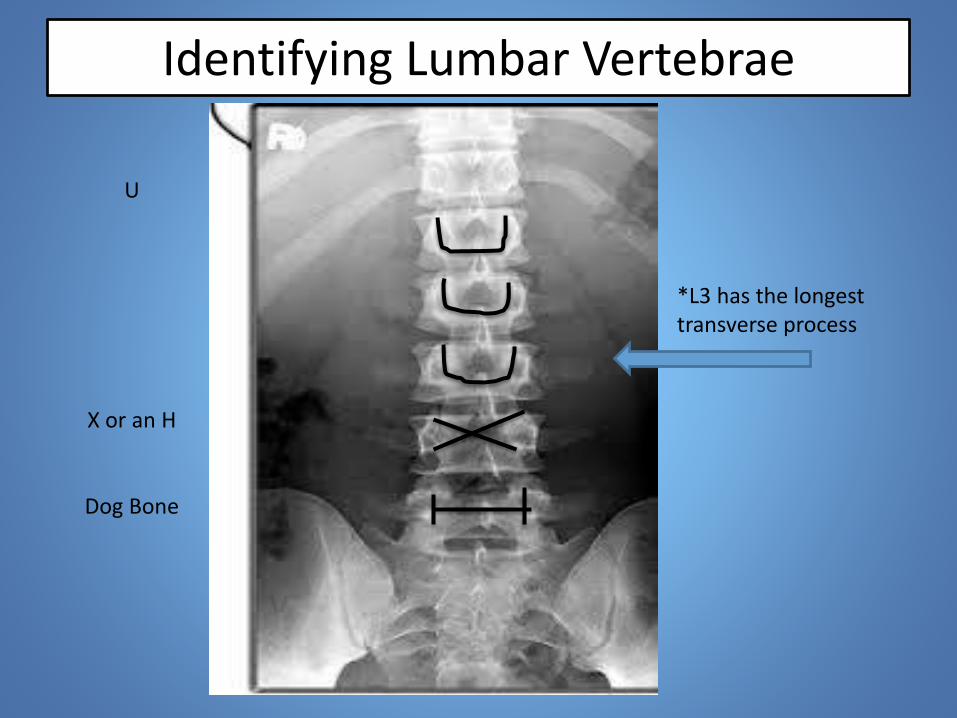
Identifying Lumbar Vertebrae
U
X or an H
Dog Bone
*L3 has the longest transverse process

Proximal Femur
Greater Trochanter
Shaft
Neck
Ishium
Lesser Trochanter

Acquisition of Spine and Proximal Femur
DEXA Scans

Positioning of the Lumbar Spine
• Patient is supine
• Centre patient on the table
• Pillow is under the head not shoulders or upper back. Consider a neck roll for kyphotic patients
• Make sure the hips and shoulders are square to one another
• Ensure that the pelvis is not rotated
• Bend the knees and place the positioning box under the knees. Very important to have the femurs at 90 degrees to reduce lordosis and allow for the best reproducibility for serial exams

Poor box position

Positioning of the Lumbar Spine

Positioning of the Lumbar Spine

Spine Acquisition
• Ensure that all the patient demographics are correct
• Center to the midline 2” below navel
• Choose the proper scan mode
• Want to see iliac crest. Not rotated
• Spine must be centred so even amounts of soft tissue are seen on both sides
• Stop scan if you see movement, artifact or you need to reposition your patient

Spine Acquisition
• Include roughly half of L1 and T12
• Region of Interest (ROI) should include L1-L4
• Always label from the bottom up
• **For serial scans
– You must use the same scan mode
– You must duplicate previous positioning as closely as possible. Always have the previous scan available if not provided in a side by side view on your system
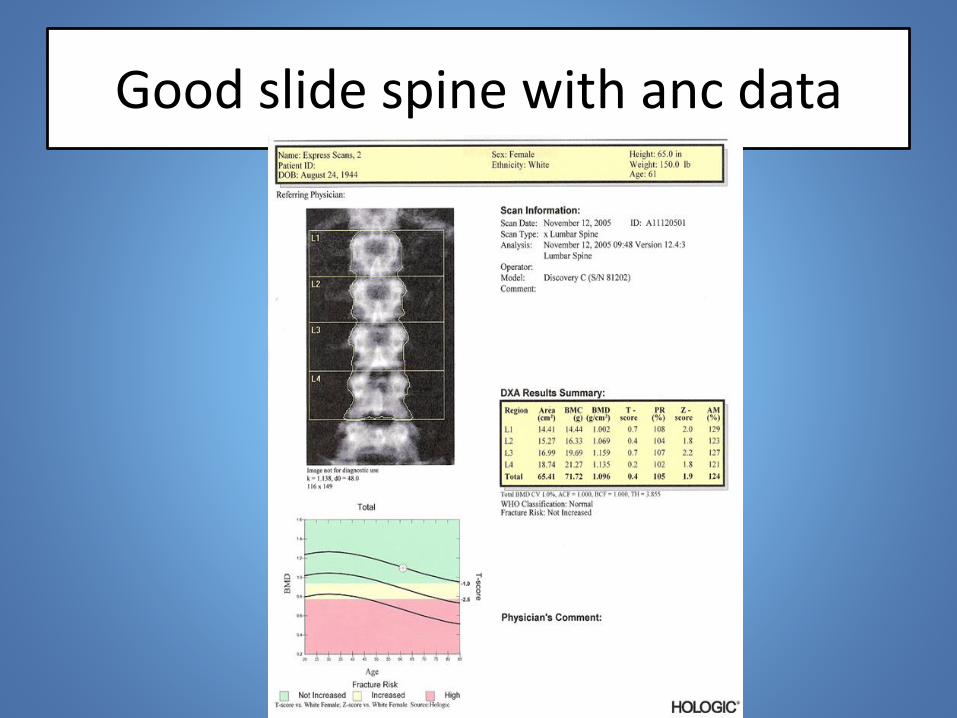
Good slide spine with anc data

Poor Spine Scans

Proximal Femur Acquisition
• Internally rotate the femur 15-20 degrees– Pitfalls include just rotating the foot or rotating
the pelvis
• Use the positioning device
• Ensure that the shaft of the femur runs parallel to the long axis of the table
• Patient may have to retract Pannus fat
• Positioning of the laser varies according to the manufacturer

Patient Position for Proximal Femur

Proximal Femur Acquisition
• Position the laser 3”below the greater trochanter and 1” medial to the femoral shaft
• There should be no abduction or adduction of the femoral shaft
• The lesser trochanter should not be prominent
– Sometimes difficult with men
– Some patients may have limited range of motion

Proximal Femur Acquisition
• Look for artifacts
– Metal objects, wallets, pills, pannus
– **severe OA, bony pathologies
• Stop scan and correct these positioning errors

Proximal Femur

Poor Proximal Femur Scans

Scan Analysis

Spine Analysis
• Your scan will be automatically analyzed by the equipment• Do not assume it is perfect every time
• Review your scan and analysis every time– No motion– No external artifacts – Excellent positioning– Edge detection/bone mapping– Vertebrae labelled correctly– Intervertebral lines properly placed

Incorrect Auto analysis of the Spine

Baseline Spine Analysis
• ROI includes L1-L4
• Adjust bone mapping
– Delete large osteophytes
– Important not to change the bone mapping too much . It will be harder to reproduce on serial exams
• Use the tools provided by your manufacturer
– grey scale, histograms, zoom, inversion, SE/DE

Baseline Spine Analysis
• You must analyze at least 2 consecutive vertebral levels
• You should delete vertebrae
– That appear to be #, loss of height
– With severe degenerative changes
– That contain an artifact
– Vertebrae that differ in t-score from an adjacent vertbrae by more than 1 SD

>1 SD from adjacent vertebra

Baseline Proximal Femur Analysis
• Review your scan for abduction/ adduction, sufficient internal rotation
• Review the auto analysis and correct if needed
• Adjust bone mapping or edges only if required
• HOLOGIC– The upper right corner of the ROI neck box will
just touch the greater trochanter. The other three corners must be in soft tissue. Delete the ischium if needed

Good hologic hip

Baseline Proximal Femur Analysis
• GE LUNAR PRODIGY
– Femoral neck ROI should not include greater trochanter or ishium. Neutralize as need.
• GE LUNAR DPX
– Cannot neutralize the ishium

GE Lunar Prodigy

Serial Spine Scan
• Cannot compare data for a scan done on a different DEXA scanner
• The previous scan should always be in front of you while scanning
• Hologic shows current and previous scans side by side as it scans
• GE has a feature under “Options-Measure” to view the previous scan

Serial Spine Scan
• You should compare the current scan to the previous exam, not the patient’s Baseline scan
– Too many changes can occur from the baseline such as fractures, degenerative changes, body habitus changes
• You must position the patient as closely as possible to the previous positioning.
• You must use the same scan mode

Serial Spine Scan
• Check your vertebral heights
• You may have to change/neutralize you bone mapping to account for osteophytes. Do this as simply as possible as it must be replicated in serial exams
• Document any changes you’ve had to make

Serial Spine Scan
• Check the precision of your area measurement
• The area of the ROI must be within 2% of the previous scan. Can adopt the 1 cm2 rule.
• If there is more than a +/- 2% change in area determine the cause. Is it bone mapping, a new fracture or poor positioning
• Document all changes

Serial Proximal Femur Scan
• Remember to only compare to the previous scan not the baseline
• Is your positioning and scan mode the same as the previous?
• Are there any artifacts on the current scan
• The neck box ROI must match on angle, position and size

Serial Proximal Femur Scan
• The area of the Total Hip must have precision within 2% of the previous. Can adopt the 0.6 cm2 rule
• *for GE if any changes are made to the bone mapping you must use the Search icon . The software will adjust the ROI to find the lowest area of BMD

Total Area of Proximal Femure

Precision
• What is Precision?
– Precision is the ability to reproduce the same BMD value in repeated measurements
– It is our goal to maintain that precision
• Keep in mind, precision cannot assure the measurement of true value

Why is Area Precision Important
BMD=BMC/Area
%BMD ch.=BMC/%Area ch.
If you had a 1.0 gm/cm2 BMD value then a change in area by 2% will change the BMD value by 2%

Precision
• Remember Least Significant change (LSC)
• If you are not falling within the 2% precision, you could be changing the BMD result of your patient significantly enough that it is higher than the LSC and will be reported a change in BMD for your patient
• A lack of area precision can lead to inaccurate reporting in Rate of Change of BMD

Conclusion
• Quality Technologists
• Quality Clinical History
• Quality positioning
• Quality attention to detail
• PRECISION, PRECISION, PRECISION
• Quality documentation
• Quality reporting