Embed Size (px)
Citation preview

www.acoaus.com.au/cablemate
79
ACO CABLEMATE®
2. Installation
Once an appropriate location for a cable enclosure is determined and the conduit installed, preparations can be made for digging. Investigate whether other underground services exist.
In Australia, ACO recommends contacting ‘Dial Before You Dig’ on 1100 or visiting their website at www.1100.com.au.
Designers and contractors must observe the regulations and codes of practice legislated by the electrical safety act and refer to ACO’s standard installation drawings on pg 84.
Adverse ground conditions may require an increase in these dimensions and/or the addition of reinforcement. If in doubt, engineering advice should be sought.
a. Cable Pits
The following is a basic methodology for installing cable pits. If a degree of weather proofing is required, visit www.acoaus.com.au/cablemate for specific details.
1. Before installation, mark all conduit entries on pit walls.
2. Using holesaw of required size, cut out conduit entries. (See accessories pg 43).
3. Excavate greater than overall dimensions of the pit (refer to ACO’s excavation guide for minimum dimensions - pg 82).
4. Remove all loose material from excavation. Level and compact base. ACO recommends compaction to 95% RDD (Relative Dry Density).
5. Install pit on a stiff wet concrete base with a minimum depth of 50mm. Higher load classes will require more concrete. A minimum concrete strength of 25MPa is recommended.
If using standard lids, ensure top of pit is level with the finished pavement level. If access covers are used, top of the pit must be set down beneath pavement. See standard installation drawings on pg 84.
6. Connect conduit to the pit, flush with
inside wall so clear working area of the enclosure is not impeded. Conduits must have sharp edges removed from their internal surfaces.
If a bellmouth conduit fitting is required for drawing operations (pg 12), an appropriate sized hole should be cut and the bellmouth fitting is then epoxy glued onto the pit. The outside of pit should be reinforced around the bellmouth to ensure bellmouth/pit joint is not damaged when the cable is pulled.
ACO does not recommend the use of bellmouths for plastic pits.
7. For multiple conduit entries, ACO recommends a concrete haunch around all pipes to preserve pit rigidity. Minimum of 100mm concrete encasing is recommended around pipes and 200mm measured out from the pit wall (pg 20).
8. Seal pit and pipe connection with a proprietary sealant to prevent ingress of moisture and silt into pit during service.
9. Place lid into the rebate of pit before backfilling.
For Class A applications, backfill using sand or clean fill and lightly compact at 300mm increments. Note, if using plastic pits, do not over compact as this can lead to pit walls deforming.
For Class B applications, a concrete collar (at least) is required for paved, concreted and asphalted pavements with a minimum width and depth of 150mm. A minimum concrete strength of 25MPa is recommended.
For applications defined as Class C and above, concrete is required to encase all of the pit and access cover. In these instances, plastic pits are not recommended.
The visible/trafficable surface of the cement concrete surround (or pavement if asphalted to the edge of the pit/duct) must be finished flush with the pit/cover edge.
For installation illustrations for cable pit systems see pg 84 or for full installation details visit
www.acoaus.com.au/cablemate

80
Supporting Information
2. Installation cont’d.
Access Cover Systems
If an access cover is used, it must be installed directly above the pit (pg 84)i. Form the rebate to size (to support
the frame)ii. Position the access cover in rebateiii. Check the unit is level and does not
rockiv. Pour & vibrate the concrete around
the access cover and in the cover (if a concrete filled recessed cover is used)
v. Level and finish concrete, lay pavers or pavement materials. Urbanfil®/Pavermate® covers are to be filled with concrete to a minimum depth of 45mm as concrete is integral to the strength of these covers. ACO does not recommend tiles deeper than 25mm in Urbanfil® covers and pavers more than 40mm deep in Pavermate® covers.
Recessed pan depths; - Urbanfil® - 85mm, - Pavermate® - 135mm, - Rhinocast® - either 12mm or 40mm
dependent on steel edging height. Refer to notes beneath parts list table
vi. Allow concrete to cure before removing cover – early removal may cause twisting of the frame
ACO sells a wide range of lifting keys dependent on the lid or cover type. Refer to accessories on pg 43.
For full installation details visit www.acoaus.com.au/cablemate
Pit Drainage
Conduits are generally installed with slope allowing water to drain into cable pits which are positioned at sag points along a cable route. Cable pits are generally not supplied with waterproof covers. To minimise the amount of standing water in the enclosure and in the conduits, a drainage point should be connected from the base of the pit to a suitable soakaway. All ACO cable pits are supplied with either a preformed hole (plastic pits) or a drillout hole in the base of polymer concrete pits. Holes are typically 25mm diameter or similar.
In some applications, telecommunication carriers may require up to a 300mm clearance below the lowest conduit entry for drainage purposes.
For landscaped applications, where only foot traffic is anticipated, it is recommended that at least 150mm of a gravel base is laid at the bottom of the pit. ACO recommends compaction no less than 60% RDD. The gravel acts as a drain and will help prevent the enclosure from sinking.
Conduits entering buildings should be installed to stop liquid from draining into the building. The simplest method is to make the exit end of the conduit (inside the building) higher than the external entry, while still applying sealing around the penetration of the building and within the pit wall.
Pit drainage with soakaway.
Landscape pit drainage.

www.acoaus.com.au/cablemate
81
ACO CABLEMATE®
b. Surface Cable Ducting
Ducting channels are installed in a continuous trench run, and are usually fully encased in concrete.
1. Excavate greater than the overall dimensions of the ducting channel (refer to ACO’s excavation guide for minimum dimensions - pg 83).
2. Lay out ducting channels near the trench.
3. Ducting channels need to be supported at the correct height and held securely in place during the concrete pour.
4. To finish installation, pour concrete evenly either side of the trench. The top of the adjacent pavement should be above the lid level by approximately 3mm.
For installation illustrations for surface ducting systems see pg 84 or for full installation details visit www.acoaus.com.au/cablemate
c. Access Holes & Trunking Systems
Maintenance holes and cable trunking systems are usually fabricated on site or supplied as precast reinforced structures. ACO’s access covers are designed to be installed above them in a multipart or trench run configuration (trench run multiparts).
For a customised recommendation and full installation details contact ACO or visitwww.acoaus.com.au/cablemate
Cast-in-situ enclosure
Rhinocast® Trench run multipart
Cable trunking system

82
Polymer Concrete Pits1 D E F G H I 2
Type 33Type 45Type 66Type 66HType 99Type 52Type 63Type 95Type 96Type 8
5407108708701210710850118012001600
5407108708701210420500720900780
54070072010206805408406907201000
6408109709701310810950128013001700
64081097097013105206008201000880
150150150150150150150150150150
Plastic Pits1 D E F G H I 2
Type 1Type 2Type 3Type 4Type 5Type 6Type 7Type 8Type 9Type 43Type 53Type 55Type 77
7208607709209201580122015802240630740760910
440490540610670770770770770630500760910
5006806309007407701250990990710560610760
8209608701020102016801320168023407308408601010
5405906407107708708708708707306008601010
150150150150150150150150150150150150150
F
D & E
Supporting Information
3. Excavation GuideDimensions shown indicate minimum material to be excavated. (To be read in conjunction with pg 84/85). Class A & B
(without collar)Class A & B (with collar)
Polymer Concrete Pits1 D E F G H I 2
Type 33Type 45Type 66Type 66HType 99Type 52Type 63Type 95Type 96Type 8
5407108708701210710850118012001600
5407108708701210420500720900780
54070072010206805408406907201000
9009001050105013509001050135013501750
8608801030103013308608608801030900
150150150150150150150150150150
Plastic Pits1 D E F G H I 2
Type 1Type 2Type 3Type 4Type 5Type 6Type 7Type 8Type 9Type 55Type 77
7208607709209201580122015802240760910
440490540610670770770770770760910
5006806309007407701250990990610760
9001050103010801080175016001750232010501200
860860860860860900105090090010301180
150150150150150150150150150150150
Class A & B (with collar)
Cable Pit & Lid Systems
Cable Pit with Access Cover Systems
G & H
F
D & E
I
G & H
F
D & E
I

www.acoaus.com.au/cablemate
83
ACO CABLEMATE®
Polymer Concrete Pits1 D E F G H I 2
Type 33Type 45Type 66Type 66HType 99Type 52Type 63Type 95Type 96Type 8
6408109709701310810950128013001700
64081097097013105206008201000880
59075077010707305908907407701050
9709701120112014909701120142014201790
9709701120112014209709709701120970
200200200200200200200200200200
Class C & D (with collar)Cable Pit with Access Cover Systems
Polymer Concrete Pits1 D E F G H I 2
Type 33Type 45Type 66Type 66HType 99Type 52Type 63Type 95Type 96Type 8
7409101070107014109101050138014001800
7409101070107014106207009201100980
64080082011207806409407908201100
1090109012401240163010901240154015401930
1090109012401240154010901090109012401240
250250250250250250250250250250
Class E, F & G (with collar)
Ducts E F E F E F
CD1215CD2127CD3015
330410530
280390280
n/an/an/a
n/an/an/a
n/an/an/a
n/an/an/a
CS010CS030
360360
300420
460460
350470
560560
400520
CS2000CS2020
460460
390490
560560
440540
660660
490590
CS3000CS3020
560560
500620
660660
550670
760760
600720
Class A & BSurface Cable Ducting
Class C & D Class E, F & G
Note:1. If risers are used, add the following to the depth Type 43, 52, 53, 63 - riser not available Type 55 - 150 mm Type 1, 2, 77 (plastic riser) - 200 mm Type 7, 8, 9 - 400 mm Type 77 (polymer concrete riser) and all other pits - 300 mm 2. If access covers are installed adjacent to pavers, increase excavation depth (I) by the depth of the paver and mortar. (See pg 84/85).
F
E
G & H
F
D & E
I

Technical Bulletin
Bulletin No.: TB200703 Amendment 1 Date: 26 August 2010 Issued By: DC
Page 1 of 2 U:\Technical Services\Internal releases & image data base\Technical Bulletins\TB Drafts\TB200703\TB200703 Amendment 1.doc
ACO Polycrete Pty Ltd 134-140 Old Bathurst Road Emu Plains NSW 2750 Telephone (02) 4747 4000 Facsimile (02) 4747 4040 Email: [email protected]
© 2010 COPYRIGHT ACO POLYCRETE PTY LTD. All reasonable care has been taken in compiling the information in this technical bulletin. All recommendations and suggestions on the use of ACO products are made without guarantee since the conditions of use are beyond the control of the company. It is the customer’s responsibility to ensure that the product is fit for its intended purpose and that the actual conditions of use are suitable. ACO Polycrete pursues a policy of continuous product development and reserves the right to amend specifications without notice.
CUTTING PIPE ENTRIES USING A HOLESAW
– INSTRUCTIONS
Recommended Drill Requirements
Holesaws up to 80mm in diameter • 18V cordless drill - (minimum) • 600W power drill - (minimum)
Holesaws above 80mm in diameter • 800W to 1500W power drill
If using a SDS Plus drill, ensure you have purchased the correct arbour. (Figure 1)
1. Firstly mark out the location for the required penetration. 2. Pre-drill a 12mm pilot hole using a masonry drill bit. (Figure 2) 3. Assemble the components for the holesaw. The pilot drill is a taper lock
style and only requires to be knocked into the arbour to secure it. Use the provided drift key to remove the pilot drill when required.
4. Turn OFF hammer function. Only drilling action is required. The use of
the hammer setting will “blow out” the polymer concrete being cut, and damage the holesaw.
5. Start off drilling by keeping the drill level and use the speed of the drill to
do the cutting. Avoid using excess pressure, let the diamonds do the cutting. (Figure 3)
Figure 1
Figure 2
Figure 3

ACO Polycrete Pty Ltd Technical Bulletin No.: TB200703 Amendment 1 Page 2 of 2 Date: 26 August 2010
6. Once the hole is around 1/3 deep to aid dust clearance and therefore
increase the speed of cut, make small circular motions with the drill. This allows dust to escape easier and can aid in the elimination of jamming the bit in the hole. (Figure 4)
7. The holesaw range has been designed to drill polymer concrete dry.
However it is necessary to cool the diamond cutting edge of the holesaw on a regular basis. For every 1.5 to 2 minutes of drilling, rinse and cool the holesaw in a shallow container of water. This will extend the life of the holesaw; keep the holesaw cutting at a faster rate and will stop the diamonds from ‘glazing’, which simply means they stop biting into the polymer concrete. Remember to shake off excess water before resuming to drill. (Figure 5)
8. Depending on the size of the holesaw used, penetrations should take
between 45 seconds and 3 minutes. This also depends on the wattage and rpm’s of the drill being used. Rpm’s should be started on a slower speed to begin with, building up as you go. The speed can be always be increased as required. (Figure 6)
9. If the holesaws performance starts to slow over time, it may be that new
diamonds need to be exposed and some of the alloy encasing those diamonds needs to be removed. To do this, drill a hole into some waste sandstone, limestone or concrete with sand added to the hole. Use water to irrigate as you drill. These materials are very abrasive and will wear away the old fatigued diamonds and alloy and expose new diamond cutting surfaces. 1 to 4 minutes should be ample time to re-fresh a holesaw.
ACO offers a range of holesaws to facilitate this operation, refer to page 43 in the ACO Cablemate brochure. For pit installation details, refer to page 79 in the ACO Cablemate brochure.
Figure 4
Figure 5
Figure 6
Figure 7

Technical Bulletin
Bulletin No.: TB200604 Amendment 1 Date: 26 August 2010 Issued By: DC
Page 1 of 1 U:\Technical Services\Internal releases & image data base\Technical Bulletins\TB Drafts\TB200604\TB200604 Amendment 1.doc
ACO Polycrete Pty Ltd 134-140 Old Bathurst Road Emu Plains NSW 2750 Telephone (02) 4747 4000 Facsimile (02) 4747 4040 Email: [email protected]
© 2010 COPYRIGHT ACO POLYCRETE PTY LTD. All reasonable care has been taken in compiling the information in this technical bulletin. All recommendations and suggestions on the use of ACO products are made without guarantee since the conditions of use are beyond the control of the company. It is the customer’s responsibility to ensure that the product is fit for its intended purpose and that the actual conditions of use are suitable. ACO Polycrete pursues a policy of continuous product development and reserves the right to amend specifications without notice.
CUTTING & JOINING PIPE ENTRIES
– INSTRUCTIONS
1. Mark all pipe entries on the pit and/or riser walls or use the preformed standard pipe entry guides/plastic inserts on the pit walls as a guide (Figure 1 & 2).
2. If multiple pipe entry is required, refer to the relevant regulatory authority
for minimum cable separation spacings. ACO recommends a minimum of 50mm between penetrations to avoid local cracking.
3. Using a diamond tip holesaw of required size, remove the pit wall to fit
the pipe (Figure 3). ACO offers a range of holesaws to facilitate this operation, refer to page 43 in the ACO Cablemate brochure.
4. A small diameter masonry grinder may be used to enlarge the opening
for pipes entering the pit at an angle. 5. For multiple pipe entries, ACO recommends a concrete haunch around
the all the pipes to preserve pit rigidity. Minimum of 100mm concrete encasing is recommended around the pipes and 200mm measured out from the pit wall. Concrete to be fully compacted and of grade 25MPa*. (Figure 4)
6. Install the pit and pipe. Cut the pipe flush with the inside wall of the pit so
that the clear working area of the pit is not impeded. 7. Seal connection with a proprietary cementitious sealing compound to
prevent ingress of moisture into the pit during service. For pit installation details, refer to page 79 in the ACO Cablemate brochure. * Adverse ground conditions may require an increase in these dimensions and/or the addition of reinforcement. If in doubt, engineering advice should be sought.
Figure 1
Figure 2
Figure 3
Figure 4
Standard Pipe Entry Guides
Plastic Insert

Technical Bulletin
Bulletin No.: TB200503 Date: 6 December 2005 Issued By: DC
Page 1 of 4 U:\USERS\Laurissa\Internal Marketing\ACO INFO\marketing channels\Technical Bulletins\TB Drafts\TB200503\TB200503 .doc
ACO Polycrete Pty Ltd 134-140 Old Bathurst Road Emu Plains NSW 2750 Telephone (02) 4747 4000 Facsimile (02) 4747 4060 Email: [email protected]
© 2005 COPYRIGHT ACO POLYCRETE PTY LTD. All reasonable care has been taken in compiling the information in this technical bulletin. All recommendations and suggestions on the use of ACO products are made without guarantee since the conditions of use are beyond the control of the company. It is the customer’s responsibility to ensure that the product is fit for its intended purpose and that the actual conditions of use are suitable. ACO Polycrete pursues a policy of continuous product development and reserves the right to amend specifications without notice.
RHINOCAST – DUCTILE IRON ACCESS COVERS
– INSTALLATION GUIDE
Installation of Single, 2 and 3 Part Cover Systems
Single Part Covers 2 Part Cover 3 Part Cover
Identification and Preparation 1. Form the access pit and rebate to the size required. See Figures 5, 6 & 7 for the recommended rebate
dimensions for the required load class. 2. Remove all the dust caps and locking bolts from the covers and remove the covers from the frame using the
appropriate Rhinocast lifting key. See Figures 8, 9 & 10 for the different Rhinocast lifting key options. 3. For 2 part or 3 part covers, mark the frame & covers at the lifting end to ensure that covers are reinstalled in
the same position. The marks on the frame should line up with the lifting key holes. 4. Position the frame in the rebate and ensure that the lifting end of the frame is not obstructed by a wall,
bollard etc.; otherwise cover removal will be restricted after installation. The frame must not protrude into the pit opening.
5. Pack under the corner of the frame joints to raise the level of the frame to the finished floor level. Ensure the packing does not protrude into the pit opening. For 2 and 3 part cover systems, pack under the additional frame joints to prevent the frame from sagging.
6. Set up the internal formwork to ensure that the frame will be fully supported after the concrete pour. For Class D and Class G covers block out the holes in the cover with metal sheeting.
7. Thoroughly clean the seat areas of the covers and frame. It is important that these surfaces are dirt and dust free.
8. Using the marks on the frame and covers (Step 3), place the covers back into the frame ensuring that the top edges of the frame and cover are level with each other. Check the covers for any diagonal rocking movement and adjust the packing under the frame where required. It is critical that the covers are properly seated in the frame and are not obstructed by any internal formwork.
9. Check that the top level edges of the covers and frame are level over the entire perimeter of the access cover. If the covers are not level, the covers and frame seats may not be dirt and dust free (Step 7) and/or the frame is damaged.
10. Replace all the dust caps in the covers. Note: For Class D to Class G installations reinforcing may be required in the rebate under the frame. The
reinforcement should be installed to the engineer’s details.

ACO Polycrete Pty Ltd Technical Bulletin No.: TB200503 Page 2 of 4 Date: 6 December 2005
Concrete Pour 11. Simultaneously fill the rebate gap, cellular frames and recessed covers with concrete as specified in Table 1. 12. Tap the covers and frame to ensure that the concrete is well compacted and the frame is fully supported.
Ensure all cavities and pockets are completely filled with concrete. 13. Screed off the excess concrete and finish the surface as required. The edges of the cover and frame
should be visible. 14. Concrete must be allowed to cure for at least 24 hours before removing the covers from the frame. Early
removal of the covers may cause twisting of the frame and damage to the supporting concrete. This may prevent covers from fitting back into the frame.
15. After the concrete has cured, remove the covers and strip the internal formwork. 16. Clean the seat area of the covers and frame. It is important that these surfaces are dirt and dust free. 17. Liberally apply sealing grease to the seat area of the covers and frame. This should be done periodically to
assist in the maintenance procedure. 18. Using the marks on the frame and covers, place the covers back into the frame. 19. Tap down on the keyholes with a rubber mallet until the top of the covers are level with the top of the frame. 20. Replace all the locking bolts and dust caps in the covers.
Installation of Multi-part Cover Systems
Identification and Preparation 1. Using ACO’s Multipart Cover Rebate Detail provided
(example shown in Figure 1), form the access pit and rebate. Ensure that the pit clear opening, beam pockets and pit wall rebates are consistent with the detail. The numbering system on the drawing represents the position and order of installation of the covers. The frames and beams are numbered to help locate the covers, see Figures 2 & 3.
2. The frame is delivered in sections. Ensure the end frame (containing the beam locating boxes) components mate with the side frame components.
Multi-part Cover
3. Set the end frames so that the beam locating boxes are positioned with the corresponding beam pocket/s in the slab. Ensure all the undercut frames are installed at one end and the drawcut frames are installed at the opposite end, see Figure 11. Pack under the corner of the frame joints to raise the level of the frame to the finished floor level. Leave a clearance of 50mm between the concrete beam pocket/s and the beam locating boxes.
4. Place the side frames into position and bolt (finger tight) to the end frames. Ensure that the frames are level and square. Check carefully along the frames and across the diagonals. Surveying equipment is recommended. Ensure the frames and packing pieces do not protrude into the clear opening of the pit.
5. Lower the beams into the corresponding boxes.
6. Set up the internal formwork to ensure that the frame will be fully supported after the concrete pour. For Class D and Class G covers block out the holes in the cover with metal sheeting.
Figure 1 – Multi-part Cover Rebate Detail
7. Place the covers into the frame according to the numbering system (Step 1), ensuring that the top edges of the frame and covers are level with each other. Check the covers for any diagonal rocking movement and adjust the packing under the frame where required. It is critical that the covers are properly seated in the frame and are not obstructed by any internal formwork.
8. Check that the top edges of the covers and frame are level over the entire perimeter of the multi-part system. 9. Remove covers to access the (finger tight) bolts and tighten with a wrench. Repeat steps 7–9. 10. Replace all the dust caps in the covers.

ACO Polycrete Pty Ltd Technical Bulletin No.: TB200503 Page 3 of 4 Date: 6 December 2005
Concrete Pour Follow concrete pour procedure for single, 2 and 3 part cover systems.
Figure 2 – Frame Sections & Beams are Numbered Figure 3 – Multi-part System Setup Key Installation Requirements Clear Opening The clear opening is the unobstructed opening inside the frame, see Figure 4. The clear opening of the frame must be equal to or larger than the clear opening of the pit. Dimensions Dimensions are given as width (W) by length (L). Refer to ACO Access brochure for the complete dimensions of all the Rhinocast covers available.
Figure 4 – Clear Opening
Rebate Dimensions To support the anticipated loads, the rebate must be cast according to Figures 5, 6 & 7. For covers with decorative edging add the height of the edging to the recommended rebate depths. The dimensions shown are the recommended minimum amount of concrete required to fully support the frame. Reinforcing may be required in the rebate under the frame. The reinforcement should be installed to the engineer’s details.
Figure 5 – Class B Rebate Figure 6 – Class D Rebate Figure 7 – Class G Rebate
Concrete Specification • Minimum compressive strength of 32 MPa at 28 days • Minimum cement content of 400 kg/m3 • Aggregate size: 10-13mm
Table 1 – Concrete Specification
ACO Polycrete Pty Ltd Technical Bulletin No.: TB200503 Page 4 of 4 Date: 6 December 2005
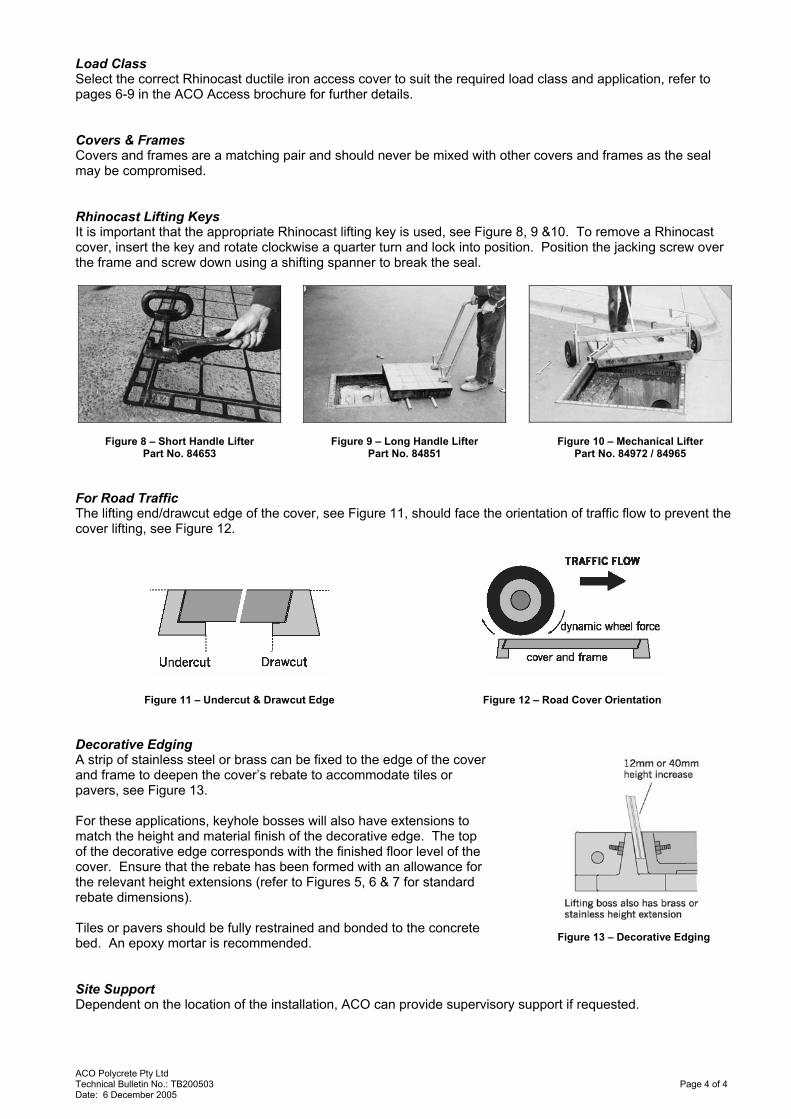
Load Class Select the correct Rhinocast ductile iron access cover to suit the required load class and application, refer to pages 6-9 in the ACO Access brochure for further details. Covers & Frames Covers and frames are a matching pair and should never be mixed with other covers and frames as the seal may be compromised. Rhinocast Lifting Keys It is important that the appropriate Rhinocast lifting key is used, see Figure 8, 9 &10. To remove a Rhinocast cover, insert the key and rotate clockwise a quarter turn and lock into position. Position the jacking screw over the frame and screw down using a shifting spanner to break the seal.
Figure 8 – Short Handle Lifter Part No. 84653
Figure 9 – Long Handle Lifter Part No. 84851
Figure 10 – Mechanical Lifter Part No. 84972 / 84965
For Road Traffic The lifting end/drawcut edge of the cover, see Figure 11, should face the orientation of traffic flow to prevent the cover lifting, see Figure 12.
Figure 11 – Undercut & Drawcut Edge Figure 12 – Road Cover Orientation Decorative Edging A strip of stainless steel or brass can be fixed to the edge of the cover and frame to deepen the cover’s rebate to accommodate tiles or pavers, see Figure 13. For these applications, keyhole bosses will also have extensions to match the height and material finish of the decorative edge. The top of the decorative edge corresponds with the finished floor level of the cover. Ensure that the rebate has been formed with an allowance for the relevant height extensions (refer to Figures 5, 6 & 7 for standard rebate dimensions). Tiles or pavers should be fully restrained and bonded to the concrete bed. An epoxy mortar is recommended.
Figure 13 – Decorative Edging
Site Support Dependent on the location of the installation, ACO can provide supervisory support if requested.

Technical Bulletin
Bulletin No.: TB200701 Date: 14 June 2007 Issued By: DC
Page 1 of 4 T:\Internal Marketing\ACO INFO\Internal Marketing History\ACO INFO\marketing channels\Technical Bulletins\TB Drafts - Darren\TB200701\TB200701.doc
ACO Polycrete Pty Ltd 134-140 Old Bathurst Road Emu Plains NSW 2750 Telephone (02) 4747 4000 Facsimile (02) 4747 4060 Email: [email protected]
© 2007 COPYRIGHT ACO POLYCRETE PTY LTD. All reasonable care has been taken in compiling the information in this technical bulletin. All recommendations and suggestions on the use of ACO products are made without guarantee since the conditions of use are beyond the control of the company. It is the customer’s responsibility to ensure that the product is fit for its intended purpose and that the actual conditions of use are suitable. ACO Polycrete pursues a policy of continuous product development and reserves the right to amend specifications without notice.
URBANFIL – GALVANISED STEEL ACCESS COVERS
– INSTALLATION GUIDE
Installation of Single Part Covers and Trench Run Systems
Single Part Cover 2 Part Cover
Identification and Preparation 1. Form the access pit and rebate to the size required. See Figures 7, 8 & 9 for the recommended rebate
dimensions for the required class load. 2. Remove all the dust caps and locking bolts from the covers and remove the covers from the frame. 3. Position the frame centrally over the clear opening in the rebate. The frame must not protrude into the pit
opening.4. Pack under the corners of the frame to raise the level of the frame to the finished floor level. Ensure the
packing does not protrude into the pit opening. For trench run systems, pack under the additional frame joints to prevent the frame from sagging.
5. Set up the internal formwork to ensure that the frame will be fully supported after the concrete pour. 6. Thoroughly clean the seat areas of the covers and frame. It is important that these surfaces are dirt and
dust free. 7. Place the covers back into the frame ensuring that the top edges of the frame and cover are level with each
other. Check the covers for any diagonal rocking movement and adjust the packing under the frame where required. It is critical that the covers are properly seated in the frame and are not obstructed by any internal formwork.
8. Insert the plastic spacing pieces, one at the centre of each side between the cover and the frame at the top surface level. This is to ensure that clearance is maintained during the concrete pour.
9. Replace all the locking bolts and dust caps in the covers. 10. Check that the top level edges of the covers and frame are level over the entire perimeter of the access
cover. If the covers are not level, the covers and frame seats may not be dirt and dust free (Step 6) and/or the frame is damaged.
11. Prior to the concrete pour, place clear sticky tape over the gap between the cover and frame and the locking recesses to prevent concrete from falling into the gap.

ACO Polycrete Pty Ltd Technical Bulletin No.: TB200701 Page 2 of 4 Date: 14 June 2007
Concrete Pour 12. Fill the rebate gap with concrete as specified in Table 1, to a depth to accommodate the installation of the
floor finish such as tiles or pavers and mortar at a later time. Tap the cover/frame to ensure that the concrete is well compacted. Ensure all cavities and pockets are completely filled with concrete. Allow to set before infilling covers. Take precautions to protect the exposed unit.
13. Fill the cover to a depth to accommodate the installation of the floor finish such as tiles or pavers and mortar at a later time. The cover must be filled with a minimum concrete depth of 45mm and must cover all the reinforcement. Tap the cover/frame to ensure that the concrete is well compacted.
14. The plastic spacing pieces should be removed soon after filling and before concrete hardens. 15. Concrete must be allowed to cure for at least 24 hours before removing the covers from the frame. Early
removal of the covers may cause twisting of the frame and damage to the supporting concrete. This may prevent covers from fitting back into the frame.
16. After the concrete has cured, remove the covers and strip the internal formwork. 17. Clean the seat area of the covers and frame. It is important that these surfaces are dirt and dust free. 18. Replace the cover and all the locking bolts and dust caps. Care must be taken to ensure that the exposed
frame and cover edges are protected against damage. 19. Infill cover with tiles/pavers or other floor finishes. The finished level of the floor finish must be flush with the
top of the cover and frame.
Installation of Multi-part Cover Systems
Identification and Preparation 1. Using ACO’s Multipart Cover Rebate Detail provided (example
shown in Figure 1), form the access pit and rebate. Ensure that the pit clear opening, beam pockets and pit wall rebates are consistent with the detail. The numbering system on the drawing represents the position and order of installation of the covers. The frames and beams are numbered to help locate the covers.
2. The frame is delivered in sections. Ensure the end frame (containing the beam locating boxes) components mate with the side frame components. Multi-part Cover
3. Set the end frames so that the beam locating boxes are positioned with the corresponding beam pocket/s in the slab. Pack under the beam locating boxes and the corner of the frame joints to raise the level of the frame to the finished floor level.
4. Place the side frames into position and bolt (finger tight) to the end frames. Ensure that the frames are level and square. Check carefully along the frames and across the diagonals. Surveying equipment is recommended. The frame and packing must not protrude into the pit opening.
5. Lower the beams into the corresponding boxes. Set up the internal formwork to ensure that the frame will be fully supported after the concrete pour.
6. Place the removable cross bars into position. Remove all the dust caps and locking bolts from the covers.
7. Place the covers into the frame according to the numbering system (Step 1), ensuring that the top edges of the frame and covers are level with each other. Check the covers for any diagonal rocking movement and adjust the packing under the frame where required. It is critical that the covers are properly seated in the frame and are not obstructed by any internal formwork.
Figure 1 – Multi-part Cover Rebate Detail
8. Insert the plastic spacing pieces, one at the centre of each side, between the covers and between the cover and frames at the top surface level. This is to ensure that clearance is maintained during the concrete pour.
9. Check that the top edges of the covers and frame are level over the entire perimeter of the multi-part system. 10. Tighten the (finger tight) bolts joining the frames with a wrench. Replace all the locking bolts and dust caps
in the covers. 11. Prior to the concrete pour, place clear sticky tape over the gap between the cover and frame and the locking
recesses to prevent concrete from falling into the gap.

ACO Polycrete Pty Ltd Technical Bulletin No.: TB200701 Page 3 of 4 Date: 14 June 2007
Figure 2 – Frame & Beam Figure 3 – Cross Bars Figure 4 – Cover & Frame Figure 5 – Covers Assembled
Concrete Pour Follow concrete pour procedure for single part covers and trench run systems.
Key Installation Requirements
Clear Opening The clear opening is the unobstructed opening inside the frame, see Figure 6. The clear opening of the frame must be equal to or larger than the clear opening of the pit.
DimensionsDimensions are given as width (W) by length (L). Refer to ACO Access brochure for the complete dimensions of all the Urbanfil and Pavermate covers available.
Figure 6 – Clear Opening
Rebate Dimensions To support the anticipated loads, the rebate must be cast according to Figures 7, 8 & 9. ACO’s standard installation recommendations can be downloaded from ACO’s website: http://www.acoaus.com.au/install_drawings_access.htm
Figure 7 – Class A Rebate Figure 8 – Class B Rebate Figure 9 – Class C Rebate
Concrete Specification Minimum compressive strength of 32 MPa at 28 days Minimum cement content of 400 kg/m3
Table 1 – Concrete Specification

ACO Polycrete Pty Ltd Technical Bulletin No.: TB200701 Page 4 of 4 Date: 14 June 2007
Load Class Select the correct Urbanfil galvanised steel access cover to suit the required load class and application, refer to pages 6-9 in the ACO Access brochure for further details.
Covers & Frames Covers and frames are a matching pair and should never be mixed with other covers and frames as the seal may be compromised.
Urbanfil Lifting Keys It is important that the Urbanfil lifting key and locking (14mm allen) key are used, see Figure 10 and 11. To remove an Urbanfil cover, remove the locking bolts using the locking key from each corner and insert two short handle lifting keys in adjacent corners and rotate clockwise a quarter turn. Then lift both lifting keys and slide the cover out. Note square covers will fit diagonally through the frame so care should be taken not to drop the cover through the clear opening.
Figure 10 – Short Handle Lifter Part No. 84306
Figure 11 – Locking (14mm Allen) Key Part No. 84313
Decorative Edging A strip of brass can be fixed to the edge of the cover and frame for an attractive finish, see Figure 12.
For these applications, keyhole bosses will also have extensions to match the decorative edge. The top of the decorative edge corresponds with the finished floor level of the cover.
Infill Materials For Urbanfil covers, a maximum tile depth of 25mm is recommended. For Pavermate covers, a maximum paver depth of 40mm is recommended.
Tiles or pavers positioned on the cover and in the first course outside the frame must be fully restrained and bonded to the concrete bed. An epoxy mortar is recommended.
Figure 12 – Decorative Edging
Site Support Dependent on the location of the installation, ACO can provide supervisory support if requested.


