Embed Size (px)
Citation preview

Acer Classroom Manager
Product Manual – Version 2

Acer Classroom Manager v2
2
Manual COPYRIGHT (C) 2013 NetSupport Ltd. All rights
reserved.
Information in this document is subject to change without notice. NetSupport Ltd reserves the right to revise this document and to make changes from time to time in the content hereof without obligation to notify any person or persons of such revisions or changes.
The software described in this document is supplied under a licence agreement and is protected by international copyright laws. You may copy it only for the purpose of backup and use it only as described in the Licence agreement. Any implied warranties including any warranties of merchantability or fitness for a particular purpose are limited to the terms of the express
warranties set out in the licence agreement. Program COPYRIGHT (C) 1991-2013 NetSupport Ltd. All rights reserved.
Trademarks
NetSupport is a registered trademark of NetSupport Ltd. Windows, Windows 2003/2008/XP/Vista, Windows 7 and 8 are trademarks of Microsoft Corporation.
Other products, trademarks or registered trademarks are the property of their respective owners.

Acer Classroom Manager v2
3
Software Licence Agreement
Please read this agreement before using your copy of this Acer Software application. This
is a legal agreement between you, Acer Incorporated and NetSupport Limited. If you do
not wish to be bound by the terms of this licence agreement you must not load, activate or
use the software.
TERM: Subject to termination under Termination Clause below the licence shall be
perpetual.
GRANT OF LICENCE: Subject to the payment of the applicable licence fees, and subject to
your abidance by the terms and conditions of this agreement, NetSupport Ltd hereby
grants to you a non-exclusive, non-transferable right to use one copy of the specified
version of the software which you have acquired.
USE: The software is licensed with volume use terms specified in the applicable order
acknowledgement, product invoice, licence certificate or product packaging. You may
make, install and use as many additional copies of the software on the number of devices
as the terms specify. You must have a reasonable mechanism in place to ensure that the number of devices on which the software has been installed does not exceed the number
of licenses you have obtained.
SERVER USE: To the extent that the applicable order acknowledgement, product invoice,
product packaging or licence certificate sets forth, you may use the software on a device or
on a Server within a multi-user or networked environment ("Server Use"). A separate
licence is required for each device or "seat" that may connect to the software at any time,
regardless of whether such licensed devices or seats are connected to the software
concurrently, or are actually using the software at any particular time. Your use of software or hardware that reduces the number of devices or seats that connect to and use
the software directly or simultaneously (e.g., "multiplexing" or "pooling" software or
hardware) does not reduce the number of licenses required. Specifically, you must have
that number of licenses that would equal the number of distinct inputs to the multiplexing
or pooling software or hardware "front end"). If the number of devices or seats that can
connect to the software can exceed the number of licenses you have obtained, then you
must have a reasonable mechanism in place to ensure that your use of the software does
not exceed the use limits specified for the licence you have obtained.
COPYRIGHT: This software is protected by international copyright laws. You may copy it only for backup purposes. The software is licensed to you, but not sold to you.
RESTRICTIONS: Neither you nor any reseller may rent, lease, sell licensed copies [on
approval], or otherwise transfer the right to use this software to another person, except
that you may sell or give away your original copy, as long as you do not keep any copies.
The software may not be modified, disassembled or reverse engineered except with the
prior written consent of NetSupport Ltd.
LIMITED WARRANTY: NetSupport Ltd warrants that the software will perform substantially in accordance with the accompanying documentation for a period of ninety (90) days from
the date of purchase. NetSupport's entire liability and your exclusive remedy shall be
either a) the replacement of the defective software or b) return of the price paid. This
remedy shall be at NetSupport's option and subject to proof of purchase from an
authorised source.

Acer Classroom Manager v2
4
Any implied warranties including any warranties of quality or fitness for a particular
purpose are limited to the terms of the express warranties. NetSupport Ltd. Shall not in
any event be liable for loss of profits, data or information of any kind or for special,
incidental, consequential, indirect or other similar damages arising from any breach of
these warranties or use of the software even if they have been advised of the possibility of
such damages. Some countries do not allow the limitation or exclusion of incidental or
consequential damages, so the above limitation or exclusion may not apply to you. This
warranty does not affect your statutory rights, and you may have other rights that vary
from country to country. In any event NetSupport's maximum liability shall not exceed the
price paid by the end-user / licensee.
TERMINATION: You may terminate this licence and this Agreement at any time by
destroying the program and its documentation, together with any copies in any form.
NetSupport Ltd. may terminate this licence forthwith by notice in writing to you if you
commit any serious breach of any term of this licence and (in the case of a breach capable
of being remedied) shall have failed within 30 days after receipt of a request in writing
from NetSupport Ltd. so to do, to remedy the breach (such request to contain a warning
of NetSupport's intention to terminate). Upon termination you will destroy or return to NetSupport Ltd the original and all copies of the software and will confirm in writing to
NetSupport Ltd that this has been done.
SUPPORT: If you have a problem with the installation of the software you should in the
first instance contact your supplier. You can separately purchase support and maintenance
which will also cover the supply of enhancements and upgrades.
GOVERNING LAW: This agreement shall be governed by the laws of England.

Acer Classroom Manager v2
5
Table of Contents What is Acer Classroom Manager? .................................................... 10 Conventions Used .......................................................................... 11 Terminology Used .......................................................................... 11 INSTALLATION ........................................................................... 12 System Pre-Requisites .................................................................... 13 Starting the Installation .................................................................. 15 Creating an administrative (network) installation ............................... 21 Silent Installation ........................................................................... 22
Install Configuration Options Dialog .............................................. 23 Acer Classroom Manager Deploy - Acer Classroom Manager’s Remote Install Utility .................................................................................. 24
Starting Acer Classroom Manager Deploy ....................................... 26 Preparing a Deployment .............................................................. 27 Deploy a Acer Classroom Manager Package .................................... 28 Deploy a Client Configuration ....................................................... 33 Deploy a Acer Classroom Manager Licence file ................................ 34 Remote Uninstall ........................................................................ 35 Pre-Define Settings For A Future Deployment ................................. 37 Log Files .................................................................................... 38
Acer Classroom Manager Deploy - Room Mode................................... 39 STARTING ACER CLASSROOM MANAGER .................................... 41 Starting Acer Classroom Manager..................................................... 41 The Control Window ....................................................................... 43 Tutor Toolbar................................................................................. 48 Student Automatic Login ................................................................. 49 Student Register ............................................................................ 50 Working with Classroom Layouts ...................................................... 55
Setting a background .................................................................. 56 Power Management – Power on/Power off ......................................... 58
Client Power On .......................................................................... 58 Client Power Off ......................................................................... 59
Finding and Connecting to Students ................................................. 60 Class Wizard .............................................................................. 61 Connect to Students using Browse Mode ........................................ 63 Connect to Students using PC Mode .............................................. 64 Connect to Students using User Mode ........................................... 65 Connect to Students via Room Mode ............................................. 65

Acer Classroom Manager v2
6
Creating a class for Students to join (Publish Class) ........................ 67 Class Lists ................................................................................. 69 Client Disconnects from an Active Session ..................................... 70 Configuring Acer Classroom Manager For Subnet Browsing .............. 71 Understanding IP Addresses ......................................................... 73 Implementing Acer Classroom Manager in a Terminal Server Environment .............................................................................. 75 Installing and Configuring the Acer Classroom Manager Classroom Assistant ................................................................................... 76 Installing and configuring the Acer Classroom Manager Student for Android ..................................................................................... 79 Licencing for Tablets ................................................................... 80
Using Acer Classroom Manager in a wireless classroom ....................... 81 Using a Name Server/Gateway to Find Student PCs ............................ 83
Installing & Configuring a Name Server ......................................... 84 Gateway Configuration – General Properties................................... 85 Gateway Configuration – Creating Keys ......................................... 87 Gateway Configuration Utility - Licenses Tab .................................. 88 Gateway Configuration Utility - Security Tab .................................. 89
Working with Groups ...................................................................... 90 Group Leaders ............................................................................ 92
Customise Client and Group Icons .................................................... 95 USING ACER CLASSROOM MANAGER .......................................... 96 Locking Student Controls and Blanking Student Screens ..................... 97
To blank a Student’s screen when locked ....................................... 97 To display a graphic when locking a Student workstation ................. 98
Viewing Student screens ............................................................... 100 Blanking the Clients screen while Viewing .................................... 103 Sending Ctrl+Alt+Delete while viewing ........................................ 103 Viewing multiple screens simultaneously...................................... 103
Blank All Client Screens ................................................................ 104 Remote Clipboard ........................................................................ 105 Scanning Students ....................................................................... 107
Scanning multiple screens simultaneously .................................... 109 Monitor Mode .............................................................................. 112 Messenger Monitoring ................................................................... 115
View Instant Messenger History .................................................. 117 Keyboard Monitoring .................................................................... 119

Acer Classroom Manager v2
7
Setting up Word Lists ................................................................ 121 View Typing History .................................................................. 123
Screen Capture ............................................................................ 125 Capture a Students screen whilst Viewing .................................... 125 Capture a Students screen whilst Scanning .................................. 126
Showing to Students .................................................................... 127 Show Leader ............................................................................ 132 Exhibit - Showing a Student's screen on Student screens ............... 134
Interactive Whiteboard ................................................................. 136 Annotating Screens ...................................................................... 139
Annotate Toolbar ...................................................................... 140 Audio Monitoring .......................................................................... 142 Using Audio Support ..................................................................... 146
The Announce Function ............................................................. 146 Using Audio while Viewing ......................................................... 147 Using Audio while Showing ........................................................ 147 Adjusting Audio settings ............................................................ 148
Acer Classroom Manager Video Player ............................................ 149 Play a Video file on a workstation ............................................... 150 Playing Videos via Explorer ........................................................ 150 Acer Classroom Manager Video Player Control Panel ..................... 151
Using Replay Files ........................................................................ 153 Record Replay Files For All Students ............................................ 154 Record Replay Files for Individual Students .................................. 155 Record Replay Files at the Tutor ................................................. 155 Watching Replay Files................................................................ 157 Replay Window - Control Panel ................................................... 158 Showing Replay Files to Students ............................................... 160 Converting Replay Files to Video Files .......................................... 161
Show Application ......................................................................... 162 Chatting to Students .................................................................... 163
The Chat Window ...................................................................... 165 Sending a Message to Students ..................................................... 167
Send a message whilst Viewing .................................................. 168 Creating Preset Messages .......................................................... 168
Help Requests ............................................................................. 170 Transferring Files ......................................................................... 172 Distributing Files .......................................................................... 175
Acer Classroom Manager v2
8
Sending and Collecting Work ......................................................... 178 Remotely Launching applications on Student workstations ................ 183 User Defined Tools ....................................................................... 187 Rebooting or Logging out Students ................................................. 189 Web Control Module ..................................................................... 190
Setting up an Approved or Restricted Web Site List ....................... 195 View Web History ..................................................................... 201
Co-Browser ................................................................................. 203 Using the Co-Browser ................................................................ 204 Lock/Unlock Students in the Co-browser ...................................... 205
Application Control Module ............................................................ 207 Setting up Approved or Restricted Applications ............................. 212 View Application History ............................................................ 216
Student Surveys .......................................................................... 218 Survey Lists ............................................................................. 221
Question and Answer Module ......................................................... 224 Question and Answer Module - Tutor Interface ............................. 228 Using the Question and Answer Module ....................................... 230 Question and Answer Team Mode ............................................... 232
Printer Management ..................................................................... 234 Using Print Management ............................................................ 236 View Print History ..................................................................... 239
Device Control ............................................................................. 241 Tutor Profiles ............................................................................... 244 Manage Student Resources ........................................................... 246 Student Journal ........................................................................... 247 Lesson Planner ............................................................................ 251 Student Toolbar ........................................................................... 253 Student Rewards.......................................................................... 256 CONFIGURING THE STUDENT WORKSTATION .......................... 257 Network Settings ......................................................................... 258 Room Settings ............................................................................. 259 Security Settings.......................................................................... 260 Audio Settings ............................................................................. 262 User Interface Settings ................................................................. 263 Advanced Settings ....................................................................... 265 Student Journal Settings ............................................................... 268 Terminal Services Settings ............................................................ 269 CONFIGURING THE TUTOR WORKSTATION .............................. 271 Start Options ............................................................................... 272

Acer Classroom Manager v2
9
Tutor Startup Restrictions ............................................................. 273 Network and Wireless Settings ....................................................... 275 Performance Settings ................................................................... 278 Student Selection ......................................................................... 279 Administration - Security Settings .................................................. 281 Administration - Profiles ................................................................ 283 CONFIGURING REMOTE CONTROL SETTINGS ........................... 286 Tutor View Settings ...................................................................... 288 Tutor Keyboard/Mouse Settings ..................................................... 291 Replay File Settings ...................................................................... 293 Audio Settings ............................................................................. 294 Tutor File Transfer Settings ........................................................... 296 Tutor User Interface Settings ......................................................... 299 Student User Interface Settings ..................................................... 301 Classroom Assistant Settings ......................................................... 302 Group Leader Settings .................................................................. 304 Student Toolbar Settings ............................................................... 305 Tutor Journal Settings .................................................................. 306 Show Settings ............................................................................. 308 TECH CONSOLE ......................................................................... 310
Hardware and Software Inventory .............................................. 313 Policy Management ................................................................... 315 Student Security Settings .......................................................... 317 Remote Command Prompt Window ............................................. 319
TESTING MODULE .................................................................... 320 The Test Designer ........................................................................ 321
The Questions Interface ............................................................. 323 The Exam Interface ................................................................... 341 Setting Up User Accounts .......................................................... 348 Admin Options .......................................................................... 349 Import/Export Data ................................................................... 350
The Testing Console ..................................................................... 351 Running an Exam ..................................................................... 351 Test Reports Window ................................................................ 354
The Test Player ............................................................................ 356 Index ....................................................................................... 358

Acer Classroom Manager v2
10
What is Acer Classroom Manager?
Acer Classroom Manager is the class-leading training software solution, providing teachers with the ability to instruct and visually/audibly monitor, as well as interact with their students, individually, as a pre-defined group or to the whole class. Rising to the challenge and requirements of today’s modern classroom, Acer Classroom Manager provides the ability to deliver lesson content,
simultaneously monitor all student PCs and work collaboratively, ensuring that complete student attention and focus is maintained at all times. There are no hidden extras; all features are included as standard including a customised testing suite, dedicated Technicians’ Console, digital student revision aids, lesson planning tools and the option for teachers to reward students for good effort.
Acer Classroom Manager can be used on any Windows computer and is designed to work flawlessly over both wired and wireless networks. Increasingly, schools are also embracing new PC technologies and Acer Classroom Manager works happily in Terminal Server, shared resource, virtual desktop and thin/zero client computing environments.
Classroom Assistant A free component available from both the Apple and Android App stores, the Acer Classroom Manager Classroom Assistant delivers greater mobility for teachers around the ICT suite and is also the ideal tool to allow teaching assistants to help with monitoring student progress. iPad, iPod, iPhone, Android tablet and smartphone compatible, once
installed on a device the app pairs with the Acer Classroom Manager desktop Tutor software, allowing teachers the freedom to move around the classroom, helping retain key control and monitoring of all student workstations/devices. Student for Android
The Acer Classroom Manager Student for Android meets the challenges presented by the increased use of mobile technology in the modern classroom. Enabling mobile learners to participate in Acer Classroom Manager-managed lessons, once installed on students’ Android tablets, teachers can interact with and support students from the traditional desktop Tutor application.

Acer Classroom Manager v2
11
Conventions Used
The following logical and easy to understand conventions are used in this manual: -
• Step-by-step instructions, which should be performed in sequence,
are shown as numbered paragraphs, beneath a clearly stated, ‘How to do’ heading.
• As there is often more than one way of carrying out a task you will find ‘Or’ options also included.
• Additional tips or explanatory notes regarding these instructions are enclosed in a border under the heading ‘Note’.
• Individual items in menu commands are enclosed in braces and should be followed in sequence, for example: {Student}{Broadcast}.
Terminology Used
Control/Tutor The workstation that is used to take over another.
Client/Student The workstation that is to be taken over.
Available Client When a Client has been installed on a workstation; it becomes available for connection to a Control. A Client must be available before a
Control can connect to it.
Known Client Having browsed for available Clients, Acer Classroom Manager stores a list of Clients in the Client.NSS file. These are Known Clients.
Connected Client All available Client’s or Groups of Clients can be chosen for simultaneous connection. A Control can only remote control a Client to which they are connected.
Selected Client A Client or group of connected Clients can be selected by the Control. The Control can then perform a variety of functions such as View, Show, and Message etc. A Control can switch between multiple Clients, making each of them,
in turn, the selected Clients.

Acer Classroom Manager v2
12
INSTALLATION
Installing Acer Classroom Manager is exceptionally easy and you should be up and running within a very short time. Decide what functions to install
If you wish to manage the class as the teacher, you will need to install
the Tutor (Control) on your machine. On every student machine you wish to connect to, you need to install the Student (Client). To allow technicians to manage and maintain the school’s network, as
well as providing technical support, you can install the Technicians’ Console.
Note: The Acer Classroom Manager Tutor is configured to use TCP/IP.
Recommended method to connect to Students (Clients) Room Mode is a quick and easy method to connect to the Clients in a
given room. A startup wizard will allow you to assign machines to a particular room, and, at the start of a lesson, the teacher simply indicates which of the pre-defined rooms they wish to connect to. ‘Roaming’ Students also have the option of connecting to a designated room. The Room settings can also be configured at the Student in the Acer
Classroom Manager Student Configurator. Other ways to connect the Tutor to the Students are via Browse Mode, PC Mode or User Mode. You are now ready to install Acer Classroom Manager Tutor and Student
programs.

Acer Classroom Manager v2
13
System Pre-Requisites
Some areas of Acer Classroom Manager’s functionality rely on the presence of certain files/applications; please ensure these are available
before installing Acer Classroom Manager. General
Internet Explorer 5 service pack 2 or above. Windows XP (SP2), 2003(SP2), Vista, 2008, Windows 7 and Windows 8. 50Mbytes free disk space for Student-only installation. 140Mbytes free disk space for a Tutor-only installation. 100Mbytes free disk space for an IT Technician-only installation.
160Mbytes free disk space for full installation. TCP/IP. Acer Classroom Manager operates in Terminal Server, Thin/Zero Client, Virtual Desktop, Multiseat and shared-resource computing environments and is supported on Android tablets.
Classroom Assistant app supported on iOS devices running 4.3 and higher, Android 2.3 and higher. Student for Android app supported on Android tablets running 4.0 or later.
The Acer Classroom Manager Tutor requires a screen resolution of 1024 x 768 or above. Synchronised Multimedia Player for WAV, MOV, AVI, MPG, etc. files Testing Module
The Test Designer requires MDAC 2.1 or higher and COMCTL32.dll version 5.80 or higher. During installation, Acer Classroom Manager will
check to see if these files are present and advise if not. However, if installing ‘silently’ using the Acer Classroom Manager Deploy utility, you will not be warned if the files are missing.

Acer Classroom Manager v2
14
Note: To enable printer notifications to be sent to the Tutor PC the
installer applies the following changes to the Student PCs:
Windows Firewall
On installation, Windows Firewall entries are automatically added
to allow the product to be used for the active network. If you change to another network you may need to extend the scope of the Windows Firewall entries to allow connections to continue to be allowed through the Windows Firewall. The File and Print Sharing Exception is enabled on Windows XP SP2 and Windows Vista.
The scope of port TCP 139 is changed from "Subnet" to "ANY" on Windows XP SP2. Local Security Policy Settings
On Windows Vista (or higher) workgroup connected PCs, the following local policy settings are set:
Network Access: Allow anonymous SID/Name translation
ENABLED
Network Access: Do not allow anonymous enum of SAM accounts
DISABLED
Network Access: Do not allow anonymous enum of SAM accounts & shares
DISABLED
Network Access: Let everyone permissions
apply to anonymous users
ENABLED
Network Access: Restrict anonymous access to Named Pipes and Shares
DISABLED

Acer Classroom Manager v2
15
Starting the Installation
Click the appropriate language from the menu and select the option to install Acer Classroom Manager.
Select which installer to use: setup.exe or MSI file. If an Active Directory deployment is required you will need to install using the MSI file. The Acer Classroom Manager installation will start displaying a Welcome screen. Click Next to continue.
Notes:
• If you are upgrading your Windows operating system, you must ensure that you de-install Acer Classroom Manager prior to
upgrading. Acer Classroom Manager can then be re-installed once the operating system upgrade has been completed.
• When installing ensure you are logged in as an Administrator.
Acer Classroom Manager Licence Agreement
The Acer Licence Agreement will be displayed. Please read the Licence
Agreement carefully and select ‘I accept the terms in the Licence Agreement’ and click Next to continue. If you reject the Licence Agreement, ‘I do not accept the terms in the Licence Agreement’ click Cancel. Acer Classroom Manager will not be installed and you will be directed to exit from the install program.
Click Next to continue.
Acer Classroom Manager v2
16
Select Setup Type
Choose the setup type to install on the workstation.
Student
Installs the Student software. This feature (the Client) should be installed on workstations/devices that will be remote controlled. Tutor
Installs the Tutor software. This feature (the Control) should be installed
on workstations/devices which will be used to remote control other PCs. IT Technician
Installs the Tech Console. This feature should be installed on workstations that will be managing and maintaining computers. Custom
Allows you to pick and choose which features to install on the workstation.
Click Next. If you have selected Custom the Custom Setup screen will be displayed.

Acer Classroom Manager v2
17
Custom Setup
Select the component(s) to install on the workstation. Student
Install this component (the Client) on workstations/devices that will be remote controlled. By installing this component, you are enabling a Tutor
machine to establish a link with the Student. The range of features available to students is limited to those that enable them to communicate with the teacher: for example, sending a help request. Install Configurator
The Acer Classroom Manager Student Configurator is used to customise
the Student setup at each workstation. For example, setting the Transport to be used, allocating a Student name and setting security. When you choose the Student component you will also be given the option of installing the Student Configurator. Clear this checkbox if you do not want to install the component, you can
still configure the Student machine by running the Student Configurator at a later stage of this installation.
Acer Classroom Manager v2
18
Add Configurator Start Menu Shortcut
Choose whether to create a Start Menu shortcut to the Student Configurator at the Student workstation. The advantage of installing this at the Student machine is that it is easier to make changes to the settings in the future. The disadvantage is that the Students themselves could access the option and make changes.
Note: If you're installing the Tutor component, the Student Configurator will be installed by default.
Tutor Console
This component (the Control) should be installed on workstations which will be used to remote control other PCs. It gives teachers access to Acer Classroom Manager’s full range of features: for example, viewing student
screens and showing their screen to students. Selecting this component will also install a Portable Tutor folder; this allows you to run the Tutor from a portable device such as USB Pen Drive, Memory Stick or Flash Drive.
Note: If you need the flexibility of allowing other machines to view this
one, you can also install the Student component.
Add Desktop Shortcut for Tutor
Choose whether to create a desktop icon for the Control (Tutor) to enable easy access to the Tutor program. Remote Deployment Utility
The Remote Deploy Utility enables you to perform multiple Acer
Classroom Manager installations without the need to visit each individual workstation. Tech Console (includes Remote Deployment Utility)
This component should be installed on workstations that will be managing and maintaining computers. It provides lab technicians and network managers with the main Acer Classroom Manager features. Add Desktop Shortcut for the Tech Console
Choose whether to create a desktop icon to enable easy access to the Tech Console program.

Acer Classroom Manager v2
19
Name and Connectivity Server
This provides a simple and reliable method of locating and connecting to Student PCs. Replay Conversion Utility
This utility allows you to convert Replay Files to video files.
Note: This will be installed by default if you are installing the Tutor or Tech Console component.
Standalone Test Designer
The Test Designer allows you to set customised tests including text, picture, audio and video questions.
Note: If you are installing the Tutor component, the Test Designer will
be installed by default.
Install to:
By default, Acer Classroom Manager will be installed in the folder C:\Program Files\Acer\Acer Classroom Manager. If you want to install in a different folder, click Change. Click Next when ready to continue.
Room Identification
Enter the value for the room you wish to connect to. The default room value is Eval. The room value can be updated later in the Tutor Configuration settings. Click Next to continue.
Ready to Install the Program
To start the installation, click Install. To change any of the previous selections, click Back. To quit the installation, click Cancel.
Note: If you have elected to install a Client (Student), the setup will
make the required amendments to your System.INI and/or registry, to load the Client as Windows initialises. Acer Classroom Manager will not replace any of your existing Drivers.

Acer Classroom Manager v2
20
Installation Complete
To complete the installation: • Choose whether to run the Client Configurator. This enables you to
set basic Client information and security.
• Choose whether to run the Remote Deploy utility. This provides you with the facility to install and configure Acer Classroom Manager on
multiple workstations.
Click Finish to exit the Setup program. Remove the CD and restart the workstation.
Existing Installation Detected
This screen will appear if a copy of Acer Classroom Manager is already installed on the workstation.
• Modify
Change the program features that are installed. • Repair
Repair any installation errors in the program.
• Remove
Remove Acer Classroom Manager from the computer.
Select the required option and click Next.

Acer Classroom Manager v2
21
Creating an administrative (network) installation
An administrative installation (distribution copy) of Acer Classroom Manager is designed to assist administrators to install Acer Classroom Manager on networked PCs where the installation media or licence details may not be readily available and it is anticipated that a number of
installs will be performed either at once or over a period of time. This type of installation can also be preconfigured to setup Acer Classroom Manager with certain options, therefore ensuring that all Acer Classroom Manager installations are configured the same. Once created, the distribution copy can be used when performing a
standard install, a Silent Installation or as part of a remote deployment. To setup a distribution copy of Acer Classroom Manager on a server
1. Create a folder on the network that is accessible to all PCs that you may want to install on.
2. Copy, from your original source media (CD or download) the file SETUP.EXE.
3. Create and copy a valid NSM.LIC file to this folder. If a licence file is not present in the folder when running the install, Acer Classroom Manager will be installed using the default Evaluation licence.
4. Create and copy a CLIENT32.INI file to this folder.
Note: You can make the network folder ‘read only’ to avoid the
configuration being altered by unauthorised users.
To install Acer Classroom Manager from a server onto individual workstations
1. At the required workstation, navigate to the network folder containing the Acer Classroom Manager setup files.
2. Run Setup.exe.
3. Follow instructions in Starting the Installation.

Acer Classroom Manager v2
22
Silent Installation
A silent installation is one that requires no input from the user, providing a convenient method for performing a set installation at several
machines.
To perform a Silent Install
1. Create a distribution copy of Acer Classroom Manager containing the required Acer Classroom Manager Installation files.
2. To determine the properties for the Installation, at the command line
run INSTCFG.EXE /S from the Acer Classroom Manager program folder. The Install Configuration Options dialog will appear. The selected properties are stored in a parameter file: default name NSS.ini.
3. Choose {File}{Save} and save the ‘NSS.ini’ file to the folder containing the distribution copy of Acer Classroom Manager.
4. To perform the Silent Install at the required workstation, from the folder containing the distribution copy, run:
msiexec /i "Acer Classroom Manager.msi" /qn (MSI installer) setup /S /v/qn (setup.exe installer)
Note: Acer Classroom Manager can be installed via Active Directory. The software installation group policy object (GPO) must be applied to organisational units (OUs) containing computer accounts rather
than users. Please note that for software installation to take effect immediately it is necessary to enable the, Always wait for the network at computer startup and logon parameter in the Computer Configuration| Administrative Templates| System| Logon| leaf of the group policy controlling the computers that are subject to software installation. This change will affect login times for Windows XP machines that have this applied. Without this
change an additional log off / log on cycle is required to effect installation.

Acer Classroom Manager v2
23
Install Configuration Options Dialog
When performing a silent installation or using Acer Classroom Manager Deploy, you can customise the installation to suit individual requirements. This dialog, accessed by running INSTCFG.EXE /S from the
Acer Classroom Manager program folder if performing a silent installation or if using Acer Classroom Manager Deploy, via the Install Properties General tab, enables you to specify the variables for the installation. The information is stored in a parameter file: default name NSS.ini.
Icons
Select the relevant check boxes to indicate which Acer Classroom Manager components will be installed on the Client machines. General
Install Directory
Specify the directory where Acer Classroom Manager will be installed. Leave blank to install in the default directory, \Program Files\Acer\Acer Classroom Manager.
Acer Classroom Manager v2
24
Acer Classroom Manager Deploy - Acer Classroom
Manager’s Remote Install Utility
The Acer Classroom Manager Deploy Utility provides network administrators with the facility to install and configure Acer Classroom
Manager on multiple workstations without the need to visit the machines individually. You are provided with a view of your network, allowing you to pick and choose which workstations you want to deploy to. With Acer Classroom Manager Deploy you can:
• Remotely Install a Acer Classroom Manager package on multiple workstations simultaneously.
• Create and download specific Client configurations to multiple workstations.
• Remotely update Acer Classroom Manager licence details on multiple workstations.
• Remotely Uninstall a Acer Classroom Manager package from multiple workstations simultaneously.
Notes:
• When deploying to a Windows Vista PC (or later) within a domain,
the console user must be either logged onto the domain or enter the user credentials when prompted of a domain account that has local administrator rights to the target PC.
• The Deploy Prompt user options are not supported on Windows Vista and above.
Installing the Deploy Utility
When installing Acer Classroom Manager, you decide which combination of components to include. To install Acer Classroom Manager Deploy, select the Remote Deployment Utility along with any other components you require.
Acer Classroom Manager Deploy is currently supported on the following operating systems: • Windows XP • Windows 2003 • Windows Vista
Acer Classroom Manager v2
25
• Windows Server 2008\2008r2
• Windows 7 • Windows 8 • Windows Server 2012
Planning
Acer Classroom Manager Deploy is a powerful utility that makes installing Acer Classroom Manager packages on multiple workstations a quick and easy process. However, while we endeavour to ensure that there are no
limitations or incompatibility issues in the use of the software, it is recommended that a trial deploy is performed on a small number of workstations to ensure there are no conflicts with other similar products such as remote control or desktop security packages. In addition, for added security and protection you must have appropriate administrator rights for the machines you are deploying to.
Deploying on Windows XP and above
To enable you to deploy Acer Classroom Manager on Windows XP Professional and above, you need access to the Admin$ share on the remote machine in order to transfer the package to be deployed. By
default there is no access allowed to Admin$ share. To enable network access:
In Administrative Tools select Local Security Policy.
1. Select {Security Settings}{Local Policies}{Security Options}
2. Select {Network access: Sharing and security model for local
accounts}
3. Alter the setting for this policy to {Classic – local users authenticate as themselves}
The Admin$ share will now be available and you can deploy as normal.

Acer Classroom Manager v2
26
Starting Acer Classroom Manager Deploy
1. Select Acer Classroom Manager Deploy from your Acer Classroom Manager Program Group.
2. The Acer Classroom Manager Deploy main window will appear.
The Deploy Main window is divided into the following sections:
Menu Bar
The Menu bar contains a series of drop down menus that can be used to access the various tools and configuration utilities for the deploy process.
Left Hand Pane
Contains three tabs, Network, Log Files and Security. Network and Security Tabs
List, in a Tree view, the available Networks, Domains and Workgroups that can be selected for a deploy routine.
Log Files Tab
Lists, in a Tree view, a history of previous deployments.

Acer Classroom Manager v2
27
Right Hand Pane
With the Network tab selected, you are provided with a range of general information, machine name and platform for example, about the workstations located on the selected network/domain.
The Log Files tab provides a breakdown of past deployments categorised by type. The Security tab also lists information specific to each individual
workstation located on the chosen network/domain. In addition to the machine name, you will be able to identify the IP Address, determine if the machine already has a Acer Classroom Manager Client installed and which version is running, whether the Client is password protected or has User Acknowledgement set. With this information to hand you can decide in advance which machines to include or exclude from the forthcoming deployment. For example, if a current Acer Classroom Manager Client is
already installed at some of the workstations you might choose to ignore it.
Preparing a Deployment
Choosing Who To Deploy To
1. From the main window select the Network or Security tab.
2. A list of available Networks, Domains and Workgroups will appear in the left hand pane. Expand or reduce the tree list by clicking on + or -.
Note: You can also deploy to specific IP Ranges by adding the
appropriate address range to the tree. Select {Tools}{Add IP Domain} from the Menu bar.
3. Highlight the required group.
4. The names of the workstations belonging to the selected group will appear in the right hand pane.
5. Select the workstations to include in the deploy routine. (You can use CTRL-Click or SHIFT-Click). Before deciding to include or exclude a workstation, you can view its properties by right clicking on the
machine name.

Acer Classroom Manager v2
28
Choosing What To Deploy
You can choose:
• Acer Classroom Manager Package.
• Client Configuration. • Acer Classroom Manager Licence File. • Uninstall Acer Classroom Manager.
Note: The properties for each of the above can also be pre-defined if it
is not convenient to deploy immediately. See Pre-define settings for a future deployment.
Deploy a Acer Classroom Manager Package
With the required workstations selected.
1. Choose {Deploy}{Acer Classroom Manager Package} from the Deploy Main window drop down menu. Or, Right click the selected workstations and choose Deploy-Acer Classroom Manager Package.
2. The Deploy Summary dialog will appear.
This dialog provides a summary of the options you have selected for the deployment. If a first time deployment, the text will appear in red to indicate that required information has not been entered. To enter or amend the information for the deployment, Click
Properties.

Acer Classroom Manager v2
29
3. The Install Properties dialog will appear.
4. Enter the properties for the deployment by selecting the five tabs in
turn. General tab Used to specify the Acer Classroom Manager package to deploy and which components are to be installed.
Enter a description for the package being deployed. If left blank, the package name/version number will be used.
Click Browse and select the folder containing the Acer Classroom Manager package to install. Ideally this will be a folder containing a
distribution copy of Acer Classroom Manager. (See the ‘Creating an administrative (network) installation’ section of this manual.)
Click Edit to specify the components to install. The Install Configuration Options dialog will appear. (See the ‘Install
Configuration Options dialog’ section of this manual for a full description of this dialog.)
Note: Because of the way Acer Classroom Manager Deploy handles
restarting workstations, leave the Restart Machine box un-checked. This is only relevant when performing a Silent Install where The Install Configuration Options dialog is also used for specifying the options to install.

Acer Classroom Manager v2
30
When you have completed this dialog choose {File}{Save} to save
the NSS.ini file to the folder containing the distribution copy of Acer Classroom Manager. Choose {File}{Exit} to return to the Install Properties dialog.
Options Tab
Use the information supplied in the Network and Security tabs to identify which machines may already have Acer Classroom Manager installed, you can then choose to:
• Ignore them by checking the Skip machines already running Acer Classroom Manager box.
• Update the machines with the latest version by checking the Update new or older systems to current version box.
• After deploying the package, you can confirm that the Client is running by checking the Verify Client running after restarting box. Ensure that workstations are restarted automatically after the deploy for this option to work. See Restart tab.
Acknowledgement Tab
Consider whether the workstations will be in use when commencing the deploy. You can choose to:
• Install Acer Classroom Manager Immediately. No prompt will be received at the workstations being deployed to.
• Warn user before installing Acer Classroom Manager. The
user will receive a prompt and needs to click OK for the install to commence. Users cannot cancel this.
• User can postpone Acer Classroom Manager installation. You can specify the number of times a user can postpone the
installation. If the user does choose to postpone, they will be re-prompted at hourly intervals or the next time they restart the workstation whichever comes earlier.

Acer Classroom Manager v2
31
Message Tab
You can specify a custom message to be displayed at each workstation while the installation is in progress.
Restart Tab
Note: If you have asked for verification that the Client is running,
see Options tab, you must choose an option that will force the workstations to be restarted immediately.
• Advise user to restart machine. At the completion of the
deployment, a message will be displayed at workstations asking the user to restart the PC at the next convenient opportunity. Do not choose if above Note applies.
• Insist user restarts machine. A message will be displayed at workstations, advising the user to restart the PC to complete the installation.
• Force restart. At the end of the deployment, a message is
displayed advising users that the workstation will be restarted. A time bar is displayed indicating how many seconds it is before the restart commences.
• Automatic restart if not logged on. If the workstation being deployed to is not logged on, restart will commence automatically.
5. When you have completed all five tabs, click OK to return to the
Deploy Summary dialog. You can review your selections and edit if required.
6. Click Deploy to commence the installation. A progress dialog will appear, enabling you to monitor the deployment as it installs on each
workstation.

Acer Classroom Manager v2
32
The dialog has two tabs:
Log tab enables you to monitor the deployment as it reaches each workstation.
Status tab lists the stage the deployment has reached on each workstation. For example, the installation may be complete on one
machine but still in progress on another.
7. Click Close to return to the Deploy main window when the installation is complete.

Acer Classroom Manager v2
33
Deploy a Client Configuration
Using Acer Classroom Manager Deploy, you can remotely deploy a Client Configuration file containing specific Client settings. 1. Select the required workstations.
2. Choose {Deploy}{Client Configuration} from the Deploy Main window drop down menu.
Or,
Right click the selected workstations and choose Deploy-Client Configuration.
3. The Deploy Summary dialog will appear.
4. Click Properties to enter the details for the deployment.
5. Click Browse to specify the folder containing the Client Configuration
file that is to be deployed. The default configuration file is CLIENT32.INI and is stored in the Acer Classroom Manager installation directory.
6. Click Edit to access the Client Configurator in order to make changes to the Configuration file.
7. For the new settings to take effect immediately, by default the Client Service will be automatically restarted after the deployment. If not required, uncheck the Restart the Acer Classroom Manager Client service box.
8. Click OK to return to the Summary dialog. You can view the contents of the configuration file by clicking on the file name.
9. Click Deploy. A progress dialog will appear enabling you to monitor the status of the deployment.
10. Click Close when complete.

Acer Classroom Manager v2
34
Deploy a Acer Classroom Manager Licence file
When installing a Acer Classroom Manager package, a licence file is sent to each workstation. However, there may be occasions when the licence information needs updating. For example, you have purchased additional licenses and the licence file needs updating to reflect this. By using Acer Classroom Manager Deploy you can remotely update the file on user
workstations. 1. Select the required workstations.
2. Choose {Deploy}{Acer Classroom Manager Licence file} from the Deploy Main window drop down menu.
Or,
Right click the selected workstations and choose Deploy-Acer
Classroom Manager Licence file.
3. The Deploy Summary dialog will appear.
4. Click Properties to enter the details for the deployment.
5. Click Browse to specify the folder containing the licence file that is to be deployed. The default file is NSM.LIC.
6. For the new settings to take effect immediately, by default the Client Service will be automatically restarted after the deployment. If not
required, uncheck the Restart the Acer Classroom Manager Client service box.
7. Click OK to return to the Summary dialog. You can view the contents of the licence file by clicking on the file name.
8. Click Deploy. A progress dialog will appear enabling you to monitor the status of the deployment.
9. Click Close when complete.

Acer Classroom Manager v2
35
Remote Uninstall
Using Acer Classroom Manager Deploy you can remotely uninstall a Acer Classroom Manager package. 1. Select the required workstations.
2. Choose {Deploy}{Uninstall Acer Classroom Manager} from the Deploy Main window drop down menu.
Or, Right click the selected workstations and choose Deploy-Uninstall
Acer Classroom Manager.
3. The Deploy Summary dialog will appear.
4. Click Properties to enter the details for the deployment. The Uninstall Acer Classroom Manager dialog will appear.
5. Enter the properties for the deployment by selecting the four tabs in turn.
General tab Provides a description of the package being uninstalled. Acknowledgement Tab Consider whether the workstations will be in use when commencing the deploy. You can choose to:

Acer Classroom Manager v2
36
• Uninstall Acer Classroom Manager Immediately. No prompt
will be received at the workstations being deployed to.
• Warn user before uninstalling Acer Classroom Manager. The user will receive a prompt and needs to click OK for the uninstall to commence. Users cannot cancel this.
• User can postpone uninstall of Acer Classroom Manager. You can specify the number of times a user can postpone the uninstall. If the user does choose to postpone, they will be prompted the next time they restart the workstation.
Message Tab You can specify a custom message to be displayed at each workstation while the uninstall is in progress.
Restart Tab To completely remove all Acer Classroom Manager files, the workstations must be restarted.
• Insist user restarts machine. A message will be displayed at workstations, advising the user to restart the PC to complete the process.
• Force restart. At the end of the deployment, a message is
displayed advising users that the workstation will be restarted. A time bar is displayed indicating how many seconds it is before the restart commences.
• Automatic restart if not logged in. If the workstation being deployed to is not logged in, restart will commence automatically.
6. When you have completed all four tabs, click OK to return to the Deploy Summary dialog. You can review your selections and edit if required.
7. Click Deploy to commence the uninstall. A progress dialog will appear, enabling you to monitor the deployment as it uninstalls each
workstation.
8. Click Close when complete.

Acer Classroom Manager v2
37
Pre-Define Settings For A Future Deployment
There may be occasions when you want to defer a deployment until a more convenient time of the day. With Acer Classroom Manager Deploy you can prepare the settings in advance and choose when to perform the deployment.
Note: You select the workstations to deploy to when you are ready to run the deployment.
To Prepare The Settings For A Future Deployment
1. Choose {Deploy}{Configuration} from the Deploy Main window drop down menu.
2. The Deploy List dialog will appear. Select the required Deploy option. (Package, Client Configuration, Licence File or Uninstall)
3. Click Properties and enter the required settings.
4. When all settings are entered, click Close to return to the Deploy Main window.
To Run The Deployment
1. Select the workstations to Deploy to. See Preparing a Deployment.
2. Choose {Deploy} from the Main window drop down menu.
Or,
Right click the selected workstations and choose Deploy.
3. Select the required Deploy option.
4. The Deploy Summary dialog will appear, showing your pre defined selections. You can edit these if required.
5. Click Deploy to start the deployment.

Acer Classroom Manager v2
38
Log Files
When using Acer Classroom Manager Deploy, information about each deployment, whether a package install, licence update, configuration download or uninstall, is recorded. This provides a useful reminder each
time you use the utility of what you have previously deployed. The information is stored in a Log File. To view Log Files
1. From the Acer Classroom Manager Deploy main window, select the Log Files tab.
2. In the left hand pane of the Main window, increase or decrease the Tree view to see a description of each type of deployment, the date and time the deployment took place and the workstations that were deployed to.
3. As you select an item from the left hand pane, itemised information about that deployment will appear in the right hand pane.
Printing a Log File
1. Select the required Log File in the Tree view.
2. Choose {Log}{Print} from the Deploy Main window drop down menu.
Deleting a Log File

Acer Classroom Manager v2
39
1. Select the required Log File in the Tree view.
2. Choose {Log}{Delete} from the Deploy Main window drop down menu.
Acer Classroom Manager Deploy - Room Mode
Acer Classroom Manager provides a quick and easy way to assign PCs to a particular room and quickly deploy the Student software to those machines. The Tutor specifies the required room at start of a lesson and
will connect to all computers in that room.
Note: If you need to deploy the Student software across your network or need more advanced deploy options, you will need to use the
Acer Classroom Manager Deploy utility. This can be accessed by clicking Network on the Acer Classroom Manager Startup Wizard or selecting {Start}{Programs}{Acer Classroom Manager}{Acer Classroom Manager Deploy}.
1. From the Acer Classroom Manager Startup Wizard select Classroom.
2. The Acer Classroom Manager Deploy dialog will appear.
3. Enter the room to assign the computers.
4. The drop down list will display all the available Domains and workgroups, you can also deploy to specific IP ranges by selecting Add a new IP range from the list.
5. Select the required group, the available computers will be displayed in the Available Computers list.

Acer Classroom Manager v2
40
6. Select the computer(s) to deploy the Student software to and click Add. The computer(s) will be moved to the Selected Computers list.
7. Click Finish to commence the installation. A progress dialog will appear, enabling you to monitor the deployment as it installs on each computer.
8. The Acer Classroom Manager Student software will be deployed to the requested machine and assigned to the room specified.
Note: You can also access the Acer Classroom Manager Basic Deploy
dialog from the Tutor Configurator. Select {School}{Configuration – Network and Wireless Settings} from the Control window drop down menu and click the Deploy button.

Acer Classroom Manager v2
41
STARTING ACER CLASSROOM MANAGER
This section will guide you through starting Acer Classroom Manager. The main point to remember when using Acer Classroom Manager is that the workstation that is taking control of other workstations is called the
Control or Tutor, and the workstations being controlled are called the Clients or Students.
Note: This guide assumes you have already installed Acer Classroom
Manager. If you have not done this, do so now. See the Installation section for details.
Starting Acer Classroom Manager After installation the Student program is automatically loaded on the Student workstations as Windows starts up.
To start the Acer Classroom Manager Tutor program, double click the Acer Classroom Manager Tutor icon in your Acer Classroom Manager Program Group, or choose {Start}{Programs}{Acer Classroom Manager}{Acer Classroom Manager Tutor Console}.
Note: On Windows 8, only the Tutor and Tech Console icons will appear
in the Start screen. You can access the other Acer Classroom Manager components by right-clicking and selecting All Apps along the bottom of the screen. If you want any of the other Acer Classroom Manager components to appear on the Start screen,
right-click the item and choose Pin to Start.
When Acer Classroom Manager loads, the Welcome Wizard will appear. From here you can deploy the Student software onto new computers in
your current classroom, by clicking Classroom. If you need to deploy the Student software across your network or need more advanced options click Network. To just start the Tutor program, click Start and the Class Wizard will appear. The Class Wizard enables you to enter the general properties of a new
lesson and allows you to choose how to locate and connect to your Students. You can create multiple classes using different connection methods. The required class can then be loaded at the start of the lesson and you can quickly connect to Student machines.

Acer Classroom Manager v2
42
As the Tutor program loads, Acer Classroom Manager will then browse
the network for the specified Students. While it is searching, the browsing message will be displayed. A warning icon will highlight machines you have been unable to connect to. Mouse over the icon to display the reason why the connection failed. All connected Students will have their icons displayed in the Control
window. You can enter or alter the lesson details for the current class in Normal
view. This pane can be minimised by clicking the button.
Note: To prevent the Tech Console from automatically connecting to the
Tutor workstation, ensure the Acer Classroom Manager Client is installed and set the Enable User Acknowledge option in the Client Configurator. You will have to confirm the connection before it can take place.

Acer Classroom Manager v2
43
The Control Window
The Control window is the primary interface for: -
• Configuring the Control;
• Connecting to Student workstations;
• Maintaining Client information;
• Selecting which Student workstations to work with;
• Selecting tasks to carry out.
The Title Bar
This indicates that you are in the Control window and displays the name of the Acer Classroom Manager Control workstation.

Acer Classroom Manager v2
44
The Menu Bar
The Menu bar contains a series of drop down menus that can be used to access the various tools and configuration utilities. These menus can be used to select Student workstations to work with, as well as maintaining and organising Student workstations into work groups. The Toolbar
The toolbar contains shortcuts to many of the most frequently used tasks and tools. Positioning the cursor over an icon will display a brief description of its function. For convenience, features that are of a similar nature, Show, Show Video, Show Replay Files for example, are grouped within the same toolbar icon. However, you can add these as individual icons if preferred.
Some drop down menus will have a small pin in the right hand corner. Clicking this pin turns the menu into a floating window, which is displayed until you close the window. To customise the toolbar choose {View}{Toolbar - Customise} or right click the toolbar and choose Customise.
The Quick View Bar
The Quick view bar is used to switch between currently connected Clients. Clicking on the button containing the required Client’s name enables you to immediately View that Client’s window.
To enable/disable the Quick view bar choose {View}{Toolbar – Quick View}. The Lesson Bar
The Lesson bar allows you to create a lesson and provides tools to
manage the lesson once in progress. A Progress bar will advise the Tutor on the current activity and time remaining. To enable/disable the Lesson bar choose {View}{Toolbar – Lesson Plan}.

Acer Classroom Manager v2
45
The Group Bar
Until you have defined groups of Clients only the “ALL” group will appear on this toolbar. Once defined, the group name along with the number of members will appear and the Group tool icons will become fully active, allowing you to add, delete and change Group properties. With the required Student Group selected, Properties such as the
displayed name and icon image can be changed by choosing {Group}{Customise} or {Group}{Properties} from the Control window drop down menu. To enable/disable the Group bar choose {View}{Toolbar – Group bar}.
The List View
The List view displays the currently connected Clients or Groups. You
can switch the display mode between large and small icons, lists and detailed view from the drop down {View} menu. When you mouse over a Client icon a thumbnail of the Student machine is displayed. Client Properties, such as the displayed name and icon image, can be
changed by selecting {Student}{Customise} or {Student}{Properties} from the Control window drop down menu. The wireless status and battery power level can be displayed next to the Student icon when in thumbnail mode or list view. You can choose which indicators to display in the Tutor User Interface settings.
Note: Student names can also be customised using the Student Register function.

Acer Classroom Manager v2
46
The List view can be viewed in the following modes:
Normal View
Monitor Mode
Audio View
Q&A View
Web View
Application View
Survey View
Print View
IM View
Device View
Typing View
Whiteboard View

Acer Classroom Manager v2
47
Click the individual icons on the left hand side of the Control window, or
choose {View}{Normal/ Monitor/ Audio/ Q&A/Web/ Application/ Survey / Print/ IM/ Device/ Typing/ Whiteboard view} from the Control window drop down menu to change mode. The default view Mode is Normal View.
Note: Student thumbnails can be viewed full screen by pressing F11.
The Status Bar
The Control Status bar is displayed at the bottom of the Control window. It shows the Status of the Control and the number of currently connected
Clients. The current status of the Journal will be displayed when it's turned on. To enable/disable the Status bar choose {View}{Status bar}.

Acer Classroom Manager v2
48
Tutor Toolbar
The Tutor Toolbar provides details of the current lesson to the Tutor and access to key Acer Classroom Manager functions when the Tutor
program is minimised. The Tutor can mute sound at all of the Students, add notes to the Student Journal, Scan, Chat, Message, Announce, Show, Lock/Unlock Students, Blank Student screens and block all Internet access by clicking the relevant icon. When the Tutor program is maximised the Tutor Toolbar will disappear and any settings applied will show in the Control window.
Note: The Tutor program can be maximised by double clicking the Acer
Classroom Manager Tutor desktop icon.
To disable the Tutor Toolbar choose {View}{Current Settings - User Interface - Tutor} from the Control window drop down menu and uncheck Show Tutor Toolbar on minimizing.
Note: There is also a Student Toolbar that can be activated at the
Student, providing feedback on the current lesson.

Acer Classroom Manager v2
49
Student Automatic Login
If a generic naming convention is used for your classroom PCs, you can automatically log the Students in to save time at the start of a lesson.
To automatically login Student machines
1. Select the Student machine(s) you wish to login.
2. Choose {Student}{Power Management - Login} from the Control window drop down menu.
Or
Click the Manage icon on the Control toolbar and choose Login.
3. The Auto Login dialog will appear.
4. Enter the Username, Password and domain and click Login. The
Username will appear once the login has been successful.
5. You can also view Student screens from this dialog, select the required Student and click View.
6. Click Close when complete.

Acer Classroom Manager v2
50
Student Register
By default Acer Classroom Manager will display the computer name of the Client workstation in the Control window. However, there may be
times when you want the control to display the actual name of the student and request additional information. The Student Register option enables the Tutor to prompt the Students for their details.
Note: You can also change the name of the Client workstation by editing
the Client Properties Details tab.
To Prompt Students to Login:
1. If specific Student details are required select the relevant Client icons in the Control window. Alternatively, to prompt all connected Students leave the icons unselected.
2. Choose {School}{Student Register} from the Control window drop
down menu.
Or
Click the Student Register icon on the toolbar.
3. Select Sign In from the available options.
4. The Student Register dialog will appear. The Tutor can then select the information that the Student will be required to complete.
Note: The Student Register will also appear if you check Create a Student Register on the Class Wizard

Acer Classroom Manager v2
51
Student Register Dialog
This dialog enables the Tutor to create a customised Registration form, which will prompt Students for their details. By selecting a name the Tutor can also interact with Students using the View and Chat options.
Class Details
If required, the Teacher Name, Lesson Title, Room Number and Lesson objectives can be included on the Registration form that is sent to Students.
Note: By default the startup mode is Connect to Student in Room(s). In
this mode the Room field displays the room specified at startup, and cannot be changed.
Required Student Details
Decide which details to prompt the Students for. You can also add two custom fields to the form.
Note: If the Get Logged on User Name option is selected, the first
name and surname will be greyed out and the Student name will automatically default to the Login name.

Acer Classroom Manager v2
52
Auto Save Register
Student registration details can be viewed in a report but this will be lost when the Control disconnects. If you want to store a copy of the report check this option. You will be prompted for a file name, location and file format (CSV, HTML or XML). Click Register to send the form to Student machines. You can monitor
progress as the Students respond. Click Close when all Students have Signed In, the Client icon in the Control window will now display the Registered name.
Sign Out
At the end of a lesson you can reset the Client Names using the Sign Out
option. 1. Choose {School}{Student Register} from the Control window drop
down menu.
Or
Click the Student Register icon on the toolbar.
2. Select Sign Out from the available options. Confirm that you want to unregister the Students.

Acer Classroom Manager v2
53
Registration Report
Student registration and Printer usage details can be viewed in a report but this will be lost when the Control disconnects. 1. Choose {School}{Student Register} from the Control window drop
down menu.
Or
Click the Student Register icon on the toolbar.
2. Select Registration Report from the available options.
Notes:
• If you want to store a copy of the report ensure that the Auto Save Register option is enabled on the Student Register dialog when
requesting the Student details. The report can be stored in CSV, HTML or XML format.
• To quickly print a copy of the report, click the Student Register icon and then click Quick Print.
To display the Login name of Students
When registering Student details, rather than prompt them for their actual name you can default to their Login name.
1. Choose {View}{Current Settings – User Interface - Tutor} from the
Control window drop down menu.

Acer Classroom Manager v2
54
2. Check Display Student User Names.
3. Click OK.
To Save Students Login Name
Enable this option to permanently store the Students Login name. 1. Choose {View}{Current Settings – User Interface} from the Control
window drop down menu.
2. Check Remember Student User/ Login names.
3. Click OK.

Acer Classroom Manager v2
55
Working with Classroom Layouts
Once you have selected a classroom or group, you can rearrange the individual Client icons in the Control List view to reflect the layout of the
classroom. A background image can also be added to further customise the Control view. When using Room mode the classroom layout will be automatically saved against the Room selected. When you start the Tutor and select your Room the layout will automatically load.
To arrange icons
1. Select the Client icon and drag it to the desired position.

Acer Classroom Manager v2
56
To lock a layout
1. Arrange the Client icons to the required positions.
2. Choose {Layout}{Lock Layout} from the control window drop down menu.
3. Client icons will be fixed in position and unable to be moved.
Note: The current classroom layout can be printed, select {Layout}{Print Layout} from the Control window drop down
menu.
Setting a background
As well as tailoring the position of Client icons in the Control List view to reflect the layout of the classroom you can choose alternative images to decorate the background and enhance the layout of the icons.
Note: Background layouts support .BMP, .PNG and transparent images.
To set a background 1. Choose {Layout – Set Background) from the Control window drop
down menu.
2. The Set Background dialog will appear.

Acer Classroom Manager v2
57
3. Select the location of the image you wish to use. The default BMP
files are stored in the Acer Classroom Manager program folder. A preview of the selected image is provided.
4. Choose Image position on display to select the position of the image. If you select Tile you can also choose to centre the Client icons on the image.
5. If required, select a background colour.
6. Click OK to add the background to the Control window.
7. If you are adding the background to an existing Layout, choose {Layout – Save Layout} to update. To create a new Layout, select {Layout – Save Layout As}.
If you wish to clear the currently set background, choose {Layout – Clear Background}.

Acer Classroom Manager v2
58
Power Management – Power on/Power off
Power consumption equates largely with heat generation and increased energy consumption. With millions of workstations in use, and
sometimes hundreds located within the same company or School, the desire to conserve energy has grown from a minor-issue to a major issue over the last ten years. Power Management is a technique that enables hardware and software to reduce system power consumption. It works by shutting down portions of the hardware during periods of downtime, meaning that the
workstation is ready to work when you are and conserve energy when you are not.
Client Power On
To Power on a Acer Classroom Manager Client the workstation must have a Wake-on-LAN network adapter and a BIOS that will support it (consult
your network adapter documentation for more information), the Client must also be ‘Known’ to the Control. The Control sends a Wake-on-LAN packet to the Client network adapter, which instructs the workstation to Power On. To Power On a Acer Classroom Manager Client
1. Select the icon(s) of the Clients you wish to Power On.
2. Choose {Student}{Power Management – Power On} from the Control window drop down menu.
Or,
Click the Manage icon on the Control toolbar and choose Power On.
3. The Client workstations will now Power On.

Acer Classroom Manager v2
59
Client Power Off
Acer Classroom Manager uses the Advanced Power Management (APM) features of the Windows operating system (where supported), to provide Client power down capabilities. APM relies on the Client workstation having an ATX motherboard and ATX power supply.
A Control can remotely Power Off a Client workstation using the Acer Classroom Manager Power Management function. To Power Off a Acer Classroom Manager Client
1. Ensure all open applications at the Client workstations are closed.
2. Select the icon(s) of the Clients you wish to Power Off.
3. Choose {Student}{Power Management – Power Off} from the Control window drop down menu.
Or
Click the Manage icon drop down arrow on the Control toolbar and select Power Off.
Or
If displayed, click the Power Off icon on the toolbar.
4. The Client workstations will now Power Off.

Acer Classroom Manager v2
60
Finding and Connecting to Students
The Class Wizard enables the Tutor to select the connection mode that best suits their requirements. The Class Wizard is displayed when the
Tutor program is initially started and when a class is restarted. You can also specify how Students are connected to and configure these settings in the Tutor Configuration, select {School}{Configuration - Student Selection} from the Control window drop down menu. The connection methods available are:
• Room Mode Connect to Student computers by Room(s).
• PC Mode
Connect to a fixed list of Student computers by machine name. • User Mode
Connect to a fixed list of Students (by logged on user name). • Browse Mode
Browse the network and connect to Student computers with a specific machine name.
• Publish Class Create a class and enable Students to connect to it.
Note: Publish Class is only available for selection in the Tutor
Configuration.
The default method is ‘Room Mode’.
Notes:
• If the expected Students are not found it may be because Acer Classroom Manager has not been configured to browse the required
Networks. See Configuring Acer Classroom Manager For Subnet Browsing for more information.
• If a 'Name Server/Gateway' has been configured, the Tutor program will use the details registered here rather than perform a browse across the network.
• It is essential that you have a logical naming convention for the Student workstations. If you need to change the names of any Student workstations see Configuring the Student workstations.

Acer Classroom Manager v2
61
Class Wizard
The Class Wizard enables you to enter the general properties of a new lesson and allows you to choose how to locate and connect to your Students. You can create multiple classes using different connection methods. The required class can then be loaded at the start of the lesson and you can quickly connect to Student machines.
Lesson Details
You have the option to input the Teacher name, Lesson title, Lesson objectives and outcome. If these details are completed they will form part of the Student Register should you require one. What time does this Lesson finish? Enter the time you want the class to finish, a timer will appear while the
lesson is in progress. If you do not want the lesson to be timed enable the Open Lesson option. Connect to Select the method to locate and connect to Students.

Acer Classroom Manager v2
62
Click New to create a connection method for your class. The Select
Startup Mode dialog will appear: you can connect by a Room, a list of PC names, a list of Student logon names or browse the local network to locate Students. When the connection method for your class has been defined it appears in the Class Wizard and is available for selection. Highlight the required
mode and click Select, a green tick will appear showing that it is the current method of connection. To modify an existing class select the required class and click Edit. The dialog relating to the method of connection will appear allowing you to modify the details.
To delete a class select the required class and click Remove. Power On Turns on all computers when connecting by Room or PC names.
Startup Options
Create a Journal
Allows you to start or open an existing Student Journal.
Create a Student Register
Before the lesson starts you can prompt the Students to login with their
names. These will be displayed at the Tutor instead of the machine names.
Don’t show this dialog again By checking this box the Class Wizard will not appear at startup.
Note: To re-activate the Class Wizard to appear at startup, set the
Display Class Wizard option in the startup section of the configuration.
Click OK to start the lesson. The Tutor will now browse and connect to Students using the selected connection mode. If you have asked for Students to register their names, the Register Student dialog will appear.

Acer Classroom Manager v2
63
Connect to Students using Browse Mode
Browse Mode allows you to browse the local network and connect to all available Students that match your search criteria. 1. In the Class Wizard select New. 2. Click Browse Mode.
3. The Acer Classroom Manager Browse dialog will appear. 4. Enter the first few characters of the Student names that you want to
connect to. For example, entering Class1 would connect to all workstations whose Student name started with Class1. e.g. Class1_Wk1, Class1_Wk2 etc. This can be left blank to search for all Students.
5. To make this the active connection method, select Make this the
active connection method. 6. Click OK. 7. The new class will appear in the Class Wizard. Click OK. 8. The Tutor will browse for and connect to all Students found and
display their icons in the Control Window.
Notes:
• If a workstation was not available at the time the Tutor initialised, you can subsequently connect to it by clicking the Manage Class icon in the toolbar and then clicking Refresh. This will re-search the
network and connect any additional Clients meeting the criteria.
• If required, a message can be displayed at the Student workstation when a connection is made. See the Configuring The Student section of this manual.
• A warning icon will highlight machines you have been unable to connect to. Mouse over the icon to display the reason why the connection failed.

Acer Classroom Manager v2
64
Connect to Students using PC Mode
PC Mode allows you to connect to a fixed list of Student computers by machine name. When connecting to Students using PC Mode the Students will become part of the Fixed list of PCs. The Fixed list of PCs is a list of available Students that have been found on the network. These details are stored in the Client.NSS file.
1. In the Class Wizard click New. 2. Click PC Mode. 3. The Create Class dialog will appear. 4. Specify a name and description for your class. 5. Enter a prefix for the Students computer name in the text box (leave
blank to search all computers).
6. Click Browse. 7. All Students matching the prefix will appear in the 'Available
Students' list. 8. Select the Student icons to include in your class and click Add. 9. To make this the active connection method, select Make this the
active connection method. 10. Click OK.
11. The new class will appear in the Class Wizard. Click OK. 12. The Tutor will connect to the selected Students and display their
icons in the Control window. These Students have now been added to the Fixed list of PCs.
Note: You can also choose how to connect to Students in the Tutor
Configurator.
To remove Students from the Fixed list of PCs 1. Choose {School}{Manage Class - Modify Class} from the Control
window drop-down menu. Or Click the Manage Class icon in the toolbar and select Modify Class.
2. The Modify Class dialog will appear. 3. Select the Student icon from the 'Student in class' list. 4. Click Remove. 5. The Student is now available but is not part of the fixed list of PCs. 6. Click OK. 7. The Student icon will be removed from the Control window.
Note: In order to reconnect to a removed Student, you must browse for them and add them to the 'Students in class' list.

Acer Classroom Manager v2
65
Connect to Students using User Mode
User Mode allows you to connect to a fixed list of Students by their logged on user name. When connecting to Students using User Mode the Students will become part of the Fixed list of Users. The Fixed list of Users is a list of available Students that have been found on the network. These details are stored in the Client.NSS file.
1. In the Class Wizard click New. 2. Click User Mode. 3. The Create Class dialog will appear. 4. Specify a name and description for the class. 5. Enter the Student logon names, one per line. 6. To make this the active connection method, select Make this the
active connection method. 7. Click OK. 8. The new class will appear in the Class Wizard. Click OK. 9. The Tutor will browse for and connect to the Students and display
their icons in the Control Window. These Students have now been added to the Fixed list of Users.
Note: You can also choose how to connect to Students in the Tutor Configurator.
To modify Students in the Fixed list of Users 1. Choose {School}{Manage Class - Modify Class from the Control
window drop-down menu.
Or Click the Manage Class icon in the toolbar and select Modify Class.
2. The Modify Class will appear. 3. Delete or add the required Student logon names to the list. 4. Click OK.
Connect to Students via Room Mode
Acer Classroom Manager provides a quick and easy method to connect to the machines in a given room. An intuitive startup wizard enables you to assign PCs to a particular room and quickly deploy the student software to those machines. At the start of a lesson the teacher simply indicates which of the pre-defined rooms they want to connect to. ‘Roaming’
Students also have the option of connecting to a designated room. The Room settings can also be configured at the Student in the Acer Classroom Manager Student Configurator.

Acer Classroom Manager v2
66
Note: Roaming Students can be configured to manually enter the room
from the Student icon in the taskbar. If the Student icon is hidden in the taskbar the Student can still manually enter the room by running the setroom.exe. This file is located in the
Program folder on the Student machine.
Connecting to Students
1. Select {School}{Configuration} from the Control window drop down menu.
2. Select Student Selection.
3. Click the Connect to Students in Room(s) option and enter the required room.
4. If you want to acknowledge roaming Students click the checkbox.
5. Click Prompt at startup if you want the Tutor to be prompted to enter a room value each time the Tutor starts.
6. Click OK.
7. Click Yes to re-initialise the Tutor configurator.
8. The Tutor will connect to all Students found and display their icons in the Control window.
Note: A warning icon will be displayed next to Students that have been
unable to connect. Mouse over this icon to see the reason for the failed connection.

Acer Classroom Manager v2
67
Creating a class for Students to join (Publish Class)
The traditional method for establishing a connection with Students is for the Tutor to browse the local network to find the required machines. However, there may be occasions when the required Students are not available or the Students themselves wish to connect to a particular
remote control session. This feature enables the Tutor to create a ‘class’ that the Students themselves can connect to.
Notes:
• Feature only supported over TCP/IP connections. • Tutor machines running Windows Vista or above will not accept join
class requests from Students.
Creating a class for Students to join
1. To change the default methods of connection choose {School}{Configuration – Student Selection} from the Control window drop down menu.
2. Select Publish Class and allow Students to Join.
3. Enter a name and description for the class. (This is the name that will appear at the Student machine when they try to connect)
4. Click OK.
5. To apply the changes immediately, click Yes.
6. The Join Class dialog will appear. This lists the Student names as they connect to the class.
7. Click Done when all Students have connected. You can now conduct a remote control session with the connected Students.
Note: If new Students want to join the class, select Manage Class from
the toolbar and then click Refresh to display the ‘Join Class’ dialog. The Student machines will only find the class if this dialog is active.
To join a class
Student machines that have the Acer Classroom Manager Client program
installed can browse the network to find ‘classes’. 1. At the Student machine, select the Acer Classroom Manager Client
icon from the taskbar.

Acer Classroom Manager v2
68
2. Choose {Commands}{Join a Class} from the Client drop down menu.
3. The Join Class dialog will appear and immediately search the network for classes.
4. Highlight the required Class and click Join.
5. When the connection has been made close the dialog.
The name of the connected Student will appear at the Control.

Acer Classroom Manager v2
69
Class Lists
With Acer Classroom Manager you have the option to create Class Lists, this provides you with a quick and convenient way of saving multiple Student lists for all your different classes. The Class List can then be loaded at the start of a lesson and you can quickly connect to the Student machines.
Class Lists are created automatically when using PC Mode, User Mode or the Publish Class connection mode You can switch to these modes in the Acer Classroom Manager Tutor Configurator.
Note: A command line utility can be used to generate Class Lists
outside the Tutor program. The 'Class List Processor' enables you to produce Class Lists in advance based on data that may have been supplied from an external source. The file, classlistprocessor.exe is installed in the Program Folder along
with explanatory notes as to its use, classlistprocessordocumentation.txt.
To End a Class
1. Choose {School}{Manage Class - End Class} from the Control window drop down menu.
Or Click the Manage icon in the toolbar and select End Class.
2. Your current class will be ended and the Class Wizard will appear allowing you to start a new lesson.
Notes: • If the Tutor machine does not have write access to the Class Lists
folder, the Tutor will not be able to create new Class Lists or edit
existing ones.
• You can specify the location for the Class Lists to be stored by using the following registry key and then specifying a location;
Files\Classlist
[HKEY_LOCAL_MACHINE\SOFTWARE\Productive Computer Insight\PCICTL\ConfigList\Standard]
"Files\\Classlist"="C:\\Temp"

Acer Classroom Manager v2
70
Client Disconnects from an Active Session
During an active session you may find that Students inadvertently disconnect, for example, when they reboot their machine. Each time a Student disconnects a message will appear advising which Student has disconnected, you can dismiss this prompt or leave to timeout as it will allow you to carry on working, this message can be disabled if required.
To Disable the Disconnect Prompt
1. Select {View}{Current Settings - User Interface - Tutor} from the Control window drop down menu.
2. Select the Silent Disconnect option and Click OK. The next time a Student disconnects no message will be displayed.
Note: To automatically reconnect to Students when they become available, ensure that the Automatically Reconnect to Students option is selected in the Tutor User Interface Settings.

Acer Classroom Manager v2
71
Configuring Acer Classroom Manager For Subnet Browsing
If your network is running across multiple TCP/IP Subnets you need to configure Acer Classroom Manager to use the additional subnets when browsing for Clients. Before configuring Acer Classroom Manager to browse on a remote IP
subnet it is useful to understand how IP addresses are made up and in particular what an IP Broadcast Address is. See Understanding IP Addresses. To Configure the Acer Classroom Manager Control to browse IP subnets
1. Select {School}{Configuration} from the Control window drop down menu.
2. From the Configuration options choose Network and Wireless Settings.
3. Click the Settings button under Browsing.
4. The Configure TCP/IP Client Browsing dialog will appear.
5. Click Add and enter the Broadcast Address of the network you wish to browse if known.
Or,
To enable Acer Classroom Manager to calculate the Broadcast Address, click Advanced and enter a Target IP Address followed by the Subnet mask or enter the required Address Range.

Acer Classroom Manager v2
72
6. Click OK.
Notes: • When adding the address of a remote subnet, you must ensure that
the broadcast address for the local subnet is also present. If not, the Control will not find any local clients when you perform a browse.
• Some network Routers will suppress broadcast packets from being transmitted across WAN links. If this is the case then even if the Control is correctly configured you will not be able to browse the remote subnet.

Acer Classroom Manager v2
73
Understanding IP Addresses
An IP address is made up of 4 bytes, each byte being made up of eight bits, which can have a value of 1 or 0. This gives possible IP addresses of 0.0.0.0 to 255.255.255.255. Each IP address is also split into two portions, a network portion, which
identifies the network the device is on, and the local or host portion, which identifies a particular device. The subnet mask defines the position of this split between the network and host portions of the address, which is associated with the address. The subnet mask is also a four-byte number. Each bit in the subnet mask that is set to 1 denotes that the corresponding bit in the IP address is
part of the network portion. For example if we have an IP address of 10.10.2.21 and a subnet mask of 255.255.255.0
IP Address 10 . 10 . 2 . 21
Subnet Mask 255 . 255 . 255 . 0
IP Address In Binary 00001010. 00001010. 00000010 .00010101
Subnet Mask in Binary 11111111. 11111111. 11111111 .00000000
Network Portion Of IP
Address
00001010. 00001010. 00000010 .00000000
Host Portion Of IP Address 00000000. 00000000. 00000000 .00010101
Network Portion Of IP Address
10 . 10 . 2 . 0
Host Portion Of IP Address 0 . 0 . 0 21
Therefore when we send an IP packet to 10.10.2.21 we are actually sending a packet to device 21 on network 10.10.2.0 In the example above, the network 10.10.2.0 can have 256 host addresses, 0 to 255. However, two of the host addresses, the first and last, on each IP network are reserved. The reserved host address with all
bits set to 0 is the network address, and the one with bits set to 1 is the broadcast address. In our example network of 10.10.2.0;
10.10.2.0 is the network address
10.10.2.255 is the broadcast address.

Acer Classroom Manager v2
74
When an IP packet is sent to a networks broadcast address each device
on the IP network will receive this packet. It is this IP network broadcast address, which is used when configuring Acer Classroom Manager Control to browse on an IP subnet other than its own.

Acer Classroom Manager v2
75
Implementing Acer Classroom Manager in a Terminal
Server Environment
A Acer Classroom Manager Tutor can connect to Students within a Terminal Server environment.
For ease of implementation Acer Classroom Manager provides a downloadable setup package which will guide you through the required installation and configuration processes.
Note: Terminal Server and other thin clients, may not be configured to
use the Acer Classroom Manager Name and Connectivity Server.
Connecting to a Acer Classroom Manager Student running in a Terminal server session The preferred method to connect to the Students running in the Terminal Server Sessions is using the Connect via Room Mode option. Using this method it's possible to configure the Students running in the Terminal Server sessions to be located in a particular room depending on the User logged onto the Session.
Once the Tutor is configured to the same room as the Students it will automatically connect to all Students located in the room.
Note: The Student Terminal Server settings can be configured in the
Acer Classroom Manager Client Configurator.

Acer Classroom Manager v2
76
Installing and Configuring the Acer Classroom Manager
Classroom Assistant
For use in your existing Acer Classroom Manager-managed classroom environment, the Acer Classroom Manager Classroom Assistant delivers greater mobility for teachers around the ICT suite and is also the ideal
tool to allow teaching assistants to help with monitoring student progress. The Acer Classroom Manager Classroom Assistant works on iPad, iPhone, iTouch, Kindle Fire, Android phones and Android Tablets and is available for free from the Apple and Android app stores, as well as Google Play.
Stage 1 - Configuring the Acer Classroom Manager Tutor to
connect to the Acer Classroom Manager Classroom Assistant You will be prompted to configure the Acer Classroom Manager Classroom Assistant connections when the Tutor starts. From here you can set a passcode to authenticate connections from the Classroom Assistant. To access the full Classroom Assistant configuration settings: 1. Select {View}{Current Settings - Classroom Assistant} from the
Control window drop down menu. 2. The Classroom Assistant configuration settings dialog will appear. 3. Enter a name for the Acer Classroom Manager Tutor that will appear
at the Classroom Assistant. 4. Enter the connection port and password to authenticate connections.
Acer Classroom Manager v2
77
5. Decide whether to allow Classroom Assistants to be automatically
authorised or manually authorised. 6. Click OK. Stage 2 - Installing the Acer Classroom Manager Classroom Assistant 1. Download the Acer Classroom Manager Classroom Assistant from the
Apple App store or Google Play store. 2. Tap the Assistant icon on the home page. 3. Enter the IP address of the Acer Classroom Manager Tutor console
you wish to connect to. 4. Enter the password, this will have been set at the Acer Classroom
Manager Tutor console. 5. The default port is 37777. This can be changed but would also need
to be amended at the Acer Classroom Manager Tutor.
Note: The Acer Classroom Manager Tutor will need to authorise the first
connection from the Acer Classroom Manager Classroom Assistant.
The Classroom Assistant toolbar icon will change to when the
Classroom Assistant service is started and connections are allowed. Features supported on Tablets: • Support for Android and iPad tablets. • View student thumbnails.
• Send students a preset message. • Block Restricted websites. • Set Approved websites. • Block All internet access. • Lock/Unlock student computers. • Logoff student computers. • Blank/Unblank student screens.
• Restrict student printing. • Set Approved applications. • Block Restricted applications. • Select a group of students. • Details View. • View student Help Request notifications.
• Zoom on student. • Sort students by name/tutor order.

Acer Classroom Manager v2
78
• View current application.
• View current websites. • Set connection password. • Tutor badge displaying the number of currently connected Classroom
Assistants. Features supported on Smartphones:
• Support for Android and Apple iOS smartphones. • Send students a preset message. • Block Restricted websites. • Set Approved websites. • Block All internet access. • Lock/Unlock student computers.
• Logoff student computers. • Blank/Unblank student screens. • Restrict student printing. • Set Approved applications. • Block Restricted applications. • Set connection password.

Acer Classroom Manager v2
79
Installing and configuring the Acer Classroom Manager
Student for Android
Acer Classroom Manager delivers the tools you need to help maximize the effectiveness of computer-led teaching on Android devices.
The Acer Classroom Manager Student for Android can be installed on each Android tablet. From the teacher’s desktop you can then connect to each system enabling you to interact with each student quickly and efficiently. The Acer Classroom Manager Student for Android app works on Android v4.0 or later tablets and is available for free from the Google Play store.
Set up and configure the Acer Classroom Manager Student for Android You can pre-configure each device with the required password-protected classroom connectivity settings from the device or 'push' the settings to each device from within the Acer Classroom Manager Tutor program:
1. Select {School}{Student Settings} from the Control drop-down window.
2. Select the students you wish to send the settings to. 3. Click Modify. The Modify Student Settings dialog will appear. 4. Set the required options and click Save. 5. If a password has already been set at the Android device, enter this.
6. Click Send. 7. You can now browse for Android Students in Room mode. If you selected the 'Tablet students only' licence type during installation the Acer Classroom Manager Tutor will only display the features that are supported for Tablet Students.
Features supported on Android: • Student Register. • Lesson objective. • Receive Messages from the Tutor. • Student Request help. • Group or 1:1 Chat.
• Student Survey. • Lock/Unlock student computers. • Real Time Instruction (Show Mode).

Acer Classroom Manager v2
80
Licencing for Tablets
Each Android Tablet that connects to the Acer Classroom Manager Tutor needs to be licenced. Licences for Tablets can be purchased independently of the main Acer Classroom Manager product and are registered with Acer Classroom Manager by loading a new Licence file (NST.LIC). This file controls the number of Tablet Students that can
connect. If this file is not present, then the usual Licence File (NSM.LIC) will allow Tablet Students to connect but this will reduce the Licence count available for Acer Classroom Manager Students. e.g. With both an NSM.LIC (10 User) and NST.LIC (10 user) the software will independently limit to 10 connections of each type. With 10 Acer
Classroom Manager Students connected, the 11th Tablet Student would be rejected. With just a NSM.LIC (20 User) the software would limit to a maximum of 20 connections of regardless of whether they are from Tablet Student or standard Acer Classroom Manager Students.

Acer Classroom Manager v2
81
Using Acer Classroom Manager in a wireless
classroom
It is recognised that wireless networks generally do not perform as reliably as wired networks as they use radio frequencies to transmit data and these are susceptible to interference. In addition, simultaneously connecting a large number of devices to a wireless access point will have a negative impact on the bandwidth allocated to each.
When using Acer Classroom Manager in an un-optimised wireless environment, the above can result in poor performance and student devices frequently disconnecting from the Tutor console. Acer Classroom Manager uses advanced techniques to limit the effects of an unreliable wireless network.
Optimising Acer Classroom Manager for use in a wireless environment Once you have established a reliable wireless connection between the devices in your classroom, there are some settings within the Tutor console that you can change to optimise performance on your wireless network.
A school will have a finite amount of network bandwidth available; viewing the students’ screens, distributing files or broadcasting the teacher’s screen simultaneously will consume this bandwidth. Acer Classroom Manager provides multiple configuration options designed to reduce the amount of data sent across the network which
will result in improved performance. These options can be found under their respective configuration sections in the Tutor console. For a wireless environment, it is recommended that both of the options within the Performance section of the Tutor settings are selected: Colour reduction – The view window, thumbnails and the teacher’s
screen when broadcast will be restricted to 256 colours. Low bandwidth mode - The number of video frames transferred will be reduced to around 5 per second. Additionally, within the Network and Wireless Settings section of the Tutor console, it is recommended that the following option is enabled
when using Acer Classroom Manager on a wireless network:

Acer Classroom Manager v2
82
Enable Broadcast Show –When broadcasting the teacher’s screen or
distributing files to multiple students, enabling this option will result in the screen data or files being sent to all machines simultaneously. Finally, performance can further be enhanced by reducing the speed that the Tutor console sends data onto the network to match the speed that the wireless access point can deliver the data. Sending data onto the
network too quickly may result in packets being lost, which will result in the students requesting the data again and additional traffic being produced on the network. For a wireless environment, it is recommended that the following options are set:
Wireless Network – Select this option to optimise Acer Classroom Manager for best performance in a wireless environment. Maximum Throughput – This option provides the ability to fine tune the speed that the Tutor console sends data to the connected student devices.

Acer Classroom Manager v2
83
Using a Name Server/Gateway to Find Student PCs
The Acer Classroom Manager 'Name Server' or 'Gateway', is provided as an optional installation component. Its purpose is to provide a simple
and reliable method of locating and connecting to Student PCs in LAN/Wireless LAN environments. This can be particularly useful where Students transport laptops from class to class making it difficult for traditional connectivity options to find them. Once configured, Student PCs connect to the Name Server on startup and register their availability and current IP address with the Server. At
the Tutor end, when browsing to locate Students, a search of the Name Server is performed rather than a UDP browse across the network. The Tutor program uses the IP address registered with the Name Server. The Name Server can be used with all three startup modes. The advantages of using a Name Server over traditional Browse options
are:
• Negates the need to browse the network to locate Student PCs.
• Reduces the time taken to locate Students.
• Reduces the need to configure and maintain broadcast range entries in the Tutor configuration.
• More reliable connection method in wireless LAN environments. The
Tutor uses the current IP address when establishing connections. Avoids problems in Wireless environments where Student laptops change access points and are assigned new IP addresses.
• Students on different subnets are able to join a published class without having to define additional Browse address information on
the Student PC. The basic requirements for using a Name Server are:
• It needs to be installed on a PC that is accessible to all Tutor and
Student PCs.
• It needs to have a static IP address.
• The Tutor and Student PCs need to be configured to use the Name Server.
The Name Server, Tutor PC and Student PC must have a matching Name Server Security key configured.

Acer Classroom Manager v2
84
Installing & Configuring a Name Server
A 'Name Server' or 'Gateway' is designed to run on a machine that is accessible from both the Tutor and Student PCs. It must therefore have a fixed or static IP address. The Name Server can be installed as a standalone component on the machine you wish to use, or along with other Acer Classroom Manager components.
When performing a Acer Classroom Manager installation, select the Name and Connectivity Server component from the Custom Setup screen. You will also need to configure the Server (Gateway) properties. At the end of the installation the Gateway Configuration dialog will appear or after installation you can launch the dialog by right clicking on the Gateway icon in the system tray, or from the Gateway Console File
menu.
Note: To display the Gateway icon in the system tray, choose
{Start}{Programs}{Startup}{Acer Classroom Manager Name Server Console}.
The Gateway/Name Server is configured with the IP Address of the
Gateway machine and a Security Key. This same information must also be entered at both the Tutor and Student machine thus validating connections between the various components. Once the Tutor and Student connectivity options are set to use the designated Name Server, each time the Student machine starts up, its
current IP Address will be registered with the Server. In turn, the Tutor will check the currently defined method for browsing for Students at Start Up but rather than performing a UDP browse of the network it will poll the Name Server to find Students matching the criteria.
Note: If connecting to Students via the Name & Connectivity Server in
either Room or Publish Class mode, it is necessary to set the Name & Connectivity Server settings at the Tutor in both the Tutor Configurator and the Client Configurator.

Acer Classroom Manager v2
85
Gateway Configuration – General Properties
You use this dialog to configure the properties of the Gateway. (Name Server) You can access the dialog at the end of the installation, when the dialog will appear automatically, or via the Acer Classroom Manager
Gateway icon which appears in the workstations system tray. Right-click the icon and select Configure Gateway. The dialog can also be accessed from the Gateway Console select {File}{Configure Gateway} from the drop down menu. Alternatively, you can run the file Pcigwcfg.exe from the Acer Classroom Manager program folder.
Note: To display the Gateway icon in the system tray, choose
{Start}{Programs}{Startup}{Acer Classroom Manager Name Server Console}. On Windows 8 machines right-click in the Start screen and choose All Apps at the bottom of the screen. Click the
Acer Classroom Manager Name Server Console icon.

Acer Classroom Manager v2
86
Listening Port and Interfaces
Listen on all IP interfaces By default, the installed Gateway component uses the local IP Address(es) and communicates through Port 443.
Listen on specified IP interfaces If the Gateway machine has multiple network cards installed, you can add the specific IP Address to use. Click Add and enter the required address.
Note: The IP address of the Gateway machine and key will also need to
be configured at both the Tutor and Student workstation.
Comms. Management Packet Interval
CMPI (secs:) When configured for Gateway connections, the Client workstation
confirms its availability by periodically polling the Gateway. By default, a network packet is sent every 60 seconds but you can change this if required. Event Log Files
Gateway activity during an active session is recorded in a text file, default GW001.LOG. This can be useful for checking which Clients and Controls have connected through the Gateway. Location: By default, the log file is stored in the Acer Classroom Manager program
folder. i.e. \\program files\Acer\Acer Classroom Manager\GW001.log. Select Browse to specify an alternative path. Max File Size (KB): Over a period of time the log file could become quite large, you can manage this by specifying a maximum file size. When the limit is reached the existing information in the file is overwritten by the new records.
Note: For changes to the log file settings to take affect you will need to restart the Gateway32 service.

Acer Classroom Manager v2
87
Gateway Configuration – Creating Keys
Access to a Gateway/Name Server is protected by use of a Security Key.
The Gateway will not accept connections from a Tutor or Student unless a "Gateway key" is specified, and that same key is also configured at both the Tutor and Student end. The Gateway can support multiple keys, at least one key must be specified.
Select Add to specify the key. The Key must be at least 8 characters.

Acer Classroom Manager v2
88
Gateway Configuration Utility - Licenses Tab
Displays all licenses stored in the Acer Classroom Manager directory, if you do not have an Internet connection you can manually activate your Acer Classroom Manager licence here.
An activation code is required, contact Acer or your Reseller for this. Click Requires Activation and enter the code. You will then need to restart the Name Server.
Note: If an Internet connection is available the licence will activate
automatically and the Name Server does not need to be restarted.

Acer Classroom Manager v2
89
Gateway Configuration Utility - Security Tab
The Acer Classroom Manager Gateway provides support for an enhanced level of encryption to be used when initiating communications from remote computers.
Enable encryption of communications to remote computers When enabled all communications in the connection process are
encrypted.
Note: The remote computers (Controls and Clients) need to be running
version 10.61 or later.
Block any remote computers not using encrypted communications
Earlier versions of the Control and Client programs do not support the enhanced level of encryption. Selecting this option will block connections from remote computers running versions of the Control or Client software that does not support this.

Acer Classroom Manager v2
90
Working with Groups
Acer Classroom Manager provides you with sophisticated grouping functions to enable you to manage and organise different groups of
Students. You can use the following functions on groups as a whole: -
• Show
• File Distribution
• Scan
• Execute
• Message
• Lock/Unlock
• Multimedia Support
• Send/Collect Work
• Chat
To create a Group
1. Choose {Group}{New} from the Control window drop down menu.
Or,
Click the New Group icon on the Group bar.
Or,
Right click the selected Client icons and choose Add to Group and
select New.
2. A Group Wizard dialog box appears that asks you to provide a name and brief description of the group. It will then assist you in creating your group.
Your newly created Group will appear as a tab on the Group bar for quick access.

Acer Classroom Manager v2
91
Group Students Randomly
1. Choose {Group}{Group Randomly} from the Control window drop
down menu.
2. The Group Randomly dialog will appear.
3. Select how to group the teams. If randomly, enter the number of teams. If Student chooses team, enter the team names; the
Students will then be able to pick a team from a drop down list. Click OK.
4. The newly created Group(s) will appear as a tab on the Group bar.
Note: You can ungroup students by selecting {Group}{Ungroup} from
the Control window drop down menu.
To change the members of a Group
1. Choose {Group}{Properties} from the Control window drop down menu.
Or,
Click the Properties icon on the Group bar.
Or,
Click the Properties icon in the Control window.
2. Choose the Members tab and simply select the Client to be removed or added.
3. Click OK, when you are happy with the members of the Group.
Or, 1. Right click the selected Client icons and choose Remove from
Group.
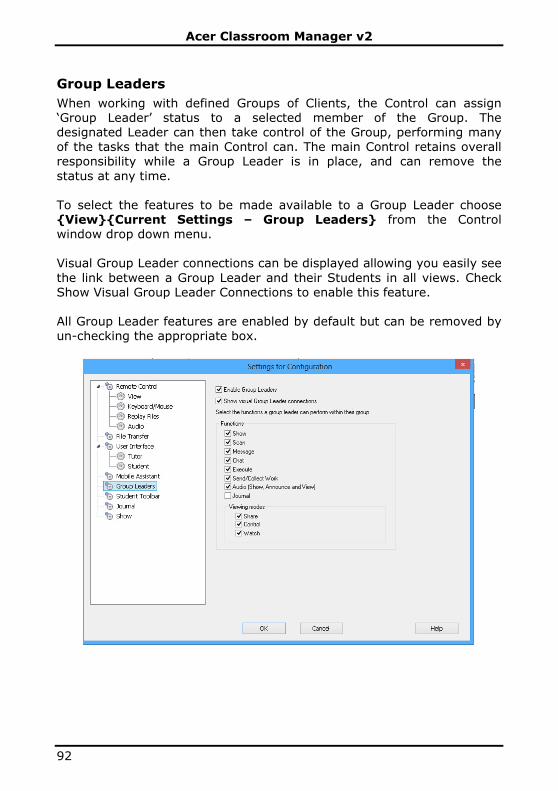
Acer Classroom Manager v2
92
Group Leaders
When working with defined Groups of Clients, the Control can assign ‘Group Leader’ status to a selected member of the Group. The designated Leader can then take control of the Group, performing many of the tasks that the main Control can. The main Control retains overall responsibility while a Group Leader is in place, and can remove the
status at any time. To select the features to be made available to a Group Leader choose {View}{Current Settings – Group Leaders} from the Control window drop down menu. Visual Group Leader connections can be displayed allowing you easily see
the link between a Group Leader and their Students in all views. Check Show Visual Group Leader Connections to enable this feature. All Group Leader features are enabled by default but can be removed by un-checking the appropriate box.

Acer Classroom Manager v2
93
Assigning a Group Leader
1. Select the required Group from the Group bar.
2. Select the required Client icon.
3. Choose {Student}{Group Leader} from the Control window drop down menu.
Or,
Right click the required Client and select Group Leader.
The Client icon in the Control window will be highlighted to indicate that they are a Group Leader. A connection bar showing the link from the Group Leader to the Students can also be displayed choose {View}{Current Settings - Group Leaders} from the Control window drop down menu and enable Show Visual Group Leader Connections. Different groups will have different colour connection bars, these will be
displayed in other views when in "Large Icons" layout.
The Client will receive a message indicating that they have been given Group Leader Status. They can choose to run the Group Leader Control immediately or at a later stage by clicking on the Group Leader icon that will be created in their system tray or Student Toolbar.
Notes:
• Although a Client may be in more than one group, they can only lead one group at a time.
• Each defined Group can have a Group Leader even if one of the
Group Members is already leading another Group.
• The main Control can continue to monitor all Clients, including Group
Leaders.

Acer Classroom Manager v2
94
Suspend Group Leaders
During a Control session where Group Leaders are in place, the Tutor may want to perform a task without conflicting with something the Group Leaders are doing. Rather than remove and reinstate each Group Leader individually, you can globally suspend and reinstate Group Leader access as required.
To Suspend Group Leaders
1. Choose {School}{Suspend Group Leaders} from the Control window
drop down menu.
2. All Group Leaders will be suspended.
To Reinstate Group Leaders
1. Choose {School}{Suspend Group Leaders} from the Control window drop down menu.
2. All Group Leaders will be reinstated.
Remove Group Leader
The main Control can remove Group Leader status from Clients at any time. To Remove Group Leaders
1. From the Control window, select the Group containing the required Client.
2. Right click the Client icon and select Group Leader.
Or,
Choose {Student}{Group Leader} from the Control window drop down menu.
The Client will receive a message informing them that Group Leader rights have been removed.

Acer Classroom Manager v2
95
Customise Client and Group Icons
The Student and Group icons displayed in the Control window can be customised to suit individual requirements. A choice of images can be
used and you can apply these to the machine name or to the logged on user.
Customise Client and/or Group Icons
1. Select {Student}{Customize} or {Group}{Customize} from the
Control window drop down menu.
2. The Image Customisation dialog will appear. Select one of the three tabs:
All Computers Applies the selected image to the machine name.
Logged On User Name Assigns the image to the user name so will
load at whatever PC the Student logs onto. This option takes precedence over the machine name.
Groups Enables you to apply an image to each defined Group of Students.
3. Select the Client Name or Group from the list and click Modify. If using the Logged on User name option, click Add and enter the
Students logon name.
4. Browse for the required icon image. A number of default libraries (*.ncl) are provided in the Program Folder or you can select a picture of your own choosing. Highlight the required image and click OK. Repeat this process for any other Clients and Groups.
5. Click OK when complete.
Note: Individual Client and Group icons can be changed by amending the properties of the selected item. Choose {Client}{Properties}{Details Tab} or {Group}{Properties} from
the Control window drop down menu. Select Customise in the Appearance section.

Acer Classroom Manager v2
96
USING ACER CLASSROOM MANAGER
In this chapter…
You will discover how to use the wealth of features available to a Control User. From how to initiate a
remote control session to how you then monitor and manage activity at the end-users desktop.
Acer Classroom Manager v2
97
Locking Student Controls and Blanking Student
Screens
When you perform a Show, the Students’ mice and keyboards are automatically locked. There may, however, be other occasions when you want to lock Students’ keyboards and mice. You can only Lock/Unlock Students that are connected.
The keyboard and mouse can be configured to lock separately if required. From the Control window drop down menu choose {View}{Current Settings – User Interface - Student}. To Lock Students
1. Select the Student(s) or Groups of Students you wish to Lock.
2. From the Control window drop down menu, choose {Student}{Lock Keyboard/Mouse}.
Or,
From the toolbar, choose Lock.
Or,
Right click the selected Student icons and choose Lock keyboard/Mouse.
3. By default a graphic will appear on the Student workstation, informing them that you have locked their mouse and keyboard.
To Unlock Students
1. From the Control window drop down menu, choose {Student}{Unlock Keyboard/Mouse}.
Or,
From the toolbar, choose Unlock.
Or, Right click the selected Student icons and select Unlock Keyboard/Mouse.
To blank a Student’s screen when locked
1. Choose {View}{Current Settings – User Interface - Student} from the Control window drop down menu.
2. Check Blank screen when Locking mouse and keyboard.
3. Click OK.

Acer Classroom Manager v2
98
4. Select the Student(s) or Groups of Students you wish to lock.
5. From the Control window drop down menu, choose {Student}{Lock Keyboard/Mouse}.
Or,
From the toolbar, press the Lock icon.
Note: If you View a locked Student, the blank Student screen setting will no longer apply. To blank a Student screen when Viewing,
choose {Student}{Blank screen} from the View window drop down menu.
To display a graphic when locking a Student workstation
By default a graphic is displayed on a Student's screen when the Tutor
uses the Lock function. When a Client’s keyboard and mouse have been locked, a default image nss_lock_image_jpg appears on their screen.
1. Choose {View}{Current Settings – User Interface - Student} from the Control window drop down menu.
2. Clear the Display image when locking mouse and keyboard option.
3. Click OK.
4. The Student's screen will now be blanked when locked.
Notes: • If you View a locked Student, the display graphic on a Student
screen will no longer apply.
• If an Image file cannot be located on the Student machine, a flashing message “This machine has been locked by the control user” will be displayed on the Student screen.

Acer Classroom Manager v2
99
Change the graphic to be displayed
The image can be changed if necessary by replacing the file or by using the Student Configurator to select an alternative file. 1. In the Student Configurator choose {Advanced}.
2. The Image file will display the default file.
3. Click Browse to select an alternative file, then Open.
4. The Image file will display the new file.
5. Click OK.
Note: If you would like to display an Image file that is not available on
Client workstations, use the Acer Classroom Manager Deploy function to Deploy a Configurator setting to all connected Student workstations.

Acer Classroom Manager v2
100
Viewing Student screens
Having connected to a Client, you can now control it. This is called Viewing. The Client’s screen will be displayed in a window on the Control
workstation. Acer Classroom Manager will allow you to View multiple Client screens, each in its own window, simultaneously.
Note: If required, a message can be displayed at the Client
workstation confirming it is being Viewed. See the Configuring The Student Section of this manual.
The Quick view bar allows you to View a connected Client quickly and easily. When you connect to a Client a button with the Clients name will appear on the Quick view bar on the Control window. By clicking on a button you will View the Clients screen, by clicking on the button while Viewing, the View window will be closed. To View a Client
1. Double click the required Client icon in the List view.
Or,
With the required Client icon selected, choose {Student}{View} from the Control window drop down menu.
Or,
Click the View Client icon on the Control toolbar.
Or,
Right click the Client icon and choose View.
Or,
Click the required Client name on the Quick view toolbar.
2. The View window for that Client will appear at the Control. To aid navigation of the Client screen, a thumbnail image of the screen is displayed enabling you to scroll the Client desktop more easily.
Simply click and drag inside the thumbnail to view specific areas. The navigation panel can be enabled or disabled by selecting {View}{Navigation} from the View window drop down menu.

Acer Classroom Manager v2
101
Notes: • For acceptable performance while Viewing, ensure that the Client’s
Active Desktop is turned off.
• If the Client uses multiple monitors you will be able to switch between the desktops by clicking the tabs displayed beneath the View window toolbar.
To stop Viewing and return to the Control window
Choose {Client}{Close} from the View window drop down menu.
There are three modes in which you can View a Client workstation:
Share The Client’s screen will be displayed at both the Control and the Client. Both the Control and the Client will be able to enter keystrokes and mouse movements.
Watch The Client’s screen will be displayed at both the Control and the Client. Only the Client will be able to enter
keystrokes and mouse movements. The user at the Control will be locked out.

Acer Classroom Manager v2
102
Control The Client's screen will be displayed at both the Control
and the Client. Only the Control will be able to enter keystrokes and mouse movements. The Client will be locked out.
To change the Viewing mode
1. While Viewing the Client, click the View Mode icon on the View window toolbar and select Share, Watch or Control.
Or,
Select {Client}{Share/Watch/Control} from the View window drop down menu.
Other View window options are:
Scaling to Fit
It may be that the Client is running in a higher resolution than the Control. In this case choosing the Scale to Fit option from the View window menu or toolbar, will re-size its screen to fit the window in which it is displayed.
Keep Aspect Maintain the correct aspect ratio of the remote screen. Switching to Full Screen
Alternatively, you might choose to use the whole of the Control’s screen to display the Client’s screen. This is known as the Full Screen Viewing. While Viewing a Client in Full Screen a floating toolbar will also be displayed. If you close this down, remember to use the hot keys, usually
CTRL+RSHIFT+LSHIFT, to get back to the Control window or press <PAUSE ALT> to display the drop down menus. Screen Scrape
Acer Classroom Manager’s favoured, and the most efficient, method for capturing screen data is to hook into the Video Driver of the workstation being viewed. However, there may be occasions when this method will not work because certain applications bypass the driver. In these
circumstances you can enable screen scrape’ mode in order to take a snapshot of the screen. Although this will have a greater impact on the network it will at least provide an accurate representation of the Client’s screen.

Acer Classroom Manager v2
103
Maximise View Area
Hides the View Menu bar, Status bar and Toolbar to uses the maximum possible area to display the Clients screen without switching to full screen mode.
Blanking the Clients screen while Viewing
For security reasons, you may require the Client screen to be blank while you are remotely controlling it.
1. Choose {Client}{Blank screen} from the View window drop down menu.
2. The Clients screen will be blanked.
3. To restore the screen, choose {Client}{Blank screen} from the View window drop down menu.
Sending Ctrl+Alt+Delete while viewing
You can send Ctrl+Alt+Delete to a workstation that you are Viewing. To send Ctrl+Alt+Delete to a Client you are Viewing
1. Press the Ctrl+Alt+Esc keys simultaneously.
Or,
1. Choose {Client}{Send Ctrl+Alt+Delete} from the View window drop down menu.
2. Click Yes, to confirm Send Ctrl+Alt+Delete.
Viewing multiple screens simultaneously
Acer Classroom Manager enables you to View multiple Clients simultaneously, each in its own window. You can even scale their
individual View Windows to fit on the Control’s screen. To View multiple screens
1. From the Control window menu or any Client View menu, choose {Window}{Tile} and then select which Acer Classroom Manager Windows you want to display.
2. Your chosen Windows will be tiled on the Control’s screen. If you want to be able to see the entire Client’s screen then choose the Scale to Fit option in the toolbar of each Client’s View window.
Note: Scale to Fit is set by default. To View the screen in normal
resolution, turn off Scale to Fit.

Acer Classroom Manager v2
104
Blank All Client Screens
Although you can blank a Client screen while it is being Viewed, there may be occasions when you quickly want to blank all Client screens simultaneously.
To Blank All Client Screens
1. Choose {School}{Blank Screen} from the Control window drop down menu.
2. The Lock symbol will appear on each Client icon.
3. To restore the screens, repeat the above process.

Acer Classroom Manager v2
105
Remote Clipboard
During a View Session you can copy the content of the clipboard between Control and Client PCs.
The Clipboard icon, available on the View window toolbar, provides the following options: Send Clipboard Used when copying from the Control to a Client and using the {Edit}{Cut/Copy} menu option.
Retrieve Clipboard Used when copying from the Client to the Control and using the {Edit}{Cut/Copy} menu option. Auto When enabled, provides the quickest method for copying data. Use the
short cut keys (Ctrl-C & Ctrl-V) to automatically copy to and from the clipboard at both the Control and Client machines. Sending the content of the clipboard from a Control to a Client workstation
1. View the required Client.
2. Open appropriate applications on the Client and Control workstations.
Select and copy the required data from the application at the Control.
If Auto is enabled using Ctrl-C copies the data directly to the clipboard.
Or,
If you have used {Edit}{Cut/Copy}, return to the Clients view window and click the Clipboard icon on the View window toolbar and choose Send Clipboard.
3. To paste the data at the Client application, choose {Edit} from the Client application drop down menu, select Paste.
Or,
Use the short cut keys (Ctrl-V) to paste the data.

Acer Classroom Manager v2
106
Sending the content of the clipboard from a Client to a Control
workstation
1. View the required Client.
2. Open appropriate applications on the Client and Control workstations.
3. Copy the required data from the application at the Client as above but if using menu options rather than the shortcut keys, choose
Clipboard – Retrieve Clipboard from the toolbar.
4. Return to the Control application and paste the data using the appropriate menu options or the short cut keys (Ctrl-V).

Acer Classroom Manager v2
107
Scanning Students
The Scan function enables you to cycle through each connected Client in turn, displaying its screen on the Control. It is an alternative to Viewing
multiple Clients in scaled windows, which may cause their screens to be unreadable. Multiple Client screens can also be scanned in one Scan window. To Scan one Client screen at a time
1. Choose {Group}{Scan} from the Control window drop down menu.
2. The Scan dialog will appear.
3. Specify which Clients to Scan by removing or including the check mark next to the Client name.
Note: If you want to start scanning from a particular Client, select
their icon in the Scan dialog.
4. Select the Scan interval.
5. Select Display one Client at a time.
6. Click Scan.
7. The Scan window will appear and immediately show you the first
Client in the sequence. It will cycle through the selected Clients, showing their screens on the Control, until you end the Scan.

Acer Classroom Manager v2
108
The toolbar buttons for a single Client Scan Window have the following functions: -
Previous, Auto and Next buttons
You can turn auto timing on or off from the Scan window toolbar, or choose to move forwards or backwards between individual Clients. The Previous button shows the previous Client screen scanned. The Next
button shows the next Clients screen in the scan cycle. Scaling to Fit
It may be that the Client is running in a higher resolution than the Control. In this case choosing the Scale to Fit button, will re-size its screen to fit the window in which it is displayed. Full Screen
When Scanning in full screen mode, you can use the Scan Floating
toolbar to Control the operation.

Acer Classroom Manager v2
109
Capture
A snapshot of the current Client view window will be taken. You will then
have the option to name and save the current screen contents to a file. To end the Scan
1. Choose {Scan}{Close} from the Scan window drop down menu.
Scanning multiple screens simultaneously
Multiple Client screens can be scanned simultaneously in one Scan window. To Scan multiple screens simultaneously
1. Choose {Group}{Scan} from the Control window drop down menu.
Or,
Select the Scan button from the Control toolbar.
2. The Scan dialog will appear.
3. Specify which Clients to Scan by removing or including the check mark next to the Client name.
4. Select Display multiple Clients at a time.
5. Select number of Client screens to be displayed in the Scan window.
6. If scanning more than four Client screens, select a Scan interval.
7. Click Scan.
8. The Scan window will appear.
Note: If Scanning more Client screens than the number of screens
displayed in the Scan window, by using the Next, Auto and Previous buttons you are able to switch between multiple Scan Windows.

Acer Classroom Manager v2
110
The toolbar buttons for a multiple Client Scan Window have the following functions: - Previous, Auto and Next buttons
You can turn auto timing on or off from the Scan window toolbar, or
choose to move forwards or backwards between individual Clients. The Previous button shows the previous Client screen scanned. The Next button shows the next Clients screen in the scan cycle. Scaling to Fit
It may be that the Client is running in a higher resolution than the Control. In this case choosing the Scale to Fit button, will re-size its screen to fit the window in which it is displayed.
Maximise
To enlarge a Client View window. This button will be greyed out until you select a Client View window. To maximise the Client View window, click the Maximise button or click the box in the top right hand corner of the Client View window.

Acer Classroom Manager v2
111
Lock
To lock a selected Client’s keyboard and mouse.
Chat
To initiate a chat session between a Client and the Control. Share
To View a Client in Share Mode.
Capture
A snapshot of the current Client view window will be taken. You will then have the option to name and save the current screen contents to a file.
To end the Scan
1. Choose {Scan}{Close} from the Scan window drop down menu.
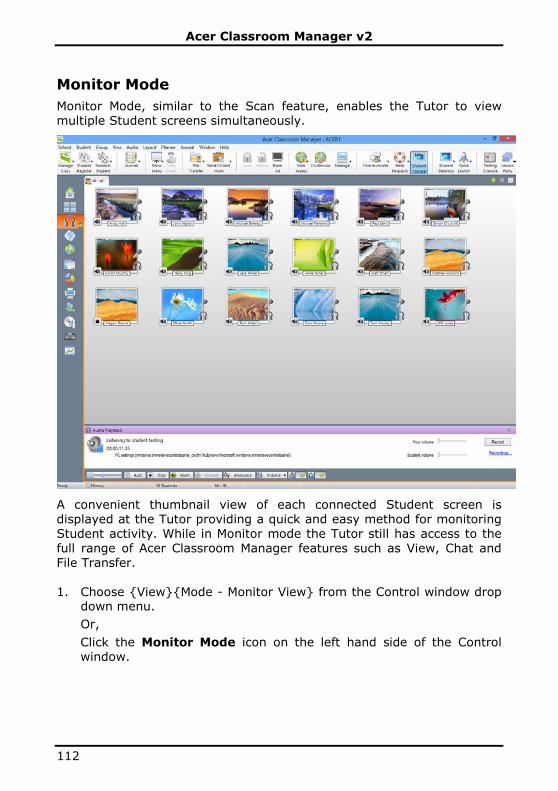
Acer Classroom Manager v2
112
Monitor Mode
Monitor Mode, similar to the Scan feature, enables the Tutor to view multiple Student screens simultaneously.
A convenient thumbnail view of each connected Student screen is displayed at the Tutor providing a quick and easy method for monitoring Student activity. While in Monitor mode the Tutor still has access to the full range of Acer Classroom Manager features such as View, Chat and File Transfer.
1. Choose {View}{Mode - Monitor View} from the Control window drop
down menu.
Or,
Click the Monitor Mode icon on the left hand side of the Control window.

Acer Classroom Manager v2
113
The List view will display each Student thumbnail. By mousing over a
thumbnail you can zoom into that screen. Double-clicking on a thumbnail will open a view session to the selected Student, right-click and you can select from the full range of available Client features. For example, by selecting multiple thumbnails you can invite those Students into a Chat session.
Note: The Zoom facility can be toggled on/off by selecting {Monitor}{Zoomed Mode} from the Control window drop down menu or clicking the Zoom In icon at the bottom of the Control window.
Monitor Mode provides a number of additional tools:
Customise Thumbnail Size
Student thumbnails can be resized to suit personal preferences. This is
particularly useful when connected to large numbers of Student machines. 1. Choose {Monitor}{Size} from the Control window drop down menu.
2. Select the required size from the available options.
Or
1. Use the slider on the Size icon at the bottom of the Control window to select the required size.
Auto-Fit Size of Student Thumbnail
This option will automatically adjust the size of the displayed thumbnails
to fit the window. 1. Choose {Monitor}{Auto fit Students} from the Control window drop
down menu.
Or,
Click the Auto icon at the bottom of the Control window.
Note: The Tutor interface can be viewed full screen by pressing F11
should more room be needed to view the Student thumbnails.
Changing The Thumbnail Refresh Rate
Depending on how closely you want to monitor Student activity you can adjust the frequency at which the thumbnails are refreshed.

Acer Classroom Manager v2
114
1. Choose {Monitor}{Update} from the Control window drop down menu.
2. Select the required time interval from the available options.
Show Active Application
When enabled, an icon will appear in the top right of each thumbnail indicating which application is currently active at the Student machine. In addition, if you have created approved and restricted application lists, a green (approved) or red (restricted) border will appear on the thumbnail alerting you to any potential misuse of applications.
1. Choose {Monitor}{Show Active Application} from the Control window drop down menu.
Or
Click the Show Active Application icon at the bottom of the Control window.
Show Active Web Site
Displays an icon in the bottom right of each thumbnail indicating which site the Student is currently visiting. If you have created approved and restricted web lists, a green (approved) or red (restricted) border will
appear on the thumbnail alerting you to any potential misuse of the Internet. 1. Choose {Monitor}{Show Active Web Site} from the Control window
drop down menu.
Or
Click the Show Active Web Site icon at the bottom of the Control window.
Show Help Requests
If enabled, this option highlights when a Student has outstanding help requests. A flashing Question Mark icon appears in the top right of the relevant thumbnail. To enable/disable, choose {Monitor}{Show Help Requests} from the Control window drop down menu.

Acer Classroom Manager v2
115
Messenger Monitoring
Acer Classroom Manager extends its application control features with the availability of Messenger Monitoring. In addition to the ability to prevent
Messenger applications running within the classroom, Acer Classroom Manager also provides real-time monitoring of specific Messenger applications presenting the Teacher with a real time view of chat activity and content.
Notes:
• Messenger Monitoring supports the following Instant Messenger applications, Yahoo Messenger 8 or above, Windows Messenger 4.0 or above and Windows Live Messenger 8.1.
• Instant Messenger restrictions can be applied at startup. Choose
{School}{Configuration}{Start Options - Restrictions} from the Control window drop down menu.
1. Choose {View}{Mode - IM View} from the Control window drop
down menu. Or, Click the Instant Messenger icon on the left hand side of the Control window.
Acer Classroom Manager v2
116
Identify Students Instant Messenger Activity
In the List view, the Student icons can be viewed in two different ways. Choose {View}{Large Icons/ Details} or right click in the List view and select one of these options to change the layout of the Student icons. When viewing the "Large Icons" layout, an icon is displayed next to the Student icon showing that the Student is signed into Instant Messenger.
If the List view is in "Details" layout, the Instant Messenger status for each Student is displayed. You can filter the Instant Messenger activity, choose {IM}{Filter}{Show Sign In/ Show Sign Out/ Show Messages/ Show File Transfer} from the Control window drop down menu.
The lower panes can be minimised to make more room for the Student
thumbnails. Click the button. Monitor Instant Messenger
1. Choose {IM}{Monitor} from the Control window drop down menu.
Or, Click the Monitor Activity icon at the bottom of the Control window.
2. You can now monitor the Students Instant Messenger.
Note: If monitoring is enabled and you switch modes, an icon will be
displayed on the Messenger tab to acknowledge that Messenger monitoring is currently switched on.
Block Instant Messenger
1. Choose {IM}{Block} from the Control window drop down menu. Or, Click the Block icon at the bottom of the Control window.
2. The Messenger Status for the Students will now show as blocked.
Clear Instant Messenger History
Allows you to clear the Instant Messenger data from the List view. This data is not deleted, you can view this in the Instant Messenger history. 1. Choose {IM]{Clear} from the Control window drop down menu.
2. The Instant Messenger data will be cleared from the List view.

Acer Classroom Manager v2
117
View Instant Messenger History
This feature of Messenger Monitoring enables you to monitor the Messenger activity of connected Students and if required, store or print a permanent record. 1. In Instant Messenger View choose {IM}{History} from the Control
window drop down menu.
2. The Instant Messenger History dialog will appear.
This provides details of the Students Instant Messenger activity during the currently connected session.
The available options are:
Show History for:
The list can be viewed by currently Selected Client or All Connected Clients. Refresh
While viewing the list click Refresh at any time to update the display.

Acer Classroom Manager v2
118
Save
To keep a permanent record of the displayed items, you can save the
details to a text file before disconnecting. Export
Exports data to a CSV file allowing the data to be imported if needed. Print
Prints details of the currently displayed items. Close
Closes the History dialog but details will continue to be recorded
while the Control is connected.

Acer Classroom Manager v2
119
Keyboard Monitoring
Allows the Tutor to monitor Students keyboard usage while using any approved application, providing a real-time insight into Student activity
during a class. The Tutor can monitor the entire class, quickly viewing any typed content and keeping an eye on Student activity levels. To further enhance the monitoring process a Tutor can create 'Target' and 'Inappropriate' words lists, when a Student types a word on the list it will be immediately highlighted. The keyboard monitor also provides a perfect monitoring tool when
Students are online in forums or search forms.
Note: Keyboard Monitoring is not available in the following languages:
Korean, Simplified Chinese, Traditional Chinese, Arabic, Japanese and Russian.
In 'Typing' mode you can view details of Target or Inappropriate words and use the available icons to:

Acer Classroom Manager v2
120
• Create a new word list.
• Load an existing word list.
• Monitor Student Typing activity.
Note: "Details" layout is the default layout, you will be unable to view
Keyboard monitoring in any other layout.
The lower panes can be minimised to make more room for the Student
thumbnails. Click the button.
The current application will be displayed along with the text the Student is typing, any Target or Inappropriate words will be identified with either a green (Target) or red (Inappropriate) visual indicator. A count of how many Target/Inappropriate words that have been typed by each Student will also be displayed.
Note: Keyboard Monitoring can be setup at startup. Choose
{School}{Configuration}{Start Options - Restrictions} from the Control window drop down menu.
The lower panes can be minimised to make more room for the Student
thumbnails. Click the button.
Monitoring Activity
1. Choose {View}{Mode - Typing View} from the Control window drop down menu.
2. Choose {Typing}{Monitor} from the Control window drop down menu.
Or, Click the Monitor Activity icon from the bottom of the Control window.
3. An icon showing the current application running on the Student workstation will be displayed next to each Student along with any typed content and any Target/Inappropriate words will be identified.
Note: If monitoring is enabled and you switch modes, an icon will be
displayed on the keyboard tab to acknowledge that Keyboard monitoring is currently switched on.

Acer Classroom Manager v2
121
Setting up Word Lists
While Keyboard monitoring provides real-time tracking of what Students are typing, you can ensure Students are on track during the lesson by creating Target or Inappropriate Word lists. There may be certain words that you will expect Students to include during a written lesson. When a Student types a word on the list it will be identified with a visual
indicator, green (Target) or red (Inappropriate).
Notes:
• Word Lists can be sent to the Student Journal, allowing the Student
to refer back to this after the lesson. Choose {Typing}{ Add Target Word List to Journal} from the Control window drop down menu.
• The Target Word List can be viewed in the Student Toolbar, choose {Typing}{Allow Students to View Target Words} from the Control window drop down menu.
Add a Word to your Target or Inappropriate List
1. Click + to add a word to your Target or Inappropriate list. Or Right click in the list box and select Add Word.
2. The Add Word list dialog will appear.
3. Type in the word to be added.
4. Click OK.
5. The word will appear under the Target or Inappropriate list.
Remove a Word from your Target or Inappropriate List
1. To remove a word from the list, simply highlight the chosen word and click X. Or Right click in the list box and select Remove Word.
Create a new Word List
1. Choose {Typing}{Create new Word List}.
2. A dialog will appear. Enter a file name and click Create.
3. A new blank Word list will appear.

Acer Classroom Manager v2
122
Open an Existing Word List
1. Choose {Typing}{Load Existing Word List}.
2. Highlight the relevant file and click Open.
3. The existing Word list will appear. Save a Word List
1. Choose {Typing}{Save Word List as}.
2. A dialog will appear. Enter a file name and click Save.
3. The current Word list will be saved.
Notes:
• Any changes that have been made to the new or existing Word list will be automatically saved when a new Word list is created or when you have exited from the Acer Classroom Manager program.
• The default Word list is saved as Acer Classroom Manager.wdl.

Acer Classroom Manager v2
123
View Typing History
This feature of Keyboard Monitoring enables you to monitor the Keyboard usage of connected Students and if required, store or print a permanent record. 1. In Typing View choose {Typing}{History} from the Control window
drop down menu.
2. The Typing History dialog will appear.
This provides details of the Students Keyboard activity during the currently connected session.
The available options are:
Show History for:
The list can be viewed by currently Selected Client or All Connected Clients. Refresh
While viewing the list click Refresh at any time to update the display.
Acer Classroom Manager v2
124
Save
To keep a permanent record of the displayed items, you can save the
details to a text file before disconnecting. Export
Exports data to a CSV file allowing the data to be imported if needed. Print
Prints details of the currently displayed items. Close
Closes the History dialog but details will continue to be recorded
while the Control is connected.

Acer Classroom Manager v2
125
Screen Capture
Screen Capture enables the Tutor to take a snapshot of the current Student screen whilst Viewing or Scanning and allows the Tutor to save
the current screen contents to a file. The Machine Name, Student Name, Date, Time and Product Name will also be recorded on the Screen Capture when saved.
Capture a Students screen whilst Viewing
1. When Viewing a Student choose {Tools}{Capture Screen} to capture the current screen contents.
Or
Click the Capture icon on the toolbar.
2. A Save As dialog will appear.
3. Type in a File Name.
4. Choose one of the three different file formats, .BMP, .JPG, and
.PNG.
5. Click Save.

Acer Classroom Manager v2
126
Capture a Students screen whilst Scanning
1. When Scanning Student screens choose {View}{Capture Screen} to capture the current screen contents.
Or
Click the Capture icon on the toolbar.
Notes:
• When Scanning Multiple Students, a Student screen must be active (highlighted) for the Screen Capture feature to become available.
• When capturing in the Scan session (one Student at a time),
Auto Scan is temporarily suspended until the Screen Capture operation is complete. Once complete, Auto Scan is re-enabled automatically and the Scan of the next Student continues.
2. A Save As dialog will appear.
3. Type in a File Name.
4. Choose one of the three different file formats, .BMP, .JPG, and .PNG.
5. Click Save.

Acer Classroom Manager v2
127
Showing to Students
The Show feature enables the Control user to emphasise key learning points by displaying the information on their screen to a selected Client
or group of Clients. You can also show a stored Replay file, Audio file a Video or an Application that is currently running at the Control. During a Show, the Control can nominate a selected Client to take over the demonstration, making them the Show Leader.
Note: When showing the Control screen to Clients, the screen
information is sent to each Client machine in turn. In some network environments where there is limited network bandwidth available or when showing to larger numbers of machines this can
affect performance. In these circumstances, Acer Classroom Manager’s Broadcast Show facility can be enabled, see Control Configurator, Connectivity. This results in the screen information being sent to all machines simultaneously thus improving the speed of transfer.
Whilst reducing overall network traffic generated by Acer
Classroom Manager, using this feature will generate additional broadcast packets on your network. It is recommended that you
consult your network administrator before using this feature.
To include a 'snapshot' of the screen in the Student Journal click Print Screen during the Show or right-click the Show icon on the taskbar. A dialog will appear displaying the image to be added to the Journal, notes can be added to accompany the image.
To Show a Control screen
1. Click the Show Menu icon on the Control toolbar and choose Show.
2. Your desktop will be displayed to all connected Students.
Note: You can set the properties for a Show session, select {View}{Current Settings - Show} from the Control window drop down menu.
Or,
1. Choose {Student}{Show - Show} from the Control window drop down menu.
Or,
Right-click a selected Client icon and choose Show.

Acer Classroom Manager v2
128
2. The Show dialog will appear.
In this dialog you select the Client, or Clients, that you will Show your screen to and set any associated properties. Select what you would like to Show
Acer Classroom Manager will identify if the Control is running multiple monitors, giving you the option to choose which one to Show from the drop down list. If you are unsure which is the correct screen, click Identify. Alternatively, select Whole Desktop to show all.
Select Recipients
Select the Client or Clients that you will Show your screen to. Show Options
Restrict Internet access to approved sites only during a show
Allows the Tutor to only access websites that are on the Approved Site List, preventing inappropriate websites being displayed to Students during a Show.

Acer Classroom Manager v2
129
Set Show Mode at Client (Windowed, Full Screen or Maximise Window)
This option allows you to Show at the Client either in a small window, full screen or maximised window size. When showing in windowed and maximised window size the Clients Mouse and Keyboard are not locked. Enable Audio
This turns Audio Support on. If you are Showing to only one Client, both the Control and Client can speak. If you are Showing to many, only the
Control can speak (Announce). Show Hotkeys
To ensure that all actions performed by the Control are visible to the Clients during a show you can enable the use of Hotkeys. Any key combinations that the Control uses, e.g. CTRL+V, will be displayed in a balloon at both the Control and Client screens.
Notes:
• If using a mixture of key combinations e.g. ALT+V+T, Acer Classroom Manager will only display two consecutive keystrokes at any one time.
• This utility is only supported on Windows XP and above.
Send Physical Fonts
In order to reduce the volume of data being sent when sharing information of this nature, Acer Classroom Manager passes the font information by reference. The target workstation will refer to its own
internal font mappings to find an appropriate match to the one that has been sent. In most cases the same fonts will be available but if there are instances where this isn’t the case you can send the full information. Check this box to enable. Screen Scrape
Acer Classroom Manager’s favoured, and the most efficient, method for capturing screen data is to hook into the Video Driver of the workstation
being viewed. However, there may be occasions when this method will not work because certain applications bypass the driver. In these circumstances you can enable ‘screen scrape’ mode in order to take a snapshot of the screen. Although this will have a greater impact on the network it will at least provide an accurate representation of the Client’s screen.

Acer Classroom Manager v2
130
Create Replay File at Client
The Show session can be recorded and stored in a Replay file giving
Clients the opportunity to playback the session at a later date. To end the Show
1. Click the Acer Classroom Manager button
Or
Double click the Show icon on the taskbar.
Or
Double click the Acer Classroom Manager Tutor icon on the desktop.
2. This will display the Show Suspended dialog.
3. Click End.
Or,
1. Right click the Show icon on the taskbar.
2. Click End Show.
Or,
1. Use the hot key combination CTRL+ALT+END.
To enable the Control to Continue working in the background while Showing
1. Click the Acer Classroom Manager button on the taskbar.
2. The Showing dialog will be displayed.
3. Click Continue.

Acer Classroom Manager v2
131
The Control window will be displayed and the Title bar will indicate that
the Show is suspended. You can now continue to use the Control workstation without the Clients seeing what you are doing. The Client screens will still display the previous Show.
To Resume a Show while Suspended
1. Click Resume on the Control window toolbar.
Or,
1. Choose {Student}{Show - Resume} from the Control window drop down menu.
2. Clients will now see the application currently displayed at the Control.
3. The Showing dialog will be displayed on the Control screen from which you can choose to End, Resume or Continue the Show.
To end a Show while Suspended
1. Choose {Student}{Show - End Show} from the Control window drop down menu.
2. Clients will now see their own display. To set a Show Leader while Suspended
With the Show suspended, the Control can assign Show Leader status to one of the selected Clients. This unlocks the mouse and keyboard of the Client, enabling them to take over the demonstration. The Control continues to oversee the Show and can End the Show as required.
See the Show Leader section of this manual for more information.

Acer Classroom Manager v2
132
Show Leader
While the Control screen is being shown to the class, it may be appropriate for a Student to take over the demonstration. For this purpose, the Control can assign Show Leader status to a selected Student. The mouse and keyboard of the Show Leader’s PC are unlocked and they can continue the presentation on the Control’s behalf.
The Control can still interact simultaneously with the Show Leader and can suspend or end the session as required. To create a Show Leader
1. Start Showing the Control screen to Students as normal.
2. When you are ready to create a Show Leader, click the Acer Classroom Manager button on the taskbar.
3. This will display the Showing dialog and the Show will be suspended. Client screens will still display the Control screen.
4. Click Show Leader.
5. The Show Leader dialog will be displayed.
Note: If the Show icon on taskbar option has previously been
selected, you can create a Show Leader by right clicking on the icon and choosing Show Leader.
6. Click This Client and select the Client to make Show Leader.
Note: The Show Leader will have full access to your desktop.
7. Click OK.
8. The message ‘You are leading the Show’ will appear at the selected Clients machine.

Acer Classroom Manager v2
133
9. Click Resume to restart the Show.
The Show Leader and Control can now interact together in leading the Show.

Acer Classroom Manager v2
134
Exhibit - Showing a Student's screen on Student screens
With Acer Classroom Manager, it is possible to Show the Control’s screen to a number of connected Clients. It is also possible to show an individual Student’s screen on selected or all Students’ screens. For example, Client 1 has produced some work, which you wish to show to rest of the class. To Show a Students screen
1. Select the Client whose screen you want to show to the other Clients.
2. Choose {Student}{Show - Exhibit this Client} from the drop down menu.
Or,
Right click the Client icon and choose Exhibit this Client.
3. The Exhibit dialog will be displayed.
4. Select the Clients you wish to include.
5. Set the Show Mode to be used at the Client screens, Full Screen, Windowed or Maximise window.
6. Click Exhibit to commence the Show.
7. The selected Client’s screen will be then be displayed on the screens of the Control and the other Clients. Only the Control and the Exhibiting Client will be able to change the screen, with the keyboard or mouse.
Note: You can also exhibit a Student's screen to others by clicking the
Show Menu icon, selecting the Student to exhibit from the drop down list under Exhibit and then clicking Exhibit.
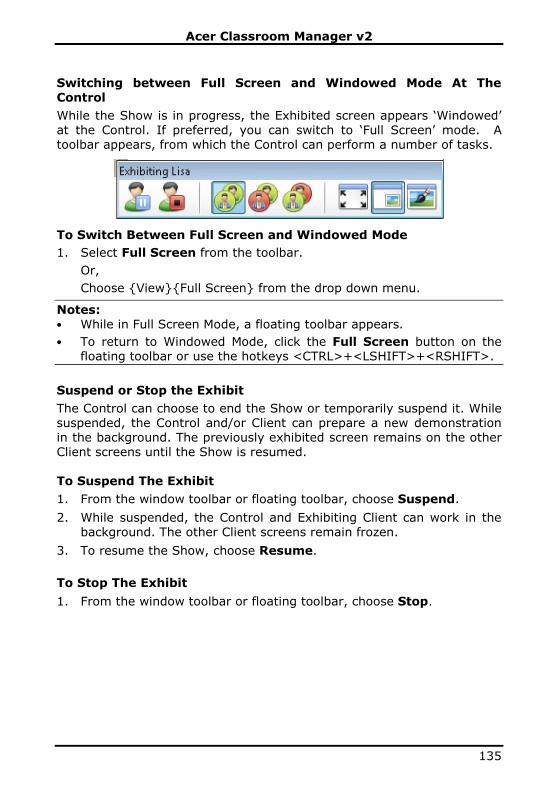
Acer Classroom Manager v2
135
Switching between Full Screen and Windowed Mode At The Control
While the Show is in progress, the Exhibited screen appears ‘Windowed’ at the Control. If preferred, you can switch to ‘Full Screen’ mode. A toolbar appears, from which the Control can perform a number of tasks.
To Switch Between Full Screen and Windowed Mode
1. Select Full Screen from the toolbar.
Or,
Choose {View}{Full Screen} from the drop down menu.
Notes: • While in Full Screen Mode, a floating toolbar appears.
• To return to Windowed Mode, click the Full Screen button on the floating toolbar or use the hotkeys <CTRL>+<LSHIFT>+<RSHIFT>.
Suspend or Stop the Exhibit
The Control can choose to end the Show or temporarily suspend it. While suspended, the Control and/or Client can prepare a new demonstration in the background. The previously exhibited screen remains on the other Client screens until the Show is resumed. To Suspend The Exhibit
1. From the window toolbar or floating toolbar, choose Suspend.
2. While suspended, the Control and Exhibiting Client can work in the background. The other Client screens remain frozen.
3. To resume the Show, choose Resume.
To Stop The Exhibit
1. From the window toolbar or floating toolbar, choose Stop.

Acer Classroom Manager v2
136
Interactive Whiteboard
A full screen Interactive Whiteboard is provided, enabling the Tutor to use Acer Classroom Manager’s annotation tools to highlight the screen and show the results to a selected group of Students.
Note: To include the Whiteboard image in the Student Journal Choose {Whiteboard}{File - Add to Journal} from the Control window drop down menu or click the File icon at the bottom of the Control window and select Add to Journal.
1. To switch to Whiteboard mode, choose {View}{Mode - Whiteboard View} from the Control window drop down menu.
Or,
Click the Whiteboard icon on the left hand side of the Control window.

Acer Classroom Manager v2
137
2. Use the range of annotation tools to highlight the screen and add any
stored graphics. Choose {Whiteboard} from the Control window drop down menu.
Or,
Select the relevant icons at the bottom of the Control window.
3. If required you can save the content of the Whiteboard for later use. Choose {Whiteboard}{File- Save Whiteboard}.
Or,
Select the File icon at the bottom of the Control window and select Save Whiteboard.
To show the Whiteboard to Students
1. If showing a stored Whiteboard image select {Whiteboard}{File – Load Image} from the Control window drop down menu.
Or,
Choose the File icon at the bottom of the Control window and select Load Image.
2. From the Group bar, select the Group of Students to show the Whiteboard to.
3. Choose {Whiteboard}{Show Whiteboard} from the Control window drop down menu.
Or,
Select the Show icon at the bottom of the Control window.
4. The content of the Whiteboard will appear on the selected Student screens. The Tutor can continue to annotate the Whiteboard in real time.
5. To remove the Whiteboard from Student screens, select
{Whiteboard}{Show Whiteboard} from the drop down menu.
Or,
Select the Show icon at the bottom of the Control window. Whiteboard Leader
When Students are viewing the Whiteboard they cannot initially annotate the screen themselves. However, the Tutor can nominate a Student to be
the ‘Whiteboard Leader’. This activates the annotation options at the selected machine. The Tutor can switch control to any of the other participants as required by selecting their icon in the Student List. 1. Select the required Student from the Student List.

Acer Classroom Manager v2
138
2. Choose {Whiteboard}{Make Student Leader} from the Control
window drop down menu.
or
Right click the required icon in the Students List and select Make Leader.
3. The Student can now use the available tools to add content to the Whiteboard.
4. Control can be switched to another Student by simply selecting their icon in the Student List and repeating step 2.
Note: The Whiteboard leader can send the current Whiteboard image to
their Journal by selecting {Options}{Send to Journal} from the Whiteboard toolbar.

Acer Classroom Manager v2
139
Annotating Screens
The Show, Exhibit and View features provide a useful Annotate tool that can be used to highlight areas of a Tutor or Student’s screen in order to emphasise a key learning point.
To annotate a Show screen
While the Control screen is being shown, the tutor may want to draw the student’s attention to a particular area. The Annotate tools can be used to highlight the relevant part of the screen. 1. While Showing, right click the Acer Classroom Manager Showing
icon or the Acer Classroom Manager Task bar button, and select
Annotate Screen.
Or,
Double click the Annotate icon.
2. The Annotate toolbar will appear.
3. Select the tool, colour etc and use the mouse to draw over the relevant part of the Control screen.
Notes:
• If you do not want the Student’s to see the screen being annotated in real-time, click Suspend. This freezes the Show enabling the
Tutor to continue working in the background. Click Suspend again to restart the Show, this refreshes the display at the Student screens.
• To include a screenshot of the Show in the Student Journal, select Send to Journal from the Annotate Options menu or use shortcut keys CTRL+ALT+Print Screen, you can also add notes to accompany the image.
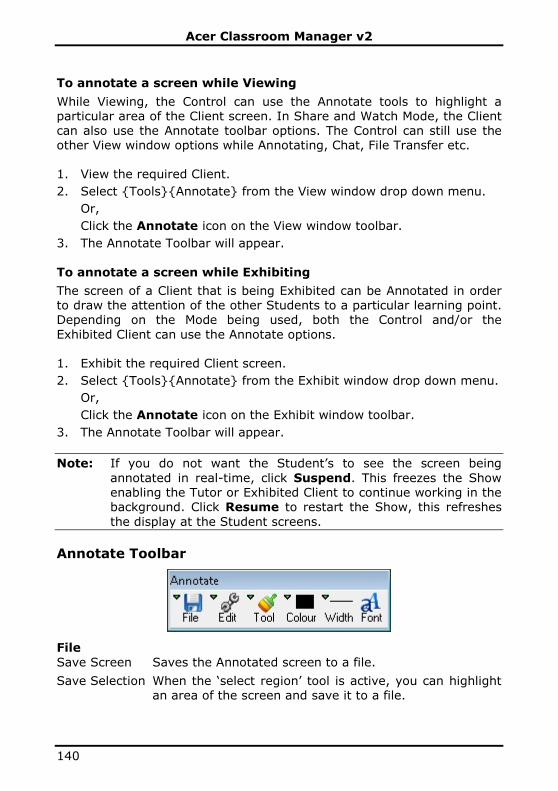
Acer Classroom Manager v2
140
To annotate a screen while Viewing
While Viewing, the Control can use the Annotate tools to highlight a particular area of the Client screen. In Share and Watch Mode, the Client can also use the Annotate toolbar options. The Control can still use the other View window options while Annotating, Chat, File Transfer etc. 1. View the required Client.
2. Select {Tools}{Annotate} from the View window drop down menu.
Or,
Click the Annotate icon on the View window toolbar.
3. The Annotate Toolbar will appear. To annotate a screen while Exhibiting
The screen of a Client that is being Exhibited can be Annotated in order to draw the attention of the other Students to a particular learning point. Depending on the Mode being used, both the Control and/or the
Exhibited Client can use the Annotate options. 1. Exhibit the required Client screen.
2. Select {Tools}{Annotate} from the Exhibit window drop down menu.
Or,
Click the Annotate icon on the Exhibit window toolbar.
3. The Annotate Toolbar will appear.
Note: If you do not want the Student’s to see the screen being
annotated in real-time, click Suspend. This freezes the Show enabling the Tutor or Exhibited Client to continue working in the background. Click Resume to restart the Show, this refreshes
the display at the Student screens.
Annotate Toolbar
File
Save Screen Saves the Annotated screen to a file.
Save Selection When the ‘select region’ tool is active, you can highlight an area of the screen and save it to a file.

Acer Classroom Manager v2
141
Exit Ends Annotate but stays in Show, Exhibit or View mode.
Edit
Clear Annotations Clears the annotations.
Undo Undo the most recent Annotation.
Redo Redo an Annotation that has been undone.
Tool Choose from a range of tools with which to annotate the
screen. For example, freehand draw, draw arrow, select region.
Colour Sets the pen colour.
Width Sets the width of the line.
Fill Sets the colour and fill style.
Font Sets text font.
Suspend Suspends the Show allowing you to go back to the Control View window. (Not available when Viewing or Exhibiting)
End Ends the Show, and takes you back to Control View window.
(Not available when Viewing or Exhibiting)

Acer Classroom Manager v2
142
Audio Monitoring
Audio Monitoring allows the Tutor to monitor audio activity on all Students workstations. The Tutor is instantly alerted to any microphone
or speaker/headphone activity at the Student and can select one of the displayed Student thumbnails to listen to the audio being played on that PC. Audio activity can also be recorded and played back to Students.
Notes:
• If the Student toolbar is enabled Students will be advised when their audio activity is being listened to or recorded.
• Windows XP/2003 64bit systems do not support audio output from software applications to be captured.
1. Choose {View}{Mode - Audio View} from the Control window drop
down menu. Or, Select the Audio icon on the left hand side of the Control window.
A thumbnail of each connected Student screen is displayed, the
microphone or headphone icon will flash on the Student thumbnail showing there is audio activity at the Student workstation.

Acer Classroom Manager v2
143
The lower panes can be minimised to make more room for the Student
thumbnails. Click the button.
Notes: • You can remove the microphone and headphone icons from Student
thumbnails by clicking the microphone and/or headphone icon at the bottom of the Control window, removing the green tick.
• Audio Monitoring can be setup at startup. Choose {School}{Configuration}{Start Options - Restrictions} from the Control window drop down menu.
Listen to Student Audio
1. Select the required Student in the List view.
2. Select {Audio}{Listen to Student} from the Control window drop down menu.
Or, Click the Listen icon on the required Student thumbnail. Or, Click the Listen icon at the bottom of the Control window.
3. Details of the Student you are listening to, the active application and how long you have been listening is displayed in the Audio Playback window.
4. To stop listening, click the Stop icon at the bottom of the Control window.
Record Audio Activity
1. While listening to audio activity, click the Record button in the Audio Playback window.
2. The Audio Playback window will show that you are now recording the audio.
3. To stop recording and to carry on listening to the audio, click the Stop button in the Audio Playback window.
Note: To access all stored recordings, click the Recordings link in the
Audio Playback window.
Acer Classroom Manager v2
144
Volume Control
You can control the volume at both the Tutor and the Student.
1. Click the Volume icon at the bottom of the Control window.
2. Adjust the volume controls. You can mute sound and lock the Student volume from here. Or, While listening to audio use the slider bars in the Audio Playback window to adjust the volume.
Mute Sound at the Student
Sound can be muted at all Student machines. 1. Choose {Audio}{Mute Sound} from the Control window drop down
menu Or, Click the Mute Sound icon at the bottom of the control window.
Or,
1. Click the Volume icon at the bottom of the Control window.
2. Select the Mute option.
Note: By default sound will be muted at Students when locking the
mouse/keyboard or blanking screens. This option can be disabled in the Student User Interface Configuration settings.
Customise Thumbnail Size
Student thumbnails can be resized to suit personal preferences. This is particularly useful when connected to large numbers of Student machines. Use the slider on the Size icon at the bottom of the Control window to select the required size.

Acer Classroom Manager v2
145
Auto-Fit Size of Student Thumbnail
This option will automatically adjust the size of the displayed thumbnails
to fit the window. 1. Click the Auto icon at the bottom of the Control window.
Notes:
• You can send an audio announcement to Students headphones or speakers. Click the Announce icon at the bottom of the Control window. The Announce dialog will appear.
• Recordings can be played back to Students using the Show function.

Acer Classroom Manager v2
146
Using Audio Support
Acer Classroom Manager allows you to use audible communications to connected Clients, via microphones, headphones and speakers during
View and Show. Acer Classroom Manager will only operate Audio if the workstations have Audio Support Installed.
Note: Acer Classroom Manager also allows you to monitor all Student
audio activity, see Audio Monitoring for further information.
The Announce Function
This feature sends the audio announcement to all the selected students headphones or speakers. They will be able to hear the Tutor but will not be able to speak back. To make an announcement
1. Choose {Student}{Announce} from the Control window drop down menu bar.
Or,
Click the Announce icon on the toolbar
Or,
Click the Communicate icon drop down arrow on the Control toolbar and select Announce.
Or, In Audio view click the Announce icon at the bottom of the Control window.
2. The Announce dialog box will appear, include (green tick), or exclude (red cross), Clients from the announcement, then click the Announce button.
3. A dialog box will then appear indicating that you can now announce. Click OK when you have finished speaking.

Acer Classroom Manager v2
147
Using Audio while Viewing
When Viewing a Client you can conduct a two way audible chat session. To use Audio while Viewing
1. Click the Audio button on the toolbar in the View window.
2. The Audio options will be displayed. From here you can: -
• Turn Audio on or off;
• Enable only the Control or the Client to talk;
• Set the microphone sensitivity;
• Select the Audio Quality.
The Mute toolbar button toggles the speaker and microphone on and off.
Using Audio while Showing
When Showing to a Client you can conduct a two-way audible chat session. To use Audio while Showing
1. In the Show Configuration dialog box select the Enable Audio Support check box.
2. During the show only the Control has Announce functionality.
The Audio Settings set in the Control Configurator Audio option will apply during these sessions.

Acer Classroom Manager v2
148
Adjusting Audio settings
You can adjust the audio settings within Acer Classroom Manager to match the capabilities of your multimedia workstations or to fine tune performance. However, you should note that the higher the quality of sound you select, the greater the volume of data that needs to be sent. This can affect screen update performance on slower workstations.
To Access the Volume Controls
1. Right click the Speaker icon in the task bar. To change other options such as sound quality, do one of the following: - Global Method (Changes default setting for all Clients)
1. Choose {View}{Current Settings – Audio} from the Control window drop down menu
Individual Client Method (During a Show or View)
1. While Viewing the Client.
2. Choose {View}{Settings for Client – Audio} from the View window drop down menu.
3. The Audio Setting dialog will be displayed. This allows you to set the following properties.
Volume Settings Adjustments
Threshold Microphone sensitivity
Microphone Volume of microphone
Speaker Volume of speakers
Enable Options
On Turn Audio on
Off Turn Audio off
Talk Set the Control Audio to Talk function only
Listen Set the Control Audio to Listen function only

Acer Classroom Manager v2
149
Acer Classroom Manager Video Player
Acer Classroom Manager provides exceptional multimedia support with full Audio, Video and remote control capabilities.
While the Video Player can be used to run a video file on the local workstation, Acer Classroom Manager’s remote control capabilities combined with full Audio Support enable you to use this tool to enhance training sessions and demonstrations across multiple PCs simultaneously. All standard video files, for example .avi and .mpg, are supported. The
Video Player runs locally on each Client workstation and the video file can be accessed locally or from a network drive. If video files are stored locally the impact on the network is minimised as only the data to control the player, e.g. start, stop, pause and synchronisation packets, are sent. If each Client machine retrieves the video file from a network drive you will place additional demands on the network.
For optimum performance, store the video files locally on each workstation, you may wish to use File Distribution to do this. Other influencing factors will be:
• The number of Client workstations accessing the file;
• The speed of the network e.g.: 10/100 MB;
• The size of the video file;
• Client workstation memory/performance specification;
• Other traffic on the network.
Notes:
• If the video file to be played does not exist on the Student machine Acer Classroom Manager will automatically send it to the Student.
• If a Client workstation is required to retrieve files from a Server, for smooth operation, ensure that the Client workstation has sufficient access rights to the relevant drive and files.
• The quality of the display will be affected by the video adapter of the workstation and how the screen resolution is configured.

Acer Classroom Manager v2
150
Play a Video file on a workstation
1. Choose {Student}{Show - Show Video} from the Control window drop down menu.
Or,
Right-click a Client icon in the List view and choose Show Video.
Or,
Click the Show Menu icon on the Control toolbar and choose Show Video.
2. The Show Video dialog will appear.
In the Video File field enter the location and name of the required
video, you can select Open to browse for the file.
3. Click Show.
4. A check will be made to ensure that the video file is available at the Student. If not, the video file will be automatically copied to the Student machine.
5. When the video file is launched, the Video Player Control Panel appears. Standard operations are available, Play, Stop, Pause etc.
Note: While the video is running, the Client workstations are locked.
Playing Videos via Explorer
Acer Classroom Manager also provides an option to run videos from outside the Tutor program. Simply navigate to the required video file in Explorer and launch it from the folder where it is stored. 1. Navigate to the folder containing the video file.
2. Right-click the required video and select Show with Acer Classroom Manager from the drop down list.

Acer Classroom Manager v2
151
3. The Tutor program will load, connect to the Known Clients and
display the Show Video dialog.
4. Confirm which Clients to include, the Video file will already be selected, and click Show.
Acer Classroom Manager Video Player Control Panel
The Video Player Control Panel operates in a similar manner to all audio and visual aids. Although the commands on the toolbar perform the same actions as would be expected please find a detailed explanation below.
File Menu - The File drop down menu contains the following options:
Open
Allows you to select and load the appropriate video file. Close Closes the open video file. Exit
Shuts down the Video Player. View Menu - The View drop down menu contains the following options: Toolbar Hides and displays the Video Player toolbar. Status Bar
Hides and displays the Status bar of the Video Player. Zoom Resizes the video screen Play Menu - The Play drop down menu contains the following options:
Play Starts the loaded video file. Stop Returns to the beginning of the loaded video file.

Acer Classroom Manager v2
152
Pause
Blanks the Clients video screen and pauses the video file at the Control workstation. Repeat The video file will be repeated until the Tutor stops this.
Start Returns to the beginning of the video file. End Fast forwards to the end of the video file. Mute Clients
If students are not using headphones while they are watching a video, the sound coming from each workstation can be distracting. This option turns audio off at the Client workstations but leaves it on at the Tutor machine. Help Menu - Provides access to the on-line Help and general Version information.

Acer Classroom Manager v2
153
Using Replay Files
When a Tutor remote controls a Student workstation they can record the screen, keyboard and mouse activity taking place. In addition, if the PCs
are configured for audio, any narration that takes place can also be recorded. The information is stored in a file that can be replayed at the Tutor machine and, if required, shown to other Students. The Replay facility can be configured to record at all or individual Student
machines. Local activity at the Tutor machine can also be recorded. Once enabled, activity is recorded as soon as a View session is opened. Recording stops when the View session is closed, at which point the stored Replay File becomes available for playback. A Show session can also be recorded enabling Clients to playback the
demonstration at their convenience. By default, a Replay file is saved as a .rpf file, these can be converted to AVI or WMV video files. Pre-set options will be provided for converting Replay files to video files. More advanced users can access the Replay conversion utility where you can control video resolution, audio quality,
start and end points of the video and much more. To launch the Replay conversion utility select {Start}{Programs}{Acer Classroom Manager} {Acer Classroom Manager Replay}. On Windows 8 machines right-click in the Start screen and choose All Apps at the bottom of the screen. Click the Acer Classroom Manager Replay icon.
Note: Replay Files store screen images and can therefore become very
large. Good housekeeping plays a vital role in maintaining files of this nature. It is recommended that old files are deleted on a regular basis.

Acer Classroom Manager v2
154
Record Replay Files For All Students
This procedure enables the Tutor to create a Replay file at any Student workstation that it remote controls. 1. Choose {View}{Current Settings-Replay Files} from the Control
window drop down menu. The Replay Files dialog will appear.
2. Enable the Record Replay Files check box. A Replay file will be
created each time the Tutor opens a view session at any Student machine.
3. Include Audio
In addition to the screen, mouse and keyboard activity, if the workstation is configured for Audio, you can record any microphone narration from the Tutor. Check this box to enable.
Note: Desktop sounds, music, etc, are unable to be recorded.
4. Prefix Files With Client Name
In order to identify each Replay file, filenames are prefixed with the Client Name and the date/time of the recording. Alternatively, by unchecking this box the files will be named sequentially in the format 00000001.rpf etc.
5. In Folder
Specify where the Replay Files are to be stored.
6. Click OK.
Acer Classroom Manager v2
155
Record Replay Files for Individual Students
This procedure enables Replay Files to be created at selected Student workstations. 1. View the required Student machine.
2. Choose {View}{Settings for Client-Replay Files} from the View window drop down menu. The Replay Files dialog will appear.
3. Enable the Record Replay Files check box. A Replay file will be created each time the Tutor opens a view session at this Student machine.
4. Include Audio
In addition to the screen, mouse and keyboard activity, if the workstation is configured for Audio, you can record any microphone narration from the Tutor. Check this box to enable.
Note: Desktop sounds, music, etc, are unable to be recorded.
5. Prefix Files With Client Name
In order to identify each Replay file, filenames are prefixed with the Client Name and the date/time of the recording. Alternatively, by unchecking this box the files will be named sequentially in the format 00000001.rpf etc.
6. In Folder
Specify where the Replay Files are to be stored. A separate folder can be specified for each Student.
7. Click OK. Recording will start immediately, close the View session to stop recording.
8. Repeat steps 1-7 for any other Student machines.
Record Replay Files at the Tutor
Activity at the local machine can be recorded and shown to Students.
1. Choose {School}{Record Files} from the Control window drop down
menu. 2. The Replay Files dialog will appear. Existing Replay files will be listed.

Acer Classroom Manager v2
156
3. Click Change to specify where you want the Replay files stored.
4. Click Create Replay to start recording. The Recording icon will appear in the task bar.
5. To stop recording, double click the Recording icon.
By default, filenames will be prefixed with ‘Local’ and the date and time of the recording. You can rename the file by over typing the default name. The Replay file will appear in the list.

Acer Classroom Manager v2
157
Watching Replay Files
Stored Replay Files can be watched by Tutors and, if required, shown to Students. At a local level, the Acer Classroom Manager Client program also provides a Replay option enabling Clients to launch files.
At the Control
1. Choose {School}{Replay Files} from the Control window drop down menu.
Or,
If displayed, click the Playback icon on the toolbar.
2. Select the required Replay File and click Play Replay File.
3. The Replay Window will open and start playing the file.
4. Choose {File}{Close} from the drop down menu to close the window.

Acer Classroom Manager v2
158
At the Client
1. Right-click the Acer Classroom Manager Client icon in the system tray and choose Replay.
Or,
Double-click the Client icon and choose {Commands}{Replay} from the drop down menu.
2. Navigate to the folder where the Replay Files are stored.
3. Select the file to replay.
4. Click Open. The Replay Window will appear. Use the Replay Controls to Start/Stop the file.
Replay Window - Control Panel
When viewing a replay file in full screen mode a control panel is displayed, this provides the controls for playing the recorded information. The control panel contains a replay time index that indicates where in the replay file you currently are, and displays information about the file being played.
The individual sub menus and available functions are: Stop and Play
The Stop button is shown when you are playing a replay file and the Play button when the file is stopped. Only one of these buttons is displayed at a time. The file is played until the end is reached or the Pause Marker is encountered. Rewind
Start playing the file from the beginning if it is already playing otherwise moves the replay index to the beginning of the file.
Skip to Previous marker
Moves the replay index to the previous activity marker or to the beginning of the file if there isn’t one. These markers are added at points when lots of activity was recorded at the Client.

Acer Classroom Manager v2
159
Frame Advance
Advance the replay index to the next frame. Press and hold this button
to Fast-Forward though the replay file. Skip to Next marker
Moves the replay index to the next activity marker or to the end of the file if there isn’t one. Mute
Turn audio on/off within the Replay file. Other Information
The current time index is displayed to the right of these controls in the hh:mm:ss.ms format. The name of the Client that the replay was recorded on, the date and time are displayed at the bottom of the window. Replay Marker
This marker can be positioned anywhere within the time frame of the
replay file. The marker is the small black triangle beneath the time index control. Click and drag this to the position where you want the file to stop playing. When the marker is encountered the replay stops, and you can then press play to continue past it.

Acer Classroom Manager v2
160
Showing Replay Files to Students
Using Acer Classroom Manager’s Show feature, a Tutor can show a stored Replay file to any number of connected Students. 1. Click the Show Menu icon on the Control toolbar and choose Show
Replay.
Or,
Choose {Student}{Show - Show Replay} from the Control window drop down menu.
Or, Choose {School}{Replay Files} from the Control window drop down menu and select Show Replay.
2. The Show Replay dialog will appear.
3. Browse for and select the required Replay file.
4. Click Show.
5. The Replay Window will open at the Tutor machine and start playing the Replay file to the selected Students.
6. Click End on the Replay window toolbar to end the show.

Acer Classroom Manager v2
161
Converting Replay Files to Video Files
Acer Classroom Manager Replay files can be converted to video files allowing them to be played outside of Acer Classroom Manager on a range of media players. Replay files can be converted to WMV and AVI formats.
Converting Replay Files 1. Select {School}{Replay Files} from The Control window. 2. The Replay Files dialog will open. 3. Select the Replay files to convert and click Convert File. 4. The wizard will guide you through the conversion process. Using the Replay Conversion Utility
For more advanced options when converting Replay files a Replay conversion utility is provided allowing you to control video resolution, audio quality, start and end points of the video and much more.
Note: The Replay conversion utility is installed by default when installing
the Acer Classroom Manager Tutor or Tech Console. You can also install the utility as a standalone component.
1. Select {Start}{Programs}{Acer Classroom Manager}{Acer
Classroom Manager Replay}.
Note: On Windows 8 machines right-click in the Start screen and
choose All Apps at the bottom of the screen. Click the Acer Classroom Manager Replay icon.
2. The Replay conversion utility will open. 3. Browse for the required Replay file and set the required properties. 4. Click Start Encoding.

Acer Classroom Manager v2
162
Show Application
The Show feature enables you to display the Control screen to Students. However, if a number of programs are open at the Control, there may be
occasions when you want to show a single application in isolation. To Show an Application
1. Choose {Student}{Show - Show Application} from the Control window drop down menu.
Or,
Right-click a selected Client icon and choose Show Application.
Or,
Click the Show Menu icon on the Control toolbar and choose Show Application.
2. The Show Application dialog will appear.
3. Drag the icon to the required application on the Controls desktop and release. (A pink border will appear around the selected application as you move the mouse around the desktop)
Or,
Click Select and choose the application from the displayed list.
Note: Acer Classroom Manager will identify if the Control is running
multiple monitors, giving you the option to confirm which one the selected application is sited on. If you are unsure which is the correct screen, click Identify. If only one monitor is detected, select Whole Desktop.
4. Click Show.
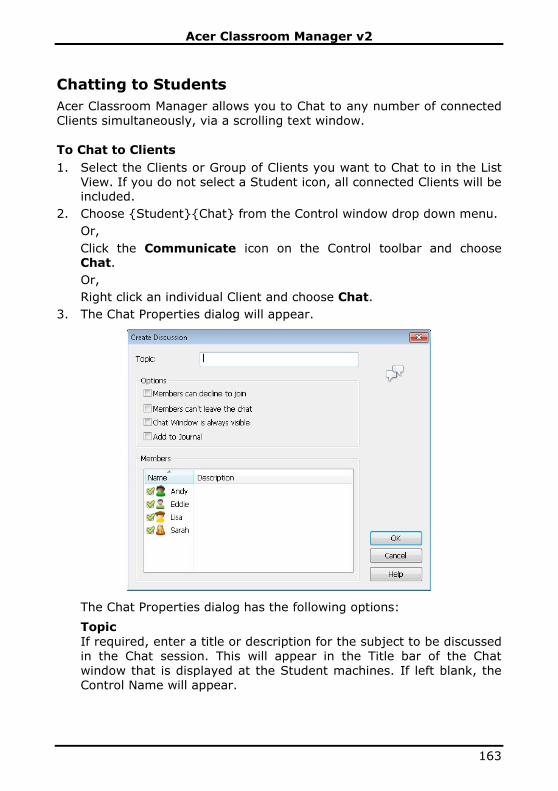
Acer Classroom Manager v2
163
Chatting to Students
Acer Classroom Manager allows you to Chat to any number of connected Clients simultaneously, via a scrolling text window.
To Chat to Clients
1. Select the Clients or Group of Clients you want to Chat to in the List View. If you do not select a Student icon, all connected Clients will be included.
2. Choose {Student}{Chat} from the Control window drop down menu.
Or,
Click the Communicate icon on the Control toolbar and choose Chat.
Or,
Right click an individual Client and choose Chat.
3. The Chat Properties dialog will appear.
The Chat Properties dialog has the following options:
Topic
If required, enter a title or description for the subject to be discussed in the Chat session. This will appear in the Title bar of the Chat window that is displayed at the Student machines. If left blank, the Control Name will appear.

Acer Classroom Manager v2
164
Members
To exclude Clients from the Chat session, remove the check mark next to the Student name.
Options
Members can decline to join
If checked, a message will appear at the Clients machine inviting them to join the Chat session. They can choose to Join or Decline.
Members can’t leave the chat If checked, the option for Clients to Leave the Chat session will be removed.
Chat Window is always visible If checked, the Chat window remains on the Clients desktop for the duration of the Chat session. Members cannot minimise the window.
Add to Journal
Adds the contents of the Chat session to the Student Journal. Confirm which Students to include in the Chat session and select any additional properties that should apply. Click OK to start the Chat session.
4. The Chat window will appear at the Control and Client workstations.

Acer Classroom Manager v2
165
The Chat Window
This window is displayed at each participating member’s machine and lists the progress of the Chat session. Only the Control or Group Leader can add or remove Clients from the session.
Unless the option is disabled in the Chat Properties dialog, Clients can choose to leave the session.
The following options are available from the Chat Window:-
Chat Menu
The content of a Chat session can be stored for future reference.
Choose Save As to create a file containing the text or choose Copy to be able to paste the Chat content into another application or file.
Each message is restricted to 128 characters. Check Auto Send long message to automatically send the message when the limit is reached.
You can add the content of the Chat session to the Student Journal by selecting Add to Journal.
Window Menu
Only the Control’s Chat window will have a window drop down menu. This menu enables you to swap between opened screens or Tile them.
Chat Progress
The main body of the Chat window is used to record the progress of a Chat session. It holds details of members who have joined or left the discussion, as well as the messages that have been sent by each
member.
Send Message
This is where you type your comments. Type the message and press Enter or click Send. Each message is restricted to 128 characters. You can automatically send the message when the limit is reached, select {Chat}{Auto Send long Message} from the Chat window drop down menu.
Note: Emoticons can be included within the message.

Acer Classroom Manager v2
166
Close
Ends the Chat session.
Members Members currently included in the Chat session are listed here. The Tutor can add or remove Students from the Chat session as required. Unless disabled, Clients have the option to Leave the session of their own accord.
Invite The Chat Properties dialog is initially used to select the Clients to include/exclude from the Chat session. To add Clients when the Chat session is in progress, click Invite. The Add Members dialog will appear, select the required Clients and click Add. You can send a copy of the Chat progress to new members by checking the Send discussion history box.
Note: Clients that have been removed or have decided to leave the Chat session can be invited back.
Eject To remove Clients from the Chat session, select the Client in the Members list and click Eject. Ejected Clients can be invited back into the
session if required.
Notes:
• Students can also initiate Chat sessions by opening the Client Main window and choosing {Commands}{Chat}.
• By default, the Student can only Chat to the Control. However, the Control can enable the option for Students to Chat to each other by selecting {View}{Current Settings - User Interface - Student} from the Control window drop down menu and checking Student to Student Chat.
Chat to a Client whilst Viewing
1. Choose {Tools}{Chat} from the View window drop down menu. or
Click the Chat icon on the toolbar. 2. The Chat Window will appear on the Control and Client workstation. To end Chat
1. Choose {Close} from the Chat window.

Acer Classroom Manager v2
167
Sending a Message to Students
With Acer Classroom Manager, you can send a message to all connected Students or the currently selected Students. If you send the same
message on a regular basis, you can store up to four pre-defined messages. To enter and send a new message
1. Select the Students you want to send the message to.
2. Right click and choose {Message}{Message}. Or, Choose {Student}{Message - Message} from the Control window drop down menu.
Or, Click the Communicate icon on the Control toolbar and select Message. Or,
If displayed, click the Message icon on the toolbar.
3. The Message dialog box will appear. Choose whether to send the message to all Connected Clients or only the Currently selected Clients. Enter the message and decide whether to show the message at the Clients PCs for a specified time.
Note: If the Student Journal has been started you will have the option to add the message to this.
4. Click Send. The Message will be displayed in a dialog at the Client screens and will remain until the User closes the dialog or the specified time limit expires.

Acer Classroom Manager v2
168
To Send a Quick Message
1. Click the Communicate icon on the toolbar. 2. Enter the message under Quick Message and click Send. 3. The message will be sent to all connected Students.
Send a message whilst Viewing
1. Choose {Client}{Message} from the View window drop down menu. or Click the Send a Message icon on the toolbar.
2. The Send Message dialog box will appear.
3. Enter your message.
4. Click Send. The message will be displayed on the Student screen currently being viewed by the Tutor and will remain until the Student clicks OK.
Creating Preset Messages
You can store up to four commonly used text messages that can be quickly broadcast to Students using the Message feature. 1. Click Communicate on the toolbar and select Edit under Preset
Messages.
Or,
Select {Student}{Message - Preset Messages} from the Control window drop down menu.
Or,
Right-click a Student icon and choose Message - Preset Messages.

Acer Classroom Manager v2
169
2. Enter the required text message(s).
3. Set any additional properties for each of the messages.
• Indicate how long the message should remain on the Students
screen.
• Choose an icon to be displayed alongside the message. This can be used to quickly identify the type of message, Information, Question, Warning, and Stop.
• You can further highlight the message by playing a sound at the Student machine.
4. Click OK when ready.
To Send a Pre-Defined Message
1. Select the required Student icons.
2. Right-click and select Message.
Or,
Choose {Student}{Message} from the drop down menu.
Or,
Click the Communicate icon.
3. Each of the pre-defined messages will be displayed, click the required item to send the message to Students.
Or,
To create a new message, select Preset Messages.

Acer Classroom Manager v2
170
Help Requests
Acer Classroom Manager allows a Client to Request Help from a Control. They do this either by selecting the request Help Command from the
Client menu (assuming that it has not been configured for quiet mode, which hides the Client icon) or by pressing the hotkeys set in the Client Configurator.
Note: If the Student Toolbar is enabled Students can request help by
clicking on the Help request icon.
To request help 1. Press the Hotkeys, usually ALT+LSHIFT+RSHIFT.
Or Click the Help Request icon in the Student toolbar.
2. This opens a dialog box into which they type the message.
3. Click OK.
4. The Help Request will then be sent to the connected Control.
Note: Students can send an alert to the Tutor when work is complete, they need help or they need urgent help. They do this by clicking
the Help Request icon in the Student toolbar, selecting an option from the Alert Teacher drop down list and clicking Alert. The Student toolbar will change colour depending on the alert selected. The Student icon at the Tutor will change colour to notify the Tutor what alert has been raised; green for work is complete, amber for help needed and red for urgent help needed.

Acer Classroom Manager v2
171
The Tutor can request support directly from a lab technician or network
manager, a Get Support icon will be displayed in the Control window toolbar allowing the Tutor to chat or send a message directly to the lab technician or network manager. This feature will need to be enabled in the Tech Console, speak to your lab technician or network manager for further information.
If a Student raises a Help Request an alert will be raised at the Tutor provided it currently has that Student connected. Any outstanding Help Requests will be visible to the Tutor with a Help Request icon displayed next to the Student and a badge indicating the number of outstanding help requests on the toolbar. This will show until that Help Request has been cleared.
To display current Help Requests
1. Choose {School}{Help Requests} from the Control window drop down menu bar.
Or Click the Help Request icon on the toolbar.
2. The Help request window will open and list the Requests. If there
are any help requests pending since the last time the Control connected to the Client, the Help Request window will be open as the Control initialises.
3. By clicking on the View Client or Chat toolbar buttons, you can reply to the Clients Help Request.
Note: If a Student has raised an alert at the Tutor, the Student icon at
the Tutor will change colour to notify the Tutor what alert has been raised; green for work is complete, amber for help needed and red for urgent help needed. You can switch these alerts off in
the Tutor configuration.

Acer Classroom Manager v2
172
Transferring Files
Acer Classroom Manager includes sophisticated File Transfer functionality that enables you to transfer files to and from the Control and Client.
Note: File Transfer functionality can be configured by clicking the File Transfer icon on the toolbar and selecting File Transfer options.
The Control’s folder structure and the files in each folder are displayed in the top half of the window. The Client’s folder structure and the files in each folder are displayed in the lower half of the window. To copy files and folders from a Control to a Client
1. Select the required Client in the List view.
2. Click the File Transfer icon on the toolbar and choose File Transfer.
Or,
Choose {Student}{File Transfer} from the Control window drop down menu.
Or,
Right-click the selected Client icons and choose File Transfer.
Or,

Acer Classroom Manager v2
173
If you are Viewing the Client, select the File Transfer icon on the
View window toolbar. 3. The File Transfer window to that Client will open.
4. From the Client Tree view, select the destination drive or folder into which the items will be copied.
5. From the Control List select the item(s) to be copied to the Client.
6. Click the toolbar Copy File button.
7. A confirmation dialog will be displayed, click Yes.
Note: The required item(s) can also be ‘dragged’ from the Control view
and ‘dropped’ into the appropriate folder in the Client view.
To copy files and Folders from a Client to a Control
1. Select the required Client in the List view.
2. Click the File Transfer icon on the toolbar and choose File Transfer.
Or,
Choose {Student}{File Transfer} from the Control window drop down menu.
Or,
Right-click the selected Client icons and choose File Transfer.
Or,
If you are Viewing the Client, select the File Transfer icon on the View window toolbar.
3. The File Transfer window to that Client will open.
4. From the Control Tree view, select the destination drive or folder into which the items will be copied.
5. From the Client List view, select the item(s) to be copied to the Control.
6. Click the toolbar Copy File button.
7. A confirmation dialog will be displayed, click Yes.
Note: The required item(s) can also be ‘dragged’ from the Client view and ‘dropped’ into the appropriate folder in the Control view.

Acer Classroom Manager v2
174
To transfer files between Clients
With Acer Classroom Manager’s File Transfer it is also possible to copy files and folders between two Clients. To do this, connect to each Client and display the File Transfer window for each. Arrange the File Transfer Windows so you can see both and simply drag file/folders from one Client to the other.
You can see more of a Clients files and folders by moving the horizontal sizing bar or clicking on the Maximise button located above the Clients folder tree. Deleting files and folders
You can delete files and folders from either a Control or Client machine
using the File Transfer window. To delete a file 1. Select the file you wish to delete. 2. Click the toolbar Delete File button. 3. A confirmation dialog will be displayed, click Yes.
To delete a Folder 1. Select the folder you wish to delete. 2. Click the toolbar Delete Folder button. 3. The Remove folder dialog will be displayed. 4. Select the Include Contents check box. 5. Click Yes.
Notes: • You cannot remove more than one folder at a time. If you have
several folders selected in the List View when performing the Delete
operation, only the last selected folder will be removed. • By default, all files deleted from the Local pane will be sent to the
Recycle bin, this can be changed in the File Transfer settings.

Acer Classroom Manager v2
175
Distributing Files
As well as enabling you to Transfer Files to and from individual Clients, Acer Classroom Manager also allows you to Distribute Files to multiple
Clients simultaneously. You can Distribute Files to:
• All connected Clients;
• Selected Clients;
• A pre-defined Group of Clients.
Note: When distributing files to Clients, the files are sent to each Client machine in turn. In some network environments where there is limited network bandwidth available or when broadcasting to
larger numbers of machines this can affect performance. In these circumstances, Acer Classroom Manager's Broadcast File Distribution facility can be enabled. This results in the files being sent to all machines simultaneously thus improving the speed of transfer.
Whilst reducing overall network traffic generated by Acer
Classroom Manager, using this feature will generate additional broadcast packets on your network. It is recommended that you consult your network administrator before using this feature.
To Distribute Files to a defined Group of Clients
1. Select the appropriate tab from the Group bar in the Control window.
2. Click the File Transfer icon drop down arrow on the toolbar, selecting File Distribution from the list of features.
Or,
If displayed, select the File Distribution icon on the toolbar.
3. The File Distribution window will appear.

Acer Classroom Manager v2
176
4. From the Local Pane Tree view, select the item(s) to be copied to the Clients.
5. The location on the Client workstations where the files/folders are copied to is called the Destination Folder. Unless otherwise specified, the Client Destination Folder will be the same as the item(s) location
on the Control workstation. If the Client does not have the same Folder available, the item(s) will be copied to the C Drive by default and the folders automatically created. Or, To set a specific destination folder on the Client workstation, select the Client icon in the Remote Pane and click Set Destination in the
toolbar. Specify a destination then click OK.
6. Click Copy. To Distribute Files to a selected number of Clients
1. Click the File Transfer icon drop down arrow on the toolbar, selecting File Distribution from the list of features.
Or,
If displayed, select the File Distribution icon on the toolbar.
2. The File Distribution window will appear.

Acer Classroom Manager v2
177
3. In the Remote Pane indicate which Clients you wish to copy files to by checking the tick box beside the Client name.
4. From the Local Pane Tree view, select the item(s) to be copied to the Clients.
5. The location on the Client workstations where the files/folders are copied to is called the Destination Folder. Unless otherwise specified, the Client Destination Folder will be the same as the item(s) location on the Control workstation. If the Client does not have the same Folder available, the item(s) will be copied to the C Drive by default and the folders automatically created.
Or,
To set a specific Destination Folder on the Client workstation, right
click the Client icon in the Remote Pane and choose Set Destination. Specify a destination then click OK.
6. Click Copy.

Acer Classroom Manager v2
178
Sending and Collecting Work
The Send/Collect work feature enables you to send a document or a number of documents to individual or multiple Client workstations. You
can then collect Students’ responses on your workstation. To Send work
Two methods are available for sending pre-prepared work files to Student workstations: • Quick Send is useful for one-off operations where you want to send
work to all connected Students or a defined group of Students.
• Advanced Send enables you to store the properties of an operation that will be performed regularly and provides greater flexibility as to which Students the work is sent to.
To Send Work Using Quick Send
1. Decide which Students to send work to, All or a defined Group. You
cannot select individual Students using Quick Send.
2. Choose {School}{Send/Collect Work – Quick Send} from the Control window drop down menu.
Or,
Click the Send/Collect Work icon on the Control toolbar and choose Send Work.
3. The Quick Send dialog will appear.

Acer Classroom Manager v2
179
4. List the file(s) to send to the Students. Files should include a full
path and optionally a wildcard specification. You can include multiple specifications by separating them with ‘;’
Or,
Click the Browse button to locate the file(s).
Or, Enter the path for the file or folder in the edit box and click Add.
5. Specify the folder at the Student workstation to copy the files to. A new folder will be created if necessary.
6. Click Send.
7. The result of the operation will be displayed for you to check that the work has been sent successfully.
To Send Work Using Advanced Send
1. Decide which Students to send work to, All or a defined Group. You will have the opportunity to exclude Students if required.
2. Choose {School}{Send/Collect Work - Advanced} from the Control window drop down menu bar.
Or,
Click the Send/Collect Work icon on the Control toolbar and select Send/Collect.
3. The Send/Collect Work wizard will open.
4. Select an operation from the list and click Send Work. The Select Students dialog will appear.
Or,
Add a new operation by clicking New and completing the wizard.

Acer Classroom Manager v2
180
Once work has been sent to the Students you will be able to see the
current status from the Send/Collect Work icon drop down menu. You can toggle between showing Students who have completed their work or those with items remaining. The Students can open work items from the Student toolbar and click when a work item is complete, this will then update the status in the
Send/Collect Work icon drop down menu.
To Collect work
Two methods are available for retrieving completed work files from Student workstations: • The Quick Collect option remembers the last file(s) sent via Quick
Send and provides a quick and easy method for retrieving the work back at the end of a session.
• Advanced Collect lets you select the file(s) to retrieve from a list
of pre-defined Send/Collect operations and provides greater flexibility as to which Students the work is collected from.

Acer Classroom Manager v2
181
To Collect Work Using Quick Collect
1. Choose {School}{Send/Collect Work – Quick Collect} from the Control window drop down menu.
Or,
Click the Send/Collect Work icon on the Control toolbar and select Collect Work.
Or,
If displayed, click the Collect Work icon on the Control toolbar.
2. The Quick Collect dialog will appear.
3. Specify the name of the file(s) to collect. e.g. *.* or Test1.TXT;Test2.TXT
4. Specify the folder that the file(s) are stored in, e.g.: C:\TEMP, and whether you want to remove the file from the Student workstation after it has been collected.
5. Specify the folder on the Control workstation to collect the file(s) in, e.g.: C:\ TEMP
6. Click Collect.
7. The result of the operation will be displayed for you to check that the work has been collected successfully.
To Collect Work Using Advanced Collect
1. Choose {School}{Send/Collect Work - Advanced} from the Control window drop down menu bar.
Or,
Click the Send/Collect icon drop down arrow on the Control toolbar and select Send/Collect.
2. The Send/Collect Work wizard will open.

Acer Classroom Manager v2
182
3. Select the required operation from the list and click Collect Work.
4. The Select Students dialog will appear. Select the Students that you want to retrieve the file(s) from.
5. Click OK.
6. The result of the operation will be displayed for you to check that the work has been collected successfully.
To change the Properties of an Operation
1. Choose {School}{Send/Collect Work - Advanced} from the Control window drop down menu bar.
Or,
Click the Send/Collect Work icon on the Control toolbar and select Send/Collect.
2. The Send/Collect Work wizard will open.
3. Select an operation from the list and click Properties.
4. The Properties dialog will appear.
5. Adjust as necessary.

Acer Classroom Manager v2
183
Remotely Launching applications on Student
workstations
This feature allows you to execute or open a software application, on a Client or a Group of Client workstations without actually Remote Controlling them. For example, after showing Students how to use a MS Office application you might want to start the application on their workstations.
Note: The application itself must be installed on, or available to, the Client workstations.
To launch an application on a Student workstation
1. Select the required Client.
2. Choose {Student}{Launch Application} from the Control window drop down menu.
3. The Launch Application dialog will appear.
4. Click Add.
5. Enter the name and path of the application to execute at the Client.
Or, Click the Browse button and select an executable application on the Tutor workstation.

Acer Classroom Manager v2
184
Notes:
• Check that Client applications are stored in the same location as the Control to ensure successful execution.
• If you want to launch a specific file with the application, you must separate the two instructions with quotes. For example, “C:\Program Files\Microsoft Office\Excel.exe” “C:\My
Documents\Accounts.xls”.
6. Click OK.
7. The application icon will be displayed in the Launch Application dialog and saved for future use.
Note: If you only want to execute applications to Clients that are
logged on select the option "Execute Only if the Client is Logged on".
8. Select the required application and click Launch.
Note: Before clicking Launch you have the option to tick the Show
Errors box. This will notify you of any errors when launching applications at Students. This option is only available will launching to multiple Students.
To Launch an Application on a Group of Students
1. Select the required Group tab.
2. Choose {Group}{Launch Applications} from the Control window drop down menu bar.
3. The Launch Application dialog will appear.
4. Click Add.
5. Enter the name and path of the application to launch at the Student.
Or,
Click the Browse button and select an executable application on the Tutor workstation.
Note: Check that Client applications are stored in the same location
as the Control to ensure successful execution.
6. Click OK.
7. The application icon will be displayed in the Launch Application dialog and saved for future use.
Note: If you only want to execute applications to Clients that are logged on select the option "Execute Only if the Client is Logged on".
8. Select the required application and click Launch.

Acer Classroom Manager v2
185
Launch an application on a Student workstation whilst Viewing
1. Choose {Client}{Launch Application} from the View window drop down menu.
Or Click the Launch Application icon on the toolbar.
2. The Execute at Client dialog will appear.
3. Select the required application and click Launch.
4. Select the application to launch or click Add to add a new one. Quick Launch Enables you to launch an application or web site to Students without having to direct your way through the drop down menus.
1. Click Quick Launch on the toolbar. 2. Click Add Item and select to add either an application or web site.
Or
Drag the required application into the window. 3. Right click the required application or web site and select Launch at
Students.
Note: You can edit the properties of a saved application or web site.
Right click the required item in the Quick Launch window and click Properties.

Acer Classroom Manager v2
186
To edit a saved Executable application
1. Open the Execute Application dialog. 2. Select the Application to edit. 3. Click Properties. 4. Edit the required details and click OK. 5. Click Close
To remove a saved Executable application
1. Open the Execute Application dialog.
2. Select the Application to remove.
3. Click Remove.
4. Click Close.

Acer Classroom Manager v2
187
User Defined Tools
As well as allowing a Tutor to launch applications at Student workstations, you can automatically run a task on a Tutor workstation
using a Defined Tool.
To Add a Tool
1. Choose {School}{Tools – Edit} from the Control window drop down menu.
2. The User Defined Tool dialog will appear.
3. Click the Add button.
4. The Add Tool dialog will appear.
5. Enter the required information.
6. Click OK. The new tool will be listed on the Tools menu.
7. Click Close. To run a Tool
1. Choose {School}{Tools} from the Control window drop down menus.
2. Select the tool you wish to run. The Tool will automatically run.
To Edit a Tool
1. Choose {School}{Tools – Edit} from the Control window drop down menus.
2. The User Defined Tool dialog will appear.
3. Select the tool you wish to edit.
4. Click the Edit button.
5. The Edit dialog will appear.
6. Edit the appropriate information, click OK.
Acer Classroom Manager v2
188
To Delete a Tool
1. Choose {School}{Tools – Edit} from the Control window drop down menus.
2. The User Defined Tool dialog will appear.
3. Select the tool you wish to delete.
4. Click the Delete button.
5. A confirmation dialog will appear, click Yes. The Tool will be removed.

Acer Classroom Manager v2
189
Rebooting or Logging out Students
Having connected to a Client or Group of Clients you are able to remotely Logout or Reboot the Client workstations at the end of a session. This is
a simple way to prepare multiple workstations for the next group of students. To Reboot or Logout a Client
1. Select a Client or Group of Clients.
2. Choose {Student}{Power Management - Reboot or Logout} from the Control window drop down menu.
Or,
Click the Manage icon drop down arrow on the Control toolbar and select Reboot or Logout.
Or,
If displayed, click the Reboot or Logout icon on the toolbar.
3. A message will appear, confirming the Client(s) included in the Reboot/Logout.
4. Click Yes to continue.
To Reboot or Logout a Client whilst Viewing
1. Choose {Client}{Reboot or Logout} from the View window drop down menu.
2. A message will appear, confirming the Client included in the Reboot/Logout.
3. Click Yes to continue.

Acer Classroom Manager v2
190
Web Control Module
The Web Control Module is used to monitor and control the websites visited by connected Students. A record of sites visited in a session can
be stored and, if required, the Tutor can restrict or approve the use of specific URLs. In addition the Tutor can temporarily suspend all Internet access.
Note: Supported Internet Browsers for Internet metering and
restrictions are IE 5.5 or higher, Firefox 2 or higher and Google Chrome. The following Browsers only support Internet restrictions: Apple Safari 5.0, Opera 9 and higher.
1. Choose {View}{Mode - Web View} from the Control window drop
down menu.
Or,
Click the Web Control icon on the left hand side of the Control window.
In ‘Web’ Mode you can view details of Approved or Restricted Websites and use the available icons to:

Acer Classroom Manager v2
191
Revert back to unrestricted access if restrictions
have been in place.
Activate the “Approved Site List”. The Student will only be able to view url’s that are in the approved list. All other url’s are blocked. When the Student accesses the Internet they are forced to choose an Approved Site rather than
being able to surf at will.
Activate the “Restricted Site List”. The Student will not be able to view url’s that are in the restricted list but will be able to view all other url’s.
Block all access to the Internet.
Activate "Safe Search" mode. Stops inappropriate web sites being displayed while Students are using search engines.
Activate "Block FTP" sites. Block Students from accessing FTP sites.
Notes: • A padlock will be displayed next to the Web Control view icon when
there are global policy restrictions in force. You can override the
restrictions in the Tutor configuration. • To temporarily block web access for all Students, select the Block
All icon on the Control toolbar. An indicator will appear next to the Student icons to confirm Internet usage is suspended. This feature only works with IE based browsers.

Acer Classroom Manager v2
192
The Web Control Module can be used to perform the following
functions: Identify Websites currently running on the Student workstation
In the List View, the Student icons can be viewed in two different ways. Choose {View}{Large Icons/Details} or right click in the List view and select one of these options to change the layout of the Student Icons.
The lower panes can be minimised to make more room for the Student
thumbnails. Click the button.
An icon is displayed next to the Student icon informing the Tutor of the current Student activity. This icon will be the default Internet Explorer icon or a personalised url icon.
Large Icons
Details
If the url is currently listed in the Approved or Restricted lists, then a visual Green (Approved) or Red (Restricted) identifier is shown
surrounding the url icon to make identification easier. If the List view is in “Details” layout then a list of all other url’s running on the Student workstation is also displayed.

Acer Classroom Manager v2
193
When viewing any one of the four layout options, the order of the
Student icons can also be rearranged by the Tutor. Right click in the List view and choose {Arrange}. The Tutor is able to change the layout of the icons using the following options: By Name Student icons will be arranged in
alphabetical order according to their Client
Name/ Display Name/ Student Register Name.
By Current Web Site Student Icons will be arranged in alphabetical order according to the current url the Student is viewing.
By All Web Sites Student Icons will be arranged in alphabetical order according to the running
url’s on the Student workstation. By Policy Student icons will be arranged in
alphabetical order according to the current policy set in the Tech Console. This option will only be displayed if there is a policy in force.
Selection of one of the above options is identified by a blue dot.
Auto Arrange If a new Student has been added to the list, or a new application is running on a
Student machine, this option will automatically arrange the icons into the previously selected order above. A blue tick will identify selection of this option. To deselect this option, simply re-click Auto Arrange and the tick will disappear.
Ascending If this option has been selected, the student icons will appear in ascending order according to the previously selected option above. A blue tick will identify selection of this option. To deselect this option, simply re-click Ascending and the tick will disappear. This will arrange the
Student icons in descending order. Align to Image Centres This option will only be available if a
background image has been set to tile. This will align the Student icons to the centre of the image.

Acer Classroom Manager v2
194
Close the current/running Website on a Student workstation
1. To close a url on a Student workstation choose {View}{Details}.
2. The Details List view will appear.
3. Right click a url icon under Current Web Site or All Web Sites.
4. Choose Close Browser.
The url will be closed at the Student machine and the url icon will
disappear from the List view.
Note: By right clicking on a url icon in the Approved or Restricted List, the Tutor is able to close a url on all connected Students, by
choosing Close at Students.
Change the current Website running on a Student workstation
1. To change the current url running on a Student workstation choose {View}{Details}.
2. The Details List view will appear.
3. Right click a url icon listed under All Web Sites.
4. Choose Activate.
5. The newly activated url will now replace the current url running on the Student workstation.
6. The icon listed under Current Web Site will be replaced with the newly activated url icon.
Launch a Website on all connected Students
1. Right click a url icon in the Approved Sites List.
2. Choose Send to Students.
3. The url will be launched on all connected Student workstations.
4. In the List view the launched url icon will appear in the current web site list.
Or,
1. Highlight a url in the Approved Applications List.
2. Drag and drop the highlighted url into the List view.
3. The url will be launched on all connected Student workstations.
4. In the List view the launched url icon will appear in the current web site list.

Acer Classroom Manager v2
195
Setting up an Approved or Restricted Web Site List
Approved Sites
When activated, the Student is only able to view the url’s specified on this list. A page will appear at the Student machines displaying the list of
approved sites that they can choose from. This will only appear if the Student Toolbar is disabled.
Restricted Sites
When activated, the Student is unable
to view the url’s specified on this list. However, all other sites, even those that are not on the Approved List, can be viewed.
Notes: • To temporarily block web access for all Students, select the Block
All icon on the Control toolbar. An indicator will appear next to the
Student icons to confirm Internet usage is suspended. This feature only works with IE based browsers.
• By default, keywords are entered to prevent/ allow a Student to view a URL that includes these keywords. This can be used to deal with websites that are re-directed.
• To ensure Students are only viewing the appropriate pages in a website you can approve/restrict Sub-URLs, specific web pages and have different parts of the same website approved/restricted. i.e.
www.bbc.co.uk/learning can be restricted but www.bbc.co.uk/learning/history can be approved. Students will only be able to view pages relating to history and not view pages relating to Science or English.
• Web restrictions can be applied at startup. Choose {School}{Configuration}{Start Options - Restrictions} from the Control window drop down menu.

Acer Classroom Manager v2
196
Add a Website to your Approved or Restricted List
1. Click + to add a url to your Approved or Restricted list.
Or,
Right click in the list boxes and select Add Website.
2. The Add Web Site dialog will appear.
2. Type in the website address under URL, e.g. www.google.com
4. Click View to check that the url website address is correct.
5. Type in the Description, e.g. Acer Classroom Manager (this is optional).
6. Click OK.
7. The url icon and description will appear under the Approved or Restricted List.
Or,
1. Choose {View}{Details}.
2. Right click a url icon in the List View under Current Web Site or All
Web Sites
3. Choose Add to Approved List.
Or,
Choose Add to Restricted List.
4. The url icon and description will appear under the Approved or Restricted List.
Note: You can also add a URL to the Approved or Restricted list from the Co-Browser.

Acer Classroom Manager v2
197
Remove a Website from your Approved or Restricted List
1. To remove a url from the list, simply highlight the chosen url and
click x.
Or, Right click in the list boxes and select Remove Site.
Apply Approved or Restricted Web Sites
Restrictions can be applied to individual Students or all connected Students. Students can view the current restrictions in the Student Toolbar. 1. If you want to apply restrictions to individual Students select their
icons in the List View
2. To apply these restrictions choose {Web}{Allow Approved Websites Only or Block Restricted Websites}
Or,
Click the relevant restriction icon at the bottom of the Control window. Or, Click the Web Access icon on the Control toolbar and choose
Approved Only or Block Restricted.
3. To acknowledge which restriction has been activated an appropriate indicator will appear next to the Student icons. (When viewing Large icons only). Red for restricted, green for approved.
4. If a Student is currently viewing a website included in the activated restriction list they will be redirected to a message stating that the
url has been blocked by the Tutor.
Notes: • You can amend the URL that restricted websites will be redirected to.
Choose {School}{Configuration}{Administration - Security} from the Control window drop down menu and enter the required URL under Redirect URL.
• Full internet redirection is supported on Internet Explorer, Netscape (in IE Mode) and Browsers that provide IE based rendering. For Mozilla and Firefox the Browser window will close.
• You can specify a time limit that certain Internet permissions apply for. Select {Web}{Allow access for limited time}, once the time limit has expired the permission will revert to "Block All".

Acer Classroom Manager v2
198
End Approved or Restricted Web Sites
1. To remove the restrictions for individual Students, select their icons in the List view.
2. Choose {Web}{Unrestricted Access} from the drop down menu
Or,
Click the Unrestricted icon at the bottom of the Control window.
Or, Click the Web Access icon on the Control toolbar and choose Unrestricted.
3. The green or red indicator will be removed from the selected Student icons.
Note: Because Internet browsers often hold the results of recent web
access attempts in cache memory, lifting an internet restriction may not appear to take effect immediately. If this happens you may have to restart the browser. The same situation may arise if you are using an application which requires Internet access to a site that has been blocked. Once the restriction has been lifted you may need to restart the application for it to recognise the
change.
Block All Web Access
1. If you want to block Web Access to individual Students select their icons in the List view.

Acer Classroom Manager v2
199
2. Choose {Web}{Restrict all Websites} from the Control window drop down menu.
Or, Click the Restrict All icon at the bottom of the Control window. Or, Click the Web Access icon on the toolbar and choose Restrict All.
3. All Web access will be blocked for the selected Students.
Note: You can also block Web access for all connected Students from
the Tutor Toolbar.
Include Proxy Overrides
Allows you to include websites that have been added to the Proxy Settings Exceptions list, when using the Approved Website list. 1. Choose {Web}{Include Proxy Overrides} from the Control window
drop down menu.
2. Apply the Approved Websites Only list.
3. Students will only be able to view websites from the Approved list and the Proxy Settings Exception list.
Note: Websites listed in the Proxy Settings Exception list will not appear in the list of approved websites at the Student.
Apply Safe Search Mode
Prevents inappropriate content from being displayed while Students are using search engines.
1. Choose {Web}{Safe Search Mode} from the Control window drop
down menu.
Or,
Click the Safe Search icon at the bottom of the Control window.
Block FTP Sites
Prevent Students from accessing FTP sites to stop the exchanging of files. 1. Choose {Web}{Block FTP Sites} from the Control window drop down
menu.

Acer Classroom Manager v2
200
Or,
Click the Block FTP icon at the bottom of the Control window.
2. Access to FTP sites will now be blocked.
Create a new Website List
1. To create a new Website List choose {Web}{Create new Website List}.
2. A dialog will appear. Enter a file name and click Create.
3. A new blank Website List will appear.
Note: The default Website List is saved as Acer Classroom Manager.web
Open an existing Website List
1. To open an existing Website List choose {Web}{Load Existing Website List}
2. Highlight the relevant file and click Open.
3. The existing Website List will appear. Save an Website List
1. To save a current Website List choose {Web}{Save Website List as} from the drop down menu.
2. A dialog will appear. Enter a file name and click Save.
3. The current Website List will be saved.
Notes:
• Any changes that have been made to the new or existing Web List will be automatically saved when a new Web List is created, or when
you exit out of the Acer Classroom Manager program.
• The default Web List is saved as Acer Classroom Manager.web.

Acer Classroom Manager v2
201
View Web History
This feature of the Web Control Module enables you to monitor the websites being visited by connected Students and, if required, store or print a permanent record. 1. In Web View choose {Web}{History} from the Control window drop
down menu.
2. The Web History dialog will appear.
This provides details of the sites visited by the Student(s) during the currently connected session.
The available options are: Show Web History for:
The list can be viewed by currently Selected Client or All Connected Clients.
Refresh
While viewing the list click Refresh at any time to update the
display.

Acer Classroom Manager v2
202
Save
To keep a permanent record of the displayed items, you can save the
details to a text file before disconnecting. Print
Prints details of the currently displayed items. Export
Exports data to a CSV file allowing the data to be imported if needed. Close
Closes the History dialog but details will continue to be recorded
while the Control is connected.

Acer Classroom Manager v2
203
Co-Browser
Acer Classroom Manager provides the Tutor and Students with a shared Web Browser. This enables the Tutor to lead a browser session,
navigating Students through various web pages, with the added security of locking the Students so they can only view the pages opened by the Tutor.
Note: The Co-Browser is not supported with websites that use Flash
Navigation or Java Scripting.
To open a Co-Browse Session
1. Select the Client(s) that are to be included in the session.
2. Choose {Student}{Co-Browse} from the Co-Browse window drop down menu.
Or,
If displayed, click the Co-Browse icon on the toolbar.
3. The Co-Browse window will open and also appear on the selected
Student machines. From here you can open web pages and create new tabs that allow you to navigate between web pages.

Acer Classroom Manager v2
204
Using the Co-Browser
Using the Co-Browser is a very straightforward process with a simple to use interface. Once the Co-Browser is active on the selected Students screens, you can guide Students through a variety of web pages to suit the needs of your lesson. You can view multiple websites by creating new tabs which allows you to easily switch between different web sites.
To Create a New Tab
1. Select {File}{New Tab} from the Co-Browser drop down menu.
2. A new tab will appear. Enter the website address in the Address bar and select Go.
3. The website will be displayed under the new tab.
To Approve/Restrict Websites
You can add websites to the approved or restricted lists in the Web Control Module from the Co-Browser window. 1. Select the website you wish to approve or restrict.
2. Choose {Restrictions}{Add to Approved Sites or Add to Restricted Sites} from the Co-Browser drop down menu.
3. The website will now either be approved or restricted and this will apply to the Students when using the Co-Browser.
Notes:
• There are three different modes that you can apply to Students while they are using the Co-Browser, Locked, Restricted and Free, by default the Students will be locked.
• You can pause the Students Co-Browse session by selecting the Pause icon on the toolbar. This may be useful if you wish to perform any functions you don’t wish the Students to see.
• To set the Students web pages to the same as the Tutor’s click the Synchronise icon on the toolbar.

Acer Classroom Manager v2
205
Lock/Unlock Students in the Co-browser
There are several different modes you can apply to the Students when using the Co-Browser. Lock Students, lets you guide Students through a selection of web pages with Students having no control over what they are viewing. Restrict Students, enables Students to have some control but only view web pages that you have selected. Free Students, allows
Students have full control over what websites they can access.
Note: Whilst the Students are unlocked, any restrictions applied in the Web Control Module will apply to the Students in the Co-Browser
session.
To Lock Students
1. Select {File}{Lock Students} from the Co-Browser drop down menu.
Or,
Click the Lock/Unlock icon on the toolbar and select Lock Students.
2. Students will now be locked, they will only be able to view websites that the Tutor shows them, with no access to any of the Co-Browse functions.
To Free Students
1. Select {File}{Free Students} from the Co-Browser drop down menu.
Or,
Click the Lock/Unlock icon on the toolbar and select Free Students.
2. Students will now have control over the Co-Browser and will be able to open new websites etc. Any web pages or tabs selected by the Tutor will be left open.

Acer Classroom Manager v2
206
To Restrict Students
1. Select {File}{Restrict Students} from the Co-Browser drop down menu.
Or,
Click the Lock/Unlock icon on the toolbar and select Restrict Students.
Students will be unlocked, but they will only be able to access web pages or tabs left open by the Tutor. Students will not have access to other websites or be able to open links on existing pages.

Acer Classroom Manager v2
207
Application Control Module
The Application Control module is used to monitor and control the applications used by connected Students. A record of applications used in
a session can be stored and, if required, the Tutor can restrict or approve the use of applications. 1. Choose {View}{Mode - Application View} from the Control window
drop down menu.
Or,
Click the Application Control icon on the left hand side of the Control window.
In ‘Applications’ Mode you can view details of Approved or Restricted Applications and use the available icons to:
Revert back to unrestricted access if application restrictions have been in place.
Activate the “Approved Applications” list. The Student will only be able to run applications that are in the approved list. All other applications are
blocked.

Acer Classroom Manager v2
208
Activate the “Restricted Applications” list. The
Student will not be able to run applications that are in the restricted list but will be able to run all other applications.
Note: A padlock will be displayed next to the Application Control view
icon when there are global policy restrictions in force. You can override the restrictions in the Tutor configuration.
The Application Control Module can be used to perform the following functions: Identify applications currently running on the Student workstation
In the List View, the student icons can be viewed in two different ways. Choose {View}{Large Icons/Details} or right click in the List view and select one of these options to change the layout of the Student Icons. The lower panes can be minimised to make more room for the Student
thumbnails. Click the button.
An icon is displayed next to the Student icon informing the Tutor of the current application in use.
Large Icons
Details
If the application is currently listed in the Approved or Restricted lists, then a visual Green (Approved) or Red (Restricted) identifier is shown surrounding the application icon to make identification easier. If the List view is in “Details” layout then a list of all other applications
running on the Student workstation is also displayed.

Acer Classroom Manager v2
209
When viewing any one of the four layout options, the order of the
Student and Application icons can also be rearranged by the Tutor. Right click in the List view and choose {Arrange}. The Tutor is able to change the layout of the icons using the following options: By Name Student icons will be arranged in alphabetical order
according to their Client Name/ Display Name/
Student Register Name.
By Current Application
Student icons will be arranged in alphabetical order according to the current application.
By Running Applications
Student icons will be arranged in alphabetical order according to the running applications on the Student workstation.
By Policy Student icons will be arranged in alphabetical order
according to the current policy set in the Tech Console. This option will only be displayed if there is a policy in force.
Selection of one of the above options is identified by a blue dot. Auto Arrange If a new Student has been added to the list, or a
new application is running on a Student machine, this option will automatically arrange the icons into the previously selected order above. A blue tick will identify selection of this option. To deselect this option, simply re-click Auto Arrange and the tick will disappear.
Ascending If this option has been selected, the Student icons will appear in ascending order according to the previously selected option above. A blue tick will identify selection of this option. To deselect this option, simply re-click Ascending and the tick will disappear. This will arrange the Student icons in descending order.
Align to Image Centres
This option will only be available if a background image has been set to tile. This will align the Student icons to the centre of the image.

Acer Classroom Manager v2
210
Close current/ running applications on a Student workstation
The Tutor has two options when closing down an application on a Student workstation:
Close Close down an application but respect any applications
requests at the Student e.g. to save file before closing.
Kill Force the application to close, without any application prompts.
1. To close an application running on a Student workstation choose {View}{Details).
2. The Details List view will appear.
3. Right click an application icon listed under Current Application or Running Application in the List view.
4. Choose Close Application or Kill Process.
5. The application will be closed at the Student workstation and the icon
will disappear from the List view.
Note: By right clicking on an application in the Approved or Restricted
List, the Tutor is able to Close a running application on all connected Students.
To close all applications at the Student All running applications at the Student will be forced to close. 1. Select the Students you wish to close applications at. 2. Select the Student Desktop icon on the toolbar. 3. Click Clear Desktop and then click Yes.

Acer Classroom Manager v2
211
Change the current application running on a Student workstation
1. To change the current application running on a Student machine choose {View}{Details).
2. The Details List view will appear.
3. Right click an application icon listed under Running Application.
4. Choose Activate.
5. The current application running on the Student workstation will now
be replaced by the newly activated application.
6. The icon listed under Current Application will be replaced with the newly activated application icon.
Note: You can minimise all applications at Student machines. Select
Student Desktop on the toolbar and click Show Desktop.
Launch an application on all connected Students
1. Right click an application icon in the Approved Applications List.
2. Choose Send to Students.
3. The application will be Launched on all connected Student workstations.
4. In the List view the Launched application icon will appear in the Current application list.
Or,
1. Highlight an application in the Approved Applications List.
2. Drag and drop the highlighted application into the List view.
3. The application will be Launched on all connected Student workstations.
4. In the List view the Launched application icon will appear in the
current application list.

Acer Classroom Manager v2
212
Setting up Approved or Restricted Applications
Approved Applications
The Student is only able to run the applications specified on this list.
Restricted Applications
The Student is unable to run the
applications specified on this list.
Note: Application restrictions can be applied at startup. Choose {School}{Configuration}{Start Options - Restrictions} from the Control window drop down menu.
Add an application to your Approved or Restricted List
1. Click + to add an application to your List.
Or,
Right click in the List boxes and select Add Application.
Or,
Drag and drop applications from your desktop or Start Menu into the Approved or Restricted List box.
2. The Add Application dialog will appear.
3. Type in the .exe file name (e.g. winword.exe) under Application or Browse for your chosen application.
4. Type in the description e.g. Microsoft Word.
5. Click OK.
6. The application icon, name and description will appear in your Approved or Restricted List box.

Acer Classroom Manager v2
213
Or,
1. Choose {View}{Details}.
2. Right click an application icon in the List view under “Current Application” or “Running Applications”.
3. Choose Add to Approved List.
Or,
Choose Add to Restricted List.
4. The application icon and description will appear in the Approved or Restricted List.
Note: When adding applications on Windows 8 workstations two tabs will
be displayed in the Application Properties dialog. The 'Desktop Application' tab allows you to add standard Windows applications as detailed above. The 'Windows Store Application' tab lists
Windows 8 applications. Select the required application and click OK to add to the approved or restricted list.
Remove an application from your Approved or Restricted List
1. To remove an application from the List, simply highlight the chosen
application and click x.
Or, Right click in the list boxes and select Remove Application.
Note: The default Application List is Acer Classroom Manager.app.
Apply Approved or Restricted Applications
Restrictions can be applied to individual Students or all connected Students. Students can view the current restrictions in the Student Toolbar. 1. If you want to apply restrictions to individual Students select their
icons in the List view
2. To apply these restrictions choose {Applications}{Allow Approved Applications Only or Block Restricted Applications}.
Or,
Click the Approved or Restricted icon at the bottom of the Control window.

Acer Classroom Manager v2
214
3. To acknowledge which restriction has been activated an appropriate
indicator will appear next to the Student icons. (When viewing Large icons only). Red for restricted, green for approved.
4. If a Student is currently running an application included in your activated restriction list, an Application Blocked dialog will appear on their screen, stating the application that has been blocked by the Tutor. This will also appear if a Student attempts to run any of the
applications included on the restriction list.
End Approved or Restricted Applications
1. To remove the restrictions for individual Students, select their icons in the List view.
2. Choose {Applications}{Unrestricted Access} from the drop down
menu
Or,
Click the Allow All icon at the bottom of the Control window.
3. The green or red indicator will be removed from the selected Student icons.
Note: Removing a restriction may not appear to take effect immediately.
You may need to restart the application for it to recognise the change.
Create a new Application List
1. To create a new Application List choose {Applications} {Create New Application List}
2. A dialog will appear. Enter a file name and click Save.
3. A new blank Application List will appear.

Acer Classroom Manager v2
215
Note: Application Lists can be assigned to different Control Users, by
setting up a Tutor Profile. See Tutor Profiles.
Open an existing Application List
1. To open an existing application list choose {Applications} {Load Existing Applications List}
2. Highlight the relevant file and click Open.
3. The existing application list will appear.
Save an Application List
1. To save the current Application List, choose {Application}{Save Application List as}.
2. A dialog will appear. Enter a file name and click Save.
3. The current Application List will be saved.
Notes:
• Any changes that have been made to the new or existing
Applications List will be automatically saved when a new Applications List is created, or when you exit out of the Acer Classroom Manager program.
• The default Application List is saved as Acer Classroom Manager.app.

Acer Classroom Manager v2
216
View Application History
This feature of the Application Control Module enables you to monitor the Applications being used by connected Students and, if required, store or print a permanent record.
1. In Applications View choose {Applications}{History} from the Control
window drop down menu.
2. The Application History dialog will appear.
This provides details of any application used by the Student(s) during the currently connected session.
The available options are: Show Application History for:
The list can be viewed by currently Selected Client or All Connected Clients.
Refresh
While viewing the list click Refresh at any time to update the display. Save
To keep a permanent record of the displayed items, you can save the details to a text file before disconnecting.

Acer Classroom Manager v2
217
Prints details of the currently displayed items.
Export
Exports data to a CSV file allowing the data to be imported if needed. Close
Closes the History dialog but details will continue to be recorded while the Control is connected.

Acer Classroom Manager v2
218
Student Surveys
The Student Survey tool enables the Tutor to get instant feedback from Students during or at the end of a session. The Tutor sends connected
Students a question together with a selection of pre-defined responses. Student responses are gathered at the Tutor with the results shown as an overall percentage and by individual Student. Results can be shown to Students in the form of a pie chart, Students must respond before they can view the results. Students can also be temporarily ‘grouped’ by response enabling you to
see in an instant who selected the same answer. This could be useful if you felt a quick follow-up question or message to particular Students was required.
The basic procedure for sending a survey to Students is:
1. Choose {View}{Mode - Survey View} from the Control window drop down menu.
Or,

Acer Classroom Manager v2
219
Select the Student Survey icon from the left hand side of the Control window.
2. Select the Students to include in the survey. This can be all Students in the list view, selected Students or a defined group of Students.
3. Enter a question in the box provided.
4. Select the responses/answers to the question. These can either be chosen from the drop down list of defaults or you can enter your own
options, using a comma to separate each one. Up to 6 choices can be entered.
5. Send the survey to Students by choosing {Survey}{Send} from the Control window drop down menu.
Or,
Click the Send icon displayed at the bottom of the Survey pane.
A dialog will open at the Student machines displaying the question and responses. Students choose the appropriate response and submit the answer.
6. As Students submit their answers the Survey Results pane will display the percentage response for each option. The Client icon will also flag how the individual Student answered. By choosing
{View}{Details} from the Control window drop menu you can sort the Students by result. Alternatively, you can sort the Students into temporary groups by response. Choose {Survey}{Auto Group Students} from the Control window drop down menu.

Acer Classroom Manager v2
220
7. When the survey is complete, remove it from the screen by choosing
{Survey}{Cancel Survey} from the Control window drop down menu.
Or,
Click the Cancel icon displayed at the bottom of the Survey pane.
Note: The Survey will be cleared from all machines whether the Student has responded or not.
Show Survey Results to Students
1. Choose {Survey}{Show Results to Students} from the Control window drop down list.
Or, Click the Show icon at the bottom of the Control window.
2. The results will be displayed as a pie chart on the Students screen.
Note: Survey results will only be displayed if the Student Toolbar is
running and the Student has submitted their answer.
Save Survey Results
The Survey can be saved to a .CSV file. 1. Choose {Survey}{Save Results} from the Control window drop down
menu. Or,
Click the Save icon at the bottom of the survey pane. Print Survey Results
Before clearing the survey you can print a permanent record of the results. 1. Choose {Survey}{Print Results} from the Control window drop down
menu.
Or,
Click the Print icon displayed at the bottom of the Survey pane.
Note: The Student results can be added to the Student Journal, choose {Survey}{Add Results to Journal} from the Control window drop down menu or click the Add Survey Results to Journal icon.

Acer Classroom Manager v2
221
Survey Lists
Surveys can be re-used by adding them to a Survey List. Acer Classroom Manager provides a default list, Acer Classroom Manager.sul, into which questions and responses are automatically stored, but you can create custom lists if you want to categorise different types of question.
Create a Survey List
1. In Survey view, choose {Survey}{Create New Survey List} from the Control window drop down menu.
2. Enter a name for the file and click Create.
3. Any new Surveys you enter will be added to the list.
Load a Survey List
1. In Survey view, choose {Survey}{Load Existing Survey List} from the Control window drop down menu.
2. Select the required list and click Open. Using Survey Lists
With the required Survey List loaded you can enter new questions or use and manage previously stored questions and responses.
To Add a New Question to a Survey List
1. In the Student Survey pane enter the question and choose the required responses from the drop down list or add new options if the defaults aren’t appropriate.
2. Send the Survey to Students. The Survey will automatically be stored in the current list.
or
Rather than send the Survey immediately, choose {Survey}{Add Survey to List} from the Control window drop down menu or click the Add icon displayed at the bottom of the Survey pane to store the
question and responses for future use.

Acer Classroom Manager v2
222
To Use an Existing Survey
1. In the Student Survey pane click the Select/Add Question icon. (Green cross). The Select Survey dialog will appear.
2. Select a question from the list and click OK.
3. The question will be displayed in the Survey pane ready to be sent to Students.

Acer Classroom Manager v2
223
Manage Questions and Responses
As well as enabling you to choose an existing Survey, the Select Survey dialog can be used to add new questions/responses and edit questions/responses if the current examples are not appropriate. 1. If the Survey list does not currently include the required question,
enter the new question along with the responses in the boxes
provided and click Add.
Or,
To edit an existing question, select it from the list, change the question and/or the responses and click Add.
Note: If you change the question it will be added to the list in
addition to the original. If you only change the responses, the original will be overwritten.
2. To use the question in a Survey, select it from the list and click OK.
3. The question will be displayed in the Survey pane ready to be sent to Students.
Note: When you use customised responses in a Survey they will be
attached to that question only. If you want to make the responses available to other Surveys they need to be added to the default drop down list. Click Manage, the Manage Responses dialog will appear, enter the required responses and click Add.
Acer Classroom Manager v2
224
Question and Answer Module
Acer Classroom Manager's Question and Answer module is a unique collaborative tool that enables teachers to reinforce key learning points
and instantly gauge student understanding during a lesson. You can verbally ask questions to the whole class, gauge student answers and understanding, bounce questions around the classroom, develop peer assessment opportunities as well as track rewards against both the individual and, where appropriate, teams.
Note: The Student toolbar will be enabled and displayed at the Student,
even if the toolbar is turned off at the Tutor.
1. Choose {View}{Mode - Q&A View} from the Control window drop
down menu. Or, Click the Q&A Control icon on the left hand side of the Control window.
2. The Question Types dialog will appear.
Acer Classroom Manager v2
225
There are five types of questions to choose from: First to Answer Enter an Answer
Pot Luck Team First to Answer Team Enter an Answer
3. Select a question type to continue. 4. The Ask the question dialog is displayed. Set the required properties
for the question and click OK.
5. Click Go to start the Question and Answer session. 6. The Tutor will display the Student thumbnails. From here you can
see who has responded and mark their answers.
Acer Classroom Manager v2
226
A Question and Answer dialog is displayed at the Student, showing the
current question type and any awards the Student has received. Students will be able to see the current state of all Students for each question. You can also choose to show the results to Students, this can be set in the Question & Answer Options dialog.
Note: Questions can also be started from the Q&A menu. Select
{Q&A}{Question Type} from the Control window drop down menu or click the Types button at the bottom of the Control window.
Question and Answer Module - First to Answer Question Type The teacher asks a verbal question and the Students click to answer. The 'top x' fastest responders will be displayed and the quickest Student is
asked for their answer. You then decide whether this is correct or not and rewards can be awarded or deducted.
Note: Questions can be bounced to the next quickest Student when
more than one Student has been selected. This can be done automatically by selecting the Automatically bounce to next Student option in the Ask the question dialog or manually by selecting {Q&A}{Bounce Question} from the Control window drop down menu or clicking the Bounce icon at the bottom of the Control window.
A thinking time limit can be applied, the Answer button is disabled during this period, giving Students a chance to think about their answer
before they click. A time limit for answering the question can also be set. You can choose to exclude a Student from the next round if they have already answered a question, ensuring all Students have a fair chance to answer a question.
Question and Answer Mode - Enter an Answer Question Type The teacher enters the answer to the next question in advance and then verbally asks the question. Students are prompted to enter their answer. Results are instantly displayed to the class and rewards can be awarded or deducted.
Note: You can determine whether the answer is case sensitive or not.

Acer Classroom Manager v2
227
A thinking time limit can be applied, the Answer button is disabled
during this period, giving Students a chance to think about their answer before they click. A time limit for answering the question can also be set. You can choose to exclude a Student from the next round if they have already answered a question, ensuring all Students have a fair chance to
answer a question. Question and Answer Mode - Pot Luck Question Type The teacher decides how many Students to select randomly, Acer Classroom Manager will pick and order them. A Student is then randomly selected and you verbally ask a question and the Student answers. You then decide whether this is correct or not and have the option to 'bounce'
the question to another random Student. Rewards can be awarded or deducted.
Note: Questions can be bounced when more than one Student has been
selected. This can be done automatically by selecting the Allow question bounce option or manually by selecting {Q&A}{Bounce Question} from the Control window drop down menu or clicking the Bounce icon at the bottom of the Control window.
If a Student has answered correctly you can allow them to select the next random Student.
Note: If a Student has answered they will not be randomly selected again during this session.
You can also select a Student randomly by selecting {Student}{Select Random Student} from the Control window drop down menu.

Acer Classroom Manager v2
228
Question and Answer Module - Tutor Interface
Once the question type has been selected and the options chosen, Student thumbnails will be displayed in the Tutor. The thumbnails allow you to see who has responded and mark their answers more easily. Customise Thumbnail Size
Student thumbnails can be resized to suit personal preferences. 1. Choose {Q&A}{Size} from the Control window drop down menu. 2. Select the required size from the available options. Or,
1. Use the slider on the Size icon at the bottom of the Control window to select the required size.
Auto-Fit Size of Student Thumbnail This option will automatically adjust the size of the displayed thumbnails to fit the window.
1. Click the Auto icon at the bottom of the Control window. The following icons can be displayed at the Tutor:
Student has not yet answered.
The Student has answered. You can mark their answer correct or incorrect by clicking on the tick or cross. Clicking the thumbs up/down button allows the rest of the class to peer assess the answer. The yellow number indicates that this Student answered the fastest.
Student has been marked correct. The number of rewards the Student currently has is also displayed.
Student has been marked incorrect.

Acer Classroom Manager v2
229
Student is excluded from the round.
The time ran out in Enter an answer mode before the Student answered.
A Student is being peer assessed, the green and red areas will fill as Students respond.
Student thought the answer was correct in peer assess mode.
Student thought the answer was incorrect in peer assess mode.
During a pot luck question student icons flash in this
state to indicate they might be selected. A corresponding large ‘?’ is also shown at Student screens.

Acer Classroom Manager v2
230
Using the Question and Answer Module
Once a Question and Answer session has begun you will be able to see who has responded and mark Student answers by clicking the tick or cross on the Student's thumbnail. Awards can be given for a correct answer and deducted for an incorrect answer, you can configure these options in the Question & Answer options dialog. Students can see their
current awards in the Question and Answer dialog.
Note: Rewards can be allocated/deducted outside of a Question and Answer session, select {Student}{Rewards} from the Control
window drop down menu.
Questions can be bounced around the class encouraging discussion. You
can also ask Students to peer assess an answer to find out if they thought it was correct or not. You can move onto the next round by selecting {Q&A}{Next Round} from the Control window drop down menu or clicking on the Next Round icon at the bottom of the Control window. A new session for the current question type can be started by clicking the New icon at the
bottom of the Control window. You can stop the current Question Type and clear Question and Answer dialogs on the Student machines by clicking Reset at the bottom of the Control window. Excluding Students To ensure all Students are involved equally in the process, you can
choose to exclude specific students, those that have already answered a question, from the next round of questioning. Students are automatically excluded from a round if either of the Exclude options in the Question & Answer options dialog have been selected. Students can be manually excluded, right click the Student and select Exclude Student from round.
Sound Effects You can include sound effects to be played at the Tutor and Students. Sounds will be played at the Tutor when a Student answers, at the Student when the Answer dialog is displayed and at both when randomly selecting a Student and when the thinking time or time limit is at 5 and 2.5 seconds. Sounds effects will be turned on by default.

Acer Classroom Manager v2
231
1. Click the Sound effects icon at the bottom of the Control window.
2. Select the relevant option to turn sound effects on/off at the Tutor or Student.
3. Use the slider bar to adjust the volume. This can be locked at the Student if required.
Bouncing Questions
To encourage discussion across the class you can bounce a question to the next Student asking if they have an answer or what they thought of the previous answer.
Note: You can only bounce a question for First to Answer and Pot Luck
question types when more than one Student has been selected.
Questions can be automatically bounced to the next Student who has responded as soon as you click the tick or cross. Select the Automatically bounce to next Student option in the Ask the question dialog. The question will be bounced around the Students for the number of times specified. Manually Bounce Questions
If you haven't selected the automatically bounce option you can still bounce questions to the next available Student. 1. Select {Q&A}{Bounce Question} from the Control window drop down
menu. Or,
Right click the Student and select Bounce Question. Or, Click the Bounce icon at the bottom of the Control window.
When a question has been bounced the display changes to show who now has the question and where it came from. The next Student can answer and this can continue around the whole class until all Students
who have answered have been included.

Acer Classroom Manager v2
232
Peer Assessment
Peer assessment allows Students to give feedback in response to an answer given by one of their classmates. After a question has been answered you can ask the rest of the class to assess the answer by
clicking on the button. A dialog appears at Student screens
asking them to decide if the answer was correct or not. As the Students answer the Student thumbnail at the Tutor will change to reflect the number of Students who think their answer is right or wrong.
Question and Answer Team Mode
You can use team mode when selecting Team first to answer or Team enter an answer question types. Students then compete for rewards as a group rather than individually. Teams can be created randomly or Students can pick a team to join. Custom team names can be created and you can customise the colour allocated to the team.
Using Team Mode 1. Select Team first to answer or Team enter an answer from the
Question type dialog. Or, Select {Q&A}{Question Type} from the Control window drop down
menu and select the required question type. Or, Select the Types icon at the bottom of the Control window and select the required question type.
2. Select the required properties for the question in the Ask the question dialog. Click OK.
3. The Create Teams dialog will appear.

Acer Classroom Manager v2
233
4. Select how to group the teams. If randomly, enter the number of
teams. If Student chooses team, enter the team names; the Students will then be able to pick a team from a drop down list. Click OK.
5. The Team Summary dialog will appear showing how many Students are in each team. Acer Classroom Manager randomly allocates colours to teams; you can change this by clicking the colour and
selecting a new colour. 6. Click OK. The question and answer session will start as normal. The Tutor screen will display which team each Student is in. The default Group bar is replaced with one containing the teams. The team statistics will be displayed to students in the Question and Answer dialog. Rewards will now be awarded to the team and not the individual.

Acer Classroom Manager v2
234
Printer Management
Print Management gives the Tutor total control over printer usage within the classroom, the Tutor can monitor and control all printing activity by
connected Students or printer. Students can be prevented from printing, be assigned page limits or require Tutor authorisation to print. The print management feature supports multiple printers within a classroom, prevents the addition, deletion or modification of existing printers and provides printing usage summaries as part of the Student register.
Notes:
• Printers must be added to Student workstations before the Tutor
connects.
• A padlock will be displayed next to the Print view icon when there are
global policy restrictions in force. You can override the restrictions in the Tutor configuration.
1. Choose {View}{Mode - Print View} from the Control window drop down menu. Or, Click the Print Management icon on the left hand side of the Control window.

Acer Classroom Manager v2
235
In the List view, the Student icons can be viewed in two different ways.
Choose {View}{Large icons/ Details} or right click in the List view and select one of these options to change the layout of the Student icons. When viewing the "Large Icons" layout, an icon is displayed next to the Student icon informing the Tutor of the current print activity. If the List View is in "Details" layout, a summary of the print activity for each
Student is displayed. The lower panes can be minimised to make more room for the Student
thumbnails. Click the button.
To keep track of print usage while in other areas of the Tutor program, select {Print}{Show Printers} from the Control window drop down menu. The printer icon will be displayed in all other views allowing you to see jobs as they happen, pause, delete and resume printing.
Notes:
• All printers will be displayed when you select Show Printers. You can remove printers by removing the tick next to the printer in the
Printer list.
• When a Student is printing a connection bar will be displayed from the printer to the Student that is printing.

Acer Classroom Manager v2
236
Using Print Management
Printers must be added to the Student workstation before the Tutor connects, once connected to Students, printers cannot be added, removed or modified. All printers that are attached to Student workstations will appear in the Printer List. All printers that are attached to Student workstations will appear in the Printer List, from here you can
pause, delete and resume printing by printer. Student print jobs will be displayed in the Print Queue, giving you an overview of who is printing, what is being printed, how many pages are printing and the current print status. From here you can delete or resume printing for Students.
Notes: • If Show printers is enabled you can pause, delete and resume jobs
via the Printer icon in any view.
• Print restrictions can be applied at startup. Choose
{School}{Configuration}{Start Options - Restrictions} from the Control window drop down menu.
If the Student Toolbar is enabled Students will be notified of the current
print status. Setting Print Thresholds
Print thresholds can be applied for an individual print job, allowing the Tutor to specify the maximum number of pages Students can print. If the Student exceeds this limit, the print job will be automatically paused
or deleted. 1. Choose {Print}{Set Print Thresholds} from the Control window drop
down menu.
2. The Print Thresholds dialog will appear, allowing you to apply the relevant settings.
Pause Printing
1. Select the required Students in the List view.
2. Choose {Print}{Pause Printing} from the Control window drop down menu.
Or, Click the Pause Printing icon at the bottom of the Control window.
3. The Print status for the selected Student(s) will now show as paused.

Acer Classroom Manager v2
237
Or,
1. Select the required printer in the Printer list.
2. Right click and choose Pause.
3. Printing will be paused for the selected printer.
Block all Printing
1. Select the required Students in the List view.
2. Choose {Print}{Block All Printing} from the Control window drop down menu.
Or, Click the Block Printing icon at the bottom of the Control window.
3. The Print status for the selected Student(s) will now show as
blocked.
Or,
1. Select the required printer in the Printer list.
2. Right click and choose Block.
3. Printing will be blocked for the selected printer.
Delete Print Jobs
You can delete all print jobs, selected print jobs or all print jobs for a Student.
1. Select the required print job(s) in the Print Queue.
2. Right click and choose Delete/ Delete All/ Delete All jobs for Test20.
3. The selected print job(s) will be deleted.
Deleting Duplicate Print Jobs
1. Choose {Print}{Delete Duplicates} from the Control window drop down menu. Or, Click the Duplicate icon at the bottom of the Control window.
2. Duplicate print jobs will now be deleted.

Acer Classroom Manager v2
238
Resume Printing
Allows you to restart printing after it has been paused or blocked. 1. Select the required Students in the List view.
2. Choose {Print}{Resume Printing} from the Control window drop down menu. Or,
Click the Unrestricted icon at the bottom of the Control window.
3. Printing will now be resumed.
Or,
1. Select the required printer in the Printer list.
2. Right click and choose Resume.
3. Printing will be resumed for the selected printer.
Note: You can also resume printing for Student(s) in the Print Queue. Select the required print job, right click and choose Resume.
Printer Properties
Allows you to change the image, display name of the printer and reset the total page and job count.
1. Select the Printer icon in the List view.
Or, Select the required printer in the Printer list.
2. Right click and choose Properties.
3. Amend the required properties.
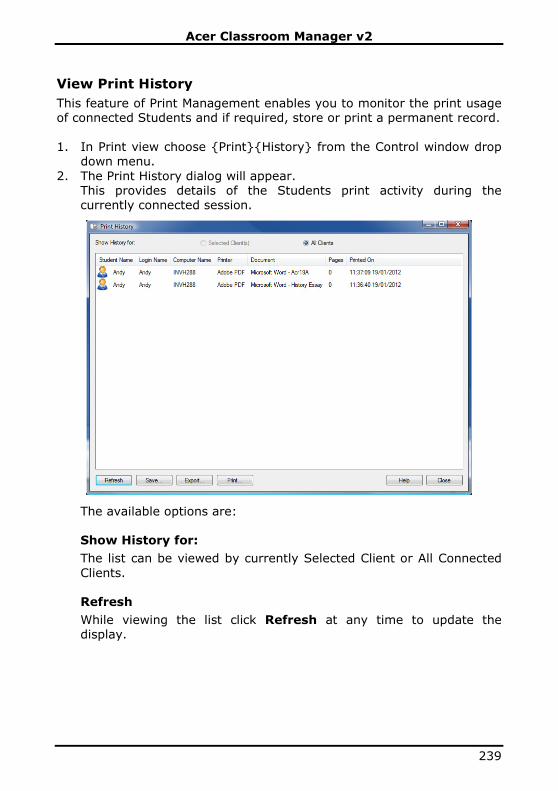
Acer Classroom Manager v2
239
View Print History
This feature of Print Management enables you to monitor the print usage of connected Students and if required, store or print a permanent record. 1. In Print view choose {Print}{History} from the Control window drop
down menu.
2. The Print History dialog will appear. This provides details of the Students print activity during the currently connected session.
The available options are: Show History for:
The list can be viewed by currently Selected Client or All Connected
Clients. Refresh
While viewing the list click Refresh at any time to update the display.

Acer Classroom Manager v2
240
Save
To keep a permanent record of the displayed items, you can save the
details to a text file before disconnecting. Print
Prints details of the currently displayed items. Export
Exports data to a CSV file allowing the data to be imported if needed. Close
Closes the History dialog but details will continue to be recorded
while the Control is connected.

Acer Classroom Manager v2
241
Device Control
The Device Control feature allows the Tutor to protect against external sources during a Lesson. The Tutor can prevent data from being copied
to or from USB devices and CD/DVD drives. In addition the Tutor can provide read only access, allowing Students to view files from devices but prevents copying files from them. 1. Choose {View}{Mode - Device View} from the Control window drop
down menu. Or,
Click the Device Control icon on the left hand side of the Control window.
Note: A padlock will be displayed next to the Device Control view icon when there are global policy restrictions in force. You can override
the restrictions in the Tutor configuration.

Acer Classroom Manager v2
242
In the List view, the Student icons can be viewed in two ways. Choose
{View}{Large Icons/ Details} or right click in the List view and select one of these options to change the layout of the Student icons. When viewing the "Large Icons" layout, an icon is displayed next to the Student icon informing the Tutor of the current Device restrictions. If the List view is in "Details" layout, a summary of Device restrictions for each
Student is displayed.
Note: Device restrictions can be applied at startup. Choose {School}{Configuration}{Start Options - Restrictions} from the
Control window drop down menu.
Block Access to CD/DVD or USB Devices
1. Select the required Students in the List view
2. Choose {Device}{CD/ USB - Block Access} from the Control window drop down menu. Or, Click the CD/DVD icon or USB icon at the bottom of the Control window and choose Block Access.
Read Only Access to CD/DVD or USB Devices
Provide Students with read only access to CD/DVD or USB devices. 1. Select the required Students in the List view
2. Choose {Device}{CD/ USB - Read Only} from the Control window drop down menu.
Or, Click the CD/DVD icon or USB icon at the bottom of the Control window and choose Read Only.
Unrestricted Access
Provide Students with full access to CD/DVD or USB devices.
1. Select the required Students in the List view.
2. Choose {Device}{CD/ USB - Unrestricted} from the Control window drop down menu. Or, Click the CD/DVD icon or USB icon at the bottom of the Control window and choose Unrestricted.
Acer Classroom Manager v2
243
Disable Execute
Prevent Students from running programs from CD/DVD or USB devices. 1. Select the required Students in the List view
2. Choose {Device}{CD/ USB - Prevent Execute} from the Control window drop down menu. Or,
Click the CD/DVD icon or USB icon at the bottom of the Control window and choose Prevent Execute.
Note: To allow access to Execute select {Device}{CD/ USB - Allow
Execute} from the Control window drop down menu.
Mute Sound on Student Workstations
1. Choose {Device}{Mute Sound} from the Control window drop down menu. Or,
Click the Mute Sound icon at the bottom of the Control window.
2. Sound will be muted on the Student workstations.

Acer Classroom Manager v2
244
Tutor Profiles
Acer Classroom Manager allows you to set up multiple Tutor Profiles for different Control Users, each with a pre-defined set of options. On starting the Tutor program, if multiple profiles have been created a dialog is displayed that allows the user to select which profile to use. The main benefit of creating a profile is to be able to store ready-made lists of Approved / Restricted Applications, Websites and keywords rather
than have the user create these at the start of each lesson. Having created your Application, Website or Word List, as detailed in the Web Control, Application Control and Keyboard Monitoring sections, the files can then be added to a Tutor Profile.
Note: As well as Website, Application and keyword lists, other areas of the program that can be profiled are Layouts, Student Surveys, Client Lists, Group Lists, the location for storing test results, exams and Class lists.
To Create a Tutor Profile 1. Create the files, containing details of approved/restricted web sites,
applications etc that are to be included in the profile. 2. Choose {School}{Configuration}{Administration – Profile} from the
Control window drop down menu. The list of existing Tutor Profiles will appear, Acer Classroom Manager is the default.
3. To create a new profile, select Add. The Create New Configuration dialog will appear.
4. Enter a name for the profile. Functionality for the profile can be
‘copied from’ an existing Tutor configuration, the default Acer Classroom Manager or a user defined profile. Click OK. The name will be added to the profile list.
5. To change the content of the profile, click Edit. The File Locations dialog will appear.
6. In each category, select the file to be used in the profile. The Folder
locations dialog allows you to change where items are located. 7. Click OK. Each time the Tutor program is started, the user will be presented with a list of locally stored Profiles to choose from. Should you wish to share Profiles across a network the /R command line instruction can be used to launch the Tutor program with a centrally available Profile.

Acer Classroom Manager v2
245
For example, from the Acer Classroom Manager program folder run the
command; pcinssui /rN:\SampleProfile.cfg. If the profile, in this example SampleProfile.cfg, does not currently exist a default will be loaded enabling you to add your own values. Once you exit the Tutor program the Profile will be stored in the specified location.

Acer Classroom Manager v2
246
Manage Student Resources
Students can now easily access any resources required during a lesson. The Tutor can create a resource list and add links to websites,
applications and documents, this list is then displayed in the Student toolbar providing Students with a quick and easy way to access the required resources.
To Create a resource list
1. Select {School}{Manage Student Resources} from the Control window drop down menu.
2. The Resources List window will appear.
3. Select the required resource from the Available items list and either drag and drop to the Resource list or click the Add icon in the
toolbar. You will be prompted to enter a description and location for the resource.
4. The order of the list can be sorted using the appropriate arrows.
5. Click Save and specify a file name for the list, once saved the resources will be displayed in the Student toolbar.

Acer Classroom Manager v2
247
Student Journal
Acer Classroom Manager provides a 'Student Journal', this is an electronic record of key information that has been covered during the
lesson. The Student Journal is in the form of a portable PDF document, allowing Students to refer back to it after the lesson. Not only can the Tutor add notes and resources used during the lesson directly to every Student Journal, the Students are able to add their own notes making this a truly personalised document. The unique Student Journal offers a welcome summary for any Students
who were absent from a lesson as well as a structured summary of activity for the Teacher.
Note: PDF reader will be required to view the Journal.
By default the Student Journal is located in:
Windows Vista and above C:\Users\"Logged on User"\Documents\Journal Windows XP and below C:\Documents and Settings\"Logged on User"\My Documents\Journal
To change the location, choose {Start}{Programs}{Acer Classroom Manager}{Acer Classroom Manager Student Configurator - Journal}. On Windows 8 machines right-click in the Start screen and choose All Apps at the bottom of the screen. Click the Acer Classroom Manager Student Configurator icon. Items that can be included within the Journal are:
• Lesson details and objectives.
• URLs of websites used during the lesson.
• Copies of any class Chat transcripts.
• Class or group Survey Results.
• Individual Student Test results.
• Virtual Whiteboard screens.
• Screenshots from within a Presentation (and supporting explanation).
• Target keywords.
• Teacher Notes.
• Individual Student Notes.

Acer Classroom Manager v2
248
• New chapters.
Starting a Journal The Journal will automatically start when any of the Send to Journal options are selected.
1. Select {Journal}{Create New Journal} from the control window drop
down menu. Or Click the Journal icon and select Start.
Note: If the Tutor Console is closed or the Student is restarted the
current Journal will be closed. You can open an existing Journal, select {Journal}{Open existing Journal} or click the Journal icon and choose the previous Journal from the drop down list and click
Open.

Acer Classroom Manager v2
249
Adding Notes/Images to the Journal
1. Select the required Students in the List view.
2. Choose {Student}{Add notes to Journal} from the Control window drop down menu.
Or Select {Journal}{Add - Notes} from the Control window drop down menu.
Or Right click and select Add notes to Journal.
Or Click the Journal icon in the toolbar and click the Note icon in the Add section.
3. The Add Notes to Journal dialog will appear.
4. Enter the required notes and/or image, select which Students to
send this to and click OK.
Notes:
• You can quickly add a note to all Student Journals. Click the Journal icon on the toolbar, enter the required note under Quick Note and click Add.
• You can remove the last item added to the Journal. Select
{Journal}{Undo last add} from the Control window drop down menu.
Students can view and add notes to their Journal by selecting the Acer Classroom Manager Client icon from the taskbar and choosing {Commands}{Add Notes to Journal/View Journal} or from the Journal icon in the Student Toolbar.
Note: Students will be unable to add notes if the Student Toolbar and
Client icon are not visible.
Viewing a Journal
1. Select {Journal}{View Journal} from the Control window drop down menu. Or Click the Journal icon and select View Journal.
Note: You can print a copy of the current Journal. Click the Journal icon
in the toolbar and then click the Print icon in the View Journal section.

Acer Classroom Manager v2
250
Synchronise Journals
You can synchronise the Tutor Journal with the Students to ensure the Student Journals are up-to-date. Any items that are missing will be
added to the Student Journals, this will not affect any information that the Student has added. Select {Journal}{Synchronise Journals} from the Control window drop down menu.

Acer Classroom Manager v2
251
Lesson Planner
A Acer Classroom Manager Lesson Plan enables a Tutor to structure a session around a pre-defined set of tasks with appropriate timings and
prompts allocated to each part of the plan. Common Acer Classroom Manager functionality can be built into the plan, such as run test, send/collect work, scan and show. To create a Lesson Plan
1. Choose {Planner}{Manage Planner} from the Control window drop
down menu.
Or,
Click the Lesson Plans icon on the Control toolbar and choose Manage Plans.
Or,
If displayed, click the create a Lesson Plan icon on the Lesson Plan bar.
2. The Lesson Plan window will appear.
3. From the Available Items list drag the required task and drop it into the window. Enter any addition properties that are required.
4. When all tasks are in place save the lesson.
Acer Classroom Manager v2
252
5. To create a new lesson click New on the toolbar or to re-load a
saved lesson click Open.
6. Click OK.
7. The Start Lesson window will appear. This confirms the lesson content, total time, author and description of the lesson.
8. To start the currently loaded lesson click OK or click Cancel to close the window.
Managing a Lesson Plan
When a lesson is activated a progress bar will appear at the Tutor. The Tutor will be prompted before each task is due to begin and they can choose whether to continue or abort. At any point during a task you can use the tools on the Lesson bar to pause, skip to next item or abort the lesson.
Note: If you simply want a timed session without the need to run a pre-defined Lesson Plan select {Planner}{Set Class Time} from
the Control window drop down menu. This enables you to select an end time for the lesson or the duration. The timer will appear on the Lesson bar and can be switched off by selecting {Planner}{Set Class Time}{Remove}. The timer shows hours/minutes until there is 5 minutes remaining when it will switch to minutes/seconds.

Acer Classroom Manager v2
253
Student Toolbar
The Student toolbar provides feedback to the Student on the current lesson, time remaining, current websites and applications that are
available, the status of messenger, print, audio and keyboard monitoring and quick access to initiate a Chat and request help. Students can also access their USB memory stick, Student Journal, work items that have been sent and any resources from the toolbar. It can be set to be always visible at the top of the Student screen or to auto-hide.
All features included on the Toolbar can be customised by the Tutor. To select the features to be made available on the Toolbar choose {View}{Current Settings – Student Toolbar} from the Control window drop down menu.
Enable the Toolbar and decide whether to make it always visible. Alternatively, if the Toolbar is minimised the Student can mouse over the top of their screen to make it appear. If the Tutor changes a setting that
affects a toolbar option, a message will appear. For example, enabling Internet restrictions.

Acer Classroom Manager v2
254
Note: You can quickly show/hide the Student toolbar by selecting
{View}{Student Toolbar - Show/Hide} from the Control window drop down menu or by clicking the Toolbar icon on the Control window toolbar.
The following Toolbar options can be turned on or off as required:
Shows the Image associated with this Student
Displays the Student icon image.
Shows the Students logged on name or the name entered on the Student Register.
Shows the Students logged on name or the name entered on the Student Register.
Class and Teacher information Displays details of the current class, Tutor name, subject and room.
Show amount of time left in the Lesson
If a timed lesson is in progress, indicates the time remaining.
Indicate when typing is being monitor
Advises the Student when keyboard monitoring is active.
Show Instant Messenger metering state
Indicates the current status of Messenger Monitoring.
Shows the current Printer status. Blocked, Paused etc.
Shows the current Printer status. Blocked, Paused etc.
Show Application monitoring
status and give access to approved Applications
Indicates to Students the current
status of Application Monitoring, Restricted or Unrestricted access. If Restrictions apply, the list of approved applications will be displayed when Students click the Toolbar icon.
Show Internet monitoring status and give access to approved Web sites
Indicates to Students the current status of Internet Monitoring, Restricted or Unrestricted access. If
Restrictions apply, the list of approved websites will be displayed when Students click the Toolbar icon.
Allow the Student to Initiate a Chat
Enables the Student to initiate a Chat session.

Acer Classroom Manager v2
255
Allow the Student to send a request for help
Enables the Student to send a Help Request to the Tutor.
Show Clock Displays a clock
Show Rewards Shows any rewards that have been given to the Student.
Show Objectives If Lesson Objectives have been set they will be displayed.
Allows Students to access their USB memory stick from the Toolbar.
Allows Students to access their USB memory stick from the Toolbar.
Allow Students to access their Journal.
Allows Students to view and add notes to their Journal from the Student Toolbar.
Allow Students to access
resources (applications, web sites, documents or folders) that you define
Allows Student to access any
resources you have defined from the toolbar.
Show when you are listening to or recording the audio at the Student.
Advises Students when they are being listened to or if you are recording their audio.
Show list of files sent to work on. Displays the files that have been sent via the Send/Collect work feature. The Student can work through these and indicate when
they have been completed.
Note: A Tutor Toolbar is also available, this provides access to key Acer
Classroom Manager features when the Tutor program is minimised.

Acer Classroom Manager v2
256
Student Rewards
Acer Classroom Manager provides the Tutor with the ability to 'Reward' Students for good behaviour. During a lesson a Tutor can give individual
Students a Reward, in the form of a Star, which is reflected on the main toolbar. The number of Rewards a Student has can be viewed by mousing over the Student icon in Normal view.
Note: The Student Toolbar must be switched on to use this feature.
Giving Rewards to Students
1. Select the required Student in the List view.
2. Choose {Student}{Rewards - Give a Reward} from the Control window drop down menu.
Or, Right Click an individual Student and choose Reward - Give a Reward.
3. A star will appear on the Student Toolbar.
Removing Rewards
1. Select the required Student in the List view.
2. Choose {Student}{Rewards - Remove a Reward} from the Control window drop down menu.
Or,
Right Click an individual Student and choose Reward - Remove a Reward.
3. A star will be removed from the Student Toolbar.
Note: All Rewards can be removed from a Student by selecting
{Student}[Rewards – Remove all Rewards} from the Control window drop down menu.

Acer Classroom Manager v2
257
CONFIGURING THE STUDENT WORKSTATION
Acer Classroom Manager Clients are configured using the Acer Classroom Manager Student Configurator from the Acer Classroom Manager Program Group.
The Student Configurator has eight options: - Network Settings
Set the network transport that the Client will use for communicating with the Control program. It must be the same as that set at the Control. Room
Specify where to connect the Client when using Room mode. Security
Set passwords to protect the configuration and prevent unauthorised access to the Client workstation. Audio
Set the Audio settings for the Client. Both the Client and the Control workstations must have Audio hardware installed in order to use Acer Classroom Manager’s Audio features.
User Interface
Customise the interface between the Client and Control. Advanced
Set a personalised Student name and the behaviour of certain remote control features. Student Journal
Customise the settings for the Student Journal.
Terminal Services
Allows you to configure the Terminal Services settings for the Student.

Acer Classroom Manager v2
258
Network Settings
Allows you to set up the network transport for a Client. It must be the same as that set at the Control.
TCP/IP
Port
The TCP/IP protocol requires that a port number be allocated for applications to communicate through. The default-registered port for
Acer Classroom Manager is 5405. Send Keep Alive Packets
Some TCP stacks send Keep Alive Packets. In some circumstances, it may be desirable to disable this. For example on an ISDN line where a TCP/IP client is loaded a symptom may occur where the ISDN line is brought up unintentionally. Use Name & Connectivity Server (Gateway)
Enable this option if you want the Students current IP address to register with a designated 'Name Server/Gateway' on start up. Click Configure and enter the IP address of the Name Server along with the matching security key.

Acer Classroom Manager v2
259
Notes:
• If you are using Routers, you must ensure that they are configured to pass through data using this port.
• Changing port could interfere with other TCP/IP applications.
Press Test to check that the protocol is correctly installed on this workstation.
Room Settings
Allows you to specify the room settings for Students when connecting via Room mode.
This Computer is always located in the following room:
If the computer is always located in the same room, select this option and enter the required room. This is a mobile computer and may be in one of the following rooms:
Select this option if the computer could be located in different rooms, enter the required rooms and separate each value with a comma.

Acer Classroom Manager v2
260
This is a mobile computer and its room will be entered manually
Select this option if the computer is a mobile computer, the Student will
then have an option from the Student icon in the taskbar to manually enter the room.
Note: If the Student icon is hidden in the taskbar the Student can still
manually enter the room by running the setroom.exe. This file is located in the Acer Classroom Manager Program folder on the Student machine.
Security Settings
This property sheet is used to set security at the Client.
Student Security
Security Key
This sets a security key that must be the same as that set at the Control, before the Control will be allowed to connect. This setting is optional. If there is no security key set here any Control may connect, regardless of the security key set at the Control.

Acer Classroom Manager v2
261
Enable User Acknowledgement
If enabled, a Remote Control session cannot take place until the Client
has confirmed that they accept the link being made. Display Customisable Text
When Connected
The message entered here is displayed at the Client machine when a Control connects to it.
When Viewed
The message entered here is displayed at the Client machine when it is being Viewed by the Control.
Configurator Security Settings
Configurator Password
As an extra level of security, you can associate a password with a Configuration File. This prevents unauthorised amendment of this Client’s
configuration. When the Configurator is next started, the user must enter the required password before being able to change any Client parameters in this Configuration file. Choose Set, to set your password. Enable user acknowledgement for Tech Console connections (applies to Tutor only installs) If enabled, the Tech Console will not be able to connect to a Tutor
machine until the Tutor has confirmed that they accept the link being made.
Note: By default Windows XP machines will automatically request user
acknowledgement from the Tutor, you will need to enable then disable this option to turn this off.
Don't apply global policies to this computer Any policy restrictions set in the Tech Console will not be applied at this Student machine.

Acer Classroom Manager v2
262
Audio Settings
Set the Audio settings for the Client. Both the Client and Control workstations must have Audio hardware installed in order to use Acer
Classroom Manager’s audio features.
Volume
Threshold microphone sensitivity
Microphone volume of microphone
Speaker volume of speakers
Hook audio acceleration
Sets the Hardware acceleration level for the Students.
Never
Leaves the acceleration level at full. While Connected
The acceleration level will be moved to basic while connected. Always
The acceleration level will be moved to basic.
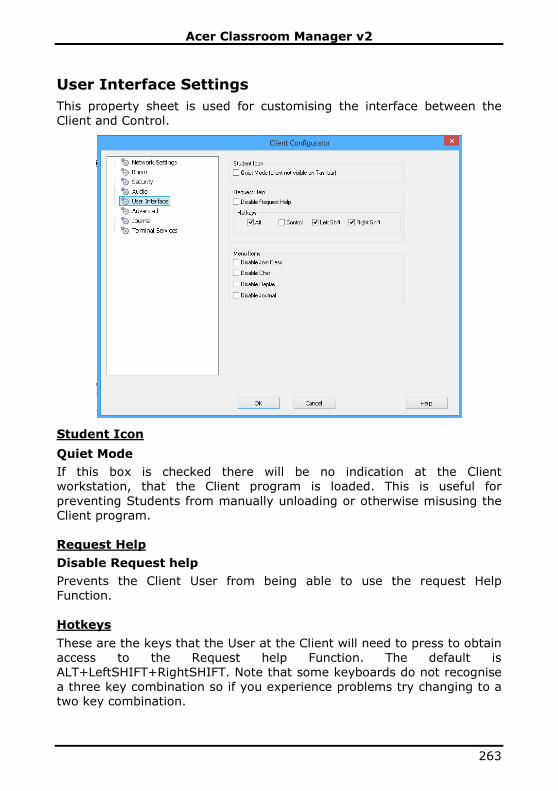
Acer Classroom Manager v2
263
User Interface Settings
This property sheet is used for customising the interface between the Client and Control.
Student Icon
Quiet Mode
If this box is checked there will be no indication at the Client workstation, that the Client program is loaded. This is useful for
preventing Students from manually unloading or otherwise misusing the Client program. Request Help
Disable Request help
Prevents the Client User from being able to use the request Help Function.
Hotkeys
These are the keys that the User at the Client will need to press to obtain access to the Request help Function. The default is ALT+LeftSHIFT+RightSHIFT. Note that some keyboards do not recognise a three key combination so if you experience problems try changing to a two key combination.

Acer Classroom Manager v2
264
Menu Items
Disable Join Class
Prevents the Client from being able to use the Join Class Function Disable Chat
Prevents the Client from being able to use the Chat Function. Disable Replay
Prevents the Client from being able to open Replay Files. Disable Journal
Disables the Journal options in the Acer Classroom Manager Client icon on the taskbar. Students will still be able to access the Journal from the Student toolbar.

Acer Classroom Manager v2
265
Advanced Settings
This property sheet enables further personalisation of the Client’s configuration. A meaningful Client name can be used rather than the
machine name, or you can specify a particular image to load when the Client’s keyboard and mouse are locked rather than use Acer Classroom Manager’s default.
Student Identification
Student Name
This is the name that the Client will be known as on the network for Acer Classroom Manager purposes. It must be a unique name of up to 15 characters. You should try to use a sensible naming convention to help you identify which workstation is which. It is also important to prefix each name in a
group of related Clients with the same few characters, as this will be used when the Control connects to establish the workgroup. For example, you might start the name of each workstation in the same room with the prefix CLASS1_. Then configure the Control to connect to all Clients starting with CLASS1_ will avoid Client workstations outside of this room being inadvertently connected and receiving a show.

Acer Classroom Manager v2
266
You can use an asterisk (*) to cause the Client name to default to the
Machine name (also known as the Computer name).
Note: Although internally the Control connects to Clients by referring to
their Client name, the user at the Control can configure the Control program to display a different name.
While Viewed
Silent Mode Allows the Control to connect and View a Client without the Clients knowledge. If Silent Mode is not selected the Clients screen and mouse icon will flicker notifying the Client that a connection has been made and their screen is being Viewed.
Send Physical Fonts When a Windows Client is sending its screen to a Control, it passes the font information by reference to reduce the volume of data sent. The Control refers to its own internal font mappings and uses the closest matching that it has to the one being displayed at the Client. In most cases, the same fonts will be available at both the Client and the Control
and so what is displayed on the screen will appear identical. However, there may be occasions when a close match cannot be found. In these cases, it is desirable that the Client sends the Control the full information that it requires to display the data in the same font.
Setting this option forces TrueType text to be sent as glyphs (i.e. character shapes), rather than character codes. This guarantees that they will be displayed correctly at the Control. This will, however, impact on performance, especially on Dial-up lines, and is not usually required.
Enable Screen Scrape Acer Classroom Manager’s favoured, and the most efficient, method for capturing screen data is to hook into the Video Driver of the workstation being viewed. However, there may be occasions when this method will not work because certain applications bypass the driver. In these circumstances you can enable ‘screen scrape’ mode in order to take a snapshot of the screen. Although this will have a greater impact on the
network it will at least provide an accurate representation of the Client’s screen.
Acer Classroom Manager v2
267
Performance
Cache size Screen data that has been recently sent to the Control by the Client is cached to improve performance. A larger cache improves performance, at the expense of using more memory at both the Client and the Control. Setting this option enables you to tailor the cache size in order to
achieve maximum performance. The Client and the Control use the same size cache, the lowest cache value will be used so you must ensure that you set this at both the Client and the Control for this to be effective. Image Option
Image File When a Client’s keyboard and mouse have been locked, a default image,
nss_lock_image.jpg, appears on their screen. Alternatively you may prefer to specify an image personal to your organisation.
Note: If you do not want to display an image, you can choose to blank
the Student's screen when locked instead. Select {View}{Current Settings - User Interface - Student} from the Control window drop-down menu and clear the Display image when locking mouse and keyboard check box. The Blank screen when locking mouse and keyboard check box will automatically be selected.
Enable DVD Playback and Direct 3D support (Win XP and above only)
On Windows XP and above, Acer Classroom Manager uses the Microsoft Mirror Driver to capture screen data for view sessions. However, while hooked into the Mirror Driver it is not possible to play DVD’s. Therefore, if you do need the capability to play DVD’s, Acer Classroom Manager provides options which load and unload the Mirror Driver as required. Except While Viewed
If checked, DVD support is enabled but will be disabled for the duration of a view session while the Mirror Driver is loaded. Except While Connected If checked, DVD support is suspended while a connection to the Client is in place.

Acer Classroom Manager v2
268
Student Journal Settings
A Student Journal is provided allowing key information from the lesson to be stored in a portable PDF file. You can use these options to customise
the settings for the Student Journal.
Margins (mm)
If required, you can adjust the top, bottom, left and right margins for the Journal. Page Size Select the required page size for the Student Journal. Font Size (points)
Set the font size to be used in the Journal. Jpeg Quality (0-100) Allows you to set the quality of images in the Journal, this is set to 100 by default. Journal Folder
Specify where you want the Student Journal to be stored.

Acer Classroom Manager v2
269
Terminal Services Settings
You can configure the settings for the Student Terminal Server here.
Note: Terminal Server and other thin clients, may not be configured to use the Acer Classroom Manager Name and Connectivity Server
Terminal Services Settings
Run Student in Console Session
Unchecking this option will stop the Client from running in a Console session. Run Student in remote sessions
Unchecking this option will stop the Client from running in remote
sessions.
Note: The above two options are not supported on Windows MultiPoint
Server 2012.
Base Port
Enter the required base Port number, the default value is 25405.

Acer Classroom Manager v2
270
Student Name
Enter the required name for the Student, if left blank a unique ID will be
displayed (defaults to %CLIENTNAME%). When entering a Student name you must include at least one environment variable e.g. %computername%. Use lookup file to set room
Checking this option allows you to allocate Students to different rooms when connecting via Room mode, a 'lookup file' containing the Student
name and required room must be used. The ‘lookup file’ should be saved with a .csv extension and should be in the format “Student Identifier”, ”Room value”.

Acer Classroom Manager v2
271
CONFIGURING THE TUTOR WORKSTATION
To configure the Acer Classroom Manager Control, choose {School} {Configuration} from the Control window drop down menu. The Control Configurator has the following options: -
Start Options
Allows you to specify the startup options for the Tutor and also set the level of access for the various modes. Network and Wireless Settings
This is used for setting the network transport that the Control will use for communicating with the Client program. It must be the same as that set at the Client. You can also set the name and description for the Tutor.
Performance Allows you to set low bandwidth and colour reduction settings to lower data sent across the networking when performing a View or Show. Student Selection
This is used to specify the mode to connect to Students when the Tutor program starts.
Administration
Enables you to set an additional password if the Configuration options are to be protected and to create pre-defined Tutor profiles.
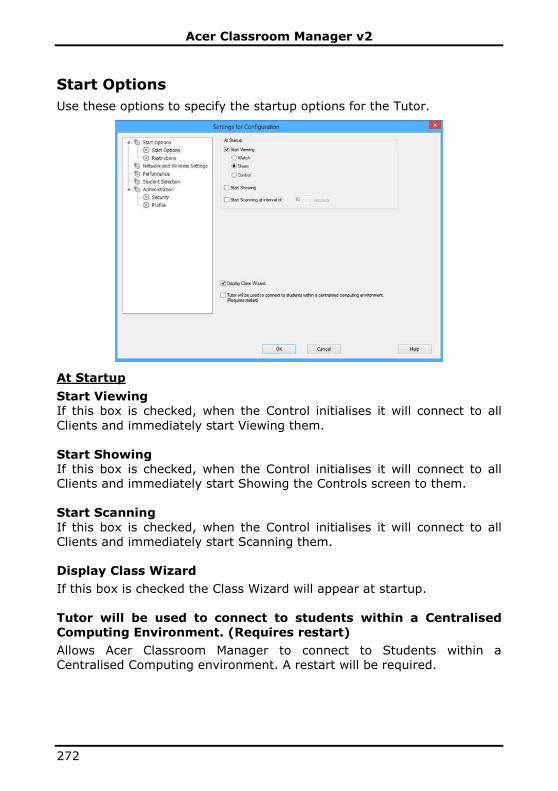
Acer Classroom Manager v2
272
Start Options
Use these options to specify the startup options for the Tutor.
At Startup
Start Viewing If this box is checked, when the Control initialises it will connect to all
Clients and immediately start Viewing them. Start Showing If this box is checked, when the Control initialises it will connect to all Clients and immediately start Showing the Controls screen to them. Start Scanning
If this box is checked, when the Control initialises it will connect to all Clients and immediately start Scanning them. Display Class Wizard
If this box is checked the Class Wizard will appear at startup. Tutor will be used to connect to students within a Centralised Computing Environment. (Requires restart)
Allows Acer Classroom Manager to connect to Students within a Centralised Computing environment. A restart will be required.

Acer Classroom Manager v2
273
Tutor Startup Restrictions
Access levels and restrictions for Acer Classroom Manager features can now be defined at startup, ensuring they come into force as soon as the
Tutor is started.
Apply global policy Applies the global policy restrictions that have been created in the Tech Console. Applications
Set the level of access for the Application Control Module. Apply global policy Applies the global policy restrictions that have been created in the Tech Console. Print
Choose the level of access for the Printer Management mode.
Use global policy Applies the global policy restrictions that have been created in the Tech Console.

Acer Classroom Manager v2
274
Devices (CD/DVD/USB)
Choose the level of access for the Device Control mode.
Use global policy Applies the global policy restrictions that have been created in the Tech Console. Audio
Enable Audio monitoring or mute audio at the Students machines.
Typing
Choose whether or not to monitor Students keyboard usage in Keyboard Monitoring mode. Instant Messenger
Set the level of access for the Messenger Monitoring mode.

Acer Classroom Manager v2
275
Network and Wireless Settings
This is primarily used for setting the network transport that the Control will use for communicating with the Clients. It must be the same as that
set at the Clients. You can also set the name and description for the Tutor.
Tutor Identification
Use these options to personalise the Tutor machines configuration.
Name
This is the name by which the Tutor will be known on the network. Setting it to an asterisk defaults to the machine or Computer Name.
Description
This is used to provide a description for the Tutor program itself. This is displayed in the Title bar of the Client program.

Acer Classroom Manager v2
276
TCP/IP Settings
Connect by Hostname (DHCP/WINS Networks)
Normally the Control connects to a Client by IP Address, rather than by name. In an environment that uses DHCP (Dynamic Host Configuration Protocol), this may be undesirable as the address may change when the Client workstation is restarted. Checking this option forces the Control to
connect by hostname. Port
The TCP/IP protocol requires that a port number be allocated for applications to communicate through. The default registered port for Acer Classroom Manager is 5405.
Note: If you are using Routers, you must ensure that they are
configured to pass through data using this port.
Use Name & Connectivity Server (Gateway)
Enable this option if you want to search for Students whose IP addresses are registered with a defined Name Server/Gateway. The currently configured browse at Startup option will still apply but rather than perform a UDP browse of the network, the Tutor program will search the Name Server for Students matching the specified criteria. Click Settings
and enter the IP address of the Name Server/Gateway along with the matching security key. Browsing
Subnets used when browsing for students
When you are running on a network with multiple subnets or addresses, you need to configure the Broadcast Addresses for each effective network. When a Browse is performed, the broadcast messages are sent to these addresses. Accelerate Browse
Increases the browse and connection speed to Clients, this is set by default.
Note: A warning icon will highlight machines you have been unable to connect to. Mouse over the icon to display the reason why the
connection failed.

Acer Classroom Manager v2
277
Broadcast Settings
Enable Broadcast Show and File Distribution
When performing a show or distributing files to Students, the screen information/files are sent to each Student machine in turn. Enabling Broadcast Show and File Distribution results in the screen information
and files being sent to all machines simultaneously. In some network environments where there is limited network bandwidth available or when broadcasting to larger numbers of machines this will provide significant performance benefits.
Whilst reducing overall network traffic generated by Acer Classroom Manager, using this feature will generate additional broadcast packets on your network. It is recommended that you consult your network administrator before using this feature. Settings
If the Broadcast Show and File Distribution option is enabled, select
this option to set the Broadcast Address. The Broadcast Settings dialog will appear. If multiple Tutor’s are attempting to use UDP/Broadcast Show simultaneously on the same subnet it is recommended that each uses a unique Port to avoid conflict. Wireless Network
Check this option in order to optimise show performance across a wireless network.
Maximum throughput Controls the level of data sent across the network to your wireless access point. The default data rate is 8 Mbps, if required this can altered to reflect the speed of the router. Deploy
Opens the Acer Classroom Manager Basic Deploy dialog, allowing you to
deploy Student software to PCs in a particular room.

Acer Classroom Manager v2
278
Performance Settings
Allows you to set low bandwidth and colour reduction settings to lower data sent across the network.
Low bandwidth mode
This mode is designed for network environments where low data usage is a priority. When enabled, video performance and quality will be reduced and limit network activity. Colour reduction
When enabled, the colour palette will be reduced from full colour to 256 colours.
This will have negligible visual impact when remotely viewing applications but may be seen when viewing multimedia. Typically this mode should be applied only when network utilisation is a priority.

Acer Classroom Manager v2
279
Student Selection
Use these options to pre-determine the Students to connect to when the Tutor program starts and in what mode.
Note: If a 'Name Server/Gateway' has been configured, the Tutor program will use the details registered here rather than perform a browse across the network.
Room Mode
Connect to Students in Room(s)
Allows you to connect to the machines in a given room. Specify the room you wish to connect to. Select from a list of rooms
Allows you to choose from a list of rooms to connect to at startup. Enter
the required rooms and separate each value with a comma. Prompt at startup
You will be prompted to specify a room when the Tutor program starts.

Acer Classroom Manager v2
280
Acknowledge Roaming Students
Allows roaming Students to connect to your room.
Note: The Room settings can be configured at the Student in the Acer Classroom Manager Student Configurator.
Browse Mode
Browse and connect to Students starting with
If this box is checked Acer Classroom Manager will browse and immediately connect to all Clients starting with the prefix set in the text box. Fixed List Mode
Connect to a List of Students
Allows you to connect to a fixed list of Student computers by machine name. Publish Class
Publish Class and allow Students to join
With the options above, the Tutor dictates which Clients are connected to. Selecting this option enables you to create a ‘class’ that the Clients (students) themselves can join.
Notes:
• Publish Class feature only supported over TCP/IP connections.
• Publish Class feature is not supported in Terminal Services environments.
• If the expected Clients are not found it may be because Acer
Classroom Manager has not been configured to browse the required Networks. See Configuring Acer Classroom Manager For Subnet
Browsing for more information. • If connecting to Students via the Name & Connectivity Server in
either Room or Publish Class mode, it is necessary to set the Name & Connectivity Server settings at the Tutor in both the Tutor Configurator and the Client Configurator.
• Publish Class is not supported on Tutor machines running Windows Vista or above.

Acer Classroom Manager v2
281
Administration - Security Settings
Protect the Configuration
The Control Configuration can be protected by setting a password. This acts independently of the Control Password if set.
Check the Protect box to set the password. Each time a Control User subsequently wants to make changes to the
Configuration, they will be prompted to enter the password. Options
Password
Setting a password will mean that the next time the Control program is started the user will be prompted to enter a password. If they do not
enter the correct password they will not be able to start the Control. Security Key
You can set a security key that will ensure that only Controls and Clients with matching keys are able to connect. Setting an asterisk * defaults the security key to be the same as the serial number. Note that this must set at both the Control and the Client. If a security key is set here, this Control will only connect to Clients with the same, or no, security
key.

Acer Classroom Manager v2
282
Redirect URL
Allows you to specify the URL that Students will be redirected to if they try to access restricted web sites. Shared Data
Checking this option allows you to share data files with other users. By default on a new install this option will be disabled.
By default on an upgrade this option will be enabled.
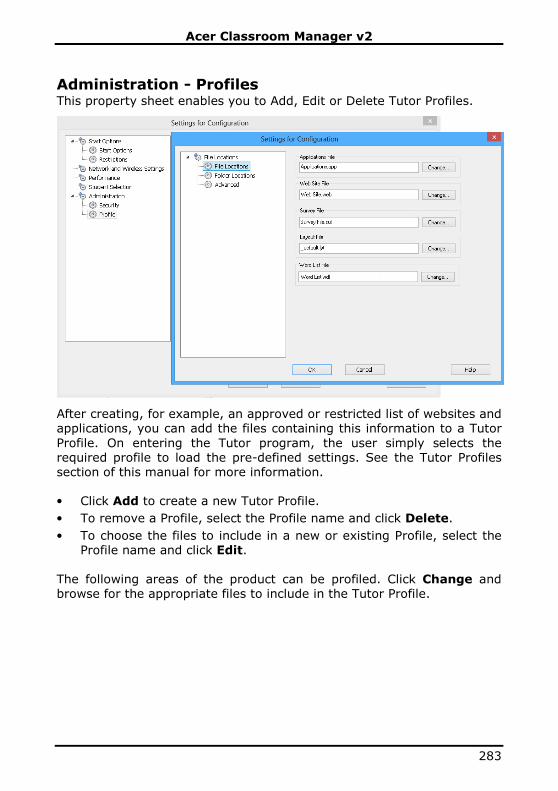
Acer Classroom Manager v2
283
Administration - Profiles This property sheet enables you to Add, Edit or Delete Tutor Profiles.
After creating, for example, an approved or restricted list of websites and applications, you can add the files containing this information to a Tutor
Profile. On entering the Tutor program, the user simply selects the required profile to load the pre-defined settings. See the Tutor Profiles section of this manual for more information. • Click Add to create a new Tutor Profile.
• To remove a Profile, select the Profile name and click Delete.
• To choose the files to include in a new or existing Profile, select the Profile name and click Edit.
The following areas of the product can be profiled. Click Change and browse for the appropriate files to include in the Tutor Profile.

Acer Classroom Manager v2
284
File Locations
Applications File Contains details of approved and restricted application packages. Default file name, Acer Classroom Manager.app. See Application Control Module for more information about creating pre-defined lists of approved or
restricted Applications. Web Site File Contains details of approved and restricted web sites. Default file name, Acer Classroom Manager.web. See Web Control Module for more information about creating pre-defined lists of approved or restricted websites.
Survey File
Identifies the location of stored Student Surveys. Default file name, Acer Classroom Manager.sul. See Student Surveys for more information. Layout File
Stores the position of the Client machines as they appear in the Control window and, if specified, a background image. Default file name, LAYOUT.LYT. See Working with Classroom Layouts for more information. Word List File Contains details of Target and Inappropriate keywords. Default file name, Acer Classroom Manager.wdl. See Keyboard Monitoring for further
information. Folder Testing Console Report Folder Specify a location for storing test results. If left blank the reports will default to \Acer Classroom Manager\tests\reports.
Testing Console Exam Folder Specify a location for storing Exams. Class List Folder Specify a location for storing Class Lists.
Journal Folder Specify the location for storing Student Journals.

Acer Classroom Manager v2
285
Audio Recordings Folder
Specify the location for storing Audio recordings. Advanced
Pre-defined Client and Group Lists can also be included in a Tutor Profile but these aren’t enabled by default. Before deciding to apply these to a Profile consider the current method of browsing for Students on startup as you may not want to override this.
Client File Contains a list of Known Client machines that the Tutor program attempts to connect to when loading. Default file name, CLIENT.NSS. See Class lists for more information. Group File Contains the details of any Client Groups that have been created. Default
file name, GROUP.NSS. See Working with Groups for more information. Use shared data files
Checking this option allows you to share data with other users.

Acer Classroom Manager v2
286
CONFIGURING REMOTE CONTROL SETTINGS
Acer Classroom Manager provides a range of customisable options enabling you to tailor each Remote Control session to suit specific requirements and conditions.
The Tutor has the option of applying settings globally or, in some instances, at individual Student level. To adjust global Configuration settings 1. From the Control window drop down menu, choose {View}{Current
Settings}.
2. The Settings dialog will appear, select the relevant option;
Remote Control View Keyboard/Mouse Replay Files Audio
File Transfer User Interface
Tutor Student
Classroom Assistant Group Leaders Student Toolbar
Journal Show
3. Configure the options to be enabled or disabled. 4. Click OK when complete. The selected settings will apply to all
Clients and will automatically be saved for future Control sessions.
Configuration settings for individual Clients The Remote Control settings, View, Keyboard/Mouse, Replay Files and Audio, can be customised for individual Clients. For example, on one Client you may want to use compression because it is on a slow link, but on another you may want to turn compression off.
To adjust settings for individual Clients 1. View the required Client. 2. Choose {View}{Settings for Client} from the View window drop
down menu.

Acer Classroom Manager v2
287
3. The Settings dialog will appear, select the relevant option, View,
Keyboard/Mouse, Replay Files or Audio. 4. Configure the options to be enabled or disabled during the View
session.
Note: If you want to change the settings permanently check the
Update Configuration Acer Classroom Manager box.

Acer Classroom Manager v2
288
Tutor View Settings
This property sheet provides configuration options for the Viewing of Client workstations.
The View Settings can be configured in two ways: 1. To apply the settings for all Client View sessions, choose
{View}{Current Settings-View} from the Control window drop down menu.
2. To apply the settings for an individual Client View session, View the Client and choose {View}{Settings for Client-View} from the View
window drop down menu.
A brief description of the available options follows:
BIOS Keyboard Checking this option causes the Control to emulate keystrokes on the Client, at the BIOS level rather than the Hardware level. Use this if an application at the Client does not appear to be correctly accepting keystrokes from the Control. Only use this option if you are experiencing problems with the default low-level Keyboard option.

Acer Classroom Manager v2
289
Confirm Switch to Full Screen
When this box is checked, you will be prompted to confirm switching to full screen mode. Full Screen Checking this options will force the Control to view a Client in Full Screen mode rather than in a windowed mode.
Scale to Fit Check this option if you want the contents of the view window to be automatically shrunk to fit the sizeable frame. Disconnect when closed Check this option to disconnect from a Client when a View window is
closed. Screen Scrape Acer Classroom Manager’s favoured, and the most efficient, method for capturing screen data is to hook into the Video Driver of the workstation being viewed. However, there may be occasions when this method will not work because certain applications bypass the driver. In these
circumstances you can enable screen scrape mode in order to take a snapshot of the screen. Although this will have a greater impact on the network it will at least provide an accurate representation of the Client’s screen. Scrollbars
You can turn off scrollbars on the view windows by checking this option. This is useful when using Auto-Scroll, as you gain a little extra workspace. Use Compression Check this box to enable compression when viewing a Client’s screen. The state of this checkbox is also reflected in the General tab.
Wallpaper Check this box if you want the Client’s wallpaper to be visible when viewing. Normally this is turned off to improve performance, so expect the screen update speed to be impacted by selecting this option. Blank Client screen
This enables the Control to blank the client screen in any of the View modes.

Acer Classroom Manager v2
290
Video Skipping
A Controls Viewing performance can be configured using Video Skipping. The Control program will not display Client screen updates if a subsequent update to the area of the screen is made. Unticking the box will result in all Client screen updates being displayed at the Control. Auto Clipboard
When enabled, provides the quickest method for copying data. Use the short cut keys (Ctrl-C & Ctrl-V) to automatically copy to and from the clipboard at both the Tutor and Student machines. Default Mode When you view a Client, by default, you start viewing in Share mode. If you prefer to start viewing in a different way, change the style from the
list provided. Cache Size The Acer Classroom Manager Control contains a cache to help improve overall performance. The cache sizes range from 256KB to 16Mb and a separate cache is allocated to each Client connection. If you are running applications on the Client that uses lots of or large bitmaps increase the
cache size to improve the performance. Max Colour Depth When you connect to a Client, you can restrict the Colour Depth that is sent. This is done to reduce the amount of traffic between Client and Control. Reduce the Colour Depth to 16 colours if you are using
applications that do not rely on anything other than the standard 16-colour palette. Change DOS Font Use this dialog to select the font to use when displaying DOS screens. This will be from Windows Clients running Full Screen DOS boxes. Windows uses a graphic character set for displaying DOS Screens. The
higher the resolution that you are running Windows in the larger the font size you will need to set to get an accurate representation of a DOS Screen. Change Japanese Font Use this dialog to select the font to use when displaying Japanese DOS screens.

Acer Classroom Manager v2
291
Tutor Keyboard/Mouse Settings
Keyboard Layout Select from the list provided a Keyboard layout to be used at the Control during viewing. These layouts map keys on the Control to keys on the Client machine. If both Client and Control are using the same keyboard layout, you should select Unmapped Keyboard from the list.
Hotkeys When you are viewing a Client in Full Screen mode, hotkeys provide a way of returning to the possibly hidden user interface. If the screen resolution at the Client is smaller than the resolution of the Control, you can simply click your mouse button outside the view window to stop
viewing and display the view window again. Check the boxes in this group to determine the keys that are used as Hotkeys. AutoScroll Speed When you are viewing a Client’s screen, the Control can automatically scroll the contents when the mouse moves close to the edges of the window. Adjusting the sliding control sets the speed at which the view
scrolls, from not at all to very fast.

Acer Classroom Manager v2
292
Scroll Delay
When Auto Scroll is enabled, you can change the delay before the scroll is activated. If you want the view to scroll as soon as the mouse is at an edge of the screen, move the slider towards Min. If you prefer a longer delay before the AutoScroll takes effect, move the slider towards Max. Mouse Delay
Adjusting the mouse delay allows you to reduce the rate at which mouse updates are sent from the Control to the Client when controlling or sharing. Move the slider control towards Infinite to reduce the rate and conserve bandwidth, or towards Min for the best mouse response. This is useful on dial-up or very slow networks. Disable Num Lock Synchronisation
Check this option if using a Laptop as the Control machine to ensure that the keyboards behaviour corresponds with that of a standard desktop machine.

Acer Classroom Manager v2
293
Replay File Settings
The Replay Files feature enables the Tutor to record and playback the screen activity that takes place at a Student workstation while it is being
remote controlled/viewed.
Record Replay Files
Check this option to enable the recording of Replay Files. A Replay File will be created each time the Tutor opens a view session at any Student machine. Include Audio In addition to the screen, mouse and keyboard activity, if the
workstation is configured for Audio, you can record any microphone narration from the Tutor.
Note: Desktop sounds, music are unable to be recorded.
Prefix Files With Client Name In order to identify each Replay File, filenames are prefixed with the
Client Name and the date/time of the recording. Alternatively, by unchecking this box the files will be named sequentially in the format 00000001.rpf etc. In Folder Specify where the Replay Files should be stored.

Acer Classroom Manager v2
294
Audio Settings
This property sheet provides configuration options for using Audio support.
The Audio settings can be configured in two ways:
1. To apply the settings for all Client sessions, choose {View}{Current Settings-Audio} from the Control window drop down menu.
2. To apply the settings for an individual Client session, View the Client and choose {View}{Settings for Client-Audio} from the View window drop down menu.
Volume
Threshold microphone sensitivity Microphone volume of microphone Speaker volume of speakers Test Check this box to test all of the above settings.

Acer Classroom Manager v2
295
Enable
On Turn Audio on. Off Turn Audio off. Talk Turn the Control Audio to Talk function only. Listen Turn the Control Audio to Listen function only. Selecting the Change transmission format buttons allows you to change
the transmission format. Use only the level you need for acceptable quality. High quality settings can affect screen update performance.

Acer Classroom Manager v2
296
Tutor File Transfer Settings
You can configure the File Transfer settings in Acer Classroom Manager. From the Control window drop down menu choose (View}{Current
Settings - File Transfer}. Here you can alter the way in which information is displayed, and set safety features such as confirmation before performing a damaging operation.
Display Options Show System/Hidden files Check this box to display all files with System and Hidden attributes. By default, this option is unchecked.
Show file details Select this option to display multiple columns of information for each file in the list. These show the file size, modified date, attributes and short filename. You can toggle between this state and the filenames only state, by using the list style buttons in the File Transfer User Interface.
Show file names only Select this option to only display filenames in the file lists. This allows you to display more files at the same time than with file details. You can toggle between this state and the Details state, by using the list style buttons in the File Transfer User Interface.

Acer Classroom Manager v2
297
Confirm
When you perform potentially dangerous file operations, such as deleting a folder or file you can make the Control display a Confirmation dialog box. This helps prevent accidental loss of data. If you are familiar with the User Interface, you can turn these options off as required. By default, all the confirmation settings are turned on.
Folder copy Make the user confirm before copying a folder structure. Folder delete Make the user confirm before deleting a folder structure. File overwrite
If checked, displays a confirmation dialog before overwriting an existing file. However, if unchecked the confirmation message will still appear if system/hidden files are about to be overwritten. File delete Display a confirmation dialog before deleting one or more files.
Use Recycle Bin for local deletions (when available) All files deleted from the Local pane will be sent to the Recycle bin, this is enabled by default. Use Compression Check this box to enable the use of compression. When you are
communicating with a Client, whether it is a File transfer, View or Chat session, the data being sent and received will be compressed. This also provides a means of security, as the data will also be encrypted. Delta File Transfer Delta File Transfer improves performance by skipping the transfer of information that is unchanged. If the file being transferred already exists
in the destination folder only the changed parts of the file will be updated. Delta File Transfer is enabled by default.

Acer Classroom Manager v2
298
Priority (when also viewing)
When you are transferring files and viewing a Clients’ screen at the same time, each operation impacts the performance of the other. You can reduce the priority of a File Transfer operation to make the viewing more responsive and vice-versa. Slide the control to the left to give the File Transfer higher priority, or to the right to give Client views higher priority. If you are not viewing a Client, this setting is ignored.
Automatically close progress when copy finished Closes the File transfer progress dialog automatically on completion. Un-tick this option if you want to see the File transfer results.

Acer Classroom Manager v2
299
Tutor User Interface Settings
The behaviour of the following interface options can be adjusted by selecting {View}{Current Settings User Interface - Student} from the
Control window drop down menu.
Display Student User Names Check this option to retrieve and display the login name of the Client on
the Control window when you perform a Student Register. Remember Student user/ login names Check this option to save the Student user/login names in the Known Client list. Silent Disconnect
Should a Client inadvertently disconnect from the Control during a session a prompt appears at the Tutor machine. Check this option to disable this warning. Automatically Reconnect to Students Ensures that Student machines automatically rejoin a live remote control session should they inadvertently disconnect.

Acer Classroom Manager v2
300
Automatically save Student history on exit
Check this option to automatically save Internet, Application, Print, Instant Messenger and Typing history to a CSV file when the Tutor is shut down. Show Tutor Toolbar on minimizing When the Tutor program is minimised, the Tutor Toolbar will be
displayed, providing access to key Acer Classroom Manager features. Uncheck this option to disable this. Show active Print Jobs Displays any active Print jobs in all views. Show Student alert level
Students can raise an alert from the Student toolbar, the Student icon will change colour at the Tutor depending on the type of alert raised. This option enables you to show or hide these alerts. Show wireless and battery status You can choose to show both the wireless and battery status and show only the battery level when it drops below 10%.

Acer Classroom Manager v2
301
Student User Interface Settings
Blank screen when locking mouse and keyboard Blanks the Client screen when their keyboard and mouse are locked. You can also blank a Client screen while Viewing.
Display image when locking mouse and keyboard Displays a full-screen image on the Client screen when their keyboard and mouse are locked. The default Acer Classroom Manager image can be replaced by one of your own choosing by setting the location of the file in the Client Configurator Student Advanced Settings dialog.
Mute sound when locking mouse/keyboard or blanking screen Sound will be muted at Students when locking the mouse/keyboard or blanking the screen. Student to Student Chat Check this option to enable Students to initiate a Group Chat session with other connected Students.
Lock/Unlock When using the Lock function, the Students mouse and keyboard are locked by default. However, there may be occasions when you still want the Student to be able to use their mouse or keyboard.

Acer Classroom Manager v2
302
Check/uncheck the appropriate box(es) as required.
Note: Both boxes must be checked when the Blank screen when locking mouse and keyboard option is used.
Classroom Assistant Settings
Configure the settings for the Acer Classroom Manager Classroom Assistant.
Tutor Name/ID
The name that appears at the Classroom Assistant. Selecting Custom allows you to enter your own name for the Tutor. System Status Shows the current system status. You can start and stop the system from here.
Start System when Tutor Starts The system will automatically start when the Tutor starts. Current Network Address The network address for the Tutor.

Acer Classroom Manager v2
303
Connection Port
Enter the port number. The default port is 37777. Connection Password Enter the password that Classroom Assistants will use to connect to the Tutor.
Show Password Displays the connection password. Authorised Assistants Lists the Classroom Assistants that have been authorised to connect to the Tutor. You can remove or unauthorise the Assistants from here.
Assistants waiting for Authorisation Lists the Classroom Assistants waiting for authorisation to connect to the Tutor. Click Authorise to approve the Assistant. Automatic Authorisation Classroom Assistants will be automatically authorised once they have entered the correct password.
Interactive Authorisation Classroom Assistants will require manual authorisation to connect to the Tutor.

Acer Classroom Manager v2
304
Group Leader Settings
When working with defined Groups of Clients, the Control can assign Group Leader status to a selected member of the Group.
Enable Group Leaders Enables the Group Leader function. Show visual Group Leader connections Visual Group Leader connections can be displayed allowing you easily see the link between a Group Leader and their Students in all views.
All Group Leader features are enabled by default but can be removed by un-checking the appropriate box. Functions Allows you to select the functions that are available to the Group Leader.

Acer Classroom Manager v2
305
Student Toolbar Settings
Configure the settings for the Student toolbar.
Enable Student Toolbar Enables the Student toolbar.
Make the toolbar always visible Decide whether to make the toolbar always visible at the top of the Student screen or to auto-hide. Toolbar options Select the options that will be displayed on the Student toolbar.

Acer Classroom Manager v2
306
Tutor Journal Settings
A Journal is provided allowing key information from the lesson to be stored in a portable PDF file. You can use these options to customise the
settings for the Journal stored at the Tutor. To customise the settings for the Student Journal choose {Start}{Programs}{Acer Classroom Manager}{Acer Classroom Manager Student Configurator - Journal}. On Windows 8 machines right-click in the Start screen and choose All Apps at the bottom of the screen. Click the Acer Classroom Manager Student Configurator icon.
Enable Student Journal Activates the Journal for the Students.
Enable Tutor Journal If enabled, a copy of the Journal will be stored for the Tutor to view. Tutor Settings Margins (mm) If required, you can adjust the top, bottom, left and right margins for the
Journal. Page Size Select the required page size for the Student Journal.

Acer Classroom Manager v2
307
Font Size (points)
Set the font size to be used in the Journal. Jpeg Quality (0-100) Allows you to set the quality of images in the Journal, this is set to 100 by default.
Journal Folder Specify where you want the Student Journal to be stored. Journal Logo Allows you to add an image that will appear at the top of the Journal.

Acer Classroom Manager v2
308
Show Settings
The Show feature allows you to display the Tutor screen on all, some or one of the Student's screens. From here you can configure the settings
for a Show.
Screen Scrape Acer Classroom Manager’s favoured, and the most efficient, method for capturing screen data is to hook into the Video Driver of the workstation being viewed. However, there may be occasions when this method will not work because certain applications bypass the driver. In these circumstances you can enable ‘screen scrape’ mode in order to take a snapshot of the screen. Although this will have a greater impact on the
network it will at least provide an accurate representation of the Client’s screen. Show Hotkeys To ensure that all actions performed by the Control are visible to the Clients during a show you can enable the use of Hotkeys. Any key
combinations that the Control uses, e.g. CTRL+V, will be displayed in a balloon at both the Control and Client screens.

Acer Classroom Manager v2
309
Send Physical Fonts
In order to reduce the volume of data being sent when sharing information of this nature, Acer Classroom Manager passes the font information by reference. The target workstation will refer to it’s own internal font mappings to find an appropriate match to the one that has been sent. In most cases the same fonts will be available but if there are instances where this isn’t the case you can send the full information.
Check this box to enable. Restrict Internet access to approved sites only during Show Allows the Tutor to only access websites that are on the Approved Site List, preventing inappropriate websites being displayed to Students during a Show.

Acer Classroom Manager v2
310
TECH CONSOLE
A classroom management solution is not simply about providing the right tools for each teacher, equally important are tools to ensure all computers in the school can be managed and maintained so they are always available for teaching. With this in mind, Acer Classroom Manager
provides a unique "Tech Console" specifically for IT technicians and network managers. The Tech Console provides a single view of all computers across the school, allowing technicians to review hardware and software inventory, monitor internet and application usage, apply 'always on' internet,
application and printing policies and define security policies which all PCs across the school will be checked against to determine whether they are secure.
Note: The Tech Console can be installed with other Acer Classroom
Manager components or as a standalone component.

Acer Classroom Manager v2
311
To start the Tech Console, choose, {Start}{Programs}{Acer Classroom
Manager}{Acer Classroom Manager Tech Console}. In Windows 8 click the Acer Classroom Manager Tech Console icon in the Start screen. When the Tech Console loads for the first time, the Control Configuration dialog will appear. This enables the Control to specify the Clients to connect to at startup. The dialog will not appear in future sessions.
Note: If required, a message can be displayed at a Tutor workstation when a connection is made. See Student Security tab for further details.
In the List view, the connected Clients can be viewed in two different ways. Image Mode, displays a thumbnail view of the Client screen
providing a quick and easy method for monitoring activity. Report Mode, displays details of the Student machines, such as name, IP address, user name, Client platform, current security state, policy settings, room, running application and all websites. To toggle between views Choose {Views}{Image Mode/ Report Mode} or Click the View icon on the toolbar.
Note: From Report mode you can activate and close Applications and Websites on a Student by right-clicking the required icon.
From the Status bar you can resize the Client thumbnails using a convenient 'slider' bar, change the thumbnail refresh rate and
automatically adjust the size of the displayed thumbnails to fit the window. Different icons will be displayed for the Tutor and the Student, allowing you to easily differentiate between the two. A connection bar showing the link from the Tutor to the Students will also be displayed. You can manually set a machine to show as a Tutor machine, right click the
required Client and click Properties. In the General tab select the This is a teacher's computer check box. The Tech Console brings together the main Acer Classroom Manager Tutor Console features: • Monitor all computers across the school network in a single view.
• Monitor Application and Internet usage on each Student PC.
• Transfer files and folders to selected or all computers.

Acer Classroom Manager v2
312
• Group all computers by classroom / physical location.
• Hardware/Software Inventory.
• Provide direct technical assistance to any classroom Teacher.
• Power On/Off classroom computers remotely.
• Reboot/Logout classroom computers remotely.
• Automatically login computers.
• Display all Students and Teachers by active class.
• Review individual Acer Classroom Manager client security settings remotely.
• Conduct Chat with one or multiple Students or Teachers.
• Broadcast messages to groups or all network users in seconds.
• Perform powerful 1:1 PC Remote Control on any selected computer.
• Shows real-time USB memory Stick status on all Student PCs.
• Lock/Unlock Students Keyboard and Mouse.
• Execute applications on Student PCs.
• View/set Power Management, Windows Update and Security Settings.
• Edit the registry of a remote system.
• Launch a local command prompt from the remote system on your PC.
• Automatically connect to Students/Teachers using Room mode.
• Ability to search for Students by name, device or class.
• Apply a school-wide set of internet, application, USB, CD/DVD and print restrictions.
Acer Classroom Manager allows Teachers to request help from Lab Technicians and network managers, ensure the Teacher Support feature
is enabled, choose {View}{Provide Teacher Support} from the Control window drop down menu. A Get Support icon will be displayed on the Tutor console toolbar. Clicking the icon allows the Tutor to either chat or send a message directly to the lab technician or network manager.

Acer Classroom Manager v2
313
Hardware and Software Inventory
For many support teams an important part of the problem resolution process is knowing not only what platform the workstation is running, but also its hardware specifications and the applications installed on the workstation. For this reason, Acer Classroom Manager provides the tools to supply a full inventory of the remote workstation.
In addition to its sophisticated hardware/software reporting, where over 50 items of information are collected specifically about the hardware or environment of the client PC, you can obtain details of applications in memory, installed hot-fixes, processes running and installed services. As well as the real-time reporting, Acer Classroom Manager also provides
the tools, security permitting, to allow you to remotely stop and start services, end applications and more.
Notes:
• In order to use the HTML based features within Acer Classroom Manager’s Inventory options, Internet Explorer 4 or above is required.
• The Inventory is only available from the Tech Console.

Acer Classroom Manager v2
314
To Retrieve a Client Inventory
1. Select the required Client icon in the Control window List view
2. Choose {Tools}{Inventory} from the Control window drop down menu Or, Right click the Client icon and choose Inventory.
Or, Click the Inventory icon on the toolbar.
3. The Inventory window for the selected Client will appear.
Note: Once collected, the various Client inventories are stored locally in
the Acer Classroom Manager program folder meaning that you do not need to be connected to the target PC to be able to view the information at a later date. Simply select the required Client from the List view and choose the Inventory option. However, if you subsequently want to refresh the inventory you do need to
connect to the target PC.

Acer Classroom Manager v2
315
Policy Management
The Tech Console allows you to create a set of policy restrictions that can be applied across the whole school. The policy can include Internet, Application, USB, CD/DVD and Print restrictions. In Report mode you can view the current policy restrictions for Clients.
Hovering over the icons in the Policy column displays further information about the current policy. The Acer Classroom Manager Tutor is notified of any policy restrictions that are in force. A lock icon will be displayed next to the relevant feature advising that a central policy has been applied.
Note: The Tutor can override central policies for their Students in the Acer Classroom Manager Tutor - Start Option settings.
Creating a Policy 1. Select {Security}{Policy Management} from the Tech Console drop
down menu. 2. The Policy Management dialog will appear. 3. Set the required restrictions.

Acer Classroom Manager v2
316
Applying a Policy
You can apply the policy to all connected machines.
Note: Teacher machines can be excluded from a policy. Select the Don't
apply policies to teacher computers check box in the Tech Console - General Settings dialog.
1. Select the required Client(s) to apply the policy to. Or 1. Switch the List view to Report mode. 2. Right click in the Policy column and select Apply Policy.
Clear a Policy Clears the current policy from the selected Client(s). 1. Switch the List view to Report mode. 2. Select the required Client(s). 3. Right click in the Policy column and select Clear Policy.
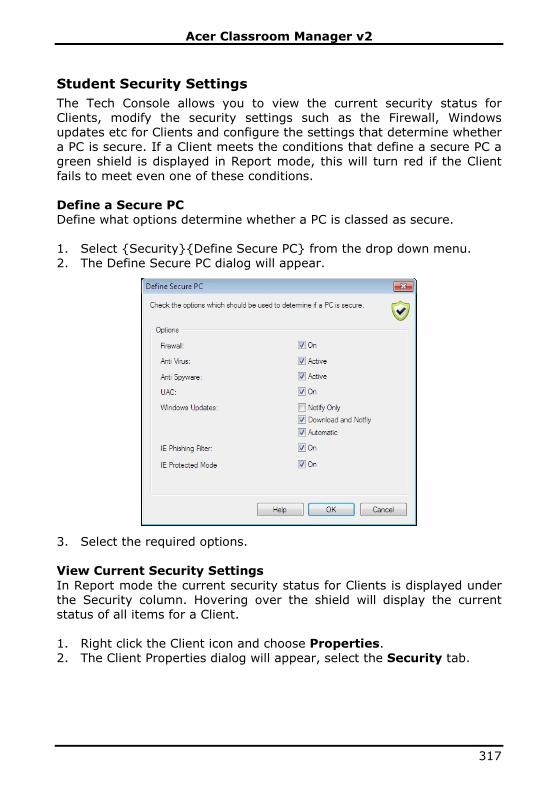
Acer Classroom Manager v2
317
Student Security Settings
The Tech Console allows you to view the current security status for Clients, modify the security settings such as the Firewall, Windows updates etc for Clients and configure the settings that determine whether a PC is secure. If a Client meets the conditions that define a secure PC a green shield is displayed in Report mode, this will turn red if the Client
fails to meet even one of these conditions. Define a Secure PC Define what options determine whether a PC is classed as secure. 1. Select {Security}{Define Secure PC} from the drop down menu. 2. The Define Secure PC dialog will appear.
3. Select the required options. View Current Security Settings
In Report mode the current security status for Clients is displayed under the Security column. Hovering over the shield will display the current status of all items for a Client. 1. Right click the Client icon and choose Properties. 2. The Client Properties dialog will appear, select the Security tab.

Acer Classroom Manager v2
318
Change the Security Settings
1. Select the Client icon.
2. Choose {Security}{Modify Security Settings} from the drop down menu. Or Click the Modify icon on the toolbar. Or Right click the shield in Report mode and select {Modify Security
Settings}. 3. The Modify Settings dialog will appear. Alter the settings as required. Or 1. Right click the Client icon and choose Properties. 2. The Client Properties dialog will appear, select the Security tab.
3. Click Change and alter the settings as required.

Acer Classroom Manager v2
319
Remote Command Prompt Window
By launching the Command Prompt window you can remotely execute command line instructions at a connected Client. 1. Connect to the required Client and choose {Tools}{Remote
Command Prompt} from the drop down menu.
Or, Right-click on the Client icon and select Remote Command Prompt. Or, Click the Remote Command icon on the toolbar.
2. The Remote Command Prompt window will appear. The title bar will confirm the name of the connected Client.
The window is split into two frames. The input frame at the bottom of the window, which can be resized if required, and the output/results frame at the top. While the window is open each command is stored by the Control
enabling you to recall previous instructions that you may wish to run again. Either scroll through the entries using the up and down arrow keys and press enter when the required command is displayed, or press F7 to show all commands in a window. Click on the required command and press enter.
A maximum of 50 commands are stored. To clear the history press F8. Once the Control closes the Remote Command window the history is cleared automatically.

Acer Classroom Manager v2
320
TESTING MODULE
Acer Classroom Manager’s Testing Module is a powerful utility that enables Tutor’s to design tests and examinations with the minimum of effort. Incorporating an intuitive Test Designer allowing a Tutor to set customised tests including text, picture, audio and video questions, once
the specified Students have completed the test in the pre-set time, the results are automatically collated, marked and made available to the Tutor. The following components are available within the Testing Module:
The Test Designer
Launched from the Acer Classroom Manager program group, the Test Designer is used to create questions and tests. The Testing Console
Run from within the Acer Classroom Manager Tutor program, the Testing Console is used to launch the required test at selected Student
workstations, monitor progress and collate results. The Test Player
This component runs the test at the Student workstation, it loads automatically when the Tutor launches a test.

Acer Classroom Manager v2
321
The Test Designer
The Acer Classroom Manager Test Designer is the primary interface for:-
• Creating questions.
• Creating tests/examinations.
• Maintaining stored questions and tests.
• Providing user access to the designer.
Note: Selecting participants, running the test at student machines and
recording the results of tests is managed within the Acer Classroom Manager Tutor program. See Testing Console for more information.
Starting the Test Designer
1. Choose {Start}{Programs}{Acer Classroom Manager}{Acer Classroom Manager Test Designer}. On Windows 8 machines right-click in the Start screen and choose All Apps at the bottom of the
screen. Click the Acer Classroom Manager Test Designer icon.
Or, Select {School}{Test Designer} from the Tutor Console drop down menu. Or, If displayed, click the Test Designer icon on the Tutor Console
toolbar.
2. The Test Designer logon screen will appear. Enter your User Name and Password.
Note: Acer Classroom Manager provides a default Administrator logon for use the first time you access the Designer (User
Name admin, Password admin) but you can add additional users.

Acer Classroom Manager v2
322
The Test Designer User Interface
The Designer comprises two modes of operation, Questions and Exams. You navigate the two interfaces using the drop down menus or the icons displayed above each tree view. Stored Questions grouped by Subject are shown in the top pane and Exams at the bottom. The right-hand pane shows a preview of the currently selected Question or Exam.
The main toolbar provides shortcuts to a number of general tasks such as creating user accounts, importing and exporting data and managing
question resources. The Layout toolbar icon enables you to customise the Designer Interface should you wish to work in either Question or Exam mode. Select Normal Layout to return to the default interface.
Note: An online resource centre is available, providing teachers with
access to a wide range of curriculum based information that can be used within the Testing Module. The portal is provided and managed by Acer Classroom Manager but the actual content will be provided by Educators for Educators, which will ensure it reflects up to date and relevant curriculum content. Select
{Help}{Online Resources} from the Designers drop down menu to access the site.

Acer Classroom Manager v2
323
The Questions Interface
You can create questions in a variety of formats and these can be enhanced by the use of imported pictures, videos and sound clips. The four icons available in Question Mode enable you to:
• Create Questions
• Edit a selected item
• Delete a selected question
• Change the way questions are arranged in the Tree. This can be by Author, Question Type, Subject or Level of Difficulty.
Subjects and Topics can be added to the Tree at any time or, if you are not sure which subject groups your questions will belong to, you can add them when creating a question. To add Subjects directly to the tree, select {Questions}{New Subject}
from the drop down menu or right-click in the Questions window and select New Subject. Multiple Topics can then be added beneath a Subject by right-clicking on the Subject name and selecting New Topic or choosing {Questions}{New Topic} from the drop down menu.

Acer Classroom Manager v2
324
Create Questions
A choice of eight question styles are available, each with a Question Wizard that steps you through the required process. To create a question, choose {Questions}{Create Question} from the
drop down menu, click the Create New Question icon or right-click a question and select Create Question.
Select the required Question Type and click Create.
Note: Questions can also be created in the Exam Editor at the time you compile a test.
The eight question types are: Multi Choice
The Student is required to pick the correct answer from up to four possible options. Drag And Drop Text Students must try to complete a statement by adding a word or phrase from the alternatives provided.

Acer Classroom Manager v2
325
Drag And Drop Image
Students must match an image with the appropriate statement. Combo List Students are presented with up to four questions and need to select the correct answer from a drop down list. You can insert additional 'decoy' answers into the list.
Label Image You provide students with a picture that has various areas marked. The student needs to label each area correctly. True or False The Students are provided with a statement and they must decide
whether this is true or false. Multi True or False Students are presented with up to four statements and must decide whether they are true or false. Order Items
The Students are required to place the items in the correct order.

Acer Classroom Manager v2
326
Multi Choice
Students select the correct answer from up to four possibilities. The first stage, of three, is to set the question followed by the correct answer and up to three false answers. When the question is run at Student machines, the answers are randomly arranged.
Once you have completed part one of the wizard, click Next.

Acer Classroom Manager v2
327
Drag and Drop Text
The Student is presented with four partially completed statements. They must complete the statement by dragging and dropping the appropriate word or phrase from a list.
The first stage, of three, is to enter the instructions for the question along with the four statements. Within each statement, highlight with your mouse the word or phrase that you will want the Students to drag and drop, clicking Set Answer when you are happy that you have
selected the appropriate text. When the question is run at Student machines, the four highlighted items are removed from the statements and randomly arranged.
Once you have completed part one of the wizard, click Next.

Acer Classroom Manager v2
328
Drag and Drop Image
The Student is presented with up to four statements or questions, and a selection of images. They must match the image with the correct statement. The first stage, of three, is to enter the instructions along with up to four statements or phrases. Alongside each statement you add the
appropriate image. Click Browse to search for the images. The list of pictures currently stored in the Images database will appear. Either select an existing image or Import a new one. Click Use to apply the image to the question. When the question is run at Student machines, the pictures are randomly arranged at the bottom of the screen and the Students drag and drop
the images next to the appropriate statement.
Once you have completed part one of the wizard, click Next.

Acer Classroom Manager v2
329
Combo List
The Student is presented with up to four statements, alongside each statement is a drop down list containing a choice of possible answers. They must select the correct answer from the list. The first stage, of three, is to enter the instructions along with up to four statements or phrases. Alongside each statement enter the correct
answer text. You can then add two further dummy answers, meaning that when the question is run at Student machines, the Student will be shown all possible answers to choose from.
Once you have completed part one of the wizard, click Next.

Acer Classroom Manager v2
330
Label Image
Students are presented with a picture that has up to four areas marked, each with an adjacent blank’ text box. At the bottom of their screen will be up to four text labels which they must drag and drop into the correct text box. The first stage, of five, is to enter the question along with up to four text
labels. You then select the image that the Students will need to label. Click Browse to search for the images. The list of pictures currently stored in the Images database will appear. Either select an existing image or import a new one. Click Use to apply the image to the question.
Once you have completed part one of the wizard, click Next. If the image you have chosen for the Label Image question is too large
for the viewable area you can resize it.

Acer Classroom Manager v2
331
Use the scroll-bars to position the image within the viewable area. To select the required section, use your mouse to draw around the area you require. When ready, press Enter or click Next to continue. Use this preview window to position the answers on the image, select the
type of arrow you wish to use and choose an appropriate colour scheme for the ‘pointer’ lines and background.
Acer Classroom Manager v2
332
1. Drag the end of each ‘pointer’ to the correct region of the image.
2. Drag the associated text box to an appropriate area.
3. Select the pointer style you wish to use and choose a colour for the pointers and background.
4. Click Next when ready.

Acer Classroom Manager v2
333
True or False
Students are provided with a statement and they must decide whether it is true or false. The first stage of three is to provide instructions for the question, then enter the statement you want the students to answer and specify whether the statement is true or false.
Once you have completed part one of the wizard, click Next.

Acer Classroom Manager v2
334
Multi True or False
Students are provided with up to four statements and they must decide whether they are true or false. The first stage of three is to enter instructions for the questions along with up to four statements. Alongside each of the statements choose whether they are true or false, by selecting the appropriate button.
Once you have completed part one of the wizard, click Next.

Acer Classroom Manager v2
335
Order Items
Students are required to correctly place up to four items in the correct order. The first stage of three is to set the question, with up to four answers in the correct order. When the question is run at the Student machines, the answers will be randomly arranged and the Students will drag and drop
each item to the correct place.
Once you have completed part one of the wizard, click Next.

Acer Classroom Manager v2
336
Adding Additional Resources to Questions
The Resources Database
Imagery in the form of pictures, videos and sound clips are often an
integral part of any question you create. Question types such as Label Image and Drag and Drop Image are graphical by nature but any question type can have an additional supporting resource included. The Designer provides an ‘Observation’ mode which, if enabled, forces Students to view or listen to a resource before they can answer the question.
Before you can attach a resource to a question it must first be added to the programs internal Resources database. By default this is stored in \\program files\Acer\Acer Classroom Manager\resources but the location can be modified by selecting {File}{Options} from the drop down menu. To populate the database, click the Resources icon on the Designers
main toolbar or select {File}{Resources} from the drop down menu. The Resource List will appear. A range of toolbar options are available, enabling you to import and manage items. Prior to importing a new resource click the Filter icon and select the relevant category, Audio, Image or Video. This ensures that each resource type is stored in the appropriate folder within the database.
Click the Import a Resource icon and browse for the required file. Alternatively, you can simply drag and drop the file directly into the list from its location using Windows explorer. At the stage where you add your resources to a question, if the required file isn’t already in the database you can import it at that time.
Acer Classroom Manager v2
337
Adding Resources To A Question
Each Question Wizard will prompt you to add Resources at the appropriate stage. 1. Decide which resource type is appropriate, image, sound or video
and click Browse. The resources list for the selected type will appear.
2. If the required file has already been imported into the database highlight it in the list and click Use. You can preview the files before selecting them.
Or,
To add a new item to the list, click Import and browse for the file. When you have selected the file, you can preview it to ensure it is the correct one. It is also important that you include a suitable
description for the item, as this will appear in the Resources list rather than the file name. Once added to the list, click Use to add the item to the question.
3. Click Next. Observation Mode Selecting this option allows you to force the Students to view a resource file before the question appears, they will not be able to view the resource in the question. When the exam is run at the Student machines
they will be advised that the question media will only be shown once. If this option is selected you will not be able to continue until a resource has been added to the question.
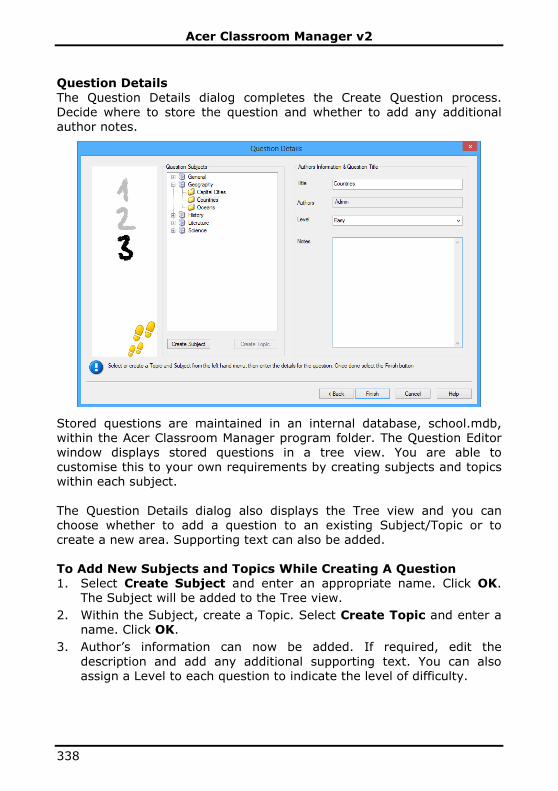
Acer Classroom Manager v2
338
Question Details
The Question Details dialog completes the Create Question process. Decide where to store the question and whether to add any additional author notes.
Stored questions are maintained in an internal database, school.mdb, within the Acer Classroom Manager program folder. The Question Editor window displays stored questions in a tree view. You are able to customise this to your own requirements by creating subjects and topics within each subject.
The Question Details dialog also displays the Tree view and you can choose whether to add a question to an existing Subject/Topic or to create a new area. Supporting text can also be added. To Add New Subjects and Topics While Creating A Question 1. Select Create Subject and enter an appropriate name. Click OK.
The Subject will be added to the Tree view.
2. Within the Subject, create a Topic. Select Create Topic and enter a name. Click OK.
3. Author’s information can now be added. If required, edit the
description and add any additional supporting text. You can also assign a Level to each question to indicate the level of difficulty.

Acer Classroom Manager v2
339
4. Click Finish to store the question and return to the Create a
Question dialog. Either select another question type or click Close to return to the Question Editor window.
Edit Questions
To edit a stored question, highlight it in the Tree and choose {Questions}{Edit Question} from the drop down menu, click the Edit The Selected Item icon or right-click the question and select Edit. Change the required details by selecting the appropriate tab on the Edit Question dialog and click OK when complete.
Note: Questions can be duplicated, right-click the question and select Duplicate. The Edit Question dialog will appear, if required, make any changes and click OK when complete, the duplicate question
will now appear under the original question in the Tree.

Acer Classroom Manager v2
340
Delete Questions, Subjects and Topics
A Question can only be deleted if it does not appear in an exam. A Subject or Topic can be removed if there are no items beneath it in the Tree, the currently selected Sort view determining the extent of the deletion. Select the item in the Tree and choose {Questions}{Delete Item} from
the drop down menu, click the Delete Selected Item icon or right-click and select Delete. You can rename a Subject or Topic by right-clicking on the required item and selecting Rename or clicking the Edit Selected Item icon. When deleting a Subject or Topic the program will check to see if there
are items beneath it in the Tree and, depending on the current Sort view, if the item appears anywhere else in the Tree. When sorted by Subject Type, there will only be one occurrence of the item. Therefore, a Topic will be removed if it does not contain any questions and a Subject if it does not contain any Topics. However, when sorted by Question Type, for example, there may be multiple
occurrences of the same Subject and Topic in the Tree. If you delete the only occurrence of a Geography question in the Multi-Choice category, that Topic or Subject will be removed from Multi-Choice but not from any other category that Geography appears in.

Acer Classroom Manager v2
341
The Exam Interface
Having created a library of questions you can then add them to an exam. Your own Grading and Scoring schemes can be applied and Exams can be centrally ‘published’ for shared use with other teachers.
The icons available in Exam Mode enable you to: • Create Exams
• Edit the content of an exam
• Delete an Exam
• Publish an Exam. Before an exam can be run at Student PCs it needs to be published. This also enables you to store completed exams in a shared area for general use.
• Preview an Exam. Enables you to step through the questions as the Students will see them
• Edit Exam Grades. Apply your own Grading scheme to exams.
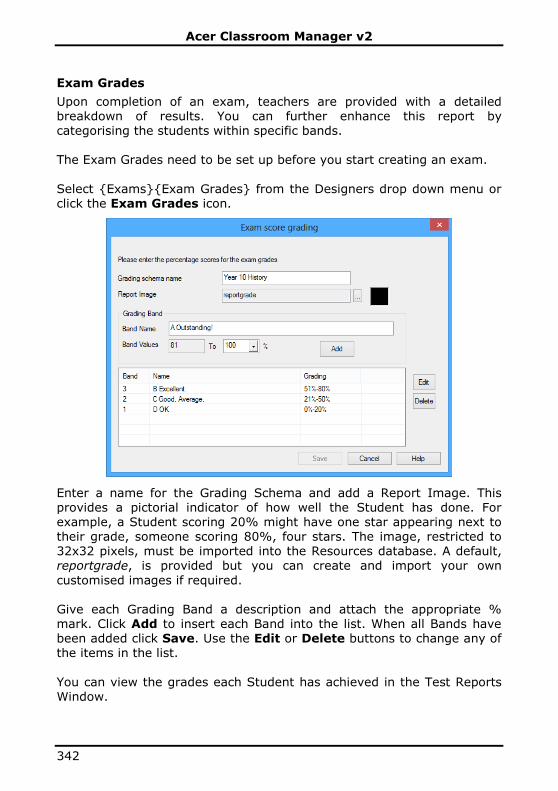
Acer Classroom Manager v2
342
Exam Grades
Upon completion of an exam, teachers are provided with a detailed breakdown of results. You can further enhance this report by categorising the students within specific bands. The Exam Grades need to be set up before you start creating an exam.
Select {Exams}{Exam Grades} from the Designers drop down menu or click the Exam Grades icon.
Enter a name for the Grading Schema and add a Report Image. This provides a pictorial indicator of how well the Student has done. For example, a Student scoring 20% might have one star appearing next to their grade, someone scoring 80%, four stars. The image, restricted to 32x32 pixels, must be imported into the Resources database. A default, reportgrade, is provided but you can create and import your own
customised images if required. Give each Grading Band a description and attach the appropriate % mark. Click Add to insert each Band into the list. When all Bands have been added click Save. Use the Edit or Delete buttons to change any of the items in the list.
You can view the grades each Student has achieved in the Test Reports Window.

Acer Classroom Manager v2
343
Create Exam
Having created a suitable mix of questions in the Question Editor, adding those questions to an exam is a quick and easy process. The Exam Wizard guides you through the process of selecting the required questions, setting a time limit for the exam, using your own grading system and including supporting information. New questions can
also be created during this process. To Create an Exam 1. Choose {Exams}{Create Exam} from the Designers drop down
menu or click the Create New Exam icon.
2. The first stage is to enter general supporting information about the
exam. Enter a Title and Description for the exam. Choose whether to have the exam timed, if so set the time limit, hh:mm. You can use your own grading system by selecting from the Grading Schema drop down. Decide whether to use the default scoring system (you can assign your own scores to questions in stage two). You can then add some optional information such as the age range or class group that
the exam is aimed at. Click Next when ready.
Note: If you wish to use a Grading Schema you must first create one in the Exam Grades dialog.

Acer Classroom Manager v2
344
3. Stage two is to select the questions for the exam. Expand the tree in
the left-hand pane of the window and highlight the required question, click the Add Question button. The tree view can be sorted by Author, Level, Question Type and Subject. Repeat this process until all questions are selected.
4. Selected questions appear in the right-hand pane of the window. From here you can use the buttons to remove a question from the exam, sort the questions into the required order, preview the question, assign a new score to the question or even create a new question.
5. Click Finish to store the exam in the Exam Editor window tree view.
Once created, you can use the Exam Editor menu or toolbar options to edit or delete exams, preview exams and publish the exam.
Note: Although the newly created exam appears in the Exam Editor
tree view, it cannot be run at Student workstations until it has been ‘published’. This bundles the various elements of the exam, questions, pictures, videos etc, into a single ZIP file which is then made available in the Testing Console.
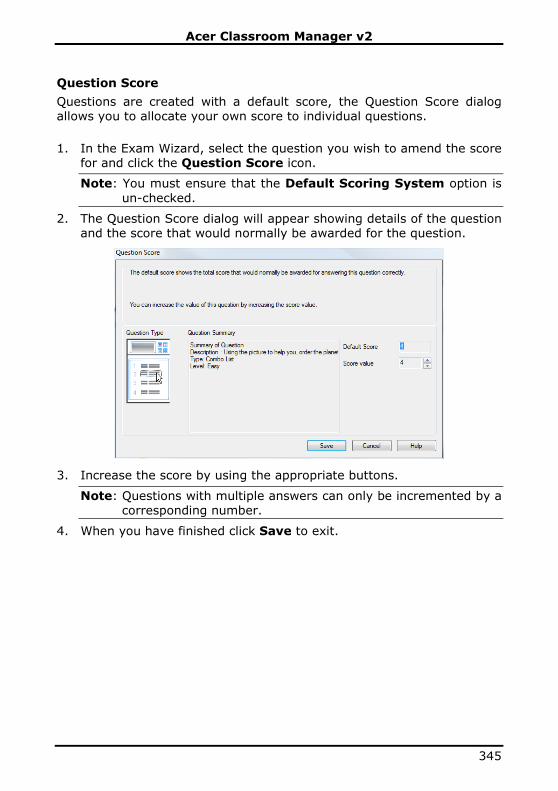
Acer Classroom Manager v2
345
Question Score
Questions are created with a default score, the Question Score dialog allows you to allocate your own score to individual questions.
1. In the Exam Wizard, select the question you wish to amend the score for and click the Question Score icon.
Note: You must ensure that the Default Scoring System option is
un-checked.
2. The Question Score dialog will appear showing details of the question and the score that would normally be awarded for the question.
3. Increase the score by using the appropriate buttons.
Note: Questions with multiple answers can only be incremented by a corresponding number.
4. When you have finished click Save to exit.

Acer Classroom Manager v2
346
Preview Exam
You can preview an exam at any time in order to simulate what the Students will see. This is a useful way of checking each question and viewing the resources, pictures, video’s etc that may have been included. Although the exam runs exactly how it would at the Student workstations, the preview facility does not return any results.
1. Select the exam in the Tree view.
2. Choose {Exams}{Preview Exam} from the Designers drop down menu, click the Preview Exam icon or right-click the exam name and select Preview.
3. Use the buttons at the bottom of the window to move between questions and end the preview. You can also click each question number on the left hand side of the window to view each one.
Note: Individual questions can also be previewed in this mode. Expand the tree beneath an exam to reveal the questions, highlight the appropriate item and click Preview.
Edit Exam
1. Select the exam in the Tree view.
2. Choose {Exams}{Edit Exam} from the Designers drop down menu,
click the Edit Exam icon or right-click the exam name and select Edit.
3. The Exam Wizard will appear.
4. Select the Exam Details or Exam Question tab and edit the required items.
5. Click OK.

Acer Classroom Manager v2
347
Delete Exam
Although this procedure removes the exam from the Exam Editor window, it does not delete the Zip file that is created when an exam is published. The exam will therefore still be available to run at Student workstations. To Delete an Exam
1. Select the exam in the Tree view.
2. Choose {Exams}{Delete Exam} from the Designers drop down menu, click the Delete Exam icon or right-click the exam name and select Delete.
3. Confirm that you want to delete the exam. Publish Exam
Before an exam can be run at Student PCs it must be ‘published’. This procedure bundles the various elements of the exam, questions, resources etc, into a ZIP file that can be stored in either the default Program Files Tests Folder or in a shared network area of your choosing. The latter having the added benefit of enabling other Teachers to access the exam.
Once published, the test can be selected in the Testing Console. To Publish an Exam
1. Select the newly created exam in the Tree view.
2. Choose {Exams}{Publish Exam} from the Designers drop down menu, click the Publish Exam icon or right-click the exam name
and select Publish.
3. A window will appear confirming the exam properties. Click Publish.
4. The Save As dialog will appear. Give the exam a suitable name, this is the name that will appear in the Testing Console when selecting an exam to run. Click Save to create the Zip file.
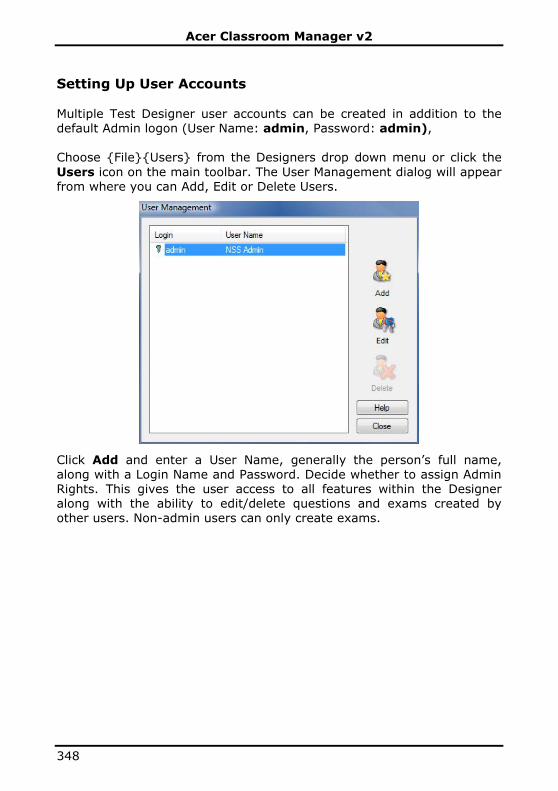
Acer Classroom Manager v2
348
Setting Up User Accounts Multiple Test Designer user accounts can be created in addition to the default Admin logon (User Name: admin, Password: admin), Choose {File}{Users} from the Designers drop down menu or click the
Users icon on the main toolbar. The User Management dialog will appear from where you can Add, Edit or Delete Users.
Click Add and enter a User Name, generally the person’s full name, along with a Login Name and Password. Decide whether to assign Admin Rights. This gives the user access to all features within the Designer along with the ability to edit/delete questions and exams created by other users. Non-admin users can only create exams.
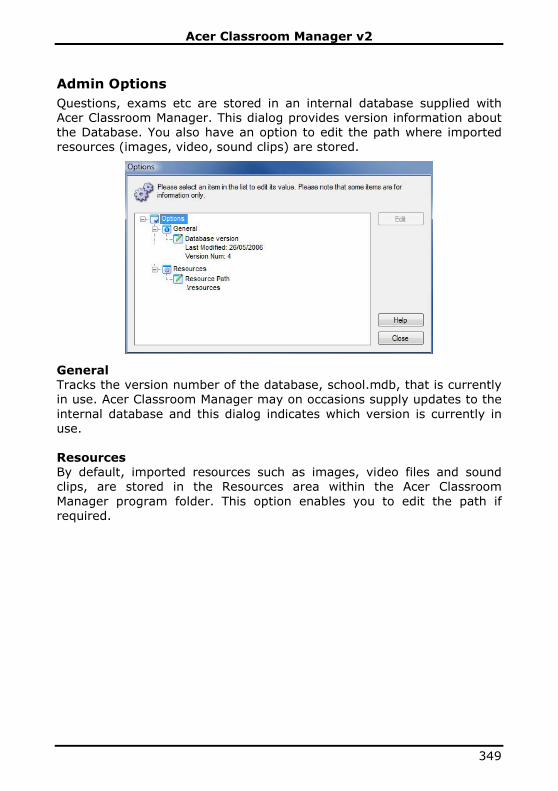
Acer Classroom Manager v2
349
Admin Options
Questions, exams etc are stored in an internal database supplied with Acer Classroom Manager. This dialog provides version information about the Database. You also have an option to edit the path where imported resources (images, video, sound clips) are stored.
General Tracks the version number of the database, school.mdb, that is currently in use. Acer Classroom Manager may on occasions supply updates to the
internal database and this dialog indicates which version is currently in use. Resources By default, imported resources such as images, video files and sound clips, are stored in the Resources area within the Acer Classroom
Manager program folder. This option enables you to edit the path if required.

Acer Classroom Manager v2
350
Import/Export Data
The Test Designer provides an Import/Export facility enabling you to store external backups of data or make information available to other users. Exported files can be password protected for security. You have the choice of exporting all items in the database or just the exams, questions or resources.
The Import/Export options can be accessed from either the Question or Exam Editor Windows. Exporting Data
1. Choose {File}{Export} from the Designers drop down menu or click the Export icon on the main toolbar.
2. The Export Database dialog will appear. Select the category of information to be exported and Click Export.
3. The Export Wizard will appear. Specify the location for the exported data and provide a filename. By default, files are prefixed with the current date but you may prefer to enter a custom name. If required, password protect the file, add any additional notes and click Next when ready to proceed.
4. Depending on the category selected, (Exams, Questions, Resources etc) the Wizard will now prompt you to choose, from a tree view, the specific items to be exported. Select each item in turn and click the
Add Item To Export List button. When the Export List is complete, click Next.
5. The Wizard will confirm the items to be exported. Any resources associated with exams or questions are included. Check the details and if required click Back to change the information.
6. Click Finish to begin exporting.
7. A progress dialog will appear. Click Close when complete.
Note: Exported data is not removed from the Designer.
Importing Data
1. Choose {File}{Import} from the Designers drop down menu or click the Import icon on the main toolbar.
2. The Import Database dialog will appear. Browse for the required Export file and click Open.
3. Click Import DB to start importing. If the file has been protected you will be prompted for the password.

Acer Classroom Manager v2
351
4. A progress dialog will appear. Click Close when complete.
Note: To refresh the Interface with the imported data logout of the Designer.
The Testing Console
Having used the Test Designer to create questions and exams, you use the Testing Console option in the Acer Classroom Manager Tutor program
to run the exam at Student workstations and monitor results.
Running an Exam
1. Select {School}{Testing Console} from the Control window drop down menu.
Or,
Click the Testing Console icon on the Control toolbar.
2. The Select Students dialog will appear. From the list of connected Students, indicate which ones should participate in the exam by checking or un-checking the box next to their name. Click Next to continue.
3. Select the exam to run. Details of the published exams are listed, choose the one that you want to run at the selected Student PCs. If required, you can alter the time limit for the exam. Click Finish when ready to run the exam.

Acer Classroom Manager v2
352
4. The Acer Classroom Manager Test Player will automatically launch at the Student PCs and a dialog enabling you to administer the exam will appear on the Tutor screen.
5. This dialog is used to start the exam, monitor Student progress and collect results.

Acer Classroom Manager v2
353
The window enables you to track individual Student progress. Each
question is marked in real-time so you can see immediately how each Student is doing! At the end of the exam you can view the results by class and individual Student and print a permanent record. You can also show each Student their results giving them the opportunity to see where they made mistakes.
The following toolbar options are available:
View Client You can view a particular Student screen at any point during the exam. All options normally associated with the View window are available. Chat If required, you can open a Chat session with Students while the exam is
running. Although the Test Player provides a help button offering Students guidance with each question type, you may find that you need to offer additional assistance. Test Login Before starting the exam you can ask each Student to Login with their own name. This would be useful if, for example, the Machine Name is
listed and be more meaningful when checking results against each Student. Pause Test You can Pause the exam at any point. Click Start when ready to continue.
Start Test Starts running the exam at Student PCs. Stop Test If Students answer all the questions within the time limit you can Stop the exam rather than wait for the clock to tick down.
Report This option gathers the results when the exam has finished. (When the Tutor stops the exam or the time limit elapses)

Acer Classroom Manager v2
354
Test Reports Window
The Reports window enables the Tutor to review the results of an exam. You also have the option to allow Students to see their own results.
By selecting the required item in the Tree view you can display two types of report, a Class Summary and individual Student summaries. Each can be printed and copies are also stored, in HTML format, in the \\Acer\Acer Classroom Manager\Tests\Reports folder.
Note: An alternative location for the reports can be specified in the
Tutor Profiles option.
Class Summary
This provides a summary of each Students result in tabular format. The report details the number of questions in the exam, the number of points available (questions other than multi-choice are worth 1 point for each correct answer) and itemises each Students score.
Individual Student Summary
By selecting the Student name in the Tree view you can display a full breakdown of the individual results. This is ideal for highlighting any problem areas that the Student may have. If you have applied a Grading Schema the marked grade along with any comments you added would also be displayed. An index itemising the points scored for each question
is provided from which you can jump to each question to see how the Student answered.

Acer Classroom Manager v2
355
The toolbar provides shortcuts to a number of additional features:
Show Results
This enables you to show each Student their results and, if required, include the answers. To display to all Students simultaneously highlight Students Reports in the tree, to show to an individual Student select their name. The Test Player will re-open at the Student workstations enabling them
to view each question in turn. The window will indicate which questions they got right, wrong or, in the case of questions that have multiple answers, partially correct. If you have chosen to include the answers, a Show Answers button will appear on the Test Player window enabling the Student to toggle between their response and the correct answers.
Show Report
This option enables you to display the individual summary reports at Student workstations. Print Report
Enables the Tutor to obtain a printed copy of the Class and Student
summaries. Highlight the required item in the Tree and click Print Report. When ready, close the window to return to the Test Console dialog from where you can exit the test. This will clear the results or reports from the Student screens.
Send to Journal
Allows you to send a copy of Students result to their Student Journal. The Student then has the opportunity to review their answers after the lesson.

Acer Classroom Manager v2
356
The Test Player
The Acer Classroom Manager Test Player is the testing utility that loads at Student PCs when an exam is running.
The Tutor uses the Testing Console option to choose the Students to participate in the exam and select the exam to run. At this point the Test Player loads automatically at each Student PC. When the Tutor starts the exam, the first question appears and the Students can then work their way through the exam.
The Test Player window displays the following:
Exam Time Counts down the time remaining. Question List Numbered buttons indicate how many questions there are in the exam. The Student can click these to quickly move between questions. Useful at the end of the exam to review answers and to make changes before the
time runs out.

Acer Classroom Manager v2
357
Question Area
The main body of the window displays the question and, depending on the question type, the associated options. Buttons are provided to view any resources that may have been included, pictures, videos or sound clips, and a reference button is available which provides Students with tips on how to answer the particular type of question.
Navigation Buttons In addition to the numbered buttons in the question list, navigation buttons are also available at the bottom of the window enabling Students to move between questions. When they have completed the exam they click Finished. When the exam has finished, the Tutor has the option to show Students
their results and, if required, include the answers. The Test Player will re-open at the Student workstations enabling them to view each question in turn. The window will indicate which questions they got right, wrong or, in the case of questions that have multiple answers, partially correct. If the Tutor has chosen to include the answers a Show Answers button will appear enabling the Student to toggle between their response and the correct answers.

Acer Classroom Manager v2
358
Index
access point speed, 275
Acer Classroom Manager
starting, 41 Acer Classroom Manager deploy, 24
a Acer Classroom Manager licence file, 34
a Acer Classroom Manager package, 28
a Client configuration, 33 getting started, 26 log files, 38 pre-define settings, 37
Acer Classroom Manager deploy
remote uninstall, 35 Acer Classroom Manager deploy via
room mode, 39
adding notes to the student journal, 247
adding resources to questions, 336
android, 79
annotating screens, 139
annotate toolbar, 140
interactive whiteboard, 136 application
show application, 162 application control module, 207
approved/restricted lists, 211 close application, 210 history, 216 identify applications in use, 208
arrange Client icons, 55
assign group leader, 92
audio monitoring, 142
audio settings, 294
audio support, 146
adjusting audio settings, 148 announcement, make a, 146 configure at Client, 262
automatically reconnect to students, 70, 299
automtaic login, 49
backgrounds, 56
blanking Client screens, 97, 103
all screens, 104 bouncing questions, 231
broadcast show, 127, 275
on wireless network, 275 browse mode, 63
browsing
configuring subnets, 71 for Clients at installation, 41 for students at startup, 60 for terminal server Clients, 75
cache size, 267
cancel group leader, 94
chatting to Clients, 163
disable at Client, 264 the chat window, 165
class lists
create class lists, 69 class wizard, 61
classroom assistant, 76
configure settings, 302 classroom assistant settings, 302
Client
arrange icons, 55 as a show leader, 132 audio settings, 262 audio support, 146 clipboard, 105 configure, 257 configure advanced settings, 265 configure security, 260 configure transport, 258 connecting to a class, 67 connecting to at installation, 41 connecting to at startup, 60 customise icons, 95 exhibit a Client screen, 134 group leader, 92 help requests, sending, 170 record activity, 153
remote installation, 24 save login name, 54 scan screens, 107 sign in, 50 transfer files between Clients, 174 user interface configuration, 263 viewing screens, 100
client disconnects, 70
clipboard, 105

Acer Classroom Manager v2
359
co-browser, 203
lock/unlock students in the co-browser, 205
using the co-browser, 204 combo list question, 329
configure remote control settings, 286
audio settings, 294 file transfer settings, 296 group leader settings, 304 replay file settings, 293 student toolbar settings, 305 student user interface settings,
301 tutor journal settings, 306 tutor keyboard/mouse settings,
291 tutor user interface settings, 299 tutor view settings, 288
configure the Client
advanced settings, 265 audio settings, 262 enable name server, 258 security, 260 transport, 258 user interface settings, 263
configure the Client, 257
configure the Control, 271
administration options, 281 enable name server, 275 for subnet browsing, 71 protect configuration, 279 set connectivity, 275 set Control name, 279 set password, 279 set transport, 275 to show across wireless networks,
275 Tutor profiles, 244, 283
configure the student toolbar, 253
configuring the classroom assistant, 76
connect to students
browse mode, 63 pc mode, 64 room mode, 65
user mode, 65
connect to students using browse
mode, 63
connect to students using pc mode, 64
connect to students using user mode, 65
connecting to Clients
at installation, 41 configuring subnets, 71 join class, 67 name server/gateway, 83 terminal server, 75
connecting to students
at startup, 60 connecting to students via room
mode, 65
connectivity, 258, 275
console. See testing console
Control
announcement, make a, 146 audio support, 146 blanking Client screens, 97 chat to Clients, 163 clipboard, 105 configure, 271 create class, 67 ctrl+alt+delete, 103 executing applications at Clients,
183 file distribution, 175 file transfer, 172 help requests, dealing with, 170 lock Client mouse and keyboard,
97 logoff Clients, 189 make Client a group leader, 92 messages, sending, 167 profiles, 283 protect configuration, 281 remote control, 100 scan Clients, 107 showing the Control screen, 127 starting, 41 user defined tools, 187 using replay files, 153 using show leaders, 132
video support, 149 viewing Clients, 100

Acer Classroom Manager v2
360
Control Window, 43
bitmap backgrounds, 56 customise Client names, 50 customise list view, 55 customise toolbar, 44
conventions used, 11
converting replay files to video files, 161
create exam, 343
create group leader, 92
create pre-set messages, 168
create questions, 324
create test designer users, 348
creating an administrative installation, 21
ctrl+alt+delete, 103
customisable text, 261
customise
Client & group icons, 95 Control window toolbar, 44
cut and paste, remotely, 105
define a secure pc, 317
delete exam, 347
delete group leader, 94
delete questions/subjects/topics, 340
deleting files and folders, 174
deploy
a Acer Classroom Manager licence file, 34
a Acer Classroom Manager
package, 28 a Client configuration, 33 getting started, 26 log files, 38 pre-define settings, 37 Remote Install, 24 remote uninstall, 35 room mode, 39
designer
adding resources to questions, 336
create combo list question, 329 create drag & drop image
question, 328 create exam, 343 create label image question, 330
create multi choice question, 326
create multi true or false question, 334
create order items question, 335 create questions, 324 create true or false question, 333 delete exam, 347 delete questions, 340 drag & drop text question, 327 edit exam, 346 exam mode, 342 import/export data, 350 observation mode, 337 preview exam, 346 publish exam, 347 question scores, 345 questions mode, 323 setting up user accounts, 348 testing module, 321
device control, 241
disable disconnect prompt, 70
disconnect, 70
display customisable text, 261
distributing files, 175
distribution copy for installation, 21
drag and drop image question, 328
drag and drop text question, 327
DVD support, 265
edit exam, 346
enable DVD support, 265
enable student toolbar, 253
enter an answer question type, 226
exam grades, 342
exams mode
create exam, 343 delete exam, 347 edit exam, 346 exam grades, 342 preview exam, 346 publish exam, 347 question scores, 345
exhibit Client screens, 134
annotate while exhibiting, 140 explorer
show video, 150 export data. See testing module
file distribution, 175
Acer Classroom Manager v2
361
file locations
Tutor profiles, 283 file transfer, 172
between Clients, 174 deleting files and folders, 174 from a Client to the Control, 173 from the Control to a Client, 172 settings, 296
first to answer question type, 226
gateway, 83
configuration, 85, 87 enable at Tutor, 275
gateway configuration
licences tab, 88 get name, 50
save Client login name, 54 giving students rewards, 256
group chat, 163
group leader settings, 304
groups
change members, 91 creating, 90 customise icons, 95 group leaders, 92 reinstate group leader, 94 remove group leader, 94 suspend group leader, 94 working with groups, 90
hardware inventory, 313
help requests
dealing with, 170 disable Client requesting help, 263 sending, 170
history
application control module, 216 web control module, 201
hotkeys, 263
display when showing, 127 icons
customise, 95 image file
display image when Client locked, 267
import/export data. See testing module
install configuration options, 23
installation
setup type, 16
installing
from a server, 21 parameters for silent install, 23 planning, 12 pre-requisites, 13 remote deploy, 24 silent installation, 22
installing and configuring
android student, 79 installing the classroom assistant,
76
instcfg.exe file, 23
interactive whiteboard, 136
inventory, 313
ip subnet browsing, 71
join class, 67
disable Client joining class, 264 keyboard monitoring, 119
setting up word lists, 119 typing history, 123
label image question, 330
launching applications, 183
launching applications at Clients, 183
layout
arrange Client icons, 55 set background, 56
lesson planner, 251
set class time, 251 list view
application view. See application control module
arrange icons, 55 survey view. See student surveys web view. See web control module
lock/unlock mouse and keyboard, 97
display graphic, 98 display image, 267
lock/unlock students in the co-browser, 205
log files
during a remote deploy, 38 logging in students, 49
logout, 189
manage student resources, 246
messages

Acer Classroom Manager v2
362
create pre-set messages, 168
sending, 167 messenger monitoring, 115
history, 117 monitor mode, 112
multi true or false question, 334
multi-choice question, 326
multi-scan, 109
name server, 83
configuration, 85, 87 enable at Tutor, 275
observation mode, 337
order items question, 335
password
at Control, 279 protect Control configuration, 281
pc mode, 64
peer assessment, 232
performance settings, 278
planner, 251
planning an installation, 12
play replay file, 157
play video, 149, 150
via explorer, 150 policy management, 315
pot luck question type, 227
pre-define deploy settings, 37
pre-define lesson plan, 251
pre-requisites, 13
pre-set messages, 168
preview exam, 346
printer management, 234
history, 239 using print management, 236
profiles, 244
protect Control configuration, 279, 281
publish class, 67
publish exam, 347
question and answer module, 224
bouncing questions, 231 enter an answer, 226 first to answer, 226 peer assessment, 232 pot luck, 227 team mode, 232
tutor interface, 228
using question and answer module, 230
question and answer module team module, 232
question scores, 345
questions mode, 323
adding resources to questions, 336
create combo list question, 329 create drag and drop image
question, 328 create drag and drop text
question, 327 create label image question, 330 create multi true or false question,
334 create multi-choice question, 326 create order items question, 335 create true or false question, 333 delete questions/subjects/topics,
340 observation mode, 337 store questions, 338
quiet mode, 263
reboot, 189
register students, 50
reinstate group leader, 94
remote
clipboard, 105 launching applications at Clients,
183 log off Client workstations, 189
remote command prompt, 319
remote deploy utility, 24
remote install
a Acer Classroom Manager license file, 34
a Acer Classroom Manager package, 28
a Client configuration, 33 log files, 38
remote uninstall, 35
remove group leader, 94
replay file settings, 293
replay files, 153
control panel, 158 converting replay files, 161

Acer Classroom Manager v2
363
create at the tutor, 155
create for all students, 154 create for selected students, 155 showing to students, 160 watch, 157
reports
test results, 354 restricted application list. See
application control module
restricted website list. See web control module
room mode, 65
scale to fit mode, 102
scanning, 107
monitor mode, 112 multi-scan, 109 screen capture, 125
Screen Capture, 125
security
configure at Client, 260 security key
Client, 260 control, 281
select setup type, 16
select Students for exam, 351
send physical fonts, 265
send/collect work, 178
change properties, 182 collect work, 180 send work, 178
sending messages, 167
create pre-set messages, 168 server installation, 21
set class time, 251
set name for Control, 279
setup. see installing
show leaders, 132
show printers, 234
show settings, 308
showing
a Client screen, 134 across a wireless network, 275 an application, 162 annotate while showing, 139 broadcast show, 127, 275 hotkey combinations, 127 replay files, 160
set show leader, 131
suspend a show, 130 the Control screen, 127 using audio, 147 using Show leaders, 132 videos, 150
sign in, 50
sign out, 52
silent disconnect, 70, 299
silent installation, 22
specify parameters, 23 silent mode, 265
software inventory, 313
starting Acer Classroom Manager
test designer, 321 starting Acer Classroom Manager,
41
startup restrictions, 273
startup settings, 272
student disconnects, 70
student journal, 247
adding notes to the journal, 247 student login, 49
Student name
configure, 265 student register, 50
student rewards, 256
student security settings, 317
student surveys, 218
show results to students, 218 survey lists, 221
student toolbar, 253
student toolbar settings, 305
student user interaface settings, 301
subnet browsing, 71
suspend group leader, 94
system pre-requisites, 13
tech console, 310
policy management, 315 remote command prompt, 319 student security settings, 317
terminal server, 75
terminology used, 11
tesing module
true or false question, 333 test designer, 321

Acer Classroom Manager v2
364
test player, 356
testing console, 351
testing module
adding resources to questions, 336
combo list question, 329 create exam, 343 create questions, 324 delete exam, 347 delete questions/subjects/topics,
340 drag and drop image question,
328 drag and drop text question, 327 edit exam, 346 exam grades, 342 exams mode, 341 import/export data, 350 introduction, 320 label image question, 330 multi true or false question, 334 multi-choice question, 326 order items question, 335 preview exam, 346 publish exam, 347 question scores, 345 questions mode, 323 reviewing results, 354 run exam, 351 select Students for exam, 351 setting up user accounts, 348 starting the designer, 321 store questions, 338 test player, 356 testing console, 351 what the Student sees, 356
timed lesson, 251
toolbar
customise, 44 tools
add, 187 transfer files, 172
transport
configure at Client, 258 true or false question, 333
Tutor. See Control
tutor journal settings, 306
tutor keyboard mouse settings, 291
Tutor profiles, 244, 283
tutor toolbar, 48
tutor user interface settings, 299
tutor view settings, 288
unattended installation, 22
specify parameters, 23 understanding ip addresses, 73
unlock/lock mouse and keyboard, 97
user acknowledgement, 261
user defined tools, 187
user mode, 65
using audio support, 146
using question and answer module, 230
using the co-browser, 204
using this manual, 11
values.txt file, 23
video player, 149
control panel, 151 play video, 150 play video in Explorer, 150
viewing, 100
annotate while viewing, 140 blank Client screen, 103 Clients, 100 launch an application, 185 logout, 189 modes, 102 monitor mode, 112 multiple screens, 103 reboot, 189 remote clipboard, 105 scale to fit, 102 screen capture, 125 send ctrl+alt+delete, 103 send message, 168 using audio, 147
watch replay files, 157
web browser, 203
web control module, 190
approved/restricted lists, 195 block all internet access, 198 block FTP sites, 199 change URLs, 194 close URLs, 194 history, 201 launch URL, 194

Acer Classroom Manager v2
365
safe search mode, 199
whiteboard, 136
window
application control, 207 chat, 165 control main, 43 file distribution, 175 file transfer, 172 monitor mode, 112 replay files, 158
scan, 107
Student survey, 218 test reports, 354 view, 100 web control, 190
wireless network
optimise show performance, 275 using Acer Classroom Manager, 81
working with groups, 90
zoomed mode. See monitor mode