Embed Size (px)
Citation preview
1
Access Control Integration Host User’s Manual
V1.1.0
Table of Contents
1 Overview ............................................................................................................................... 0
2 Device Structure and Installation ...................................................................................... 1
3 System Strcuture ................................................................................................................. 5
3.1 System Structure ................................................................................................................. 5
3.2 Wiring .................................................................................................................................. 5
4 Function Setting ................................................................................................................... 8
4.1 Login .................................................................................................................................... 8
4.2 User Management ............................................................................................................... 8
4.2.1 Add User ................................................................................................................... 9
4.2.2 Delete User ............................................................................................................. 10
4.3 Unlock Mode ..................................................................................................................... 11
4.4 Period Setup ...................................................................................................................... 12
4.4.1 Card Swiping Period ................................................................................................ 12
4.4.2 Holiday period ........................................................................................................ 13
4.4.3 Mode Period ........................................................................................................... 13
4.5 System Settings ................................................................................................................. 13
4.5.1 IP Setup ................................................................................................................... 13
4.5.2 Communication Setup ............................................................................................ 14
4.5.3 Date Setup .............................................................................................................. 14
4.5.4 Unlock Time ............................................................................................................ 14
4.5.5 Alarm Setup ............................................................................................................ 14
4.5.6 Password Change ................................................................................................... 15
4.5.7 Master Card Management ..................................................................................... 16
4.5.8 Default .................................................................................................................... 17
4.6 Reboot System ................................................................................................................... 17
4.7 Local Info ........................................................................................................................... 17
Important Safeguards and Warnings

Please read the following safeguards and warnings carefully before using the product in
order to avoid damages and losses.
Note:
Do not expose the device to lampblack, steam or dust. Otherwise it may cause
fire or electric shock.
Do not install the device at position exposed to sunlight or in high temperature.
Temperature rise in device may cause fire.
Do not expose the device to humid environment. Otherwise it may cause fire.
The device must be installed on solid and flat surface in order to guarantee
safety under load and earthquake. Otherwise, it may cause device to fall off or
turnover.
Do not place the device on carpet or quilt.
Do not block air vent of the device or ventilation around the device. Otherwise,
temperature in device will rise and may cause fire.
Do not place any object on the device.
Do not disassemble the device without professional instruction.
Warning:
Please use battery properly to avoid fire, explosion and other dangers.
Please replace used battery with battery of the same type.
Do not use power line other than the one specified. Please use it properly.
Otherwise, it may cause fire or electric shock.
Special Announcement
This manual is for reference only.
All the designs and software here are subject to change without prior written
notice.
All trademarks and registered trademarks are the properties of their
respective owners.
If there is any uncertainty or controversy, please refer to the final explanation
of us.
Please visit our website for more information.
0
1 Overview
The Access Control Integration Host integrates card reading, config and execution
functions. Its has a neat appearance for medium to high-end clients such as commercial
building, corporation and intelligent community.
It has:
Touch keyboard + LCD display, TCP/IP protocol, support 30,000 valid cards and
300,000 records.
Support unlock via card, password, card+password, card or password and by period.
Door time out alarm, intrusion alarm, forced alarm, and vandal-proof alarm.
Add guest card, forced card, black/white list and patrol card, while support period of
validity or times.
Support 128 groups of schedule, 128 groups of period and 128 groups of holiday
period.
1
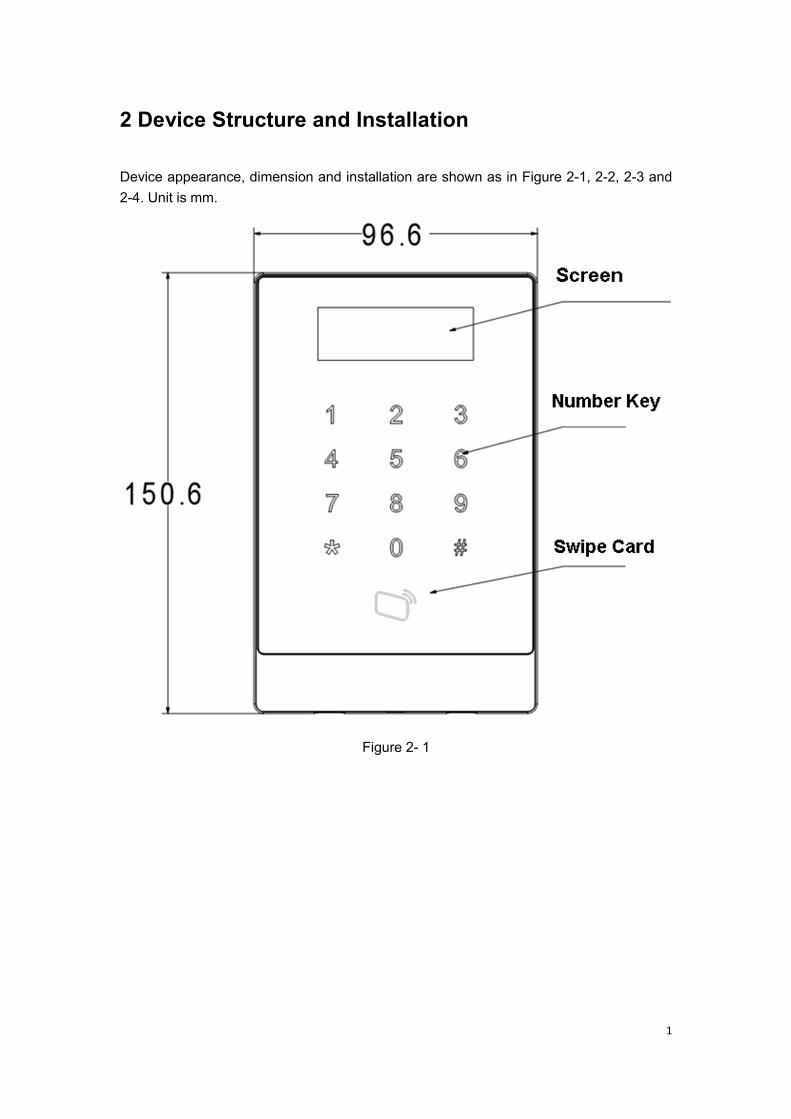
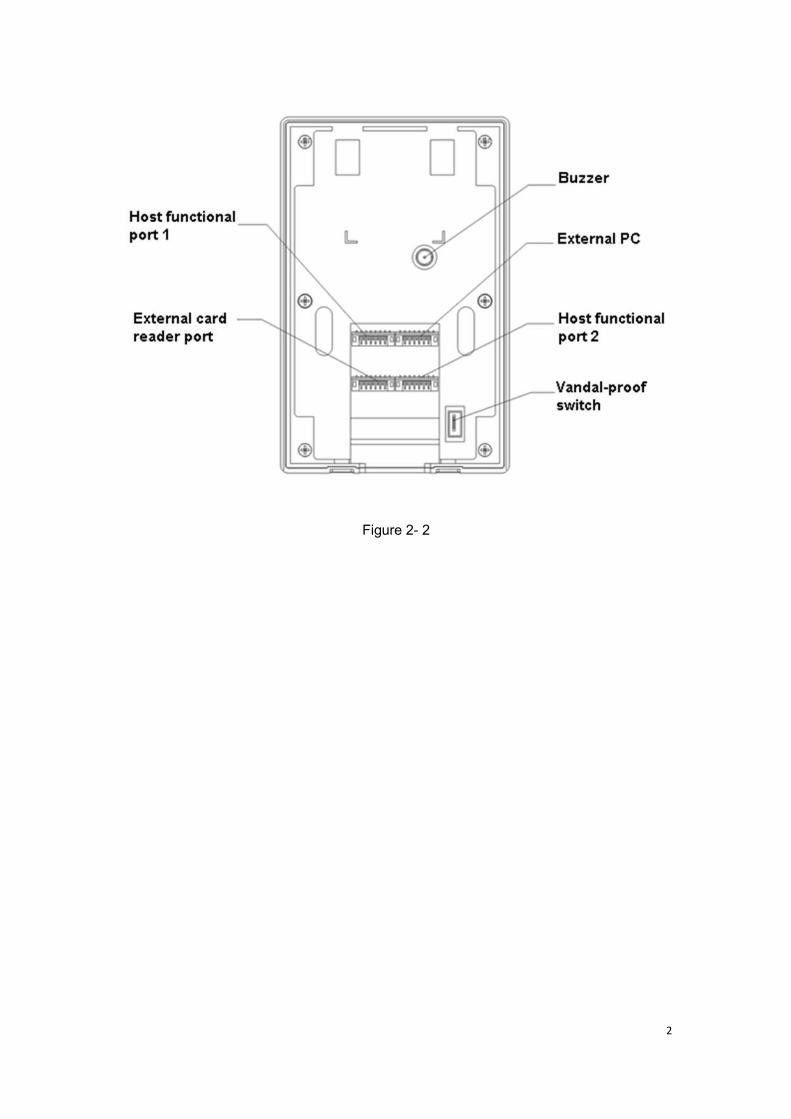
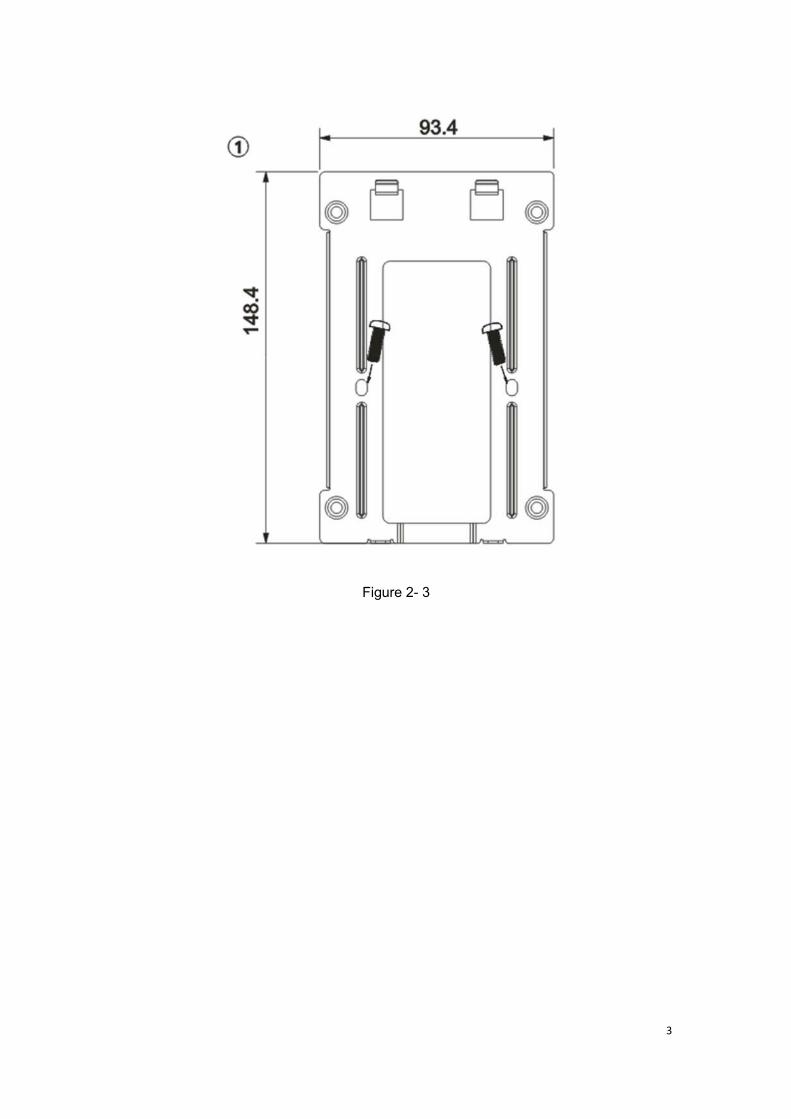
2 Device Structure and Installation
Device appearance, dimension and installation are shown as in Figure 2-1, 2-2, 2-3 and
2-4. Unit is mm.
Figure 2- 1
2
Figure 2- 2
3
Figure 2- 3
4
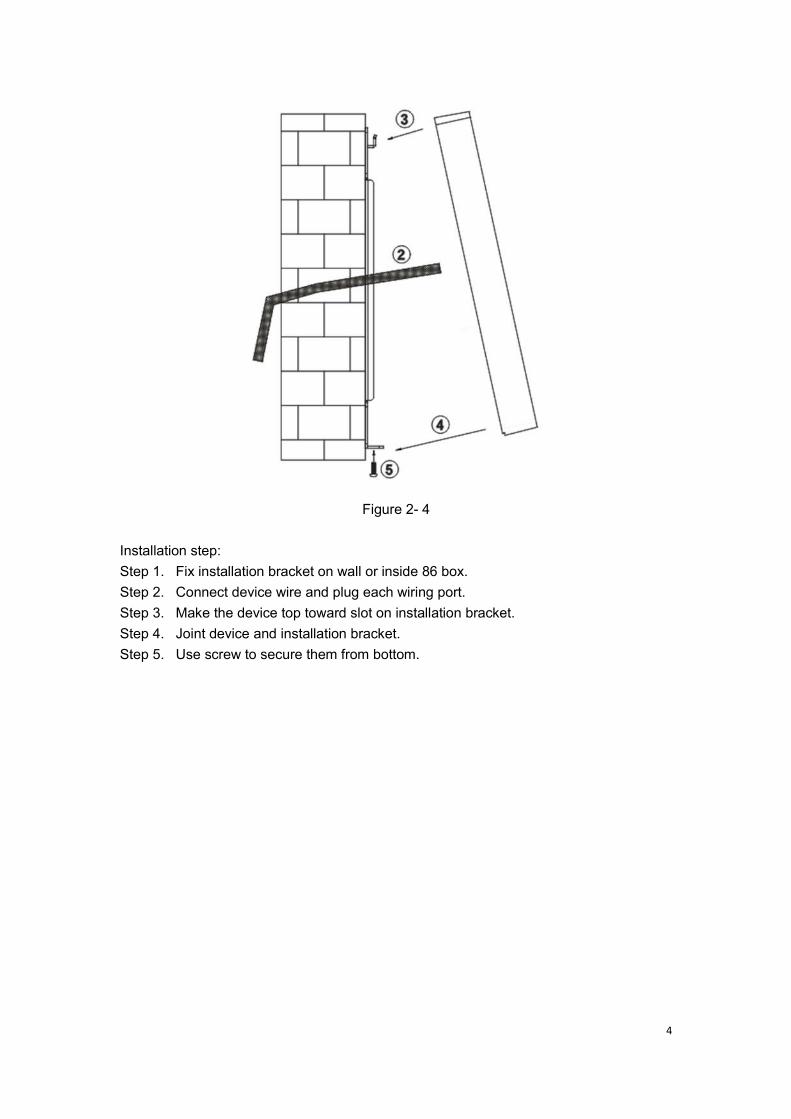
Figure 2- 4
Installation step:
Step 1. Fix installation bracket on wall or inside 86 box.
Step 2. Connect device wire and plug each wiring port.
Step 3. Make the device top toward slot on installation bracket.
Step 4. Joint device and installation bracket.
Step 5. Use screw to secure them from bottom.

5
3 System Strcuture
3.1 System Structure
The device and card reader, alarm device, access control PC and etc. compose a system
as in Figure 3- 1.
Figure 3- 1
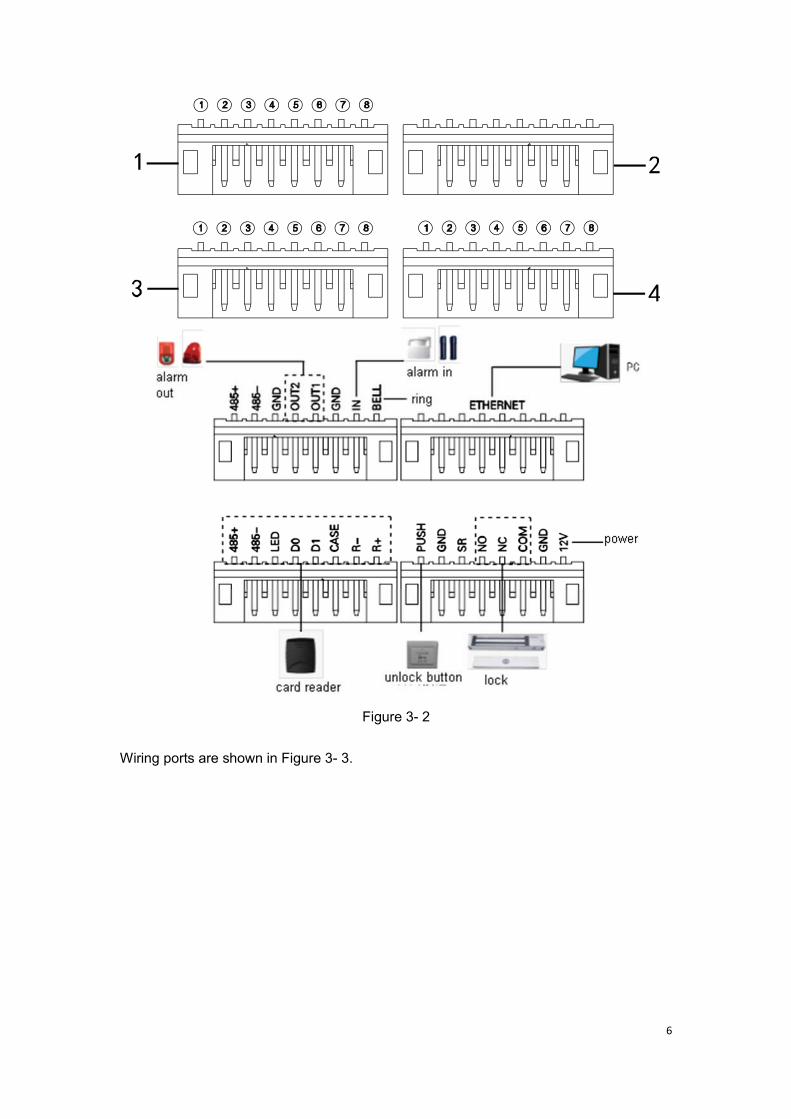
3.2 Wiring
Wiring of the device is shown in Figure 3- 2.
6
Figure 3- 2
Wiring ports are shown in Figure 3- 3.

7
Figure 3- 3
No. Port No. Note
1 ①485+ RS485+
②485- RS485-
③GND Connect GND
④OUT2 Alarm output 2(5V relay switch),
external connect to voltage not over 12V
⑤OUT1 Alarm output 1(5V relay switch),
external connect to voltage not over 12V
⑥GND Connect GND
⑦IN Alarm input
⑧BELL Ring control
2 TCP/IP,network port
3 ①485+ RS485+,485 card reader
②485- RS485-,485 card reader
③LED LED_OUT,Weigand card reader
④D0 D0,Weigand card reader
⑤D1 D1,Weigand card reader
⑥CASE Card reader protection alarm
⑦R- Connect GND
⑧R+ 12V card reader power
4 ①PUSH Connect unlock button
②GND Connect GND
③SR Door sensor check
④NO Door lock NO end
⑤NC Door lock NC end
⑥COM Door lock COM end
⑦GND Connect GND
⑧12V 12V power input

8
4 Function Setting
4.1 Login
Login interface step:
Step 1. Plug in power, device is going to boot up.
Step 2. Press # button, screen displays project password.
Step 3. Input project password, and press # button to enter main interface.
Default password is “88888888”.
You can select to enter user management, unlock mode, period setup, system
setting, system reboot and local info as main menu.
Press 【2】 button as up.
Press 【8】 button as down.
Press 【#】 button to enter or confirm.
Press 【*】 button to return or exit.
4.2 User Management
You can add or delete card, password.
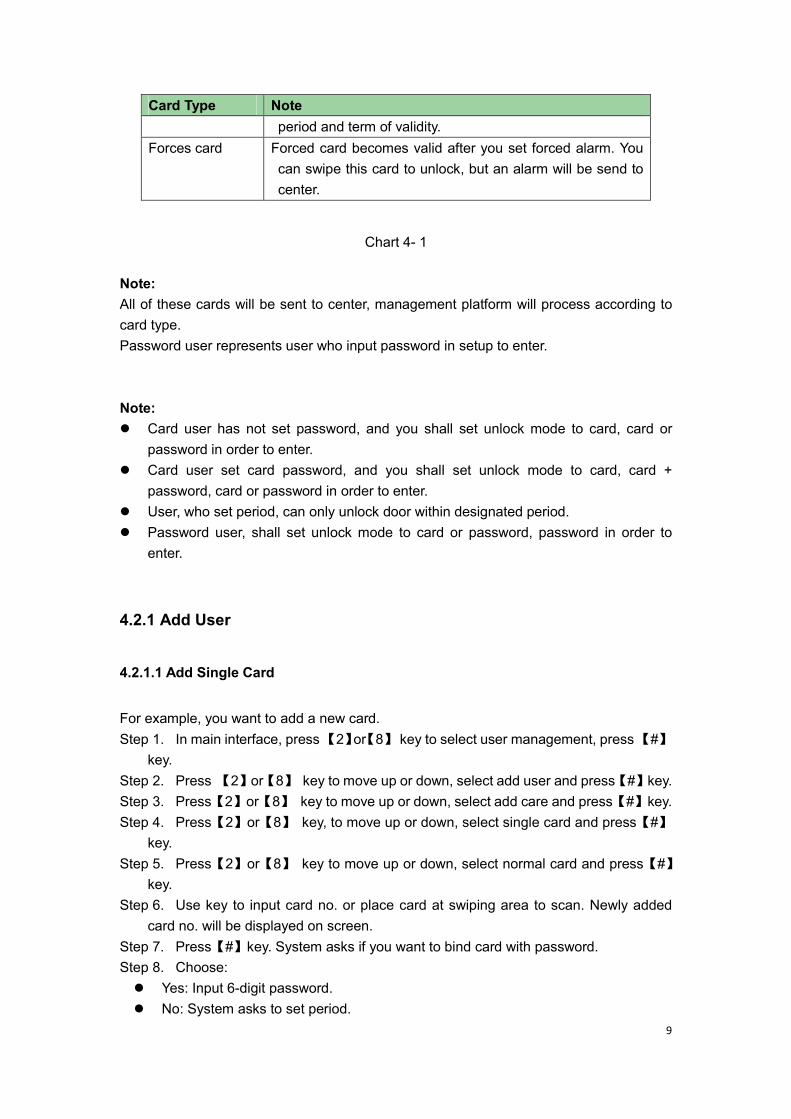
Card type includes general, VIP, guest, patrol, black list and forced.
Please refer to Chart 4- 1.
Card Type Note
General card General user card.
When you add card, system will ask if set card password,
period and term of validity.
VIP card VIP user card. It warns service personal when cardholder
enters.
When you add card, system will ask if set card password,
period and term of validity.
Guest card When you add guest card, you need to set usage times. So
when it exceeds this limit, the card becomes invalid.
Patrol card Patrol card can only swipe card at patrol spot but cannot
unlock.
When you add card, system will ask if set card password,
period and term of validity.
Black list When you swipe card on black list and enters, it wanrns
service personal.
When you add card, system will ask if set card password,
9
Card Type Note
period and term of validity.
Forces card Forced card becomes valid after you set forced alarm. You
can swipe this card to unlock, but an alarm will be send to
center.
Chart 4- 1
Note:
All of these cards will be sent to center, management platform will process according to
card type.
Password user represents user who input password in setup to enter.
Note:
Card user has not set password, and you shall set unlock mode to card, card or
password in order to enter.
Card user set card password, and you shall set unlock mode to card, card +
password, card or password in order to enter.
User, who set period, can only unlock door within designated period.
Password user, shall set unlock mode to card or password, password in order to
enter.
4.2.1 Add User
4.2.1.1 Add Single Card
For example, you want to add a new card.
Step 1. In main interface, press 【2】or【8】 key to select user management, press 【#】
key.
Step 2. Press 【2】or【8】 key to move up or down, select add user and press【#】key.
Step 3. Press【2】or【8】 key to move up or down, select add care and press【#】key.
Step 4. Press【2】or【8】 key, to move up or down, select single card and press【#】
key.
Step 5. Press【2】or【8】 key to move up or down, select normal card and press【#】
key.
Step 6. Use key to input card no. or place card at swiping area to scan. Newly added
card no. will be displayed on screen.
Step 7. Press【#】key. System asks if you want to bind card with password.
Step 8. Choose:
Yes: Input 6-digit password.
No: System asks to set period.

10
Step 9. Press【#】key, set time period and press 【#】key.
Step 10. Press【#】, set term of validity and press 【#】. When you finish setup, system
asks if you want to save.
Step 11. Press【#】to save.
4.2.1.2 Add Continuous cards
For example, you want to add continuous cards.
Step 1. In add card interface, press 【2】or【8】 key to select add continuous cards, press
【#】 key.
Step 2. Press【2】or【8】 key to move up or down, select normal card and press【#】
key.
Step 3. Input quantity of cards, press【#】key.
Step 4. Input card number of first card or swipe the first card, and press 【#】key. System
asks to bind password.
The following steps are similar to Ch 4.2.1.1.step 8 to 11.
4.2.1.3 Add Password User
To add password user:
Step 1. In add user interface, press 【2】or【8】 key to move up or down, select add
password, and press【#】key. System displays no. and password.
Step 2. Input password, and press 【#】key. Password must be 6 digits. System asks to
save or not.
Step 3. Press 【#】 to save.
4.2.2 Delete User
4.2.2.1 Delete Card User
You can delete a single card, continuous cards or all cards user.
To delete a single card:
Step 1. In user management interface, press 【2】or 【8】 key to select delete user, and
press 【#】 key.
Step 2. Press 【2】or【8】 key to move up or down, select delete card and press【#】
key.
Step 3. Press【2】or【8】 key, to move up or down, select single card and press【#】

11
key.
Step 4. Input no. of card to delete, place the card at swiping area, and press【#】key.
System asks if to delete it or not.
Step 5. Press 【#】key to delete single card.
To delete continuous cards:
Step 1. In delete card interface, move up or down to select continuous card, and press
【#】 key.
Step 2. Input quantity to delete, and press 【#】.
Step 3. Input first card no. or place it on swiping area, and press【#】key. System asks if
to delete it or not.
Step 4. Press【#】key to confirm. System shows deleted result and quantity.
To delete all cards:
Step 1. In delete card interface, move up or down to select all cards, and press 【#】key.
System asks if to delete all or not.
Step 2. Press 【#】key to confirm. System says deleted successfully.
4.2.2.2 Delete Password User
You can delete a single password user or delete all password users.
To delete a single password user:
Step 1. In delete user interface, press 【2】or 【8】 key to select delete password, and
press 【#】 key.
Step 2. Press 【2】or【8】 key to move up or down, select single password and press
【#】key.
Step 3. Input no. of password user to delete, and press【#】key.
System asks if to delete it or not.
Step 4. Press 【#】key to delete.
To delete all password users:
Step 1. In delete password interface, press 【2】or 【8】 key to select all password, and
press 【#】 key. System asks if to delete it or not.
Step 2. Press 【#】key to delete.
4.3 Unlock Mode
Unlock mode includes card, password, card+password, card or password and by period.
To set:

12
Step 1. In main interface, press【2】or 【8】key to move up or down, select unlock mode,
and press【#】. Enter unlock mode setup page.
Step 2. Press【2】or 【8】 key to select mode to set, and press 【#】key. When it is
selected, there will be a √ next to the mode.
4.4 Period Setup
You can set unlock period, including card swiping period, holiday period and mode period.
4.4.1 Card Swiping Period
Card swiping period can be 0~127, a total of 128 periods. In each period, you need to set
schedule for each day of week. When a new card is added, and set card swiping period,
then user swipe card to unlock. Access control will judge if current time is within set
period.
For example, set period 1, and the Monday to Sunday setup are in Chart 4- 2.
Day Period
Monday 0800-2200 (valid period: 08:00 to 22:00)
Tuesday 0800-2200 (valid period: 08:00 to 22:00)
Wednesday 0800-2200 (valid period: 08:00 to 22:00)
Thursday 0800-2200 (valid period: 08:00 to 22:00)
Friday 0800-2200 (valid period: 08:00 to 22:00)
Saturday 0800-2200 (valid period: 08:00 to 22:00)
Sunday 0800-2200 (valid period: 08:00 to 22:00)
Chart 4- 2
To set card swiping period:
Step 1. In main interface, press 【2】or【8】key to move up or down, select time period
setup, and press【#】key. Enter time period interface.
Step 2. Press【2】or 【8】 key to select card swiping period, and press【#】key.
Step 3. Input time period, and press 【#】key. Input any number between 0~127. Screen
displays period.
Step 4. Modify period and press 【#】key.
Step 5. Set other periods. System asks if save it or not.
Step 6. Press【#】key, save config.
When new card set period 1, and user use it to unlock door. According to time period
set, system judge if it is within unlock period. Other periods cannot unlock door.
Note:
Default period is full periods.

13
4.4.2 Holiday period
Holiday period can be 0~127, a total of 128 periods. When time is any period in 0~127, all
cards or passwords cannot unlock door.
To set holiday period:
Step 1. In time period setup page, press【2】 or【8】 key to select holiday period, and
press【#】key.
Step 2. Input period, and press 【#】key. Input any number between 0~127, such as 1.
Step 3. Modify start time, press 【#】key.
Step 4. Modify end time, press 【#】key. System asks if to save or not.
Step 5. Press 【#】key to save.
4.4.3 Mode Period
Mode period has four periods per day, from Monday to Sunday, 7 days a week.
Note:
You shall allocate unlock mode by period, and then mode period config become valid.
Unlock mode config refers to Ch 4.3.
To set mode period:
Step 1. In time period setup interface, press 【2】or【8】key, select mode period, and
press【#】. System displays periods of Monday to Sunday.
Step 2. For example select Monday, and press 【#】key. System displays period 1 page.
Step 3. Config period 1, press 【#】. System displays config mode interface.
Step 4. Press【2】or【8】 key, config mode 1, press【#】key.
Step 5. Config period 2, period 3 and period 4 in sequence. System asks if to save or
not.
Step 6. Press 【#】key, save.
Step 7. Config Tuesday to Sunday periods.
4.5 System Settings
You can set IP, communication, date, unlock, alarm, password, master card and default in
system settings.
4.5.1 IP Setup
Set current access control IP address, subnet mask and gateway.

14
Step 1. In main interface, press 【2】or【8】key to select system settings, and press【#】.
You enter system settings page.
Step 2. Press 【2】or【8】key, select IP setup, and press【#】.
Step 3. Modify IP address, subnet mask and gateway, and press 【#】. System asks to
save or not.
Step 4. Press 【#】, save config.
4.5.2 Communication Setup
It sets current access control communication, including RS485 and TCP/IP.
Step 1. In system settings interface, press【2】or【8】key, select communication setup,
and press【#】.
Step 2. Press 【2】or【8】key, select communication method, and press【#】.
When you select successfully, there will be a √ next to selected item.
4.5.3 Date Setup
It sets current system date and time.
Step 1. In system settings page, press 【2】or【8】key, select date setup, and press【#】
key.
Step 2. Set year, month, hour, minute and second. Press 【#】key. System asks to save
it or not.
Step 3. Press 【#】key to save.
4.5.4 Unlock Time
It sets current unlock time.
Step 1. In system settings interface, press 【2】or【8】key, select unlock time, and press
【#】.
Step 2. According to range of value, set unlock time, and press 【#】.System asks if to
save or not.
Step 3. Press 【#】key to save.
4.5.5 Alarm Setup
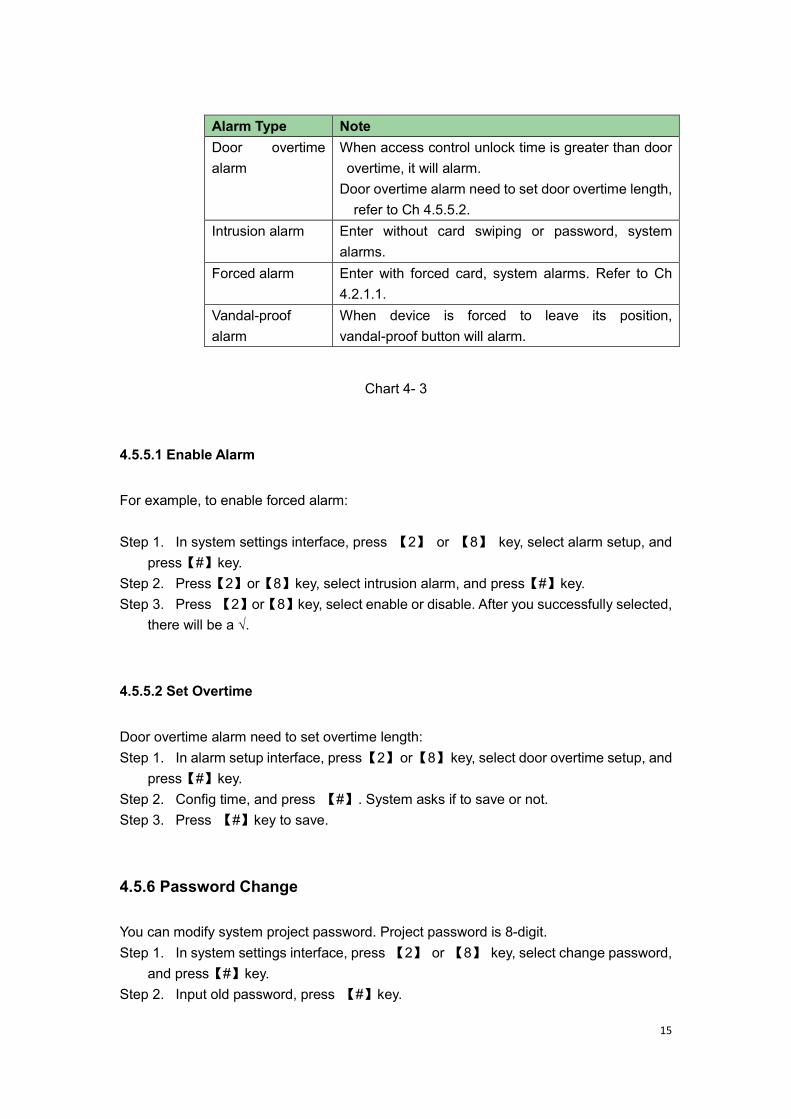
You can enable alarm in alarm setup, and set door overtime. System alarm includes door
overtime alarm, intrusion alarm, forced alarm and vandal-proof alarm. See Chart 4- 3.
15
Alarm Type Note
Door overtime
alarm
When access control unlock time is greater than door
overtime, it will alarm.
Door overtime alarm need to set door overtime length,
refer to Ch 4.5.5.2.
Intrusion alarm Enter without card swiping or password, system
alarms.
Forced alarm Enter with forced card, system alarms. Refer to Ch
4.2.1.1.
Vandal-proof
alarm
When device is forced to leave its position,
vandal-proof button will alarm.
Chart 4- 3
4.5.5.1 Enable Alarm
For example, to enable forced alarm:
Step 1. In system settings interface, press 【2】 or 【8】 key, select alarm setup, and
press【#】key.
Step 2. Press【2】or【8】key, select intrusion alarm, and press【#】key.
Step 3. Press 【2】or【8】key, select enable or disable. After you successfully selected,
there will be a √.
4.5.5.2 Set Overtime
Door overtime alarm need to set overtime length:
Step 1. In alarm setup interface, press 【2】 or 【8】 key, select door overtime setup, and
press【#】key.
Step 2. Config time, and press 【#】. System asks if to save or not.
Step 3. Press 【#】key to save.
4.5.6 Password Change
You can modify system project password. Project password is 8-digit.
Step 1. In system settings interface, press 【2】 or 【8】 key, select change password,
and press【#】key.
Step 2. Input old password, press 【#】key.
16
Step 3. Input new password, and press【#】key.
Step 4. Input new password again, and press 【#】key. System asks if to save or not.
Step 5. Press 【#】key to save.
4.5.7 Master Card Management
You can use master card to add new user
4.5.7.1 Modify Master Card
Step 1. In system settings interface, press 【2】 or 【8】 key, select master card
management, and press【#】key.
Step 2. Press 【2】or【8】keym select modify master card, and press【#】key.
Step 3. Input card no. or place the card on card swiping area to scan, and press 【#】key.
System asks if to save it or not.
Step 4. Press 【#】key, system says successfully set.
4.5.7.2 Add Card with Master Card
Is means using master card to add user of card. The added user is the same as user in
user management. For example, add general card:
Step 1. In master card interface, press 【2】 or 【8】 key, select add card with master
card, and press【#】key.
Step 2. Press【2】or【8】key, select general card, and press【#】. System asks if to bind
password or not.
Step 3. Select according to actual condition.
Yes: input password.
No: system asks if to set period.
Step 4. Press 【#】, set period, and press 【#】key. Time period shall match card swiping
period in time period setup. Refer to Ch 4.4.1.
Step 5. Press 【#】key, set term of validity, and press 【#】.
After you finish, system asks you to swipe master card.
Step 6. Place master card on card swiping area to scan. System prompts master card
mode.
Step 7. Place card to add on card swiping area to scan. System will say successfully
added.

17
4.5.8 Default
You can restore card swiping period, holiday period and mode time to default, or restore
all info to default.
To restore card swiping period:
Step 1. In system settings interface, press 【2】 or 【8】key, select default, and press
【#】key.
Step 2. Press 【2】 or【8】 key, select card swiping period, and press【#】key.
System asks if to restore or not.
Step 3. Press 【#】key to restore.
4.6 Reboot System
You can reboot current device host under system reboot.
Step 1. In main interface, press 【2】or【8】key, select system reboot, and press【#】.
System asks if to reboot or not.
Step 2. Press【#】key to reboot, and press【*】to cancel.
4.7 Local Info
You can view current device card quantity, card swiping record, password quantity, alarm
record, communication, IP address, MAC address and version info.
Step 1. In main interface, press 【2】or【8】key, select local info, and press【#】key.
Step 2. View card quantity, card swiping record, password quantity, alarm record,
communication, IP address, MAC address and version info.
Note:
This manual is for reference only. Slight difference may be found in user
interface.
All the designs and software here are subject to change without prior written
notice.
All trademarks and registered trademarks are the properties of their respective
owners.

18
If there is any uncertainty or controversy, please refer to the final explanation of
us.
Please visit our website or contact your local service engineer for more
information.


![MicroStation FDO Readerconsulting.surell.se/files/FDO Reader - Users Manual.pdf · FDO Reader – User’s Manual surell consulting ab [Ange företagets namn] 1 Terms In this document](https://img.dokumen.tips/doc/110x75/5e9e696e14f5525afb4aed1a/microstation-fdo-reader-users-manualpdf-fdo-reader-a-useras-manual-surell.jpg)


