Embed Size (px)
Citation preview

About this manual:
The product described in this manual, has been developed and produced by ST Audio/HOONTECH Co., Ltd.
• DSP3000 M-Port, DSP24, ADC&C3000 are trademarks of HOONTECH Co., Ltd. • Microsoft, Windows, Windows 95, Windows 98, Windows Me, Windows 2000 and Windows XP are
registered trademarks, or trademarks of Microsoft Corporation. • ADAT is a registered trademark of Alesis.
All other brands and product names are trademarks, or registered trademarks of their respective holders.
October 2002
It is the policy of ST Audio to improve products as new technology and newer components become available. ST Audio, therefore reserves the right to change specifications without prior notice. All the information in this manual has been checked thoroughly when it was created. ST Audio and the authors of this text cannot be held responsible for any misleading or incorrect information provided in this documentation.
A/S Centre
ST Audio / HOONTECH Co., Ltd. 483-6 Simgok-Dong, Wonmi-Gu, Bucheon City, Kyungki-Do, Korea Tel.: +82-32-611-1994 Fax: +82-32-612-0079 Internet: www.STAUDIO.com
Copyright © 2002 HOONTECH Co., Ltd.
This documentation was created by HOONTECH Co., Ltd. (Korea), RIDI multimedia (Germany) and Sound & Music Promotions Pty Ltd. (Australia).
Caution: To reduce the risk of electrical shock, do not remove the cover or rear panel of this unit. No user serviceable parts inside. Please refer servicing to qualified personnel only.
Warning: To reduce the risk of fire or electrical shock do not expose this appliance to rain or moisture.
Servicing: The user should not attempt to service the appliance beyond that is described in the Operating Instructions. All other servicing should be referred to qualified service personnel.
Note: To avoid damage of your speakers, always turn down the volume, or turn off the power of your amplifier / active speakers connected to the ST Audio DSP3000 M-Port when you are rebooting or shutting down your PC.


ST AUDIO DSP3000 M-Port (DSP24 + ADC&DAC3000)
Contents I. Introduction ............................................................................................... 4
What’s in the box? 4 Functions 5 About this manual 5
II. I/O connectors and controls .................................................................... 6 III. PC Hardware installation.......................................................................... 9 IV. ADC&DAC3000 usage ............................................................................ 12
Inputs and Inserts 12 Standalone usage via ADAT I/O 13
V. Driver and software installation ............................................................ 15 Installation under Windows XP 15 Installation under Windows 2000 18 Installation under Windows 9x/Me 21
VI. External Links ......................................................................................... 24 External Mixer 29 Hardware Settings 32 Internal Mixer 35
VII. Usage with software applications ......................................................... 37 Available in- and output devices 37 Windows default audio devices 38 Setting up Emagic Logic SoundTrack24 41 Setting up Steinberg Cubase VST/32 5.1 43 Setting up Cakewalk SONAR 1.3.1 46 Setting up Native Instruments Traktor DJ Studio 48
VIII. Troubleshooting / FAQ........................................................................... 50 Windows 2000 / XP system optimization 53 Hardware detection and IRQ assignment 56
IX. Support / Contact.................................................................................... 59 X. Specifications.......................................................................................... 60
- 3 -

ST AUDIO DSP3000 M-Port (DSP24 + ADC&DAC3000)
I. Introduction Congratulations on your purchase of the DSP3000 M-Port by ST Audio. The DSP3000 M-Port is a combination of the ST Audio DSP24 PCI-card and the external 2U-rackmountable ADC&DAC3000 multi-channel converter box.
The ADC&DAC3000 box is also available without the DSP24 PCI-card. The converter box can be connected to an existing DSP24 PCI-card or to any device with optical ADAT I/O.
Note: This manual covers both, the DSP3000 M-Port system (DSP24 PCI-card plus ADC&DAC3000 box) and the ADC&DAC3000 box when used standalone.
What’s in the box?
You should have received the following with your DSP3000 M-Port system (or with your ADC&DAC3000 box):
• ST Audio DSP24 PCI audiocard (DSP3000 M-Port system only)
• XG DB I interface bracket with digital I/O connectors and internal 4pin connection cable (DSP3000 M-Port system only)
• 2U rackmountable 19" ADC&DAC3000 box with analog I/O connectors (both DSP3000 M-Port system and ADC&DAC3000 standalone)
• 2pin-2pin CD-ROM digital audio cable (DSP3000 M-Port system only)
• 4pin-3pin CD-ROM analog audio cable (DSP3000 M-Port system only)
• 44pin D-SUB connection cable to connect the PCI card with the ADC&DAC3000 (H-BUS) (both DSP3000 M-Port system and ADC&DAC3000 standalone)
• external 12V power supply for ADC&DAC3000 box (both DSP3000 M-Port system and ADC&DAC3000 standalone)
• ST Audio / Hoontech driver and installation CD-ROM (DSP3000 M-Port system only)
• Logic SoundTrack24 CD-ROM by Emagic (DSP3000 M-Port system only)
• This manual (both DSP3000 M-Port system and ADC&DAC3000 standalone)
- 4 -

ST AUDIO DSP3000 M-Port (DSP24 + ADC&DAC3000)
Functions
The DSP3000 M-Port system by ST Audio is easy to install and contains everything you need to build a powerful professional multi channel recording system with your PC or any ADAT compatible device. The system supports up to 24bit resolution and 96kHz sample rates. It can handle up to 10 input and 10 output channels simultaneously including the external (ADC&DAC3000) analog in- and outputs and the optical & coaxial S/PDIF (or AES/EBU) in- and outputs on the XG DB I daughter card. The internal signal paths are processed at 36bit resolution ensuring the highest amount of headroom and fidelity. Each input channel of the external ADC&DAC3000 box is equiped with a high-quality microphone preamp with adjustable gain, balanced connectors, insert per channel and switchable 48V phantom power.
It is even possible to install up to four DSP24 PCI-cards one system to increase the number of I/O channels that can be used simultanously. Also, the DSP24 can be used with additional rackmountable external boxes by ST Audio (using the H-BUS interface), e.g. to add ADAT, TDIF or multiple S/PDIF I/O channels as options.
About this manual
The DSP3000 M-Port system is a powerful professional audiocard that combines a huge number of functions in one single product. The system delivers outstanding performance never seen before at such an affordable price. With extensive experience in the audio and PC industry, combined with valuable suggestions from our customers, our engineers have developed a product we know you will be satisfied with. We guarantee you uncompromising quality, as well as excellent technical and audio properties. The hardware can be used in a very wide range of different applications. Because of that, you need to setup your audio software and your PC specifically for each of your audio applications. This manual contains detailed information about all the functions of the hardware and the control panel software. It also contains details about setting up certain audio applications for the DSP3000 M-Port system and it continues with optimization and troubleshooting information. Because of that, we strongly recommend to read this manual completely before you start using your DSP3000 M-Port.
Note: If you have bought or if you are using the ADC&DAC3000 box without the DSP24 PCI-card, you can ignore the informations about PC hardware installation and software usage/setup in this manual. All important informations you need to use the ADC&DAC3000 are in the I/O CONNECTORS AND CONTROLS and ADC&DAC3000 USAGE chapters of this manual.
- 5 -
ST AUDIO DSP3000 M-Port (DSP24 + ADC&DAC3000)
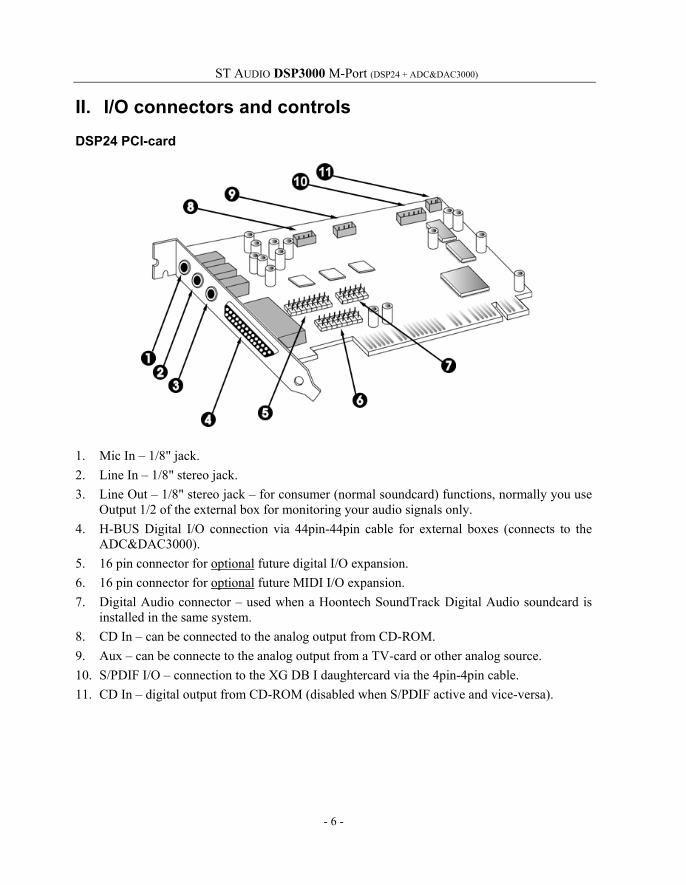
II. I/O connectors and controls DSP24 PCI-card
1. Mic In – 1/8" jack. 2. Line In – 1/8" stereo jack. 3. Line Out – 1/8" stereo jack – for consumer (normal soundcard) functions, normally you use
Output 1/2 of the external box for monitoring your audio signals only. 4. H-BUS Digital I/O connection via 44pin-44pin cable for external boxes (connects to the
ADC&DAC3000). 5. 16 pin connector for optional future digital I/O expansion. 6. 16 pin connector for optional future MIDI I/O expansion. 7. Digital Audio connector – used when a Hoontech SoundTrack Digital Audio soundcard is
installed in the same system. 8. CD In – can be connected to the analog output from CD-ROM. 9. Aux – can be connecte to the analog output from a TV-card or other analog source. 10. S/PDIF I/O – connection to the XG DB I daughtercard via the 4pin-4pin cable. 11. CD In – digital output from CD-ROM (disabled when S/PDIF active and vice-versa).
- 6 -

ST AUDIO DSP3000 M-Port (DSP24 + ADC&DAC3000)
XG DB I daughter card
1+2. AES/EBU connectors. To use them, you will need a pair of 1/8" to XLR adapter cables. 3+5. optical S/PDIF I/O connectors. 4+6. coaxial S/PDIF I/O connectors. 7. 4pin connector to connect the daugther card to the DSP24 PCI-card. 8. CD digital in 2pin connector for digital out CD-ROM signals.
ADC&DAC3000 – front
1. Input gain controls for each of the 8 input channels, with Phantom Power (+48V) switch for each input channel pair. The LEDs show if the corresponding input channel pair has been enabled in the External Links software of the DSP24 PCI-card.
2. Level meters for each input and output channel. Via the switch for each channel you can select between the input and output signal for the corresponding channel.
3. Samplerate selection switch for standalone usage (via ADAT I/O). Use this switch to select the samplerate (44.1kHz when disabled, 48kHz when enabled) when the ADC&DAC3000 will supply the master clock via the ADAT optical output. This switch has no function when the ADC&DAC3000 is connected to the DSP24 PCI-card.
4. Stereo headphone output (1/4") with gain control; sends out the same signal as Output 1/2. 5. Power switch with Power LED.
- 7 -

ST AUDIO DSP3000 M-Port (DSP24 + ADC&DAC3000)
ADC&DAC3000 – back
1. DATA IN / DATA OUT 44pin D-SUB connector (H-BUS): connection via a 44pin-44pin cable to the DSP24 PCI-card and to other (optional) external boxes. You can use either of the two connectors to connect the ADC&DAC3000 to your DSP24 PCI card.
2. 12V DC regulated power supply connector to use an external power supply (+ on tip). The ADC&DAC3000 will not work unless you connect it to external power.
3. 1 MIDI input / 2 MIDI outputs (will only be used when the ADC&DAC3000 is connected to the DSP24 PCI-card).
4. Optical ADAT I/O in TOSlink format. These two connectors are used when the ADC&DAC3000 is not connected to the DSP24 PCI-card and used as a standalone AD/DA converter unit together with ADAT compatible devices. If the ADC&DAC3000 is connected to the DSP24 PCI-card, the ADAT I/O connectors are not used.
5. Output 1~8 with balanced XLR connectors. 6. Wordclock I/O with BNC connectors. Wordclock I/O will only be used when the
ADC&DAC3000 is not connected to the DSP24 PCI-card and used standalone. 7. Input 1~8 with fully balanced XLR inputs and unbalanced 1/4" inputs that can be used
alternativly for each input. Every input channel has a separate ensert connector (1/4" TRS). The inserts can be used if you want to modify the signal between the microphone preamp and the actual ADC (e.g. for an effect processor like a compressor/limiter).
- 8 -
ST AUDIO DSP3000 M-Port (DSP24 + ADC&DAC3000)
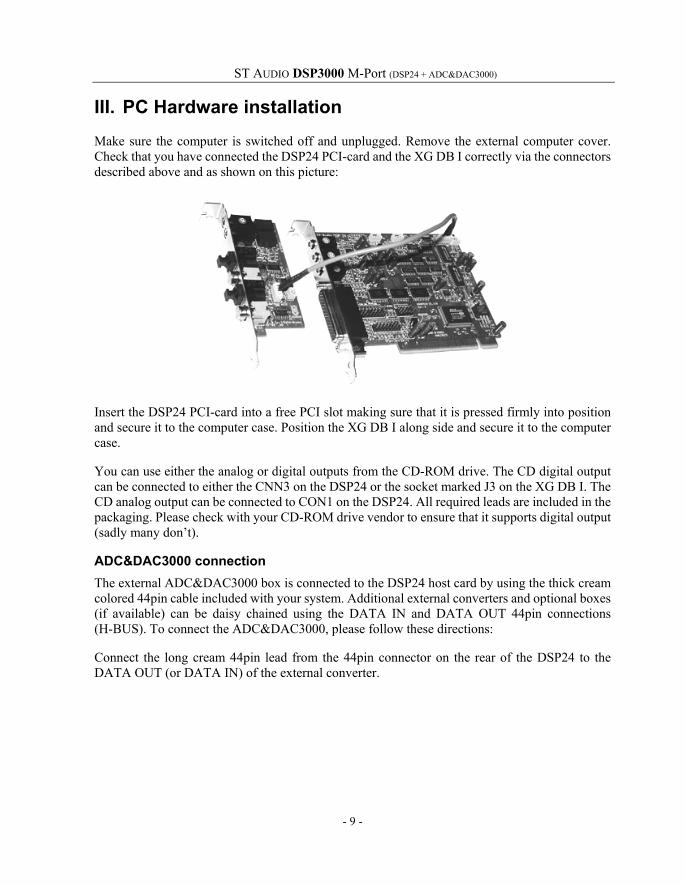
III. PC Hardware installation Make sure the computer is switched off and unplugged. Remove the external computer cover. Check that you have connected the DSP24 PCI-card and the XG DB I correctly via the connectors described above and as shown on this picture:
Insert the DSP24 PCI-card into a free PCI slot making sure that it is pressed firmly into position and secure it to the computer case. Position the XG DB I along side and secure it to the computer case.
You can use either the analog or digital outputs from the CD-ROM drive. The CD digital output can be connected to either the CNN3 on the DSP24 or the socket marked J3 on the XG DB I. The CD analog output can be connected to CON1 on the DSP24. All required leads are included in the packaging. Please check with your CD-ROM drive vendor to ensure that it supports digital output (sadly many don’t).
ADC&DAC3000 connection The external ADC&DAC3000 box is connected to the DSP24 host card by using the thick cream colored 44pin cable included with your system. Additional external converters and optional boxes (if available) can be daisy chained using the DATA IN and DATA OUT 44pin connections (H-BUS). To connect the ADC&DAC3000, please follow these directions:
Connect the long cream 44pin lead from the 44pin connector on the rear of the DSP24 to the DATA OUT (or DATA IN) of the external converter.
- 9 -

ST AUDIO DSP3000 M-Port (DSP24 + ADC&DAC3000)
Caution: never connect or disconnect the 44pin cable when the computer is turned on. Always shut down your system before.
DIP switch settings
You need to have one DIP switch in the UP position. There are 10 DIP switches on the right side panel of the ADC&DAC3000. The down position represents OFF for all switches. The up position represents ON for all switches. Switches 1-4 set the units unique specific ID for software control. This is necessary so the system can differentiate individual ADC converters or external boxes, when several external units are connected to one card. At least one DIP switch must be in the up position.
Up to four external devices can be used at the same time with the DSP24. An example would be a system with the ADC&DAC3000 and the DS2000 (ADAT and TDIF I/O).
Remember, each box needs a unique ID number. If you connect a second box, the box ID number controlled by the DIP switch on the right side must be different. After setting the correct DIP switch, connect the second box using the supplied cream 44pin cable to DATA IN (or DATA OUT) of the first external box and the DATA OUT (or DATA IN) of the second one.
Normally you should set the ADC&DAC3000 to box number 1 which means that the first DIP switch is set to ON and all others to OFF. This is also the default setting.
After everything is connected to the card, you can re-assemble your PC and continue with the driver and software installation.
- 10 -

ST AUDIO DSP3000 M-Port (DSP24 + ADC&DAC3000)
Amplifier / speaker connection The main outputs on the back of the external box are designed for the use with a suitable amplifier, active speakers or a mixer. Typically you will use Output 1/2 (XLR) as your master output.
Note: it is not enough to connect the 1/8" Line-Out on the PCI card to active multimedia speakers or a HiFi-system only. Audio applications using ASIO or GSIF drivers will send out signals via the external box or the digital outputs only.
If you use a digital amplifier, connect it to the coaxial or to the optical S/PDIF output of the XG DB I.
Power supply For stable operation, the ADC&DAC3000 needs to be connected to the external 12V DC power supply. Please connect it to power and the ADC&DAC3000 box before you use your PC with the ADC&DAC3000 box. Also turn on the power switch before you are booting your PC.
Note: please avoid to off the power of the external box while your PC is using the audio hardware. You will have to reboot your system if this happens and if you want to use the external box again.
- 11 -

ST AUDIO DSP3000 M-Port (DSP24 + ADC&DAC3000)
IV. ADC&DAC3000 usage The ADC&DAC3000 allows you to use up to 8 analog mono signal sources simultaneously. Any input is equiped with gain control. That allows you not only to use line level signals (such as the output of a synthesizer or effect processor) but also microphones. Via phantom power switches (one for each input channel pair) you can even use high quality condenser microphones that require +48V power supply. Of course the inputs also work with dynamic microphones. Probably the nicest feature of the ADC&DAC3000 are the level meters that are showing the input signal independandly for each channel. You can check the level meters while you adjust the input/recording level via the gain knob of each channel. Make sure the input does not clip (= reaches 0dB). Of course you can individually adjust the input level for each input channel, even if you have different signal sources on the separate inputs.
Every individual level meter is equiped with a switch that allows you to display the output signal (instead of the input signal). This allows you to monitor playback signals (e.g. for diagnose) for each of the 8 independand balanced XLR outputs.
Inputs and Inserts
Every input channel of the ADC&DAC3000 has two inputs: one balanced XLR input (which you would normally use for microphones or for higher end audio equipment with balanced outputs and one unbalanced 1/4" input (which you would normally use for synthesizers, keyboards, etc.). You can use cables with both mono 1/4" and 1/4" TRS (Tip/Ring/Sleeve) connectors on the unbalanced inputs. Please note that you cannot use the XLR and 1/4" input simultaneously (independandly for each channel of course). As soon as a cable (or adapter) is plugged into the 1/4" input, the XLR input gets deactivated.
Every input channel on the ADC&DAC3000 has a separate insert connector. Inserts are usually used to process the analog input signal in an external effect processor before it gets converted by the ADC. You may be familiar with the concept of inserts, many mixing desks have inserts for example. If you never heard of effect inserts before, you might be a bit confused – don’t worry, inserts are a very nice addition to this product.
As mentioned, inserts allow you to use the microphone preamps of the ADC&DAC3000 for incoming signals, then run the signal through external hardware effects (e.g. a compressor/limiter) before the AD-converter processes the signal. In order to use the inserts, you need a so-called "insert-cable", sometimes called "Y-cable", with a 1/4" TRS connector on one and and two 1/4" mono connectors on the two other ends. If you have trouble to find such a cable, contact your local music retailer – they will certainly be able to help you. The TRS connector gets plugged into the insert connector of the specific channel of the ADC&DAC3000. The 1/4" connector that is connected to the "tip" of the TRS connector gets connected into the input of your effect processor. The 1/4" connector that is connected to the "ring" of the TRS connector gets connected to the
- 12 -

ST AUDIO DSP3000 M-Port (DSP24 + ADC&DAC3000)
output of your effect processor (the "sleeve" carries ground). So, every 1/4" insert connector is used for both, 'sending' and 'receiving' the signal. You need only one "insert-cable" per channel.
Note: You can even use the insert connectors of the ADC&DAC3000 as outputs (if you want to use the unit only as high quality preamp) or you can use the insert as line level input if you don’t want to use the gain control.
Standalone usage via ADAT I/O
As mentioned previously, the ADC&DAC3000 can be used standalone without the DSP24 PCI-card. In fact, you might have bought the ADC&DAC3000 alone without the PCI-card.
The optical ADAT in- and outputs for standalone usage are accessable on the backpanel of your ADC&DAC3000.
All 8 analog input channels (with inserts, when in use) are converted into digital signals and then transferred to the optical ADAT output. The digital signal from the ADAT input is converted into analog signals and then transferred to the 8 balanced analog outputs.
If you use the ADC&DAC3000 both as AD- and DA-converter simultanously, you connect the ADAT input of ADC&DAC3000 to the ADAT output of your device. Also you would connect the ADAT output of ADC&DAC3000 to the ADAT input of your device. If you use ADC&DAC3000 just as AD-converter or just as DA-converter, you will just need one optical ADAT cable. We strongly recommend the use of only high quality optical leads to connect other ADAT devices. Sometimes a certain minium length is needed – try to avoid very short optical cables with a low diameter.
Internal and External Clock
If you use the ADC&DAC3000 as AD-converter only, it will supply the master clock for your other digital audio signals. In that case, you can select the samplerate the unit operates (44.1 or 48kHz) with a switch on the front panel. If this switch is enabled (pushed), the samplerate will be 48kHz, in the other case it will be 44.1kHz.
Please note that the setting of the samplerate selection switch will normally be ignored when you use ADC&DAC3000 as DA-converter or as AD- and DA-converter simultanously. In that case, the unit will work with the samplerate that is provided by the digital ADAT input.
Please also refer to the manual of your digital ADAT devices that you want to use together with the ADC&DAC3000 to learn more about master/slave clock settings. When several units are connected via ADAT (or via other digital protocols), it is extremly important that all devices are using the same samplerate.
- 13 -

ST AUDIO DSP3000 M-Port (DSP24 + ADC&DAC3000)
WordClock I/O
You can also use the WordClock I/O connectors of the ADC&DAC3000 to sync the box to other devices. The WordClock output always sends out the current samplerate that is used. If you use the WordClock input, the unit automatically uses the clock from this input instead of the otherwise selected clock. Never connect anything to the WordClock input unless you want to force the ADC&DAC3000 to use this signal as clock / samplerate.
- 14 -

ST AUDIO DSP3000 M-Port (DSP24 + ADC&DAC3000)
V. Driver and software installation The DSP3000 M-Port system comes with a CD-ROM that contains WDM drivers for Windows 2000/XP and drivers for Windows 9x/Me. You can also download the latest drivers from our website at www.STAUDIO.com. We recommend you to check our website regulary for new driver updates. Please note that the installation process is different, depending on the version of Windows you are using.
Installation under Windows XP
The following instructions refer to Windows XP. If you use Windows XP Professional, you must be logged in as Administrator or with similar rights in order to install the required DSP24 driver.
After the installation of the PCI-card in the computer, boot up the system. Windows will detect the new hardware automatically a few seconds after you have entered your password and display the following screen.
Select Install from a list or a specific location (Advanced) and click Next.
- 15 -
ST AUDIO DSP3000 M-Port (DSP24 + ADC&DAC3000)
D:\sound\dsp24\wdm
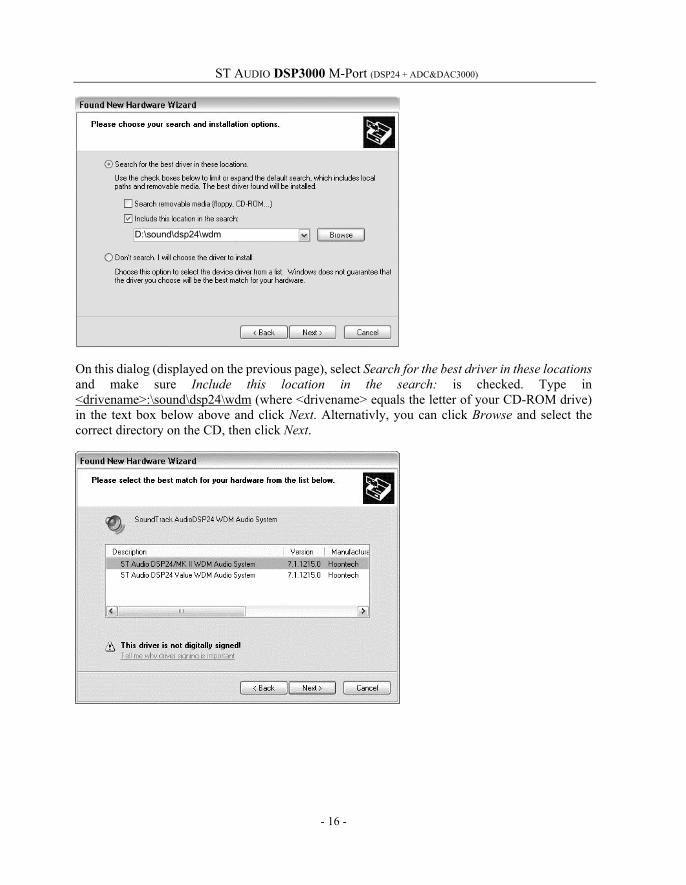
On this dialog (displayed on the previous page), select Search for the best driver in these locations and make sure Include this location in the search: is checked. Type in <drivename>:\sound\dsp24\wdm (where <drivename> equals the letter of your CD-ROM drive) in the text box below above and click Next. Alternativly, you can click Browse and select the correct directory on the CD, then click Next.
- 16 -

ST AUDIO DSP3000 M-Port (DSP24 + ADC&DAC3000)
On this dialog (displayed on the previous page), make sure to select ST Audio DSP24 / MK II WDM Audio System to select the driver of the DSP24 and DSP24 MK II card. Do not select any of the other entries (very important!). Click Next. If you get a dialog box about a missing driver signature, you can ignore it and just select Continue installation.
The driver files are now copied to your system. Once the installation is completed, the following dialog will be displayed:
Click Finish.
After the driver is installed ensure the installation worked by selecting Start > Control Panel > System > Hardware > Device Manager > Sound, video and game controllers (you might have to switch your Windows XP Control Panel to Classic View to get to the System applet directly). You should see the audiocard's device listed there. Highlight it and click on Properties. You should see the message This device is working properly. If so, congratulations are in order. You have successfully installed the drivers for the DSP24 PCI-card under Windows XP.
- 17 -
ST AUDIO DSP3000 M-Port (DSP24 + ADC&DAC3000)
Installation under Windows 2000
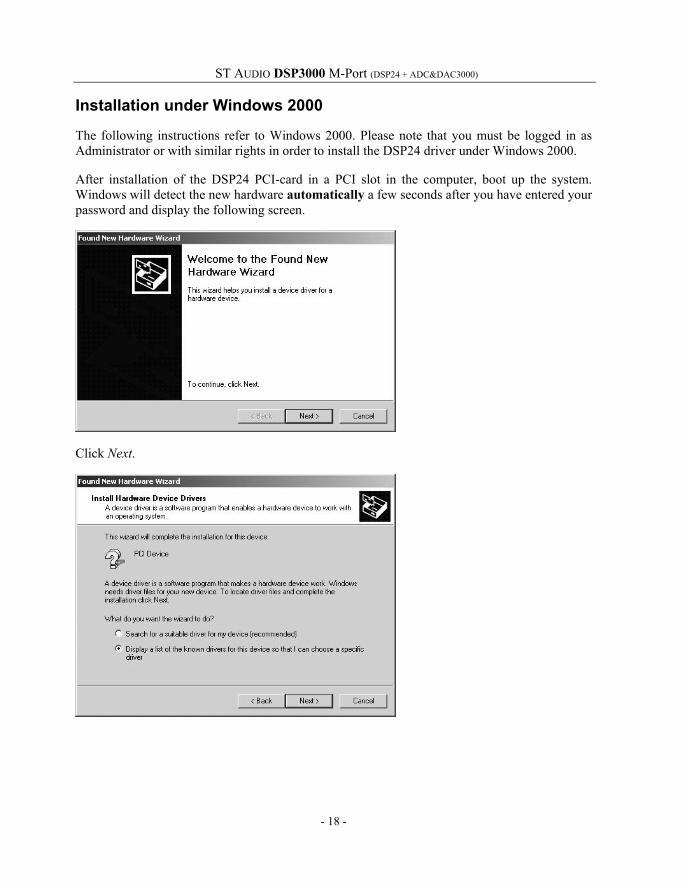
The following instructions refer to Windows 2000. Please note that you must be logged in as Administrator or with similar rights in order to install the DSP24 driver under Windows 2000.
After installation of the DSP24 PCI-card in a PCI slot in the computer, boot up the system. Windows will detect the new hardware automatically a few seconds after you have entered your password and display the following screen.
Click Next.
- 18 -
ST AUDIO DSP3000 M-Port (DSP24 + ADC&DAC3000)
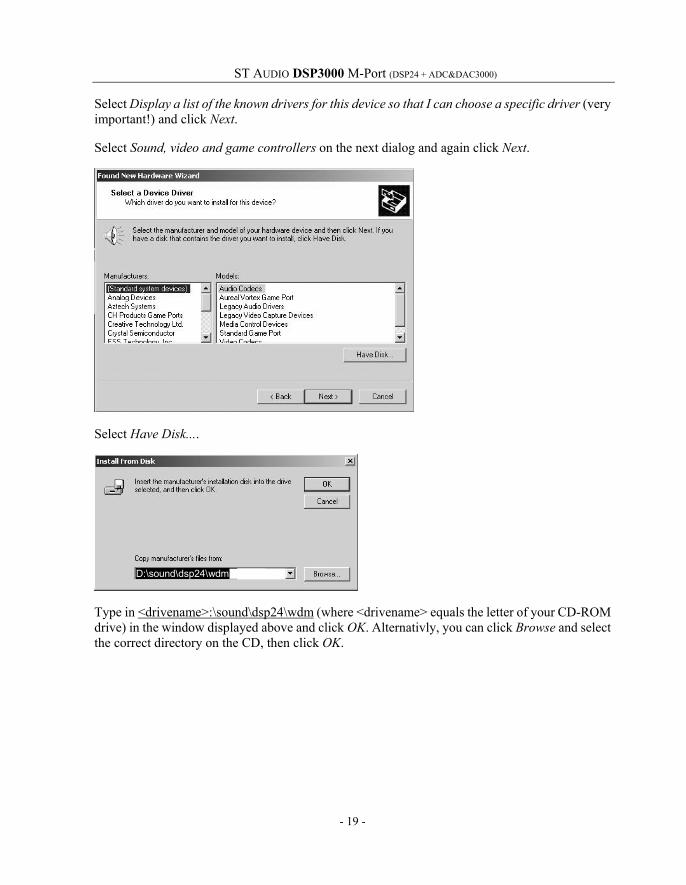
Select Display a list of the known drivers for this device so that I can choose a specific driver (very important!) and click Next.
Select Sound, video and game controllers on the next dialog and again click Next.
Select Have Disk....
D:\sound\dsp24\wdm
Type in <drivename>:\sound\dsp24\wdm (where <drivename> equals the letter of your CD-ROM drive) in the window displayed above and click OK. Alternativly, you can click Browse and select the correct directory on the CD, then click OK.
- 19 -

ST AUDIO DSP3000 M-Port (DSP24 + ADC&DAC3000)
On this dialog, make sure to select ST Audio DSP24 / MK II WDM Audio System. Do not select any of the other entries (very important!). Click Next. If you get a dialog box about a missing driver signature, you can ignore it and just select Continue.
ST Audio DSP24 / MK II WDM Audio System
The next dialog is displayed to confirm the correct selection. Click Next. The driver files are now copied to your system.
At the next window, complete the installation by clicking Finish. On some systems you will be prompted to reboot the system. If that is the case on your PC, click Yes.
After the driver is installed, ensure the installation worked by selecting Start > Settings > Control Panel > System > Hardware > Device Manager > Sound, video and game controllers. You should see the audiocard's device listed there. Highlight it and click on Properties. You should see the message This device is working properly. If so, congratulations are in order. You have successfully installed the drivers for the DSP24 PCI-card under Windows 2000.
- 20 -

ST AUDIO DSP3000 M-Port (DSP24 + ADC&DAC3000)
Installation under Windows 9x/Me
The following instructions refer to Windows 98 / 98 SE. The installation under Windows 95 and Windows Me is very similar, although the displayed dialog boxes might look slightly different.
After the installation of the DSP24 in a PCI slot in the computer, boot up the system. Windows will detect the new hardware automatically and display the following screen.
Click Next.
Select Search for the best driver for your device and click Next.
- 21 -

ST AUDIO DSP3000 M-Port (DSP24 + ADC&DAC3000)
Check Specify a location. Do not check CD-ROM drive or Floppy disk drives. Type in <drivename>:\sound\dsp24\driver (where <drivename> equals the letter of your CD-ROM drive) in the window displayed above and click Next. Alternativly, you can click Browse and select the correct directory on the CD, then click Next.
Note: make sure that you do not use drivers from any other directory, even if Windows might offer them to you. This is especially important if you use Windows Me.
After Windows finds the driver you should see the above screen naming the driver information file indicated in the screenshot. Click Next.
- 22 -

ST AUDIO DSP3000 M-Port (DSP24 + ADC&DAC3000)
At this window, complete the installation by clicking Finish. Windows will now install the driver for you through a series of installation screens. If you are prompted to do anything (this would be unusual), please follow the directions on screen.
The External Links software will be loaded automatically now. Check the EXTERNAL LINKS chapter (VI) for reference.
After the driver is installed ensure the installation worked by selecting Start > Settings > Control Panel > System > Device Manager > Sound, video and game controllers. You should see the audiocard's device listed there. Highlight it and click on Properties. You should see the message This device is working properly. Click on the Resources tab, you should see the message No conflicts. If so, congratulations are in order. You have successfully installed the drivers for the DSP24 PCI-card under Windows 9x/Me.
- 23 -

ST AUDIO DSP3000 M-Port (DSP24 + ADC&DAC3000)
VI. External Links External Links is the main control center of the DSP24 PCI-card with the look&feel of a patchbay. You use it to setup the hardware after the installation and to control the signal routing for your specific software and studio setup.
As the DSP24 card can be used in different configurations and provides huge expandibility via the H-BUS interface, a manual one-time setup is needed to 'inform' the driver of the hardware options you have installed in your setup.
External Links also controls the monitoring of your PC based studio with the DSP24 card. Different studio envrionments (e.g. analog mixing desk vs. PC as digital mixer) require different monitroing setups. Sometimes you want to listen to the signal you are recording at the moment. Sometimes you want to listen to a modified version of the signal (e.g. processed by an effect processor) or you do want to listen to a completly different audio track while recording. This means that you need to be able to define what exactly is played through the separate output channels of your audiocard and External Links allows you to do that.
Initial setup
As mentioned, you need to perform some one-time configuration steps to be able to use the different hardware options. You do this via Inputs>Add Inputs in the menu:
• select ADC&DAC3000. • select XG DB I if you are using the digital
S/PDIF or AES/EBU input of the card. • select SoundTrack DigitalAudio(Master) if
you have installed a Hoontech ST D_A 4ch/16ch soundcard in your PC as well.
• select Digital Station 2000 if you have connected the DS2000 ADAT- / TDIF- interface to the card.
• select Digital Modulator III if you have connected a DM III to the card.
The right section of the External Links window will now display what you have selected in the menu. By right clicking on a box on screen you can select the Box Number for the rackmountable external boxes. Please make sure that the number (displayed as a yellow number) is identical with the number you have selected on the rackmountable hardware via the DIP-switches on the right side panel. By default, the ADC&DAC3000 has set the first DIP switch is to ON (up), all others to OFF (down). This means the box number is 1 and that needs to be selected inside External Links
- 24 -

ST AUDIO DSP3000 M-Port (DSP24 + ADC&DAC3000)
as well. This allows you optionally to use several external boxes at the same time via the H-BUS interface of your DSP24 card as every box has a unique number.
After the ADC&DAC3000 box has been added and after the four stereo input channel pairs have been connected virtually on screen, the software will look like this:
The four red LEDs on the front of the ADC&DAC3000 next to the gain knobs will also be turned on now (so you can see that the corresponding input channel pair is used).
As you can see on screen, the input signal routing is always done in stereo-pairs. The reason is the internal handling of audio I/O channels in stereo-pairs of the Windows operating system (MME devices). Most professional audio applications allow you to select / control the two different mono channels of a stereo-pair individually of course.
As you have seen, there is no option (and no need!) to select anything to setup the outputs of the card. The DSP24 hardware will automatically recognize all available outputs. As long as you do not change this setup, the software will always remember your settings.
- 25 -

ST AUDIO DSP3000 M-Port (DSP24 + ADC&DAC3000)
What is displayed by External Links?
After we have performed the needed one-time steps to 'tell' the DSP24 driver what hardware options we have installed, we can check what else we can do with the software. The software is divided into three main sections (yes, from right to left):
1. All the available inputs are displayed on the right side of the window. You can connect them virtually on screen when needed.
2. The section in the middle symbolizes the I/O interface on the DSP24 card. The virtual connectors on the right side (gray) are representing the input channels of the card, the connectors on the left side (white) are the available sources for the outputs.
3. The output channels of the card are displayed on the left side of the window. The digital output (S/PDIF Out) and also the 8 channels of the external boxes are displayed under the DAC headline (Digital to Analog Converter)
The virtual cables on screen show you the signal routing for all inputs and all inputs. The input cables on the right side can be removed and added as needed. The virtual cables for the outputs (which mainly control the monitoring) cannot be removed but replaced by other connections. Because of that, the connections are displayed as straight lines.
The five gray virtual connectors in the middle section are corresponding to the MME wave devices (and the ASIO-driver) you are using inside your application.
The first one (S/PDIF In) corresponds to the wave device ADSP24 S/PDIF Device or to channel 9/10 of the ASIO driver.
The others (Input x,y) correspond to the wave devices ADSP24 Ext. x/y Audio Device or to channels x/y of the ASIO driver (where x+y are the numbers of the channels). This means for example: if you record using ADSP24 Ext. 5/6 Audio Device, you will get the signal from the yellow virtual cable which would be the input signal from the inputs number 5 and 6 of the ADC&DAC3000 box.
On the left side of the middle section, the available output sources are listed with white connectors. You can see:
- 26 -

ST AUDIO DSP3000 M-Port (DSP24 + ADC&DAC3000)
• S/PDIF In; the signal from the gray input connector on the right • Wave S/PDIF Out; the playback of the wave device ADSP24 S/PDIF
Audio Device or channel 9/10 of the ASIO/GSIF driver • Input 1,2; the signal from the gray 1,2 input on the right (usually from the
ADC&DAC3000) • WaveOut 1,2; the playback of the wave device ADSP24 Ext. 1/2 Audio
Device or channel 1/2 of the ASIO/GSIF driver • Input 3,4; the signal from the gray 3,4 input on the right (usually from the
ADC&DAC3000) • WaveOut 3,4; the playback of the wave device ADSP24 Ext. 3/4 Audio Device or channel 3/4
of the ASIO/GSIF driver • Input 5,6; the signal from the gray 5,6 input on the right (usually from the ADC&DAC3000) • WaveOut 5,6; the playback of the wave device ADSP24 Ext. 5/6 Audio Device or channel 5/6
of the ASIO/GSIF driver • Input 7,8; the signal from the gray 7,8 input on the right (usually from the ADC&DAC3000) • WaveOut 7,8; the playback of the wave device ADSP24 Ext. 7/8 Audio Device or channel 7/8
of the ASIO/GSIF driver
All of these available signal sources can be connected to the outputs on the left side of the External Links window.
Monitoring
For each stereo channel pair it is possible to activate direct monitoring (without any latency). As in the example on these two pictures, you simply do it by connecting Input 1,2 to Output 1,2. This means that the signal that comes in on the input channel 1 and 2 is sent directly to the output channel 1 and 2 without any latency / delay. This example allows you to send out monitor signals of a microphone (connected to Input 1,2) to the headphone of the singer (connected to the headphone output of the external box) for example. The signal you play inside your application via channel 1 and 2 is not audible now of course!
The second picture shows the alternative: if you connect WaveOut 1,2 with Output 1,2, the playback from your audio application is audible via the first stereo output channel. The signal from the input is not audible at the same time!
- 27 -

ST AUDIO DSP3000 M-Port (DSP24 + ADC&DAC3000)
The limitation of these two options for monitoring is that you cannot hear the input and output signal simultaneously. If you use an analog (or digital) mixer that is connected to both the inputs and the outputs of the DSP3000 M-Port system, you can monitor via the mixer so that is no problem. The DSP24 hardware however has a built-in digital mixer so you do not really need an external mixing desk. This function is called External Mixer (easy to remember! – check the detailed description on the next pages) and as the input and playback signals, you can connect it to Output 1,2 as shown on this picture.
If the External Mixer is connected to Output 1,2 (or alternativly to S/PDIF Out), all input and all playback signals are audible simultaneously. When you open the External Mixer (just click on the Ext.Mixer button), you can set the volume for each playback and input
channel independently. This allows you to create your own mix completly digitally inside your PC without the need of external mixing equipment and without the need for special software from third parties. This final mix can even be digitally resampled using the ADSP24 Ext. Mixer Device MME wave device or channel 11/12 of the ASIO 2.0 driver.
Internal / External Master Clock
When you are recording from a digital source (usually from S/PDIF In which is connected to the XG DB I via the ADSP24 S/PDIF Audio Device) it is important that the synchronisation is made correctly. The current synchronisation setting is displayed in the upper left corner. Internal Master Clock shows that the DSP24 PCI card is responsible to supply the samplerate for all recording and playback operations. As soon as you connect the virtual cable from the XG DB I on the right side of External Links, the sync is changed to External Master Clock to allow clean recordings from the S/PDIF or AES/EBU input. Please note that it is very important that an active device is connected to the digital input when the sync is set to external. It is usually not possible to record a clean signal from the digital input if you use internal synchronisation ... also it is not possible to playback and record clean signals (on any in- and output) if you use external synchronisation without anything connected to the digital input. In fact, on some systems it is not possible to record and playback at all with a wrong sync setting! It is important to use this setting very carefully. It can also be changed in the H/W Settings dialog which is described later in this chapter.
Using multiple DSP24 cards
The External Links software allows you to control up to four DSP24 cards in one system. The card number selection in the upper right corner allows you to switch between the different cards. Every card has unique and individual settings when installed together in one PC.
- 28 -

ST AUDIO DSP3000 M-Port (DSP24 + ADC&DAC3000)
External Mixer
With the Ext.Mixer section inside External Links you can control all incoming and outgoing signals. Open it by clicking on Call Ext.Mixer in the menu of External Links or by clicking the Ext. Mixer button.
Note: The External Mixer will only change the audible signal for monitoring purposes. You can either output it through the analog output 1/2 and/or through the S/PDIF output (as connected inside External Links). When you are recording an input signal, the digital External Mixer does not change the signal level. This ensures that you are always recording with best possible audio quality without reduction of the dynamic range.
Master
Controls the output volume of the External Mixer. The signal controlled here will be played through the analog output 1/2 and/or through the S/PDIF output. It is even possible to resample the output signal of the digital mixer internally using the wave device ADSP24 Ext. Mixer Device or channel 11/12 of the ASIO driver.
You can control the volume of the left and right channels independandly. Muting the signal is possible as well.
- 29 -
ST AUDIO DSP3000 M-Port (DSP24 + ADC&DAC3000)
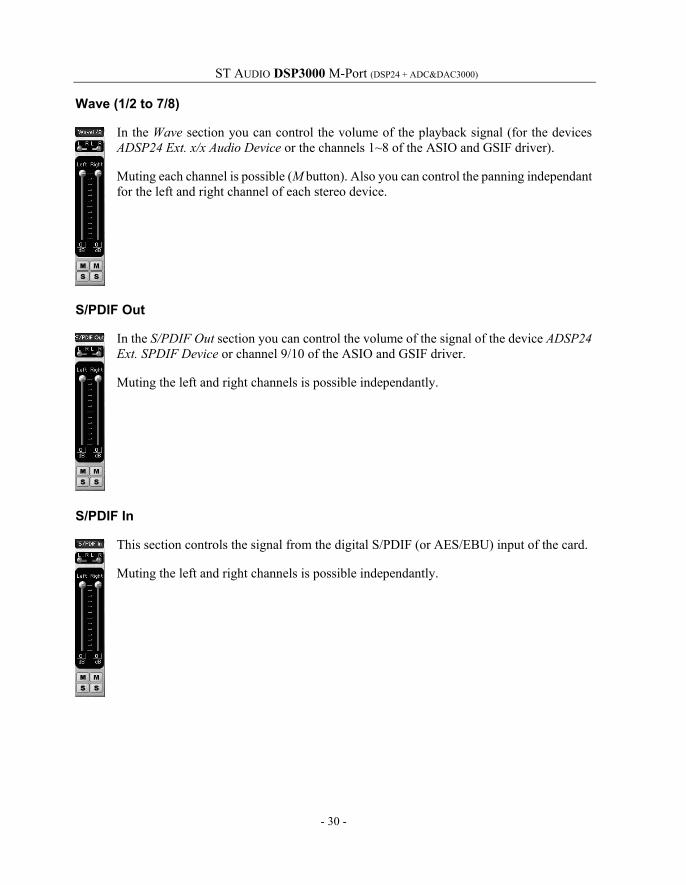
Wave (1/2 to 7/8)
In the Wave section you can control the volume of the playback signal (for the devices ADSP24 Ext. x/x Audio Device or the channels 1~8 of the ASIO and GSIF driver).
Muting each channel is possible (M button). Also you can control the panning independant for the left and right channel of each stereo device.
S/PDIF Out
In the S/PDIF Out section you can control the volume of the signal of the device ADSP24 Ext. SPDIF Device or channel 9/10 of the ASIO and GSIF driver.
Muting the left and right channels is possible independantly.
S/PDIF In
This section controls the signal from the digital S/PDIF (or AES/EBU) input of the card.
Muting the left and right channels is possible independantly.
- 30 -

ST AUDIO DSP3000 M-Port (DSP24 + ADC&DAC3000)
Input (1/2 to 7/8)
This sections controls the audible playback volume of the analog input channel 1~8.
Muting the left and right channel for each pair is possible independantly.
Presets
The External Mixer allows you to save four presets for quick access. You can easily load them by clicking on the 1, 2, 3 or 4 button. To save the current settings under the selected number, simply press Save.
- 31 -

ST AUDIO DSP3000 M-Port (DSP24 + ADC&DAC3000)
Hardware Settings
The H/W Setting dialog of the DSP24 PCI-card is used to control the basic driver settings of the audiocard. You call it via External Links (H/W Setting button or via the menu). The H/W Setting dialog is also used when you open the ASIO control panel from an ASIO compatible sequencer such as Emagic Logic Audio or Steinberg Cubase VST. It is required to setup this dialog before you launch your audio software.
The upper section displays the current version of the driver that is installed. Also you can see the current latency that has been selected for the ASIO 2.0 driver. Below that, you can see the resolution of the converters that are used in your hardware setup. This will be always 24 bit with the DSP3000 M-Port system as the converters used in the ADC&DAC3000 work with 24bit resolution.
Clock Settings
The Clock Settings tab controls the samplerate of the card.
Under Audio Data Handling you can determine if the card allows you to playback and record with a bit-depth that is higher than the converter resolution (displayed above). As the converter resolution on the DSP3000 M-Port system is 24bit, it does not matter in most situations what is selected here. The default setting is Allow operation when data exceeds converter resolution.
- 32 -

ST AUDIO DSP3000 M-Port (DSP24 + ADC&DAC3000)
The Clock And Sample Rates (Hertz) section allows you to select the source of the clock for the DSP24 card. You can select between Internal Master Clock and External Master Clock. Make sure to select External Master Clock only if you are recording or monitoring from the S/PDIF input of the card (optical or coaxial). In that case, the device that is connected to the input will supply the clock for all operations you perform with the card. If you select Internal Master Clock (default), the clock generator on the card will generate the samplerate. You will have problems with noise and clicks in your audio signal if you have selected external clock without an active device (DAT, MD, digital mixer, etc.) on the digital input. Also you will have similar problems when you want to record a signal from the digital input with the card set to internal clock.
The section of the H/W Settings dialog also shows the current sample rate of the card, which has been set by your application software. The samplerate selected here will be used for all functions of the card. This includes the digital output, so if you sync an external device (MD, DAT, digital mixer, etc.) to the DSP24 PCI-card, it will use the clock that is selected here. The Rate Locked option is used to force the card to a specific samplerate. It is disabled by default (which is also our recomendation) which automatically allows your application software access to all supported samplerates. When the option is enabled, your software will only work with the selected sample rate. This means that any application that attempts to use the driver at a different sample rate will show an error message. Reset Rate After Play should be selected when you want the sample rate to return to a specific setting after software has finished using the card for playback and/or recording. This is especially important if your external device that is connected to the digital output of the card, is synced to the DSP24 card. If you just use the analog outputs, the selected samplerate and the Reset Rate After Play option are not important when the card is not used by your software at the moment.
Device Settings
The Device Settings tab controls the options needed for playback and recording.
Under Waveout Driver you can select the MME/ASIO buffer size (latency). The smaller the selected value is, the smaller the resulting latency of the ASIO driver will be (and the other way round). You might notice the latency when you perform some action inside your ASIO application (e.g. you are using a VST instrument in Cubase VST): the result of your action will be audible with a certain delay - the latency.
You have to keep in mind that a smaller latency also increases the PC utilization, and might have some influence on the performance (very much depending on the PC configuration). A buffer size that is too small may result in clicks or drop outs in the audio signal. Larger buffers could prevent
- 33 -
ST AUDIO DSP3000 M-Port (DSP24 + ADC&DAC3000)
this. This buffer size should be set in the dialog box before you launch your music software. In some ASIO applications it is important to re-launch the software even if you have changed the buffer size via the ASIO control panel inside the application. We strongly recommend this for Logic SoundTrack24 and other versions of Logic Audio from Emagic for example but it is also recommended for all other ASIO applications.
The WaveDriver setting under the MME/ASIO buffer allows you to change the latency of the MME driver in ms for Windows 2000/XP (this setting is sometimes not needed, depending on the driver version).
The MME drivers of the DSP24 card automatically synchronize the beginning of recording and playback for all audio devices. For some software applications that are using several MME devices simultaneously, you should select Single and In-Sync under MultiTrack Wave Drivers to ensure that all channels will begin playback and/or recording at exactly the same time. Otherwise select Independent - this allows you to use the cards MME devices with more than one application at the same time.
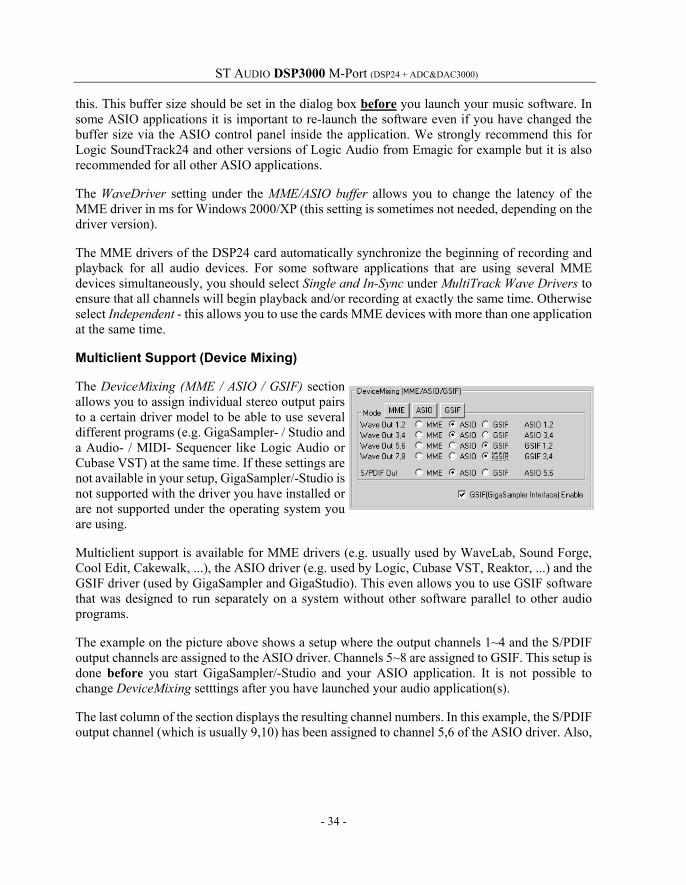
Multiclient Support (Device Mixing)
The DeviceMixing (MME / ASIO / GSIF) section allows you to assign individual stereo output pairs to a certain driver model to be able to use several different programs (e.g. GigaSampler- / Studio and a Audio- / MIDI- Sequencer like Logic Audio or Cubase VST) at the same time. If these settings are not available in your setup, GigaSampler/-Studio is not supported with the driver you have installed or are not supported under the operating system you are using.
Multiclient support is available for MME drivers (e.g. usually used by WaveLab, Sound Forge, Cool Edit, Cakewalk, ...), the ASIO driver (e.g. used by Logic, Cubase VST, Reaktor, ...) and the GSIF driver (used by GigaSampler and GigaStudio). This even allows you to use GSIF software that was designed to run separately on a system without other software parallel to other audio programs.
The example on the picture above shows a setup where the output channels 1~4 and the S/PDIF output channels are assigned to the ASIO driver. Channels 5~8 are assigned to GSIF. This setup is done before you start GigaSampler/-Studio and your ASIO application. It is not possible to change DeviceMixing setttings after you have launched your audio application(s).
The last column of the section displays the resulting channel numbers. In this example, the S/PDIF output channel (which is usually 9,10) has been assigned to channel 5,6 of the ASIO driver. Also,
- 34 -

ST AUDIO DSP3000 M-Port (DSP24 + ADC&DAC3000)
the channels 5~8 are assigned to channels 1~4 of the GSIF driver. This assignment is needed, because the DSP24 driver simulates a normal audiocard interface in the different driver models for the applications. This prevents compatibility issues with certain audio applications.
It is not recommended to change this setup often, as the different applications will also save the channel assignments internally. If you change the settings in the DeviceMixing section, it is wise to double-check the soundcard setup inside the audio apps you are using after that. These options have been invented because of the demand from the users to be able to use GigaSampler/Studio simultanously to famous Audio-/MIDI-Sequencer software. We strongly recommend to use at least v1.64 of GigaSampler or v2.2 of GigaStudio in order to use the multiclient support. The performance may not be as good when using earlier versions of the software. GigaStudio 2.2 and above will give you best performance. For Windows 2000/XP, you need at least version 2.5 of GigaStudio. GigaSampler is not supported under Windows 2000/XP.
Etc. section
Under the Etc. tab, the option Multi Channel Device Support allows you to playback audio signals on multiple audio channels simultaneously over one wave device (a possibility that is used by DVD player applications such as WinDVD or PowerDVD
for example). Unless you are using a software that plays multiple audio channels via one MME audio device, you don't need to enable this option.
Internal Mixer
Clicking on Call Internal Mixer in the File menu inside External Links will launch the Windows Mixer (SNDVOL32.EXE) to control the Internal Mixer section of the card.
The Internal Mixer on the DSP24 PCI-card represents basically an additional soundcard which has been 'added' to the audiocard functions. You can use this section to play Windows sounds, or the metronome from a sequencer. You can also use it for consumer applications such as games, or for internet phone usage. Since the Internal Mixer even supports DirectSound, you can use it also for some conventional software synthesizer applications. The Windows Mixer is used to control these functions. These functions are represented by an AC-97 codec chip that is on your DSP24 PCI-card. AC-97 has been defined as standard by Intel for consumer audio applications on modern PCs. The AC-97 codec ST Audio is using works with a 18bit ADC, a 18bit DAC and an analog mixer. The output signal of the Internal Mixer is audible via the 1/8" line-out on the PCI-card.
Note: The Internal Mixer output signal is not audible via the outputs of the external box.
- 35 -

ST AUDIO DSP3000 M-Port (DSP24 + ADC&DAC3000)
Practically you would never use the Internal Mixer for high quality recording or playback for music creation. However, the Internal Mixer is a great feature that allows you to have the basic functions of a normal soundcard (e.g. for Windows system sounds) when needed.
The following channels are available:
Master Controls the Master output volume of the Internal Mixer. This signal is sent out via the 1/8" output on the PCI-card.
Wave Controls the Wave volume. The signal you play via the MME device ADSP24 Int. WaveOut is controlled here. Signals from pro audio applications (using ASIO or GSIF for example) are not sent controlled by the Internal Mixer of course. By default this device is selected as output for Windows system sounds under Control Panel > Multimedia > Audio > Prefered playback device. Of course you can change this if you do not want the Windows system sounds to be played via the 1/8" output of the PCI-card, still: we recommend it.
Mic Controls the volume of the 1/8" mic input on the DSP24 PCI-card. Line In Controls the volume of the 1/8" line input on the DSP24 PCI-card. CD In Controls the volume of the internal analog CD input (3-pin).
- 36 -

ST AUDIO DSP3000 M-Port (DSP24 + ADC&DAC3000)
VII. Usage with software applications For each application you are using with the DSP3000 M-Port you have to follow some configuration steps. Basically, every stereo input or output channel of the card can be used like a normal soundcard using the corresponding devices. Normally every program will have a configuration function where you can select the devices.
Available in- and output devices
The available wave devices for playback and recording are:
• ADSP24 Int. WaveOut – plays audio data through the Internal Mixer (through the 1/8" line output on the PCI-card). Note that this driver only supports 16bit/48kHz as maximum resolution and samplerate. Also note: if you use the WDM driver (Windows 2000/XP), the name of this device is ADSP24 Int. Audio Device.
• ADSP24 Ext. WaveOut 1/2 – first stereo wave output device. Use this driver to play audio through output channels 1/2. Please note: if you use the WDM driver (Windows 2000/XP), the name of this device is ADSP24 Ext. 1/2 Audio Device.
• ADSP24 Ext. WaveOut 3/4 – second stereo wave output device. Use this driver to play audio through output channels 3/4. Please note: if you use the WDM driver (Windows 2000/XP), the name of this device is ADSP24 Ext. 3/4 Audio Device.
• ADSP24 Ext. WaveOut 5/6 – third stereo wave output device. Use this driver to play audio through output channels 5/6. Please note: if you use the WDM driver (Windows 2000/XP), the name of this device is ADSP24 Ext. 5/6 Audio Device.
• ADSP24 Ext. WaveOut 7/8 – fourth stereo wave output device. Use this driver to play audio through output channels 7/8. Please note: if you use the WDM driver (Windows 2000/XP), the name of this device is ADSP24 Ext. 7/8 Audio Device.
• ADSP24 Ext. S/PDIF Out – plays audio through the stereo S/PDIF digital output (optical, coaxial and also AES/EBU). Please note: if you use the WDM driver (Windows 2000/XP), the name of this device is ADSP24 Ext. SPDIF Device.
• ADSP24 Int. Record – records the signal from Internal Mixer. Use this driver to record from the internal CD or Aux input or from the 1/8" inputs on the card. Note that this driver only supports 16bit/48kHz as maximum resolution and samplerate. Also note: if you use the WDM driver (Windows 2000/XP), the name of this device is ADSP24 Int. Audio Device.
• ADSP24 Ext. Input 1/2 –stereo input driver to record signals from input channel 1/2. Please note: if you use the WDM driver (Windows 2000/XP), the name of this device is ADSP24 Ext. 1/2 Audio Device.
- 37 -

ST AUDIO DSP3000 M-Port (DSP24 + ADC&DAC3000)
• ADSP24 Ext. Input 3/4 –stereo input driver to record signals from input channel 3/4. Please note: if you use the WDM driver (Windows 2000/XP), the name of this device is ADSP24 Ext. 3/4 Audio Device.
• ADSP24 Ext. Input 5/6 –stereo input driver to record signals from input channel 5/6. Please note: if you use the WDM driver (Windows 2000/XP), the name of this device is ADSP24 Ext. 5/6 Audio Device.
• ADSP24 Ext. Input 7/8 –stereo input driver to record signals from input channel 7/8. Please note: if you use the WDM driver (Windows 2000/XP), the name of this device is ADSP24 Ext. 7/8 Audio Device.
• ADSP24 S/PDIF In – records signal from the S/PDIF input (optical, coaxial or AES/EBU). Please note: if you use the WDM driver (Windows 2000/XP), the name of this device is ADSP24 Ext. SPDIF Device.
• ADSP24 Digital Mixer – with this driver you can record the output signal of the integrated digital mixer. This can be used to record output signals from one application in another program for example. Please note: if you use the WDM driver (Windows 2000/XP), the name of this device is ADSP24 Ext. Mixer Device.
Additionally, the card provides an ASIO 2.0 driver called ADSP24 ASIO. It allows access to all input and output channels simultaneously in applications that support ASIO (like Cubase VST or Logic Audio). ASIO allows applications to record and playback at a very low latency (down to 2ms). This means that it is possible to apply realtime effects with your systems CPU input or output signals. Also, you can use software synthesizers to output through ASIO.
Please note that most applications will need special settings to ensure that the DSP3000 M-Port is working properly. We are continuously testing the card with various popular applications. In the following sections we have provided examples for the software that is bundled with the DSP24 hardware and for a few additional famous audio applications. Please take the time to review it to avoid problems later. Note that we are providing more detailed information about the programs, updated tips and tricks and recommended settings for many other audio applications on our website www.STAUDIO.com in the Knowledge Base section.
Windows default audio devices
Quite a number of applications are using the default wave and MIDI devices that are selected in the Windows Control Panel. The default wave playback device is used to playback the Windows system sounds. It is also used as default output device for most audio applications. Some programs (e.g. the Windows Media Player) are using the default playback device only and provide no options to change the settings inside the program. Other applications (e.g. Logic SoundTrack24 or Cubase VST by Steinberg) provide their own setup dialogs for the audio hardware.
- 38 -

ST AUDIO DSP3000 M-Port (DSP24 + ADC&DAC3000)
Windows Me / 2000 / XP
Under Windows Me, 2000 and XP the default wave and MIDI devices are selected via Control Panel > Sounds & Multimedia > Audio (under Windows XP we recommend to switch the Control Panel to Classic View in order to access the Sounds & Multimedia dialog as described).
For playback you usually select one of the following devices as Default device:
• ADSP24 Ext. 1/2 Audio Device – to playback (up to) 24bit/96kHz via output channel 1/2 of the external box.
• ADSP24 Int. Audio Device – to playback signals via the 1/8" line out on the card (e.g. to provide compatibility to consumer applications such as games). This selection is strongly recommended by us if you use audio applications with ASIO or GSIF support under Windows 2000/XP.
• ADSP24 Ext. SPDIF Device – to playback signals via the digital outputs.
For Sound recording you usually select one of the following devices:
• ADSP24 Ext. 1/2 Audio Device – to record (with up to 24bit/96kHz) from input channel 1/2 of the external box.
• ADSP24 Int. Audio Device – to record signals from the onboard connectors of the PCI-card (e.g. for speech recognition software or for internet telephone applications).
• ADSP24 Ext. SPDIF Device – to record signals from the optical or coaxial S/PDIF or the AES/EBU input.
- 39 -

ST AUDIO DSP3000 M-Port (DSP24 + ADC&DAC3000)
Windows 95 / 98 / 98 SE
Under Windows 95 / 98 / 98 SE, the default wave devices are selectable under Control Panel > Multimedia > Audio. As Prefered device for Playback, you would select:
• ADSP24 Ext. 1/2 WaveOut1/2 – to playback (up to) 24bit/96kHz via output channel 1/2 of the external box.
• ADSP24 Int. WaveOut – to playback signals via the 1/8" line out on the card (e.g. to provide compatibility to consumer applications such as games). If you experience problems (e.g. crackling sound or dropouts) with the setting, you can reduce the Performance value under Advanced Properties.
• ADSP24 Ext. S/PDIF Out – to playback signals via the digital outputs.
Under Recording, this would be typical selections:
• ADSP24 Ext. Input 1/2 – – to record (with up to 24bit/96kHz) from input channel 1/2 of the external box.
• ADSP24 Int. Record – to record signals from the onboard connectors of the PCI-card (e.g. for speech recognition software or for internet telephone applications).
• ADSP24 S/PDIF In – to record signals from the optical or coaxial S/PDIF or the AES/EBU input.
- 40 -

ST AUDIO DSP3000 M-Port (DSP24 + ADC&DAC3000)
Setting up Emagic Logic SoundTrack24
Logic SoundTrack24 is a special version of the Logic Software from Emagic, designed to be used with the DSP24 series of audiocards. It can use the ASIO driver of the DSP3000 M-Port for recording and playback. Please note that Logic SoundTrack24 v4.2 only works under Windows 9x/Me. The newer v4.8 of Logic SoundTrack24 also supports Windows 2000/XP. To install it, you need to launch SETUP.EXE from the separate Logic SoundTrack24 CD that was included with your DSP3000 M-Port.
• call the H/W setting dialog inside the External Links software.
• under Device Settings select the ASIO buffer size: we recommend using a value of about
1024 – depending on the system performance. • click on the ASIO button under Device Mixing. • make sure the option Rate Locked under Clock Settings is disabled • set the option MultiTrack Wave Drivers to Independent (under Clock Settings) • launch Logic SoundTrack24 and select the option Audio>Audio Hardware & Drivers.
• select Audio & Hardware Drivers and select ASIO ADSP 24 as ASIO device. If you want to
work with 24-bit resolution, enable the option 20/24 Bit Recording. • exit Logic and launch it again to activate the settings. Please also refer to the documentation of Logic SoundTrack24 that you can find on the included Logic SoundTrack24 CD.
- 41 -

ST AUDIO DSP3000 M-Port (DSP24 + ADC&DAC3000)
When using Logic SoundTrack24, we recommend to monitor audio signals from output 1/2 on the back of the external box. In that case you can use the digital mixer of the DSP3000 M-Port hardware to control the monitoring and the signal levels for playback. In order to use this setup, you need to patch Ext. Mixer to Output 1/2 in External Links before you launch Logic. Please refer to the EXTERNAL LINKS section in this manual for further reference.
- 42 -

ST AUDIO DSP3000 M-Port (DSP24 + ADC&DAC3000)
Setting up Steinberg Cubase VST/32 5.1
Cubase VST/32 5.1 from Steinberg uses the ASIO specification to access recording hardware. Steinberg has defined ASIO and improved support for recording multiple channels at the same time. ASIO features reduced latency for playback of VST plugins and instruments. Please note, that other Steinberg programs (like smaller versions of Cubase, Nuendo, Cubasis VST or the newer Cubase SX) have a very similar setup when using the ASIO driver. To setup the DSP3000 M-Port in Cubase VST/32 5.1, please follow these steps:
• Call the H/W setting dialog inside the External Links software.
• Select the ASIO buffer size. On faster systems (Pentium III, Athlon) it is usually safe to use
512 as a small setting. On other systems you may try this setting but increase the buffer size later, depending on the performance. Also you can decrease the buffer size but please test if the performance is OK on your specific system.
• Click on the ASIO button under Device Mixing. • Under Windows XP/2000 only: launch SetupMME (in the Cubase folder of your startmenu)
and disble Microsoft GS Synthesizer as MIDI output device. • Start Cubase VST and goto Options > Audio
Setup > System. • In the section Audio Performance, set Number
of Channels to 16 (recommended). • In the Monitoring section, select Global
Disable (recommended, see below). • In the upper right corner under ASIO Device
select ADSP24 ASIO. • Below that you can choose the Sample Rate. • If you want to use the DSP24’s realtime
monitoring functions (without adding effects to the monitor signal), select ASIO Direct Monitoring (see below).
- 43 -

ST AUDIO DSP3000 M-Port (DSP24 + ADC&DAC3000)
To define which input and outputs to use in Cubase VST, first go to Panels > VST-Inputs. A window will appear that allows you to activate or deactivate each input (stereo).
Please note that the default names for the input channels might be a bit confusing as they are separating the left and right audio channels. For example: input channel 1/2 of the DSP3000
M-Port is called by default IN1 L and IN1 R. The names IN2 L and IN2 R are used for input channel 3/4. You can either keep that in mind when working with Cubase VST or you can simply change the names, e.g. to IN 1 and IN 2 (etc.).
To be able to record multiple tracks of audio simultaneously in Cubase VST, you need to follow a number of steps. First, select Options > Multirecord > Active (make sure it is checked and enabled). After that you can enable and disable recording indivdually for each audio track by clicking in the R column of the arrangement window. When you do this for the first time, Cubase will ask you for the directory to store your audio files.
The VST Channel Mixer (via Panels > VST Channel Mixer or Audio > Monitors under Cubase VST 3.xx) is probably the best ways to assign the physical inputs to the specific audiotracks. Just click and hold the left mouse button on the grey channel button on top of each audio channel (it shows the currently assigned input – e.g. IN1 R or IN 1). A small menu will appear that allows you to select the physical input. Note: under Cubase VST 3.xx you need to hold the CTRL-key while you click on this button.
To assign audio channels or other signals (e.g. the output of an effect plugin) to the physical outputs, you need to activate the output busses under Panels > Master (Audio > Master under Cubase VST 3.xx). This window allows you to activate a stereo bus for each physical stereo output. These busses can be used internally in Cubase VST to route signals to the outputs (the black options with yellow writing, e.g. in the VST Channel Mixer). You can find more information about this in the Cubase VST documentation.
The latest updates for Cubase VST can be downloaded from http://www.steinberg.de. We recommend to use at least version 3.72 under Windows 9x/Me, at least version 5.0 under Windows 2000 and at least version 5.1 under Windows XP.
- 44 -

ST AUDIO DSP3000 M-Port (DSP24 + ADC&DAC3000)
Montoring
If you disable the internal monitoring function from Cubase (Audio System Setup > Global Disable), the monitoring (= what you hear) will be controlled by the DSP3000 hardware. Open External Links and connect Ext.Mixer to Output 1/2. Now the digital mixer of the DSP3000 M-Port controls the complete monitoring of all input and all output signals. Just use the External Mixer to change the playback volume.
Alternativly you can bypass the DSP24 hardware mixer and use Cubase VST as mixer. The advantage is that you have more flexible mixer controls and you can work completely inside Cubase VST. Also it is possible to assign realtime effects (e.g. plugins) on incoming audio signals. The negative aspect is the increased CPU load with this setup.
To bypass the hardware mixer, connect WaveOut 1/2 to Output 1/2 inside External Links. Inside Cubase, select Tape Type as monitoring option in the Audio System Setup dialog. If you want to listen to an input signal, just click on the grey channel button in the VST Channel Mixer of the corresponding channel. The button will turn yellow to show that the input signal of this channel gets monitored in realtime. If you have assigned a certain effect or plugin to this channel, you can hear the processed signal. The limitation is that the signal gets delayed by the latency because it first gets recorded, then processed and then sent to the output.
If you want to monitor incoming signals in realtime without any delay (zero latency), you can do this by activating the ASIO Direct Monitoring checkbox in the Cubase VST Audio System Setup dialog. Cubase VST will then remotly control External Links.
- 45 -

ST AUDIO DSP3000 M-Port (DSP24 + ADC&DAC3000)
Setting up Cakewalk SONAR 1.3.1
Cakewalk SONAR is the first popular audio software that uses special features of the new WDM driver model by Microsoft that was introduced with Windows 98 SE. Other operating systems that support WDM are: Windows ME, Windows 2000 and Windows XP. Older versions of Windows (NT 4.0, 98, 95) do not support WDM drivers. This means that it is strongly recommended to use the WDM drivers. SONAR will also work with the MME interface of the VXD drivers (Windows 9x/Me) but the performance will not be very good. Please also note that it is strongly recommended to use at least version 1.3.1 of SONAR. You can get free updates for the software if you use an older version. Last but not least, the performance under Windows XP is noticably better compared to the other Windows versions according to our tests.
After launching SONAR, please click on Options > Audio to open the Audio Options dialog. All important settings related to the audiocard are made in this dialog. When you launched SONAR for the first time, you have been prompted to launch the Wave Profiler. If you have not completed this before, please click on the Wave Profiler... button now and follow the instructions on screen.
Please go to the Drivers section.
Separated into input and output devices, you can select the wave devices you want to use for recording and playback. These lists will show the devices of all soundcards that are installed in your PC.
Please check these issues when you are selecting the devices:
• do not select ADSP24 Int. Audio Device for recording or playback
• please do not select devices from other soundcards if present
• select ADSP24 Ext. SPDIF Device only if you need to use the digital output (for playback) or the digital input (for recording)
Now move to the General section. Please make the following settings:
- 46 -
ST AUDIO DSP3000 M-Port (DSP24 + ADC&DAC3000)
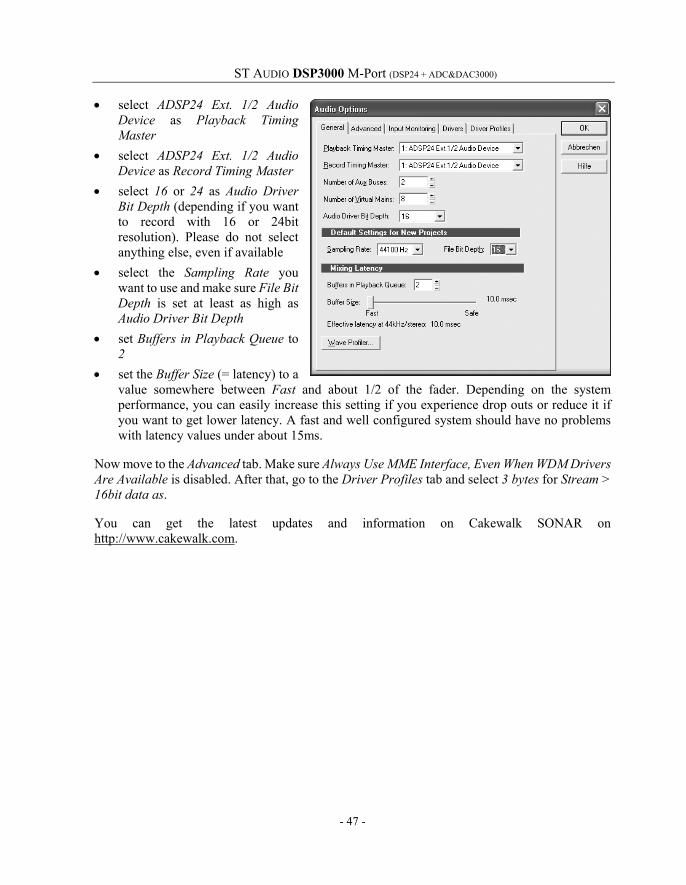
• select ADSP24 Ext. 1/2 Audio Device as Playback Timing Master
• select ADSP24 Ext. 1/2 Audio Device as Record Timing Master
• select 16 or 24 as Audio Driver Bit Depth (depending if you want to record with 16 or 24bit resolution). Please do not select anything else, even if available
• select the Sampling Rate you want to use and make sure File Bit Depth is set at least as high as Audio Driver Bit Depth
• set Buffers in Playback Queue to 2
• set the Buffer Size (= latency) to a value somewhere between Fast and about 1/2 of the fader. Depending on the system performance, you can easily increase this setting if you experience drop outs or reduce it if you want to get lower latency. A fast and well configured system should have no problems with latency values under about 15ms.
Now move to the Advanced tab. Make sure Always Use MME Interface, Even When WDM Drivers Are Available is disabled. After that, go to the Driver Profiles tab and select 3 bytes for Stream > 16bit data as.
You can get the latest updates and information on Cakewalk SONAR on http://www.cakewalk.com.
- 47 -
ST AUDIO DSP3000 M-Port (DSP24 + ADC&DAC3000)
Setting up Native Instruments Traktor DJ Studio
The Traktor DJ Studio by Native Instruments is a professional DJ mixing software that integrates two independand players and many extremly useful functions like the beat matcher, a very nice digital scratcher or special filter effects. To use the software in a professional envrionment, a multichannel audiocard with several separate and independand output channels like the DSP3000 M-Port is needed. In this setup example, we will use channel 1/2 as stereo monitor output (for headphone monitoring) and channel 3/4 as separate and independand stereo output for the main audio signal.
First we have to assign the output channels for independand playback inside External Links. In order to do that, please connect WaveOut 1/2 with Output 1/2 (this channel will be used for headphone monitoring) and WaveOut 3/4 to Output 3/4 (this will be used as output for the master playback). Now connect your headphones to the headphone output on the external box and your amplifier / speakers to output 3 (left) and output 4 (right) on the back of the external box.
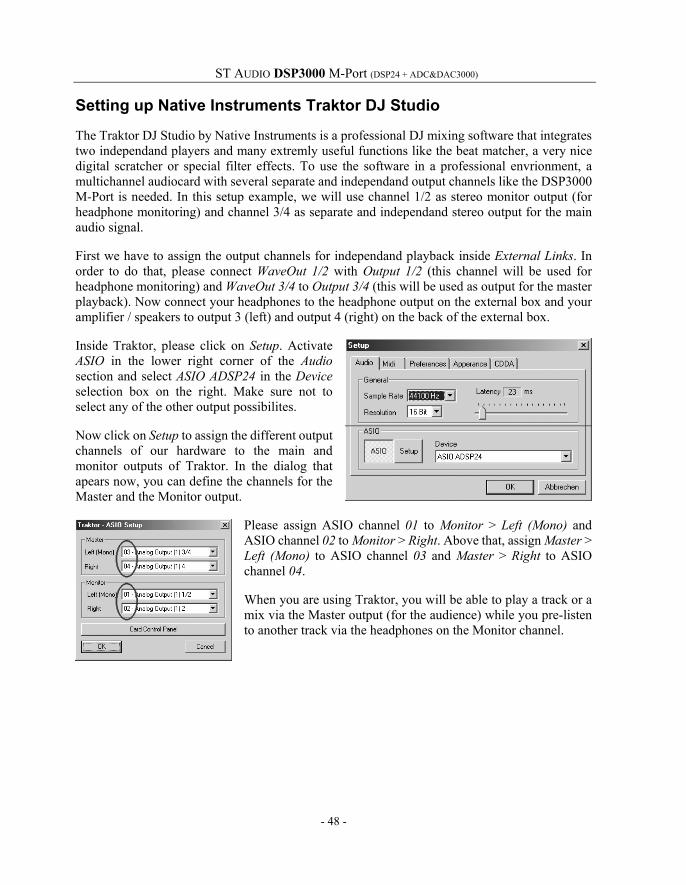
Inside Traktor, please click on Setup. Activate ASIO in the lower right corner of the Audio section and select ASIO ADSP24 in the Device selection box on the right. Make sure not to select any of the other output possibilites.
Now click on Setup to assign the different output channels of our hardware to the main and monitor outputs of Traktor. In the dialog that apears now, you can define the channels for the Master and the Monitor output.
Please assign ASIO channel 01 to Monitor > Left (Mono) and ASIO channel 02 to Monitor > Right. Above that, assign Master > Left (Mono) to ASIO channel 03 and Master > Right to ASIO channel 04.
When you are using Traktor, you will be able to play a track or a mix via the Master output (for the audience) while you pre-listen to another track via the headphones on the Monitor channel.
- 48 -
ST AUDIO DSP3000 M-Port (DSP24 + ADC&DAC3000)
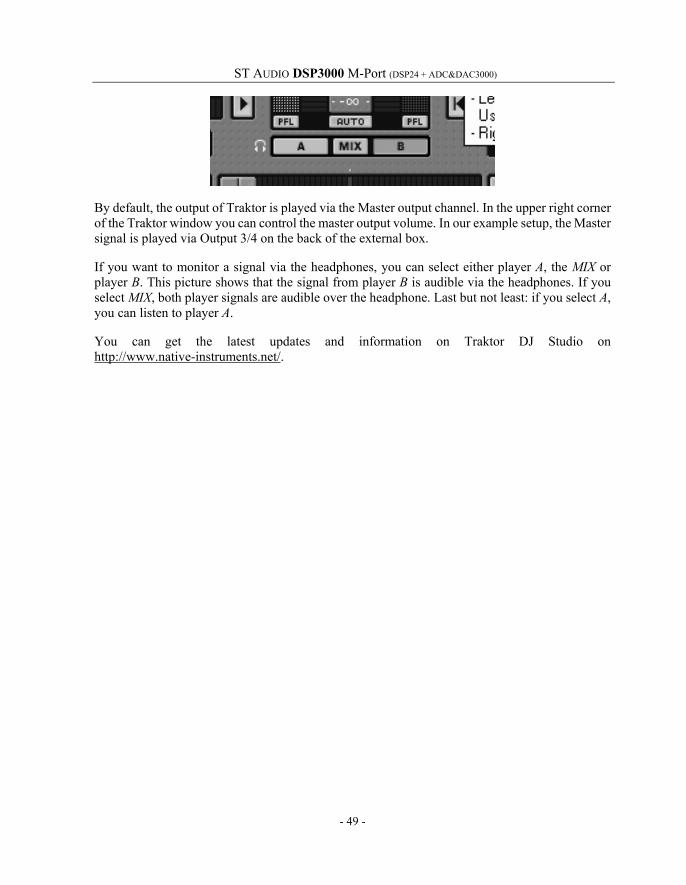
By default, the output of Traktor is played via the Master output channel. In the upper right corner of the Traktor window you can control the master output volume. In our example setup, the Master signal is played via Output 3/4 on the back of the external box.
If you want to monitor a signal via the headphones, you can select either player A, the MIX or player B. This picture shows that the signal from player B is audible via the headphones. If you select MIX, both player signals are audible over the headphone. Last but not least: if you select A, you can listen to player A.
You can get the latest updates and information on Traktor DJ Studio on http://www.native-instruments.net/.
- 49 -

ST AUDIO DSP3000 M-Port (DSP24 + ADC&DAC3000)
VIII. Troubleshooting / FAQ This chapter addresses common questions to solve possible problems and avoid conflict with other PC hardware or specific system configurations.
Q: What are the minimum system requirements? A: The card will work on a 100% PCI 2.1 compilant mainboard with Intel Pentium 133MHz CPU (or higher / compatible) and at least 32 MB of memory. We strongly recommend to use at least an Intel Celeron, Pentium II or AMD Duron CPU and 128 MB of memory to be compatible with currrent audio software. Also note: the software you are using may have even higher system requirements.
Q: Can I use the card with an AMD Athlon / Duron / Thunderbird CPU? Will it work with a VIA Cyrix CPU? A: Yes, of course! There are no compatibility issues with microprocessors. Please also check the following question about VIA chipsets, as many mainboards for AMD and VIA CPUs are based on VIA chipsets.
Q: What about VIA chipsets? Can I use my VIA chipset based mainboard with the card? A: Yes, you can use VIA based systems with the DSP24 series of cards. Unlike with some other chipsets, the configuration in this case is more 'sensitive' and the system needs to be properly configured to avoid possible trouble: Please make sure the DSP24 PCI card gets a unique and unshared IRQ. Secondly, a recent version of the VIA 4-in-1 driver (we recommend at least v4.31) and the VIA USB Filter driver must be installed (check http://www.via.com.tw/ or the website of your mainboard manufacturer). If you are using Windows 98SE with USB enabled, Microsoft's UHCD Update should be used as well (do a search for 'uhcd.sys' on Microsoft's Knowledge Base). Please check if there is an update for the BIOS of your mainboard ... if so, please download and use it. On mainboards with the KT133 and KT133A chipset, you must use high quality 133MHz memory modules only. Also check the correspsonding setting in your BIOS (it should be set to 133MHz) and make sure the memory timing is not set to an incorrect (e.g. too low) value. Set PCI DELAY TRANSACTION in your BIOS to DISABLED. Then, set PCI DEVICE LATENCY TIMER to a value of 32 or lower. PCI MASTER READ CACHING should be set to DISABLED as well (could cause performance problems, but because of the VIA southbridge bug, this setting is required). Last but not least, we recommend to disable all power managment related functions.
Check the service section on www.STAUDIO.com from time to time to get more updated info on this topic.
- 50 -

ST AUDIO DSP3000 M-Port (DSP24 + ADC&DAC3000)
Q: Is it possible to install this card in a system with onboard-sound or another soundcard? A: Yes! As long as the other soundchip does not use a Envy24 / ICE17xx, there should be no problems. You should make sure that both devices do not share their IRQ. You can use two, three or four DSP24 cards in one system of course. It is also no problem when they share their IRQs.
Q: How many available IRQs do I need to use the card? A: Exactly one. It should be unshared if possible, because the DSP24 is a busmaster device ... otherwise you might get performance problems. It does not matter which IRQ number has been assigned to the card.
Q: I have read that the card is full duplex, but I can't do simultaneous record and playback with Cakewalk! A: Simultaneous record and playback needs to be enabled in Cakewalk Pro Audio. In the software, go to Settings > Audio Options > Advanced and make sure Enable simultaneous record and playback is checked.
Q: I am using Cubase VST 5.x and I'm going crazy: always when I change a setting inside External Links or the mixer, the playback suddenly stops! A: Make sure the menu entry Options > Active in Background is checked inside Cubase. This is a general Cubase setting and not related to the audiocards driver.
Q: I am using Cubase VST 3.xx and I'm going crazy: always when I change a setting inside External Links or the mixer, the playback suddenly stops! A: Goto File > Preferences and make sure that Active in Background is checked for MIDI and Audio. This is a general Cubase setting and not related to the audiocards driver.
Q: I am using Cubase VST 5.x and it crashes or I get an error message as soon as I select the ASIO driver under Windows 2000 / XP.
A: Launch SetupMME (inside the Steinberg folder of your Start-menu) and disable Microsoft GS Wavetable Synth as MIDI device. We also recommend to set ADSP24 Int. Audio Device as prefered playback device in Control Panel > Sounds & Multimedia > Audio.
Q: I am using Nuendo under Windows 2000 / XP and it crashes or I get an error message as soon as I select the ASIO driver.
A: Please set ADSP24 Int. Audio Device as prefered playback device under Control Panel > Sounds & Multimedia > Audio. Then reboot the system and launch Nuendo again.
- 51 -

ST AUDIO DSP3000 M-Port (DSP24 + ADC&DAC3000)
Q: I am using Logic Audio 4.8.x or 5.0 under Windows 2000 / XP and it crashes as soon as I select the ASIO driver and re-launch Logic.
A: Please set ADSP24 Int. Audio Device as prefered playback device under Control Panel > Sounds & Multimedia > Audio. Then reboot the system and launch Logic again.
Q: When recording or playing audio, I get an audible click about every 3 to 5 seconds. Is the hardware defective? A: No! First of all, check the following two settings (under Windows 9x/Me): Make sure the 'auto-play' function for CD-ROMs is disabled. Goto Control Panel > System > Device Manager > CD-ROM and select Properties for all CD-ROM drives. Now disable Auto Insert Notification under Settings. DMA access for your IDE HDDs must be enabled. Goto Control Panel > System > Device Manager > Disk Drives and select Properties for each IDE-HDD you have installed (an entry is typically called GENERIC IDE DISK TYPExx). Now enable DMA under Settings. Please check these settings from time to time. Some Windows installations 'loose' the DMA and CD-ROM notification settings when you are changing certain elements in the hardware configuration or if you boot Windows in Safe Mode. Under Windows 2000/XP, please check the next section in this chapter with more details about optimizing your system for audio editing and recording.
Q: I can hear cracks and noise when I play my recorded audio signal! Is this a hardware problem? A: In most cases this problem can be solved by changing the interrupt which has been assigned to your hardware. Check in Control Panel > System > Device Manager > Computer > Properties if there is another hardware component using the same interrupt as the DSP24 PCI-card (it should have its own interrupt, especially on mainboards using the VIA chipset). Except an IRQ-Holder (IRQ steering) entry, no other device should be listed with the same IRQ number. If you find such a problem, you usually have to install the DSP24 PCI card into a different PCI slot. On some mainboards you can change the IRQ assignment inside the BIOS of your mainboard.
Q: I can hear noise when I move a window or fader on screen inside my audio application. I am using an ATI Rage 128 graphic card. A: Please download and install current drivers for your graphic card and set the bit-depth to 32bit (not lower). This will reduce the system load the graphic card is causing.
Q: I can hear noise when I move a window or fader on screen inside my audio application. I am using an Matrox Millenium/Mystique/G200 card. A: Please download and install current drivers for your grpahic card. Inside the Matrox specific options you can find a setting called Busmastering - please disable it.
- 52 -

ST AUDIO DSP3000 M-Port (DSP24 + ADC&DAC3000)
Q: Can I use Logic SoundTrack24 under Windows 2000/XP? A: You need at least version 4.8 of Logic SoundTrack24 (also called "Volume2") in order to use it under Windows 2000/XP. The older release v4.2 (sometimes called "Volume1") only supports Windows 9x/Me. Please contact ST Audio and/or your local distributor to get more information on this topic.
Q: I am not able to change the MME / ASIO / GSIF settings for the multiclient driver in the Hardware Settings dialog. A: These settings are not available when the driver that is installed currently does not support multiclient operation for GigaSampler-/Studio. Check www.STAUDIO.com to get more information about this topic and updated drivers.
Q: Why do I get error messages that the ASIO Multimedia test/configuration failed using Cubase VST, Cubase SL/SX, Cubasis VST or Nuendo from Steinberg? A: This test is done by the ASIO Multimedia driver from Steinberg that simulates ASIO for soundcards without ASIO support. It would disappear as soon as this driver is configured properly. However, as the DSP24 series of cards have their own ASIO driver for Windows 9x/Me/2000/XP, you don't need to run this test at all. Just select the ASIO driver (ASIO ADSP24) and then the ASIO Multimedia driver will no longer be used.
Q: Can I input a signal into the ADC&DAC3000 at fixed line level (to bypass the preamp)? A: No, this is not directly possible to allow full independand gain/level control for each input channel. However, if you really need a fixed line level input without the desire to adjust the input gain, you can use the effect insert connector of that channel as unbalanced line level input. If you use a normal "insert-cable", the 1/4" TRS connector needs to be plugged into the insert of the ADC&DAC3000 and the 1/4" connector connected to the "ring" will be your input.
Windows 2000 / XP system optimization
This section deals with the most important issues related to the installation and configuration of Windows 2000 / XP.
ACPI
The Automatic Configuration Power Interface (ACPI) functionality of Windows 2000 / XP can be very critical on PCs dedicated to HD-recording. If ACPI is enabled, Windows 2000 / XP will use one IRQ (usually 9, sometimes 11) for all PCI and all onboard devices in your system. IRQ sharing generally is not a big problem for modern PCI devices. However, it always affects the performance. As we want that your DSP24 PCI card works with
- 53 -
ST AUDIO DSP3000 M-Port (DSP24 + ADC&DAC3000)
best possible performance, IRQ sharing should be avoided. In the case of ACPI, the IRQ sharing sometimes even causes bigger conflicts if one of the other devices in the system have problems with ACPI installations. One example: some graphic cards with nVidia chipsets are known to cause system crashes or at least performance problems of the DSP24 card when they share their IRQ with our hardware.
When you are installing Windows 2000 / XP, disabling ACPI is very easy. Before you install Windows, check your BIOS for the PNP OS INSTALLED setting. Set it to NO or DISABLED. During the installation process, you can select the Standard-PC HAL (Hardware Abstraction Layer) instead of the ACPI-PC HAL. To select this HAL, you need to hit F6 when you are asked to install updated device drivers for HDD controllers (SCSI, ...). Then hit F5 to choose Standard-PC.
If Windows 2000 / XP is already installed, it is also possible to replace the ACPI-PC HAL with the Standard-PC HAL. It is important to know that the process that is described in the next few lines is risky in certain configurations and not recommended at all. To stay on the safe side, it is better to directly re-install Windows 2000 / XP as described above with Standard-PC.
Make sure that the PNP OS INSTALLED setting in your BIOS is disabled. No open the Device Manager (Control Panel > System > Hardware > Device Manager). Check the Computer section. Under it, you will see an entry that is called ACPI-PC when ACPI is enabled. When ACPI is not enabled, you will see an entry called Standard-PC instead (as on the picture on the previous page).
Now double click on ACPI-PC. Continue with Driver > Update Driver > Display a list of the known drivers for this device > Show all hardware of this device class. In the list dialog, you can select Standard-PC now. Confirm your selection. Windows 2000 / XP will reboot your system after that. Note that all device drivers for all your hardware components are re-installed then because the IRQ assignment from your BIOS will be used. Once the process is completed, check the Device Manager again. It should have a Standard-PC entry as on this picture now.
Please note that Windows XP is not installed by default with the ACPI-PC HAL on most systems (unlike Windows 2000). Microsoft obviously noticed that ACPI installations are still causing too many performance and configuration issues.
Note: if you own a modern Intel Pentium 4 or AMD Athlon mainboard based on a SiS chipset, we do not recommend to use the Standard-PC HAL. The reason is the implementation of the SiS 645/735/745 chipset drivers that cause severe performance problems with the onboard IDE-controller. Please continue to use the ACPI-PC HAL if you use a SiS chipset based motherboard.
Please always check the service section on www.STAUDIO.com from time to time to get more updated info on this topic. With the release of new mainboards and other PC components, our recommendations have to change from time to time.
- 54 -
ST AUDIO DSP3000 M-Port (DSP24 + ADC&DAC3000)
APM
When you are using the Standard-PC HAL as recommended, you may find that Windows will not turn off the power of your PC when you shutdown the system. To change this, you need to enable Advanced Power Management (APM). Goto Control Panel > Power Management > Power Options and enable APM. This is only possible if your mainboard supports APM.
Background services
Some software vendors recommend their users to change the processor scheduling option from Programs to Background services, e.g. Steinberg. We noticed that especially Cubase VST and Nuendo from Steinberg but also other programs are working better when you use small buffer settings (low-latency). Interestingly, some articles about Windows 2000 / XP audio tuning claim that this tweak does not help at all and even reduces the performance of your system. Our recomendation: try it, but if you use ASIO based software by Steinberg, your system will run better with this tweak. Under Windows 2000 (not XP), goto Control Panel > System > Advanced > Performance Options and select Background services. Under Windows XP, goto Control Panel > System > Advanced > Settings > Advanced > Processor scheduling and select Background services.
Default playback device / Microsoft GS Synthesizer
Windows 2000 and XP both contain the so-called Microsoft GS Synthesizer. This software synthesizer emulates a simple Roland GS sound module. The sound quality is not excellent but OK to listen to GM/GS MIDI files. Sadly, also the latency of the Microsoft GS Synthesizer is too high to use it for music creation inside a sequencer software. The offset / delay to other tracks is simply too big. Even worse: the software synthesizer is not only unusable for music production, it also can cause potential trouble.
The Microsoft GS Synthesizer always uses the default playback device that has been selected under Control Panel > Sounds/Multimedia > Audio > Prefered Playback Device. If you select ADSP24 Ext. Audio Device 1/2 as default device (output 1/2 of the external box), the Microsoft GS Synthesizer will have a conflict with the ASIO driver of your DSP24 PCI-card. Because of that, we strongly recommend to use the Internal Mixer audio device instead: please select ADSP24 Int. Audio Device as prefered playback device when you work with ASIO applications that also use MIDI.
To avoid conflicts with the Microsoft GS Synthesizer, you can also make sure that your audio application does not use the corresponding MIDI output device. For example, if you use Cubase VST by Steinberg, disable the MIDI device in the Setup MME software that is accessable from your Startmenu (you need to use at least v5.1 of Cubase VST if you are running Windows XP).
- 55 -
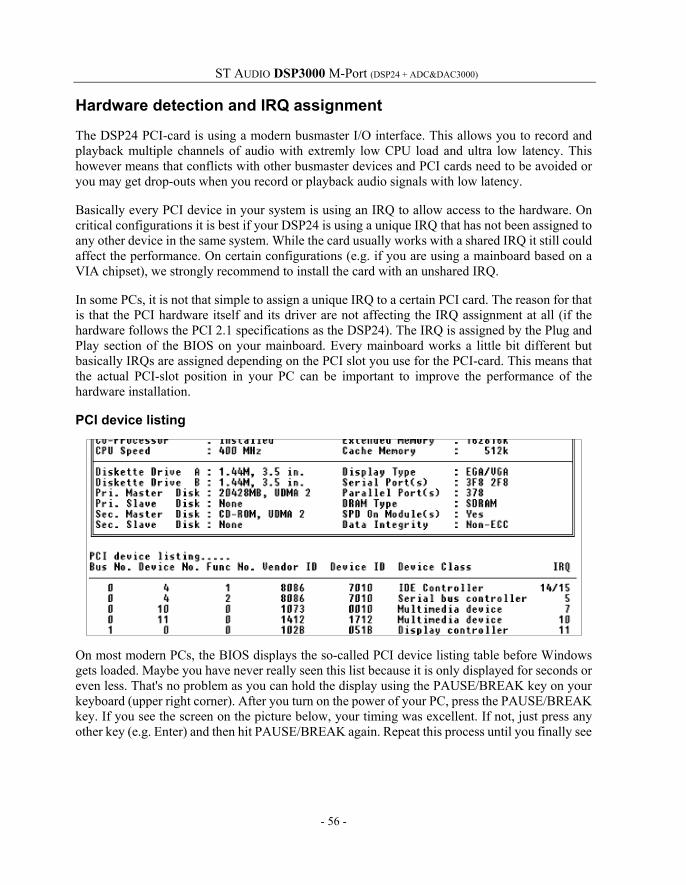
ST AUDIO DSP3000 M-Port (DSP24 + ADC&DAC3000)
Hardware detection and IRQ assignment
The DSP24 PCI-card is using a modern busmaster I/O interface. This allows you to record and playback multiple channels of audio with extremly low CPU load and ultra low latency. This however means that conflicts with other busmaster devices and PCI cards need to be avoided or you may get drop-outs when you record or playback audio signals with low latency.
Basically every PCI device in your system is using an IRQ to allow access to the hardware. On critical configurations it is best if your DSP24 is using a unique IRQ that has not been assigned to any other device in the same system. While the card usually works with a shared IRQ it still could affect the performance. On certain configurations (e.g. if you are using a mainboard based on a VIA chipset), we strongly recommend to install the card with an unshared IRQ.
In some PCs, it is not that simple to assign a unique IRQ to a certain PCI card. The reason for that is that the PCI hardware itself and its driver are not affecting the IRQ assignment at all (if the hardware follows the PCI 2.1 specifications as the DSP24). The IRQ is assigned by the Plug and Play section of the BIOS on your mainboard. Every mainboard works a little bit different but basically IRQs are assigned depending on the PCI slot you use for the PCI-card. This means that the actual PCI-slot position in your PC can be important to improve the performance of the hardware installation.
PCI device listing
On most modern PCs, the BIOS displays the so-called PCI device listing table before Windows gets loaded. Maybe you have never really seen this list because it is only displayed for seconds or even less. That's no problem as you can hold the display using the PAUSE/BREAK key on your keyboard (upper right corner). After you turn on the power of your PC, press the PAUSE/BREAK key. If you see the screen on the picture below, your timing was excellent. If not, just press any other key (e.g. Enter) and then hit PAUSE/BREAK again. Repeat this process until you finally see
- 56 -

ST AUDIO DSP3000 M-Port (DSP24 + ADC&DAC3000)
the PCI device listing table. If you will see the title screen of Windows 9x/Me or the boot manager of Windows NT/2000/XP, you somehow missed the correct moment and you can repeat the process (first boot the operating system and perform a normal shutdown). Note that a few(!) PCs do not display this table (see below).
The list in the example screen the IDE Controller (usually onboard), the USB controller (Serial bus), two Multimedia devices (usally soundcards, but also for example TV-cards) and the graphic card (Display controller). In each line, the assigned IRQ is displayed in the last column. The DSP24 can be identified by the Vendor ID 1412 and Device ID 1712. In the screen above, you can see that the card uses IRQ 10 (in this example). If this table is displayed but there is no entry with this Vendor and Device IDs, the card is probably not installed correctly (double check that!) in the PCI slot or maybe even defective.
How to avoid IRQ sharing
If the same IRQ number that has been assigned to the DSP24 PCI card is shown also on other entries in the PCI device listing table, the two (or more) devices are sharing one IRQ. This can affect the performance and in some situations, depending on the other devices with the same IRQ, even create major stability problems. For example, if you use a graphic card with nVidia chipset, you should avoid IRQ sharing (especially under Windows 2000/XP) with the DSP24 card.
As mentioned before, the IRQs are assigned depending on the PCI-slot. This means that you need to install the card into a different PCI-slot when you want to assign a different IRQ that is not shared. Some mainboard manufacturers (e.g. ASUS) have lists in the printed documentation that are showing the PCI slots / IRQ assignments. If you do not have that, you will need to try it. On most mainboards with VIA or AMD chipset, the third PCI slot is the best one to use, on most mainboards with Intel chipset, the second PCI slot is optimal. However, this is not a general rule as every mainboard can be different.
Please note that the IRQ number itself (e.g. 9, 10, 11, etc.) is not important. The DSP24 card will work on any of them. Also: if your BIOS allows you to assign certain IRQs to certain PCI slots, you can try this function before you review the PCI device listing table. In most cases however, all devices that share the same IRQ will use the assigned one (shared) after you change that setting. This would mean that the card has to be installed into a different PCI-slot as described above.
No PCI device listing table?
Some PCs do not display the PCI device listing table. This may have several reasons:
• The BIOS of your mainboard is very old (e.g. it does not fully support the PCI 2.1 specs). Please check with your mainboard vendor if there is a newer version and install it. This usually only happens with very old mainboards (older than about three years).
- 57 -

ST AUDIO DSP3000 M-Port (DSP24 + ADC&DAC3000)
• The BIOS of your mainboard simply does not display this information. This happens for example if your mainboard BIOS is based on an older version of a Phoenix or AMI BIOS. Currently most generic PC mainboards are using BIOS software from Award.
• Your PC does not display anything or at least not any configuration information before Windows gets loaded. This happens on some PCs from Compaq, Dell or IBM for example.
Also keep in mind, that the PCI device listing table looks a bit different in some cases (e.g. if you have an AMI BIOS). The information in it is usually always the same.
It is a small limitation of your mainboard if its BIOS does not display the PCI device listing table. It means that you will have to check the IRQ assignment under Windows after the driver installation. If you already have problems with driver installation (e.g. Windows does not detect the card automatically), the most important diagnostic tool is not available with the missing PCI device listing table. Under Windows, you can can check the IRQ assignment of the devices in the Device Manager. Except the so-called IRQ-Holder, nothing should be displayed with the same IRQ number if you want to have an unshared, unique IRQ for the DSP24 card.
- 58 -

ST AUDIO DSP3000 M-Port (DSP24 + ADC&DAC3000)
IX. Support / Contact ST Audio offers various resources to provide customer support. Please visit our website www.STAUDIO.com to access our customer Service area.
The extensive Knowledge Base and FAQ sections of our website, deal with common issues and are updated frequently by us. Please check this resource from time to time to get the latest updates on your DSP24 card.
The Q&A forum on the website provides help – please use it to discuss all issues related to our products. Our qualified support staff from all over the planet (and some from other planets) will help you to solve issues you may have. This ensures the fastest reply possible, as tech support staff in different countries/time zones visit the site daily. Do not hesitate to use the Q&A forum for any question you might have or even positive feedback/suggestions. Other customers read the messages and will possibly reply to the requests on this forum as well.
You can also call technical support locally if needed. Please only call the technical support in the country in which you bought your DSP24 card. Below is a list representing some of our distributors:
• North America: 1-800-343-0353 (Kaysound) • Australia: +61-3-9528-5744 (Sound + Music) • France: +33-2-40-78-22-44 (Waves System) • Germany: +49 7152 398880 (RIDI multimedia) • phone numbers for other countries are listed on our website in the www.STAUDIO.com
Distribution section.
Note: You can find updated versions of drivers, applications and documentation on our website.
Recommendation: If you need help, always check out the information on our website www.STAUDIO.com before you contact us.
- 59 -
ST AUDIO DSP3000 M-Port (DSP24 + ADC&DAC3000)
X. Specifications Features:
• 10 x 10 24-bit/96kHz 100% Full-Duplex recording path support • 8 x balanced (XLR) inputs with built in pre-amps (-24dB to +50dB), switchable phantom power
(48V) and insert per channel (1/4" TRS), every input is also available via an unbalanced 1/4" connector that can be used alternativly
• 8 x balanced (XLR) outputs • level meter display for each input channel (switchable to display output signal) • coaxial and optical & AES/EBU I/O connections as standard • stereo headphone output with volume control (1/4" connector) • 2 x 16 channel (32 channels) MIDI interface ports provided (2 outputs, 1 input) • ADC&DAC3000 external rack can be used standalone via optical ADAT I/O connectors (no
DSP24 PCI-card needed) • up to four PCI cards can be sample accurate sync linked (40 channel I/O) • internal or external sync supported (external can be set via the S/PDIF input) • 44pin H-BUS interface connector available • 22kHz~99kHz frequency rates supported • direct monitoring for input signals (zero latency, by hardware) • internal mixing, routing and monitoring software provided • drivers for Windows 9x/Me/2000/XP, support for ASIO 2.0 (latency can be lowered under
2ms), WDM and multiclient-GSIF (GigaStudio) Controller Chip & Converters:
• ADC&DAC3000 external rack uses Crystal CS5396 24bit/96kHz ADCs with 120dB dynamic range (a-weighted) for all stereo input channels
• ADC&DAC3000 external rack uses AKM AK4393 24bit/96kHz DACs with 120dB dynamic range (a-weighted) for all stereo output channels
• DSP24 host card uses the IC Ensemble Envy24 I/O controller chip (ICE1712) • DSP24 internal I/O for standard windows system sounds (mini-jacks on card) uses SigmaTel
STAC97xx 18bit AC-97 Codec (ADC & DAC) 95dB output S/N ratio (a-weighted)
- 60 -