Embed Size (px)
Citation preview

EnglishOriginal Instructions 12-2018 A031C171 (Issue 8)
OperatorOperator ManualManual
Onan Generator Set for RV
HGJBB (Spec A-B)

iA031C171 (Issue 8) Copyright © 2018 Cummins Inc.
Table of Contents
1. IMPORTANT SAFETY INSTRUCTIONS ....................................................................................... 11.1 Overview ................................................................................................................................. 11.2 Warning, Caution, and Note Styles Used in This Manual ..................................................... 11.3 General Safety Precautions.................................................................................................... 11.4 Automatic Generator Start Control Hazards ........................................................................... 31.5 Electrical Shock and Arc Flash Can Cause Severe Personal Injury or Death ....................... 31.6 Generator Voltage Is Deadly .................................................................................................. 31.7 Engine Exhaust/Carbon Monoxide Is Deadly ......................................................................... 41.8 Fuel Is Flammable and Explosive........................................................................................... 51.9 Battery Gas Is Explosive......................................................................................................... 51.10 Moving Parts Can Cause Severe Personal Injury or Death ................................................. 51.11 CARB .................................................................................................................................... 61.12 Generator Set Warning Labels ............................................................................................. 6
2. INTRODUCTION............................................................................................................................ 92.1 About this Manual ................................................................................................................... 92.2 Related Literature ................................................................................................................... 92.3 Model Identification ............................................................................................................... 10
2.3.1 Nameplate Location ................................................................................................... 102.4 How to Obtain Service .......................................................................................................... 11
2.4.1 In U.S. and Canada ................................................................................................... 112.4.2 Outside U.S. and Canada.......................................................................................... 112.4.3 Information To Have Available................................................................................... 11
3. OVERVIEW.................................................................................................................................. 133.1 Electromagnetic Compatibility Compliance........................................................................... 133.2 Information for Generator Set Users (Spark-Ignited Exhaust Emissions) ............................ 133.3 Build Standards..................................................................................................................... 143.4 Specifications........................................................................................................................ 15
3.4.1 Gasoline Model Specifications................................................................................... 153.4.2 LPG Model Specifications.......................................................................................... 16
3.5 List of Acronyms ................................................................................................................... 17
4. OPERATION ................................................................................................................................ 214.1 Key Component Locations.................................................................................................... 214.2 Control Panel ........................................................................................................................ 23
4.2.1 Generator Set Control Panel...................................................................................... 234.2.2 Remote Control Panel................................................................................................ 23
4.3 Starting and Stopping the Generator Set ............................................................................. 254.3.1 Pre-start Checks ........................................................................................................ 254.3.2 Priming the Fuel System ........................................................................................... 254.3.3 Starting the Generator Set ......................................................................................... 264.3.4 Stopping the Generator Set ....................................................................................... 26

Table of Contents 12-2018
ii A031C171 (Issue 8)Copyright © 2018 Cummins Inc.
4.4 Loading the Generator Set ................................................................................................... 264.4.1 Power Versus Altitude................................................................................................ 28
4.5 Exercising the Generator Set................................................................................................ 284.6 Resetting Line Circuit Breakers ............................................................................................ 294.7 Connecting Shore Power...................................................................................................... 304.8 Operating in Weather Extremes ........................................................................................... 304.9 Operating in Dusty Environments ......................................................................................... 304.10 Care of New or Rebuilt Engine ........................................................................................... 30
5. MAINTENANCE ........................................................................................................................... 315.1 Periodic Maintenance ........................................................................................................... 31
5.1.1 Periodic Maintenance Schedule ................................................................................ 315.2 Consumable Parts ................................................................................................................ 325.3 General Inspection................................................................................................................ 325.4 Maintaining the Battery ......................................................................................................... 325.5 Maintaining the Lubrication System...................................................................................... 33
5.5.1 Oil Level ..................................................................................................................... 335.5.2 Engine Oil Recommendations ................................................................................... 345.5.3 Changing Engine Oil .................................................................................................. 34
5.6 Maintaining the Fuel System ................................................................................................ 365.6.1 Fuel System ............................................................................................................... 365.6.2 Fuel Recommendations ............................................................................................. 375.6.3 Replacing the Fuel Filter ............................................................................................ 37
5.7 Exhaust System.................................................................................................................... 395.8 Mechanical System............................................................................................................... 40
5.8.1 Gasoline Choke Assembly......................................................................................... 405.9 Replacing the Air Filter Element ........................................................................................... 435.10 Replacing the Spark Plug(s) ............................................................................................... 435.11 Cleaning the Spark Arrester ............................................................................................... 445.12 Storing the Generator Set................................................................................................... 45
5.12.1 Carburetor Float Bowl Drain Valve .......................................................................... 475.13 Returning the Generator Set to Service ............................................................................. 47
6. TROUBLESHOOTING ................................................................................................................. 496.1 Overview ............................................................................................................................... 496.2 Fault Codes........................................................................................................................... 49
6.2.1 Code 2 - Low Oil Pressure......................................................................................... 506.2.2 Code 3 - Service Check............................................................................................. 506.2.3 Code 4 - Over Crank.................................................................................................. 506.2.4 Code 12 - Over Voltage ............................................................................................. 516.2.5 Code 13 - Under Voltage ........................................................................................... 516.2.6 Code 14 - Over Frequency ........................................................................................ 516.2.7 Code 15 - Under Frequency ...................................................................................... 516.2.8 Code 27 - Voltage Sense........................................................................................... 516.2.9 Code 29 - High Battery Voltage ................................................................................. 526.2.10 Code 31 - Over Speed............................................................................................. 526.2.11 Code 32 - Low Cranking Speed............................................................................... 52

Table of Contents12-2018
iiiA031C171 (Issue 8) Copyright © 2018 Cummins Inc.
6.2.12 Code 35 - Control Card Failure................................................................................ 526.2.13 Code 36 - Engine Stopped ...................................................................................... 526.2.14 Code 37 - Invalid Generator Set Configuration........................................................ 536.2.15 Code 38 - Over Current (Field Overload) ................................................................ 536.2.16 Code 41 - Generator Rotor ...................................................................................... 536.2.17 Code 42 - Processor ................................................................................................ 546.2.18 Code 43 - Processor ................................................................................................ 546.2.19 Code 45 - Speed Sense .......................................................................................... 546.2.20 Code 47 - Ignition..................................................................................................... 546.2.21 Code 48 - Generator Field Sense............................................................................ 54
6.3 Symptom Based.................................................................................................................... 546.3.1 Status Indicator Not Working ..................................................................................... 546.3.2 Starting Batteries Run Down...................................................................................... 546.3.3 Starter Engages-Disengages..................................................................................... 556.3.4 Status Indicator Goes Out While Cranking—No Start ............................................... 556.3.5 No Power—Generator Set Running, Status Light On................................................ 55
7. MAINTENANCE RECORD........................................................................................................... 57

This page is intentionally blank.
Table of Contents 12-2018
iv A031C171 (Issue 8)Copyright © 2018 Cummins Inc.

1A031C171 (Issue 8) Copyright © 2018 Cummins Inc.
1 Important Safety Instructions
1.1 OverviewThoroughly read the Operator Manual before operating the generator set. It contains important instructionsthat should be followed during operation and maintenance. Safe operation and top performance can onlybe achieved when equipment is properly operated and maintained. The owners and operators of thegenerator set are solely responsible for its safe operation.
Generator set operation, maintenance, and installation must comply with all applicable local, state, andfederal codes and regulations. Electricity, fuel, exhaust, moving parts, and batteries present hazards whichcan result in severe personal injury or death. Only trained and experienced personnel with knowledge offuels, electricity, and machinery hazards should perform generator set installation or adjustmentprocedures; or remove, dismantle, or dispose of the generator set.
1.2 Warning, Caution, and Note Styles Used in ThisManualThe following safety styles and symbols found throughout this manual indicate potentially hazardousconditions to the operator, service personnel, or equipment.
DANGERIndicates a hazardous situation that, if not avoided, will result in death or serious injury.
WARNINGIndicates a hazardous situation that, if not avoided, could result in death or serious injury.
CAUTIONIndicates a hazardous situation that, if not avoided, could result in minor or moderate injury.
NOTICEIndicates information considered important, but not hazard-related (e.g., messages relating toproperty damage).
1.3 General Safety PrecautionsWARNING
Operation of equipment is unsafe when mentally or physically fatigued. Do not operateequipment in this condition, or after consuming any alcohol or drug.

1. Important Safety Instructions 12-2018
2 A031C171 (Issue 8)Copyright © 2018 Cummins Inc.
WARNINGMaintaining or installing a generator set can cause severe personal injury. Wear personalprotective equipment such as safety glasses, protective gloves, hard hats, steel-toed boots, andprotective clothing when working on equipment.
WARNINGRunning the generator set without the cover or service door can cause severe personal injury orequipment damage. Do not operate the generator set with the cover or service doors removed.
WARNINGStarting fluids, such as ether, can cause explosion and generator set engine damage. Do not use.
WARNINGBenzene, found in some fuels, has been identified by some state and federal agencies to causecancer or reproductive toxicity. Do not ingest, breathe the fumes, or contact gasoline whenchecking, draining, or adding gasoline.
WARNINGUsed engine oils have been identified by some state and federal agencies to cause cancer orreproductive toxicity. Do not ingest, breathe the fumes, or contact used oil when checking orchanging engine oil.
CAUTIONTo prevent accidental or remote starting while working on the generator set, disconnect thenegative (-) battery cable at the battery using an insulated wrench.
CAUTIONUnsecured or loose fasteners can cause equipment damage. Make sure all fasteners are secureand properly torqued.
CAUTIONOily rags and other material can cause fire and restrict cooling. Keep the generator set, drip pan,and compartment clean.
CAUTIONAccumulated grease and oil can cause overheating and engine damage presenting a potentialfire hazard. Keep the generator set clean and repair any oil leaks promptly.
NOTICEKeep multi-class ABC fire extinguishers handy. Class A fires involve ordinary combustiblematerials such as wood and cloth. Class B fires involve combustible and flammable liquid fuelsand gaseous fuels. Class C fires involve live electrical equipment. (Refer to NFPA No. 10 inapplicable region.)

1. Important Safety Instructions12-2018
3A031C171 (Issue 8) Copyright © 2018 Cummins Inc.
1.4 Automatic Generator Start Control HazardsWARNING
Accidental starting can cause severe personal injury or death. Turn off the AGS wheneverperforming maintenance or service, when the vehicle is stored between uses, is awaiting service,or is parked in a garage or other confined area.
Unexpected starting may occur if the generator set is equipped with an inverter-charger or other AutomaticGenerator Start (AGS) control. This may cause exposure to:
• Unexpected generator starting
• Moving parts hazards
• Electric shock
• Exhaust carbon monoxide (CO)
1.5 Electrical Shock and Arc Flash Can Cause SeverePersonal Injury or Death
WARNINGElectrical shocks and arc flashes can cause severe personal injury or death. Adhere to thefollowing guidelines:
• Only qualified service personnel certified and authorized to work on power circuits shouldwork on exposed energized power circuits.
• All relevant service material must be available for any electrical work performed by certifiedservice personnel.
• Exposure to energized power circuits with potentials of 50 VAC or 75 VDC or higher poses asignificant risk of electrical shock and electrical arc flash.
• Refer to standard NFPA 70E, or equivalent safety standards in corresponding regions, fordetails of the dangers involved and for safety requirements.
1.6 Generator Voltage Is DeadlyWARNING
Improperly connected generator electrical output connections can cause equipment damage,severe personal injury, or death. Electrical connections must be made by a trained andexperienced electrician in accordance with applicable codes.
WARNINGImproper installations can cause equipment damage, severe personal injury, or death. Allinstallations must be conducted by trained and experienced personnel in accordance with theinstallation instructions and all applicable codes.

1. Important Safety Instructions 12-2018
4 A031C171 (Issue 8)Copyright © 2018 Cummins Inc.
WARNINGBack feed to shore power can cause electrocution and damage to equipment. The generator setmust not be connected to shore power or to any other source of electrical power. An approvedswitching device must be used to prevent interconnections.
WARNINGLive electrical equipment can cause electrocution. Use caution when working on live electricalequipment. Remove jewelry, make sure clothing and shoes are dry, stand on a dry woodenplatform or rubber insulating mat, and use tools with insulated handles.
1.7 Engine Exhaust/Carbon Monoxide Is DeadlyWARNING
Substances in exhaust gases have been identified by some state and federal agencies to causecancer or reproductive toxicity. Do not breathe in or come into contact with exhaust gases.
WARNINGCarbon monoxide is a poisonous gas. Inhalation of this gas can cause severe personal injury ordeath. Adhere to the following bullet points to make sure carbon monoxide is not being inhaledby occupants of the vehicle as well as others working on or around the generator set.
• Inspect for exhaust leaks, and test and confirm that all carbon monoxide detectors areworking in accordance with the manufacturer's instructions or owner's manual, prior toevery startup, and after every 8 hours of running.
• Never occupy the vehicle while the generator set is running unless the vehicle is equippedwith a working carbon monoxide detector.
• Never operate the generator set when the vehicle is in a confined space, such as a garage,basement, or building of any kind.
• Make sure the exhaust system is installed in accordance with the generator set installationmanual.
• Never use engine cooling air for heating a working or living space compartment.
Carbon Monoxide (CO) is odorless, colorless, tasteless, and non-irritating. It cannot be seen or smelled.Exposure, even to low levels of CO for a prolonged period can lead to asphyxiation (lack of oxygen).
Mild effects of CO poisoning include:
• headache
• dizziness
• drowsiness
• fatigue
• chest pain
• confusion
More extreme symptoms include:
• vomiting
• seizure

1. Important Safety Instructions12-2018
5A031C171 (Issue 8) Copyright © 2018 Cummins Inc.
• loss of consciousness
1.8 Fuel Is Flammable and ExplosiveWARNING
Fuel and fuel vapor is highly explosive. Adhere to the following bullets to avoid igniting fuel andfuel vapors.
• Do not smoke or turn electrical switches on or off where fuel fumes are present or in areassharing ventilation with fuel tanks or equipment.
• Keep flame, sparks, pilot lights, arc-producing equipment and all other sources of ignitionwell away from fuel lines and sources.
• Fuel lines must be secured, free of leaks, and separated or shielded from electrical wiring.
Leaks can lead to explosive accumulations of gas.
• LPG sinks when released and can accumulate inside housings and basements and other below-grade spaces.
NOTICENatural gas is identifiable by a rotten egg smell.
1.9 Battery Gas Is ExplosiveWARNING
Battery gas is highly explosive and may cause personal injury or death if ignited. Take the properprecautions to avoid personal injury.
• For personal safety, wear appropriate PPE when working on or around the generator set.
• To make sure battery gas is not ignited, do not smoke around the generator set.
• To reduce arcing when disconnecting or reconnecting battery cables, always disconnectthe negative (–) battery cable first and reconnect it last.
1.10 Moving Parts Can Cause Severe Personal Injury orDeath
WARNINGMoving parts can cause severe personal injury or death, and hot exhaust parts can cause severeburns. Make sure all protective guards are properly in place before starting the generator set.
WARNINGHot moving, and electrically live parts can cause severe personal injury or death. Keep childrenaway from the generator set.

1. Important Safety Instructions 12-2018
6 A031C171 (Issue 8)Copyright © 2018 Cummins Inc.
WARNINGHot, moving, and electrically live parts can cause severe personal injury or death. Only trainedand experienced personnel should make adjustments while the generator set is running.
WARNINGMoving parts can catch on loose items such as clothing or jewelry. Do not wear loose clothing orjewelry near moving parts such as PTO (power take-off) shafts, fans, belts, and pulleys.
WARNINGMoving parts can entangle appendages such as fingers. Keep the protective guards in place overfans, belts, pulleys, and other moving parts and keep hands away from all moving parts.
1.11 CARBCAUTION
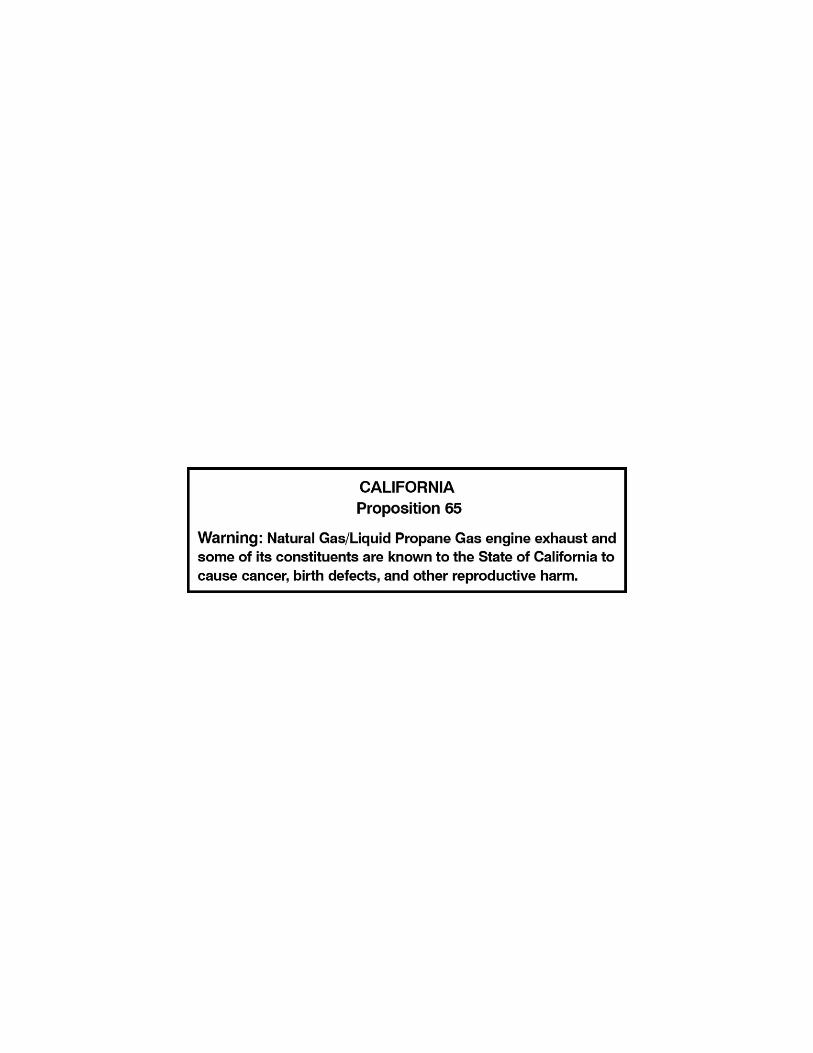
Unauthorized modifications or replacement of fuel, exhaust, air intake, or speed control systemcomponents that affect engine emissions are prohibited by law in the state of California.
The California Air Resources Board (CARB) has requirements regarding modification & repair of fuelsystem & exhaust components including, but not limited to, adherence to evaporative emissionsrequirements in mobile installations. Evaporative generator sets must be used in trailers, fifth wheeltrailers, and other non-motorized vehicles where on-board gasoline fuel storage is self-contained in thetrailer equipment. Completing the installation of the generator set fuel evaporative system providescompliance with the California code of regulations for small off-road equipment effective January 1, 2008and Federal Small SI regulation effective January 1, 2011. Any questions regarding the installation orevaporative emission certification should be directed to Cummins Inc. for clarification.
1.12 Generator Set Warning LabelsWarning signs are provided on the generator set at or near the point of risk. To avoid injury, always takethe necessary precautions as indicated on the sample signs shown below.
Caution or Warning.Indicates a risk of personal injury.
Caution or Warning of Temperature Hazard.Indicates a risk of personal injury from high temperature.
Caution or Warning of High Voltage Hazard.Indicates a risk of personal injury from electric shock or electrocution.

1. Important Safety Instructions12-2018
7A031C171 (Issue 8) Copyright © 2018 Cummins Inc.
Caution or Warning of Engine Coolant Pressure Hazard.Indicates a risk of personal injury from hot pressurized engine coolant.
Caution or Warning.Indicates to read Operator Manual for additional information.
Caution or Warning of No Step.Indicates a risk of personal injury or equipment damage from stepping on equipment.
Caution or Warning of Combustion or Explosion Hazard.Indicates a risk of personal injury from explosion.
Caution or Warning of Belt and Rotating Part Hazard.Indicates a risk of personal injury from entanglement in moving parts.
Caution or Warning of Chemical (ingestion or burn) Hazard.Indicates a risk of personal injury or asphyxiation from poisonous fumes or toxic gases.
Caution or Warning of High Voltage or Current Source Hazard.Indicates a risk of personal injury from electrical shock or electrocution.
Caution or Warning of Fan and Rotating Part Hazard.Indicates a risk of personal injury from entanglement in moving parts.

This page is intentionally blank.
1. Important Safety Instructions 12-2018
8 A031C171 (Issue 8)Copyright © 2018 Cummins Inc.

9A031C171 (Issue 8) Copyright © 2018 Cummins Inc.
2 Introduction
2.1 About this ManualThis is the Operator Manual for the generator set or sets listed on the front cover. Each operator shouldstudy this manual carefully and observe all of its instructions and safety precautions. Keep this manualreadily available for reference.
The information contained within the manual is based on information available at the time of printing. Inline with Cummins Inc. policy of continuous development and improvement, information may change atany time without notice. The users should therefore make sure that before commencing any work, theyhave the latest information available. The latest version of this manual is available on QuickServe Online(https://quickserve.cummins.com).
The Operation, Maintenance, and Troubleshooting Chapters of this manual provide instructions necessaryfor operating the generator set and maintaining it at top performance. The owner is responsible forperforming maintenance in accordance with the information provided in Chapter 5 on page 31.
This manual also includes generator set specifications and information on how to obtain service,emissions regulation compliance, and model identification.
See the Parts Manual for part identification numbers and required quantities. Genuine Cumminsreplacement parts are recommended for best results.
2.2 Related LiteratureBefore any attempt is made to operate the generator set, the operator should take time to read all of themanuals supplied with the generator set, and to familiarize themselves with the warnings and operatingprocedures.
CAUTIONA generator set must be operated and maintained properly if you are to expect safe and reliableoperation. The Operator manual includes a maintenance schedule and a troubleshooting guide.The Health and Safety manual must be read in conjunction with this manual for the safeoperation of the generator set:
• Health and Safety Manual (0908-0110)
The relevant manuals appropriate to your generator set are also available, the documents below are inEnglish:
• Operator Manual for RV Generator Set HGJBB (Spec A-B) (A031C171)
• Installation Manual for RV Generator Set HGJBB (Spec A-B) (A031C172)
• Generator Set Service Manual for RV Generator Set HGJBB (Spec A) (A031C173)
• Recommended Spares List (RSL) for RV Generator Set HGJBB (Spec A) (A043W890)
• Parts Manual for RV Generator Set HGJBB (Spec A-B) (A035B506)
• Standard Repair Times - CY Family (A031C174)
• Service Tool Manual (A043D529)
• Failure Code Manual (F1115C)
• Warranty Administration Manual (4021290)

2. Introduction 12-2018
10 A031C171 (Issue 8)Copyright © 2018 Cummins Inc.
• Global Commercial Warranty Statement (A028U870)
2.3 Model IdentificationEach generator set is provided with a nameplate that contains the model and serial numbers. Thisinformation is needed when contacting Cummins for parts, service, and product information.
Every character of the model number is significant. The last character of the model number is thespecification letter which is important for obtaining the correct parts.
Record the generator set model and serial numbers in the figure below to have them available if needed.
2.3.1 Nameplate Location
FIGURE 1. NAMEPLATE LOCATION

2. Introduction12-2018
11A031C171 (Issue 8) Copyright © 2018 Cummins Inc.
2.4 How to Obtain ServiceFor generator set parts, service, and literature, contact the nearest authorized Cummins Inc. distributor.You may go to the Internet site power.cummins.com for information on contacting our distributorsworldwide.
2.4.1 In U.S. and CanadaCall +1-800-CUMMINSTM (1-800-286-6467) for the nearest Cummins Inc. distributor in the United States orCanada. Press 1 (option 1) to be automatically connected.
If you are unable to contact a distributor using the automated service, consult the Yellow Pages. Typically,our distributors are listed under: generators - electric.
2.4.2 Outside U.S. and CanadaIf you are outside U.S. and Canada, refer to power.cummins.com or send an email [email protected].
2.4.3 Information To Have Available• model number
• serial number
• date of purchase
• nature of the problem (see Chapter 6 on page 49)

This page is intentionally blank.
2. Introduction 12-2018
12 A031C171 (Issue 8)Copyright © 2018 Cummins Inc.

13A031C171 (Issue 8) Copyright © 2018 Cummins Inc.
3 Overview
3.1 Electromagnetic Compatibility ComplianceGenerator sets emit and receive electromagnetic (radio frequency) energy. If the generator set affectsoperation of nearby devices, or nearby devices affect generator set operation, increase the distancebetween them.
When used in countries where compliance to the EMC directive is required: This generator set has beenevaluated for use in the residential, commercial, and light industrial environments.
3.2 Information for Generator Set Users (Spark-IgnitedExhaust Emissions)This generator set meets the requirements of exhaust emissions standards for 50-state operation asstated on the nameplate.
As a user of this generator set, please be aware that unauthorized modifications or replacement of fuel,exhaust, air intake, or speed control system components that affect engine emissions are prohibited.Unauthorized modification, removal, or replacement of the generator set label is prohibited.
Carefully review Operator (Owner), Installation, and other manuals and information you receive with thegenerator set. If unsure that the installation, use, maintenance, or service of the generator set isauthorized, seek assistance from an approved Cummins dealer.
Generator set users may use the following table as an aid in locating information related to therequirements for emissions control.
TABLE 1. EMISSIONS CONTROL INFORMATION
Generator Set Warranty Information
The EPA (Part Number A034R654) and California (Part NumberA034R656) emissions control warranty statements are located in thesame packet of information as this manual when the generator set isshipped from the factory.
Engine Valve Lash See Section 3.4 on page 15.
Engine Ignition Timing See Section 3.4 on page 15.
Engine Fuel Requirements
Gasoline Models: The engine is certified to operate on unleadedgasoline.LPG Models: The engine is certified to operate on LPG.See Section 5.6 on page 36 for fuel recommendations.
Engine Lubricating Oil Requirements See Section 5.5 on page 33 for engine oil recommendations.
Engine Fuel Mixture Settings The generator set engines have precision-manufactured carburetorswhich are not adjustable.
Engine Adjustments None.
Engine Emission Control SystemThe engine emission control system consists of inherent engine designand, in some cases, an exhaust after-treatment system incorporating athree-way catalyst and pulse secondary air injection.
3. Overview 12-2018
14 A031C171 (Issue 8)Copyright © 2018 Cummins Inc.
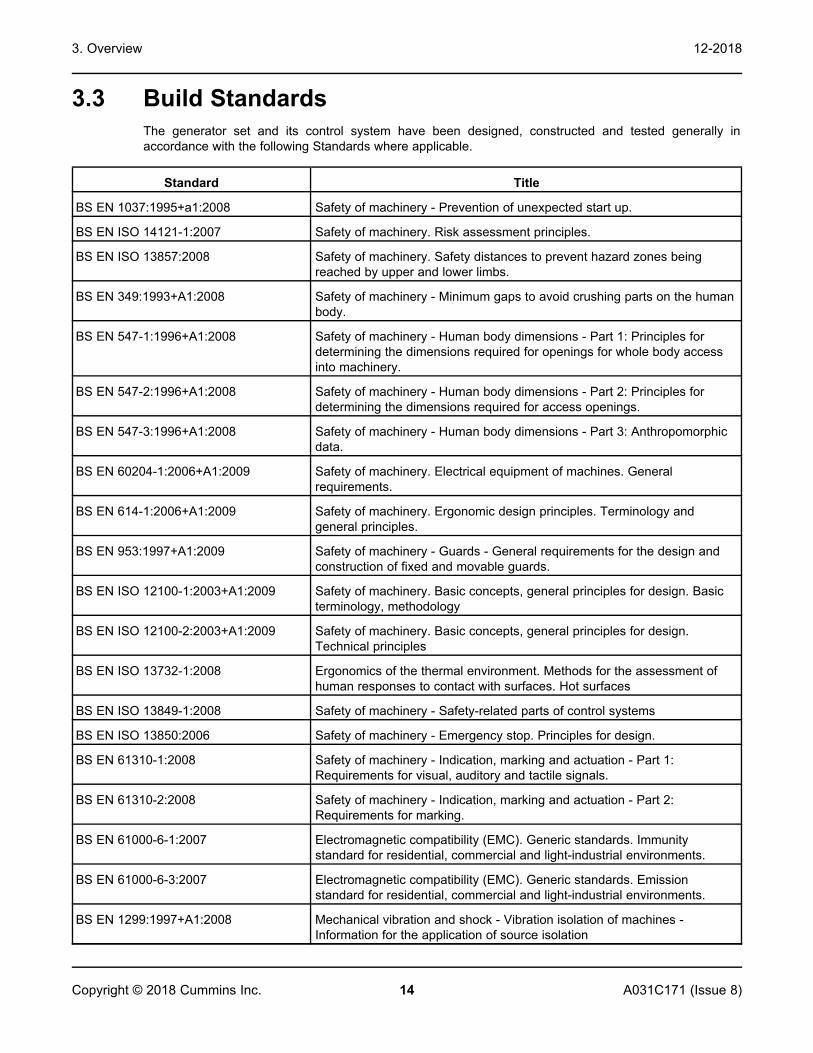
3.3 Build StandardsThe generator set and its control system have been designed, constructed and tested generally inaccordance with the following Standards where applicable.
Standard Title
BS EN 1037:1995+a1:2008 Safety of machinery - Prevention of unexpected start up.
BS EN ISO 14121-1:2007 Safety of machinery. Risk assessment principles.
BS EN ISO 13857:2008 Safety of machinery. Safety distances to prevent hazard zones beingreached by upper and lower limbs.
BS EN 349:1993+A1:2008 Safety of machinery - Minimum gaps to avoid crushing parts on the humanbody.
BS EN 547-1:1996+A1:2008 Safety of machinery - Human body dimensions - Part 1: Principles fordetermining the dimensions required for openings for whole body accessinto machinery.
BS EN 547-2:1996+A1:2008 Safety of machinery - Human body dimensions - Part 2: Principles fordetermining the dimensions required for access openings.
BS EN 547-3:1996+A1:2008 Safety of machinery - Human body dimensions - Part 3: Anthropomorphicdata.
BS EN 60204-1:2006+A1:2009 Safety of machinery. Electrical equipment of machines. Generalrequirements.
BS EN 614-1:2006+A1:2009 Safety of machinery. Ergonomic design principles. Terminology andgeneral principles.
BS EN 953:1997+A1:2009 Safety of machinery - Guards - General requirements for the design andconstruction of fixed and movable guards.
BS EN ISO 12100-1:2003+A1:2009 Safety of machinery. Basic concepts, general principles for design. Basicterminology, methodology
BS EN ISO 12100-2:2003+A1:2009 Safety of machinery. Basic concepts, general principles for design.Technical principles
BS EN ISO 13732-1:2008 Ergonomics of the thermal environment. Methods for the assessment ofhuman responses to contact with surfaces. Hot surfaces
BS EN ISO 13849-1:2008 Safety of machinery - Safety-related parts of control systems
BS EN ISO 13850:2006 Safety of machinery - Emergency stop. Principles for design.
BS EN 61310-1:2008 Safety of machinery - Indication, marking and actuation - Part 1:Requirements for visual, auditory and tactile signals.
BS EN 61310-2:2008 Safety of machinery - Indication, marking and actuation - Part 2:Requirements for marking.
BS EN 61000-6-1:2007 Electromagnetic compatibility (EMC). Generic standards. Immunitystandard for residential, commercial and light-industrial environments.
BS EN 61000-6-3:2007 Electromagnetic compatibility (EMC). Generic standards. Emissionstandard for residential, commercial and light-industrial environments.
BS EN 1299:1997+A1:2008 Mechanical vibration and shock - Vibration isolation of machines -Information for the application of source isolation

3. Overview12-2018
15A031C171 (Issue 8) Copyright © 2018 Cummins Inc.
Standard Title
BS EN 1679-1:1998 Reciprocating internal combustion engines - Safety - Part 1: Compressionignition engines
BS EN 12601:2001 Reciprocating internal combustion engine driven generating sets - Safety
3.4 Specifications3.4.1 Gasoline Model Specifications
TABLE 2. GASOLINE MODEL SPECIFICATIONS
2.8 HGJBB 2.3 HGJBB 2.8 HGJBB
GENERATOR: 2-Pole Revolving Field, Self-Excited, 1-Phase, Electronically Regulated, Direct Drive
Power 2800 Watts 2300 Watts 2800 Watts
Frequency1 60 Hz 50 Hz 60 Hz
Voltage 120 Volts 230 Volts 100 Volts
Current 23.3 Amps 10 Amps 28 Amps
Breaker 25 Amps 10 Amps 30 Amps
Speed 3600 RPM 3000 RPM 3600 RPM
FUEL CONSUMPTION:
No Load 0.78 l/h (0.2 gph) 0.69 l/h (0.18 gph) 0.78 l/h (0.2 gph)
Half Load 1.32 l/h (0.35 gph) 1.18 l/h (0.31 gph) 1.32 l/h (0.35 gph)
Fuel Load 1.75 l/h (0.46 gph) 1.56 l/h (0.41 gph) 1.75 l/h (0.46 gph)
ENGINE: 1-Cylinder, 4-Cyle, Spark Ignited, OHC, Air-Cooled
Bore 67 mm (2.64 in)
Stroke 60 mm (2.36 in)
Displacement 211 cm3 (12.87 in3)
Compression Ratio 8.5 : 1
Oil Capacity 0.6 liters (0.63 qt)
Intake Valve Lash(Cold) 0.12-0.15 mm (0.0047-0.0059 in)
Exhaust Valve Lash(Cold) 0.12-0.15 mm (0.0047-0.0059 in)
Spark Plug Gap 0.6–0.7 mm (0.024-0.028 in)
Ignition Timing 23° BTDC, non-adjustable
Ignition Coil Gap 0.3–0.7 mm (0.012-0.020 in)
Compression 3.9 kgf/cm2 (55.47 lbf/in2) @ 500 RPM
DC SYSTEM:

3. Overview 12-2018
16 A031C171 (Issue 8)Copyright © 2018 Cummins Inc.
2.8 HGJBB 2.3 HGJBB 2.8 HGJBB
Battery Voltage 12 Volts
Minimum BatteryRating 360 CCA @ –18 °C (0 °F)
INSTALLATION:
Minimum Free Air InletArea 232 cm2 (36 in2)
Weight 57 kg (125 lbs)
Minimum CompartmentSize (H x D x W)2 325 mm x 415 mm x 560 mm (12.8 in x 16.3 in x 22.0 in)
1. 60 Hz models are listed by CSA and the US Testing Company.2. See the Installation Manual for additional considerations when sizing the generator set compartment.
3.4.2 LPG Model SpecificationsTABLE 3. LPG MODEL SPECIFICATIONS
2.5 HGJBB 2.3 HGJBB
GENERATOR: 2-Pole Revolving Field, Self-Excited, 1-Phase, Electronically Regulated, Direct Drive
Power 2500 Watts 2300 Watts
Frequency1 60 Hz 50 Hz
Voltage 120 Volts 230 Volts
Current 20.8 Amps 10 Amps
Breaker 21 Amps 10 Amps
Speed 3600 RPM 3000 RPM
FUEL CONSUMPTION:
No Load 0.53 kg/h (1.17 lbs/h) 0.49 kg/h (1.08 lbs/h)
Half Load 0.76 kg/h (1.66 lbs/h) 0.69 kg/h (1.53 lbs/h)
Full Load 1.02 kg/h (2.25 lbs/h) 0.94 kg/h (2.07 lbs/h)
ENGINE: 1-Cylinder, 4-Cycle, Spark Ignited, OHC, Air-Cooled
Bore 67 mm (2.64 in)
Stroke 60 mm (2.36 in)
Displacement 211 cm3 (12.87 in3)
Compression Ratio 8.5 : 1
Oil Capacity 0.6 liters (0.63 qt)
Intake Valve Lash (Cold) 0.12-0.15 mm (0.0047-0.0059 in)
Exhaust Valve Lash (Cold) 0.12-0.15 mm (0.0047-0.0059 in)
Spark Plug Gap 0.6–0.7mm (0.024-0.028 in)

3. Overview12-2018
17A031C171 (Issue 8) Copyright © 2018 Cummins Inc.
2.5 HGJBB 2.3 HGJBB
Ignition Timing 23° BTDC, non-adjustable
Ignition Coil Gap 0.3–0.7 mm (0.012-0.020 in)
Compression 3.9 kgf/cm2 (55.47 lbf/in2) @ 500 RPM
DC SYSTEM:
Battery Voltage 12 Volts
Minimum Battery Rating 360 CCA @ –18 °C (0 °F)
INSTALLATION:
Minimum Free Air Inlet Area 232 cm2 (36 in2)
LPG Vapor Supply Pressure 229–330 mm (9–13 in) WC
LPG Liquid Connection Pressure 1/4-18 NPTF Tank Pressure
Weight 57 kg (125 lbs)
Minimum Compartment Size (H x D x W)2 325 mm x 415 mm x 560 mm (12.8 in x 16.3 in x 22.0 in)
1. 60 Hz models are listed by CSA and the US Testing Company.2. See the Installation Manual for additional considerations when sizing the generator set compartment.
3.5 List of AcronymsTABLE 4. ACRONYM DEFINITIONS
Acronym Definition
AC Alternating Current
AGS Automatic Generator Start
AISI American Iron and Steel Institute
ANSI American National Standards Institute
API American Petroleum Institute
ASTM American Society for Testing and Materials (now known as ASTM International)
BS Build Standard
BTDC Before Top Dead Center
CARB California Air Resources Board
CCA Cold Cranking Amp
CO Carbon Monoxide
CSA Canadian Standards Association
DC Direct Current
EEPROM Electronically Erasable Programmable Read Only Memory
EMC Electromagnetic Compatibility

3. Overview 12-2018
18 A031C171 (Issue 8)Copyright © 2018 Cummins Inc.
Acronym Definition
EPA Environmental Protection Agency
GFCI Grounded Fault Circuit Interrupters
hp High Pressure
I.D. Inside Diameter
ISO International Organization for Standardization
LED Light-emitting Diode
LPG Liquid Petroleum Gas
NFPA National Fire Protection Agency
NPTF National Pipe Taper Fuel
O.D. Outside Diameter
PTO Power Take-Off
PPE Personal Protective Equipment
RAM Random Access Memory
ROM Read Only Memory
RV Recreational Vehicle
RVIA RV Industry Association
SAE Society of Automotive Engineers
UNC Unified National Coarse
US, U.S. United States
WC Water Column
TABLE 5. ACRONYMS FOR UNITS OF MEASUREMENT
Acronym Definition
Amp Ampere
C Celsius
cm centimeter
D Depth
F Fahrenheit
ft Feet, foot
ft-lbs Foot-pounds
gph Gallons per hour
H Height
Hz Hertz
in Inch

3. Overview12-2018
19A031C171 (Issue 8) Copyright © 2018 Cummins Inc.
Acronym Definition
kg kilogram
kg/h kilograms per hour
kgf/cm2 kilogram-force per square centimeter
kW kilowatt
l/h Liters per hour
lb Pound
lbf/in2 OR psi Pound per square inch
lbs/h Pounds per hour
m Meter
mm millimeter
Nm Newton meter
psi OR lbf/in2 Pound per square inch
qt Quart
RPM Revolutions per Minute
VAC Volts Alternating Current
VDC Volts Direct Current
W Watts, Width

This page is intentionally blank.
3. Overview 12-2018
20 A031C171 (Issue 8)Copyright © 2018 Cummins Inc.

21A031C171 (Issue 8) Copyright © 2018 Cummins Inc.
4 Operation
4.1 Key Component LocationsThe control panel and the components requiring attention during periodic maintenance (see Section 5.1on page 31) are located behind a removable access cover. The figure below illustrates the components ofa typical generator set. There may be some variation depending on the generator set model.
• To remove the access cover:
1. Slide the cover latches up and pull the cover outward from the bottom.
2. Lower the cover to remove it from the housing.
• To replace the access cover:
1. Position the tabs on the top of the cover into the openings on the housing.
2. Slide the latches up and push the bottom of the cover in place.
3. Hold the cover in place firmly and release the latches.
WARNINGOperating the generator set with the access cover off can result in severe personal injury orequipment damage. Hot components are exposed when the access cover is removed andgenerator set cooling air does not circulate properly. Do not operate the generator set with theaccess cover removed.

4. Operation 12-2018
22 A031C171 (Issue 8)Copyright © 2018 Cummins Inc.
No. Description No. Description
1 Removable Access Cover 5 Air Filter Cover
2 Muffler (inside) 6 Oil Drain Plug
3 Spark Plug 7 Control Panel
4 Oil Fill Cap and Dipstick 8 Fuel Filter
FIGURE 2. KEY COMPONENT LOCATIONS

4. Operation12-2018
23A031C171 (Issue 8) Copyright © 2018 Cummins Inc.
4.2 Control Panel4.2.1 Generator Set Control Panel
No. Name Description
1 Status Indicator LED in the control switch that blinks rapidly during cranking. Stays oncontinuously after generator set is running. If the generator set shuts downabnormally, the indicator blinks a numerical code to indicate the cause of theshutdown (see Chapter 6 on page 49).
2 Control Switch Used to start and stop the generator set, and to prime the engine fuel system.Hold the switch in its START position to crank and start the generator set.Press the switch to the STOP position to stop the generator set. Hold theswitch in its STOP/PRIME position to prime the fuel system (gasoline modelsonly).
3 Line Circuit Breaker Protects the AC power leads connected to the generator set from overloadsand equipment short circuits.
FIGURE 3. GENERATOR SET CONTROL PANEL
4.2.2 Remote Control PanelA remote control panel may be installed inside the vehicle. There are 3 remote control panel kits available.
• Control switch with status indicator.
• Control switch with status indicator and an hour meter.
• Control switch with status indicator and a DC voltmeter.

4. Operation 12-2018
24 A031C171 (Issue 8)Copyright © 2018 Cummins Inc.
No. Name Description
1 Control Switch Used to start and stop the generator set, and to prime the engine fuel system.Hold the switch in its Start position to crank and start the generator set. Pressthe switch to the Stop position to stop the generator set. Hold the switch in itsStop position to prime the fuel system.
2 Status Indicator LED in the control switch that blinks rapidly during preheat and cranking.Stays on continuously after generator set is running. If the generator set shutsdown abnormally, the indicator flashes a numerical code to indicate the causeof the shutdown (see Chapter 6 on page 49).
3 Hour Meter Records the total running time of the generator set. Cannot be reset.
4 DC Voltmeter Displays voltage of the generator set. If the voltage across the 12 VDC controlsystem consistently stays above or below 12 VDC, see Section 5.4 on page32.
FIGURE 4. REMOTE CONTROL PANELS
4. Operation12-2018
25A031C171 (Issue 8) Copyright © 2018 Cummins Inc.
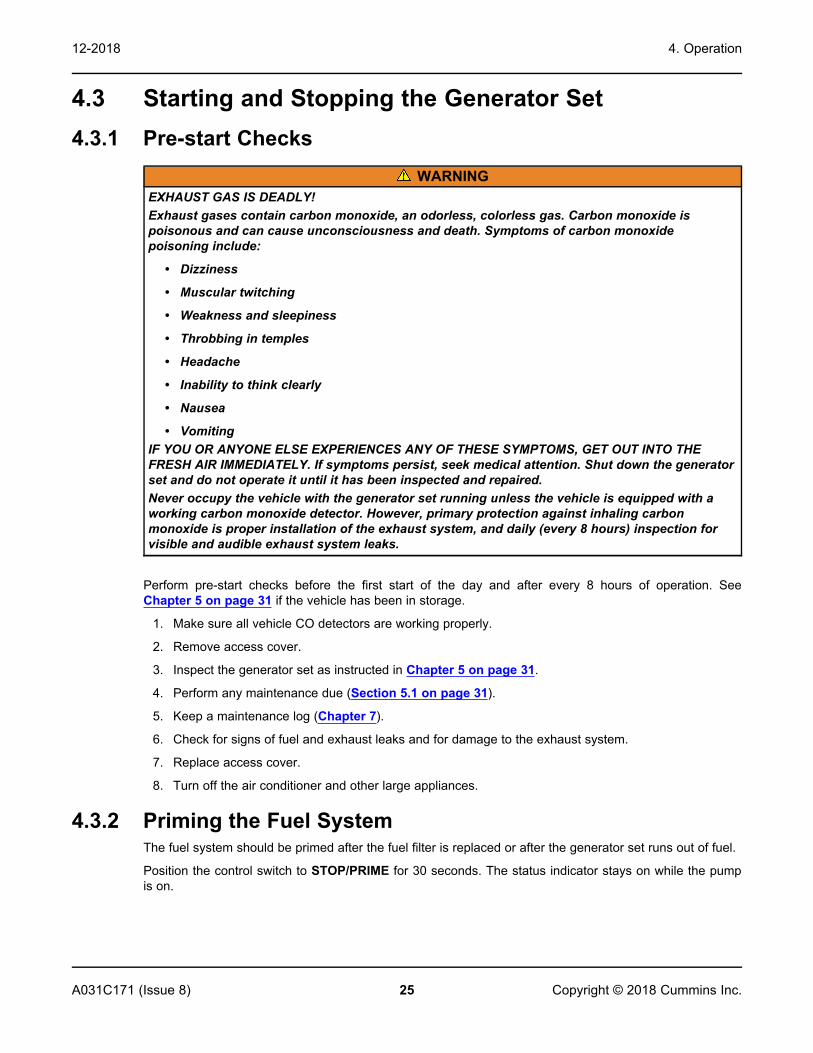
4.3 Starting and Stopping the Generator Set4.3.1 Pre-start Checks
WARNINGEXHAUST GAS IS DEADLY!Exhaust gases contain carbon monoxide, an odorless, colorless gas. Carbon monoxide ispoisonous and can cause unconsciousness and death. Symptoms of carbon monoxidepoisoning include:
• Dizziness
• Muscular twitching
• Weakness and sleepiness
• Throbbing in temples
• Headache
• Inability to think clearly
• Nausea
• VomitingIF YOU OR ANYONE ELSE EXPERIENCES ANY OF THESE SYMPTOMS, GET OUT INTO THEFRESH AIR IMMEDIATELY. If symptoms persist, seek medical attention. Shut down the generatorset and do not operate it until it has been inspected and repaired.Never occupy the vehicle with the generator set running unless the vehicle is equipped with aworking carbon monoxide detector. However, primary protection against inhaling carbonmonoxide is proper installation of the exhaust system, and daily (every 8 hours) inspection forvisible and audible exhaust system leaks.
Perform pre-start checks before the first start of the day and after every 8 hours of operation. SeeChapter 5 on page 31 if the vehicle has been in storage.
1. Make sure all vehicle CO detectors are working properly.
2. Remove access cover.
3. Inspect the generator set as instructed in Chapter 5 on page 31.
4. Perform any maintenance due (Section 5.1 on page 31).
5. Keep a maintenance log (Chapter 7).
6. Check for signs of fuel and exhaust leaks and for damage to the exhaust system.
7. Replace access cover.
8. Turn off the air conditioner and other large appliances.
4.3.2 Priming the Fuel SystemThe fuel system should be primed after the fuel filter is replaced or after the generator set runs out of fuel.
Position the control switch to STOP/PRIME for 30 seconds. The status indicator stays on while the pumpis on.
4. Operation 12-2018
26 A031C171 (Issue 8)Copyright © 2018 Cummins Inc.
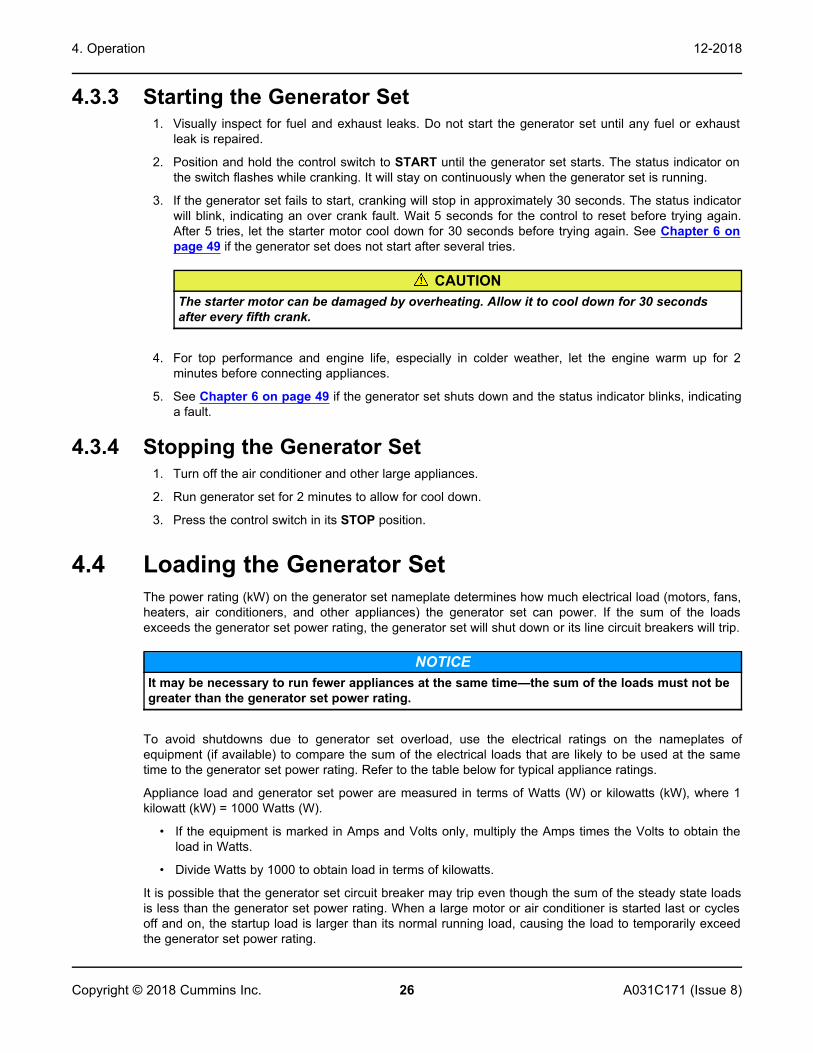
4.3.3 Starting the Generator Set1. Visually inspect for fuel and exhaust leaks. Do not start the generator set until any fuel or exhaust
leak is repaired.
2. Position and hold the control switch to START until the generator set starts. The status indicator onthe switch flashes while cranking. It will stay on continuously when the generator set is running.
3. If the generator set fails to start, cranking will stop in approximately 30 seconds. The status indicatorwill blink, indicating an over crank fault. Wait 5 seconds for the control to reset before trying again.After 5 tries, let the starter motor cool down for 30 seconds before trying again. See Chapter 6 onpage 49 if the generator set does not start after several tries.
CAUTIONThe starter motor can be damaged by overheating. Allow it to cool down for 30 secondsafter every fifth crank.
4. For top performance and engine life, especially in colder weather, let the engine warm up for 2minutes before connecting appliances.
5. See Chapter 6 on page 49 if the generator set shuts down and the status indicator blinks, indicatinga fault.
4.3.4 Stopping the Generator Set1. Turn off the air conditioner and other large appliances.
2. Run generator set for 2 minutes to allow for cool down.
3. Press the control switch in its STOP position.
4.4 Loading the Generator SetThe power rating (kW) on the generator set nameplate determines how much electrical load (motors, fans,heaters, air conditioners, and other appliances) the generator set can power. If the sum of the loadsexceeds the generator set power rating, the generator set will shut down or its line circuit breakers will trip.
NOTICEIt may be necessary to run fewer appliances at the same time—the sum of the loads must not begreater than the generator set power rating.
To avoid shutdowns due to generator set overload, use the electrical ratings on the nameplates ofequipment (if available) to compare the sum of the electrical loads that are likely to be used at the sametime to the generator set power rating. Refer to the table below for typical appliance ratings.
Appliance load and generator set power are measured in terms of Watts (W) or kilowatts (kW), where 1kilowatt (kW) = 1000 Watts (W).
• If the equipment is marked in Amps and Volts only, multiply the Amps times the Volts to obtain theload in Watts.
• Divide Watts by 1000 to obtain load in terms of kilowatts.
It is possible that the generator set circuit breaker may trip even though the sum of the steady state loadsis less than the generator set power rating. When a large motor or air conditioner is started last or cyclesoff and on, the startup load is larger than its normal running load, causing the load to temporarily exceedthe generator set power rating.

4. Operation12-2018
27A031C171 (Issue 8) Copyright © 2018 Cummins Inc.
Typical "invisible" charging loads:
• During startup, air conditioners need "reserve" power and can draw 3–4 times the typical 1400–2400Watts needed to run. Too much baseload can prevent air conditioners from starting.
• Battery chargers are activated automatically and can draw a large load (up to 3000 Watts). Manageelectrical loads by adjusting battery charge rates to best suit your needs. Consult yourinverter/charger manual or manufacturer.
TABLE 6. TYPICAL APPLIANCE LOADS
Appliance Average Required Wattage Amps
Air Compressor (1hp) 900-1800 7.5-15
Air Conditioner 1200-2400 10-20
Battery Charger1 Up to 3000 6-28
Blender 450-700 3.3-5.8
Broiler 1400-1700 11.6-14
Broom/Vacuum 1000-1440 8.3-12
CD/mp3 Player & Speakers 85 0.7
Coffeepot 900-1200 7.5-10
Computer 60-270 0.5-2.25
Laptop 20-50 0.16-0.41
Converter 500-1000 4-8
Curling Iron 20-50 0.16-0.41
Dishwasher 1200-2400 10-20
Drill 250-1000 2-8
Electric Blanket 60-100 0.5-0.8
Fan 10-175 0.08-1.45
Flat Iron 40-80 0.3-0.6
Frying Pan/Wok 1000-1350 8-11.25
Game Console 19-200 0.16-1.6
Hair Dryer 1200-1875 10-15.6
Iron 1000-1800 8-15
Light Bulbs 13-100 0.1-0.8
Microwave/Convection Oven 750-1100 6.25-9.2
Radio 50-200 0.4-1.6
Refrigerator 400-1000 3.3-8
Shaver 15-20 0.12-0.16
Space Heater 750-1500 6.25-12.5
Stove 900-2500 7.5-20.8

4. Operation 12-2018
28 A031C171 (Issue 8)Copyright © 2018 Cummins Inc.
Appliance Average Required Wattage Amps
Television 43-600 0.35-5
Toaster 800-1400 6.6-11.6
VCR/DVD/Blu-ray Player 6-30 0.05-0.25
Washer/Dryer 350-500/1800-5000 3-4/15-42
Water Heater 1000-1500 8-12.5
Water Pump 250-1100 2-9.161 Battery chargers can be a source of significant load and will be on whether they are connected to shore power orthe generator set.
4.4.1 Power Versus AltitudeThe generator set is rated at standard barometric pressure, humidity, and air temperature (reference ISO3046). Low barometric pressure (high altitude) or high ambient temperature decreases engine power.
• As ambient temperature increases, rated generator set engine power decreases approximately 1%for every 5.5 °C (10 °F) above 25 °C (77 °F).
• Power decreases approximately 3.5% of rated power each 305 m (1000 ft) of increase in elevation.Refer to the table below for typical elevation/generator set power calculations.
NOTICEIt may be necessary to run fewer appliances at higher altitudes and ambient temperatures.
TABLE 7. POWER VERSUS ALTITUDE
Elevation Above Mean SeaLevel Maximum Generator Set Power1 Maximum Generator Set Power1
Up to 152 m (500 ft) 2500 Watts (rated) 2800 Watts (rated)
762 m (2500 ft) 2325 Watts 2600 Watts
1676 m (5500 ft) 2060 Watts 2310 Watts
Above 1676 m (5500 ft) 2060 Watts minus 87.5 Watts each 305m (1000 ft)
2310 Watts minus 98 Watts each 305 m(1000 ft)
1. - Does not take into account the effect circuit breakers may have in limiting maximum power.
4.5 Exercising the Generator SetExercise the generator set at least 2 hours each month if use is infrequent. Run the generator set atapproximately 1/2 rated power. A single 2-hour exercise period is better than several shorter periods.
Exercising a generator set drives off moisture, relubricates the engine, replaces stale fuel in fuel lines, andremoves oxides from electrical contacts and generator slip rings. The result is better starting, longerengine life, and greater reliability.

4. Operation12-2018
29A031C171 (Issue 8) Copyright © 2018 Cummins Inc.
4.6 Resetting Line Circuit BreakersIf a generator set line circuit breaker or a circuit breaker in the power distribution panel trips, either a shortcircuit has occurred or too many loads were connected.
NOTICEThe generator set continues to run if its circuit breaker trips.
If a circuit breaker trips:
1. Disconnect or turn off as many electrical loads as possible.
2. Reset the circuit breaker.
3. If the circuit breaker trips right away, either the appliance (or electrical load) has a short or the circuitbreaker is faulty. Call a qualified electrician.
NOTICEIt may be necessary to push the circuit breaker OFF to reset it and ON to reconnect thecircuit.
4. If the circuit breaker does not trip right away, reconnect loads one-by-one making sure not tooverload the generator set or cause a circuit breaker to trip. If a circuit breaker trips right away whenan appliance is connected, that appliance or circuit probably has a short.
FIGURE 5. CIRCUIT BREAKER CONNECTIONS
WARNINGShort circuits in electrical equipment can cause fire and electrical shock leading to severepersonal injury or death. Electrical equipment and its grounding must be maintained properly toprotect against short circuits.
Electrical equipment must be used and maintained properly, and be properly grounded, to cause the linecircuit breakers to trip when short circuits occur.
Electrical appliances and tools must be used and maintained in accordance with their manufacturer'sinstructions and safety precautions. Proper grounding is needed to reduce the risk of electric shock andfire.

4. Operation 12-2018
30 A031C171 (Issue 8)Copyright © 2018 Cummins Inc.
4.7 Connecting Shore PowerWARNING
Interconnecting the generator set and shore power can lead to electrocution of utility lineworkers, equipment damage, and fire. Use an approved switching device to preventinterconnections.
A vehicle with provisions for connecting utility power must have an approved device to keep the generatorset and utility from being interconnected. See the generator set Installation Manual for more information.
4.8 Operating in Weather ExtremesPay particular attention to the following items when operating the generator set in cold or hot weather.
1. Make sure nothing blocks airflow to and from the generator set.
2. Make sure engine oil viscosity is appropriate for the ambient temperature. See Section 5.5 on page33 for engine oil recommendations.
3. Keep the generator set clean.
4. Perform maintenance due. See Section 5.1 on page 31.
4.9 Operating in Dusty EnvironmentsPay particular attention to the following items when operating the generator set in dusty environments.
1. Do not let dirt and debris accumulate inside the generator set compartment. Keep the generator setclean.
2. Perform air filter element maintenance more often.
3. Change engine oil more often.
4.10 Care of New or Rebuilt EngineProper engine break-in on a new generator set or on one with a rebuilt engine is essential for top engineperformance and acceptable oil consumption. Run the generator set at approximately 1/2 rated power forthe first 2 hours and at 3/4 rated power for 2 more hours.
Proper engine oil and oil level are especially critical during break-in because of the higher enginetemperatures that can be expected. Change the oil if the oil is not appropriate for the ambienttemperatures during break-in. See Section 5.5 on page 33 for engine oil recommendations.
Check oil level twice a day or every 4 hours during the first 20 hours of operation and change the oil afterthe first 20 hours of operation.

31A031C171 (Issue 8) Copyright © 2018 Cummins Inc.
5 MaintenanceWARNING
Only authorized and competent personnel who are familiar with the equipment and its operationshould carry out maintenance.
5.1 Periodic MaintenanceWARNING
Accidental starting can cause severe personal injury or death. Turn off the AGS wheneverperforming maintenance or service, when the vehicle is stored between uses, is awaiting service,or is parked in a garage or other confined area.
Periodic maintenance is essential for top performance and long generator set life. Use the PeriodicMaintenance Schedule below for normal periodic maintenance. In hot and dusty environments somemaintenance procedures should be performed more frequently, as indicated by the footnotes in theschedule. Keeping a log of maintenance performed and hours run will help keep generator setmaintenance regular and provide a basis for supporting warranty claims (see Chapter 7).
Maintenance, replacement, or repair of emission control devices and systems may be performed by anyengine repair establishment or individual. However, warranty work must be completed by an authorizedCummins Service Representative.
5.1.1 Periodic Maintenance ScheduleTABLE 8. PERIODIC MAINTENANCE SCHEDULE
MAINTENANCE PROCEDURE
MAINTENANCE FREQUENCY
Every Dayor Every 8
Hours
After First20 Hours
EveryMonth
Every 150Hours
Every 450Hours
Every 500Hours
General Inspection X
Check Engine Oil Level X
Clean and Check Battery X3
Change Engine Oil X1 X2, 3, 4
Replace Air Filter Element X2
Clean Engine Cooling Fins X2
Replace Spark Plug(s) X5
Replace Fuel Filter X5
Adjust Valve Lash X6

5. Maintenance 12-2018
32 A031C171 (Issue 8)Copyright © 2018 Cummins Inc.
MAINTENANCE PROCEDURE
MAINTENANCE FREQUENCY
Every Dayor Every 8
Hours
After First20 Hours
EveryMonth
Every 150Hours
Every 450Hours
Every 500Hours
1 - As a part of engine break-in, change the engine oil after the first 20 hours of operation.2 - Perform more often when operating in dusty environments.3 - Perform more often when operating in hot weather.4 - Perform at least once a year.5 - Perform sooner if engine performance deteriorates.6 - Must be performed by a qualified mechanic (authorized Cummins Service Representative).7 - Must be completed for optimum performance.
5.2 Consumable PartsThe following is a list of consumables associated with the generator models covered in this manual:
TABLE 9. CONSUMABLE PARTS
Part Number Description Quantity
0167-1652 Spark Plug 1
0149-2661 Fuel Filter 1
A030Y328 Air Filter 1
A043H188 Brush Block 1
5.3 General Inspection1. Check battery connections (Section 5.4 on page 32).
2. Check engine oil level (Section 5.5 on page 33).
3. Check fuel system (Section 5.6 on page 36).
4. Check exhaust system (Section 5.7 on page 39).
5. Check mechanical system (Section 5.8 on page 40).
5.4 Maintaining the BatteryThe generator set requires a 12 Volt battery to power its control and starting circuits. Reliable generatorset starting and starter service life depend upon adequate battery system capacity and maintenance.
WARNINGFire HazardFlames, sparks, or arcing at battery terminals, light switches, or other equipment can ignitebattery gas, causing severe personal injury.Ventilate the battery area before working on or near a battery, wear safety glasses, and do notsmoke. Turn work light on or off away from the battery.

5. Maintenance12-2018
33A031C171 (Issue 8) Copyright © 2018 Cummins Inc.
Refer to Section 5.1 on page 31 for the battery maintenance schedule and follow the batterymanufacturer's instructions. Have the battery charging system serviced if DC system voltage isconsistently low or high.
Check the battery terminals for clean, tight connections. Loose or corroded connections have highelectrical resistance which makes starting harder.
1. Keep the battery case and terminals clean and dry.
2. Keep the battery terminals tight.
3. Remove battery cables with a battery terminal puller.
4. Make sure which terminal is positive (+) and which is negative (–) before making batteryconnections, always removing the negative (–) cable first and reconnecting it last to reduce arcing.
5.5 Maintaining the Lubrication SystemKeep dirt, water, and other contaminants from entering the lubrication system and corroding or clogginglubrication components.
5.5.1 Oil LevelPark the vehicle on level ground and stop the generator set before checking engine oil level.
WARNINGHot SurfacesContact with hot surfaces can cause severe burns, lacerations and liquid splash.Wear appropriate PPE when working on hot equipment and avoid contact with hot surfaces.
WARNINGCrankcase PressureCrankcase pressure can blow hot engine oil out the fill opening causing, severe burns.Always stop the generator set before removing the oil fill cap.
WARNINGToxic HazardState and federal agencies have determined that contact with used engine oil can cause canceror reproductive toxicity.Avoid skin contact and breathing of vapors. Use rubber gloves and wash exposed skin.
NOTICEToo little oil can cause severe engine damage. Too much oil can cause high oil consumption.Keep the oil level between the high and low beads (or markings) on the dipstick.
1. Unscrew the oil fill cap and wipe oil off the dipstick.
2. Reinsert without screwing in the dipstick.
3. Remove the dipstick again to check oil level.
4. Add or drain oil as necessary. Keep the oil level between the full and add marks.
5. Insert the dipstick and screw the oil fill cap back on securely.

5. Maintenance 12-2018
34 A031C171 (Issue 8)Copyright © 2018 Cummins Inc.
FIGURE 6. OIL FILL CAP AND DIPSTICK
5.5.2 Engine Oil Recommendations• Use API (American Petroleum Institute) performance Class SJ, SH or SG engine oil, which may be
in combination with performance Class CH-4, CG-4 or CF-4 (for example: SJ/CH-4).
• Look for the SAE (Society of Automotive Engineers) viscosity grade. Choose the viscosity gradeappropriate for the ambient temperatures expected until the next scheduled oil change.
• Single-grade SAE 30 oil is preferable when temperatures are consistently above freezing. Multigradeoils are better when wide temperature variations are expected.
TABLE 10. OIL VISCOSITY VS. TEMPERATURE
EXPECTED AMBIENT TEMPERATURES SAE VISCOSITY GRADE
0 °C (32 °F) and higher 30 (OnaMax)
–12 to 38 °C (10 to 100 °F) 15W-40 (OnaMax)
–18 to 27 °C (0 to 80 °F) 10W-30 10W-40
–28 to 10 °C (–20 to 50 °F) 5W-30
5.5.3 Changing Engine OilWARNING
Accidental or Remote StartingAccidental or remote starting can cause severe personal injury or death.Before removing a panel or access door, or before working on the generator set, use aninsulated wrench to disconnect the negative (-) cable from the battery to prevent accidentalstarting.
WARNINGHot SurfacesContact with hot surfaces can cause severe burns, lacerations and liquid splash.Wear appropriate PPE when working on hot equipment and avoid contact with hot surfaces.

5. Maintenance12-2018
35A031C171 (Issue 8) Copyright © 2018 Cummins Inc.
WARNINGToxic HazardState and federal agencies have determined that contact with used engine oil can cause canceror reproductive toxicity.Avoid skin contact and breathing of vapors. Use rubber gloves and wash exposed skin.
Refer to Section 5.1 on page 31 for the engine oil change schedule. Change oil more often in hot ordusty environments.
1. Run the generator set under load until it is up to operating temperature, stop it, and disconnect thenegative (–) battery cable at the battery.
WARNINGCrankcase PressureCrankcase pressure can blow hot engine oil out the fill opening causing, severe burns.Always stop the generator set before removing the oil fill cap.
2. Remove the oil fill cap.
3. Place a pan underneath the oil drain plug and remove the plug with a socket (see Oil Change Valuesand Drain Plug Location below). Let all oil drain from the engine.
4. Replace the plug. Tighten to torque value in Oil Change Values below.
NOTICEToo little oil can cause severe engine damage. Too much oil can cause high oilconsumption. Keep the oil level between the high and low beads (or markings) on thedipstick.
5. Refill with oil (see Oil Change Values below). Check the oil level and add or drain oil as necessary.
6. Screw the oil fill cap on securely.
7. Reconnect the negative battery cable.
8. Run the generator for a few minutes, shut it down, and recheck for proper oil level and leaks.
9. Dispose of the used oil in accordance with local environmental regulations.
5.5.3.1 Oil Change Values and Drain Plug LocationTABLE 11. OIL CHANGE VALUES
Drain Plug Bolt Plug Torque Oil Amount
9/16 inch 6.78–13.56 Nm (5–10 ft-lbs) 0.6 liters (0.63 qt)

5. Maintenance 12-2018
36 A031C171 (Issue 8)Copyright © 2018 Cummins Inc.
FIGURE 7. OIL DRAIN PLUG(S)
5.6 Maintaining the Fuel SystemKeep dirt, water, and other contaminants from entering the fuel system and corroding or clogging fuelsystem components.
5.6.1 Fuel SystemWARNING
Combustible LiquidFuel leaks are a fire or explosion hazard which can cause severe burns or death.Do not run the generator set if there is an indication of a fuel leak or causes fuel to leak.
1. Check for leaks at the hose, tube, and pipe fittings in the fuel supply system while the generator setis running and while it is stopped.
2. Check flexible fuel hoses sections for cuts, cracks, abrasions, and loose hose clamps.
3. Make sure the fuel line does not rub against other parts of the vehicle or generator set.
4. Replace worn or damaged fuel line parts before leaks occur.
5. If an LPG generator set and gas odor is detected, close the LPG container shutoff valve and havethe generator set serviced.

5. Maintenance12-2018
37A031C171 (Issue 8) Copyright © 2018 Cummins Inc.
5.6.2 Fuel RecommendationsWARNING
Gasoline and LPG are highly flammable and explosive and can cause severe personal injury ordeath. Do not smoke or turn electrical switches ON or OFF where fuel fumes, tanks, orequipment are present; or in areas sharing ventilation. Keep flames, sparks, pilot lights, arc-producing equipment and switches, and all other sources of ignition well away. Keep a type ABCfire extinguisher in the vehicle.
5.6.2.1 Gasoline ModelsUse clean, fresh unleaded gasoline having a minimum octane rating (Anti-Knock Index) of 87.
• Ethanol Blend - Not more than 10% ethanol
• Methanol Blend - Not more than 5% methanol and the fuel must also contain solvents and corrosioninhibitors.
CAUTIONUsing gasoline containing more than 5% methanol, or gasoline additives containing methanol,can be corrosive to fuel system components.
NOTICEAvoid using leaded gasoline because of the extra engine maintenance required.
5.6.2.2 LPG ModelsUse clean, fresh HD-5 grade liquefied petroleum gas (LPG) or equivalent product consisting of at least 90percent propane. Commercial LPG fuels may contain more than 2.5 percent butane which can result inpoor fuel vaporization and poor engine starting in low ambient temperatures (below 0 oC (32 oF)).
Satisfactory performance on low-pressure LPG models requires that the LPG vapor be supplied at apressure within the range indicated in the specifications chapter.
WARNINGHigh LPG supply pressure can cause gas leaks which can lead to fire and severe personal injuryor death. LPG supply pressure must be adjusted to Specifications by trained and experiencedpersonnel.
5.6.3 Replacing the Fuel FilterWARNING
Accidental or Remote StartingAccidental or remote starting can cause severe personal injury or death.Before removing a panel or access door, or before working on the generator set, use aninsulated wrench to disconnect the negative (-) cable from the battery to prevent accidentalstarting.
5. Maintenance 12-2018
38 A031C171 (Issue 8)Copyright © 2018 Cummins Inc.
WARNINGHot SurfacesContact with hot surfaces can cause severe burns, lacerations and liquid splash.Wear appropriate PPE when working on hot equipment and avoid contact with hot surfaces.
WARNINGGasoline is highly flammable and explosive and can cause severe personal injury or death. Donot smoke or turn electrical switches ON or OFF where fuel fumes, tanks, or equipment arepresent; or in areas sharing ventilation. Keep flames, sparks, pilot lights, arc-producingequipment and switches, and all other sources of ignition well away. Keep a type ABC fireextinguisher in the vehicle.
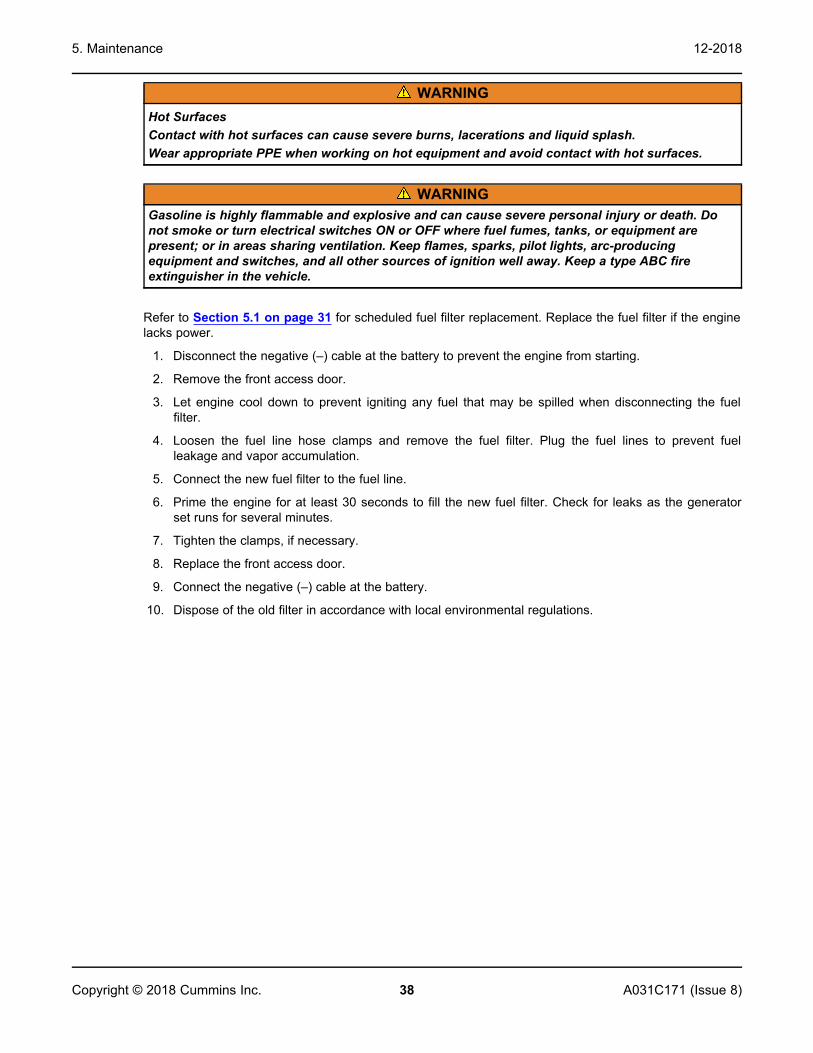
Refer to Section 5.1 on page 31 for scheduled fuel filter replacement. Replace the fuel filter if the enginelacks power.
1. Disconnect the negative (–) cable at the battery to prevent the engine from starting.
2. Remove the front access door.
3. Let engine cool down to prevent igniting any fuel that may be spilled when disconnecting the fuelfilter.
4. Loosen the fuel line hose clamps and remove the fuel filter. Plug the fuel lines to prevent fuelleakage and vapor accumulation.
5. Connect the new fuel filter to the fuel line.
6. Prime the engine for at least 30 seconds to fill the new fuel filter. Check for leaks as the generatorset runs for several minutes.
7. Tighten the clamps, if necessary.
8. Replace the front access door.
9. Connect the negative (–) cable at the battery.
10. Dispose of the old filter in accordance with local environmental regulations.
5. Maintenance12-2018
39A031C171 (Issue 8) Copyright © 2018 Cummins Inc.
No. Description No. Description
1 Fuel Filter 2 Clamps
FIGURE 8. FUEL FILTER
5.7 Exhaust SystemWARNING
EXHAUST GAS IS DEADLY! Do not operate the generator set if there is an exhaust leak or anydanger of exhaust gasses entering or being drawn into the vehicle.
WARNINGGrass or brush in contact with the exhaust system can cause fire. Do not park the vehicle in highgrass or brush.
1. Look and listen for exhaust system leaks while the generator set is running. Shut down the generatorset if a leak is found and have it repaired before operating.
2. Look for openings or holes between the generator set compartment and vehicle cab or living space ifthe generator set engine sounds louder than usual. Have all such openings or holes closed off andsealed to prevent exhaust gases from entering the vehicle.
3. Replace dented, bent, or severely rusted sections of the tailpipe and make sure the tailpipe extendsat least 25.4 mm (1 in) beyond the perimeter of the vehicle.
4. Park the vehicle so that generator set exhaust gases disperse away from the vehicle. Barriers suchas walls, snow banks, high grass, brush, and other vehicles can cause exhaust gases to accumulatein and around the vehicle.
5. Do not operate power ventilators or exhaust fans while the vehicle is standing with the generator setrunning. The ventilator or fan can draw exhaust gases into the vehicle.
5. Maintenance 12-2018
40 A031C171 (Issue 8)Copyright © 2018 Cummins Inc.
6. Check all CO monitors to assure proper operation.
5.8 Mechanical SystemWARNING
Compressed air, pressure washers, and steam cleaners can cause severe eye injury. Alwayswear safety glasses when using.
1. Look for mechanical damage and listen for unusual noises and vibrations.
2. Check the generator set mounting bolts.
3. Check to see that the generator set air inlet and outlet openings are not clogged with debris orblocked.
4. Clean accumulated dust and dirt from the generator set. Do not clean the generator set while it isrunning or still hot. Protect the generator, air cleaner, control panel, and electrical connections fromwater, soap, and cleaning solvents.
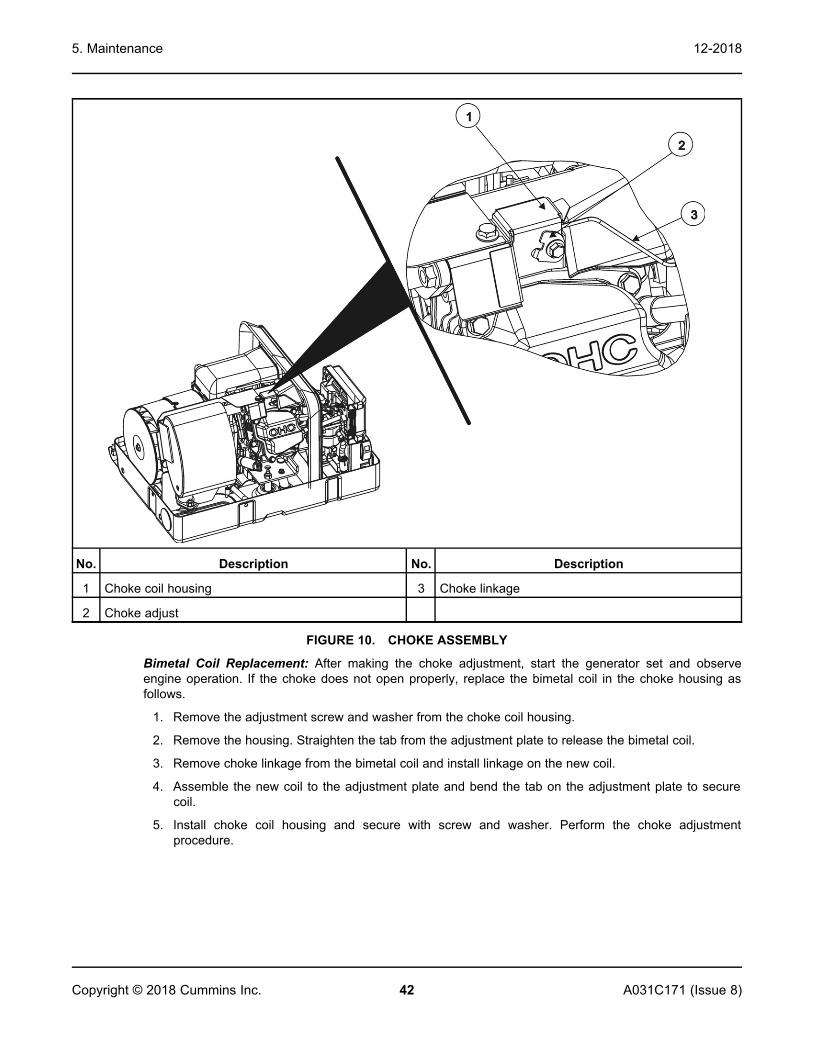
5.8.1 Gasoline Choke AssemblyThe generator set has an automatic choke assembly that consists of a bimetal choke coil, coil housing,heater tube (from the exhaust tube), and choke linkage. The choke linkage connects to the choke shaftlever on the carburetor.
When the engine is cold, the choke coil position causes the linkage to hold the choke nearly closed. Whenthe engine starts, hot air from the exhaust manifold enters the coil housing. The choke coil expandspulling the linkage to partially open the choke. As the engine warms up, the coil continues to expand andgradually opens the choke and holds it open while the engine is operating.
If the engine starts but runs rough and exhausts black smoke after a minute or two of operation, the chokesetting is too rich. If the engine starts but sputters or stops before it warms up, the choke setting is toolean.
Choke Adjustment: Check the choke linkage to make sure it is not bent or rubbing. Rotate the chokelever on the carburetor. The choke shaft should move freely and it should return to its original positionwhen released.
WARNINGThe choke housing becomes hot during operation and can cause severe burns if touched. Allowthe generator set to cool down before handling the choke assembly.
1. Allow the generator set to cool down. The temperature inside the housing must be the same as theambient temperature.
2. Loosen the adjustment screw holding the adjustment plate.
• If ambient temperature is different than 68 °F (20 °C), rotate the adjustment plate according tothe following table:
TABLE 12. CHOKE ADJUSTMENTS
Ambient Temp (°C) 8 14 20 26 32 38
Rotation of adjustment plate (notch) 1 0.5 0 0.5 1 1.5
Plate rotation CW CW - CCW CCW CCW

5. Maintenance12-2018
41A031C171 (Issue 8) Copyright © 2018 Cummins Inc.
3. Rotate the choke link plate on the carburetor until it is parallel to the carburetor flange.
4. Keeping that choke lever position, remove any tension of bimetal (tapping the adjustment plate orbimetal box lightly).
5. Tighten the adjustment bolt at that position. Release the choke lever and it should rotate back someby return spring.
NOTICEThis is the position the choke lever should be in when the ambient temperature is 68 °F (20°C).
6. Move the choke lever back and forth to check for free movement. Verify that the choke does not bindor stick.
FIGURE 9. CHOKE ADJUST
5. Maintenance 12-2018
42 A031C171 (Issue 8)Copyright © 2018 Cummins Inc.
No. Description No. Description
1 Choke coil housing 3 Choke linkage
2 Choke adjust
FIGURE 10. CHOKE ASSEMBLY
Bimetal Coil Replacement: After making the choke adjustment, start the generator set and observeengine operation. If the choke does not open properly, replace the bimetal coil in the choke housing asfollows.
1. Remove the adjustment screw and washer from the choke coil housing.
2. Remove the housing. Straighten the tab from the adjustment plate to release the bimetal coil.
3. Remove choke linkage from the bimetal coil and install linkage on the new coil.
4. Assemble the new coil to the adjustment plate and bend the tab on the adjustment plate to securecoil.
5. Install choke coil housing and secure with screw and washer. Perform the choke adjustmentprocedure.
5. Maintenance12-2018
43A031C171 (Issue 8) Copyright © 2018 Cummins Inc.
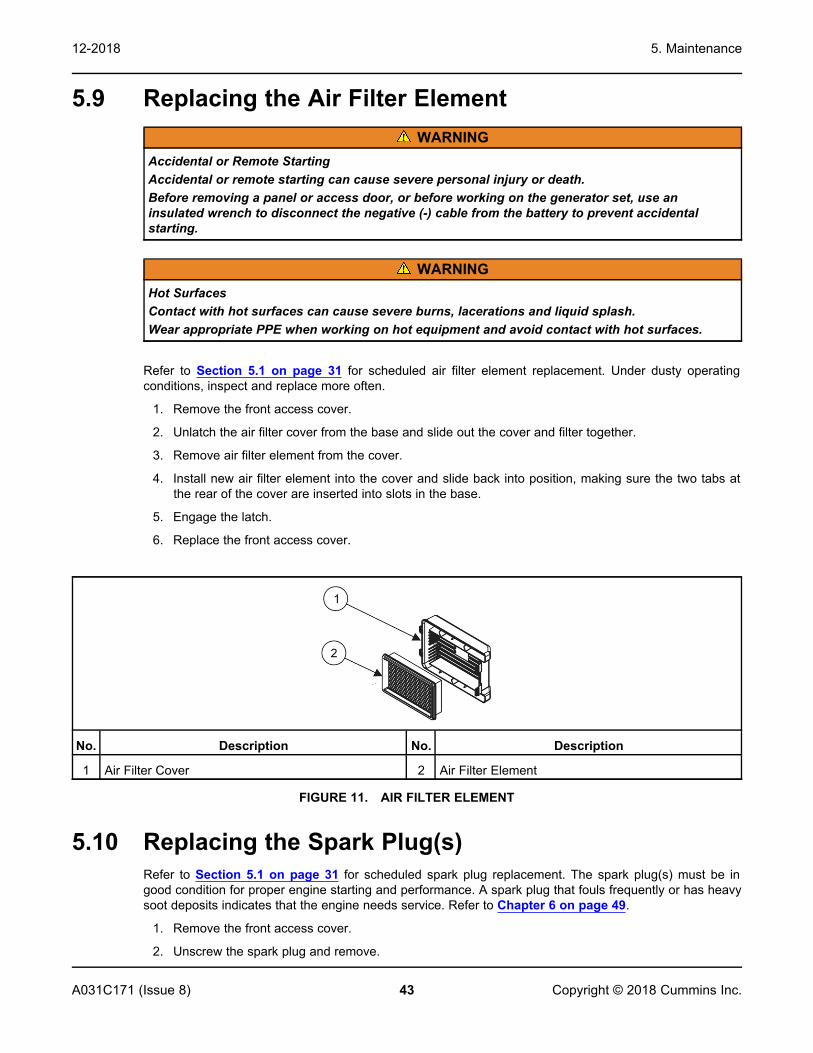
5.9 Replacing the Air Filter ElementWARNING
Accidental or Remote StartingAccidental or remote starting can cause severe personal injury or death.Before removing a panel or access door, or before working on the generator set, use aninsulated wrench to disconnect the negative (-) cable from the battery to prevent accidentalstarting.
WARNINGHot SurfacesContact with hot surfaces can cause severe burns, lacerations and liquid splash.Wear appropriate PPE when working on hot equipment and avoid contact with hot surfaces.
Refer to Section 5.1 on page 31 for scheduled air filter element replacement. Under dusty operatingconditions, inspect and replace more often.
1. Remove the front access cover.
2. Unlatch the air filter cover from the base and slide out the cover and filter together.
3. Remove air filter element from the cover.
4. Install new air filter element into the cover and slide back into position, making sure the two tabs atthe rear of the cover are inserted into slots in the base.
5. Engage the latch.
6. Replace the front access cover.
No. Description No. Description
1 Air Filter Cover 2 Air Filter Element
FIGURE 11. AIR FILTER ELEMENT
5.10 Replacing the Spark Plug(s)Refer to Section 5.1 on page 31 for scheduled spark plug replacement. The spark plug(s) must be ingood condition for proper engine starting and performance. A spark plug that fouls frequently or has heavysoot deposits indicates that the engine needs service. Refer to Chapter 6 on page 49.
1. Remove the front access cover.
2. Unscrew the spark plug and remove.
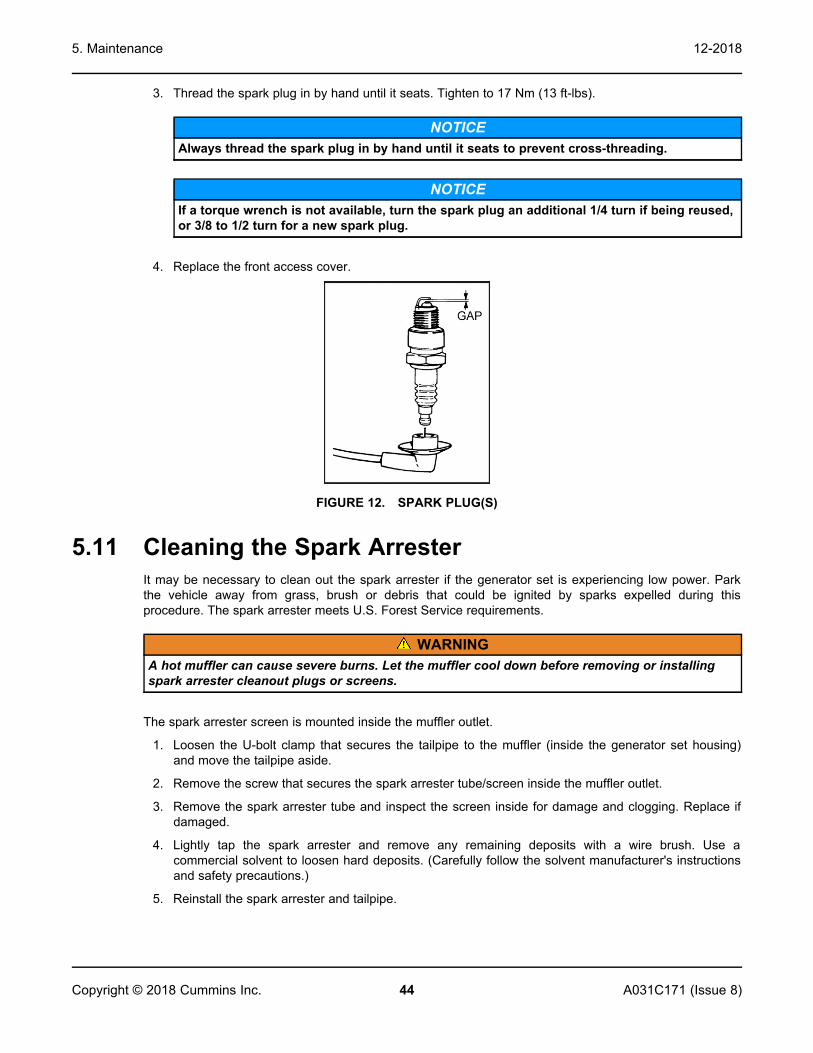
5. Maintenance 12-2018
44 A031C171 (Issue 8)Copyright © 2018 Cummins Inc.
3. Thread the spark plug in by hand until it seats. Tighten to 17 Nm (13 ft-lbs).
NOTICEAlways thread the spark plug in by hand until it seats to prevent cross-threading.
NOTICEIf a torque wrench is not available, turn the spark plug an additional 1/4 turn if being reused,or 3/8 to 1/2 turn for a new spark plug.
4. Replace the front access cover.
FIGURE 12. SPARK PLUG(S)
5.11 Cleaning the Spark ArresterIt may be necessary to clean out the spark arrester if the generator set is experiencing low power. Parkthe vehicle away from grass, brush or debris that could be ignited by sparks expelled during thisprocedure. The spark arrester meets U.S. Forest Service requirements.
WARNINGA hot muffler can cause severe burns. Let the muffler cool down before removing or installingspark arrester cleanout plugs or screens.
The spark arrester screen is mounted inside the muffler outlet.
1. Loosen the U-bolt clamp that secures the tailpipe to the muffler (inside the generator set housing)and move the tailpipe aside.
2. Remove the screw that secures the spark arrester tube/screen inside the muffler outlet.
3. Remove the spark arrester tube and inspect the screen inside for damage and clogging. Replace ifdamaged.
4. Lightly tap the spark arrester and remove any remaining deposits with a wire brush. Use acommercial solvent to loosen hard deposits. (Carefully follow the solvent manufacturer's instructionsand safety precautions.)
5. Reinstall the spark arrester and tailpipe.
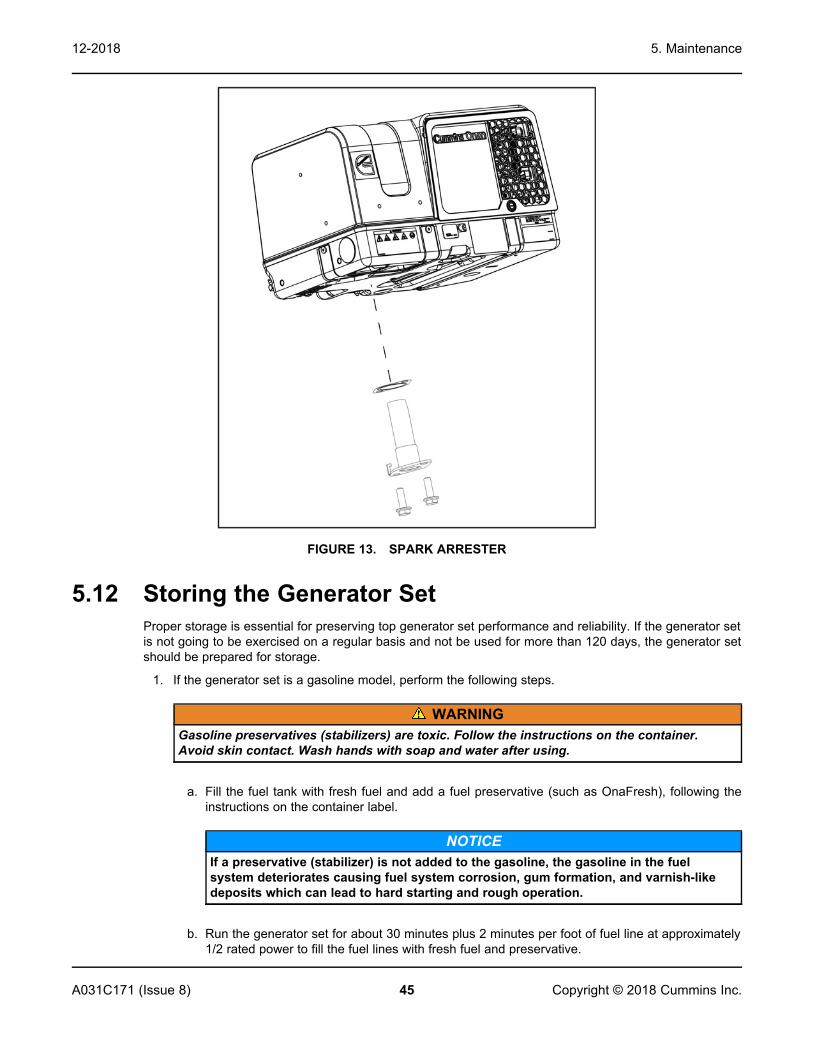
5. Maintenance12-2018
45A031C171 (Issue 8) Copyright © 2018 Cummins Inc.
FIGURE 13. SPARK ARRESTER
5.12 Storing the Generator SetProper storage is essential for preserving top generator set performance and reliability. If the generator setis not going to be exercised on a regular basis and not be used for more than 120 days, the generator setshould be prepared for storage.
1. If the generator set is a gasoline model, perform the following steps.
WARNINGGasoline preservatives (stabilizers) are toxic. Follow the instructions on the container.Avoid skin contact. Wash hands with soap and water after using.
a. Fill the fuel tank with fresh fuel and add a fuel preservative (such as OnaFresh), following theinstructions on the container label.
NOTICEIf a preservative (stabilizer) is not added to the gasoline, the gasoline in the fuelsystem deteriorates causing fuel system corrosion, gum formation, and varnish-likedeposits which can lead to hard starting and rough operation.
b. Run the generator set for about 30 minutes plus 2 minutes per foot of fuel line at approximately1/2 rated power to fill the fuel lines with fresh fuel and preservative.

5. Maintenance 12-2018
46 A031C171 (Issue 8)Copyright © 2018 Cummins Inc.
2. Change the engine oil and attach a tag indicating the oil grade viscosity.
3. Remove the air filter and restart the generator set. While the generator set is running, spray anengine fogger (such as OnaGard) into the carburetor, following the instructions on the containerlabel.
NOTICEThe engine fogger leaves a protective coat of oil on the internal surfaces of the engine.
4. Stop the generator set.
5. Disconnect all appliances.
6. Disconnect the battery cables, negative (–) cable first, from the starting battery and store the batteryaccording to the battery manufacturer's recommendations.
7. Cap the exhaust tail pipe to keep out dirt, moisture, rodents, and other foreign materials.
8. Close the fuel supply valve (if so equipped).
9. Position the line circuit breaker to OFF.
WARNINGLPG leaks can lead to explosive accumulation in pits, sumps, or other below-gradelocations. Comply will all local ordinances regarding the garaging of vehicles with LPGengine fuel systems.
10. If the generator set is an LPG model, check the local ordinances if the vehicle is going to begaraged. Generally, ordinances require that the LPG system be leak-free, that the LPG container notbe filled beyond specified limits, that the container shutoff valve be closed, and that the vehicle notbe parked near sources of heat or ignition.
WARNINGDo not open the carburetor drain when the engine is hot. Close the drain immediately afterdraining. Failure to heed this warning can lead to fire resulting in severe personal injury ordeath.
11. If the generator set is a gasoline model, perform the following steps to drain the carburetor float bowl.
NOTICEDraining the float bowl prevents deposits of gum from clogging the tiny passages in thecarburetor because the gasoline in the bowl evaporates during storage.
a. Let the engine cool down thoroughly.
b. Place paper towels under the drain to absorb all of the drainage (less than 1/2 cup).
WARNINGOpening the carburetor drain when the engine is hot can lead to fire resulting in severepersonal injury or death. Do not open the drain when the engine is hot. Close the drainimmediately after draining.
c. Open the drain valve by turning counter-clockwise with a screwdriver.
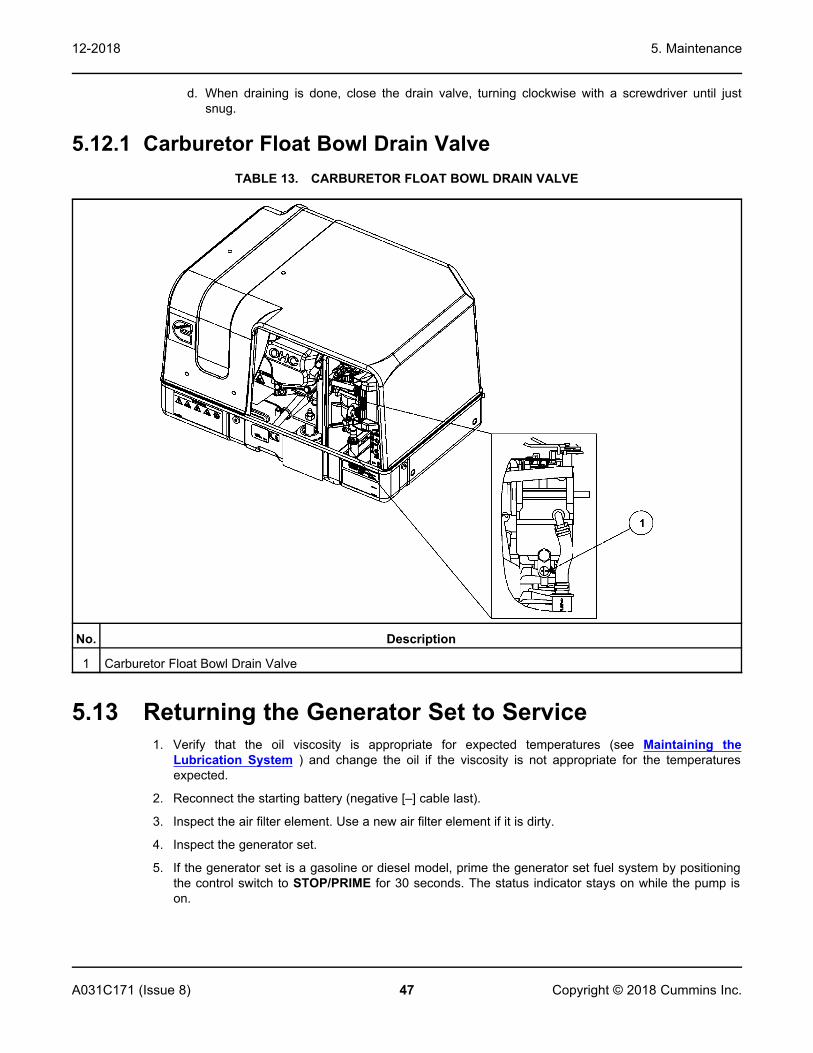
5. Maintenance12-2018
47A031C171 (Issue 8) Copyright © 2018 Cummins Inc.
d. When draining is done, close the drain valve, turning clockwise with a screwdriver until justsnug.
5.12.1 Carburetor Float Bowl Drain ValveTABLE 13. CARBURETOR FLOAT BOWL DRAIN VALVE
No. Description
1 Carburetor Float Bowl Drain Valve
5.13 Returning the Generator Set to Service1. Verify that the oil viscosity is appropriate for expected temperatures (see Maintaining the
Lubrication System ) and change the oil if the viscosity is not appropriate for the temperaturesexpected.
2. Reconnect the starting battery (negative [–] cable last).
3. Inspect the air filter element. Use a new air filter element if it is dirty.
4. Inspect the generator set.
5. If the generator set is a gasoline or diesel model, prime the generator set fuel system by positioningthe control switch to STOP/PRIME for 30 seconds. The status indicator stays on while the pump ison.

5. Maintenance 12-2018
48 A031C171 (Issue 8)Copyright © 2018 Cummins Inc.
6. Start the generator set. There may be smoke and rough operation for a few minutes until the oil fromthe fogger burns off. If the engine does not start, clean or replace the spark plug, which may havebeen fouled by the fogger.
7. Position the line circuit breaker to ON when the generator set is ready to power loads.

49A031C171 (Issue 8) Copyright © 2018 Cummins Inc.
6 Troubleshooting
6.1 OverviewWARNING
Hot engine parts can cause severe burns. Always allow the engine to cool down beforeperforming any maintenance or service.
The following paragraphs provide fault code faults and symptom-based faults. If a problem is not resolvedafter taking the corrective actions suggested, contact a local dealer or distributor. See Section 2.4 onpage 11.
NOTICEMaintaining engine oil level, keeping battery connections clean and tight, watching the fuelgauge, not overloading the generator set, etc. will prevent most shutdowns.
NOTICEWhen the generator set and vehicle engine share a common fuel tank, the fuel dip tubes areusually arranged so that the generator set will run out of fuel first. Marking the generator setempty point on the fuel gauge will make it easier to tell when to stop the generator set beforerunning it out of fuel.
6.2 Fault CodesThe generator set control contains extensive diagnostics to detect shutdown faults. Following a faultshutdown, the control indicates the fault code by flashing the numeric code on the status indicator in thecontrol switch.
Determine the fault code as follows:
• 3 flashes indicates a service fault (Code 3 fault).
1. Press STOP/PRIME on the control switch once to have the 2-digit service fault code flash.
The 2-digit code consists of two sets of flashes. The first set is of flashes represents the 10sdigit of the code. After a brief pause, the second digit of the code flashes representing the unitdigit of the code. This is followed by a long pause before repeating the flashing of the faultcode.
For example, Fault Code 36 appears as: blink-blink-blink—pause—blink-blink-blink-blink-blink-blink—long pause—repeat
2. Press STOP/PRIME to stop flashing the fault code.
• 4 flashes indicates that cranking exceeded 30 seconds without the engine starting (Code 4 fault).
NOTICEFault codes 33 and 34 are not assigned as fault codes. Be careful of interpreting FaultCodes 3 and 4 as second-level faults.
6. Troubleshooting 12-2018
50 A031C171 (Issue 8)Copyright © 2018 Cummins Inc.
The fault code stops flashing after 5 minutes. Pressing STOP/PRIME 3 times within 5 seconds causes thefault code to resume flashing.
NOTICEThe last fault logged continues to flash even though the condition that caused the shutdown hasbeen corrected.
6.2.1 Code 2 - Low Oil PressureIndicates that the low oil pressure cutoff switch did not open.
A. Check Engine Oil Level1. If the dipstick indicates oil is low, add oil.
2. If oil is above the full mark on dipstick, drain excess oil.
6.2.2 Code 3 - Service CheckSee second-level fault code.
6.2.3 Code 4 - Over CrankIndicates that cranking exceeded 30 seconds without engine starting.
A. Check Fuel Level1. If fuel level is low, fill the fuel tank.
NOTICEThe generator set fuel pickup tube could be higher up in the fuel tank than the vehicleengine pickup.
2. Prime the engine fuel system by positioning the control switch to STOP/PRIME for 30 seconds.
B. Check LPG LevelCheck and fill the LPG container, as necessary.
NOTICEOn cold days, the LPG container may have to be kept at least half full to provide the rate ofvaporization necessary to keep up with the generator set fuel demand.
C. Check Spark Plug(s)1. Secure the spark plug lead(s) on the spark plug(s).
2. Replace the spark plug(s).
D. Check Air Filter ElementReplace the air filter if dirty.

6. Troubleshooting12-2018
51A031C171 (Issue 8) Copyright © 2018 Cummins Inc.
E. Replace Engine OilReplace engine oil with oil of proper viscosity for the ambient temperature.
NOTICEHigh oil viscosity can slow down cranking speed.
F. Check Fuel Fittings1. Tighten any fuel fitting if there is a fuel or air leak.
2. Reprime the engine fuel system by positioning the control switch to STOP/PRIME for 30seconds.
G. Replace Fuel Filter
6.2.4 Code 12 - Over VoltageIndicates the control is unable to maintain rated voltage.
A. Contact Local Dealer or Distributor
6.2.5 Code 13 - Under VoltageIndicates the control is unable to maintain rated voltage.
A. Reduce LoadReduce the number of connected appliances, especially air conditioners and battery chargers.(Review load management in Section 4.4.)
6.2.6 Code 14 - Over FrequencyIndicates the engine governor is unable to maintain rated frequency.
A. Contact Local Dealer or Distributor
6.2.7 Code 15 - Under FrequencyIndicates the engine governor is unable to maintain rated frequency.
A. Reduce LoadReduce the number of connected appliances, especially air conditioners and battery chargers.(Review load management in Section 4.4.)
6.2.8 Code 27 - Voltage SenseIndicates the control is unable to sense output voltage.

6. Troubleshooting 12-2018
52 A031C171 (Issue 8)Copyright © 2018 Cummins Inc.
A. Contact Local Dealer or Distributor
6.2.9 Code 29 - High Battery VoltageIndicates that voltage across the battery system is greater than 19 Volts.
A. Check Battery1. Check battery bank connections and reconnect if necessary so that the 12 Volt batteries
serving the generator set are connected in parallel (12 Volt) rather than in series (24 Volt).
2. Select a lower battery boost charge rate.
6.2.10 Code 31 - Over SpeedIndicates that engine speed is greater than 3400 RPM.
A. Contact Local Dealer or Distributor
6.2.11 Code 32 - Low Cranking SpeedIndicates that cranking speed is less than 180 RPM for more than 2 seconds.
A. Check Battery1. Clean and tighten the positive (+) and negative (–) battery cable connections at the battery and
at the generator set.
2. Recharge or replace the battery. Refer to the battery manufacturer's recommendations.
B. Replace Engine OilReplace engine oil with oil of proper viscosity for the ambient temperature.
NOTICEHigh oil viscosity can slow down cranking speed.
6.2.12 Code 35 - Control Card FailureIndicates that a microprocessor EEPROM error occurred during self test.
A. Contact Local Dealer or Distributor
6.2.13 Code 36 - Engine StoppedIndicates that the engine stopped without receiving a command from the control.
A. Check Fuel Level1. If fuel level is low, fill the fuel tank.
6. Troubleshooting12-2018
53A031C171 (Issue 8) Copyright © 2018 Cummins Inc.
NOTICEThe generator set fuel pickup tube could be higher up in the fuel tank than the vehicleengine pickup.
2. Prime the engine fuel system by positioning the control switch to STOP/PRIME for 30 seconds.
B. Check LPG LevelCheck and fill the LPG container, as necessary.
NOTICEOn cold days, the LPG container may have to be kept at least half full to provide the rate ofvaporization necessary to keep up with the generator set fuel demand.
C. Check Spark Plug(s)1. Secure the spark plug lead(s) on the spark plug(s).
2. Replace the spark plug(s).
D. Check Air Filter ElementReplace the air filter if dirty.
E. Check for Mechanical Damage
6.2.14 Code 37 - Invalid Generator Set ConfigurationIndicates that the frequency/RPM ratio is wrong.
A. Contact Local Dealer or Distributor
6.2.15 Code 38 - Over Current (Field Overload)Indicates low power factor loads.
A. Reduce LoadReduce the number of connected appliances, especially air conditioners and battery chargers.(Review load management in Section 4.4.)
B. Check Appliances for Proper OperationHave air conditioners and other appliances checked for proper operation.
6.2.16 Code 41 - Generator RotorIndicates control is unable to sense field or output voltage.

6. Troubleshooting 12-2018
54 A031C171 (Issue 8)Copyright © 2018 Cummins Inc.
A. Contact Local Dealer or Distributor
6.2.17 Code 42 - ProcessorIndicates that a microprocessor ROM error occurred during self test.
A. Contact Local Dealer or Distributor
6.2.18 Code 43 - ProcessorIndicates that a microprocessor RAM error occurred during self test.
A. Contact Local Dealer or Distributor
6.2.19 Code 45 - Speed SenseIndicates the control is unable to sense quadrature frequency.
A. Contact Local Dealer or Distributor
6.2.20 Code 47 - IgnitionIndicates the control is unable to sense ignition.
A. Contact Local Dealer or Distributor
6.2.21 Code 48 - Generator Field SenseIndicates the control is unable to sense field voltage.
A. Contact Local Dealer or Distributor
6.3 Symptom BasedDiagnosis of some problems involves observing system operation.
6.3.1 Status Indicator Not WorkingIndicates that there could be faulty connections or no battery voltage.
A. Check Other Control SwitchTry the generator set control switch if the remote control switch start doesn't work, and vice versa.
B. Check Battery1. Clean and tighten the positive (+) and negative (–) battery cable connections at the battery and
at the generator set.
2. Recharge or replace the battery. Refer to the battery manufacturer's recommendations.
6.3.2 Starting Batteries Run DownIndicates problem with batteries, connections, charging system, or parasitic loads.

6. Troubleshooting12-2018
55A031C171 (Issue 8) Copyright © 2018 Cummins Inc.
A. Check Battery1. Clean and tighten the positive (+) and negative (–) battery cable connections at the battery and
at the generator set.
2. Recharge or replace the battery. Refer to the battery manufacturer's recommendations.
B. Battery Charging SystemInstall or service a battery charging system in the vehicle.
6.3.3 Starter Engages-DisengagesIndicates cranking voltage dips below 6 Volts.
A. Use Vehicle to Start Generator SetRun the vehicle propulsion engine while trying to start the generator set—the battery chargingalternator may be able to maintain starting voltage high enough to start the generator set.
B. Check Battery1. Clean and tighten the positive (+) and negative (–) battery cable connections at the battery and
at the generator set.
2. Recharge or replace the battery. Refer to the battery manufacturer's recommendations.
C. Change Battery CablesIncrease battery cable size or run parallel cables.
6.3.4 Status Indicator Goes Out While Cranking—No StartIndicates an internal short circuit caused an automatic-reset circuit protective device to trip.
A. Try Starting AgainIf the status indicator flashes and goes out again without the engine starting, call local dealer ordistributor.
6.3.5 No Power—Generator Set Running, Status Light OnIndicates line circuit breaker is OFF, or tripped due to short circuit or overload.
A. Check Line Circuit Breakers1. Turn on or reset the line circuit breaker on the generator set.
2. Turn on or reset the line circuit breaker on the main distribution panel in the vehicle.

This page is intentionally blank.
6. Troubleshooting 12-2018
56 A031C171 (Issue 8)Copyright © 2018 Cummins Inc.

57A031C171 (Issue 8) Copyright © 2018 Cummins Inc.
7 Maintenance RecordRecord all periodic and unscheduled maintenance and service. See the Periodic Maintenance section formore information.
Record the name, address, and phone number of your authorized Cummins service center.
TABLE 14. MAINTENANCE RECORD
DATEHOUR
METERREADING
MAINTENANCE OR SERVICE PERFORMED

7. Maintenance Record 12-2018
58 A031C171 (Issue 8)Copyright © 2018 Cummins Inc.
This page is intentionally blank.


power.cummins.comCopyright © 2018 Cummins Inc. All rights reserved.Cummins, Onan, and the "C" logo are registered trademarks of Cummins Inc. and its subsidiaries.Other company, product, or service names may be trademarks or service marks of others.Specifications are subject to change without notice.