Embed Size (px)
Citation preview

A Short Introduction to POV-Ray
Peter Fischer, ZITI, Heidelberg University
1 A Short Introduction to POV-Ray © Peter Fischer

What is POV-Ray ?
§ A software to produce 3D images
§ Very easy to use (in my opinion) • Simple concept to generate complex shapes • Can define new objects easily • Can do mathematics & calculations & loops & ...
§ Can obtain very high quality • Based on Ray Tracing • Many 3D textures • Many illumination schemes
§ Open source standard – many examples available
2 A Short Introduction to POV-Ray © Peter Fischer

Why Use & Know About POV-Ray ?
§ 3D images are good to illustrate presentations or documents
3 A Short Introduction to POV-Ray © Peter Fischer
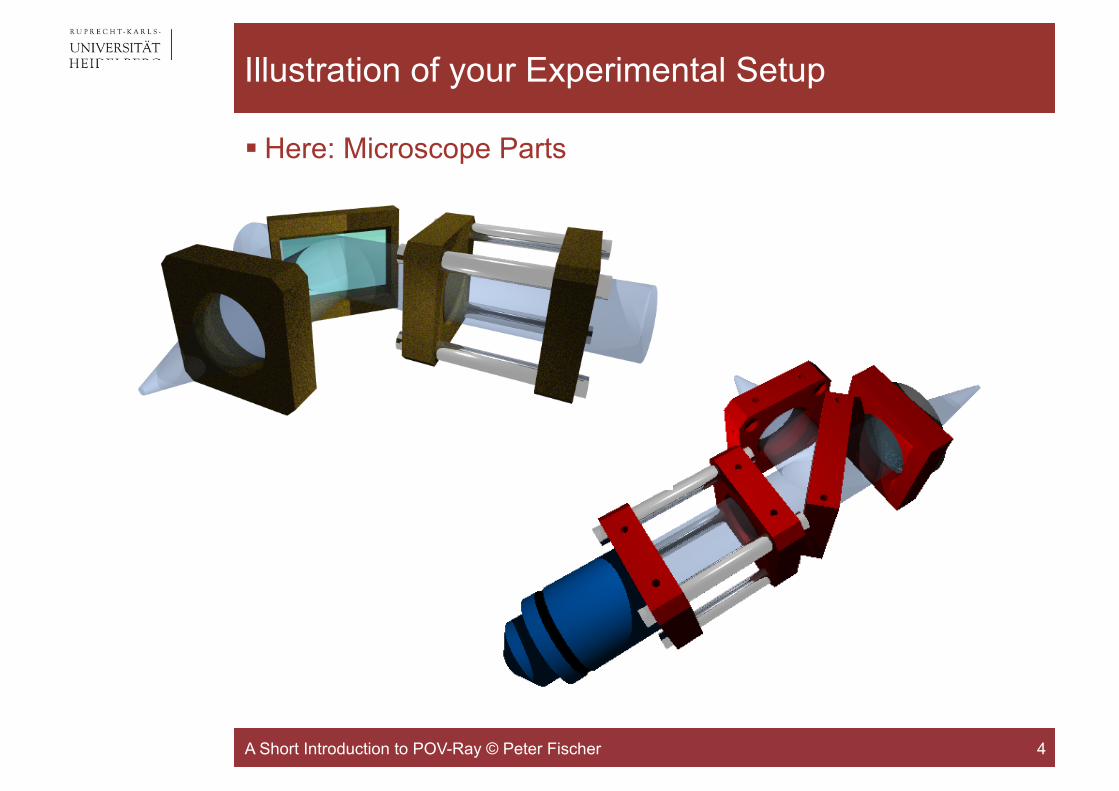
Illustration of your Experimental Setup
§ Here: Microscope Parts
4 A Short Introduction to POV-Ray © Peter Fischer

Another Example
§ Taken from a PhD Thesis (N. Camus) on Optics
5 A Short Introduction to POV-Ray © Peter Fischer

Where to get POV-Ray and help ?
§ POVRAY is open source: • Main site: www.povray.org • Extensions: megapov.inetart.net • For Mac: megapov.inetart.net/povrayunofficial_mac • Wiki: wiki.povray.org/content/Main_Page • Tutorial: de.wikibooks.org/wiki/Raytracing_mit_POV-Ray • Tutorial: www.f-lohmueller.de/pov_tut/pov__ger.htm
§ Windows / MAC versions comes with integrated editor
§ Linux version is command line tool
6 A Short Introduction to POV-Ray © Peter Fischer
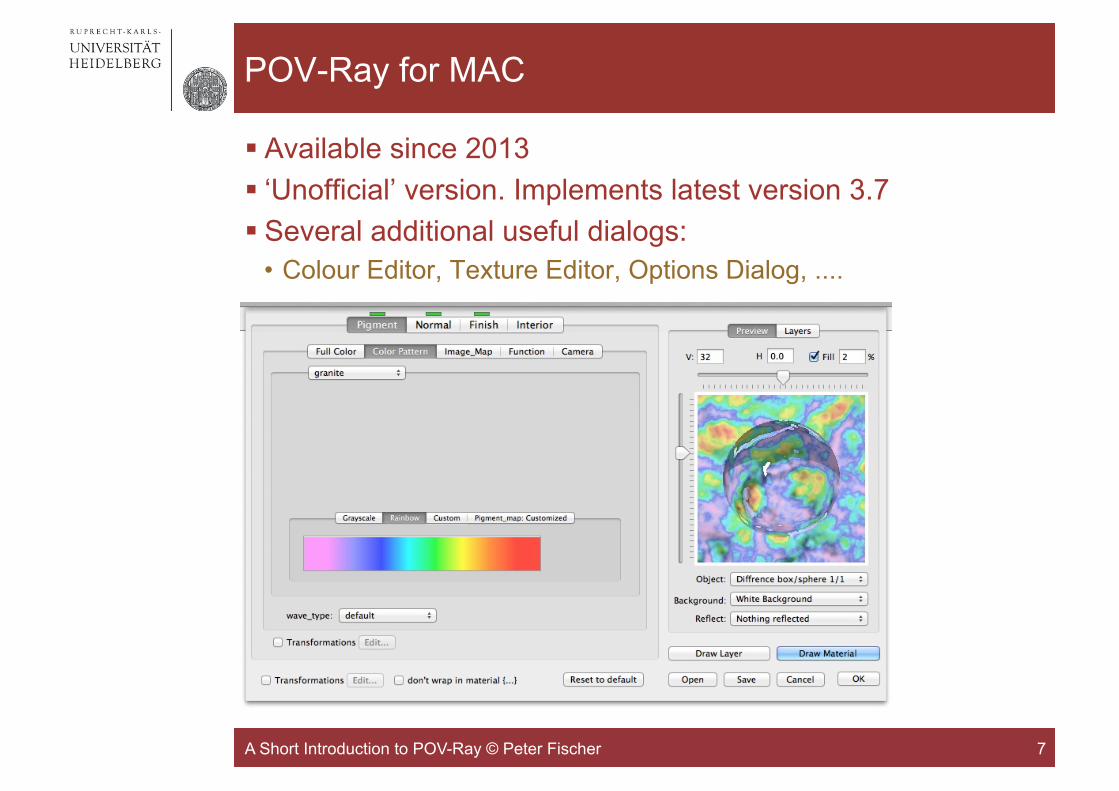
POV-Ray for MAC
§ Available since 2013 § ‘Unofficial’ version. Implements latest version 3.7 § Several additional useful dialogs:
• Colour Editor, Texture Editor, Options Dialog, ....
7 A Short Introduction to POV-Ray © Peter Fischer

Have a Look at this Phantastic Web-Site:
§ The site www.f-lohmueller.de offers a very wide range of • Tutorials • Examples (with source codes) • Animations • Textures • Shapes • ... (much more)... • ... (much more)...
§ Pages are available in German / English / French / Italian
§ There are many tricky details explained on that site!
8 A Short Introduction to POV-Ray © Peter Fischer
Go and see it!

Command Line Options (Linux, CIP Pool)
§ Start for instance with povray +Ifile.pov +H400 +W400 +SP8 +Q8 +A0.3 +P +fn
§ Options shown are: +Ifile.pov : input file (do not forget ‘+I’ !!!) +H400 : image height in pixels +W400 : image width in pixels +SP8 : generate every 8th pixel first, then every 4th etc.
(does not work in CIP Pool!) +Q8 : quality: 1.., higher = better & slower (8=reflections...) +A0.3 : anti-aliasing setting (slower) +P : pause after rendering (to admire the picture) +fn : output format = .png (default on Linux)
§ To get more information: -H : show all options
9 A Short Introduction to POV-Ray © Peter Fischer
Using a Configuration File
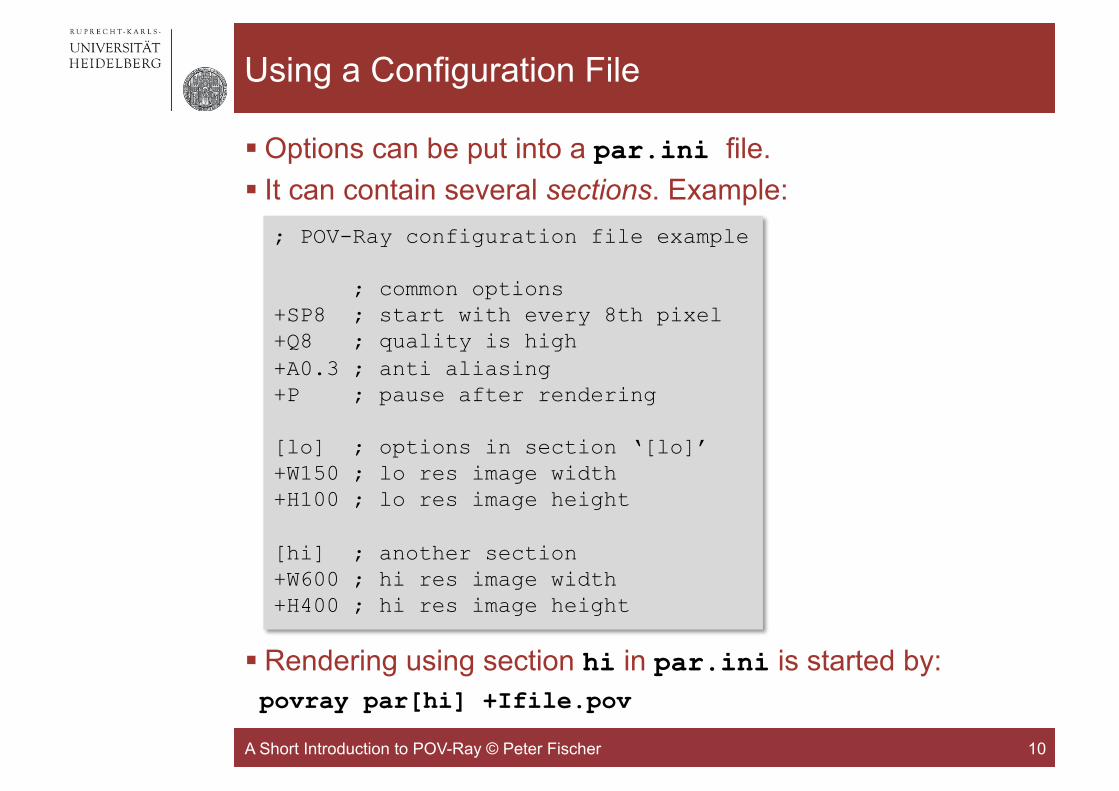
§ Options can be put into a par.ini file. § It can contain several sections. Example:
§ Rendering using section hi in par.ini is started by: povray par[hi] +Ifile.pov
10 A Short Introduction to POV-Ray © Peter Fischer
; POV-Ray configuration file example ; common options +SP8 ; start with every 8th pixel +Q8 ; quality is high +A0.3 ; anti aliasing +P ; pause after rendering [lo] ; options in section ‘[lo]’ +W150 ; lo res image width +H100 ; lo res image height [hi] ; another section +W600 ; hi res image width +H400 ; hi res image height

A First Example
A Short Introduction to POV-Ray © Peter Fischer 11
#include "colors.inc" #include "woods.inc" #include "glass.inc"
cylinder { <-2,-2,0.5>, <-2,1,0.5>, 1 pigment {color Red} } sphere { <0,1,1>, 1 texture{ T_Wood20 scale 3 } } box { <-3,-1,-1>, <1,-0.5, 2> pigment {Col_Glass_Winebottle} }
background { color White } light_source {<0, 5, -3> color White } light_source {<-2, 2, 0.5> color Yellow }
camera { location <0, 2, -6> angle 50 right x look_at <-1, 0, 0> }
Red cylinder
Wooden sphere
transparent box
illumination
Position of camera
HelloWorld.pov

The Coordinate System
§ Remember: X and Y are like in Mathematics § Positive Z is ‘into the screen’
• note: This is a LEFT-handed coordinate system
12 A Short Introduction to POV-Ray © Peter Fischer
Vectors, Directions & Rotations
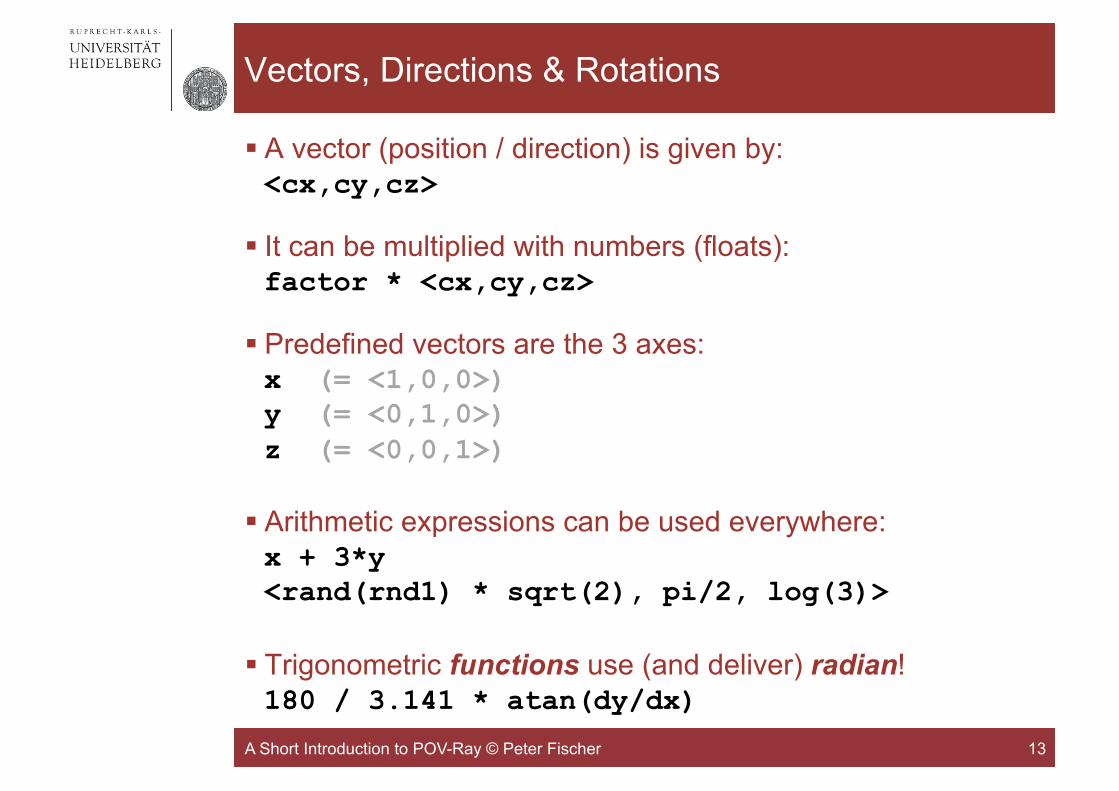
§ A vector (position / direction) is given by: <cx,cy,cz>
§ It can be multiplied with numbers (floats): factor * <cx,cy,cz>
§ Predefined vectors are the 3 axes: x (= <1,0,0>) y (= <0,1,0>) z (= <0,0,1>)
§ Arithmetic expressions can be used everywhere: x + 3*y <rand(rnd1) * sqrt(2), pi/2, log(3)>
§ Trigonometric functions use (and deliver) radian! 180 / 3.141 * atan(dy/dx)
13 A Short Introduction to POV-Ray © Peter Fischer

Vector as Rotation Axis
§ Vectors are also used for rotations: • The direction of the vector is the rotation axis • The length of the vector is the angle (in degrees) • left hand rotation sense is used (for positive angle values)
14 A Short Introduction to POV-Ray © Peter Fischer
63.6 * <3,3,0>
This are 270 degrees because the length of vector = √(32+32+02)
270 * <0,1,0> or
270 * y

Technicalities: Comments & Definitions
§ POV-Ray is caseSensiTIve § Comment lines start with //: // comment
§ Comment blocks are done as in C: /* ... (can be multiple lines) ... */
§ Constants or frequently used expressions are defined by: #declare name = ... ; • Note: #define does not work • A semicolon is required! (No Semicolon is required after ‘}’)
§ Parameters can be passed by defining a ‘macro’: #macro name (parameters,..) ... #end
15 A Short Introduction to POV-Ray © Peter Fischer

The Camera
16 A Short Introduction to POV-Ray © Peter Fischer
§ It has a position: location <point> § The viewing direction can be set by: look_at <point>
location <2,3,-4> look_at <2,0,0> // red sphere
location <2,3,-4> look at <1,2,0> // red sphere

More Camera Positions
§ The two scenes look at the same (red) point <1,1,0> from different camera positions
17 A Short Introduction to POV-Ray © Peter Fischer
From below the x-z-ground plane, from left side. From ‘behind’

Camera: Viewing Angle
§ viewing angle angle <value> sets • small value: ‘Tele’ (low distortion) • large value: ‘Wide angle’ • very large value: ‘Fish Eye’ (significant bending of straight lines)
18 A Short Introduction to POV-Ray © Peter Fischer
view 60 view 30

Camera: Aspect Ratio
§ A nasty detail is that we must tell the renderer the aspect ratio (width / height) of the image to avoid distortion
§ This ratio is best set to the rendering command values: right x * image_width / image_height
19 A Short Introduction to POV-Ray © Peter Fischer
Rendering: +H400 +W400 File: right x * 1.0
Rendering: +H200 +W400 File: right x * 1.0
Rendering: +H200 +W400
File: right x * 2.0

Camera: All together
§ A typical camera command is
§ The default camera (if no camera is defined) is
20 A Short Introduction to POV-Ray © Peter Fischer
camera { location <1, 1, -6> look_at <0, 1, 0> angle 50 right x * image_width / image_height }
camera { perspective location <0,0,0> direction <0,0,1> right 4.0 / 3.0 * x up y sky <0,1,0> }

Light Sources
§ They can be point sources, area sources or spotlights, ...
§ Use background {color xxx} to color the ‘sky’ § Use global_settings {ambient_light color} to get
diffuse light on all surfaces. (More light with …10*<1,0,0>)
21 A Short Introduction to POV-Ray © Peter Fischer
light_source { <position> color ... }
light_source { <position> area_light // parameters.. }
light_source { <position> spotlight // parameters.. }

Light Sources
§ Light Sources can have color: • Image shows a white sphere. Look at sphere color & shadows!
22 A Short Introduction to POV-Ray © Peter Fischer
No green light here: Plane is red

Note
§ The order of commands in light source definitions matters, some combinations give syntax errors…
23 A Short Introduction to POV-Ray © Peter Fischer
light_source { <-1,2,-2> color White spotlight // ERROR if used before point_at <0,0,0> // 'color' line!!! radius 50.0 falloff 200.0 tightness 5 }

Simple Objects
§ Simple objects are: • sphere { <location>, radius } • box { <corner>, <opposite_corner> } • cylinder { <p1>, <p2>, radius } • cone { <p1>, r1, <p2>, r2 } • plane { <normal>, dist_origin } • torus { rlarge, rsmall } // in x-y plane
§ They can be coloured (surface & volume!) using • pigment {color rgb <r, g, b>}
or just • pigment {color <r, g, b>}
§ Transparency can be added by a 4th parameter • pigment {color rgbt <r, g, b, t>}
§ Predefined colors from "colors.inc" are Red, White,..
24 A Short Introduction to POV-Ray © Peter Fischer
rlarge rsmall

Example
#include "colors.inc“
sphere { < 0, 5, 0>, 1 pigment {color Blue} finish { phong 0.9 phong_size 60 } } cylinder { <-1, 3, -1>, <1, 3.5, 1>, 0.5 pigment {color <1,0,0>} }
cone { <-1, 1.5, -1>, 0.8, <1, 1, 1>, 0.1 pigment {color rgbt <1,1,0,0.5>} } box { <-1,0,-1>, <1, 0.5, 1> pigment {color Magenta} } plane { y,-1 pigment {checker Gray80, White} }
background { color White } light_source {<-2,5,-3> color White } light_source {<2,2,-1.5> color Yellow }
camera { location <0, 1, -6> angle 40 right x * 400 / 800 look_at <0,2,0> }
25 A Short Introduction to POV-Ray © Peter Fischer
Exercise 1
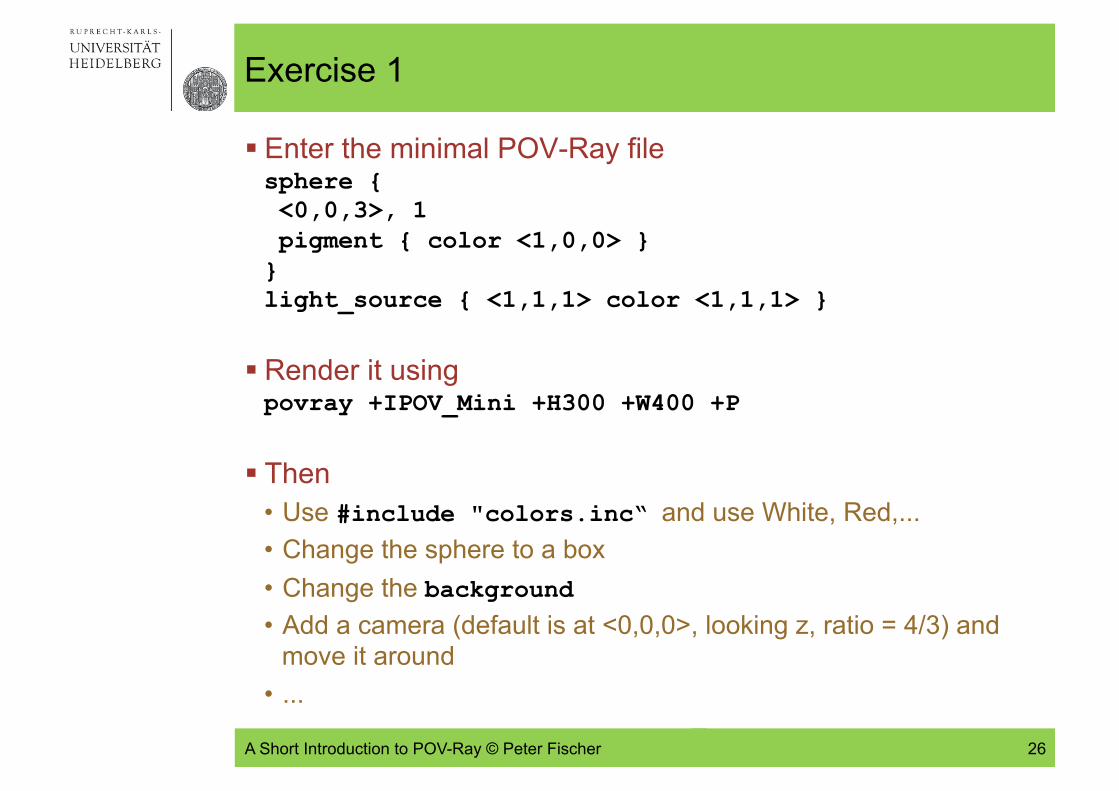
§ Enter the minimal POV-Ray file sphere { <0,0,3>, 1 pigment { color <1,0,0> } } light_source { <1,1,1> color <1,1,1> }
§ Render it using povray +IPOV_Mini +H300 +W400 +P
§ Then • Use #include "colors.inc“ and use White, Red,... • Change the sphere to a box • Change the background • Add a camera (default is at <0,0,0>, looking z, ratio = 4/3) and
move it around • ...
26 A Short Introduction to POV-Ray © Peter Fischer

Exercise 2
§ Create the following scene (just the red stuff, no blue axes) • The centre of the sphere is at <-2,0,0> • put the camera at <-1,2,-5>
27 A Short Introduction to POV-Ray © Peter Fischer

Moving and Rotating Things
§ Objects can be moved, scaled & rotated: • translate <shift_vector> • scale <scalex, scaley, scalez> (or scale val) • rotate <vector> (vector defines direction & angle)
§ Example:
28 A Short Introduction to POV-Ray © Peter Fischer
box { <-1,-1,-1>, <1,1,1> pigment {color Red} scale <2,1,1> rotate 30*z translate 3*z }

Rotations & Translations are not Commutative!
A Short Introduction to POV-Ray © Peter Fischer 29
box { <-1,-1,-1>, <1,1,1> translate 2*x rotate 45*z }
box { <-1,-1,-1>, <1,1,1> rotate 45*z translate 2*x }

(Exercise 3 – not so easy…)
§ The painting ‘Waterfall’ from M.C.Escher contains two geometric figures
§ Draw the left one, which consists of 3 rotated cubes!
30 A Short Introduction to POV-Ray © Peter Fischer

Instantiating and Merging Objects
§ Several Objects can be grouped with • union { objects … transformations … pigment …}
§ Objects can be predefined by #declare name = …; § A #declared object can be instantiated with • object{ name … pigment …}
31 A Short Introduction to POV-Ray © Peter Fischer
#declare H = 0.5; #declare B = box {<-H,-H,-H>, <H,H,H>} union { object {B translate -x} sphere {x, 0.5} pigment {color Red} rotate 45 * z scale 1.5 } ...

Exercise 4
§ Create the following scene using the object from Exercise 2:
§ Define first a union containing sphere, cylinder and cube § Instantiate three of these with appropriate shifts / rotates § Change the pigment of one part to Green
32 A Short Introduction to POV-Ray © Peter Fischer

(Exercise 5)
§ Draw a red and a blue ‘Escher-Cube’ (Exercise 3) side by side on a green table
33 A Short Introduction to POV-Ray © Peter Fischer

(Exercise 6)
§ Make a rounded cube by adding spheres to the corners and cylinders to the edges • Keep (inner) cube size and corner radius variable using #macro CUBE (D,R) ..code using D and R.. #end
• You can assemble the cube from 4 face-objects (as shown on the right) and two ‘covers’ made from boxes
34 A Short Introduction to POV-Ray © Peter Fischer

Making Complex Shapes, Cutting Things
§ Constructive Solid Geometry (CSG) allows to construct complex shapes from simple shapes.
§ Commands to cut objects are: • Volume covered by both objects (A and B): intersection { objA objsB } //several Bs ok
• Volume covered by A and not B (A and !B): difference { objA objsB } //several Bs ok
§ We also have • Volume covered by (A or B), inner faces stay
(used to translate, ... objects together) union { obj1 obj2 }
• Volume covered by (A or B), inner faces are removed (useful for transparent objects) merge { obj1 obj2 }
35 A Short Introduction to POV-Ray © Peter Fischer

Examples for CSG
A Short Introduction to POV-Ray © Peter Fischer 36
union { object {S} object {B} }
difference { object {S} object {B} }
difference { object {B} object {S} }
intersection { object {B} object {S} }

More Examples for CSG
A Short Introduction to POV-Ray © Peter Fischer 37
difference { object {S} object {B} }
difference { object {B} object {S} }
intersection { object {B} object {S} }
difference { object {B} object {S inverse } }
‘inverse’ exchanges inside and outside
‘inverse’ exchanges inside and outside

Exercise 7: Dice
§ Make a (Game) Dice • This is the difference of a cube with the inverse of a large
sphere and several small spheres
38 A Short Introduction to POV-Ray © Peter Fischer
Exercise 8
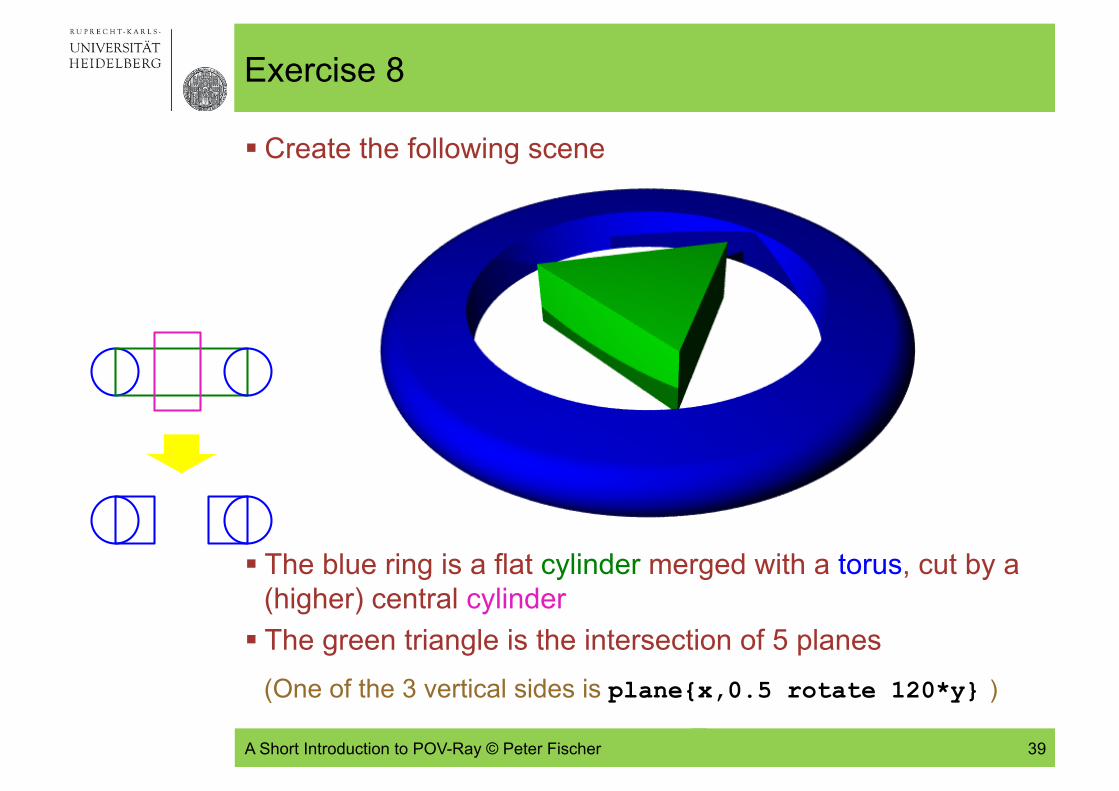
§ Create the following scene
§ The blue ring is a flat cylinder merged with a torus, cut by a (higher) central cylinder
§ The green triangle is the intersection of 5 planes (One of the 3 vertical sides is plane{x,0.5 rotate 120*y} )
39 A Short Introduction to POV-Ray © Peter Fischer

Textures
§ Textures define the surface & volume appearance § They consist of, for instance texture {
pigment {color ...} // color, transparency finish { // surface properties ambient 0...1 // emitted light diffuse 0...1 // % of light reflected in a diffuse way reflection 0...1 // % of light reflected in a specular way phong 0...1 // intensity of highlights phong_size 60 // size of highlights ... // many more (see documentation!) } normal {bumps 2 scale 0.5} // surface roughness }
40 A Short Introduction to POV-Ray © Peter Fischer

Example for Surface Properties
#include "colors.inc“ #include "woods.inc“ plane {y, 0 pigment { checker Green, Red rotate 10*y} } // note that checker is rotated! sphere { y, 1 finish {reflection 1.5} } // fully reflective sphere sphere { y-2*x-z, 1 pigment {color Blue} finish {reflection 0.5 phong 0.5 phong_size 80} }
box { <1.5,0,-2>, <2.5,2,0> texture{ T_Wood20 scale 5 rotate 30*z+80*x} } background { color LightBlue } light_source {<0, 5, -3> color 2*White } light_source {<4, 5, -3> color White }
camera { location <0.5, 2.1, -10> look_at <-0.2,0.8,0> angle 40 right 2*x }
41 A Short Introduction to POV-Ray © Peter Fischer

(Rendering Quality)
§ The previous scene rendered with different +Q levels:
42 A Short Introduction to POV-Ray © Peter Fischer
+Q1 only shapes +Q3 surfaces, no shadows
+Q7 shadows, no reflections +Q8 reflections

Predefined Texture
§ Many textures are available in the include files #include "stones.inc" #include "woods.inc“ etc.
§ For an overview, see for instance http://texlib.povray.org
43 A Short Introduction to POV-Ray © Peter Fischer

(Rotating and Scaling Textures)
§ Textures can be rotated and scaled inside the object:
44 A Short Introduction to POV-Ray © Peter Fischer
#declare C = box { <-0.4,-0.4,-1>,<0.4,0.4,1> } #declare T = DMFWood3; object { C texture {T} translate y } object { C texture {T rotate -20*y} } object { C texture {T scale 3} translate –y }

(Self Made Volume Textures)
§ There are many options to define (volume) textures. § Just one example: Layered colours
45 A Short Introduction to POV-Ray © Peter Fischer
#include "colors.inc“ plane {y,-2 pigment{hexagon Gray80 White Gray90}} difference { sphere { <0,0,0>, 1 }
cylinder {-2 * y, 2*y, 0.6 rotate -45*x} pigment { gradient <0,1,1> // orientation
color_map { // colors in range 0...1 [0.1 color Red] [0.3 color Blue] [0.7 color Green] [1.0 color Red] }
scale 0.8 } }
background { color White } light_source {<0, 5, -3> color White } light_source {<-2, 0.5, -2> color 1.5*White } camera {
location <-1.0, 2.0, -5> look_at <0,0,0> angle 30 right x*image_width/image_height }

(More Stuff: Bump Maps)
§ The surface normal (used to calculate how light is reflected) can be disturbed with various pattern. This gives spectacular ‘bumpy’ surfaces. • Many examples at www.f-lohmueller.de/pov_tut/tex/tex_000d.htm
46 A Short Introduction to POV-Ray © Peter Fischer
Programming
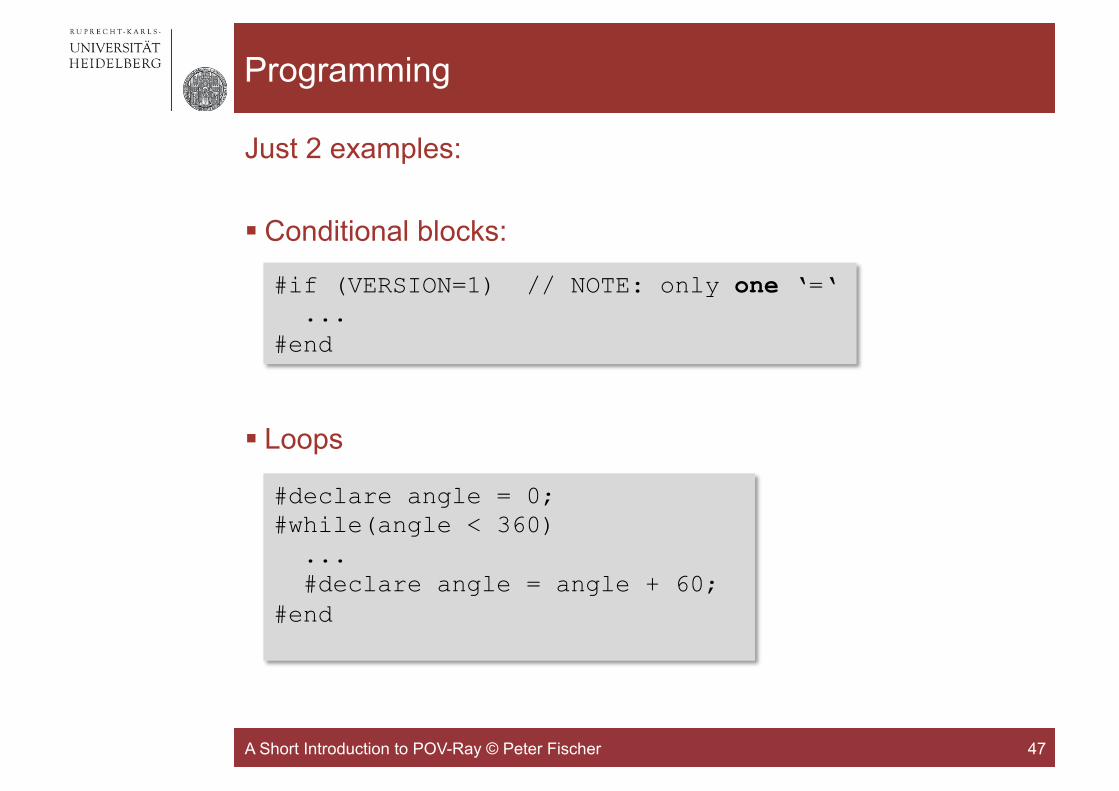
Just 2 examples:
§ Conditional blocks:
§ Loops
47 A Short Introduction to POV-Ray © Peter Fischer
#if (VERSION=1) // NOTE: only one ‘=‘ ... #end
#declare angle = 0; #while(angle < 360) ... #declare angle = angle + 60; #end

Programming Example
A Short Introduction to POV-Ray © Peter Fischer 48
#include "textures.inc" cylinder {-0.2*y, -0.1*y, 2.5 texture {Silver_Metal} } #declare S = sphere {2*x, 0.5 texture {EMBWood1} } #declare phi = 0; #while(phi < 360) object { S rotate phi * y} #declare phi = phi + 40; #end background { color White } light_source {<0, 5, -3> color White } light_source {<-2,2,0.5> color Yellow } camera { location <0, 4, -5> look_at <0,-0.5,0> angle 50 right 6/4*x }

Animations
§ Several renderings can be done in a batch job § The value of clock is incremented in each frame from a
start to an end value in predefined steps § Rendering creates a series of images § The sequence of images can be merged to a movie
§ See Demo, or for instance • http://www.alzinger.de/cms5/robert/raytracing/raytracing-
video.html • http://www.alzinger.de/cms5/robert/raytracing/marble-machine-
in-povray.html
49 A Short Introduction to POV-Ray © Peter Fischer

Common Problems
§ No light • Put a light source at the camera position (no nice illumination,
but light everywhere) • use global_settings {ambient_light color} • add finish {ambient…) to shapes
§ Bad camera
• Make sure you are not inside a shape • Move camera far away to start with • Use large angle • Use look_at
50 A Short Introduction to POV-Ray © Peter Fischer

Exercise 9
§ Create a Christmas Tree with Decoration, for instance • Use #declare R1=seed(1234); and then rand(R1)to
get random positions.
51 A Short Introduction to POV-Ray © Peter Fischer

VRML AND X3D
An alternative to POV-Ray (?): VRML
§ VRML = Virtual Reality Modeling Language
§ Is a 3D Scene description language similar to POV-Ray § Can be rendered in real time
• Viewer for instance from http://www.instantreality.org • Cortona3D browser plugin is not free any more
§ User interaction is possible
§ Much less powerful graphics, but interactive
§ VRML has not really become a standard. Plugin installation not standard
§ Seems to die out… (replaced by X3D and others)
53 A Short Introduction to POV-Ray © Peter Fischer

DEFINING OBJECTS FOR 3D PRINTERS

How Filament 3D Printers Work
§ Small 3D printers deposit molten plastic layer by layer § Typical layer thickness and nozzle site is 0.1-0.2 mm
55 A Short Introduction to POV-Ray © Peter Fischer

3D Object Definition for 3D printers
§ 3D Printers need input files which describe the 3D object § Several possibilities. One is the SCAD language § Concept is very similar to Povray
• constants • CSG • programming
§ GOOD: Interactive viewer § BUT: No textures, light,…
56 A Short Introduction to POV-Ray © Peter Fischer
difference() { sphere(r=10); cylinder(r=5,h=20,center=true); }