Embed Size (px)
Citation preview

A quick look at the basic functions of theHercules Programmable Controller by
Basic Manual Operations
Basic Programmable Features
Recall a Preset
Switch a Relay
Sweep All Relays
Time Events
Photocell Events
Skip Events
Set Presets
Holidays
External Inputs
hercules version 3.01.01 and later
Configuration Options
Sensor Setup

�
hercules version 3.01.01 and laterlast edit 07/07/�016
Events
p.11
p.12
p.10
p.13
p.14
p.15
p.17
p.18
. . . . . . . . . . . . . . . . . . . . . . . . . . . . . . . . . . . . . . . . . . . . . . . . . . . . . . . . . . . . . . .
. . . . . . . . . . . . . . . . . . . . . . . . . . . . . . . . . . . . . . . . . . . . . . . . . . . . .
. . . . . . . . . . . . . . . . . . . . . . . . . . . . . . . . . . . . . . . . .
Basic Manual Override Operations
. . . . . . . . . . . . . . . . . . . . . . . . . . . . . . . . . . . . . . . . . . . . . . . . . . . . . . . . . . . . . . . . .
. . . . . . . . . . . . . . . . . . . . . . . . . . . . . . . . . . . . . . . . . . . . . . . . . . . . . . . . . . . . .
. . . . . . . . . . . . . . . . . . . . . . . . . . . . . . . . . . . . . . . . . . . . . . . . . . . . . . . . .
. . . . . . . . . . . . . . . . . . . . . . . . . . . . . . . . . . . . . . . . . . . . . . . . . . . . . . . . . . . . . . . . .
. . . . . . . . . . . . . . . . . . . . . . . . . . . . . . . . . . . . . . . . . . . . . . . . . . . . . . . . . . . . . .
Basic Programmable Features
Presets
p.5
p.6
p.7
p.4
. . . . . . . . . . . . . . . . . . . . . . . . . . . . . . . . . . . . . . . . . . . . . . . . . . . . . . . . . . . . . . .
. . . . . . . . . . . . . . . . . . . . . . . . . . . . . . . . . . . . . . . . . . . . . . . . . . . . . . . . . . . . . .
. . . . . . . . . . . . . . . . . . . . . . . . . . . . . . . . . . . . . . . . . . . . . . . . . . . . . . . . . . . . . . . .
. . . . . . . . . . . . . . . . . . . . . . . . . . . . . . . . . . . . . . . . . . . . . . . . . . . . . . . . . . . . . . . .
Hercules Overview
p.19
p.20
p.21
. . . . . . . . . . . . . . . . . . . . . . . . . . . . . . . . . . . . . . . . . . . . . . . . . . . . . . . . . . . . . . . .
. . . . . . . . . . . . . . . . . . . . . . . . . . . . . . . . . . . . . . . . . . . . . . . . . . . . . . . . . .
. . . . . . . . . . . . . . . . . . . . . . . . . . . . . . . . . . . . . . . . . . . . . . . . . . .
Skip Events
Holidays
Sensorsp.22
p.22
p.23
. . . . . . . . . . . . . . . . . . . . . . . . . . . . . . . . . . . . . . . . . . . . . . . . . . . . . . . . . . . . . .
. . . . . . . . . . . . . . . . . . . . . . . . . . . . . . . . . . . . . . . . . . . . . . . . . . . . . . . . . .
. . . . . . . . . . . . . . . . . . . . . . . . . . . . . . . . . . . . . . . . . . . . . . . . . . . . . . . . . . . . . . . .

3
hercules version 3.01.01 and laterlast edit 07/07/�016
Basic Programmable Features
p.25
p.27
p.28
. . . . . . . . . . . . . . . . . . . . . . . . . . . . . . . . . . . . . . . . . . . . . . . . . . . . . . .
. . . . . . . . . . . . . . . . . . . . . . . . . . . . . . . . . . . . . . . . . . . . . . . . . . . . . . . . . . . .
. . . . . . . . . . . . . . . . . . . . . . . . . . . . . . . . . . . . . . . . . . . . . . . . . . .
System Configuration
p.29
p.30
p.31
. . . . . . . . . . . . . . . . . . . . . . . . . . . . . . . . . . . . . . . . . . . . . . . . . . .
. . . . . . . . . . . . . . . . . . . . . . . . . . . . . . . . . . . . . . . . . . . . . . . . . . . . . . . . . . . . .
. . . . . . . . . . . . . . . . . . . . . . . . . . . . . . . . . . . . . . . . . . . . . . . . . . . . . . . . . . .
p.33
p.34
p.35
. . . . . . . . . . . . . . . . . . . . . . . . . . . . . . . . . . . . . . . . . . . . . . . . . . . . . . . . . . . . . . . . . . .
. . . . . . . . . . . . . . . . . . . . . . . . . . . . . . . . . . . . . . . . . . . . . . . . . . . . . .
. . . . . . . . . . . . . . . . . . . . . . . . . . . . . . . . . . . . . . . . . . . . . . . . . . . . . . . . . . . . . . .

�
hercules version 3.01.01 and laterlast edit 07/07/�016
introductionWelcome to the How To, the guide to everything Hercules. Let us begin with understanding what this controller can do. The Hercules Programmable Controller allows you to control and automate your Marlin Controls lighting system. Using the Hercules, you can quickly and easily:
Recall presets and switch relays On or OffSet a schedule to automatically recall presets and switch relaysUse a photocell to automatically recall presets and switch relays based on the amount of available sunlight.Create a unique lighting system using the many other functions
This manual will show you how to navigate through the menus and around the keypad and also how to operate the Hercules and how to completely utilize its features.
••••

�
hercules version 3.01.01 and laterlast edit 07/07/�016
lighting lingoIf this is your first run-in with a Hercules then you’ll need to start with a crash course on the vernacular used in the lighting world. Those are “preset”, “fade rate” and other words that clearly mean something to a lighting expert, but may mean squat to you.
Dimmers are devices used to control or “dim” specified areas of your lighting. They are sometimes referred to as channels.
Fade rate refers to the length of time, usually in seconds, that dimmers take to raise or lower lighting from their current levels to the levels of a recalled preset.
Light level refers to the brightness of lights controlled by a dimmer measured from 0% to 100%, where 0% represents total darkness and 100% represents maximum brightness.
Passwords provide protection for the Hercules functions and come in two levels:
User Password allows access to the user level to perform any of the manual override functions, such as recalling presets and turning relays on or off manually.
Operator Password allows access to the operator level, which has the same functionality as the user level and additionally allows you to set, preview, and delete time & photocell events, as well as several other functions in the Program Mode.
Photocell is a physical device, usually installed outdoors, which measures the amount of sunlight. The reading is sent to the Hercules, which can automatically recall a preset or switch relays when a specified photocell reading is received.
Preset is a saved set of light levels and fade rates for every channel of lighting being controlled by the system; sometimes called a “scene”. By creating presets, you can quickly call up light settings for different times of day or different occasions. Night setting, Day setting, and Clean Up setting are all examples of possible presets.
Relays, like dimmers, control specified areas of your lighting, but are only for switching On and Off.
Zones are relays that have been grouped together to control a larger area with one controller.

6
hercules version 3.01.01 and laterlast edit 07/07/�016
1. Manual Override Button - Press to enter into Manual Override
2. Auto Mode Button - Press to enter into Auto Mode
3. Program Mode Button - Press to enter into Programming Mode
4. Numerical Keys - Used to enter alphanumerical data
5. LCD Display - 2x12 characters
6. Up/Down Button - Used to scroll through menu options
7. Left/Right Button - Used to move the curson through text
8. Activity LED - Indicator for power and communication
9. Escape Button - Cancel a selection or go back to the previous menu
10. OFF Button - Used to recall the OFF preset or to turn relays OFF, also used as the #9 key
11. ON Button - Used to recall the ON preset or to turn relays ON, also used as the #0 key
12. OK Button - Make selections or enter data
10/08/12 MONPreset 1
MAN
AUTO
PRO
1
2
3
10 11 129
hercules keypad layout
1
�
ESC
�
6
9
3
7
0
�
8
OKONOFF
4
6
7
5
8

7
hercules version 3.01.01 and laterlast edit 07/07/�016
hercules menu layoutPreset
Channels
Schedule Time
Photocell
Preset
Relay
Skips
Holidays Bank 1
Bank 2
MAN Preset #
Single
All Channels
PROG Add
Preview
Delete
One Relay
All Relays
Preview
Delete
Delete
Add
Preview
Relay #
Continue to the next page for the rest of
the menu layout
Light Level Preset #Set Lights
Preview
Delete
Relay Relay # Turn OnOne Relay
All Relays Turn Off
One Channel
All Channels
Yes
No

8
hercules version 3.01.01 and laterlast edit 07/07/�016
Constraints
Ext. Inputs Type Alarm
Trigger
Preset
Standard
Delayed
Continued from the Program Menu
hercules menu layout part II
Continue to the next page for the rest of
the menu layout
Relays Add
Preview
Delete

9
hercules version 3.01.01 and laterlast edit 07/07/�016
hercules menu layout part IIIContinued from the Program Menu
Configure
Photocell
Time Set Time
Yes
Delay
Off Time
On Time
No
DL Savings
Start Week
End Month
End Week
Start Month
Astro Clock Sunrise Time
Sunset Time
Date Set Date
Time To Auto Set Time To Auto
Location Time Zone
Latitude
Longitude
Off Sweeps Work Hours
Override
Weekend
Open
Close
Yes
No
LCD Adjust Backlit Off
Contrast
Revision
Channels # Channels
# Ch/Room
Edit Text Preset
Tolerance
Relay
Channel
Ext. Input

10
hercules version 3.01.01 and laterlast edit 07/07/�016
enter manual override1. Press MAN to enter the Manual mode.
2. By default, no code is required; skip to step 3. However, if one is required, use the numeric keypad to enter it, and press OK button.
3. Scroll to the desired option and press OK button. Options are: “Preset”, “Relay”, and “Channels”.
enter progam mode1. Press PROG to enter the Program mode.
2. Enter your password (“5700” by default) by using the numeric keypad, and press OK button.
3. Scroll to the desired option and press OK button. The options are: “Schedule”, “Light Level”, “Zone Setup”, “Holidays”, “Ext. Inputs”, “Skip”, and “Setup”. Some of these options may not be available, depending on the specific configuration of your lighting system.
10/08/12 MONPreset 1
MAN
AUTO
PRO
1
�
ESC
�
6
9
3
7
0
�
8
OKONOFF
10/08/2012 MONPreset 1
Manual ModeCode =
Manual Mode> Preset
10/08/2012 MONPreset 1
Program ModeCode =
Manual Mode> Preset
This page was updated on 10/17/13 to meet new Hercules version

11
hercules version 3.01.01 and laterlast edit 07/07/�016
10/08/12 MONPreset 1
MAN
AUTO
PRO
1
�
ESC
�
6
9
3
7
0
�
8
OKONOFF
switch a relay1. Press MAN to enter the Manual mode.
Scroll to “Relay” and press OK button.
2. Scroll to “One Relay” or “All Relays” and press OK button. If “All Relays”, skip to step 4.
10/08/2012 MONPreset 1
Relays> One Relay
One RelayRelay #_
Relay #1ON
3. Use the numeric keypad to select the desired relay and press the OK button. The screen will show the relay’s current state.
4. Press the OFF button to turn the relay(s) off, or press the ON button to turnt he relay(s) ON, and press the OK button.
*Text on this screen will vary depending on the event you have selected.
*
This page was updated on 10/17/13 to meet new Hercules version
enter manual override1. Press MAN to enter the Manual mode.
2. By default, no code is required; skip to step 3. However, if one is required, use the numeric keypad to enter it, and press OK button.
3. Scroll to the desired option and press OK button. Options are: “Preset”, “Relay”, and “Channels”.
10/08/2012 MONPreset 1
Manual ModeCode =
Manual Mode> Preset

1�
hercules version 3.01.01 and laterlast edit 07/07/�016
adjust light level
10/08/12 MONPreset 1
MAN
AUTO
PRO
1
�
ESC
�
6
9
3
7
0
�
8
OKONOFF
1. Press MAN to enter the Manual mode. Scroll to “Channels” and press OK button.
2. Scroll to “Single” or “All” and press OK button. If “All”, skip to step 4.
10/08/2012 MONPreset 1
Channels> Single
SelectChannel #__
Adjust LightLevel ___%
3. Use the numeric keypad to select the desired channel and press the OK button.
4. Use the numeric keypad to set the light level from 0% (full OFF) to 100%( full ON), and press OK button.
This page was updated on 10/17/13 to meet new Hercules version
recall a preset1. Press MAN to enter the Manual mode.
Scroll to “Preset” and press OK button.
2. Use the numeric keypad to select the desire preset (9=OFF preset, 0=ON preset), then press the OK button.
10/08/2012 MONPreset 1
PresetPreset _?
Preset 3Recalled

13
hercules version 3.01.01 and laterlast edit 07/07/�016
set a time event1. Press PROG button to enter Program Mode. Enter your password (“5700” by default), by using the
numeric keypad and press OK button. Press OK button to select “Schedule”.10/08/2012 MON
Preset 1
2. Press OK button to select “Add”. Press OK button again to select “Time”.
3. Go to “Preset” or “Relay” option and press OK. If “Preset”, go to step 3a. If Relay, skip to Step 4.
4. Select “One Relay” option and press OK button; enter a relay number and press OK again. OR select “All Relays” and press OK button.
5. Select for the event to occur on: “Single Day”, “Everyday”, “Weekday,” or “Weekend” and press OK. If “Single Day” was selected, go to Step 5a, else skip to Step 6.
5a. Indicate the day by pressing the corresponding #1-7 (1=Sunday -> 7=Saturday) and press OK button.
6. Navigate to “Exact Time”, “Sunrise”, or “Sunset” and press OK button. If “Exact Time” is selected, go to Step 7; if “Sunrise” or “Sunset” are selected, go to Step 8.
7. Enter the time in HH:MM format using the numeric keypad and indicate AM or PM using the Up/Down button. Press OK button and skip to Step 9.
8. Select “No Offset”, “Before” or “After” and press OK button. If “No Offset” was selected, skip to Step 9, else go to Step 8a.
8a. Indicate the offset time in H:MM format (up to 3 hrs, 59 mins), using the numeric keypad, and press OK.
9. If the event is for a Relay, indicate whether the relay should be turned On or Off by the event by pressing ON or OFF. The screen will automatically take you back to Step 6, so you can add more time events
3a. Indicate the Preset # by using the numeric keypad and press OK. (#9=OFF preset, #0=ON preset)
*Schedule*> Add
Time Events> Preset
Preset EventPreset _?
Relay Event> One Relay
Recurrence> Single Day
Select a DaySUN
Time Events> Exact Time
Preset 3__:__ AM
*
*Text on this screen will vary depending on the selections you made on previous screens.
** If you want to modify a time event, first DELETE THE EVENT, and add a new on to replace it using the steps on this page.
Sunrise > No Offset
BeforeSunrise _:__
*
Relay 1OFF or ON
*
This page was updated on 10/11/13 to meet new Hercules version

1�
hercules version 3.01.01 and laterlast edit 07/07/�016
preview time events
3. Scroll to “By Preset” or “By Relay” and press OK button. Indicate the Preset or Relay number to preview and press OK button. Use the Up/Down button to look through the events. Press ESC button or OK button to return to the previous menu.
delete time event1. From the “Schedule” menu, scroll to “Delete” and press OK button. Press OK button again to select
“Time”.
2. Scroll to “By Preset” or “By relay” and press OK button. Indicate the Preset or Relay number to delete and press OK button.
4. Press OK button to select “Delete” to delete the selected event. If you don’t wish to delete the event, scroll to “Cancel” and press OK button.
This page was updated on 10/14/13 to meet new Hercules version
1. Press PROG button to enter Program Mode. Enter your password (“5700” by default), by using the numeric keypad and press OK button. Press OK button to select “Schedule”.
10/08/2012 MONPreset 1
2. Scroll to “Preview” and press OK button. Press OK button to select “Time”.*Schedule*> Preview
View Time> By Preset
Relay 3 ON> MON
*Schedule*> Delete
Delete> By Preset
Delete Event> Delete
3. Use the Up/Down button to look through the events. When you’ve found the event you would like to delete, press the OK button.
Relay 3 ON> MON
*
*Text on this screen will vary depending on the event you have selected.
*

1�
hercules version 3.01.01 and laterlast edit 07/07/�016
set a photocell event
6. Use the numeric keypad to indicate the photocell reading at which the event should occur and press OK button. **
7. If the event is for a Relay, indicate whether the relay should be turned On or Off by the event by pressing ON or OFF button.
1. Press PROG button to enter Program Mode. Enter your password (“5700” by default), by using the numeric keypad and press OK button. Press OK button to select “Schedule”.
10/08/2012 MONPreset 1
2. Press OK button to select “Add”. Press Down button to scroll to “Photocell” and press OK button.*Schedule*
> Add
This page was updated on 10/14/13 to meet new Hercules version
3. Go to “Preset” or “Relay” option and press OK. If “Preset”, go to step 3a. If Relay, skip to Step 4.
4. Select “One Relay” option and press OK button; enter a relay number and press OK again. OR select “All Relays” and press OK button.
5. Select for the event to occur on: “Single Day”, “Everyday”, “Weekday,” or “Weekend” and press OK. If “Single Day” was selected, go to Step 5a, else skip to Step 6.
5a. Indicate the day by pressing the corresponding #1-7 (1=Sunday -> 7=Saturday) and press OK button.
3a. Indicate the Preset # by using the numeric keypad and press OK. (#9=OFF preset, #0=ON preset)
PHC Events> Preset
Preset EventPreset _?
Relay Event> One Relay
Recurrence> Single Day
Select a DaySUN
Phc. percent100%
Relay 1OFF or ON
*Text on this screen will vary depending on the selections you made on previous screens.
** If you want to modify a photocell event, press OK button when screen prompts to override the current photocell event.
*

16
hercules version 3.01.01 and laterlast edit 07/07/�016
preview photocell events
delete photocell event
3. Scroll to “By Preset” or “By Relay” and press OK button. Indicate the Preset or Relay number to preview and press OK button. Use the Up/Down button to look through the events. Press ESC button or OK button to return to the previous menu.
1. From the “Schedule” menu, scroll to “Delete” and press OK button. Scroll to “Photocell” and press OK button again.
2. Scroll to “By Preset” or “By relay” and press OK button. Indicate the Preset or Relay number to delete and press OK button.
4. Press OK button to select “Delete” to delete the selected event. If you don’t wish to delete the event, scroll to “Cancel” and press OK button.
1. Press PROG button to enter Program Mode. Enter your password (“5700” by default), by using the numeric keypad and press OK button. Press OK button to select “Schedule”.
10/08/2012 MONPreset 1
2. Scroll to “Preview” and press OK button. Scroll to “Photocell” and press OK button.*Schedule*> Preview
View PHC> By Preset
Preset 3SUN
*Schedule*> Delete
DELETE EVENT> By Preset
Delete Event> Delete
3. Use the Up/Down button to look through the events. When you’ve found the even you would like to delete, press the OK button.
Preset 3SUN
*
*Text on this screen will vary depending on the event you have selected.
*
Press the Down button once to see the PHC value for this event.
This page was updated on 10/14/13 to meet new Hercules version

17
hercules version 3.01.01 and laterlast edit 07/07/�016
set light levels
3. Indicate which Preset you want to set the lights for, and press OK button.
4. Scroll to “One Channel” or “All Channels” and press OK button. If “One Channel”, go to Step 4a, otherwise continue to step 5.
4a. Indicate the channel whose preset should be set and press OK button.
5. Indicate the Light Level for the preset setting from 0% (full Off ) to 100% (full On), and press OK button.
6. Indicate the Fade Rate, or the rate at which the light levels should be adjusted from one preset to the next, and press OK button. Fade Rates are from 0 seconds to 999 seconds
7. Wait for the controller to finish writing the presets to your dimming system. This may take up to several minutes depending on the number of channels in your system. The screen will display “Transmission Complete” when it is safe to continue programming
1. Press PROG button to enter Program Mode. Enter your password (“5700” by default), by using the numeric keypad and press OK button. Scroll to “Light Level” and press OK button.
10/08/2012 MONPreset 1
2. Press OK button to select “Set Lights”.**Presets**> Set Lights
This page was updated on 10/14/13 to meet new Hercules version
Set PresetPreset _?
Set Preset> One Channel
Set PresetChannel:__
Set PresetLL = ___%
Fade RateFR = ___sec
SET PRESETTransmitting
TransmissionComplete

18
hercules version 3.01.01 and laterlast edit 07/07/�016
preview light levels
2. Scroll to “Preview” and press OK button. Select whether to preview the presets ‘By Preset’ or ‘By Chan-nel’. If ‘By Preset’, go to Step 3. If ‘By Channel’, go to Step 4
3. Indicate the Preset to preview, press OK button, and use the Up/Down button to scroll through the channels. The screen will alternate between showing the channel # and the light level and fade rate recorded for it. Press OK button to go back to the “Preview” menu.
4. Indicate the desired Channel, press OK button, and use the numerical keypad to select each of the presets. (This is to view each of the preset settings for this particular channel) If there is nothing recorded for the selected preset, you’ll return to the “Preview” menu.
10/08/2012 MONPreset 1
This page was updated on 10/14/13 to meet new Hercules version
**Presets**> Preview
PresetPreset _?
SelectChannel #__
1. Press PROG button to enter Program Mode. Enter your password (“5700” by default), by using the numeric keypad and press OK button. Scroll to “Light Level” and press OK button.
*Text on this screen will vary depending on the selections you made on previous screens.

19
hercules version 3.01.01 and laterlast edit 07/07/�016
skip events
3. Use the numeric keypad to select the relay # you’d like to skip, and press OK button.
2. Scroll to “One Relay” or “All Relays”, and press OK button. If “All Relays”, skip to step 4.
1. Press PROG button to enter Program Mode. Enter your password (“5700” by default), by using the numeric keypad and press OK button. Scroll to “Skip” option and press OK button.
10/08/2012 MONPreset 1
**Skip**> One Relay
Skip RelayRelay #__
4. Select the day(s) the relay should be skipped by selecting “Single Day”, Every day” “Week day”, “Weekend”, “Date”, or “Holiday”. If “Single Day”, go to step 5. If “Date”, go to step 6. If “Holiday”, go to step 7.
Add Skip> Single Day
5. Indicate the single day of the week on which the skip should occur by pressing the corresponding number (1=SUN, 7=SAT), and press OK button.
Skip R# 002SUN
6. Use the numeric keypad to indicate the date on which the skip should occur using the format MM/DD/YY, and press OK button.
Enter Date:--/--/--
*
*Text on this screen will vary depending on the selections you made on previous screens.
6. Indicate which bank of holidays should be skipped by scrolling to either “Holidays 1” or “Holidays 2”, and press OK button.
Add Skip> Holidays 1
This page was updated on 10/18/13 to meet new Hercules version

�0
hercules version 3.01.01 and laterlast edit 07/07/�016
preview skips
3. Scroll to the desired relay using the Up/Down button, and then press the OK button to read through the information. Press the ESC button to return to the main Skip Events screen
delete skips1. From the “Skip” menu, scroll to “Delete” and press OK button.
2. Scroll to the desired event using the Up/Down button and press OK button.
3. Press the OK button to confirm that you want to delete this Skip event, or press the ESC button to return to the list of relays without deleting.
This page was updated on 10/18/13 to meet new Hercules version
2. Scroll to “Preview” and press OK button.
1. Press PROG button to enter Program Mode. Enter your password (“5700” by default), by using the numeric keypad and press OK button. Scroll to “Skip” option and press OK button.
10/08/2012 MONPreset 1
**Skip**> Preview
Preview SkipRelay #001 <
10/08/2012 MONPreset 1
Delete SkipRelay #001 <
Confirm> Delete
*
*
*Text on this screen will vary depending on the selections you made on previous screens.

�1
hercules version 3.01.01 and laterlast edit 07/07/�016
add a holiday
3. Use the numeric keypad to enter the date of the new holiday in the format MM/DD/YY and press OK button.
4. Use the numeric keypad to set the duration of the holiday in years, up to 9 years (01=single occur-rence) and press OK to add the new holiday to the selected bank.
preview/delete a holiday1. From the “Holidays” menu, select the desired holiday bank and press OK button. Scroll to either
“Preview” or “Delete” and press OK button again.
2. Use the Up/Down button to scroll through the holidays stored in the bank. The holidays are shown in the format MM/DD/YY with the 2-digit duration time following. If “Delete” was selected, go to Step 3.
3. If you’ve already scrolled to the holiday you want to delete, Press OK button to delete it from the bank, or press ESC to quit without deleting.
10/08/2012 MONPreset 1
Holidays> Bank 1
Add Holiday__/__/__
Add Duration__ Years
Holidays> Bank 1
View Date:12/25/12 09
*
Delete Date12/25/12 09
2. Select “Bank 1” or “Bank 2” and press OK button. Press OK button again to select “Add”.
1. Press PROG button to enter Program Mode. Enter your password (“5700” by default), by using the numeric keypad and press OK button. Scroll to “Holidays” option and press OK button.
*
*Text on this screen will vary depending on the selections you made on previous screens.
This page was updated on 10/18/13 to meet new Hercules version

��
hercules version 3.01.01 and laterlast edit 07/07/�016
sensors - enable/disable
configure sensors1. Follow the instructions above to get to the “Setup” menu. Scroll to “Sensors” and press OK button.
3. Use the numeric keypad to select the desired sensor and press the OK button. Use the OK button to enable or disable the selected sensor.
4. If you enabled the sensor, use the OK button to choose whether the sensor is an ambience sensor, PIR sensor, or Both. You will then enter the sensor delay menu.
10/08/2012 MONPreset 1
*Setup*> Sensors
*Setup*> Sensors
Sensor #1> Enable
2. Scroll to “Sensors” and press OK button. Use the Up/Down buttons to select “Enable” or “Disable” and press OK.
1. Press PROG button to enter Program Mode. Enter your password (“5700” by default), by using the numeric keypad and press OK button. Scroll to “Setup” option and press OK button.
*
*Text on this screen will vary depending on the selections you made on previous screens.
Sensor #1> Ambient
*
5. If you want the delay to stay at default, press OK on “Test Mode”. If not, navigate to “Time Delay” and press OK.
6. Use the numeric keypad to input the desired delay and press OK.
Select Delay> Test Mode
Delay Time000 seconds
2. Scroll to “Configure Sensors” and press OK button.**Sensors**> Configure
Number ofSensors 00 <
Sensors> Reverse
4. Follow Steps #1 and 2. Navigate to “Reverse” or “Forward”, to set the default phase to reverse phase or forward phase. Press OK to make your selection.
3. If sensors are Enabled, navigate to “Count” and press OK. Use the numberic keypad or Up/Down but-tons to set the number of sensors that will be on the system, and press OK.
*
�3
hercules version 3.01.01 and laterlast edit 07/07/�016
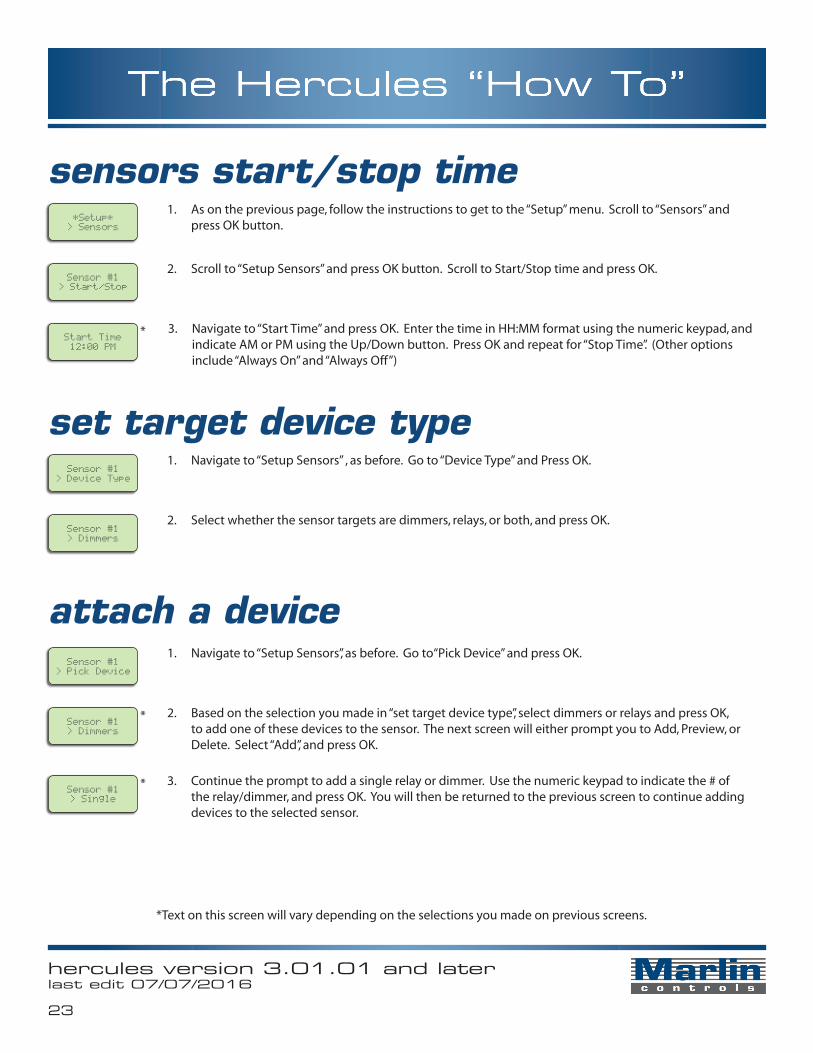
sensors start/stop time
3. Navigate to “Start Time” and press OK. Enter the time in HH:MM format using the numeric keypad, and indicate AM or PM using the Up/Down button. Press OK and repeat for “Stop Time”. (Other options include “Always On” and “Always Off”)
1. Navigate to “Setup Sensors” , as before. Go to “Device Type” and Press OK.
*Setup*> Sensors
Sensor #1> Start/Stop
Start Time12:00 PM
Sensor #1> Device Type
2. Scroll to “Setup Sensors” and press OK button. Scroll to Start/Stop time and press OK.
1. As on the previous page, follow the instructions to get to the “Setup” menu. Scroll to “Sensors” and press OK button.
2. Select whether the sensor targets are dimmers, relays, or both, and press OK.Sensor #1> Dimmers
1. Navigate to “Setup Sensors”, as before. Go to“Pick Device” and press OK.Sensor #1
> Pick Device
2. Based on the selection you made in “set target device type”, select dimmers or relays and press OK, to add one of these devices to the sensor. The next screen will either prompt you to Add, Preview, or Delete. Select “Add”, and press OK.
Sensor #1> Dimmers
*Text on this screen will vary depending on the selections you made on previous screens.
*
set target device type
attach a device
*
3. Continue the prompt to add a single relay or dimmer. Use the numeric keypad to indicate the # of the relay/dimmer, and press OK. You will then be returned to the previous screen to continue adding devices to the selected sensor.
Sensor #1> Single
*
��
hercules version 3.01.01 and laterlast edit 07/07/�016
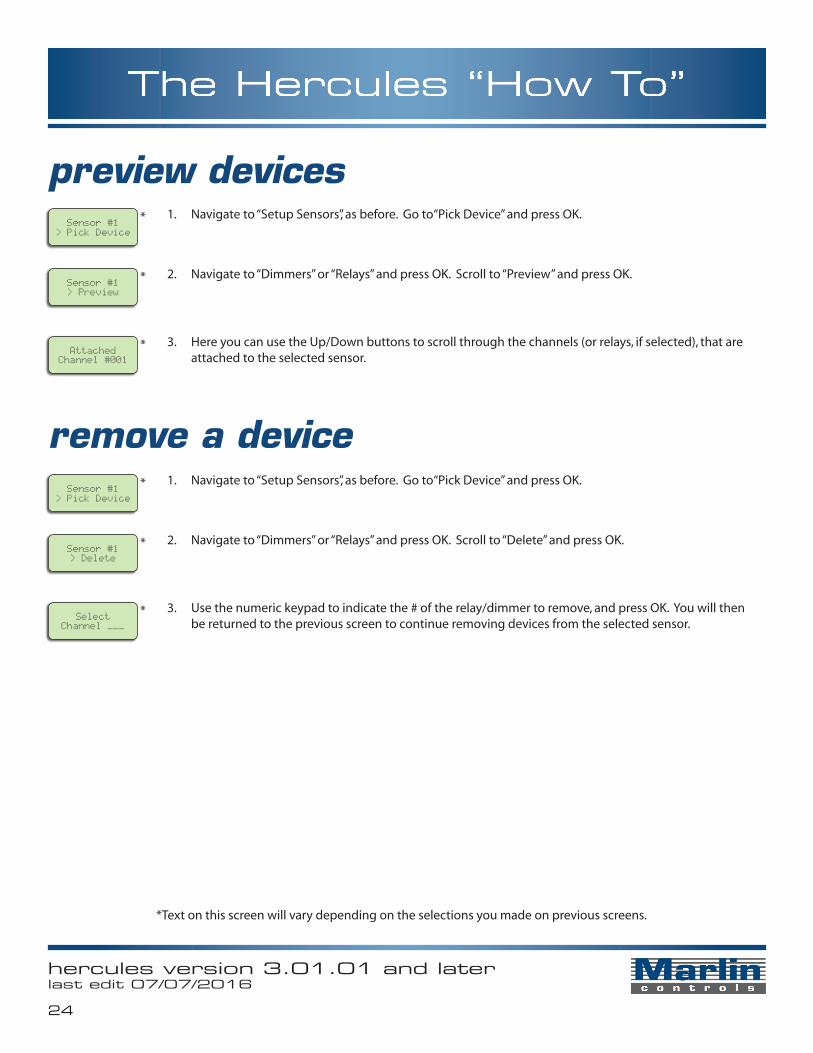
preview devices
1. Navigate to “Setup Sensors”, as before. Go to“Pick Device” and press OK.Sensor #1
> Pick Device
2. Navigate to “Dimmers” or “Relays” and press OK. Scroll to “Delete” and press OK.Sensor #1> Delete
*Text on this screen will vary depending on the selections you made on previous screens.
remove a device
*
3. Use the numeric keypad to indicate the # of the relay/dimmer to remove, and press OK. You will then be returned to the previous screen to continue removing devices from the selected sensor.
SelectChannel ___
*
1. Navigate to “Setup Sensors”, as before. Go to“Pick Device” and press OK.Sensor #1
> Pick Device
2. Navigate to “Dimmers” or “Relays” and press OK. Scroll to “Preview” and press OK.Sensor #1> Preview
*
3. Here you can use the Up/Down buttons to scroll through the channels (or relays, if selected), that are attached to the selected sensor.
AttachedChannel #001
*
*
*

��
hercules version 3.01.01 and laterlast edit 07/07/�016
configure external inputs part I
This feature allows you to configure each of four external inputs by enabling each input, defining the type of input it is, and selecting the preset or relay event that will be triggered when the input receives a signal.
what is this feature?
2. Select an external input to configure (from 1 to 4) and press OK button. Press OK button again to select “Enable”. (Can also be disabled here if you no longer want to use a particular external input)
1. Press PROG button to enter Program Mode. Enter your password (“5700” by default), by using the numeric keypad and press OK button. Scroll to “Ext. Inputs” option and press OK button.
10/08/2012 MONPreset 1
Ext. InputsInput #_
Ext. Inputs> Preset
3. The options available are “Preset”, “Relays”, or “Preview”. Scroll to your selection and press OK button. If “Preset” was selected, go to step 4. If “Relays” was selected, go to step 5.
Set Preset> No Preset
4. To remove a Preset from the external input, press OK for “No Preset”. Otherwise, scroll to “Select” and press OK button. Use the numeric keypad to select the preset you would like recalled by the selected expternal input and press OK button (9=OFF preset, 0=ON preset). Continue to step 8.
Input Relays> Add
5. “Add”, “Delete” or “Preview” the relays affected by the input; scroll to your selection and press OK. If you chose “Add”, you can select “One Relay” or “All Relays”, and press OK button again. Go to step 6 if you selected “One Relay”. If you selected “All Relay’s, continue to step 7.
ADD RELAYRelay #_
6. Use the numeric keypad to select the desired relay and press OK button.
Relay #3OFF or ON
7. Use OFF or ON button to select if the triggered input will turn the relay(s) OFF or ON, and press OK button.
*
*Text on this screen will vary depending on the selections you made on previous screens.
Input Setup> Set
8. Press OK button to select “Set” option, or scroll to “Preview” and press OK if you want to view the input’s current settings. If you chose “Set”, continue to step 9.
Input Setup> Start Time
9. Scroll to “Start Time” or “Stop Time” and press the OK button. If “Stop Time” was selected, skip to step 13.
Please continue to “how to... configure external inputs part II”
This page was updated on 10/15/13 to meet new Hercules version
�6
hercules version 3.01.01 and laterlast edit 07/07/�016
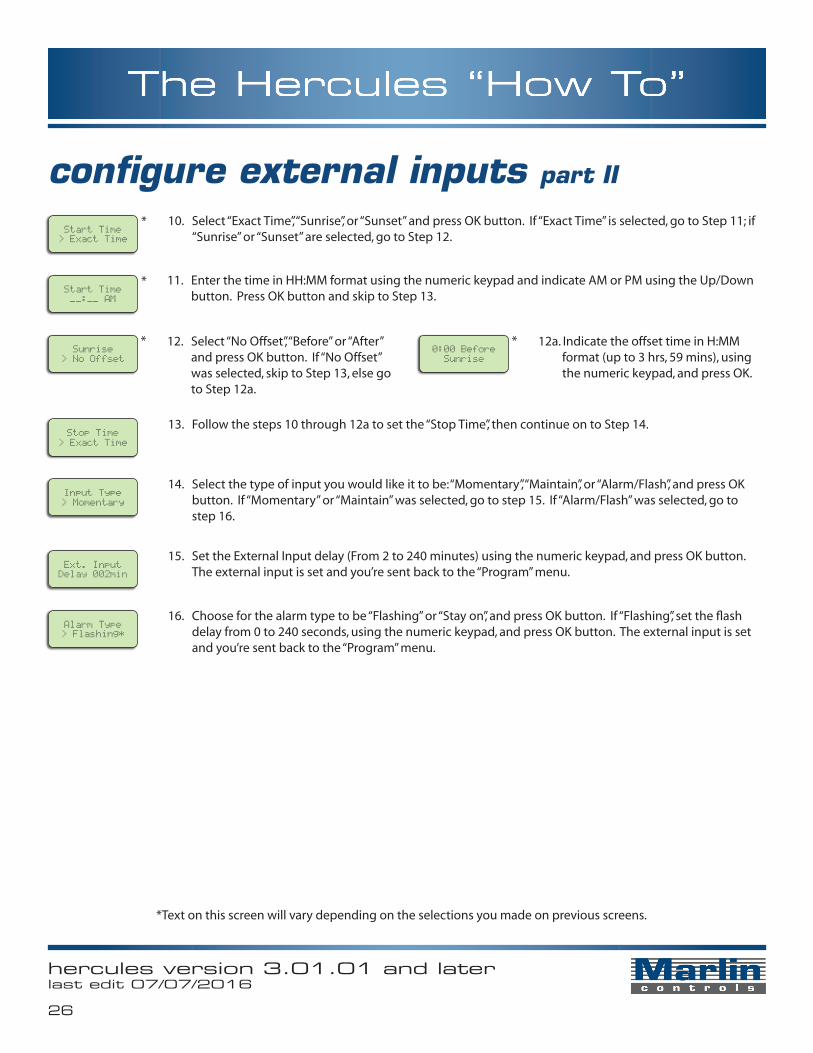
configure external inputs part II
This page was updated on 10/15/13 to meet new Hercules version
10. Select “Exact Time”, “Sunrise”, or “Sunset” and press OK button. If “Exact Time” is selected, go to Step 11; if “Sunrise” or “Sunset” are selected, go to Step 12.
11. Enter the time in HH:MM format using the numeric keypad and indicate AM or PM using the Up/Down button. Press OK button and skip to Step 13.
12. Select “No Offset”, “Before” or “After” and press OK button. If “No Offset” was selected, skip to Step 13, else go to Step 12a.
12a. Indicate the offset time in H:MM format (up to 3 hrs, 59 mins), using the numeric keypad, and press OK.
Start Time> Exact Time
Start Time__:__ AM
*
Sunrise > No Offset
0:00 BeforeSunrise
**
*
13. Follow the steps 10 through 12a to set the “Stop Time”, then continue on to Step 14.Stop Time
> Exact Time
14. Select the type of input you would like it to be: “Momentary”, “Maintain”, or “Alarm/Flash”, and press OK button. If “Momentary” or “Maintain” was selected, go to step 15. If “Alarm/Flash” was selected, go to step 16.
Input Type> Momentary
15. Set the External Input delay (From 2 to 240 minutes) using the numeric keypad, and press OK button. The external input is set and you’re sent back to the “Program” menu.
Ext. InputDelay 002min
16. Choose for the alarm type to be “Flashing” or “Stay on”, and press OK button. If “Flashing”, set the flash delay from 0 to 240 seconds, using the numeric keypad, and press OK button. The external input is set and you’re sent back to the “Program” menu.
Alarm Type> Flashing*
*Text on this screen will vary depending on the selections you made on previous screens.

�7
hercules version 3.01.01 and laterlast edit 07/07/�016
photocell setup
3. Press OK button to set the On Time for the photocell.
This page was updated on 10/16/13 to meet new Hercules version
enable/disable this feature
2. Scroll to “Photocell” and press OK button. Press OK button again to select “Yes”, which will enable this feature, and continue on to step 3. If you wish to disable the photocell, scroll to “No” and press OK button, which will return you to the “Setup” menu.
1. Press PROG button to enter Program Mode. Enter your password (“5700” by default), by using the numeric keypad and press OK button. Scroll to “Setup” option and press OK button.
10/08/2012 MONPreset 1
*Setup*> Photocell
PhotocellOn Time
ON Time10:45 AM
3a. Use the numeric keypad to set the time in HH:MM format. Use the Up/Down button to select AM or PM, and press OK button.
4. Press OK button to set the Off Time for the photocell.
PhotocellOff Time
OFF Time09:00 PM
4a. Use the numeric keypad to set the time in HH:MM format. Use the Up/Down button to select AM or PM, and press OK button.
5. Press OK button to set the Delay for the photocell.
PhotocellDelay
Delay030 seconds
5a. Use the numeric keypad to set the delay from 000 to 240 seconds, and press OK (default is 30 sec).
6. Press OK button to set the tolerance for the photocell.
PhotocellTolerance
Tolerance+/- 05%
6a. Use the numeric keypad to set the tolerance from +/- 0% to 29%, and press OK button (default is +/-5%).
*Text on this screen will vary depending on the selections you made on previous screens.
*
*
*
*
set photocell options
*Text on this screen will vary depending on the selections you made on previous screens.

�8
hercules version 3.01.01 and laterlast edit 07/07/�016
set time/date/astro clock
1. Go to “Time/Date” menu again. Scroll to “Date” and press OK button.
1. Go to “Time/Date” menu again. Scroll to “Astro Clock” and press OK button.
2 Use the Up/Down button to scroll between previewing the Sunrise Time and the Sunset Time. Press OK or ESC button to return to the “Time/Date” menu.
set date
set time
view astronomical clock
3. Indicate the Time in the HH:MM:SS format using the numeric keypad, and set AM or PM by using the Up/Down button. Press OK button when the time is set.
2. Indicate the Date in the MM:DD:YY format using the numeric keypad. The day of the week is calcu-lated for you. Press OK button when the date is set.
This page was updated on 10/11/13 to meet new Hercules version
2. Press OK button to select “Time/Date”. Press OK button again to select “Set Time”.
1. Press PROG button to enter Program Mode. Enter your password (“5700” by default), by using the numeric keypad and press OK button. Scroll to “Setup” option and press OK button.
10/08/2012 MONPreset 1
*Setup*> Time/Date
Set Time*01:48:44 PM
*Time/Date*> Date
Set Date10/08/2012 MON
*Time/Date*> Astro Clock
Sunrise> 07:28 AM

�9
hercules version 3.01.01 and laterlast edit 07/07/�016
set daylight saving time
1. From the “DL. Saving” menu, scroll to “Start Month” and press OK button. Use the numeric keypad to enter the 2-digit Start Month and press OK button.
1. From the “DL. Saving” menu, scroll to “End Month” and press OK button. Use the numeric keypad to enter the 2-digit End Month and press OK button.
2. Again, from the “DL. Saving” menu, scroll to “End Week” and press OK button. Use the numeric keypad to enter the 1-digit End Week and press OK button.
enable/disable this feature
set end date
2. Again, from the “DL Saving” menu, scroll to “Start Week” and press OK button. Use the numeric keypad to enter the 1-digit Start Week and press OK button.
You can set when daylight saving begins and ends by setting the start date and end date. For instance, set the starting month and week, and daylight saving will begin on the Sunday of the specified week at 2 AM. This feature is usually already enabled.
what is this feature?
This page was updated on 10/11/13 to meet new Hercules version
2. Press OK button to select “Time/Date”. Scroll to “DL. Saving” and press OK button.
1. Press PROG button to enter Program Mode. Enter your password (“5700” by default), by using the numeric keypad and press OK button. Scroll to “Setup” option and press OK button.
10/08/2012 MONPreset 1
*Setup*> Time/Date
DL. Saving> Yes *
3. To ENABLE the daylight saving feature, press OK button to select “Yes”, or to DISABLE the daylight saving feature, scroll to “No” and press OK button.
set start date
DL. Saving> Yes *
DL. Saving> Start Month
DL. Saving> Yes *
DL. Saving> End Month

30
hercules version 3.01.01 and laterlast edit 07/07/�016
set location
2. Press OK button to select “Time/Date”. Scroll to “Location” and press OK button.
3. Press OK button to select “Time Zone”. Set the Time Zone of the Location using the numeric keypad or the Up/Down button and press OK button.
4. Scroll to “Latitude” and press OK button. Set the Latitude minutes and degrees of the Location using the numeric keypad. Use the Up/Down button to set North or South and press OK button.
5. Scroll to “Longitude” and press OK button. Set the Longitude minutes and degrees of the Location us-ing the numeric keypad. Use the Up/Down button to set East or West and press OK button.
1. Press PROG button to enter Program Mode. Enter your password (“5700” by default), by using the numeric keypad and press OK button. Scroll to “Setup” option and press OK button.
10/08/2012 MONPreset 1
This page was updated on 10/11/13 to meet new Hercules version
*Setup*> Time/Date
Location> Time Zone
Location> Time Zone
Location> Time Zone

31
hercules version 3.01.01 and laterlast edit 07/07/�016
set off-sweep feature part I
All lighting in a facility should turn off after working hours are over. If, however, any relays are switched on after this time, the Hercules will wait a designated amount of time and “sweep” them off again. This is called “Off Sweep”. The programmable options for this feature are described below.
what is this feature?
4. Use the numeric keypad to set the time the work hours will end (off-sweeps will begin), and use the Up/Down button to set AM or PM. Press OK button.
Please continue to “how to... set off-sweep feature part II”
Work hours are the set hours that a facility is open and the lighting should be on. The Off Sweep will not occur during work hours. You can specify the open and close time.
set the off-sweep work hours
2. Scroll to “Off Sweeps” and press OK button. Press Ok button again to select “Work Hours”.
1. Press PROG button to enter Program Mode. Enter your password (“5700” by default), by using the numeric keypad and press OK button. Scroll to “Setup” option and press OK button.
10/08/2012 MONPreset 1
*Setup*> OFF Sweeps
Open^ 08:00 AM
3. Use the numeric keypad to set the time the work hours will begin (off-sweeps will end), and use the Up/Down button to set AM or PM. Press OK button.
Close^ 05:00 PM
enable/disable the weekend setting
The Weekend feature is used to indicate whether or not the Off Sweep function should be performed on Saturdays and Sundays. If “No”, Off Sweep is disabled on weekends.
1. From the “OFF Sweeps” menu, scroll to “Weekend” and press OK button. To ENABLE the Weekend feature, press OK button to select “Yes”. To DISABLE this feature, scroll to “No” and press OK button. (The selected state will have a ‘*’ beside it)
Weekend> Yes *
This page was updated on 10/11/13 to meet new Hercules version

3�
hercules version 3.01.01 and laterlast edit 07/07/�016
set off-sweep feature part II
set the override settings
“Override settings” actually refers to three different settings. “Override” is the amount of time the relays will remain on before being swept off. “Warn Before” indicates the amount of time before the off sweep that the lighting will flash to warn occu-pants of the imminent blackout. “Warn Cycle” is the amount of time between warning flashes.
1. From the “OFF Sweeps” menu, scroll to “Override” and press OK button.
2. Use the numeric keypad to indicate the additional amount of time, in hours, that the lights should stay on before being swept off by the Off Sweep feature (from 1 to 5 hours), and press OK button.
3. Indicate, in minutes, the amount of time before the off-sweep occurs that the lighting will flash to warn occupants of the imminent “blackout” (from 1 to 60 minutes). Press OK button to continue.
4. Indicate, in minutes, the amount of time between warning flashes (from 1 to 20 minutes), and press OK button.
OFF Sweeps> Weekend
Override2 hours
Warn Before45 minutes
Warn Cycle10 minutes
This page was updated on 10/11/13 to meet new Hercules version

33
hercules version 3.01.01 and laterlast edit 07/07/�016
edit text
2. Scroll to “Edit Text” and press OK. The list of objects with names which can be edited are as follows: “Preset”, “Relay”, “Channel”, and “Ext. Input”. Select one and press OK button.
3. The next screen will prompt for the number of the Preset, Relay, Channel, or External Input who’s name should be changed. Use the numeric keypad to enter the number and press OK button.
4. Enter a descriptive name of no more than 11 characters by using the numeric keypad. The letters are assigned to the numbers as you would find on a standard telephone (i.e. 2=ABC, 3=DEF, etc.), and you can skip spaces by using the Left/Right button. Press OK button when you’re finished.
This page was updated on 10/16/13 to meet new Hercules version
1. Press PROG button to enter Program Mode. Enter your password (“5700” by default), by using the numeric keypad and press OK button. Scroll to “Setup” option and press OK button.
10/08/2012 MONPreset 1
*
*
*Text on this screen will vary depending on the selections you made on previous screens.
*Setup*> Edit Text
Edit TextPreset _
Relay #01___________

3�
hercules version 3.01.01 and laterlast edit 07/07/�016
general settings
1. From the “Setup” menu, scroll to “LCD Adjust” and press OK button. Press OK button again to select “Backlit OFF”.
1. From the “Setup” menu, scroll to “Sound” and press OK button.
2. Select between the options “High”, “Medium”, “Low”, or “Off”, and press OK button.
lcd settings
time to auto setting
adjust sound
2. Use the numeric keypad to indicate the amount of time that should pass before the time clock switch-es back to Auto mode from Program or Manual mode in the format MM:SS, with a maximum time of 10 minutes 59 seconds. Press OK
2. Indicate the amount of time in minutes before the backlight will turn off after controller use (from 1 to 5 minutes), and then Press OK button. This will take you back to the “LCD Adjust” menu.
3. From the “LCD Adjust” menu, stroll to “Contrast” and press OK button. Use the numeric keypad to enter a contrast percentage for the LCD Screen and press OK button.
1. Press PROG button to enter Program Mode. Enter your password (“5700” by default), by using the numeric keypad and press OK button. Scroll to “Setup” option and press OK button. Scroll to
“Time to Auto” and press OK button again.
10/08/2012 MONPreset 1
Time To Auto00:30 ?
*Setup*> LCD Adjust
Backlit OFFafter 1 min?
LCD Adjust> LCD Contrast
*Setup*> Sound
SOUND OPTION> High
1. From the “Setup” menu, scroll to “Revision” and press OK button.
2. The revision information will be displayed for a few seconds before returning to the “Setup” menu.
revision info
*Setup*> Revision
v3.00.0502/06/2013
This page was updated on 10/16/13 to meet new Hercules version

hercules version 3.01.01 and laterlast edit 07/07/�016
Marlin Controls, Inc.
Corporate Headquarters:11011 Regency Crest Dr.Suite �00Dallas, TX 7��38
Mailing Address:P.O. Box ��0��7Dallas, TX 7�3��
(800) 788-�7�0 (toll free)(�1�) ��3-1011 (fax)