Embed Size (px)
Citation preview

A Programmer’s Guideto ADO.NET in C#
MAHESH CHAND
933FM 3/20/02 4:09 PM Page i

A Programmer’s Guide to ADO.NET in C#Copyright ©2002 by Mahesh Chand
All rights reserved. No part of this work may be reproduced or transmitted in any form orby any means, electronic or mechanical, including photocopying, recording, or by anyinformation storage or retrieval system, without the prior written permission of the copy-right owner and the publisher.
ISBN (pbk): 1-893115-39-9
Printed and bound in the United States of America 12345678910Trademarked names may appear in this book. Rather than use a trademark symbol withevery occurrence of a trademarked name, we use the names only in an editorial fashion andto the benefit of the trademark owner, with no intention of infringement of the trademark.
Technical Reviewer: Ildiko Blackburn, Boost Data LimitedEditorial Directors: Dan Appleman, Peter Blackburn, Gary Cornell, Jason Gilmore,
Karen Watterson, John ZukowskiManaging Editor: Grace WongProject Manager and Developmental Editor: Tracy Brown CollinsCopy Editor: Kim WimpsettProduction Editor: Kari BrooksComposition: Impressions Book and Journal Services, Inc.Artist: Cara Brunk, Blue Mud ProductionsIndexer: Valerie PerryCover Designer: Tom DebolskiMarketing Manager: Stephanie Rodriguez
Distributed to the book trade in the United States by Springer-Verlag New York, Inc., 175Fifth Avenue, New York, NY, 10010 and outside the United States by Springer-Verlag GmbH& Co. KG, Tiergartenstr. 17, 69112 Heidelberg, Germany.In the United States, phone 1-800-SPRINGER, email [email protected], or visithttp://www.springer-ny.com.Outside the United States, fax +49 6221 345229, email [email protected], or visithttp://www.springer.de.
For information on translations, please contact Apress directly at 2560 9th Street, Suite 219,Berkeley, CA 94710. Phone 510-549-5930, fax: 510-549-5939, email [email protected], or visithttp://www.apress.com.
The information in this book is distributed on an “as is” basis, without warranty. Althoughevery precaution has been taken in the preparation of this work, neither the author norApress shall have any liability to any person or entity with respect to any loss or damagecaused or alleged to be caused directly or indirectly by the information contained in this work.
The source code for this book is available to readers at http://www.apress.com in theDownloads section. You will need to answer questions pertaining to this book in order tosuccessfully download the code.
933FM 3/20/02 4:09 PM Page ii

About the Book
• Learn how to use the major data providers of the .NET platform, such as OleDb, Sql, and ODBC
• Master XML classes, learn how to integrate XML into ADO.NET architecture, and use the power of XML to transfer, read, and store data
• Develop Web-based applications using ADO.NET and ASP.NET, and build Web services using ADO.NET
• Contains numerous code examples that illustrate how to use ADO.NET with SQL Server, Access, Oracle 8i, Oracle 9i, Sybase, MySQL, and even Excel and text databases
• Illustrates how to develop ADO.NET-based Web applications and create Web services
• Covers COM interoperability, including ADO Recordset, ADOX, and ADOMD • What You Need to Know sections on the C# language, Windows Forms, and
XML make it easy for beginners to grasp the key concepts • Based on the .NET final release
This is the book on ADO.NET. ADO.NET is the latest database technology from Microsoft and represents the most powerful way to manipulate a database to date. A Programmer's Guide to ADO.NET in C# begins by taking readers through an overview of C# and then delves into ADO.NET. Author Mahesh Chand provides details on each of the major data providers of the .NET platform, such as OleDb, Sql, and ODBC, which enable developers to read and write data to the targeted databases. This book also serves as a good reference for finding detailed methods and properties for these data provider classes.
Chand shows C# programmers how to work with XML classes, integrate XML into ADO.NET architecture, and use the power of XML to transfer, read, and store data. A Programmer's Guide to ADO.NET in C# provides developers with a veritable cornucopia of practical ideas about how to take advantage of VS .NET and ASP.NET, and how to tie data to the myriad of powerful Windows Forms and Web Forms controls, including the multifaceted DataGrid. Chand also discusses how ADO.NET can be combined with ASP.NET to develop ADO.NET-based Web applications and Web services.
In this book, programmers develop numerous "real-world" sample applications that they will find easy to adapt. Examples illustrate how to execute and develop stored procedures, views, and triggers; how to create database tables and update database schemas programmatically; and how to perform event handling in ADO.NET. Finally, programmers work through the development of a Web-based guest book application.

Table of Contents: A Brief Synopsis Chapter 1: Introduction to C#
If you’re a beginner and you’ve never programmed in C#, this chapter is for you. In this chapter, you’ll be introduced to C#. You’ll learn how to write and compile C# programs, and you’ll explore C# syntaxes, data types, control flow, classes and their members, interfaces, arrays, and exception handling.
Chapter 2: Introduction to Windows Forms
In this chapter, you’ll learn how to write a Windows Forms application in a text editor and run it from the command line. The chapter then walks you rapidly through creating a simple Windows Forms application graphically using the Visual Studio .NET IDE. You’ll also be introduced to the powerful Windows common controls and you’ll learn how to use them in your application.
Chapter 3: Overview of ADO.NET
This chapter provides an overview of ADO.NET. In this chapter, you’ll learn the basics of ADO.NET and its advantages over current data access technologies. You’ll briefly cover ADO.NET classes and namespaces and how to use them to write simple database applications with Visual Studio .NET. Microsoft Visual Studio .NET provides tremendous support to write database applications in no time through the use of its wizards and utilities.
Chapter 4: Data Components in Visual Studio .NET
The Visual Studio .NET IDE provides design-time support to work with data components. In this chapter, you’ll learn how to use these data components in the Visual Studio .NET IDE at design time to create database applications. In this chapter, you’ll learn how to use various tools such as Server Explores and Data Form Wizard.
Chapter 5: ADO.NET Data Providers and Disconnected Classes
This chapter is divided into two parts: “ADO.NET Data Providers” and “ADO.NET Disconnected Classes.” It provides a broad view of ADO.NET architecture and the basic building blocks of ADO.NET and ADO.NET data providers. The “ADO.NET Disconnected Classes” section of this chapter covers DataTable, DataColumn, DataRow, DataSet, and related classes, and “ADO.NET Data Providers” section covers OleDb and Sql data provider connection, command, data adapter, data reader, transaction, and other related classes.

Chapter 6: Working with XML
The programming world is moving more and more toward the Web, and XML is an essential part of Web-based programming. This chapter begins with basic definitions of HTML, XML, and other Web-related technologies. You’ll then take a look at the .NET Framework library namespaces and classes that provide XML functionality in the .NET Framework. This chapter also explains how to read, write, and navigate XML documents using XML and DOM .NET classes, followed by a discussion of XML transformations. You’ll learn the relationship between ADO.NET and XML, and how to mix them up and use rich ADO .NET database components to display and manipulate XML data. At the end of this chapter, you’ll explore the XPathNavigator class, which is used to navigate XML documents.
Chapter 7: Developing Web Applications Using ADO.NET
As the programming world moves toward the Internet, developing Web applications and Web services are likely to become important tasks for developers. The Microsoft .NET Framework is designed to provide support to develop, maintain, and deploy reliable, high-performance Web applications and Web services. In this chapter, you’ll first develop a simple Web application and see how the ASP.NET model works with C# and other .NET languages. After that, you’ll concentrate on ASP.NET and you’ll learn how to write some real-world database Web applications using ADO.NET and C#.
Chapter 8: Using Web Services with ADO.NET
Web services provide a way to run a service on the Web and access its methods using standard protocols. These protocols include SOAP, XML, WSDL, and HTTP. The uses of a Web service may range from credit card validation, to searching for data in a database, to inserting an order into a shopping cart, to updating a guest list. Actually, the sky is the limit on what you can have your Web service do on your server. Web services under .NET can be run by invoking methods in the service directly through the HTTP or SOAP protocol, so someone wanting to run your Web service from his or her box at home can simply send an HTTP call to your service, passing the parameters in a standard URL. You’ll discover how to do so in this chapter.
Chapter 9: Handling ADO.NET Events
In this chapter, you’ll learn how you can handle events for ADO.NET objects. This chapter shows developers how they can develop database applications where they need to handler data events. It covers all ADO.NET components that have events such as DataTable, DataSet, DataAdapter, and so on.

Chapter 10: Different Flavors of ADO.NET
In this chapter, you’ll learn how to write database applications using the power of stored procedures, views, and triggers. You’ll also cover COM interoperability issues and explore how to use existing COM-based database technologies in managed code through ADO.NET data providers. Other topics discussed in this chapter include using ADO Recordset, ADOX, and ADOMD in managed code using ADO.NET.
Chapter 11: Working with the ODBC .NET Data Provider
The ODBC data provider is a recent addition to ADO.NET. This chapter shows you how to use the ODBC data provider to access various ODBC data sources, such as Oracle, Sybase, MySQL, Excel, and text.
Appendix A: Relational Databases: Some Basic Concepts
This appendix covers database issues such as normalization, transactions, concurrency, cursors, and locking.
Appendix B: Commonly Used SQL Statements
SQL statements are used frequently by database developers. This appendix is useful for nondatabase developers who are not familiar with SQL statements.

Contents at a Glance
Foreword . . . . . . . . . . . . . . . . . . . . . . . . . . . . . . . . . . . . . . . . . . . . . . . . . . . . . . . . . . . . . .xi
About the Author . . . . . . . . . . . . . . . . . . . . . . . . . . . . . . . . . . . . . . . . . . . . . . . . . . . .xiv
About the Technical Reviewer . . . . . . . . . . . . . . . . . . . . . . . . . . . . . . . . . . . . . .xv
Acknowledgments . . . . . . . . . . . . . . . . . . . . . . . . . . . . . . . . . . . . . . . . . . . . . . . . . . . . .xvi
Introduction . . . . . . . . . . . . . . . . . . . . . . . . . . . . . . . . . . . . . . . . . . . . . . . . . . . . . . . .xvii
Chapter 1: Introduction to C# . . . . . . . . . . . . . . . . . . . . . . . . . . . . . . . . . . . . . . .1
Chapter 2: Introduction to Windows Forms . . . . . . . . . . . . . . . . . . . . . . . .69
Chapter 3: Overview of ADO.NET . . . . . . . . . . . . . . . . . . . . . . . . . . . . . . . . . .123
Chapter 4: Data Components in Visual Studio .NET . . . . . . . . . . . . .153
Chapter 5: ADO.NET Data Providers and
Disconnected Classes . . . . . . . . . . . . . . . . . . . . . . . . . . . . . . . . .229
Chapter 6: Working with XML . . . . . . . . . . . . . . . . . . . . . . . . . . . . . . . . . . . . . .355
Chapter 7: Developing Web Applications Using ADO.NET . . . . . . . .435
Chapter 8: Using Web Services with ADO.NET . . . . . . . . . . . . . . . . . . . .511
Chapter 9: Handling ADO.NET Events . . . . . . . . . . . . . . . . . . . . . . . . . . . . . .545
Chapter 10: Different Flavors of ADO.NET . . . . . . . . . . . . . . . . . . . . . . .573
Chapter 11: Working with the ODBC .NET Data Provider . . . . . . . .613
Appendix A: Relational Databases: Some Basic Concepts . . . . . . . .653
Appendix B: Commonly Used SQL Statements . . . . . . . . . . . . . . . . . . . . . . .667
Index . . . . . . . . . . . . . . . . . . . . . . . . . . . . . . . . . . . . . . . . . . . . . . . . . . . . . . . . . . . . . . . .685
v
933FM 3/20/02 4:09 PM Page v

CHAPTER 4
Data Components inVisual Studio .NET
IN PREVIOUS CHAPTERS, YOU’VE SEEN the basics of the ADO.NET model and its compo-nents. Visual Studio (VS) .NET provides design-time support to work withdata components. In this chapter, you’ll learn how to use these data componentsin VS .NET at design-time to create database applications. Using these compo-nents is similar to using any Windows control. You just drag the component toa form, set its properties and methods, and you’re up and running.
In this chapter I’ll start with the Server Explorer, a useful tool for databaseapplications. I’ll focus on developing database applications quickly, usingdata components in VS .NET without writing a lot of code. I’ll also show youa step-by-step tutorial to help you develop and run a project. After that, I’ll dis-cuss data connection, data adapter, data command, dataset, and data viewcomponents in more detail. After finishing this chapter, you’ll have a good under-standing of data components and how to work with them in VS .NET.
Creating Your ADO.NET Project
Begin your project by launching VS .NET and choosing New ➢ Project from the Project menu. Choose Visual C# Projects from Project Types and then pick the Windows Application template. If you like, type an appropriate name into the Name field for your first ADO.NET application and click OK (see Figure 4-1).
153
933ch4 3/20/02 11:03 AM Page 153

Using the Server Explorer
The Server Explorer is new to Visual Studio .NET. You can open the ServerExplorer by clicking the View ➢ Server Explorer menu item, as shown in Figure 4-2.
154
Chapter 4
Figure 4-1. Creating a new project
933ch4 3/20/02 11:03 AM Page 154

The Server Explorer enables you to manage your database servers and con-nections. If you’ve ever used ODBC in your applications, then you’re probablyfamiliar with the traditional Windows ODBC Administration where you createddata source names (DSNs) using ODBC drivers for a data source and then con-nected your application using this DSN.
Well, now you don’t have to worry about it. You can use the Server Explorer toadd a new server or a data connection to your list.
155
Data Components in Visual Studio .NET
Figure 4-2. Opening the Server Explorer
933ch4 3/20/02 11:03 AM Page 155

As you see in Figure 4-3, the Server Explorer has two root nodes: DataConnections and Servers. By right-clicking on these nodes you can add a newdata connection or a new server to your list.
Specifically, to add a new server to the Server Explorer, you right-click on theServers node, select the Add Server menu option, and enter the server name.
Adding a New Connection
Adding a new connection is the next step after adding a server (if you’re usinga server) to the Server Explorer. You add a new connection to your list by right-clicking on the Data Connections tree item and choosing the Add Connectionoption. This brings up a Data Link Properties Wizard. The first tab of this wizard,Provider, displays all the data source providers installed on your machine; this is
156
Chapter 4
Figure 4-3. Adding a server through the Server Explorer
933ch4 3/20/02 11:03 AM Page 156

where you select your database provider. The list could contain any OLE-DBprovider, Jet OLD-DB, or other data driver available on your computer. Figure 4-4shows you a list of providers on my machine.
The second tab of this wizard, Connection, lets you pick your server and cor-responding data source. The drop-down list displays all the available servers. Myserver is a SQL Server with the default name localhost. After selecting a server,the database drop-down list displays all the available databases on the server. I’llselect the Northwind database in this example. By clicking the Test Connectionbutton, you can make sure your database connection is working. If you’ve pro-vided a wrong user ID or password, the test will throw an error (see Figure 4-5).
157
Data Components in Visual Studio .NET
Figure 4-4. Choosing a data provider
933ch4 3/20/02 11:03 AM Page 157

The third tab, Advanced, is for setting connection timeout and access per-missions. You can give this connection read, write, or other permissions using theAdvanced tab (see Figure 4-6).
158
Chapter 4
Figure 4-5. Selecting a database from SQL Server
933ch4 3/20/02 11:03 AM Page 158

Managing and Viewing Data
The Server Explorer not only lets you add server and database connections, italso lets you manage and view data. You can add, update, and delete data froma database. The Server Explorer also provides options to create new databasesand objects, including tables, views, stored procedures, and so on.
The Server Explorer manages database objects in a tree structure. Each data-base is a tree node of the server. As you expand the Northwind database node, youcan see its children listed as tables, stored procedures, and views (see Figure 4-7).
159
Data Components in Visual Studio .NET
Figure 4-6. Additional options such as permissions and the connection timeout period
933ch4 3/20/02 11:03 AM Page 159

If you expand this connection by double-clicking on it, you’ll notice it showstables, views, and stored procedures. You can further expand these to see them inmore detail.
Besides showing a list of database objects such as tables, views, stored proce-dures, and functions, the Server Explorer also lets you view, add, edit, and deletedata from a data source. Figure 4-8 shows the Employees table of the Northwinddatabase in the Server Explorer. In Figure 4-8, you see the data in a grid. You canedit this data at any time. For example, to delete a row or a collection of rows,select the rows and hit Delete, or right-click on the selected rows and hit theDelete option. The right-click option of the grid also provides you options tomove to the grid’s first, next, previous, and last records.
160
Chapter 4
Figure 4-7. The Server Explorer with database tables
933ch4 3/20/02 11:03 AM Page 160

You can also right-click on a table and choose Retrieve Data from Table toretrieve data of that table, as shown in Figure 4-9.
161
Data Components in Visual Studio .NET
Figure 4-8. The Employee table in the Server Explorer
Figure 4-9. Retrieving data from a table in the Server Explorer
933ch4 3/20/02 11:03 AM Page 161

Using Visual Data Components
As mentioned in Chapter 2, “Introduction to Windows Forms,” Microsoft .NETprovides many data providers to work with different types of data sources. Theclass hierarchy model of these data providers remains the same, so programmerswon’t have any problem switching between data providers. Some of thesedata providers are OleDb, Sql, and Odbc. The Odbc data provider was a new addition to the .NET Framework (added after .NET Beta 2). If you don’t haveOdbc data providers available in your namespaces, you can install the Odbc dataprovider by installing Odbc .NET Software Development Kit (SDK) from theMicrosoft site (http://msdn.microsoft.com/data/).
162
Chapter 4
NOTE This location may change. You can always find the updated URL inthe downloads section (http://www.c-sharpcorner.com/downloads.asp) ofC# Corner.
If you’re not sure, you can check the toolbox to see if you have an Odbcdata provider already installed. The toolbox’s Data tab shows you the avail-able data controls in Visual Studio. These components are DataSet, DataView,SqlConnection, SqlCommand, SqlDataAdapter, OleDbConnection, OleDbCommand, andOleDbDataAdapter (see Figure 4-10).
Figure 4-10. Data components
933ch4 3/20/02 11:03 AM Page 162

With the OleDb and Sql data components, if you also see ODBC components,then you already have the Odbc data provider installed. Otherwise, you have toinstall the Odbc data provider. After installing ODBC .NET SDK, you need to goyour toolbox to see the ODBC data components. After installing the ODBC .NETSDK, right-click on the toolbox and select Customize Toolbox (see Figure 4-11).
Now, you’ll notice a list of Component Object Model (COM) components and.NET Framework components (see Figure 4-12). Click on the .NET FrameworkComponents tab and select the OdbcCommand, OdbcConnection,OdbcCommandBuilder, and OdbcDataAdapter components. If these componentsdon’t show up in the tab, then you need to browse for the component using theBrowse button. You can usually find the ODBC components stored as \Program Files\Microsoft.NET\Odbc.NET\Microsoft.Data.Odbc.dll.
163
Data Components in Visual Studio .NET
Figure 4-11. The Customize Toolbox option
933ch4 3/20/02 11:03 AM Page 163

After clicking the OK button, use the Toolbox ➢ Data option to see yourODBC data components (see Figure 4-13).
164
Chapter 4
Figure 4-12. ODBC data components
NOTE If you don’t see this file in your Microsoft .Net directory, theODBC.NET SDK may not have installed on your machine. Try reinstalling it.
933ch4 3/20/02 11:03 AM Page 164

As mentioned briefly in Chapter 3, “Overview of ADO.NET,” the .NETFramework Library contains many ADO.NET data providers, including OleDb,Sql, and Odbc. The OleDb data provider wraps up native OLE-DB COM API towork with OLE-DB data sources. To access an OLE-DB data source, you need to install an OLE-DB data provider for that database. Sql data providers workwith SQL Server 7 or later databases. Odbc data providers wrap up the ODBCAPI to work with ODBC data sources (with the help of ODBC Admin andODBC drivers). Chapter 5 discusses these data providers in more detail. You can even create your own custom data providers. Microsoft and other vendorsmight add more data providers, which can be added to the library later.
In the .NET Framework, each of these data providers has its own name-spaces. For instance, the System.Data.OleDb namespace consists of classesbelonging to the OleDb data providers. All of these namespace classes start withOleDb. The System.Data.ODBC and System.Data.SqlClient namespaces consist ofclasses belonging to the Odbc and Sql data providers, respectively. Similar toOleDb, classes in Odbc start with Odbc, and classes in SqlClient start with Sql.
In Visual C#, some of these classes (or objects) are available from the toolbox;you can add them to a form using drag-drop operation as any other Windowscontrol in the toolbox. These controls are data components.
All of these types of components work in pretty much the same way exceptfor the Connection component, whose connection string will vary based on thedata source to which you’re connecting.
165
Data Components in Visual Studio .NET
Figure 4-13. Viewing your ODBC data components in the toolbox
933ch4 3/20/02 11:03 AM Page 165

166
Chapter 4
NOTE In the next section, I’ll discuss how you can add these componentsto your Window Forms applications and set their properties and methodsat design-time with the help of the .NET wizards.
VS .NET also provides a set of data-bound controls. DataGrid, ListBox, andDataList are good examples of some of these data-bound controls. It’s fairly easyto work with these controls. You just set a few properties, and they’re ready to dis-play your data. For example, setting a DataGrid control’s DataSource propertydisplays data from a DataSet object. You’ll see these controls in the examplesthroughout this chapter.
Understanding Data Connections
To connect to a data source, the first thing you need to learn about is adata connection.
Each data provider has a connection class, and if you’re using VS .NET, youcan see these class objects as components in the Toolbox ➢ Data tab. For exam-ple, the SqlConnection, OdbcConnection, and OleDbConnection class objectsrepresent a connection for the Sql, Odbc, and OleDb data providers, respectively.See the following:
• SqlConnection creates and manages SQL Server database connections.
• OdbcConnection creates and manages connections to ODBC data sources.
• OleDbConnection creates and manages connections to an OLE-DB data sources.
In VS .NET, you can create a connection component in many ways. You canuse the IDE to add a connection object to a project, create it programmatically, or use data adapters that automatically create a connection object for you. In thischapter, we’ll be concentrating on adding a connection through VS .NET.
The easiest way to add a connection to a project in VS .NET is to drag a con-nection component (SqlConnection, OleDbConnection, or OdbcConnection) fromthe toolbox’s Data tab. This action adds a connection object to your project. Afterthat, you can set the connection’s properties using the Properties windows. Forthis demonstration, I’ll drop a SqlConnection from the toolbox onto the form.Figure 4-14 shows the Properties window displayed after creating theSqlConnection. Note that the default connection name is the class name with
933ch4 3/20/02 11:03 AM Page 166
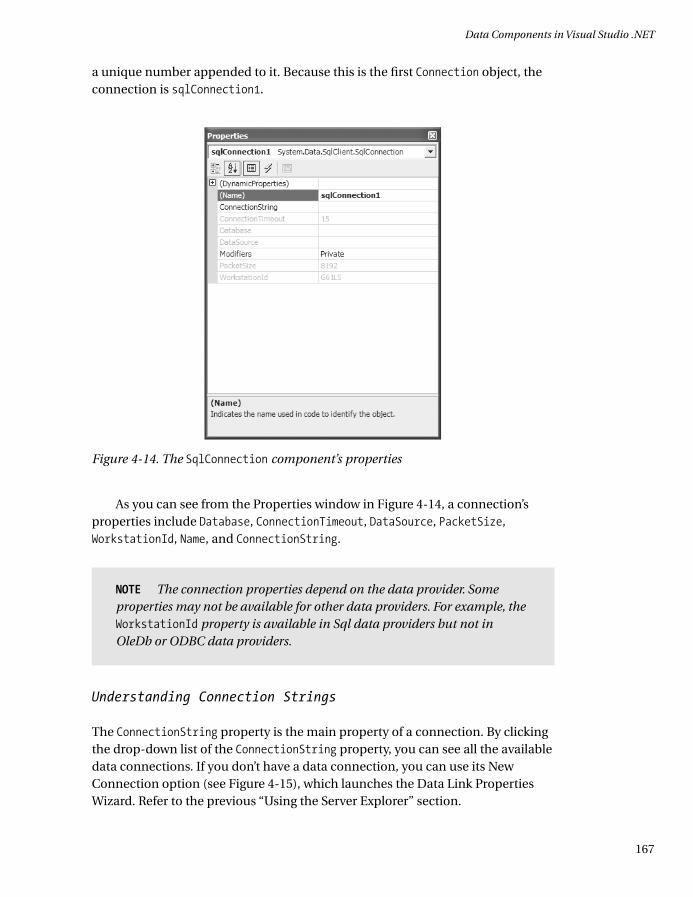
a unique number appended to it. Because this is the first Connection object, theconnection is sqlConnection1.
As you can see from the Properties window in Figure 4-14, a connection’sproperties include Database, ConnectionTimeout, DataSource, PacketSize,WorkstationId, Name, and ConnectionString.
167
Data Components in Visual Studio .NET
Figure 4-14. The SqlConnection component’s properties
NOTE The connection properties depend on the data provider. Someproperties may not be available for other data providers. For example, theWorkstationId property is available in Sql data providers but not inOleDb or ODBC data providers.
Understanding Connection Strings
The ConnectionString property is the main property of a connection. By clickingthe drop-down list of the ConnectionString property, you can see all the availabledata connections. If you don’t have a data connection, you can use its NewConnection option (see Figure 4-15), which launches the Data Link PropertiesWizard. Refer to the previous “Using the Server Explorer” section.
933ch4 3/20/02 11:03 AM Page 167

After choosing the New Connection option and launching the Data LinkProperties Wizard, you choose a server in the Connection tab. On my machine,the SQL Server’s name is G61LS, the user ID and password aren’t entered becauseI’m using Windows NT Integrated Security. You need to enter your server name(or select from the drop-down list), and enter your user ID and password if you’renot using Windows NT Integrated Security option (see Figure 4-16).
168
Chapter 4
Figure 4-15. ConnectionString property options
933ch4 3/20/02 11:03 AM Page 168

The SQLConnection string looks like following:
“data source=MCB;initial catalog=Northwind;persist security info=False;”+
“user id=sa;workstation id=MCB;packet size=4096”
169
Data Components in Visual Studio .NET
Figure 4-16. Data Link Properties Wizard
NOTE In Chapter 5, I’ll discuss a connection and its properties in moredetail and show how to set them programmatically.
Working with SQL Data Adapters
A data adapter is another important component of a data provider. Similar to theconnection, each data provider has a corresponding data adapter class. Alldata adapters in ADO.NET work in the same way, which means if you know howto work with Sql data adapters, you can use OleDb, ODBC, and other dataadapters easily. The SqlDataAdapter, OleDbDataAdapter, and OdbcDataAdaperclasses represent data adapter components in Sql, OleDb, and ODBC data
933ch4 3/20/02 11:03 AM Page 169
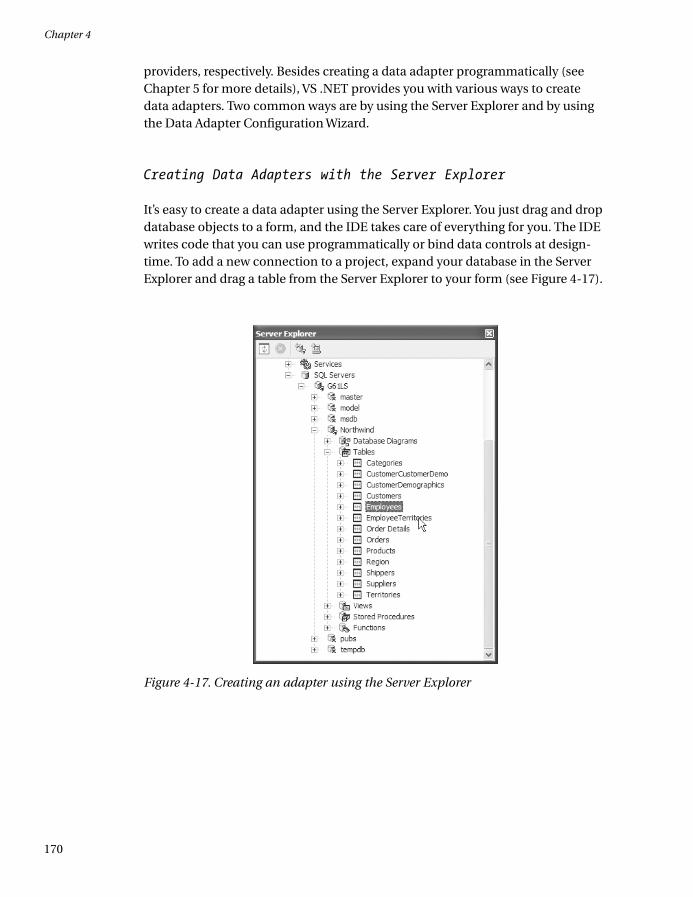
providers, respectively. Besides creating a data adapter programmatically (seeChapter 5 for more details), VS .NET provides you with various ways to createdata adapters. Two common ways are by using the Server Explorer and by usingthe Data Adapter Configuration Wizard.
Creating Data Adapters with the Server Explorer
It’s easy to create a data adapter using the Server Explorer. You just drag and dropdatabase objects to a form, and the IDE takes care of everything for you. The IDEwrites code that you can use programmatically or bind data controls at design-time. To add a new connection to a project, expand your database in the ServerExplorer and drag a table from the Server Explorer to your form (see Figure 4-17).
170
Chapter 4
Figure 4-17. Creating an adapter using the Server Explorer
933ch4 3/20/02 11:03 AM Page 170

This action creates a connection and a data adapter. You can even dragselected columns or stored procedures on the form. VS .NET takes care of therest. Right-click on the form and choose View Code to examine the code gener-ated by the wizard; in this example, you’ll see one SqlConnection component andone SqlDataAdapter component along with a set of SqlCommand components:
private System.Data.SqlClient.SqlConnection sqlConnection1;
private System.Data.SqlClient.SqlDataAdapter sqlDataAdapter1;
private System.Data.SqlClient.SqlCommand sqlSelectCommand1;
private System.Data.SqlClient.SqlCommand sqlInsertCommand1;
private System.Data.SqlClient.SqlCommand sqlUpdateCommand1;
private System.Data.SqlClient.SqlCommand sqlDeleteCommand1;
Once you have a DataAdapter, you can use it to populate datasets and workwith its properties. We’ll discuss DataSet basics and how to construct them man-ually in Chapter 5 in more detail. With VS .NET, you can even generate datasetsusing the visual representation of the DataAdapter. We’ll discuss how to populatea DataSet using VS .NET IDE wizards in the “Generating Typed DataSets UsingData Adapter” section of this chapter.
Creating Data Adapters with the Data Adapter Configuration Wizard
The Data Adapter Configuration Wizard is a powerful tool to develop databaseapplications. To see how you can create data adapters using the this wizard, you’llcreate a new Window Forms–based sample project.
In this first sample project, I’ll show you how to create SQL data adapters,read data from a SQL Server data source, and display the data from a dataadapter to a DataGrid control. Just follow the following simple steps in the nextseveral sections. After completing these steps, you’ll see how easy it is to developdatabase applications using the Data Adapter Configuration Wizard.
Step 1: Selecting a Project Template
First, create a Windows Application template as you did at the beginning of thechapter (see Figure 4-18).
171
Data Components in Visual Studio .NET
933ch4 3/20/02 11:03 AM Page 171

Step 2: Adding a DataGrid Control to the Form
Now add a DataGrid control to the form by dragging a DataGrid control from theToolbox ➢ Windows Forms category to the form.
Step 3: Adding a Data Adapter Component
Next, drag a SqlDataAdapter control from the Toolbox ➢ Data category to theform. As you drop the data adapter (Sql, OleDb, or ODBC), the Data AdapterConfiguration Wizard pops up.
Welcome Page
The first page of this wizard is just a welcome screen (see Figure 4-19).
172
Chapter 4
Figure 4-18. Creating a Windows Application project
933ch4 3/20/02 11:03 AM Page 172

Choose Your Data Connection Page
The second page of the wizard lets you create a new connection or pick froma list of available connections on your machine. In this example, I’m using thedefault Northwind SQL Server database that comes with Visual Studio. As youcan see in Figure 4-20, the Northwind connection is available in the list. Don’tconfuse it with G61LS, which is specific to my machine name. This name will bedifferent for different machines. If you don’t have any connection listed, you canuse the New Connection button, which launches the Data Link Properties Wizard(discussed in the “Connection Strings” section).
173
Data Components in Visual Studio .NET
Figure 4-19. The Data Adapter Configuration Wizard welcome screen
933ch4 3/20/02 11:03 AM Page 173

Choose a Query Type
The next page of the wizard is for command set types. A command set could con-sist of a SQL statement or a new or already existing stored procedure (see Figure 4-21).
174
Chapter 4
Figure 4-20. Choosing the Northwind SQL Server database in the Data AdapterConfiguration Wizard
933ch4 3/20/02 11:03 AM Page 174

Generate the SQL Statement
The next page of the Data Adapter Configuration Wizard lets you build a SQLstatement or a stored procedure (see Figure 4-22).
175
Data Components in Visual Studio .NET
Figure 4-21. Choosing a query type in the Data Adapter Configuration Wizard
933ch4 3/20/02 11:03 AM Page 175

Query Builder
The Query Builder option lets you pick tables from your data source. First, selectthe Employees table to read in the Employee data. You actually have the option ofselecting as many tables as you want, but for now select only one table (seeFigure 4-23) and click the Add button.
176
Chapter 4
Figure 4-22. Creating a Select statement through the Data Adapter Configuration Wizard
933ch4 3/20/02 11:03 AM Page 176

If you’ve ever used Microsoft Access, you’ll find that the Query Builder is sim-ilar to it. In Access, you can create queries by dragging tables and their columnsto the grid (or checking the columns), and the Query Builder builds a SQL queryfor your action. In this sample, I’ll select EmployeeID, FirstName, and LastNamefrom the Employees table to build our SQL statements (see Figure 4-24).
177
Data Components in Visual Studio .NET
Figure 4-23. The Query Builder
933ch4 3/20/02 11:03 AM Page 177

Now, I’ll select three columns from the Employees table. The result looks likeFigure 4-25.
178
Chapter 4
Figure 4-24. Building columns in the query
Figure 4-25. The Query Builder selection
933ch4 3/20/02 11:03 AM Page 178

View Wizard Results
The View Wizard Results page shows you the action being taken by the wizard; inthis example, it was successful. The Details section shows that the wizard hasgenerated SQL Select, Insert, Update, and Delete statements and mappings (seeFigure 4-26).
Now you can click the Finish button to complete the process.Now, if you examine the form in Figure 4-27, you’ll see two components:
sqlConnection1 and sqlDataAdapter1. The wizard sets the properties of thesecomponents for you. Now you can use the data adapter to populate yourdatasets. Don’t forget to resize the DataGrid you added to the project.
179
Data Components in Visual Studio .NET
NOTE You can even write your own SQL statement if you don’t want touse the Query Builder. For performance reasons, if you only want a fewcolumns, then use column names instead of using SELECT * statements.
Figure 4-26. The View Wizard Results page
933ch4 3/20/02 11:03 AM Page 179

Step 4: Setting and Reviewing Data Adapter Properties
OK, now that you have a DataAdapter on your form, let’s take a look at theSqlDataAdapter component properties. You can see its properties by right-clicking on the adapter and selecting the Properties menu item. The Propertieswindow looks like Figure 4-28.
The wizard also shows the available command properties, includingInsertCommand, DeleteCommand, SelectCommand, and UpdateCommand (see Figure 4-28).
180
Chapter 4
Figure 4-27. SqlConnection and SqlDataAdapter shown in the form designer
933ch4 3/20/02 11:03 AM Page 180

You can set DataAdapter properties by clicking on these properties.SqlCommand and TableMappings, for example, are important properties. A data adapter has four SqlCommand properties—SelectCommand, DeleteCommand,InsertCommand, and UpdateCommand—that all execute SQL commands on thedata source. For example, if you look at the SelectCommand property in Figure 4-29, you’ll see the SQL Select statement.
181
Data Components in Visual Studio .NET
Figure 4-28. The data adapter in the Properties window
NOTE Chapter 5 covers SelectCommand, InsertCommand, UpdateCommand,and DeleteCommand in more detail.
933ch4 3/20/02 11:03 AM Page 181

As you also see in Figure 4-29, you can set CommandText, CommandType,Connection, and so on using the Properties dialog box. If you double-click onCommandText, it pops up the Query Builder where you can rebuild your query (seeFigure 4-30).
182
Chapter 4
Figure 4-29. Setting the SQL SelectCommand in the data adapter
933ch4 3/20/02 11:03 AM Page 182

The TableMapping class represents a mapping of DataColumns in thedata source to DataColumns in the DataSet. I’ll discuss DataTables and table map-pings in more detail in Chapter 5. If you click on the TableMappings property(which is a collection of TableMapping objects), it brings up the Table Mappingsdialog box.
As you can see from Figure 4-31, the Table Mapping dialog box has twocolumns: Source Table and Dataset Table. The Source Table column is a list ofactual columns, and the Dataset Table column is a list of the column names usedin the dataset. By default, dataset columns names are the same as the sourcetable. This is useful when you want to use different names in a program. You canchange dataset columns by editing the column itself. Of course, you can’t changesource columns, but you can reorder them by using the column drop-down list.
183
Data Components in Visual Studio .NET
Figure 4-30. Relaunching the Query Builder from the CommandText property
933ch4 3/20/02 11:03 AM Page 183

By using this dialog box, you can even delete columns from your mappingusing the Delete button.
Step 4: Reviewing Other Options
If you look closely at data adapter properties, you’ll see three links: ConfigureData Adapter, Generate Dataset, and Preview Data (see Figure 4-32).
The Configure Data Adapter option calls the Data Adapter ConfigurationWizard, discussed earlier in this chapter. If you want to reset the wizard to changeyour options, you can use this link.
The Generate Dataset option lets you generate a dataset for this data adapter.I’ll discuss how to generate datasets using data adapter properties in the“Working with OleDb Data Adapters” section of this chapter.
184
Chapter 4
Figure 4-31. Table Mappings dialog box
933ch4 3/20/02 11:03 AM Page 184

The Preview Data option enables you to view the DataSet schema. You caneven preview the data in the DataSet by clicking the Fill button. The Data AdapterPreview dialog box looks like Figure 4-33.
185
Data Components in Visual Studio .NET
Figure 4-32. Data Adapter option links
933ch4 3/20/02 11:03 AM Page 185

The Fill Dataset button in Figure 4-33 fills data into a grid based upon thecurrent state of the SelectCommand in the DataAdapter.
Step 5: Reviewing the Source Code
Now it’s time to examine the code and see what the wizard has done for you auto-matically. You can see the source code by right-clicking on the form and selectingthe View Source option.
186
Chapter 4
Figure 4-33. Previewing data for the data adapter
NOTE If you don’t want to know what the wizard has automatically donefor you, you can skip this step.
933ch4 3/20/02 11:03 AM Page 186

All source code generated by the Windows form designer is defined in theInitializeComponent method of the file . Right-click on your form and chooseView Code. Upon examining the source code, you’ll see where the wizard hasadded two components, sqlConnection1 and sqlDataAdapter1, to your source fileas well as four SqlCommand components. Scroll down to the Windows DesignerGenerated Code option and expand it. This will reveal the contents of theInitializeComponent routine (see Listing 4-1).
Listing 4-1. Added Sql Server provider componentsnamespace DataAdapterSamp1
{
public class Form1 : System.Windows.Forms.Form
{
private System.Windows.Forms.DataGrid dataGrid1;
private System.Data.SqlClient.SqlDataAdapter sqlDataAdapter1;
private System.Data.SqlClient.SqlCommand sqlSelectCommand1;
private System.Data.SqlClient.SqlCommand sqlInsertCommand1;
private System.Data.SqlClient.SqlCommand sqlUpdateCommand1;
private System.Data.SqlClient.SqlCommand sqlDeleteCommand1;
private System.Data.SqlClient.SqlConnection sqlConnection1;
// more Source code
private void InitializeComponent()
{
this.dataGrid1 = new System.Windows.Forms.DataGrid();
this.sqlDataAdapter1 = new System.Data.SqlClient.SqlDataAdapter();
this.sqlSelectCommand1 = new System.Data.SqlClient.SqlCommand();
this.sqlInsertCommand1 = new System.Data.SqlClient.SqlCommand();
this.sqlUpdateCommand1 = new System.Data.SqlClient.SqlCommand();
this.sqlDeleteCommand1 = new System.Data.SqlClient.SqlCommand();
this.sqlConnection1 = new System.Data.SqlClient.SqlConnection();
. . .
// more code
. . .
}
}
Do a search for the ConnectionString by hitting Ctrl+F to bring up the searchdialog box. If you examine the InitializeComponent() method, you’ll see that thewizard sets SqlConnection’s ConnectionString property to the following:
187
Data Components in Visual Studio .NET
933ch4 3/20/02 11:03 AM Page 187

this.sqlConnection1.ConnectionString = “data source=(local);initial catalog” +
“=Northwind;persist security info=False;user id” +
“=mahesh;workstation id=7LJML01;packet size=4096”;
It also sets the CommandText property of the SqlCommand with the corre-sponding SELECT, INSERT, UPDATE, and DELETE SQL statements. The Connectionproperty of SqlCommand is set to SqlConnection:
this.sqlSelectCommand1.CommandText = “SELECT LastName, “ +
“EmployeeID, FirstName FROM Employees”;
this.sqlSelectCommand1.Connection = this.sqlConnection1;
If you examine the Listing 4-2, you’ll see that DataAdapter is connected toa Connection through data commands, and the TableMapping property is respon-sible for mapping tables and their columns. Note that the TableMappings betweenDataSet columns and DataSource columns generated by the wizard have exactlythe same column names.
Listing 4-2. DataAdapter connection through TableMappingprivate void InitializeComponent()
{
//
// some code here
//
this.sqlDataAdapter1.DeleteCommand = this.sqlDeleteCommand1;
this.sqlDataAdapter1.InsertCommand = this.sqlInsertCommand1;
this.sqlDataAdapter1.SelectCommand = this.sqlSelectCommand1;
Please break up code.
this.sqlDataAdapter1.TableMappings.AddRange
(new System.Data.Common.DataTableMapping[]
{new System.Data.Common.DataTableMapping
(“Table”, “Employees”, new System.Data.Common.DataColumnMapping[]
{
new System.Data.Common.DataColumnMapping(“LastName”, “LastName”),
new System.Data.Common.DataColumnMapping(“EmployeeID”, “EmployeeID”),
new System.Data.Common.DataColumnMapping(“FirstName”, “FirstName”)})
}
);
// . . ...
//. . .. . ...
}
188
Chapter 4
933ch4 3/20/02 11:03 AM Page 188

It looks like the wizard did a lot of the work for you!
Step 6: Filling the DataGrid Control with Data
Until now, you didn’t have to write a single line of code. Now, though, you’ll add a few lines of code and then you’ll be all set to see the data from your data source.First, you’ll create a method, FillDBGrid, which fills a DataSet object. Then you’llread data from a DataSet object and populate the DataGrid control.
The Fill method of SqlDataAdapter fills data from a data adapter to theDataSet. You call Fill method in FillDBGrid method. Once you have a DataSetcontaining data, you can do anything with it including creating views for thatdata. (I discussed multiple views of a DataSet object in the previous chapter.) Inthis example, you set a DataGrid control’s DataSource property to theDataSet.DefaultViewManager, which binds the DataSet object to the DataGridcontrol (see Listing 4-3).
Listing 4-3. FillDBGrid methodprivate void FillDBGrid()
{
DataSet ds = new DataSet();
sqlDataAdapter1.Fill(ds);
dataGrid1.DataSource = ds.DefaultViewManager;
}
Now you simply call FillDBGrid from the Form1 constructor or the Form_Loadevent or from a button-click handler. In this example I’ll call it from the formconstructor just after the InitializeComponent() call, as you can see in Listing 4-4.
Listing 4-4. Calling the FillDBGrid method from the Form1 constructorpublic Form1()
{
//
// Required for Windows Form Designer support
//
InitializeComponent();
FFiillllDDBBGGrriidd(());;
//
// TODO: Add any constructor code after InitializeComponent call
//
}
189
Data Components in Visual Studio .NET
933ch4 3/20/02 11:03 AM Page 189

Now build and run the project. The result looks like Figure 4-34. Easy, huh?
Working with OleDb Data Adapters
In the previous section, I discussed Sql data adapters. Now, let’s take a quick lookat OleDb data adapters. Actually, all data adapters (Sql, OleDb, and ODBC) workexactly the same way. I’ll take you through a quick step-by-step tutorial on how touse OldDb data adapters. To give you more of a variety, you’re going to use OleDbwith an Access 2000 database.
As you already know, the first step in working with ADO.NET is to add a newconnection using the Server Explorer. For the purposes of consistency, I’ve usedthe Northwind Microsoft Access 2000 database for these examples. Feel free,however, to use any data source that has an OLE DB provider available on your machine.
In the Data Link Properties dialog box, choose the Microsoft Jet 4.0 OLD DBProvider (see Figure 4-35).
190
Chapter 4
Figure 4-34. Output of the Employee data to a DataGrid control
933ch4 3/20/02 11:03 AM Page 190

And the database is C:\Northwind.mdb, as you can see in Figure 4-36.
191
Data Components in Visual Studio .NET
Figure 4-35. Choosing the OLE DB driver for Access
Figure 4-36. Choosing the database in Server Explorer
933ch4 3/20/02 11:03 AM Page 191

Adding an OleDbDataAdapter
Working with either an OleDbDataAdapter or an ODBCDataAdapter is the same asworking with the SqlDataAdapter. You can use either the Server Explorer or theData Adapter Configuration Wizard to create an OleDb data adapter. In thisexample, I’ll use the Data Adapter Configuration Wizard. Drop anOleDbDataAdapter control from Toolbox ➢ Data to your application form. Thisaction will bring up the Data Adapter Configuration Wizard.
On the second page of the wizard, Choose Your Data Connection, you caneither create a new connection or pick an existing connection (see Figure 4-37).
On the next page, select the Use SQL Statement option and click the Nextbutton (see Figure 4-38).
192
Chapter 4
Figure 4-37. Configuring an OleDb data adapter for Access
933ch4 3/20/02 11:03 AM Page 192

This will bring you to the Add Table selection page. As you can see fromFigure 4-39, I’m picking the Orders table. Then, click the Add button.
193
Data Components in Visual Studio .NET
Figure 4-38. Choosing the query type in the Data Adapter Configuration Wizard
Figure 4-39. Adding a table to the query in the Data Adapter Configuration Wizard
933ch4 3/20/02 11:03 AM Page 193

After clicking Add, the Query Builder brings up a table column selector, asshown in Figure 4.40.
I chose OrderID, OrderDate, ShipAddress, ShipCity, and RequiredDate for myquery by checking the columns in the Orders window. This builds the queryshown in the third pane of the Query Builder. Clicking OK displays the finalquery, as shown in Figure 4-41.
194
Chapter 4
Figure 4-40. Choosing columns for the query in the Data Adapter Configuration Wizard
933ch4 3/20/02 11:03 AM Page 194

Clicking on the Advanced Options button brings up the Advanced SQLGeneration Options dialog box, as shown in Figure 4-42.
195
Data Components in Visual Studio .NET
Figure 4-41. Generating the SQL statements in the Data Adapter Configuration Wizard
Figure 4-42. Advanced options in the Data Adapter Configuration Wizard
933ch4 3/20/02 11:03 AM Page 195

In this dialog box you can opt not to generate INSERT, UPDATE, or DELETE state-ments by turning off the first option. This is useful if you’re planning on onlyreading the database and don’t want all this extraneous code generated.
The second option, Use Optimistic Concurrency, causes the wizard to useoptimistic concurrency. Optimistic concurrency checks to see if the row beingupdated in the database has already been changed by someone else during the update process. The data provider manages this by using a WHERE clause in theUPDATE statement that checks for the original data in the dataset. If it doesn’t findthe original data, it won’t update the data source. A data provider maintains twosets of parameters: one with the original data and one with the current data. Thecurrent data parameters work in the UPDATE statement (this is the data you’re try-ing to update the database with), and the original data parameters work in theWHERE clause (these parameters are the check to make sure the database hasn’tbeen updated). If you turn off the Use Optimistic Concurrency option, the WHEREclause only contains the primary key and no original parameter data is gener-ated. You can probably turn this off to speed things up if the application is onlyfor a single user. Below are the differences between the Select statements gener-ated with optimistic concurrency on and off.
This is the code with optimistic concurrency turned off:
dateCommand1.CommandText = @”UPDATE Orders SET OrderDate = ?,”+
“RequiredDate = ?, ShipAddress = ?, ShipCity = ? WHERE (OrderID = ?)”+
“AND (OrderDate = ? OR ? IS NULL AND OrderDate IS NULL) AND “+
“(RequiredDate = ? OR ? IS NULL AND RequiredDate IS NULL) AND “+
“(ShipAddress = ? OR ? IS NULL AND ShipAddress IS NULL) AND “+
“(ShipCity = ? OR ? IS NULL AND ShipCity IS NULL)”;
This is the code with optimistic concurrency on:
this.oleDbUpdateCommand1.CommandText = @”UPDATE Orders SET OrderID = ?,”+
“OrderDate = ?, RequiredDate = ?, ShipAddress = ?, ShipCity = ?”+
“WHERE (OrderID = ?) AND (OrderDate = ?) AND (RequiredDate = ?)”+
“AND (ShipAddress = ?) AND (ShipCity = ?)” ;
“SELECT OrderID, OrderDate, RequiredDate, ShipAddress,”+
“ShipCity FROM Orders WHERE (OrderID = ?)”;
You may also notice the SQL Select statement tacked onto the end of theSQL UPDATE statement. The Refresh the DataSet option adds this statement.Turning this option off will remove the Select statement. You had to uncheck thisfor the OleDb adapter or else Insert and Update don’t work. This isn’t true, how-ever, for the SqlServer adapter.
196
Chapter 4
933ch4 3/20/02 11:03 AM Page 196

Clicking Next brings up the results screen. As you can see in Figure 4-43, theData Adapter Configuration Wizard has done quite a bit of work! It’s generated allof the commands for the adapter, all of the mappings, and, although not indi-cated, all of the parameters.
If you examine the form designer, you’ll see the wizard added two compo-nents to your form: oleDbConnection1 and oleDbDataAdapter1. The source codegenerated by the wizard is similar to the source generated for the SqlDataAdapter.You’ll notice differences, though, in the ConnectionString and the parameters ifyou were to go through the same process with a SqlDataAdapter. TheOdbcDataAdapter will also generate similar code.
Populating DataSet and Filling the DataGrid
Now, to test whether everything went fine, create a Windows Forms applicationand add an OleDataAdapter using the previous steps. Then, add a DataGrid con-trol to the form, as well as all the code listed in Listing 4-5 on the Form_Load eventor a button-click handler.
197
Data Components in Visual Studio .NET
Figure 4-43. View Wizard Results page of the Data Adapter Configuration Wizard
933ch4 3/20/02 11:03 AM Page 197

Listing 4-5. Adding the code on the Form_Load eventprivate void Form1_Load(object sender, System.EventArgs e)
{
DataSet ds = new DataSet();
// Populate DataSet by calling Fill method
oleDbDataAdapter1.Fill(ds);
// Set DataGrid’s DataSource property
dataGrid1.DataSource = ds.DefaultViewManager;
}
If you remember the SqlDataAdapter example, you know that it containedalmost the same code. As you can see from Listing 4-5, you create a DataSetobject and call OleDbDataAdapter’s Fill method to fill data from the data adapterto the dataset. After that you use the DataGrid control’s DataSource property andset it as DataSet’s DefaultViewManager.
Now build and run the project. Your output should look like Figure 4-44.
198
Chapter 4
Figure 4-44. Filling a DataGrid with the Orders table
933ch4 3/20/02 11:03 AM Page 198

Using DataSet and DataView Components
After discussing data adapters and data connections, you got a pretty goodidea of how to take advantage of VS .NET design-time support to develop data-bound Windows Form database applications.
The DataSet and DataView components are two powerful and easy-to-usecomponents of the ADO.NET model. In this section, you’ll see how to utilizeDataSet and DataView components at design-time. In Chapter 5, I’ll discuss theirproperties and methods in more detail and show how to use them programmati-cally. The DataSet and DataView components fall in the disconnected componentscategory, which means you can use these components with or withoutdata providers. I’ll discuss connected and disconnected data components inChapter 5 in more detail. These components work in the same way for alldata providers, including Sql, OleDb, and Odbc.
Understanding Typed DataSets in Visual Studio .NET
There are two types of datasets: typed datasets and untyped datasets. As dis-cussed in Chapter 3 (and in more detail in Chapter 5), a typed dataset has anXML schema attached to it. The XML schema defines members for a dataset cor-responding to database table columns, and you can access data through thesecolumns. Untyped datasets are ones that are created at run-time and don’t havean schema attached to them. I’ll now show you how you can generate typeddatasets using a VS .NET wizard.
Generating Typed DataSets Using Data Adapters
You can generate typed datasets by using any of the data adapters. You can eithergenerate a dataset by right-clicking on a data adapter and selecting the GenerateDataset menu option or by using the data adapter Properties windows. To gener-ate a dataset from data adapter’s Properties window, choose the GenerateDataset hyperlink, which generates a DataSet object, and the wizard writes thecode for you (see Figure 4-45).
199
Data Components in Visual Studio .NET
933ch4 3/20/02 11:03 AM Page 199

This action pops up a dialog box, which generates a dataset. Type yourdataset name and click OK (see Figure 4-46).
200
Chapter 4
Figure 4-45. Generating a typed dataset from the Properties window
933ch4 3/20/02 11:03 AM Page 200

This action adds a dataset (if you check Add This Dataset to the Designercheck box) and pops up the dataset Properties dialog box (see Figure 4-47).
201
Data Components in Visual Studio .NET
Figure 4-46. Dialog box for generating a dataset
933ch4 3/20/02 11:03 AM Page 201

Every dataset generated by the IDE creates an XML schema for the dataset.Figure 4-47 provides you with two hyperlinks at the bottom of the dialog: ViewSchema and DataSet Properties. View Schema lets you view the DataSet schema,and the DataSet Properties hyperlink lets you set the DataSet properties. By fol-lowing these links you can set the DataSet’s column names and other properties(see Figure 4-48).
202
Chapter 4
Figure 4-47. A dataset’s Properties window showing a typed dataset
933ch4 3/20/02 11:03 AM Page 202

This action also adds one class inherited from a DataSet and one XMLschema (DataSet1.xsd). The Class View of the DataSet is a derived class and lookslike Figure 4-49.
203
Data Components in Visual Studio .NET
Figure 4-48. Setting DataSet names and additional properties
Figure 4-49. A VS .NET–generated typed DataSet class
933ch4 3/20/02 11:03 AM Page 203

You can now create an instance of this class instead of creating a DataSetprogrammatically. This class has a member corresponding to each column of thetable to which it’s attached:
MyDataSet ds = new MyDataSet();
The beauty of typed datasets is that you can access the data in the columnsusing MyDataSet object members.
Besides creating a DataSet using the Data Adapter Configuration Wizard,there is another good way to do so. I’ll discuss this alternate solution in the fol-lowing section.
Adding Typed DataSets
In the previous discussion, you saw how you can generate DataSet objects froma data adapter. There are other ways to create a typed DataSet object.
You can click on the Project menu and choose Add New Item (or clickCtrl+D). This brings up the Add New Item window where you’ll find the Data Settemplate (see Figure 4-50).
204
Chapter 4
Figure 4-50. Creating a typed DataSet from the Add New Item window
933ch4 3/20/02 11:03 AM Page 204

After adding the DataSet, the designer creates an XSD (XML schema) file andadds it to your project area. As you can see from Figure 4-51, myDS.xsd is empty.
Next, drop a table (or multiple tables) from the Server Explorer to the form(see Figure 4-52).
205
Data Components in Visual Studio .NET
Figure 4-51. myDS.xsd in VS .NET
933ch4 3/20/02 11:03 AM Page 205

This action adds one XML schema (MyDS.xsd), which looks like Figure 4-53.
206
Chapter 4
Figure 4-52. Drag and drop tables from the Server Explorer to the form to createa typed DataSet
Figure 4-53. Design View of the XML schema of the DataSet
933ch4 3/20/02 11:03 AM Page 206

It also automatically adds the typed DataSet class that inherits from DataSet.As you can see in Figure 4-54, the myDS class contains members used to accessdata from the database.
Once you have this class, you can create an instance of this class and workwith its property fields directly:
MyDSet ds = new MyDSet();
207
Data Components in Visual Studio .NET
Figure 4-54. Wrapper class generated for the typed DataSet
NOTE See Chapter 5 for a more extensive example on using datasets.
Understanding DataView
A DataView represents a view of a DataSet object. You can set filters on the data orsort on data in the DataSet through different DataViews and produce differentviews of the data. For example, you can create a DataSet with three tables andcreate three different DataView objects for each table. Once you have a DataViewobject, you can attach it with any data-bound control, such as a DataGrid ora ComboBox control using data-bound control’s DataSource property.
933ch4 3/20/02 11:03 AM Page 207

To create a DataView at design-time, drag the DataView from Toolbox ➢Data onto your form. Then create a DataSet object and set the DataView’s Tableproperty to a table in the typed DataSet (see Figure 4-55).
Using the Data Form Wizard
At the end of this chapter, I’d like to discuss Data Form Wizard, one more usefultool to develop database applications. You can use the Data Form Wizard todevelop your database application with viewing, updating, and deleting capabili-ties. This is probably the fastest way to develop database applications in .NET(unless you’re an extremely fast typist).
In this section, you’ll use a Data Form Wizard to write a fully functioningdatabase application including features such as inserting, updating, and deletingdata without writing a single line of code. In this simple example, I’ve used thefamiliar Northwind database. I’ll use both the Customers and Orders tables toshow you a data relationship between table data.
208
Chapter 4
Figure 4-55. DataView Properties window
933ch4 3/20/02 11:03 AM Page 208

Like many parts of this book, this topic is in the form of tutorial. Just followthe simple steps, and in a few minutes you’ll be able to run a wonderful appli-cation. In this section, you’re going to create a Windows application. After thatyou’ll add a Data Form Wizard to it and call the Data Form Wizard from the main application.
Step 1: Selecting a Project Template
Create a new Windows project by selecting New Project ➢ Visual C# Projects ➢Windows Application and typing your application name (see Figure 4-56).
Step 2: Adding a Data Form Wizard Item
Now add a Data Form Wizard by selecting Project ➢ Add New Item ➢ Data FormWizard from the available templates. You can type the name of your DataFormclass in the Name field of the dialog box (see Figure 4-57).
209
Data Components in Visual Studio .NET
Figure 4-56. Creating a Windows Application project
933ch4 3/20/02 11:03 AM Page 209

Now click Open, which calls the Data Form Wizard.
Step 3: Walking through the Data Form Wizard
The first page of the wizard is a welcome page telling you what the wizard isabout to do (see Figure 4-58).
210
Chapter 4
Figure 4-57. Using the Data Form Wizard
Figure 4-58. Welcome page of the Data Form Wizard
933ch4 3/20/02 11:03 AM Page 210

Step 4: Choosing the Dataset You Want
On the second page of the wizard, you can choose a dataset name that will laterbe used to access the data. You can either create a new dataset name or select anexisting one. In this example, I’ll choose MyDS as the dataset name (see in Figure 4-59).
Step 5: Choosing a Data Connection
The next page of the wizard asks you to provide a connection. The combo boxdisplays your available connection. If you didn’t create a connection, use the NewConnection button, which launches the Server Explorer discussed earlier in thischapter. I’ll select the usual database, Northwind (see Figure 4-60).
211
Data Components in Visual Studio .NET
Figure 4-59. Choosing a DataSet in the Data Form Wizard
933ch4 3/20/02 11:03 AM Page 211

Step 6: Choosing Tables or Views
The next page of the wizard lets you pick the tables and views you want to con-nect to the dataset. As you can see in Figure 4-61, I select the Customers andOrders tables in the Available Items list on this page and use the > button to addthese tables to the Selected Items list.
212
Chapter 4
Figure 4-60. Choosing a data connection in the Data Form Wizard
933ch4 3/20/02 11:03 AM Page 212

Now you’re ready to create a relationship between these two tables.
Step 7: Creating a Relationship between Tables
The next page lets you define a relationship between the Customers and Orderstables. It’s useful to provide a relationship between tables when you have a master-detail relationship database. In other words, a customer may have many ordersassociated with it, so there is a relationship through the CustomerID in theOrders table joined to information about the customer in the Customers table.Now, say you want to see all the orders of a customer based on the CustomerID. Ifyou do this manually, you need to write code to select data from the Orders tableto correspond to a CustomerID and then fill data to the form. If you useData Form Wizard instead, it does everything for you. Neat, huh?
This is the same step you’re going to see on the Create a Relationshipbetween Tables page of the wizard. You’re going to create a relationship betweenthe Customers and Orders tables based on the CustomerID. I named the relation-ship between Customers and Orders table CustOrderRelation. You also need topick the associated primary key and foreign key that links the parent to the childtable. Once you’ve chosen the joining key (CustomerID), you have to click the > button to tell the wizard that you want to add it.
213
Data Components in Visual Studio .NET
Figure 4-61. Choosing a DataTable or DataView in the Data Form Wizard
933ch4 3/20/02 11:03 AM Page 213

When you run the final program, you’ll see how you can filter all orders fora customer based on the CustomerID. As you can see from Figure 4-62, you needto pick one table as parent and another table as a child based on the relationshipbetween them. In this example, the Customers table is the parent table, and theOrders table is the child table.
After adding the relationship to the Relations list, the wizard looks like Figure 4-63.
214
Chapter 4
Figure 4-62. Selecting Customers as the parent and Orders as the child table tocreate the CustOrderRelation relationship
933ch4 3/20/02 11:03 AM Page 214

Step 8: Choosing Tables and Columns to Display on the Form
The next page of the wizard lets you select which tables and columns you want toshow on the form. For this example, select all the columns from both of the tables(this is the default selection). As you can see in Figure 4-64, the Customers tableis the master, and the Orders table is the detail table.
215
Data Components in Visual Studio .NET
Figure 4-63. CustOrderRelation listed in the Relations list
933ch4 3/20/02 11:03 AM Page 215

Step 9: Choosing the Display Style
This page is an important part of creating your form. Actually, the Data FormWizard adds a Windows form with some controls on it and writes code to fill,update, delete, and navigate data. There are two ways to view the data, and youchoose your option on this page. These two options are:
• All Records in a Grid
• Single Record in Individual Controls
Figure 4-65 displays these options.
216
Chapter 4
Figure 4-64. Choosing columns to display on the Data Form Wizard
933ch4 3/20/02 11:03 AM Page 216

The output of All Records in a Grid looks like Figure 4-66. After that you canresize controls on the form.
217
Data Components in Visual Studio .NET
Figure 4-65. Choosing between a grid and individual controls on the DataForm Wizard
933ch4 3/20/02 11:03 AM Page 217

The second option, Single Record in Individual Controls, shows data in textboxes and provides you with navigation controls. As you can see from Figure 4-67,the Single Record in Individual Controls option activates Add, Delete, Cancel, andNavigation controls check boxes. You can uncheck the check boxes if you don’twant to add that feature in your project.
218
Chapter 4
Figure 4-66. Grid DataForm output
933ch4 3/20/02 11:03 AM Page 218

The form generated by this option looks like Figure 4-68. As you can see fromFigure 4-68, each column of the table has a field on the form.
219
Data Components in Visual Studio .NET
Figure 4-67. The Single Record in Individual Controls option
933ch4 3/20/02 11:03 AM Page 219

After your selection of data display style, you click Finish button. TheData Form Wizard adds the Windows form DataForm1 and the class DataForm1.cscorresponding to it.
Step 10: Calling the Data Form Wizard Form from theApplication
Now you need to change one more thing. You need to call DataForm1 when you start your application. By default, your application calls the Form1 form onstart up.
220
Chapter 4
Figure 4-68. Data Form Wizard–generated form for the Single Record in IndividualControl option
933ch4 3/20/02 11:03 AM Page 220

static void Main()
{
Application.Run(new Form1());
}
So, you need to replace Form1 with your Data Form Wizard’s form name. Inthis example, Listing 4-6 replaces Form1 with DataForm1 in the Main method.
Listing 4-6. Calling DataForm1 from the applicationstatic void Main()
{
Application.Run(new DataForm1());
}
221
Data Components in Visual Studio .NET
NOTE If you’ve modified the name of your Data Form Wizard–generatedform, you need to call that form instead of DataForm1.
Step 11: Viewing the Output
Now you should see the output shown in Figure 4-69 when you run your application (if you selected the grid view option).
The Load and Update buttons load and update the data, respectively, andCancel All cancels all the operations. The neat thing is if you move into the topgrid, corresponding information changes in the bottom grid. Neat, huh?
933ch4 3/20/02 11:03 AM Page 221

Figure 4-70 shows the output when you select the Single Record in IndividualControl option. By using this view option, you can add, edit, delete, and navigaterecords easily.
222
Chapter 4
Figure 4-69. Data Form Wizard with all records in a grid option
933ch4 3/20/02 11:03 AM Page 222

Finally, compile and run your application. Without writing a single line ofcode, you just created a fully functional database application.
The Load button on the individual control form loads the data, and the Add,Update, and Delete buttons on the form inserts, updates, and deletes records, respectively.
Data Form Wizard: Looking under the Hood
You just saw how you can develop fully functional database applications in notime with the help of the Data Form Wizard. Now let’s see what the wizard doesfor you in the actual code. (The inherent beauty of VS .NET is that it magicallyhides all the messy code for you.) The wizard adds two items to your project:MyDS.xsd and DataForm1.cs.
223
Data Components in Visual Studio .NET
Figure 4-70. Textbox output with navigational controls
933ch4 3/20/02 11:03 AM Page 223

Understanding MyDS.xsd
MyDS.xsd is an XML schema for the dataset you’ve added to the project. It’s simi-lar to the one discussed in the “Understanding Typed DataSets in Visual Studio.NET” section of this chapter.
Understanding DataForm1.cs
The second item added by the wizard is the DataForm1 class, a class derived fromSystem.Windows.Forms.Form. The DataForm1 class defines its entire functionality.The InitializeComponent method creates the data connection, the data command, the data adapter, the dataset, and other data components.
The LoadDataSet method loads the data from the data source into the controls by calling FillDataSet (see Listing 4-7).
Listing 4-7. LoadDataSet method generated by the Data Form Wizardpublic void LoadDataSet()
{
// Create a new dataset to hold the records
//returned from the call to FillDataSet.
// A temporary dataset is used because filling
//the existing dataset would
// require the databindings to be rebound.
MyDataFormWizardSamp.MyDS objDataSetTemp;
objDataSetTemp = new MyDataFormWizardSamp.MyDS();
try
{
// Attempt to fill the temporary dataset.
this.FillDataSet(objDataSetTemp);
}
catch (System.Exception eFillDataSet)
{
// Add your error handling code here.
throw eFillDataSet;
}
try
{
// Empty the old records from the dataset.
objMyDS.Clear();
// Merge the records into the main dataset.
objMyDS.Merge(objDataSetTemp);
}
224
Chapter 4
933ch4 3/20/02 11:03 AM Page 224

catch (System.Exception eLoadMerge)
{
// Add your error handling code here.
throw eLoadMerge;
}
}
FillDataSet fills the dataset from the data adapter by calling the Fillmethod on each data adapter. Note that with the Data Form Wizard,a DataAdapter is created for each table, one DataAdapter for the Customers tableand one DataAdapter for the Orders table. Both DataAdapters fill the sameDataSet. Listing 4-8 shows the FillDataSet method.
Listing 4-8. The FillDataSet method generated by the Data Form Wizardpublic void FillDataSet(MyDataFormWizardSamp.MyDS dataSet)
{
// Turn off constraint checking before the dataset is filled.
// This allows the adapters to fill the dataset without concern
// for dependencies between the tables.
dataSet.EnforceConstraints = false;
try
{
// Open the connection.
this.oleDbConnection1.Open();
// Attempt to fill the dataset through the OleDbDataAdapter1.
this.oleDbDataAdapter1.Fill(dataSet);
this.oleDbDataAdapter2.Fill(dataSet);
}
catch (System.Exception fillException)
{
// Add your error handling code here.
throw fillException;
}
finally
{
// Turn constraint checking back on.
dataSet.EnforceConstraints = true;
// Close the connection whether or not the exception was thrown.
this.oleDbConnection1.Close();
}
}
225
Data Components in Visual Studio .NET
933ch4 3/20/02 11:03 AM Page 225

The UpdateDataSource method updates the data source from the DataSet.The UpdateDataSet method calls UpdateDataSource, which utilizes the Updatemethod of the data adapters. Listing 4-9 shows the UpdateDataSource method.
Listing 4-9. The UpdateDataSource and UpdateDataSet methods generated by theData Form Wizardpublic void UpdateDataSource(MyDataFormWizardSamp.MyDS ChangedRows)
{
try
{
// The data source only needs to be updated if there
//are changes pending.
if ((ChangedRows != null))
{
// Open the connection.
this.oleDbConnection1.Open();
// Attempt to update the data source.
oleDbDataAdapter1.Update(ChangedRows);
oleDbDataAdapter2.Update(ChangedRows);
}
}
catch (System.Exception updateException)
{
// Add your error handling code here.
throw updateException;
}
finally
{
// Close the connection whether or not the exception
//was thrown.
this.oleDbConnection1.Close();
}
}
226
Chapter 4
933ch4 3/20/02 11:03 AM Page 226

Summary
Congratulations! Now you have completed one more step toward understandingADO.NET and its components. After completing this chapter, you should havea pretty good idea of how to write database applications using VS .NET.
In this chapter, you learned about visual data components in Visual Studio.NET. The Server Explorer is a handy utility added to VS .NET IDE to help youmanage your database connections.
Data adapters let you connect to a data source a design-time and can beused to populate DataSet objects. Data adapters also allow you to add, update,and delete data through data command objects. VS .NET also lets you generatetyped datasets, which create a DataSet with properties of tables and columnsspecific to a data source.
DataView is a bindable view of a DataSet. You can sort and filter a DataSetwith a DataView and use it to bind to a graphical component in many of theWindows form controls.
Finally, the Data Form Wizard is a useful tool in which you can generate full-fledged database applications with features such as insert, delete, update in notime. In the next chapter, I’ll discuss ADO.NET data providers and otherADO.NET components and show how to work with them programmatically.Chapter 5 will also cover data component’s methods and properties.
227
Data Components in Visual Studio .NET
933ch4 3/20/02 11:03 AM Page 227

933ch4 3/20/02 11:03 AM Page 228