Embed Size (px)
Citation preview
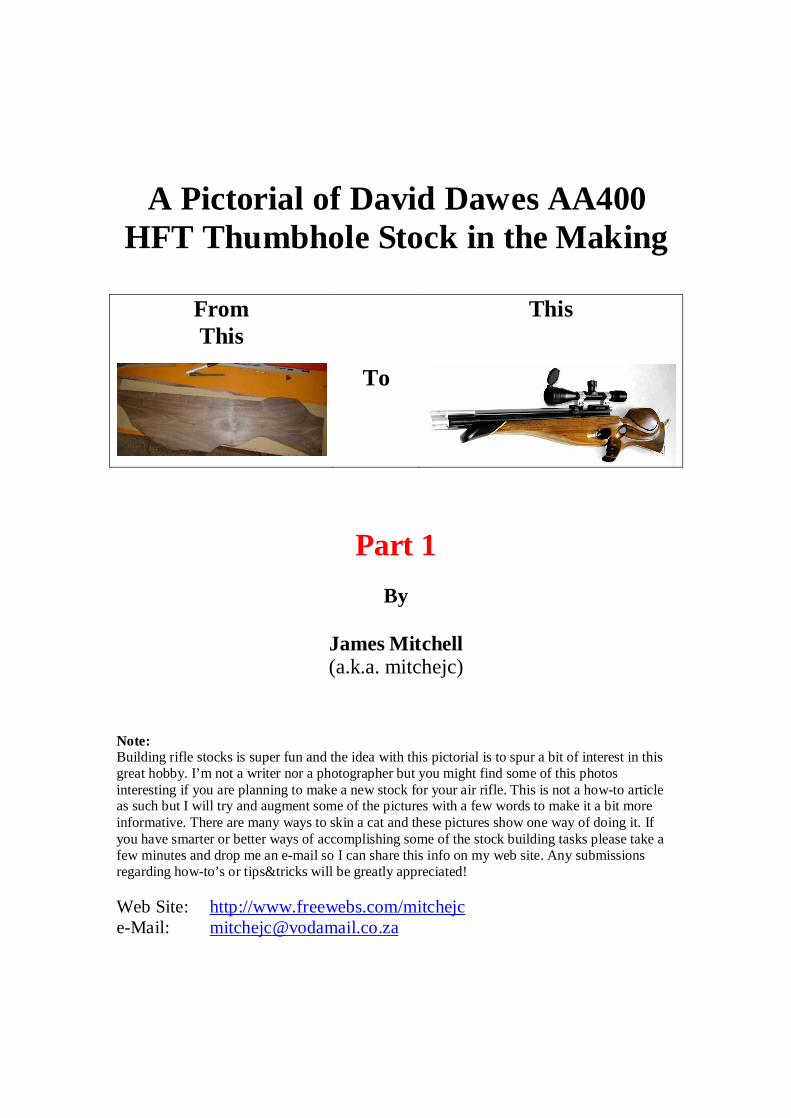
A Pictorial of David Dawes AA400
HFT Thumbhole Stock in the Making
From This
This
To
Part 1
By
James Mitchell (a.k.a. mitchejc)
Note: Building rifle stocks is super fun and the idea with this pictorial is to spur a bit of interest in this great hobby. I’m not a writer nor a photographer but you might find some of this photos interesting if you are planning to make a new stock for your air rifle. This is not a how-to article as such but I will try and augment some of the pictures with a few words to make it a bit more informative. There are many ways to skin a cat and these pictures show one way of doing it. If you have smarter or better ways of accomplishing some of the stock building tasks please take a few minutes and drop me an e-mail so I can share this info on my web site. Any submissions regarding how-to’s or tips&tricks will be greatly appreciated! Web Site: http://www.freewebs.com/mitchejc e-Mail: [email protected]

Lets start. I have skipped the design and wood selection process in this pictorial and will post little articles on these topics sometime in the future on my web site. 1) Draw the design on a nice solid piece of wood. Fine tipped permanent marker pens works great for this. The photo shows the design partially cut out with a band saw. Tip: Leave a bit of extra wood at the bottom of the fore-end if your blank is large enough, to give you some extra space to work when clamped in a vice. This one has much more than is required to show the idea.
2) This stock will have an adjustable cheek piece. Tip: Cut this out first as it will make some of the following steps a bit easier. Be very careful with the cutting at a mistake here will ruin your work piece.

3) Plane the top of the stock flat. This step would not have been possible with the cheek piece in place.
4) Make sure the top is flat and square.
5) Next step is to make the components for the fore-end tip. This picture shows a very thin piece of wood being planed to about 3 or 4 mm in thickness.

6) Cut the wood for the tip and sand/grind the surface that will be glued 100% flat to ensure a good fit to the stock
7) Test fit the tip and the stock

8) Glue the tip to the blank using water proof wood glue or epoxy. Make sure there is no oil or wax from the planner left on the wood. Tip: Always a good idea to wipe the surface with thinners and let dry before gluing.

9) Tip glued in place. Inspect carefully. If its not perfect, cut it off and repeat the steps to grind, fit and glue the tip.
10) You probably have time to kill while the glue on the tip is drying, so use it to shape the top and bottom of the cheek piece.
11) Sand the area where the cheek piece will mount.

12) Check cheek piece for fit and repeat steps 10 and 11 until it looks neat.
13) Drill out the trigger hole. Good quality forstner bits helps a lot when drilling these large holes and will save a lot of sanding in this awkward spot later.

14) Drill the thumb hole and top of pistol grip.

15) Sand the trigger hole to the correct shape.
16) Mark the inletting on the top side of your blank.

17) Route the cylinder channel. I use a half inch router bit for this. Don’t cut it out to the front and leave a little bit of wood there.
18) Shape the inside of the fore-end to a half round . Use a piece of pipe that is the same diameter as your rifle’s cylinder to check the shape.

19) Ignore the piece of plastic and pipe and notice the little piece of wood, in the center of the picture, that was left in when band sawing the stock profile. This disposable flat surface is handy for router alignment as can be seen on this photo and will be cut out later after all inletting is complete.
20) A wooden insert is made by clamping to pieces of wood together and then drilling a 32mm hole with a BIG auger bit right through the middle where the two pieces meet. If the drilling was straight you should end up with two blocks, each having a half-round inlet along the length. Trim the sides of one of the piece to fit into the slot you’ve routed in the stock. Glue the wooden insert to which the rifles action will bolt into place. Some pictures later on will show the insert in a bit more detail. I use piece of pipe wrapped in plastic to clamp it down with. The plastic is just to ensure you don accidentally glue the

pipe to the stock.
21) Route the trigger slot. Notice the wooden insert made from Rose Wood as mentioned in previous step.
22) Drill the hole for the pressure gauge and complete the rest if the inletting. Make sure its in the right place!


23) Test fit the rifle and make adjustments to the inletting. Probably the topic for whole mini article on its own
24) Tip: Oops! Forgot to mention this earlier but it’s a good idea to protect the sharp edge at the rear of the cheek piece (depending on your design) from damage by wrapping a few layers of tape over it.
END OF PART 1 – PART 2 to follow shortly!