Embed Size (px)
Citation preview

04/19/2304/19/23 11
SAP NavigationSAP Navigation

04/19/2304/19/23 22
Learning Objectives Learning Objectives After completing this course, you will be familiar After completing this course, you will be familiar with some of the basic tools and terminology for with some of the basic tools and terminology for navigating through the SAP system and will be navigating through the SAP system and will be able to perform basic functions including: able to perform basic functions including:
Drilling down menu pathsDrilling down menu paths Entering transaction codesEntering transaction codes Creating a new sessionCreating a new session Creating a shortcut on the desktopCreating a shortcut on the desktop Creating favoritesCreating favorites Using helpUsing help
04/19/2304/19/23 33
TopicsTopics
Basic Navigation Tools & NomenclatureBasic Navigation Tools & Nomenclature Basic FeaturesBasic Features

04/19/2304/19/23 44
Basic Navigation Tools & Basic Navigation Tools & NomenclatureNomenclature
This section presents some of the common This section presents some of the common tools that are used to navigate through the tools that are used to navigate through the SAP system, along with various SAP system, along with various screen screen shots shots and explanations of their functionality. and explanations of their functionality. Some of the tools/functions will be further Some of the tools/functions will be further explained in latter sections of this course.explained in latter sections of this course.

04/19/2304/19/23 55
Logging on to SAPLogging on to SAPThe first step to logging on to SAP is to The first step to logging on to SAP is to double click on the SAP Logon icon on your double click on the SAP Logon icon on your desktop and then select the SAP system you desktop and then select the SAP system you will be working in as follows:will be working in as follows:
1.1.Core – PRD (SSHE-PRD)– This is the SAP Core – PRD (SSHE-PRD)– This is the SAP production system (no testing or configuration production system (no testing or configuration permitted).permitted).
2.2.Core – TRN – Training - This is the training Core – TRN – Training - This is the training client.client.
3.3.Core – SF1 – Sandbox - Sandbox client for Core – SF1 – Sandbox - Sandbox client for initial testing of new concepts/functionality)initial testing of new concepts/functionality)
4.4.Core – DF1 – Development - This is where Core – DF1 – Development - This is where SyTEC only performs system configuration SyTEC only performs system configuration and unit testing.and unit testing.
5.5.Core – QF1 – Quality Test System – This is Core – QF1 – Quality Test System – This is where the OOC, SyTEC and other end users where the OOC, SyTEC and other end users perform final quality testing.perform final quality testing.
6.6.Core – PFX – Production Fix – This is a Core – PFX – Production Fix – This is a copy of Production every week used to copy of Production every week used to troubleshoot issues.troubleshoot issues.

04/19/2304/19/23 66
Logging on to SAPLogging on to SAP
Before you log on to the R/3 System, you need to know your client number, user name, Before you log on to the R/3 System, you need to know your client number, user name, and password. and password.
If the Client field already contains a client number, you can either accept this entry or If the Client field already contains a client number, you can either accept this entry or overwrite it. For example, in DF1, Client 100 is for configuration only, while unit testing overwrite it. For example, in DF1, Client 100 is for configuration only, while unit testing is performed in client 150.is performed in client 150.
Press the TAB key to place the cursor at the beginning of the User field.Press the TAB key to place the cursor at the beginning of the User field. Enter your user name in the User field and press the TAB key to move the cursor to the Enter your user name in the User field and press the TAB key to move the cursor to the
Password field. As you type in the password, the asterisks (*) remain in the field and Password field. As you type in the password, the asterisks (*) remain in the field and only the cursor moves. As a security measure, the system does not display what you only the cursor moves. As a security measure, the system does not display what you type. type.
Click the Click the “Enter” icon at the top of the screen (or your Enter key) to access the “Enter” icon at the top of the screen (or your Enter key) to access the system.system.
Client - The client is an independent technical unit. A user master record must be Client - The client is an independent technical unit. A user master record must be created for the user for each client in which he or she wants to work. created for the user for each client in which he or she wants to work.
Access authorizations are created separately for each client.Access authorizations are created separately for each client.

04/19/2304/19/23 77
The SAP WindowThe SAP WindowThe SAP window is the user interface to the SAP System. The SAP window is the user interface to the SAP System. The elements of a typical SAP window are shown below:The elements of a typical SAP window are shown below:

04/19/2304/19/23 88
Menu Bar / ToolbarMenu Bar / ToolbarThe Menu Bar contains menu paths available for navigation from the current screen. The menu options vary according to screen or task. On the following screen, the available options include:
Menu Edit Favorites Extras System Help

04/19/2304/19/23 99
Standard ToolbarStandard ToolbarThe standard toolbar, located just below the menu bar, contains buttons/icons for performing common actions such as Save, Enter, Back, Exit, Cancel, etc. The toolbar also contains the Command field (see white rectangular box in red circle below) where transaction codes can be entered.
If you are in a particular transaction and want to proceed to the next transaction without going back to the main menu, you can enter “/n” followed by the transaction code in the command field, then click .
The functions that can be performed with the toolbar will be dependent upon where you are in a particular transaction. For example, notice in the toolbar above that the Save icon is “grayed out”; you would not be able to Save in this instance. Other buttons may be “grayed out” at any given time depending on where you are in a particular transaction (i.e., what screen you are on).
A table summarizing the function of each button of the standard toolbar is presented on the next page. In addition, these buttons/icons are explained in further detail later in this course.

04/19/2304/19/23 1010
Standard ToolbarStandard Toolbar(Buttons / Functions)(Buttons / Functions)

04/19/2304/19/23 1111
Standard ToolbarStandard Toolbar(Buttons / Functions cont.)(Buttons / Functions cont.)

04/19/2304/19/23 1212
Radio ButtonsRadio ButtonsTo enter information in the SAP System, you must sometimes select among several options. In some cases, you can select only one option; in other cases, you can select more than one.
When you are limited to only one option, radio buttons identify the options:
Choosing Options with Radio Buttons
To select an option, click the radio button next to that option. The selected radio button is now filled in.
To change your selection, click a different radio button. The original button is now empty and the new selection is filled in.
To select a radio button using the keyboard, use the Tab key to move to the group of options. Use the and keys to move to the desired option, and press the spacebar.
Click the “None” radio button.

04/19/2304/19/23 1313
Check BoxesCheck BoxesWhen you can select multiple items, options are identified by check boxes:
Choosing Options with Check Boxes
To select one or more options, click the checkbox next to each desired option. The selected checkboxes now contain a checkmark.
To deselect a checkbox containing a checkmark, click it again. The checkmark disappears.
To select a checkbox using the keyboard, use the Tab key to go to the group of options. Use the arrow keys to go to each desired option, and press the spacebar.
To deselect a checkbox containing a checkmark, use the arrow keys to go to the option, and press the spacebar. The checkmark disappears.
Click the “Parked items” check box.
Click the “Open items” check box.

04/19/2304/19/23 1414
Dialog BoxesDialog BoxesThe SAP System displays dialog boxes when it:
Requires more information before it can proceed Is providing information, such as messages or specific information about your current task
Before you can continue, you must choose an action from a dialog box. To choose an action, choose one of the buttons at the bottom of the dialog box.
A sample dialog box is shown here:
When you end a task without saving your data, or you choose a function that may cause you to lose data, the SAP System usually displays a dialog box in which you are asked to confirm or cancel your action.

04/19/2304/19/23 1515
Required Input FieldsRequired Input FieldsWhen you work in the SAP System, you will sometimes encounter input fields containing a checkmark icon. These are required input fields. An example is shown below:
Use
If the screen you are working in contains any required input fields, you must enter data in these input fields before you can proceed to the next screen or tab (if the screen is using tabs).
Generally, if a screen has no required input fields, you can go to the next screen or tab without entering data in any fields. Some screens, however, have required input fields that are not identified. This situation can occur when:
• You enter data in an optional field that has required fields associated with it
• You need to enter data in one of several input fieldsFor example; freight can be delivered by a specific day or week. Neither the Day field nor the Week field are identified as required input fields; however, you must complete one of the fields (not both).
When you choose OK to proceed to another screen, if you have not completed all the required input fields on a screen, the SAP System displays an error message in the status bar. At the same time, it places the cursor in the required input field so that you can make the necessary data entry.

04/19/2304/19/23 1616
TabsTabsTabs enable you to enter, display, and alternate between multiple screens. In transactions containing multiple screens, they provide a clearer overview. In addition, tabs enable you to proceed from one tab page to the next without having completed all the data. To access a tab page, select the corresponding tab header.
In some cases, you must complete all required input fields on a tab page before you can move to the next tab page

04/19/2304/19/23 1717
Tabs (cont.)Tabs (cont.)
Features
In the case of longer tab strips, not all of the tabs appear on the screen. The left and right arrows at the top of the tab strip allow you to scroll to all the tabs.
If you choose the button at the right of the tab strip , the system displays a list of all the tabs on the tab strip. If you select a tab from this list, the selected tab page moves to the foreground.
Tabs are arranged in order of importance or in the process order of the transaction.
Tab headers can contain text, icons, or both.

04/19/2304/19/23 1818
Tabs (cont.)Tabs (cont.)To get an idea of how these features work:
1. Click the “Additional account assignments” tab to display its options2. Click the right arrow to display additional tabs3. Click the List button to display a list of all tabs available4. From the list, click “Special absences” to display that tab

04/19/2304/19/23 1919
Basic FeaturesBasic Features
This section presents a review of some of This section presents a review of some of the more common features that can be the more common features that can be utilized to navigate through SAP. utilized to navigate through SAP.

04/19/2304/19/23 2020
Features / ProceduresFeatures / ProceduresAfter logging on, the SAP Easy Access screen will be After logging on, the SAP Easy Access screen will be displayed:displayed:

04/19/2304/19/23 2121
How to Drill DownHow to Drill DownWhen you logon to the SAP system, you will only be able to see a few choices, as shown on the screen below. In order to reach a specific transaction, such as hiring a new employee or entering time, you will need to drill down to the lowest level.
Drilling down one level is achieved by clicking once on a right-pointing arrow. On the following screen Human Resources has been highlighted because that is the area where drill-down is required in order to reach the time entry screen.

04/19/2304/19/23 2222
How to Drill Down (cont.)How to Drill Down (cont.)Click the arrow next to Human Resources
Note that additional related transactions and folders have been displayed

04/19/2304/19/23 2323
How to Drill Down (cont.)How to Drill Down (cont.)Shown below is the display after drilling down three levels (by clicking on the right pointing arrow three times), when starting from Human Resources:
Each transaction can have multiple levels. The lowest level is indicated by the cube symbol, shown here: In this case it is CAT2 – Record Working Times.

04/19/2304/19/23 2424
How to Drill Down (cont.)How to Drill Down (cont.)
Clicking on CAT2 will take you to the following "Time Sheet – Initial Screen" window:
This is the window where you will actually perform the entries required for the transaction.

04/19/2304/19/23 2525
How to Enter a Transaction CodeHow to Enter a Transaction CodeA transaction code is a faster way that can be used to reach a transaction screen without using a menu path. It is typically a four digit, alphanumeric value that identifies a “transaction”, such as FB60, which is used for Entering a Vendor Invoice.
On the following screen, the Command Field has been circled in red. This is the place where you can enter the transaction code:

04/19/2304/19/23 2626
How to Enter a Transaction CodeHow to Enter a Transaction Code1. Click in the Command Field and the CAT2 transaction code will be entered for you.
2. Click the green checkmark
CAT2
04/19/2304/19/23 2727
How to Enter a Transaction Code How to Enter a Transaction Code (cont.)(cont.)
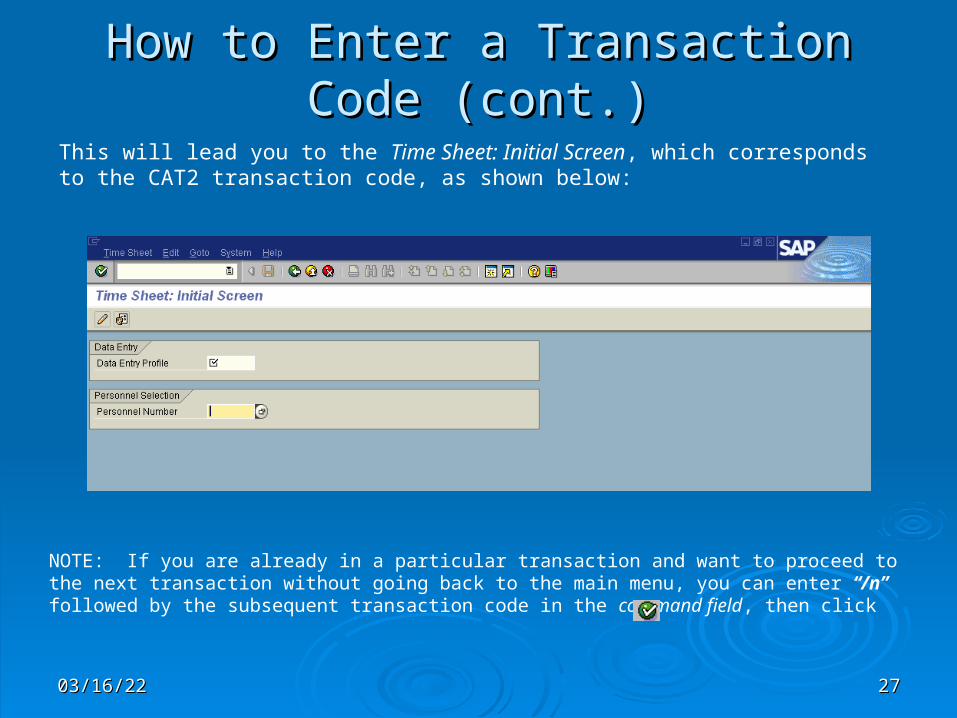
This will lead you to the Time Sheet: Initial Screen, which corresponds to the CAT2 transaction code, as shown below:
NOTE: If you are already in a particular transaction and want to proceed to the next transaction without going back to the main menu, you can enter “/n” followed by the subsequent transaction code in the command field, then click

04/19/2304/19/23 2828
Standard Toolbar / NavigationStandard Toolbar / NavigationThe navigation options in the SAP R/3 System are intended to give the user as much freedom as possible when moving between screens and tasks. To support this, a number of standard functions (such as "Back", "Exit", and "Cancel") are offered.
Note the green checkmark and colored arrows on the following screen (Green, yellow and red). Their functionality is explained in this section.
The following screenshot is a blown-up version of the Standard Toolbar

04/19/2304/19/23 2929
Standard Toolbar Buttons / IconsStandard Toolbar Buttons / IconsGreen Checkmark
This icon is used as the ENTER key that allows you to continue to the next step. It is used when you require the system to validate your field entries and then move to the next function, or screen, in a system task. This key does NOT save the information that you enter. For that, you will have to use the SAVE icon.
Green Arrow
This icon is used as the BACK key. It is typically used to go back to the previous screen or menu level.

04/19/2304/19/23 3030
Standard Toolbar Buttons / IconsStandard Toolbar Buttons / IconsYellow Arrow
This icon is used as the EXIT key. It is used when you want to exit the current menu level or system task without saving the data.
Red X
This icon is used as the CANCEL key. It is used when you want to cancel the data you entered in the current system task.

04/19/2304/19/23 3131
Standard Toolbar Buttons / IconsStandard Toolbar Buttons / IconsSave
This icon is used as the SAVE key. It is used to save data or save changes to data in a system task.
Delete
This icon is used as the DELETE key.

04/19/2304/19/23 3232
Standard Toolbar Buttons / IconsStandard Toolbar Buttons / IconsPrint
This icon is used as the PRINT key.

04/19/2304/19/23 3333
Standard Toolbar Buttons / IconsStandard Toolbar Buttons / IconsPaging
You can use the four paging buttons to move through a long list or report.
To move: A page up: click on the single up arrow A page down: click on the single down arrow To the first page: click on the up double arrows To the last page: click on the down double arrows

04/19/2304/19/23 3434
Creating a New SessionCreating a New SessionYou can work with multiple sessions of SAP. A session is equivalent to a window. What this feature allows is to have two, or more, windows open at the same time. For example, you can use one window to work on the transaction “Create an invoice”. Simultaneously, you can use the other window to go to another transaction to check the address of the vendor, without closing the first window.
The following screen highlights the icon that is used to create a new session:
To create a new window: Click on the icon highlighted by the red circle on the above screen
This will create a new window. You can switch between the two windows, the old and the new, by: Pressing the ALT key (and keep holding it down) Hitting the TAB key to move to the other window(s)

04/19/2304/19/23 3535
Creating A Desktop ShortcutCreating A Desktop ShortcutYou can create a shortcut on your desktop in order to be able to access a transaction directly from your desktop.
While in a particular transaction, click on the Generate a Shortcut icon highlighted on the following screen:

04/19/2304/19/23 3636
Creating A Desktop Shortcut (cont.)Creating A Desktop Shortcut (cont.)The following pop-up window will appear:

04/19/2304/19/23 3737
Creating A Desktop Shortcut (cont.)Creating A Desktop Shortcut (cont.) Verify the default data in the pop-up window. Click OK.
Clicking on the OK button will place the shortcut on the desktop as shown below:

04/19/2304/19/23 3838
Creating A FavoriteCreating A FavoriteA favorite is just like a bookmark in a Browser, which enables you to reach a transaction without using a menu path or typing in a transaction code. You can add multiple, frequently used, transactions to your list of favorites so that you can reach your destination quickly without having to remember either the menu path or the transaction code.
To add a favorite:
1. Drill down to the transaction code that you want to add to your favorites
2. Click on Favorites on the menu bar
3. Click on Add

04/19/2304/19/23 3939
Creating A Favorite (cont.)Creating A Favorite (cont.)On the following screen, PA20 - Display has been highlighted. This is the transaction code that we are adding to the list of favorites.
*** Click Favorites ***
*** Click Add ***

04/19/2304/19/23 4040
Creating A Favorite (cont.)Creating A Favorite (cont.)This will add the PA20 transaction code to the list of favorites, as shown below:

04/19/2304/19/23 4141
Status BarStatus BarThe Status Bar is located at the bottom of the SAP screen. It displays important system messages, such as errors and completion of transactions, as well as other session information. The fol lowing screen shows the message generated by the system after a purchase requis ition was changed:
The circ le on the left hand side of the screen indicates that the purchase requis ition has been changed.
The circ le on the right hand side of the screen indicates the system information. For example, i t indicates that the TRN client 722 is currently being used.

04/19/2304/19/23 4242
Determining The Current Transaction Determining The Current Transaction Code (Method 1)Code (Method 1)
As indicated on the previous slide, the default information displayed in the right-hand portion of the status bar indicates which client is in use. By clicking on the selection list icon (circled in red below), you have the option to select from several other choices of data to be displayed in this area.
04/19/2304/19/23 4343
Determining The Current Transaction Determining The Current Transaction Code (Method 1, cont.)Code (Method 1, cont.)
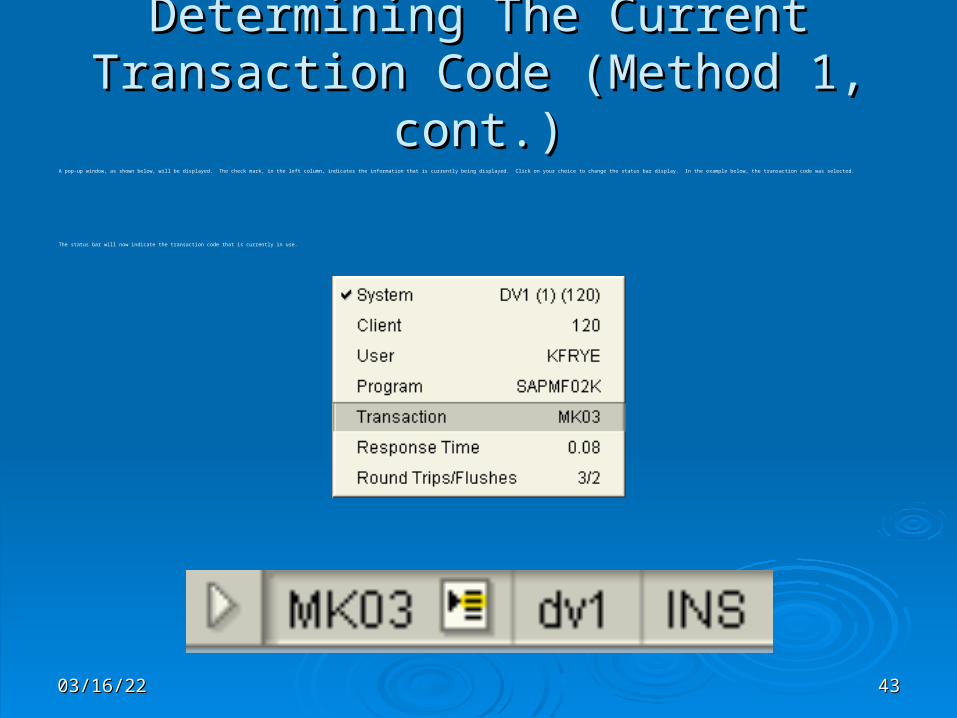
A pop-up window, as shown below, will be displayed. The check mark, in the left column, indicates the information that is currently being displayed. Click on your choice to change the status bar display. In the example below, the transaction code was selected.
The status bar will now indicate the transaction code that is currently in use.

04/19/2304/19/23 4444
Determining The Current Transaction Determining The Current Transaction Code (Method 2)Code (Method 2)
If you want to find out the transaction code for the transaction that you are currently working on, as well as some other details, navigate as shown on the following screen:

04/19/2304/19/23 4545
Determining The Current Transaction Determining The Current Transaction Code (Method 2, cont.)Code (Method 2, cont.)
This will lead you to the following window:
Clicking on the green checkmark (next to Navigate), will return you to the previous transaction.

04/19/2304/19/23 4646
Creating A Personal MenuCreating A Personal MenuSAP allows you to create your own “personalized” menu (i.e., user menu). The new SAP Easy Access user menu is the user-specific point of entry into the SAP system. You can access the user menu by clicking on the icon as shown below:

04/19/2304/19/23 4747
Creating A Personal Menu (cont.)Creating A Personal Menu (cont.)
OR by clicking “Menu” in the upper left corner of the screen, then “User Menu” from the drop-down list (see below):

04/19/2304/19/23 4848
Creating A Personal Menu (cont.)Creating A Personal Menu (cont.)The user menu contains only those items – such as transactions, reports, and Web addresses – you need to perform your daily tasks.

04/19/2304/19/23 4949
Creating A Personal Menu (cont.)Creating A Personal Menu (cont.)If a user menu has been defined by your system administrator, it appears when you log on to the system.
If you have not been assigned a user menu, or you need to access items that are not contained in your user menu: Open the SAP standard menu by choosing Menu ® SAP standard menu. You now have a complete overview of the SAP System you are currently working with. Use the navigation area to navigate to the items you need. Or, contact your system administrator.
On the SAP Easy Access initial screen, you can also: Create a favorites list consisting of the transactions, files, and Web addresses you use most frequently Go to SAP Business Workplace, if you are using Work items

04/19/2304/19/23 5050
RolesRolesRoles are collections of activities used in business scenarios. Users access the transactions, reports, or Web-based applications through user menus. SAP currently delivers over 1200 predefined roles. Users can change aspects of roles they are assigned, for example, by creating their own favorites list.
When a user is assigned a role, they are assigned not only the menu, but also the authorizations they require to access the information, ensuring that the business data is always secure. Authorization profiles are generated according to the activities contained in the role, thus restricting the authorizations of each user in the SAP System to only those activities.
In the mySAP.com Workplace, the user uses a Web browser to view and execute the required tasks and activities. Roles can be assigned here as well.
The system administrator can tailor the user menu to the personal requirements of each user, by adding or deleting menu entries.

04/19/2304/19/23 5151
Field Entry SearchesField Entry SearchesWhen entering data, you will at times need to conduct a search to determine the appropriate data to enter in a field. There are a few ways that this can be accomplished.
In the example below, a Personnel Number is required. If you do not know the number, a search facility is available for this field. When your cursor is in the field, the search button - will appear immediately to the right when available. See the red circle below.
04/19/2304/19/23 5252
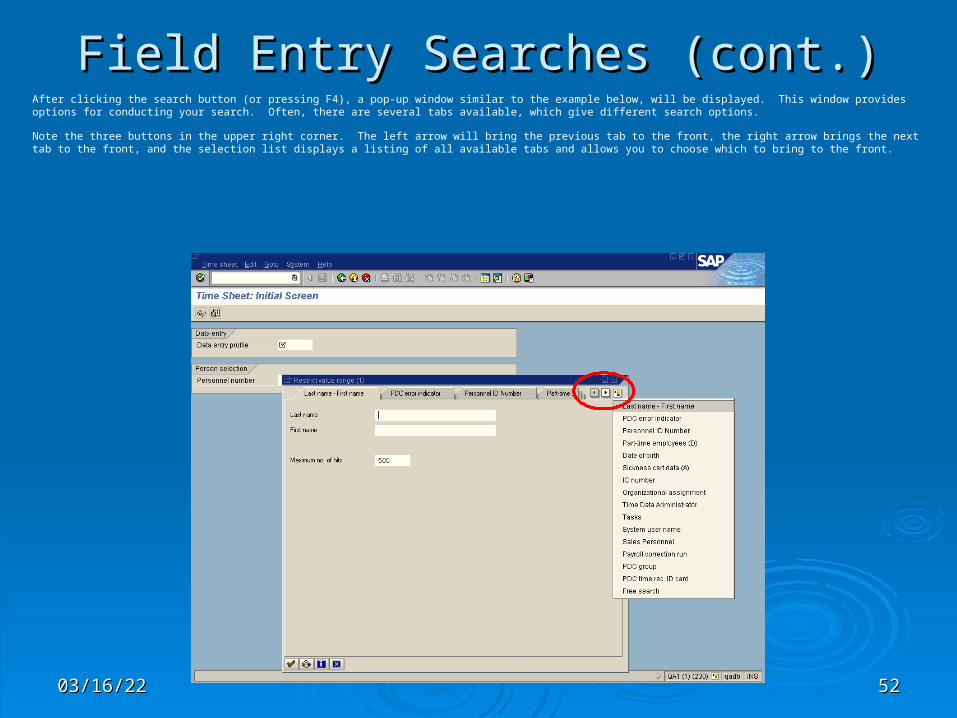
Field Entry Searches (cont.)Field Entry Searches (cont.)After clicking the search button (or pressing F4), a pop-up window similar to the example below, will be displayed. This window provides options for conducting your search. Often, there are several tabs available, which give different search options.
Note the three buttons in the upper right corner. The left arrow will bring the previous tab to the front, the right arrow brings the next tab to the front, and the selection list displays a listing of all available tabs and allows you to choose which to bring to the front.

04/19/2304/19/23 5353
Field Entry Searches (cont.)Field Entry Searches (cont.)Once you have chosen the tab that corresponds to your desired search method, enter data in the fields to limit your search. You may complete all, some, or none of the fields. If no fields have been completed, the entire list of possible selections will be returned. In the example below, only employees with the last name Smith will be returned.
Click the green check mark to execute the search. To cancel and close the pop-up window, click the blue X .

04/19/2304/19/23 5454
Field Entry Searches (cont.)Field Entry Searches (cont.)Sample search results are shown below. When the desired item is located (Andrew), double-click it. Or highlight it by clicking on it once and then clicking the green check mark . If you are not satisfied with the search results, click the blue X to close the window.

04/19/2304/19/23 5555
Field Entry Searches (cont.)Field Entry Searches (cont.)The result of either of the two methods will be the entry field being populated with the selected The result of either of the two methods will be the entry field being populated with the selected data. data.

04/19/2304/19/23 5656
Using A “Wild Card” In The Field Entry SearchUsing A “Wild Card” In The Field Entry Search
While conducting a field entry search, you can use an asterisk (*) as a wild card character to help expand the search. In the example below, the last name search is being limited. Instead of entering a complete last name, only the first two letters were entered followed by the * wild card.

04/19/2304/19/23 5757
Using A “Wild Card” (cont.)Using A “Wild Card” (cont.)This will return all employees whose last name starts with the characters “ kh” as shown below:
The wild card can be added at the beginning, middle, or end of your search term. You can also use multiple wild cards within a search term.

04/19/2304/19/23 5858
User ProfileUser ProfileAccess through transaction “SU3” or System/User Access through transaction “SU3” or System/User Profile/Own dataProfile/Own dataThe purpose of the User Profile settings:The purpose of the User Profile settings:•User defaults change the default printer and date User defaults change the default printer and date display.display.•User address allows you to maintain your address, User address allows you to maintain your address, telephone number, and other information.telephone number, and other information.•You can choose settings that will make your work You can choose settings that will make your work easier. For example, you can change the default easier. For example, you can change the default setting to specify the printer closest to your desk. setting to specify the printer closest to your desk. •You can choose your preferred date and number You can choose your preferred date and number formats.formats.•User parameters allow you to enter default User parameters allow you to enter default information for frequently used fields. For example, information for frequently used fields. For example, parameters MOL and UGR should always be set for parameters MOL and UGR should always be set for “10” (USA) for PASSHE employees.“10” (USA) for PASSHE employees.

04/19/2304/19/23 5959
How To Get HelpHow To Get Help
To get help, navigate as shown on the following screen:

04/19/2304/19/23 6060
How To Get Help on Screen fieldsHow To Get Help on Screen fields
For help on a field, place the cursor on the field and choose [F1] or the help icon, which is For help on a field, place the cursor on the field and choose [F1] or the help icon, which is a question mark. a question mark.
You can access glossary definitions for terms highlighted in the help text. You can access glossary definitions for terms highlighted in the help text. To do this, click on the term with the mouse or position the cursor on the term and choose To do this, click on the term with the mouse or position the cursor on the term and choose
Reference. Reference. To access further information on possible entries or field definitions from the Help window, To access further information on possible entries or field definitions from the Help window,
choose Possible entries or Technical info. choose Possible entries or Technical info. To access a list of possible entries or matchcodes to help you search for the data you To access a list of possible entries or matchcodes to help you search for the data you
require, place the cursor on the entry field and choose [F4] or the down arrow to the right require, place the cursor on the entry field and choose [F4] or the down arrow to the right of the entry field. of the entry field.
To transfer a value from the list of possible entries to the entry field, place the cursor on To transfer a value from the list of possible entries to the entry field, place the cursor on the value you require and choose [F2], or double-click on it.the value you require and choose [F2], or double-click on it.

04/19/2304/19/23 6161
How To Log OffHow To Log Off To log off you will click on System
This will display the following menu:
You will then click on Logoff. This will log you off the system.

04/19/2304/19/23 6262
How To Log Off (cont.)How To Log Off (cont.)
You can also logoff by clicking the button in the upper right corner of the screen.
04/19/2304/19/23 6363
SummarySummary
The following features were covered in this course:The following features were covered in this course: How to navigate using menu paths, arrows and How to navigate using menu paths, arrows and
transaction codestransaction codes How to drill downHow to drill down How to move up/down pages and screensHow to move up/down pages and screens How to create multiple windows (sessions)How to create multiple windows (sessions) How to create a shortcut on the desktopHow to create a shortcut on the desktop How to create a favoriteHow to create a favorite How to do Field Entry searchesHow to do Field Entry searches How to get helpHow to get help How to logoffHow to logoff