Embed Size (px)
Citation preview

9 Fall Crafts and Fall Decorating Ideas
Find hundreds of free holiday craft ideas, projects, tutorials and more at www.AllFreeHolidayCrafts.com. 0

9 Fall Crafts and Fall Decorating Ideas
Find hundreds of free holiday craft ideas, projects, tutorials and more at www.AllFreeHolidayCrafts.com. 1
9 Fall Crafts and Fall Decorating Ideas Copyright 2013 by Prime Publishing LLC
All rights reserved. No part of this book may be reproduced or transmitted in any form or by any means,
electronic or mechanical, including photocopying, recording, or by any information storage or retrieval
system, without written permission from the publisher, except in the case of brief quotations embodied
in critical articles and reviews.
Trademarks are property of their respective holders. When used, trademarks are for the benefit of the
trademark owner only.
Published by Prime Publishing LLC, 3400 Dundee Road, Northbrook, IL 60062 – www.primecp.com
Free Holiday Craft Projects
Free Crochet Projects Free Knitting Projects Free Craft Projects
Free Sewing Projects Free Quilt Projects Free Jewelry Projects
Free Kids Crafts Free Christmas Crafts Free Crochet Afghan Patterns

9 Fall Crafts and Fall Decorating Ideas
Find hundreds of free holiday craft ideas, projects, tutorials and more at www.AllFreeHolidayCrafts.com. 2
Letter from the Editors
Hi Holiday Crafters,
Fall is one of the most exciting seasons to decorate for. With gorgeous leaves coating your lawn, you can
find craft materials right outside your door. Using fall leaves to create home décor is just one way to
celebrate the spirit of the season. Transform your home into a harvest haven when you create pumpkins
that will add the warmth of autumn into your home. Once I start to feel that bite to the crisp fall air, I
know it’s time to break out my favorite fall items, and pumpkins are surely one of them! Choose from
the 9 fall crafts and decorating ideas included in this exclusive collection and get ready to see orange,
red, and yellow everywhere.
The Editors of AllFreeHolidayCrafts
You can find more summer craft ideas, garden crafts, crafts for the beach and other holiday craft ideas
at www.AllFreeHolidayCrafts.com.
Our eBooks, like all of our craft projects, are absolutely FREE to members of our crafting community.
Please feel free to share with family and friends and ask them to sign up at our website for our
free e-mail newsletter.
9 Fall Crafts and Fall Decorating Ideas
Find hundreds of free holiday craft ideas, projects, tutorials and more at www.AllFreeHolidayCrafts.com. 3
9 Fall Crafts and Fall Decorating Ideas
Simple Fall Leaf Table Runner ........................ 4
Decorative Napkin Rings ................................ 6
Ruffled Leaf Pattern Table Runner ................. 9
Very Vintage Leaf Garland ........................... 11
Glittery Autumn Wall Hanging ..................... 13
Magical Fall Candles .................................... 15
Colorful Grapevine Pumpkin........................ 16
Easy Cheesecloth Pumpkin Craft ................. 17
Gorgeous Golden Glitter Pumpkins ............. 19

9 Fall Crafts and Fall Decorating Ideas
Find hundreds of free holiday craft ideas, projects, tutorials and more at www.AllFreeHolidayCrafts.com. 4
Simple Fall Leaf Table Runner
By: Fawnda from Fireflies and Jellybeans
Table runners are a quick and easy way to dress
up your dining room for the season. Get ready
for autumn by whipping up this Simple Fall Leaf
Table Runner in just a few easy steps! This is
one of those colorful fall table decorations that
just makes you smile when you look at it.
Materials:
Fall colored felt or fleece
ClipArt Leaf patterns
Scissors
Sewing machine or needle and thread.
Brown thread
Instructions:
1) Cut about 2 dozen leaves out of your felt or fleece.
2) Sew on leaf details on each leaf.
3) Sew sets of two leaves together at the tips.
4) Line up at your pairs of leaves to get an idea of what order you want them to be placed in.

9 Fall Crafts and Fall Decorating Ideas
Find hundreds of free holiday craft ideas, projects, tutorials and more at www.AllFreeHolidayCrafts.com. 5
5) Pile up all your leaf pairs in the order you want to sew them. 6) Sew your leaves pairs together. This also can be a bit tedious I sewed some together at the tips and others more to the bottom part of the leaves. I just had to see how it fit the best. But I would guess if you are a quilter you would probably be better at lining these up than I was.
7) Lay it out on you table.

9 Fall Crafts and Fall Decorating Ideas
Find hundreds of free holiday craft ideas, projects, tutorials and more at www.AllFreeHolidayCrafts.com. 6
Decorative Napkin Rings By Gloria from The Domestic Diva
There is more to these Decorative Napkin Rings
than meets the eye. This DIY fall decoration will
keep not only your napkins happy, but your
candles too. We love the way this simple napkin
holder transforms into a handy candle votive.
The pretty autumn leaves spruce up your
everyday napkin holder and make it a
decorative table piece. You'll surprise everyone
when your napkin holders become part of your
table decorations.
Materials:
Clay conditioning machine
Premo clay colors: Ecru, Olive, Red, Orange, Hazelnut
Etch n’ Pearl tool
Sculpting tool
Clay texture sheets
Diamond Glaze
Paint brush
Round cookie cutter
Foil
2544 Gold metallic enamel pain marker
Instructions:
1) Condition about 1 oz. of each clay color except the Ecru. You’ll need more of it because it’s used for the ring and some leaves.
2) Roll the clay with a roller or put it through a pasta machine to create layers of equal thickness, about 1/16”. Use a cutter to make sheets the same dimension and stack them. 3) Cut through the stack from top to bottom cutting .50” wide slices. Roll each slice into a cigar shape on the work surface. Now twist and roll again to blend the colors.
Note: If you’re not happy with the result, fold the “cigar” in half and roll again against the width until you have the color blend you want.

9 Fall Crafts and Fall Decorating Ideas
Find hundreds of free holiday craft ideas, projects, tutorials and more at www.AllFreeHolidayCrafts.com. 7
4) Use a leaf shaped mini clay cutter, to cut 4 or 5 leaves in each color blend. Place plastic wrap on the clay before pressing the cutter into the clay. This will give you smooth edges. Use a clay sculpting tool to draw the veins in the leaves.
5) Roll out a strip of Ecru clay 6” long and a little more than 1” wide. You will trim it later. This size will fit a 2” cookie cutter. Press a design from a texture sheet onto the clay, you may need to remove the texture sheet and place it down again.
6) When the entire strip is textured, cover it with plastic wrap and cut it with a blade to form a 6” x 1” strip.
7) Wrap a 2” round cookie cutter as smoothly as possible with aluminum foil. Tuck the edges inside.
8) Wrap the clay around the foil. Use a round sculpting tool to blend the two clay ends.
9) Arrange the leaves on the clay ring. Allow them to extend higher than the clay strip on one side of the ring. Curve their tops forward slightly so they don’t lie completely flat against the ring and push on the leaf ends with the pearl end of an Etch n’ Pearl tool to secure them to the ring. Fill the ring with leaves.

9 Fall Crafts and Fall Decorating Ideas
Find hundreds of free holiday craft ideas, projects, tutorials and more at www.AllFreeHolidayCrafts.com. 8
10) Bake the ring in an oven at 275 degrees for 30 minutes on a foil lined baking pan. Allow to cool completely before handling. 11) Unwrap the foil from the cookie cutter and slide the cutter out of the foil then pull the foil away from the clay.
12) Fill a small container with Diamond Glaze. Using a paint brush, apply the glaze to the leaves and ring. Allow to dry completely; for about 2 hours.
13) To finish, apply gold paint to the circles created by the Etch n’ Pearl tool using the

9 Fall Crafts and Fall Decorating Ideas
Find hundreds of free holiday craft ideas, projects, tutorials and more at www.AllFreeHolidayCrafts.com. 9
Ruffled Leaf Pattern Table Runner By Allison from A Glimpse Inside The decor at your next fall party is going to be bursting with holiday cheer if you use this Ruffled Leaf Pattern Table Runner. This is an easy sewing project that will bring new dimensions to your fall table decorations with the unique design and festive pattern. Everyone will be ready to enjoy their next meal with this fall table runner brightening your holiday decor.
Materials:
Burlap
Fall leaf fabric tablecloth
Sewing machine
Needle and thread
Instructions:
1) Cut the burlap to the width and length that you want your runner to be. 2) Lay out your tablecloth and cut 3" strips to make ruffles from.
3) Change the settings on your sewing machine to a very long stitch and very little to no tension. Then just sew a straight line down the center of your strip.
4) Gently pull the bottom/back thread. As you pull, the fabric should ruffle.

9 Fall Crafts and Fall Decorating Ideas
Find hundreds of free holiday craft ideas, projects, tutorials and more at www.AllFreeHolidayCrafts.com. 10
5) You can also gently pull and then move the ruffles down the fabric a little bit at a time.
6) Position the fabric and ruffles to how you want them and prepare to sew them onto your burlap.
7) Sew down the ruffles. Try to sew along the same line you stitched to make the ruffles.
Note: As you sew, flatten the ruffles a bit to help you attach them to your fabric.
8) Once the ruffles are sewn on, pull the edges of the burlap to fringe it a bit.

9 Fall Crafts and Fall Decorating Ideas
Find hundreds of free holiday craft ideas, projects, tutorials and more at www.AllFreeHolidayCrafts.com. 11
Very Vintage Leaf Garland
By: Julee from Warm Hot Chocolate
Bring the beauty of fall leaves inside your home
with this lovely DIY garland idea. This Very
Vintage Leaf Garland would look wonderful
hanging about your mantel or fireplace this
season. If you love nature, why not add a bit of
it to your indoor decor in the form of this easy
craft? Show off your love for all things autumn
with this gorgeous garland; you won't find
anything like it in stores.
Materials:
About 2 dozen fall leaves, depending on the size you intend your garland to be
Modge Podge
Twine
Tape
Lightweight metallic gold tempera paint
Hard cover book
Instructions: 1) Collect about 2 dozen fall leaves from your yard. 2) Paint your leaves with Modge Podge and press in a hardcover book overnight to dry.
3) Take your leaves out of the book and apply a coat of your lightweight metallic gold tempera paint.
Note: Using lightweight paint will insure you do not cover the natural color and texture of your leave

9 Fall Crafts and Fall Decorating Ideas
Find hundreds of free holiday craft ideas, projects, tutorials and more at www.AllFreeHolidayCrafts.com. 12
4) Once the leaves are dry, arrange them on a piece of twine.
5) Tape the backs of the leaves to the twine and hang your garland.6) Hang your garland.

9 Fall Crafts and Fall Decorating Ideas
Find hundreds of free holiday craft ideas, projects, tutorials and more at www.AllFreeHolidayCrafts.com. 13
Glittery Autumn Wall Hanging
By Allison from A Glimpse Inside
Make your fall decorations really sparkle with
this Glittery Autumn Wall Hanging. This
beautiful and simple fall decoration craft is one
that you can personalize in many different
ways; choose any color or design that you'd like
to make this wall hanging pop. You'll also find
this craft to be a fun way to get your kids
excited about helping to create a custom
addition to your modern fall decorations.
Materials:
Acrylic Paint
Glitter Glue
Glue in your choice of colors (I went for a fall theme)
Canvas or Wood
Instructions: 1) Paint the raw edges of the wood or canvas. I painted it metallic silver at first then switched it to metallic gold but forgot to take a picture.
2) Tape off your design. I decided to do stripes.
3) Press firmly on the edges of the tape so there is no bleeding of the glue. 4) Paint on the glitter glue then sprinkle the glitter color of your choice.
5) Tear off tape and let dry.

9 Fall Crafts and Fall Decorating Ideas
Find hundreds of free holiday craft ideas, projects, tutorials and more at www.AllFreeHolidayCrafts.com. 14
6) Once the glue is dry on the first stripes, tape off to do the larger stripes.
7) Paint glue and sprinkle next color. Let dry.
8) Tape off again and continue to paint your stripes.
9) Allow to dry completely before hanging.
9 Fall Crafts and Fall Decorating Ideas
Find hundreds of free holiday craft ideas, projects, tutorials and more at www.AllFreeHolidayCrafts.com. 15
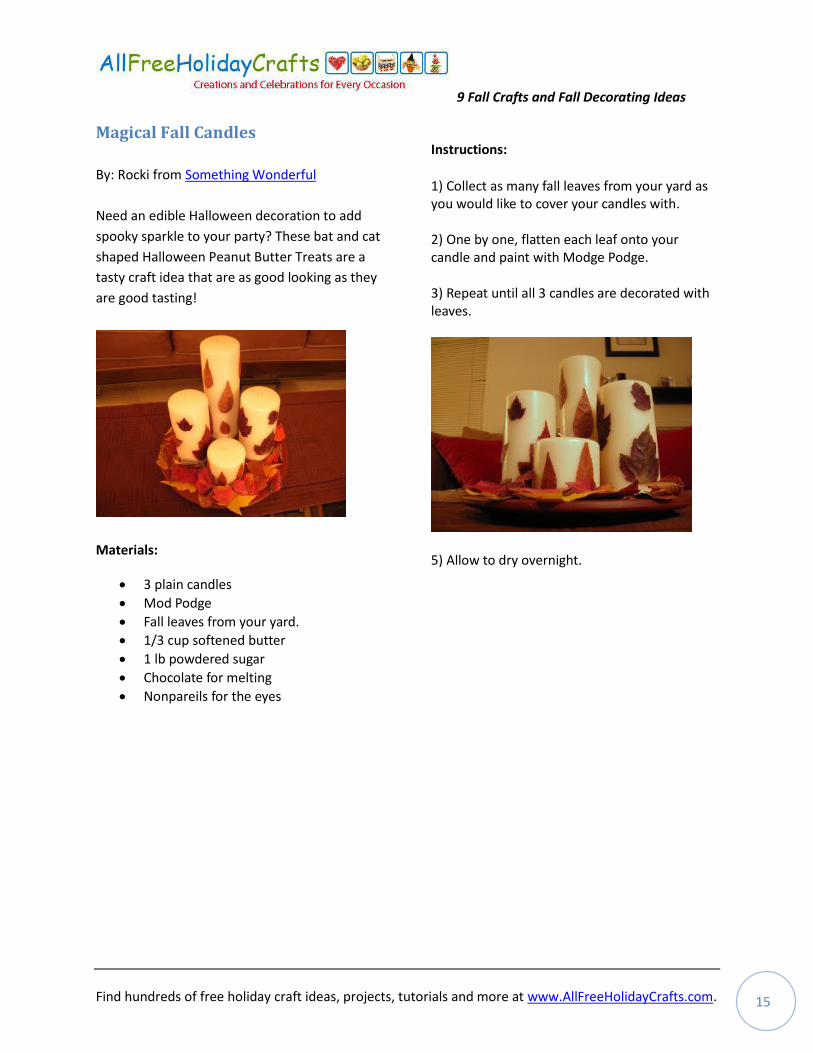
Magical Fall Candles
By: Rocki from Something Wonderful
Need an edible Halloween decoration to add
spooky sparkle to your party? These bat and cat
shaped Halloween Peanut Butter Treats are a
tasty craft idea that are as good looking as they
are good tasting!
Materials:
3 plain candles
Mod Podge
Fall leaves from your yard.
1/3 cup softened butter
1 lb powdered sugar
Chocolate for melting
Nonpareils for the eyes
Instructions:
1) Collect as many fall leaves from your yard as you would like to cover your candles with. 2) One by one, flatten each leaf onto your candle and paint with Modge Podge. 3) Repeat until all 3 candles are decorated with leaves.
5) Allow to dry overnight.

9 Fall Crafts and Fall Decorating Ideas
Find hundreds of free holiday craft ideas, projects, tutorials and more at www.AllFreeHolidayCrafts.com. 16
Colorful Grapevine Pumpkin By: Kathy Lewinski from Just Crafty Enough Dress up any grapevine pumpkin with this fun and easy fall crafting project. This Colorful Grapevine Pumpkin is covered in bright I-cords that give it an extra boost. Knit together a few strands of I-cord with your favorite type of yarn and drape them around your pumpkin to create this fun fall craft. The best thing about this pumpkin is that it will last forever and decorate your yard for years to come.
Materials:
Undecorated grapevine pumpkin
Worsted weight yarn in fall colors or pre-made i-cords
Glue
Fall berries
Instructions: 1) Start by purchasing or knitting i-cords that are long enough to reach span the height of your pumpkin. 2) Weave your i-cords and glue them to your pumpkin.
3)Add your fall berries around the stem of your pumpkin to finish it off.
3) Put the eyes on before the chocolate hardens, and you’re finished!

9 Fall Crafts and Fall Decorating Ideas
Find hundreds of free holiday craft ideas, projects, tutorials and more at www.AllFreeHolidayCrafts.com. 17
Easy Cheesecloth Pumpkin Craft
By: Ashley from Cherished Bliss
Try this Easy Cheesecloth Pumpkin Craft and
add it to your fall mantel this season. This cloth
pumpkin is a perfect piece of fall home decor
that all your guests can enjoy throughout the
season. The project is quick, easy and
inexpensive with a great pumpkin decoration as
your end result. To close your cheesecloth
pumpkin all you will need is a bit of brown yarn,
which creates a cute stem to top it off.
Materials:
1 package of cheesecloth
1 bottle of orange rit dye
Small amount of fabric to go under the cheesecloth
Yarn or twine for the stem
Paper bag
Off-white flannel material
Instructions: 1) Follow the instructions on your cheesecloth box to prepare it.
2) Dilute your dye, again by following the directions on the box. Pour 1/2 the bottle into 4 cups of the hottest tap water you can get.
3) Add your solution to the washer and set it to have an additional soak time and an extra rinse.

9 Fall Crafts and Fall Decorating Ideas
Find hundreds of free holiday craft ideas, projects, tutorials and more at www.AllFreeHolidayCrafts.com. 18
5) After the cycle is finished, dry your cheesecloth and get ready to start creating your pumpkin.
6) Take a paper bag and crumple it up into a sphere. 7)Wrap it up in your off-white flannel material.
8) Wrap the cheesecloth around your flannel and trim as necessary. 9) Wrap yarn or twine around your stem, tie it off, and you’re done!

9 Fall Crafts and Fall Decorating Ideas
Find hundreds of free holiday craft ideas, projects, tutorials and more at www.AllFreeHolidayCrafts.com. 19
Gorgeous Golden Glitter Pumpkins
By: Julee from Warm Hot Chocolate
How is it possible to make such a beautiful
season even more beautiful? With the help of
these Gorgeous Golden Glitter Pumpkins, of
course! This fun and easy pumpkin painting
project is the perfect way to put a bit of sparkle
into your annual harvest decor. With just a few
pretty pumpkins and your favorite sparkly craft
material, you can get started on this simple
pumpkin craft. It's an easy way to add a bit of
shimmer to your seasonal decor this year.
Materials:
White mini pumpkins
Gold pain
Paint brushes
Glue
Glitter
Instructions:
1) Gather your white mini pumpkins.
2)Using your gold paint, coat the pumpkins.
3) Allow to dry completely. 4) Coat each pumpkin in glue, add your glitter, and allow to dry!

9 Fall Crafts and Fall Decorating Ideas
Find hundreds of free holiday craft ideas, projects, tutorials and more at www.AllFreeHolidayCrafts.com. 20
9 Fall Crafts and Fall Decorating Ideas
Included in this eBook:
Table décor for fall
Home décor for fall
Pumpkin patterns
Sign up for our free holiday craft newsletter and receive more summer project ideas, garden craft tutorials, crafting tips, and more – straight to your inbox every week.
Special Thanks: Fawnda from Fireflies and Jellybeans Allison from A Glimpse Inside Gloria from The Domestic Diva Julee from Warm Hot Chocolate
Rocki from Something Wonderful Kathy Lewinski from Just Crafty Enough Ashley from Cherished Bliss