Embed Size (px)
Citation preview

IP-432/IP-424PS-344/PS-346

Thank you very much for purchasing the KONICA MINOLTA Print Controller.This User’s Manual includes instructions for making prints, correct handling of the machine, and precautions forsafety. Please read this manual before printing.In order to maintain a satisfactory printing performance, please keep this User’s Manual readily available for refer-ence.
ACKNOWLEDGEMENT:Microsoft, MS and MS-DOS are registered trademarks of Microsoft Corporation in the United States.
IBM is a registered trademark of International Business Machines, Inc. in the United States.
WindowsTM is a trademark of Microsoft Corporation.HP and PCL are registered trademarks of Hewlett-Packard Company.
Agfa Microtype font is a registered trademark of Agfa Corporation.
PEERLESS is a registered trademark of PEERLESS SYSTEMS CORPORATION.Apple, Macintosh and Mac are registered trademarks or trademarks of Apple Computer, Inc.
Adobe, Adobe Logo, Acrobat, Acrobat Logo, PostScript and PostScript Logo are registered trademarks or trademarks of Adobe Systems, Inc.
Other company names and product names used in this manual are the registered trademarks or trade-marks of their respective companies.
COPYRIGHT© 2004 by Konica Minolta Business Technologies, Inc. All Rights Reserved.
Introduction
iii Introduction
■IntroductionThe KONICA MINOLTA print controller is designed to be a built-in server for the KONICA MINOLTA printer/copier. It enables direct printing from Windows-compliant computers. It can also enable use of the copier asa network printer when an internal network interface card is used.
FCC Regulation (for U.S.A only)Warning: This equipment has been tested and found to comply with limits for a Class B digital device, pursuant topart 15 of FCC rules. These limits are designed to provide reasonable protection against harmful interfer-ence in a residential area.
This equipment generates, uses and can radiate radio frequency energy and, if not installed and used inaccordance with the instructions, may cause harmful interference to radio communications. However,there is no guarantee that interference will not occur in a particular installation. If this equipment doescause harmful interference to radio or television reception, which can be determined by turning the equip-ment off and on, the user is encouraged to try to correct the interference by one or more of the followingmeasures:
Reorient or relocate the receiving antenna.
Increase the distance between the equipment and the receiver.
Connect the equipment to an outlet on a circuit other than the circuit to which the receiver is con-nected.
Consult your dealer or an experienced radio/TV technician for help.
Canadian Department of Communications RegulationsCet appareil numérique de la classe B est conforme á la norme NMB-003 du Canada.
This Class B digital apparatus complies with Canadian ICES-003.
Patent NoticeThe product includes an implementation of LZW licensed under U.S.Patent 4,558,302.
Built-in FontsThe print controller includes support for PCL5e Language (HP PCL clone) and includes the 80 built-in
Agfa Microtype fonts. For details on fonts, refer to [font list] ( Page 491).
NoteA part or all of this User's Guide may not be used or copied without permission.
KONICA MINOLTA will have no liability for any incidents caused by using the printing system and thismanual.
Information written in this User's Guide is subject to change without notice.
Konica Minolta Business Technologies, Inc. maintains the copyright of this printer driver.
iv
Introduction
Introduction
SOFTWARE LICENSE AGREEMENTThis package contains the following materials provided by Konica Minolta Business Technologies, Inc. (KMBT): soft-ware included as part of the printing system, the digitally-encoded machine-readable outline data encoded in thespecial format and in the encrypted form ("Font Programs"), other software which runs on a computer system foruse in conjunction with the Printing Software ("Host Software"), and related explanatory written materials("Documentation").
The term "Software" shall be used to describe Printing Software, Font Programs and/or Host Software and also in-clude any upgrades, modified versions, additions, and copies of the Software.
The Software is being licensed to you under the terms of this Agreement.
KMBT grants to you a non-exclusive sublicense to use the Software and Documentation, provided that you agreeto the following:
1. You may use the Printing Software and accompanying Font Programs for imaging to the licensed output de-vice(s), solely for your own internal business purposes.
2. In addition to the license for Font Programs set forth in Section 1 ("Printing Software") above, you may use Ro-man Font Programs to reproduce weights, styles, and versions of letters, numerals, characters and symbols("Typefaces") on the display or monitor for your own internal business purposes.
3. You may make one backup copy of the Host Software, provided your backup copy is not installed or used onany computer. Notwithstanding the above restrictions, you may install the Software on any number of comput-ers solely for use with one or more printing systems running the Printing Software.
4. You may assign its rights under this Agreement to an assignee of all of Licensee's right and interest to suchSoftware and Documentation ("Assignee") provided you transfer to Assignee all copies of such Software andDocumentation Assignee agrees to be bound by all of the terms and conditions of this Agreement.
5. You agree not to modify, adapt or translate the Software and Documentation.
6. You agree that you will not attempt to alter, disassemble, decrypt, reverse engineer or decompile the Software.
7. Title to and ownership of the Software and Documentation and any reproductions thereof shall remain withKMBT.
8. Trademarks shall be used in accordance with accepted trademark practice, including identification of the trade-mark owner's name. Trademarks can only be used to identify printed output produced by the Software. Suchuse of any trademark does not give you any rights of ownership in that trademark.
9. You may not rent, lease, sublicense, lend or transfer versions or copies of the Software that the Software Lic-ensee does not use, or Software contained on any unused media, except as part of the permanent transfer ofall Software and Documentation as described above
10. In no event will KMBT be liable to you for any consequential, incidental or special damages, including any lostprofits or lost saving, even if KMBT has been advised of the possibility of such damages, or for any claim byany third party. Some states or jurisdictions do not allow the exclusion or limitation of incidental, consequentialor special damages, so the above limitations may not apply to you.
11. Notice to Government End Users: The Software is a "commercial item," as that term is defined at 48 C.F.R.2.101, consisting of "commercial computer software" and "commercial computer software documentation," assuch terms are used in 48 C.F.R. 12.212. Consistent with 48 C.F.R. 12.212 and 48 C.F.R. 227.7202-1 through227.7202-4, all U.S. Government End Users acquire the Software with only those rights set forth herein.
Macintosh® is a registered trademark of Apple Computer, Inc.
Windows® is a registered trademark of Microsoft Corporation.

v
Introduction
Introduction
SOFTWARE LICENSE AGREEMENT(Exclusive for PostScript3 Option)
This package contains the following materials provided by Adobe Systems Incorporated (“Adobe”) and Konica Mi-nolta Business Technologies, Inc. (KMBT): software included as part of the printing system, including PostScript®
software and other Adobe software (“Printing Software”), the digitally-encoded machine-readable outline data en-coded in the special format and in the encrypted form (“Font Programs”), other software which runs on a computersystem for use in conjunction with the Printing Software (“Host Software”), and related explanatory written materials(“Documentation”).
The term “Software” shall be used to describe Printing Software, Font Programs and/or Host Software and also in-clude any upgrades, modified versions, additions, and copies of the Software.
The Software is being licensed to you under the terms of this Agreement.
KMBT grants to you a non-exclusive sublicense to use the Software and Documentation, provided that you agreeto the following:
1. You may use the Printing Software and accompanying Font Programs for imaging to the licensed output de-vice(s), solely for your own internal business purposes.
2. In addition to the license for Font Programs set forth in Section 1 (“Printing Software”) above, you may use Ro-man Font Programs to reproduce weights, styles, and versions of letters, numerals, characters and symbols(“Typefaces”) on the display or monitor for your own internal business purposes.
3. You may make one backup copy of the Host Software, provided your backup copy is not installed or used onany computer. Notwithstanding the above restrictions, you may install the Adobe Driver Software on any num-ber of computers solely for use with one or more printing systems running the Printing Software.
4. You may assign its rights under this Agreement to an assignee of all of Licensee’s right and interest to suchSoftware and Documentation (“Assignee”) provided you transfers to Assignee all copies of such Software andDocumentation Assignee agrees to be bound by all of the terms and conditions of this Agreement.
5. You agree not to modify, adapt or translate the Software and Documentation.
6. You agree that it will not attempt to alter, disassemble, decrypt, reverse engineer or decompile the Software.
7. Title to and ownership of the Software and Documentation and any reproductions thereof shall remain with Ado-be and KMBT.
8. Trademarks shall be used in accordance with accepted trademark practice, including identification of the trade-mark owner’s name. Trademarks can only be used to identify printed output produced by the Software. Suchuse of any trademark does not give you any rights of ownership in that trademark.
9. You may not rent, lease, sublicense, lend or transfer versions or copies of the Software Licensee does not use,or Software contained on any unused media, except as part of the permanent transfer of all Software and Doc-umentation as described above.
10. In no event will KMBT or Adobe be liable to you for any consequential, incidental or special damages, includingany lost profits or lost saving, even if KMBT has been advised of the possibility of such damages, or for anyclaim by any third party. Some states or jurisdictions do not allow the exclusion or limitation of incidental, con-sequential or special damages, so the above limitations may not apply to you.
11. Notice to Government End Users: The Software is a “commercial item,” as that term is defined at 48 C.F.R.2.101, consisting of “commercial computer software” and “commercial computer software documentation,” assuch terms are used in 48 C.F.R. 12.212. Consistent with 48 C.F.R. 12.212 and 48 C.F.R. 227.7202-1 through227.7202-4, all U.S. Government End Users acquire the Software with only those rights set forth herein.
12. You are hereby notified that Adobe Systems Incorporated, a Delaware corporation located at 345 Park Avenue,San Jose, CA 95110-2704 (“Adobe”), is a third-party beneficiary to this Agreement to the extent that this Agree-ment contains provisions which relate to Licensee’s use of the Software, Font Programs, Typefaces and thetrademarks licensed hereby. Such provisions are made expressly for the benefit of Adobe and are enforceableby Adobe in addition to KMBT.
Introduction
vi Introduction
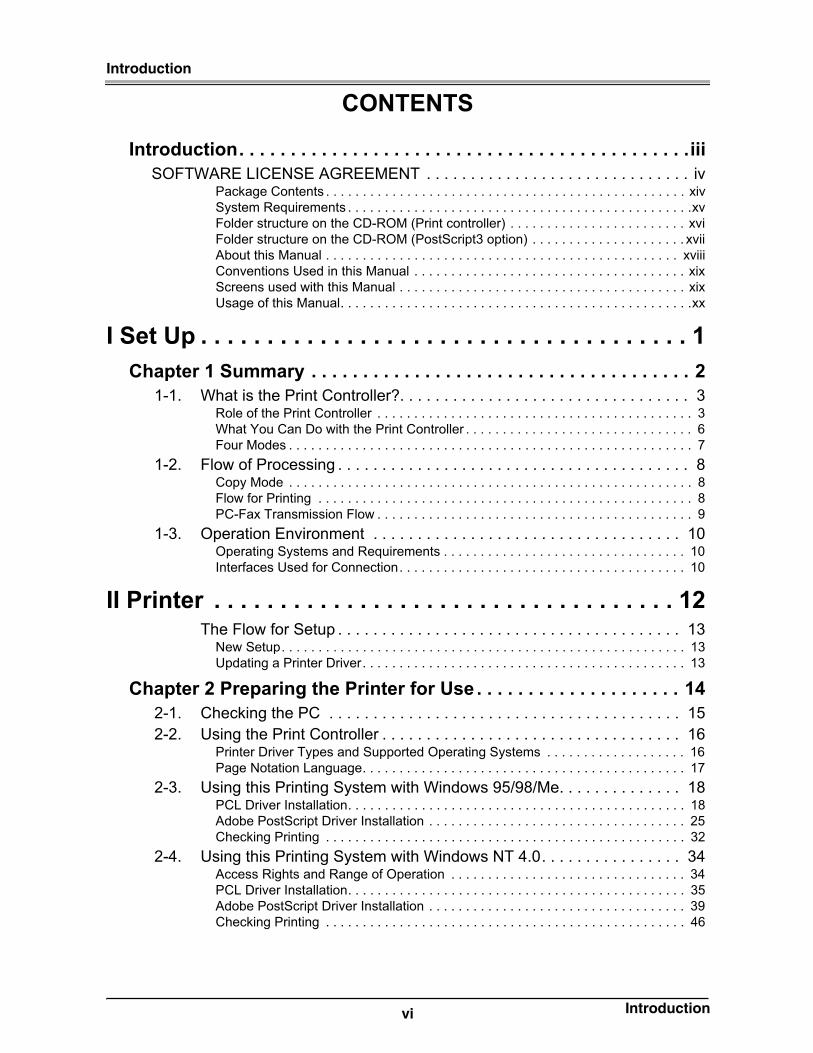
CONTENTS
Introduction. . . . . . . . . . . . . . . . . . . . . . . . . . . . . . . . . . . . . . . . . . . .iii
SOFTWARE LICENSE AGREEMENT . . . . . . . . . . . . . . . . . . . . . . . . . . . . . . ivPackage Contents . . . . . . . . . . . . . . . . . . . . . . . . . . . . . . . . . . . . . . . . . . . . . . . . . xivSystem Requirements . . . . . . . . . . . . . . . . . . . . . . . . . . . . . . . . . . . . . . . . . . . . . . .xvFolder structure on the CD-ROM (Print controller) . . . . . . . . . . . . . . . . . . . . . . . . xviFolder structure on the CD-ROM (PostScript3 option) . . . . . . . . . . . . . . . . . . . . . xviiAbout this Manual . . . . . . . . . . . . . . . . . . . . . . . . . . . . . . . . . . . . . . . . . . . . . . . . xviiiConventions Used in this Manual . . . . . . . . . . . . . . . . . . . . . . . . . . . . . . . . . . . . . xixScreens used with this Manual . . . . . . . . . . . . . . . . . . . . . . . . . . . . . . . . . . . . . . . xixUsage of this Manual. . . . . . . . . . . . . . . . . . . . . . . . . . . . . . . . . . . . . . . . . . . . . . . .xx
I Set Up . . . . . . . . . . . . . . . . . . . . . . . . . . . . . . . . . . . . . 1
Chapter 1 Summary . . . . . . . . . . . . . . . . . . . . . . . . . . . . . . . . . . . . . 2
1-1. What is the Print Controller?. . . . . . . . . . . . . . . . . . . . . . . . . . . . . . . . . 3Role of the Print Controller . . . . . . . . . . . . . . . . . . . . . . . . . . . . . . . . . . . . . . . . . . . 3What You Can Do with the Print Controller . . . . . . . . . . . . . . . . . . . . . . . . . . . . . . . 6Four Modes . . . . . . . . . . . . . . . . . . . . . . . . . . . . . . . . . . . . . . . . . . . . . . . . . . . . . . . 7
1-2. Flow of Processing . . . . . . . . . . . . . . . . . . . . . . . . . . . . . . . . . . . . . . . . 8Copy Mode . . . . . . . . . . . . . . . . . . . . . . . . . . . . . . . . . . . . . . . . . . . . . . . . . . . . . . . 8Flow for Printing . . . . . . . . . . . . . . . . . . . . . . . . . . . . . . . . . . . . . . . . . . . . . . . . . . . 8PC-Fax Transmission Flow . . . . . . . . . . . . . . . . . . . . . . . . . . . . . . . . . . . . . . . . . . . 9
1-3. Operation Environment . . . . . . . . . . . . . . . . . . . . . . . . . . . . . . . . . . . 10Operating Systems and Requirements . . . . . . . . . . . . . . . . . . . . . . . . . . . . . . . . . 10Interfaces Used for Connection. . . . . . . . . . . . . . . . . . . . . . . . . . . . . . . . . . . . . . . 10
II Printer . . . . . . . . . . . . . . . . . . . . . . . . . . . . . . . . . . . 12The Flow for Setup . . . . . . . . . . . . . . . . . . . . . . . . . . . . . . . . . . . . . . . 13
New Setup. . . . . . . . . . . . . . . . . . . . . . . . . . . . . . . . . . . . . . . . . . . . . . . . . . . . . . . 13Updating a Printer Driver. . . . . . . . . . . . . . . . . . . . . . . . . . . . . . . . . . . . . . . . . . . . 13
Chapter 2 Preparing the Printer for Use . . . . . . . . . . . . . . . . . . . . 14
2-1. Checking the PC . . . . . . . . . . . . . . . . . . . . . . . . . . . . . . . . . . . . . . . . 152-2. Using the Print Controller . . . . . . . . . . . . . . . . . . . . . . . . . . . . . . . . . . 16
Printer Driver Types and Supported Operating Systems . . . . . . . . . . . . . . . . . . . 16Page Notation Language. . . . . . . . . . . . . . . . . . . . . . . . . . . . . . . . . . . . . . . . . . . . 17
2-3. Using this Printing System with Windows 95/98/Me. . . . . . . . . . . . . . 18PCL Driver Installation. . . . . . . . . . . . . . . . . . . . . . . . . . . . . . . . . . . . . . . . . . . . . . 18Adobe PostScript Driver Installation . . . . . . . . . . . . . . . . . . . . . . . . . . . . . . . . . . . 25Checking Printing . . . . . . . . . . . . . . . . . . . . . . . . . . . . . . . . . . . . . . . . . . . . . . . . . 32
2-4. Using this Printing System with Windows NT 4.0. . . . . . . . . . . . . . . . 34Access Rights and Range of Operation . . . . . . . . . . . . . . . . . . . . . . . . . . . . . . . . 34PCL Driver Installation. . . . . . . . . . . . . . . . . . . . . . . . . . . . . . . . . . . . . . . . . . . . . . 35Adobe PostScript Driver Installation . . . . . . . . . . . . . . . . . . . . . . . . . . . . . . . . . . . 39Checking Printing . . . . . . . . . . . . . . . . . . . . . . . . . . . . . . . . . . . . . . . . . . . . . . . . . 46

Introduction
vii Introduction
2-5. Using this Printing System with Windows 2000 . . . . . . . . . . . . . . . . . 48Access Rights and Range of Operation . . . . . . . . . . . . . . . . . . . . . . . . . . . . . . . . 48PCL Driver Installation. . . . . . . . . . . . . . . . . . . . . . . . . . . . . . . . . . . . . . . . . . . . . . 49Adobe PostScript Driver Installation . . . . . . . . . . . . . . . . . . . . . . . . . . . . . . . . . . . 53Checking Printing . . . . . . . . . . . . . . . . . . . . . . . . . . . . . . . . . . . . . . . . . . . . . . . . . 62
2-6. Using this Printing System with Windows XP. . . . . . . . . . . . . . . . . . . 65Access Rights and Range of Operation . . . . . . . . . . . . . . . . . . . . . . . . . . . . . . . . 65PCL Driver Installation. . . . . . . . . . . . . . . . . . . . . . . . . . . . . . . . . . . . . . . . . . . . . . 66Adobe PostScript Driver Installation . . . . . . . . . . . . . . . . . . . . . . . . . . . . . . . . . . . 71Checking Printing . . . . . . . . . . . . . . . . . . . . . . . . . . . . . . . . . . . . . . . . . . . . . . . . . 80
2-7. Using as a USB Printer (Windows 2000/XP) . . . . . . . . . . . . . . . . . . . 83Installing a Printer Driver . . . . . . . . . . . . . . . . . . . . . . . . . . . . . . . . . . . . . . . . . . . . 83
2-8. Using this Printing System with a Macintosh . . . . . . . . . . . . . . . . . . . 88Adobe PostScript Driver Installation . . . . . . . . . . . . . . . . . . . . . . . . . . . . . . . . . . . 88Selecting the Printer . . . . . . . . . . . . . . . . . . . . . . . . . . . . . . . . . . . . . . . . . . . . . . . 94Checking Printing . . . . . . . . . . . . . . . . . . . . . . . . . . . . . . . . . . . . . . . . . . . . . . . . . 99
2-9. Updating the Printer Driver . . . . . . . . . . . . . . . . . . . . . . . . . . . . . . . . 100Updating the Printer Driver with Windows 95/98/Me. . . . . . . . . . . . . . . . . . . . . . 101Updating the Printer Driver with Windows NT 4.0 . . . . . . . . . . . . . . . . . . . . . . . . 103Updating the Printer Driver with Windows 2000 . . . . . . . . . . . . . . . . . . . . . . . . . 105Updating the Printer Driver with Windows XP . . . . . . . . . . . . . . . . . . . . . . . . . . . 107Updating the Printer Driver with Macintosh . . . . . . . . . . . . . . . . . . . . . . . . . . . . . 109
2-10. Installation Problems . . . . . . . . . . . . . . . . . . . . . . . . . . . . . . . . . . . . 111An Old Version of the Driver Is Already Installed. . . . . . . . . . . . . . . . . . . . . . . . . 111You Are Asked Which File to Use, the One You Are Installing or a New File Already on the Computer. . . . . . . . . . . . . . . . . . . . . . . . . . . . . . . . . . 111Test Page Cannot Be Printed.. . . . . . . . . . . . . . . . . . . . . . . . . . . . . . . . . . . . . . . 111
Chapter 3 Printing from Windows. . . . . . . . . . . . . . . . . . . . . . . . 112
3-1. Setting Printer Functions . . . . . . . . . . . . . . . . . . . . . . . . . . . . . . . . . 113Windows 95/98/Me . . . . . . . . . . . . . . . . . . . . . . . . . . . . . . . . . . . . . . . . . . . . . . . 114Windows NT 4.0 . . . . . . . . . . . . . . . . . . . . . . . . . . . . . . . . . . . . . . . . . . . . . . . . . 117Windows 2000. . . . . . . . . . . . . . . . . . . . . . . . . . . . . . . . . . . . . . . . . . . . . . . . . . . 121Windows XP . . . . . . . . . . . . . . . . . . . . . . . . . . . . . . . . . . . . . . . . . . . . . . . . . . . . 125Image View . . . . . . . . . . . . . . . . . . . . . . . . . . . . . . . . . . . . . . . . . . . . . . . . . . . . . 129
3-2. Function List . . . . . . . . . . . . . . . . . . . . . . . . . . . . . . . . . . . . . . . . . . . 1303-3. Basic Print Settings . . . . . . . . . . . . . . . . . . . . . . . . . . . . . . . . . . . . . 132
Setting the Printer Languages. . . . . . . . . . . . . . . . . . . . . . . . . . . . . . . . . . . . . . . 132Setting the Number of Copies to Print (Copies). . . . . . . . . . . . . . . . . . . . . . . . . . 134Setting the Print Direction (Orientation). . . . . . . . . . . . . . . . . . . . . . . . . . . . . . . . 136Setting the Print Paper Size (Paper Size) . . . . . . . . . . . . . . . . . . . . . . . . . . . . . . 138Selecting the Type of Paper (Media Type/Paper Type) . . . . . . . . . . . . . . . . . . . 140Printing Enlarged/Reduced (Scaling) . . . . . . . . . . . . . . . . . . . . . . . . . . . . . . . . . 142Selecting the Input Tray (Paper Source) . . . . . . . . . . . . . . . . . . . . . . . . . . . . . . . 144Selecting the Output Tray (Output Bin) . . . . . . . . . . . . . . . . . . . . . . . . . . . . . . . . 146Setting the Margin (Margins) . . . . . . . . . . . . . . . . . . . . . . . . . . . . . . . . . . . . . . . . 148
3-4. Printing Multiple Pages. . . . . . . . . . . . . . . . . . . . . . . . . . . . . . . . . . . 149Printing on Both the Front and Rear of the Paper (Duplex) . . . . . . . . . . . . . . . . 153Printing Multiple Pages on One Sheet of Paper (Pages per Sheet/Layout) . . . . 155Folding Paper in Two to Make Booklets (Combination) . . . . . . . . . . . . . . . . . . . 158Fold&Stitch . . . . . . . . . . . . . . . . . . . . . . . . . . . . . . . . . . . . . . . . . . . . . . . . . . . . . 161Printing One Copy at a Time of All Pages (Collate/Sort). . . . . . . . . . . . . . . . . . . 164Outputting Sorted into Separate Sets of Copies (Offset) . . . . . . . . . . . . . . . . . . 166

Introduction
viii Introduction
Stapling (Staple) . . . . . . . . . . . . . . . . . . . . . . . . . . . . . . . . . . . . . . . . . . . . . . . . . 169Punch/Punch Holes. . . . . . . . . . . . . . . . . . . . . . . . . . . . . . . . . . . . . . . . . . . . . . . 173Attaching a Front Cover/Back Cover (Front Cover/Back Cover) . . . . . . . . . . . . . 177Attaching a Sheet Insertion (Windows NT 4.0/2000/XP). . . . . . . . . . . . . . . . . . . 180
3-5. Making Image Settings. . . . . . . . . . . . . . . . . . . . . . . . . . . . . . . . . . . 187Halftoning . . . . . . . . . . . . . . . . . . . . . . . . . . . . . . . . . . . . . . . . . . . . . . . . . . . . . . 187Brightness (Windows 95/98/Me) . . . . . . . . . . . . . . . . . . . . . . . . . . . . . . . . . . . . . 187Contrast (Windows 95/98/Me). . . . . . . . . . . . . . . . . . . . . . . . . . . . . . . . . . . . . . . 187Print Density (Windows NT 4.0/2000/XP) . . . . . . . . . . . . . . . . . . . . . . . . . . . . . . 187Print as Black (Windows NT 4.0/2000/XP) . . . . . . . . . . . . . . . . . . . . . . . . . . . . . 188Smoothing . . . . . . . . . . . . . . . . . . . . . . . . . . . . . . . . . . . . . . . . . . . . . . . . . . . . . . 188Toner Save . . . . . . . . . . . . . . . . . . . . . . . . . . . . . . . . . . . . . . . . . . . . . . . . . . . . . 190Setting the Resolution (Resolution). . . . . . . . . . . . . . . . . . . . . . . . . . . . . . . . . . . 192Printing with Black and White Reversed (Print as a Negative Image). . . . . . . . . 193Printing with Left/Right Reversed (Print as a Mirror Image) . . . . . . . . . . . . . . . . 195
3-6. Setting the Font . . . . . . . . . . . . . . . . . . . . . . . . . . . . . . . . . . . . . . . . 196TrueType Font Settings (Windows 95/98/Me). . . . . . . . . . . . . . . . . . . . . . . . . . . 196PostScript Font Settings . . . . . . . . . . . . . . . . . . . . . . . . . . . . . . . . . . . . . . . . . . . 197
3-7. Special Printing . . . . . . . . . . . . . . . . . . . . . . . . . . . . . . . . . . . . . . . . 203Printing Overlaying Another Document (Overlay) . . . . . . . . . . . . . . . . . . . . . . . . 204Printing Watermarks (Watermark). . . . . . . . . . . . . . . . . . . . . . . . . . . . . . . . . . . . 207Printing with a Password (Password Print) . . . . . . . . . . . . . . . . . . . . . . . . . . . . . 211Holding the Printed Text in the Document Folder(Hold) . . . . . . . . . . . . . . . . . . . 216
3-8. Setting the Connection between the Computer and Printer . . . . . . . 220Windows 95/98/Me . . . . . . . . . . . . . . . . . . . . . . . . . . . . . . . . . . . . . . . . . . . . . . . 220Windows NT 4.0 . . . . . . . . . . . . . . . . . . . . . . . . . . . . . . . . . . . . . . . . . . . . . . . . . 224Windows 2000/XP . . . . . . . . . . . . . . . . . . . . . . . . . . . . . . . . . . . . . . . . . . . . . . . . 228
Chapter 4 Printing from a Macintosh . . . . . . . . . . . . . . . . . . . . . 232
4-1. Setting Printer Functions . . . . . . . . . . . . . . . . . . . . . . . . . . . . . . . . . 2334-2. Function List . . . . . . . . . . . . . . . . . . . . . . . . . . . . . . . . . . . . . . . . . . . 2344-3. Basic Print Settings . . . . . . . . . . . . . . . . . . . . . . . . . . . . . . . . . . . . . 236
Setting the Number of Copies to Print (Copies) . . . . . . . . . . . . . . . . . . . . . . . . . 236Setting the Print Direction (Direction) . . . . . . . . . . . . . . . . . . . . . . . . . . . . . . . . . 238Setting the Print Paper Size (Paper) . . . . . . . . . . . . . . . . . . . . . . . . . . . . . . . . . . 240Setting Any Paper Size . . . . . . . . . . . . . . . . . . . . . . . . . . . . . . . . . . . . . . . . . . . . 242Selecting the Type of Paper (Media Type) . . . . . . . . . . . . . . . . . . . . . . . . . . . . . 244Printing Enlarged/Reduced (Magnification Ratio) . . . . . . . . . . . . . . . . . . . . . . . . 246Selecting the Input Tray (Paper Source) . . . . . . . . . . . . . . . . . . . . . . . . . . . . . . . 248Selecting the Print Order (Reverse Print Order) . . . . . . . . . . . . . . . . . . . . . . . . . 250Selecting the Output Tray (Output Bin) . . . . . . . . . . . . . . . . . . . . . . . . . . . . . . . . 251Setting the Margin (Margins) . . . . . . . . . . . . . . . . . . . . . . . . . . . . . . . . . . . . . . . . 253
4-4. Printing Multiple Pages. . . . . . . . . . . . . . . . . . . . . . . . . . . . . . . . . . . 255Printing on Both the Front and Rear of the Paper (Duplex Printing) . . . . . . . . . . 258Printing Multiple Pages on One Sheet of Paper (Document Pages/Print Pages/Layout Direction) . . . . . . . . . . . . . . . . . . . . . . . . 260Folding Paper in Two to Make Booklets (Special Mode). . . . . . . . . . . . . . . . . . . 264Printing One Copy at a Time of All Pages (Collate) . . . . . . . . . . . . . . . . . . . . . . 267Outputting Sorted into Separate Sets of Copies (Offset) . . . . . . . . . . . . . . . . . . 269Stapling (Staple) . . . . . . . . . . . . . . . . . . . . . . . . . . . . . . . . . . . . . . . . . . . . . . . . . 271Punch/Punch Holes. . . . . . . . . . . . . . . . . . . . . . . . . . . . . . . . . . . . . . . . . . . . . . . 275Fold&Stitch . . . . . . . . . . . . . . . . . . . . . . . . . . . . . . . . . . . . . . . . . . . . . . . . . . . . . 278

Introduction
ix Introduction
Attaching a Front Cover/Back Cover (Front Cover/Back Cover) . . . . . . . . . . . . . 281
4-5. Special Printing . . . . . . . . . . . . . . . . . . . . . . . . . . . . . . . . . . . . . . . . 284Printing with Top/Bottom or Left/Right Reversed (Mirror Image Printing) . . . . . . 284Printing with Black and White Reversed (Negative Image Printing) . . . . . . . . . . 285Printing Watermarks (Watermark). . . . . . . . . . . . . . . . . . . . . . . . . . . . . . . . . . . . 286Smoothing Characters and Curved Lines (Smoothing). . . . . . . . . . . . . . . . . . . . 289Conserving Toner (Toner Save) . . . . . . . . . . . . . . . . . . . . . . . . . . . . . . . . . . . . . 291
4-6. Making PostScript Settings (File Save) . . . . . . . . . . . . . . . . . . . . . . 293
Chapter 5 Print Count Management (Printer EKC/ECM) . . . . . . 295
5-1. Managing the Print Count. . . . . . . . . . . . . . . . . . . . . . . . . . . . . . . . . 2965-2. Printer EKC/ECM Settings . . . . . . . . . . . . . . . . . . . . . . . . . . . . . . . . 297
Printer EKC/ECM Printing . . . . . . . . . . . . . . . . . . . . . . . . . . . . . . . . . . . . . . . . . . 297Reading Counter Values . . . . . . . . . . . . . . . . . . . . . . . . . . . . . . . . . . . . . . . . . . . 300EKC/ECM Limits . . . . . . . . . . . . . . . . . . . . . . . . . . . . . . . . . . . . . . . . . . . . . . . . . 300
Chapter 6 Printing Problems . . . . . . . . . . . . . . . . . . . . . . . . . . . . 301
6-1. Problems with Printing . . . . . . . . . . . . . . . . . . . . . . . . . . . . . . . . . . . 302No Printing. . . . . . . . . . . . . . . . . . . . . . . . . . . . . . . . . . . . . . . . . . . . . . . . . . . . . . 302The Paper Type Cannot Be Selected.. . . . . . . . . . . . . . . . . . . . . . . . . . . . . . . . . 302Test Page Cannot Be Printed.. . . . . . . . . . . . . . . . . . . . . . . . . . . . . . . . . . . . . . . 303The Print Settings and Print Results Do Not Match. . . . . . . . . . . . . . . . . . . . . . . 304Duplex Printing Is Not Possible. . . . . . . . . . . . . . . . . . . . . . . . . . . . . . . . . . . . . . 304Forms Cannot Be Printed.. . . . . . . . . . . . . . . . . . . . . . . . . . . . . . . . . . . . . . . . . . 304
6-2. Problems Printing with the Adobe PostScript Driver . . . . . . . . . . . . 305PostScript Error Is Displayed. . . . . . . . . . . . . . . . . . . . . . . . . . . . . . . . . . . . . . . . 305[Vmerror], [limitcheck], or Other PostScript Error Is Displayed. . . . . . . . . . . . . . 305PostScript Error Is Displayed No Matter Which Computer Is Attempting to Print. 305PostScript Error Is Displayed for Printing from a Specific Application. . . . . . . . . 305PostScript Error Is Displayed for Printing a Specific File. . . . . . . . . . . . . . . . . . . 305PostScript Error Is Displayed for Printing a Specific Page. . . . . . . . . . . . . . . . . . 305Non Fixed Size Paper (Custom) Cannot Be Printed Correctly with a Macintosh. 305
6-3. Checking Incomplete Jobs . . . . . . . . . . . . . . . . . . . . . . . . . . . . . . . . 306
III Fax . . . . . . . . . . . . . . . . . . . . . . . . . . . . . . . . . . . . 307
Chapter 7 Fax Functions (PC-Fax) . . . . . . . . . . . . . . . . . . . . . . . 308
7-1. Sending Faxes from the Computer. . . . . . . . . . . . . . . . . . . . . . . . . . 3097-2. Registering Recipient Names and their Fax Numbers . . . . . . . . . . . 3107-3. Using PC-Fax . . . . . . . . . . . . . . . . . . . . . . . . . . . . . . . . . . . . . . . . . . 311
Operating Systems Supported by PC-Fax . . . . . . . . . . . . . . . . . . . . . . . . . . . . . 311Setting the Fax Unit. . . . . . . . . . . . . . . . . . . . . . . . . . . . . . . . . . . . . . . . . . . . . . . 311
Chapter 8 Sending Faxes. . . . . . . . . . . . . . . . . . . . . . . . . . . . . . . 312
8-1. Transmission Procedure. . . . . . . . . . . . . . . . . . . . . . . . . . . . . . . . . . 313Fax Transmission . . . . . . . . . . . . . . . . . . . . . . . . . . . . . . . . . . . . . . . . . . . . . . . . 313
8-2. Setting a Cover Sheet (Windows NT/2000/XP) . . . . . . . . . . . . . . . . 3188-3. PC-Fax Transmission Error Reports . . . . . . . . . . . . . . . . . . . . . . . . 320
Introduction
x Introduction
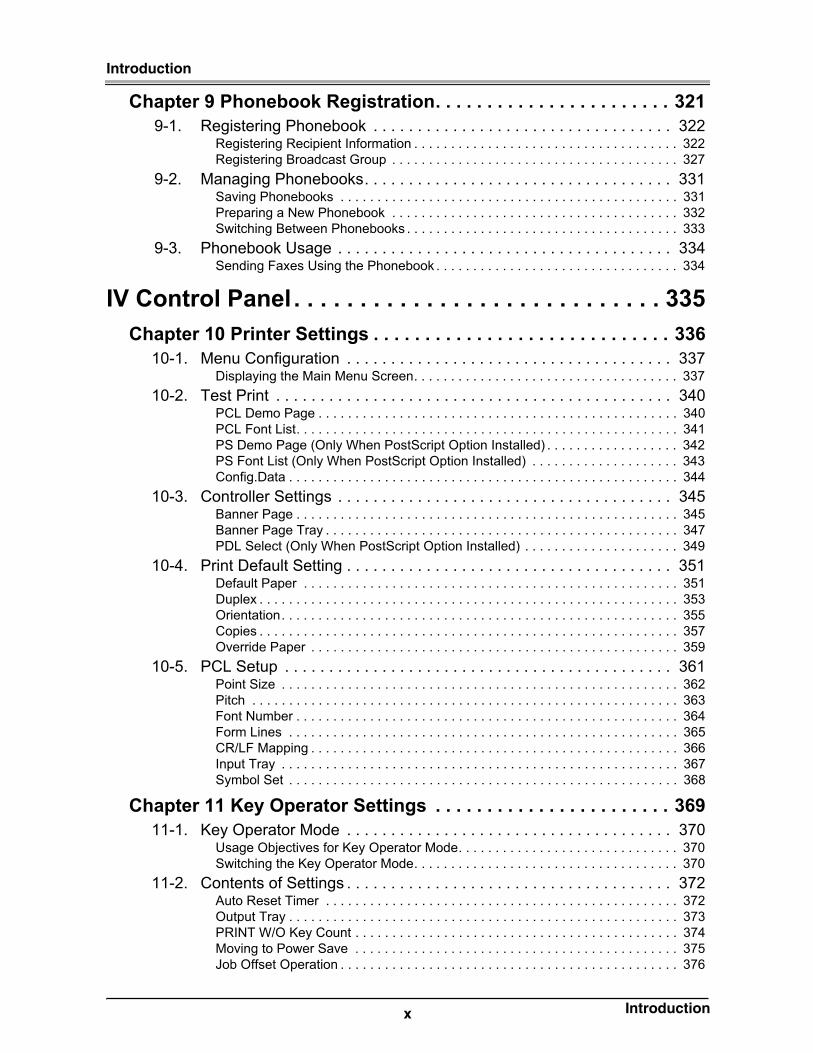
Chapter 9 Phonebook Registration. . . . . . . . . . . . . . . . . . . . . . . 321
9-1. Registering Phonebook . . . . . . . . . . . . . . . . . . . . . . . . . . . . . . . . . . 322Registering Recipient Information . . . . . . . . . . . . . . . . . . . . . . . . . . . . . . . . . . . . 322Registering Broadcast Group . . . . . . . . . . . . . . . . . . . . . . . . . . . . . . . . . . . . . . . 327
9-2. Managing Phonebooks. . . . . . . . . . . . . . . . . . . . . . . . . . . . . . . . . . . 331Saving Phonebooks . . . . . . . . . . . . . . . . . . . . . . . . . . . . . . . . . . . . . . . . . . . . . . 331Preparing a New Phonebook . . . . . . . . . . . . . . . . . . . . . . . . . . . . . . . . . . . . . . . 332Switching Between Phonebooks . . . . . . . . . . . . . . . . . . . . . . . . . . . . . . . . . . . . . 333
9-3. Phonebook Usage . . . . . . . . . . . . . . . . . . . . . . . . . . . . . . . . . . . . . . 334Sending Faxes Using the Phonebook . . . . . . . . . . . . . . . . . . . . . . . . . . . . . . . . . 334
IV Control Panel . . . . . . . . . . . . . . . . . . . . . . . . . . . . 335
Chapter 10 Printer Settings . . . . . . . . . . . . . . . . . . . . . . . . . . . . . 336
10-1. Menu Configuration . . . . . . . . . . . . . . . . . . . . . . . . . . . . . . . . . . . . . 337Displaying the Main Menu Screen. . . . . . . . . . . . . . . . . . . . . . . . . . . . . . . . . . . . 337
10-2. Test Print . . . . . . . . . . . . . . . . . . . . . . . . . . . . . . . . . . . . . . . . . . . . . 340PCL Demo Page . . . . . . . . . . . . . . . . . . . . . . . . . . . . . . . . . . . . . . . . . . . . . . . . . 340PCL Font List. . . . . . . . . . . . . . . . . . . . . . . . . . . . . . . . . . . . . . . . . . . . . . . . . . . . 341PS Demo Page (Only When PostScript Option Installed) . . . . . . . . . . . . . . . . . . 342PS Font List (Only When PostScript Option Installed) . . . . . . . . . . . . . . . . . . . . 343Config.Data . . . . . . . . . . . . . . . . . . . . . . . . . . . . . . . . . . . . . . . . . . . . . . . . . . . . . 344
10-3. Controller Settings . . . . . . . . . . . . . . . . . . . . . . . . . . . . . . . . . . . . . . 345Banner Page . . . . . . . . . . . . . . . . . . . . . . . . . . . . . . . . . . . . . . . . . . . . . . . . . . . . 345Banner Page Tray . . . . . . . . . . . . . . . . . . . . . . . . . . . . . . . . . . . . . . . . . . . . . . . . 347PDL Select (Only When PostScript Option Installed) . . . . . . . . . . . . . . . . . . . . . 349
10-4. Print Default Setting . . . . . . . . . . . . . . . . . . . . . . . . . . . . . . . . . . . . . 351Default Paper . . . . . . . . . . . . . . . . . . . . . . . . . . . . . . . . . . . . . . . . . . . . . . . . . . . 351Duplex . . . . . . . . . . . . . . . . . . . . . . . . . . . . . . . . . . . . . . . . . . . . . . . . . . . . . . . . . 353Orientation. . . . . . . . . . . . . . . . . . . . . . . . . . . . . . . . . . . . . . . . . . . . . . . . . . . . . . 355Copies . . . . . . . . . . . . . . . . . . . . . . . . . . . . . . . . . . . . . . . . . . . . . . . . . . . . . . . . . 357Override Paper . . . . . . . . . . . . . . . . . . . . . . . . . . . . . . . . . . . . . . . . . . . . . . . . . . 359
10-5. PCL Setup . . . . . . . . . . . . . . . . . . . . . . . . . . . . . . . . . . . . . . . . . . . . 361Point Size . . . . . . . . . . . . . . . . . . . . . . . . . . . . . . . . . . . . . . . . . . . . . . . . . . . . . . 362Pitch . . . . . . . . . . . . . . . . . . . . . . . . . . . . . . . . . . . . . . . . . . . . . . . . . . . . . . . . . . 363Font Number . . . . . . . . . . . . . . . . . . . . . . . . . . . . . . . . . . . . . . . . . . . . . . . . . . . . 364Form Lines . . . . . . . . . . . . . . . . . . . . . . . . . . . . . . . . . . . . . . . . . . . . . . . . . . . . . 365CR/LF Mapping . . . . . . . . . . . . . . . . . . . . . . . . . . . . . . . . . . . . . . . . . . . . . . . . . . 366Input Tray . . . . . . . . . . . . . . . . . . . . . . . . . . . . . . . . . . . . . . . . . . . . . . . . . . . . . . 367Symbol Set . . . . . . . . . . . . . . . . . . . . . . . . . . . . . . . . . . . . . . . . . . . . . . . . . . . . . 368
Chapter 11 Key Operator Settings . . . . . . . . . . . . . . . . . . . . . . . 369
11-1. Key Operator Mode . . . . . . . . . . . . . . . . . . . . . . . . . . . . . . . . . . . . . 370Usage Objectives for Key Operator Mode. . . . . . . . . . . . . . . . . . . . . . . . . . . . . . 370Switching the Key Operator Mode. . . . . . . . . . . . . . . . . . . . . . . . . . . . . . . . . . . . 370
11-2. Contents of Settings . . . . . . . . . . . . . . . . . . . . . . . . . . . . . . . . . . . . . 372Auto Reset Timer . . . . . . . . . . . . . . . . . . . . . . . . . . . . . . . . . . . . . . . . . . . . . . . . 372Output Tray . . . . . . . . . . . . . . . . . . . . . . . . . . . . . . . . . . . . . . . . . . . . . . . . . . . . . 373PRINT W/O Key Count . . . . . . . . . . . . . . . . . . . . . . . . . . . . . . . . . . . . . . . . . . . . 374Moving to Power Save . . . . . . . . . . . . . . . . . . . . . . . . . . . . . . . . . . . . . . . . . . . . 375Job Offset Operation . . . . . . . . . . . . . . . . . . . . . . . . . . . . . . . . . . . . . . . . . . . . . . 376

Introduction
xi Introduction
V Network Print Settings. . . . . . . . . . . . . . . . . . . . . 377
Chapter 12 Summary of Network Functions . . . . . . . . . . . . . . . 378
12-1. Network Functions . . . . . . . . . . . . . . . . . . . . . . . . . . . . . . . . . . . . . . 379Features of Network Functions . . . . . . . . . . . . . . . . . . . . . . . . . . . . . . . . . . . . . . 379Use with Peer-to-Peer Connections (Windows 95/98/Me) . . . . . . . . . . . . . . . . . 379Use through LPD/LPR (Windows NT 4.0/2000/XP) . . . . . . . . . . . . . . . . . . . . . . 380Using with UNIX . . . . . . . . . . . . . . . . . . . . . . . . . . . . . . . . . . . . . . . . . . . . . . . . . 380Using with NetWare. . . . . . . . . . . . . . . . . . . . . . . . . . . . . . . . . . . . . . . . . . . . . . . 380Using with Macintosh (Only When PostScript Option Installed) . . . . . . . . . . . . . 380
Chapter 13 Printing with IP Peer-to-Peer
(Windows 95/98/Me only) . . . . . . . . . . . . . . . . . . . . . . . . . . . . . . . 381
13-1. IP Peer-to-Peer . . . . . . . . . . . . . . . . . . . . . . . . . . . . . . . . . . . . . . . . 382
Chapter 14 Settings for Printing with LPD/LPR
(Windows NT 4.0/2000/XP only). . . . . . . . . . . . . . . . . . . . . . . . . . 383
14-1. LPD/LPR . . . . . . . . . . . . . . . . . . . . . . . . . . . . . . . . . . . . . . . . . . . . . 38414-2. Preparations for Printing with LPD/LPR . . . . . . . . . . . . . . . . . . . . . . 38514-3. LPD/LPR Settings in Windows NT 4.0 . . . . . . . . . . . . . . . . . . . . . . . 386
Checking the Network Service . . . . . . . . . . . . . . . . . . . . . . . . . . . . . . . . . . . . . . 386Adding a LPD/LPR Printer Port and Installing a Printer Driver (PCL Driver). . . . 387
14-4. LPD/LPR Settings in Windows 2000 . . . . . . . . . . . . . . . . . . . . . . . . 391Checking the Unix Print Service . . . . . . . . . . . . . . . . . . . . . . . . . . . . . . . . . . . . . 391Adding a LPD/LPR Printer Port and Installing a Printer Driver (PCL Driver). . . . 392
14-5. LPD/LPR Settings in Windows XP . . . . . . . . . . . . . . . . . . . . . . . . . . 396Checking the Unix Print Service . . . . . . . . . . . . . . . . . . . . . . . . . . . . . . . . . . . . . 396Adding a LPD/LPR Printer Port and Installing a Printer Driver (PCL Driver). . . . 396
Chapter 15 Using with NetWare . . . . . . . . . . . . . . . . . . . . . . . . . 401
15-1. Print Controller NetWare Settings . . . . . . . . . . . . . . . . . . . . . . . . . . 40215-2. NetWare 3.x . . . . . . . . . . . . . . . . . . . . . . . . . . . . . . . . . . . . . . . . . . . 403
Before Setting NetWare . . . . . . . . . . . . . . . . . . . . . . . . . . . . . . . . . . . . . . . . . . . 403NetWare Settings . . . . . . . . . . . . . . . . . . . . . . . . . . . . . . . . . . . . . . . . . . . . . . . . 403
15-3. NetWare 4.x–6 . . . . . . . . . . . . . . . . . . . . . . . . . . . . . . . . . . . . . . . . . 404Features of NetWare 4.x–6 . . . . . . . . . . . . . . . . . . . . . . . . . . . . . . . . . . . . . . . . . 404NDS Settings. . . . . . . . . . . . . . . . . . . . . . . . . . . . . . . . . . . . . . . . . . . . . . . . . . . . 406Bindery Emulation Settings . . . . . . . . . . . . . . . . . . . . . . . . . . . . . . . . . . . . . . . . . 407
Chapter 16 Using via the Internet (Windows 2000/XP) . . . . . . . 408
16-1. Internet Printing . . . . . . . . . . . . . . . . . . . . . . . . . . . . . . . . . . . . . . . . 40916-2. Printer Settings. . . . . . . . . . . . . . . . . . . . . . . . . . . . . . . . . . . . . . . . . 410
Printing System TCP/IP Settings. . . . . . . . . . . . . . . . . . . . . . . . . . . . . . . . . . . . . 410IPP Attribute Settings . . . . . . . . . . . . . . . . . . . . . . . . . . . . . . . . . . . . . . . . . . . . . 410
16-3. Windows 2000 Settings . . . . . . . . . . . . . . . . . . . . . . . . . . . . . . . . . . 41116-4. Windows XP Settings . . . . . . . . . . . . . . . . . . . . . . . . . . . . . . . . . . . . 417
Chapter 17 UNIX Configuration . . . . . . . . . . . . . . . . . . . . . . . . . . 424
17-1. UNIX Printing through TCP/IP . . . . . . . . . . . . . . . . . . . . . . . . . . . . . 425

Introduction
xii Introduction
17-2. Printing Overview . . . . . . . . . . . . . . . . . . . . . . . . . . . . . . . . . . . . . . . 42617-3. lpd UNIX Printing . . . . . . . . . . . . . . . . . . . . . . . . . . . . . . . . . . . . . . . 427
Setting Up a BSD Remote Printer to Use lpd . . . . . . . . . . . . . . . . . . . . . . . . . . . 427Setting Up an AIX Version 2.5 Remote Printer to Use lpd . . . . . . . . . . . . . . . . . 428Setting Up an AIX 4.0 System. . . . . . . . . . . . . . . . . . . . . . . . . . . . . . . . . . . . . . . 429Setting Up an HP-UX Remote Printer to Use lpd . . . . . . . . . . . . . . . . . . . . . . . . 430Setting Up an AS/400 System to Use lpd . . . . . . . . . . . . . . . . . . . . . . . . . . . . . . 431Setting Up a DEC ULTRIX 4.3 RISC or OSF1 Remote Printer. . . . . . . . . . . . . . 432Setting Up a SCO UNIX Remote Printer to Use lpd . . . . . . . . . . . . . . . . . . . . . . 433Setting Up System V Release 4 and Solaris 2.X to Use lpd . . . . . . . . . . . . . . . . 434Printing on Linux . . . . . . . . . . . . . . . . . . . . . . . . . . . . . . . . . . . . . . . . . . . . . . . . . 435
Chapter 18 Use with AppleTalk . . . . . . . . . . . . . . . . . . . . . . . . . . 436
18-1. Preliminary Procedure for Using with AppleTalk . . . . . . . . . . . . . . . 43718-2. Network Controller AppleTalk Settings. . . . . . . . . . . . . . . . . . . . . . . 43818-3. Macintosh Settings . . . . . . . . . . . . . . . . . . . . . . . . . . . . . . . . . . . . . . 43918-4. Installing a Printer Driver . . . . . . . . . . . . . . . . . . . . . . . . . . . . . . . . . 440
Selecting the Printer . . . . . . . . . . . . . . . . . . . . . . . . . . . . . . . . . . . . . . . . . . . . . . 446
Chapter 19 When There Is Network Printing Trouble . . . . . . . . 451
19-1. Troubleshooting Network Hardware Connections . . . . . . . . . . . . . . 45219-2. NetWare Protocol Troubleshooting . . . . . . . . . . . . . . . . . . . . . . . . . 453
NetWare Check Items . . . . . . . . . . . . . . . . . . . . . . . . . . . . . . . . . . . . . . . . . . . . . 453File Server Check Items . . . . . . . . . . . . . . . . . . . . . . . . . . . . . . . . . . . . . . . . . . . 453Workstation Check Items . . . . . . . . . . . . . . . . . . . . . . . . . . . . . . . . . . . . . . . . . . 454Setting Check Items . . . . . . . . . . . . . . . . . . . . . . . . . . . . . . . . . . . . . . . . . . . . . . 454Print Server/File Server/Printer Check Items . . . . . . . . . . . . . . . . . . . . . . . . . . . 455Work Station and Network Controller Connection Check Items . . . . . . . . . . . . . 455When the Connection between the Network Controller and the Novell File Server Is Cut . . . . . . . . . . . . . . . . . . . . . . . . . . . . . . . . . . . . . . . . 455
VI Appendix . . . . . . . . . . . . . . . . . . . . . . . . . . . . . . . 456
Chapter 20 Troubleshooting . . . . . . . . . . . . . . . . . . . . . . . . . . . . 457
20-1. When Trouble Occurs in this Printing System . . . . . . . . . . . . . . . . . 458
Chapter 21 Appendix . . . . . . . . . . . . . . . . . . . . . . . . . . . . . . . . . . 460
21-1. IP-432 Product Specifications . . . . . . . . . . . . . . . . . . . . . . . . . . . . . 461Printer Function . . . . . . . . . . . . . . . . . . . . . . . . . . . . . . . . . . . . . . . . . . . . . . . . . . 461PC-FAX Function . . . . . . . . . . . . . . . . . . . . . . . . . . . . . . . . . . . . . . . . . . . . . . . . 462
21-2. IP-424 Product Specifications . . . . . . . . . . . . . . . . . . . . . . . . . . . . . 463Printer Function . . . . . . . . . . . . . . . . . . . . . . . . . . . . . . . . . . . . . . . . . . . . . . . . . . 463PC-FAX Function . . . . . . . . . . . . . . . . . . . . . . . . . . . . . . . . . . . . . . . . . . . . . . . . 464
21-3. PostScript PS-344 Option Product Specifications . . . . . . . . . . . . . . 46521-4. PostScript PS-346 Option Product Specifications . . . . . . . . . . . . . . 46521-5. Options . . . . . . . . . . . . . . . . . . . . . . . . . . . . . . . . . . . . . . . . . . . . . . . 466
Memory (IP-432 only) . . . . . . . . . . . . . . . . . . . . . . . . . . . . . . . . . . . . . . . . . . . . . 466Hard Disk (IP-432 only) . . . . . . . . . . . . . . . . . . . . . . . . . . . . . . . . . . . . . . . . . . . . 467CF-101 compact flash ROM (IP-424 only) . . . . . . . . . . . . . . . . . . . . . . . . . . . . . 467Problems with Optional Products . . . . . . . . . . . . . . . . . . . . . . . . . . . . . . . . . . . . 468

Introduction
xiii Introduction
21-6. Function List . . . . . . . . . . . . . . . . . . . . . . . . . . . . . . . . . . . . . . . . . . . 470PCL Function List . . . . . . . . . . . . . . . . . . . . . . . . . . . . . . . . . . . . . . . . . . . . . . . . 470Adobe PostScript Function List . . . . . . . . . . . . . . . . . . . . . . . . . . . . . . . . . . . . . . 478
21-7. Fonts . . . . . . . . . . . . . . . . . . . . . . . . . . . . . . . . . . . . . . . . . . . . . . . . 484Using the Accessory Screen Fonts . . . . . . . . . . . . . . . . . . . . . . . . . . . . . . . . . . . 484Installing Screen Fonts . . . . . . . . . . . . . . . . . . . . . . . . . . . . . . . . . . . . . . . . . . . . 485Installing Adobe Type Manager (ATM) . . . . . . . . . . . . . . . . . . . . . . . . . . . . . . . . 488Downloading Fonts . . . . . . . . . . . . . . . . . . . . . . . . . . . . . . . . . . . . . . . . . . . . . . . 490PCL Font List. . . . . . . . . . . . . . . . . . . . . . . . . . . . . . . . . . . . . . . . . . . . . . . . . . . . 491PostScript Font List . . . . . . . . . . . . . . . . . . . . . . . . . . . . . . . . . . . . . . . . . . . . . . . 496
21-8. Font Number List (Control Panel-PCL Setup) . . . . . . . . . . . . . . . . . 50021-9. Symbol Sets List (Control Panel-PCL Setup) . . . . . . . . . . . . . . . . . . 50321-10. PCL Macro and Font . . . . . . . . . . . . . . . . . . . . . . . . . . . . . . . . . . . . 505
PCL macro . . . . . . . . . . . . . . . . . . . . . . . . . . . . . . . . . . . . . . . . . . . . . . . . . . . . . 505
21-11. Index According to Item . . . . . . . . . . . . . . . . . . . . . . . . . . . . . . . . . . 50821-12. Purpose-Oriented Index . . . . . . . . . . . . . . . . . . . . . . . . . . . . . . . . . . 511
Introduction
xiv Introduction
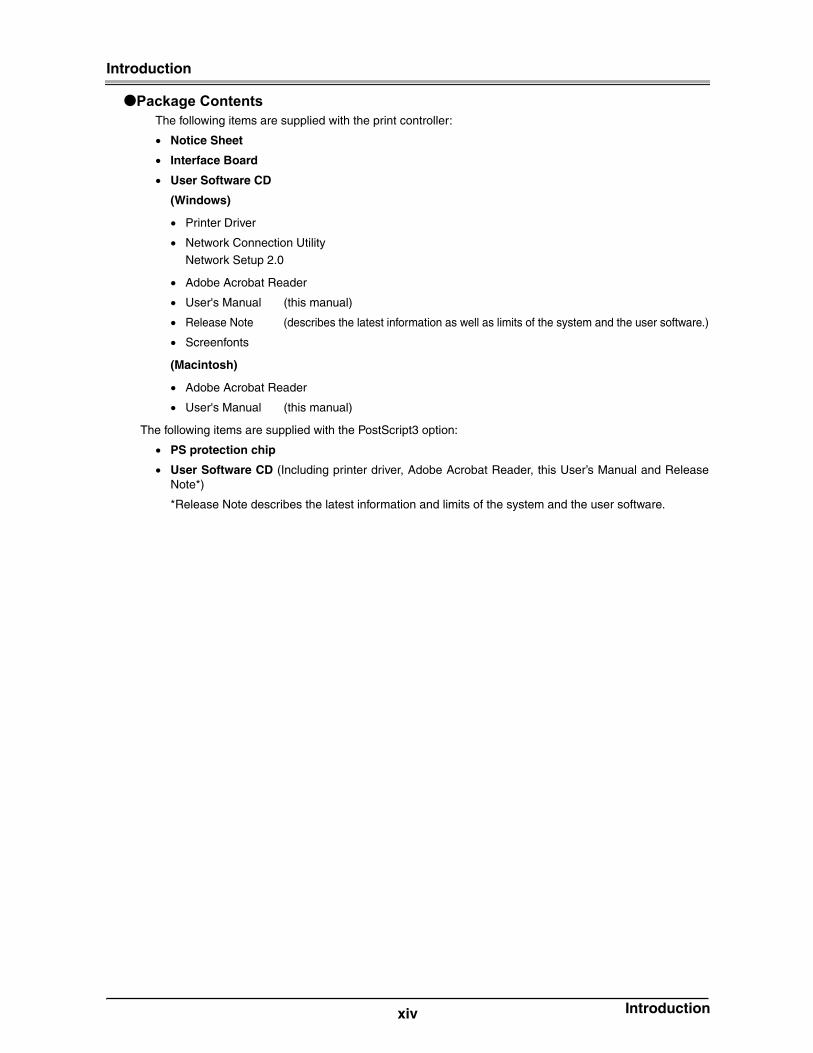
●Package Contents
The following items are supplied with the print controller:
Notice Sheet
Interface Board
User Software CD
(Windows)
Printer Driver
Network Connection Utility
Network Setup 2.0
Adobe Acrobat Reader
User's Manual (this manual)
Release Note (describes the latest information as well as limits of the system and the user software.)
Screenfonts
(Macintosh)
Adobe Acrobat Reader
User's Manual (this manual)
The following items are supplied with the PostScript3 option:
PS protection chip
User Software CD (Including printer driver, Adobe Acrobat Reader, this User’s Manual and ReleaseNote*)
*Release Note describes the latest information and limits of the system and the user software.

Introduction
xv Introduction
●System Requirements
WindowsThe following are required to print from Windows-compliant computers to the printing system:
Computers on which Windows 95/98/Me/NT 4.0/2000/XP can run
CD-ROM drive (necessary to install the printer driver or the scanner driver)
Using Windows 95/98/MeMicrosoft Windows 95/98/Me
32 MB RAM or more
Using Windows NT 4.0Microsoft Windows NT 4.0 and NT Service Pack 3 or later
32 MB RAM or more
Using Windows 2000/XPMicrosoft Windows 2000/XP
128 MB RAM or more
MacintoshThe following are required to print from the Macintosh to the Print Controller.
Computers on which Mac 8.x or higher can run.
CD-ROM drive (necessary to install the printer driver)
Network Interface (necessary to access printing system)
Parallel PortThe following are required to print to the print controller by way of the parallel port:
Windows-compliant computers
IEEE 1284 parallel cable
One end of the cable is required to have a DB 36 pin male connector (connected to the print controller).
Introduction
xvi Introduction
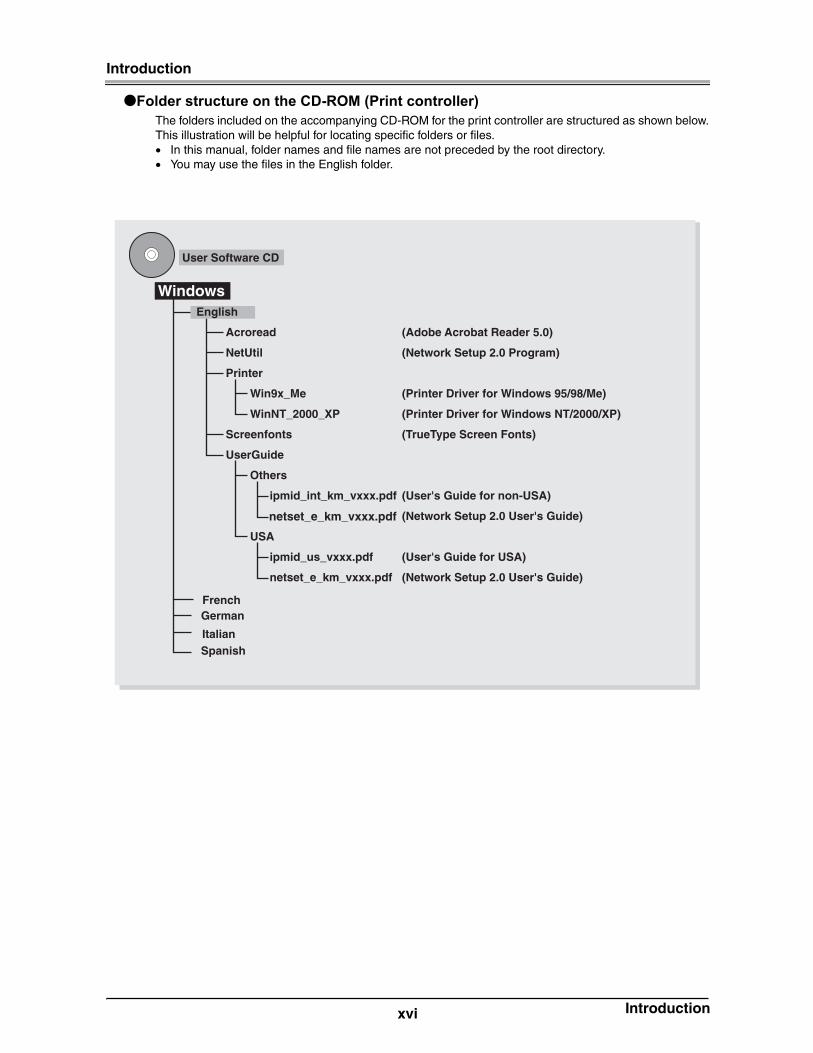
●Folder structure on the CD-ROM (Print controller)
The folders included on the accompanying CD-ROM for the print controller are structured as shown below.This illustration will be helpful for locating specific folders or files.
In this manual, folder names and file names are not preceded by the root directory.You may use the files in the English folder.
English
Acroread (Adobe Acrobat Reader 5.0)
NetUtil (Network Setup 2.0 Program)
Printer
Win9x_Me (Printer Driver for Windows 95/98/Me)
WinNT_2000_XP (Printer Driver for Windows NT/2000/XP)
Screenfonts (TrueType Screen Fonts)
UserGuide
Others
ipmid_int_km_vxxx.pdf (User's Guide for non-USA)
(Network Setup 2.0 User's Guide)
USA
ipmid_us_vxxx.pdf (User's Guide for USA)
netset_e_km_vxxx.pdf (Network Setup 2.0 User's Guide)
French
Italian
German
Spanish
User Software CD
Windows
netset_e_km_vxxx.pdf

Introduction
xvii Introduction
●Folder structure on the CD-ROM (PostScript3 option)
The folders included on the accompanying CD-ROM for PostScript3 option are structured as shown below.This illustration will be helpful for locating specific folders or files.
In this manual, folder names and file names are not preceded by the root directory.You may use the files in the English folder.
User Software CD
WindowsEnglish
Acroread (Adobe Acrobat Reader 5.0)Driver
AdobePSWin9x_Me (Printer Driver for Windows 95/98/Me)
(Printer Driver for Windows 95/98/Me)
WinNT (Printer Driver for Windows NT)Win2000_XP
Win9x_Me WinNT_2000_XP
(Printer Driver for Windows 2000/XP)
(Printer Driver for Windows NT/2000/XP)Screenfonts
ATM Light (Adobe Type Manager 4.1)PS Screen Fonts (PS3 TrueType/Type1 Screen Fonts)
UserGuide Others
ipmid_int_km_vxxx.pdf (User's Guide for non-USA) pssw2k_int_km_vxxx.pdf (KONICA MINOLTA PS Driver User's Guide for non-USA)
pssw2k_us_vxxx.pdf (KONICA MINOLTA PS Driver User's Guide for USA)
USAipmid_us_vxxx.pdf (User's Guide for USA)
French Italian German Spanish
EnglishAcroread (Adobe Acrobat Reader 4.0)Driver OS8_x to 9_x (Printer Driver/PPD file for Power Mac)
OS10.2x (Mac OS X Printer Driver)Screenfonts
ATM Light (Adobe Type Manager 4.1) PS3 TrueType (Screen Fonts for PS3 TrueType) PS3 Type1 (Screen Fonts for PS3 Type1)UserGuide
Others ipmid_int_km_vxxx.pdf (User's Guide for non-USA) USA
ipmid_us_vxxx.pdf (User's Guide for USA)
Macintosh
French Italian German Spanish
KONICA MINOLTA PS

Introduction
xviii Introduction
●About this Manual
This manual is used only for the Print Controller.
This manual describes how to operate the Print Controller when the KONICA MINOLTA Copier is con-nected to computers and used as a printer.
This manual assumes you are familiar with the basic operation of your Operating System and the Copier.
The copier is separately supplied with user’s manuals. Refer to these manuals as needed.
For detailed operations of Windows 95/98/Me and Windows NT 4.0/2000/XP, refer to the operating manu-als for each operating system. For application operations, refer to the operating manuals provided witheach application.
This manual is composed of the following five volumes and appendices.
I Set UpThis volume summarizes what you can do with the KONICA MINOLTA print controller and explains the
operation environment.
II PrinterThis volume explains what is necessary when using this printing system as a printer. It covers the
printer driver installation method, print settings method, print count management, and what to do in the
event of problems.
III FaxThis volume explains what is necessary when using this printing system as a facsimile machine. It cov-
ers fax functions in summary and settings methods, transmission methods, and fax number registra-
tion method.
IV Control PanelThis volume explains the settings that can be made by the printer administrator using the control panel.
V Network Print SettingsThis volume explains necessary settings to use this printing system as a network printer.
VI AppendixThe appendices explain how to handle problems and give the product specifications, a list of built-infonts, etc.

Introduction
xix Introduction
●Conventions Used in this Manual
Notation of each productThe following abbreviations are used in this manual:
(1) IP-432 Print Controller: Print controller
(2) IP-424 Print Controller: Print controller
(3) KONICA MINOLTA 7222/7223/
7228/7238/7145 Printer/Copier: Copier (or main body printer)(4) Internal Network Controller: network controller
(5) A combination of the above
(1),(2),(3) and (4) products: printing system(6) PS-344 PostScript option PostScript option
(7) PS-346 PostScript option: PostScript option
(8) Microsoft Windows 95: Windows 95Microsoft Windows 98: Windows 98
Microsoft Windows Me: Windows Me
Microsoft Windows NT 4.0: Windows NT 4.0Microsoft Windows 2000: Windows 2000
Microsoft Windows XP: Windows XP
Above Operating Systems: Windows 95/98/MeWindows NT 4.0/2000/XP
Windows 95/98/Me/NT 4.0/2000/XP
Notation of names shown on the screen are written within square brackets.(e.g., "click the [OK] button.")
Notation of foldersFolders are referred to in upper-to-lower sequence.
For example:Select the [Printer.inf] file in the "PCL\English\Win9X" folder of the User Software CD.
Notation of a reference to this manual is written within square marks.(e.g., [Chapter 1 Summary]).
The following indicates page reference for specific information contained in this manual.
(e.g., ( Page 1).When you click in the page number, you are linked to the reference page.
●Screens used with this Manual
The functional descriptions of the printer driver refer to the printer driver for the IP-432 (PS-344).

Introduction
xx Introduction
●Usage of this Manual
3-1. Setting Printer Functions
The printer functions are set by displaying the printer settings screen.
1 Press the (PRINTER) button on the control panel.
2 Touch the [Printer Set] key.
3 From the taskbar, select [Start]- [Settings] - [Printers].
4 For [Drives:], select the CD-ROM drive. For folder, double-click the
[\English\Printer\Win9x_Me] folder.
● When the Adobe PostScript driver is selected, the document size can-not be set.
● Sending to an FTP server [Sending to FTP server ] ( Page 325)
● Always set irregular size paper in the copier's bypass tray.
● If there are any files that cannot be deleted, logon again.
This is the item title.This illustrates that either [PCL] or [Adobe PS] can be used for the printer driver setting.
This displays but-tons on the control panel.
This covers restric-tions when func-tions are combined.
This is the contents of the screen dis-played when an op-eration is executed.
The names of win-dows, dialog boxes, and icons displayed on the computer screen are written in brackets [ ].
This covers impor-tant information.
This covers items requiring attention or which are pro-hibited during op-eration.
PCL Adobe PS
This displays the keys on the LCD screen.
The related items are explained on the following page.If you click the page number on the PDF, it moves to the ref-erenced page.
Folder structure is written in upper to lower sequence.
1
This volume summarizes what you can dowith the KONICA MINOLTA print controllerand explains the operating environment.
Chapter 1 Summary............................... 2
I Set Up

I Set Up
2
Chapter 1 Summary
This chapter explains what you need to know about the print controller, before you begininstallation and printing.
1-1. What is the Print Controller? ...............................................................3
1-2. Flow of Processing ...............................................................................8
1-3. Operation Environment ......................................................................10

3 I Set Up Chapter 1 Summary
1-1. What is the Print Controller?
Role of the Print Controller
The printer controller is embedded into the KONICA MINOLTA copier, turning it into a network-capable print-ing system.You can print and send faxes from applications on the PC connected to the printing system. When using thecopier as a network printer, the print controller is used and you can print and send faxes from applications onthe PC.
Flow for printing (Using as local printer)
Flow for printing (Using as USB printer)
ComputerCopier
PrintController
Printing system
Parallelinterface
Copier
PrintController
Printing system
USB
E-RDH memory
Network

1-1. What is the Print Controller?
4 I Set Up Chapter 1 Summary
Flow for printing (Using as network printer)
Flow for PC-Fax transmission (Using as local printer)
Flow for PC-Fax transmission (Using as USB printer)
Copier
PrintController
Printing system
Network
HUB
Ethernet
Computer
Copier
PrintController
Printing system
Parallelinterface
Printing with the Copier
Faxtransmission
E-RDH memory
Copier
PrintController
Printing systemNetwork
HUBUSB

1-1. What is the Print Controller?
5 I Set Up Chapter 1 Summary
Flow for PC-Fax transmission (Using as network printer)
To use the PC-FAX feature of the IP-432, you must install an optional fax kit.
Copier
PrintController
Printing systemNetwork
HUB
Ethernet
Printing with the Copier
Fax transmission
E-RDH memory
1-1. What is the Print Controller?
6 I Set Up Chapter 1 Summary
What You Can Do with the Print Controller
The print controller has the following functions.
It can receive print commands during printing.
Even while the print controller is printing or receiving data from one PC, it can receive print commandsfrom another.
This printing system stores data temporarily in the copier's memory and uses the Electronic Recirculat-ing Document Handler (E-RDH) to handle the printing.
The standard E-RDH memory is 64 MB, which can hold about 360 pages of A4-size documents. Thememory can be expanded to up to 320 MB.
For details on memory, refer to [21-5. Options] ( Page 466)
Functions used with the copier can also be utilized from the PC.
Even when using the copier as a printer, duplex printing and paper tray selection can be executed thesame as when the unit is used as a copier. Also, stapling and other such functions can be selected ifthe optional finisher is installed.
Managing the number of sheets printed (Printer EKC/ECM)
If the [Printer EKC/ECM] function is set, the number of sheets printed for each user can be managed bypassword. It is possible to reject users without passwords and users who have reached a preset copyor print limit.
For details, refer to [ Chapter 5 Print Count Management (Printer EKC/ECM)].
( Page 295)
The print controller can be used as a fax and printer.
The print controller can be used to send faxes directly from the PC.
For details on the fax functions, refer to [ Chapter 7 Fax Functions (PC-Fax)].
( Page 308)

1-1. What is the Print Controller?
7 I Set Up Chapter 1 Summary
Four Modes
The printer driver settings are primarily made from the PC, but the font list printing, controller settings, anddefault settings for printing can be set with the copier control panel. Also, with the print controller, the copiercan be used as a copier or scanner by changing the mode.The mode is switched with the [Mode switch] button on the copier control panel.
Copy mode
This uses the printer main unit as a copier.
Fax mode
This uses the printer main unit as a fax machine.
Scanner mode
This uses the copier as a scanner.
For details on the scanner, refer to the copier user’s manual [Network Setup and Scanner Operations].
Printer mode
This mode is used for setting the printing system and for outputting lists, confidential documents, etc.
[Mode switch] button
8 I Set Up Chapter 1 Summary
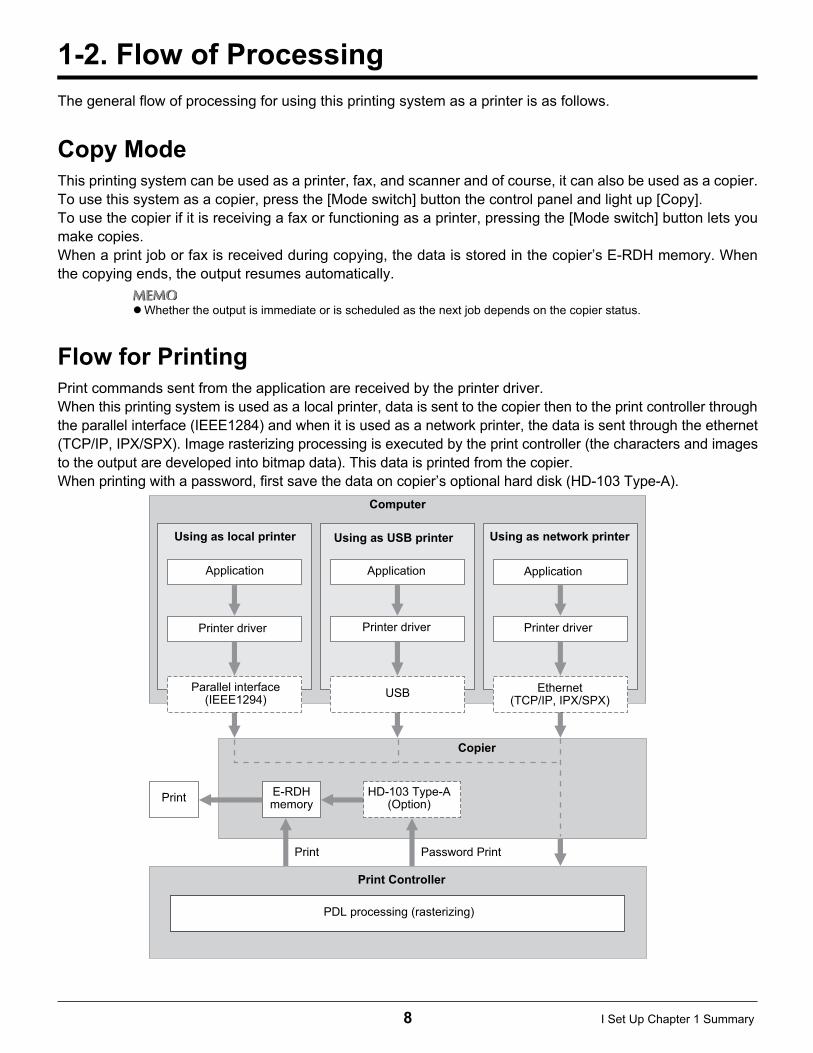
1-2. Flow of Processing
The general flow of processing for using this printing system as a printer is as follows.
Copy Mode
This printing system can be used as a printer, fax, and scanner and of course, it can also be used as a copier.To use this system as a copier, press the [Mode switch] button the control panel and light up [Copy].To use the copier if it is receiving a fax or functioning as a printer, pressing the [Mode switch] button lets youmake copies.When a print job or fax is received during copying, the data is stored in the copier’s E-RDH memory. Whenthe copying ends, the output resumes automatically.
Whether the output is immediate or is scheduled as the next job depends on the copier status.
Flow for Printing
Print commands sent from the application are received by the printer driver.When this printing system is used as a local printer, data is sent to the copier then to the print controller throughthe parallel interface (IEEE1284) and when it is used as a network printer, the data is sent through the ethernet(TCP/IP, IPX/SPX). Image rasterizing processing is executed by the print controller (the characters and imagesto the output are developed into bitmap data). This data is printed from the copier.When printing with a password, first save the data on copier’s optional hard disk (HD-103 Type-A).
Computer
Using as network printerUsing as local printer
Application
Printer driver
Parallel interface(IEEE1294)
Application
Printer driver
Ethernet(TCP/IP, IPX/SPX)
Print Controller
PDL processing (rasterizing)
E-RDHmemory
HD-103 Type-A(Option)
Print Password Print
Copier
Using as USB printer
Application
Printer driver
USB

1-2. Flow of Processing
9 I Set Up Chapter 1 Summary
PC-Fax Transmission Flow
The transmission command sent from the application is received by the printer driver.When this printing system is used as a local printer, data is sent to the copier then to the print controller throughthe parallel interface (IEEE1284) and when it is used as a network printer, the data is sent through the ethernet(TCP/IP, IPX/SPX). Image rasterizing processing is executed by the print controller (the characters and images tothe output are developed into bitmap data). This data is stored in the copier’s E-RDH memory is transmitted by faxas a normal fax job.
PDL processing (rasterizing)
Computer
Application
Printer driver
Parallel interface(IEEE1294)
Application
Printer driver
Ethernet(TCP/IP, IPX/SPX)
Print Controller
Faxtransmission
Using as network printerUsing as local printer
E-RDH memory
Copier
Using as USB printer
Application
Printer driver
USB
10 I Set Up Chapter 1 Summary
1-3. Operation Environment
This section explains the system requirements to use this printing system and the interfaces that can be usedfor connection.
Operating Systems and Requirements
Windows
Operating system: Windows 95/98/Me/NT 4.0/2000/XP
Memory: 32 MB min.
CD-ROM drive
MacintoshCan only be used if the PostScript option is installed.
Operating system: Mac OS 8.x - 9.x/Mac OS X v10.2x
CD-ROM drive
Network controller
Interfaces Used for Connection
The following two types of interfaces can be used to connect this printing system and the PC.
Parallel interface (included with the copier)This interface is used when using this printing system as a local printer.Only Windows PCs can be connected through this interface and an IEEE1284 parallel cable isrequired. Use a parallel cable that has an Amphenol 36-pin male connector at one end.Parallel interface can be used in compatible, nibble, and ECP mode.
USB interface (included with the copier)This interface is connected when using this printing system as a USB printer.A USB cable is required for connection and only Windows 2000/XP PCs can be connected through thisinterface.Use A type (4-pin male) and B-type (4-pin male) USB cables. This interface is in compliance withUSB1.1.Use of a USB cable which is 3m in length or less is recommended.
Ethernet (included with the copier)This interface is used when using this printing system as a network printer.This interface supports the 100Base-TX and 10Base-T standards. The protocols supported are TCP/IP(LPD/LPR, Peer-to-Peer), IPX/SPX (NetWare), and AppleTalk (EtherTalk), etc..
1-3. Operation Environment
11 I Set Up Chapter 1 Summary
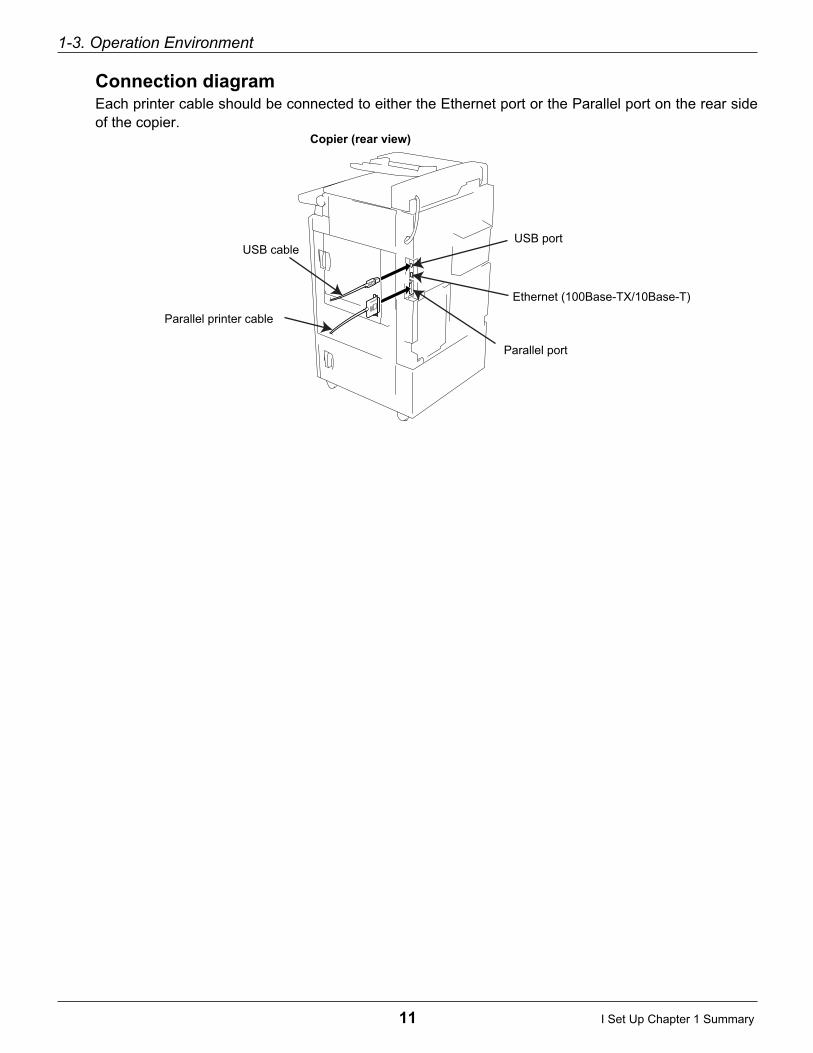
Connection diagramEach printer cable should be connected to either the Ethernet port or the Parallel port on the rear sideof the copier.
Ethernet (100Base-TX/10Base-T)
Parallel port
USB cable
Copier (rear view)
Parallel printer cable
USB port

12
This volume explains printer usage.
The Flow for Setup ........................................13
Chapter 2 Preparing the Printer for Use......14
Chapter 3 Printing from Windows..............112
Chapter 4 Printing from a Macintosh.........232
Chapter 5 Print Count Management (Printer
EKC/ECM) ..................................295
Chapter 6 Printing Problems......................301
II Printer

13 II Printer
The Flow for Setup
This printing system must be set up before it is used.The setup procedures connect the copier to the computer and install the printer driver in the computer.When using this printing system with your computer for the first time, set up as shown in [New Setup].To install a new printer driver in a printing system already in use, set up as shown in [Updating a PrinterDriver].
New Setup
To set up the first time:
1 Connect the copier to the computer.
When connecting the copier to the computer, refer to [1-3.Operation Environment] ( page 10).
2 Install the printer driver.
When installing the print driver, refer to [2-2.Using the Print Controller] ( page 16).
3 Execute a test print.
Updating a Printer Driver
To update the current printer driver:
1 Delete the current printer driver.
When deleting the current printer driver, refer to [2-9.Updating the Printer Driver] ( page 100).
2 Restart the computer.
3 Install the new printer driver.
4 Execute test print.
For some printer drivers and Operating Systems, the installation procedure for the printer driver may be different.The procedure for deleting the old printer driver may be different on some Operating Systems.

II Printer
14
Chapter 2 Preparing the Printer for Use
To use the print controller, first it is necessary to install the printer driver on the PC.This chapter explains the printer driver installation method for each operating system sup-ported.It also explains how to update printer drivers and how to handle problems that might arise dur-ing installation.
2-1. Checking the PC..................................................................................15
2-2. Using the Print Controller ..................................................................16
2-3. Using this Printing System with Windows 95/98/Me........................18
2-4. Using this Printing System with Windows NT 4.0............................34
2-5. Using this Printing System with Windows 2000 ..............................48
2-6. Using this Printing System with Windows XP..................................65
2-8. Using this Printing System with a Macintosh ..................................88
2-9. Updating the Printer Driver ..............................................................100
2-10. Installation Problems......................................................................111
15 II Printer Chapter 2 Preparing the Printer for Use
2-1. Checking the PC
To use this printing system, it is necessary to install the printer driver. A printer driver is a program that controlsprocessing at data output and is installed on the PC from the [User software CD] before use.The Operating Systems on which this printer driver can be installed are as follows.
Windows 95
Windows 98
Windows Me
Windows NT 4.0 (Service Pack 3 or later)
Windows 2000
Windows XP
Mac OS 8.x - 9.x (When PostScript Option installed.)
Mac OS x v10.2x (When PostScript Option installed.)
16 II Printer Chapter 2 Preparing the Printer for Use
2-2. Using the Print Controller
This section explains the printer driver installed to use the print controller and the page notation language types.
Printer Driver Types and Supported Operating Systems
The [User software CD] that comes with this printing system contains printer drivers. Install the requiredprinter driver.
PCL DriverThis driver is installed on PCs running Microsoft Windows. The Operating Systems on which this printerdriver can be installed are as follows.
Windows 95
Windows 98
Windows Me
Windows NT 4.0 (Service Pack 3 or later)
Windows 2000
Windows XP
Adobe PostScript DriverThis driver is installed when the PostScript option is installed. The Operating Systems on which thisprinter driver can be installed are as follows.
Windows 95
Windows 98
Windows Me
Windows NT 4.0 (Service Pack 3 or later)
Windows 2000
Windows XP
Mac OS 8.x - 9.x
Mac OS X v10.2x
The printer driver is not installable on Mac OS v10.0 or v10.1.
The Adobe PostScript Driver is on the [User software CD] that comes with the PostScript option.
2-2. Using the Print Controller
17 II Printer Chapter 2 Preparing the Printer for Use
Page Notation Language
Page notation language is a language that describes the characters, pictures, and other print images to theprinter when printing data is prepared on a PC. The page notation language used in this printing system areas follows.
When used only with the print controllerPCL is used.
When the PostScript option installedWhen the PostScript option is installed, either PCL or AdobePS is used.
The printer driver installation methods are explained on the following pages.
Using this printing system with Windows 95/98/Me Page 18
Using this printing system with Windows NT 4.0 Page 34
Using this printing system with Windows 2000 Page 48
Using this printing system with Windows XP Page 65
Using this printing system with Macintosh Page 88

18 II Printer Chapter 2 Preparing the Printer for Use
2-3. Using this Printing System with Windows 95/98/Me
Install the printer driver on the PC running either Windows 95, 98, or Me. Have the [User software CD] CD-ROMon hand.
PCL Driver Installation
This section explains the procedure with the screens of Windows 98.
1 Switch on the power for the computer and start Windows.
Close down any applications that are running.When installing the Adobe PostScript Driver, refer to [Adobe PostScript Driver Installation].( Page 25)
2 Put the [User software CD] in the computer's CD-ROM drive.
3 From the taskbar, select [Start] - [Settings] - [Printers].
The [Printers] screen is displayed.
4 Double click the [Add Printer] icon.
The [Add Printer Wizard] screen is displayed.

2-3. Using this Printing System with Windows 95/98/Me
19 II Printer Chapter 2 Preparing the Printer for Use
5 Click the [Next ›] button.
The screen for selecting the connection method is displayed.
6 When the printer and the computer are directly connected, select [Local printer]. Whenprinting with the printing system connected to another computer via the network,select [Network printer].
7 Click the [Next ›] button.If you selected [Local printer], proceed to Step 8.If you selected [Network printer], input the [Network path or queue name:], or click the [Browse…] but-ton to select it, then click the [Next ›] button.
For information about network settings, consult your network administrator.
2-3. Using this Printing System with Windows 95/98/Me
20 II Printer Chapter 2 Preparing the Printer for Use
8 Click the [Have Disk…] button.
The [Install From Disk] screen is displayed.
9 Click the [Browse…] button.
The [Open] screen is displayed.
10 For [Drives:], select the CD-ROM drive. For folder, double-click the [\English
\Printer\Win9x_Me] folder.
[Setup.inf] is displayed as the [File name:].
11 Click the [OK] button.
The [Install From Disk] screen is displayed.
12 Click the [OK] button.
The display returns to the [Add Printer Wizard] screen.

2-3. Using this Printing System with Windows 95/98/Me
21 II Printer Chapter 2 Preparing the Printer for Use
13 Ensure that [KONICA MINOLTA xxxx/IP-xxx PCL] is displayed in [Printers], then click the
[Next ›] button.
The screen for selecting the port to be used with the printer is displayed.
14 From the [Available ports:] list, select the port to which this printing system is con-
nected.
For a local printer, select [LPT1].
15 Click the [Next ›] button.
A screen to confirm the printer name is displayed.
16 Check the printer name.
To change it, input a new printer name.

2-3. Using this Printing System with Windows 95/98/Me
22 II Printer Chapter 2 Preparing the Printer for Use
17 If you want to use this printing system as your default printer, select [Yes]; if you do
not want to use this printing system as your default printer, select [No].
18 Click the [Next ›] button.
A screen is displayed asking whether or not you want to print a test print.
19 To print a test print, select [Yes]; to not print a test print, select [No].
A test print means printing a standard Windows test page. Test prints can also be executed in [Properties].( Page 32)
20 Click the [Finish] button.
Install the printer driver from the user software CD to the PC and printing of the test page starts.
21 If the test page is printed correctly, click the [Yes] button.
The icon for the installed printer driver is displayed in the [Printers] screen.This completes printer driver installation.
If the test page is not printed correctly, refer to [Test Page Cannot Be Printed.]( Page 111)

2-3. Using this Printing System with Windows 95/98/Me
23 II Printer Chapter 2 Preparing the Printer for Use
Setting optionsOptions installed on the copier are set so that they can be used with the printer driver.
1 From the taskbar, select [Start] - [Settings] - [Printers].
The [Printers] screen is displayed.
2 Right click the [KONICA MINOLTA xxxx/IP-xxx] icon, then select [Properties].
The [KONICA MINOLTA xxxx/IP-xxx Properties] screen is displayed.
3 Click the [Setup] tab.

2-3. Using this Printing System with Windows 95/98/Me
24 II Printer Chapter 2 Preparing the Printer for Use
4 In [Available options:], select the options that are installed on the copier.
For details on options installed on the copier, consult the system administrator.
5 Click the [Add] button.
The selected options are included in [Installed options] and can be used with the printer driver.

2-3. Using this Printing System with Windows 95/98/Me
25 II Printer Chapter 2 Preparing the Printer for Use
Adobe PostScript Driver Installation
1 Switch on the power for the computer and start Windows.
Close down any applications that are running.
2 Put the PostScript option [User software CD] in the computer's CD-ROM drive.
3 From the taskbar, select [Start] - [Settings] - [Printers].
The [Printers] screen is displayed.
4 Double click the [Add Printer] icon.
The [Add Printer Wizard] screen is displayed.

2-3. Using this Printing System with Windows 95/98/Me
26 II Printer Chapter 2 Preparing the Printer for Use
5 Click the [Next ›] button.
The screen for selecting the connection method is displayed.
6 When the printer and the computer are directly connected, select [Local printer]. Whenprinting with the printing system connected to another computer via the network,select [Network printer].
7 Click the [Next ›] button.If you selected [Local printer], proceed to Step 8.If you selected [Network printer], input the [Network path or queue name], or click the [Browse…] but-ton to select it, then click the [Next ›] button.
For information about network settings, consult your network administrator.

2-3. Using this Printing System with Windows 95/98/Me
27 II Printer Chapter 2 Preparing the Printer for Use
8 Click the [Have Disk…] button.
The [Install From Disk] screen is displayed.
9 Click the [Browse…] button.
The [Open] screen is displayed.
10 For [Drives], select the CD-ROM drive. For [Folders], double-click the [\English
\Driver\AdobePS\Win9x_Me] folder.
[oemsetup.inf] is displayed as the [File name:].
11 Click the [OK] button.
The [Install From Disk] screen is displayed.
12 Click the [OK] button.
The display returns to the [Add Printer Wizard] screen.

2-3. Using this Printing System with Windows 95/98/Me
28 II Printer Chapter 2 Preparing the Printer for Use
13 Ensure that [KONICA MINOLTA IP-xxx PS] is displayed in [Printers], then click the
[Next ›] button.
The screen for selecting the port to be used with the printer is displayed.
14 From the [Available ports:] list, select the port to which this printing system is con-
nected.
For a local printer, select [LPT1].
15 Click the [Next ›] button.
A screen to confirm the printer name is displayed.
16 Check the printer name.
To change it, input a new printer name.
2-3. Using this Printing System with Windows 95/98/Me
29 II Printer Chapter 2 Preparing the Printer for Use
17 If you want to use this printing system as your default printer, select [Yes]; if you do
not want to use this printing system as your default printer, select [No].
18 Click the [Next ›] button.
A screen is displayed asking whether or not you want to print a test print.
19 To print a test print, select [Yes]; to not print a test print, select [No].
A test print means printing a standard Windows test page. Test prints can also be executed in [Properties].( Page 32)
20 Click the [Finish] button.
Install the printer driver from the user software CD to the PC and printing of the test page starts.
21 If the test page is printed correctly, click the [Yes] button.
The icon for the installed printer driver is displayed in the [Printers] screen.This completes printer driver installation.
If the test page is not printed correctly, refer to [Test Page Cannot Be Printed.]( Page 111)
2-3. Using this Printing System with Windows 95/98/Me
30 II Printer Chapter 2 Preparing the Printer for Use
Setting optionsOptions installed on the copier are set so that they can be used with the printer driver.
1 From the taskbar, select [Start] - [Settings] - [Printers].
The [Printers] screen is displayed.
2 Right click the [KONICA MINOLTA IP-xxx PS] icon, then select [Properties].
The [KONICA MINOLTA IP-xxx PS Properties] screen is displayed.
3 Click the [Device Options] tab.

2-3. Using this Printing System with Windows 95/98/Me
31 II Printer Chapter 2 Preparing the Printer for Use
4 From among the [Installable options] [Finisher], [Drawer Base], [Large Capacity Tray], and
[Memory Configuration], select those options that are installed on the copier, then change
the contents.
For details on options installed on the copier, consult the system administrator.
5 Click the [OK] button.
When the option settings are complete, the options can be used with the printer driver.

2-3. Using this Printing System with Windows 95/98/Me
32 II Printer Chapter 2 Preparing the Printer for Use
Checking Printing
Once the printing system and the computer have been connected and the printer driver installed, printing ispossible. Try printing an actual document.You can check printing by executing the test print from the printer driver properties screen or by printing from anapplication.
Print settingsThe basic print settings are made from the printer driver [Properties] or the application’s [Print] screen.When making the print settings from the application’s [Print] screen, the settings you make are notsaved after that application ends. For details on making the print settings from the printer driver [Prop-erties] screen, refer to [3-1.Setting Printer Functions] ( Page 114).
Executing a test printThe test print prints the standard Windows test page.
1 From the taskbar, select [Start] - [Settings] - [Printers].
The [Printers] screen is displayed.
2 Right click the printer icon, then select [Properties].
The printer driver [Properties] screen is displayed.
3 Select the [General] tab, then click the [Print Test Page] button.
The test page is printed and the check screen is displayed.

2-3. Using this Printing System with Windows 95/98/Me
33 II Printer Chapter 2 Preparing the Printer for Use
4 After checking the printing, click the [Yes] button.
If the test page is not printed correctly, refer to [Test Page Cannot Be Printed.]( Page 111)
Printing from an applicationThis method prints data with a [Print] command from an application in use.
1 Open data with the application, then execute [Print].
The [Print] screen is displayed.
2 Ensure that the name of this printing system is displayed as the [Name:].
If this printer is not selected, click the [▼] button to select it.
The [Print] screen varies according to the application.
3 Set the print range and the number of copies, then click the [OK] button.
Check that the specified pages are printed.

34 II Printer Chapter 2 Preparing the Printer for Use
2-4. Using this Printing System with Windows NT 4.0
Install the printer driver on the PC running Windows NT 4.0. Have the [User software CD] CD-ROM on hand.
Access Rights and Range of Operation
Since Windows NT 4.0 is an operating system designed for network management, security functions arestronger than for Windows 95, 98, or Me.When a new printer is added, the range of allowable operations can be specified according to the securitylevel (access rights) of the user.
The Windows NT 4.0 printer access rights and range of global operations are as follows. After installing theprinter driver, set the access rights for users.
For details on setting printer access rights, refer to the Windows NT 4.0 System Guide.
Refer to the page below for the driver installed.
PCL Driver installation page 35
Adobe PostScript Driver installation page 39
Access rights Range of allowable operations
Off Printer operations disabled
Printing
Document printingPrint parameter setting
Print related (paper size, input tray, and other selections)
Graphic related (resolution, half tone, and other settings)
Printer functions (selection of functions unique to a copier)
Document manage-ment
Document setting controlPrint pause, restart, reprint, cancel
Full control
All [print] and [document management] itemsPrinter pause, restart, all document cancelPrinter cancelPrinter access rights setting and change

2-4. Using this Printing System with Windows NT 4.0
35 II Printer Chapter 2 Preparing the Printer for Use
PCL Driver Installation
1 Switch on the power for the computer and start Windows.
Close down any applications that are running.
2 Log on with a user name that has administrator rights.
If you cannot log on with a user name that has administrator rights, log on with a user name that has incorporatingthose of a Power User.
3 Put the [User software CD] in the computer's CD-ROM drive.
4 From [My Computer], select the [CD-ROM] and then double-click [Setup.exe] in[English] - [Printer] - [WinNT_2000_XP] folder.
5 Click the [OK] button.
The [Printer Driver Installer] screen is displayed.
6 Set up the following items.

2-4. Using this Printing System with Windows NT 4.0
36 II Printer Chapter 2 Preparing the Printer for Use
[Printer Name]
1 Check the printer name. To change it, input a new printer name.
[Selecting the Printer Port]
1 Select the port to which the printer is connected.
[Install as the Default Printer]
1 If you want to use this printing system as your default printer, check the [Install as the
Default Printer] checkbox.

2-4. Using this Printing System with Windows NT 4.0
37 II Printer Chapter 2 Preparing the Printer for Use
7 When all the settings are complete, click the [Install] button.
8 Click the [Finished] button.
This completes printer driver installation.
2-4. Using this Printing System with Windows NT 4.0
38 II Printer Chapter 2 Preparing the Printer for Use
Setting optionsOptions installed on the copier are set so that they can be used with the printer driver.
1 From the taskbar, select [Start] - [Settings] - [Printers].
The [Printers] screen is displayed.
2 Right click the [KONICA MINOLTA xxxx/IP-xxx] icon, then select [Properties].
The [KONICA MINOLTA xxxx/IP-xxx] screen is displayed.
3 Click the [Options] tab.
4 In [Available options:], select the options that are installed on the copier.
For details on options installed on the copier, consult the system administrator.
5 Click the [Add] button.
The selected options are included in [Installed options] and can be used with the printer driver.

2-4. Using this Printing System with Windows NT 4.0
39 II Printer Chapter 2 Preparing the Printer for Use
Adobe PostScript Driver Installation
1 Switch on the power for the computer and start Windows.
Close down any applications that are running.
2 Log on with a user name that has administrator rights.
If you cannot log on with a user name that has administrator rights, log on with a user name that has rightsincorporating those of a Power User.
3 Put the PostScript option [User software CD] in the computer's CD-ROM drive.
4 From the taskbar, select [Start] - [Settings] - [Printers].
The [Printers] screen is displayed.
5 Double click the [Add Printer] icon.
The [Add Printer Wizard] screen is displayed.
2-4. Using this Printing System with Windows NT 4.0
40 II Printer Chapter 2 Preparing the Printer for Use
6 When connecting the printer directly to the PC or when installing the printer driver onthe PC that manages the printer, select [My Computer]. When printing via the networkwith the printing system connected to another PC, select [Network printer server].( Page 41)
Before you can select [Network printer server], the network controller and PC network settings must be complete. Fordetails, consult your network administrator.
When [My Computer] is selected
1 Click the [Next ›] button.
The printer port select screen is displayed.
2 Click on the checkbox for the port to which the printer is connected.
When the printer and the PC are directly connected, select the [LPT port].When printing directly with the printing system via the network, select the [LPR port].( Page 387)
3 Click the [Next ›] button.
A screen to confirm the printer manufacturer and name is displayed.Proceed to Step 7.
2-4. Using this Printing System with Windows NT 4.0
41 II Printer Chapter 2 Preparing the Printer for Use
When [Network printer server] is selected
1 Click the [Next ›] button.
The [Printer connection] screen is displayed.
2 Either input the printer path at [Printer] or select [Shared Printers:], then click the [OK] but-
ton.
A screen to confirm the printer manufacturer and name is displayed.Proceed to Step 7
For information about network settings, consult your network administrator.
7 Click the [Have Disk…] button.
The [Install From Disk] screen is displayed.
2-4. Using this Printing System with Windows NT 4.0
42 II Printer Chapter 2 Preparing the Printer for Use
8 Click the [Browse…] button.
The [Locate File] screen is displayed.
9 From [Look in:], select the CD-ROM drive, then double-click the [\English\Driver\AdobePS\WinNT] folder.
[Oemsetup] is displayed as the [File name:].
10 Click the [Open] button.
The display returns to the [Install From Disk] screen.
11 Click the [OK] button.
The display returns to the [Add Printer Wizard] screen.

2-4. Using this Printing System with Windows NT 4.0
43 II Printer Chapter 2 Preparing the Printer for Use
12 Ensure that [KONICA MINOLTA IP-xxx PS] is selected in [Printers], then click the
[Next ›] button.
A screen to confirm the printer name is displayed.
13 Check the printer name.
To change it, input a new printer name.
14 Click the [Next ›] button.
The screen to comfirm whether or not the printer is shared is displayed.
15 To share the printer, select [Shared]; to not share it, select [Not shared].
To assign a share name to the printer, input the share name.

2-4. Using this Printing System with Windows NT 4.0
44 II Printer Chapter 2 Preparing the Printer for Use
16 If necessary, select the substitute driver for the network client.
17 Click the [Next ›] button.
A screen is displayed asking whether or not you want to print a test print.
18 To print a test print, select [Yes]; to not print a test print, select [No].
A test print means printing a standard Windows test page. Test prints can also be executed in [Properties].( Page 46)
19 Click the [Finish] button.
Install the printer driver on the PC and printing of the test page starts.
20 If the test page is printed correctly, click the [Yes] button.
The icon for the installed printer driver is displayed in the [Printers] screen.This completes printer driver installation.
If the test page is not printed correctly, refer to [Test Page Cannot Be Printed.]( Page 111)

2-4. Using this Printing System with Windows NT 4.0
45 II Printer Chapter 2 Preparing the Printer for Use
Setting optionsOptions installed on the copier are set so that they can be used with the printer driver.
1 From the taskbar, select [Start] - [Settings] - [Printers].
The [Printers] screen is displayed.
2 Right click the [KONICA MINOLTA IP-xxx PS] icon, then select [Properties].
The [KONICA MINOLTA IP-xxx PS Properties] screen is displayed.
3 Click the [Device Settings] tab.
4 In [Installable Options], select the options installed on the copier, then change the contents.
For details on options installed on the copier, consult the system administrator.
5 Click the [OK] button.
When the option settings are complete, the options can be used with the printer driver.
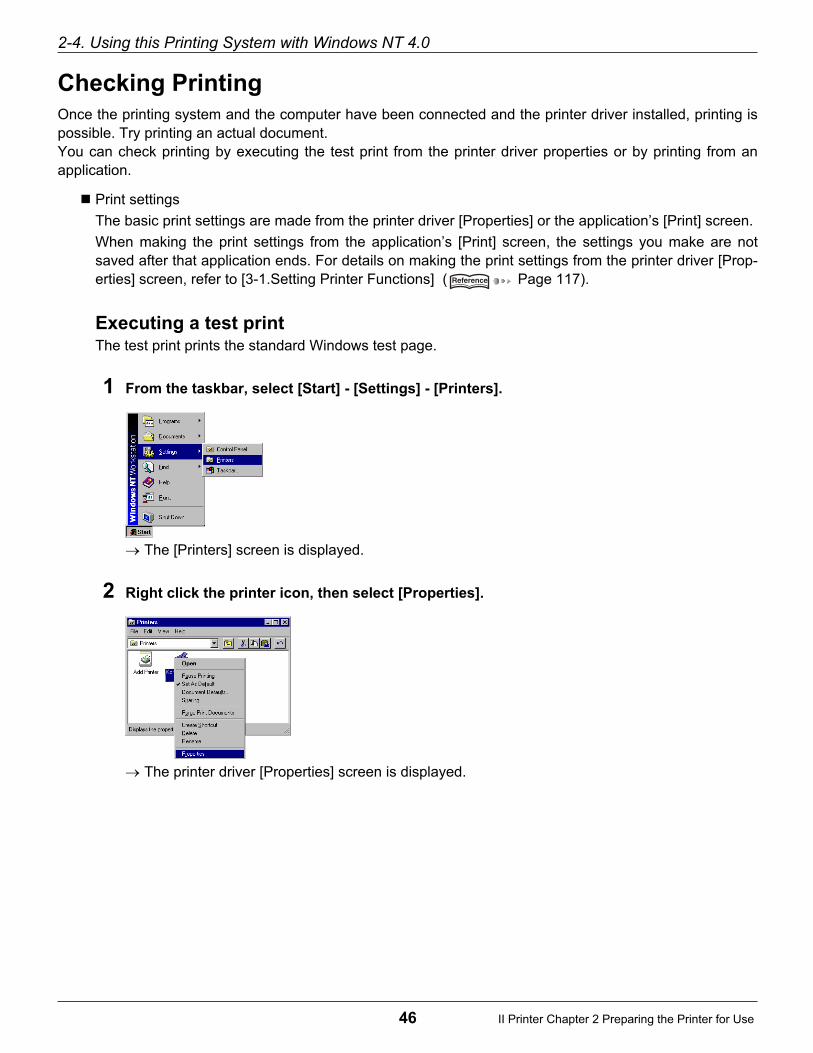
2-4. Using this Printing System with Windows NT 4.0
46 II Printer Chapter 2 Preparing the Printer for Use
Checking Printing
Once the printing system and the computer have been connected and the printer driver installed, printing ispossible. Try printing an actual document.You can check printing by executing the test print from the printer driver properties or by printing from anapplication.
Print settings
The basic print settings are made from the printer driver [Properties] or the application’s [Print] screen.
When making the print settings from the application’s [Print] screen, the settings you make are notsaved after that application ends. For details on making the print settings from the printer driver [Prop-erties] screen, refer to [3-1.Setting Printer Functions] ( Page 117).
Executing a test printThe test print prints the standard Windows test page.
1 From the taskbar, select [Start] - [Settings] - [Printers].
The [Printers] screen is displayed.
2 Right click the printer icon, then select [Properties].
The printer driver [Properties] screen is displayed.

2-4. Using this Printing System with Windows NT 4.0
47 II Printer Chapter 2 Preparing the Printer for Use
3 Select the [General] tab, then click the [Print Test Page] button.
The test page is printed and the check screen is displayed.
4 After confirming that the test printed correctly, click the [Yes] button.
If the test page is not printed correctly, refer to [Test Page Cannot Be Printed.]( Page 111)
Printing from an applicationThis method prints data with a [Print] command from an application in use.
1 Open data with the application, then execute [Print].
The [Print] screen is displayed.
2 Ensure that the name of this printing system is displayed as the [Name:].
If this printer is not selected, click the [▼] button to select it.
The [Print] screen varies according to the application.
3 Set the print range and the number of copies, then click the [OK] button.
Check that the specified pages are printed.

48 II Printer Chapter 2 Preparing the Printer for Use
2-5. Using this Printing System with Windows 2000
Install the printer driver on the PC running Windows 2000. Have the [User software CD] CD-ROM on hand.
Access Rights and Range of Operation
Since Windows 2000 is an operating system designed for network management, security functions are stron-ger than for Windows 95/98/Me.When a new printer is added, the range of allowable operations can be specified according to the securitylevel (access rights) of the user.
The Windows 2000 printer access rights and range global operations are as follows. After installing theprinter driver, set the access rights for users.
For details on setting printer access rights, refer to the Windows 2000 System Guide.
Refer to the page below for the driver installed.
PCL Driver installation page 49
Adobe PostScript Driver installation page 53
Access rights Range of allowable operations
Off Printer operations disabled
Printing
Document printingPrint parameter setting
Print related (paper size, input tray, and other selections)
Graphic related (resolution, half tone, and other settings)
Printer functions (selection of functions unique to a copier)
Printer management
All [Print] itemsPrint pause, restart, and spooler settingsPrinter property changePrinter access rights setting and change
Document management
Document setting controlPrint pause, restart, reprint, cancel

2-5. Using this Printing System with Windows 2000
49 II Printer Chapter 2 Preparing the Printer for Use
PCL Driver Installation
1 Switch on the power for the computer and start Windows.
Close down any applications that are running.
2 Log on with a user name that has administrator rights.
If you cannot log on with a user name that has administrator rights, log on with a user name that has rightsincorporating those of a Power User.
3 Put the [User software CD] in the computer's CD-ROM drive.
4 From [My Computer], select the [CD-ROM] and then double-click [Setup.exe] in the
[English] - [Printer] - [WinNT_2000_XP] folder.
5 Click the [OK] button.
The [Printer Driver Installer] screen is displayed.
6 Set up the following items.

2-5. Using this Printing System with Windows 2000
50 II Printer Chapter 2 Preparing the Printer for Use
[Printer Name]
1 Check the printer name. To change it, input a new printer name.
[Selecting the Printer Port]
1 Select the port to which the printer is connected.
[Install as the Default Printer]
1 If you want to use this printing system as your default printer, check the [Install as the
Default Printer] checkbox.

2-5. Using this Printing System with Windows 2000
51 II Printer Chapter 2 Preparing the Printer for Use
7 When all the settings are complete, click the [Install] button.
8 Click the [Finished] button.
This completes printer driver installation.
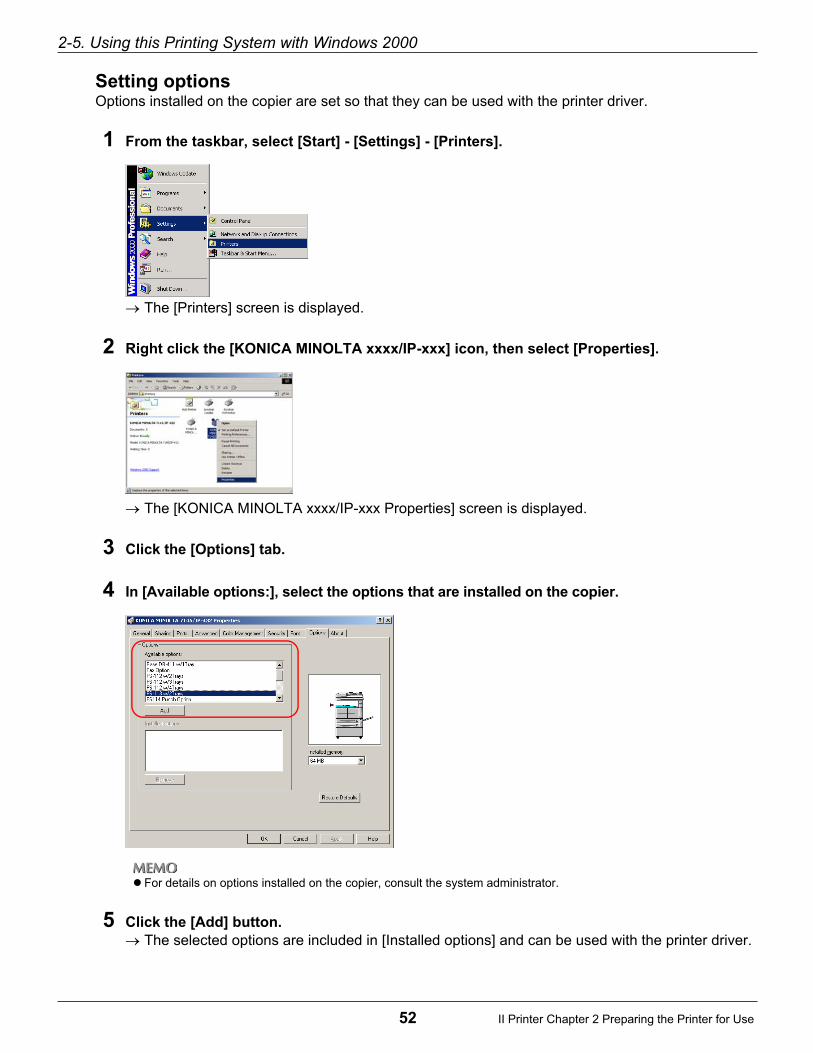
2-5. Using this Printing System with Windows 2000
52 II Printer Chapter 2 Preparing the Printer for Use
Setting optionsOptions installed on the copier are set so that they can be used with the printer driver.
1 From the taskbar, select [Start] - [Settings] - [Printers].
The [Printers] screen is displayed.
2 Right click the [KONICA MINOLTA xxxx/IP-xxx] icon, then select [Properties].
The [KONICA MINOLTA xxxx/IP-xxx Properties] screen is displayed.
3 Click the [Options] tab.
4 In [Available options:], select the options that are installed on the copier.
For details on options installed on the copier, consult the system administrator.
5 Click the [Add] button.
The selected options are included in [Installed options] and can be used with the printer driver.

2-5. Using this Printing System with Windows 2000
53 II Printer Chapter 2 Preparing the Printer for Use
Adobe PostScript Driver Installation
1 Switch on the power for the computer and start Windows.
Close down any applications that are running.
2 Log on with a user name that has administrator rights.
If you cannot log on with a user name that has administrator rights, log on with a user name that has rightsincorporating those of a Power User.
3 Put the Post Scripit option [User software CD] in the computer's CD-ROM drive.
4 From the taskbar, select [Start] - [Settings] - [Printers].
The [Printers] screen is displayed.
5 Double click the [Add Printer] icon.
The [Add Printer Wizard] screen is displayed.
6 Click the [Next ›] button.
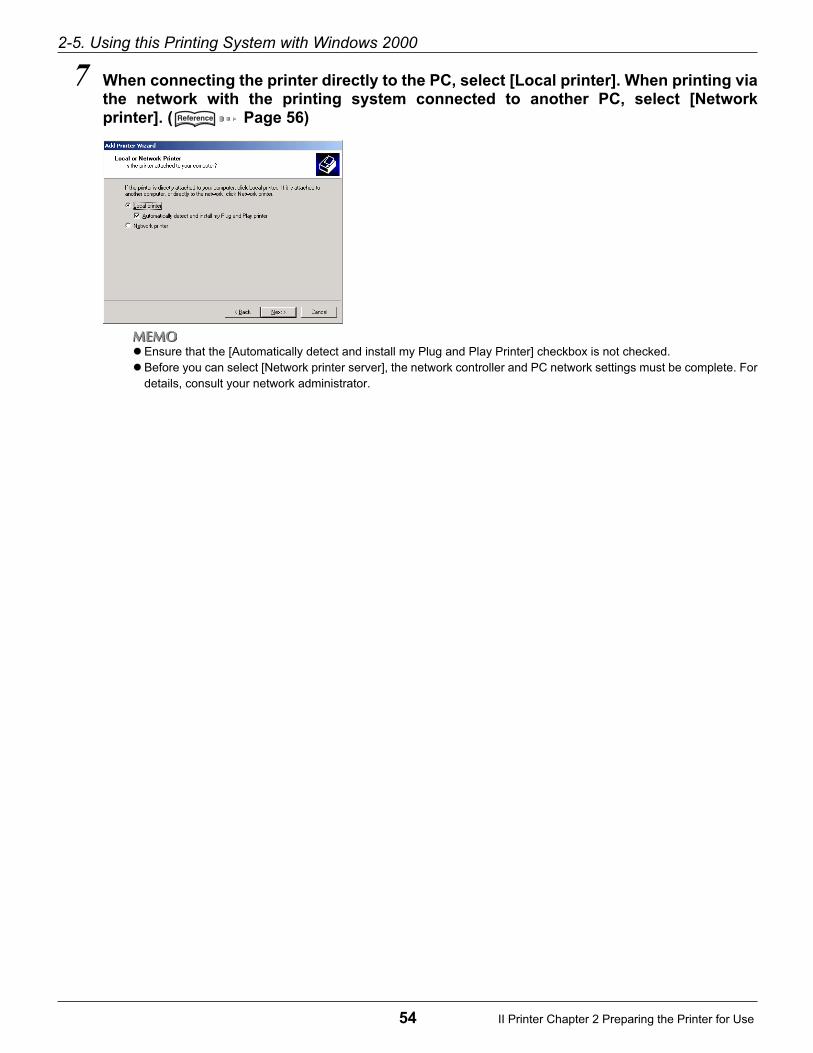
2-5. Using this Printing System with Windows 2000
54 II Printer Chapter 2 Preparing the Printer for Use
7 When connecting the printer directly to the PC, select [Local printer]. When printing viathe network with the printing system connected to another PC, select [Networkprinter]. ( Page 56)
Ensure that the [Automatically detect and install my Plug and Play Printer] checkbox is not checked.Before you can select [Network printer server], the network controller and PC network settings must be complete. Fordetails, consult your network administrator.

2-5. Using this Printing System with Windows 2000
55 II Printer Chapter 2 Preparing the Printer for Use
When [Local printer] is selected
1 Click the [Next ›] button.
The printer port select screen is displayed.
2 Select the port to which the printer is connected.
When the printer and the PC are directly connected, select the [LPT port].When printing directly with the printing system via the network, select the [LPR port].( Page 392)
3 Click the [Next ›] button.
A screen to confirm the printer manufacturer and name is displayed.Proceed to Step 8.
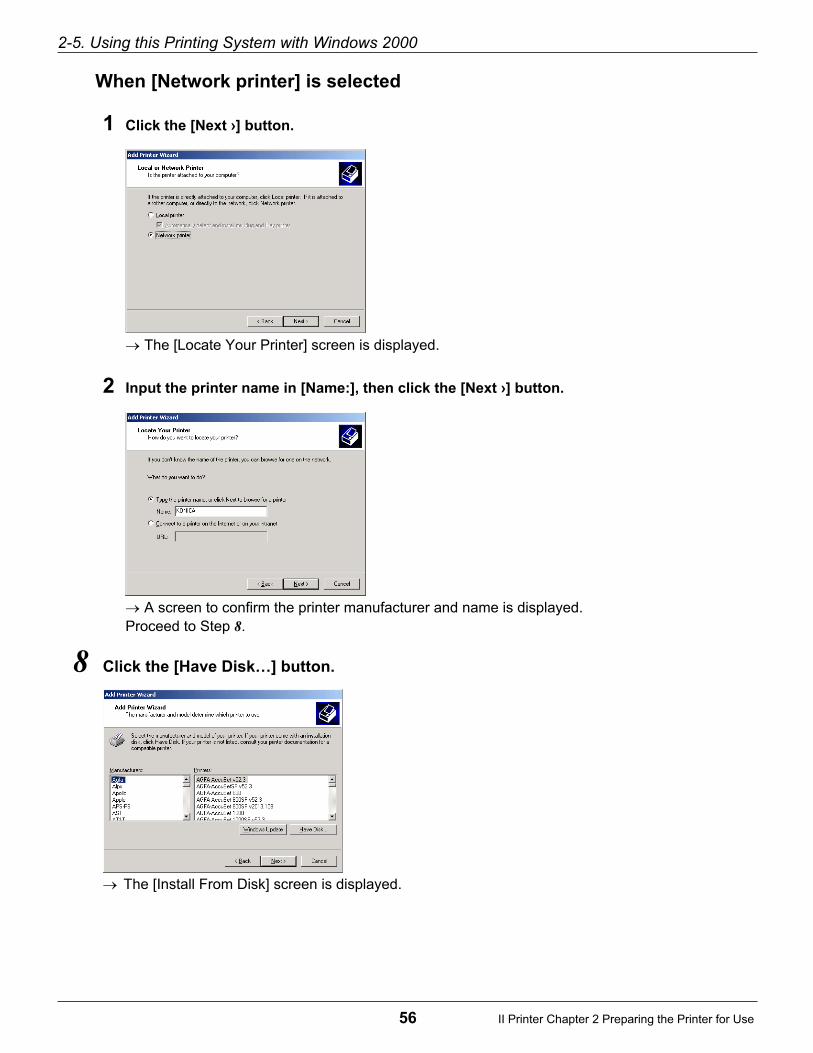
2-5. Using this Printing System with Windows 2000
56 II Printer Chapter 2 Preparing the Printer for Use
When [Network printer] is selected
1 Click the [Next ›] button.
The [Locate Your Printer] screen is displayed.
2 Input the printer name in [Name:], then click the [Next ›] button.
A screen to confirm the printer manufacturer and name is displayed.Proceed to Step 8.
8 Click the [Have Disk…] button.
The [Install From Disk] screen is displayed.

2-5. Using this Printing System with Windows 2000
57 II Printer Chapter 2 Preparing the Printer for Use
9 Click the [Browse…] button.
The [Locate file] screen is displayed.
10 From [Look in], select the CD-ROM drive, then double-click the [\English\Driver
\AdobePS\Win2000_XP] folder.
[OEMSETUP] is displayed as the [File name:].
11 Click the [Open] button.
The display returns to the [Install From Disk] screen.
12 Click the [OK] button.
The display returns to the [Add Printer Wizard] screen.
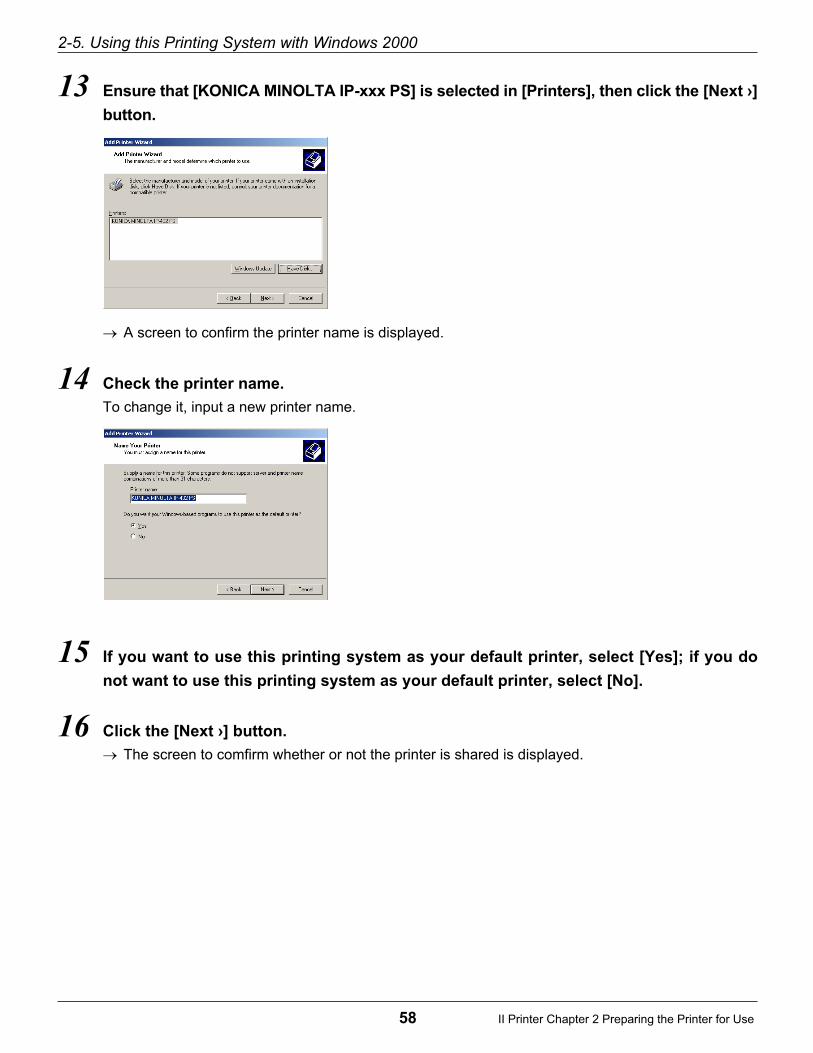
2-5. Using this Printing System with Windows 2000
58 II Printer Chapter 2 Preparing the Printer for Use
13 Ensure that [KONICA MINOLTA IP-xxx PS] is selected in [Printers], then click the [Next ›]
button.
A screen to confirm the printer name is displayed.
14 Check the printer name.
To change it, input a new printer name.
15 If you want to use this printing system as your default printer, select [Yes]; if you do
not want to use this printing system as your default printer, select [No].
16 Click the [Next ›] button.
The screen to comfirm whether or not the printer is shared is displayed.
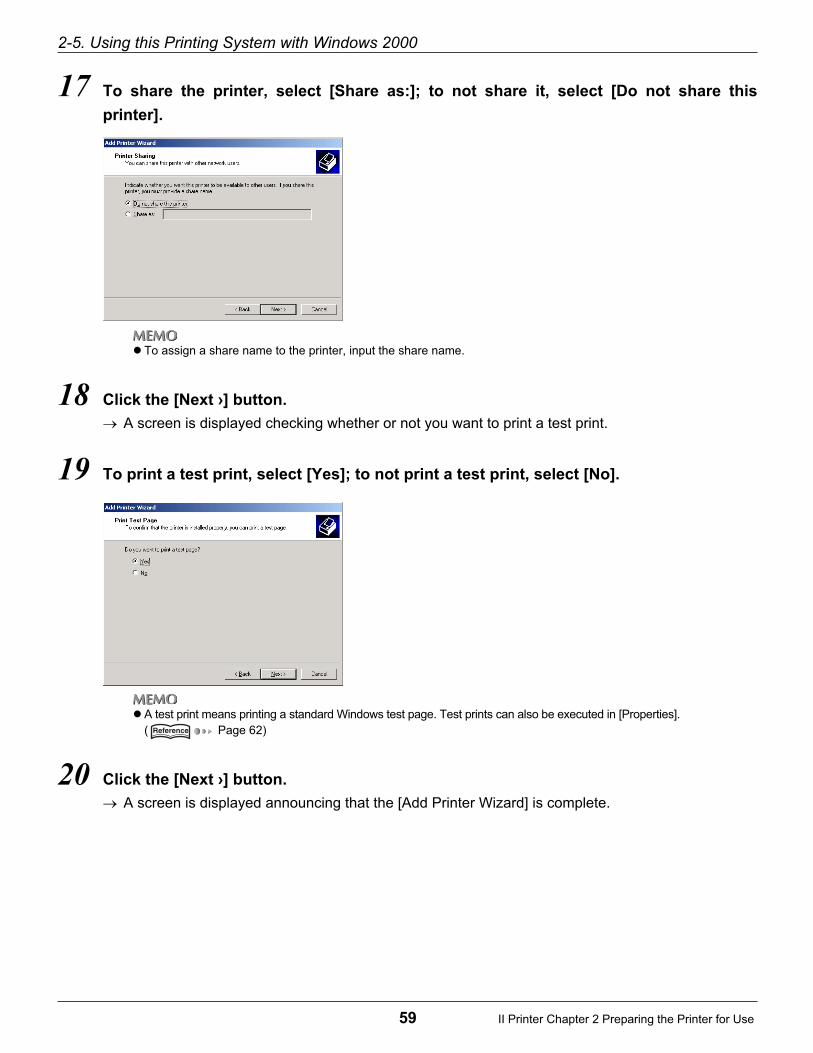
2-5. Using this Printing System with Windows 2000
59 II Printer Chapter 2 Preparing the Printer for Use
17 To share the printer, select [Share as:]; to not share it, select [Do not share this
printer].
To assign a share name to the printer, input the share name.
18 Click the [Next ›] button.
A screen is displayed checking whether or not you want to print a test print.
19 To print a test print, select [Yes]; to not print a test print, select [No].
A test print means printing a standard Windows test page. Test prints can also be executed in [Properties].( Page 62)
20 Click the [Next ›] button.
A screen is displayed announcing that the [Add Printer Wizard] is complete.

2-5. Using this Printing System with Windows 2000
60 II Printer Chapter 2 Preparing the Printer for Use
21 Click the [Finish] button.
Install the printer driver on the PC and printing of the test page starts.
22 If the test page is printed correctly, click the [OK] button.
The icon for the installed printer driver is displayed in the [Printers] screen.This completes printer driver installation.
If the test page is not printed correctly, refer to [Test Page Cannot Be Printed.]( Page 111)

2-5. Using this Printing System with Windows 2000
61 II Printer Chapter 2 Preparing the Printer for Use
Setting optionsOptions installed on the copier are set so that they can be used with the printer driver.
1 From the taskbar, select [Start] - [Settings] - [Printers].
The [Printers] screen is displayed.
2 Right click the [KONICA MINOLTA IP-xxx PS] icon, then select [Properties].
The [KONICA MINOLTA IP-xx PS Properties] screen is displayed.
3 Click the [Device Settings] tab.
4 In [Installable Options], select the options installed on the copier, then change the contents.
For details on options installed on the copier, consult the system administrator.
5 Click the [OK] button.
When the option settings are complete, the options can be used with the printer driver.

2-5. Using this Printing System with Windows 2000
62 II Printer Chapter 2 Preparing the Printer for Use
Checking Printing
Once the printing system and the computer have been connected and the printer driver installed, printing ispossible. Try printing an actual document.You can check printing by executing the test print from the printer driver properties or by printing from anapplication.
Print settings
The basic print settings are made from the printer driver [Properties] or the application’s [Print] screen.
When making the print settings from the application’s [Print] screen, the settings you make are notsaved after that application ends. For details on making the print settings from the printer driver [Prop-erties] screen, refer to [3-1.Setting Printer Functions] ( Page 121).
Executing a test printThe test print prints the standard Windows test page.
1 From the taskbar, select [Start] - [Settings] - [Printers].
The [Printers] screen is displayed.
2 Right click the printer icon, then select [Properties].
The printer driver [Properties] screen is displayed.

2-5. Using this Printing System with Windows 2000
63 II Printer Chapter 2 Preparing the Printer for Use
3 Select the [General] tab, then click the [Print Test Page] button.
The test page is printed and the check screen is displayed.
4 After checking the printing, click the [OK] button.
If the test page is not printed correctly, refer to [Test Page Cannot Be Printed.]( Page 111)
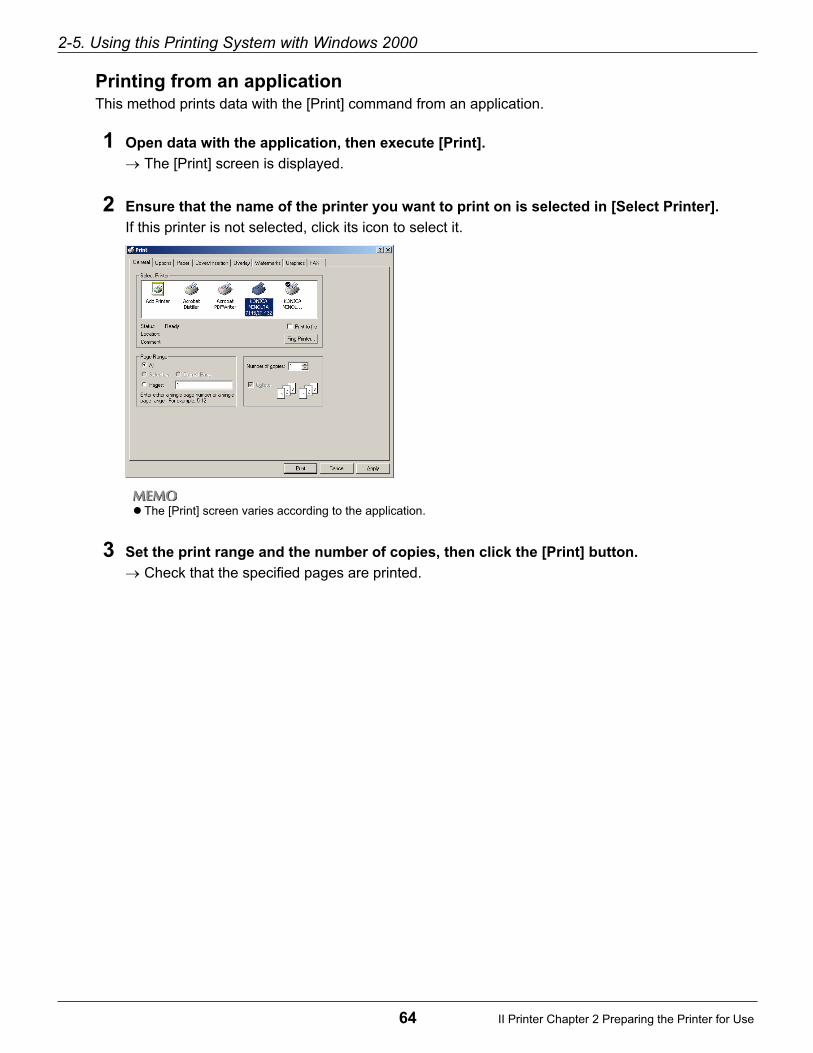
2-5. Using this Printing System with Windows 2000
64 II Printer Chapter 2 Preparing the Printer for Use
Printing from an applicationThis method prints data with the [Print] command from an application.
1 Open data with the application, then execute [Print].
The [Print] screen is displayed.
2 Ensure that the name of the printer you want to print on is selected in [Select Printer].
If this printer is not selected, click its icon to select it.
The [Print] screen varies according to the application.
3 Set the print range and the number of copies, then click the [Print] button.
Check that the specified pages are printed.

65 II Printer Chapter 2 Preparing the Printer for Use
2-6. Using this Printing System with Windows XP
Install the printer driver on the computer running Windows XP. Have the [User software CD] CD-ROM on hand.
Access Rights and Range of Operation
When a new printer is added, the range of allowable operations can be specified according to the securitylevel (access rights) of the user.
The Windows XP printer access rights and range of operations are as follows. After installing the printerdriver, set the access rights for users.
For details on setting printer access rights, refer to the Windows XP System Guide.
Refer to the page below for the driver installed.
PCL Driver installation page 66
Adobe PostScript Driver installation Page 71
Access rights Range of allowable operations
Off Printer operations disabled
Printing
Document printingPrint parameter setting
Print related (paper size, input tray, and other selections)
Graphic related (resolution, half tone, and other settings)
Printer functions (selection of functions unique to a copier)
Printer management
All [Print] itemsPrint pause, restart, and spooler settingsPrinter property changePrinter access rights setting and change
Documentmanagement
Document setting controlPrint pause, restart, reprint, cancel

2-6. Using this Printing System with Windows XP
66 II Printer Chapter 2 Preparing the Printer for Use
PCL Driver Installation
1 Switch on the power for the computer and start Windows.
Close down any applications that are running.
2 Log on with a user name that has administrator rights.
If you cannot log on with a user name that has administrator rights, log on with a user name that has rightsincorporating those of a Power User.
3 Put the [User software CD] in the computer's CD-ROM drive.
4 From [My Computer], select the [CD-ROM] and then double-click [Setup.exe] in the
[English] - [Printer] - [WinNT_2000_XP] folder.
5 Click the [OK] button.
The [Printer Driver Installer] screen is displayed.
6 Set up the following items.

2-6. Using this Printing System with Windows XP
67 II Printer Chapter 2 Preparing the Printer for Use
[Printer Name]
1 Check the printer name. To change it, input a new printer name.
[Selecting the Printer Port]
1 Select the port to which the printer is connected.
[Install as the Default Printer]
1 If you want to use this printing system as your default printer, check the [Install as the
Default Printer] checkbox.

2-6. Using this Printing System with Windows XP
68 II Printer Chapter 2 Preparing the Printer for Use
7 When all the settings are complete, click the [Install] button.
8 Click the [Finished] button.
This completes printer driver installation.

2-6. Using this Printing System with Windows XP
69 II Printer Chapter 2 Preparing the Printer for Use
Setting optionsOptions installed on the copier are set so that they can be used with the printer driver.
1 From the taskbar, select [Start] - [Printers and Faxes].
The [Printers and Faxes] screen is displayed.
2 Right click the [KONICA MINOLTA xxxx/IP-xxx] icon, then select [Properties].
The [KONICA MINOLTA xxxx/IP-xxx Properties] screen is displayed.
3 Click the [Options] tab.

2-6. Using this Printing System with Windows XP
70 II Printer Chapter 2 Preparing the Printer for Use
4 In [Available options], select the options that are installed on the copier.
For details on options installed on the copier, consult the system administrator.
5 Click the [Add] button.
The selected options are included in [Installed options] and can be used with the printer driver.

2-6. Using this Printing System with Windows XP
71 II Printer Chapter 2 Preparing the Printer for Use
Adobe PostScript Driver Installation
1 Switch on the power for the computer and start Windows.
Close down any applications that are running.
2 Log on with an account that has [computer administrator] rights.
3 Put the Post Script option [User software CD] in the computer's CD-ROM drive.
4 From the taskbar, select [Start] - [Printers and Faxes].
The [Printers and Faxes] screen is displayed.
5 Click the [Add a printer] icon.
The [Add Printer Wizard] screen is displayed.

2-6. Using this Printing System with Windows XP
72 II Printer Chapter 2 Preparing the Printer for Use
6 Click the [Next ›] button.
7 When connecting the printer directly to the PC, select [Local printer attached to thiscomputer]. When printing via the network with the printing system connected toanother PC, select [A Network printer, or a printer attached to another computer].( Page 74)
Ensure that the [Automatically detect and install my Plug and Play printer] checkbox is not checked.Before you can select [Network printer server], the network controller and PC network settings must be complete. Fordetails, consult your network administrator.

2-6. Using this Printing System with Windows XP
73 II Printer Chapter 2 Preparing the Printer for Use
When [Local printer attached to this computer] is selected
1 Click the [Next ›] button.
The printer port select screen is displayed.
2 Select the port to which the printer is connected.
When the printer and the PC are directly connected, select the [LPT] port.When printing directly with the printing system via the network, select the [LPR] port. ( Page 396)
3 Click the [Next ›] button.
A screen to confirm the printer manufacturer and name is displayed.Proceed to Step 8.

2-6. Using this Printing System with Windows XP
74 II Printer Chapter 2 Preparing the Printer for Use
When [A Network printer, or a printer attached to another computer] is selected
1 Click the [Next ›] button.
The [Specify a Printer] screen is displayed.
2 Input the printer name in [Name:], then click the [Next ›] button.
A screen to confirm the printer manufacturer and name is displayed.Proceed to Step 8.
8 Click the [Have Disk…] button.
The [Install From Disk] screen is displayed.
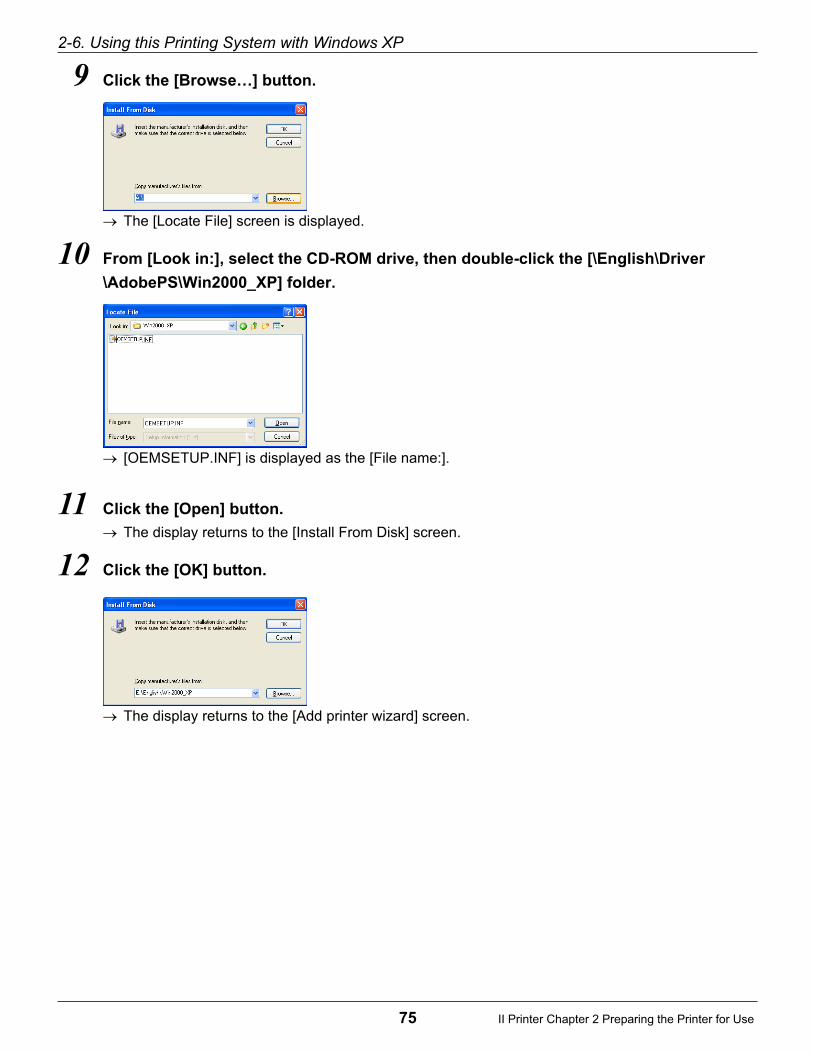
2-6. Using this Printing System with Windows XP
75 II Printer Chapter 2 Preparing the Printer for Use
9 Click the [Browse…] button.
The [Locate File] screen is displayed.
10 From [Look in:], select the CD-ROM drive, then double-click the [\English\Driver
\AdobePS\Win2000_XP] folder.
[OEMSETUP.INF] is displayed as the [File name:].
11 Click the [Open] button.
The display returns to the [Install From Disk] screen.
12 Click the [OK] button.
The display returns to the [Add printer wizard] screen.

2-6. Using this Printing System with Windows XP
76 II Printer Chapter 2 Preparing the Printer for Use
13 Ensure that [KONICA MINOLTA IP-xxx PS] is displayed in [Printers], then click the
[Next ›] button.
A screen to confirm the printer name is displayed.
14 Check the printer name.
To change it, input a new printer name.
15 If you want to use this printing system as your default printer, select [Yes]; if you do
not want to use this printing system as your default printer, select [No].
16 Click the [Next ›] button.
A screen is displayed checking whether or not you want to print a test print.

2-6. Using this Printing System with Windows XP
77 II Printer Chapter 2 Preparing the Printer for Use
17 To print a test print, select [Yes]; to not print a test print, select [No].
A test print means printing a standard Windows test page. Test prints can also be executed in [Properties].( Page 80)
18 Click the [Next ›] button.
A screen is displayed announcing that the [Add Printer Wizard] is complete.
19 Click the [Finish] button.
20 If the test page is printed correctly, click the [OK] button.
The icon for the installed printer driver is displayed in the [Printers and Faxes] window.This completes printer driver installation.
If the test page is not printed correctly, refer to [Test Page Cannot Be Printed.]( Page 111)

2-6. Using this Printing System with Windows XP
78 II Printer Chapter 2 Preparing the Printer for Use
Setting optionsOptions installed on the copier are set so that they can be used with the printer driver.
1 From the taskbar, select [Start] - [Printers and Faxes].
The [Printers and Faxes] screen is displayed.
2 Right click the [KONICA MINOLTA IP-xxx PS] icon, then select [Properties].
The [KONICA MINOLTA IP-xxx PS Properties] screen is displayed.
3 Click the [Device Settings] tab.
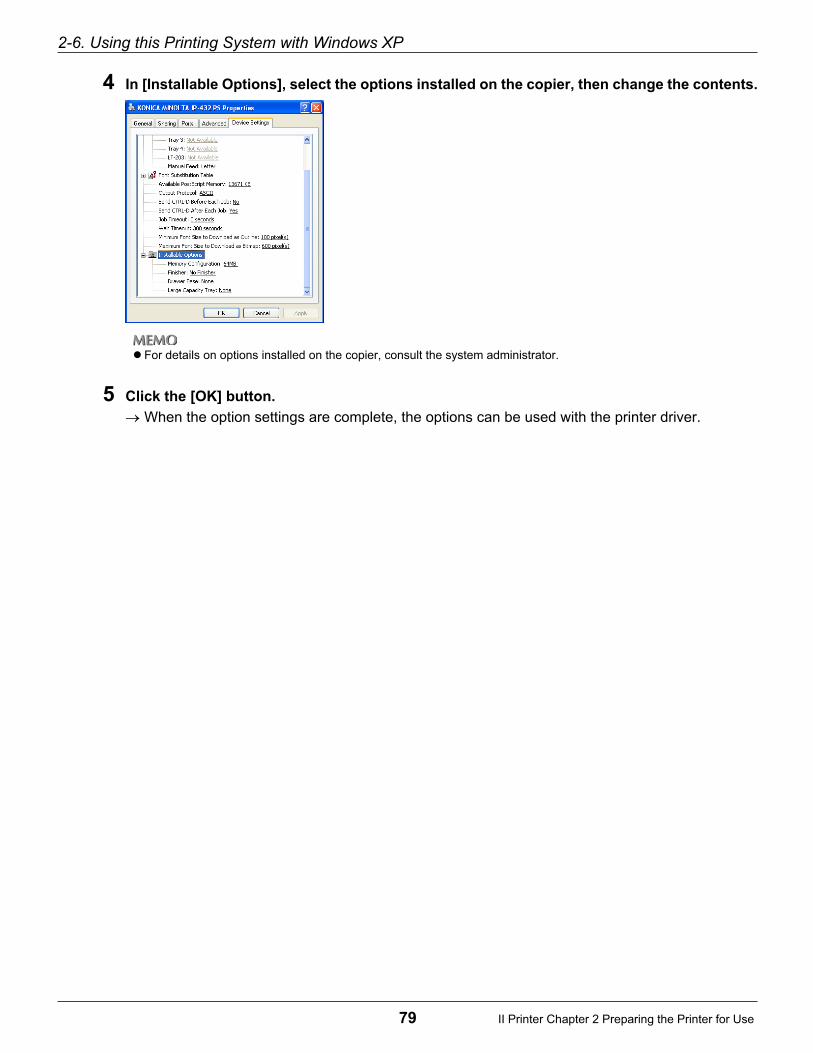
2-6. Using this Printing System with Windows XP
79 II Printer Chapter 2 Preparing the Printer for Use
4 In [Installable Options], select the options installed on the copier, then change the contents.
For details on options installed on the copier, consult the system administrator.
5 Click the [OK] button.
When the option settings are complete, the options can be used with the printer driver.

2-6. Using this Printing System with Windows XP
80 II Printer Chapter 2 Preparing the Printer for Use
Checking Printing
Once the printing system and the computer have been connected and the printer driver installed, printing ispossible. Try printing an actual document.You can check printing by executing the test print from the printer driver properties or by printing from anapplication.
Print settings
The basic print settings are made from the printer driver [Properties] or the application’s [Print] screen.
When making the print settings from the application’s [Print] screen, the settings you make are notsaved after that application ends. For details on making the print settings from the printer driver [Prop-erties] screen, refer to [3-1.Setting Printer Functions] ( Page 125).
Executing a test printThe test print prints the standard Windows test page.
1 From the taskbar, select [Start] - [Printers and Faxes].
The [Printers and Faxes] screen is displayed.
2 Right click the printer icon, then select [Properties].
The printer driver [Properties] screen is displayed.
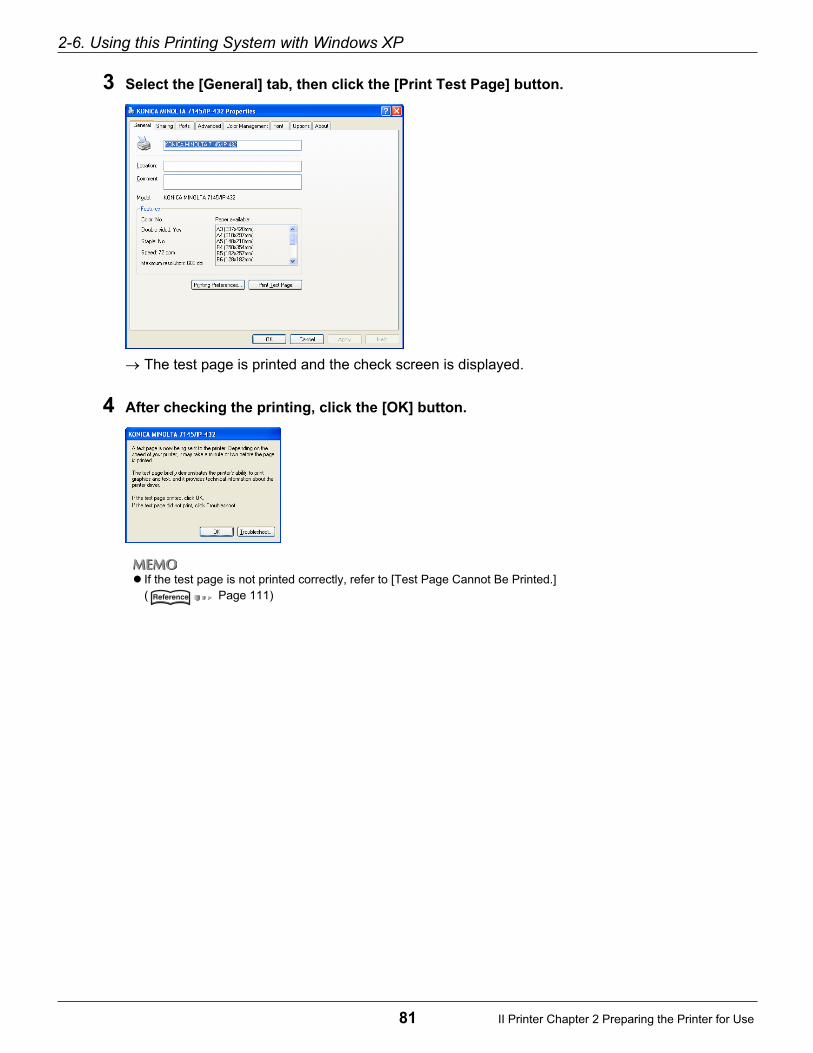
2-6. Using this Printing System with Windows XP
81 II Printer Chapter 2 Preparing the Printer for Use
3 Select the [General] tab, then click the [Print Test Page] button.
The test page is printed and the check screen is displayed.
4 After checking the printing, click the [OK] button.
If the test page is not printed correctly, refer to [Test Page Cannot Be Printed.]( Page 111)

2-6. Using this Printing System with Windows XP
82 II Printer Chapter 2 Preparing the Printer for Use
Printing from an applicationThis method prints data with a [Print] command from an application in use.
1 Open data with the application, then execute [Print].
The [Print] screen is displayed.
2 Ensure that the name of the printer you want to print on is selected in [Select printer].
If this printer is not selected, click its icon to select it.
The [Print] screen varies according to the application.
3 Set the print range and the number of copies, then click the [Print] button.
Check that the specified pages are printed.

83 II Printer Chapter 2 Preparing the Printer for Use
2-7. Using as a USB Printer (Windows 2000/XP)
Install a printer driver in the personal computer which will use the copier as a USB printer. Prepare the acces-sory CD-ROM [User Software CD] which comes with the copier.
The copier cannot be used as a USB printer with operating systems other than Windows 2000/XP.
Use of a USB cable which is 3m in length or less is recommended.
Refer to the OS you are using for the [Access Rights and Range of Operation].
Windows 2000 Page 48
Windows XP Page 65
Installing a Printer Driver
1 Switch on the power for the computer and start Windows.
Close down any applications that are running.
2 Log on with a user name that has administrator rights.
If you cannot log on with a user name that has administrator rights, log on with a user name that has rightsincorporating those of a Power User.
3 Put the [User software CD] in the computer's CD-ROM drive.
4 Connect a USB cable to the personal computer and the copier.
The following message box appears and the [Detect New Hardware Wizard] is displayed on thescreen.
Use Type A (4-pin male) - Type B (4-pin male) USB cables.

2-7. Using as a USB Printer (Windows 2000/XP)
84 II Printer Chapter 2 Preparing the Printer for Use
5 Click the [Next >] button.
6 Check [Search for a suitable driver for my device] and click the [Next >] button.
7 Check the [Specify a location] check box and click [Next >].

2-7. Using as a USB Printer (Windows 2000/XP)
85 II Printer Chapter 2 Preparing the Printer for Use
8 Click the [Browse...] button.
The [Locate File] screen is displayed.
9 From the [Locate File], select the CD-ROM drive, then double-click the [/English/Printer/WinNT_2000_XP] folder.
The Setup information is displayed.
10 Click the [Open] button.
The display returns to the [Found New Hardware Wizard] screen.
11 Click the [OK] button.
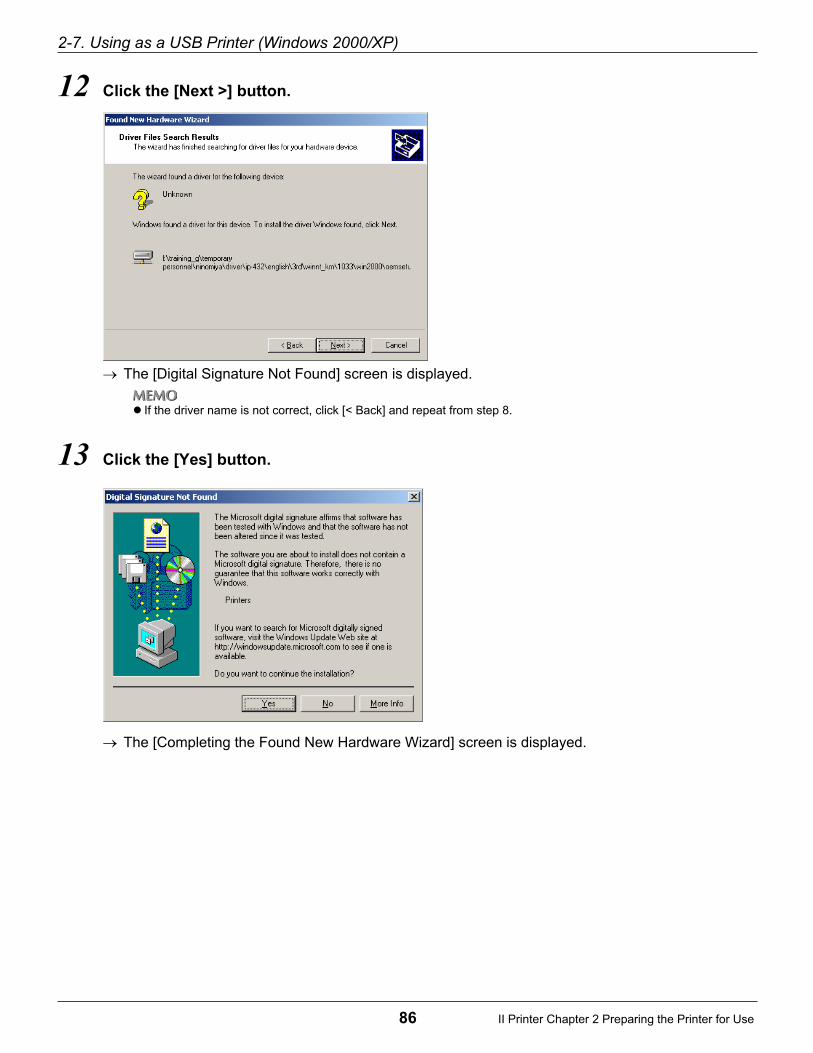
2-7. Using as a USB Printer (Windows 2000/XP)
86 II Printer Chapter 2 Preparing the Printer for Use
12 Click the [Next >] button.
The [Digital Signature Not Found] screen is displayed.
If the driver name is not correct, click [< Back] and repeat from step 8.
13 Click the [Yes] button.
The [Completing the Found New Hardware Wizard] screen is displayed.
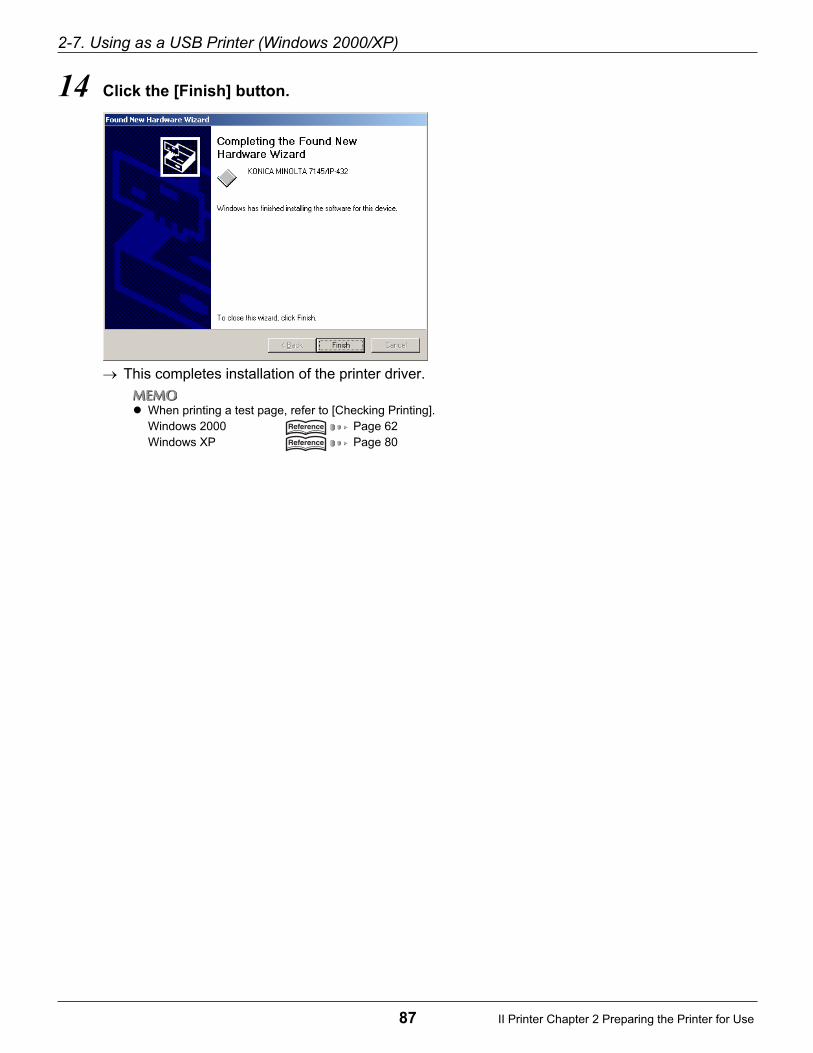
2-7. Using as a USB Printer (Windows 2000/XP)
87 II Printer Chapter 2 Preparing the Printer for Use
14 Click the [Finish] button.
This completes installation of the printer driver.
When printing a test page, refer to [Checking Printing].Windows 2000 Page 62Windows XP Page 80
88 II Printer Chapter 2 Preparing the Printer for Use
2-8. Using this Printing System with a Macintosh
Install the printer driver on the Macintosh.Have the PostScript option accessory [User software CD] on hand.
Adobe PostScript Driver Installation
The installation location depends on the Macintosh model and the Mac OS version. When installing on aPower Macintosh, check the Mac OS version.
For a Power Macintosh with Mac OS 8.x or higher up to version 9.x.
Refer to the user software CD [English] - [Driver] - [OS8_x to 9_x] folder.
For Mac OS X v10.2x
Refer to the user software CD [English] - [Driver] - [OS X] folder.
For details on the installation, refer to [Mac OS X v10.2x Version Installation] ( page 91).
The printer driver is not installable on Mac OS v10.0 or v10.1.
After installing the printer driver, it is recommended to re-start the computer.
If Adobe PostScript has been installed before the driver for this printing system is installed, that version
is overwritten by the Adobe PostScript that comes with this printing system.

2-8. Using this Printing System with a Macintosh
89 II Printer Chapter 2 Preparing the Printer for Use
Mac OS 8.x or higher up to version 9.x Instllation
1 Switch on the power for the Macintosh and start the Mac OS.
Close down any applications that are running.
2 Put the PostScript option [User software CD] in the computer's CD-ROM drive.
3 Double click the [English] - [Driver] folder on the user software CD.
4 Double click [OS8_x to 9_x], then select [Koxxxxx.ppd] and copy to the computer’s [HDD] -
[System Folder] - [Expansions] - [Printer Descriptions].
5 In the folder where the user software CD printer driver is stored, double-click [Adobe PS
Installer].
The [Adobe PostScript Driver] screen is displayed.
6 Click the [Continue…] button.
The [License] screen is displayed.
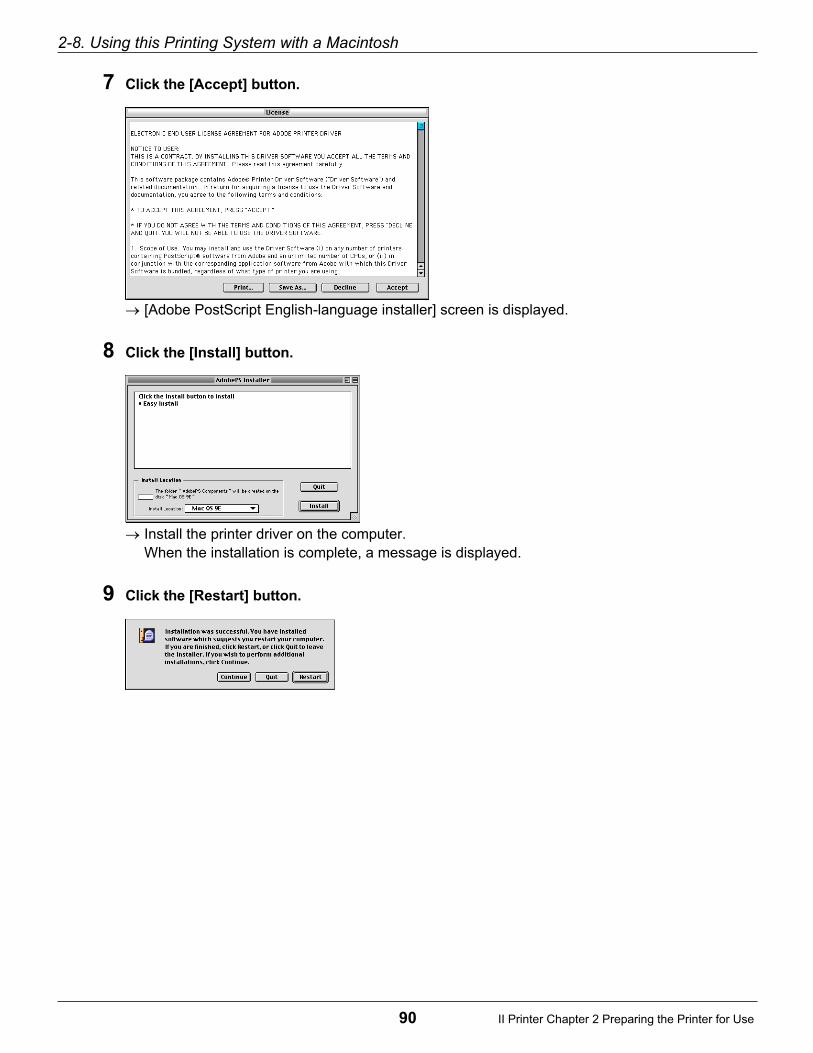
2-8. Using this Printing System with a Macintosh
90 II Printer Chapter 2 Preparing the Printer for Use
7 Click the [Accept] button.
[Adobe PostScript English-language installer] screen is displayed.
8 Click the [Install] button.
Install the printer driver on the computer.When the installation is complete, a message is displayed.
9 Click the [Restart] button.

2-8. Using this Printing System with a Macintosh
91 II Printer Chapter 2 Preparing the Printer for Use
Mac OS X v10.2x Version Installation
The printer driver is not installable on Mac OS v10.0 or v10.1.
1 Power ON PC and startup Macintosh.
2 Setup [User Software CD] on PC CD-ROM drive.
Close all running application, if any.
3 From [User Software CD] - [English], double-click [Driver] folder.
4 Select [IP-xxxPrinter.pkg] and copy it onto desktop.
5 Double-click on [IP-xxxPrinter.pkg].
[Welcome to the KONICA MINOLTA Printer Driver Installer] screen appears.
6 When the system prompts to enter the name and password of the administrator, enter the
name and password of the administrator.
Clicking the [Cancel] button at this point exits the installer.
For information about the name and password of the administrator, consult the system administrator.

2-8. Using this Printing System with a Macintosh
92 II Printer Chapter 2 Preparing the Printer for Use
7 Click the [Continue] button.
[Important Information] screen appears.
8 Click the [Continue] button.
[Software License Agreement] screen appears.
9 Click the [Continue] button.
10 Click the [Agree] button.
[Select a Destination] screen appears.
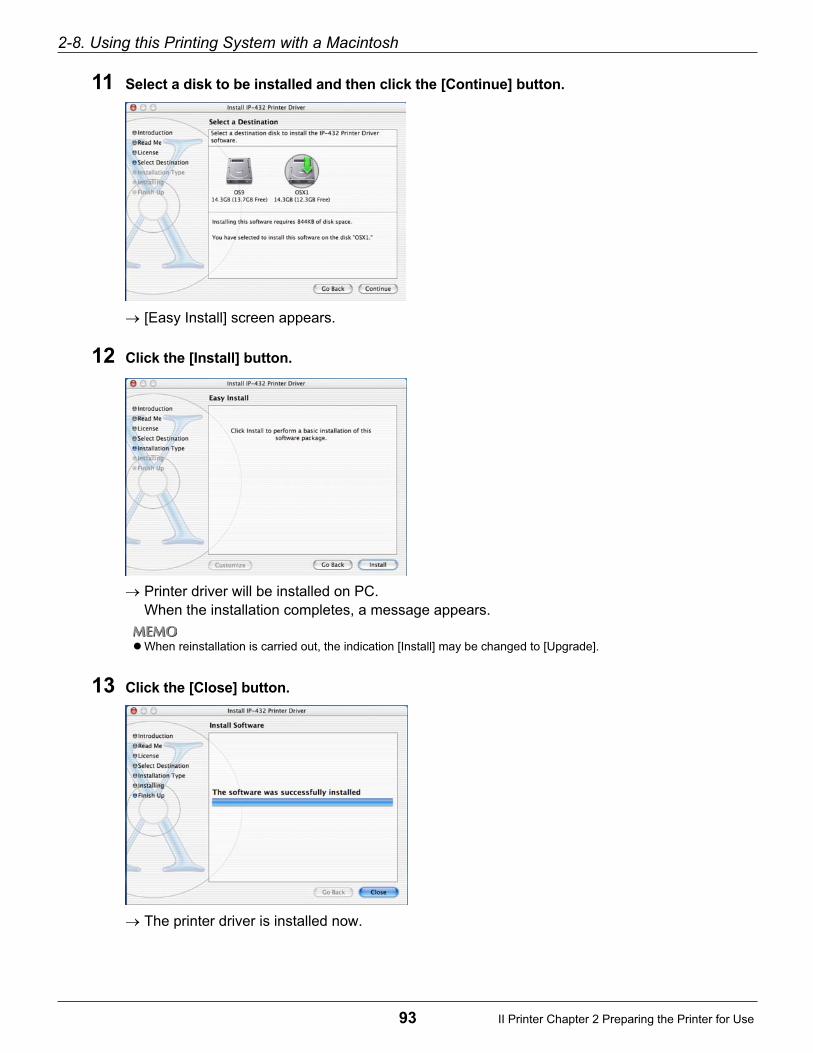
2-8. Using this Printing System with a Macintosh
93 II Printer Chapter 2 Preparing the Printer for Use
11 Select a disk to be installed and then click the [Continue] button.
[Easy Install] screen appears.
12 Click the [Install] button.
Printer driver will be installed on PC.When the installation completes, a message appears.
When reinstallation is carried out, the indication [Install] may be changed to [Upgrade].
13 Click the [Close] button.
The printer driver is installed now.
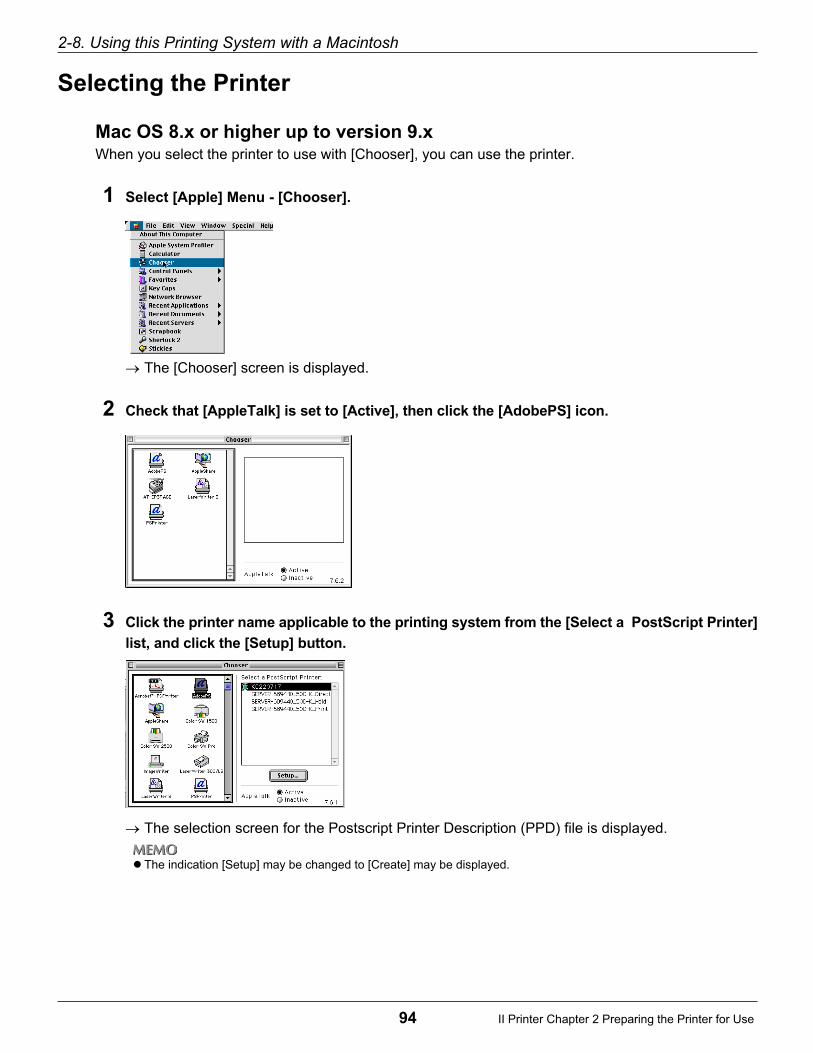
2-8. Using this Printing System with a Macintosh
94 II Printer Chapter 2 Preparing the Printer for Use
Selecting the Printer
Mac OS 8.x or higher up to version 9.xWhen you select the printer to use with [Chooser], you can use the printer.
1 Select [Apple] Menu - [Chooser].
The [Chooser] screen is displayed.
2 Check that [AppleTalk] is set to [Active], then click the [AdobePS] icon.
3 Click the printer name applicable to the printing system from the [Select a PostScript Printer]
list, and click the [Setup] button.
The selection screen for the Postscript Printer Description (PPD) file is displayed.
The indication [Setup] may be changed to [Create] may be displayed.

2-8. Using this Printing System with a Macintosh
95 II Printer Chapter 2 Preparing the Printer for Use
4 Click the applicable PPD file and click the [Select] button.
The additional option setting screen is displayed.
5 Click the [ ] button for each item to set the options installed on the copier.
For details on options installed on the copier, consult the system administrator.
6 Click the [OK] button.
The display returns to the [Selector] screen.
7 Close the [Chooser] screen.
▲▼

2-8. Using this Printing System with a Macintosh
96 II Printer Chapter 2 Preparing the Printer for Use
Mac OS X v10.2x[Print Center] enables you to select a printer you want to use.
1 From installed [HDD] - [Applications] - [Utilities], double-click on [Print Center].
2 Click the [Add] button.
If the applicable printer is set, the illustration of 2 is not displayed.
3 Select the corresponding printer name.
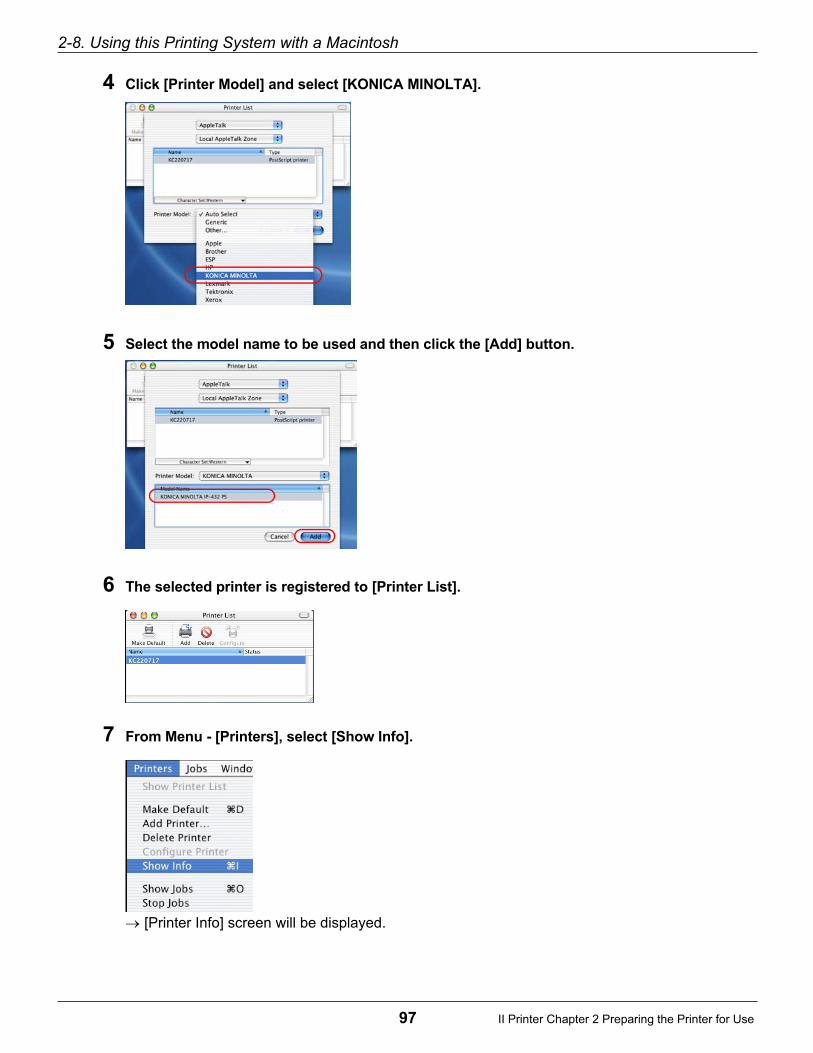
2-8. Using this Printing System with a Macintosh
97 II Printer Chapter 2 Preparing the Printer for Use
4 Click [Printer Model] and select [KONICA MINOLTA].
5 Select the model name to be used and then click the [Add] button.
6 The selected printer is registered to [Printer List].
7 From Menu - [Printers], select [Show Info].
[Printer Info] screen will be displayed.

2-8. Using this Printing System with a Macintosh
98 II Printer Chapter 2 Preparing the Printer for Use
8 Select [Installable Options].
9 Setup the options that are equipped to copier.
10 Click the [Apply Changes] button.
11 Close [Print Info] screen.

2-8. Using this Printing System with a Macintosh
99 II Printer Chapter 2 Preparing the Printer for Use
Checking Printing
Once the printing system and the computer have been connected and the printer driver installed, printing ispossible. Try printing from the [Print] command of an application.
1 Open a file with an application, then execute [Print].
The [Print] screen is displayed.
2 Check that this printing system is selected in [Printer].
If this printer is not displayed, select this printer in [Chooser].(Page 94)
The [Print] screen varies according to the application.When you click the [Save settings] button, the contents of the settings are saved.
3 Set the number of copies and the print range, then click the [Print] button.Check that the specified pages are printed.

100 II Printer Chapter 2 Preparing the Printer for Use
2-9. Updating the Printer Driver
Refer to the appropriate information below.
Updating the printer driver with Windows 95/98/Me Page 101
Updating the printer driver with Windows NT 4.0 Page 104
Updating the printer driver with Windows 2000 Page 105
Updating the printer driver with Windows XP Page 107
Updating the printer driver with Macintosh Page 109
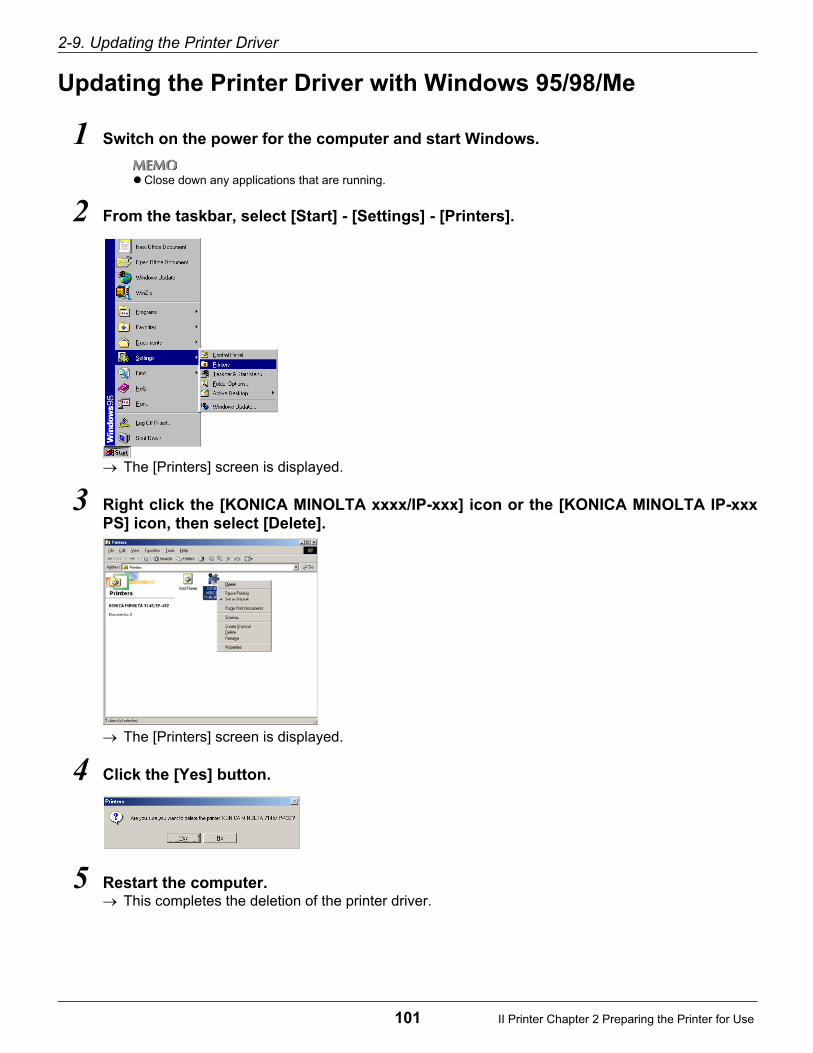
2-9. Updating the Printer Driver
101 II Printer Chapter 2 Preparing the Printer for Use
Updating the Printer Driver with Windows 95/98/Me
1 Switch on the power for the computer and start Windows.
Close down any applications that are running.
2 From the taskbar, select [Start] - [Settings] - [Printers].
The [Printers] screen is displayed.
3 Right click the [KONICA MINOLTA xxxx/IP-xxx] icon or the [KONICA MINOLTA IP-xxxPS] icon, then select [Delete].
The [Printers] screen is displayed.
4 Click the [Yes] button.
5 Restart the computer.This completes the deletion of the printer driver.

2-9. Updating the Printer Driver
102 II Printer Chapter 2 Preparing the Printer for Use
6 Go to [Installing a Printer Driver].
When installing the print driver, refer to [2-3.Using this Printing System with Windows 95/98/Me] ( page 18).

2-9. Updating the Printer Driver
103 II Printer Chapter 2 Preparing the Printer for Use
Updating the Printer Driver with Windows NT 4.0
1 Switch on the power for the computer and start Windows.
Close down any applications that are running.
2 Log on with a user name that has administrator rights.
If you cannot log on with a user name that has administrator rights, log on with a user name that has installing rightssuch as a Power User.
3 Put the [User software CD] in the computer's CD-ROM drive.
4 From [My Computer], select the [CD-ROM] and then double click the [Setup. exe] in the[English] - [Printer] - [WinNT_2000_XP] folder.
5 Click the [OK] button.
The [Printer Driver Installer] screen is displayed.
6 The screen shown below appears. Then click [No].
7 Click the [Remove a Driver] tub.
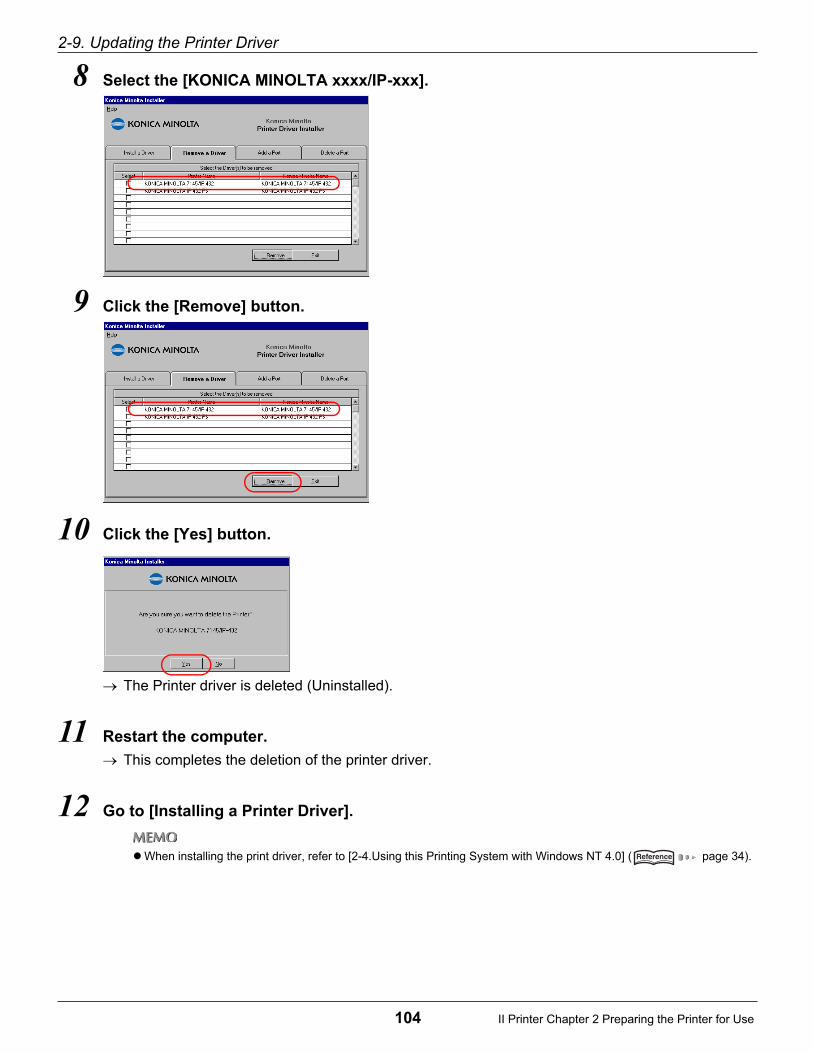
2-9. Updating the Printer Driver
104 II Printer Chapter 2 Preparing the Printer for Use
8 Select the [KONICA MINOLTA xxxx/IP-xxx].
9 Click the [Remove] button.
10 Click the [Yes] button.
The Printer driver is deleted (Uninstalled).
11 Restart the computer.
This completes the deletion of the printer driver.
12 Go to [Installing a Printer Driver].
When installing the print driver, refer to [2-4.Using this Printing System with Windows NT 4.0] ( page 34).

2-9. Updating the Printer Driver
105 II Printer Chapter 2 Preparing the Printer for Use
Updating the Printer Driver with Windows 2000
1 Switch on the power for the computer and start Windows.
Close down any applications that are running.
2 Log on with a user name that has administrator rights.
If you cannot log on with a user name that has administrator rights, log on with a user name that has installing rightssuch as a Power User.
3 Put the [User software CD] in the computer's CD-ROM drive.
4 From [My Computer], select the [CD-ROM] and then double click the [Setup. exe] in the[English] - [Printer] - [WinNT_2000_XP] folder.
5 Click the [OK] button.
The [Printer Driver Installer] screen is displayed.
6 The screen shown below appears. Then click [No].
7 Click the [Remove a Driver] tub.

2-9. Updating the Printer Driver
106 II Printer Chapter 2 Preparing the Printer for Use
8 Select the [KONICA MINOLTA xxxx/IP-xxx].
9 Click the [Remove] button.
10 Click the [Yes] button.
The Printer driver is deleted (Uninstalled).
11 Restart the computer.
This completes the deletion of the printer driver.
12 Go to [Installing a Printer Driver].
When installing the print driver, refer to [2-5.Using this Printing System with Windows 2000] ( page 48).

2-9. Updating the Printer Driver
107 II Printer Chapter 2 Preparing the Printer for Use
Updating the Printer Driver with Windows XP
1 Switch on the power for the computer and start Windows.
Close down any applications that are running.
2 Log on with a user name that has administrator rights.
If you cannot log on with a user name that has administrator rights, log on with a user name that has installing rightssuch as a Power User.
3 Put the [User software CD] in the computer's CD-ROM drive.
4 From [My Computer], select the [CD-ROM] and then double click the [Setup. exe] in the[English] - [Printer] - [WinNT_2000_XP] folder.
5 Click the [OK] button.
The [Printer Driver Installer] screen is displayed.
6 The screen shown below appears. Then click [No].
7 Click the [Remove a Driver] tub.

2-9. Updating the Printer Driver
108 II Printer Chapter 2 Preparing the Printer for Use
8 Select the [KONICA MINOLTA xxxx/IP-xxx].
9 Click the [Remove] button.
10 Click the [Yes] button.
The Printer driver is deleted (Uninstalled).
11 Restart the computer.
This completes the deletion of the printer driver.
12 Go to [Installing a Printer Driver].
When installing the print driver, refer to [2-6.Using this Printing System with Windows XP] ( page 65).
2-9. Updating the Printer Driver
109 II Printer Chapter 2 Preparing the Printer for Use
Updating the Printer Driver with Macintosh
Mac OS 8.x or higher up to version 9.x
1 Switch on the power for the Macintosh and start the Mac OS.
Close down any applications that are running.
2 Select the printer icon to delete from the desktop and drag it to the recycle bin.
The printer driver is uninstalled.
3 In [HDD] - [System folder] - [Expansion functions] - [Printer notation file], select
[koxxxxx.PPD] and drag it to the recycle bin.
Printer driver related files are deleted.
If old driver files are left, they can cause problems with driver updating. Before updating the printer, delete the olddriver without fail.
4 Restart the computer.
This completes the deletion of the printer driver.
5 Continuously go to [Install the printer driver].
When installing the print driver, refer to [2-8.Using this Printing System with a Macintosh] ( page 94).

2-9. Updating the Printer Driver
110 II Printer Chapter 2 Preparing the Printer for Use
Mac OS X v10.2x
1 Switch on the power for the Macintosh and start the Mac OS.
2 Double-click the [Print Center].
3 Select the name of the printer to be deleted and click the [Delete] button.
The selected printer is deleted.
4 Close the [Printer List].
5 Double-click the [HDD] on which the printer driver was installed, then from [Libraries] -
[Printers] - [PPDs] - [Contents] - [Resources] - [en.lprej], select [KONICA MINOLTA IP-xxx
PS v**] and drag it to the recycle bin.
6 Double-click the [HDD] on which the printer driver was installed, then from the [Libraries] -
[Printers] - [PPD Plugins], drag the following 3 folders to the recycle bin.
KONICA MINOLTA Setup.pluginKONICA MINOLTA Finishing.pluginKONICA MINOLTA ImageLayout.plugin
Printer driver related files are deleted.
Delete the old driver without fail before updating the driver software. If any old driver file is left, some malfunction mayoccur in updating the driver.
7 Restart the computer.
This completes the deletion of the printer driver.
8 Continuously go to [Install the printer driver].
When installing the print driver, refer to [2-8.Using this Printing System with a Macintosh] ( page 96).

111 II Printer Chapter 2 Preparing the Printer for Use
2-10. Installation Problems
If you run into any problems during installation, check the following information.
An Old Version of the Driver Is Already Installed.
If an old version of the [PCL] driver is already installed, delete it, then install the newer driver.
For details on how to update the driver, refer to [2-9.Updating the Printer Driver] ( Page 100).
You Are Asked Which File to Use, the One You Are Installingor a New File Already on the Computer.
When you install a printer driver, the computer may already have a more recent file with the same name asthe one on the [User software CD].In this case, select the file with the more recent date. If you use the file with the older date, the operating sys-tem may not operate normally.
Test Page Cannot Be Printed.
1 Check the copier control panel LCD screen.
If nothing at all is displayed, proceed to next.If [Ready to Copy] is displayed, proceed to Step 3.If a diagnostics message or error message is displayed, refer to the copier user’s manual.
2 Press the sub power switch on the control panel.If the copier is in auto shut-off mode, pressing this button puts the LCD screen into display mode.
3 Check that copying is possible.If copying is possible, proceed to next.
4 Switch off the power for the copier, wait about 10 seconds, then switch the power backon again.
5 Once the print controller can be used, print a test page again.If the test page cannot be printed, contact your authorized service representative.
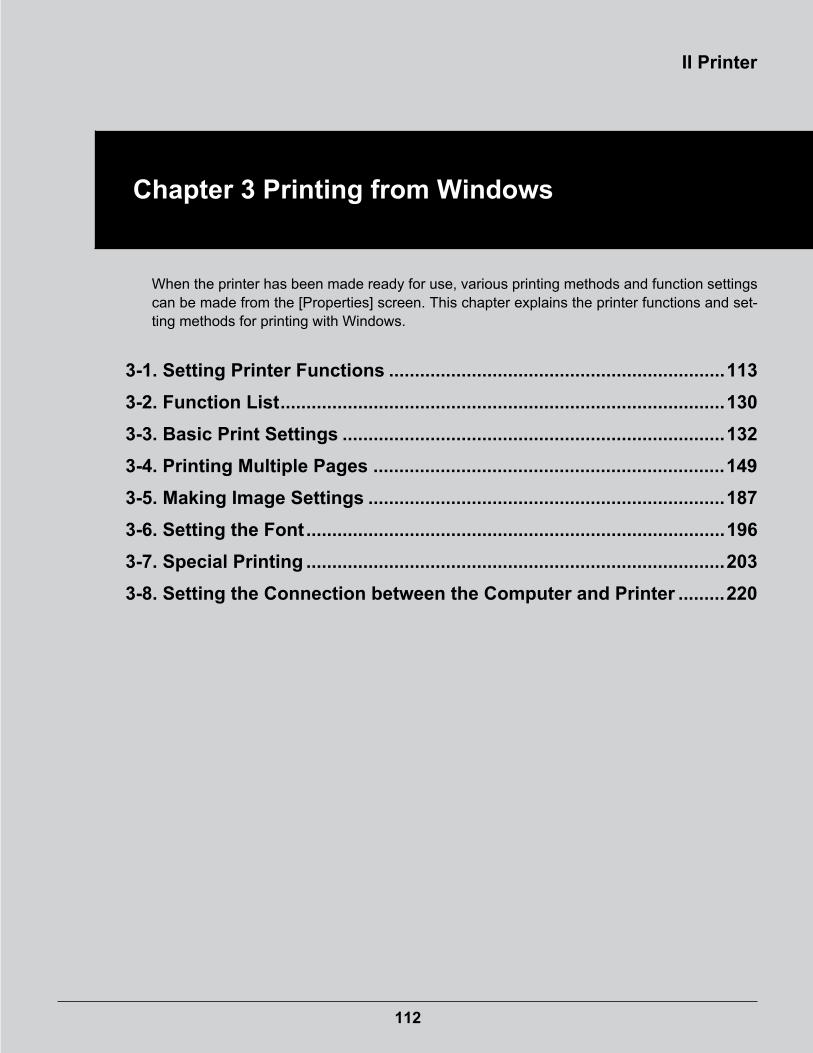
II Printer
112
Chapter 3 Printing from Windows
When the printer has been made ready for use, various printing methods and function settingscan be made from the [Properties] screen. This chapter explains the printer functions and set-ting methods for printing with Windows.
3-1. Setting Printer Functions .................................................................113
3-2. Function List......................................................................................130
3-3. Basic Print Settings ..........................................................................132
3-4. Printing Multiple Pages ....................................................................149
3-5. Making Image Settings .....................................................................187
3-6. Setting the Font.................................................................................196
3-7. Special Printing .................................................................................203
3-8. Setting the Connection between the Computer and Printer .........220

113 II Printer Chapter 3 Printing from Windows
3-1. Setting Printer Functions
The printer functions are set by displaying the printer settings screen. The settings screen comprises multiplescreens called [tabs] for different choices. Click the tab for the function to set the choices.
There are two methods for displaying the settings screen:This section explains the method for displaying the screen for setting the printer functions.
Setting from the [Properties] screen
Right click the printer icon, then set from the [Properties] screen.
The choices of these settings apply to all applications used on this computer.
Setting on an application
Settings are made from the screen displayed when the [Print] command is executed from an application.
These settings only remain in effect while the application is being used. When the application ends, thesettings are deleted.
Refer to the appropriate page below for the OS you use:
Using this printing system with Windows 95/98/Me Page 114
Using this printing system with Windows NT 4.0 Page 117
Using this printing system with Windows 2000 Page 121
Using this printing system with Windows XP Page 125
Tab

3-1. Setting Printer Functions
114 II Printer Chapter 3 Printing from Windows
Windows 95/98/Me
Setting from the [Properties] screen
1 From the taskbar, select [Start] - [Settings] - [Printers].
The printer screen is displayed.
2 Right click the [KONICA MINOLTA xxxx/IP-xxx] icon or the [KONICA MINOLTA IP-xxx PS]
icon, then select [Properties].
The [Properties] screen is displayed.
PCL driver
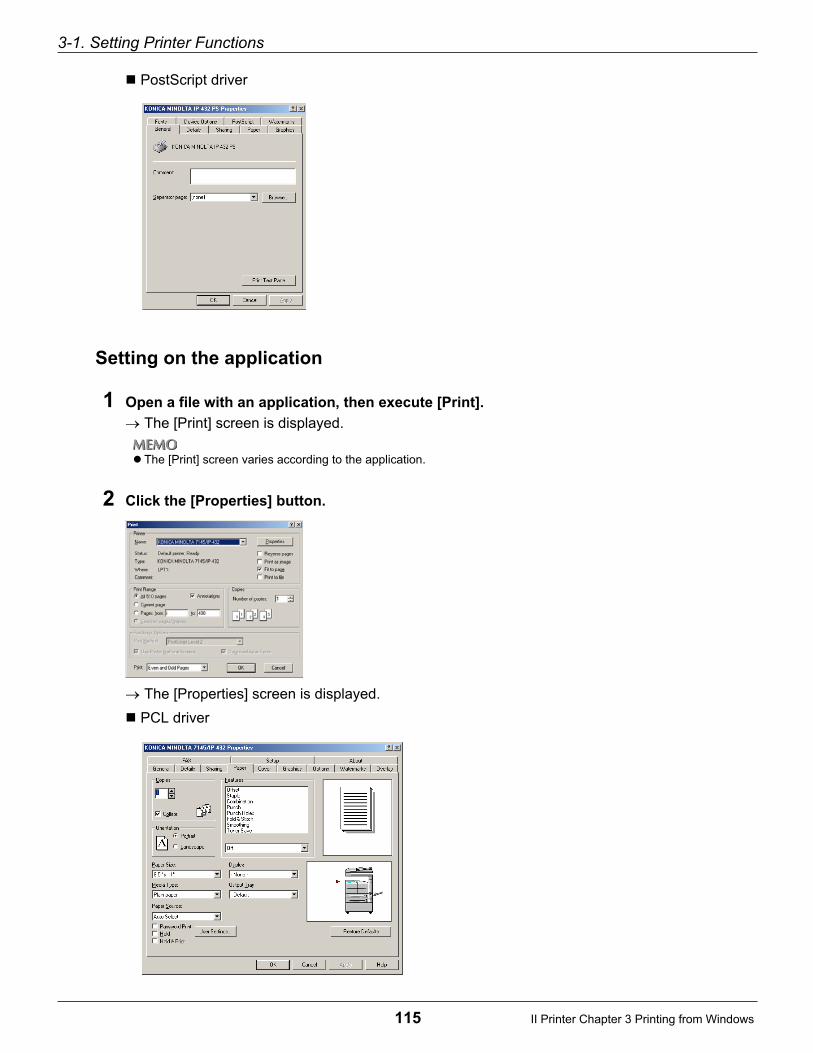
3-1. Setting Printer Functions
115 II Printer Chapter 3 Printing from Windows
PostScript driver
Setting on the application
1 Open a file with an application, then execute [Print].
The [Print] screen is displayed.
The [Print] screen varies according to the application.
2 Click the [Properties] button.
The [Properties] screen is displayed.
PCL driver
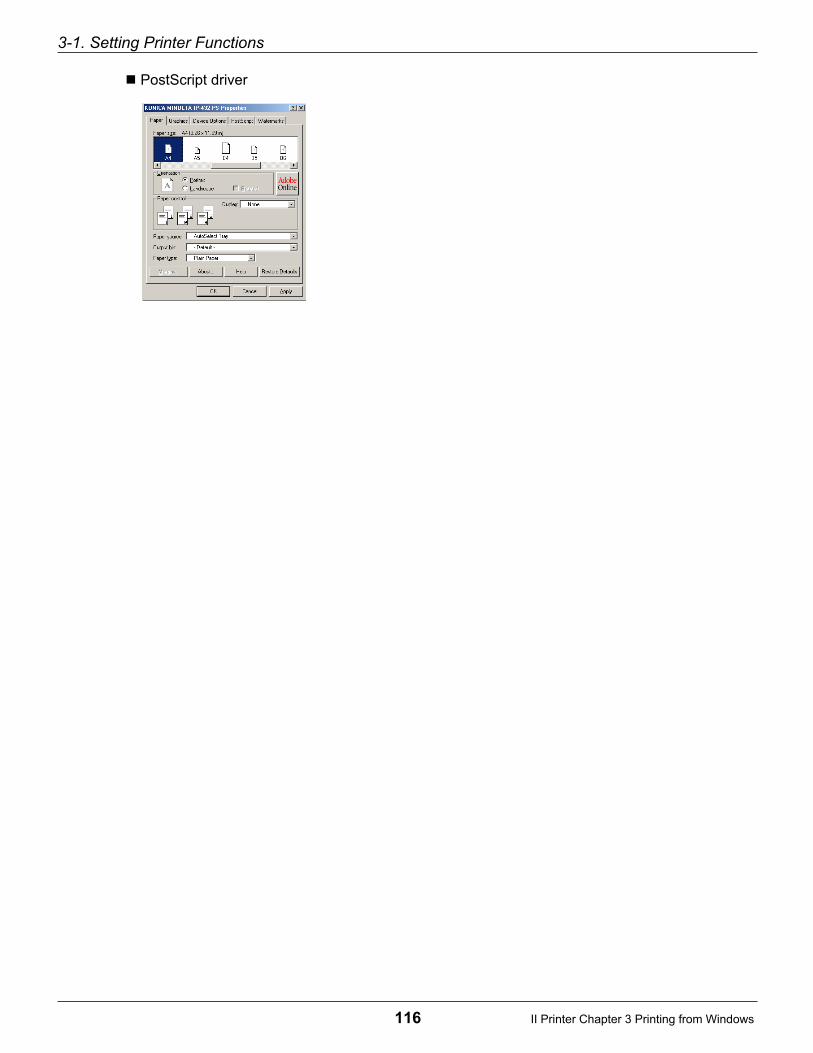
3-1. Setting Printer Functions
116 II Printer Chapter 3 Printing from Windows
PostScript driver

3-1. Setting Printer Functions
117 II Printer Chapter 3 Printing from Windows
Windows NT 4.0
Setting from the [Properties] screenThis sets the printer port and options.
1 From the taskbar, select [Start] - [Settings] - [Printers].
The [Printers] screen is displayed.
2 Right click the [KONICA MINOLTA xxxx/IP-xxx] icon or the [KONICA MINOLTA IP-xxx PS]
icon, then select [Properties].
The [Properties] screen is displayed.
PCL driver

3-1. Setting Printer Functions
118 II Printer Chapter 3 Printing from Windows
PostScript driver
Setting from the [Document Defaults…] screenThis makes the basic print settings.
1 From the taskbar, select [Start] - [Settings] - [Printers].
The [Printers] screen is displayed.
2 Right click the [KONICA MINOLTA xxxx/IP-xxx] icon or the [KONICA MINOLTA IP-xxx PS]
icon, then select [Document Defaults…].
The [Document Defaults…] screen is displayed.

3-1. Setting Printer Functions
119 II Printer Chapter 3 Printing from Windows
PCL driver
PostScript driver
Setting on the application
1 Open a file with an application, then execute [Print].
The [Print] screen varies according to the application.
2 Click the [Property] button.
The [Properties] screen is displayed.

3-1. Setting Printer Functions
120 II Printer Chapter 3 Printing from Windows
PCL driver
PostScript driver

3-1. Setting Printer Functions
121 II Printer Chapter 3 Printing from Windows
Windows 2000
Setting from the [Properties] screenThis sets the printer port and options.
1 From the taskbar, select [Start] - [Settings] - [Printers].
The [Printers] screen is displayed.
2 Right click the [KONICA MINOLTA xxxx/IP-xxx] icon or the [KONICA MINOLTA IP-xxx PS]
icon, then select [Properties].
The [Properties] screen is displayed.
PCL driver

3-1. Setting Printer Functions
122 II Printer Chapter 3 Printing from Windows
PostScript driver
Setting from the [Printing Preferences…] screenThis makes the basic print settings.
1 From the taskbar, select [Start] - [Settings] - [Printers].
The [Printers] screen is displayed.
2 Right click the [KONICA MINOLTA xxxx/IP-xxx] icon or the [KONICA MINOLTA IP-xxx PS]
icon, then select [Printing Preferences…].
The settings screen is displayed.

3-1. Setting Printer Functions
123 II Printer Chapter 3 Printing from Windows
PCL driver
PostScript driver

3-1. Setting Printer Functions
124 II Printer Chapter 3 Printing from Windows
Setting on the application
1 Open a file with an application, then execute [Print].
The [Print] screen is displayed.
2 Right click the printer icon, then select [Properties].
The [Properties] screen is displayed.
The [Print] screen varies according to the application.
PCL driver
PostScript driver
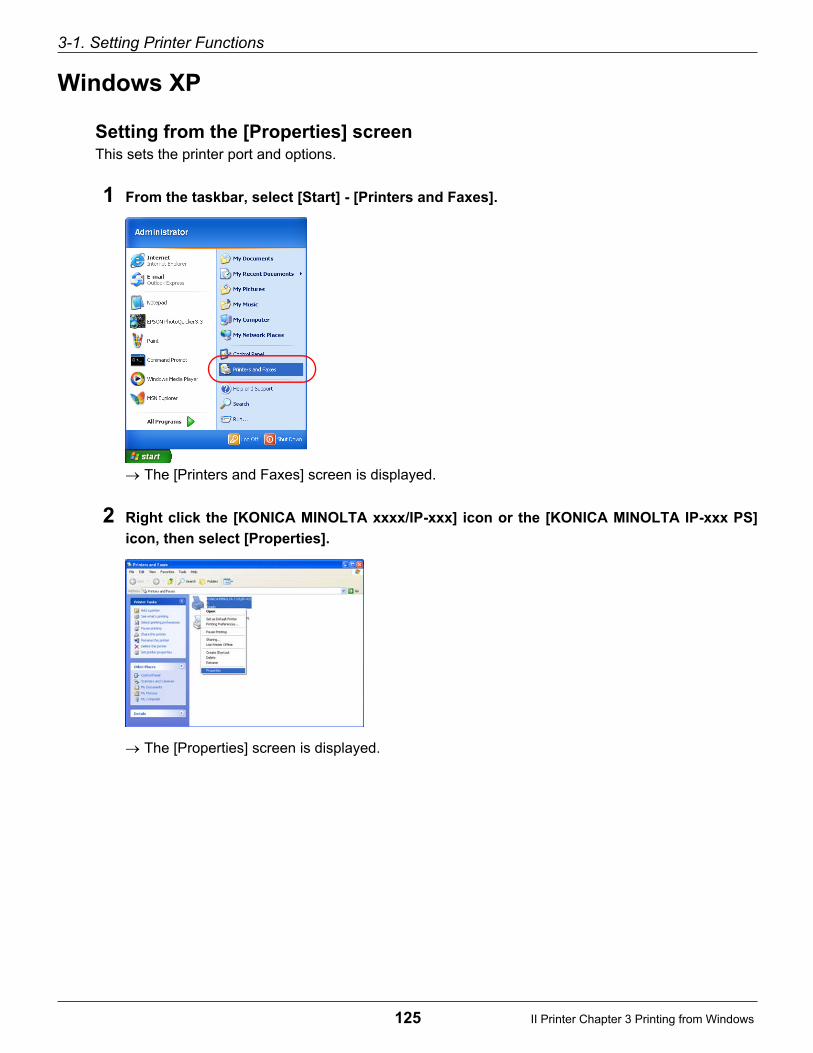
3-1. Setting Printer Functions
125 II Printer Chapter 3 Printing from Windows
Windows XP
Setting from the [Properties] screenThis sets the printer port and options.
1 From the taskbar, select [Start] - [Printers and Faxes].
The [Printers and Faxes] screen is displayed.
2 Right click the [KONICA MINOLTA xxxx/IP-xxx] icon or the [KONICA MINOLTA IP-xxx PS]
icon, then select [Properties].
The [Properties] screen is displayed.
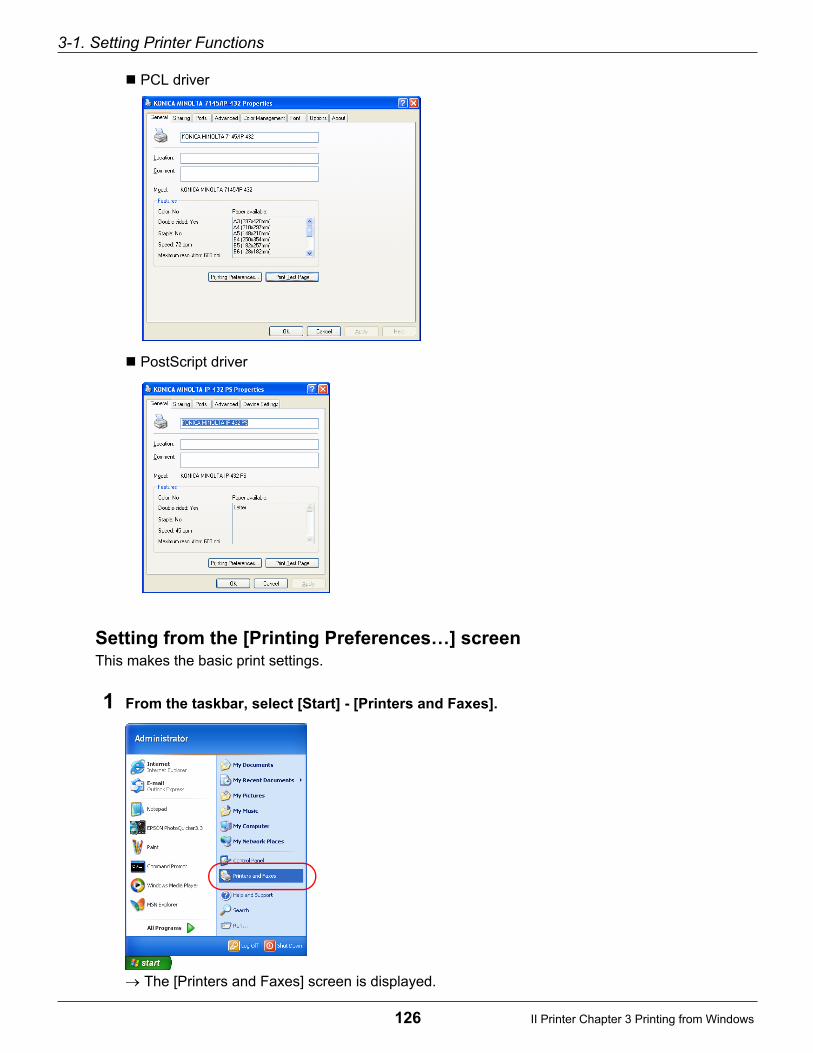
3-1. Setting Printer Functions
126 II Printer Chapter 3 Printing from Windows
PCL driver
PostScript driver
Setting from the [Printing Preferences…] screenThis makes the basic print settings.
1 From the taskbar, select [Start] - [Printers and Faxes].
The [Printers and Faxes] screen is displayed.
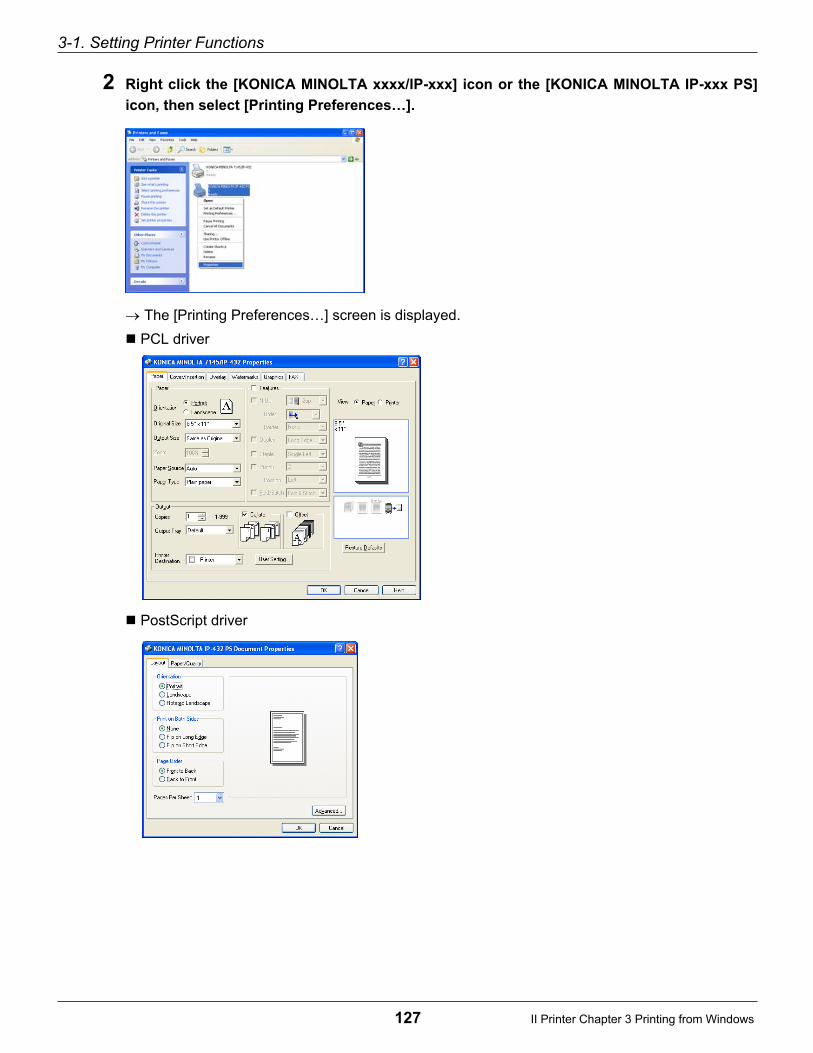
3-1. Setting Printer Functions
127 II Printer Chapter 3 Printing from Windows
2 Right click the [KONICA MINOLTA xxxx/IP-xxx] icon or the [KONICA MINOLTA IP-xxx PS]
icon, then select [Printing Preferences…].
The [Printing Preferences…] screen is displayed.
PCL driver
PostScript driver

3-1. Setting Printer Functions
128 II Printer Chapter 3 Printing from Windows
Setting on the application
1 Open a file with an application, then execute [Print].
The [Print] screen is displayed.
2 Right click the printer icon, then select [Properties].
The [Properties] screen is displayed.
The [Print] screen varies according to the application.
PCL driver
PostScript driver

3-1. Setting Printer Functions
129 II Printer Chapter 3 Printing from Windows
Image View
If you set the properties using the [PCL] driver, you can check the current setting status. This switchesbetween paper display and copier display.
1 From the PCL driver [Properties], select the [Paper] tab.
PaperA sample of the printed paper is displayed.
Main unitThe settings of the Input tray and Output tray are displayed.

130 II Printer Chapter 3 Printing from Windows
3-2. Function List
This list contains a summary of the main settings related to printing.
● The names of the functions are basically those displayed in Windows95/98/Me. The display of listed
items and setting values may vary according to whether options are present (and their settings).
● For details on functions not covered here, refer to your Windows guide.
Function Summary
Operating Systems
supported Reference
95/98/Me NT 4.0 2000/XP
Basic print settings
Setting the printer
languages
Sets the printer language for printing.❍ ❍ ❍ Page 132
Copies Specifies the number of copies to print. ❍ ❍ ❍ Page 134
OrientationSelects landscape or portrait direction toprint on the paper.
❍ ❍ ❍ Page 136
Paper size Sets the size of the paper to print on. ❍ ❍ ❍ Page 138
Media Type/Paper Type Sets the type of the media for printing. ❍ ❍ ❍ Page 140
Scaling Prints enlarged/reduced. ❍ ❍ ❍ Page 142
Paper SourceSelects the input tray containing the paper toprint on.
❍ ❍ ❍ Page 144
Output Tray Selects the tray which to output printed material. ❍ ❍ ❍ Page 146
MarginsSets the width for the margin (the section notprinted at all) for printing
❍ Page 148
Printing multiple pages
DuplexPrints consecutive pages on the front andback.
❍ ❍ ❍ Page 153
Pages per sheet/Layout
Combines multiple pages of consecutivedata on one side of one sheet of paper andautomatically reduces the multiple pages tomatch the paper size.
❍ ❍ ❍ Page 155
CombinationPrints swapping the order of the pages sothat the output paper can be compiled andfolded in two to make a booklet.
❍ ❍ ❍ Page 158
Fold/StitchProcesses a sheet for fold & stitch, thendelivers it.
❍ ❍ ❍ Page 161
Collate/Sort Prints one copy at a time of all the pages. ❍ ❍ ❍ Page 164
Collate/OffsetPrinting multiple copies, this shifts the outputposition for each set.
❍ ❍ ❍ Page 166
Staple Staples. ❍ ❍ ❍ Page 169
Punch/Punch Hole Punch holes in the document ❍ ❍ ❍ Page 173
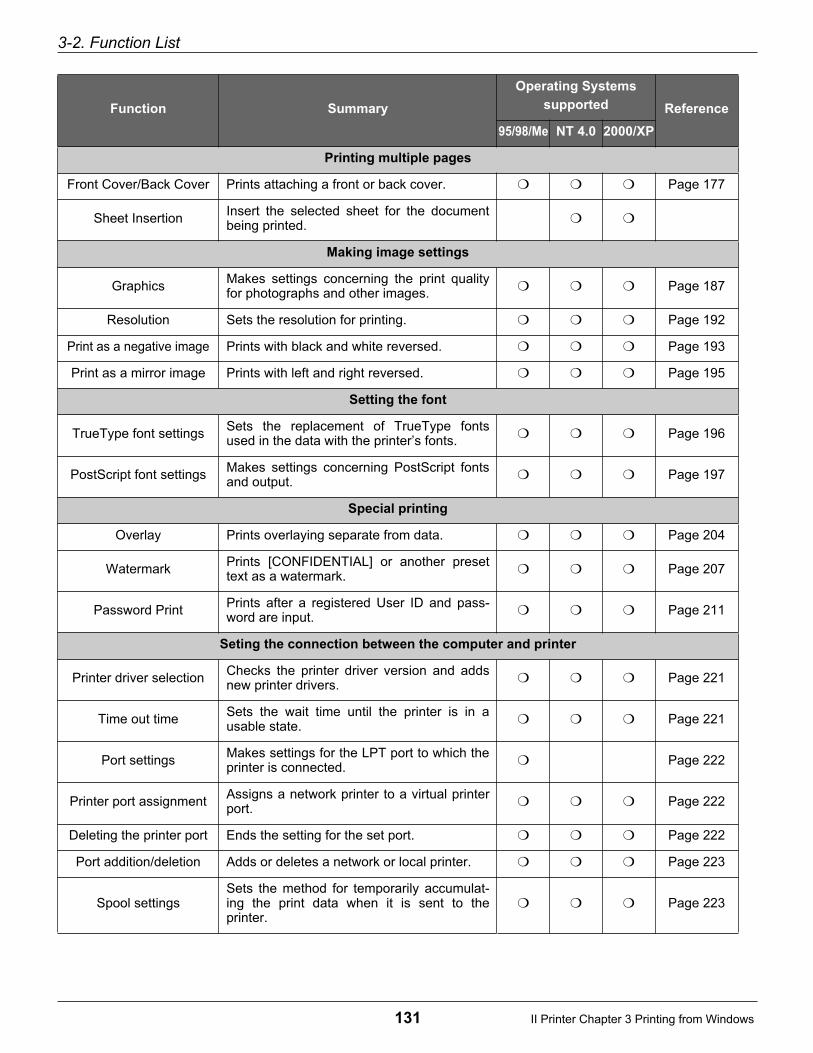
3-2. Function List
131 II Printer Chapter 3 Printing from Windows
Printing multiple pages
Front Cover/Back Cover Prints attaching a front or back cover. ❍ ❍ ❍ Page 177
Sheet InsertionInsert the selected sheet for the documentbeing printed.
❍ ❍
Making image settings
GraphicsMakes settings concerning the print qualityfor photographs and other images.
❍ ❍ ❍ Page 187
Resolution Sets the resolution for printing. ❍ ❍ ❍ Page 192
Print as a negative image Prints with black and white reversed. ❍ ❍ ❍ Page 193
Print as a mirror image Prints with left and right reversed. ❍ ❍ ❍ Page 195
Setting the font
TrueType font settingsSets the replacement of TrueType fontsused in the data with the printer’s fonts.
❍ ❍ ❍ Page 196
PostScript font settingsMakes settings concerning PostScript fontsand output.
❍ ❍ ❍ Page 197
Special printing
Overlay Prints overlaying separate from data. ❍ ❍ ❍ Page 204
WatermarkPrints [CONFIDENTIAL] or another presettext as a watermark.
❍ ❍ ❍ Page 207
Password PrintPrints after a registered User ID and pass-word are input.
❍ ❍ ❍ Page 211
Seting the connection between the computer and printer
Printer driver selectionChecks the printer driver version and addsnew printer drivers.
❍ ❍ ❍ Page 221
Time out timeSets the wait time until the printer is in ausable state.
❍ ❍ ❍ Page 221
Port settingsMakes settings for the LPT port to which theprinter is connected.
❍ Page 222
Printer port assignmentAssigns a network printer to a virtual printerport.
❍ ❍ ❍ Page 222
Deleting the printer port Ends the setting for the set port. ❍ ❍ ❍ Page 222
Port addition/deletion Adds or deletes a network or local printer. ❍ ❍ ❍ Page 223
Spool settingsSets the method for temporarily accumulat-ing the print data when it is sent to theprinter.
❍ ❍ ❍ Page 223
Function Summary
Operating Systems
supported Reference
95/98/Me NT 4.0 2000/XP
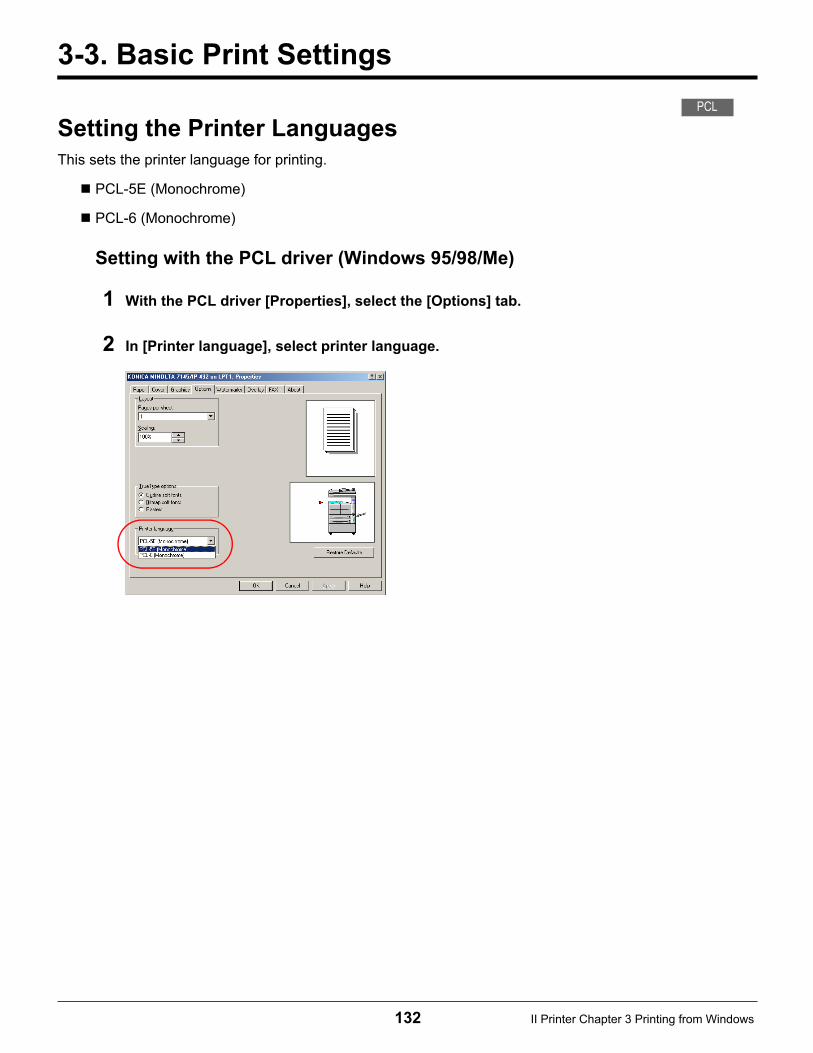
132 II Printer Chapter 3 Printing from Windows
3-3. Basic Print Settings
Setting the Printer Languages
This sets the printer language for printing.
PCL-5E (Monochrome)
PCL-6 (Monochrome)
Setting with the PCL driver (Windows 95/98/Me)
1 With the PCL driver [Properties], select the [Options] tab.
2 In [Printer language], select printer language.
PCL

3-3. Basic Print Settings
133 II Printer Chapter 3 Printing from Windows
Setting with the PCL driver (Windows NT 4.0/2000/XP)
PCL-5E
PCL-XL
1 With the PCL driver [Printing Preferences…], select the [Graphics] tab.
For Windows NT 4.0, set with the [Document Defaults…] screen.For Windows 2000/XP, set with the [Printing Preferences…] screen.
2 In [Printer language], select printer language.
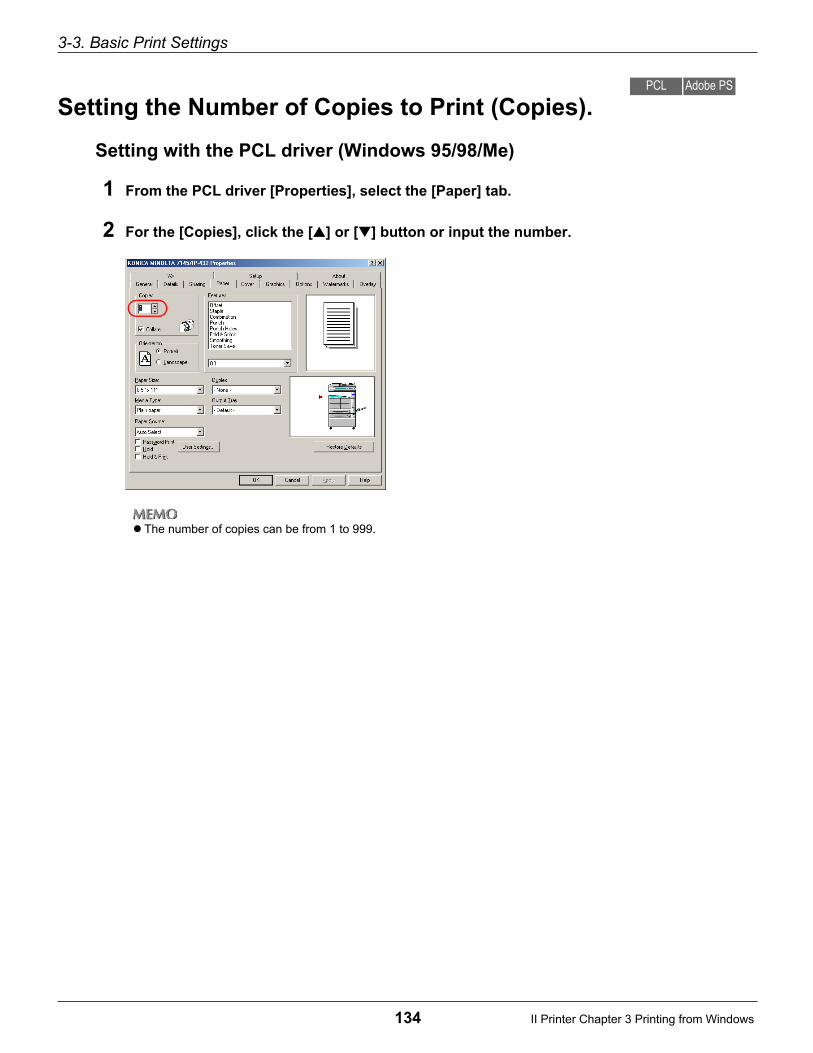
3-3. Basic Print Settings
134 II Printer Chapter 3 Printing from Windows
Setting the Number of Copies to Print (Copies).
Setting with the PCL driver (Windows 95/98/Me)
1 From the PCL driver [Properties], select the [Paper] tab.
2 For the [Copies], click the [▲] or [▼] button or input the number.
The number of copies can be from 1 to 999.
PCL Adobe PS
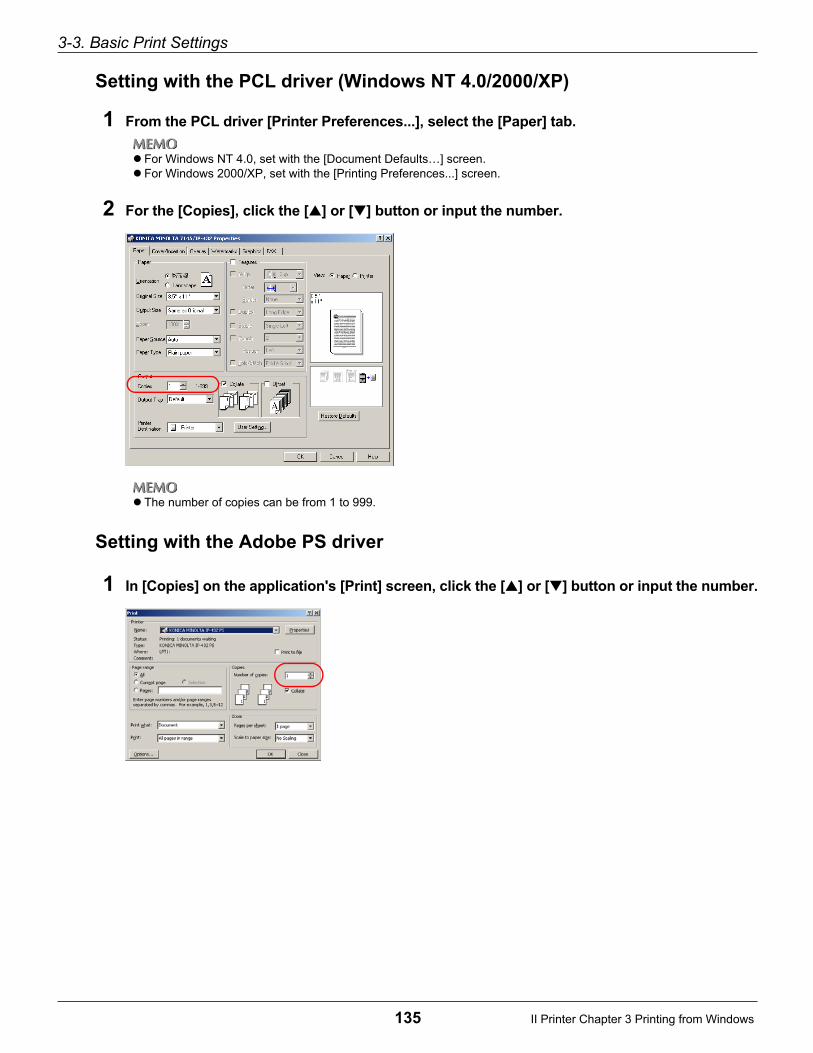
3-3. Basic Print Settings
135 II Printer Chapter 3 Printing from Windows
Setting with the PCL driver (Windows NT 4.0/2000/XP)
1 From the PCL driver [Printer Preferences...], select the [Paper] tab.
For Windows NT 4.0, set with the [Document Defaults…] screen.For Windows 2000/XP, set with the [Printing Preferences...] screen.
2 For the [Copies], click the [▲] or [▼] button or input the number.
The number of copies can be from 1 to 999.
Setting with the Adobe PS driver
1 In [Copies] on the application's [Print] screen, click the [▲] or [▼] button or input the number.

3-3. Basic Print Settings
136 II Printer Chapter 3 Printing from Windows
Setting the Print Direction (Orientation)
This selects Iandscape or portrait direction to print on the paper.
Setting with the PCL driver (Windows 95/98/Me)
1 From the PCL driver [Properties], select the [Paper] tab.
2 For the [Orientation], select [Portrait] or [Landscape].
Setting with the PCL driver (Windows NT 4.0/2000/XP)
1 From the PCL driver [Printer Preferences...], select the [Paper] tab.
For Windows NT 4.0, set with the [Document Defaults…] screen.For Windows 2000/XP, set with the [Printing Preferences...] screen.
2 For the [Orientation], select [Portrait] or [Landscape].
PCL Adobe PS

3-3. Basic Print Settings
137 II Printer Chapter 3 Printing from Windows
Setting with the Adobe PS driver
1 From the Adobe PS driver [Properties], select the [Paper] tab.
2 For the [Orientation], select [Portrait] or [Landscape].
● When the Adobe PS driver is selected, if [Landscape] is selected, you can select [Rotated]. To reverse
printing from top/bottom, check the [Rotated] checkbox.

3-3. Basic Print Settings
138 II Printer Chapter 3 Printing from Windows
Setting the Print Paper Size (Paper Size)
This sets the size of the paper to print on.
For details on the sizes of paper that can be set in the printer's input trays, refer to the copier user's manual.
The paper sizes that can be selected are as follows.
Statement (5.5 x 8.5 inch)
Letter (8.5x11inch)
Legal (8.5 x 14 inch)
Tabloid (11 x 17 inch)
A3 (297 x 420 mm)
A4 (210 x 297 mm)
A5 (148 x 210 mm)
B4 (250 x 354mm)
B5 (182 x 257 mm)
B6 (128 x 182mm)
F4 (8 x 13 inch)
8K (267 x 390 mm)
16K (195 x 267 mm)
Setting with the PCL driver (Windows 95/98/Me)
1 From the PCL driver [Properties], select the [Paper] tab.
2 Select [Paper Size].
PCL Adobe PS

3-3. Basic Print Settings
139 II Printer Chapter 3 Printing from Windows
Setting with the PCL driver (Windows NT 4.0/2000/XP)
1 From the PCL driver [Printer Preferences...], select the [Paper] tab.
For Windows NT 4.0, set with the [Document Defaults…] screen.For Windows 2000/XP, set with the [Printing Preferences…] screen.
2 Select [Original Size].
● Depending on the application being used, the paper size is set automatically by the application and the
paper size that is selected here is ignored. For example, with “Microsoft Word 98”, the paper size
selected by [Paper Size] in [Page Setup] from the [File] menu is set for the paper size.
Setting with the Adobe PS driver
1 From the Adobe PS driver [Properties], select the [Paper] tab.
2 Select [Paper size].

3-3. Basic Print Settings
140 II Printer Chapter 3 Printing from Windows
Selecting the Type of Paper (Media Type/Paper Type)
This selects the type of media to print.
The types of paper you can select are as follows.
Plain paper: Regular copy paper
OHP (Transparency): Overhead projector film
OHP Interleave (Blank): White paper inserted between overhead projector film
OHP Interleave (Print): Prints the same choices on the OHP interleaf paper as on the film.
Setting with the PCL driver (Windows 95/98/Me)
1 From the PCL driver [Properties], select the [Paper] tab.
2 In [Media Type], select the media type.
Setting with the PCL driver (Windows NT 4.0/2000/XP)
1 From the PCL driver [Printer Preferences...], select the [Paper] tab.
For Windows NT 4.0, set with the [Document Defaults...] screen.For Windows 2000/XP, set with the [Printing Preferences...] screen.
PCL Adobe PS

3-3. Basic Print Settings
141 II Printer Chapter 3 Printing from Windows
2 In [Paper Type], select the paper type.
● The collate function cannot be used at the same time as a [Paper Type] selection of [OHP (Transpar-
ency)], [OHP Interleave (Blank)], or [OHP Interleave (Printed)].
Setting with the Adobe PS driver
1 From the Adobe PS driver [Properties], select the [Paper] tab.
2 In [Paper type], select the paper size.
● The collate function cannot be used at the same time as a [Paper Type] selection of [OHP (Transpar-
ency)], [OHP Interleave (Blank)], or [OHP Interleave (Printed)].
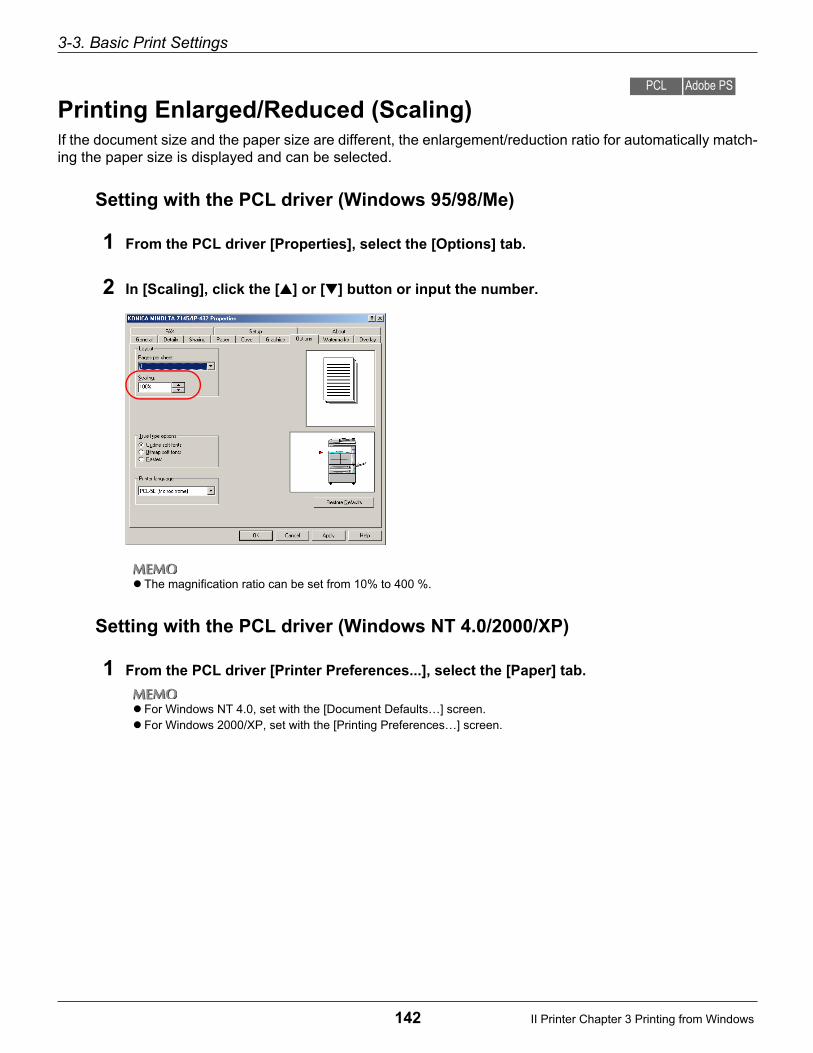
3-3. Basic Print Settings
142 II Printer Chapter 3 Printing from Windows
Printing Enlarged/Reduced (Scaling)If the document size and the paper size are different, the enlargement/reduction ratio for automatically match-ing the paper size is displayed and can be selected.
Setting with the PCL driver (Windows 95/98/Me)
1 From the PCL driver [Properties], select the [Options] tab.
2 In [Scaling], click the [▲] or [▼] button or input the number.
The magnification ratio can be set from 10% to 400 %.
Setting with the PCL driver (Windows NT 4.0/2000/XP)
1 From the PCL driver [Printer Preferences...], select the [Paper] tab.
For Windows NT 4.0, set with the [Document Defaults…] screen.For Windows 2000/XP, set with the [Printing Preferences…] screen.
PCL Adobe PS

3-3. Basic Print Settings
143 II Printer Chapter 3 Printing from Windows
2 Select the [Original Size] and [Output Size].
3 In [Zoom], click the [▲] or [▼] button or input the number.
The magnification ratio can be set from 25% to 400 %.Zooming is performed in ratio to the size converted to output size.
Setting with the Adobe PS driver
1 From the Adobe PS driver [Properties], select the [Graphics] tab.
2 In [Scaling], click the [▲] or [▼] button or input the number.
The magnification ratio can be set from 10% to 400 %.
● When the paper size is set to A3 in Windows 95/98/Me, the magnification ratio can be set from 25% to 400 %.

3-3. Basic Print Settings
144 II Printer Chapter 3 Printing from Windows
Selecting the Input Tray (Paper Source)
This selects the input tray containing the paper to print on.
The types of input trays that can be selected are as follows.
Auto Select: The tray is selected automatically to match the paper size.
Tray 1-5: Input trays (The number of trays depends on the options installed on the copier.)
Bypass Tray
Setting with the PCL driver (Windows 95/98/Me)
1 From the PCL driver [Properties], select the [Paper] tab.
2 In [Paper Source], select the tray.
When an input tray other than [Auto] is selected, the selected tray is displayed blue on the copier diagram.
PCL Adobe PS

3-3. Basic Print Settings
145 II Printer Chapter 3 Printing from Windows
Setting with the PCL driver (Windows NT 4.0/2000/XP)
1 From the PCL driver [Printer Preferences...], select the [Paper] tab.
For Windows NT 4.0, set with the [Document Defaults…] screen.For Windows 2000/XP, set with the [Printing Preferences…] screen.
2 In [Paper Source], select the tray.
When an input tray other than [Auto] is selected, the selected tray is displayed blue on the copier diagram.
Setting with the Adobe PS driver
1 From the Adobe PS driver [Properties], select the [Paper] tab.
2 In [Paper Source], select the tray.

3-3. Basic Print Settings
146 II Printer Chapter 3 Printing from Windows
Selecting the Output Tray (Output Bin)
This selects the tray which to output printed material. This can be selected when the optional output unit isinstalled on the copier.
The types of output trays that can be selected are as follows.
Default: The printer’s (copier’s) normal output tray.
Tray 1-4: Trays on the optional output unit
Setting with the PCL driver (Windows 95/98/Me)
1 From the PCL driver [Properties], select the [Paper] tab.
2 In [Output Tray], select the tray.
PCL Adobe PS
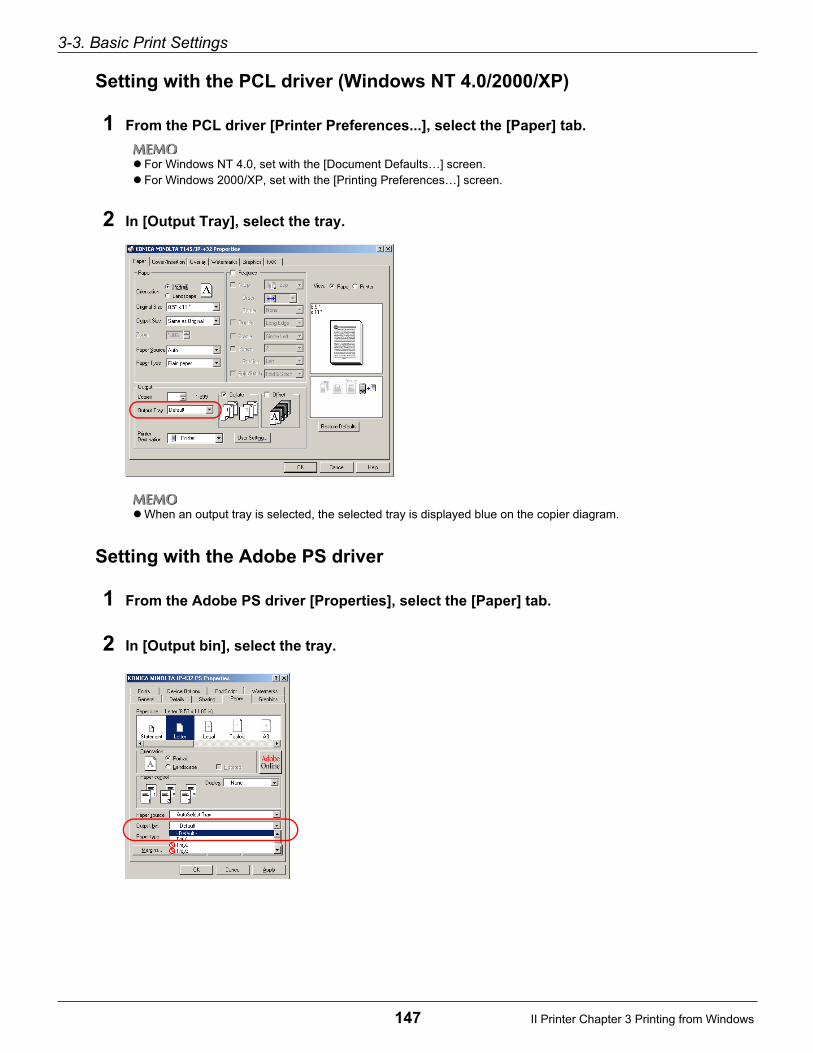
3-3. Basic Print Settings
147 II Printer Chapter 3 Printing from Windows
Setting with the PCL driver (Windows NT 4.0/2000/XP)
1 From the PCL driver [Printer Preferences...], select the [Paper] tab.
For Windows NT 4.0, set with the [Document Defaults…] screen.For Windows 2000/XP, set with the [Printing Preferences…] screen.
2 In [Output Tray], select the tray.
When an output tray is selected, the selected tray is displayed blue on the copier diagram.
Setting with the Adobe PS driver
1 From the Adobe PS driver [Properties], select the [Paper] tab.
2 In [Output bin], select the tray.

3-3. Basic Print Settings
148 II Printer Chapter 3 Printing from Windows
Setting the Margin (Margins)
This sets the width for the margin for printing.When the PostScript option is installed, the settings can be made on Windows 95/98/Me.
1 From the Adobe PS driver [Properties], select the [Paper] tab.
● The margins can be set from the application’s [Print] screen.
2 Click the [Margins...] button.
The [Margins] screen is displayed.
3 Select the margins [Units].
4 The margin widths are set. Click the [▲] or [▼] button or input the number.
The minimum margin that can be set is (0.18 inch). The maximum margin that can be set depends on the size of thepaper.
5 Click the [OK] button.
Adobe PS

149 II Printer Chapter 3 Printing from Windows
3-4. Printing Multiple Pages
Duplex ( Page 153)
This prints consecutive pages on the front and rear.[Flip on long edge] or [Flip on short edge] can be selected.
Pages per sheet /Layout ( Page 155)
This prints multiple pages of consecutive data combined on one side of one sheet of paper. The printimage is automatically reduced to match the selected paper size.2-16 pages of data can be combined on one print page.
PCL Adobe PS
PCL Adobe PS
Flip on long edge Flip on short edge

3-4. Printing Multiple Pages
150 II Printer Chapter 3 Printing from Windows
Combination ( Page 158)
For the PCL driver, if the [Orientation] is set to [Landscape], [Top binding] is set.
Fold/Stitch ( Page 161)
Processes a sheet for fold & stitch, then delivers it.
Collate/Sort ( Page 164)
This prints one entire set of multi-page data at one time.
PCL Adobe PS
PCL Adobe PS
PCL Adobe PS

3-4. Printing Multiple Pages
151 II Printer Chapter 3 Printing from Windows
Offset ( Page 166)
When printing multiple copies, this shifts the position for each set.
Stapling ( Page 169)
This staples.
Punch/Punch Holes ( Page 173)
Punch holes in the document.
Front Cover/Back Cover ( Page 177)
This prints attaching a front cover or back cover.
PCL Adobe PS
PCL Adobe PS
PCL Adobe PS
PCL Adobe PS
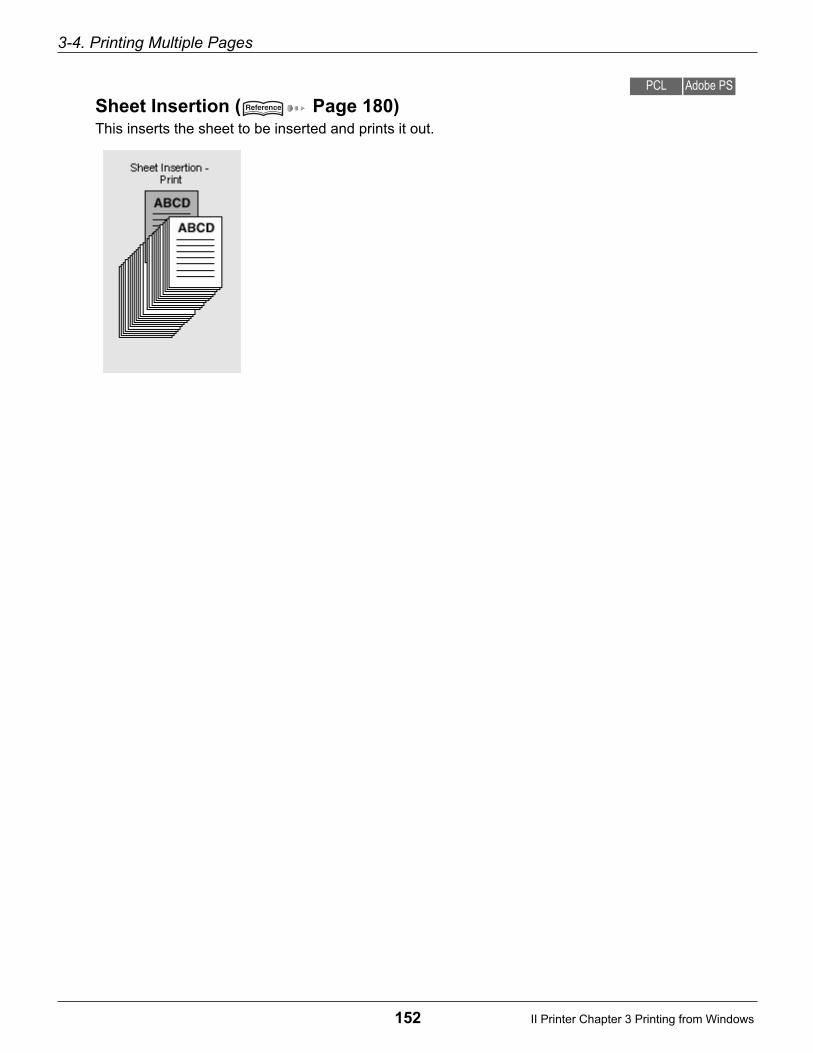
3-4. Printing Multiple Pages
152 II Printer Chapter 3 Printing from Windows
Sheet Insertion ( Page 180)This inserts the sheet to be inserted and prints it out.
PCL Adobe PS

3-4. Printing Multiple Pages
153 II Printer Chapter 3 Printing from Windows
Printing on Both the Front and Rear of the Paper (Duplex)
This prints consecutive pages on the front and rear.[Flip on long edge] or [Flip on short edge] can be selected.
Flip on long edge
The pages are flipped on their long edges. The front and rear have the same top.
Flip on short edge
The pages are flipped on their short edges. The front and rear have tops at opposite ends.
Setting with the PCL driver (Windows 95/98/Me)
1 From the PCL driver [Properties], select the [Paper] tab.
2 In [Duplex], select [Flip on long edge] or [Flip on short edge].
PCL Adobe PS
Flip on long edge Flip on short edge

3-4. Printing Multiple Pages
154 II Printer Chapter 3 Printing from Windows
Setting with the PCL driver (Windows NT 4.0/2000/XP)
1 From the PCL driver [Printer Preferences...], select the [Paper] tab.
For Windows NT 4.0, set with the [Document Defaults…] screen.For Windows 2000/XP, set with the [Printing Preferences…] screen.Duplex printing and booklet printing cannot be set simultaneously.
2 Check the [Duplex] checkbox.
3 In [Duplex], select [Long Edge] or [Short Edge].
Setting with the Adobe PS driver
1 From the Adobe PS driver [Properties], select the [Paper] tab.
2 In [Duplex], select [Flip on long edge] or [Flip on short edge].

3-4. Printing Multiple Pages
155 II Printer Chapter 3 Printing from Windows
Printing Multiple Pages on One Sheet of Paper (Pages per Sheet/Layout)
This prints multiple pages of consecutive data combined on one side of one sheet of paper. The print imageis automatically reduced to match the selected paper size.
Page combination
2-16 pages of data can be combined on one print page.
● When printing, the print image is automatically reduced to match the selected paper size.
PCL Adobe PS
2 up
4 up 6 up
9 up 16 up

3-4. Printing Multiple Pages
156 II Printer Chapter 3 Printing from Windows
Setting with the PCL drier (Windows 95/98/Me)
1 From the PCL driver [Properties], select the [Options] tab.
2 In [Pages per sheet], select the combination type.
Setting with the PCL driver (Windows NT 4.0/2000/XP)
1 From the PCL driver [Printer Preferences...], select the [Paper] tab.
For Windows NT 4.0, set with the [Document Defaults…] screen.For Windows 2000/XP, set with the [Printing Preferences…] screen.
2 Check the [N-up] checkbox.
3 In [N-up], select the combination type.
4 From [Order] the sheet layout order can be selected from left to right or from right to left.
5 From [Border] the type of line for the frame can be selected.
When 4up or more is selected for the N-up, select the [Order] from the four types.
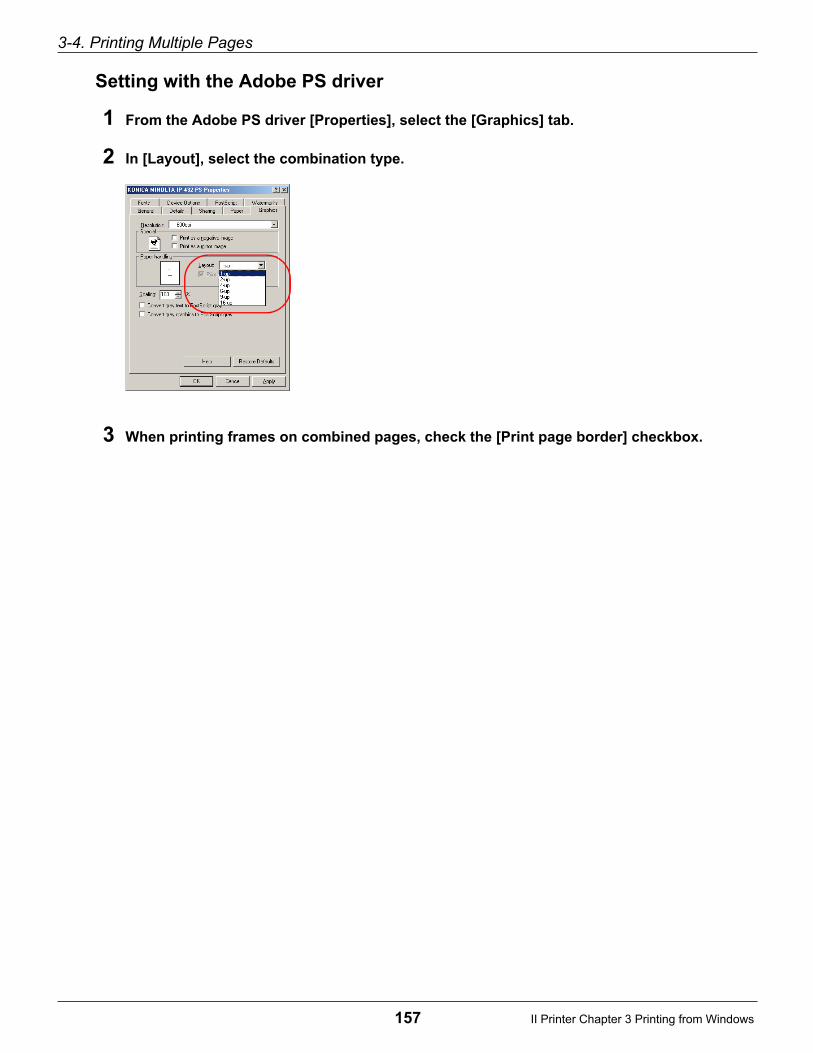
3-4. Printing Multiple Pages
157 II Printer Chapter 3 Printing from Windows
Setting with the Adobe PS driver
1 From the Adobe PS driver [Properties], select the [Graphics] tab.
2 In [Layout], select the combination type.
3 When printing frames on combined pages, check the [Print page border] checkbox.
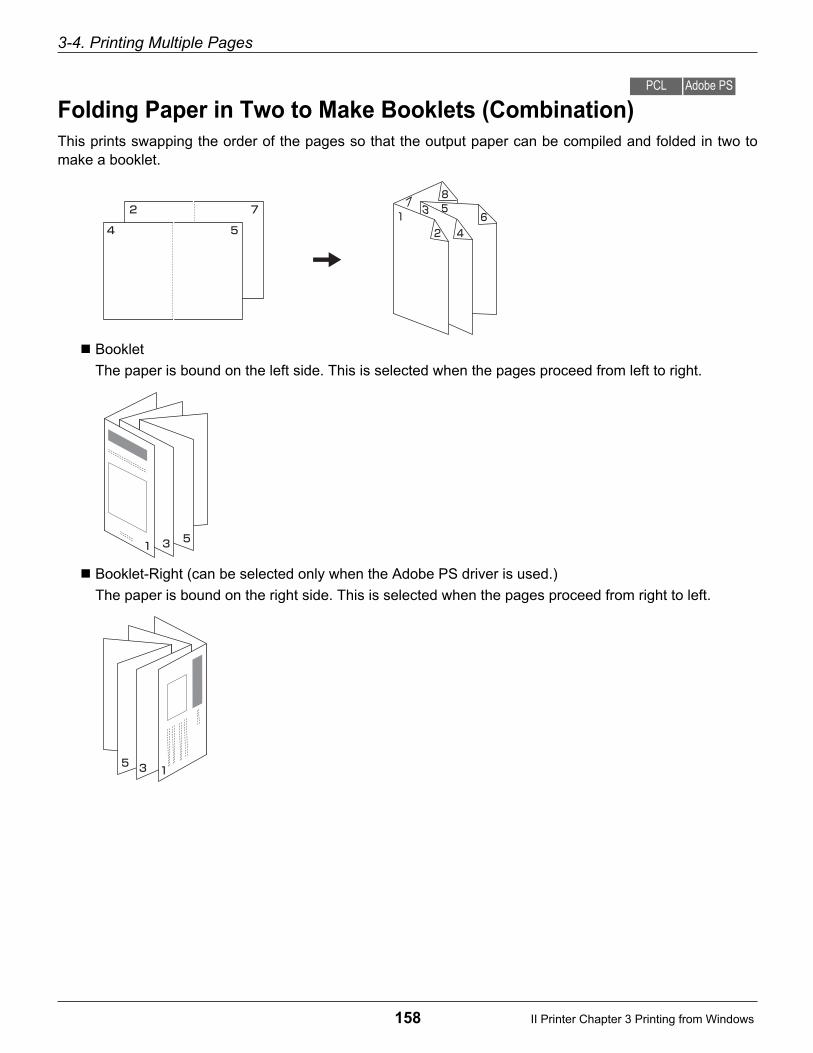
3-4. Printing Multiple Pages
158 II Printer Chapter 3 Printing from Windows
Folding Paper in Two to Make Booklets (Combination)
This prints swapping the order of the pages so that the output paper can be compiled and folded in two tomake a booklet.
Booklet
The paper is bound on the left side. This is selected when the pages proceed from left to right.
Booklet-Right (can be selected only when the Adobe PS driver is used.)
The paper is bound on the right side. This is selected when the pages proceed from right to left.
PCL Adobe PS

3-4. Printing Multiple Pages
159 II Printer Chapter 3 Printing from Windows
● When using the PCL driver, if the [Orientation] is set to [Landscape], [Top binding] is set.
● Booklet/special mode cannot be selected when any of the settings below are in effect:
When the [Paper Size] is other than [Legal (8.5 x 14 inch)], [Tabloid (11 x 17 inch)], [A3], [B4], [B6],
[F4], [8K], and [16K].
When the [Media type] is [OHP (Transparency)], [OHP Interleave (Blank)], or [OHP Interleave (Print)]
When [Stapling], [Duplex],or [Punch] is set
When [Front cover/Back cover] is set
When [Sort] is not set
Setting with the PCL driver (Windows 95/98/Me)
1 From the PCL driver [Properties], select the [Paper] tab.
2 In [Combination], select [Booklet] or [Booklet-Right].

3-4. Printing Multiple Pages
160 II Printer Chapter 3 Printing from Windows
Setting with the PCL driver (Windows NT 4.0/2000/XP)
1 From the PCL driver [Printer Preferences...], select the [Cover/Booklet] tab.
For Windows NT 4.0, set with the [Document Defaults…] screen.For Windows 2000/XP, set with the [Printing Preferences…] screen.
2 Check the [Booklet] checkbox.
3 In [Booklet], select [Left Binding] or [Right Binding].
Setting with the Adobe PS driver
1 From the Adobe PS driver [Properties], select the [Device Options] tab.
2 In [Printer features], select [Combination].
3 In [Change setting for], select [Booklet] or [Booklet-Right].

3-4. Printing Multiple Pages
161 II Printer Chapter 3 Printing from Windows
Fold&Stitch
Fold or bind a sheet in the center and output.
Stitch
Staple at two sections in the center of sheet to be output, then fold it into two and output.
Fold
The sheet to be output is folded at the center and output.
● If the Fold & Stitch option is used in the "Booklet" mode, a sheet that is bound at the center and folded
into two is output.
(With the "Booklet" mode only, sheets are not folded into two and output.)
● Fold & Stitch cannot be used when the following settings are selected.
Common for PCL and Adobe PS
• When "B6", "F4" or "16K" is selected for the [Paper Size].
• If "Staple," "Offset," or "Punch" is selected.
• When "Collate" is not selected ("Sort" is not selected)
PCL only
• When [Fold] or [Fold&Print] is selected as the "Output Method."
PCL Adobe PS
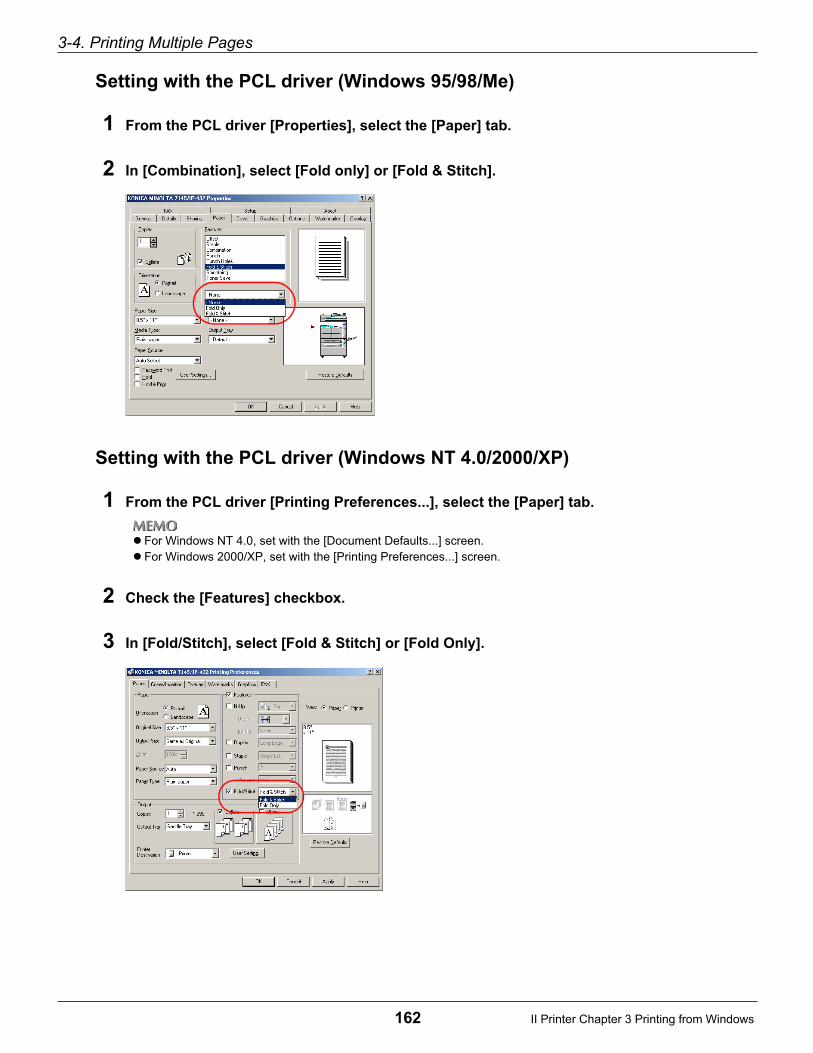
3-4. Printing Multiple Pages
162 II Printer Chapter 3 Printing from Windows
Setting with the PCL driver (Windows 95/98/Me)
1 From the PCL driver [Properties], select the [Paper] tab.
2 In [Combination], select [Fold only] or [Fold & Stitch].
Setting with the PCL driver (Windows NT 4.0/2000/XP)
1 From the PCL driver [Printing Preferences...], select the [Paper] tab.
For Windows NT 4.0, set with the [Document Defaults...] screen.For Windows 2000/XP, set with the [Printing Preferences...] screen.
2 Check the [Features] checkbox.
3 In [Fold/Stitch], select [Fold & Stitch] or [Fold Only].

3-4. Printing Multiple Pages
163 II Printer Chapter 3 Printing from Windows
Setting with the Adobe PS driver
1 From the Adobe PS driver [Properties], select the [Paper] tab.
2 In [Paper type], select [Saddle Tray].
3 Select the [Device Options] tab.
4 In [Printer features], select [Fold, Stitch].
5 In [Change setting for], select [Fold only] or [Fold, Stitch].
3-4. Printing Multiple Pages
164 II Printer Chapter 3 Printing from Windows
Printing One Copy at a Time of All Pages (Collate/Sort)
This prints one entire set of multi-page data at one time.
Setting with the PCL driver (Windows 95/98/Me)
1 From the PCL driver [Properties], select the [Paper] tab.
2 Check the [Collate] checkbox.
PCL Adobe PS

3-4. Printing Multiple Pages
165 II Printer Chapter 3 Printing from Windows
Setting with the PCL driver (Windows NT 4.0/2000/XP)
1 From the PCL driver [Printer Preferences...], select the [Paper] tab.
For Windows NT 4.0, set with the [Document Defaults…] screen.For Windows 2000/XP, set with the [Printing Preferences…] screen.
2 Check the [Collate] checkbox.
Setting with the Adobe PS driver
1 From the Adobe PS driver [Properties], select the [Device Options] tab.
2 In [Printer features], select [Collate].
3 In [Change setting for] select [Sort].
3-4. Printing Multiple Pages
166 II Printer Chapter 3 Printing from Windows
Outputting Sorted into Separate Sets of Copies (Offset)
When printing multiple copies, this shifts the output position for each set.This is handy when outputting multiple copies to a single output tray.
● When the copier optional paper output unit is installed, the paper is output with its position shifted for
each set.
When the paper output unit is not installed, the paper is output with the direction changed for each set.
PCL Adobe PS
When there is a paper output unit When there is no paper output unit

3-4. Printing Multiple Pages
167 II Printer Chapter 3 Printing from Windows
Setting with the PCL driver (Windows 95/98/Me)
1 From the PCL driver [Properties], select the [Paper] tab.
2 In [Offset], select [On].
Setting with the PCL driver (Windows NT 4.0/2000/XP)
1 From the PCL driver [Printer Preferences...], select the [Paper] tab.
For Windows NT 4.0, set with the [Document Defaults…] screen.For Windows 2000/XP, set with the [Printing Preferences…] screen.
2 Check the [Offset] checkbox.

3-4. Printing Multiple Pages
168 II Printer Chapter 3 Printing from Windows
Setting with the Adobe PS driver
1 From the Adobe PS driver [Properties], select the [Device Options] tab.
2 In [Printer features], select [Job Offset].
3 In [Change setting for], select [On].

3-4. Printing Multiple Pages
169 II Printer Chapter 3 Printing from Windows
Stapling (Staple)
Portrait and Landscape
Stapling with the papers joined lengthwise is called [Portrait] and stapling with the papers joined width-wise is called [Landscape].
Number of staples and their locations
The pages are bound on either the left or right side of the paper. For stapling, you can select one- ortwo-point stapling.
For details on the stapling positions, refer to the copier user's manual.
PCL Adobe PS

3-4. Printing Multiple Pages
170 II Printer Chapter 3 Printing from Windows
The types of stapling that can be selected are as follows:
● Stapling cannot be selected when any of the following settings are in effect:
When the [Paper Size] is [B6]
When the [Media Type] is [OHP (Transparency], [OHP Interleave (Blank)], or [OHP Interleave (print)]
When [Combination] is set
When [Sort] is not set
Single Left
Single Right
Double Left
Double Top
Double Right
Single Left
Single Right
Double Left
Double Top
Double Right
Portrait Landscape

3-4. Printing Multiple Pages
171 II Printer Chapter 3 Printing from Windows
Setting with the PCL driver (Windows 95/98/Me)
1 From the PCL driver [Properties], select the [Paper] tab.
2 In [Staple], select the number and location of the staples.
To set either portrait or landscape, change the [Orientation] setting.
Setting with the PCL driver (Windows NT 4.0/2000/XP)
1 From the PCL driver [Printer Preferences...], select the [Paper] tab.
For Windows NT 4.0, set with the [Document Defaults…] screen.For Windows 2000/XP, set with the [Printing Preferences…] screen.
2 Check the [Staple] checkbox.
3 Select the number and location of the staples.
To set either portrait or landscape, change the [Orientation] setting.

3-4. Printing Multiple Pages
172 II Printer Chapter 3 Printing from Windows
Setting with the Adobe PS driver
1 From the Adobe PS driver [Properties], select the [Device Options] tab.
2 In [Printer features], select [Stapling].
3 In [Change setting for], select the number and location of the staples.

3-4. Printing Multiple Pages
173 II Printer Chapter 3 Printing from Windows
Punch/Punch Holes
This punches holes in the document.
Portrait and Landscape
Punching the papers joined lengthwise is called [Portrait] and punching the papers joined widthwise iscalled [Landscape].
Left
This punches holes on the left side of the document. Used to fasten the page from the left side.
Right
This punches holes on the right side of the document. Used to fasten the page from the right side.
Top
This punches holes on the top side of the document. Used to fasten the page from the top.
Punch count settings are different every destination.
2 Holes [2/3 Hole Type] (for U.S. and Canada market area only)
3 Holes [2/3 Hole Type] (for U.S. and Canada market area only)
4 Holes [4 Hole Type]
PCL Adobe PS
Left (Portrait) Left (Landscape)
Right (Portrait) Right (Landscape)
Top (Portrait) Top (Landscape)
3-4. Printing Multiple Pages
174 II Printer Chapter 3 Printing from Windows
● Punch holes cannot be selected when any of the following settings are in effect:
When the [Paper Size] is [A5], [B6], [Tabloid], or [Statement]
When the [Media Type] is not [Plain paper]
When [Combination] is set
● Depending on the setting for [Paper Size], [Orientation], [Pages per sheet], or [Staple], some part of the
settings can be limited.
Setting with the PCL driver (Windows 95/98/Me)
1 From the PCL driver [Properties], select the [Paper] tab.
2 In [Punch], select the number and location of the punch.
3 In [Punch Holes], select the number of the punch holes.
3-4. Printing Multiple Pages
175 II Printer Chapter 3 Printing from Windows
Setting with the PCL driver (Windows NT 4.0/2000/XP)
1 From the PCL driver [Printer Preferences...], select the [Paper] tab.
For Windows NT 4.0, set with the [Document Defaults…] screen.For Windows 2000/XP, set with the [Printing Preferences…] screen.
2 Check the [Punch] checkbox.
3 In [Position], select the location of the punch.
Setting with the Adobe PS driver
1 From the Adobe PS driver [Properties], select the [Device Options] tab.
2 In [Printer features], select [Punch].
3 In [Change setting for], select the location of the punch.

3-4. Printing Multiple Pages
176 II Printer Chapter 3 Printing from Windows
4 In [Printer features], select [Punch Holes].
5 In [Change setting for], select the number of the punch holes.

3-4. Printing Multiple Pages
177 II Printer Chapter 3 Printing from Windows
Attaching a Front Cover/Back Cover (Front Cover/Back Cover)
This prints attaching a front cover or back cover.
Front cover
This prints a front cover. For the front cover, select either [Blank] or [Printed].
For [Blank], one sheet of white paper is added. For [Printed], the first page of the data is printed on thefront cover.
Back cover
This prints attaching a back cover. For the back cover, select either [Blank] or [Printed].
For [Blank], one sheet of white paper is added. For [Printed], the last page of the data is printed on theback cover.
Input tray
Select the tray in which the paper for the front cover/back cover is. Select a tray with paper the samesize as the main text.
● Front cover/back cover cannot be set when any of the following settings are in effect:
When the [Paper Size] is [B6], [Legal], or [Statement]
When a [Media Type] of [OHP (Transparency)], [OHP Interleave (Blank)], or [OHP Interleave (Print)]
is selected
When [Combination] is set
When [Collate/Sort] is not set
PCL Adobe PS
When the front cover is set to [Blank] When the front cover is set to [Printed]
When the back cover is set to [Blank] When the back cover is set to [Printed]

3-4. Printing Multiple Pages
178 II Printer Chapter 3 Printing from Windows
Setting with the PCL driver (Windows 95/98/Me)
1 From the PCL driver [Properties], select the [Cover] tab.
2 Check the [Front Cover] or [Back Cover] checkbox.
3 For the front cover/back cover, select either [Blank] or [Printed].
4 Select the [Tray] containing the paper to use as the front cover/back cover.
Setting with the PCL driver (Windows NT 4.0/2000/XP)
1 From the PCL driver [Printer Preferences...], select the [Cover/Booklet] tab.
For Windows NT 4.0, set with the [Document Defaults…] screen.For Windows 2000/XP, set with the [Printing Preferences…] screen.
2 Check the [Front Cover] or [Back Cover] checkbox.

3-4. Printing Multiple Pages
179 II Printer Chapter 3 Printing from Windows
3 For the front cover/back cover, select either [Blank] or [Printed].
4 Select the [Tray] containing the paper to use as the front cover/back cover.
Setting with the Adobe PS driver
1 From the Adobe PS driver [Properties], select the [Device Options] tab.
2 In [Printer features], select [Front Cover] and/or [Back Cover].
3 In [Change setting for], select [Printed] or [Blank].
4 In [Printer features], select [Front/Back Cover Tray].
5 In [Change setting for], select the input tray in which the paper for the front cover/back
cover is set.

3-4. Printing Multiple Pages
180 II Printer Chapter 3 Printing from Windows
Attaching a Sheet Insertion (Windows NT 4.0/2000/XP)
During printing, a specified page can be printed out on a sheet from a separate paper tray. Also, single-side printing and dual-side printing can be specified in the middle of printing out a document.
Sheet Insertion
A specified page can be printed on a sheet from a separate paper tray. Also, single-side printingand dual-side printing can be specified in the middle of printing out a document.
List
Settings of [Page Number], [Page Source], [Print Type], [Duplex Mode] for sheet insertion can beregistered as the "List".
1 In the PCL driver [Properties] screen, select [Cover/Insertion] tag.
For Windows NT 4.0, set with the [Document Defaults...] screen.For Windows 2000/XP, set with the [Printing Preferences...] screen
2 Check the checkbox for [Sheet Insertion].
3 Click the [▼] button at the right side of the List Name box to display list names and select a
list name to be used from the list.
In the list box, the settings for the selected list name are displayed.
Ten types of list names [List 1] to [List 10] are registered and the lists are limited to 10 types.
4 To change the [List Name], click the [Change Name...] button. If you plan to leave the list as
is, skip to step 7.
PCL

3-4. Printing Multiple Pages
181 II Printer Chapter 3 Printing from Windows
5 Change the [List Name].
Up to 16 characters can be input in the [List Name] field.
6 Click the [OK] button.
The display returns to the [Cover/Insertion] tab.
7 Click the [Add...] button.
8 Input the page numbers for the inserted sheets in the [Page Number] box.
Input the page number in half-width numbers between 1 and 999.Multiple page numbers can be input.Example:To specify pages 2, 4 and 6: [2,4,6]
To specify pages 6 to 10 [6-10]
9 To switch between single-side and dual-side printing in the middle of printing a document,
check the [Simplex/Duplex selection for each page] checkbox.
● When the [Simplex/Duplex selection for each page] checkbox is checked, the front and back covers can-
not be used.

3-4. Printing Multiple Pages
182 II Printer Chapter 3 Printing from Windows
10 Click the [▼] button at the right side of the [Print Type] box to display sheet types and
select a sheet type for the inserted sheets from the list of sheet types being displayed.
If the [Simplex/Duplex selection for each page] checkbox in step 9 is turned OFF, [Printed] is displayed for[Printed(Simplex)] and [Printed(Duplex)].
11 Click the [▼] button at the right side of the [Duplex Mode] box and select [Long Edge] or
[Short Edge] from the list being displayed.
● If a setting other than [Printed(Duplex)] is selected in step 10, setting for [Duplex Mode] cannot be per-
formed.

3-4. Printing Multiple Pages
183 II Printer Chapter 3 Printing from Windows
12 Click the [▼] button at the right side of the list box for [Paper Source], then select a tray for
feeding the insertion sheets from the list.
13 Click the [OK] button.
Returns to the display of the [Front Cover/Insertion Sheet] tab. The selected tray is displayed inthe list box.
14 When selecting a different print type or different paper tray for the inserted sheets, repeat
steps 7 to 13.
Up to 256 settings can be added to a list.
15 Check the settings in the list.
16 Click the [OK] button

3-4. Printing Multiple Pages
184 II Printer Chapter 3 Printing from Windows
Adding/Changing the Inserted Sheet Lists
1 In the [Properties] screen for the PCL driver, select [Cover/Insertion] tab.
For Windows NT 4.0, set with the [Document Defaults...] screen.For Windows 2000/XP, set with the [Printing Preferences...] screen.
2 Check the [Sheet Insertion] checkbox.
3 Click the [▼] button at the right side of the List Name box and select a list name to be used
from the list being displayed.
The settings for the selected list name are displayed in the list box.
Ten types of list names [List 1] to [List 10] are registered and the lists are limited to 10 types.
4 To change the [List Name], click the [Change Name...] button.
5 Change the setting.
Up to 16 characters can be input in the [List Name] box.
6 Click the [OK] button.

3-4. Printing Multiple Pages
185 II Printer Chapter 3 Printing from Windows
7 To change the settings appearing in the list box, select the setting to be changed, then click
the [Edit] button.
8 Change the settings.
For details on changing settings, refer to steps 7 to 13 in [Attaching a Sheet Insertion].
9 Click the [OK] button
Returns to the display of the [Cover/Insertion] tab.
10 Check the contents of the list.
11 Click the [OK] button.
Deleting a List of Insertion Sheets
1 In the [Properties] screen of the PCL driver, select the [Cover/Insertion] tab.
For Windows NT 4.0, set with the [Document Defaults...] screen.For Windows 2000/XP, set with the [Printing Preferences...] screen.
2 Check the [Sheet Insertion] checkbox.

3-4. Printing Multiple Pages
186 II Printer Chapter 3 Printing from Windows
3 Select an item to be deleted and click the [Delete] button.
4 Check the contents of the list. If there are other items to be deleted, repeat the procedure in
step 3.
5 Click the [OK] button.

187 II Printer Chapter 3 Printing from Windows
3-5. Making Image Settings
This makes settings concerning the print quality for photographs and other images. Image settings are madewith the PCL driver [Graphics] tab.
Halftoning
This is expressed by changing the density of the black and white dots making up the image. Select dither forprinting at high speed. The choices that can be selected are as follows.
Solid Black and White: The image is expressed with 2 tones, black and white.
Patterned Grays: The image is expressed by half tone.
Diffused Grays: Select error dispersal to print with high quality emphasizing images.
Brightness (Windows 95/98/Me)
By clicking the [<], [>] or entering numbers, set brightness of the image.
Contrast (Windows 95/98/Me)
By clicking the [<], [>] or entering numbers, set contrast of the image.
Print Density (Windows NT 4.0/2000/XP)
Printing darkness can be selected in 5 steps of shading.
PCL
<Windows 95/98/Me> <Windows NT4.0/2000/XP>
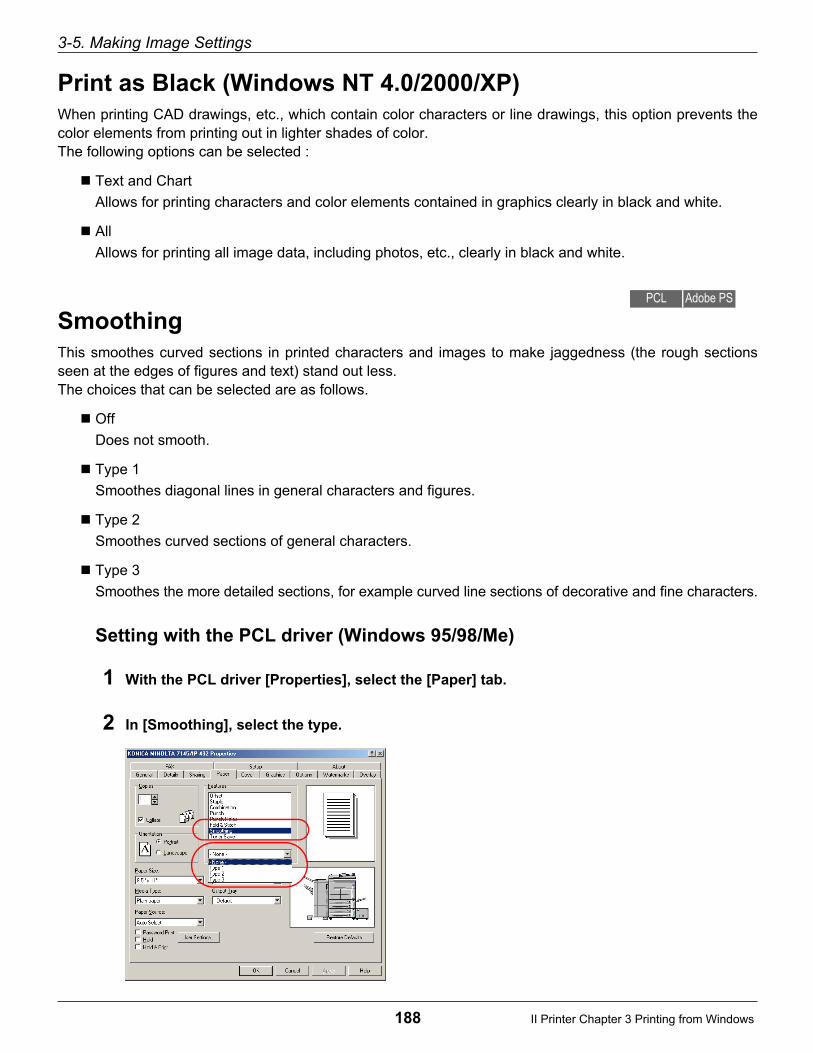
3-5. Making Image Settings
188 II Printer Chapter 3 Printing from Windows
Print as Black (Windows NT 4.0/2000/XP)
When printing CAD drawings, etc., which contain color characters or line drawings, this option prevents thecolor elements from printing out in lighter shades of color. The following options can be selected :
Text and Chart
Allows for printing characters and color elements contained in graphics clearly in black and white.
All
Allows for printing all image data, including photos, etc., clearly in black and white.
Smoothing
This smoothes curved sections in printed characters and images to make jaggedness (the rough sectionsseen at the edges of figures and text) stand out less.The choices that can be selected are as follows.
Off
Does not smooth.
Type 1
Smoothes diagonal lines in general characters and figures.
Type 2
Smoothes curved sections of general characters.
Type 3
Smoothes the more detailed sections, for example curved line sections of decorative and fine characters.
Setting with the PCL driver (Windows 95/98/Me)
1 With the PCL driver [Properties], select the [Paper] tab.
2 In [Smoothing], select the type.
PCL Adobe PS

3-5. Making Image Settings
189 II Printer Chapter 3 Printing from Windows
Setting with the PCL driver (Windows NT 4.0/2000/XP)
1 From the PCL driver [Printer Preferences...], select the [Graphics] tab.
For the Windows NT 4.0, set with the [Document Defaults...] screen.For the Windows 2000/XP, set with the [Printing Preferences...] screen.
2 In [Smoothing], select the type.
Setting with the Adobe PS driver
1 From the Adobe PS driver [Properties], select the [Device Options] tab.
2 In [Printer features], select [Smoothing].
3 In [Change setting for], select Type.

3-5. Making Image Settings
190 II Printer Chapter 3 Printing from Windows
Toner SaveThis controls the print density and conserves the toner. To conserve toner, check the checkbox.
● Toner save and Smoothing function cannot be used at same time.
Setting with the PCL driver (Windows 95/98/Me)
1 With the PCL driver [Properties], select the [Paper] tab.
2 In [Toner Save], select [On].
PCL Adobe PS

3-5. Making Image Settings
191 II Printer Chapter 3 Printing from Windows
Setting with the PCL driver (Windows NT 4.0/2000/XP)
1 From the PCL driver [Printer Preferences...], select the [Graphics] tab.
For the Windows NT 4.0, set with the [Document Defaults...] screen.For the Windows 2000/XP, set with the [Printing Preferences...] screen.
2 Check the [Toner Saver] checkbox.
Setting with the Adobe PS driver
1 From the Adobe PS driver [Properties], select the [Device Options] tab.
2 In [Printer features], select [Toner Save].
3 In [Change setting for], select [On].

3-5. Making Image Settings
192 II Printer Chapter 3 Printing from Windows
Setting the Resolution (Resolution)
This sets the resolution for printing. This setting is made with the Adobe PS driver [Graphics] tab.
1 From the Adobe PS driver [Properties], select the [Graphics] tab.
2 In [Resolution] select the resolution for printing.
The resolution can only be [600 dpi] and cannot be changed.
Adobe PS
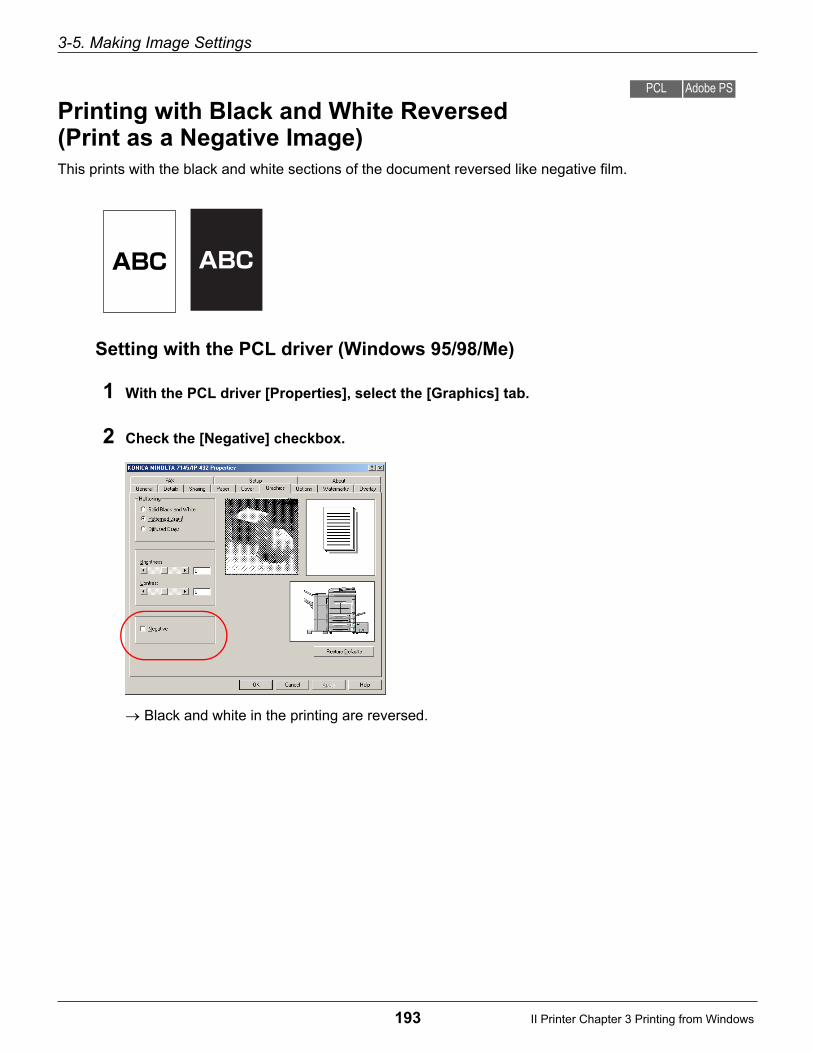
3-5. Making Image Settings
193 II Printer Chapter 3 Printing from Windows
Printing with Black and White Reversed (Print as a Negative Image)
This prints with the black and white sections of the document reversed like negative film.
Setting with the PCL driver (Windows 95/98/Me)
1 With the PCL driver [Properties], select the [Graphics] tab.
2 Check the [Negative] checkbox.
Black and white in the printing are reversed.
PCL Adobe PS

3-5. Making Image Settings
194 II Printer Chapter 3 Printing from Windows
Setting with the Adobe PS driver
1 From the Adobe PS driver [Properties], select the [Graphics] tab.
2 Check the [Print as a negative image] checkbox.
Black and white in the printing are reversed.
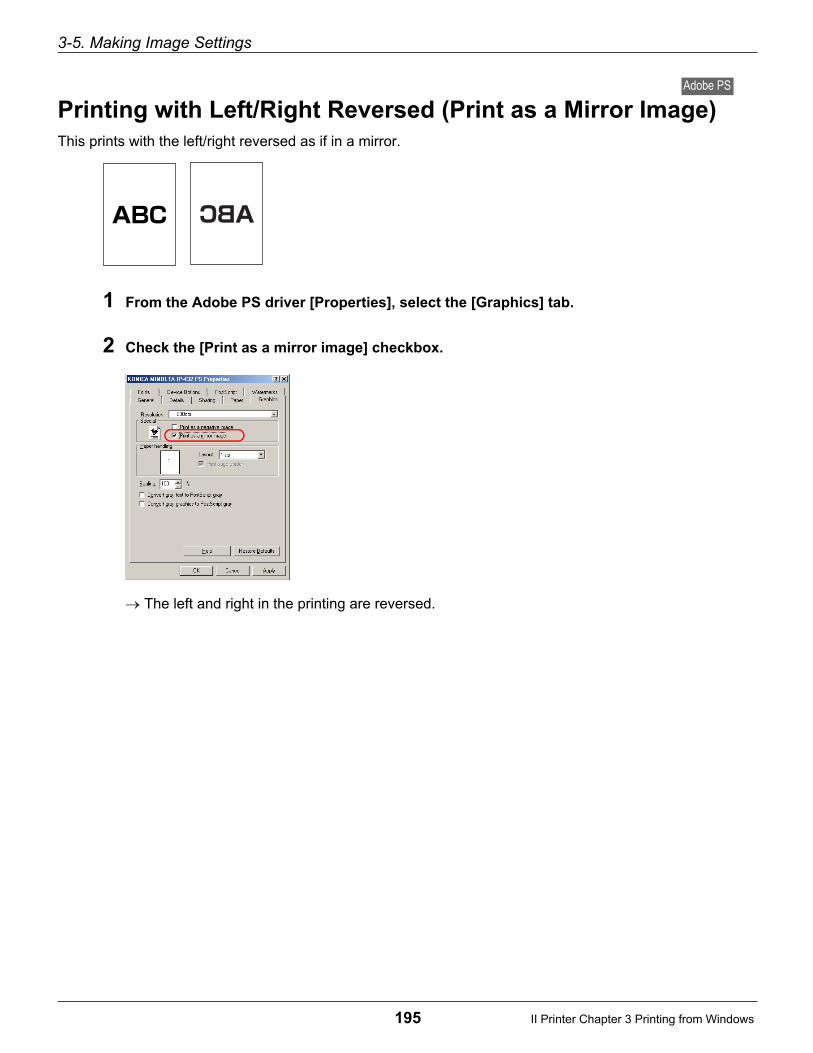
3-5. Making Image Settings
195 II Printer Chapter 3 Printing from Windows
Printing with Left/Right Reversed (Print as a Mirror Image)
This prints with the left/right reversed as if in a mirror.
1 From the Adobe PS driver [Properties], select the [Graphics] tab.
2 Check the [Print as a mirror image] checkbox.
The left and right in the printing are reversed.
Adobe PS
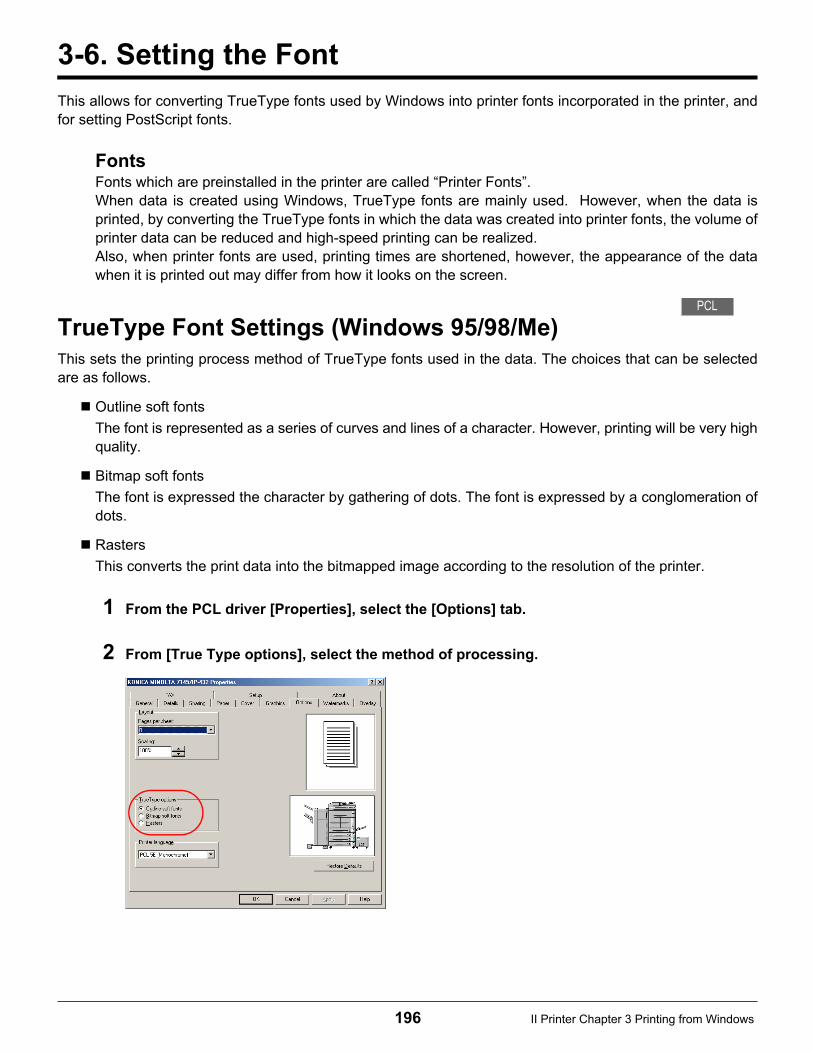
196 II Printer Chapter 3 Printing from Windows
3-6. Setting the Font
This allows for converting TrueType fonts used by Windows into printer fonts incorporated in the printer, andfor setting PostScript fonts.
FontsFonts which are preinstalled in the printer are called “Printer Fonts”.When data is created using Windows, TrueType fonts are mainly used. However, when the data isprinted, by converting the TrueType fonts in which the data was created into printer fonts, the volume ofprinter data can be reduced and high-speed printing can be realized.Also, when printer fonts are used, printing times are shortened, however, the appearance of the datawhen it is printed out may differ from how it looks on the screen.
TrueType Font Settings (Windows 95/98/Me)
This sets the printing process method of TrueType fonts used in the data. The choices that can be selectedare as follows.
Outline soft fonts
The font is represented as a series of curves and lines of a character. However, printing will be very highquality.
Bitmap soft fonts
The font is expressed the character by gathering of dots. The font is expressed by a conglomeration ofdots.
Rasters
This converts the print data into the bitmapped image according to the resolution of the printer.
1 From the PCL driver [Properties], select the [Options] tab.
2 From [True Type options], select the method of processing.
PCL
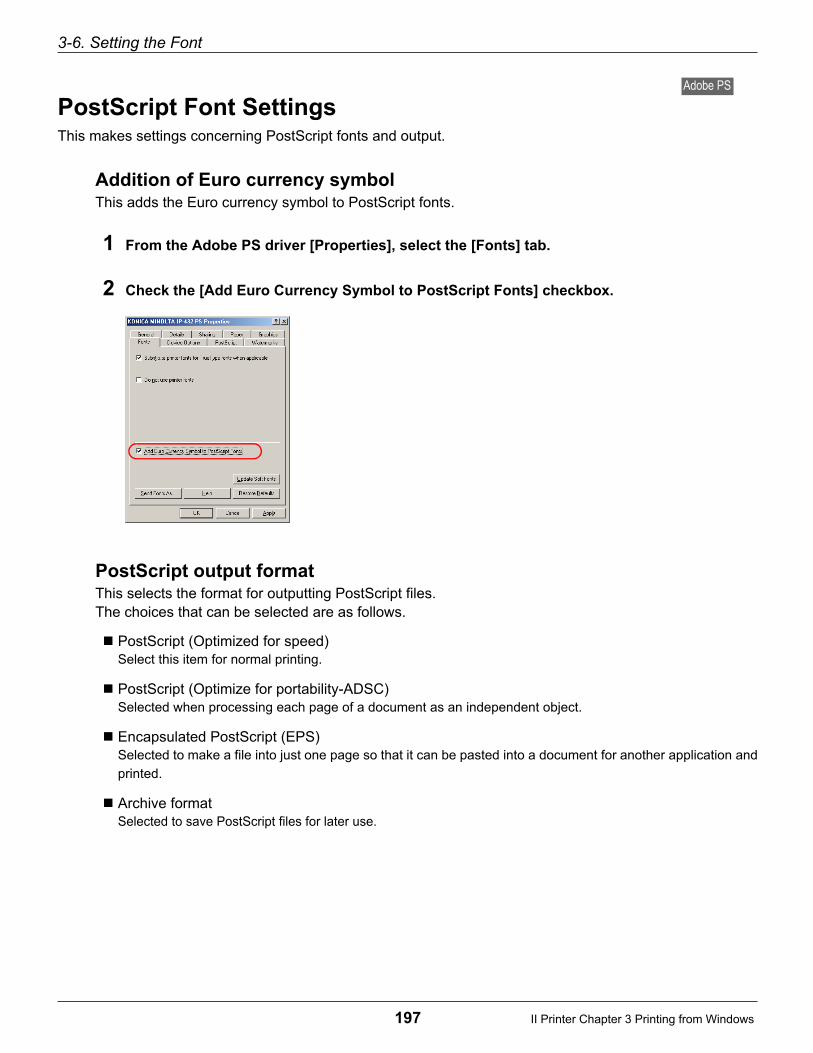
3-6. Setting the Font
197 II Printer Chapter 3 Printing from Windows
PostScript Font SettingsThis makes settings concerning PostScript fonts and output.
Addition of Euro currency symbolThis adds the Euro currency symbol to PostScript fonts.
1 From the Adobe PS driver [Properties], select the [Fonts] tab.
2 Check the [Add Euro Currency Symbol to PostScript Fonts] checkbox.
PostScript output formatThis selects the format for outputting PostScript files.The choices that can be selected are as follows.
PostScript (Optimized for speed)Select this item for normal printing.
PostScript (Optimize for portability-ADSC)Selected when processing each page of a document as an independent object.
Encapsulated PostScript (EPS)Selected to make a file into just one page so that it can be pasted into a document for another application and
printed.
Archive formatSelected to save PostScript files for later use.
Adobe PS

3-6. Setting the Font
198 II Printer Chapter 3 Printing from Windows
1 From the Adobe PS driver [Properties], select the [PostScript] tab.
2 In [PostScript output format], select the output format.
PostScript headerThis selects whether or not to send header information to the printer for each printingThe choices that can be selected are as follows.
Download header with each print job.Select this item for normal printing.
Assume header is downloaded and retained.This is selected when there is no need to send the header information repeatedly, for example on a local
printer. This reduces the print time somewhat.
Send Header NowClick this button to download the header immediately.
● When an [EPS format] or [Archive format] is selected, the PostScript header setting is ignored.
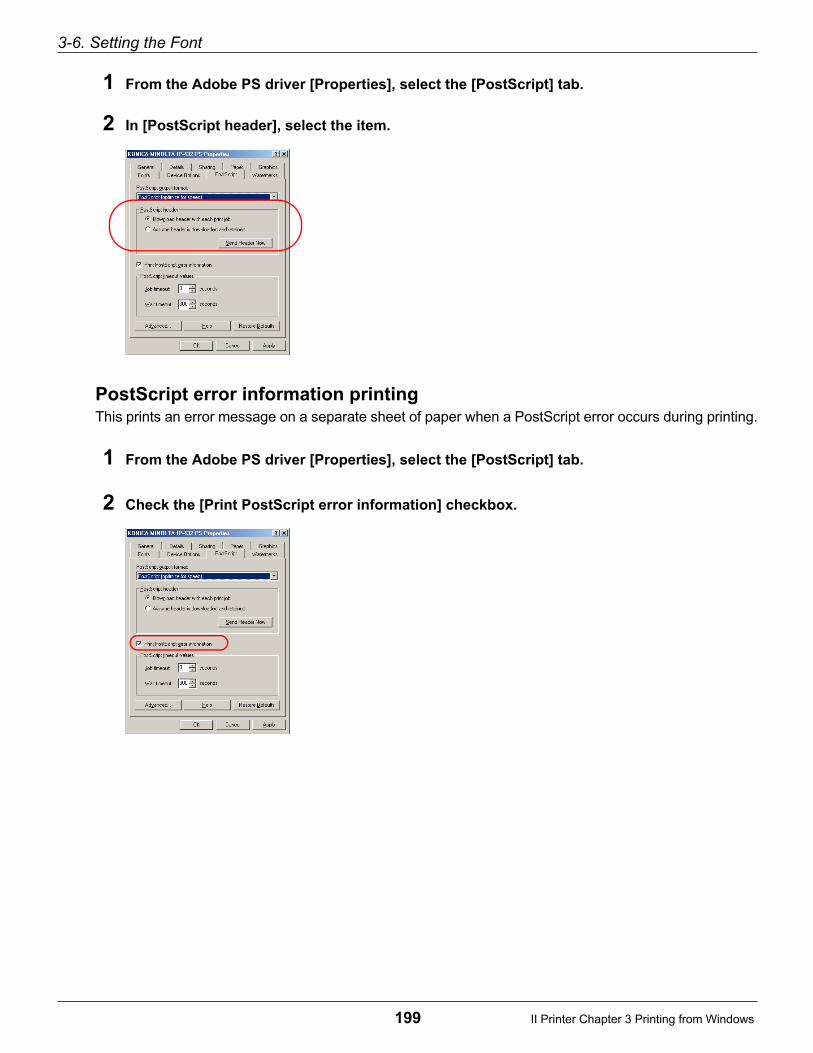
3-6. Setting the Font
199 II Printer Chapter 3 Printing from Windows
1 From the Adobe PS driver [Properties], select the [PostScript] tab.
2 In [PostScript header], select the item.
PostScript error information printingThis prints an error message on a separate sheet of paper when a PostScript error occurs during printing.
1 From the Adobe PS driver [Properties], select the [PostScript] tab.
2 Check the [Print PostScript error information] checkbox.

3-6. Setting the Font
200 II Printer Chapter 3 Printing from Windows
PostScript timeout valuesThis sets the usable time and wait time when using the printer.The choices that can be set are as follows.
Job timeoutThis is the maximum time that can be used to print one set of data. When the set time is exceeded, the printer
stops printing and starts preparations for the next set of data.
Wait timeoutThis is the time for waiting to receive data from Windows. When the set time is exceeded, the printer starts
preparations for the next set of data. The timeout is set for such cases as when the data is not sent due to a
computer error.
1 From the Adobe PS driver [Properties], select the [PostScript] tab.
2 In [PostScript timeout values], set the timeout time.
The number of copies can be set to 0-999.To disable timeouts, input [0].

3-6. Setting the Font
201 II Printer Chapter 3 Printing from Windows
TrueType Font Settings (Windows NT 4.0)The TrueType font in which data was created is converted into a printer font.
1 From the PCL driver [Properties], select the [Font] tab.
2 Check the [Use Printer Fonts] checkbox.
This enables font selection with the [TrueType Fonts Replacement Table].
3 Select the TrueType font to be replaced.
4 Select the printer font to which the TrueType font is to be replaced from [Using Printer Fonts].
5 Click [Apply].
The selected printer font is registered in the [TrueType Fonts Replacement Table].
PDL OptionThe PDL can be changed. When the PDL is changed, the printer fonts which can be used also change. The following PDL can be used:
PCL- XL
PCL- 5E

3-6. Setting the Font
202 II Printer Chapter 3 Printing from Windows
TrueType Font Settings (Windows 2000/XP)The TrueType font in which data was created is converted into a printer font.
1 From the PCL driver [Properties], select the [Fonts] tab.
2 Check the [Use Printer Fonts] checkbox.
This enables font selection with the [TrueType Fonts Replacement Table].Taken from an illustration of Windows 2000.
3 Select the TrueType font to be replaced.
4 Select the printer font to which the TrueType font is to be replaced from [Using Printer Fonts].
5 Click [Apply].
The selected printer font is registered in the [TrueType Fonts replacement Table].
PDL OptionThe PDL can be changed. When the PDL is changed, the printer fonts which can be used also change. The following PDL can be used:
PCL- XL
PCL- 5E

203 II Printer Chapter 3 Printing from Windows
3-7. Special Printing
Overlay ( Page 204)
This prints overlaying the document with separate form data.
Watermark ( Page 207)
This prints [CONFIDENTIAL] or another preset text as a watermark.
Password Print ( Page 211)
This prints after a registered User ID and password are input. This is used for printing confidential data.
PCL
PCL Adobe PS
PCL
Form data Prepared data
User ID
Password
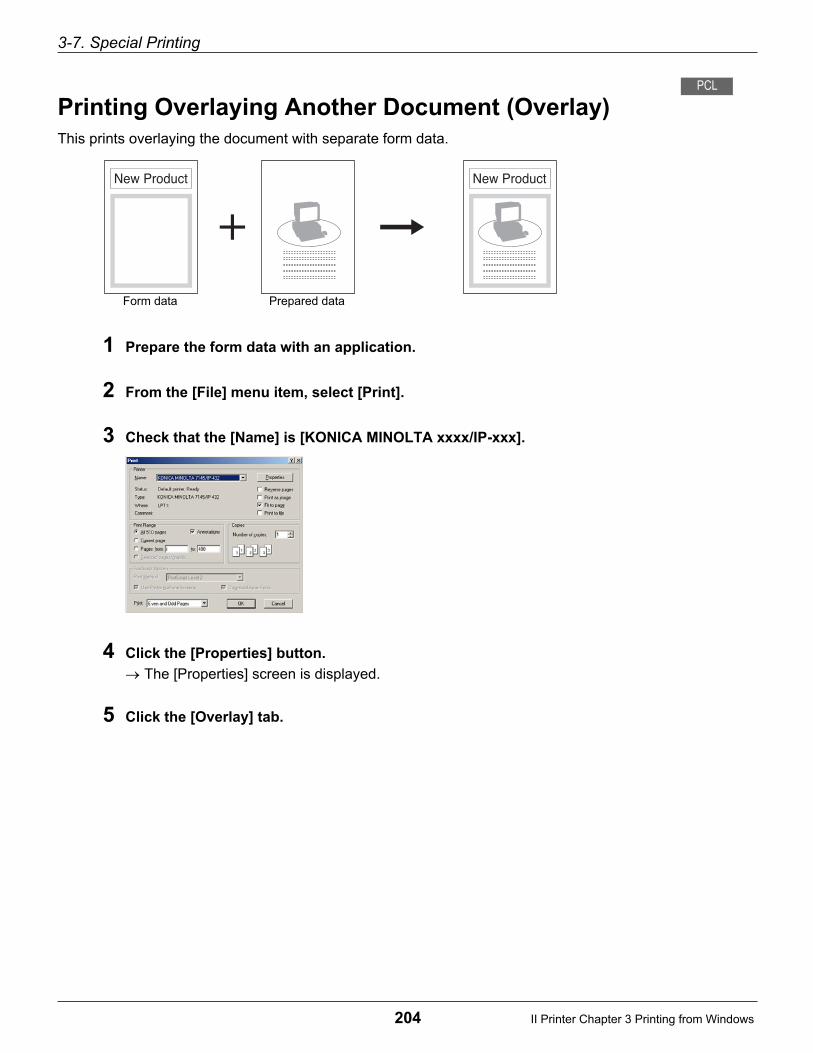
3-7. Special Printing
204 II Printer Chapter 3 Printing from Windows
Printing Overlaying Another Document (Overlay)
This prints overlaying the document with separate form data.
1 Prepare the form data with an application.
2 From the [File] menu item, select [Print].
3 Check that the [Name] is [KONICA MINOLTA xxxx/IP-xxx].
4 Click the [Properties] button.
The [Properties] screen is displayed.
5 Click the [Overlay] tab.
PCL
Form data Prepared data

3-7. Special Printing
205 II Printer Chapter 3 Printing from Windows
6 Click the [Select Bitmap] button.
The [Open overlay file] screen is displayed.
7 Select the document to print with the form data.
8 Click the [OK] button.
The display returns to the [Properties] screen.
The file name extension of [.bmp] is given.
9 Check that the selected file name is displayed.

3-7. Special Printing
206 II Printer Chapter 3 Printing from Windows
10 To shade the image, select the color of the shade from [Color] in [Shade].
11 Click the [ ], [ ] button in [Darkness], then adjust the darkness of the shade.
12 To change the size of the image, either click the [▲], [▼] button with [User defined] in [Size]
selected, or key in the numbers.
For the automatic setting, select [Automatically].
13 To change the position of the image, either click the [▲], [▼] button with [User defined] in
[Position] selected, or key in the numbers.
14 Click the [OK] button.
The display returns to the [Print] screen.
15 Click the [OK] button.
The form data is printed overlaid on the document.
▼
▼

3-7. Special Printing
207 II Printer Chapter 3 Printing from Windows
Printing Watermarks (Watermark)
This prints preset text as a watermark. This setting is made in [Watermark] tab.
You can change the character choices, size, and position with the edit functions.
Setting with PCL driver
1 From the PCL driver [Properties], select the [Watermarks] tab.
2 In [Text] of [Watermarks], select the characters from the list for printing. Check the [Use
watermark] checkbox.
The choices that can be selected are as follows.CONFIDENTIALCOPYDRAFTFILE COPYFINALPROOFTOP SECRET
● You can also input characters into [Text].
PCL Adobe PS
3-7. Special Printing
208 II Printer Chapter 3 Printing from Windows
3 In [Page] of [Watermarks], select the page for printing the watermark.
The choices that can be selected are as follows.All but first pageAll pagesFirst page onlyNo watermark
4 To print a watermark over an image, select [Top] in [Watermarks]. To print a watermark
behind an image, select [Bottom].
● To print several watermarks on a single page, either click the [▲], [▼] button with [Count] in [Watermark]
or key in the numbers.
You can adjust the interval between watermarks by clicking the [▲], [▼] button on [Separation].
5 In [Font], set the font.
This sets the font name, style, font size, color, and character darkness.
6 Select [User defined] in [Position], and set the character position and angle.
● If you select [Move] from [Adjustment], you can drag a character and move it. If you select [Rotate], you
can drag a character and rotate it.
● To create a watermark, click the [NEW] button.
● To delete a watermark, click the [Delete] button.

3-7. Special Printing
209 II Printer Chapter 3 Printing from Windows
Setting with Adobe PS driver
1 From the Adobe PS driver [Properties], select the [Watermarks] tab.
2 In [Select a watermark] select the characters for printing.
The choices that can be selected are as follows.
CONFIDENTIAL
COPY
DRAFT
ORIGINAL
URGENT
Edit, New, Delete (Adobe PS)The choices and size of the characters in the watermark and the position they are printed at can bechanged.It is also possible to prepare new watermarks and delete watermarks that are no longer needed.When you click the [Edit] button, the [Edit watermark] screen is displayed.
The settings that can be changed are as follows.
Watermark textThis sets the Watermark Text, Font, Size, Style.
AngleThis sets the watermark angle.

3-7. Special Printing
210 II Printer Chapter 3 Printing from Windows
PositionThis sets what position on the paper the watermark is printed at.
To print in the center, select [Automatically center].
To print at any other position, select [Position relative to center], then input the coordinates.
ColorNot Available.
Preparing a new watermarkOn the [Watermarks] tab, click the [New] button.
For the setting method, refer to the choices explained previously.
Deleting a watermarkSelect the watermark to delete in [Watermarks], then click the [Delete] button.
Check the choices, then click the [OK] button.
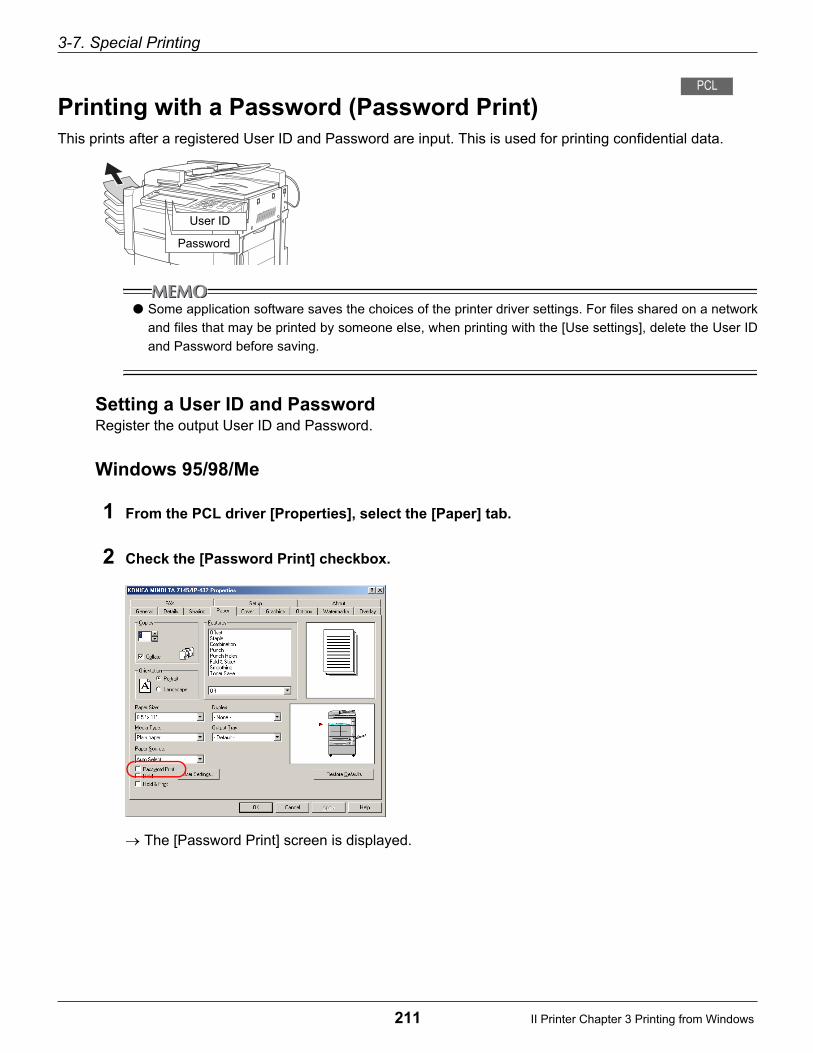
3-7. Special Printing
211 II Printer Chapter 3 Printing from Windows
Printing with a Password (Password Print)
This prints after a registered User ID and Password are input. This is used for printing confidential data.
● Some application software saves the choices of the printer driver settings. For files shared on a network
and files that may be printed by someone else, when printing with the [Use settings], delete the User ID
and Password before saving.
Setting a User ID and PasswordRegister the output User ID and Password.
Windows 95/98/Me
1 From the PCL driver [Properties], select the [Paper] tab.
2 Check the [Password Print] checkbox.
The [Password Print] screen is displayed.
PCL
User ID
Password

3-7. Special Printing
212 II Printer Chapter 3 Printing from Windows
3 Input the User ID to be registered.
Input a User ID of up to 8 digits.
4 Input the password.
Input a password up to 8 characters.
5 Click the [OK] button.
The User ID and password are set, and password print is possible.
When [Printer EKC/ECM function] is set on the copier, the User ID registered on the [Password Print Settings] screenautomatically becomes the printer EKC/ECM User ID.
For details on Printer EKC/ECM, refer to [Chapter 5 Print Count Management (Printer EKC/ECM)] (
Page 295).
6 Printing from an application.
Windows NT4.0/2000/XP
1 From the PCL driver [Printing Preferences…], select the [Paper] tab.
For Windows NT4.0, set with the [Document Defaults…] screen.For Windows 2000/XP, set with the [Printing Preferences…] screen.
2 In [Printer Destination] select the [Password Print].

3-7. Special Printing
213 II Printer Chapter 3 Printing from Windows
3 Input the User ID to be registered.
Input a User ID of up to 8 digits.
4 Input the Password.
Input a Password up to 8 characters.
5 Click the [OK] button.
The User ID and password are set, and password print is possible.
When [Printer EKC/ECM function] is set on the copier, the User ID registered on the [Password Print Settings] screenautomatically becomes the printer EKC/ECM User ID.
For details on Printer EKC/ECM, refer to [Chapter 5 Print Count Management (Printer EKC/ECM)] (
Page 295).
6 Printing from an application.
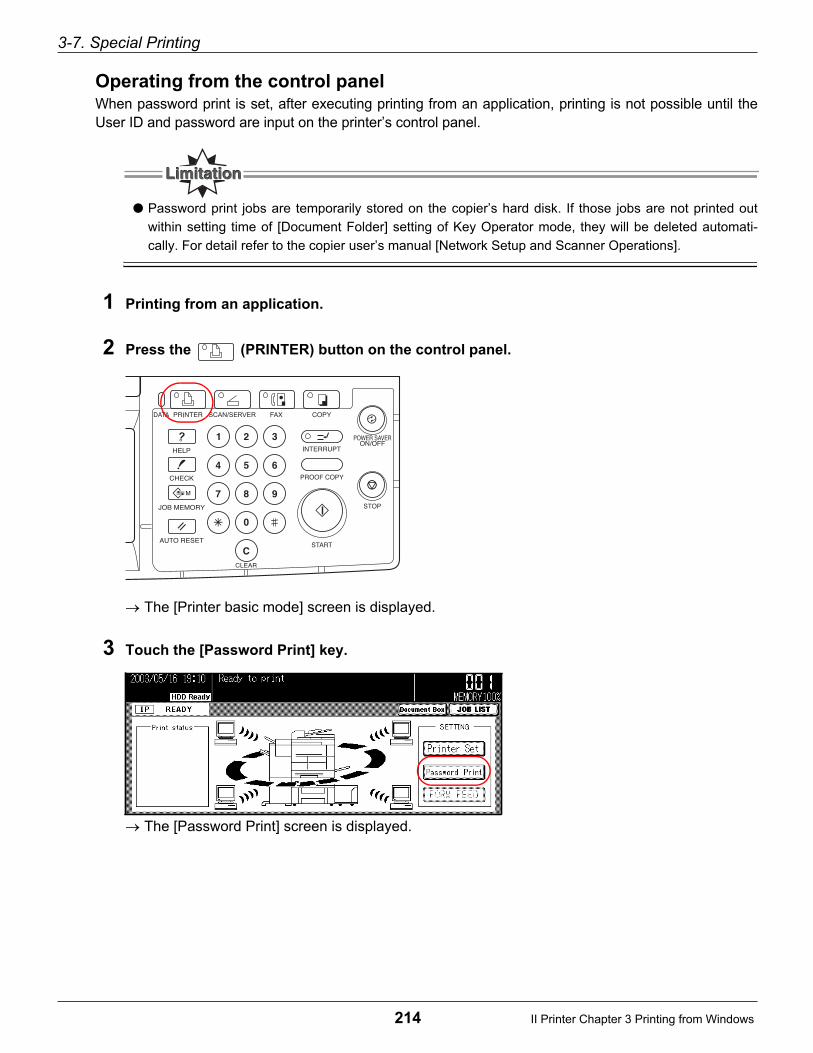
3-7. Special Printing
214 II Printer Chapter 3 Printing from Windows
Operating from the control panelWhen password print is set, after executing printing from an application, printing is not possible until theUser ID and password are input on the printer’s control panel.
● Password print jobs are temporarily stored on the copier’s hard disk. If those jobs are not printed out
within setting time of [Document Folder] setting of Key Operator mode, they will be deleted automati-
cally. For detail refer to the copier user’s manual [Network Setup and Scanner Operations].
1 Printing from an application.
2 Press the (PRINTER) button on the control panel.
The [Printer basic mode] screen is displayed.
3 Touch the [Password Print] key.
The [Password Print] screen is displayed.

3-7. Special Printing
215 II Printer Chapter 3 Printing from Windows
4 Touch the [User ID] key, input the User ID with the number key on the control panel.
If you touch the [DELETE] key, the last character is deleted.
5 Touch the [Password] key.
The [Data Input] screen is displayed.
6 Input the password with the [0] key to the [9] key, the uppercase key and lowercase key.
For instructions on inputting, refer to the copier user’s manual [Network Setup and Scanner Operations].
7 Touch the [OK] key.
A list of the corresponding print jobs is displayed.
8 Select the print job, then touch the [PRINT] key.
The selected print job is printed.Touch [ALL SELECT] to select all print jobs.Touch [DELETE] to delete print job selected.Touch [BACK] to go back to [Password Print] screen.

3-7. Special Printing
216 II Printer Chapter 3 Printing from Windows
Holding the Printed Text in the Document Folder(Hold)
The printed text can be held in the Box created in the copier. It can also be printed out while it is held in thebox.
● The printed text cannot be held in other than the Box created in the copier.
For instructions on Document Folder, refer to the copier user’s manual “Document Folder”.
Windows 95/98/Me
1 From the PCL driver [Properties], select the [Paper] tab.
2 Check the [Hold] or [Hold & Print] checkbox.
The [Hold & Print] screen is displayed.
3 Enter the UserID set for the Document Folder.
PCL

3-7. Special Printing
217 II Printer Chapter 3 Printing from Windows
● If no UserID is preset, do not input here.
Input a UserID with numerical figures up to 8 digits.
4 Input the password preset for the Document Folder.
● If no password is preset, do not input here.
Input a password with alphabetical and numerical figures up to 8 digits.
5 Input the Box No. that you want to hold. If you hold the text in the system box, do not input
here.
Input a Box No. with numerical figures up to 9 digits.
6 Click the [OK] button.
In this step you can hold the text in the box.
7 Printing from an application.
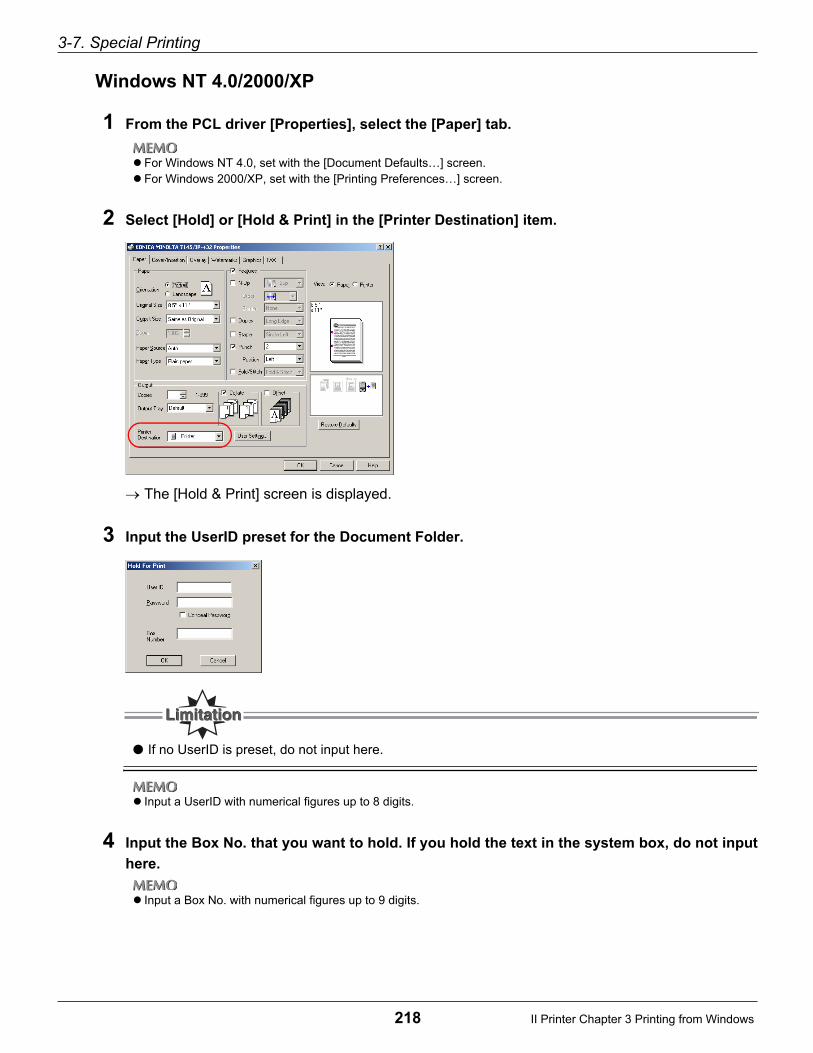
3-7. Special Printing
218 II Printer Chapter 3 Printing from Windows
Windows NT 4.0/2000/XP
1 From the PCL driver [Properties], select the [Paper] tab.
For Windows NT 4.0, set with the [Document Defaults…] screen.For Windows 2000/XP, set with the [Printing Preferences…] screen.
2 Select [Hold] or [Hold & Print] in the [Printer Destination] item.
The [Hold & Print] screen is displayed.
3 Input the UserID preset for the Document Folder.
● If no UserID is preset, do not input here.
Input a UserID with numerical figures up to 8 digits.
4 Input the Box No. that you want to hold. If you hold the text in the system box, do not input
here.
Input a Box No. with numerical figures up to 9 digits.

3-7. Special Printing
219 II Printer Chapter 3 Printing from Windows
5 Input the preset password in the Document Folder.
● If no password is preset, do not input here.
Input a password with alphabetical and numerical figures of 8 characters.
6 Click the [OK] button.
The printed text can be held in the box.
7 Printing from an application.

220 II Printer Chapter 3 Printing from Windows
3-8. Setting the Connection between the Computer and Printer
This makes the settings for the port connecting the computer and the printer and adds drivers. These settingsare made with the PCL driver or Adobe PS driver properties.
Windows 95/98/Me
Checking the printer driver versionThis checks the version of the printer driver currently being used.Select the [About] tab.The driver name and version can be checked.

3-8. Setting the Connection between the Computer and Printer
221 II Printer Chapter 3 Printing from Windows
Adding a printer driverIf you want to use a new printer driver that is not on the [Print using the following driver] list, this addsthat printer driver.
1 Click the [Details] tab.
2 Click the [New Driver...] button.
The confirmation screen is displayed.
3 Click the [Yes] button.
The [Select device] screen is displayed.
For the rest of the procedure, refer to [Chapter 2 Preparing the Printer for Use] ( page 14).
Timeout settingsThis sets the wait time until the printer is in a usable state.The choices that can be set are as follows.
Not selected
This sets the wait time until the printer can print when print data is transmitted from the computer,
When the set time is exceeded, an error message is displayed and the print job is automaticallycanceled.
Transmission retry
This sets the wait time until the printer can retry printing when data transmission from the com-puter fails.
When the set time is exceeded, an error message is displayed and the print job is automaticallycanceled.

3-8. Setting the Connection between the Computer and Printer
222 II Printer Chapter 3 Printing from Windows
Port settingsThis can be set when [LPT*] is set as the printed connection destination. This makes settings for theLPT port to which the printer is connected.The choices that can be set are as follows.
Spool MS-DOS print jobs
Spooling print jobs from MS-DOS-based applications
Check port state before printing
This checks whether the port is connected before printing.
Capture Printer portThis assigns a network printer to a virtual printer port.The choices that can be set are as follows.
Device
Select the port to which the network printer is connected.
Path
The printer connection path is input.
Reconnect at logon
Each time Windows is started, choose whether or not to connect to the printer. To connect, checkthe checkbox.
End CaptureThis ends the setting for the set port.
1 Click the [Details] tab.
2 Click the [End Capture...] button.
The [End Capture] screen is displayed.
3 The port to release is selected.

3-8. Setting the Connection between the Computer and Printer
223 II Printer Chapter 3 Printing from Windows
4 Click the [OK] button.
Port addition/deletionThis adds or deletes a network or local printer.To add a port, click the [Add port] button, then input the network path or port name.To delete a port, click the [Delete port] button, then select the port to delete.
Spool settingsThis sets the method for temporarily accumulating (spooling) the print data when it is sent to the printer.The choices that can be set are as follows.
Spool print jobs so program finishes printing faster
When this item is selected, the data is spooled. In addition, the spool format can be selected.
When you select [Start printing after last page is spooled], you can edit other documents and startother applications during printing.
When you select [Start printing after first page is spooled], the computer's processing is slightlyslower. Select this when there is little free space for spooling on the hard disk. In addition, thespool format can be selected.
Print directly to the printer
This sends print jobs directly to the printer without spooling.
Bi-directional support for this printer
This selects whether or not to use the bi-directional communications function when the printercommunicates with the computer.

3-8. Setting the Connection between the Computer and Printer
224 II Printer Chapter 3 Printing from Windows
Windows NT 4.0
Checking the printer driver versionThis checks the version of the printer driver currently being used.With the PCL driver [Properties], select the [About] tab.The driver name and version can be checked.
Adding a printer driverIf you want to use a new printer driver that is not on the [Print using the following driver] list, this addsthat printer driver.
1 In PCL driver [Properties], click the [General] tab.
2 Click the [New Driver] button.
The confirmation screen is displayed.
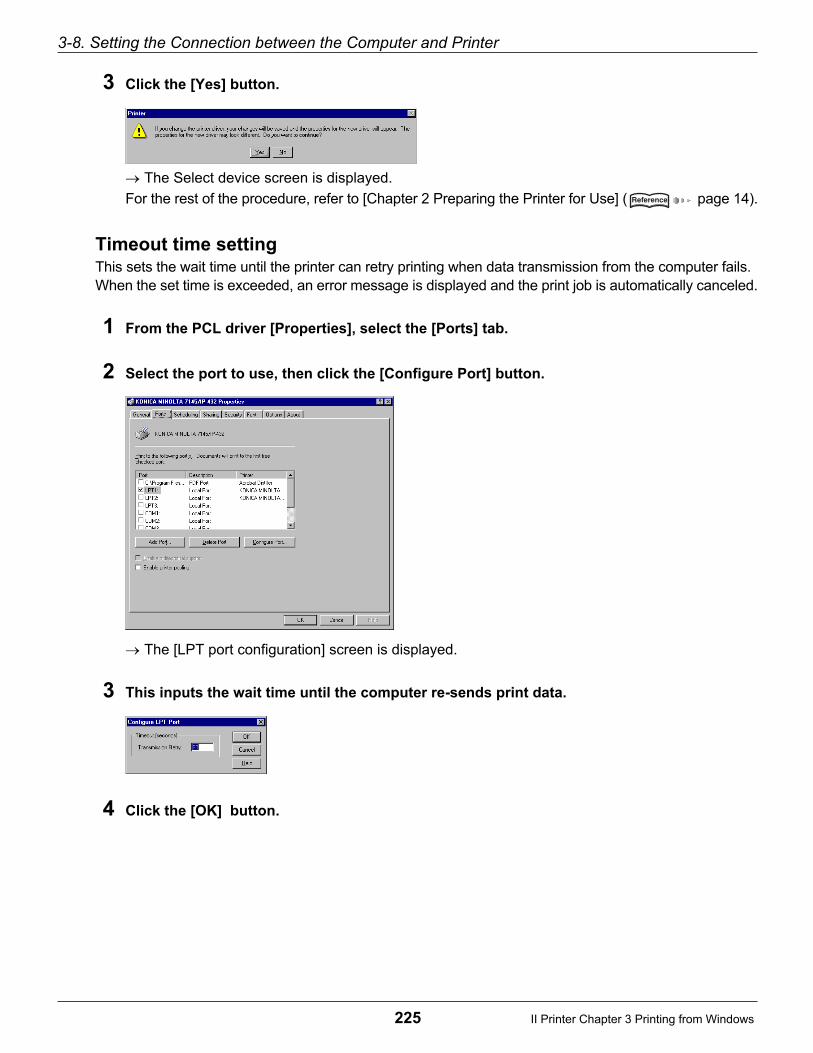
3-8. Setting the Connection between the Computer and Printer
225 II Printer Chapter 3 Printing from Windows
3 Click the [Yes] button.
The Select device screen is displayed.
For the rest of the procedure, refer to [Chapter 2 Preparing the Printer for Use] ( page 14).
Timeout time settingThis sets the wait time until the printer can retry printing when data transmission from the computer fails.When the set time is exceeded, an error message is displayed and the print job is automatically canceled.
1 From the PCL driver [Properties], select the [Ports] tab.
2 Select the port to use, then click the [Configure Port] button.
The [LPT port configuration] screen is displayed.
3 This inputs the wait time until the computer re-sends print data.
4 Click the [OK] button.

3-8. Setting the Connection between the Computer and Printer
226 II Printer Chapter 3 Printing from Windows
Printer port assignmentThis assigns a network printer to a virtual printer port.
1 From the PCL driver [Properties], select the [Ports] tab.
2 Check the checkbox for the port to which the network printer is connected.
3 Click the [OK] button.
Deleting the printer portThis ends the setting for the set port.
1 From the PCL driver [Properties], select the [Ports] tab.
2 Uncheck the checkbox for the port to be released.
3 Click the [OK] button.

3-8. Setting the Connection between the Computer and Printer
227 II Printer Chapter 3 Printing from Windows
Port addition/deletionThis adds or deletes a network or local printer.To add a port, on the [Ports] tab, click the [Add port] button, then click the [New port] button and inputthe port name.To delete a port, select the port to delete in [Ports] tab, and click the [Delete port] button.
Spool settingsThis sets the method for temporarily accumulating (spooling) the print data when it is sent to the printer.This setting is made in [Scheduling] tab.
Spool print documents so program finishes printing faster.
When this item is selected, the data is spooled. In addition, the spool format can be selected.
When you select [Start printing after last page is spooled], you can edit other documents and startother applications even during printing.
When [Start printing immediately] is selected, the spooled data is sent immediately to the com-puter.
Print directly to the printer
This sends print jobs directly to the printer without spooling.

3-8. Setting the Connection between the Computer and Printer
228 II Printer Chapter 3 Printing from Windows
Windows 2000/XP
Checking the printer driver versionThis checks the version of the printer driver currently being used.
1 On the PCL driver [Properties], click the [About] tab.
The driver name and version can be checked.
Adding a printer driverIf you want to use a new printer driver that is not on the [Print using the following driver] list, this addsthat printer driver.
1 On the PCL driver [Properties], click the [Advanced] tab.
2 Click the [New Driver...] button.
The [Add Printer Driver Wizard] screen is displayed.
For the rest of the procedure, refer to [Chapter 2 Preparing the Printer for Use] ( Page 49).

3-8. Setting the Connection between the Computer and Printer
229 II Printer Chapter 3 Printing from Windows
Timeout time settingThis sets the wait time until the printer can retry printing when data transmission from the computer fails.When the set time is exceeded, an error message is displayed and the print job is automatically canceled.
1 From the PCL driver [Properties], select the [Ports] tab.
2 Select the port to use, then click the [Configure Port] button.
The [Configure LPT Port] screen is displayed.
3 This inputs the wait time until the computer re-sends print data.
4 Click the [OK] button.

3-8. Setting the Connection between the Computer and Printer
230 II Printer Chapter 3 Printing from Windows
Printer port assignmentThis assigns a network printer to a virtual printer port.
1 From the PCL driver [Properties], select the [Ports] tab.
2 Check the checkbox for the port to which the network printer is connected.
3 Click the [OK] button.
Deleting the printer portThis ends the setting for the set port.
1 From the PCL driver [Properties], select the [Ports] tab.
2 Uncheck the checkbox for the port to be released.
3 Click the [OK] button.

3-8. Setting the Connection between the Computer and Printer
231 II Printer Chapter 3 Printing from Windows
Port addition/deletionThis adds or deletes a network or local printer.To add a port, on the [Ports] tab, click the [Add port] button, then click the [New port] button and inputthe port name.To delete a port, select the port to delete in [Ports] tab, and click the [Delete port] button.
Spool settingsThis sets the method for temporarily accumulating (spooling) the print data when it is sent to the printer.This setting is made in [Advanced] tab.
Spool print documents so program finishes printing faster.
When this item is selected, the data is spooled. In addition, the spool format can be selected.
When you select [Start printing after last page is spooled], you can edit other documents and startother applications even during printing.
When [Start printing immediately] is selected, the spooled data is sent immediately to the com-puter.
Print directly to the printer
This sends print jobs directly to the printer without spooling.

II Printer
232
Chapter 4 Printing from a Macintosh
You can select the printing method and set functions for printing from applications.This chapter explains the printer functions and setting methods for printing with a Macintosh.
4-1. Setting Printer Functions .................................................................233
4-2. Function List......................................................................................234
4-3. Basic Print Settings ..........................................................................236
4-4. Printing Multiple Pages ....................................................................255
4-5. Special Printing .................................................................................284
4-6. Making PostScript Settings (File Save)...........................................293
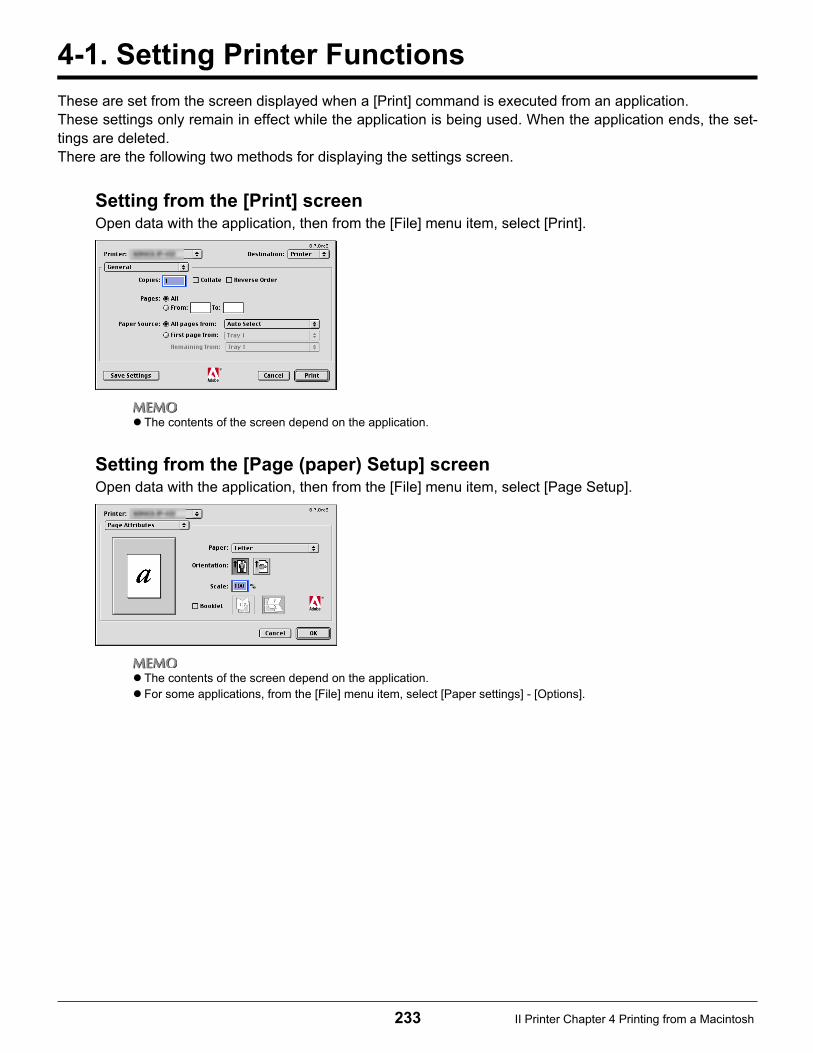
233 II Printer Chapter 4 Printing from a Macintosh
4-1. Setting Printer Functions
These are set from the screen displayed when a [Print] command is executed from an application.These settings only remain in effect while the application is being used. When the application ends, the set-tings are deleted.There are the following two methods for displaying the settings screen.
Setting from the [Print] screenOpen data with the application, then from the [File] menu item, select [Print].
The contents of the screen depend on the application.
Setting from the [Page (paper) Setup] screenOpen data with the application, then from the [File] menu item, select [Page Setup].
The contents of the screen depend on the application.For some applications, from the [File] menu item, select [Paper settings] - [Options].
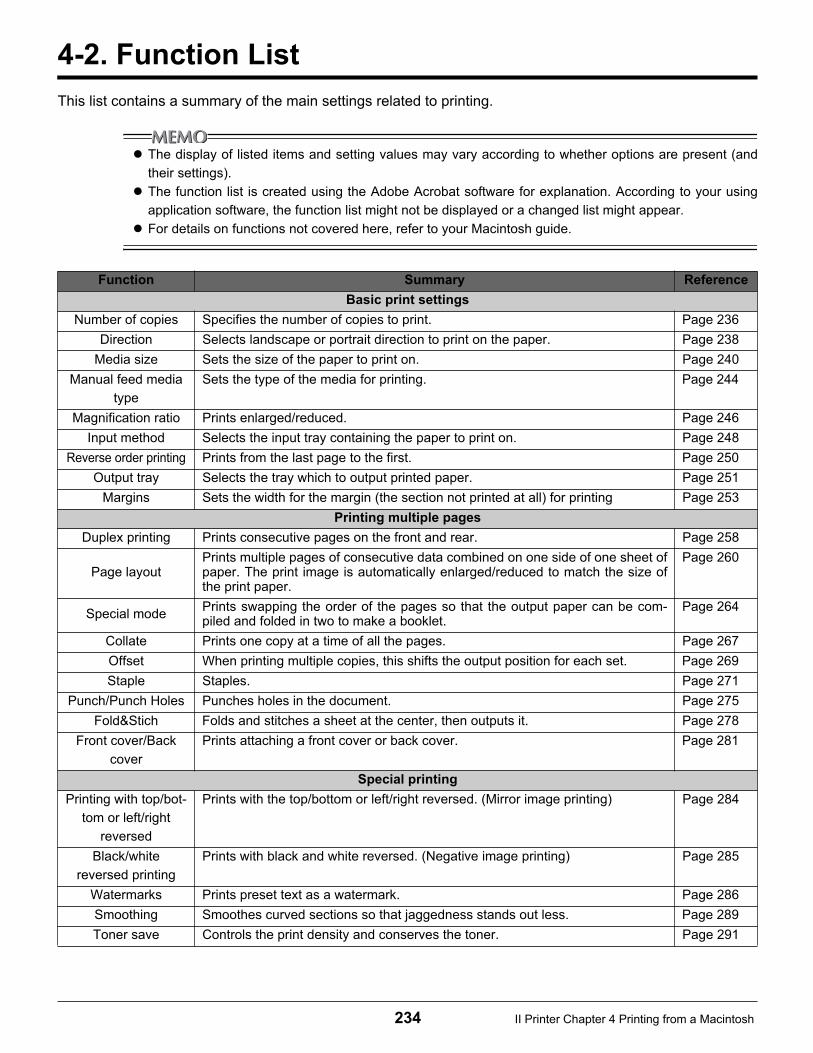
234 II Printer Chapter 4 Printing from a Macintosh
4-2. Function List
This list contains a summary of the main settings related to printing.
The display of listed items and setting values may vary according to whether options are present (and
their settings).
The function list is created using the Adobe Acrobat software for explanation. According to your using
application software, the function list might not be displayed or a changed list might appear.
For details on functions not covered here, refer to your Macintosh guide.
Function Summary Reference
Basic print settings
Number of copies Specifies the number of copies to print. Page 236
Direction Selects landscape or portrait direction to print on the paper. Page 238
Media size Sets the size of the paper to print on. Page 240
Manual feed media
type
Sets the type of the media for printing. Page 244
Magnification ratio Prints enlarged/reduced. Page 246
Input method Selects the input tray containing the paper to print on. Page 248
Reverse order printing Prints from the last page to the first. Page 250
Output tray Selects the tray which to output printed paper. Page 251
Margins Sets the width for the margin (the section not printed at all) for printing Page 253
Printing multiple pages
Duplex printing Prints consecutive pages on the front and rear. Page 258
Page layoutPrints multiple pages of consecutive data combined on one side of one sheet ofpaper. The print image is automatically enlarged/reduced to match the size ofthe print paper.
Page 260
Special modePrints swapping the order of the pages so that the output paper can be com-piled and folded in two to make a booklet.
Page 264
Collate Prints one copy at a time of all the pages. Page 267
Offset When printing multiple copies, this shifts the output position for each set. Page 269
Staple Staples. Page 271
Punch/Punch Holes Punches holes in the document. Page 275
Fold&Stich Folds and stitches a sheet at the center, then outputs it. Page 278
Front cover/Back
cover
Prints attaching a front cover or back cover. Page 281
Special printing
Printing with top/bot-
tom or left/right
reversed
Prints with the top/bottom or left/right reversed. (Mirror image printing) Page 284
Black/white
reversed printing
Prints with black and white reversed. (Negative image printing) Page 285
Watermarks Prints preset text as a watermark. Page 286
Smoothing Smoothes curved sections so that jaggedness stands out less. Page 289
Toner save Controls the print density and conserves the toner. Page 291
4-2. Function List
235 II Printer Chapter 4 Printing from a Macintosh
Function Summary Reference
Making PostScript settings (file save)
Format Sets the data format for writing to files. Page 293
PostScript level Sets the PostScript level compatibility. Page 294
Format Selects either ASCII or binary. Page 294
Font data Sets the type of font data embedded in files. Page 294

236 II Printer Chapter 4 Printing from a Macintosh
4-3. Basic Print Settings
Setting the Number of Copies to Print (Copies)This specifies the number of copies to print.
Mac OS 8.x or Higher up to Version 9.x
1 From the [File] menu item, select [Print].
2 Select [General].
3 In [Copies], input the number of copies to print.
The number of copies can be set to 1 to 999.

4-3. Basic Print Settings
237 II Printer Chapter 4 Printing from a Macintosh
Mac OS X v10.2x
1 From the [File] menu item, select [Print].
2 Select [Copies & Pages].
3 In [Copies], input the number of copies to print.

4-3. Basic Print Settings
238 II Printer Chapter 4 Printing from a Macintosh
Setting the Print Direction (Direction)
This selects landscape or portrait direction to print on the paper.
Mac OS 8.x or Higher up to Version 9.x
1 From the [File] menu item, select [Page Setup].
For some applications, from the [File] menu item, select [Paper settings] - [Options].
2 Select [Page Attributes].
3 In [Orientation], select the paper direction.

4-3. Basic Print Settings
239 II Printer Chapter 4 Printing from a Macintosh
Mac OS X v10.2x
1 From the [File] menu item, select [Page Setup].
2 Select [Page Attributes].
3 In [Orientation], select the paper direction.
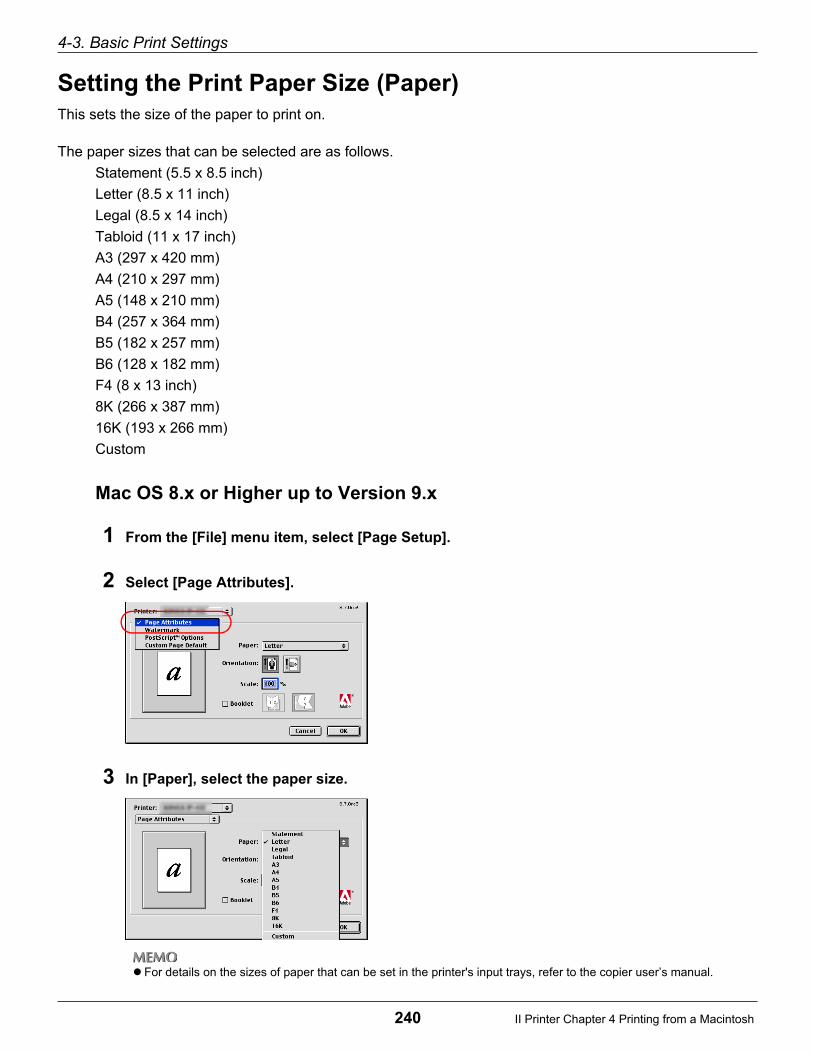
4-3. Basic Print Settings
240 II Printer Chapter 4 Printing from a Macintosh
Setting the Print Paper Size (Paper)
This sets the size of the paper to print on.
The paper sizes that can be selected are as follows.
Statement (5.5 x 8.5 inch)
Letter (8.5 x 11 inch)
Legal (8.5 x 14 inch)
Tabloid (11 x 17 inch)
A3 (297 x 420 mm)
A4 (210 x 297 mm)
A5 (148 x 210 mm)
B4 (257 x 364 mm)
B5 (182 x 257 mm)
B6 (128 x 182 mm)
F4 (8 x 13 inch)
8K (266 x 387 mm)
16K (193 x 266 mm)
Custom
Mac OS 8.x or Higher up to Version 9.x
1 From the [File] menu item, select [Page Setup].
2 Select [Page Attributes].
3 In [Paper], select the paper size.
For details on the sizes of paper that can be set in the printer's input trays, refer to the copier user’s manual.

4-3. Basic Print Settings
241 II Printer Chapter 4 Printing from a Macintosh
Mac OS X v10.2x
1 From the [File] menu item, select [Page Setup].
2 Select [Page Attributes].
3 In [Paper Size], select the paper size.

4-3. Basic Print Settings
242 II Printer Chapter 4 Printing from a Macintosh
Setting Any Paper Size
To set a non-standard paper size, select [Custom], then input the paper width and height with the followingprocedure.
Mac OS 8.x or Higher up to Version 9.x
1 From the [File] menu item, select [Page Setup].
2 Select [Custom Page Default].
3 In [Units], select the length unit, then input the height and width of the paper size.
4 Click the [OK] button.
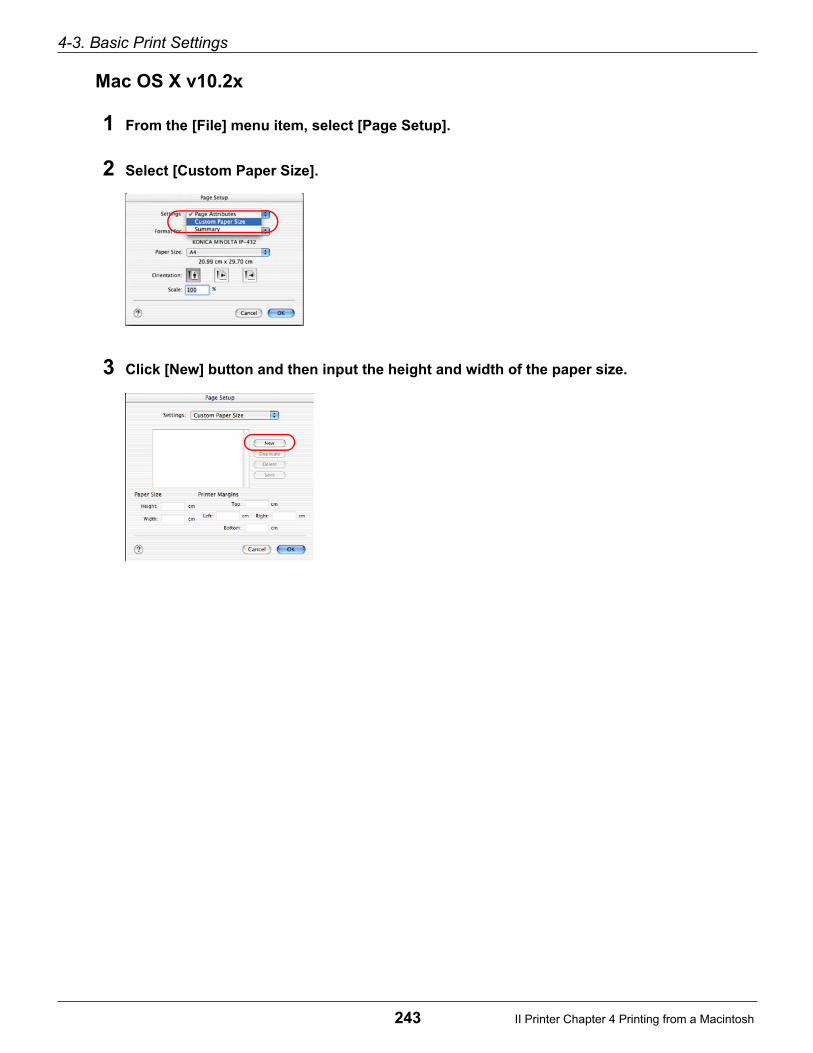
4-3. Basic Print Settings
243 II Printer Chapter 4 Printing from a Macintosh
Mac OS X v10.2x
1 From the [File] menu item, select [Page Setup].
2 Select [Custom Paper Size].
3 Click [New] button and then input the height and width of the paper size.

4-3. Basic Print Settings
244 II Printer Chapter 4 Printing from a Macintosh
Selecting the Type of Paper (Media Type)
This selects the type of media to print.
The types of paper you can select are as follows.
Plain paper: Regular copy paper
OHP (Transparency): Overhead projector film
OHP Interleave (Blank): White paper inserted between overhead projector film
OHP Interleave (Print): Prints the same contents on the OHP interleaf paper as on the transparency.
Mac OS 8.x or Higher up to Version 9.x
1 From the [File] menu item, select [Print].
2 Select [Printer Specific Options].
3 In [Media Type], select the paper type.
The collate function cannot be set at the same time as a [Media type] selection of [OHP], [OHP Inter-
leave (Blank)], or [OHP Interleave (Print)].

4-3. Basic Print Settings
245 II Printer Chapter 4 Printing from a Macintosh
Mac OS X v10.2x
1 From the [File] menu item, select [Print].
2 Select [Setup].
3 In [Media Type], select the paper type.

4-3. Basic Print Settings
246 II Printer Chapter 4 Printing from a Macintosh
Printing Enlarged/Reduced (Magnification Ratio)
This specifies the magnification ratio for printing.
Mac OS 8.x or Higher up to Version 9.x
1 From the [File] menu item, select [Page Setup].
2 Select [Page Attributes].
3 Input the [Scale].
The magnification ratio can be from 25% to 400 %.

4-3. Basic Print Settings
247 II Printer Chapter 4 Printing from a Macintosh
Mac OS X v10.2x
1 From the [File] menu item, select [Page Setup].
2 Select [Page Attributes].
3 Input the [Scale].
The magnification ratio can be from 25% to 400 %.
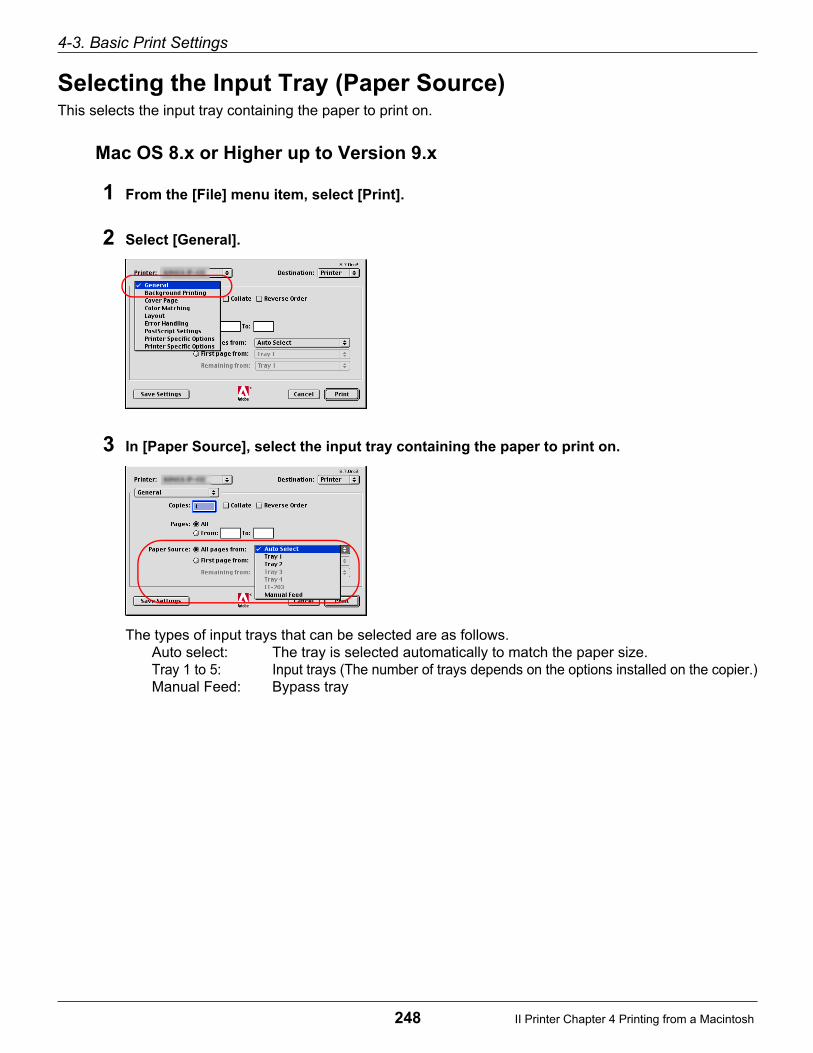
4-3. Basic Print Settings
248 II Printer Chapter 4 Printing from a Macintosh
Selecting the Input Tray (Paper Source)This selects the input tray containing the paper to print on.
Mac OS 8.x or Higher up to Version 9.x
1 From the [File] menu item, select [Print].
2 Select [General].
3 In [Paper Source], select the input tray containing the paper to print on.
The types of input trays that can be selected are as follows.Auto select: The tray is selected automatically to match the paper size.Tray 1 to 5: Input trays (The number of trays depends on the options installed on the copier.)Manual Feed: Bypass tray

4-3. Basic Print Settings
249 II Printer Chapter 4 Printing from a Macintosh
Mac OS X v10.2x
1 From the [File] menu item, select [Print].
2 Select [Paper Feed].
3 Select the input tray.
The types of input trays that can be selected are as follows.Auto select: The tray is selected automatically to match the paper size.Tray 1 to 5: Input trays (The number of trays depends on the options installed on the copier.)Manual Feed: Bypass tray
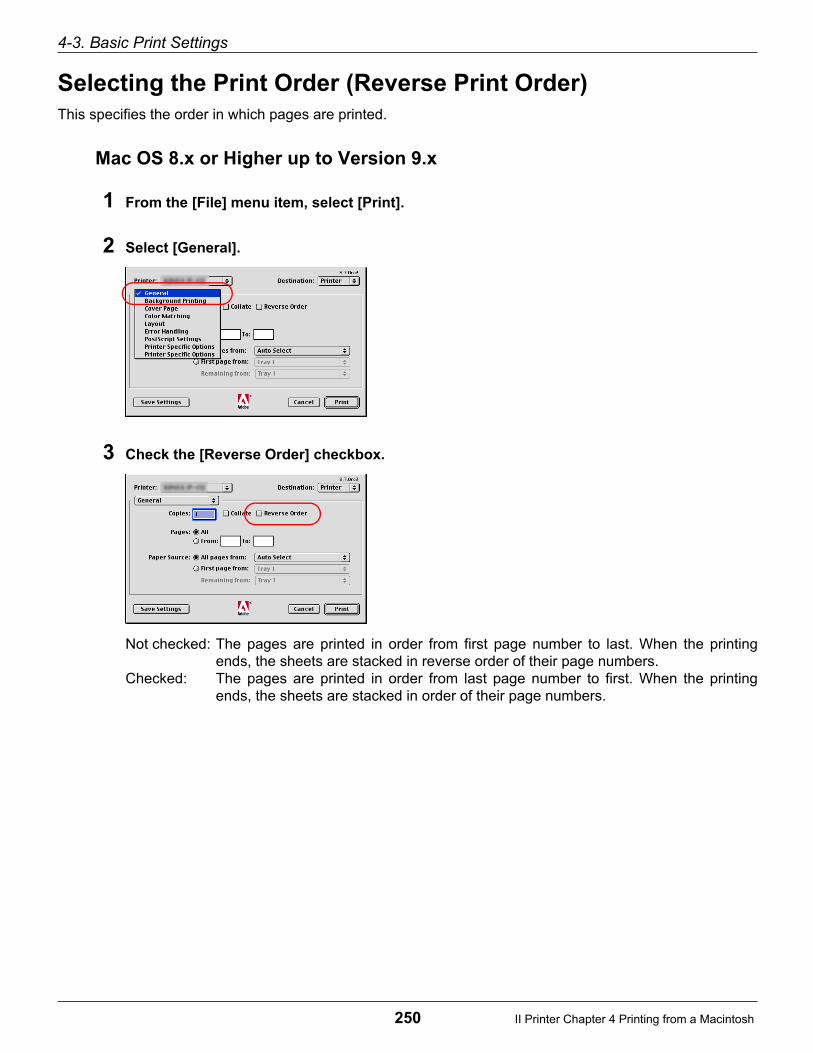
4-3. Basic Print Settings
250 II Printer Chapter 4 Printing from a Macintosh
Selecting the Print Order (Reverse Print Order)
This specifies the order in which pages are printed.
Mac OS 8.x or Higher up to Version 9.x
1 From the [File] menu item, select [Print].
2 Select [General].
3 Check the [Reverse Order] checkbox.
Not checked: The pages are printed in order from first page number to last. When the printingends, the sheets are stacked in reverse order of their page numbers.
Checked: The pages are printed in order from last page number to first. When the printingends, the sheets are stacked in order of their page numbers.

4-3. Basic Print Settings
251 II Printer Chapter 4 Printing from a Macintosh
Selecting the Output Tray (Output Bin)This selects the tray which to output printed paper. This can be selected when the optional output unit isinstalled on the copier.
Mac OS 8.x or Higher up to Version 9.x
1 From the [File] menu item, select [Print].
2 Select [Printer Specific Options].
3 The tray is selected in [Output Bin].
The types of output trays that can be selected are as follows.Default: The printer’s (copier) normal output tray.Trays 1 to 4: Trays on the optional output unit.

4-3. Basic Print Settings
252 II Printer Chapter 4 Printing from a Macintosh
Mac OS X v10.2x
1 From the [File] menu item, select [Print].
2 Select [Finishing].
3 The tray is selected in [Output Bin].
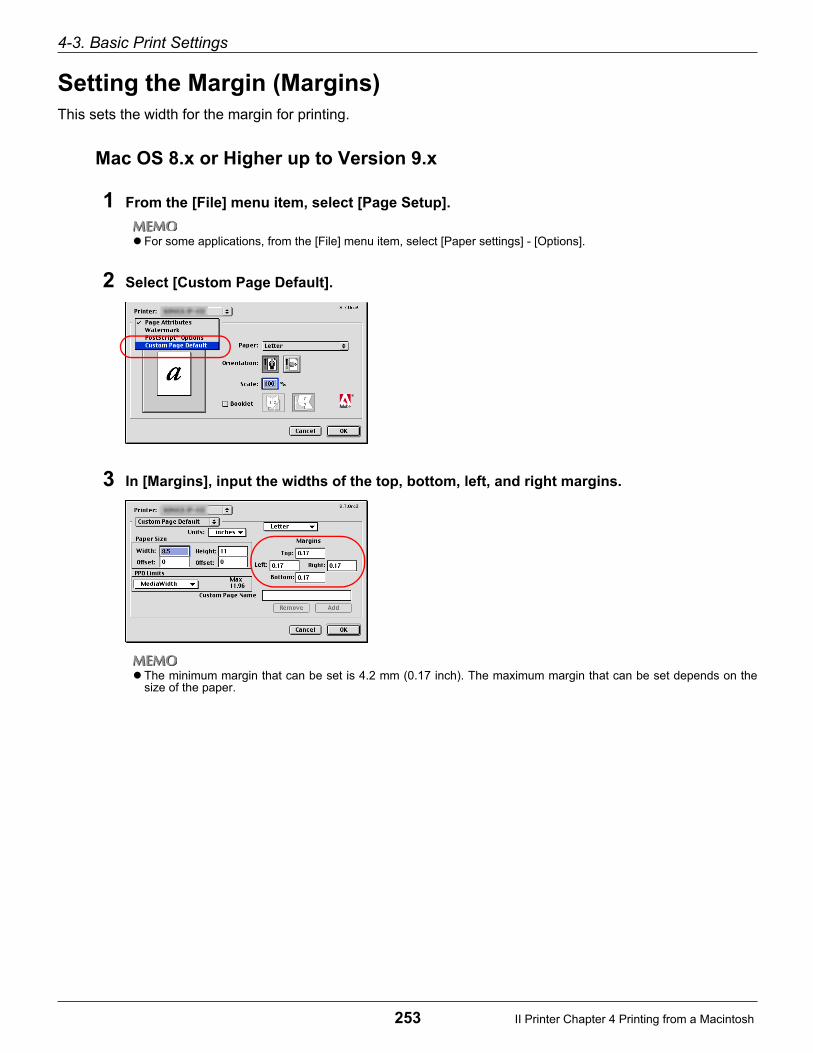
4-3. Basic Print Settings
253 II Printer Chapter 4 Printing from a Macintosh
Setting the Margin (Margins)
This sets the width for the margin for printing.
Mac OS 8.x or Higher up to Version 9.x
1 From the [File] menu item, select [Page Setup].
For some applications, from the [File] menu item, select [Paper settings] - [Options].
2 Select [Custom Page Default].
3 In [Margins], input the widths of the top, bottom, left, and right margins.
The minimum margin that can be set is 4.2 mm (0.17 inch). The maximum margin that can be set depends on thesize of the paper.

4-3. Basic Print Settings
254 II Printer Chapter 4 Printing from a Macintosh
Mac OS X v10.2x
1 From the [File] menu item, select [Page Setup].
2 Select [Custom Page Size].
3 Click [New] button and then input the widths for the Top, Bottom, Left and Right margins.
The minimum margin that can be set is 4.2 mm (0.17 inch). The maximum margin that can be set depends on thesize of the paper.

255 II Printer Chapter 4 Printing from a Macintosh
4-4. Printing Multiple Pages
Duplex printing ( Page 258)
This prints consecutive pages on the front and rear.[Flip on long edge] or [Flip on short edge] can be selected.
Document pages/print pages/layout direction ( Page 260)
This prints multiple pages of consecutive data combined on one side of one sheet of paper.When the size of the document set by the application is larger than the print paper size, one page of thedocument is printed laid out over multiple sheets of paper.The print image is automatically enlarged/reduced to match the size of the print paper.From 2 to 16 pages of data can be combined on 1 page and 1 page can be divided into 4 (2x2) to 36(6x6) units.
Printing multiple document pages on one sheet paper
Printing one document page on multiple sheets of paper
Flip on long edge Flip on short edge

4-4. Printing Multiple Pages
256 II Printer Chapter 4 Printing from a Macintosh
Special mode ( Page 264)
This swaps the order of the pages so that the output paper can be compiled and folded in two to makea booklet.[Left binding] or [Right binding] can be selected.
Collating ( Page 267)
This prints one entire set of multi-page data at one time.
Offset ( Page 269)
When printing multiple copies, this shifts the position for each set.
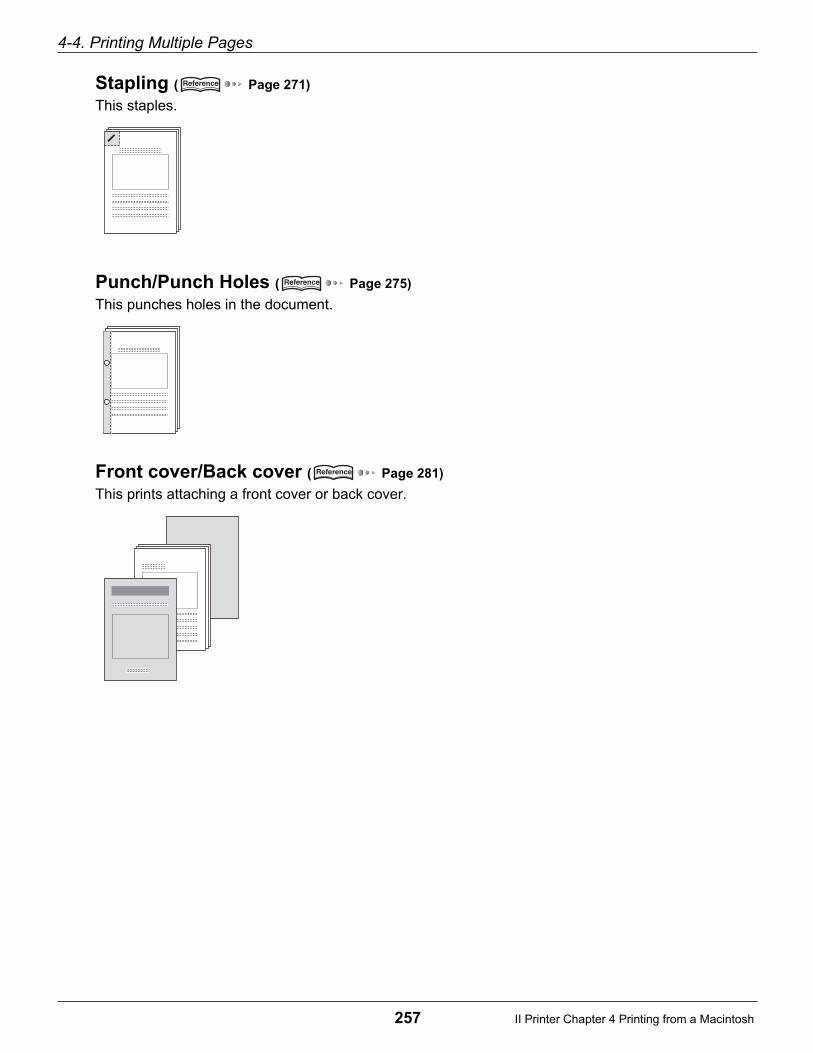
4-4. Printing Multiple Pages
257 II Printer Chapter 4 Printing from a Macintosh
Stapling ( Page 271)
This staples.
Punch/Punch Holes ( Page 275)
This punches holes in the document.
Front cover/Back cover ( Page 281)
This prints attaching a front cover or back cover.

4-4. Printing Multiple Pages
258 II Printer Chapter 4 Printing from a Macintosh
Printing on Both the Front and Rear of the Paper (Duplex Printing)This prints consecutive pages on the front and rear.[Flip on long edge] or [Flip on short edge] can be selected.
Flip on long edgeThe pages are flipped on their long edges. The front and rear have the same top.
Flip on short edgeThe pages are flipped on their short edges. The front and rear have tops at opposite ends.
Mac OS 8.x or Higher up to Version 9.x
1 From the [File] menu item, select [Print].
2 Select [Layout].
3 Check the [Print on Both Sides] checkbox.
Flip on long edge Flip on short edge

4-4. Printing Multiple Pages
259 II Printer Chapter 4 Printing from a Macintosh
4 Select the [Binding].
Mac OS X v10.2x
1 From the [File] menu item, select [Print].
2 Select [Duplex].
3 Check the [Print on Both Sides] checkboxes.

4-4. Printing Multiple Pages
260 II Printer Chapter 4 Printing from a Macintosh
Printing Multiple Pages on One Sheet of Paper (DocumentPages/Print Pages/Layout Direction)
This prints multiple pages of consecutive data combined on one side of one sheet of paper.When the size of the document set by the application is larger than the print paper size, one page of the doc-ument is printed laid out over multiple sheets of paper. The print image is automatically enlarged/reduced tomatch the size of the print paper.
Document pages/print pagesFrom 2 to 16 pages of data can be combined on 1 page and 1 page can be divided into 4 (2x2) to 36(6x6) units.
Printing multiple document pages on one sheet paper
Printing one document page on multiple sheets of paper
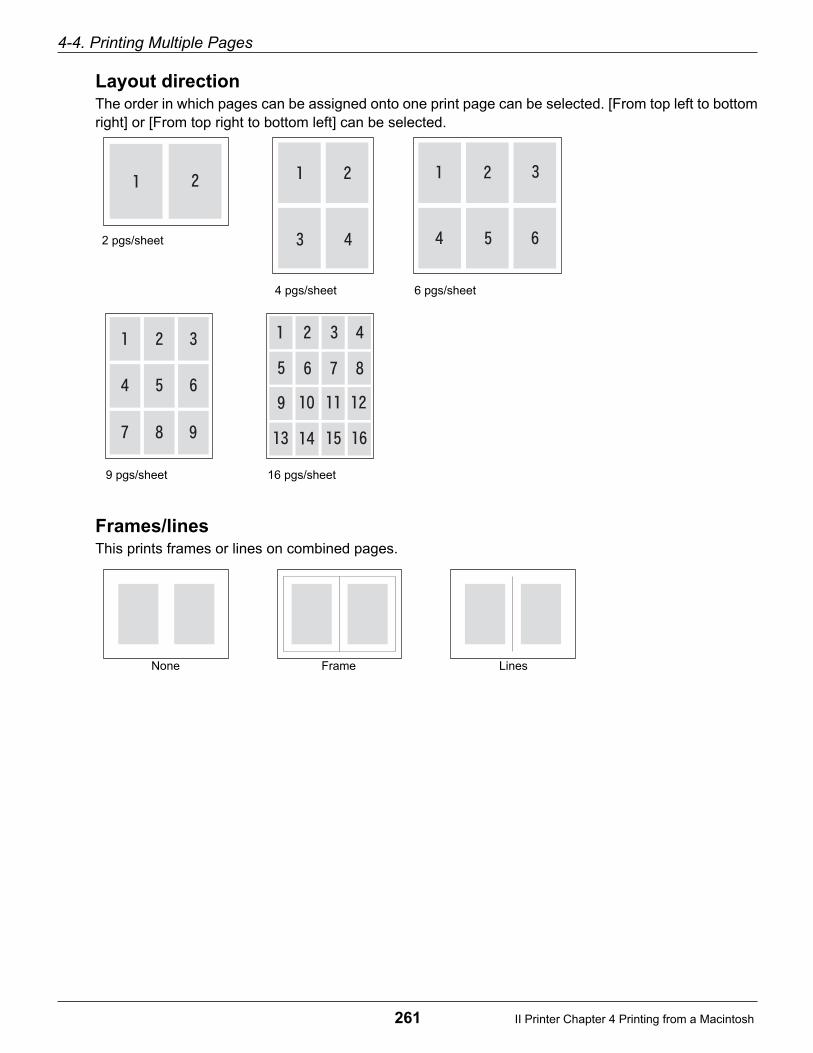
4-4. Printing Multiple Pages
261 II Printer Chapter 4 Printing from a Macintosh
Layout directionThe order in which pages can be assigned onto one print page can be selected. [From top left to bottomright] or [From top right to bottom left] can be selected.
Frames/linesThis prints frames or lines on combined pages.
2 pgs/sheet
4 pgs/sheet 6 pgs/sheet
9 pgs/sheet 16 pgs/sheet
None Frame Lines
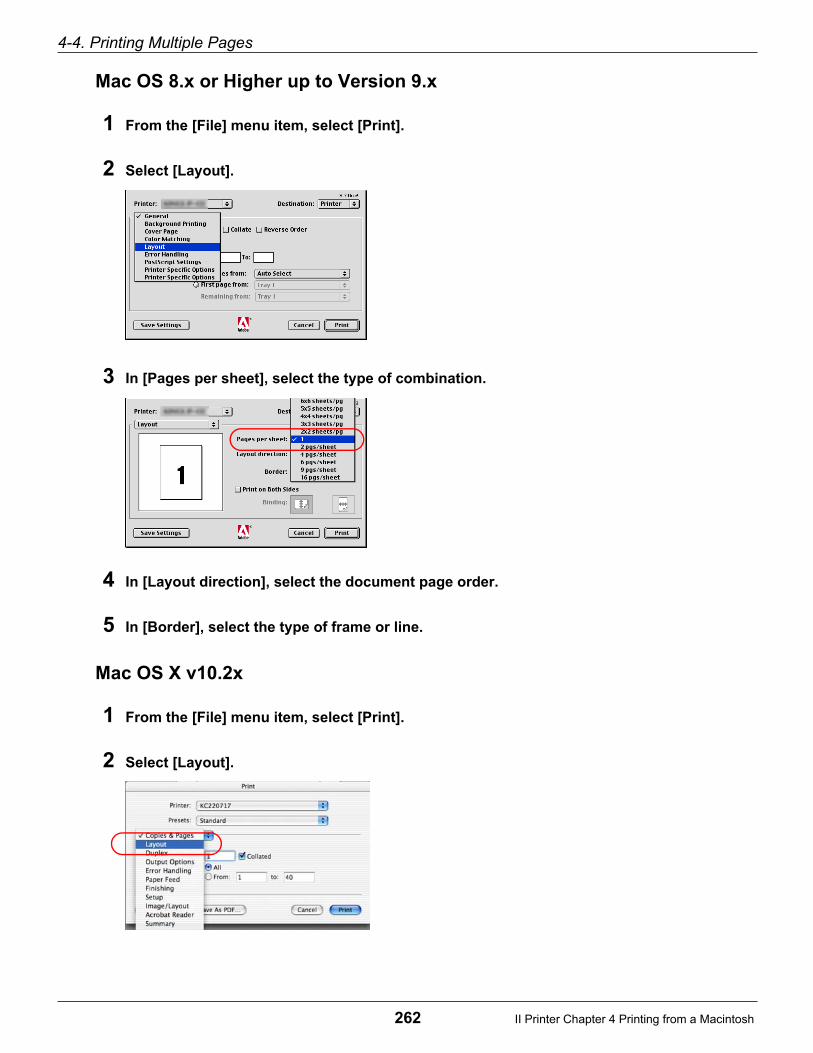
4-4. Printing Multiple Pages
262 II Printer Chapter 4 Printing from a Macintosh
Mac OS 8.x or Higher up to Version 9.x
1 From the [File] menu item, select [Print].
2 Select [Layout].
3 In [Pages per sheet], select the type of combination.
4 In [Layout direction], select the document page order.
5 In [Border], select the type of frame or line.
Mac OS X v10.2x
1 From the [File] menu item, select [Print].
2 Select [Layout].

4-4. Printing Multiple Pages
263 II Printer Chapter 4 Printing from a Macintosh
3 In [Pages per Sheet], select the type of combination.
4 In [Layout Direction], select the document page order.
5 In [Border], select the type of frame or line.

4-4. Printing Multiple Pages
264 II Printer Chapter 4 Printing from a Macintosh
Folding Paper in Two to Make Booklets (Special Mode)
This prints swapping the order of the pages so that the output paper can be compiled and folded in two tomake a booklet.You can select either [Booklet (left binding)] or [Booklet (right binding)].
Booklet (left binding)
The paper is bound on the left side. This is selected when the pages read from left to right.
Booklet (right binding)
The paper is bound on the right side. This is selected when the pages proceed from right to left.
Booklet/special mode cannot be used when any of the settings below are in effect.
When [Document pages/print page], [Staple], [Duplex], or [Front cover/Back cover] is set.

4-4. Printing Multiple Pages
265 II Printer Chapter 4 Printing from a Macintosh
Mac OS 8.x or Higher up to Version 9.x
1 From the [File] menu item, select [Print].
2 Select [Printer Specific Options].
3 In [Combination], select either [Booklet] or [Booklet-Right].

4-4. Printing Multiple Pages
266 II Printer Chapter 4 Printing from a Macintosh
Mac OS X v10.2x
1 From the [File] menu item, select [Print].
2 Select [Image/Layout].
3 In [Combination], select either [Booklet] or [Booklet-Right].

4-4. Printing Multiple Pages
267 II Printer Chapter 4 Printing from a Macintosh
Printing One Copy at a Time of All Pages (Collate)
This prints one entire set of multi-page data at one time.
Mac OS 8.x or Higher up to Version 9.x
1 From the [File] menu item, select [Print].
2 Select [Printer Specific Options].
3 In [Collate], select [Sort].

4-4. Printing Multiple Pages
268 II Printer Chapter 4 Printing from a Macintosh
Mac OS X v10.2x
1 From the [File] menu item, select [Print].
2 Select [Copies&Pages].
3 Check the [Collated] checkbox.

4-4. Printing Multiple Pages
269 II Printer Chapter 4 Printing from a Macintosh
Outputting Sorted into Separate Sets of Copies (Offset)
When printing multiple copies, this shifts the output position for each set.This is handy when outputting multiple copies to a single output tray.
When the copier optional paper output unit is installed, the paper is output with its position shifted for
each set.
When the paper output unit is not installed, the paper is output with the direction changed for each set.
Mac OS 8.x or Higher up to Version 9.x
1 From the [File] menu item, select [Print].
2 Select [Printer Specific Options].
When there is a paper output unit When there is no paper output unit

4-4. Printing Multiple Pages
270 II Printer Chapter 4 Printing from a Macintosh
3 In [Job Offset], select [On].
Mac OS X v10.2x
1 From the [File] menu item, select [Print].
2 Select [Finishing].
3 In [Job Offset], select [On].

4-4. Printing Multiple Pages
271 II Printer Chapter 4 Printing from a Macintosh
Stapling (Staple)
This staples.
Portrait and landscape
Stapling with the papers joined lengthwise is called [Portrait] and stapling with the papers joined width-wise is called [Landscape].
Number of staples and their locations
The pages are bound on either the left or right side of the paper. For stapling, you can select one- ortwo-point stapling.
For details on the stapling positions, refer to the copier user’s manual.
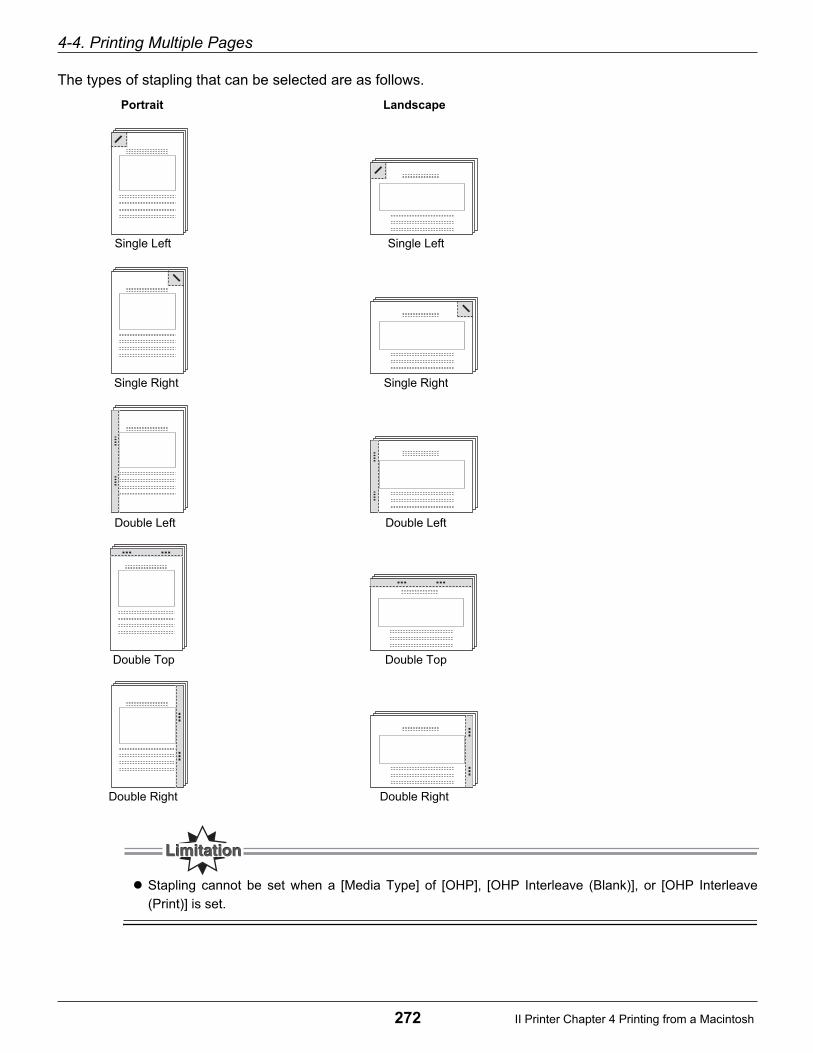
4-4. Printing Multiple Pages
272 II Printer Chapter 4 Printing from a Macintosh
The types of stapling that can be selected are as follows.
Stapling cannot be set when a [Media Type] of [OHP], [OHP Interleave (Blank)], or [OHP Interleave
(Print)] is set.
Single Left
Single Right
Double Left
Double Top
Double Right
Single Left
Single Right
Double Left
Double Top
Double Right
Portrait Landscape
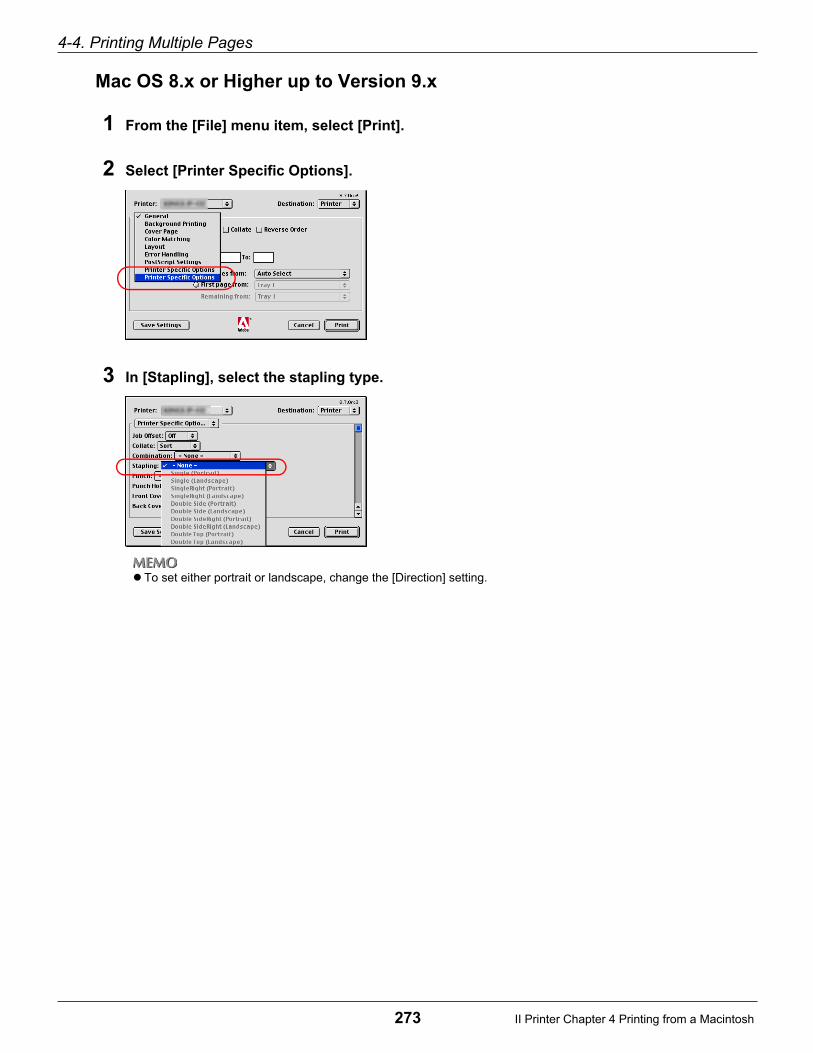
4-4. Printing Multiple Pages
273 II Printer Chapter 4 Printing from a Macintosh
Mac OS 8.x or Higher up to Version 9.x
1 From the [File] menu item, select [Print].
2 Select [Printer Specific Options].
3 In [Stapling], select the stapling type.
To set either portrait or landscape, change the [Direction] setting.

4-4. Printing Multiple Pages
274 II Printer Chapter 4 Printing from a Macintosh
Mac OS X v10.2x
1 From the [File] menu item, select [Print].
2 Select [Finishing].
3 In [Stapling], select the stapling type.

4-4. Printing Multiple Pages
275 II Printer Chapter 4 Printing from a Macintosh
Punch/Punch Holes
This punches holes in the document.
Portrait and Landscape
Punching the papers joined lengthwise is called [Portrait] and punching the papers joined widthwise iscalled [Landscape].
Left
This punches holes on the left side of the document. Used to fasten the page from the left side.
Right
This punches holes on the right side of the document. Used to fasten the page from the right side.
Top
This punches holes on the top side of the document. Used to fasten the page from the top.
Punch count settings are different every destination.
2 Holes [2/3 Hole Type] (for U.S. and Canada market area only)
3 Holes [2/3 Hole Type] (for U.S. and Canada market area only)
4 Holes [4 Hole Type]
Left (Portrait) Left (Landscape)
Right (Portrait) Right (Landscape)
Top (Portrait) Top (Landscape)
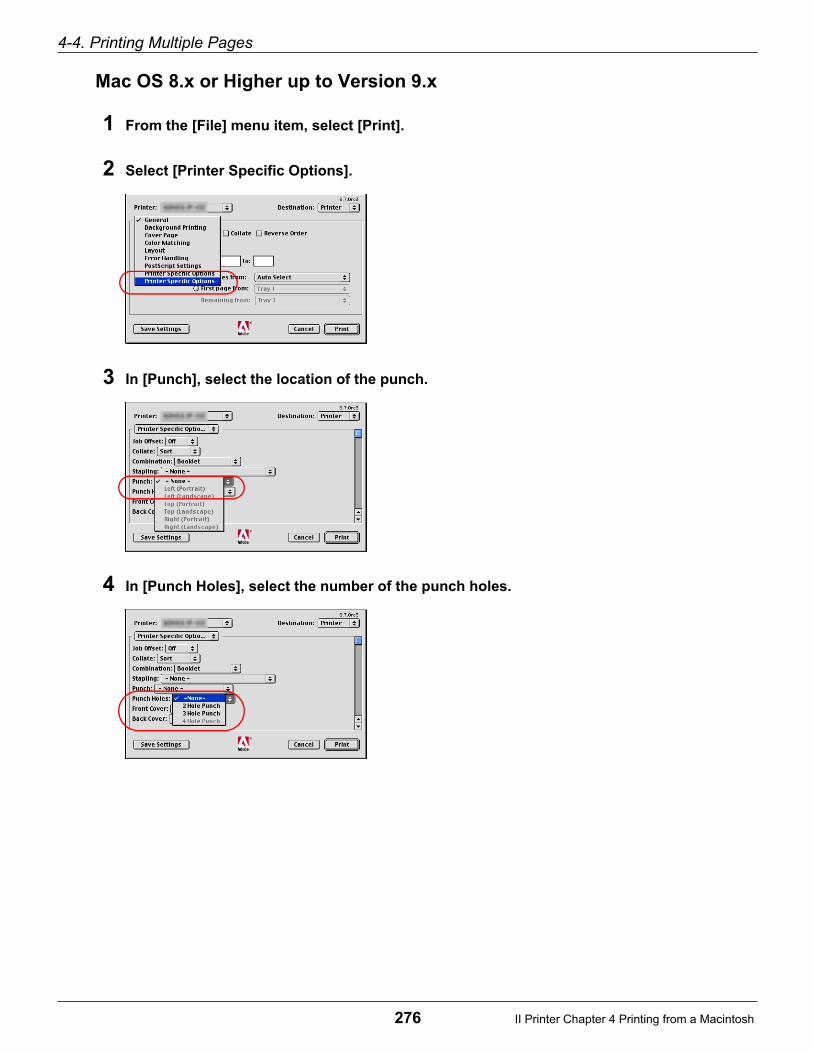
4-4. Printing Multiple Pages
276 II Printer Chapter 4 Printing from a Macintosh
Mac OS 8.x or Higher up to Version 9.x
1 From the [File] menu item, select [Print].
2 Select [Printer Specific Options].
3 In [Punch], select the location of the punch.
4 In [Punch Holes], select the number of the punch holes.

4-4. Printing Multiple Pages
277 II Printer Chapter 4 Printing from a Macintosh
Mac OS X v10.2x
1 From the [File] menu item, select [Print].
2 Select [Finishing].
3 In [Punch], select the location of the punch.
4 In [Punch Holes], select the number of the punch holes.
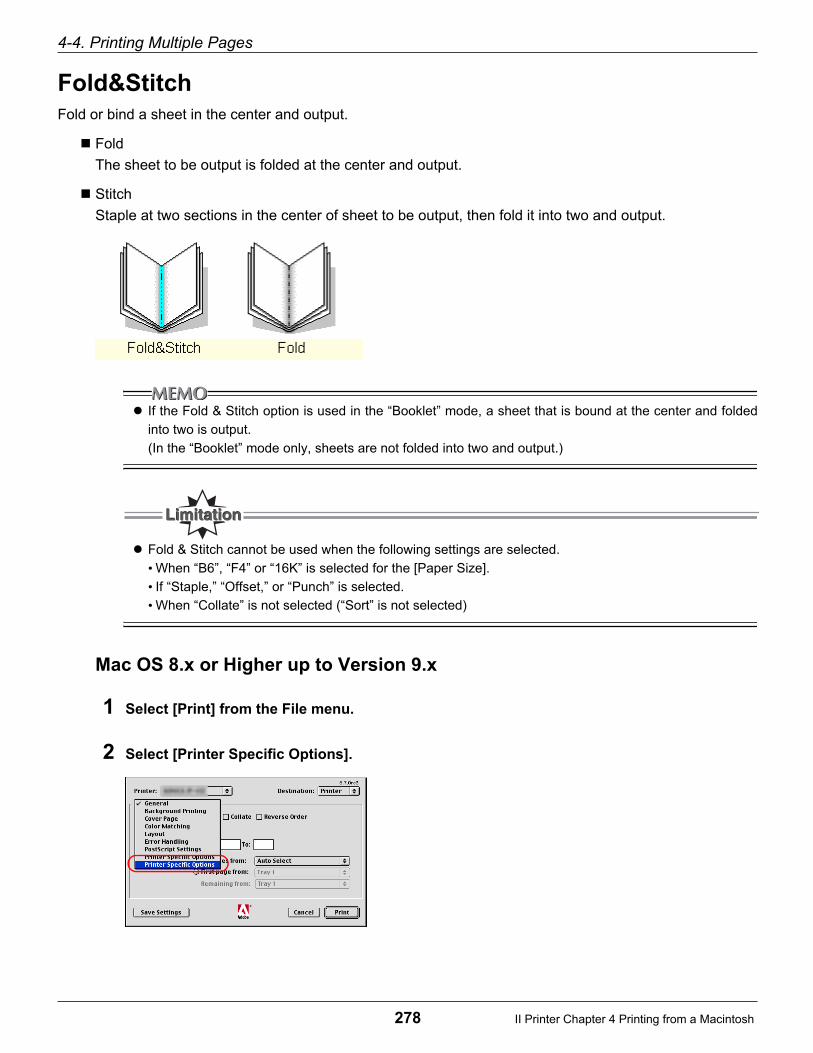
4-4. Printing Multiple Pages
278 II Printer Chapter 4 Printing from a Macintosh
Fold&Stitch
Fold or bind a sheet in the center and output.
Fold
The sheet to be output is folded at the center and output.
Stitch
Staple at two sections in the center of sheet to be output, then fold it into two and output.
If the Fold & Stitch option is used in the “Booklet” mode, a sheet that is bound at the center and folded
into two is output.
(In the “Booklet” mode only, sheets are not folded into two and output.)
Fold & Stitch cannot be used when the following settings are selected.
•When “B6”, “F4” or “16K” is selected for the [Paper Size].
• If “Staple,” “Offset,” or “Punch” is selected.
•When “Collate” is not selected (“Sort” is not selected)
Mac OS 8.x or Higher up to Version 9.x
1 Select [Print] from the File menu.
2 Select [Printer Specific Options].

4-4. Printing Multiple Pages
279 II Printer Chapter 4 Printing from a Macintosh
3 Select [Saddle Tray] from [Output bin].
4 Select [Fold only] or [Fold, Stitch] from [Fold, Stitch].
Mac OS X v10.2x
1 Select [Print] from the File menu.
2 Select [Finishing].

4-4. Printing Multiple Pages
280 II Printer Chapter 4 Printing from a Macintosh
3 Select [Saddle Tray] from [Output bin].
4 Select [Fold only] or [Fold, Stitch] from [Fold, Stitch].

4-4. Printing Multiple Pages
281 II Printer Chapter 4 Printing from a Macintosh
Attaching a Front Cover/Back Cover (Front Cover/Back Cover)
This prints attaching a front cover or back cover.
Front cover
This prints a front cover. For the front cover, select either [Blank] or [Printed].
For [Blank], one sheet of blank paper is added. For [Printed], the first page of the data is printed on thefront cover.
Back Cover
This prints attaching a back cover. For the back cover, select either [Blank] or [Printed].
For [Blank], one sheet of white paper is added. For [Printed], the last page of the data is printed on theback cover.
Front/Back Cover Tray
Select the tray in which the paper for the front cover/back cover is set. Select a tray with paper thesame size as the main text.
Front cover/back cover cannot be set when any of the following settings are in effect:
When [Booklet] is set
When [Sort] is not set
When a [Media type] of [OHP], [OHP Interleave (Blank)], or [OHP Interleave (Print)] is selected
When a [Paper size] of [B6], [Legal], or [Statement] is selected
When the front cover is set to [Blank]
When the front cover is set to [Printed]
When the back cover is set to [Blank]
When the back cover is set to [Printed]
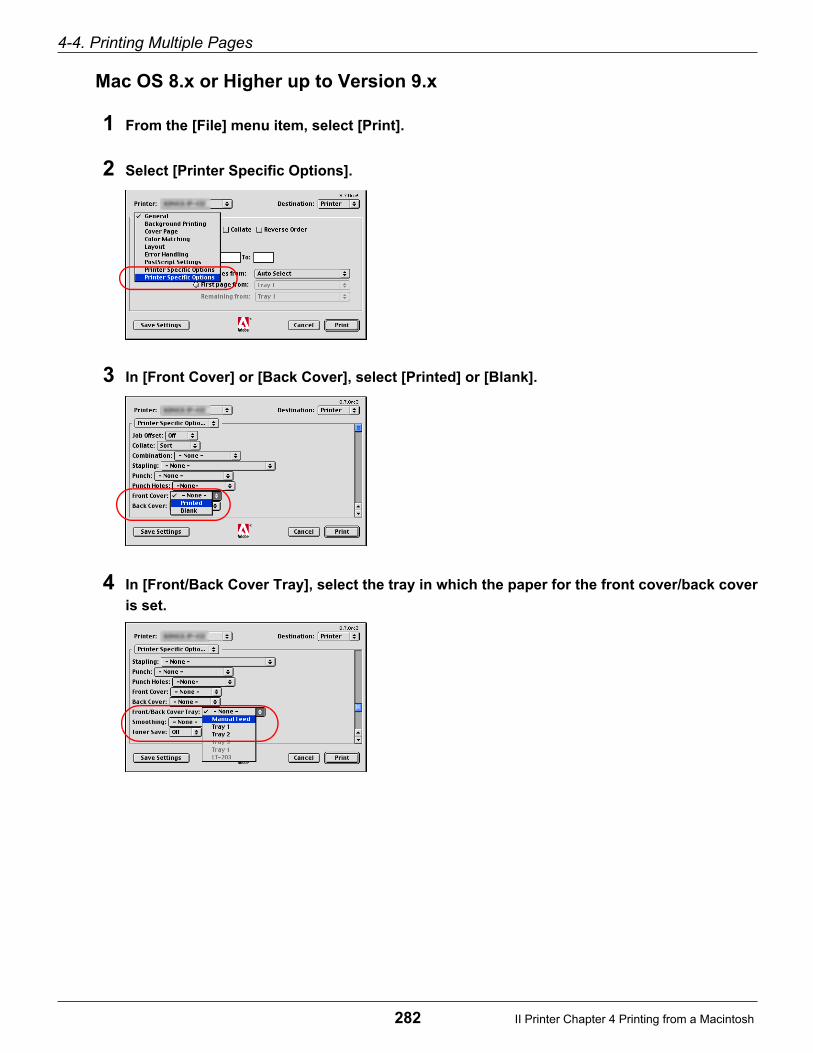
4-4. Printing Multiple Pages
282 II Printer Chapter 4 Printing from a Macintosh
Mac OS 8.x or Higher up to Version 9.x
1 From the [File] menu item, select [Print].
2 Select [Printer Specific Options].
3 In [Front Cover] or [Back Cover], select [Printed] or [Blank].
4 In [Front/Back Cover Tray], select the tray in which the paper for the front cover/back cover
is set.

4-4. Printing Multiple Pages
283 II Printer Chapter 4 Printing from a Macintosh
Mac OS X v10.2x
1 From the [File] menu item, select [Print].
2 Select [Setup].
3 In [Cover] or [Back Cover], select [Printed] or [Blank].
4 In [Cover Tray], select the tray in which the paper for the front cover/back cover.

284 II Printer Chapter 4 Printing from a Macintosh
4-5. Special Printing
Printing with Top/Bottom or Left/Right Reversed (Mirror ImagePrinting)
This prints with the top/bottom or left/right reversed, as if in a mirror.
Mac OS 8.x or Higher up to Version 9.x
1 From the [File] menu item, select [Page Setup].
For some applications, from the [File] menu item, select [Paper settings] - [Options].
2 Select [PostScript™ Options].
3 Check the [Visual Effects] [Flip Horizontal] or [Flip Vertical] checkbox.
The figure in the print example is printed with left/right or top/bottom reversed.
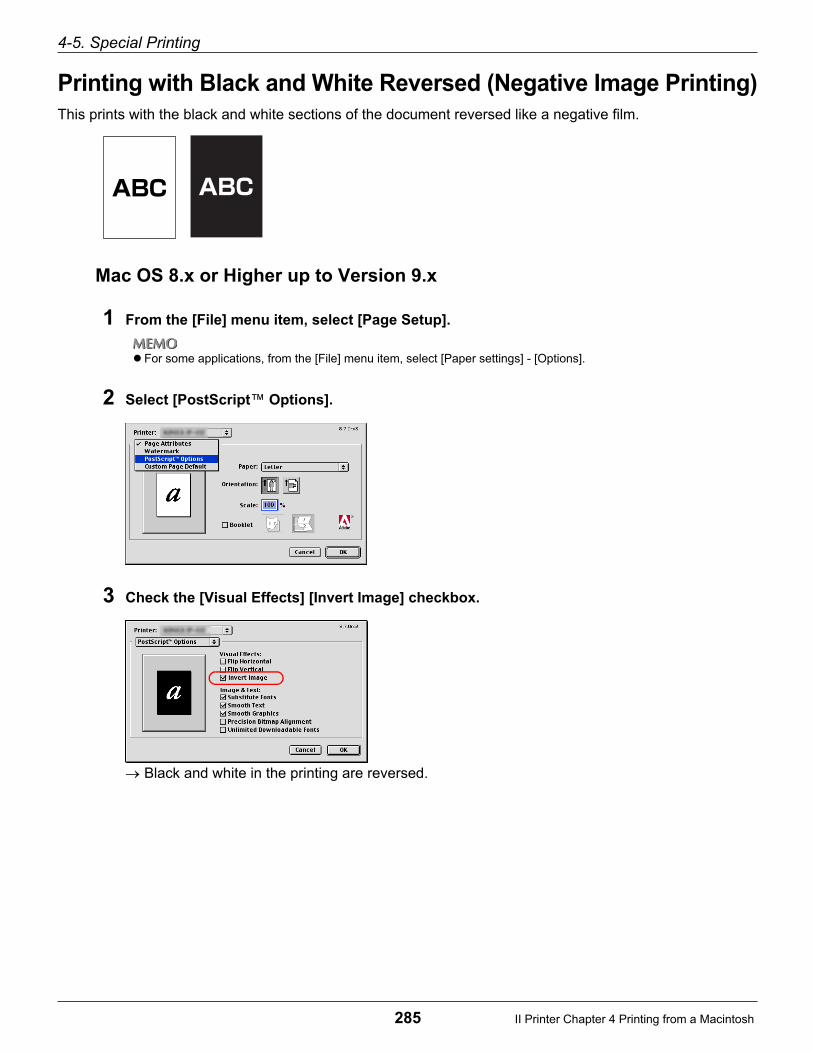
4-5. Special Printing
285 II Printer Chapter 4 Printing from a Macintosh
Printing with Black and White Reversed (Negative Image Printing)
This prints with the black and white sections of the document reversed like a negative film.
Mac OS 8.x or Higher up to Version 9.x
1 From the [File] menu item, select [Page Setup].
For some applications, from the [File] menu item, select [Paper settings] - [Options].
2 Select [PostScript™ Options].
3 Check the [Visual Effects] [Invert Image] checkbox.
Black and white in the printing are reversed.
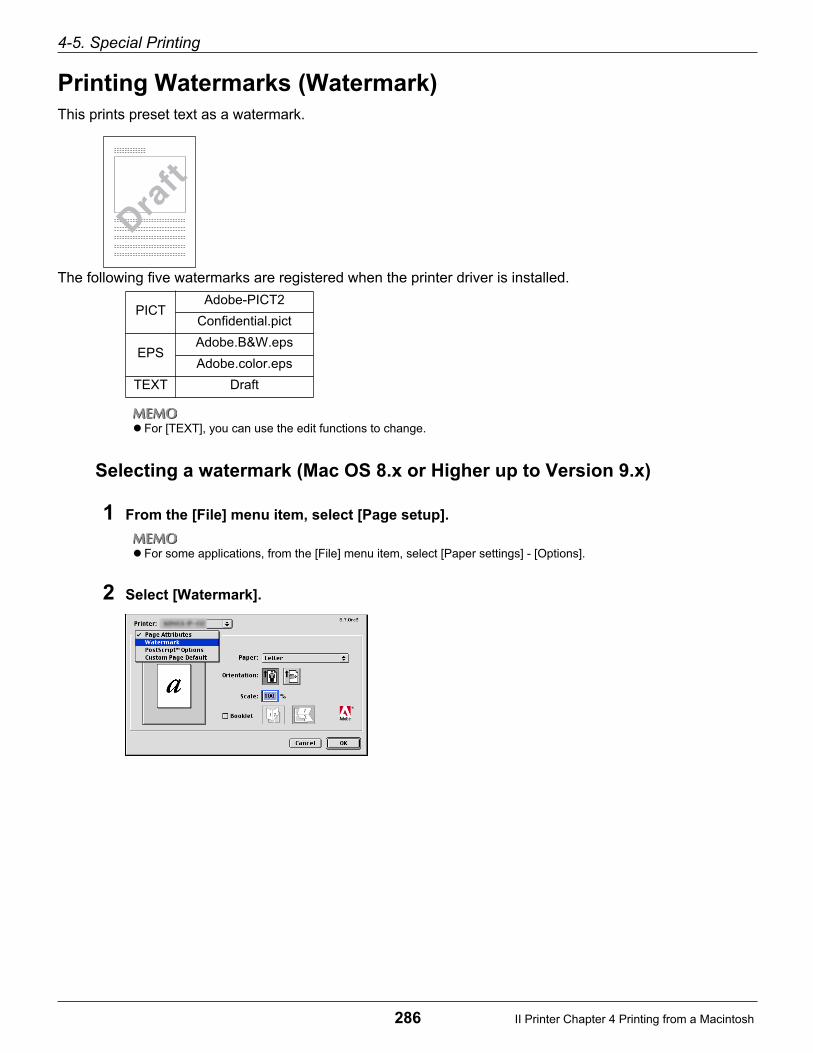
4-5. Special Printing
286 II Printer Chapter 4 Printing from a Macintosh
Printing Watermarks (Watermark)
This prints preset text as a watermark.
The following five watermarks are registered when the printer driver is installed.
For [TEXT], you can use the edit functions to change.
Selecting a watermark (Mac OS 8.x or Higher up to Version 9.x)
1 From the [File] menu item, select [Page setup].
For some applications, from the [File] menu item, select [Paper settings] - [Options].
2 Select [Watermark].
PICTAdobe-PICT2
Confidential.pict
EPSAdobe.B&W.eps
Adobe.color.eps
TEXT Draft

4-5. Special Printing
287 II Printer Chapter 4 Printing from a Macintosh
3 Select [First] or [All].
For [First], the watermark is only printed on the first page, for [All], the watermark is printed on all the pages.
4 Select [PICT], [EPS], or [TEXT].
5 Select the type of watermark to print.
Editing textWhen you select [TEXT], you can change the watermark character contents, types, and color.
1 Click the [Edit] button.
The [Watermark Specification] screen is displayed.
The settings that can be changed are as follows.
Watermark fileThis selects the file in which the watermark is stored.
Watermark font/size/styleThis sets the font and size for the watermark.
Watermark textThis inputs the character string for the watermark.
ColorNot Available.
New saveThis saves the changed settings as a watermark file.

4-5. Special Printing
288 II Printer Chapter 4 Printing from a Macintosh
This printing system does not support color. When colors are selected, they are printed converted to gray.
First/AllThe print the watermark only on the first page, select [First], to print the watermark on all the pages,select [All].
ForegroundThe watermark is usually printed in such a way that the document can be seen through the watermark.To print a watermark over the document, check the [Foreground] checkbox. With this type of printing,the portion of the document under the watermark cannot be seen.
Save with DocumentThis stores the edited watermark settings together with the document data.
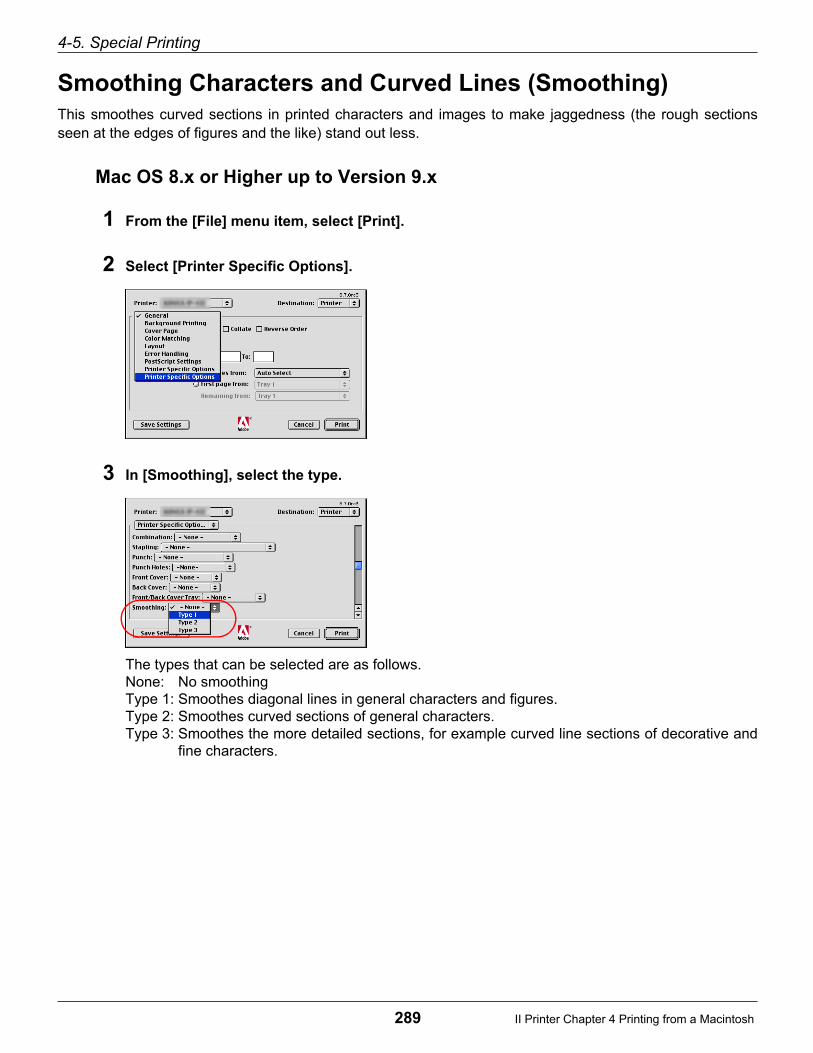
4-5. Special Printing
289 II Printer Chapter 4 Printing from a Macintosh
Smoothing Characters and Curved Lines (Smoothing)
This smoothes curved sections in printed characters and images to make jaggedness (the rough sectionsseen at the edges of figures and the like) stand out less.
Mac OS 8.x or Higher up to Version 9.x
1 From the [File] menu item, select [Print].
2 Select [Printer Specific Options].
3 In [Smoothing], select the type.
The types that can be selected are as follows.None: No smoothingType 1: Smoothes diagonal lines in general characters and figures.Type 2: Smoothes curved sections of general characters.Type 3: Smoothes the more detailed sections, for example curved line sections of decorative and
fine characters.
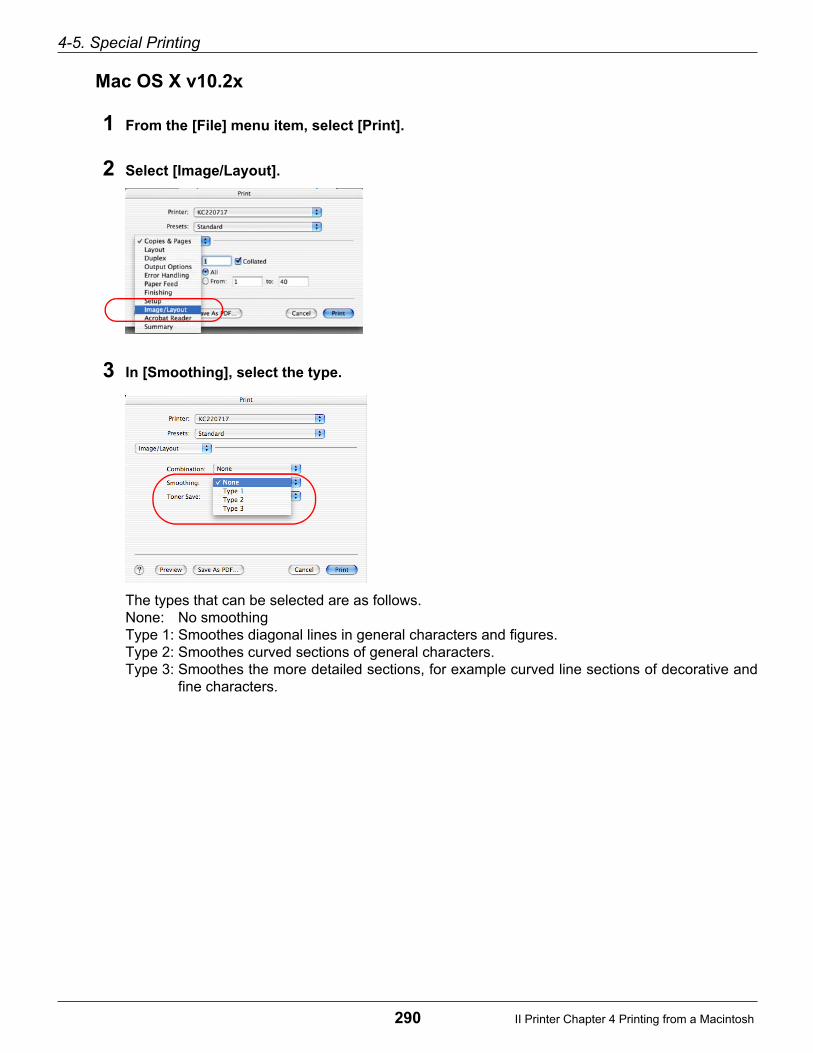
4-5. Special Printing
290 II Printer Chapter 4 Printing from a Macintosh
Mac OS X v10.2x
1 From the [File] menu item, select [Print].
2 Select [Image/Layout].
3 In [Smoothing], select the type.
The types that can be selected are as follows.None: No smoothingType 1: Smoothes diagonal lines in general characters and figures.Type 2: Smoothes curved sections of general characters.Type 3: Smoothes the more detailed sections, for example curved line sections of decorative and
fine characters.

4-5. Special Printing
291 II Printer Chapter 4 Printing from a Macintosh
Conserving Toner (Toner Save)
This controls the print density and conserves the toner.
Mac OS 8.x or Higher up to Version 9.x
1 From the [File] menu item, select [Print].
2 Select [Printer Specific Options].
3 In [Toner Save], select [On].

4-5. Special Printing
292 II Printer Chapter 4 Printing from a Macintosh
Mac OS X v10.2x
1 From the [File] menu item, select [Print].
2 Select [Image/Layout].
3 In [Toner Save], select [On].
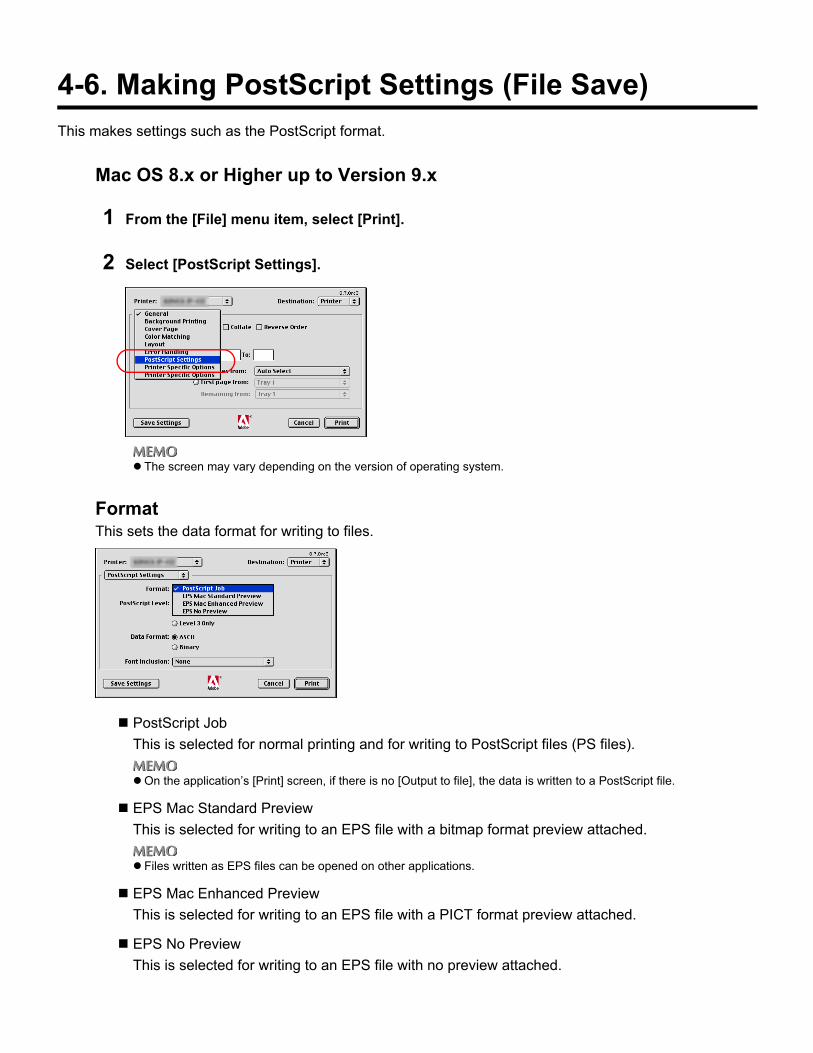
4-6. Making PostScript Settings (File Save)
This makes settings such as the PostScript format.
Mac OS 8.x or Higher up to Version 9.x
1 From the [File] menu item, select [Print].
2 Select [PostScript Settings].
The screen may vary depending on the version of operating system.
FormatThis sets the data format for writing to files.
PostScript Job
This is selected for normal printing and for writing to PostScript files (PS files).
On the application’s [Print] screen, if there is no [Output to file], the data is written to a PostScript file.
EPS Mac Standard Preview
This is selected for writing to an EPS file with a bitmap format preview attached.
Files written as EPS files can be opened on other applications.
EPS Mac Enhanced Preview
This is selected for writing to an EPS file with a PICT format preview attached.
EPS No Preview
This is selected for writing to an EPS file with no preview attached.

4-6. Making PostScript Settings (File Save)
294 II Printer Chapter 4 Printing from a Macintosh
PostScript levelThis sets the PostScript language level.Select the PostScript level supported by the printer.
The PostScript levels that can be selected are as follows.
Level 1, 2 and 3 Compatible
Level 2 Only
Level 3 Only
FormatThis selects the protocol (which determines the communications procedure) for data communicationswith the printer.
ASCII
This format can be printed on all printers. This is the format normally selected.
Binary
This has smaller data volumes than ASCII, so printing is faster, but it is not supported by all appli-cations and printers.
Font InclusionFont data can be stored together with the document data in a file.
The methods of font inclusion are as follows.
None
All
All But Standard 13
All But Fonts in PPD file
II Printer
295
Chapter 5 Print Count Management (Printer EKC/ECM)
The print count can be managed on the printing system. This function is called the [PrinterEKC/ECM].This chapter explains the printing method when the Printer EKC/ECM is set and count man-agement.
5-1. Managing the Print Count ................................................................296
5-2. Printer EKC/ECM Settings................................................................297

296 II PrinterChapter 5 Print Count Management (Printer EKC/ECM)
5-1. Managing the Print Count
The print count can be managed from this printing system. This function is called the Printer EKC/ECM.Managing the print count requires the settings below to be made on the copier.
Printer EKC/ECM settings
The settings for using the Printer EKC/ECM function are made in [Key operator settings].
User ID registration for each user
This sets the User ID input by the user when printing. Counters function for each of these User IDs.User IDs can be numbers up to eight digits long.
Limiter value settings
When the number of sheets printed for each user is restricted, the upper limit on the print count (limitervalue) must be set.
EKC/ECM operations and settings changes should be made by the administrator.
For details, refer to the copier user’s manual.

297 II PrinterChapter 5 Print Count Management (Printer EKC/ECM)
5-2. Printer EKC/ECM Settings
When the Printer EKC/ECM is set for this printing system, the functions below can be used.
Printer EKC/ECM Printing
Printing is carried out as set by the Printer EKC/ECM.
Setting with the PCL Driver (Windows 95/98/Me)
1 From the PCL driver [Properties], select the [Paper] tab.
2 Check the [User Settings...] button.
The [Password Print] screen is displayed.
3 For the [User ID], input the User ID set for the copier.
User IDs can be up to 8 digits.
4 Click the [OK] button.
The display returns to the properties screen.

5-2. Printer EKC/ECM Settings
298 II PrinterChapter 5 Print Count Management (Printer EKC/ECM)
5 Click the [OK] button.
The display returns to the [Print] screen.
6 To print, click the [OK] button.
If the User ID was input incorrectly or not input at all, the print job is not printed, but instead is registered
as an incomplete job. For details on checking on the “Incomplete job list”, refer to [6-3. Checking Incom-
plete Jobs] ( Page 306).
If you do not know your User ID, ask your system administrator.
Setting with the PCL driver (Windows NT 4.0/2000/XP)
1 From the PCL driver [Printing Preferences…], select the [Paper] tab.
For Windows NT 4.0, set with the [Document Defaults…] For Windows 2000/XP, set with the [Printing Preferences…]
2 Check the [User Setting…] button.
The [User Setting] screen is displayed.
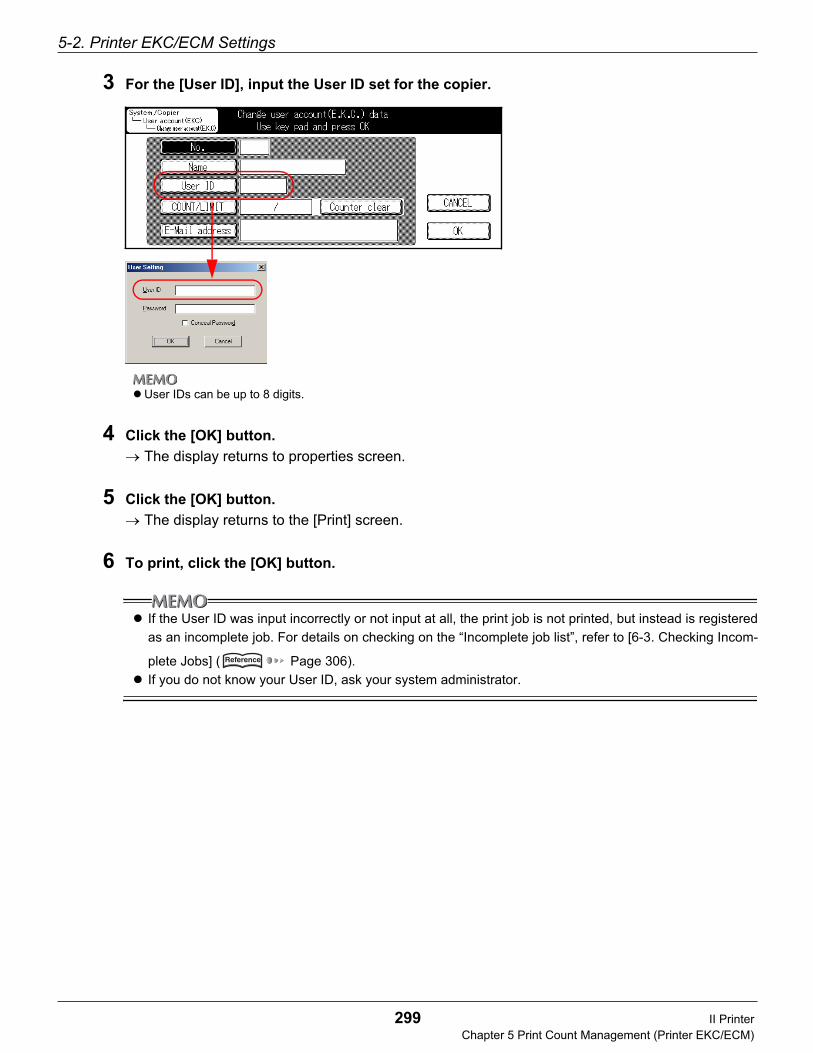
5-2. Printer EKC/ECM Settings
299 II PrinterChapter 5 Print Count Management (Printer EKC/ECM)
3 For the [User ID], input the User ID set for the copier.
User IDs can be up to 8 digits.
4 Click the [OK] button.
The display returns to properties screen.
5 Click the [OK] button.
The display returns to the [Print] screen.
6 To print, click the [OK] button.
If the User ID was input incorrectly or not input at all, the print job is not printed, but instead is registered
as an incomplete job. For details on checking on the “Incomplete job list”, refer to [6-3. Checking Incom-
plete Jobs] ( Page 306).
If you do not know your User ID, ask your system administrator.

5-2. Printer EKC/ECM Settings
300 II PrinterChapter 5 Print Count Management (Printer EKC/ECM)
Reading Counter Values
The number of sheets printed is counted for each user for whom an User ID is set. This count is called the[EKC/ECM counter].In [Key operator mode], the EKC/ECM counter value can be checked on the LCD of the copying machine.
To check the EKC counter value in [Key operator mode], refer to the copier user's manual.
EKC/ECM Limits
When the limit on the number of sheets printed is decided for each user ID on the copier, the printer operatesas follows at the point in time when the limit (limiter value) is reached. One of the following operations is exe-cuted if a print command is sent when the EKC/ECM limit has been exceeded:
A message is displayed on the LCD screen saying that the EKC/ECM counter has exceeded its limitand printing is executed normally.
The print job is not printed, but instead is registered in the [incomplete job list].
When the EKC/ECM limit is exceed during printing, one of the following operations is executed.
The fact that the EKC/ECM counter has exceeded its limiter value is displayed. Printing is executednormally.
After this print job has ended, job reception is stopped. Print jobs sent after this are registered in the[Incomplete job list].
Stop printing when the limit setting is reached. Print the number of sheets up to limit setting and cancelthe remaining sheets. Sheets in feeding are printed and outputted.
The choices of operations depend on the settings on the copier. For details, ask your system administrator.
For details on checking on the “Incomplete job list”, refer to [6-3. Checking Incomplete Jobs]
( Page 306).

II Printer
301
Chapter 6 Printing Problems
This chapter explains how to handle problems that may be experienced with the printer inprinting. If the methods during this chapter do not solve the problem, please contact your ser-vice representative.
6-1. Problems with Printing .....................................................................302
6-2. Problems Printing with the Adobe PostScript Driver ....................305
6-3. Checking Incomplete Jobs...............................................................306

302 II Printer Chapter 6 Printing Problems
6-1. Problems with Printing
No Printing.
Check the following, in order.
1 Check that the [KONICA MINOLTA IP-xxx] is selected as the printer.
2 Check that the main body power is switched On.
3 Print a [Test page].If you can print a test page, but jobs from the computer cannot be printed, notifying the system admin-istrator or service representative.
The Paper Type Cannot Be Selected.
Check the following, in order.
1 Click the [Paper] tab and [Cover] tab [Restore Defaults] button to restore the settings
to default state.
2 Select the paper tray containing the paper to print as the [Paper Source].

6-1. Problems with Printing
303 II Printer Chapter 6 Printing Problems
Test Page Cannot Be Printed.
Check the following, in order.
1 Check if cables to be connected with a printer is secure.If the cables are securely connected, go to Step 2.
2 Check the copier control panel LCD screen.If [Ready to Copy] is displayed, proceed to Step 4.If a diagnostics message or error message is displayed, refer to the copier user’s manual.If nothing at all is displayed, proceed to Step 3.
3 Press the sub power switch on the control panel.If the copier is in auto shut-off mode, pressing this switch puts the LCD screen into display mode.
4 Check that copying is possible.If copying is possible, proceed to Step 5.
5 Switch off the copier’s main power, then restart it. Once the print controller can beused, print a test page again.
When you switch the main power for the copier ON/OFF, wait at least 10 seconds before switching it On
again. Switching the main power On again too quickly can cause a system error.
If you still cannot print a test page, contact your service representative.

6-1. Problems with Printing
304 II Printer Chapter 6 Printing Problems
The Print Settings and Print Results Do Not Match.
Check the following operations.
1 Check that the printer settings have not been changed.
For details on printer settings, refer to [Chapter 3 Printing from Windows] ( Page 112) or [Chapter 4Printing from a Macintosh] ( Page 232).
Duplex Printing Is Not Possible.
Check the following, in order.
1 Click the [Paper] tab and [Cover] tab [Restore Defaults] button and restore the default
state.
2 Check that [B6] is not selected as the [Paper Size:].
3 Check that [Plain paper] is selected as the [Media Type].
4 Check that the [Combination] checkbox is not checked.
Forms Cannot Be Printed.
If any of the following conditions occur, forms cannot be printed.
1 The form data size exceeds the maximum value.
The relationship between the maximum form data size and the amount of memory in the Print Control-ler is as follows.
For details on memory, refer to [21-5. Options] ( Page 466).
Amount of memory Maximum form data size
64 MB (no expansion memory) about 2.6 MB
192 MB (128 MB expansion memory) about 7.8 MB

305 II Printer Chapter 6 Printing Problems
6-2. Problems Printing with the Adobe PostScript Driver
PostScript Error Is Displayed.
For details on the PostScript errors, refer to the Adobe homepage http://www.adobe.com.
[Vmerror], [limitcheck], or Other PostScript Error Is Displayed.
It is possible that either the printer or the copier main unit memory is insufficient. We recommend increasingthe memory.
PostScript Error Is Displayed No Matter Which Computer IsAttempting to Print.
Consult with our service shop.
PostScript Error Is Displayed for Printing from a SpecificApplication.
Some error attributed to settings of application software is considered. Recheck the settings, referring to theinstruction manual or the like for application software.There may be a problem in the application. Print a test file with this application.If the application cannot print a test file, reinstall the application.
PostScript Error Is Displayed for Printing a Specific File.
The file print settings may be incorrect, an included figure may be corrupted, or there may be a problem ele-ment included in the file.Try changing the print settings and printing.If printing is still not possible, save the file as a new file or with a difficult name. Then, retry printing suitably.
PostScript Error Is Displayed for Printing a Specific Page.
An element or font on the page may be corrupted or that the memory required is more than is available forprinting.Try printing one element or font at a time from the page.If the individual fonts and elements can be printed, but the page as a whole cannot be printed, we recom-mend increasing the memory.
Non Fixed Size Paper (Custom) Cannot Be Printed Correctlywith a Macintosh.
The direction in which non fixed size paper is loaded in the copier may be incorrect.Rotate the paper direction 90 degrees and then try printing after changing the settings of the driver and copieraccordingly.

306 II Printer Chapter 6 Printing Problems
6-3. Checking Incomplete Jobs
If there is an incomplete job, you can check in [Incomplete job list] screen.The [Incomplete job list] screen can be displayed by using the following method.
1 Touch the [JOB LIST] key on [Printer basic mode] screen.
The [JOB LIST] screen is displayed.
2 Touch the [Incomplete job] key.The [Incomplete job list] screen is displayed.
If the job you're looking for is not displayed, touch the [ ], [ ] key to scroll the display.
Contents displayed in the incomplete job listOn the incomplete job list, you can check the mode, filename or application name, cause, etc.The contents displayed on the incomplete job list are as follows.
[Incomplete job list] screen, when you touch the [FAX JOB] key or the [PRINT JOB] key, the display
returns to the [JOB LIST] screen.
When the main power for the copier is switched off, the incomplete jobs displayed on the [Incomplete job
list] screen are deleted.
Mode Cause Contents
Printer
Cancel
Stopping with STOP or CLEAR, deletion from job list, keycounter removal/setting, cancel requests from print con-troller, aborted jobs, loading inhibited due to fixing Webcount, copy inhibited until L inspection, memory error
Incorrect IDA job that was not output because the User ID was incor-rect
Over limitA job that was not output because the Printer EKC/ECMlimit value was exceeded
Memory overflowA job that was not output because the copier memorywas full
PC-FAX
Cancel
Stopping with STOP or CLEAR, deletion from job list,cancel requests from print controller, aborted jobs, trans-mission and fax controller not installed, pipe transmissionerror, file memory full
Hard disk fullA job for which uploading could not be completedbecause the hard disk was full
Memory overflowA job that was not output because the copier memorywas full

307
This chapter explains the operations for send-ing faxes using a computer.
Chapter 7 Fax Functions (PC-Fax)... 308
Chapter 8 Sending Faxes.................. 312
Chapter 9 Phonebook Registration .321
III Fax

III Fax
308
Chapter 7 Fax Functions (PC-Fax)
When an optional fax kit is installed, you can send faxes directly on the computer without usingpaper. This is called [PC-Fax].This chapter summarizes the PC-Fax functions and explains the general flow of their process-ing.
7-1. Sending Faxes from the Computer .................................................309
7-2. Registering Recipient Names and their Fax Numbers...................310
7-3. Using PC-Fax.....................................................................................311
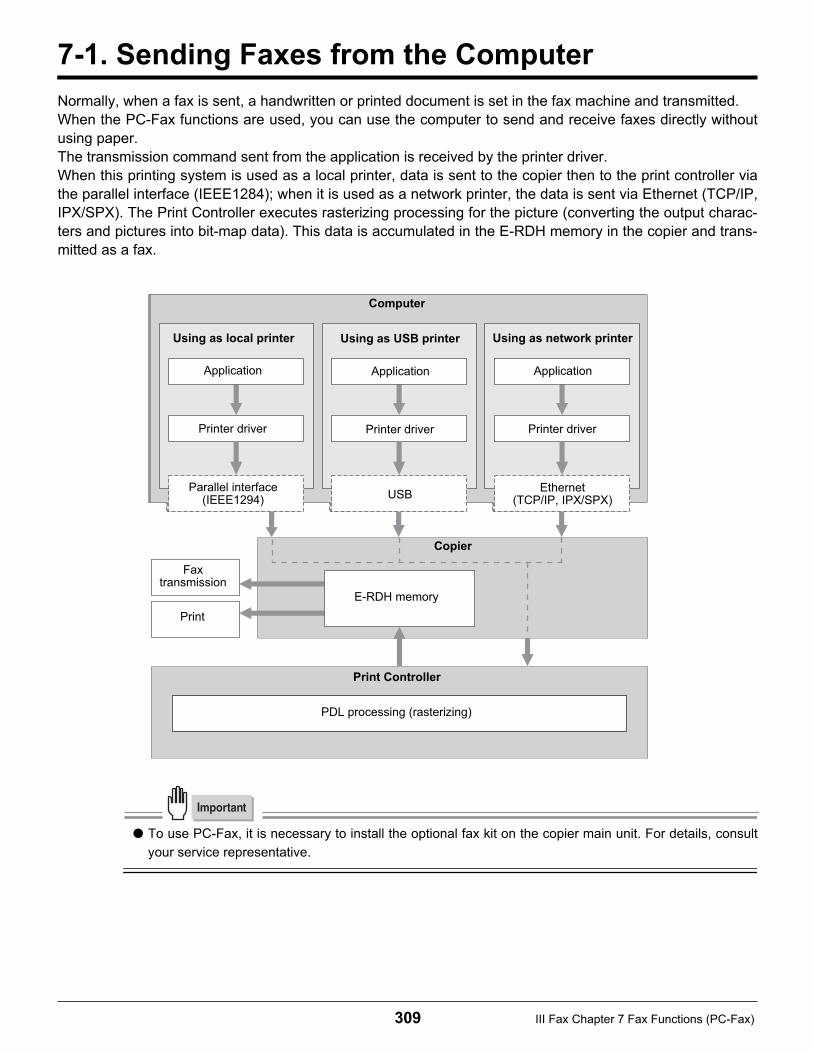
309 III Fax Chapter 7 Fax Functions (PC-Fax)
7-1. Sending Faxes from the Computer
Normally, when a fax is sent, a handwritten or printed document is set in the fax machine and transmitted.When the PC-Fax functions are used, you can use the computer to send and receive faxes directly withoutusing paper.The transmission command sent from the application is received by the printer driver.When this printing system is used as a local printer, data is sent to the copier then to the print controller viathe parallel interface (IEEE1284); when it is used as a network printer, the data is sent via Ethernet (TCP/IP,IPX/SPX). The Print Controller executes rasterizing processing for the picture (converting the output charac-ters and pictures into bit-map data). This data is accumulated in the E-RDH memory in the copier and trans-mitted as a fax.
● To use PC-Fax, it is necessary to install the optional fax kit on the copier main unit. For details, consult
your service representative.
PDL processing (rasterizing)
Computer
Application
Printer driver
Parallel interface(IEEE1294)
Application
Printer driver
Ethernet(TCP/IP, IPX/SPX)
Print Controller
Faxtransmission
Using as network printerUsing as local printer
E-RDH memory
Copier
Application
Printer driver
USB
Using as USB printer
310 III Fax Chapter 7 Fax Functions (PC-Fax)
7-2. Registering Recipient Names and their Fax Numbers
You can register and manage recipient names and their fax numbers in the phonebook.These transmission recipients can be put together into groups. You can send a document to all the membersof a group with just a single operation.
Broadcast Group 1 Broadcast Group 2
Phonebook

311 III Fax Chapter 7 Fax Functions (PC-Fax)
7-3. Using PC-Fax
Operating Systems Supported by PC-FaxThe PC-Fax functions are executed using the PCL driver. The PC-Fax functions work on the following opera-tions systems.
Windows 95
Windows 98
Windows Me
Windows NT 4.0
Windows 2000
Windows XP
Setting the Fax UnitFirst, ready the fax kit installed on the copier for use.
1 Display the PCL driver [Properties].
For details on how to display [Properties], refer to [3-1. Setting Printer Functions] ( Page 113).
2 Select the [Setup] tab.
3 In [Available options], select [Fax option], then click the [Add] button.[Fax option] is displayed on the [Installed options].
For optional menus on Windows NT 4.0/2000/XP, only the user having administrator rights can set them.
4 Click the [OK] button.

III Fax
312
Chapter 8 Sending Faxes
This chapter explains the procedures for sending faxes.
8-1. Transmission Procedure ..................................................................313
8-2. Setting a Cover Sheet (Windows NT/2000/XP) ...............................318
8-3. PC-Fax Transmission Error Reports ...............................................320

313 III Fax Chapter 8 Sending Faxes
8-1. Transmission Procedure
This section explains how to use a computer to send files as faxes using PC-Fax.
To use the PC-FAX feature of the IP-432, you must install an optional fax kit.
Fax Transmission
1 Open data with the application, then execute [Print].
The [Print] screen is displayed.
2 Check that the [Name] is [KONICA MINOLTA xxxx/IP-xxx].
3 Click the [Properties] button.The [Properties] screen is displayed.
4 Select the [FAX] tab.
5 In [Mode Selection], select the [FAX].
8-1. Transmission Procedure
314 III Fax Chapter 8 Sending Faxes
6 In [Resolution], select either [200 dpi] (fine mode) or [400 dpi] (super fine mode).
7 Click the [Setup] button.The [Fax Mode Setup] screen is displayed.
8 To print a file after a fax is sent, select [Print After Send].
9 To set a time to send the fax later, select [Delayed Transmission], then at [Time youwant to transmit], either click the [▲] or [▼] button or key in the time.
When using timer send, check that the clocks on the computer and the copier are synchronized.If the send time isearlier than the Copier current time, the fax is sent the next day.Example: Send time 12:00
Copier current time 12:10Fax sent at 12:00 the next day
10 For confidential transmission, select or input the [Sub Address] and [Sender ID].
It is possible to execute confidential communications with another fax model by using F codes.The sub-address is up to 20 digits.The sender ID is up to 20 digits including # and *.For details on sub-addresses and send IDs, refer to the fax kit user’s manual.

8-1. Transmission Procedure
315 III Fax Chapter 8 Sending Faxes
11 Click the [OK] button.
The display returns to the [Properties] screen.
12 Specifying the fax destination.
When inputting the fax recipientAt [Recipient], input the [Name] and [Fax No.], then click the [Add] button.
The recipient input into the [Recipients] is displayed.
The [Name] can be up to 40 characters.The [Fax No.] may be up to 38 digits (0 to 9), hyphens, #, *, E, P, T and spaces.Up to 100 recipients may be registered in the [Recipient].
Selecting the recipient from the phonebookThis procedure selects a recipient preset in the phone book.
For details on phonebook registration, refer to [Chapter 9 Phonebook Registration] ( Page 321)
1 Click the [Phonebook] button.
The [Phonebook] screen is displayed.

8-1. Transmission Procedure
316 III Fax Chapter 8 Sending Faxes
2 Select the recipient or broadcast group to send the fax to.
3 Click the [Add Recipient] button.
The selected recipient is displayed in the [Recipient].
When a broadcast group is selected, all the members of the group are displayed in the [Recipient].
4 Check the recipient, then click the [OK] button.
The display returns to the [FAX] tab.
13 Check that the party for file transmission is displayed in the [Recipient].
To delete a recipient, select the recipient to delete from the [Recipient], then click the [Delete] button.There is no need to change the [Error Correction Mode], [Intl Transmission Mode], and [V.34 Mode] checkboxes. Fordetails, refer to the fax kit user’s manual.
14 Click the [OK] button.
The display returns to the [Print] screen.

8-1. Transmission Procedure
317 III Fax Chapter 8 Sending Faxes
15 Click the [OK] button.
The fax transmission check message is displayed.
16 Click the [OK] button.
The fax is sent to the specified recipient.
318 III Fax Chapter 8 Sending Faxes
8-2. Setting a Cover Sheet (Windows NT/2000/XP)
Create a cover sheet to be attached to a fax message.
1 Check the [Cover Sheet] checkbox.
2 Click the [Setup…] button.The [Coversheet Setup] screen is displayed.
3 Check the checkboxes for items to be added on the cover sheet such as [Name], [FAXNumber] and [Comments] under “Recipient.” If you check the [Comment] checkbox,input a message under “Comments.”
For the [Name] and [FAX Number], only the first item of information in the “Enter Recipient” field under the [FAX] tabis displayed on the screen. Up to 640 characters can be input for “Comments.”
● If more than 50 characters are input per line, the characters may not display correctly on the cover sheet.
In such instances, check the characters on the “Screen” and insert a return, etc., to adjust the number of
characters/line as required.
8-2. Setting a Cover Sheet (Windows NT/2000/XP)
319 III Fax Chapter 8 Sending Faxes
4 Check the checkboxes for the items to be added on the cover sheet from the [Title],[Company], [Name], [FAX Number] and [Phone] under “Sender” and input the requiredinformation.
Up to 40 characters can be input for each information field.
5 Click the [OK] button.

320 III Fax Chapter 8 Sending Faxes
8-3. PC-Fax Transmission Error Reports
If an error occurs during PC-Fax transmission, an error report is printed automatically.
If you do not want error reports printed automatically, use the operator panel keys and switch [Report output settings][PC-Fax transmission error reports] - [Off].
REMOTE STATION
Fax number for the first recipient
CREATE
Time at which PC-Fax transmission was executed on the computer
START
Time specified for the timer reservation
Cause
Cause of the error
Name
Job name or user name
PC-Fax Tx Error Report
Failed to PC-Fax Tx. Please check and try PC-Fax Tx again!
REMOTE STATION CREATE START Cause
Factor Cancel : Stop PC-Fax job, ID difer : EKC/ECM user ID differ, Limit over : EKC/ECM counter limit over
HD full : Hard disc full, Mem full : Memory over
Name
test .pdfMem Full

III Fax
321
Chapter 9 Phonebook Registration
You can register and manage recipient information in the phonebook.This chapter explains how to use the phonebook.
9-1. Registering Phonebook....................................................................322
9-2. Managing Phonebooks.....................................................................331
9-3. Phonebook Usage.............................................................................334
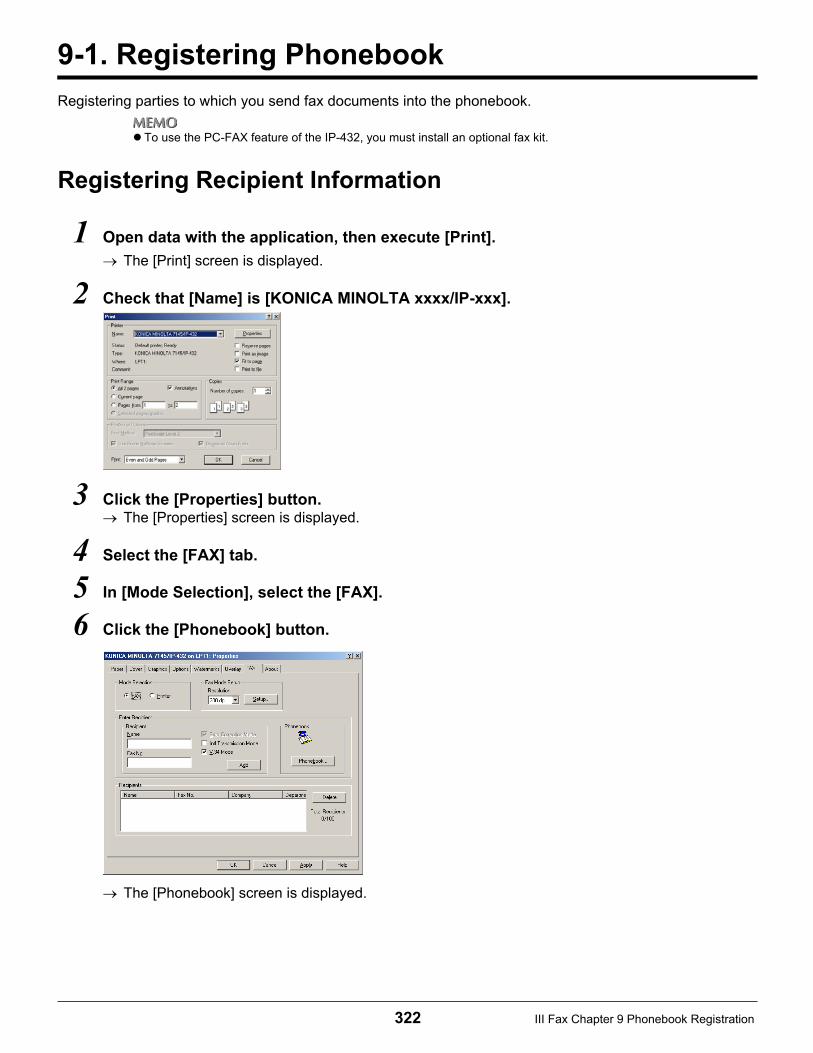
322 III Fax Chapter 9 Phonebook Registration
9-1. Registering Phonebook
Registering parties to which you send fax documents into the phonebook.
To use the PC-FAX feature of the IP-432, you must install an optional fax kit.
Registering Recipient Information
1 Open data with the application, then execute [Print].
The [Print] screen is displayed.
2 Check that [Name] is [KONICA MINOLTA xxxx/IP-xxx].
3 Click the [Properties] button.The [Properties] screen is displayed.
4 Select the [FAX] tab.
5 In [Mode Selection], select the [FAX].
6 Click the [Phonebook] button.
The [Phonebook] screen is displayed.

9-1. Registering Phonebook
323 III Fax Chapter 9 Phonebook Registration
7 Click the [Personal] button.
The [Personal Information] screen is displayed.
8 Input the [Name], [Fax No.], [Company], and [Department].
When inputting into the name column of the phonebook, you may include honorifics.There is no need to change the [ECM], [Int.Tx], and [V.34] checkboxes. For details, refer to the fax kit user’s manual.For the [Name], [Company], and [Department], up to 40 byte characters may be input.[Fax No.] may be up to 38 byte numbers (0 to 9), hyphens, #, *, E, P, T and spaces.
9 Click the [OK] button.The recipient is registered and displayed in the recipient column.
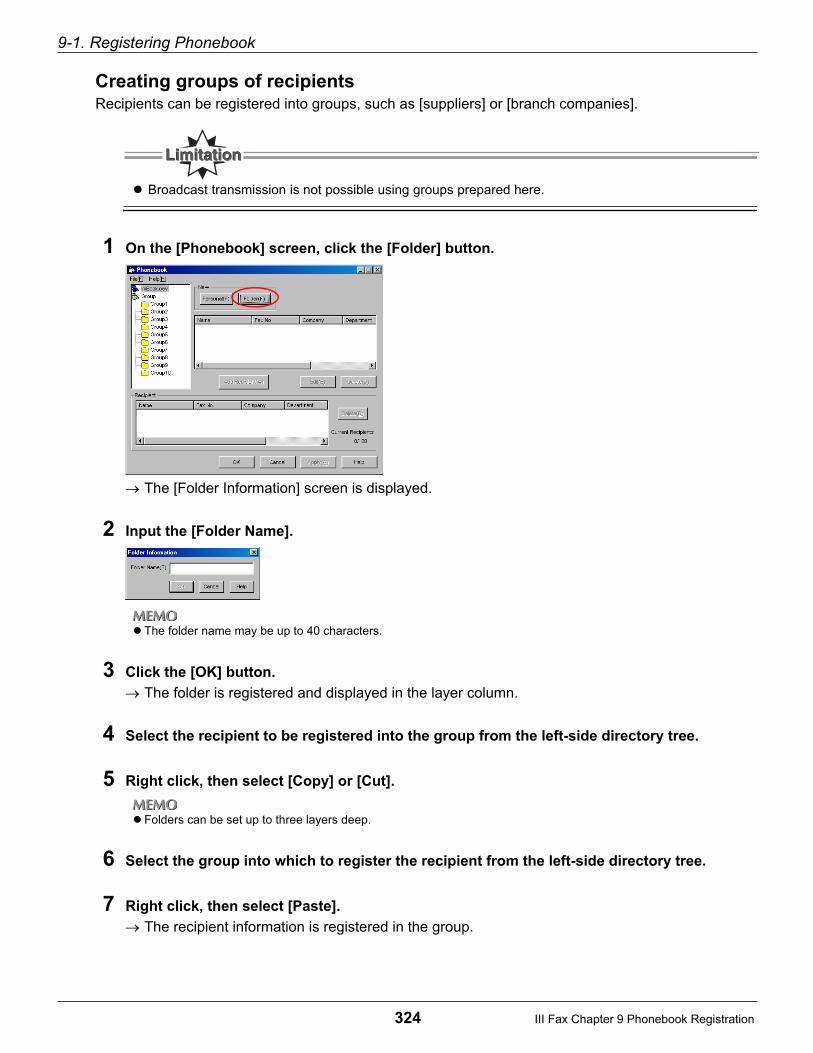
9-1. Registering Phonebook
324 III Fax Chapter 9 Phonebook Registration
Creating groups of recipientsRecipients can be registered into groups, such as [suppliers] or [branch companies].
Broadcast transmission is not possible using groups prepared here.
1 On the [Phonebook] screen, click the [Folder] button.
The [Folder Information] screen is displayed.
2 Input the [Folder Name].
The folder name may be up to 40 characters.
3 Click the [OK] button.
The folder is registered and displayed in the layer column.
4 Select the recipient to be registered into the group from the left-side directory tree.
5 Right click, then select [Copy] or [Cut].
Folders can be set up to three layers deep.
6 Select the group into which to register the recipient from the left-side directory tree.
7 Right click, then select [Paste].
The recipient information is registered in the group.

9-1. Registering Phonebook
325 III Fax Chapter 9 Phonebook Registration
Revising recipient information
1 On the [Phonebook] screen, select the recipient to be changed from the recipient informa-
tion column.
The selected recipient information is displayed inverted.
2 Click the [Edit] button.
The [Personal Information] screen is displayed
3 Revise any necessary items.

9-1. Registering Phonebook
326 III Fax Chapter 9 Phonebook Registration
Deleting unnecessary recipients and foldersOn the [Phonebook] screen, select the recipient or folder to delete.
1 On the [Phonebook] screen, select the recipient information or folder to be deleted.
The selected recipient information or folder is displayed inverted.
2 Click the [Delete] button.
The confirmation message is displayed.
3 Click the [Yes] button.
The specified recipient or folder is deleted.

9-1. Registering Phonebook
327 III Fax Chapter 9 Phonebook Registration
Registering Broadcast Group
You can pre-register the recipients to which you want to send the same fax. Such a group is called a [broad-cast group].
1 On the [Phonebook] screen, select the recipient to be registered into the broadcast
group from the recipient information column.
The selected recipient information is displayed inverted.
2 Right click, then from the [Add Group] broadcast group list, select the broadcast groupto register into.
The recipient is copied into the selected broadcast group.
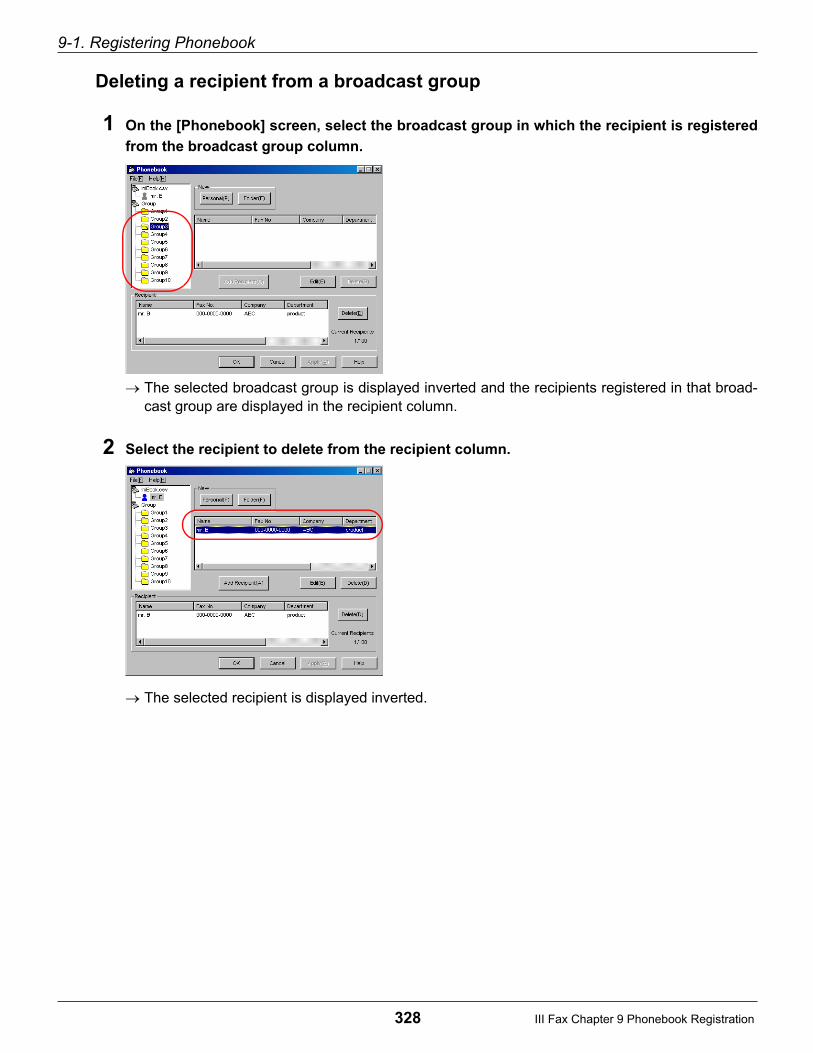
9-1. Registering Phonebook
328 III Fax Chapter 9 Phonebook Registration
Deleting a recipient from a broadcast group
1 On the [Phonebook] screen, select the broadcast group in which the recipient is registered
from the broadcast group column.
The selected broadcast group is displayed inverted and the recipients registered in that broad-cast group are displayed in the recipient column.
2 Select the recipient to delete from the recipient column.
The selected recipient is displayed inverted.

9-1. Registering Phonebook
329 III Fax Chapter 9 Phonebook Registration
3 Right click, then select [Delete from Group].
The recipient is deleted from the broadcast group.
Ten broadcast groups can be set. You cannot add or delete broadcast groups.
The total number of recipients that can be registered in all 10 broadcast groups is 100.

9-1. Registering Phonebook
330 III Fax Chapter 9 Phonebook Registration
Naming a broadcast group
1 On the [Phonebook] screen, select the broadcast group to be named from the broadcast
group column.
The selected broadcast group is displayed inverted.
2 Right click, then select the [Edit] screen.
The [Group Information] screen is displayed
3 Input the [Group Name].
The group name may be up to 40 characters.
4 Click the [OK] button.
The group name is registered and displayed in the broadcast group column.

331 III Fax Chapter 9 Phonebook Registration
9-2. Managing Phonebooks
The phonebook in which recipient information is registered can be named and saved as a file. You can havemultiple phonebooks for different usages.
Saving Phonebooks
1 When the registration of the information in the phonebook is complete, click the [OK]
or [Apply] button on the [Phonebook] screen.
For details on registering in the phonebook, refer to [9-1. Registering Phonebook] ( Page 322)
2 Specify the storage location, then input the file name.
The extension of a file is [.csv].
3 Click the [Save] button.The phonebook is saved as a file.

9-2. Managing Phonebooks
332 III Fax Chapter 9 Phonebook Registration
Preparing a New Phonebook
1 On the [Phonebook] screen, click [File] - [New].
The [IniBook.csv] folder is displayed in the layer column.
2 The recipient information is registered.
For details on registering in the phonebook, refer to [9-1. Registering Phonebook] ( Page 322)
3 Click the [OK] or [Apply] button.The [Save As] screen is displayed.
4 Specify the storage location, then input the file name.
5 Click the [Save] button.
The phonebook is saved as a file.

9-2. Managing Phonebooks
333 III Fax Chapter 9 Phonebook Registration
Switching Between Phonebooks
This is used to switch between phonebooks on the [Phonebook] screen.
1 On the [Phonebook] screen, click [File] - [Open].
The [Open] screen is displayed.
2 Select the folder for the phonebook to switch to, then click the [Open] button.
The selected phonebook is displayed.

334 III Fax Chapter 9 Phonebook Registration
9-3. Phonebook Usage
Specifying the recipients registered in the phonebook and sending the fax.
Sending Faxes Using the Phonebook
1 Click the [Phonebook] button on the [Fax] tab.
The [phonebook] screen is displayed.
2 Select the recipient or broadcast group to which send the fax.
3 Click the [Add Recipient] button.The selected recipient is displayed in [Recipient].If you have selected a broadcast group, all the recipients in that group are displayed.
4 If there are any unnecessary recipients in [Recipient], select them, then click the[Delete] button.
The unnecessary recipients are deleted from the send list.
5 Check the send list, then click the [OK] button.The display returns to the [Fax] tab.
6 Click the [OK] button.The display returns to the [Print] screen.
7 Send the fax.
For details on sending faxes, refer to [8-1. Transmission Procedure] ( Page 313)

335
This volume explains the settings made by theprinter administrator using the control panel.
Chapter 10 Printer Settings.............. 336
Chapter 11 Key Operator Settings... 369
IV Control Panel

IV Control Panel
336
Chapter 10 Printer Settings
This chapter explains the contents of the settings that can be made with operations on thecopier's LCD screen.
10-1. Menu Configuration ........................................................................337
10-2. Test Print..........................................................................................340
10-3. Controller Settings..........................................................................345
10-4. Print Default Setting........................................................................351
10-5. PCL Setup ........................................................................................361

337 IV Control PanelChapter 10 Printer Settings
10-1. Menu Configuration
When making printer settings with operations from the copier, the [Main Menu] screen is displayed with thefollowing procedure.
Displaying the Main Menu Screen
1 With the [Copy basic mode] screen displayed, press the (PRINTER) button on the
control panel.The [Printer basic mode] screen is displayed.
2 Touch the [Printer Set] key.
The [Main Menu] screen is displayed.

10-1. Menu Configuration
338 IV Control PanelChapter 10 Printer Settings
The following settings can be made from the [Main Menu] screen. The setting items depend on whether ornot the PostScript option is installed. The items marked with * in the table are only displayed when the Post-Script option is installed.The gray colored part in settings are factory defaults.
Menu item Setting item SettingsReference
page
1 Test Print Menu 1 PCL Demo Page
-
Page 340
2 PCL Font List Page 341
3 PS Demo Page * Page 342
4 PS Font List * Page 343
5 Config. Data Page 344
2 Controller set 1 Banner Page 1 On Page 345
2 Off
2 Banner Page Tray 1 Auto Tray Page 347
2 Tray1
3 Tray2
4 Tray3
5 Tray4
6 Tray5
7 Bypass Tray
3 PDL Select * 1 Auto Page 349
2 PCL
3 Post Script
3 Set Default 1 Default Paper 1 A3R 1 A3R Page 351
2 A4 2 A4
3 A5R 3 A5R
4 B4R 4 B4R
5 B5 5 B5
6 B6R 6 F4R
7 F4R 7 11 x 17R
8 11 x 17R 8 8.5 x 14R
9 8.5 x 14R 9 8.5 x 11
10 8.5 x 11 10 5.5 x 8.5R(For U.S. and
Canadamarketarea)
11 5.5 x 8.5R
12 8KR
13 16K
2 Duplex 1 Off Page 353
2 Long Edge
3 Short Edge
3 Orientation 1 Portrait Page 355
2 Landscape
4 Copies - Page 357
5 Override Paper 1 Off Page 359
2 8.5 x 11 A4
3 A4 8.5 x 11

10-1. Menu Configuration
339 IV Control PanelChapter 10 Printer Settings
4 PCL Setup 1 Point Size 12.00 0.4 ~ 99.75 Page 362
2 Pitch 10.00 0.44 ~ 99.95 Page 363
3 Font Number 11 0 ~ 88 Page 364
4 Form Lines 60 5 ~ 128 Page 365
5 CR/LF Mapping 1 Off Page 366
2 CR
3 LF
4 CR/LF
6 Input Tray 1 Auto Tray Page 367
2 Tray1
3 Tray2
4 Tray3
5 Tray4
6 Tray5
7 Bypass Tray
7 Symbol Set - Page 368
Menu item Setting item SettingsReference
page
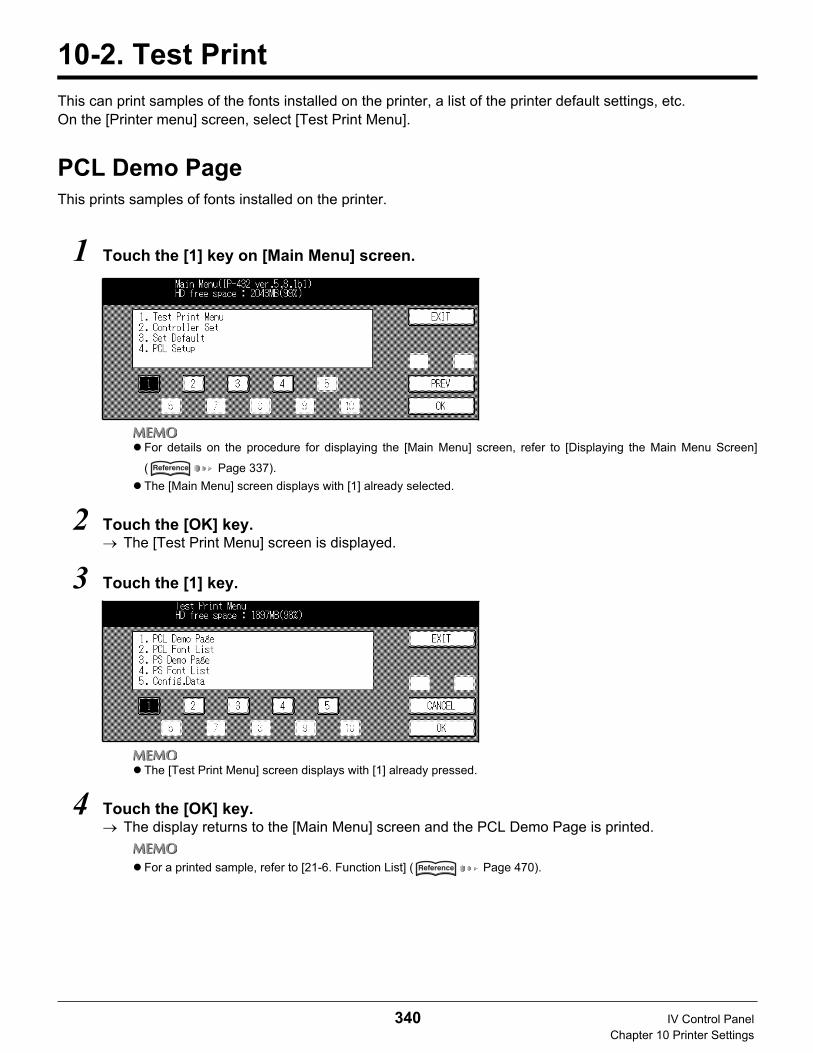
340 IV Control PanelChapter 10 Printer Settings
10-2. Test Print
This can print samples of the fonts installed on the printer, a list of the printer default settings, etc.On the [Printer menu] screen, select [Test Print Menu].
PCL Demo Page
This prints samples of fonts installed on the printer.
1 Touch the [1] key on [Main Menu] screen.
For details on the procedure for displaying the [Main Menu] screen, refer to [Displaying the Main Menu Screen]
( Page 337).
The [Main Menu] screen displays with [1] already selected.
2 Touch the [OK] key.The [Test Print Menu] screen is displayed.
3 Touch the [1] key.
The [Test Print Menu] screen displays with [1] already pressed.
4 Touch the [OK] key.The display returns to the [Main Menu] screen and the PCL Demo Page is printed.
For a printed sample, refer to [21-6. Function List] ( Page 470).
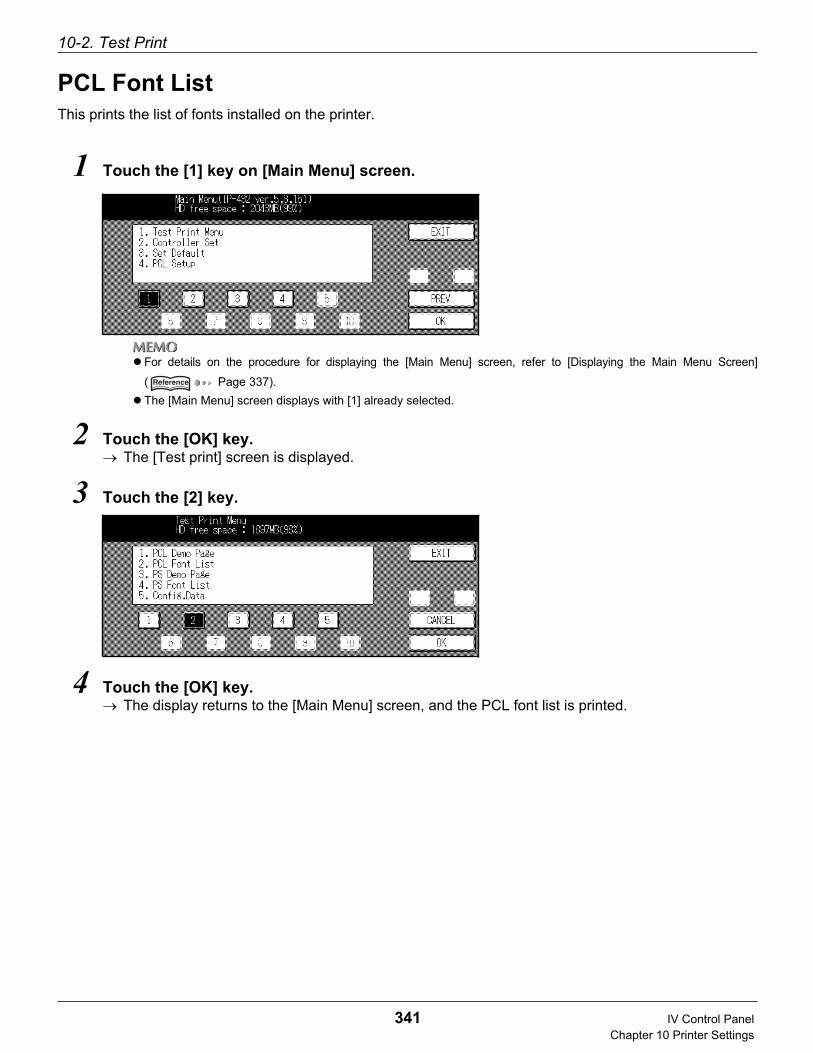
10-2. Test Print
341 IV Control PanelChapter 10 Printer Settings
PCL Font List
This prints the list of fonts installed on the printer.
1 Touch the [1] key on [Main Menu] screen.
For details on the procedure for displaying the [Main Menu] screen, refer to [Displaying the Main Menu Screen]
( Page 337).
The [Main Menu] screen displays with [1] already selected.
2 Touch the [OK] key.The [Test print] screen is displayed.
3 Touch the [2] key.
4 Touch the [OK] key.The display returns to the [Main Menu] screen, and the PCL font list is printed.

10-2. Test Print
342 IV Control PanelChapter 10 Printer Settings
PS Demo Page (Only When PostScript Option Installed)
This prints a demo page for the Adobe PostScript.
1 Touch the [1] key on [Main Menu] screen.
For details on the procedure for displaying the [Main Menu] screen, refer to [Displaying the Main Menu Screen]
( Page 337).
The [Main Menu] screen displays with [1] already selected.
2 Touch the [OK] key.The [Test Print Menu] screen is displayed.
3 Touch the [3] key.
4 Touch the [OK] key.The display returns to the [Main Menu] screen and the PostScript demo page is printed.
For a printed sample, refer to [PostScript Font List] ( Page 496).
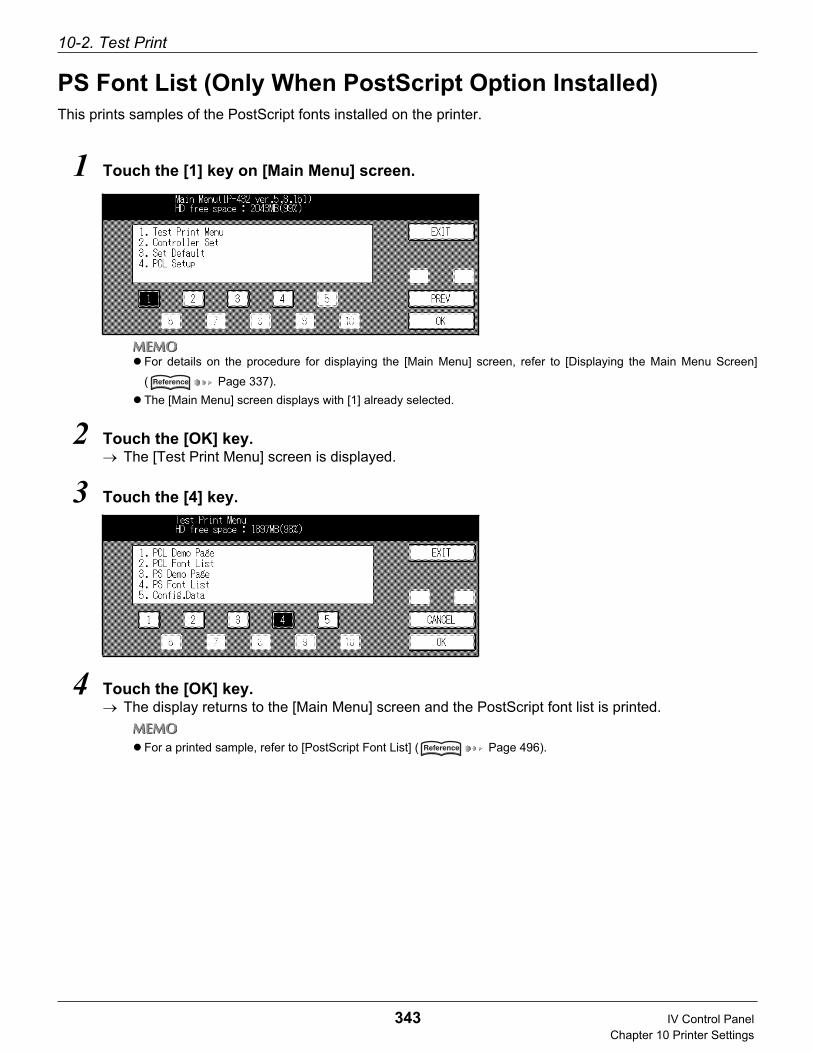
10-2. Test Print
343 IV Control PanelChapter 10 Printer Settings
PS Font List (Only When PostScript Option Installed)
This prints samples of the PostScript fonts installed on the printer.
1 Touch the [1] key on [Main Menu] screen.
For details on the procedure for displaying the [Main Menu] screen, refer to [Displaying the Main Menu Screen]
( Page 337).
The [Main Menu] screen displays with [1] already selected.
2 Touch the [OK] key.The [Test Print Menu] screen is displayed.
3 Touch the [4] key.
4 Touch the [OK] key.The display returns to the [Main Menu] screen and the PostScript font list is printed.
For a printed sample, refer to [PostScript Font List] ( Page 496).

10-2. Test Print
344 IV Control PanelChapter 10 Printer Settings
Config.Data
This prints a list of print controller setting information.The following information is printed on the setting information list.
Version Info
Current Settings (Resolution/Print Quality/Copy mode timeout/Default Paper size/Language)
Installed Paper (Manual/Tray 1/Tray 2/Tray 3/Tray 4/Tray 5)
Device Status (Total RAM installed/Hard disk free space)
Miscellaneous (Total print page count)
1 Touch the [1] key on [Main Menu] screen.
For details on the procedure for displaying the [Main Menu] screen, refer to [Displaying the Main Menu Screen]
( Page 337).
The [Main Menu] screen displays with [1] already selected.
2 Touch the [OK] key.The [Test Print Menu] screen is displayed.
3 Touch the [3] key. (When PostScript option is installed, touch the [5] key).
4 Touch the [OK] key.The display returns to the [Main Menu] screen and the setting information list is printed.
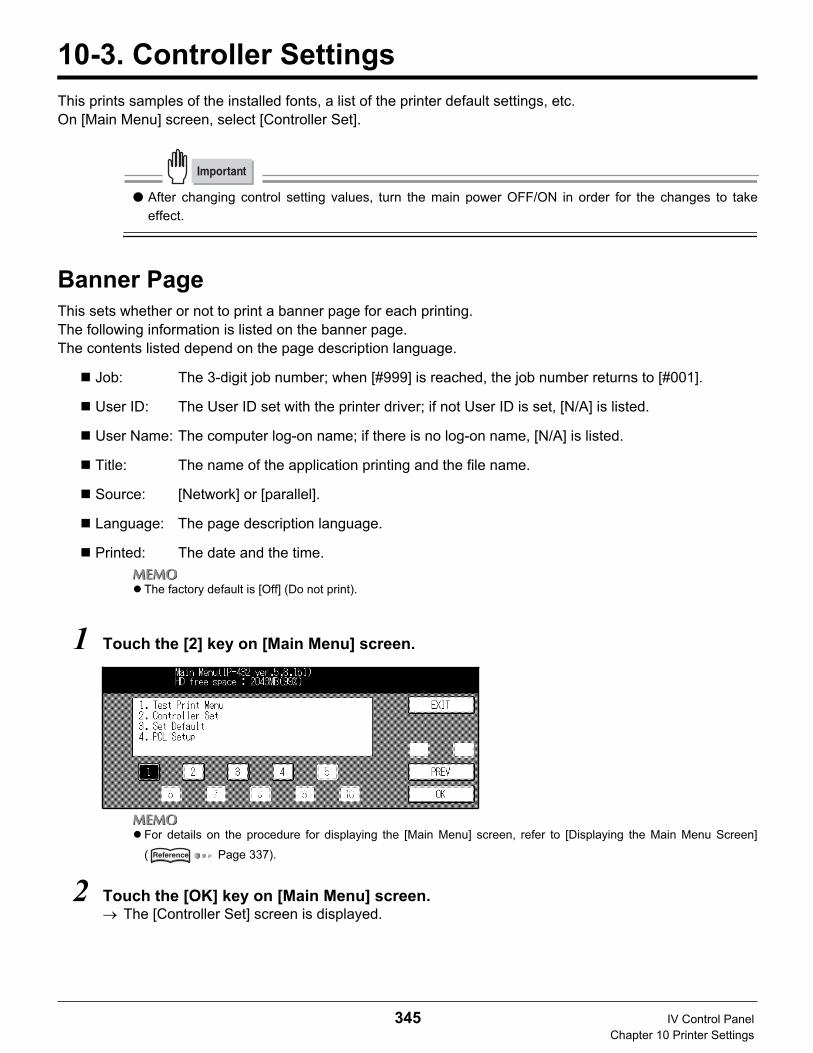
345 IV Control PanelChapter 10 Printer Settings
10-3. Controller Settings
This prints samples of the installed fonts, a list of the printer default settings, etc.On [Main Menu] screen, select [Controller Set].
● After changing control setting values, turn the main power OFF/ON in order for the changes to take
effect.
Banner Page
This sets whether or not to print a banner page for each printing.The following information is listed on the banner page.The contents listed depend on the page description language.
Job: The 3-digit job number; when [#999] is reached, the job number returns to [#001].
User ID: The User ID set with the printer driver; if not User ID is set, [N/A] is listed.
User Name: The computer log-on name; if there is no log-on name, [N/A] is listed.
Title: The name of the application printing and the file name.
Source: [Network] or [parallel].
Language: The page description language.
Printed: The date and the time.
The factory default is [Off] (Do not print).
1 Touch the [2] key on [Main Menu] screen.
For details on the procedure for displaying the [Main Menu] screen, refer to [Displaying the Main Menu Screen]
( Page 337).
2 Touch the [OK] key on [Main Menu] screen.The [Controller Set] screen is displayed.

10-3. Controller Settings
346 IV Control PanelChapter 10 Printer Settings
3 Touch the [1] key.
The [Controller Set] screen displays with [1] already selected.
4 Touch the [OK] key.The [Banner Page] screen is displayed.
5 To print a banner page for each printing, touch the [1] key; to not print, touch the [2] key.
6 Touch the [OK] key.The setting is stored.
7 After completing the controller settings and Initial settings, turn the main power OFFfor 10 seconds, and ON once again for the changes to take effect.

10-3. Controller Settings
347 IV Control PanelChapter 10 Printer Settings
Banner Page Tray
This sets the input tray for banner pages.
The factory default is [Auto Tray].
1 Touch the [2] key on [Main Menu] screen.
For details on the procedure for displaying the [Main Menu] screen, refer to [Displaying the Main Menu Screen]
( Page 337).
2 Touch the [OK] key.The [Controller Set] screen is displayed.
3 Touch the [2] key.
4 Touch the [OK] key.The [Banner Page Tray] screen is displayed.

10-3. Controller Settings
348 IV Control PanelChapter 10 Printer Settings
5 Touch one of the [1] - [7] keys.
[1] Auto Tray
[2] Tray 1
[3] Tray 2
[4] Tray 3 (When input tray option is installed)
[5] Tray 4
[6] Tray 5
[7] Bypass Tray
The number of tray depends on the option attached.This illustration appears when option DB-211 is included.
6 Touch the [OK] key.The setting is stored.
7 After completing the controller settings and Initial settings, turn the main power OFFfor 10 seconds, and ON once again for the changes to take effect.
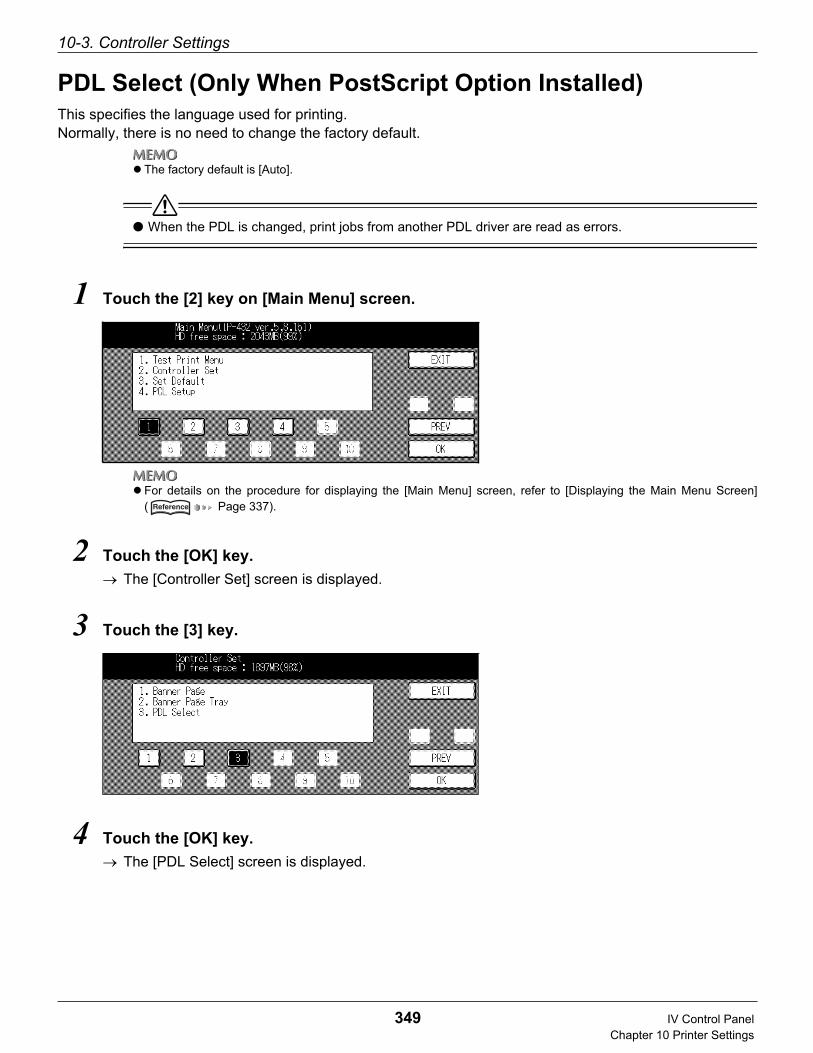
10-3. Controller Settings
349 IV Control PanelChapter 10 Printer Settings
PDL Select (Only When PostScript Option Installed)
This specifies the language used for printing.Normally, there is no need to change the factory default.
The factory default is [Auto].
● When the PDL is changed, print jobs from another PDL driver are read as errors.
1 Touch the [2] key on [Main Menu] screen.
For details on the procedure for displaying the [Main Menu] screen, refer to [Displaying the Main Menu Screen]( Page 337).
2 Touch the [OK] key.
The [Controller Set] screen is displayed.
3 Touch the [3] key.
4 Touch the [OK] key.
The [PDL Select] screen is displayed.
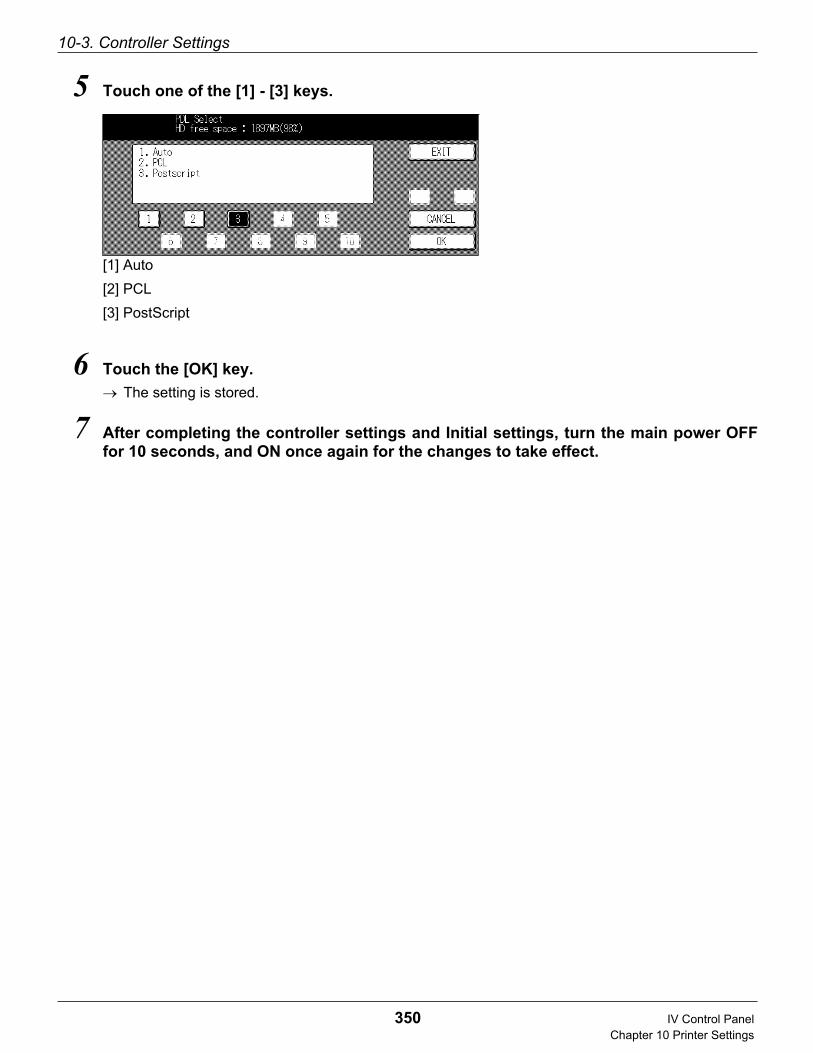
10-3. Controller Settings
350 IV Control PanelChapter 10 Printer Settings
5 Touch one of the [1] - [3] keys.
[1] Auto
[2] PCL
[3] PostScript
6 Touch the [OK] key.
The setting is stored.
7 After completing the controller settings and Initial settings, turn the main power OFFfor 10 seconds, and ON once again for the changes to take effect.

351 IV Control PanelChapter 10 Printer Settings
10-4. Print Default Setting
This sets default settings such as the paper size or duplex printing etc.On the [Main Menu] screen, select [Print default settings].
● When printing is executed from an application, if the settings made with the printer driver and the set-
tings made here are different, the printer driver settings take priority.
● After changing the Print default settings, turn the main power OFF/ON in order for the changes to take
effect.
Default Paper
This sets the default value for the paper size used for printing.
The factory default is [A4].(For U.S. and Canada market area: The factory default is [8.5 x 11])
1 Touch the [3] key on [Main Menu] screen.
For details on the procedure for displaying the [Main Menu] screen, refer to [Displaying the Main Menu Screen]
( Page 337).
2 Touch the [OK] key.The [Set Default] screen is displayed.
3 Touch the [1] key.
The [Set Default] screen displays with [1] already selected.

10-4. Print Default Setting
352 IV Control PanelChapter 10 Printer Settings
4 Touch the [OK] key.The [Default Paper] screen is displayed.
5 Touch one of the [1] - [10] keys.
To switch the items displayed on the [Default Paper] screen, touch the [<<] or [>>] key.
6 Touch the [OK] key.The setting is stored.
7 After completing the controller settings and Initial settings, turn the main power OFFfor 10 seconds, and ON once again for the changes to take effect.
[1] A3R[2] A4[3] A5R[4] B4R[5] B5
[6] F4R[7] 11 x 17R[8] 8.5 x 14R[9] 8.5 x 11[10] 5.5 x 8.5R
[1] A3R[2] A4[3] A5R[4] B4R[5] B5[6] B6R
[7] F4R[8] 11 x 17R[9] 8.5 x 14R[10] 8.5 x 11[11] 5.5 x 8.5R[12] 8KR[13] 16K
(For U.S. and Canada market area)

10-4. Print Default Setting
353 IV Control PanelChapter 10 Printer Settings
Duplex
This sets whether or not to print on both sides the paper as default.
The factory default is [Off]
1 Touch the [3] key on [Main Menu] screen.
For details on the procedure for displaying the [Main Menu] screen, refer to [Displaying the Main Menu Screen]
( Page 337).
2 Touch the [OK] key.The [Set Default] screen is displayed.
3 Touch the [2] key.
4 Touch the [OK] key.The [Duplex] screen is displayed.
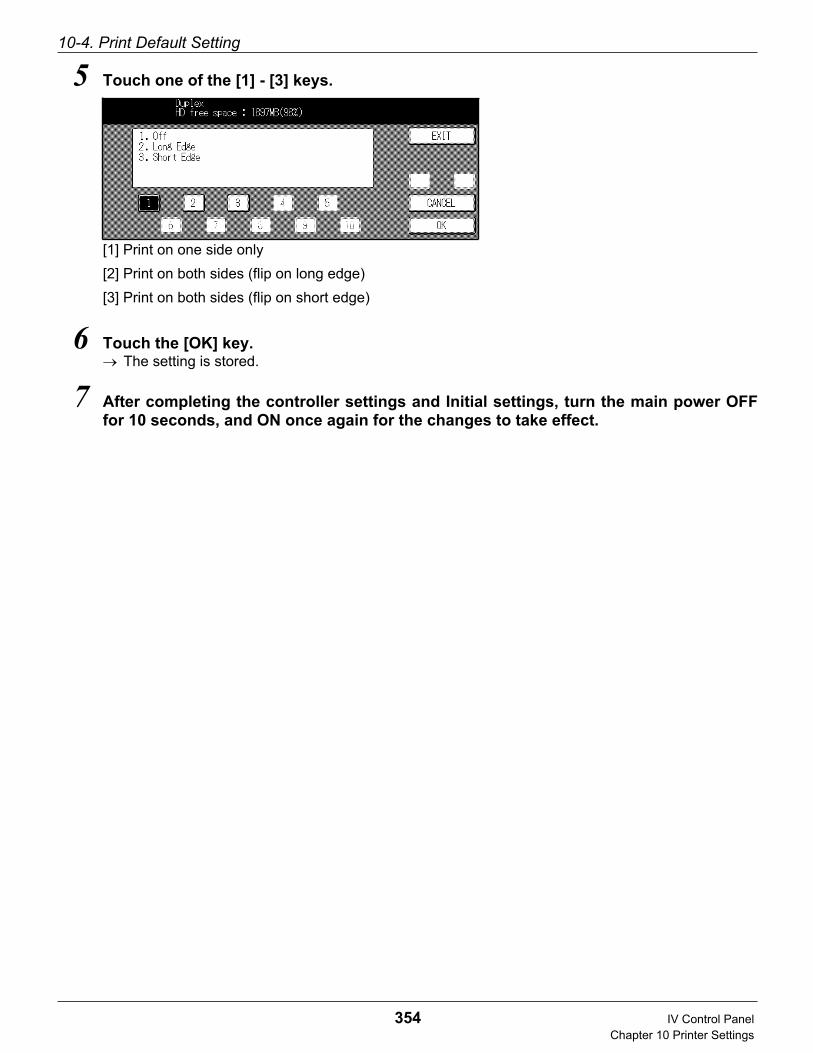
10-4. Print Default Setting
354 IV Control PanelChapter 10 Printer Settings
5 Touch one of the [1] - [3] keys.
[1] Print on one side only
[2] Print on both sides (flip on long edge)
[3] Print on both sides (flip on short edge)
6 Touch the [OK] key.The setting is stored.
7 After completing the controller settings and Initial settings, turn the main power OFFfor 10 seconds, and ON once again for the changes to take effect.
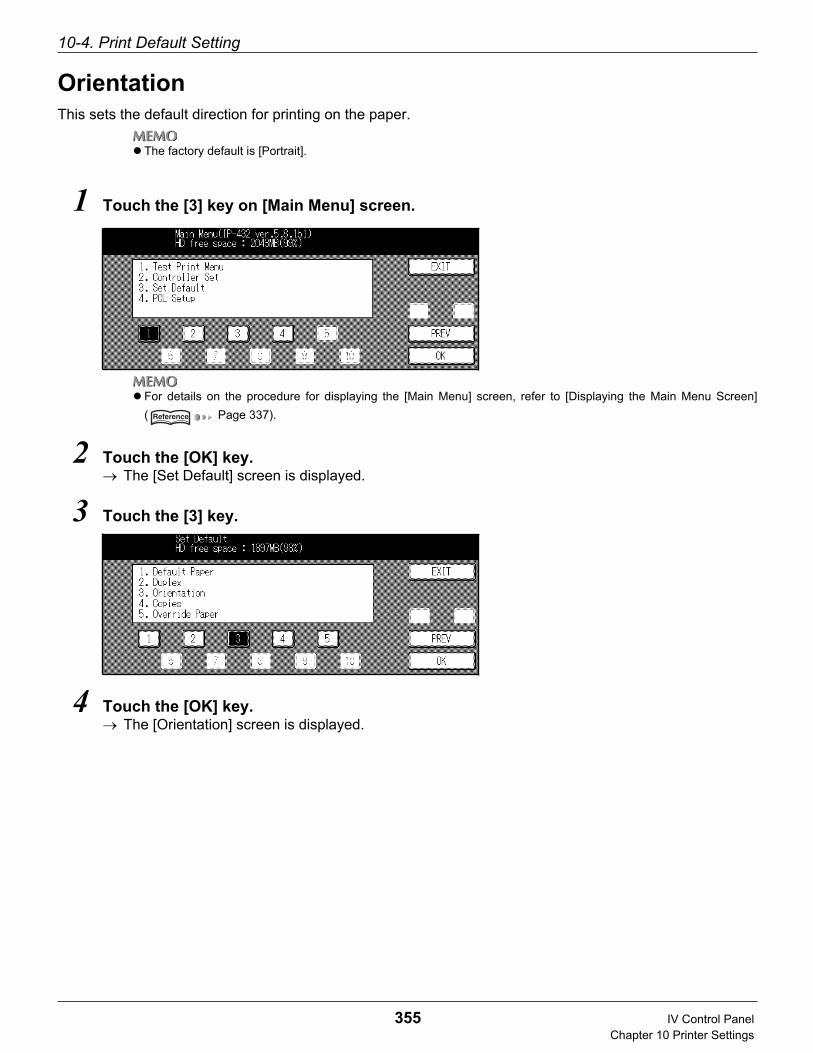
10-4. Print Default Setting
355 IV Control PanelChapter 10 Printer Settings
Orientation
This sets the default direction for printing on the paper.
The factory default is [Portrait].
1 Touch the [3] key on [Main Menu] screen.
For details on the procedure for displaying the [Main Menu] screen, refer to [Displaying the Main Menu Screen]
( Page 337).
2 Touch the [OK] key.The [Set Default] screen is displayed.
3 Touch the [3] key.
4 Touch the [OK] key.The [Orientation] screen is displayed.
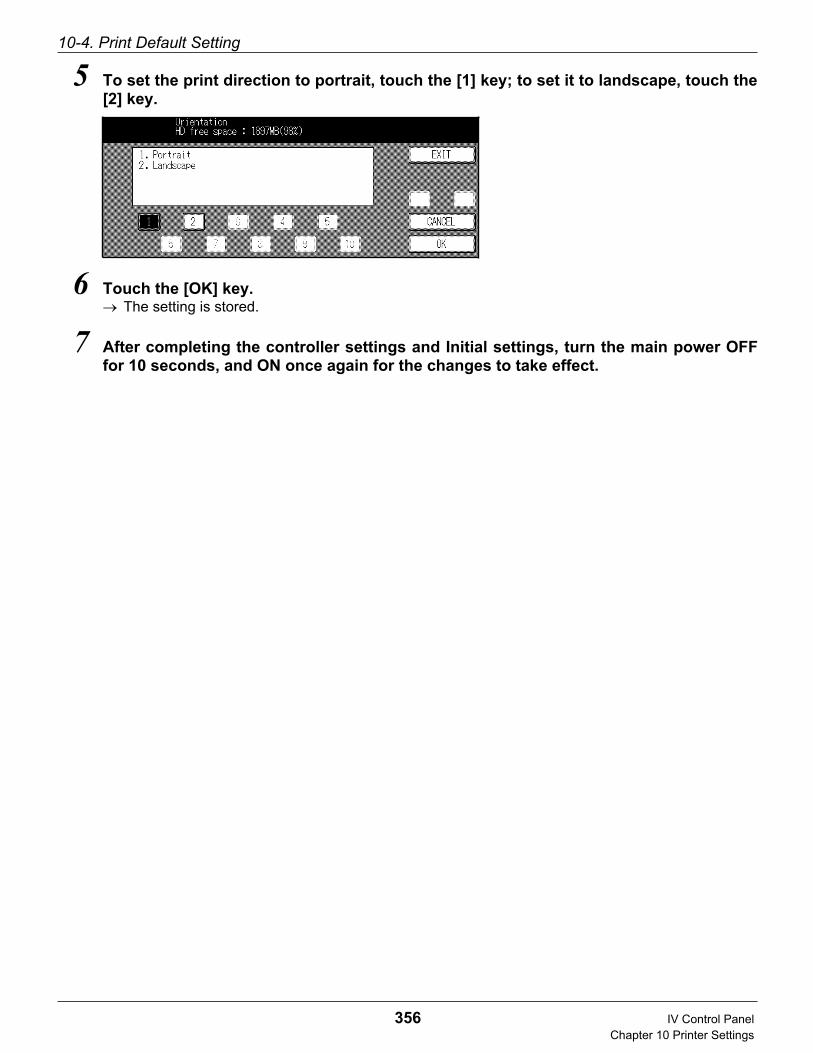
10-4. Print Default Setting
356 IV Control PanelChapter 10 Printer Settings
5 To set the print direction to portrait, touch the [1] key; to set it to landscape, touch the[2] key.
6 Touch the [OK] key.The setting is stored.
7 After completing the controller settings and Initial settings, turn the main power OFFfor 10 seconds, and ON once again for the changes to take effect.

10-4. Print Default Setting
357 IV Control PanelChapter 10 Printer Settings
Copies
This sets the default setting for the number of copies.
The factory default is [1].
1 Touch the [3] key on [Main Menu] screen.
For details on the procedure for displaying the [Main Menu] screen, refer to [Displaying the Main Menu Screen]
( Page 337).
2 Touch the [OK] key.The [Set Default] screen is displayed.
3 Touch the [4] key.
4 Touch the [OK] key.The [Copies] screen is displayed.

10-4. Print Default Setting
358 IV Control PanelChapter 10 Printer Settings
5 Touch the number keys to input the number of copies from 1 to 9999.
6 Touch the [OK] key.The setting is stored.
7 After completing the controller settings and Initial settings, turn the main power OFFfor 10 seconds, and ON once again for the changes to take effect.
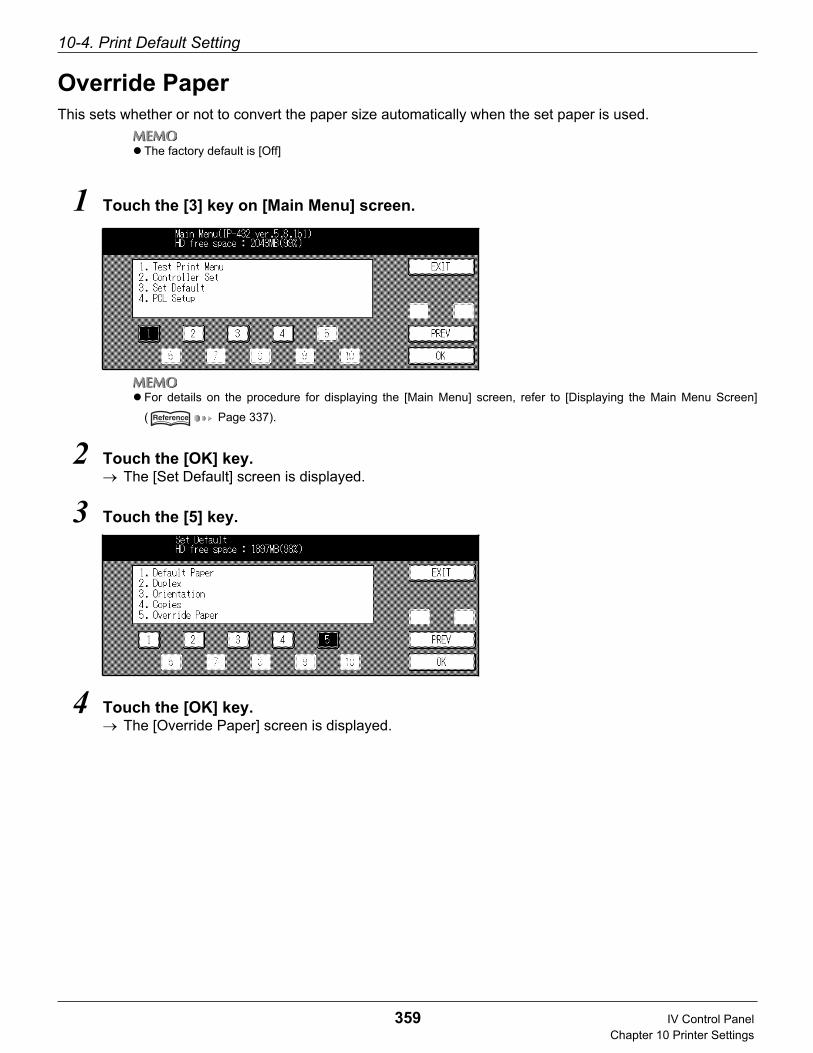
10-4. Print Default Setting
359 IV Control PanelChapter 10 Printer Settings
Override Paper
This sets whether or not to convert the paper size automatically when the set paper is used.
The factory default is [Off]
1 Touch the [3] key on [Main Menu] screen.
For details on the procedure for displaying the [Main Menu] screen, refer to [Displaying the Main Menu Screen]
( Page 337).
2 Touch the [OK] key.The [Set Default] screen is displayed.
3 Touch the [5] key.
4 Touch the [OK] key.The [Override Paper] screen is displayed.

10-4. Print Default Setting
360 IV Control PanelChapter 10 Printer Settings
5 Touch one of the [1] - [3] keys.
[1] Do not convert the paper size.
[2] Convert 8.5x11 paper to A4 size automatically.
[3] Convert A4 size paper to 8.5x11 automatically.
6 Touch the [OK] key.The setting is stored.
7 After completing the controller settings and Initial settings, turn the main power OFFfor 10 seconds, and ON once again for the changes to take effect.
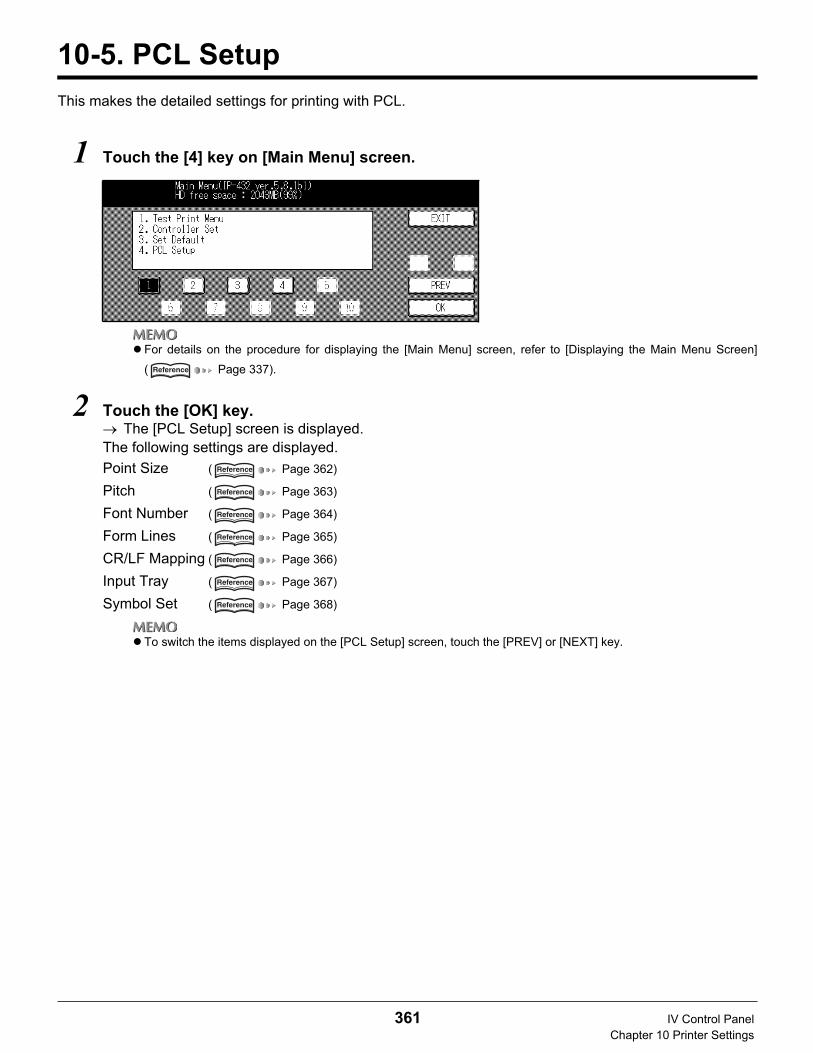
361 IV Control PanelChapter 10 Printer Settings
10-5. PCL Setup
This makes the detailed settings for printing with PCL.
1 Touch the [4] key on [Main Menu] screen.
For details on the procedure for displaying the [Main Menu] screen, refer to [Displaying the Main Menu Screen]
( Page 337).
2 Touch the [OK] key.The [PCL Setup] screen is displayed.
The following settings are displayed.
Point Size ( Page 362)
Pitch ( Page 363)
Font Number ( Page 364)
Form Lines ( Page 365)
CR/LF Mapping ( Page 366)
Input Tray ( Page 367)
Symbol Set ( Page 368)
To switch the items displayed on the [PCL Setup] screen, touch the [PREV] or [NEXT] key.

10-5. PCL Setup
362 IV Control PanelChapter 10 Printer Settings
Point Size
This sets the font point size.
The factory default is [12.00].
1 Touch the [1] key on [PCL Setup] screen.
The [PCL Setup] screen displays with [1] already selected.
2 Touch the [OK] key.The [Point Size] screen is displayed.
3 Touch the number keys to input a point size from 0.4 to 99.75.
4 Touch the [OK] key.The setting is stored.

10-5. PCL Setup
363 IV Control PanelChapter 10 Printer Settings
Pitch
This sets the character spacing.
The factory default is [10.00].
1 Touch the [2] key on [PCL Setup] screen.
2 Touch the [OK] key.The [Pitch] screen is displayed.
3 Touch the number keys to input a pitch from 0.44 to 99.95.
4 Touch the [OK] key.The setting is stored.

10-5. PCL Setup
364 IV Control PanelChapter 10 Printer Settings
Font Number
This sets font numbers for printing.
The factory default is [11].
1 Touch the [3] key on [PCL Setup] screen.
2 Touch the [OK] key.The [Font Number] screen is displayed.
3 Touch the number keys to input a font number from 0 to 88.
For details on font number, refer to [21-8. Font Number List (Control Panel-PCL Setup)] ( Page 500).
4 Touch the [OK] key.The setting is stored.
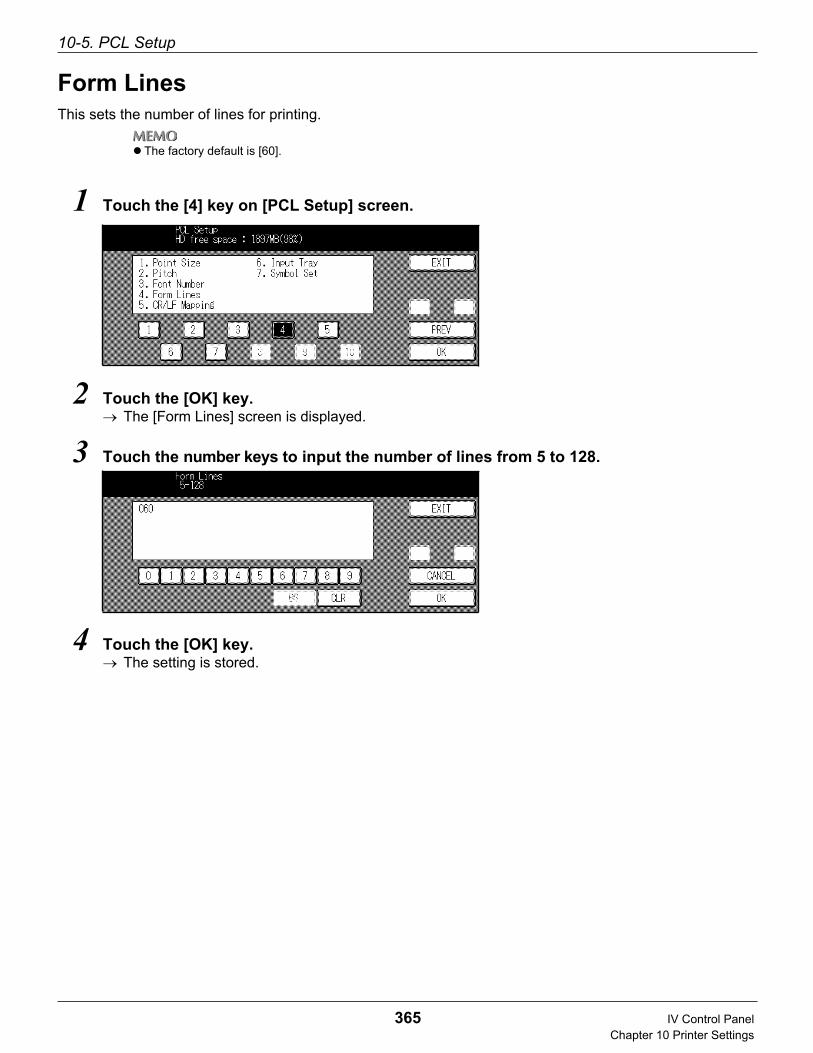
10-5. PCL Setup
365 IV Control PanelChapter 10 Printer Settings
Form Lines
This sets the number of lines for printing.
The factory default is [60].
1 Touch the [4] key on [PCL Setup] screen.
2 Touch the [OK] key.The [Form Lines] screen is displayed.
3 Touch the number keys to input the number of lines from 5 to 128.
4 Touch the [OK] key.The setting is stored.
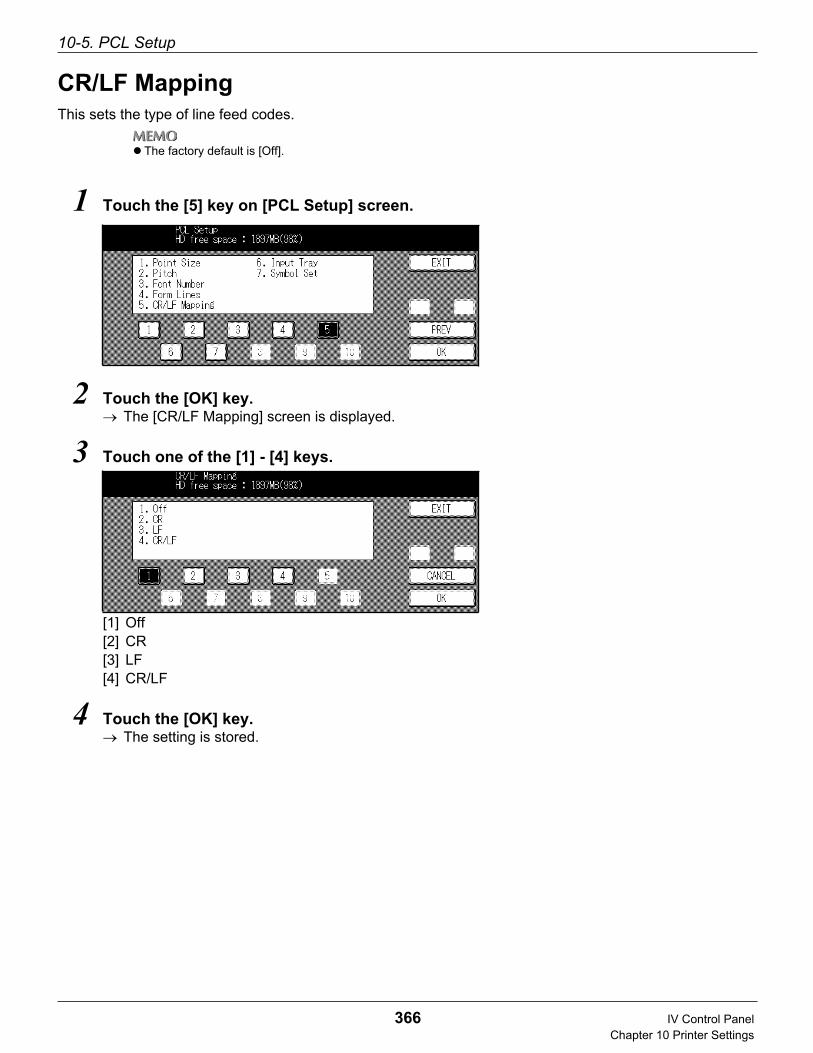
10-5. PCL Setup
366 IV Control PanelChapter 10 Printer Settings
CR/LF Mapping
This sets the type of line feed codes.
The factory default is [Off].
1 Touch the [5] key on [PCL Setup] screen.
2 Touch the [OK] key.The [CR/LF Mapping] screen is displayed.
3 Touch one of the [1] - [4] keys.
[1] Off[2] CR[3] LF[4] CR/LF
4 Touch the [OK] key.The setting is stored.

10-5. PCL Setup
367 IV Control PanelChapter 10 Printer Settings
Input Tray
This sets the input tray containing the paper to print on.
The factory default is [Auto Tray].
1 Touch the [6] key on [PCL Setup] screen.
2 Touch the [OK] key.The [Input Tray] screen is displayed.
3 Touch one of the [1] - [7] keys.
[1] Auto Tray[2] Tray1[3] Tray2[4] Tray3 (When input tray option is installed)[5] Tray4[6] Tray5[7] Bypass Tray
The number of tray depends on the option attached.
4 Touch the [OK] key.The setting is stored.

10-5. PCL Setup
368 IV Control PanelChapter 10 Printer Settings
Symbol Set
This sets the symbol sets for printing.
The factory default is [ROMAN-8].
1 Touch the [7] key on [PCL Setup] screen.
2 Touch the [OK] key.The [Symbol Set] screen is displayed.
3 Touch one of the [1] - [32] keys.
For details on Symbol set, refer to [21-9. Symbol Sets List (Control Panel-PCL Setup)] ( Page 503).
4 Touch the [OK] key.The setting is stored.

IV Control Panel
369
Chapter 11 Key Operator Settings
This chapter explains the contents of the settings that can be made with key operator mode onthe copier.
11-1. Key Operator Mode .........................................................................370
11-2. Contents of Settings .......................................................................372

370 IV Control PanelChapter 11 Key Operator Settings
11-1. Key Operator Mode
Usage Objectives for Key Operator Mode
Key operator mode is for making detailed settings concerning the printer.To make the settings, use the [PrinterMemorySW] screen from key operator mode.
Switching the Key Operator Mode
1 Press the (COPY) button on the control panel.
The [Copy basic mode] screen is displayed.
2 Press the (HELP) button on the control panel.
The [HELP MODE] screen is displayed.
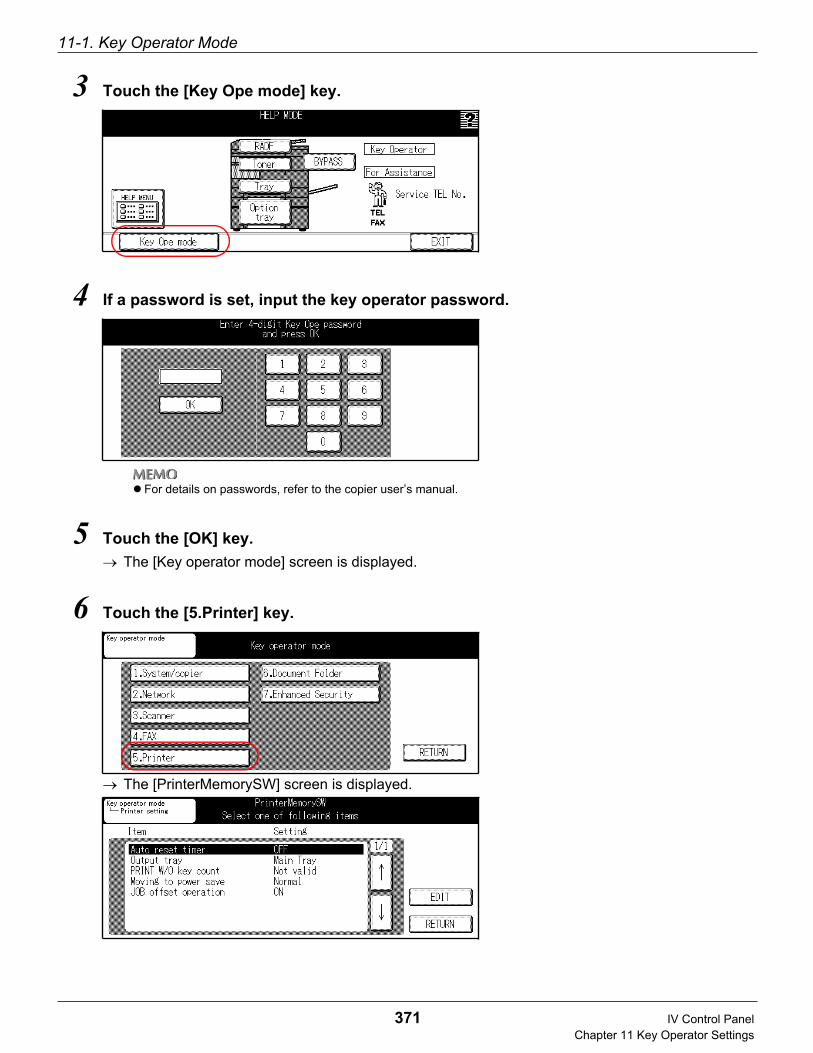
11-1. Key Operator Mode
371 IV Control PanelChapter 11 Key Operator Settings
3 Touch the [Key Ope mode] key.
4 If a password is set, input the key operator password.
For details on passwords, refer to the copier user’s manual.
5 Touch the [OK] key.
The [Key operator mode] screen is displayed.
6 Touch the [5.Printer] key.
The [PrinterMemorySW] screen is displayed.

372 IV Control PanelChapter 11 Key Operator Settings
11-2. Contents of Settings
The default values for the following items can be set with key operator mode.
Auto reset timer
Output tray
PRINT W/O key count
Moving to power save
Job offset operation
Auto Reset Timer
You can set how long the copier will wait with the [Scanner] screen left unused until it automatically returns tothe [Printer basic mode] screen.
The factory default is [Off] (Do not switch screens automatically.).
1 Select [Auto reset timer] on [PrinterMemorySW] screen.
When you touch the [ ] or [ ] key, the selection item is switched.
For details on the procedure for displaying the [PrinterMemorySW] screen, refer to [Switching the Key Operator
Mode] ( Page 370).
2 Touch the [EDIT] key, then change the setting.Each time you touch the [EDIT] key, the setting is switched. Select the setting item from among the following.
OFF, 30, 60, 90, 120, 150, 180, 210, 240, 270, 300 (seconds)
When you select [OFF], auto resets are not triggered.
As for the copier setting, if the [Valid] is selected, consult your service representative.
3 Touch the [RETURN] key.From now on, the copier operates in accordance with this setting.
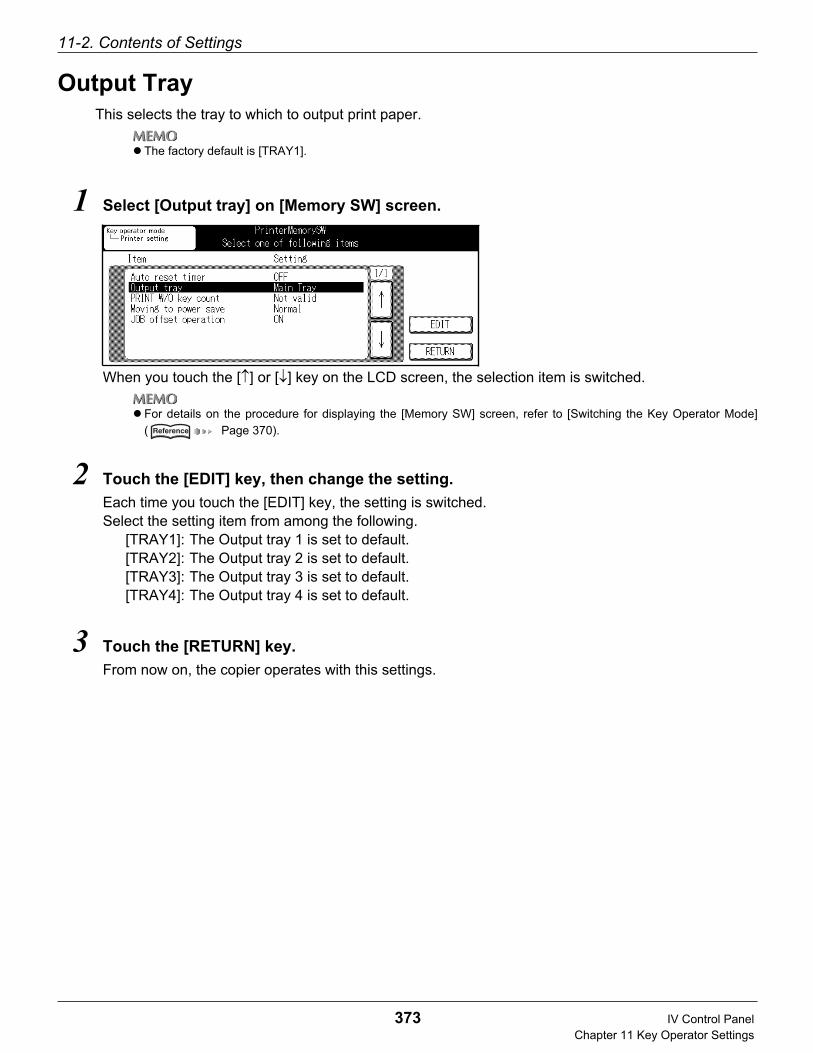
11-2. Contents of Settings
373 IV Control PanelChapter 11 Key Operator Settings
Output Tray
This selects the tray to which to output print paper.
The factory default is [TRAY1].
1 Select [Output tray] on [Memory SW] screen.
When you touch the [ ] or [ ] key on the LCD screen, the selection item is switched.
For details on the procedure for displaying the [Memory SW] screen, refer to [Switching the Key Operator Mode]
( Page 370).
2 Touch the [EDIT] key, then change the setting.
Each time you touch the [EDIT] key, the setting is switched. Select the setting item from among the following.
[TRAY1]: The Output tray 1 is set to default.[TRAY2]: The Output tray 2 is set to default.[TRAY3]: The Output tray 3 is set to default.[TRAY4]: The Output tray 4 is set to default.
3 Touch the [RETURN] key.
From now on, the copier operates with this settings.

11-2. Contents of Settings
374 IV Control PanelChapter 11 Key Operator Settings
PRINT W/O Key Count
This sets whether to enable printing or disable printing when the key counter is removed during print opera-tions.
The factory default is [Not valid] (printing is possible whether or not the key counter is present).
1 Select [PRINT W/O key count] on [PrinterMemorySW] screen.
When you touch the [ ] or [ ] key, the selection item is switched.
For details on the procedure for displaying the [PrinterMemorySW] screen, refer to [Switching the Key Operator
Mode] ( Page 370).
2 Touch the [EDIT] key, then change the setting.Each time you touch the [EDIT] key, the setting is switched. If you select [Valid], operation is according to the copier setting.If you select [Not Valid], printing is possible whether or not the key counter is present.
As for the copier setting, if the [Valid] is selected, consult your service representative.
3 Touch the [RETURN] key.From now on, the copier operates in accordance with this setting.

11-2. Contents of Settings
375 IV Control PanelChapter 11 Key Operator Settings
Moving to Power Save
This sets the standby time from when printing starts during power save mode until it returns to power savemode again.
For details on power save mode, refer to the copier user’s manual.The factory default is [Normal]. (The copier returns to power save mode after the time set as the power save time.)
1 Select [Moving to power save] on [PrinterMemorySW] screen.
When you touch the [ ] or [ ] key, the selection item is switched.
For details on the procedure for displaying the [PrinterMemorySW] screen, refer to [Switching the Key Operator
Mode] ( Page 370).
2 Touch the [EDIT] key, then change the setting.Each time you touch the [EDIT] key, the setting is switched. When you select [Normal], the copier returns to power save mode after the time set as the power savetime.When you select [Immediate], the copier returns to power save mode about one minute after the endof printing.
3 Touch the [RETURN] key.From now on, the copier operates in accordance with this setting.

11-2. Contents of Settings
376 IV Control PanelChapter 11 Key Operator Settings
Job Offset Operation
[Collate] with a copying machine is functioned instead of instructing driver’s [Collate].
For more detail on [Collate], refer to [Printing One Copy at a Time of All Pages (Collate/Sort)] ( Page 164).
The factory default is [ON].
1 Select [Job offset operation] on [PrinterMemorySW] screen.
When you touch the [ ] or [ ] key, the selection item is switched.
For details on the procedure for displaying the [PrinterMemorySW] screen, refer to [Switching the Key Operator
Mode] ( Page 370).
2 Touch the [EDIT] key, then change the setting.Each time you touch the [EDIT] key, the setting is switched.[ON]: [Collate] is done at any time.[OFF]: [Collate] is not done. However, if directed on the driver, [Collate] is done.
3 Touch the [RETURN] key.From now on, the copier operates in accordance with this setting.
377
This volume explains how to make the net-work settings.
Chapter 12 Summary of Network
Functions....................... 378
Chapter 13 Printing with IP Peer-to-Peer
(Windows 95/98/Me only)381
Chapter 14 Settings for Printing with
LPD/LPR (Windows NT 4.0/
2000/XP only).................. 383
Chapter 15 Using with NetWare ....... 401
Chapter 16 Using via the Internet
(Windows 2000/XP) ........ 408
Chapter 17 UNIX Configuration........ 424
Chapter 18 Use with AppleTalk ........ 436
Chapter 19 When There Is Network
Printing Trouble ............. 451
V Network Print Settings
V Network Print Settings
378
Chapter 12 Summary of Network Functions
This chapter summarizes the print controller network functions.
12-1. Network Functions..........................................................................379

379 V Network Print SettingsChapter 12 Summary of Network Functions
12-1. Network Functions
Features of Network Functions
This unit can handle various network environments flexibly and is equipped with the following network func-tions.
10Base-T/100Base-TX (Fast Ethernet) automatic selection
It supports for multiple protocols (TCP/IP, IPX/SPX, AppleTalk (EtherTalk))
Through dedicated utilities, it supports IP Peer-to-Peer printing through TCP/IP from Microsoft Win-dows 95/98/Me.
Through dedicated utilities, it supports IPX Peer-to-Peer printing through IPX/SPX from Microsoft Win-dows 95/98/Me.
It supports LPD/LPR on TCP/IP for Microsoft Windows NT 4.0/2000/XP.
It supports lpd/lpr on TCP/IP for UNIX.
It supports PServer and RPrinter (NPrinter) of Novell Netware.
It supports Novell NetWare printer server functions and supports both bindery mode and Novell Direc-tory Service (NDS).
It supports AppleTalk on Macintosh.
It supports for acquiring IP addresses automatically through DHCP
It supports for setting up Netware on NWSetup utility for Microsoft Windows 95/98/Me/NT 4.0/2000/XP.
It supports for assigning IP addresses on BOOTP Lite utility for Microsoft Windows 95/98/Me/NT 4.0/2000/XP.
It supports printing from various UNIX systems through UNIX-TCP/IP Programs.
Use with Peer-to-Peer Connections (Windows 95/98/Me)
With a LAN (Local Area Network) comprised solely of computers running Windows 95/98/Me, the printer canbe used without a dedicated printer server. In this case, this printing system is connected to the network witha connection configuration called peer-to-peer.
Peer-to-peer: A network configuration that connects computers under equivalent conditions without using a centralserver.

12-1. Network Functions
380 V Network Print SettingsChapter 12 Summary of Network Functions
Use through LPD/LPR (Windows NT 4.0/2000/XP)
This printing system supports printing with LPD/LPR with Windows NT 4.0/2000/XP.You can connect this printing system to a print server in a UNIX environment and send print instructions tothe printer from Windows NT 4.0/2000/XP.
This must be a print request format that can be used with LPD (Line Printer Daemon)/LPR:Windows NT 4.0/2000/XP.
Using with UNIX
This printing system supports printing with lpd/lpr with UNIX.You can connect this printing system to a print server in a UNIX environment and sent print instructions to theprinter from various UNIX systems.
Using with NetWare
The Novell NetWare 3.x–6 printer server functions are supported.You can connect this printing system to a network that uses Novell NetWare 3.x or 4.x as the network OS andsend print instructions to the printer server (network controller) from a client terminal.
For details on NetWare functions, refer to the NetWare manual.
Using with Macintosh (Only When PostScript Option Installed)
Printing on a Macintosh with AppleTalk is supported.You can connect this printing system to the AppleTalk environment print server and send print instructions tothe printer from a Macintosh.

V Network Print Settings
381
Chapter 13 Printing with IP Peer-to-Peer
(Windows 95/98/Me only)
This chapter explains the settings required for printing with a Windows 95/98/Me computer andthis printing system connected in an IP Peer-to-Peer network.
13-1. IP Peer-to-Peer ................................................................................382
382 V Network Print SettingsChapter 13 Printing with IP Peer-to-Peer (Windows 95/98/Me only)
13-1. IP Peer-to-Peer
Peer-to-Peer is a network configuration in which the client computers are connected directly to each otherwithout a server at the center of the network. Peer-to-Peer connections are used to configure a small-scalenetwork with a few computers.This printer can send print jobs directly to the computers making up the Peer-to-Peer network without goingthrough a dedicated server. This is called [Peer-to-Peer] printing.
Peer-to-Peer printing can be set and executed with Windows 95/98/Me.
● For printing by Peer-to-Peer, please use utility software (Network Setup 2.0).
For instructions regarding printing by Peer-to-Peer, refer to the instruction Manual [Network Setup 2.0].
V Network Print Settings
383
Chapter 14 Settings for Printing with LPD/LPR
(Windows NT 4.0/2000/XP only)
This chapter explains the settings required for printing with LPD/LPR using Windows NT 4.0,Windows 2000 or Windows XP
14-1. LPD/LPR...........................................................................................384
14-2. Preparations for Printing with LPD/LPR .......................................385
14-3. LPD/LPR Settings in Windows NT 4.0 ...........................................386
14-4. LPD/LPR Settings in Windows 2000..............................................391
14-5. LPD/LPR Settings in Windows XP.................................................396

384 V Network Print SettingsChapter 14 Settings for Printing with LPD/LPR (Windows NT 4.0/2000/XP only)
14-1. LPD/LPR
An LPD (Line Printer Daemon) is a printer daemon (mechanism for executing printing) used with a standardprint server; an LPR (Line Printer Remote) is the protocol for making print requests to a printer daemon.Printing using this LPD/LPR is possible from computers using Windows NT 4.0/2000/XP as their operatingsystem.In printing with LPD/LPR, TCP/IP is used as the communications protocol.

385 V Network Print SettingsChapter 14 Settings for Printing with LPD/LPR (Windows NT 4.0/2000/XP only)
14-2. Preparations for Printing with LPD/LPR
The computer and network controller are prepared with the following procedure.
1 An IP address is assigned to the network controller.
Refer to the copier user’s manual [Network Setup and Scanner Operations].
2 The network controller TCP/IP settings are made.Refer to the copier user’s manual [Network Setup and Scanner Operations].
3 The computer TCP/IP settings are made.Refer to the pages below.
Windows NT 4.0 [Checking the Network Service]( Page 386)
Windows 2000 [Checking the Unix Print Service]( Page 391)
Windows XP [Checking the Unix Print Service]( Page 396)
4 The printer port and printer driver is added.Refer to the pages below.
Windows NT 4.0 [Adding a LPD/LPR Printer Port and Installing a Printer Driver (PCL Driver)]
( Page 387)Windows 2000 [Adding a LPD/LPR Printer Port and Installing a Printer Driver (PCL Driver)]
( Page 392)Windows XP [Adding a LPD/LPR Printer Port and Installing a Printer Driver (PCL Driver)]
( Page 396)

386 V Network Print SettingsChapter 14 Settings for Printing with LPD/LPR (Windows NT 4.0/2000/XP only)
14-3. LPD/LPR Settings in Windows NT 4.0
This section explains how to make the settings with Windows NT 4.0.
Checking the Network Service
Printing with LPD/LPR requires that there be [Microsoft TCP/IP printing] and [Network service] in [Networkservice].
1 From the taskbar, select [Start] - [Settings] – [Control Panel].
The [Control Panel] screen is displayed.
2 Double click the [Network] icon.The [Network] screen is displayed.
3 Click the [Services] tab.The [Network Services:] list is displayed.
4 Check that [Microsoft TCP/IP Printing] is in the list.If it is not in the list, add it from the Windows setup CD-ROM.
For details on how to add a [Network Services], refer to the user’s manual for the operating system.

14-3. LPD/LPR Settings in Windows NT 4.0
387 V Network Print SettingsChapter 14 Settings for Printing with LPD/LPR (Windows NT 4.0/2000/XP only)
Adding a LPD/LPR Printer Port and Installing a Printer Driver(PCL Driver)
This adds an LPD/LPR printer port and installs its printer driver.
1 Switch on the power for the computer and start Windows.
Close down any applications that are running.
2 Log on with a user name that has administrator rights.
If you cannot log on with a user name that has administrator rights, log on with a user name that has installing rightssuch as a Power User.
3 Put the [User software CD] in the computer's CD-ROM drive.
4 From [My Computer], select the [CD-ROM] and then double click the [Setup. exe] in the[English] - [Printer] - [WinNT_2000_XP] folder.
5 [Click the [OK] button.
The [Printer Driver Installer] screen is displayed.
6 Click the [Add a Port] tub.

14-3. LPD/LPR Settings in Windows NT 4.0
388 V Network Print SettingsChapter 14 Settings for Printing with LPD/LPR (Windows NT 4.0/2000/XP only)
7 Select the [LPR Port].
8 Input in the columns of [Post Description] and [Port Name], and [Add Port] button.
The[Add LPR compatible printer] screen is displayed.
9 Enter the IP address assigned to the network controller in the column of [Name oraddress of server providing lpd].
10 Enter [printer] in small letters in the column of [Name of printer or print queen on thatserver] and click the [OK] button.
11 Click the [OK] button.
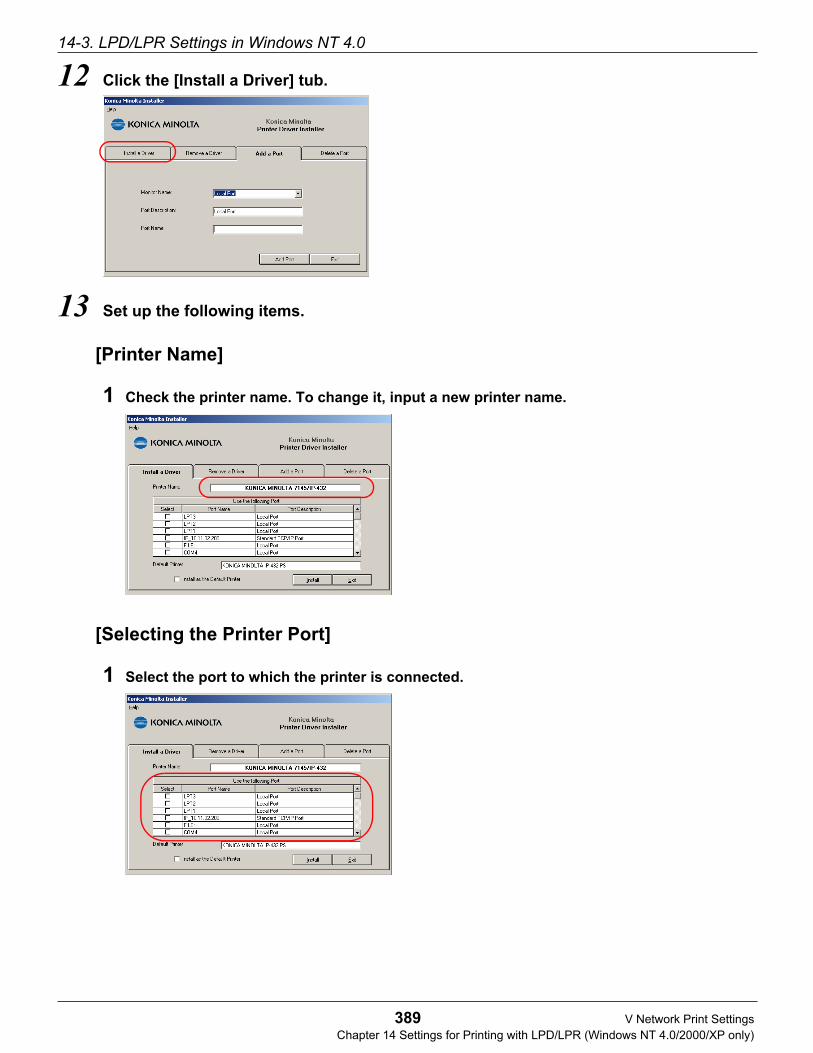
14-3. LPD/LPR Settings in Windows NT 4.0
389 V Network Print SettingsChapter 14 Settings for Printing with LPD/LPR (Windows NT 4.0/2000/XP only)
12 Click the [Install a Driver] tub.
13 Set up the following items.
[Printer Name]
1 Check the printer name. To change it, input a new printer name.
[Selecting the Printer Port]
1 Select the port to which the printer is connected.

14-3. LPD/LPR Settings in Windows NT 4.0
390 V Network Print SettingsChapter 14 Settings for Printing with LPD/LPR (Windows NT 4.0/2000/XP only)
[Install as the Default Printer]
1 If you want to use this printing system as your default printer, check the [Install as the
Default Printer] checkbox.
14 When all the settings are complete, click the [Install] button.
15 Click the [Finished] button.
This completes printer driver installation.

391 V Network Print SettingsChapter 14 Settings for Printing with LPD/LPR (Windows NT 4.0/2000/XP only)
14-4. LPD/LPR Settings in Windows 2000
This section explains how to make the settings with Windows 2000.
Checking the Unix Print Service
Printing with LPD/LPR requires that the Unix print services are installed and that they be usable. Check thesettings with the following procedure.
1 From the taskbar, select [Start] - [Settings] - [Control Panel].
The [Control Panel] window is displayed.
2 Double click [Network and Dial-up Connections] icon.The [Network and Dial-up Connections] window is displayed.
3 Select [Advanced] – [Optional Network Components].The [Windows Optional Networking Components Wizard] screen is displayed.
4 Select [Other Network File and Print Services], then click the [Details…] button.The [Other Network File and Print Services] screen is displayed.
If [Print Services for Unix] is not checked in the list, check that and add from the Windows setup CD-ROM.
For details on how to add a [Print Services for Unix], refer to the user’s manual for the operating system.

14-4. LPD/LPR Settings in Windows 2000
392 V Network Print SettingsChapter 14 Settings for Printing with LPD/LPR (Windows NT 4.0/2000/XP only)
Adding a LPD/LPR Printer Port and Installing a Printer Driver(PCL Driver)
This adds an LPD/LPR printer port and installs its printer driver.
1 Switch on the power for the computer and start Windows.
Close down any applications that are running.
2 Log on with a user name that has administrator rights.
If you cannot log on with a user name that has administrator rights, log on with a user name that has installing rightssuch as a Power User.
3 Put the [User software CD] in the computer's CD-ROM drive.
4 From [My Computer], select the [CD-ROM] and then double click the [Setup. exe] in the[English] - [Printer] - [WinNT_2000_XP] folder.
5 [Click the [OK] button.
The [Printer Driver Installer] screen is displayed.
6 Click the [Add a Port] tub.

14-4. LPD/LPR Settings in Windows 2000
393 V Network Print SettingsChapter 14 Settings for Printing with LPD/LPR (Windows NT 4.0/2000/XP only)
7 Select the [LPR Port].
8 Input in the columns of [Post Description] and [Port Name], and [Add Port] button.
The[Add LPR compatible printer] screen is displayed.
9 Enter the IP address assigned to the network controller in the column of [Name oraddress of server providing lpd].
10 Enter [printer] in small letters in the column of [Name of printer or print queen on thatserver] and click the [OK] button.
11 Click the [OK] button.
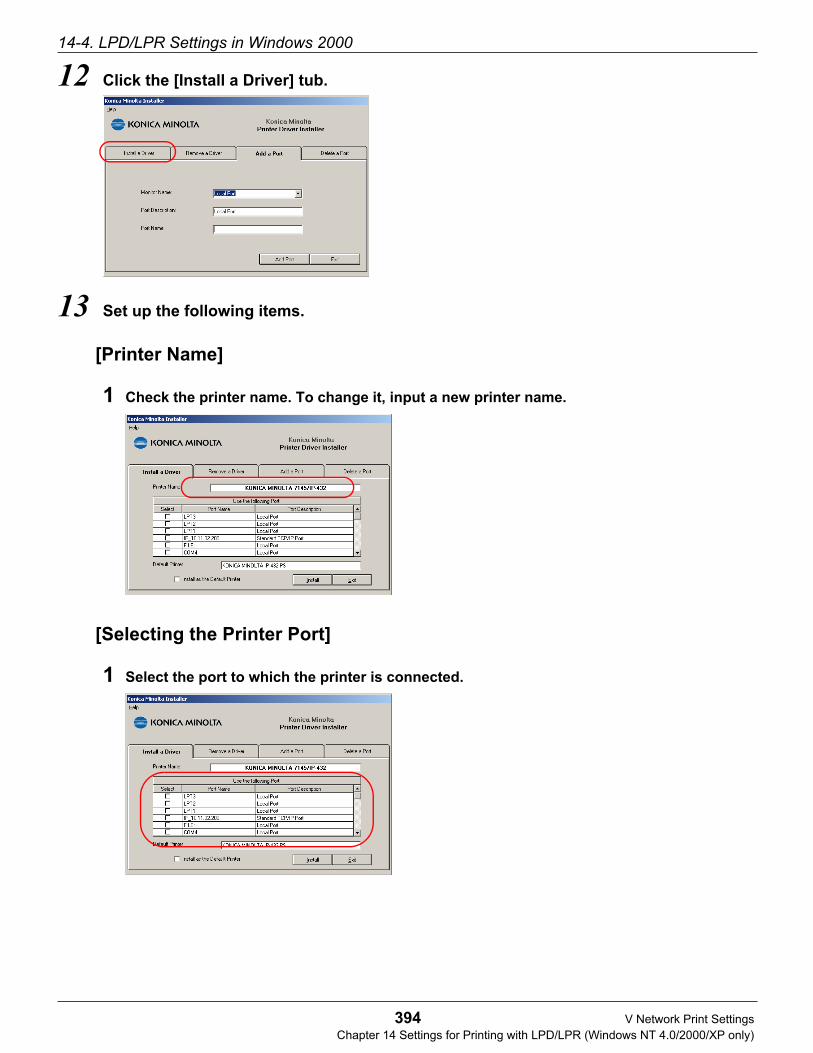
14-4. LPD/LPR Settings in Windows 2000
394 V Network Print SettingsChapter 14 Settings for Printing with LPD/LPR (Windows NT 4.0/2000/XP only)
12 Click the [Install a Driver] tub.
13 Set up the following items.
[Printer Name]
1 Check the printer name. To change it, input a new printer name.
[Selecting the Printer Port]
1 Select the port to which the printer is connected.

14-4. LPD/LPR Settings in Windows 2000
395 V Network Print SettingsChapter 14 Settings for Printing with LPD/LPR (Windows NT 4.0/2000/XP only)
[Install as the Default Printer]
1 If you want to use this printing system as your default printer, check the [Install as the
Default Printer] checkbox.
14 When all the settings are complete, click the [Install] button.
15 Click the [Finished] button.
This completes printer driver installation.

396 V Network Print SettingsChapter 14 Settings for Printing with LPD/LPR (Windows NT 4.0/2000/XP only)
14-5. LPD/LPR Settings in Windows XP
This section explains how to make these settings with Windows XP.
Checking the Unix Print Service
Printing with LPD/LPR requires that the Unix print services be installed and that they be usable. Check thesettings with the following procedure.
1 From the taskbar, select [Start] - [Control Panel] - [Network and Internet Connection].
The [Network and Internet Connections] screen is displayed.
2 Select [Network connection].The LAN or High-Speed Internet] screen is displayed.
3 Select [Advanced] menu - [Optional Networking Components].The [Windows Optional Networking Components] screen is displayed.
4 Select [Other Network File and Print Services], then click the [Details…] button.The [Other Network File and Print Services] screen is displayed.
If [Print Services for Unix] is not checked in the list, check that and add from the Windows setup CD-ROM.
For details on how to add a [Unix print services], refer to the copier’s user's manual for the operating system.
Adding a LPD/LPR Printer Port and Installing a Printer Driver(PCL Driver)
This adds an LPD/LPR printer port and installs its printer driver.
1 Switch on the power for the computer and start Windows.
Close down any applications that are running.
2 Log on with a user name that has administrator rights.
If you cannot log on with a user name that has administrator rights, log on with a user name that has installing rightssuch as a Power User.
3 Put the [User software CD] in the computer's CD-ROM drive.
4 From [My Computer], select the [CD-ROM] and then double click the [Setup. exe] in the[English] - [Printer] - [WinNT_2000_XP] folder.
14-5. LPD/LPR Settings in Windows XP
397 V Network Print SettingsChapter 14 Settings for Printing with LPD/LPR (Windows NT 4.0/2000/XP only)
5 [Click the [OK] button.
The [Printer Driver Installer] screen is displayed.
6 Click the [Add a Port] tub.
7 Select the [LPR Port].
8 Input in the columns of [Post Description] and [Port Name], and [Add Port] button.
The[Add LPR compatible printer] screen is displayed.
14-5. LPD/LPR Settings in Windows XP
398 V Network Print SettingsChapter 14 Settings for Printing with LPD/LPR (Windows NT 4.0/2000/XP only)
9 Enter the IP address assigned to the network controller in the column of [Name oraddress of server providing lpd].
10 Enter [printer] in small letters in the column of [Name of printer or print queen on thatserver] and click the [OK] button.
11 Click the [OK] button.
12 Click the [Install a Driver] tub.
13 Set up the following items.
14-5. LPD/LPR Settings in Windows XP
399 V Network Print SettingsChapter 14 Settings for Printing with LPD/LPR (Windows NT 4.0/2000/XP only)
[Printer Name]
1 Check the printer name. To change it, input a new printer name.
[Selecting the Printer Port]
1 Select the port to which the printer is connected.
[Install as the Default Printer]
1 If you want to use this printing system as your default printer, check the [Install as the
Default Printer] checkbox.

14-5. LPD/LPR Settings in Windows XP
400 V Network Print SettingsChapter 14 Settings for Printing with LPD/LPR (Windows NT 4.0/2000/XP only)
14 When all the settings are complete, click the [Install] button.
15 Click the [Finished] button.
This completes printer driver installation.

V Network Print Settings
401
Chapter 15 Using with NetWare
This chapter explains the settings required for using the network controller connected to a net-work using NetWare.The setting methods depend on the version of NetWare used, the resource managementmethods, etc. Refer to the pages appropriate to your system and make the necessary settings.
15-1. Print Controller NetWare Settings .................................................402
15-2. NetWare 3.x......................................................................................403
15-3. NetWare 4.x–6..................................................................................404
402 V Network Print SettingsChapter 15 Using with NetWare
15-1. Print Controller NetWare Settings
The network controller NetWare settings must be complete before the NetWare settings are made.
For details on the network controller NetWare settings, refer to the copier user’s manual [Network Setup and ScannerOperations].

403 V Network Print SettingsChapter 15 Using with NetWare
15-2. NetWare 3.x
This section explains the setting method for NetWare 3.x.
Before Setting NetWare
The printer server name are set from the copier LCD screen [Network settings] or Web Utilities before theNetWare side settings are made.
For details on making the NetWare settings using the Web Utilities, refer to the copier user’s manual [Network Setupand Scanner Operations].
NetWare Settings
The setting operations explained can be made only with super-user rights.For details on PCONSOLE and the concrete details of the operations described here, refer to the Novell NetWareuser’s manual.
1 Start PCONSOLE and select the file server to use.
2 Prepare and assign the print queue.
3 Set the network controller as the printer server.
4 Set the notice list/password as necessary.
5 Set the primary file server as necessary.
If the primary file server on a large network connected to many sites including multiple file servers, it must be defined.Make the setting using PCONSOLE. For details on PCONSOLE, refer to the NetWare user’s manual.
When the above settings are complete, switch Off the print controller and copier power, wait 10 sec-onds, then switch the power back on.
When you start the Copier with the default settings, the network setting list is printed. The file server thenetwork controller is installed on, the service queue serviced by the file server, and other such informa-tion can be seen on this list.
● After switching Off the copier main power, if you switch it back on without waiting, the print controller may
not operate normally and errors may be displayed.
In this case, if you switch the copier main power Off again, wait at least 10 seconds or so, then switch the
main power On again, the system will operate normally.

404 V Network Print SettingsChapter 15 Using with NetWare
15-3. NetWare 4.x–6
This section explains the setting method for NetWare 4.x–6.
Features of NetWare 4.x–6
Novell NetWare 4.x–6 has two modes: Novell direct service (NDS) and bindery service emulation (bindery emulation).These two modes can be executed simultaneously. The printer server can be set to operate in either of these modes.
● When NDS is not set correctly on the print server, if bindery service mode does not operate correctly, the
print server card cannot recognize this file server. In this case, if you print the network setting list, the list
will show that the Novell NetWare protocol is not active.
NDS (Novell Directory Service)
NDS makes possible higher-level network control than previous versions of NetWare. NDS basicallymanages all integrated network objects.
In principle, for NDS to operate, NDS must be loaded on all NetWare 4.x–6 servers. Therefore, sinceeach NetWare 4.x–6 server services printing systems, print servers, print queues, and other specifieddirectory objects, each server is a directory server.
If you have the appropriate rights, you can prepare print server objects. Setting these objects in con-texts on the network eliminates the need to setup printer servers on the network servers.
NDS makes possible true enterprise networking based on shared network databases, not physical sitesdefined separately. This greatly improves the printer server setup and management efficiency.

15-3. NetWare 4.x–6
405 V Network Print SettingsChapter 15 Using with NetWare
Bindery emulation
NetWare 4.x–6 maintains backward compatibility with 3.x–6 print services through bindery simulation.
When saving server/service, user, printing system, gateway, and other information, use the DIB (Direc-tory Information Base). The DIB is a distributed database with which information saved anywhere canbe accessed from anywhere on the network.
The data for 6 and earlier versions of NetWare is also the same as that in the DIB. However, for thoseversions of NetWare, the information is stored in the NetWare bindery.
DIB was designed for flexible accessibility and reliable security. It is divided into partitions for distribution.This directory uses an object-oriented structure rather than the flat file structure of bindery. This makes itpossible to access the entire network rather than single servers.
This directory realizes backward compatibility with NetWare bindery through bindery simulation. Whenbindery emulation is enabled, the directory service accepts bindery requests and responds to them asthough there were a bindery on the NetWare server being accessed.
The directory is a distributed database divided into partitions. Therefore, the information acquired with binderyrequests is sometimes not on the server accessed.NetWare 4.x–6 servers do not operate with binderies, but the application making the bindery request cannot tell thedifference.

15-3. NetWare 4.x–6
406 V Network Print SettingsChapter 15 Using with NetWare
NDS Settings
NDS settings use the following utilities. Each has its own usage objective.
Web Utilities
Used for setting print server (network controller) context.
For details on the Web Utilities, refer to the copier user’s manual [Network Setup and Scanner Operations].
Novell NWADMIN
Used for preparing directory tree, print server, print system, and tree print queue objects.
The network controller is equipped to support the NetWare utilities (NWADMIN) just by being connected. Therefore,the NDS administrator can control from one point (print server centralized control).For details on NWADMIN, refer to the NetWare user’s manual
PCONSOLE
With NetWare, PCONSOLE can be used instead of NWADMIN. PCONSOLE is used to set such staticprint server information as [which queue to service] and [who to notify if a problem occurs].
For details on NDS PCONSOLE, refer to the NetWare user's manual.
15-3. NetWare 4.x–6
407 V Network Print SettingsChapter 15 Using with NetWare
Bindery Emulation Settings
1 This checks the bindery context.
Before connecting a printer server (network controller) to a bindery mode Novell NetWare 4.x–6server, check whether or not the NetWare server you are connecting to has a context.If no bindery context is set, the network administrator must execute the following operations.
Revise the AUTOEXEC.NCF file to add the appropriate SET command, then restart the NetWare server.
Input the SET command from the system console.
● Console prompt commands take effect immediately but the autoexec.ncf file definitions do not take effect
until the server is restarted.
2 When you have checked that the file server has the bindery context, use PCONSOLE toset the network controller.
For details on PCONSOLE, refer to the NetWare user’s manual.
● When using bindery mode, only uppercase letters are valid for the NetWare server password.

V Network Print Settings
408
Chapter 16 Using via the Internet
(Windows 2000/XP)
This chapter explains how to use IPP (Internet Printing Protocol) to print data received via theInternet or an intranet and the settings required for using IPP.
16-1. Internet Printing ..............................................................................409
16-2. Printer Settings ...............................................................................410
16-3. Windows 2000 Settings ..................................................................411
16-4. Windows XP Settings .....................................................................417

409 V Network Print SettingsChapter 16 Using via the Internet (Windows 2000/XP)
16-1. Internet Printing
This printing system supports Internet printing using IPP (Internet Printing Protocol).Internet printing is a printing technology that exchanges print data between a computer and printer at physi-cally separate locations over the Internet or an intranet.If you are connected over the Internet or an intranet, you can print with print instructions sent from a computerat a site remote from the printer. With Internet printing, the printer can be used like a fax.
Internet printing can only be executed on computers running Windows 2000/XP as their operating system.
● IPP is a standardized protocol for sending and receiving print data over the Internet or an intranet. IPP is
a protocol based on HTTP (HyperText Transfer Protocol) and can send/receive data through firewalls,
so it makes possible print instructions via the Internet.
Internet
HUB
Router
HUB
Router
Printer (Copier)
410 V Network Print SettingsChapter 16 Using via the Internet (Windows 2000/XP)
16-2. Printer Settings
This section explains the printer settings required for Internet printing.
Printing System TCP/IP Settings
To use the Internet printing functions, the network controller TCP/IP and IPP settings must be complete.
For details on making the network controller TCP/IP settings, refer to the copier user’s manual [Network Setup andScanner Operations].
IPP Attribute Settings
The IPP attributes are set as necessary.The IPP attributes are the name, installation location, and other information concerning the printer used forInternet printing. Pre-registering the IPP attributes makes it possible to check the information concerning theprinter used for Internet printing from a remote site via the Internet.
For details on IPP attributes and how to set them, refer to the copier user’s manual [Network Setup and ScannerOperations].

411 V Network Print SettingsChapter 16 Using via the Internet (Windows 2000/XP)
16-3. Windows 2000 Settings
This section explains how to make internet printing settings with Windows 2000.
To execute Internet printing, it is necessary that the computer TCP/IP settings be complete, that the computer beable to connect to the Internet, and that the printer be connected to the Intranet.
1 Switch on the power for the computer and start Windows.
Close down any applications that are running.
2 Log on with a user name that has administrator rights.
If you cannot log on with a user name that has administrator rights, log on with a user name that has rightsincorporating those of a Power User.
3 Put the [User software CD] in the computer's CD-ROM drive.
4 From the taskbar, select [Start] - [Settings] - [Printers].
The [Printers] screen is displayed.
5 Double click the [Add Printer] icon.
The [Add Printer Wizard] screen is displayed.

16-3. Windows 2000 Settings
412 V Network Print SettingsChapter 16 Using via the Internet (Windows 2000/XP)
6 Click the [Next ›] button.
7 Select [Network printer].
Ensure that the [Automatically detect and install my Plug and Play Printer] checkbox is not checked.
8 Click the [Next ›] button.[Locate Your Printer] screen is displayed.
9 Select [Connect to a printer on the Internet or on your intranet].
For the printer IP address section, input the IP address allocated to the network controller. For details on networkcontroller IP address, refer to the copier user’s manual [Network Setup and Scanner Operations].If the DNS (Domain Name System) is set, the printer (network controller) host name can also be set. For details onDNS settings, refer to the copier user’s manual [Network Setup and Scanner Operations].

16-3. Windows 2000 Settings
413 V Network Print SettingsChapter 16 Using via the Internet (Windows 2000/XP)
10 Input the output printer's URL at [URL].
Input as follows.
http://printer IP address:631/ipp
For the “Pritner IP address section”, input the IP address allocated to the network controller.
● When a proxy is set with the Web browser, the printer cannot be accessed. For details on proxy settings,
check with your network administrator.
11 Click the [Next ›] button.
The [Connect to Printer] screen is displayed.
12 Check the [OK] button.
A screen to confirm the printer manufacturer and name is displayed.
13 Click the [Have Disk…] button.
The [Install From Disk] screen is displayed.
14 Click the [Browse…] button.
The [Locate File] screen is displayed.

16-3. Windows 2000 Settings
414 V Network Print SettingsChapter 16 Using via the Internet (Windows 2000/XP)
15 From [Look in], select the CD-ROM drive, then double-click the
[\English\Printer\WinNT_2000_XP] folder.
[Printer] is displayed as the [File name].
16 Click the [Open] button.
The display returns to the [Install From Disk] screen.
17 Click the [OK] button.
The display returns to the [Add Printer Wizard] screen.
18 Ensure that [KONICA MINOLTA xxxx/IP-xxx] is displayed selected in [Printer], then click
the [Next ›] button.
A screen to confirm the printer name is displayed.

16-3. Windows 2000 Settings
415 V Network Print SettingsChapter 16 Using via the Internet (Windows 2000/XP)
19 Check the printer name.
To change it, input a new printer name.
20 If you want to use this printing system as your default printer, select [Yes]; if you do
not want to use this printing system as your default printer, select [No].
21 Check the [Next ›] button.
The screen to confirm whether or not the printer is shared is displayed.
22 To share the printer, select [Share as]; to not share it, select [Do not share this printer].
To assign a share name to the printer, input the Share name.
23 Click the [Next ›] button.
A screen is displayed checking whether or not you want to print a test print.
24 To print a test print, select [Yes]; to not print a test print, select [No].
The test print prints the standard Windows test page. Test prints can also be executed in the [Properties].
( Page 46)

16-3. Windows 2000 Settings
416 V Network Print SettingsChapter 16 Using via the Internet (Windows 2000/XP)
25 Click the [Next ›] button.
A screen is displayed announcing that the [Add Printer Wizard] is complete.
26 Click the [Finish] button.
The [Digital Signature Not Found] screen is displayed.
27 Click the [Yes] button.
The printer driver is installed on the PC and printing of the test page starts.
28 If the test page is printed correctly, click the [OK] button.
The icon for the installed printer driver is displayed in the [Printers] screen.This completes printer driver installation.
If the test page is not printed correctly, refer to [Test Page Cannot Be Printed.]( Page 111)

417 V Network Print SettingsChapter 16 Using via the Internet (Windows 2000/XP)
16-4. Windows XP Settings
This section explains how to make internet printing settings with Windows XP.
To execute Internet printing, it is necessary that the computer TCP/IP settings be complete, that the computer beable to connect to the Internet, and that the printer be connected to the Intranet.
1 Switch on the power for the computer and start Windows.
Close down any applications that are running.
2 Log on with a user name that has administrator rights.
If you cannot log on with a user name that has administrator rights, log on with a user name that has rightsincorporating those of a Power User or the like.
3 Put the [User software CD] in the computer's CD-ROM drive.
4 From the taskbar, select [Start] - [Printers and Faxes].
The [Printers and Faxes] screen is displayed.

16-4. Windows XP Settings
418 V Network Print SettingsChapter 16 Using via the Internet (Windows 2000/XP)
5 Select [Printer task] - [Add a printer].
The [Add Printer Wizard] screen is displayed.
6 Click the [Next ›] button.
7 Select [A network printer, or a printer attached to another computer].
Ensure that the [Automatically detect and install my Plug and Play printer] checkbox is not checked.
8 Click the [Next ›] button.The [Specify a Printer] screen is displayed.

16-4. Windows XP Settings
419 V Network Print SettingsChapter 16 Using via the Internet (Windows 2000/XP)
9 Select [Connect to a printer on the Internet or on a home or office network].
10 Input the output printer URL at [URL].
Input as follows.
http://printer IP address:631/ipp
For the "Printer IP address section", input the IP address allocated to the network controller.For details on network controller IP address, refer to the copier user’s manual [Network Setup and Scanner Opera-tions].If the DNS (Domain Name System) is set, the printer (network controller) host name can also be set.For details on DNS settings, refer to the copier user’s manual [Network Setup and Scanner Operations].
When a proxy is set with the Web browser, the printer cannot be accessed. For details on proxy settings, check with your network administrator.
11 Click the [Next ›] button.
The [Install Printer Software] screen is displayed.
12 Click the [Have Disk…] button.
The [Install From Disk] screen is displayed.

16-4. Windows XP Settings
420 V Network Print SettingsChapter 16 Using via the Internet (Windows 2000/XP)
13 Click the [Browse…] button.
The [Locate File] screen is displayed.
14 From [Look in], select the CD-ROM drive, then double-click the [\English\
Printer\WinNT_2000_XP] folder.
[Printer.inf] is displayed as the [File name].
15 Click the [Open] button.
The display returns to the [Install From Disk] screen.
16 Click the [OK] button.
The display returns to the [Add Printer Wizard] screen.

16-4. Windows XP Settings
421 V Network Print SettingsChapter 16 Using via the Internet (Windows 2000/XP)
17 Ensure that [KONICA MINOLTA xxxx/IP-xxx] is displayed selected in [Printers], then
click the [Next ›] button.
The [Name Your Printer] screen is displayed.
18 Check the printer name.
To change it, input a new printer name.
19 If you want to use this printing system as your default printer, select [Yes]; if you do
not want to use this printing system as your default printer, select [No].
20 Click the [Next ›] button.
A screen is displayed checking whether or not you want to print a test print.
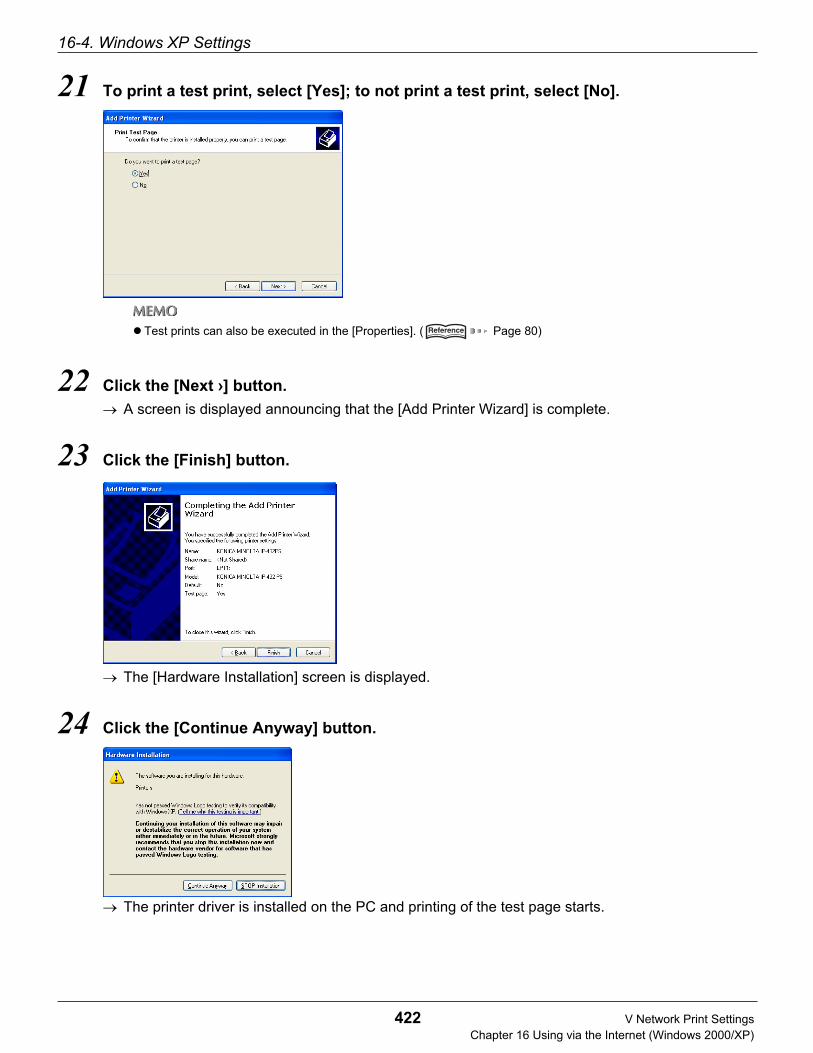
16-4. Windows XP Settings
422 V Network Print SettingsChapter 16 Using via the Internet (Windows 2000/XP)
21 To print a test print, select [Yes]; to not print a test print, select [No].
Test prints can also be executed in the [Properties]. ( Page 80)
22 Click the [Next ›] button.
A screen is displayed announcing that the [Add Printer Wizard] is complete.
23 Click the [Finish] button.
The [Hardware Installation] screen is displayed.
24 Click the [Continue Anyway] button.
The printer driver is installed on the PC and printing of the test page starts.

16-4. Windows XP Settings
423 V Network Print SettingsChapter 16 Using via the Internet (Windows 2000/XP)
25 If the test page is printed correctly, click the [OK] button.
The icon for the installed printer driver is displayed in the [Printers and Faxes] screen.This completes printer driver installation.
If the test page is not printed correctly, refer to [Test Page Cannot Be Printed.]( Page 111)

V Network Print Settings
424
Chapter 17 UNIX Configuration
This section explains how to configure the network interface card and your network for usewith TCP/IP communication in various UNIX environments. Independent setup and installationprocedures are provided for most popular UNIX systems.
17-1. UNIX Printing through TCP/IP........................................................425
17-2. Printing Overview............................................................................426
17-3. lpd UNIX Printing.............................................................................427
425 V Network Print SettingsChapter 17 UNIX Configuration
17-1. UNIX Printing through TCP/IP
The TCP/IP capability of the printing system will also operate with lpr spoolers on other systems, and withspooler/supervisor capabilities that communicate raw print jobs to the TCP/IP port of the network interfacecard. This port number is 9100.
● SNMP (Simple Network Management Protocol) is a protocol for network management services. SNMP
is supported for Management Information Base (MIB) II over the IP for the printing system. This support
allows you to query MIB II to get system information about the printing system.
The printing system can support UNIX TCP/IP printing in two modes:
Host-based where a supplied line printer daemon is run on one or more workstations and print data iscommunicated to the printing system via a TCP/IP port.
Printer-based lpd where the print controller appears as a host running a line printer daemon.
Many operating systems provide the option of using host-resident printing or printer-resident printing.In general, printer-based lpd is easier to use on BSD UNIX systems. This requires an entry in the printcap fileonce the printing system has its IP information. Some UNIX System V systems have restrictions on supportof remote lpd printers, requiring that the host-based lpd approach be used.Each printing mode has certain advantages over the other mode, as follows:
The host-resident method can print the username and filename on its banner page; whereas theprinter-resident method prints a banner page with the host's name.
The printer-resident method requires you to configure the printing system only one time, when youinstall the printing system; whereas, the host-resident method requires that a printing daemon beinstalled on every host that you want to be able to print jobs.
● The printing system will also operate with other host-resident print supervisor/spooler programs that
present a print image to the print controller over a TCP/IP port.

426 V Network Print SettingsChapter 17 UNIX Configuration
17-2. Printing Overview
Considering both the host-based and printer-based TCP/IP printing capabilities, the printing systemworks with the following systems:
All UNIX systems that support lpd
System V Rel. 4 (on 386 platforms)
DEC ULTRIX RISC Versions 4.3 and 4.4
DEC OSF/1 Versions 2.0 and 3.0
Solaris:
Version 1.1.3 (SunOS 4.1.3),
Version 2.3 (SunOS 5.3),
Version 2.4, and
Version 2
HP-UX Series 700 and 800 Version 9.01 and Version 10
IBM AIX Version 3.2.5 and Version 4.0
SCO UNIX Version 3.2
AS400

427 V Network Print SettingsChapter 17 UNIX Configuration
17-3. lpd UNIX Printing
lpd is an implementation of the standard UNIX line printer daemon that lets you print across a TCP/IP networkwithout the need to install software on your workstation, with all filtering and banners done by the printing sys-tem.Remote printing uses the same commands (lpr, lpq, lpc) as local printing.The process begins when the lpr call finds the printer on a remote system by looking at the remote (rm) entryin the /etc/printcap file for that printer.lpr handles a print job for a remote printer by opening a connection with the lpd process on the remote systemand sending the data file (followed by the control file containing control information for this job) to the remotesystem.The printer-based lpd then filters the data and prints the job according to information contained in the controlfile and its own printcap file.The network interface card lpd recognizes the format of a certain printer emulation and filters the data, if pos-sible, so it can be printed on the printer you specify.You can indicate to the printing system lpd what type of print controller it is attached to by either:
Accepting the default port setting (PCL5e, PostScript and other), or
Changing the listed emulations via a standard IP based Web Browser.
The sections that follow give specific lpd setup instructions for various systems.
Setting Up a BSD Remote Printer to Use lpd
To set up a remote printer on the host that sends jobs to the printing system using printer resident lpd, add anentry to the /etc/printcap file on your host for each printer you use. Perform the following procedure:
1 Open the /etc/printcap file.
Make an entry naming the printing system as the remote host and printer as the remote printer name.A typical printcap entry is as follows:
<printer_name>\ (for example, lprprinter)
:lp=:\
:rm=<remote_host>:\ (for example, name as entered in /etc/hosts)
:rp=printer:\
:sd=/usr/spool/lpd/<printer_name>:
(for example, spool directory on system used to spool data and control
files)
This entry will send jobs spooled at /usr/spool/lpd/<printer_name> to the printer designated<printer_name> to be printed at printer (the internal connection to the printer) of the printing systemdesignated as <remote_host>.
2 Create the spooling directory. For example, type:mkdir /usr/spool/lpd/<printer_name>
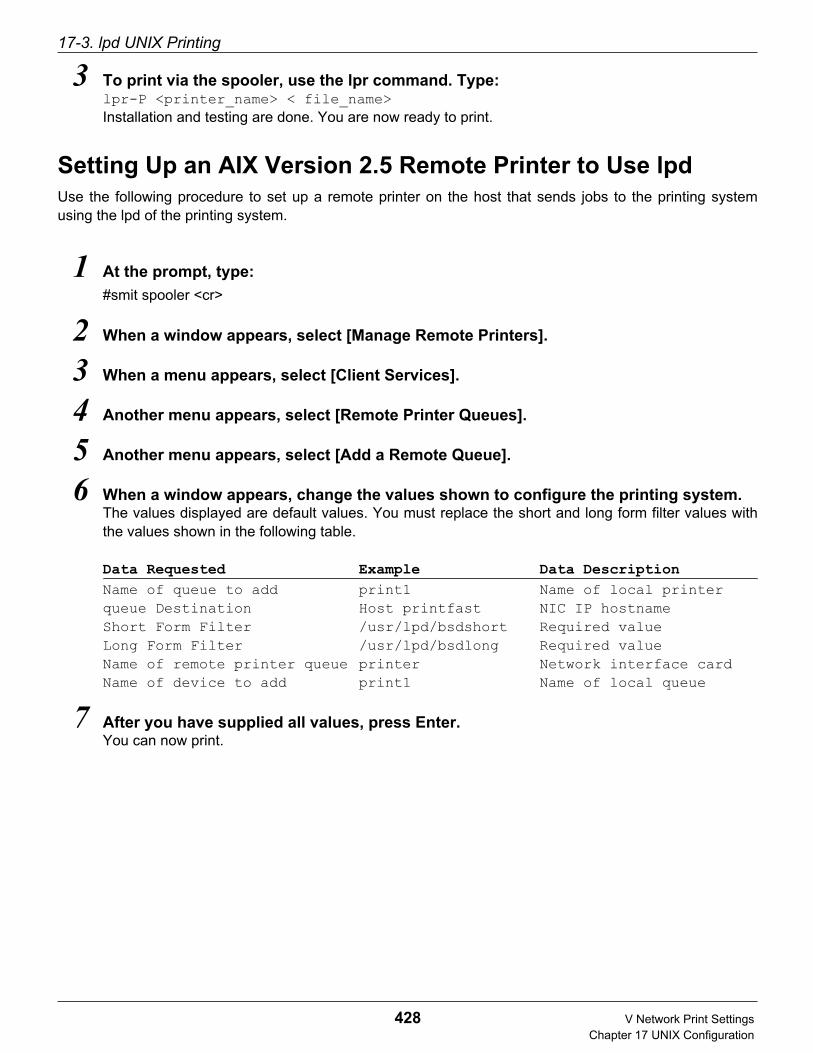
17-3. lpd UNIX Printing
428 V Network Print SettingsChapter 17 UNIX Configuration
3 To print via the spooler, use the lpr command. Type:lpr-P <printer_name> < file_name>
Installation and testing are done. You are now ready to print.
Setting Up an AIX Version 2.5 Remote Printer to Use lpd
Use the following procedure to set up a remote printer on the host that sends jobs to the printing systemusing the lpd of the printing system.
1 At the prompt, type:
#smit spooler <cr>
2 When a window appears, select [Manage Remote Printers].
3 When a menu appears, select [Client Services].
4 Another menu appears, select [Remote Printer Queues].
5 Another menu appears, select [Add a Remote Queue].
6 When a window appears, change the values shown to configure the printing system.The values displayed are default values. You must replace the short and long form filter values withthe values shown in the following table.
Data Requested Example Data Description
Name of queue to add print1 Name of local printer
queue Destination Host printfast NIC IP hostname
Short Form Filter /usr/lpd/bsdshort Required value
Long Form Filter /usr/lpd/bsdlong Required value
Name of remote printer queue printer Network interface card
Name of device to add print1 Name of local queue
7 After you have supplied all values, press Enter.You can now print.
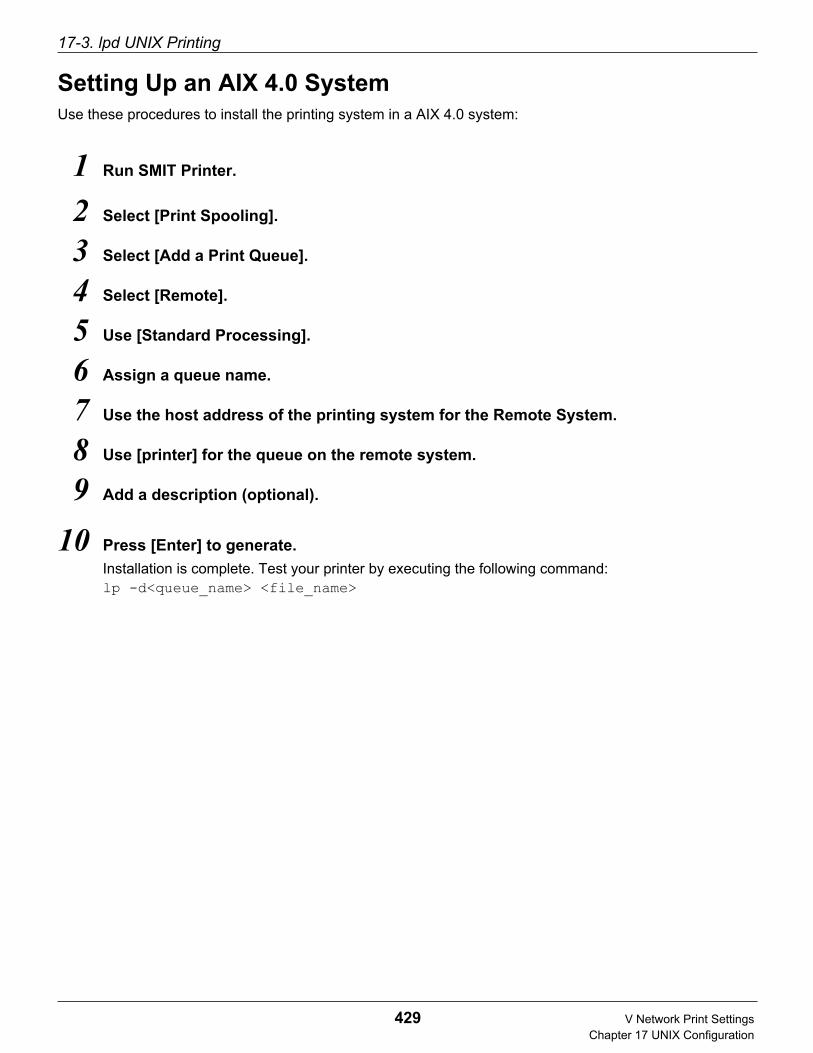
17-3. lpd UNIX Printing
429 V Network Print SettingsChapter 17 UNIX Configuration
Setting Up an AIX 4.0 System
Use these procedures to install the printing system in a AIX 4.0 system:
1 Run SMIT Printer.
2 Select [Print Spooling].
3 Select [Add a Print Queue].
4 Select [Remote].
5 Use [Standard Processing].
6 Assign a queue name.
7 Use the host address of the printing system for the Remote System.
8 Use [printer] for the queue on the remote system.
9 Add a description (optional).
10 Press [Enter] to generate.
Installation is complete. Test your printer by executing the following command:lp -d<queue_name> <file_name>

17-3. lpd UNIX Printing
430 V Network Print SettingsChapter 17 UNIX Configuration
Setting Up an HP-UX Remote Printer to Use lpd
Set up a remote printer on the host that sends jobs to the printing system using the lpd of the printing system.To do this:
1 At the prompt, type:
sam
2 When a window appears, select [Printer/Plotter Manager].
3 When the menu appears, select [List printer and plotters].
4 When a list appears, select [Actions] in the title bar.
5 From the pull-down menu, select [Add Remote Printer].
6 When a window appears, add values to configure the printing system.See example below.
Data Requested Example Description of Input Data
Printer Name myprinter name to be used in lp command
Remote System Name fastprint Network Interface Card hostname as in
/etc/hosts
Remote printer Name printer lpd queue name
7 At the bottom of the screen, select [Remote Printer is on BSD system] from the threechoices available.
8 Click on the OK button.
9 Ping the unit to test communications. Type:ping <IP address of the network interface card>
10 Ping should confirm your IP address with the message:
<IP address of the printing system> is alive
11 If the connection is confirmed, you can now print.
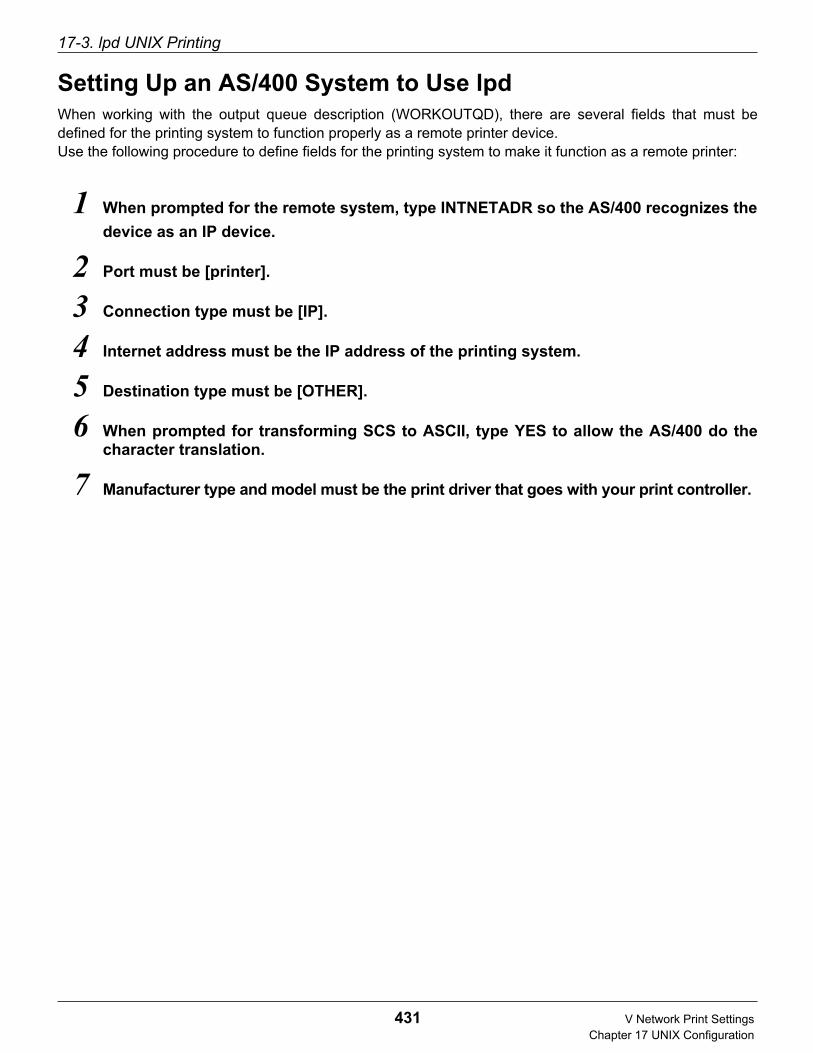
17-3. lpd UNIX Printing
431 V Network Print SettingsChapter 17 UNIX Configuration
Setting Up an AS/400 System to Use lpd
When working with the output queue description (WORKOUTQD), there are several fields that must bedefined for the printing system to function properly as a remote printer device.Use the following procedure to define fields for the printing system to make it function as a remote printer:
1 When prompted for the remote system, type INTNETADR so the AS/400 recognizes the
device as an IP device.
2 Port must be [printer].
3 Connection type must be [IP].
4 Internet address must be the IP address of the printing system.
5 Destination type must be [OTHER].
6 When prompted for transforming SCS to ASCII, type YES to allow the AS/400 do thecharacter translation.
7 Manufacturer type and model must be the print driver that goes with your print controller.

17-3. lpd UNIX Printing
432 V Network Print SettingsChapter 17 UNIX Configuration
Setting Up a DEC ULTRIX 4.3 RISC or OSF1 Remote Printer
Use the following procedure to set up a remote printer on the host that sends jobs to the printing system.
1 At the prompt, type: lprsetup, then select [add].
2 Enter a name for your printer, then press [Enter].
3 "Do you want more information on specific printer types?" Press Enter.A list of ULTRIX-supported printers is listed.
4 Type: remote, and press [Enter].
5 Enter a printer synonym (alias) and press [Enter].
6 Designate a spooler directory and press [Enter], or accept the default spooler directorydisplayed and press [Enter].
7 Designate a remote system name and press [Enter].
8 Designate printer as the remote system printer name and press [Enter].
9 You are asked to enter the name of a printcap symbol from a displayed list. Type: Q,and press [Enter].
10 Your configuration is displayed.You are asked whether these values are final. Type: Y or N, and press Enter. An example is shownbelow.
Printer #7 Symbol Type Representative Value
lp (line printer) STR
rm (remote host) STR printing system_host
rp (remote printer) STR printer
sd (spooler directory) STR /usr/spool/lpd7
11 Add comments to the printcap file. For example, you can type:
Lois' printer down the hall <Enter>
12 Select exit to save your configuration, then press [Enter].
You are now prepared to print.
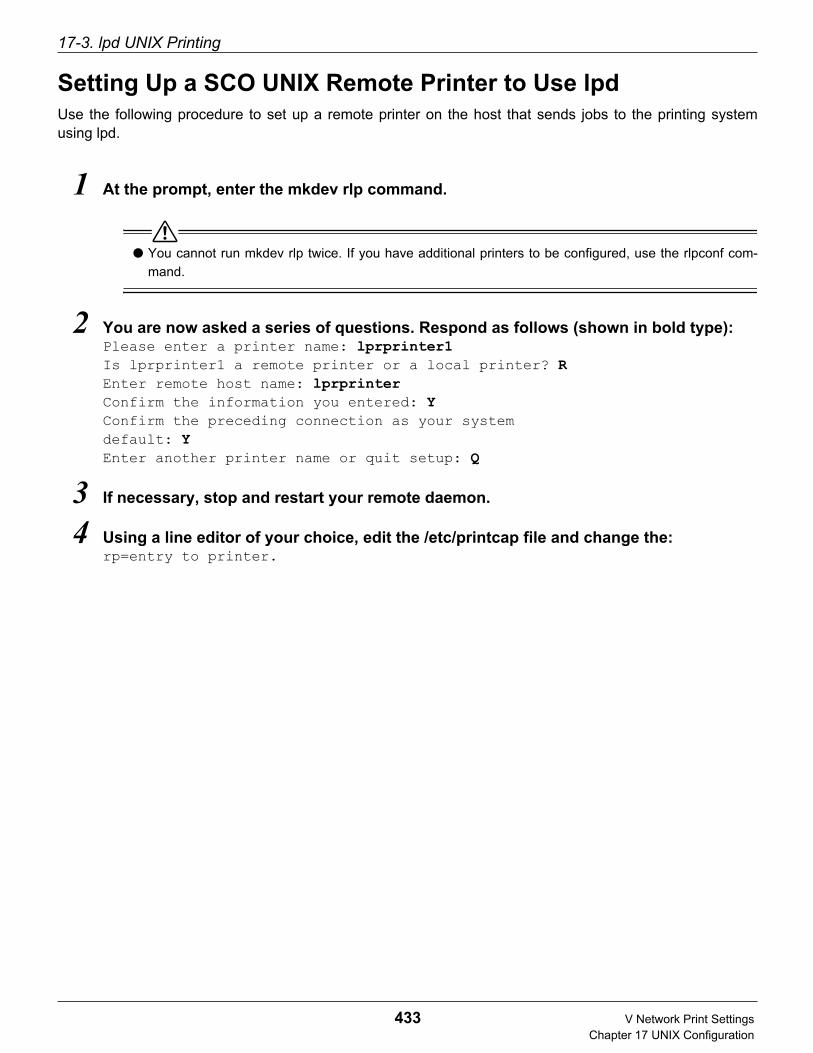
17-3. lpd UNIX Printing
433 V Network Print SettingsChapter 17 UNIX Configuration
Setting Up a SCO UNIX Remote Printer to Use lpd
Use the following procedure to set up a remote printer on the host that sends jobs to the printing systemusing lpd.
1 At the prompt, enter the mkdev rlp command.
● You cannot run mkdev rlp twice. If you have additional printers to be configured, use the rlpconf com-
mand.
2 You are now asked a series of questions. Respond as follows (shown in bold type):Please enter a printer name: lprprinter1
Is lprprinter1 a remote printer or a local printer? R
Enter remote host name: lprprinter
Confirm the information you entered: Y
Confirm the preceding connection as your system
default: Y
Enter another printer name or quit setup: Q
3 If necessary, stop and restart your remote daemon.
4 Using a line editor of your choice, edit the /etc/printcap file and change the:rp=entry to printer.
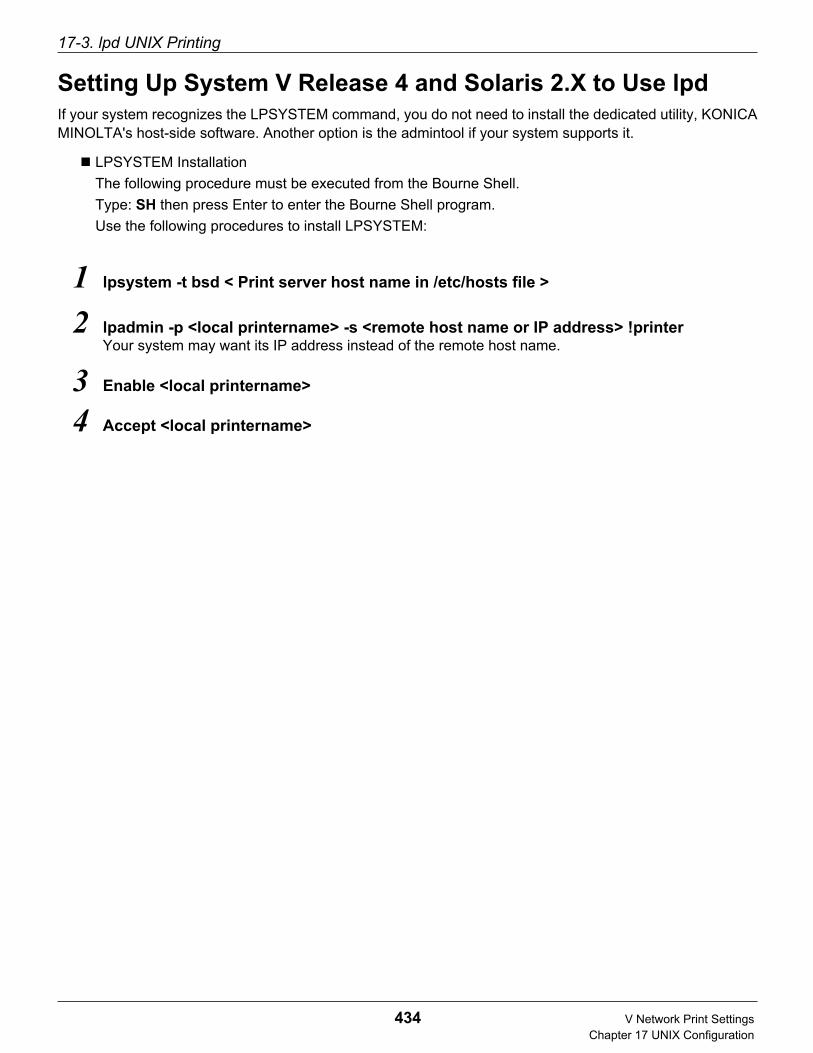
17-3. lpd UNIX Printing
434 V Network Print SettingsChapter 17 UNIX Configuration
Setting Up System V Release 4 and Solaris 2.X to Use lpd
If your system recognizes the LPSYSTEM command, you do not need to install the dedicated utility, KONICAMINOLTA's host-side software. Another option is the admintool if your system supports it.
LPSYSTEM Installation
The following procedure must be executed from the Bourne Shell.
Type: SH then press Enter to enter the Bourne Shell program.
Use the following procedures to install LPSYSTEM:
1 lpsystem -t bsd < Print server host name in /etc/hosts file >
2 lpadmin -p <local printername> -s <remote host name or IP address> !printerYour system may want its IP address instead of the remote host name.
3 Enable <local printername>
4 Accept <local printername>

17-3. lpd UNIX Printing
435 V Network Print SettingsChapter 17 UNIX Configuration
Printing on Linux
1 Start x terminal.
2 At the command prompt, enter the printtool command.The Red Hat Print System Manager window opens.
3 Click the Add button.The Add Printer Entry window opens.
4 Choose Remote Unix (lpd) Queue and click OK .The Edit Remote Unix Queue Entry window opens.
5 Specify the following:
The printer name
The spooler directory (typically, /usr/spool/lpd/prntr-name)
The IP address of the printing system (in the Remote Host field)
printer (in In the Remote Queue field)
An input filter (optional)
When you finish, click OK.
6 Restart the daemon by choosing lpd -> Restart lpd in the Print Server Manager.

V Network Print Settings
436
Chapter 18 Use with AppleTalk
This chapter explains the settings required for connecting to a network using AppleTalk andprinting from a Macintosh.
18-1. Preliminary Procedure for Using with AppleTalk.........................437
18-2. Network Controller AppleTalk Settings ........................................438
18-3. Macintosh Settings .........................................................................439
18-4. Installing a Printer Driver ...............................................................440

437 V Network Print SettingsChapter 18 Use with AppleTalk
18-1. Preliminary Procedure for Using with AppleTalk
The Macintosh and network controller are prepared with the following procedure.
1 An IP address is assigned to the network controller.
Refer to the copier user’s manual [Network Setup and Scanner Operations].
2 The copier control panel or Web utility is used to make the network controller Apple-Talk settings.
Refer to [18-2.Network Controller AppleTalk Settings],( Page 438).
3 The Macintosh is set.
Refer to [18-3.Macintosh Settings],( Page 439).
4 The [printer driver] is installed.
Refer to [18-4.Installing a Printer Driver], ( Page 440).

438 V Network Print SettingsChapter 18 Use with AppleTalk
18-2. Network Controller AppleTalk Settings
The network controller is set as follows to print with a printer using AppleTalk.
AppleTalk usage
Set the network controller [Use AppleTalk] - [Yes].
For details on making the [Use AppleTalk] setting, refer to the copier user’s manual [Network Setup and ScannerOperations].
Printer name settings
This sets the copier (network controller) name (printer name) displayed on the AppleTalk network.
For details on the [Printer name] setting, refer to the copier user’s manual [Network Setup and Scanner Operations].
Zone name setting
This sets the name of the [Zone] to which the print controller is connected in the AppleTalk network.
For details on setting the [Zone name], refer to the copier user’s manual [Network Setup and Scanner Operations].
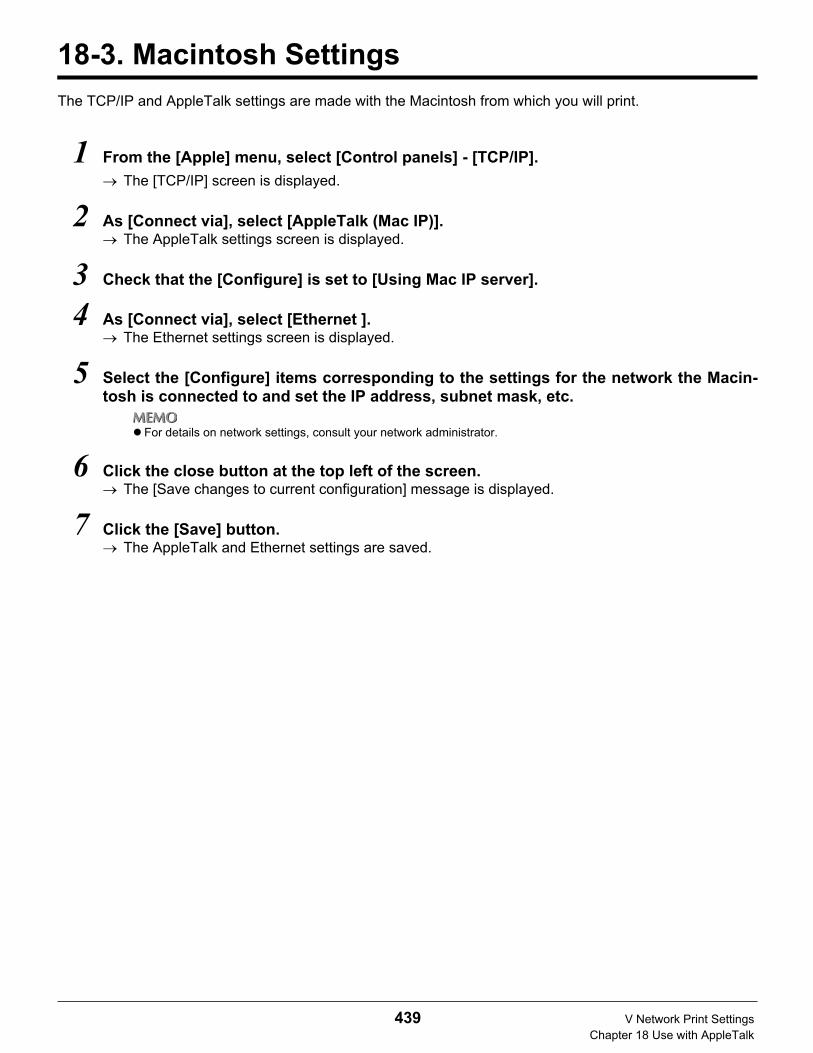
439 V Network Print SettingsChapter 18 Use with AppleTalk
18-3. Macintosh Settings
The TCP/IP and AppleTalk settings are made with the Macintosh from which you will print.
1 From the [Apple] menu, select [Control panels] - [TCP/IP].
The [TCP/IP] screen is displayed.
2 As [Connect via], select [AppleTalk (Mac IP)].The AppleTalk settings screen is displayed.
3 Check that the [Configure] is set to [Using Mac IP server].
4 As [Connect via], select [Ethernet ].The Ethernet settings screen is displayed.
5 Select the [Configure] items corresponding to the settings for the network the Macin-tosh is connected to and set the IP address, subnet mask, etc.
For details on network settings, consult your network administrator.
6 Click the close button at the top left of the screen.The [Save changes to current configuration] message is displayed.
7 Click the [Save] button.The AppleTalk and Ethernet settings are saved.

440 V Network Print SettingsChapter 18 Use with AppleTalk
18-4. Installing a Printer Driver
The Adobe PostScript driver is installed from the PostScript option “User software CD” onto the Macintoshyou will print from.
For a Power Macintosh with Mac OS 8.x or higher up to version 9.x.
Refer to the user software CD [English] - [Driver] - [OS8_x to 9_x] folder.
For Mac OS X v10.2x
Refer to the user software CD [English] - [Driver] - [OS X] folder.
For details on the installation, refer to [Mac OS X v10.2x Version Installation] ( page 443).
The printer driver is not installable on Mac OS v10.0 or v10.1.
After installing the printer driver, it is recommended to re-start the computer.
If Adobe PostScript has been installed before the driver for this printing system is installed, that version
is overwritten by the Adobe PostScript that comes with this printing system.
18-4. Installing a Printer Driver
441 V Network Print SettingsChapter 18 Use with AppleTalk
Mac OS 8.x or higher up to version 9.x Instllation
1 Switch on the power for the Macintosh and start the Mac OS.
Close down any applications that are running.
2 Put the PostScript option [User software CD] in the computer's CD-ROM drive.
3 Double click the [English] - [Driver] folder on the user software CD.
4 Double click [OS8_x to 9_x], then select [koxxxxx.ppd] and copy to the computer’s [HDD] -
[System Folder] - [Expansions] - [Printer Descriptions].
5 In the folder where the user software CD printer driver is stored, double-click [Adobe PS
Installer].
The [Adobe PostScript Driver] screen is displayed.
6 Click the [Continue…] button.
The [License] screen is displayed.

18-4. Installing a Printer Driver
442 V Network Print SettingsChapter 18 Use with AppleTalk
7 Click the [Accept] button.
[Adobe PostScript English-language installer] screen is displayed.
8 Click the [Install] button.
Install the printer driver on the computer.When the installation is complete, a message is displayed.
9 Click the [Restart] button.

18-4. Installing a Printer Driver
443 V Network Print SettingsChapter 18 Use with AppleTalk
Mac OS X v10.2x Version Installation
The printer driver is not installable on Mac OS v10.0 or v10.1.
1 Power ON PC and startup Macintosh.
2 Setup [User Software CD] on PC CD-ROM drive.
Close all running application, if any.
3 From [User Software CD] - [English], double-click [Driver] folder.
4 Select [IP-xxxPrinting.pkg] and copy it onto desktop.
5 Double-click on [IP-xxxPrinting.pkg].
[Welcome to the KONICA MINOLTA Printer Driver Installer] screen appears.
6 When the system prompts to enter the name and password of the administrator, enter the
name and password of the administrator.
Clicking the [Cancel] button at this point exits the installer.
For information about the name and password of the administrator, consult the system administrator.
18-4. Installing a Printer Driver
444 V Network Print SettingsChapter 18 Use with AppleTalk
7 Click the [Continue] button.
[Important Information] screen appears.
8 Click the [Continue] button.
[Software License Agreement] screen appears.
9 Click the [Continue] button.
10 Click the [Agree] button.
[Select a Destination] screen appears.
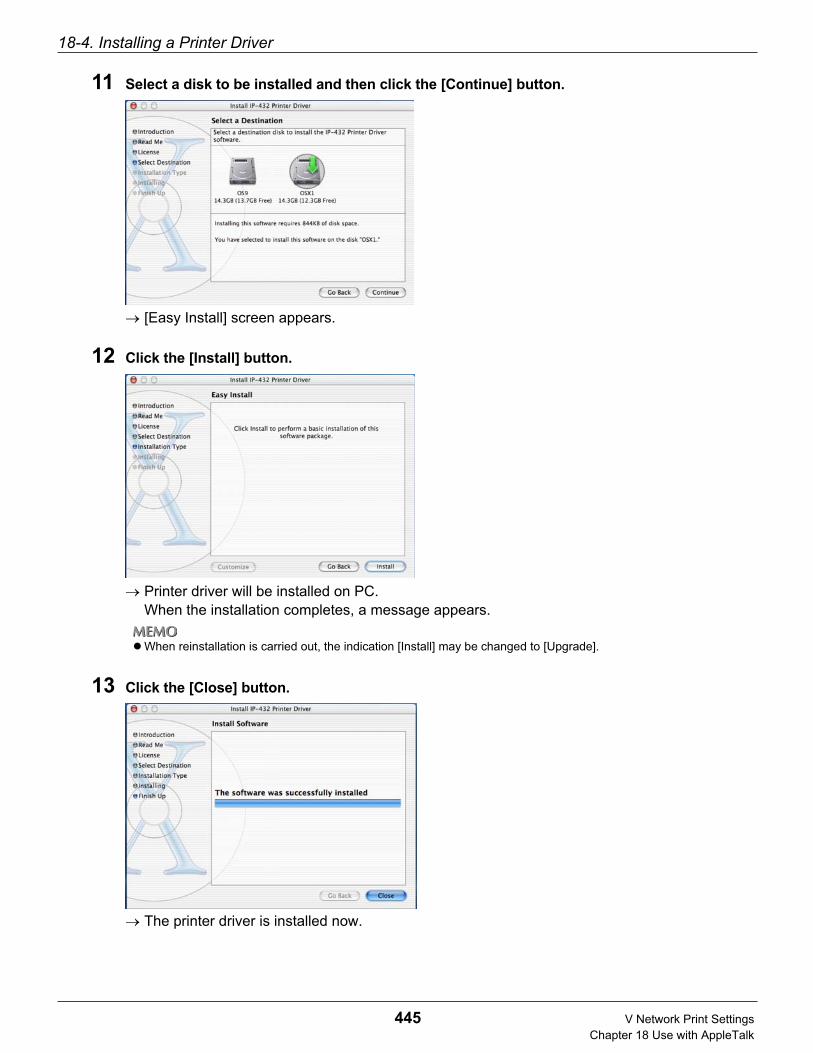
18-4. Installing a Printer Driver
445 V Network Print SettingsChapter 18 Use with AppleTalk
11 Select a disk to be installed and then click the [Continue] button.
[Easy Install] screen appears.
12 Click the [Install] button.
Printer driver will be installed on PC.When the installation completes, a message appears.
When reinstallation is carried out, the indication [Install] may be changed to [Upgrade].
13 Click the [Close] button.
The printer driver is installed now.

18-4. Installing a Printer Driver
446 V Network Print SettingsChapter 18 Use with AppleTalk
Selecting the Printer
Mac OS 8.x or higher up to version 9.xWhen you select the printer to use with [Chooser], you can use the printer.
1 Select [Apple] Menu - [Chooser].
The [Chooser] screen is displayed.
2 Check that [AppleTalk] is set to [Active], then click the [AdobePS] icon.
3 Click the printer name applicable to the printing system from the [Select a PostScript Printer]
list, and click the [Setup] button.
The selection screen for the Postscript Printer Description (PPD) file is displayed.
The indication [Setup] may be changed to [Create] may be displayed.

18-4. Installing a Printer Driver
447 V Network Print SettingsChapter 18 Use with AppleTalk
4 Click the applicable PPD file and click the [Select] button.
The additional option setting screen is displayed.
5 Click the [ ] button for each item to set the options installed on the copier.
For details on options installed on the copier, consult the system administrator.
6 Click the [OK] button.
The display returns to the [Selector] screen.
7 Close the [Chooser] screen.
▲▼
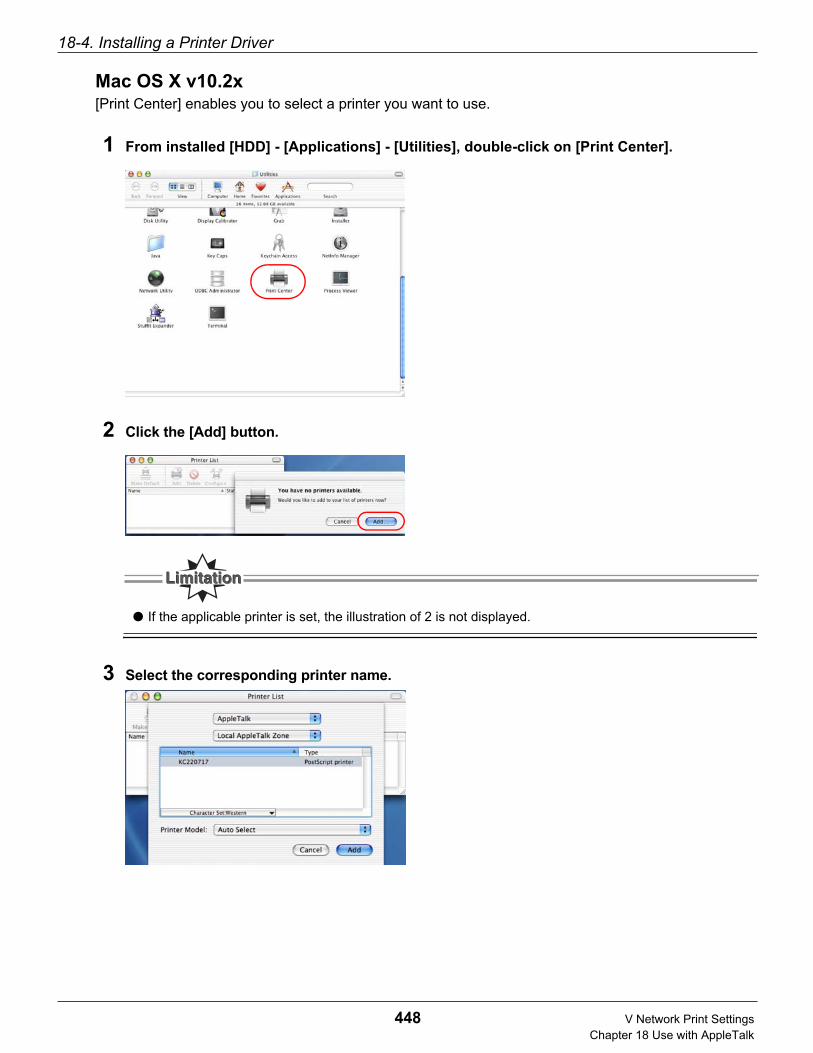
18-4. Installing a Printer Driver
448 V Network Print SettingsChapter 18 Use with AppleTalk
Mac OS X v10.2x[Print Center] enables you to select a printer you want to use.
1 From installed [HDD] - [Applications] - [Utilities], double-click on [Print Center].
2 Click the [Add] button.
● If the applicable printer is set, the illustration of 2 is not displayed.
3 Select the corresponding printer name.

18-4. Installing a Printer Driver
449 V Network Print SettingsChapter 18 Use with AppleTalk
4 Click [Printer Model] and select [KONICA MINOLTA].
5 Select the model name to be used and then click the [Add] button.
6 The selected printer is registered to [Printer List].
7 From Menu - [Printers], select [Show Info].
[Printer Info] screen will be displayed.

18-4. Installing a Printer Driver
450 V Network Print SettingsChapter 18 Use with AppleTalk
8 Select [Installable Options].
9 Setup the options that are equipped to copier.
10 Click the [Apply Changes] button.
11 Close [Print Info] screen.

V Network Print Settings
451
Chapter 19 When There Is Network Printing Trouble
This chapter explains the causes of problems that can affect networks and network equipmentand how to solve those problems.
19-1. Troubleshooting Network Hardware Connections.......................452
19-2. NetWare Protocol Troubleshooting...............................................453

452 V Network Print SettingsChapter 19 When There Is Network Printing Trouble
19-1. Troubleshooting Network Hardware Connec-tions
Check the network cables.
Check that the 100Base-TX or 10Base-TX network cable connector is connected to the RJ45 connec-tors on the network controller.
Replace the network cable to see if the problem is the cable.

453 V Network Print SettingsChapter 19 When There Is Network Printing Trouble
19-2. NetWare Protocol Troubleshooting
It is recommended that you execute Web utility and check the NetWare setup and parameters. If executingWeb utility did not solve the problem, check the following items.
NetWare Check Items
Is the print server registered correctly?
The factory default name is [KC-(serial number)]. The print server name is written in the network set-tings list.
Is a print queue assigned under the network setting menu?
It is recommended that each print queue be assigned to one printing system connected to the networkcontroller. If the print queue assigned to the printing system connected to the network controller is alsoassigned to another network printer, print jobs may be output on the other network printer.
If the PCONSOLE or NWADMIN settings are correct, it is possible that the connection between theprinter itself and the network is cut.
Switch Off the print controller and the printer itself, then use PCONSOLE or NWADMIN to wait for the[Not Connected] status message. When you switch the print controller and printer itself back On, thestatus changes to [Waiting].
File Server Check Items
Does the file server have adequate disk capacity? Is it operating?
Is the correct file server related to the printing system?
Use PCONSOLE or NWADMIN to check the relationship.
Do you have the appropriate rights (super-user/administrator rights) to set the print controller?
Are the file server and network controller communicating with each other?
To check these communications, execute the NetWare COM-CHECK utility from any workstation.
Are you logged onto the file server with the appropriate user rights?

19-2. NetWare Protocol Troubleshooting
454 V Network Print SettingsChapter 19 When There Is Network Printing Trouble
Workstation Check Items
Can the workstation connect to the network?
For details, refer to the NetWare user’s manual.
Is the application set up for printing with the network setting menu? Is the correct driver being used?
Is the workstation connected to the correct print queue?
Print and check that the workstation is connected to the correct print queue.
Is the print queue assigned to the printing system connected to the network controller assigned toanother printer too?
In this case, jobs may be output on the other printer.
Are jobs active? Are jobs printed?
Use PCONSOLE or NWADMIN to register a sample job directly to the assigned queue.
Is AUTO ENDCAP enabled?
If AUTO ENDCAP is enabled, data is output on the network printer.
Use PRINTCON to check AUTO ENDCAP. If AUTO ENDCAP is disabled, enable it.
Setting Check Items
If all the hardware connections are good, check the following points.
Use Web utility to check the printer server status.
The printer status screen shows the status of the selected print server. The file server status, error con-tents, and the queue assigned to the network controller are displayed.
It is possible that the printing system is not assigned to a valid print queue.
To send the print job to a valid queue, use CONSOLE or NWADMIN. Then, check that the print job is inthe destination queue.
If there is a changed or new network controller, use PCONSOLE or NWADMIN to check that it is setcorrectly.
Check that the printer server name is correctly input [KC- (serial number)].
When the name is changed, always change the name with PCONSOLE or NWADMIN too to enablethat setting.
Use PCONSOLE Version 1.0 or later to check the printer status.
When upgrading PCONSOLE, ask Novell.

19-2. NetWare Protocol Troubleshooting
455 V Network Print SettingsChapter 19 When There Is Network Printing Trouble
Print Server/File Server/Printer Check Items
If the network controller cannot log onto the file server or cannot process jobs from the file server, checkthe following.
Ensure if the network controller is set for the file server. If it not set, set it using PCONSOLE or NWAD-MIN.
The password assigned to the network controller through PCONSOLE or NWADMIN must match thepassword assigned through Web utility.
If you change the password stored in the network controller memory, use Web utility.
Ensure that the print job is in the print queue and that it is waiting for printing.
To check that print jobs are sent to the network controller, use PCONSOLE or NWADMIN.
Work Station and Network Controller Connection Check Items
To check that the work station and the network controller are communicating with each other, check the fol-lowing.
Print a file from the work station and use PCONSOLE or NWADMIN to check that the print job reachesthe print queue.
If printing is possible, the problem is not in the connection between the work station and the networkcontroller.
When sending data from a work station software application to the printing system, use CAPTURE.
Refer to the NetWare print server manual.
Check that no other printer is taking the print job from the queue before the network controller pro-cesses it.
Disable other printers until you have checked the setup of the printing system to which the network con-troller is connected.
When the Connection between the Network Controller and theNovell File Server Is Cut
If the connection between the network controller and the file server is cut, reconnection takes about 5-10 min-utes. If the connection is not re-established after that long, it is necessary to troubleshoot the error.

456
This volume covers the product specificationsand basic troubleshooting.
Chapter 20 Troubleshooting............. 457
Chapter 21 Appendix......................... 460
VI Appendix

VI Appendix
457
Chapter 20 Troubleshooting
This chapter explains solutions for when trouble occurs during use of this equipment.If the methods explained here do not solve the problem, contact your service representative.
20-1. When Trouble Occurs in this Printing System.............................458

458 VI Appendix Chapter 20 Troubleshooting
20-1. When Trouble Occurs in this Printing System
If trouble occurs in this printing system, first check the following basic elements.
1 Check that the printing system is correctly functioning.
Check that the copier and computer power are on and that the cables are correctly connected.
Check the contents of the problem for the information displayed on the control panel LCD screen.
If possible, print a [Test Page] and check the contents of the current settings.
For information on the method for printing the test Page, refer to [Checking Printing] ( Page 99).
2 Check the print controller status.
This checks the current status of the control panel LCD screen.
On the LCD screen, touch the [JOB LIST] to check the status of jobs.
Checking from the computerFor Windows, you can check the status of printing instructions executed from the computer using thefollowing procedure.
1 With the computer from which the printing was executed, select taskbar [Start] - [Settings] -
[Printers].
The printer screen is displayed.
2 Double-click the icon for the print controller driver.
The print status screen is displayed.If there is a job being processed or not yet output, information about it is displayed in the screen.
3 If possible, print a list of the network settings.
If it was possible to print this list, check which protocol can be used and whether or not it is operating.
For details on a list of the network settings, refer to the copier user’s manual [Network Setup and ScannerOperations].
4 Check if other users can print.
If other users using the same network OS cannot print either, refer to the Windows user's manual.
5 Switch off the main power for the copier, wait about 10 seconds, then switch the power
back on again.
If this does not solve the problem, refer to [Chapter 19 When There Is Network Printing Trouble]
( Page 451) and check the cause of the problem.

20-1. When Trouble Occurs in this Printing System
459 VI Appendix Chapter 20 Troubleshooting
● After switching Off the Copier main power, if you switch it back on without waiting, the print controller
may not operate normally and errors may be displayed.
In this case, if you switch the Copier main power Off again, wait at least 10 seconds or so, then switch
the main power On again, the system will operate normally.
VI Appendix
460
Chapter 21 Appendix
This appendix contains such information as the print controller product specifications and a listof installed fonts. It also explains the printer driver function list, and other such information.
21-1. IP-432 Product Specifications........................................................461
21-2. IP-424 Product Specifications........................................................463
21-3. PostScript PS-344 Option Product Specifications.......................465
21-4. PostScript PS-346 Option Product Specifications.......................465
21-5. Options.............................................................................................466
21-6. Function List....................................................................................470
21-7. Fonts ................................................................................................484
21-8. Font Number List (Control Panel-PCL Setup) ..............................500
21-9. Symbol Sets List (Control Panel-PCL Setup) ...............................503
21-11. Index According to Item ...............................................................508
21-12. Purpose-Oriented Index ...............................................................511

461 VI Appendix Chapter 21 Appendix
21-1. IP-432 Product Specifications
Printer Function
Type Built into KONICA MINOLTA 7145 series copier
Paper U.S.A11x17, 8.5x14, 8.5x 11, 8.5x11R, 5.5x8.5, A3, B4, A4, A4R, B5, B5R, A5R, F4Europe11x17, 8.5x14, 8.5x 11, 8.5x11R, 5.5x8.5, A3, B4, A4, A4R, B5, B5R, A5R, F4, 16K, 16KR, 8K
Paper input/output amounts
Same as copier
Paper output capacity
Same as copier
Mode Copier/printer dual operation possible (A maximum of five jobs can be processed.)
Special printing Duplex printing, media type selection, output tray selection, print quality mode selection, alternating printingStaple function, punch function, front cover and back cover function, password print, etc.
Print direction Vertical (portrait), horizontal (landscape)
Resolution Printer resolution: 600 dpi
Number of tones Binary
Number of print setting sheets
1 to 999
Printable area Top/bottom/left/right margins 4.0mm
Warm up Same as copier
CPU Intel Celeron 300A
Program memory FLASH ROM (compact flash)16MB
System memory SD-RAM64MB (standard)Option: MU-404 64MB
MU-405 128MB
Interface Parallel portCentronics (IEEE1284)/Amphenol 36-pin male connector
Operating Sys-tems supported
Windows 95/98/MeWindows NT 4.0Windows 2000Windows XPMac OS 8.x or higher up to version 9.x (when PostScript option installed)Mac OS X v10.2 or higher (when PostScript option installed)
Printer driver Windows 95/98/Me printer driversWindows NT 4.0/2000/XP printer driversMac OS 8.x or higher up to version 9.x (when PostScript option installed)Mac OS X v10.2 or higher (when PostScript option installed)
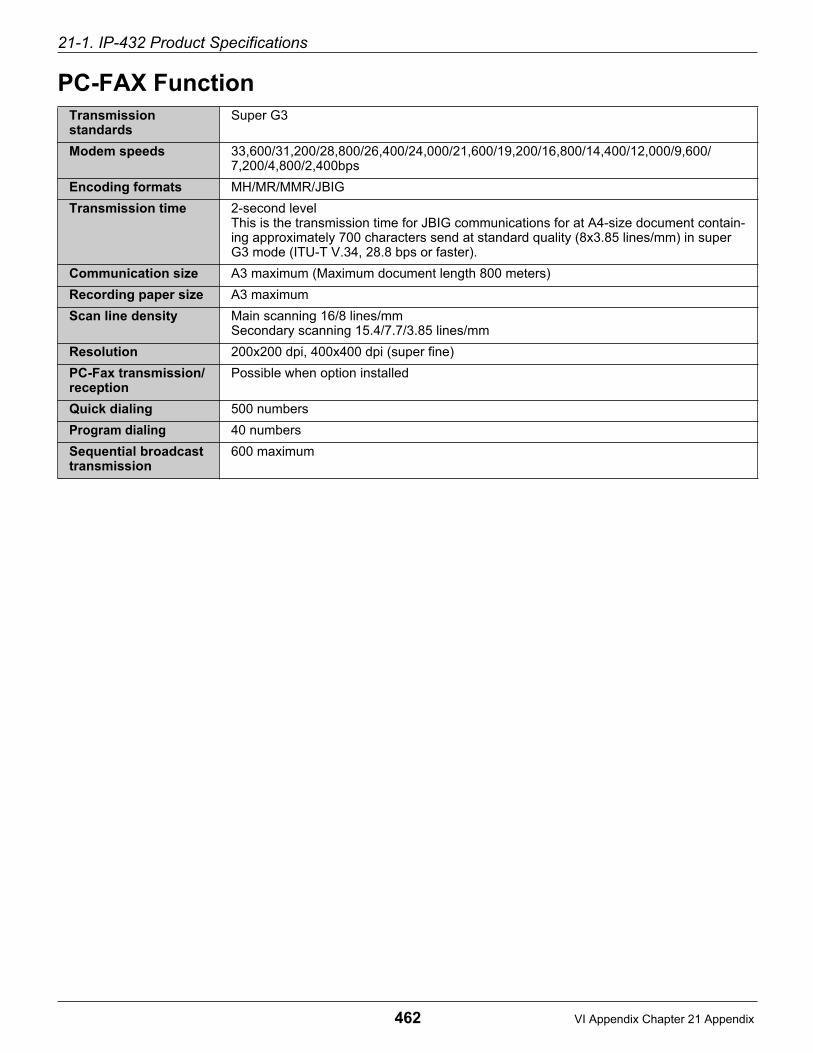
21-1. IP-432 Product Specifications
462 VI Appendix Chapter 21 Appendix
PC-FAX Function
Transmission standards
Super G3
Modem speeds 33,600/31,200/28,800/26,400/24,000/21,600/19,200/16,800/14,400/12,000/9,600/7,200/4,800/2,400bps
Encoding formats MH/MR/MMR/JBIG
Transmission time 2-second levelThis is the transmission time for JBIG communications for at A4-size document contain-ing approximately 700 characters send at standard quality (8x3.85 lines/mm) in super G3 mode (ITU-T V.34, 28.8 bps or faster).
Communication size A3 maximum (Maximum document length 800 meters)
Recording paper size A3 maximum
Scan line density Main scanning 16/8 lines/mmSecondary scanning 15.4/7.7/3.85 lines/mm
Resolution 200x200 dpi, 400x400 dpi (super fine)
PC-Fax transmission/reception
Possible when option installed
Quick dialing 500 numbers
Program dialing 40 numbers
Sequential broadcast transmission
600 maximum

463 VI Appendix Chapter 21 Appendix
21-2. IP-424 Product Specifications
Printer Function
Type Built into KONICA MINOLTA 7222/7322/7228/7235 copiers
Paper A3, A4, A4R, A5, B4, B5, B5R, B6, postcard, Letter(8.5x11), Letter R(11x8.5), Tabloid(11x14), Legal(8.5x14), Statement(5.5x8.5)
Paper input/Output amounts
Same as copier
Paper output capacity Same as copier
Mode Copier/printer dual operation possible (A maximum five jobs can be processed.)
Special printing Dual side printing, media type selection, output tray selection, print quality mode selec-tion, alternating printingStaple function, front cover and back-cover function, password print, etc.
Print direction Vertical (portrait), horizontal (landscape)
Resolution Printer resolution: 600dpi
Gradations Binary
Number of print set-ting sheets
1 to 999
Printable area Top/bottom/left/right margins 4.0mm
Warm up Same as copier
CPU NS Geode GX-1300MHz
Program memory FLASH ROM (compact flash)32MB
System memory SD-RAM128MB (standard) expandable
Interfaces (on the copier)
Parallel port Centronics (IEEE 1284)/Amphenol 36-pin male connectorUSB port
Operating Systems suppoted
Windows 95/98/MeWindows NT 4.0Windows 2000Windows XPMac OS 8.x or higher to Version 9.x (when the PostScript option is installed)Mac OS X x10.2x (when the PsotScript option is installed)
Printer driver Windows 95/98/Me printer driversWindows NT 4.0/2000/XP printer driversMac OS 8.x or higher to Version 9.x (when the PostScript option is installed)Mac OS X v10.2x (when the PostScript option is installed)

21-2. IP-424 Product Specifications
464 VI Appendix Chapter 21 Appendix
PC-FAX Function
Transmission standards
Super G3
Modem speeds 33,600/31,200/28,800/26,400/24,000/21,600/19,200/16,800/14,400/12,000/9,600/7,200/4,800/2,400bps
Encoding formats MH/MR/MMR/JBIG
Transmission time 2-second levelTransmission time for sending a A4 size paper containing approximately 700 characters with the standard picture quality i8x3.85 line/mmjin the Super G3 mode (in compliance with ITU- T V.34, 28.8 bps or higher) by JBIG communications.
Communication size A3 maximum (Maximum document length 800 meters)
Recording paper size A3 maximum
Scan line density Main scanning: 16/8 lines per mmSecondary scanning 15.4/7.7/3.85 lines/mm
Resolution 200x200 dpi, 400x400 dpi (super fine)
PC-Fax transmission/reception
Possible when option installed.
Quick dialing 500 numbers
Program dialing 40 numbers
Sequential broadcast transmission
600 maximum

465 VI Appendix Chapter 21 Appendix
21-3. PostScript PS-344 Option Product Specifications
This section gives the PostScript option product specifications.
21-4. PostScript PS-346 Option Product Specifica-tions
This section gives the PostScript option product specifications.
Type Built into print controller
Number of print setting sheets
1 to 999 (Windows 95/98/Me), 1 to 9999 (Windows NT 4.0/2000/XP, Macintosh)
Program memory FLASH ROM (compact flash)32MB
Operating Sys-tems supported
Windows 95/98/MeWindows NT 4.0Windows 2000Windows XPMac OS 8.x to 9.xMac OS X v10.2x
Type Built into print controller
Number of print setting sheets
1 to 999 (Windows 95/98/Me), 1 to 9999 (Windows NT 4.0/2000/XP, Macintosh)
Program memory FLASH ROM (compact flash) 32MB (shared with IP-424)
Operating Sys-tems supported
Windows 95/98/MeWindows NT 4.0Windows 2000Windows XPMac OS 8.x to 9.xMac OS X v10.2x

466 VI Appendix Chapter 21 Appendix
21-5. Options
This section contains information on memory, hard disks, and other options.
Memory (IP-432 only)
Almost all the memory installed in the print controller is used for image rasterizing (bitmap development pro-cessing), font cache, form function, and other processing. Part is used for system operation.The basic memory setting for the print controller is 64 MB, which makes printing in 1-bit mode (600 dpi) pos-sible for all sizes of paper.The larger the capacity of the memory in the print controller, the more pages can be rasterized while waitingfor earlier jobs in the queue to print. For A4 size paper, printing 1-bit mode data uses about 4,345 KB of mem-ory (600 dpi).Also, the copier's E-RDH memory is used for print processing. The E-RDH memory can be expanded to up to320 MB.
E-RDH (Electronic Recirculating Document Handler) memoryThe E-RDH is a system that stores print data temporarily in the copier main unit memory (E-RDH mem-ory) and processes it according to the selected settings.When printing from the print controller, the copier main unit E-RDH is used.The copier’s E-RDH memory is 64 MB standard and can be expanded to up to 320MB.The print controller uses 1-bit mode. It can hold approximately 360 pages of A4 data in the 64 MB (stan-dard) of E-RDH memory.
Under conditions such as the following, because the print controller does not have adequate memoryinstalled, the desired print results cannot be obtained.
When error dispersion (normal fine or fine) is specified with the printer driver, if the data is com-plex, image processing is switched automatically to dither and so printed.
When form data is complicated (the file sizes large), the form is not printed.
In the above cases, it is recommended that the print controller's memory be expanded.Also, when printing specifying multiple copies, booklet, job control partial stop functions, etc., the datafor all the pages (in one job) that have been rasterized with the print controller are temporarily stored inthe E-RDH memory. Therefore, when you print a document with a particularly large number of pages, ifyou use these functions, it may be impossible to print it correctly.In this case, it is recommended that the copier's E-RDH memory be expanded.
Expanding memoryTo always obtain optimum printer performance, it is recommended that you expand the memory.
● The memory for IP-424 cannot be expanded.
● For details on expansion memory, consult your service representative.
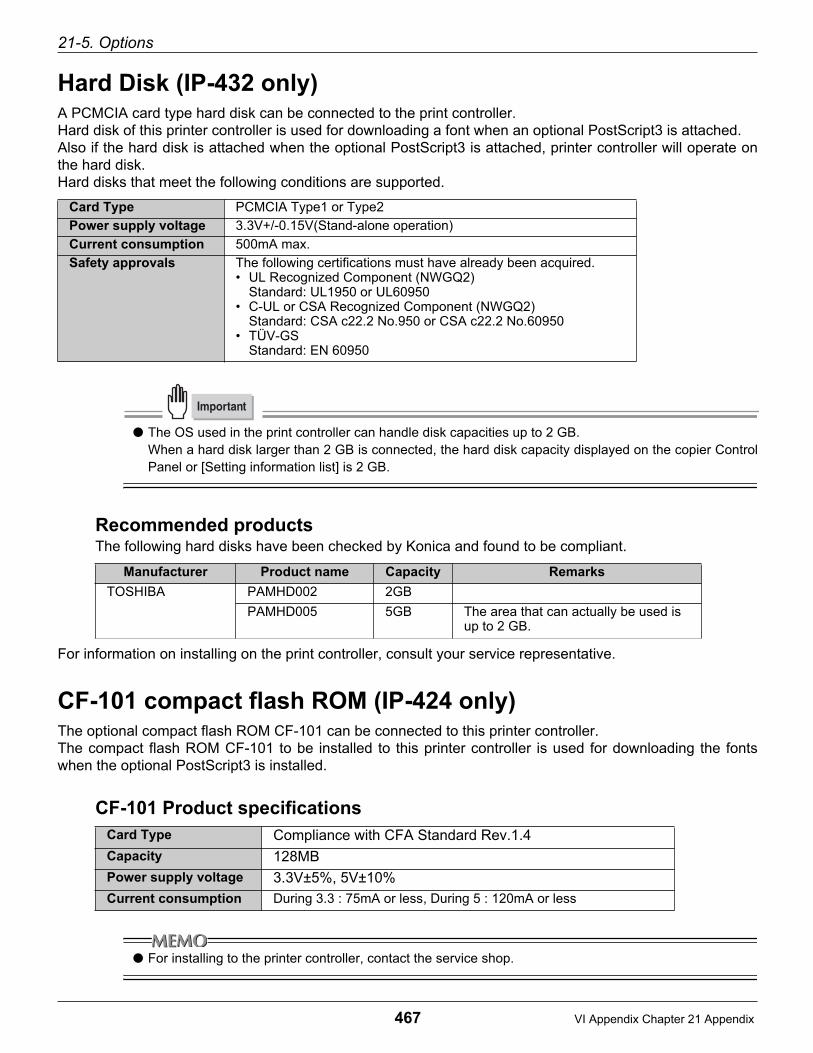
21-5. Options
467 VI Appendix Chapter 21 Appendix
Hard Disk (IP-432 only)A PCMCIA card type hard disk can be connected to the print controller.Hard disk of this printer controller is used for downloading a font when an optional PostScript3 is attached.Also if the hard disk is attached when the optional PostScript3 is attached, printer controller will operate onthe hard disk.Hard disks that meet the following conditions are supported.
● The OS used in the print controller can handle disk capacities up to 2 GB.When a hard disk larger than 2 GB is connected, the hard disk capacity displayed on the copier ControlPanel or [Setting information list] is 2 GB.
Recommended productsThe following hard disks have been checked by Konica and found to be compliant.
For information on installing on the print controller, consult your service representative.
CF-101 compact flash ROM (IP-424 only)The optional compact flash ROM CF-101 can be connected to this printer controller.The compact flash ROM CF-101 to be installed to this printer controller is used for downloading the fontswhen the optional PostScript3 is installed.
CF-101 Product specifications
● For installing to the printer controller, contact the service shop.
Card Type PCMCIA Type1 or Type2
Power supply voltage 3.3V+/-0.15V(Stand-alone operation)
Current consumption 500mA max.
Safety approvals The following certifications must have already been acquired.• UL Recognized Component (NWGQ2)
Standard: UL1950 or UL60950• C-UL or CSA Recognized Component (NWGQ2)
Standard: CSA c22.2 No.950 or CSA c22.2 No.60950• TÜV-GS
Standard: EN 60950
Manufacturer Product name Capacity Remarks
TOSHIBA PAMHD002 2GB
PAMHD005 5GB The area that can actually be used is up to 2 GB.
Card Type Compliance with CFA Standard Rev.1.4
Capacity 128MB
Power supply voltage 3.3V±5%, 5V±10%
Current consumption During 3.3 : 75mA or less, During 5 : 120mA or less

21-5. Options
468 VI Appendix Chapter 21 Appendix
Problems with Optional Products
This section gives information concerning memory and hard disk problems and explains how to solve them.
Insufficient memoryThe following print problems can occur due to insufficient print controller basic memory or copier mainunit E-RDH memory.
Parts of images are left out of printing.
Forms are not printed
Error dispersion is specified, but the data is printed with dither.
Memory overflows occur.If any of the above problems occur, use the solutions on this page.
For details on the E-RDH memory, refer to [E-RDH (Electronic Recirculating Document Handler) memory]
( Page 466).
When parts of images are left out of printingWhen the data for a single page in a print job received by the print controller is complex, for examplewhen it includes an extremely large amount of straight lines and other vector graphics on one page fora graphics application, the memory used for rasterizing with the print controller may sometimes beinsufficient.In this case, set the printer driver graphic setting to raster mode.
Forms are not printedIf any of the conditions below occur, forms may not be printed.
The form exceeds the maximum data size
The relationship between the memory installed in the print controller and the maximum size ofform data is as follows.
When [Make transparent] is specified with the [Form tab]
When forms are not printed due to insufficient memory, it is recommended that the print control-ler's memory be expanded.
When error dispersion is specified, but the data is printed with ditherError dispersal requires more printer memory for image processing than dither.In this case, it is recommended the print controller's memory be expanded.
Installed memory capacity Maximum form data size
64 MB (no expansion
memory)Approx. 2.6 MB
192 MB (128 MB expan-
sion memory)Approx. 7.8 MB
21-5. Options
469 VI Appendix Chapter 21 Appendix
When memory overflows occurThe amount of data for print job depends on the functions selected with the printer driver (booklet, cen-ter fold/center bind functions, 2-in-1 functions, etc.) and on the number of pages in the print documents,so sometimes memory overflows occur in the copier’s E-RDH memory. If a memory overflow occurs,the output for that print job is canceled.If the [Memory overflow] error message is displayed, cancel the print job, take the steps below, thenissue the print instructions again.
Check that there are currently no jobs in the copier being processed or waiting for processing,then send the job again.
If the document has many pages, do not send the print instructions for all the pages at once, butrather send the print instructions divided over a number of jobs.
Deleting unnecessary function specifications
If memory overflows occur frequently, it is recommended that the copier's memory be expanded.
The hard disk does not operate normallyIf the main power is switched off while the hard disk is operating, data may stop writing correctly and thehard disk may stop operating normally. If the hard disk is not operating normally, initialize it. For initializ-ing method, consult with our service shop.

470 VI Appendix Chapter 21 Appendix
21-6. Function List
This lists the PCL printer driver setting items (Adobe PostScript if the PostScript option is installed).
For details on the function settings, [Chapter 3 Printing from Windows] ( Page 112), [Chapter 4
Printing from a Macintosh] ( Page 232).
PCL Function List
The tabs in the main text show the [KONICA MINOLTA 7145/IP-432] property tabs.
Tab name Setting item Setting value SummaryReference
page
General
Comment – This inputs a comment. –
Separator page [none]FullSimple
This selects the separator page.–
Browse–
Specify the folder in which the file used is stored as the separator page.
–
Print test–
This prints a test page. Page 32, 62
Details
Print to the port COMx: (Communi-cations port)
FILE: (Makes a file on the disk)
LPT1: (ECP printer port)
This sets the print port.Printing is not possible from serial port Comx.
–
Add port NetworkOther
This adds a port. Page 223, 227
Delete Port–
This deletes an unnecessary port.
Page 223, 227
Print using the following driver
–This selects the driver used for printing.
–
New Driver–
This adds a driver for printing. Page 221, 224
Capture Printer Port
DevicePathReconnect at logon
This specifies the printer device name/path for printing through the network. This also sets whether or not to automatically connect when logging on to the network.
Page 222
End Capture–
This deletes the network path for an unnecessary network printer.
Page 222
Time out settings Not selected (sec-onds)Transmission retry (seconds)
This sets the parallel port timeout time (in seconds) and the wait time (in seconds) until transmis-sion is retried.
Page 225, 229

21-6. Function List
471 VI Appendix Chapter 21 Appendix
Details
Spool settings Spools print jobs program finishes printing faster• Start printing after
last page is spooled
• Start printing after first page is spooled
Print directly to the printerBi-directional sup-port for this printer
This sets whether or not to spool print data when it is sent to the printer from an application.
Page 223, 227, 231
Port Settings Spool MS-DOS print jobsCheck port state before printing
This sets whether or not to spool MS-DOS print jobs and whether or not to check the status of the LPTx: port before printing.
Page 222
Paper
Copies 1 to 999 This sets the number of copies to print.
Page 134
Collate ONOFF
This sets whether or not to sort in order of page numbers when printing jobs with multiple copies of multiple pages.
Page 164, 267
Orientation Portrait Landscape
This sets the direction for printing. Page 136
Features OffsetStapleCombinationPunchFold&StichPunch HolesSmoothingToner Save
This sets the optional functions for printing, such as Offset and Staples.Select functions in the upper col-umn, and setting options in the lower column.
Page 158,166, 169, 173, 188, 190
Paper Size 5.5"×8.5"8.5"×11"8.5"×14"11"×17"A3-297×420mmA4-210×297mmA5-148×210mmB4-250×354mmB5-182×257mmB6-128×182mmF4-8.0"×13"8K-267×390mm16K-195×267mm
This sets the size of the paper to print on.
Page 240
Duplex -None-Flip on long edgeFlip on short edge
This sets whether or not to make a duplex printing and the paper direction for folding.
Page 153
Tab name Setting item Setting value SummaryReference
page

21-6. Function List
472 VI Appendix Chapter 21 Appendix
Paper
Media Type Plain paperOHP [Transparency]OHP-Interleave [Blank]OHP-Interleave [Print]
This sets the media type for out-put.
Page 140
Output Tray -Default-Tray1Tray2
This sets the output tray. Page 146
Paper Source Auto SelectBypass trayTray1Tray2Tray3Tray4Tray5
This selects the input tray con-taining the paper to print on.
Page 144, 248
Password Print ONOFF
This sets whether or not to Pass-word print.When you select ON, enter your User ID and Password into the screen displayed.
Page 211
Hold ONOFF
This sets whether or not to hold the printed text in the box.
When you click on OFF, the [Print & Hold] screen appears. Enter the box No. and the like into the screen displayed.
Page 216
Hold & Print ONOFF
This sets whether or not to hold or print the printed text in the box.
When you click on OFF, the [Print & Hold] screen appears. Enter the box No. and the like into the screen displayed.
Page 216
User Setting User IDPassword
This sets User ID and Password for Password Print.
Page 211
RestoreDefaults
–This returns the contents set here to their default values.
–
Tab name Setting item Setting value SummaryReference
page

21-6. Function List
473 VI Appendix Chapter 21 Appendix
Cover
Front cover BlankPrinted
This sets whether or not to print the first page on the front cover when the front cover paper is dif-ferent from the paper for the main text.
Page 177
Back cover BlankPrinted
This sets whether or not to print the last page on the back cover when the back cover paper is dif-ferent from the paper for the main text.
Page 177
Tray Bypass trayTray 1Tray 2Tray 3Tray 4Tray 5
This sets the paper source for the paper used for front covers and back covers.
Page 177
Restore Defaults–
This returns the contents set here to their default values.
–
Graphics
Halftoning Solid Black and WhitePatterned Grays Diffused Grays
This sets the reproduction method of halftone area.
Page 187
Brightness -100 to 100 Adjust the Brightness of the image. Page 187
Contrast -100 to 100 Adjust the Contrast of the image. Page 187
Negative ONOFF
This sets whether or not to reverse the image.
Page 193
RestoreDefaults
–This returns the contents set here to their default values.
–
Options
Layout- pages per sheet
1246916
This prints combining multiple pages from the document into one page of print paper.
Page 260
Layout- Scaling 10% to 400% This sets the scaling value. Page 142
True Type options
Outline soft fonts Bitmap soft fonts Rasters
This sets TrueType font settings. Page 196
Printer Lan-guage
PCL-5E (Mono-chrome)PCL-6 (Mono-chrome)
This sets a printer language for printing.
Page 132
Restore Defaults–
This returns the contents set here to their default values.
–
Tab name Setting item Setting value SummaryReference
page
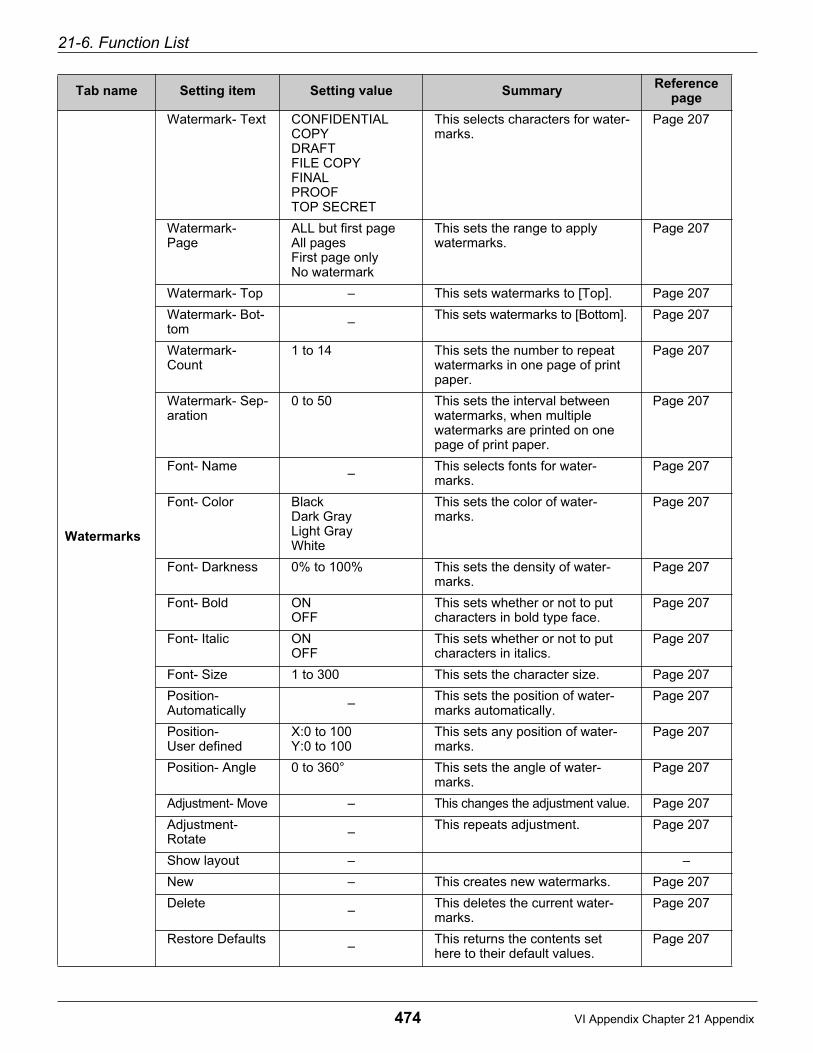
21-6. Function List
474 VI Appendix Chapter 21 Appendix
Watermarks
Watermark- Text CONFIDENTIALCOPYDRAFTFILE COPYFINALPROOFTOP SECRET
This selects characters for water-marks.
Page 207
Watermark- Page
ALL but first page All pagesFirst page onlyNo watermark
This sets the range to apply watermarks.
Page 207
Watermark- Top – This sets watermarks to [Top]. Page 207
Watermark- Bot-tom
–This sets watermarks to [Bottom]. Page 207
Watermark- Count
1 to 14 This sets the number to repeat watermarks in one page of print paper.
Page 207
Watermark- Sep-aration
0 to 50 This sets the interval between watermarks, when multiple watermarks are printed on one page of print paper.
Page 207
Font- Name–
This selects fonts for water-marks.
Page 207
Font- Color BlackDark GrayLight GrayWhite
This sets the color of water-marks.
Page 207
Font- Darkness 0% to 100% This sets the density of water-marks.
Page 207
Font- Bold ONOFF
This sets whether or not to put characters in bold type face.
Page 207
Font- Italic ONOFF
This sets whether or not to put characters in italics.
Page 207
Font- Size 1 to 300 This sets the character size. Page 207
Position-Automatically
–This sets the position of water-marks automatically.
Page 207
Position-User defined
X:0 to 100Y:0 to 100
This sets any position of water-marks.
Page 207
Position- Angle 0 to 360° This sets the angle of water-marks.
Page 207
Adjustment- Move – This changes the adjustment value. Page 207
Adjustment-Rotate
–This repeats adjustment. Page 207
Show layout – –
New – This creates new watermarks. Page 207
Delete–
This deletes the current water-marks.
Page 207
Restore Defaults–
This returns the contents set here to their default values.
Page 207
Tab name Setting item Setting value SummaryReference
page
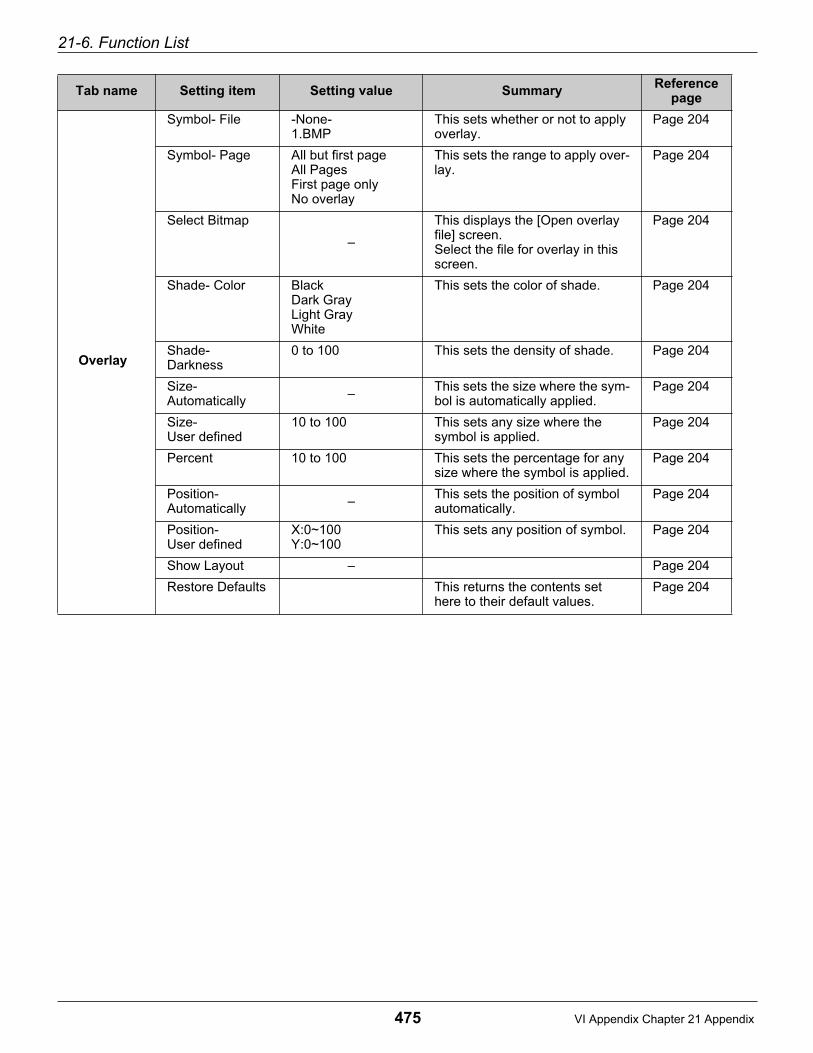
21-6. Function List
475 VI Appendix Chapter 21 Appendix
Overlay
Symbol- File -None-1.BMP
This sets whether or not to apply overlay.
Page 204
Symbol- Page All but first pageAll PagesFirst page onlyNo overlay
This sets the range to apply over-lay.
Page 204
Select Bitmap
–
This displays the [Open overlay file] screen.Select the file for overlay in this screen.
Page 204
Shade- Color BlackDark GrayLight GrayWhite
This sets the color of shade. Page 204
Shade-Darkness
0 to 100 This sets the density of shade. Page 204
Size-Automatically
–This sets the size where the sym-bol is automatically applied.
Page 204
Size-User defined
10 to 100 This sets any size where the symbol is applied.
Page 204
Percent 10 to 100 This sets the percentage for any size where the symbol is applied.
Page 204
Position-Automatically
–This sets the position of symbol automatically.
Page 204
Position-User defined
X:0~100Y:0~100
This sets any position of symbol. Page 204
Show Layout – Page 204
Restore Defaults This returns the contents set here to their default values.
Page 204
Tab name Setting item Setting value SummaryReference
page

21-6. Function List
476 VI Appendix Chapter 21 Appendix
FAX
Mode Selection FAXPrinter
This switches the document des-tination between fax and printer.
Page 313
FAX Mode Setup- Resolution
200dpi400dpi
This sets the resolution for fax transmission.
Page 313
FAX Mode Setup-Setup
–
When you click here, the [Fax Mode Setup] screen is displayed. This screen is used to make vari-ous settings for fax transmission.
Page 313
Enter Recipient - Recipient - Name
–This inputs the name of the fax recipient.
Page 313
Enter Recipient - Recipient - Fax No.
–This inputs the fax number of the recipient.
Page 313
Enter Recipient - Recipient - Error Correc-tion Mode
ONOFF
This sets whether or not to use ECM (error correction) for fax transmission.
Page 313
Enter Recipient- Recipient- Intl Transmis-sion Mode
ONOFF
Check this setting to slow the communications speed for inter-national calls.
Page 313
Enter Recipient- Recipient- V.34Mode
ONOFF
This is to be set when sending faxes in super G3 mode.
Page 313
Enter Recipient - Recipient - Add
–Clicking here adds the contents set with the [Direct input] column to the [Recipient list].
Page 313
Phonebook
–
Clicking here displays a list of the fax numbers already registered so that you can select the fax recipient from that list.
Page 313
Recipients–
This displays detailed information for the fax recipients already reg-istered.
Page 313
Recipients - Delete –
This deletes the recipient selected in the [Recipients] from that list.
Page 313
Tab name Setting item Setting value SummaryReference
page

21-6. Function List
477 VI Appendix Chapter 21 Appendix
Setup
Options- Avail-able options
Base DB-211[w/2 Trays]Base DB-411[w/1 Tray]Fax OptionFS-112[w/2 Trays]FS-112[w/3 Trays]FS-112[w/4 Trays]FS-113[w/2 Trays]FS-114 Punch OptionFS-114[w/2 Trays]FS-114[w/2 Trays+Saddle]FS-114[w/3 Trays+Saddle]FS-114[w/3 Trays]HD-103IT-101 [w/2 Trays]LT-203
This selects the expansion equipment adding to the copier.
Page 23, 38, 52, 78
Add – This adds the expansion equip-ment selected with [Available options] - [Installed options].
Page 23, 38, 52, 78
Options- Installed options
– This displays the added expan-sion equipment.
Page 23, 38, 52, 78
Remove – This removes the expansion equipment selected with [Installed options].
Page 23, 38, 52, 78
Installed memory 64MB128MB192MB
This sets the memory installed in the copier. –
About – –This displays the printer driver version information.
Page 220, 224, 228
Tab name Setting item Setting value SummaryReference
page

21-6. Function List
478 VI Appendix Chapter 21 Appendix
Adobe PostScript Function ListThe tabs in the main text show the [KONICA MINOLTA IP-432 PS] property tabs.
Tab name Setting item Setting value SummaryReference
page
General
Comment – This inputs a comment. –
Separator page [none] FullSimple
This selects the separator page. –
Browse
–
This specifies the name of the folder in which the file used for the separator page is stored.
–
Print Test Page – This prints a test page. Page 32, 46
Details
Print to the fol-lowing port
COMx: (Communica-tions port)
FILE : (Creates a file on disk)
LPT1 : (Printer Port)
This sets the print port.Printing is not possible from serial port Comx. –
Add Port NetworkOther
This adds a port. Page 223
Delete Port–
This deletes an unnecessary port.
Page 223
Print using the following driver
Drivers This selects the driver used for printing.
–
New Driver–
This adds a driver for print-ing.
Page 221
Capture Printer Port
DevicePathReconnect at logon
This specifies the printer device name/path for print-ing through the network. This also sets whether or not to automatically connect when logging on to the network.
Page 222

21-6. Function List
479 VI Appendix Chapter 21 Appendix
Details
End Capture–
This deletes the network path for an unnecessary network printer.
Page 222
Time out settings Not selected (seconds)Transmission retry (seconds)
This sets the parallel port time out time (in seconds) and the wait time (in sec-onds) until transmission is retried.
Page 221
Spool settings Spool print jobs so pro-gram finishes printing faster.• Start printing after
last page is spooled• Start printing after first
page is spooledPrint directly to the printer• Spool data format:RAWDisable bi-directional support for this printer.Enable bi-dinectional support for this printer.
This sets whether or not to spool print data when it is sent to the printer from an application.
Page 223, 227, 231
Port settings Spool MS-DOS print jobsCheck port state before printing
This sets whether or not to spool MS-DOS print jobs and whether or not to check the status of the port before print-ing.
Page 222
Paper
Paper size Statement/Letter/Legal/Tabloid/A3/A4/A5/B4/B5/B6/F4/8K/16K
This sets the size of the paper used for output.The paper sizes that can be set depend on the specifica-tions for the country and on the tray.For details, refer to the copier user's manual.
Page 138
Orientation Portrait/F4/8K/16KLandscapeRotated
This sets the direction for printing.
Page 136
Print Control NoneFlip on long edgeFlip on short edge
This sets the binding direction during finishing for paper printed on both sides.
Page 153
Paper source Auto Select TrayTray 1Tray 2Tray 3Tray 4Tray 5Manual feed
This sets the input tray. The number of trays available for selection depends on the copier model and the options installed.
Page 248
Paper output method
DefaultTray 1Tray 2Tray 3Tray 4
This sets the output tray. The number of trays available for selection depends on the copier model and the options installed.
Page 146
Tab name Setting item Setting value SummaryReference
page

21-6. Function List
480 VI Appendix Chapter 21 Appendix
Paper
Paper type Plain paperOHP (Trans parency)OHP-Interleave [Blank]OHP-Interleave [printed]
This sets the media type for output.
Page 140
Margins - Units InchesMillimeters
This sets the unit for margins set for print paper.
Page 148
Margins - Top 0.18~7.67 (Inches)4.6-145.5 (Millimeters)
This sets the amount of the top margin.
Page 148
Margins - Bottom 0.18~7.67 (Inches)4.6-145.5 (Millimeters)
This sets the amount of the bottom margin.
Page 148
Margins - Left 0.18-5.25 (Inches)4.6-104.8 (Millimeters)
This sets the amount of the left margin.
Page 148
Margins - Right 0.18-5.25 (Inches)4.6-104.8 (Millimeters)
This sets the amount of the right margin.
Page 148
About–
This displays the printer driver version information.
–
Help – This displays the help file. –
Restore Defaults –
This returns the contents set here to their default values.
–
Graphics
Resolution 600dpi This displays the output reso-lution.
Page 192
Special - Print as a neg-ative image
ONOFF
This sets whether or not to reverse white and black when printing.
Page 193
Special - Print as a mir-ror image
ONOFF
This sets whether or not to reverse left and right when printing.
Page 195
Paper handling- Layout
1 up2 up4 up6 up9 up16 up
This prints combining multi-ple pages from the document into one page of print paper.
Page 155
Paper handling - Print page bor-der
ONOFF
This sets whether or not to print a border around each document page for layout printing.
Page 155
Scaling 25% to 400% This sets the amount of enlargement or reduction.
Page 142
Convert gray text to PostSript gray
ONOFF
This sets whether or not to con-vert gray text in a document into PostScript gray.
–
Convert gray graphics to Post-Script gray
ONOFF
This sets whether or not to con-vert gray images in a document into PostScript gray.
–
Help – This displays the help file. –
Restore Defaults–
This returns the contents set here to their default values.
–
Tab name Setting item Setting value SummaryReference
page

21-6. Function List
481 VI Appendix Chapter 21 Appendix
Fonts
Substitute printer fonts for True-Type fonts when applicable
ONOFF
This sets whether or not to replace TrueType fonts within the document with printer fonts.
–
Do not use printer fonts.
ONOFF
This sets whether or not to use printer fonts for printing.
–
Add Euro cur-rency Symbol to PostScript Fonts.
ONOFF
This sets whether or not to add the Euro currency sym-bol to PostScript fonts.
Page 197
Update Soft Fonts
–Clicking here recognizes software fonts.
–
Send Font As - TrueType fonts- Send True
Type fonts as
OutlinesBitmapsType42Don’t Send
This sets the method for transmitting fonts from an application. –
Send Fonts As- Threshold to
switch between downloading bitmap or out-line fonts, mea-sured in pixels [in pixel size at the current res-olution]
0 to 9,999 This sets the amount of the bitmap and outline font switching.
–
Send Fonts As- PostScript fonts- Send Post-
Script fonts as
In Native FormatDon’t Send
This sets the method for transmitting PostScript fonts from an application.
–
Help – This displays the help file. –
Restore Defaults–
This returns the contents set here to their default values.
–
Tab name Setting item Setting value SummaryReference
page

21-6. Function List
482 VI Appendix Chapter 21 Appendix
Device Options
Available printer-memory
0 to 200,000 This sets the amount of printer memory allocated when printing documents.
–
Printer features Job OffsetCollateCombinationStaplingPunchPunch HolesFold&StichFront CoverBack coverFront/Back Cover TraySmoothingToner save
This displays a list of the printer functions that can be set for printing and their cur-rent settings.
Page 158, 164, 166, 169, 177, 188, 190
Printer features- Change setting
for–
This changes the value of the function selected with [Printer functions].
Page 158, 164, 166, 169, 177, 188, 190
Installableoptions
FinisherDrawer BaseMemory ConfigurationLarge Capacity Tray
This displays a list of the sta-tus of the copier's optional equipment.
Page 45
Instalbble options- Change setting
for
–
This changes the contents of the expansion equipment selected with [Expansion options].
Page 45
Help – This displays the help file. –
Restore Defaults–
This returns the contents set here to their default values.
–
PostScript
PostScript output format
PostScript [optimized for speed]PostScript [optimize for portability-ADSC]Encapsulated Post-Script [EPS]Archive format
This sets the format for Post-Script output from applica-tions.
Page 197
PostScript head-ers
Download header with each print jobAssume header is downloaded and retained
This sets whether or not to download the PostScript header for each job.
Page 198
PostScript head-ers- Send Header
Now
–
Clicking here starts down-loading of the PostScript header.
Page 198
Printing Post-Script error infor-mation
ONOFF
This sets whether or not to print a report when a Post-Script error occurs.
Page 199
PostScript time out values- Job timeout
0 to 999 seconds This sets the time in seconds for a transmitted job to be judged to have timed out.
Page 200
Tab name Setting item Setting value SummaryReference
page

21-6. Function List
483 VI Appendix Chapter 21 Appendix
PostScript
PostScript time out values- Wait timeout
0 to 999 seconds This sets the time in seconds for a transmitted job to be judged to have timed out.
Page 200
Advanced- PostScript lan-
guage level
32
This sets the PostScript lan-guage level used. –
Advanced- Data format
ASCII dataBinary communications protocolTagged binary communi-cations protocolPure binary data
This sets the data format used for transmitting print data.
–
Advanced- Send Ctrl+D
before job
ONOFF
This sets whether or not to send Ctrl+D before jobs. –
Advanced- Send Ctrl+D
after job
ONOFF
This sets whether or not to send Ctrl+D after jobs. –
Advanced- Display alert for
applications incompatiblewith driver fea-tures
ONOFF
This sets whether or not to output a warning when an attempt is made to use an application that is not compat-ible with driver functions (page layout, watermark).
–
Help – This displays the help file. –
Restore Defaults–
This returns the contents set here to their default values.
–
Watermarks
Select a Water-mark
NoneCONFIDENTIALCOPYDRAFT
This displays a list of the watermarks that can be selected for printing.
Page 209
Edit
–
Clicking here displays the [Edit watermark] screen. On this screen, you can change the contents of the water-mark selected with the [Select a watermark] column.
Page 209
New
–
Clicking here displays the [New watermark] screen. On this screen, you can change the contents of a new water-mark.
Page 209
Delete–
This deletes the watermark selected with the [Select a watermark] column.
Page 209
Print watermark On first page onlyIn backgroundAs outline only
This sets how the watermark is to be printed on the docu-ment.
Page 207
Help – This displays the help file. –
Tab name Setting item Setting value SummaryReference
page

484 VI Appendix Chapter 21 Appendix
21-7. Fonts
This section explains, using screen fonts recorded on the [User software CD], and downloading fonts to HDDwhen PostScript option installed.
Using the Accessory Screen Fonts
The following screen fonts are recorded on the [User software CD].
PCL font (TrueType font) 80 fonts
PostScript Type 1 font (only when PostScript option installed) 136 fontsInstalling these fonts on the computer provides a WYSIWYG environment in which you can create docu-ments while checking it on the computer screen in a state close to finished state.
For details on the attached fonts, ([PCL Font List] Page 491),([PostScript Font List]
Page 496).
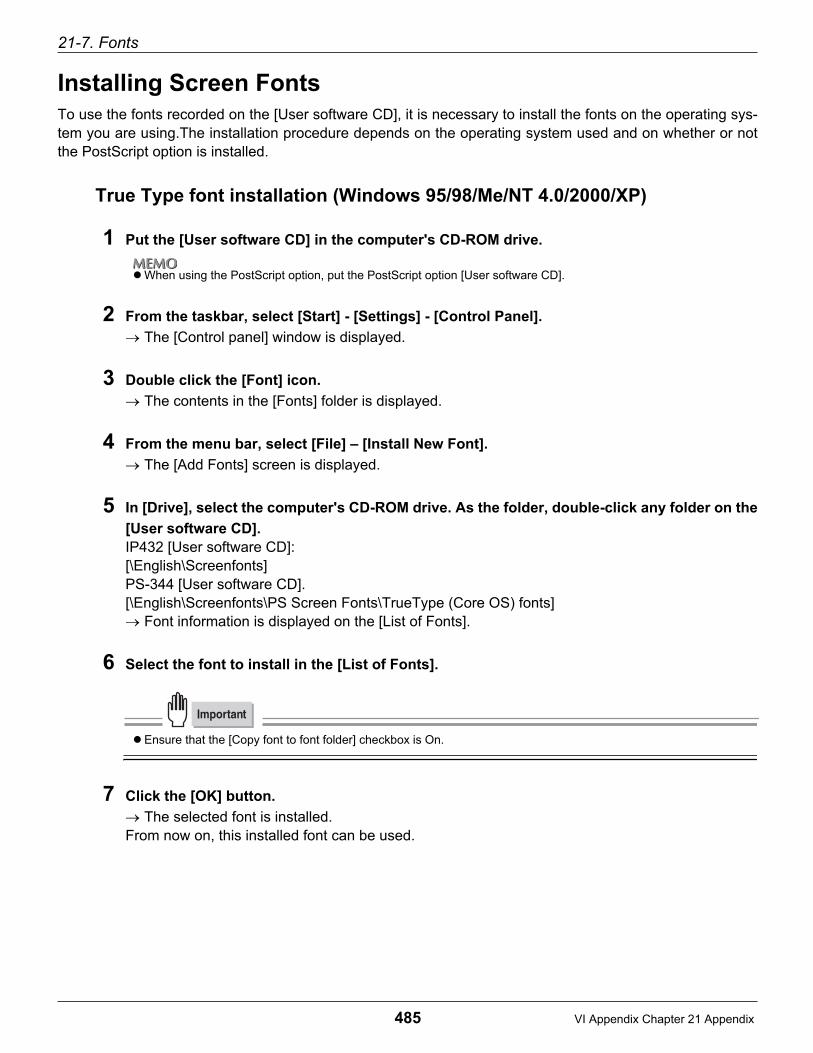
21-7. Fonts
485 VI Appendix Chapter 21 Appendix
Installing Screen Fonts
To use the fonts recorded on the [User software CD], it is necessary to install the fonts on the operating sys-tem you are using.The installation procedure depends on the operating system used and on whether or notthe PostScript option is installed.
True Type font installation (Windows 95/98/Me/NT 4.0/2000/XP)
1 Put the [User software CD] in the computer's CD-ROM drive.
When using the PostScript option, put the PostScript option [User software CD].
2 From the taskbar, select [Start] - [Settings] - [Control Panel].
The [Control panel] window is displayed.
3 Double click the [Font] icon.
The contents in the [Fonts] folder is displayed.
4 From the menu bar, select [File] – [Install New Font].
The [Add Fonts] screen is displayed.
5 In [Drive], select the computer's CD-ROM drive. As the folder, double-click any folder on the
[User software CD].
IP432 [User software CD]:[\English\Screenfonts]PS-344 [User software CD].[\English\Screenfonts\PS Screen Fonts\TrueType (Core OS) fonts]
Font information is displayed on the [List of Fonts].
6 Select the font to install in the [List of Fonts].
Ensure that the [Copy font to font folder] checkbox is On.
7 Click the [OK] button.
The selected font is installed.From now on, this installed font can be used.

21-7. Fonts
486 VI Appendix Chapter 21 Appendix
PostScript font installation (Windows 95/98/Me/NT 4.0)
(Only when PostScript option is installed)Install Adobe Type Manager (ATM) before installing PostScript fonts.
For details on installing Adobe Type Manager, [Installing Adobe Type Manager (ATM)] ( Page 488).
1 Put the PostScript option [User software CD] in the computer's CD-ROM drive.
2 From the taskbar, select [Start] - [Programs] – [Adobe] – [Abode Type Manager 4.1].
Adobe Type Manager is started.
3 Click the [Adobe Type Manager] screen [Font] tab.
4 In [Source], select [Browse Fonts].
5 In the directory selection section, select the [User software CD] [\English\Screenfonts\PS
Screen Fonts\Type1fonts].
A list of the installable fonts is displayed.
6 Select the font to install.
7 Click the [Add] button.
The selected font is installed.
8 Adobe Type Manager is closed.
From now on, this installed font can be used.

21-7. Fonts
487 VI Appendix Chapter 21 Appendix
PostScript fonts Installation (Windows 2000/XP)
(Only when the PostScript option is installed)
Since Windows 2000/XP incorporates in the operating system itself the same functions provided byAdobe Type Manager (ATM), ATM is not needed to install PostScript fonts.
1 Put the PostScript option [User software CD] in the computer's CD-ROM drive.
2 From the taskbar, select [Start] - [Settings] – [Control panel].
The [Control panel] screen is displayed.
3 Double click the [Fonts] icon.
The contents in the [Fonts] is displayed.
4 From the menu bar, select [File] – [Install New Font].
The [Add Fonts] screen is displayed.
5 In [Drive], select the computer's CD-ROM drive. As the folder, double-click the
[\English\Screenfonts\PS Screen Fonts\Type1fonts] folder.
6 Select the font to install in the [List of Fonts].
Ensure that the [Copy font to font folder] checkbox is On.
7 Click the [OK] button.
The selected font is installed.From now on, this installed font can be used.
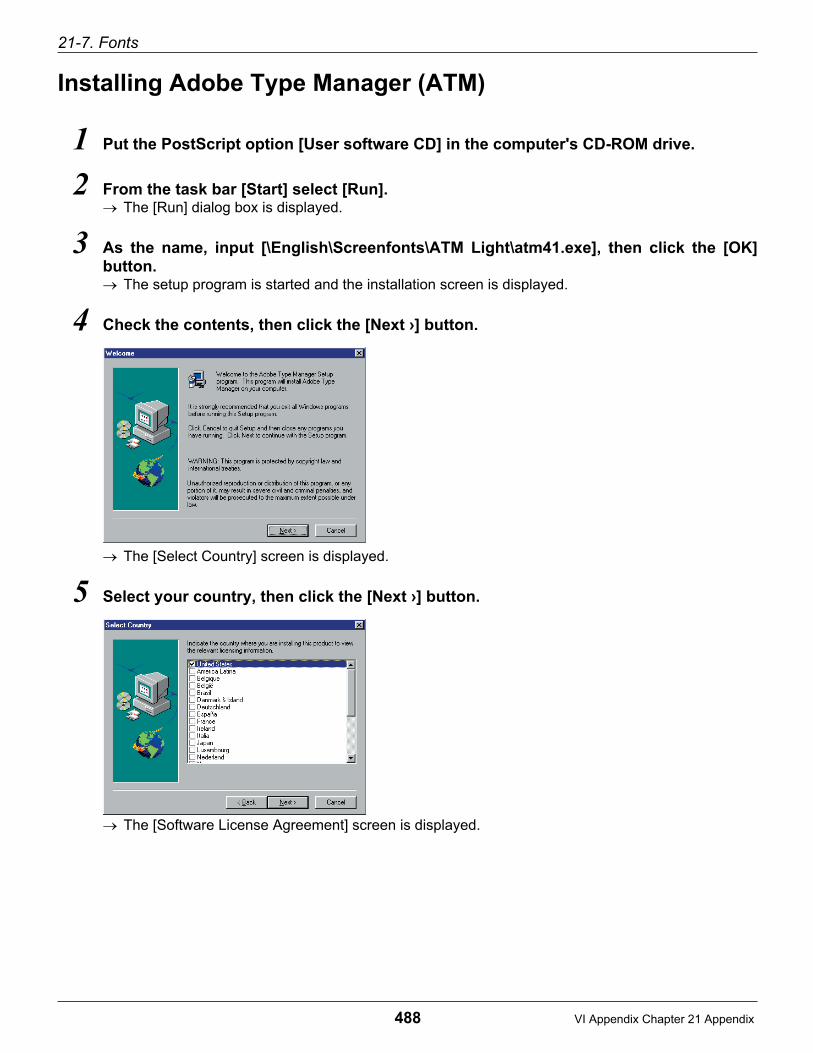
21-7. Fonts
488 VI Appendix Chapter 21 Appendix
Installing Adobe Type Manager (ATM)
1 Put the PostScript option [User software CD] in the computer's CD-ROM drive.
2 From the task bar [Start] select [Run].The [Run] dialog box is displayed.
3 As the name, input [\English\Screenfonts\ATM Light\atm41.exe], then click the [OK]button.
The setup program is started and the installation screen is displayed.
4 Check the contents, then click the [Next ›] button.
The [Select Country] screen is displayed.
5 Select your country, then click the [Next ›] button.
The [Software License Agreement] screen is displayed.
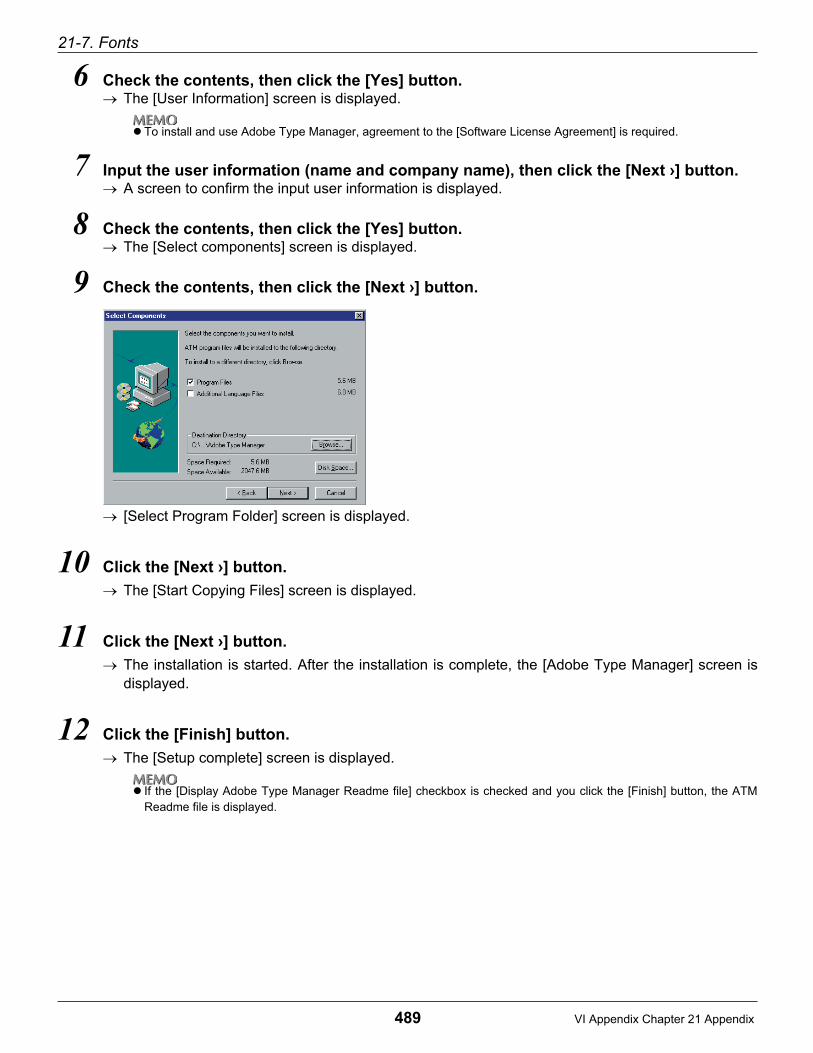
21-7. Fonts
489 VI Appendix Chapter 21 Appendix
6 Check the contents, then click the [Yes] button.The [User Information] screen is displayed.
To install and use Adobe Type Manager, agreement to the [Software License Agreement] is required.
7 Input the user information (name and company name), then click the [Next ›] button.A screen to confirm the input user information is displayed.
8 Check the contents, then click the [Yes] button.The [Select components] screen is displayed.
9 Check the contents, then click the [Next ›] button.
[Select Program Folder] screen is displayed.
10 Click the [Next ›] button.
The [Start Copying Files] screen is displayed.
11 Click the [Next ›] button.
The installation is started. After the installation is complete, the [Adobe Type Manager] screen isdisplayed.
12 Click the [Finish] button.
The [Setup complete] screen is displayed.
If the [Display Adobe Type Manager Readme file] checkbox is checked and you click the [Finish] button, the ATMReadme file is displayed.

21-7. Fonts
490 VI Appendix Chapter 21 Appendix
13 Select the timing for restarting the computer, then click the [Finish] button.
When [Yes, I want to restart my computer now] is selected, the computer is immediately restarted.When [No, I will restart my computer later] is selected, the computer is not restarted. Execute neces-sary operations, close down the computer, then restart it.
When the computer is restarted, the ATM is enabled.
Downloading Fonts
The printer font is downloaded to the hard disk in the print controller.For details on downloading fonts, refer to the user's manual that came with the fonts.
● Select [disk0] as the destination for downloading to the hard disk in the print controller. If fonts are down-
loaded to [disk1], they cannot be used.
Also, when fonts are downloaded to [disk1] the print controller may stop operating normally.
● When the font download is complete, switch the copier main power Off, wait about 10 seconds, and
switch the power back On again.The downloaded fonts cannot be used normally until the copier has
been restarted.B

21-7. Fonts
491 VI Appendix Chapter 21 Appendix
PCL Font List

21-7. Fonts
492 VI Appendix Chapter 21 Appendix

21-7. Fonts
493 VI Appendix Chapter 21 Appendix
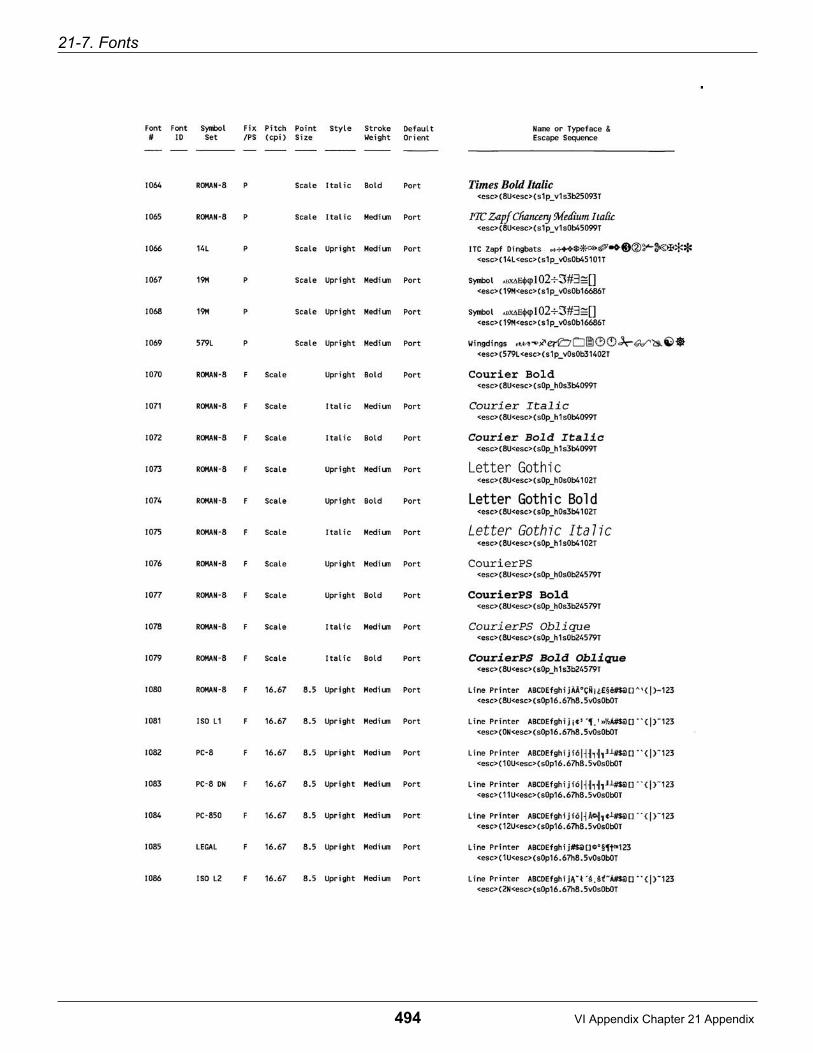
21-7. Fonts
494 VI Appendix Chapter 21 Appendix

21-7. Fonts
495 VI Appendix Chapter 21 Appendix

21-7. Fonts
496 VI Appendix Chapter 21 Appendix
PostScript Font List

21-7. Fonts
497 VI Appendix Chapter 21 Appendix
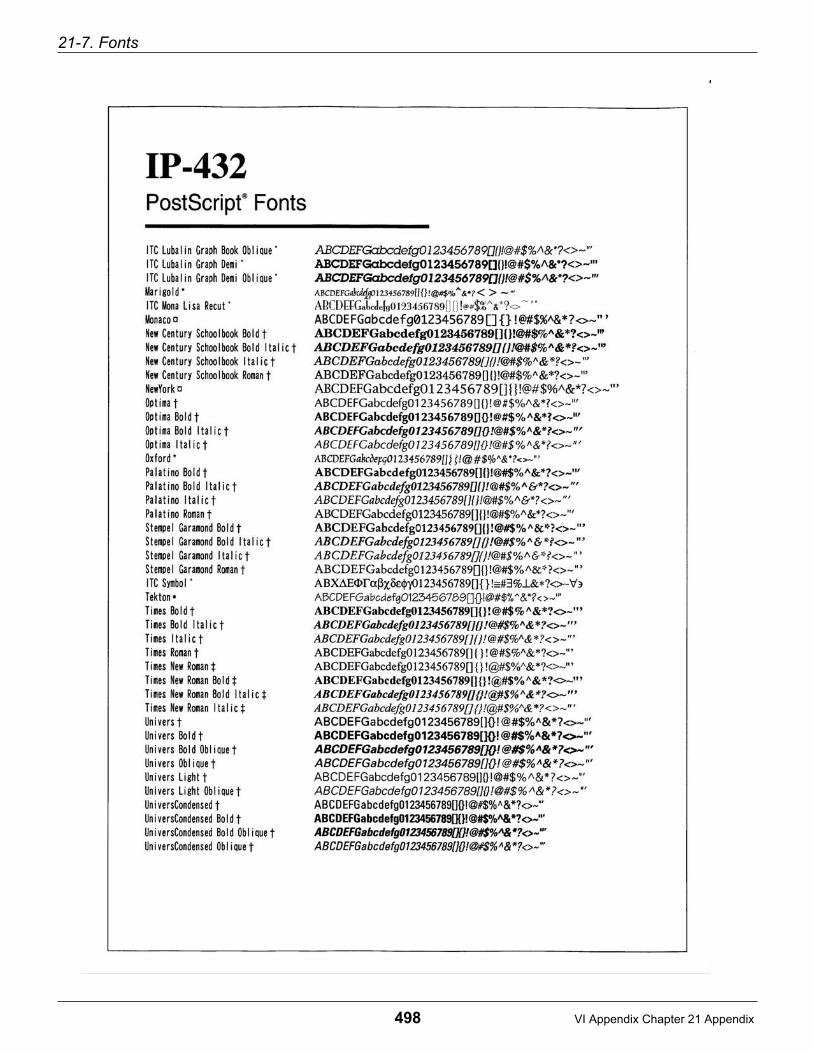
21-7. Fonts
498 VI Appendix Chapter 21 Appendix

21-7. Fonts
499 VI Appendix Chapter 21 Appendix
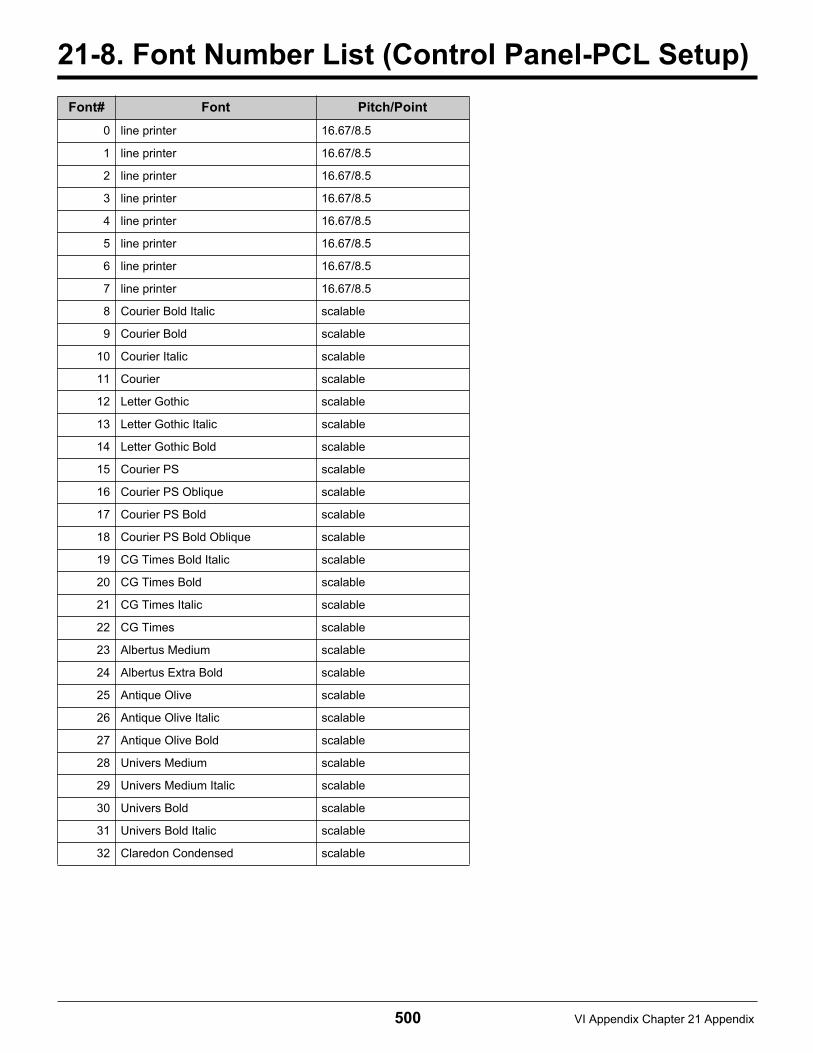
500 VI Appendix Chapter 21 Appendix
21-8. Font Number List (Control Panel-PCL Setup)
Font# Font Pitch/Point
0 line printer 16.67/8.5
1 line printer 16.67/8.5
2 line printer 16.67/8.5
3 line printer 16.67/8.5
4 line printer 16.67/8.5
5 line printer 16.67/8.5
6 line printer 16.67/8.5
7 line printer 16.67/8.5
8 Courier Bold Italic scalable
9 Courier Bold scalable
10 Courier Italic scalable
11 Courier scalable
12 Letter Gothic scalable
13 Letter Gothic Italic scalable
14 Letter Gothic Bold scalable
15 Courier PS scalable
16 Courier PS Oblique scalable
17 Courier PS Bold scalable
18 Courier PS Bold Oblique scalable
19 CG Times Bold Italic scalable
20 CG Times Bold scalable
21 CG Times Italic scalable
22 CG Times scalable
23 Albertus Medium scalable
24 Albertus Extra Bold scalable
25 Antique Olive scalable
26 Antique Olive Italic scalable
27 Antique Olive Bold scalable
28 Univers Medium scalable
29 Univers Medium Italic scalable
30 Univers Bold scalable
31 Univers Bold Italic scalable
32 Claredon Condensed scalable

21-8. Font Number List (Control Panel-PCL Setup)
501 VI Appendix Chapter 21 Appendix
Font# Font Pitch/Point
33 Coronet scalable
34 GaramondAntiqua scalable
35 Garamond Kursiv scalable
36 Garamond Halbfett scalable
37 Garamond Kursiv Halbfett scalable
38 Marigold scalable
39 CG Omega scalable
40 CG Omega Italic scalable
41 CG Omega Bold scalable
42 CG Omega Bold Italic scalable
43 SymbolPS scalable
44 Times New scalable
45 Times New Italic scalable
46 Times New Bold scalable
47 Times New Bold Italic scalable
48 Helvetica scalable
49 Helvetica Oblique scalable
50 Helvetica Bold scalable
51 Helvetica Bold Oblique scalable
52 Univers Medium Condensed scalable
53 Univers Medium Condensed Italic scalable
54 Univers Bold Condensed scalable
55 Univers Bold Condensed Italic scalable
56 ITC Avant Garde Book scalable
57 ITC Avant Garde Book Oblique scalable
58 ITC Avant Garde Demi scalable
59 ITC Avant Garde Demi Oblique scalable
60 ITC Bookman Light scalable
61 ITC Bookman Light Italic scalable
62 ITC Bookman Demi scalable
63 ITV Bookman Demi Italic scalable
64 Arial scalable
65 Arial Italic scalable
66 Arial Bold scalable
67 Arial Bold Italic scalable
68 Helvetica Narrow scalable
69 Helvetica Narrow Oblique scalable
70 Helvetica Narrow Bold scalable
71 Helvetica Narrow Bold Oblique scalable

21-8. Font Number List (Control Panel-PCL Setup)
502 VI Appendix Chapter 21 Appendix
[SYM] Symbol set [PIT] Pitch:0.44-99.95 [POI] Point size:0.4-99.75PCL version5.6.2
72 New Century Schoolbook Roman scalable
73 New Century Schoolbook Italic scalable
74 New Century Schoolbook Bold scalable
75 New Century Schoolbook Bold Italic scalable
76 Palatino Roman scalable
77 Palatino Italic scalable
78 Palatino Bold scalable
79 Palatino Bold Italic scalable
80 Courier scalable
81 Times Roman scalable
82 Times Italic scalable
83 Times Bold scalable
84 Times Bold Italic scalable
85 ITC Zapf Chancery Medium Italic scalable
86 Courier scalable
87 Symbol scalable
88 Wingdings scalable
Font# Font Pitch/Point
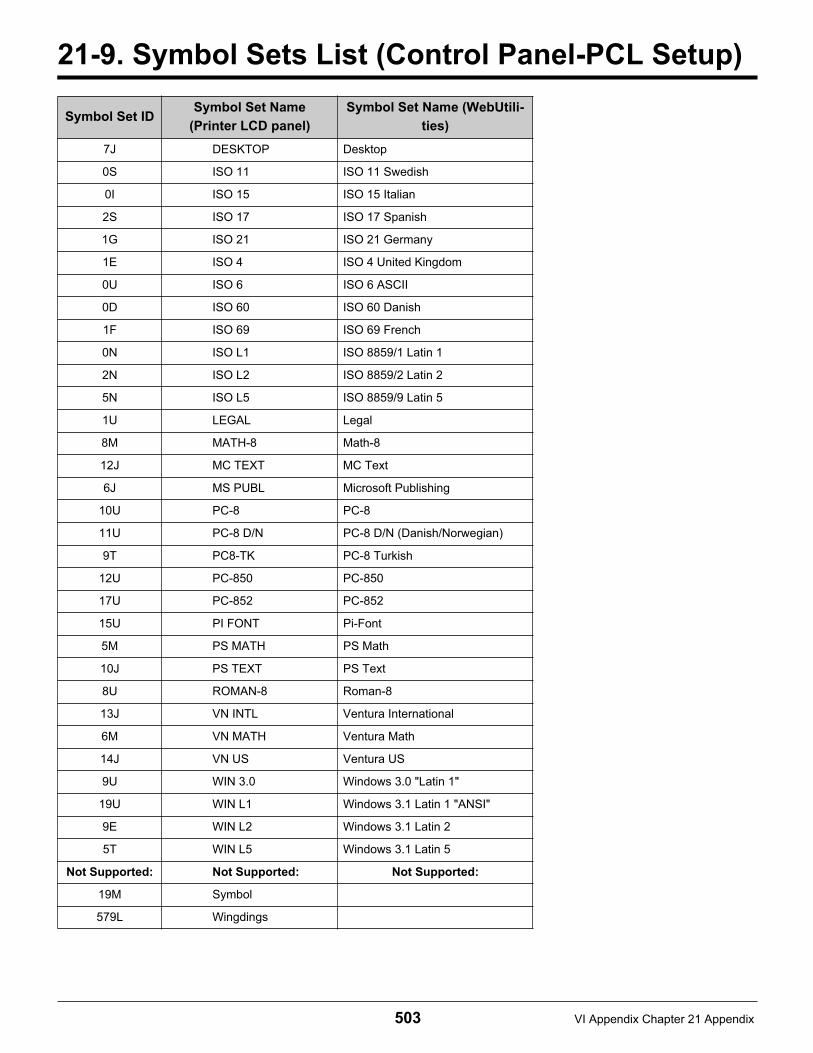
503 VI Appendix Chapter 21 Appendix
21-9. Symbol Sets List (Control Panel-PCL Setup)
Symbol Set IDSymbol Set Name
(Printer LCD panel)
Symbol Set Name (WebUtili-
ties)
7J DESKTOP Desktop
0S ISO 11 ISO 11 Swedish
0I ISO 15 ISO 15 Italian
2S ISO 17 ISO 17 Spanish
1G ISO 21 ISO 21 Germany
1E ISO 4 ISO 4 United Kingdom
0U ISO 6 ISO 6 ASCII
0D ISO 60 ISO 60 Danish
1F ISO 69 ISO 69 French
0N ISO L1 ISO 8859/1 Latin 1
2N ISO L2 ISO 8859/2 Latin 2
5N ISO L5 ISO 8859/9 Latin 5
1U LEGAL Legal
8M MATH-8 Math-8
12J MC TEXT MC Text
6J MS PUBL Microsoft Publishing
10U PC-8 PC-8
11U PC-8 D/N PC-8 D/N (Danish/Norwegian)
9T PC8-TK PC-8 Turkish
12U PC-850 PC-850
17U PC-852 PC-852
15U PI FONT Pi-Font
5M PS MATH PS Math
10J PS TEXT PS Text
8U ROMAN-8 Roman-8
13J VN INTL Ventura International
6M VN MATH Ventura Math
14J VN US Ventura US
9U WIN 3.0 Windows 3.0 "Latin 1"
19U WIN L1 Windows 3.1 Latin 1 "ANSI"
9E WIN L2 Windows 3.1 Latin 2
5T WIN L5 Windows 3.1 Latin 5
Not Supported: Not Supported: Not Supported:
19M Symbol
579L Wingdings

21-9. Symbol Sets List (Control Panel-PCL Setup)
504 VI Appendix Chapter 21 Appendix

505 VI Appendix Chapter 21 Appendix
21-10. PCL Macro and Font
PCL macro
By downloading a macro (print data) to the optional hard disk of the printer controller or to the compact flashROM (CF-101) beforehand, print commands, including a macro execution command are executed to enableoverlay printing of template forms when printing from a host computer or Unix, without routing the printerdriver.
● When the optional hard disk or compact flash ROM (CF-101) is not installed, the PCL marco and font
download function cannot be used.
Downloading the PCL macroThe following Print Stream commands are used to download the PCL macro to the optional hard disk ofthe printer controller or the compact flash ROM (CF-101).
Download macros are stored to the hard disk in the MDM directory (/ata2/int/pcl/mdm).
Print Stream commands for download<esc>0x010x02MACROLD,aaa,nnn,MacroFile0x03
<esc>0x010x02: Hex character (Fixed)
Used to get the print controller into print stream command mode.
MACROLD: Print stream command (Fixed)
Load a macro on the hard disk.
aaa: macro ID
Specifies the ID of the macro saved within a range 000-999. The ID specifiedhere is used for calling up the macro.
nnn: Size of macro file
Size of macro file is the number of bytes between the third comma and the finalhex 0x03 character (not including the third comma or the hex 0x03 character.)
MacroFile: Contents of macro file
Data to be saved as macro
0x03: Hex character (Fixed)
Indicates the end of data.
● Be sure to attach three commas which delimit data.
● If commands other than "macro ID, Size of macro file, Contents of macro file" are changed, they cannot
be executed correctly.

21-10. PCL Macro and Font
506 VI Appendix Chapter 21 Appendix
Printing the PCL macroThe following Print Stream commands are used for printing the macro data downloaded to the optionalhard disk of the printer controller or to the compact flash ROM (CF-101).By adding the following Print Stream commands to the print data during printing from the host computeror Unix, overlay printing can be performed.
Print Stream commands for printing<esc>0x260x66aaa0x59<esc>0x260x660x320x58<esc>0x45
<esc>0x260x66: Hex character (Fixed)
Used to get the print controller into the print stream command mode.
aaa: macro ID
Specifies the macro ID that was set between a range 000-999 when the macrois saved.
0x59<esc>0x260x660x320x58<esc>0x45:
Hex character (Fixed)
Execution command and end command for macro printing
● When the commands other than "macro ID" are modified, such commands cannot be executed properly.
Downloading PCL fonts The following Print Stream commands are used for downloading the soft fonts in compliance withPCL5e to the optional hard disk of the printer controller or to the compact flash ROM (CF-101). Download fonts are stored to the hard disk in the FONTS directory (/ata2/int/pcl/fonts).
Print stream commands for downloading<esc>0x010x02FONT2D,aaa,nnn,FontData0x03
<esc>0x010x02: Hex character (Fixed)
Used to get the print controller into the print stream command mode.
FONT2D: Print stream command (Fixed)
Load fonts to the hard disk.
aaa: Font ID
Specifies the ID of the fonts to be saved within a range 088-999.
nnn: Size of fonts file
Size of fonts file is the number of bytes between the third comma and the finalhex 0x03 character (not including the third comma or the hex 0x03 character.)
FontData: Contents of fonts file
Font data to be saved
0x03: Hex character (Fixed)
Indicates the end of data.

21-10. PCL Macro and Font
507 VI Appendix Chapter 21 Appendix
● Attach three commas which delimit data.
● If commands other than "Font ID, Size of fonts file, Contents of fonts file" are changed, they cannot be
executed correctly.
508 VI Appendix Chapter 21 Appendix
21-11. Index According to Item
Numerics100Base-TX ........................................................... 37910Base-T ............................................................... 379
AAccess rights ......................................... 34, 48, 65Add Printer Wizard ................................ 25, 39, 53Adding driver ........................ 220, 221, 224, 228Adobe PostScript Driver ........................................... 16Adobe PostScript Driver installation ...... 25, 53, 88AppleTalk ............................................................... 380Archive format ........................................................ 197ASCII ...................................................................... 294Auto reset timer ...................................................... 372
BBack cover ................................................. 177, 281Banner Page .......................................................... 345Banner Page Tray .................................................. 347Bi-directional support ............................................. 223Binary ..................................................................... 294Bindery context ...................................................... 407Bindery emulation ...................................... 404, 405bindery service emulation ...................................... 404bitmap format preview ............................................ 293black and white reversed ........................... 193, 285Booklet ....................................................... 158, 264Booklet-Right ......................................................... 158Brightness .............................................................. 187Broadcast ............................................................... 327broadcast group ..................................................... 327
CChecking the printer driver .............. 220, 224, 228Collate ........................................................ 164, 267Combination ............................................... 155, 158confidential transmission ........................................ 314Config.Data ............................................................ 344Connection diagram ................................................. 11Conserving toner .................................................... 291Contrast ................................................................. 187Control panel .......................................................... 458Copy mode ......................................................... 7, 8counter values ........................................................ 300Creating groups ..................................................... 324Custom Page Default ............................................. 242
DDefault Paper ......................................................... 351default printer ................................................. 22, 58default setting ......................................................... 351Delayed Transmission ........................................... 314Delete port ............................................................. 223Deleting the printer port ............................. 226, 230destination .............................................................. 315Direction ................................................................. 238
Downloading fonts ................................................. 490driver name ................................................ 220, 224driver version ................................... 220, 224, 228Duplex ........................................................ 153, 353duplex printing ....................................................... 258
EEKC/ECM .............................................................. 296EKC/ECM counter ................................................. 300EKC/ECM limits ..................................................... 300enlarged ................................................................ 246EPS ............................................................ 197, 293E-RDH ................................................................... 466E-RDH memory ..................................................... 466error report ............................................................ 320Ethernet ................................................................... 10Euro currency symbol ........................................... 197Executing a test print ............................. 46, 62, 80Expanding memory ............................................... 466
FFast Ethernet ......................................................... 379fax kit .......................................................... 309, 311Fax mode .................................................................. 7Fax transmission ................................................... 313file save ................................................................. 293fine mode .............................................................. 314Flip Horizontal ....................................................... 284Flip on long edge ........................................ 153, 258Flip on short edge ...................................... 153, 258Flip Vertical ........................................................... 284Flow for printing ......................................................... 8font ........................................................................ 196Font Inclusion ........................................................ 294font list ........................................................ 491, 496Fonts ..................................................................... 484Format ................................................................... 294Frames .................................................................. 261Front cover ................................................. 177, 281Function list ..................................... 130, 234, 470
HHalftoning .............................................................. 187Hard disk ............................................................... 467
Iimage .................................................................... 187Image View ........................................................... 129Incomplete job list ................................................. 306input tray ............................................................... 248Installing fonts ....................................................... 485Interfaces ................................................................ 10Internet printing ..................................................... 409intranet .................................................................. 409IPP ........................................................................ 409IPP attribute .......................................................... 410

21-11. Index According to Item
509 VI Appendix Chapter 21 Appendix
Jjaggedness ................................................. 188, 289Job Time Out ......................................................... 200
KKey operator mode ................................................ 370
LLandscape ................................................. 169, 271language level ........................................................ 294layout ..................................................................... 260Layout direction ...................................................... 261left binding .............................................................. 264left/right reversed ....................................... 195, 284limit on the number of sheets printed ..................... 300limiter value ................................................ 296, 300Local printer ............................................ 3, 26, 55LPD ........................................................................ 384lpd .......................................................................... 427LPD/LPR .................................................... 380, 384LPD/LPR printer .............................. 387, 392, 396LPD/LPR printer port ....................... 387, 392, 396LPR ........................................................................ 384LPT ........................................................................ 222LPT port ................................................................. 222
MMacintosh ............................................................... 380magnification ratio .................................................. 246Managing the print count ....................................... 296Margins ...................................................... 148, 253Media Type ................................................ 140, 244Memory .................................................................. 466Menu Configuration ................................................ 337Microsoft TCP/IP printing ....................................... 386Mirror image ........................................................... 284mode is switched ....................................................... 7multiple pages on one sheet .................................. 260
NNDS ........................................................... 404, 406negative image ........................................... 193, 285NetWare ................................................................. 380NetWare 3.x ........................................................... 403NetWare 4.x ........................................................... 404network .................................................................. 379Network printer ........................................ 4, 26, 56Network printer server .............................................. 41network service ...................................................... 386non-standard paper size ........................................ 242notice list/password ................................................ 403Novell Directory Service ......................................... 404number of copies to print ........................... 134, 236number of sheets printed is counted ...................... 300NWADMIN ............................................................. 406
OOffset .......................................................... 166, 269OHP ...................................................................... 244on combined pages ............................................... 261Operation environment ............................................ 10Options .................................................................. 466order ...................................................................... 250order in which pages can be assigned .................. 261Orientation .................................................. 136, 355Output tray ...................................... 146, 251, 373Overlay .................................................................. 204Override Paper ...................................................... 359
PPage notation language .......................................... 17Pages per sheet/Layout ........................................ 155Paper size .................................................. 138, 240Paper Source ............................................. 144, 248Paper type ............................................................. 140Parallel interface ..................................................... 10Password .............................................................. 211Password print ...................................................... 211PC-Fax .................................................................. 309PC-Fax transmission flow ......................................... 9PCL ......................................................................... 16PCL Demo Page ................................................... 340PCL Driver ............................................................... 16PCL Driver installation ................. 18, 35, 49, 66PCL Font List ............................................. 341, 491PCONSOLE .......................................................... 406PDL Select ............................................................ 349Peer-to-Peer ............................................... 379, 382phonebook ...................................... 310, 315, 322Plain paper ............................................................ 244port .......................................................................... 40Port addition/deletion ...................... 223, 227, 231port connecting ...................................................... 220Port settings .......................................................... 222Portrait ........................................................ 169, 271ports ............................................................... 21, 28PostScript error ..................................................... 305PostScript error information .................................. 199PostScript files ...................................................... 293PostScript font ....................................................... 197PostScript format ................................................... 293PostScript header .................................................. 198PostScript Job ....................................................... 293PostScript level ..................................................... 294PostScript output format ........................................ 197PostScript PS-343 option product specifications ..... 465PostScript timeout ................................................. 200PostScript Type 1 font ........................................... 484Preparing a new phonebook ................................. 332primary file server .................................................. 403Print as a mirror image .......................................... 195print direction ......................................................... 238print order .............................................................. 250

21-11. Index According to Item
510 VI Appendix Chapter 21 Appendix
print quality ............................................................. 187print queue ............................................................. 403Print screen ............................................................ 233printed laid out ....................................................... 260printer daemon ....................................................... 384Printer EKC/ECM ................................................... 296Printer mode .............................................................. 7Printer Name ............................................................ 21Printer port assignment .............................. 226, 230printer server .......................................................... 403Printing from an application ......... 33, 47, 64, 82Printing on .............................................................. 258Printing overlaying ................................................. 204Printing rear of the paper ....................................... 153Problems with optional products ............................ 468product specifications ............................................ 461protocol ........................................... 294, 379, 384PS Demo Page ...................................................... 342PS files ................................................................... 293PS Font List ........................................................... 343
Rrasterizing .................................................................. 8rear ......................................................................... 258Reconnect .............................................................. 222reduced .................................................................. 246Registering recipient information ........................... 322re-sends ................................................................. 225Resolution .................................................. 192, 314reverse ................................................................... 250right binding ........................................................... 264
SSaving phonebooks ............................................... 331Scaling ................................................................... 142Scanner mode ............................................................ 7security level ......................................... 34, 48, 65Sender ID ............................................................... 314Setting options........................... 23, 30, 38, 45, 52, 61, 69Setting the fax unit ................................................. 311share the printer ....................................................... 59Shared Printers ........................................................ 41Smoothing .............................................................. 289SNMP ..................................................................... 425SOFTWARE LICENSE AGREEMENT ..................... ivSort ........................................................................ 164special mode .......................................................... 264Spool .......................................................... 227, 231Spool MS-DOS print jobs ....................................... 222Spool settings ........................................................ 223Staple ......................................................... 169, 271Sub Address .......................................................... 314substitute driver ........................................................ 44super fine mode ..................................................... 314
TTCP/IP ................................................................... 425test print .................................................................. 32Time you want to transmit ..................................... 314Timeout ................................................................. 221Timeout time .............................................. 225, 229To delete a port ..................................................... 223Toner save ............................................................ 190top/bottom reversed .............................................. 284Transmission retry ................................................. 221transmitted as a fax ............................................... 309tray ...................................... 144, 146, 248, 251tray which to output ............................................... 251trouble ................................................................... 458TrueType font ............................................. 196, 484
UUNIX ........................................................... 380, 425Unix print service ........................................ 391, 396upper limit on the print count ................................. 296Usage of this Manual ............................................... xxUser ID ............................................ 211, 297, 299
Vversion ............................................. 220, 224, 228virtual port ....................................... 222, 226, 230
WWait timeout .......................................................... 200Watermark .................................................. 207, 286

511 VI Appendix Chapter 21 Appendix
21-12. Purpose-Oriented Index
C
Connection between the Computer and Printer
Windows 95/98/Me ..........................................220Windows NT 4.0...............................................224Windows 2000/XP............................................228
Control Panel Operation
Printer Settings ................................................336
Controller Settings
Banner Page ....................................................345Banner Page Tray............................................347PDL Select .......................................................349
D
Destination
Driver
Adobe PostScript ...............................................16PCL ....................................................................16
F
Fax Function
Sending Faxes
Fax Transmission.............................................313PC-Fax Transmission Error Reports................320Sending Faxes .................................................313Using a phonebook ..........................................334
Font
Downloading Fonts ..........................................490Installing Adobe Type Manager (ATM) ............488Installing Fonts.................................................485PCL Font List ...................................................491PostScript Font List..........................................496PS Demo Page
(Only When PostScript Option Installed) ... 342Setting the Font................................................196
I
Image Settings (Windows)
Halftoning.........................................................187Printing with Black and White Reversed ..........193Printing with Left/Right Reversed.....................195Setting the Resolution .....................................192Smoothing........................................................188Toner Save ......................................................190
Installing
Adobe Type Manager (ATM) ...........................488Driver Installation for Windows 95/98/Me ..........18Driver Installation for Windows NT 4.0...............34Driver Installation for Windows 2000 .................48Driver Installation for Windows XP.....................65Driver Installation for Macintosh.........................88Fonts ................................................................484Updating the Printer Driver ..............................100
K
Key Operation Mode
Setting with Key Operator Mode
Auto Reset Timer ............................................ 372Moving to Power Save .................................... 375PRINT W/O Key Count ................................... 374
L
List
Configuring Data ............................................. 344PC-Fax Transmission Error Reports ............... 320PCL Font List .................................................. 341PS Font List .................................................... 343
N
Network Functions
Internet Printing............................................... 409Printing with AppleTalk.................................... 437Printing with IP Peer-to-Peer........................... 382Printing with LPD/LPR..................................... 383Printing with NetWare ..................................... 402
O
Options
Hard Disk ........................................................ 467Memory ........................................................... 466
Setting Options
Windows 95/98/Me ..................................... 23, 30Windows NT 4.0.......................................... 38, 45Windows 2000 ............................................ 52, 61Windows XP...................................................... 78
P
PostScript Setting (Windows)
Addition of Euro currency symbol ................... 197PostScript error information printing................ 199PostScript header ........................................... 198PostScript output format ................................. 197PostScript timeout values................................ 200
PostScript Setting (Macintosh)
File Save ......................................................... 293
Printer Functions
Setting Printer Functions
Setting Print Default ....................................... 351Windows 95/98/Me ......................................... 114Windows NT 4.0.............................................. 117Windows 2000 ................................................ 121Windows XP.................................................... 125Macintosh........................................................ 233

21-12. Purpose-Oriented Index
512 VI Appendix Chapter 21 Appendix
Printing
Checking Printing
Windows 95/98/Me ............................................32Windows NT 4.0.................................................46Windows 2000 ...................................................62Windows XP.......................................................80Macintosh...........................................................99
Managing Print Count
Printer EKC/ECM .............................................297Printing Multiple Pages (Macintosh)
Attaching a Front Cover/Back Cover (Front Cover/Back Cover)......................281
Folding Paper in Two to Make Booklets (Special Mode).......................................264
Outputting Sorted into Separate Sets of Copies (Offset)...................................................269
Printing Multiple Pages on One Sheet of Paper (Document Pages/Print Pages/Layout Direction) ...............................................260
Printing on Both the Front and Rear of the Paper (Duplex Printing) ....................................258
Printing One Copy at a Time of All Pages (Collate) .................................................267
Stapling (Staple) ..............................................271Printing Multiple Pages (Windows)
Attaching a Front Cover/Back Cover (Front Cover/Back Cover)......................177
Folding Paper in Two to Make Booklets (Combination) ........................................158
Outputting Sorted into Separate Sets of Copies (Offset)...................................................166
Printing Multiple Pages on One Sheet of Paper (Pages per sheet/Layout) ......................155
Printing on Both the Front and Rear of the Paper (Duplex) .................................................153
Printing One Copy at a Time of All Pages (Collate/Sort)..........................................164
Stapling (Staple) ..............................................169Setting Basic Print Function (Windows)
Printing Enlarged/Reduced (Scaling)...............142Selecting the Input Tray (Paper Source)..........144Selecting the Output Tray (Output Tray)..........146Selecting the Type of Paper
(Media Type/Paper Type) ......................140Setting the Margin (Margins)............................148Setting the Number of Copies to Print
(Copies). ................................................134Setting the Print Direction (Orientation) ...........136Setting the Print Paper Size (Paper Size)........138
Setting Basic Print Function (Macintosh)
Printing Enlarged/Reduced (Magnification Ratio)..............................246
Selecting the Input Tray (Paper Source)..........248Selecting the Output Tray (Output Tray)..........251Selecting the Print Order
(Reverse Print Order) ............................250Selecting the Type of Paper (Media Type) ......244
Setting the Margin (Margins)........................... 253Setting the Number of Copies to Print
(Copies) ................................................ 236Setting the Print Direction (Direction).............. 238Setting the Print Paper Size (Paper) ............... 240
Special Printing (Windows)
Printing Overlaying Another Document (Overlay) ............................................... 204
Printing with a Password (Password Print) ..... 211Printing Watermarks (Watermark)................... 207
Special Printing (Macintosh)
Conserving Toner ........................................... 291Printing Watermarks........................................ 286Printing with Black and White Reversed ......... 285Printing with Top/Bottom or Left/Right Reversed..284Smoothing Characters and Curved Lines ....... 289
S
Specifications
PC-Fax Functions ................................... 461, 463PostScript PS-344 Option Product.................. 465PostScript PS-346 Option Product.................. 465Printer Functions..................................... 461, 463