Embed Size (px)
Citation preview

| 1 |
618: Deploying XenDesktop 7.5 on CloudPlatform
Hands-on Lab Exercise Guide Make money selling Field Services Stop by the Education and Consulting booths in the Solutions Expo to find out how! We're here to help.

| 2 |
Table of Contents Table of Contents ....................................................................................................................... 2 Overview .................................................................................................................................... 3 Scenario..................................................................................................................................... 6 Lab Preparation ......................................................................................................................... 6 Exercise 1 .................................................................................................................................11 Exercise 2 .................................................................................................................................13 Exercise 3 .................................................................................................................................22 Exercise 4 .................................................................................................................................35

| 3 |
Overview Hands-on Training Module Objective
• This training will provide hands-on experience with the integration, configuration and operations of Citrix CloudPlatform 4.3 and XenDesktop 7.5 working together.
Prerequisites
• Experience using the Windows 2012 operating system. • Your lab access device (PC or Mac supported) requires the Citrix Receiver to be installed.
Audience
• Citrix Partners, Customers, Sales Engineers, Consultants, Technical Support.
Lab Environment Details The lab environment uses a single physical XenServer accessed through the internet. The XenServer hosts various Virtual Machines (VMs), including four virtual XenServers, the CloudPlatform infrastructure VMs and a Windows Server 2008 R2 (Student Desktop) for accessing the Windows applications needed for the lab. All lab infrastructure VMs share a private internal (192.168.10.0/24) network with an infrastructure router providing access to the internet for all VMs. An additional network (Shared-Guest) is used in the Basic zone modules. The system diagram of the lab is shown below:
The Student Desktop is accessed remotely using Citrix Receiver running on your laptop. All Windows applications such as the Mozilla and Chrome browsers and XenCenter, (the XenServer GUI management tool), are accessed from the Student Desktop.

| 4 |
Lab Guide Conventions This symbol indicates particular attention must be paid to this step
Special note to offer advice or background information
reboot Text the student enters or an item they select from a dropdown menu is printed like this
VMDemo Filename mentioned in text or lines added to files during editing
Start Bold text indicates reference to a button or object
Focuses attention on a particular part of the screen (R:255 G:20 B:147)
Shows where to click or select an item on a screen shot (R:255 G:102 B:0)
Virtual Machines vs. Instances A Virtual Machine (VM) is a software implementation of a machine (i.e. a computer) that executes programs like a physical machine. While CloudPlatform usually refers to system VMs as VMs, it often, but not always, refers to user (Guest) VMs as “Instances”.
Lab Module Reset This lab provides the ability to reset the lab ready to start any module using the labreset.sh script. This is run on the physical XenServer host console which may be accessed through XenCenter or PuTTY. See appendix 2 for details.
Command Copy & Paste Many commands and entries used in this lab are long and/or complex. To save typing and to improve accuracy, you are encouraged to copy commands from the lab guide and paste them into the XenCenter VM console or dialog box.
A command may be copied from the lab guide by highlighting the command and then using Ctrl-C to copy the command to the copy buffer. To paste into web browsers using the Ctrl-V to paste the command into the screen. For XenServer VM console, right-click and select Paste.
You can copy several commands at once and paste them into the console as a group and they will be executed in order. For instance, you can highlight and copy all four commands below and paste them together into the VM console. Each will be executed in turn. (Do not do this now!)
service rpcbind start service nfslock start service nfs start chkconfig nfs on
| 5 |
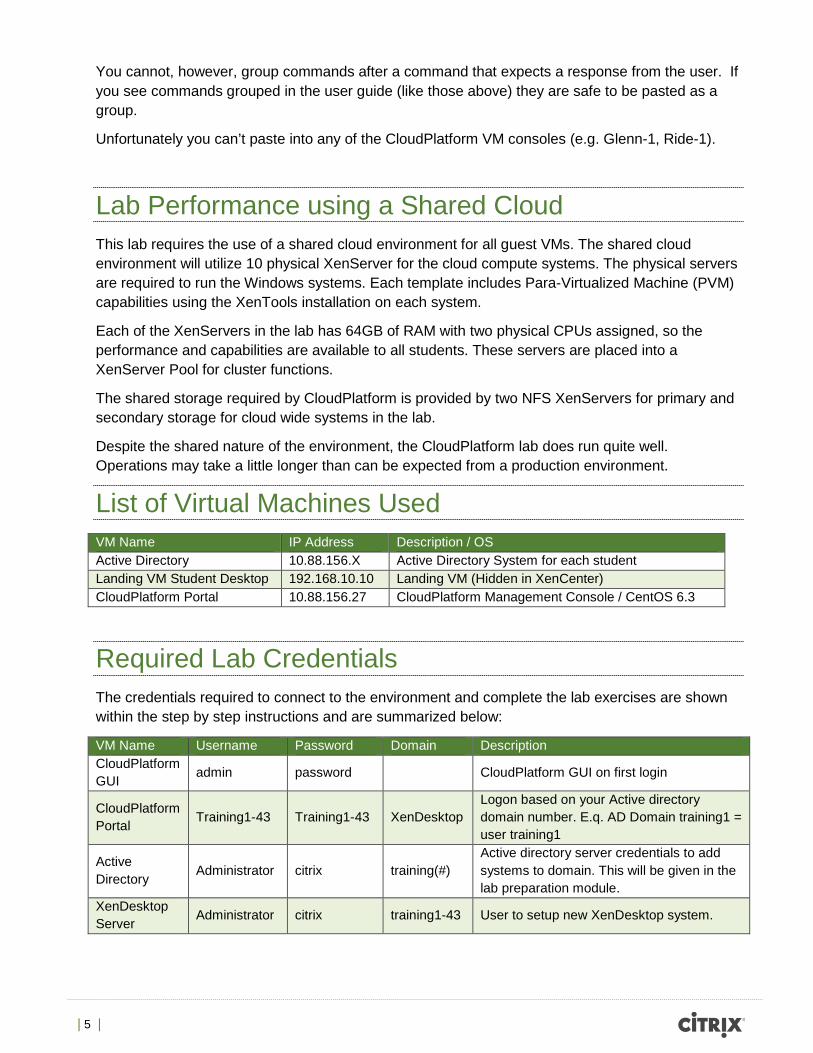
You cannot, however, group commands after a command that expects a response from the user. If you see commands grouped in the user guide (like those above) they are safe to be pasted as a group.
Unfortunately you can’t paste into any of the CloudPlatform VM consoles (e.g. Glenn-1, Ride-1).
Lab Performance using a Shared Cloud This lab requires the use of a shared cloud environment for all guest VMs. The shared cloud environment will utilize 10 physical XenServer for the cloud compute systems. The physical servers are required to run the Windows systems. Each template includes Para-Virtualized Machine (PVM) capabilities using the XenTools installation on each system.
Each of the XenServers in the lab has 64GB of RAM with two physical CPUs assigned, so the performance and capabilities are available to all students. These servers are placed into a XenServer Pool for cluster functions.
The shared storage required by CloudPlatform is provided by two NFS XenServers for primary and secondary storage for cloud wide systems in the lab.
Despite the shared nature of the environment, the CloudPlatform lab does run quite well. Operations may take a little longer than can be expected from a production environment.
List of Virtual Machines Used VM Name IP Address Description / OS Active Directory 10.88.156.X Active Directory System for each student Landing VM Student Desktop 192.168.10.10 Landing VM (Hidden in XenCenter) CloudPlatform Portal 10.88.156.27 CloudPlatform Management Console / CentOS 6.3
Required Lab Credentials The credentials required to connect to the environment and complete the lab exercises are shown within the step by step instructions and are summarized below:
VM Name Username Password Domain Description CloudPlatform GUI admin password CloudPlatform GUI on first login
CloudPlatform Portal Training1-43 Training1-43 XenDesktop
Logon based on your Active directory domain number. E.q. AD Domain training1 = user training1
Active Directory Administrator citrix training(#)
Active directory server credentials to add systems to domain. This will be given in the lab preparation module.
XenDesktop Server Administrator citrix training1-43 User to setup new XenDesktop system.

| 6 |
Scenario You work for an Infrastructure as a Service (IaaS) provider who wishes to provide XenDesktop and XenApp systems via their CloudPlatform Cloud based systems.
You will build a XenDesktop site that is integrated with CloudPlatform and a MCS catalog for users to be able to deploy systems with.
Customers do not want to understand the hassles and complexities of the different storage, network and compute systems that are involved in the deployment and are relying on a complete setup by the administrators to ensure a reliable desktop and application server service.
You will be completing your setup in an Basic CloudPlatform zone and exercise the creation of the environment using that new zone.
Lab Preparation
Logging into the Lab Environment Follow the directions below to access the lab environment.
STEP 1 Launch your laptop web browser and go to the training portal URL address provided by your instructor, e.g. http://ILT.CitrixVirtualClassroom.com
STEP 2 On the web site, enter:
Session Code The session code provided by your instructor Business Email Address Your email address
Click Get Started.
STEP 3 You will see a welcome screen with your XenServer credentials.

| 7 |
You will use the credentials from your welcome screen to attach XenCenter to your physical XenServer host in the next steps.
Click Start Lab to launch your lab session.
Wait for the lab session to launch and you will see your Student Desktop (LANDINGVM) used to launch the various applications needed during the lab.

| 8 |
Accessing the Environment Overview XenCenter is a graphical user interface application used for managing one or more XenServers.
You will be using XenCenter to access the
Step by step guidance Step Action
1. From your Student Desktop, launch Citrix XenCenter.
2.
Click Add Server to add your physical XenServer to XenCenter.
3. Enter your physical XenServer parameters from your welcome screen.
IP Address Your XenServer IP address Username root Password Your XenServer password
Click Add.
You may find it easier to copy and paste the password to
ensure it is entered correctly.

| 9 |
Step Action 4.
XenCenter will attach to your physical XenServer.
5.
You will notice one VM is already running on the physical XenServer as highlighted above.
• The AD.Training(#) VM provides Active Directory services for your XenDesktop environment. Your Domain will be the same as the “Training(#)” portion of the VM name. Please record this information, as it will be needed through out the lab.
Domain Training(#)
6. Connect to the AD.Training(#) VM by selecting the server and then the console tab
7. This will ask for Windows Security Credentials to create a RDP connection to the server
Username Training(#)\administrator Password Citrix123
8. To see the most from the window depending on your resolution settings, click on the Undock or Full Screen button at the bottom of the Console window to expand the window.
Your Physical XenServer name will be different.
This domain name will be used throughout the Lab. Please write it down or remember it..
| 10 |
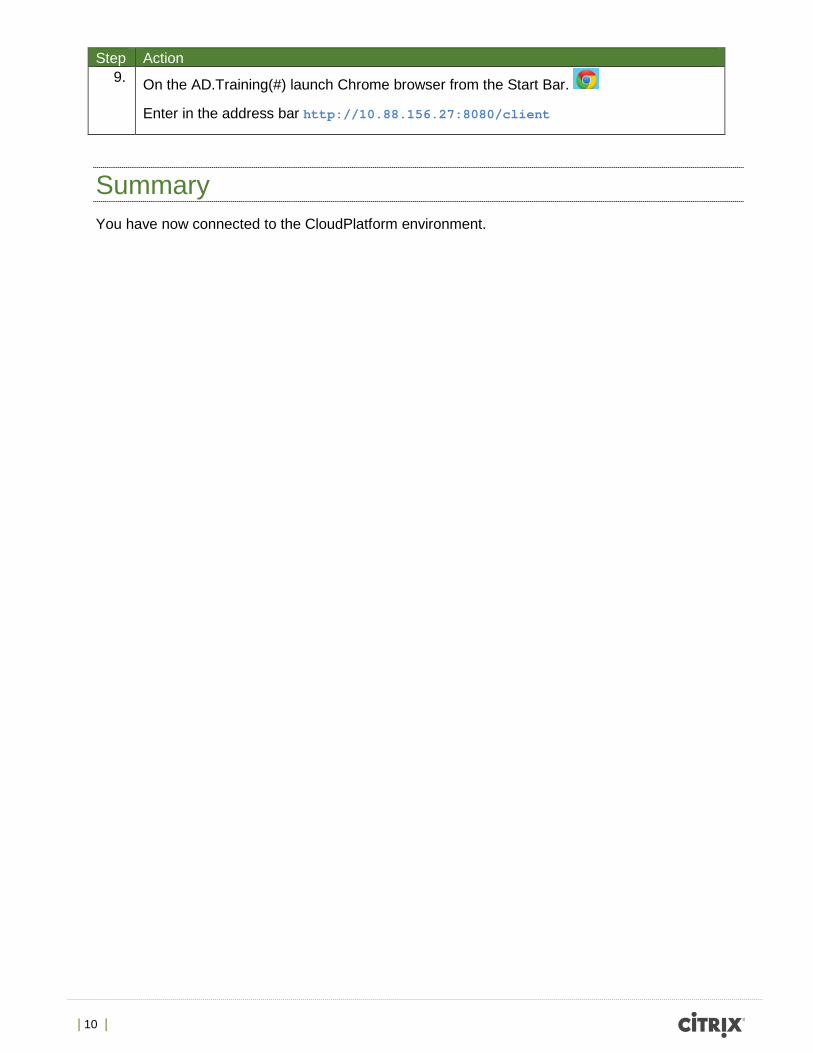
Step Action 9. On the AD.Training(#) launch Chrome browser from the Start Bar.
Enter in the address bar http://10.88.156.27:8080/client
Summary You have now connected to the CloudPlatform environment.

| 11 |
Exercise 1 Setting up the Catalog Cloud Account and User Each student will be required to create a catalog account and user. This account and user are fundamental access point for XenDesktop to connect to CloudPlatform. Each Account and User must be unique for each user to have the correct experience.
Estimated time to complete: 5 minutes
Using your domain name learned in the previous exercise, execute the following steps:
Step Action 1. Login to CloudPlatform using your User Credentials that were created in Exercise 1.
Login using the administrator access.
Username training(#) Password Citrix123 Domain XenDesktop
Click Login
2.
Select the accounts tab on the left column of administrative options.
1. Open the options of your account by clicking on the name training(#).
2. Click View Users in the upper right hand side of the screen:
Click on your user name training(#) to open all options.

| 12 |
3. API and Secret Keys are needed for secure communication between XenDesktop and CloudPlatform. These keys are generated randomly for each user.
Click on the Generate Keys button:
Click Confirm.
This will fill in the API and Secret Key Fields.
You will use these later in the lab.
4. In the upper most corner. Select the dropdown next to admin cloud and select Logout.
Summary Your CloudPlatform user is now ready to login and setup systems for the XenDesktop environment.

| 13 |
Exercise 2 Preparing templates for the Environment Each student will be required to upload and prepare a Windows 7 VDA (already template) into the cloud environment. This template will be used for integration with MCS services as the “Gold Template” for VDA deployments.
Estimated time to complete: 5 minutes
Step Action 3. Login to CloudPlatform using your User Credentials that were created in Exercise 1.
Login using the administrator access.
Username training(#) Password Citrix123 Domain XenDesktop
Click Login
4.
Select the Templates tab on the left column of options.
5. Click +Register template in the upper right hand corner.

| 14 |
6. This template will be used by XenDesktop to deploy the desktops in future exercises. Enter the following information:
Click OK.
Name Windows 7 VDI Description Windows 7 VDI URL http://10.88.156.25/lab/Windows-7-VM.vhd Zone Synergy-lab Hypervisor XenServer Format VHD OS Type Windows 7 (64 bit) Extractable <Unchecked> Password Enabled <Unchecked> Dynamically Scalable <Unchecked> Public <Unchecked>
7. The Template will show complete:

| 15 |
Exercise 3 Setting up the Windows Server Each student will be required to create a delivery server under his or her account to allow the function of XenDesktop to work within the Cloud. This system will be a Windows 2012 R2 server, and reside in the cloud environment.
Step by step guidance Estimated time to complete this exercise: 20 minutes.
Step Action 8. The dashboard and options will look different. Click Instances from the left column.
9.
In the upper right hand corner, select + Add Instance
10. Make sure that Template is selected under “Select ISO or Template”:
Click Next.
| 16 |
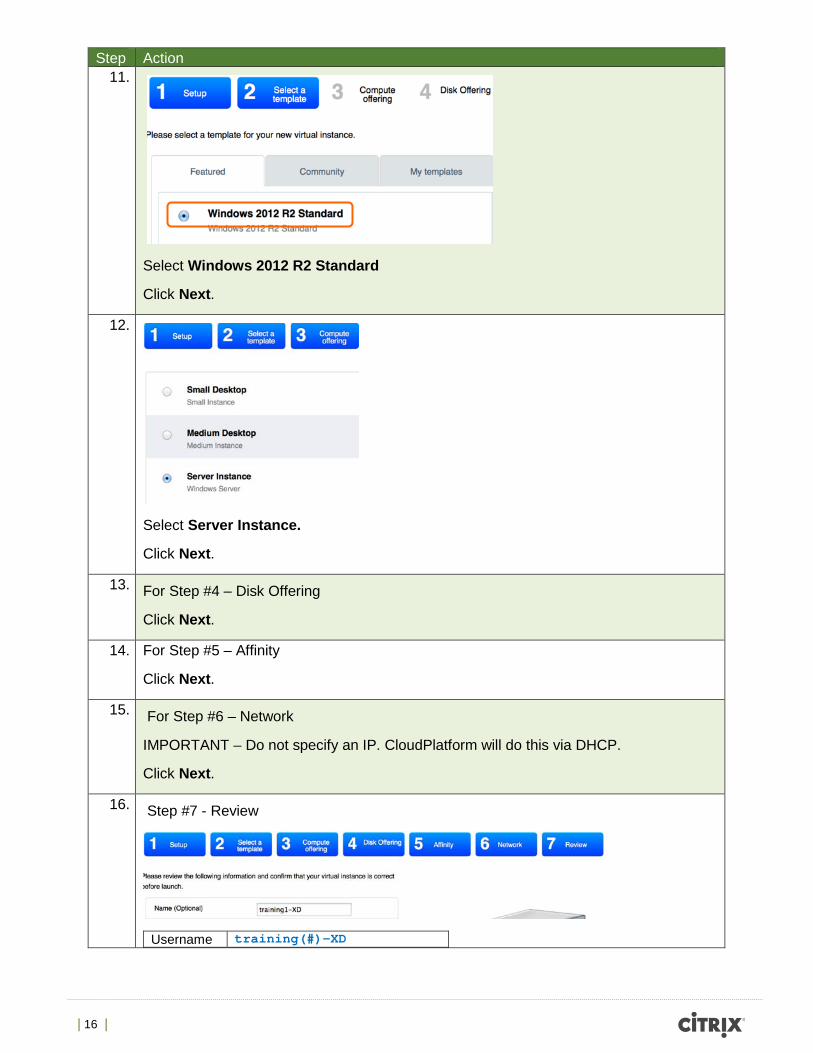
Step Action 11.
Select Windows 2012 R2 Standard
Click Next.
12.
Select Server Instance.
Click Next.
13. For Step #4 – Disk Offering
Click Next.
14. For Step #5 – Affinity
Click Next.
15. For Step #6 – Network
IMPORTANT – Do not specify an IP. CloudPlatform will do this via DHCP.
Click Next.
16. Step #7 - Review
Username training(#)-XD
| 17 |
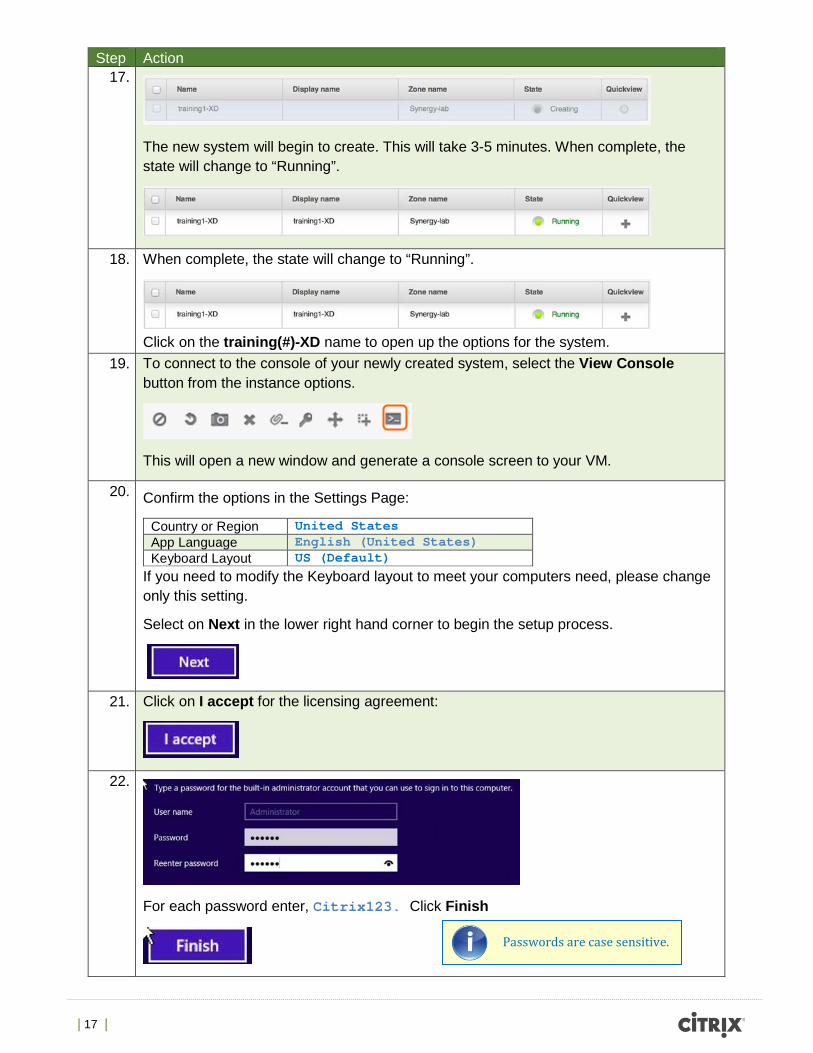
Step Action 17.
The new system will begin to create. This will take 3-5 minutes. When complete, the state will change to “Running”.
18. When complete, the state will change to “Running”.
Click on the training(#)-XD name to open up the options for the system.
19. To connect to the console of your newly created system, select the View Console button from the instance options.
This will open a new window and generate a console screen to your VM.
20. Confirm the options in the Settings Page:
Country or Region United States App Language English (United States) Keyboard Layout US (Default)
If you need to modify the Keyboard layout to meet your computers need, please change only this setting.
Select on Next in the lower right hand corner to begin the setup process.
21. Click on I accept for the licensing agreement:
22.
For each password enter, Citrix123. Click Finish
Passwords are case sensitive.

| 18 |
Step Action 23. Close the Console Session chrome window.
Select the NICs tab on the information screen for your VM in CloudPlatform.
Highlight the IP address of your VM
Click <CTRL-C> on your Keyboard to Copy the IP address.
24. On the Start Bar select the Remote Desktop Connection icon.
In the Compute field, on your keyboard type <CTRL-V> to Paste the IP address.
Click Connect.
25.
Enter the administrator password: Citrix123.

| 19 |
Step Action 26.
If you get the Network Pop-up about detecting additional devices. Click No.
27. In the Server Manager window, on the left hand side, click Local Server.
28. In the middle of the screen, next to Workgroup, select WORKGROUP.
| 20 |
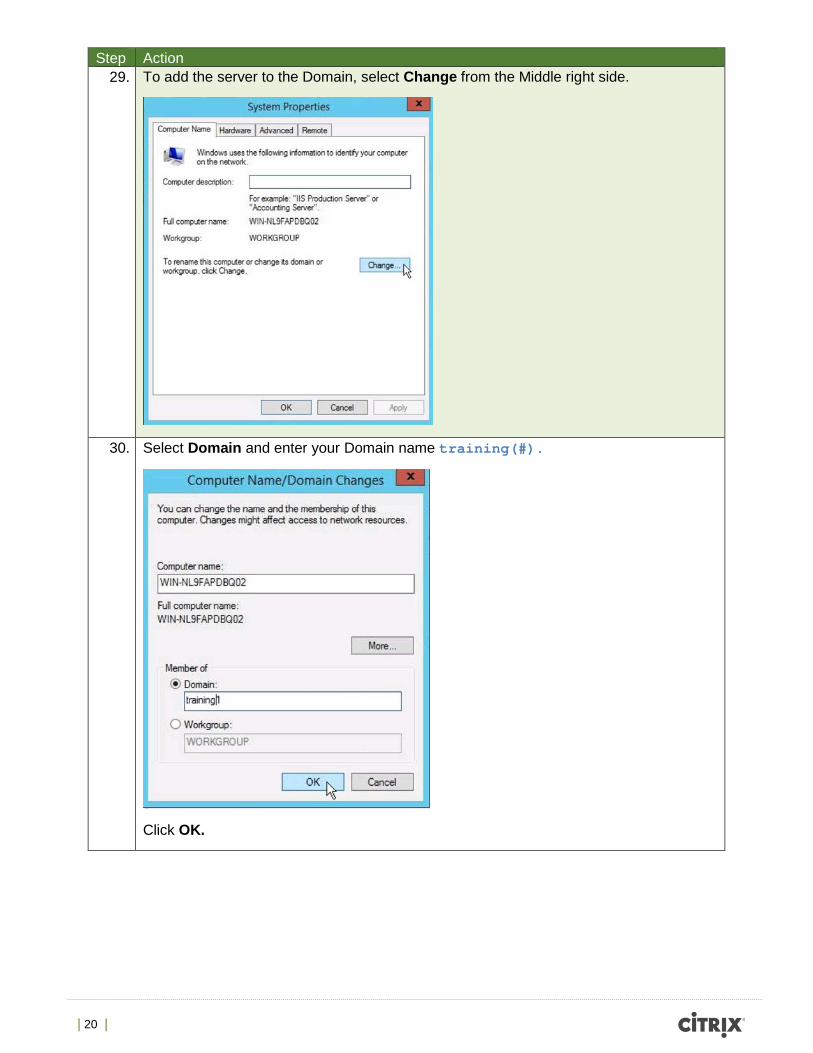
Step Action 29. To add the server to the Domain, select Change from the Middle right side.
30. Select Domain and enter your Domain name training(#).
Click OK.
| 21 |
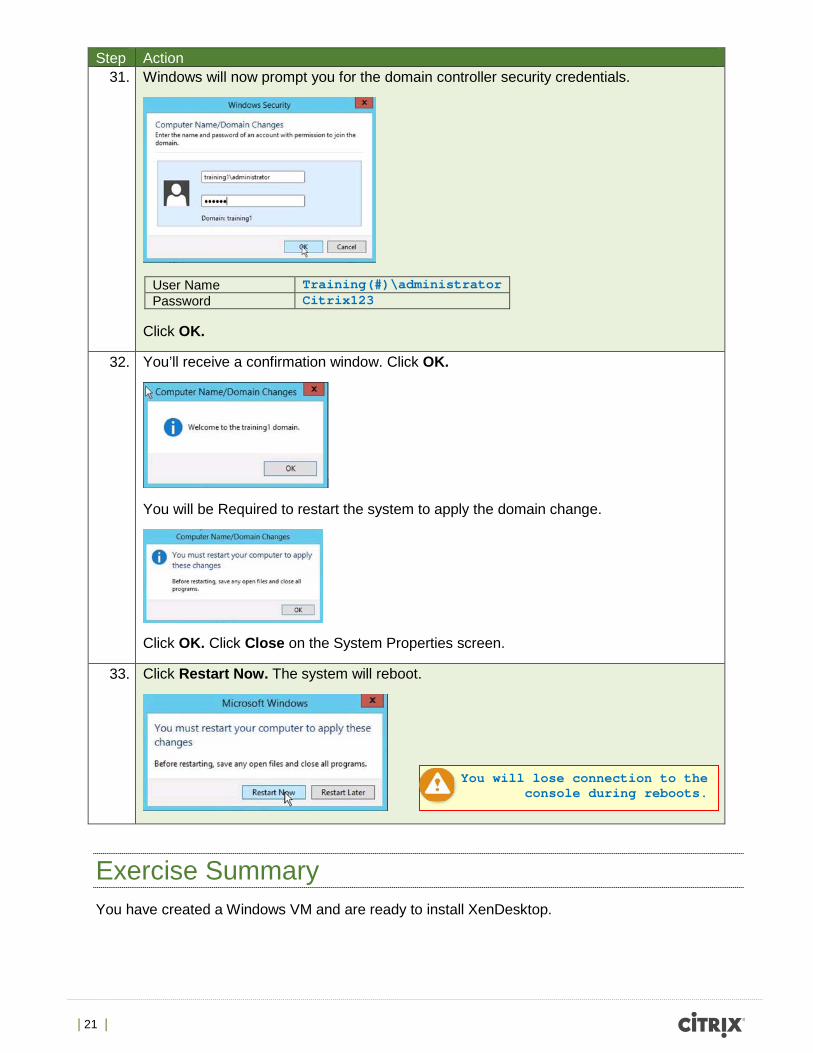
Step Action 31. Windows will now prompt you for the domain controller security credentials.
Click OK.
User Name Training(#)\administrator Password Citrix123
32. You’ll receive a confirmation window. Click OK.
You will be Required to restart the system to apply the domain change.
Click OK. Click Close on the System Properties screen.
33. Click Restart Now. The system will reboot.
Exercise Summary You have created a Windows VM and are ready to install XenDesktop.
You will lose connection to the console during reboots.

| 22 |
Exercise 4 Install XenDesktop on Your Windows VM Overview In this exercise you will:
• Install XenDesktop on the newly created Windows VM. This will become your primary XenDesktop server for integration to CloudPlatform.
Step by step guidance Estimated time to complete this exercise: X minutes.
Step Action 1. You will lose connection during the reboot.
Refresh your CloudPlatform window by selecting the Refresh Icon in the upper left handle corner of the Chrome window.
If CloudPlatform has timed out follow the next 3 steps.
If CloudPlatform has NOT time out, skip to step #5
2. Login to CloudPlatform using your User Credentials that were created in Exercise 1.
Login using the administrator access.
Username training(#) Password Citrix123 Domain XenDesktop
Click Login
3. The dashboard and options will look different. Click Instances from the left column.

| 23 |
Step Action 4. Select your Training-XD instance from the list and click on the name.
5. Select the Attach ISO button.
Select XenDesktop/XenApp 7.5 from the drop down
Click OK.
6. On the Start Bar select the Remote Desktop Connection icon.
In the Compute field, on your keyboard type <CTRL-V> to Paste the IP address.
Click Connect.

| 24 |
Step Action 7.
Enter the training(#)\administrator password: Citrix123.
8. Select the File Browser from the Start Bar:
9. You will see the XA and XD 7.5 ISO loaded in the CD drive. Double Click on the <D: Drive>
10. Click Start, next to XenDesktop:
The only difference between XenApp and XenDesktop is in the licensing. XenApp is available in
Platinum and Enterprise editions.
| 25 |
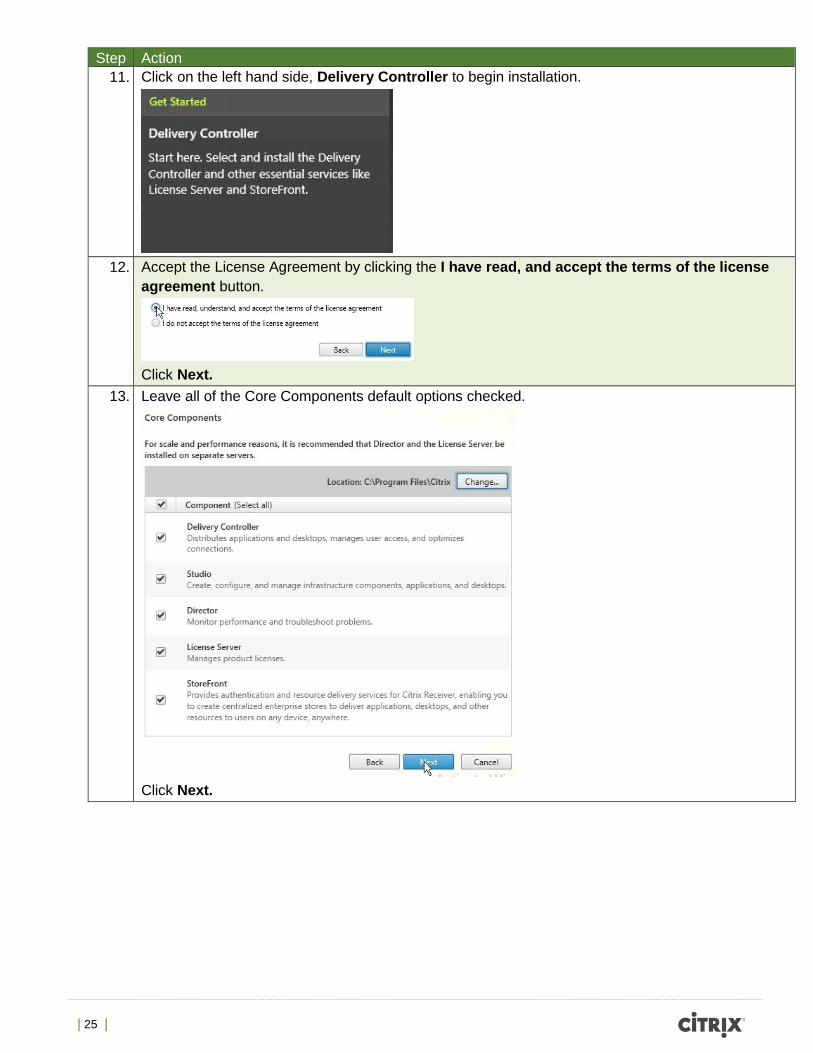
Step Action 11. Click on the left hand side, Delivery Controller to begin installation.
12. Accept the License Agreement by clicking the I have read, and accept the terms of the license
agreement button.
Click Next.
13. Leave all of the Core Components default options checked.
Click Next.
| 26 |
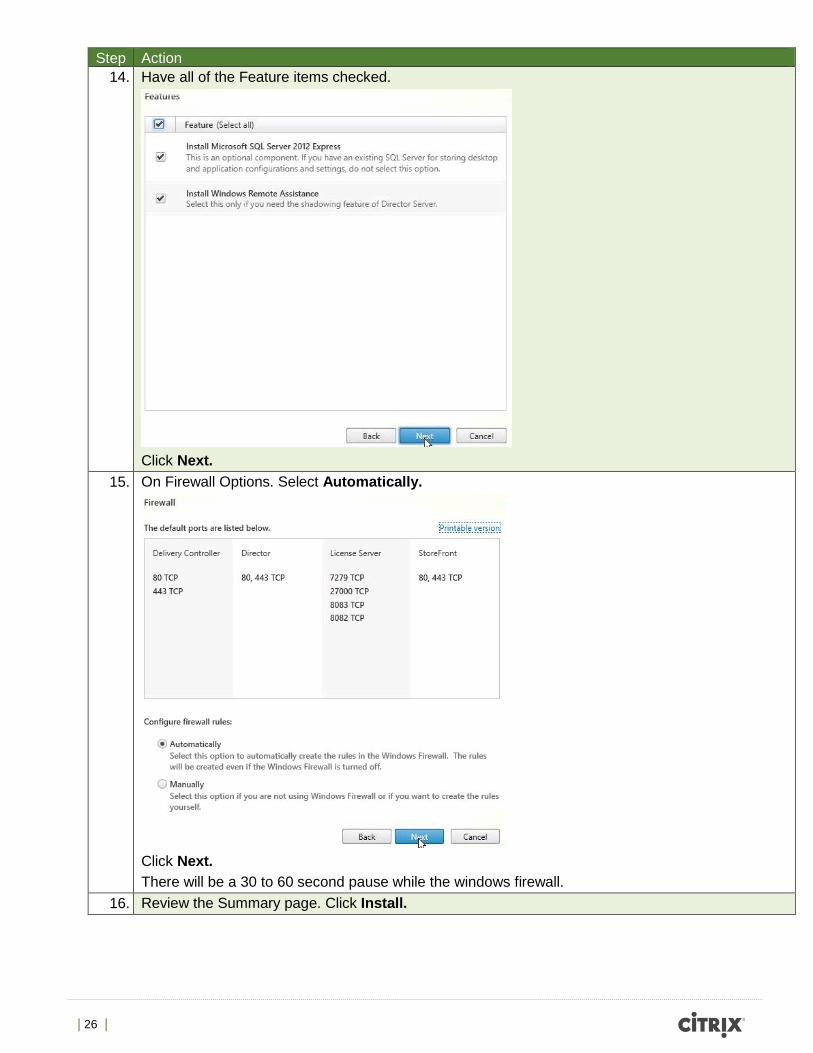
Step Action 14. Have all of the Feature items checked.
Click Next.
15. On Firewall Options. Select Automatically.
Click Next. There will be a 30 to 60 second pause while the windows firewall.
16. Review the Summary page. Click Install.

| 27 |
Step Action 17. The installation will take 15 minutes to complete.
Check Launch Studio. Click Finish.
Exercise 4 XenDesktop Configuration Overview In this exercise you will:
• Configure XenDesktop to communicate with CloudPlatform.
Step by step guidance Estimated time to complete this exercise: 15 minutes.
Step Action 1. Begin Site Setup by clicking, Deliver application and desktops to your users.

| 28 |
Step Action 2. Click A fully configured, production-ready Site (recommended for new users)
Enter Site name: CloudPlatform
Click Next.
3. On the Database Screen, leave all defaults and click Next. A Pop-up will show saying, “No database was found on the database server.”
Click OK.

| 29 |
Step Action 4. On the Licensing Screen, select Use the free 30-day trial
Click Next.
5. On your AD.Training(#) VM, Go back to your CloudPlatform session by Minimizing your remote Desktop Session.
Select the accounts tab on the left column of administrative options.
6. To confirm that setup is complete, you will now see your user in the list of accounts in the Account
screen:
Open the options of your account by clicking on the name training(#).

| 30 |
Step Action 7. Click View Users in the upper right hand side of the screen:
Click on your user name training(#) to open all details.
8. Highlight the entire API Key section.
Click <CTRL-C> on your Keyboard to Copy the API Key.
9. On the Start Bar select the Remote Desktop Connection icon.
This will Maximize your session to your VM.
The entire API key is very long and will scroll from left to right. Make sure that you copy the Entire Key for the next
step to work!

| 31 |
Step Action 10. On the connection screen for XenDesktop Site Setup
To Copy and Paste the Secret key, repeat steps 22-26 to copy before completing this screen.
Once all fields are complete, Click Next.
Connection Type Citrix CloudPlatform Connection Address http://10.88.156.27:8080/client/api API Key Click <CTRL-V> on your Keyboard to paste the API Key Secret Key Repeat Copy and Paste process from CloudPlatform User to here Connection Name CloudPlatform

| 32 |
Step Action 11. Virtual Machine Location should be set for:
• Create new virtual machines using Machine Creation Services
• Virtual Private Cloud: None
• Select an availibility zone: Synergy-lab
Click Next.
12. Name for these resources, enter Cloud.
defaultGuestNetwork should be checked.
Click Next.

| 33 |
Step Action 13. App-V Publishing will not be enabled for this exercise.
Select No under “Do you want to add App-V publishing server to this deployment?”
Click Next.
14. Review the Summary page.
Click Finish.
15. XenDesktop will return you to the Site Setup Wizard.
The number 1 should show “Configuration Successful”

| 34 |
Exercise Summary The XenDesktop system is now configured and able to communicate with CloudPlatform.

| 35 |
Exercise 5 Setup of XenDesktop Machine Catalog Overview In this exercise we will setup a XenDesktop Machine Catalog to deploy machine to CloudPlatform.
Step by step guidance Estimated time to complete this lab: 30 minutes.
Step Action 1. Click on the 2 – Set up machine for desktops and applications or remote PC
access.
2. On the Introduction page, Click Next.
3. Select Windows Desktop OS.
Click Next.
| 36 |
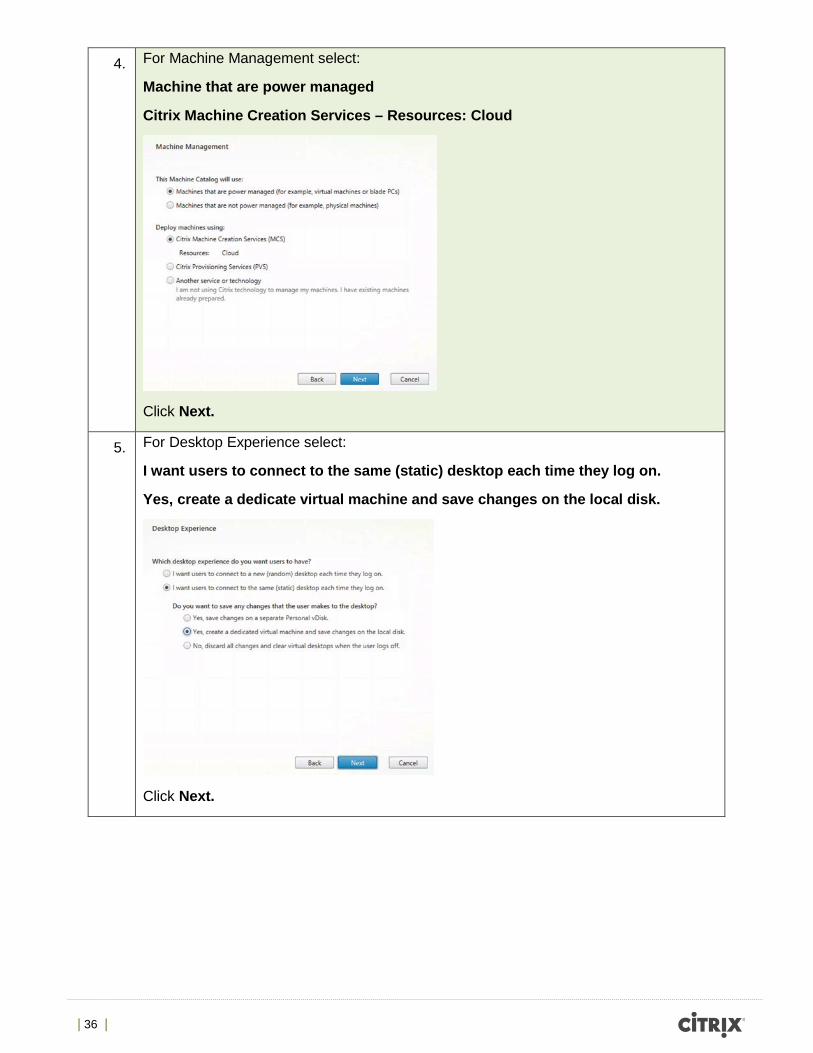
4. For Machine Management select:
Machine that are power managed
Citrix Machine Creation Services – Resources: Cloud
Click Next.
5. For Desktop Experience select:
I want users to connect to the same (static) desktop each time they log on.
Yes, create a dedicate virtual machine and save changes on the local disk.
Click Next.

| 37 |
6. Machine Template:
Select your Windows 7 VDI template.
Click Next.
7. Security:
Check default – Default Security Group
Click Use shared hardware
Click Next.

| 38 |
8. Virtual Machines:
Change “How many virtual machines…” to 2.
Select Medium
Click Next.
9. Network Interface Cards:
Leave all defaults.
Click Next.

| 39 |
10. Active Directory Compute Accounts:
Select the Computers OU from the OU list.
Account naming scheme: Cloud-VDA##
Click Next.
11. Summary:
Machine Catalog Name: CloudPlatform
Machine Catalog description for administrators: CloudPlatform VDA
Click Finish.

| 40 |
Revision: Change Description Updated By Date
1.0 Original Mathias Mullins May 2014
Please complete this survey
We value your feedback! Please take a moment to let us know about your training experience by completing the brief Learning Lab Survey
About Citrix Citrix (NASDAQ:CTXS) is a cloud company that enables mobile workstyles—empowering people to work and collaborate from anywhere, securely accessing apps and data on any of the latest devices, as easily as they would in their own office. Citrix solutions help IT and service providers build clouds, leveraging virtualization and networking technologies to deliver high-performance, elastic and cost-effective cloud services. With market-leading cloud solutions for mobility, desktop virtualization, networking, cloud platforms, collaboration and data sharing, Citrix helps organizations of all sizes achieve the speed and agility necessary to succeed in a mobile and dynamic world. Citrix products are in use at more than 330,000 organizations and by over 100 million users globally. Annual revenue in 2012 was $2.59 billion. Learn more at www.citrix.com.