Embed Size (px)
DESCRIPTION
Electrolux EOB 998
Citation preview
B u i l t - i n o v e n
STEAM
OPERATING INSTRUCTIONS
EOB 998
GB315 5285 03 / 02.01
2
Dear customer
Please read these operating instructions carefully.
Please make sure you read the safety instructions onthe first pages of these operating instructions! Keepthe operating instructions for future reference. Passthem on to any future owners.
With the warning triangle and/or by means ofkey words (Warning!, Caution!, Important!) ,information is emphasized which is importantfor your safety or the correct functioning of theappliance. It is essential that this information isobserved.
1. This symbol guides you step by step when opera-ting the appliance.
2. . . .
3. . . .
Next to this symbol you receive additional in-formation and practical tips on using the ap-pliance.
Tips and information about the economicaland environmentally friendly use of the ma-chine are marked with the clover.
These operating instructions contain information ab-out how to independently solve any problems whichmay arise. See ”Hints on technical problems”.
3
Content
Safety instructions 5. . . . . . . . . . . . . . . . . . . . . . . . . . . . . . . . . . . . . . . . . . . . . . . . . . . . . . . . . . . . . . . Electrical safety 5. . . . . . . . . . . . . . . . . . . . . . . . . . . . . . . . . . . . . . . . . . . . . . . . . . . . . . . . . . . . . . . . . . . . . . . . Child safety 5. . . . . . . . . . . . . . . . . . . . . . . . . . . . . . . . . . . . . . . . . . . . . . . . . . . . . . . . . . . . . . . . . . . . . . . . . . . Safety during use 5. . . . . . . . . . . . . . . . . . . . . . . . . . . . . . . . . . . . . . . . . . . . . . . . . . . . . . . . . . . . . . . . . . . . . . Safety when cleaning 5. . . . . . . . . . . . . . . . . . . . . . . . . . . . . . . . . . . . . . . . . . . . . . . . . . . . . . . . . . . . . . . . . . .
Disposal 6. . . . . . . . . . . . . . . . . . . . . . . . . . . . . . . . . . . . . . . . . . . . . . . . . . . . . . . . . . . . . . . . . . . . . . . . . Disposing of the packaging material 6. . . . . . . . . . . . . . . . . . . . . . . . . . . . . . . . . . . . . . . . . . . . . . . . . . . . . . Information on disposal 6. . . . . . . . . . . . . . . . . . . . . . . . . . . . . . . . . . . . . . . . . . . . . . . . . . . . . . . . . . . . . . . . .
The built–in oven 7. . . . . . . . . . . . . . . . . . . . . . . . . . . . . . . . . . . . . . . . . . . . . . . . . . . . . . . . . . . . . . . . Overall view 7. . . . . . . . . . . . . . . . . . . . . . . . . . . . . . . . . . . . . . . . . . . . . . . . . . . . . . . . . . . . . . . . . . . . . . . . . . . Control panel 7. . . . . . . . . . . . . . . . . . . . . . . . . . . . . . . . . . . . . . . . . . . . . . . . . . . . . . . . . . . . . . . . . . . . . . . . . . Fittings 8. . . . . . . . . . . . . . . . . . . . . . . . . . . . . . . . . . . . . . . . . . . . . . . . . . . . . . . . . . . . . . . . . . . . . . . . . . . . . . . Oven accessories 8. . . . . . . . . . . . . . . . . . . . . . . . . . . . . . . . . . . . . . . . . . . . . . . . . . . . . . . . . . . . . . . . . . . . . .
Prior to using for the first time 9. . . . . . . . . . . . . . . . . . . . . . . . . . . . . . . . . . . . . . . . . . . . . . . . . . . . Daytime setting 9. . . . . . . . . . . . . . . . . . . . . . . . . . . . . . . . . . . . . . . . . . . . . . . . . . . . . . . . . . . . . . . . . . . . . . . . First cleaning 9. . . . . . . . . . . . . . . . . . . . . . . . . . . . . . . . . . . . . . . . . . . . . . . . . . . . . . . . . . . . . . . . . . . . . . . . . . First heating up 9. . . . . . . . . . . . . . . . . . . . . . . . . . . . . . . . . . . . . . . . . . . . . . . . . . . . . . . . . . . . . . . . . . . . . . . .
The electronic oven function control 10. . . . . . . . . . . . . . . . . . . . . . . . . . . . . . . . . . . . . . . . . . . . . . The display 10. . . . . . . . . . . . . . . . . . . . . . . . . . . . . . . . . . . . . . . . . . . . . . . . . . . . . . . . . . . . . . . . . . . . . . . . . . . General information on using and indication elements 10. . . . . . . . . . . . . . . . . . . . . . . . . . . . . . . . . . . . . . Oven functions 11. . . . . . . . . . . . . . . . . . . . . . . . . . . . . . . . . . . . . . . . . . . . . . . . . . . . . . . . . . . . . . . . . . . . . . . .
Oven switch on and off 12. . . . . . . . . . . . . . . . . . . . . . . . . . . . . . . . . . . . . . . . . . . . . . . . . . . . . . . . . . . . . . Oven functions setting 12. . . . . . . . . . . . . . . . . . . . . . . . . . . . . . . . . . . . . . . . . . . . . . . . . . . . . . . . . . . . . .
Oven temperature setting 12. . . . . . . . . . . . . . . . . . . . . . . . . . . . . . . . . . . . . . . . . . . . . . . . . . . . . . . . . . . . . . . Timer/short–term alarm 13. . . . . . . . . . . . . . . . . . . . . . . . . . . . . . . . . . . . . . . . . . . . . . . . . . . . . . . . . . . . . . . . . Automatic programs 14. . . . . . . . . . . . . . . . . . . . . . . . . . . . . . . . . . . . . . . . . . . . . . . . . . . . . . . . . . . . . . . . . . . . Automatic switch–off 14. . . . . . . . . . . . . . . . . . . . . . . . . . . . . . . . . . . . . . . . . . . . . . . . . . . . . . . . . . . . . . . . . . .
Automatic switch–on / off 16. . . . . . . . . . . . . . . . . . . . . . . . . . . . . . . . . . . . . . . . . . . . . . . . . . . . . . . . . . . . Steam cooking 17. . . . . . . . . . . . . . . . . . . . . . . . . . . . . . . . . . . . . . . . . . . . . . . . . . . . . . . . . . . . . . . . . . . . . Interval cooking 18. . . . . . . . . . . . . . . . . . . . . . . . . . . . . . . . . . . . . . . . . . . . . . . . . . . . . . . . . . . . . . . . . . . . Meat probe 19. . . . . . . . . . . . . . . . . . . . . . . . . . . . . . . . . . . . . . . . . . . . . . . . . . . . . . . . . . . . . . . . . . . . . . . .
Children safety device 20. . . . . . . . . . . . . . . . . . . . . . . . . . . . . . . . . . . . . . . . . . . . . . . . . . . . . . . . . . . . . . . . . . Service symbol 20. . . . . . . . . . . . . . . . . . . . . . . . . . . . . . . . . . . . . . . . . . . . . . . . . . . . . . . . . . . . . . . . . . . . . . . .
Hints on the application of the oven functions 21. . . . . . . . . . . . . . . . . . . . . . . . . . . . . . . . . . . . . Steam cooking 21. . . . . . . . . . . . . . . . . . . . . . . . . . . . . . . . . . . . . . . . . . . . . . . . . . . . . . . . . . . . . . . . . . . . . . . .
Hot air and steam cooking in succession 21. . . . . . . . . . . . . . . . . . . . . . . . . . . . . . . . . . . . . . . . . . . . . . Interval cooking 22. . . . . . . . . . . . . . . . . . . . . . . . . . . . . . . . . . . . . . . . . . . . . . . . . . . . . . . . . . . . . . . . . . . .
Hot air 22. . . . . . . . . . . . . . . . . . . . . . . . . . . . . . . . . . . . . . . . . . . . . . . . . . . . . . . . . . . . . . . . . . . . . . . . . . . . . . . . Pizza setting 22. . . . . . . . . . . . . . . . . . . . . . . . . . . . . . . . . . . . . . . . . . . . . . . . . . . . . . . . . . . . . . . . . . . . . . . . . . Grilling 23. . . . . . . . . . . . . . . . . . . . . . . . . . . . . . . . . . . . . . . . . . . . . . . . . . . . . . . . . . . . . . . . . . . . . . . . . . . . . . .
Turbo grill 23. . . . . . . . . . . . . . . . . . . . . . . . . . . . . . . . . . . . . . . . . . . . . . . . . . . . . . . . . . . . . . . . . . . . . . . . . Small surface grill 24. . . . . . . . . . . . . . . . . . . . . . . . . . . . . . . . . . . . . . . . . . . . . . . . . . . . . . . . . . . . . . . . . . Large surface grill 24. . . . . . . . . . . . . . . . . . . . . . . . . . . . . . . . . . . . . . . . . . . . . . . . . . . . . . . . . . . . . . . . . .
Top- and bottom heat 24. . . . . . . . . . . . . . . . . . . . . . . . . . . . . . . . . . . . . . . . . . . . . . . . . . . . . . . . . . . . . . . . . . . Drying 24. . . . . . . . . . . . . . . . . . . . . . . . . . . . . . . . . . . . . . . . . . . . . . . . . . . . . . . . . . . . . . . . . . . . . . . . . . . . . . . . Low temperature cooking 25. . . . . . . . . . . . . . . . . . . . . . . . . . . . . . . . . . . . . . . . . . . . . . . . . . . . . . . . . . . . . . . Sterilizing 25. . . . . . . . . . . . . . . . . . . . . . . . . . . . . . . . . . . . . . . . . . . . . . . . . . . . . . . . . . . . . . . . . . . . . . . . . . . . .
General information on roasting, baking and steam cooking 26. . . . . . . . . . . . . . . . . . . . . . . .
4
Cleaning and care 27. . . . . . . . . . . . . . . . . . . . . . . . . . . . . . . . . . . . . . . . . . . . . . . . . . . . . . . . . . . . . . . . Clean enamelled cavity 27. . . . . . . . . . . . . . . . . . . . . . . . . . . . . . . . . . . . . . . . . . . . . . . . . . . . . . . . . . . . . . . . .
Baking sheets, wire shelves 27. . . . . . . . . . . . . . . . . . . . . . . . . . . . . . . . . . . . . . . . . . . . . . . . . . . . . . . . . Roasting grids and steam generator cover 27. . . . . . . . . . . . . . . . . . . . . . . . . . . . . . . . . . . . . . . . . . . . . Oven runners 28. . . . . . . . . . . . . . . . . . . . . . . . . . . . . . . . . . . . . . . . . . . . . . . . . . . . . . . . . . . . . . . . . . . . . .
Steam generation system 28. . . . . . . . . . . . . . . . . . . . . . . . . . . . . . . . . . . . . . . . . . . . . . . . . . . . . . . . . . . . . . . Control panel and oven door 29. . . . . . . . . . . . . . . . . . . . . . . . . . . . . . . . . . . . . . . . . . . . . . . . . . . . . . . . . . . .
High–grade steel exterior 29. . . . . . . . . . . . . . . . . . . . . . . . . . . . . . . . . . . . . . . . . . . . . . . . . . . . . . . . . . . .
Replacement of oven lamp 30. . . . . . . . . . . . . . . . . . . . . . . . . . . . . . . . . . . . . . . . . . . . . . . . . . . . . . . .
Useful hints on practical problems 31. . . . . . . . . . . . . . . . . . . . . . . . . . . . . . . . . . . . . . . . . . . . . . . .
Hints on technical problems 31. . . . . . . . . . . . . . . . . . . . . . . . . . . . . . . . . . . . . . . . . . . . . . . . . . . . . .
Installation instructions 32. . . . . . . . . . . . . . . . . . . . . . . . . . . . . . . . . . . . . . . . . . . . . . . . . . . . . . . . . . Building in 32. . . . . . . . . . . . . . . . . . . . . . . . . . . . . . . . . . . . . . . . . . . . . . . . . . . . . . . . . . . . . . . . . . . . . . . . . . . . Mains connection 32. . . . . . . . . . . . . . . . . . . . . . . . . . . . . . . . . . . . . . . . . . . . . . . . . . . . . . . . . . . . . . . . . . . . . .
Technical data 33. . . . . . . . . . . . . . . . . . . . . . . . . . . . . . . . . . . . . . . . . . . . . . . . . . . . . . . . . . . . . . . . . . . Directives 33. . . . . . . . . . . . . . . . . . . . . . . . . . . . . . . . . . . . . . . . . . . . . . . . . . . . . . . . . . . . . . . . . . . . . . . . . . . . .
Steam cooking table 34. . . . . . . . . . . . . . . . . . . . . . . . . . . . . . . . . . . . . . . . . . . . . . . . . . . . . . . . . . . . . . Interval cooking 35. . . . . . . . . . . . . . . . . . . . . . . . . . . . . . . . . . . . . . . . . . . . . . . . . . . . . . . . . . . . . . . . . . . . . . . . Hot air and steam cooking in succession 35. . . . . . . . . . . . . . . . . . . . . . . . . . . . . . . . . . . . . . . . . . . . . . . . . .
Baking and roasting table 36. . . . . . . . . . . . . . . . . . . . . . . . . . . . . . . . . . . . . . . . . . . . . . . . . . . . . . . . Low temperature cooking 38. . . . . . . . . . . . . . . . . . . . . . . . . . . . . . . . . . . . . . . . . . . . . . . . . . . . . . . . . . . . . . . Pizza setting 39. . . . . . . . . . . . . . . . . . . . . . . . . . . . . . . . . . . . . . . . . . . . . . . . . . . . . . . . . . . . . . . . . . . . . . . . . . Turbo grill 39. . . . . . . . . . . . . . . . . . . . . . . . . . . . . . . . . . . . . . . . . . . . . . . . . . . . . . . . . . . . . . . . . . . . . . . . . . . . . Grilling table 39. . . . . . . . . . . . . . . . . . . . . . . . . . . . . . . . . . . . . . . . . . . . . . . . . . . . . . . . . . . . . . . . . . . . . . . . . . Sterilizing table 40. . . . . . . . . . . . . . . . . . . . . . . . . . . . . . . . . . . . . . . . . . . . . . . . . . . . . . . . . . . . . . . . . . . . . . . . Drying table 40. . . . . . . . . . . . . . . . . . . . . . . . . . . . . . . . . . . . . . . . . . . . . . . . . . . . . . . . . . . . . . . . . . . . . . . . . . .
5
Safety instructionsThe safety aspects of this appliance comply with the accepted technical standards and the applicable safety regula-tions. Nevertheless, we consider it our obligation to make you aware of the following safety information:
Electrical safety
The connection to the power supply must exclus-ively be carried out by expert electricians. More-over, electrical safety has to be ensured by expertinstallation in standard built-in cabinets.
• Damaged appliances must not be used. Fuse to becut off or unscrewed in case of trouble or failure.
• For safety reasons repairing, in particular at liveparts of the appliance, has to be carried out by ex-pert electricians or trained service techniciansonly, as potential danger will result for the user. Ifa fault occurs, please contact our after–sales–ser-vice.
• The appliance must only be used when installed.This prevents contact with live electrical compo-nents.
Child safety
Always keep small children away. Make sure that play-ing children do not operate the appliance.
Safety during use
This appliance is intended for domestic cookingonly. It is not desi gned for commercial or industrialpurposes.
• Prior to first use the oven must be heated up once.Take care for a sufficient space ventilation.
• The oven bottom must not be covered with alu-foil.The heat will accumulate and may cause damageto the material.
• During steam cooking the oven door should re-main closed. Damage to furniture could be causedby escaping steam. Avoid direct contact with theescaping steam.
• In case of careless handling there is danger ofburning oneself at the heating elements in theoven.
• When taking out the hot items do absolutely makeuse of pot or thermo-gloves.
• The opened oven door must not be burdened tooheavily, do not sit or step on it.
• Besides the accessories supplied with the unit doexclusively make use of suitable and tempera-ture–resistant baking tins and roasting dishes. Doplease follow the manufacturers’ instructions.
• After use make sure that the appliance is switchedoff.
Safety when cleaning
• No heating element must be switched on duringthe cleaning procedure. Make sure that the ovenhas cooled down in a way that one may get in touchwith interior parts without any danger.
• Always keep the oven clean. When heating up fatsplashes and spots will cause inconvenientodours.
• Ensure clean sealing surfaces at door and doorframe.
• There is danger of injury near the hinge of the ovendoor. The door should therefore only be removedand fitted by a qualified customer service techni-cian.
• High–pressure cleaning units are not suitable forcleaning because of the requirements of electricalsafety.
6
Disposal
Disposing of the
packaging material
All packaging material can be recycled, shee-ting and hard foam parts are appropriatelymarked. Please dispose of the packaging ma-terial and any old appliance properly. Please observe national and regional regula-tions on appliances and packaging material,and the markings on the materials (materialseparation, waste collections, recycling de-pots).
Information on disposal
The appliance must not be disposed of withhousehold rubbish.You can obtain information about collectiondates or public tips from your local refuse de-partment or council.
Important! Please make old appliances un-usable prior to disposal. Cut off the mains ca-ble.

7
The built-in oven
Overall view
Control panel with electronic clock
Full glass oven door
Oven–door handle
Control panel
1 2 7 93 4 5 6 8 1011
Program buttons
1. ON
2. OFF
3. Children safety
4. Meat probe
5. Oven functions
6. +/– temperature and time setting
7. Duration
8. End of duration
9. Timer/short–term alarm
10. Daytime
11. Water drawer
8
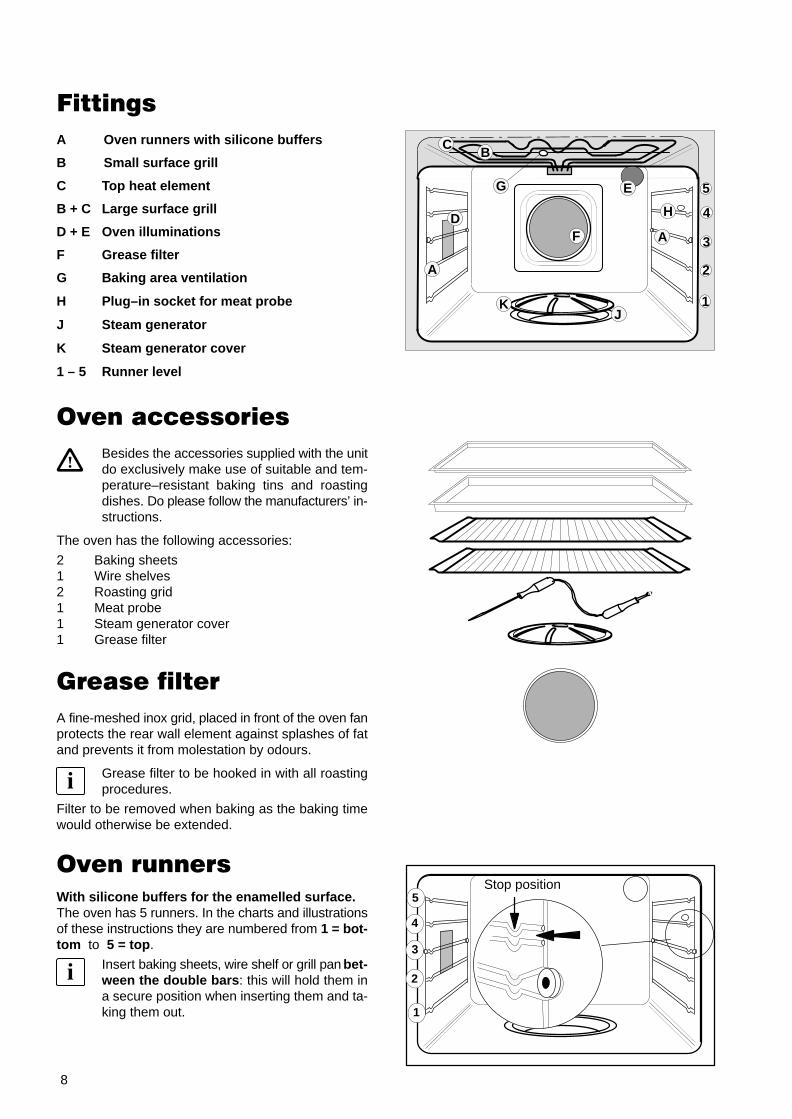
Fittings
A Oven runners with silicone buffers
B Small surface grill
C Top heat element
B + C Large surface grill
D + E Oven illuminations
F Grease filter
G Baking area ventilation
H Plug–in socket for meat probe
J Steam generator
K Steam generator cover
1 – 5 Runner level
Oven accessories
Besides the accessories supplied with the unitdo exclusively make use of suitable and tem-perature–resistant baking tins and roastingdishes. Do please follow the manufacturers’ in-structions.
The oven has the following accessories:
2 Baking sheets1 Wire shelves2 Roasting grid1 Meat probe1 Steam generator cover1 Grease filter
Grease filter
A fine-meshed inox grid, placed in front of the oven fanprotects the rear wall element against splashes of fatand prevents it from molestation by odours.
Grease filter to be hooked in with all roastingprocedures.
Filter to be removed when baking as the baking timewould otherwise be extended.
Oven runners
With silicone buffers for the enamelled surface.The oven has 5 runners. In the charts and illustrationsof these instructions they are numbered from 1 = bot-tom to 5 = top .
Insert baking sheets, wire shelf or grill pan bet-ween the double bars : this will hold them ina secure position when inserting them and ta-king them out.
5
4
3
2
1
E
CB
G
J
A
DAF
H
K
5
3
2
1
4
Stop position
9
Prior to using for the first time
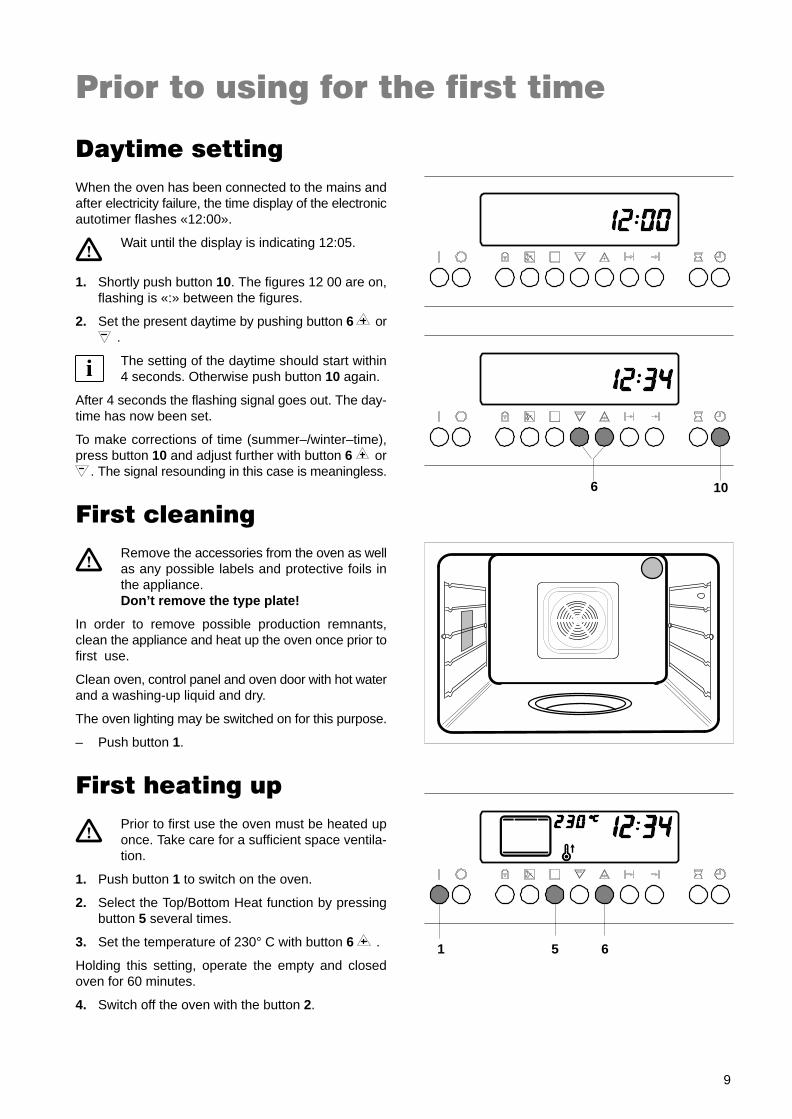
Daytime setting
When the oven has been connected to the mains andafter electricity failure, the time display of the electronicautotimer flashes «12:00».
Wait until the display is indicating 12:05.
1. Shortly push button 10. The figures 12 00 are on,flashing is «:» between the figures.
2. Set the present daytime by pushing button 6 or .
The setting of the daytime should start within4 seconds. Otherwise push button 10 again.
After 4 seconds the flashing signal goes out. The day-time has now been set.
To make corrections of time (summer–/winter–time),press button 10 and adjust further with button 6 or
. The signal resounding in this case is meaningless.
First cleaning
Remove the accessories from the oven as wellas any possible labels and protective foils inthe appliance.Don’t remove the type plate!
In order to remove possible production remnants,clean the appliance and heat up the oven once prior tofirst use.
Clean oven, control panel and oven door with hot waterand a washing-up liquid and dry.
The oven lighting may be switched on for this purpose.
– Push button 1.
First heating up
Prior to first use the oven must be heated uponce. Take care for a sufficient space ventila-tion.
1. Push button 1 to switch on the oven.
2. Select the Top/Bottom Heat function by pressingbutton 5 several times.
3. Set the temperature of 230° C with button 6 .
Holding this setting, operate the empty and closedoven for 60 minutes.
4. Switch off the oven with the button 2.
106
1 65
10
The electronic oven function control
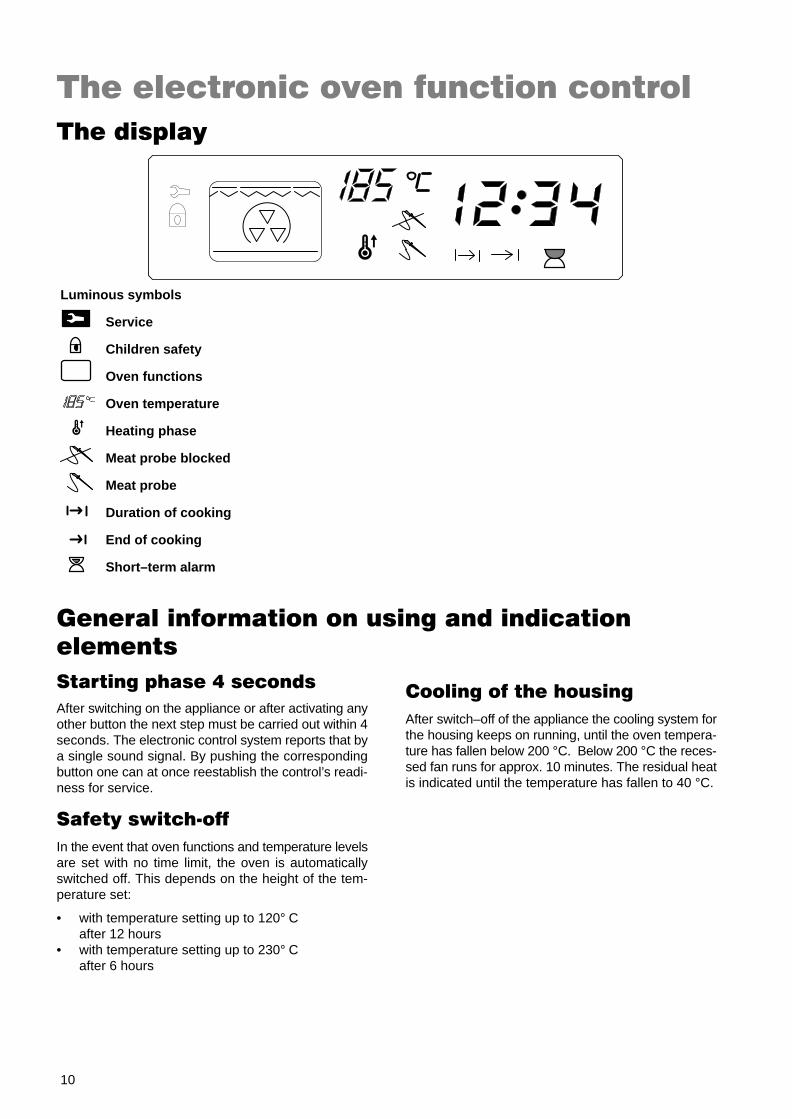
The display
Luminous symbols
Service
Children safety
Oven functions
Oven temperature
Heating phase
Meat probe blocked
Meat probe
Duration of cooking
End of cooking
Short–term alarm
General information on using and indicationelements
Starting phase 4 seconds
After switching on the appliance or after activating anyother button the next step must be carried out within 4seconds. The electronic control system reports that bya single sound signal. By pushing the correspondingbutton one can at once reestablish the control’s readi-ness for service.
Safety switch�off
In the event that oven functions and temperature levelsare set with no time limit, the oven is automaticallyswitched off. This depends on the height of the tem-perature set:
• with temperature setting up to 120° C after 12 hours
• with temperature setting up to 230° C after 6 hours
Cooling of the housing
After switch–off of the appliance the cooling system forthe housing keeps on running, until the oven tempera-ture has fallen below 200 °C. Below 200 °C the reces-sed fan runs for approx. 10 minutes. The residual heatis indicated until the temperature has fallen to 40 °C.
11
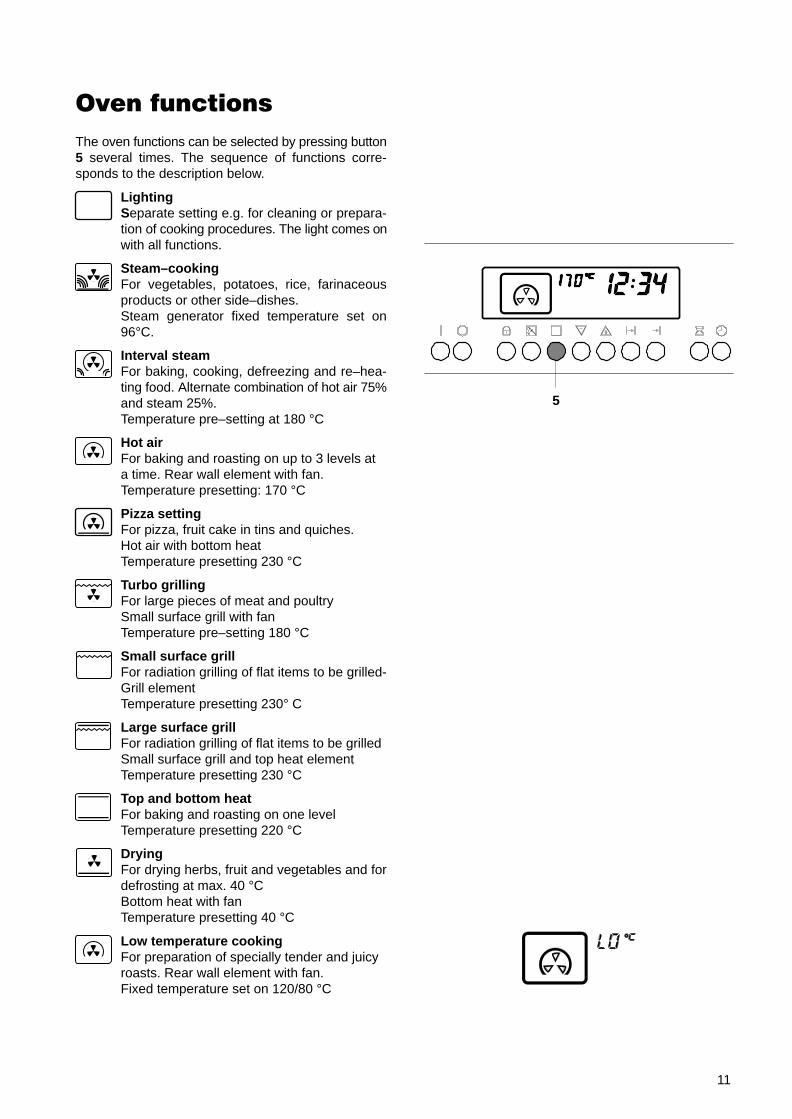
Oven functions
The oven functions can be selected by pressing button5 several times. The sequence of functions corre-sponds to the description below.
LightingSeparate setting e.g. for cleaning or prepara-tion of cooking procedures. The light comes onwith all functions.
Steam–cookingFor vegetables, potatoes, rice, farinaceousproducts or other side–dishes.Steam generator fixed temperature set on96°C.
Interval steamFor baking, cooking, defreezing and re–hea-ting food. Alternate combination of hot air 75%and steam 25%.Temperature pre–setting at 180 °C
Hot airFor baking and roasting on up to 3 levels ata time. Rear wall element with fan. Temperature presetting: 170 °C
Pizza setting For pizza, fruit cake in tins and quiches.Hot air with bottom heat Temperature presetting 230 °C
Turbo grilling For large pieces of meat and poultrySmall surface grill with fanTemperature pre–setting 180 °C
Small surface grillFor radiation grilling of flat items to be grilled-Grill elementTemperature presetting 230° C
Large surface grillFor radiation grilling of flat items to be grilledSmall surface grill and top heat elementTemperature presetting 230 °C
Top and bottom heatFor baking and roasting on one levelTemperature presetting 220 °C
DryingFor drying herbs, fruit and vegetables and fordefrosting at max. 40 °CBottom heat with fanTemperature presetting 40 °C
Low temperature cookingFor preparation of specially tender and juicyroasts. Rear wall element with fan.Fixed temperature set on 120/80 °C
5

12
Oven switch on and off
– Switch on the oven with button 1.
Prior to settings of function and temperature theswitch–on button 1 has to be pushed.Exception: Timer.
A triple short sound signal refers you to wrongsettings. In such a case push button 2 and re-start with button 1.
The cooking methods and oven temperatures areswitched on with the electronic control system andswitched off at the time desired either manually withbutton 2 or automatically at the end of a programmedsequence.
– Switch off the oven with button 2.
Oven functions setting
The functions steam–cooking, interval–cooking, hotair, pizza setting, surface grill and top –/bottom heatmay alternatively be utilized for various preparations.
– Select the required oven function by pressing but-ton 5 several times. The symbol for the desiredfunction comes on in the display.
A practice–oriented temperature value is related toeach method of cooking. Without any different temper-ature setting the function will be switched on after 4 se-conds.
Oven temperature
setting
Together with the oven function a preset temperatureshows up in the display.
– Set with button 6 or a temperature between40 and 230°C.
The desired temperature shows up in the display. To-gether with the functions hot air, pizza setting and top–/bottom heat the symbol «Heating phase» 12 flashes.
When the temperature is reached, a signal tonesounds and the «Heating phase» symbol 12 is extin-guished.
521
612
13
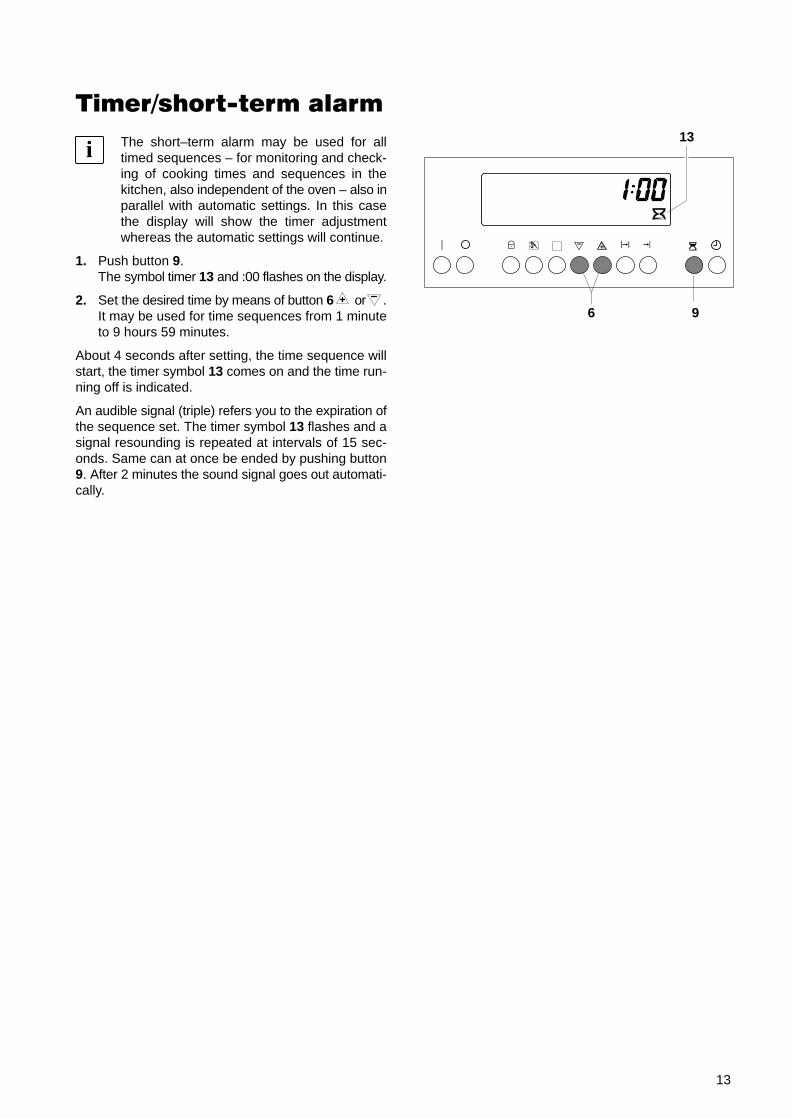
Timer/short-term alarm
The short–term alarm may be used for alltimed sequences – for monitoring and check-ing of cooking times and sequences in thekitchen, also independent of the oven – also inparallel with automatic settings. In this casethe display will show the timer adjustmentwhereas the automatic settings will continue.
1. Push button 9. The symbol timer 13 and :00 flashes on the display.
2. Set the desired time by means of button 6 or .It may be used for time sequences from 1 minuteto 9 hours 59 minutes.
About 4 seconds after setting, the time sequence willstart, the timer symbol 13 comes on and the time run-ning off is indicated.
An audible signal (triple) refers you to the expiration ofthe sequence set. The timer symbol 13 flashes and asignal resounding is repeated at intervals of 15 sec-onds. Same can at once be ended by pushing button9. After 2 minutes the sound signal goes out automati-cally.
6 9
13
14
Automatic programs
Important!Before the setting of automatic programs func-tion and temperature will have to be set. With-out this presetting the electronic control sys-tem will not take over any setting of time.
Automatic switch-off
The programs duration of cooking and switch-offtime start at once after time setting and are automati-cally switched off after expiration of that time. The ovenis in operation from setting the time until reachingswitch–off time.
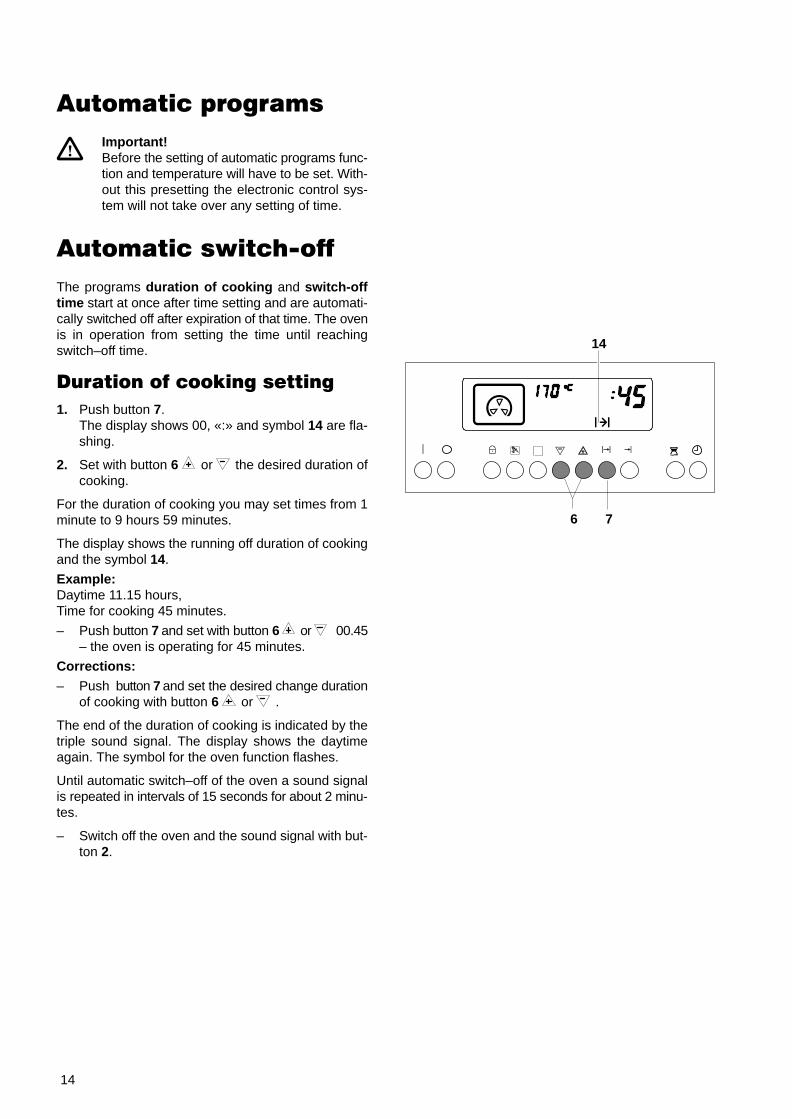
Duration of cooking setting
1. Push button 7. The display shows 00, «:» and symbol 14 are fla-shing.
2. Set with button 6 or the desired duration ofcooking.
For the duration of cooking you may set times from 1minute to 9 hours 59 minutes.
The display shows the running off duration of cookingand the symbol 14.
Example:Daytime 11.15 hours,Time for cooking 45 minutes.
– Push button 7 and set with button 6 or 00.45– the oven is operating for 45 minutes.
Corrections:– Push button 7 and set the desired change duration
of cooking with button 6 or .
The end of the duration of cooking is indicated by thetriple sound signal. The display shows the daytimeagain. The symbol for the oven function flashes.
Until automatic switch–off of the oven a sound signalis repeated in intervals of 15 seconds for about 2 minu-tes.
– Switch off the oven and the sound signal with but-ton 2.
6 7
14
15
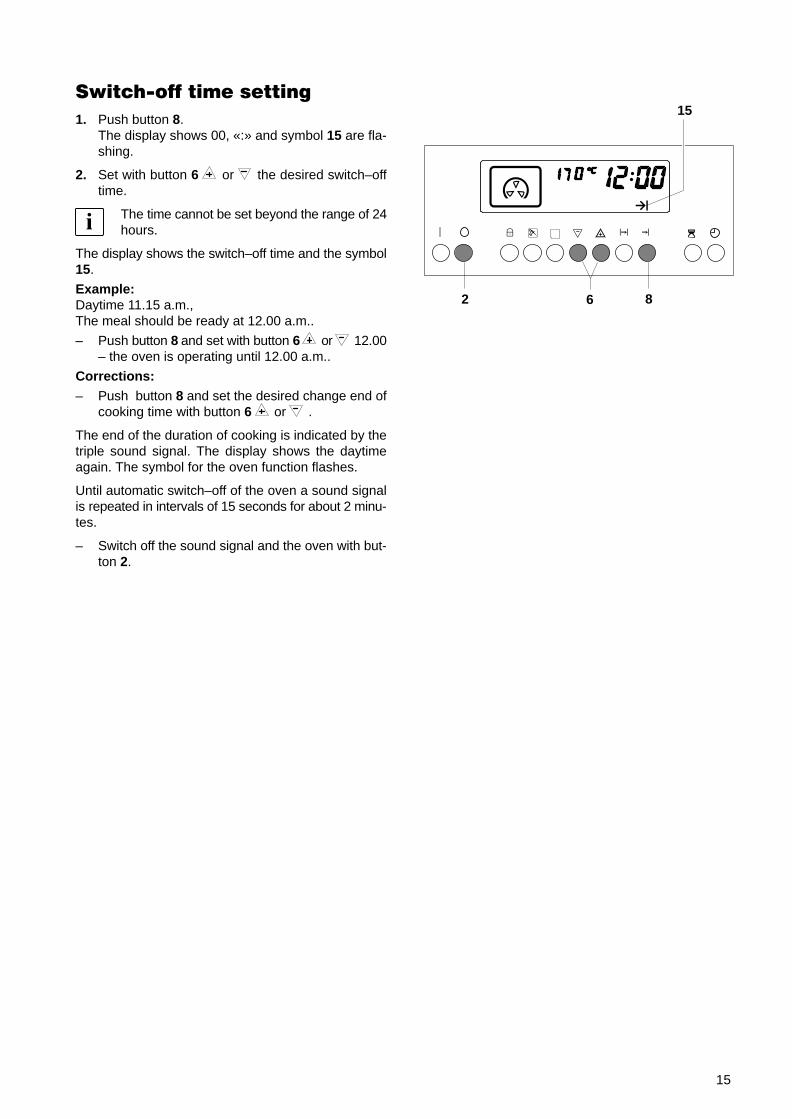
Switch-off time setting
1. Push button 8. The display shows 00, «:» and symbol 15 are fla-shing.
2. Set with button 6 or the desired switch–offtime.
The time cannot be set beyond the range of 24hours.
The display shows the switch–off time and the symbol15.
Example:Daytime 11.15 a.m.,The meal should be ready at 12.00 a.m..
– Push button 8 and set with button 6 or 12.00– the oven is operating until 12.00 a.m..
Corrections:– Push button 8 and set the desired change end of
cooking time with button 6 or .
The end of the duration of cooking is indicated by thetriple sound signal. The display shows the daytimeagain. The symbol for the oven function flashes.
Until automatic switch–off of the oven a sound signalis repeated in intervals of 15 seconds for about 2 minu-tes.
– Switch off the sound signal and the oven with but-ton 2.
86
15
2
16
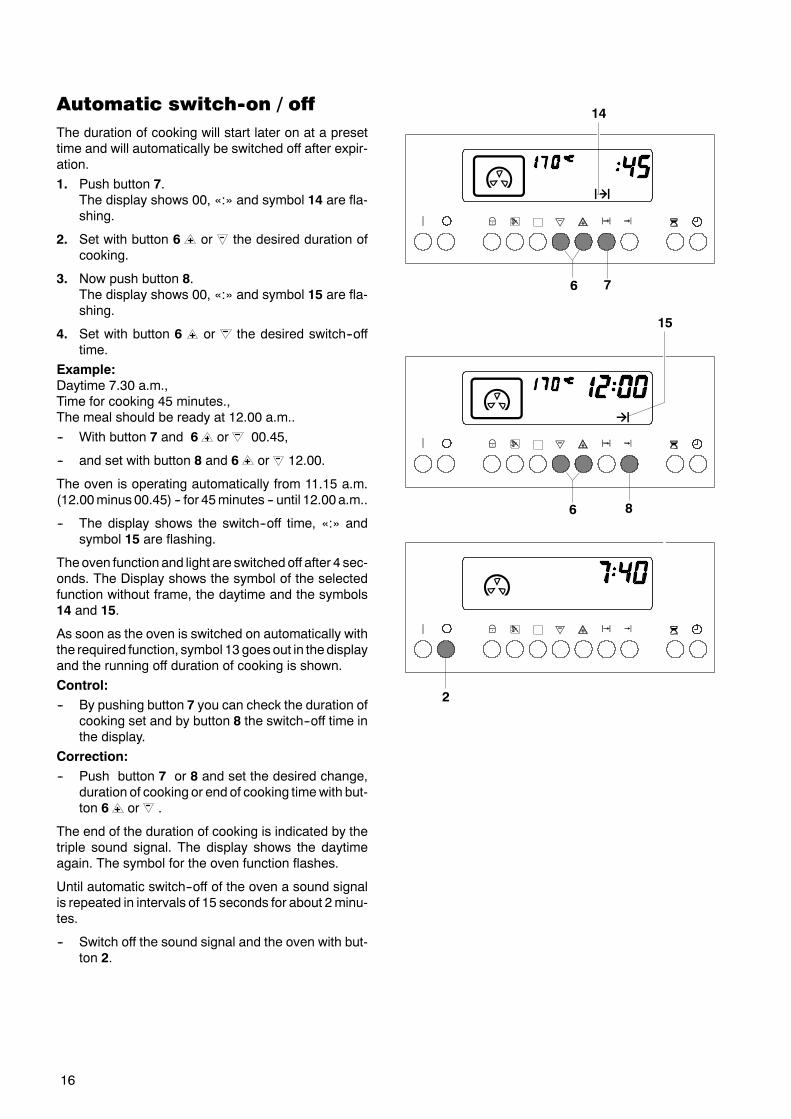
Automatic switch--on / off
The duration of cooking will start later on at a presettime and will automatically be switched off after expir-ation.
1. Push button 7.The display shows 00, «:» and symbol 14 are fla-shing.
2. Set with button 6 or the desired duration ofcooking.
3. Now push button 8.The display shows 00, «:» and symbol 15 are fla-shing.
4. Set with button 6 or the desired switch--offtime.
Example:
Daytime 7.30 a.m.,Time for cooking 45 minutes.,The meal should be ready at 12.00 a.m..
-- With button 7 and 6 or 00.45,
-- and set with button 8 and 6 or 12.00.
The oven is operating automatically from 11.15 a.m.(12.00 minus 00.45) -- for 45 minutes -- until 12.00 a.m..
-- The display shows the switch--off time, «:» andsymbol 15 are flashing.
The oven function and light are switched off after 4 sec-onds. The Display shows the symbol of the selectedfunction without frame, the daytime and the symbols14 and 15.
As soon as the oven is switched on automatically withthe required function, symbol 13 goes out in the displayand the running off duration of cooking is shown.
Control:
-- By pushing button 7 you can check the duration ofcooking set and by button 8 the switch--off time inthe display.
Correction:
-- Push button 7 or 8 and set the desired change,duration of cooking or end of cooking time with but-ton 6 or .
The end of the duration of cooking is indicated by thetriple sound signal. The display shows the daytimeagain. The symbol for the oven function flashes.
Until automatic switch--off of the oven a sound signalis repeated in intervals of 15 seconds for about 2 minu-tes.
-- Switch off the sound signal and the oven with but-ton 2.
6 7
14
86
15
2
17
Steam cooking programs
Important!
The steam cooking programs must be set
with the cooking time setting.
Settings under 10 minutes have little effect owing to theapprox. 5 minutes de--steaming time at the end ofcooking and the heating time of approx. 2 minutes.
The oven door can slightly steam up during the deva-porization process.
Insert exclusively the roasting grids with steamoperation.
When the door is opened, only steam escapesfrom the hot food. The slight condensation onthe control panel evaporates after a short time.
Demineralized water can be used, e.g. from acommercially available water filter unit, to pre-vent the deposit of scale.
Important!
Use water exclusively.
A buzzer sounds when the water has been used up.The buzzer stops shortly after refilling with water.
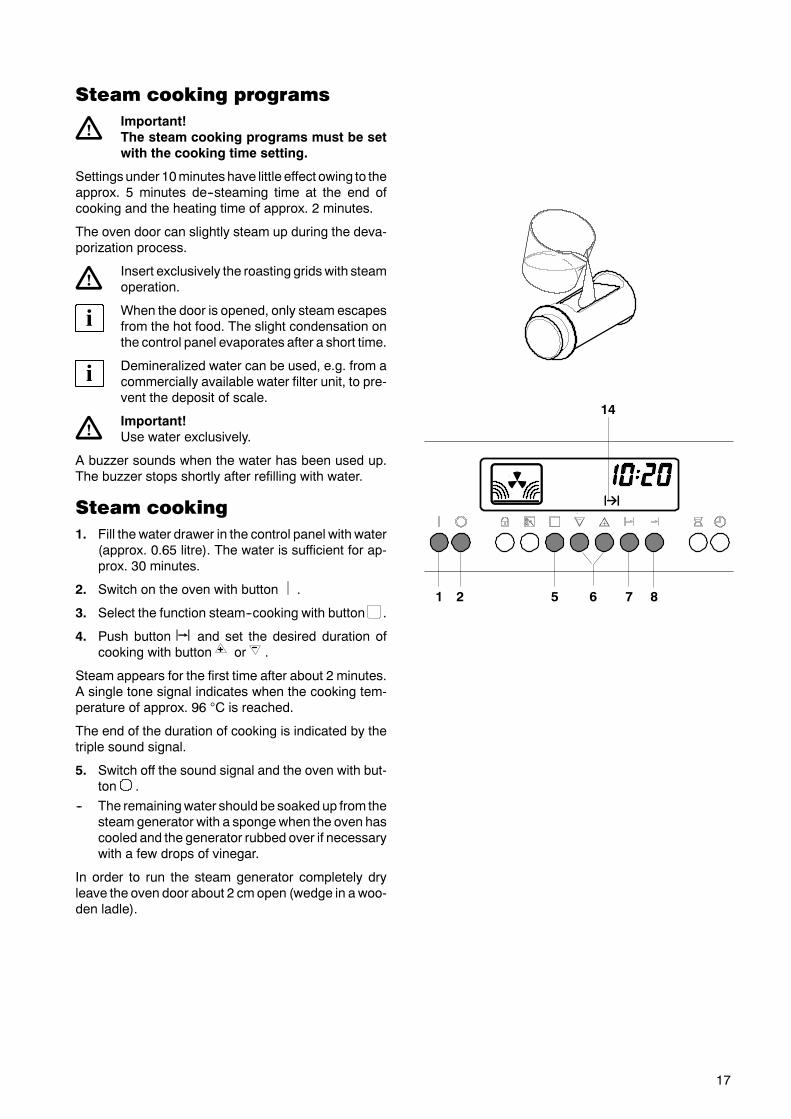
Steam cooking
1. Fill the water drawer in the control panel with water(approx. 0.65 litre). The water is sufficient for ap-prox. 30 minutes.
2. Switch on the oven with button .
3. Select the function steam--cooking with button .
4. Push button and set the desired duration ofcooking with button or .
Steam appears for the first time after about 2 minutes.A single tone signal indicates when the cooking tem-perature of approx. 96 C is reached.
The end of the duration of cooking is indicated by thetriple sound signal.
5. Switch off the sound signal and the oven with but-ton .
-- The remaining water should be soaked up from thesteam generator with a sponge when the oven hascooled and the generator rubbed over if necessarywith a few drops of vinegar.
In order to run the steam generator completely dryleave the oven door about 2 cm open (wedge in a woo-den ladle).
61 2 5 7
14
8
18
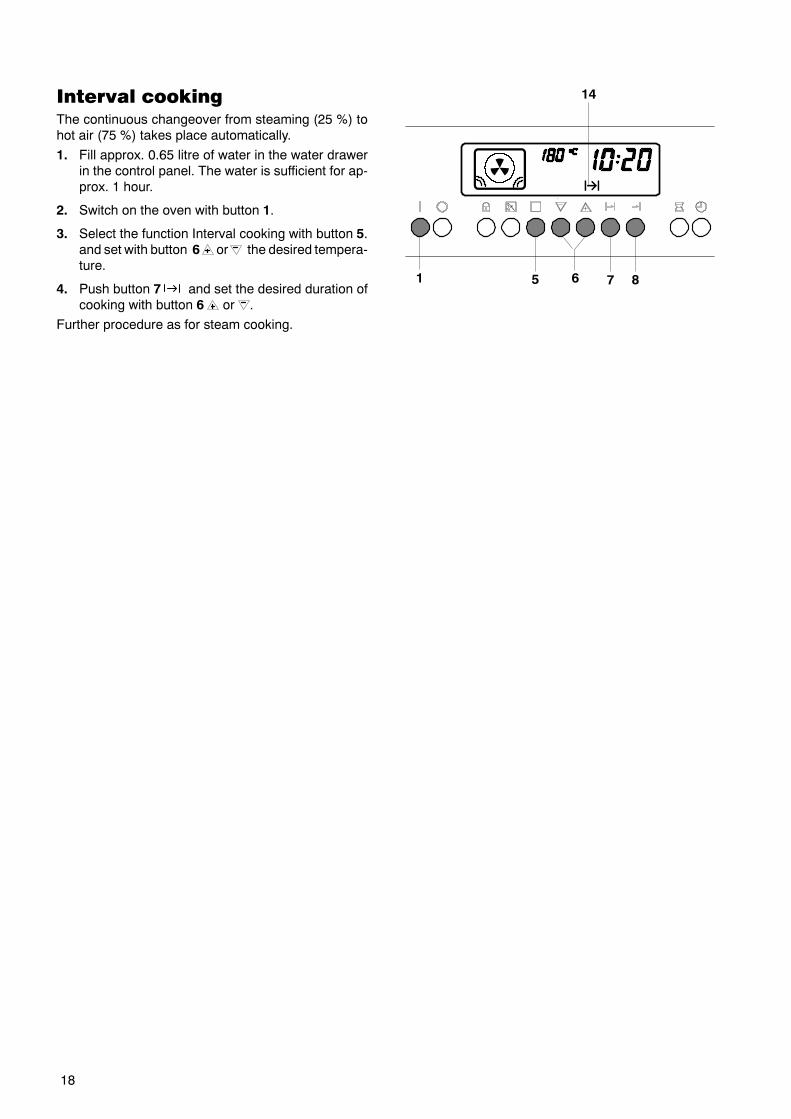
Interval cookingThe continuous changeover from steaming (25 %) tohot air (75 %) takes place automatically.
1. Fill approx. 0.65 litre of water in the water drawerin the control panel. The water is sufficient for ap-prox. 1 hour.
2. Switch on the oven with button 1.
3. Select the function Interval cooking with button 5.and set with button 6 or the desired tempera-ture.
4. Push button 7 and set the desired duration ofcooking with button 6 or .
Further procedure as for steam cooking.
14
1 65 7 8

19
Meat probe
Cooking with core temperature automatism
When cooking the temperature in the core of the foodis measured by the meat probe. The oven function isautomatically switched off when reaching the set coretemperature within the item to be cooked.
1. Insert the tip of the meat probe into the center of thefood into the pectoral muscle with poultry and in-sert the baking sheet, roasting ware or grille in theoven.
2. Insert plug of meat probe up to handle in socket inthe right--hand side wall of the oven and closeoven.
The display shows the symbol 16.
3. Push button 4 after selecting function and tempea-ture.
Instead of the daytime the display shows the defaulttemperature of 70 C.
4. Set with button 6 or the desired core tempera-ture between 30 and 99 C.
Recommended core temperatures for:
Roast beef 80 CRoastbeef or filet of beef: english 45 C
medium 50 Cwell done 60 C
Roast porc 80 -- 85 CRoast lamb 70 -- 75 CRoast veal 75 C
The display shows the symbol of the oven function, theoven temperature set (red), the meat probe symbol 16and the core temperature.
The rise of the core temperature is shown in the dis-play.
Control or correction
By pushing button 4 the core temperature value setcan be checked and , if need, be corrrected by pushingbutton 6 or .
An audible signal (triple) refers to the end of cookingoperation.
Until automatic switch--off of the oven a sound signalis repeated in intervals of 15 seconds for about 2 minu-tes.
-- Switch off the sound signal and the oven with but-ton 2.
64
16
2
20
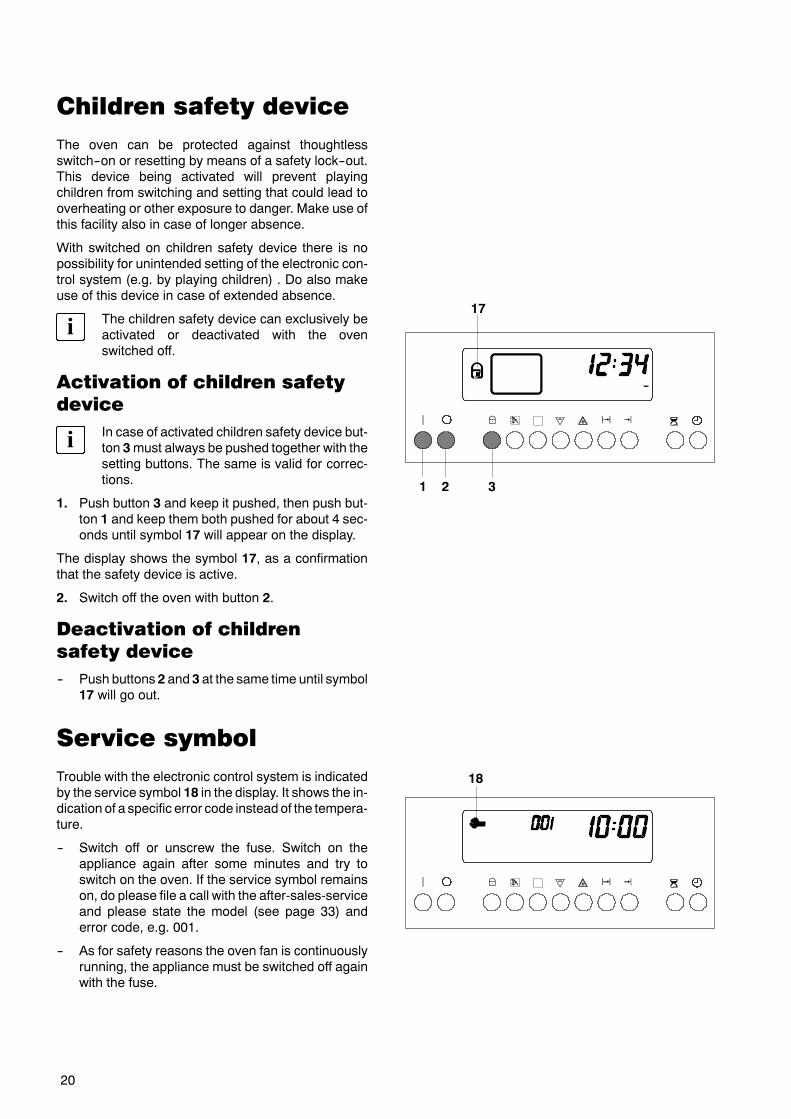
Children safety device
The oven can be protected against thoughtlessswitch--on or resetting by means of a safety lock--out.This device being activated will prevent playingchildren from switching and setting that could lead tooverheating or other exposure to danger. Make use ofthis facility also in case of longer absence.
With switched on children safety device there is nopossibility for unintended setting of the electronic con-trol system (e.g. by playing children) . Do also makeuse of this device in case of extended absence.
The children safety device can exclusively beactivated or deactivated with the ovenswitched off.
Activation of children safety
device
In case of activated children safety device but-ton 3must always be pushed together with thesetting buttons. The same is valid for correc-tions.
1. Push button 3 and keep it pushed, then push but-ton 1 and keep them both pushed for about 4 sec-onds until symbol 17 will appear on the display.
The display shows the symbol 17, as a confirmationthat the safety device is active.
2. Switch off the oven with button 2.
Deactivation of children
safety device
-- Push buttons 2 and 3 at the same time until symbol17 will go out.
Service symbol
Trouble with the electronic control system is indicatedby the service symbol 18 in the display. It shows the in-dication of a specific error code instead of the tempera-ture.
-- Switch off or unscrew the fuse. Switch on theappliance again after some minutes and try toswitch on the oven. If the service symbol remainson, do please file a call with the after-sales-serviceand please state the model (see page 33) anderror code, e.g. 001.
-- As for safety reasons the oven fan is continuouslyrunning, the appliance must be switched off againwith the fuse.
1 2 3
17
18
21
Hints on the application of the oven
functions
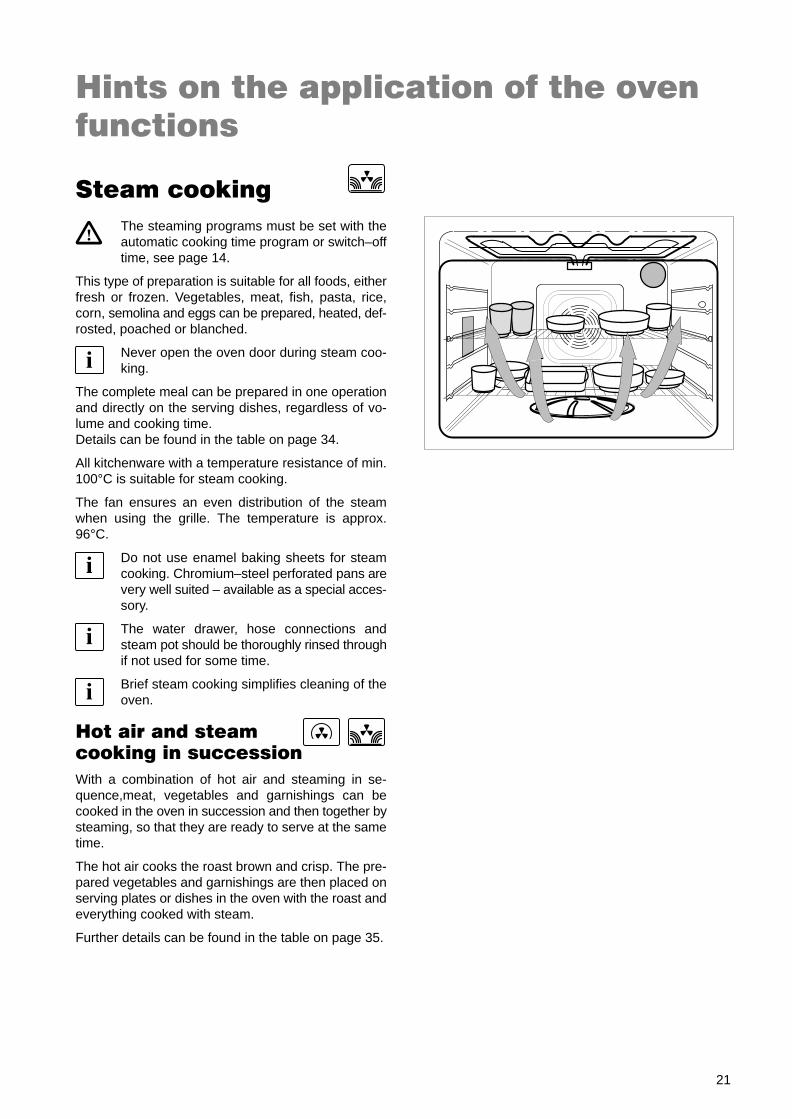
Steam cooking
The steaming programs must be set with theautomatic cooking time program or switch–offtime, see page 14.
This type of preparation is suitable for all foods, eitherfresh or frozen. Vegetables, meat, fish, pasta, rice,corn, semolina and eggs can be prepared, heated, def-rosted, poached or blanched.
Never open the oven door during steam coo-king.
The complete meal can be prepared in one operationand directly on the serving dishes, regardless of vo-lume and cooking time.Details can be found in the table on page 34.
All kitchenware with a temperature resistance of min.100°C is suitable for steam cooking.
The fan ensures an even distribution of the steamwhen using the grille. The temperature is approx.96°C.
Do not use enamel baking sheets for steamcooking. Chromium–steel perforated pans arevery well suited – available as a special acces-sory.
The water drawer, hose connections andsteam pot should be thoroughly rinsed throughif not used for some time.
Brief steam cooking simplifies cleaning of theoven.
Hot air and steam cooking in succession
With a combination of hot air and steaming in se-quence,meat, vegetables and garnishings can becooked in the oven in succession and then together bysteaming, so that they are ready to serve at the sametime.
The hot air cooks the roast brown and crisp. The pre-pared vegetables and garnishings are then placed onserving plates or dishes in the oven with the roast andeverything cooked with steam.
Further details can be found in the table on page 35.
22
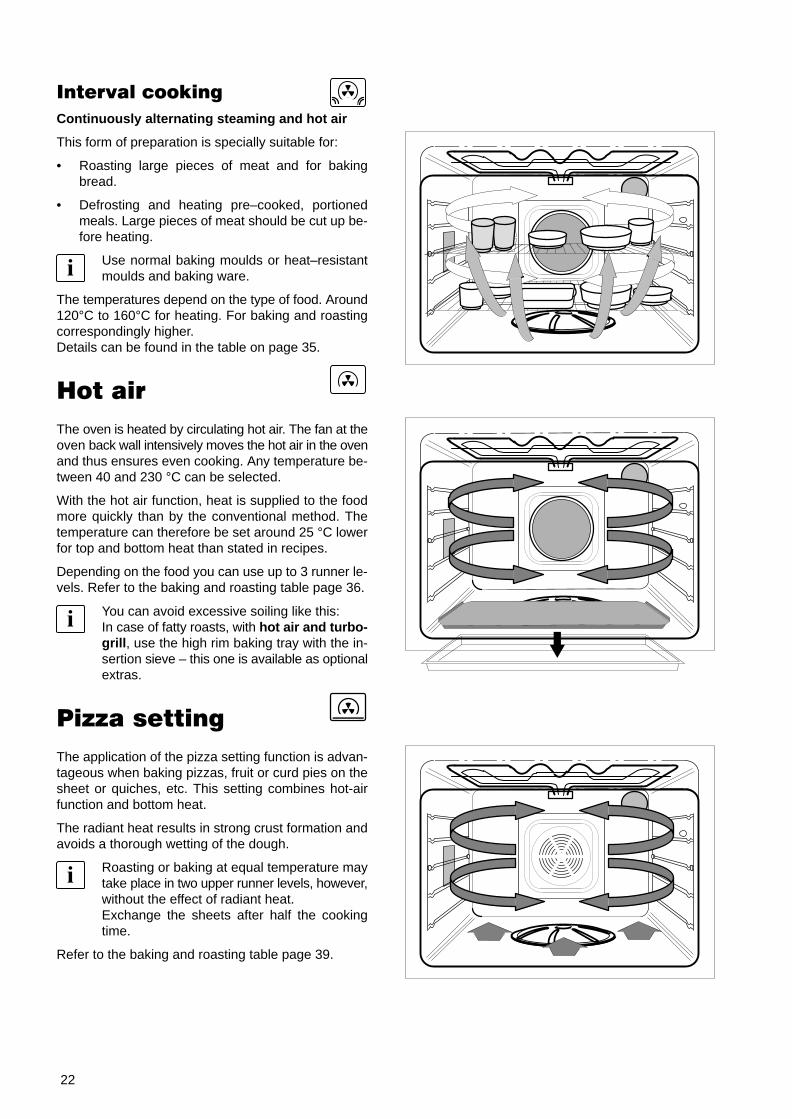
Interval cooking
Continuously alternating steaming and hot air
This form of preparation is specially suitable for:
• Roasting large pieces of meat and for bakingbread.
• Defrosting and heating pre–cooked, portionedmeals. Large pieces of meat should be cut up be-fore heating.
Use normal baking moulds or heat–resistantmoulds and baking ware.
The temperatures depend on the type of food. Around120°C to 160°C for heating. For baking and roastingcorrespondingly higher.Details can be found in the table on page 35.
Hot air
The oven is heated by circulating hot air. The fan at theoven back wall intensively moves the hot air in the ovenand thus ensures even cooking. Any temperature be-tween 40 and 230 °C can be selected.
With the hot air function, heat is supplied to the foodmore quickly than by the conventional method. Thetemperature can therefore be set around 25 °C lowerfor top and bottom heat than stated in recipes.
Depending on the food you can use up to 3 runner le-vels. Refer to the baking and roasting table page 36.
You can avoid excessive soiling like this:In case of fatty roasts, with hot air and turbo-grill , use the high rim baking tray with the in-sertion sieve – this one is available as optionalextras.
Pizza setting
The application of the pizza setting function is advan-tageous when baking pizzas, fruit or curd pies on thesheet or quiches, etc. This setting combines hot-airfunction and bottom heat.
The radiant heat results in strong crust formation andavoids a thorough wetting of the dough.
Roasting or baking at equal temperature maytake place in two upper runner levels, however,without the effect of radiant heat. Exchange the sheets after half the cookingtime.
Refer to the baking and roasting table page 39.
23
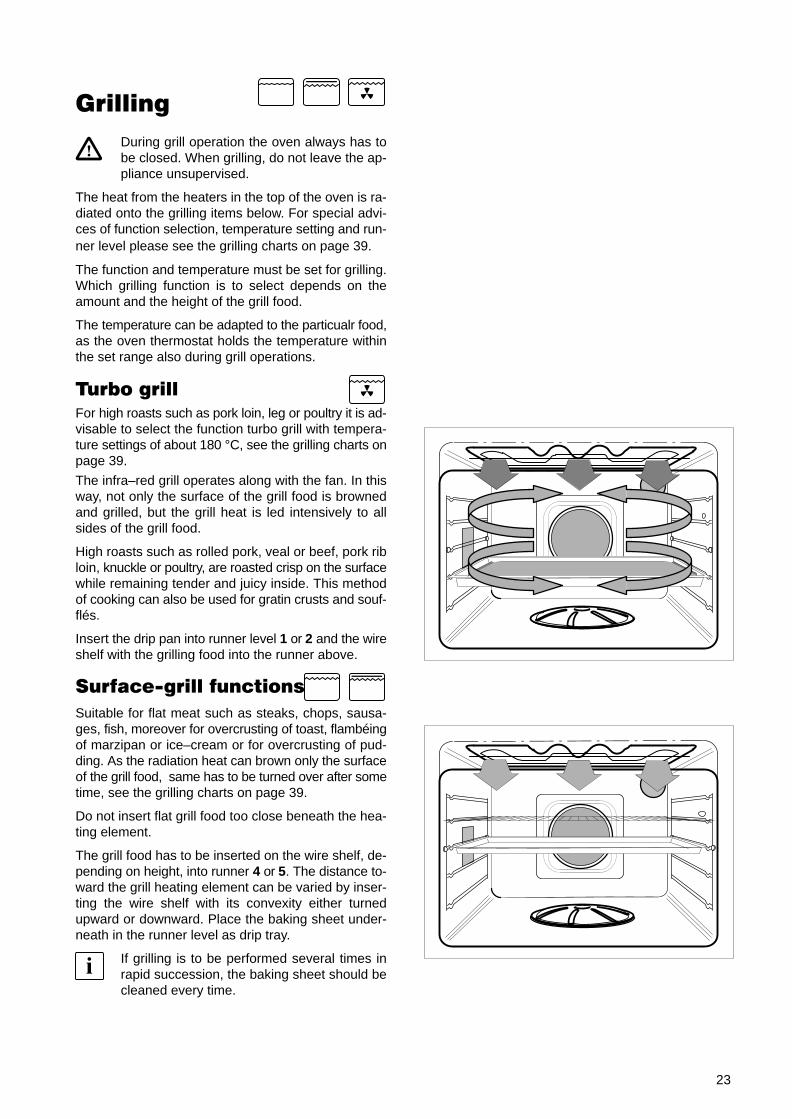
Grilling
During grill operation the oven always has tobe closed. When grilling, do not leave the ap-pliance unsupervised.
The heat from the heaters in the top of the oven is ra-diated onto the grilling items below. For special advi-ces of function selection, temperature setting and run-ner level please see the grilling charts on page 39.
The function and temperature must be set for grilling.Which grilling function is to select depends on theamount and the height of the grill food.
The temperature can be adapted to the particualr food,as the oven thermostat holds the temperature withinthe set range also during grill operations.
Turbo grillFor high roasts such as pork loin, leg or poultry it is ad-visable to select the function turbo grill with tempera-ture settings of about 180 °C, see the grilling charts onpage 39.
The infra–red grill operates along with the fan. In thisway, not only the surface of the grill food is brownedand grilled, but the grill heat is led intensively to allsides of the grill food.
High roasts such as rolled pork, veal or beef, pork ribloin, knuckle or poultry, are roasted crisp on the surfacewhile remaining tender and juicy inside. This methodof cooking can also be used for gratin crusts and souf-flés.
Insert the drip pan into runner level 1 or 2 and the wireshelf with the grilling food into the runner above.
Surface-grill functions
Suitable for flat meat such as steaks, chops, sausa-ges, fish, moreover for overcrusting of toast, flambéingof marzipan or ice–cream or for overcrusting of pud-ding. As the radiation heat can brown only the surfaceof the grill food, same has to be turned over after sometime, see the grilling charts on page 39.
Do not insert flat grill food too close beneath the hea-ting element.
The grill food has to be inserted on the wire shelf, de-pending on height, into runner 4 or 5. The distance to-ward the grill heating element can be varied by inser-ting the wire shelf with its convexity either turnedupward or downward. Place the baking sheet under-neath in the runner level as drip tray.
If grilling is to be performed several times inrapid succession, the baking sheet should becleaned every time.
24
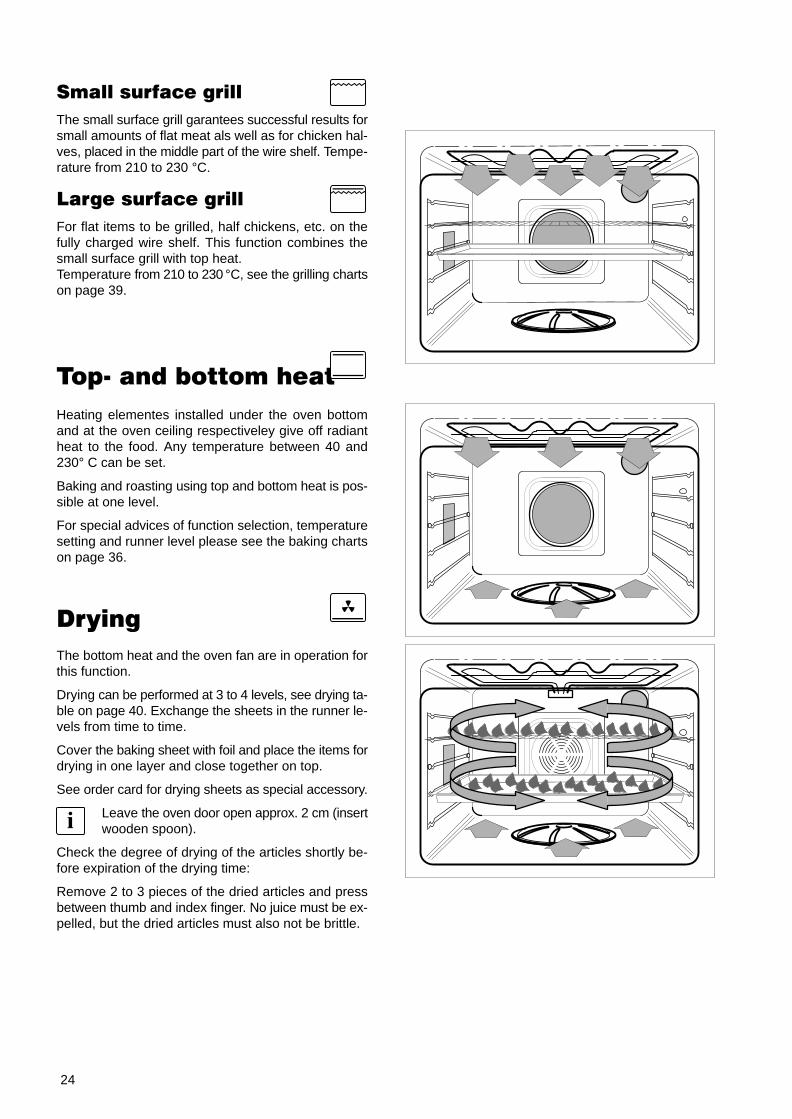
Small surface grill
The small surface grill garantees successful results forsmall amounts of flat meat als well as for chicken hal-ves, placed in the middle part of the wire shelf. Tempe-rature from 210 to 230 °C.
Large surface grill
For flat items to be grilled, half chickens, etc. on thefully charged wire shelf. This function combines thesmall surface grill with top heat. Temperature from 210 to 230 °C, see the grilling chartson page 39.
Top� and bottom heat
Heating elementes installed under the oven bottomand at the oven ceiling respectiveley give off radiantheat to the food. Any temperature between 40 and230° C can be set.
Baking and roasting using top and bottom heat is pos-sible at one level.
For special advices of function selection, temperaturesetting and runner level please see the baking chartson page 36.
Drying
The bottom heat and the oven fan are in operation forthis function.
Drying can be performed at 3 to 4 levels, see drying ta-ble on page 40. Exchange the sheets in the runner le-vels from time to time.
Cover the baking sheet with foil and place the items fordrying in one layer and close together on top.
See order card for drying sheets as special accessory.
Leave the oven door open approx. 2 cm (insertwooden spoon).
Check the degree of drying of the articles shortly be-fore expiration of the drying time:
Remove 2 to 3 pieces of the dried articles and pressbetween thumb and index finger. No juice must be ex-pelled, but the dried articles must also not be brittle.
25
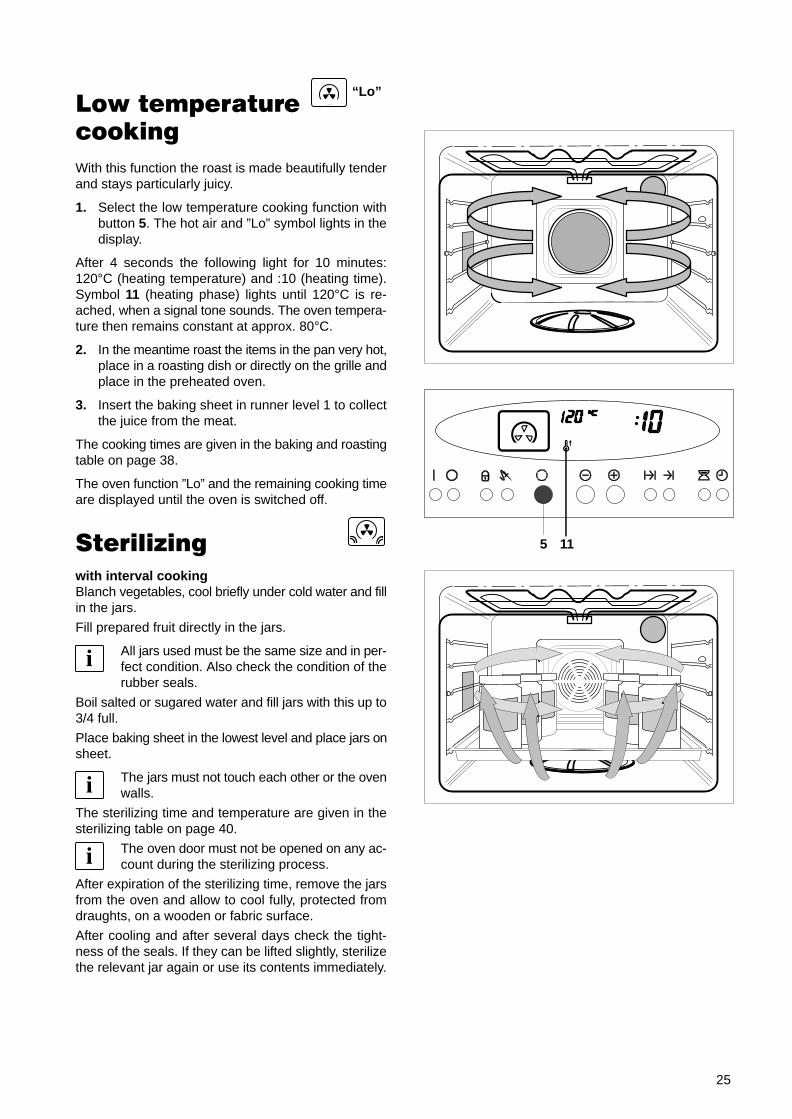
Low temperaturecooking
With this function the roast is made beautifully tenderand stays particularly juicy.
1. Select the low temperature cooking function withbutton 5. The hot air and ”Lo” symbol lights in thedisplay.
After 4 seconds the following light for 10 minutes:120°C (heating temperature) and :10 (heating time).Symbol 11 (heating phase) lights until 120°C is re-ached, when a signal tone sounds. The oven tempera-ture then remains constant at approx. 80°C.
2. In the meantime roast the items in the pan very hot,place in a roasting dish or directly on the grille andplace in the preheated oven.
3. Insert the baking sheet in runner level 1 to collectthe juice from the meat.
The cooking times are given in the baking and roastingtable on page 38.
The oven function ”Lo” and the remaining cooking timeare displayed until the oven is switched off.
Sterilizing
with interval cookingBlanch vegetables, cool briefly under cold water and fillin the jars.
Fill prepared fruit directly in the jars.
All jars used must be the same size and in per-fect condition. Also check the condition of therubber seals.
Boil salted or sugared water and fill jars with this up to3/4 full.
Place baking sheet in the lowest level and place jars onsheet.
The jars must not touch each other or the ovenwalls.
The sterilizing time and temperature are given in thesterilizing table on page 40.
The oven door must not be opened on any ac-count during the sterilizing process.
After expiration of the sterilizing time, remove the jarsfrom the oven and allow to cool fully, protected fromdraughts, on a wooden or fabric surface.
After cooling and after several days check the tight-ness of the seals. If they can be lifted slightly, sterilizethe relevant jar again or use its contents immediately.
115
“Lo”
26
General information on roasting,
baking and steam cookingRoasting with hot�air and
top�/bottom heat
The length of roasting time depends on the kind ofmeat, weight and height of the roast. Basically youreckon per cm height of meat:
• Beef, game 15 – 18 minutes• Pork, veal 15 – 18 minutes• Fillet, roastbeef 10 – 12 minutes.
The higher the roast is, the lower the temperatureneeds to be.
The doneness can be checked by pressing the meatdown with a spoon. If the roast does not give way, it isdone.
Leave the roast covered for about 10 minutes beforecutting, so that very little juice then runs out.
Roasting on the wire shelf
Place roast on wire shelf with its serving side turnedupward. Insert the baking sheet to collect the juice inthe runner below.
Baking and roasting in the
pan or baking sheet
Place large deep–frozen pastries, e.g. pizza, on thebaking sheet covered with foil to avoid distortion of thebaking sheet from large temperature differences.
Put lean meat, game or meat loaf directly into the drippan or onto the kebing sheet.
In case there is need for a roasting time of more thanan hour, put the ingredients for the gravy into the panonly half an hour before the end of cooking time, havethem browned and fill in a little hot water.
Bake- and roastware
At baking or roasting with hot-air or pizza function youcan use dark and bright baking moulds, baking pottery,heat–resistant moulds and pots. Do exclusively makeuse of suitable and temperature–resistant baking tinsand roasting dishes. Bright sheets and molds do, ho-wever, extend the baking and roasting times. Pleaseobserve manufacturer‘s instructions.
All kitchenware with a temperature resistance of min.100 °C is suitable for steam cooking – not for intervalcooking.
In the according runner level baking moulds and roa-sting dishes are put onto the baking sheet.
Temperature selection
The hot air function is faster than ordinary functions insupplying the food with heat. Therefore, set the tempe-rature by about 25 °C lower than recommended inreciepes for top and bottom heat.
Grease filter
Grease filter to be hooked in with all roasting procedu-res with hotair and when turbogrilling, this protects theinterior of the oven from excessive soiling.
Grease filter has to be removed when baking as thebaking time would otherwise be extended.
Preheating
As the set temperature is reached within a very shorttime, preheating of the oven before inserting the foodis not necessary for most of the baking and roastingoperations, see baking and roasting charts on page 9.
We recommend preheating with:
– Meat dishes and short–roasts, such as fillet, roast-beef, schnitzel or cutlet. The meat pores arequicker closed and the item to be roasted remainsjuicy.
– Fancy biscuits that tend to spread easily, rolls,quiches, Swiss rolls.
For this purpose and before insertion of the items theoven is heated up until the temperature signal lampgoes out.
Introduction for using the
baking chart
In case of too high temperatures a cake overcrusts toofast, it will collapse or will not rise properly, because on-ly an insufficient amount of water is extracted.
If the baking operation takes too long or if the cakedoes not brown enough as expected, you may selecta higher setting.
The even browning of the cake can be improved by re-ducing the baking temperature (by about 10° C). Thenprolonging of the baking time is necessary.
You might also have to change the baking time evenif you exactly followed the instructions given in the reci-pe, as the size of eggs, the binding quality of the flourand the material of which the mould is made can vary.

27
Cleaning and careNo heating element must be switched on during thecleaning procedure.Make sure that the oven has cooled down in a way thatone may get in touch with interior parts without anydanger. Only the oven lighting may be switched on.
High–pressure cleaning units are not suitablefor cleaning because of the requirements ofelectrical safety.
Carefully and regularly clean the appliance in luke-warm or cold state. Avoid repeated burning–on of soi-ling.
Clean enamelled cavity
Never use caustic, scouring and scratchingcleaners or steel–wool.
Do not use corrosive cleaning agents to re-move scale.
Caution! Chemical descalers may destroy theclean–enamel of the oven. Please follow themanufacturer specifications.
Wash out the inside of the oven with hot detergent sol-ution or a commercially available cleaning vinegar anda sponge or cloth.
If necessary, first soak soiled places or switch onsteam cooking briefly. Add a few drops of vinegar withthe water to the steam generator to prevent the depositof scale.
Afterwards wipe out with clear water and dry.
Baking sheets, wire shelvesClean with a warm liquid cleanser solution. The partsare not suitable for cleaning in a dishwasher.
Grease filter
Wash the grease filter after every use with a soft brushin a hot liquid cleanser solution or quite simply in a dish-washer. Have tenacious soiling soak and react, forinstance, in a hot scouring agent solution.
Roasting grids and steamgenerator cover
with a soft brush in a hot washing–up liquid or in a dish-washer.
ÓÓÓÓÓÓÓÓÓÓÓÓÓÓÓ
28
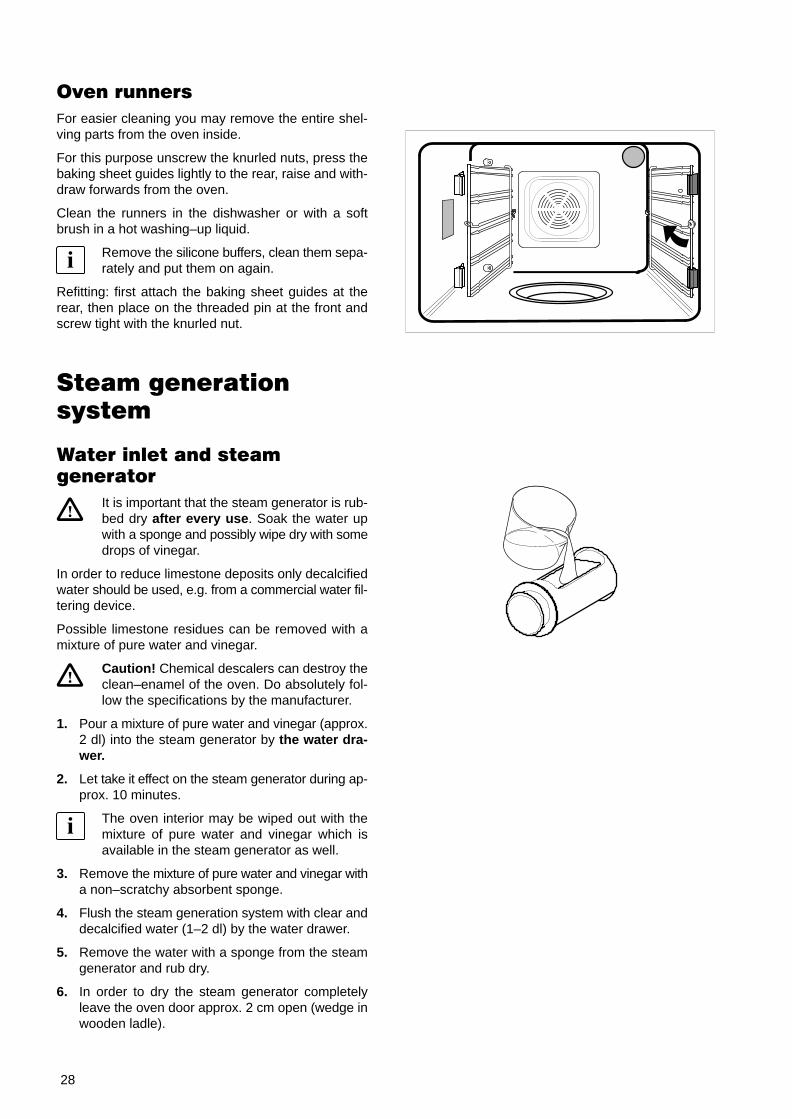
Oven runners
For easier cleaning you may remove the entire shel-ving parts from the oven inside.
For this purpose unscrew the knurled nuts, press thebaking sheet guides lightly to the rear, raise and with-draw forwards from the oven.
Clean the runners in the dishwasher or with a softbrush in a hot washing–up liquid.
Remove the silicone buffers, clean them sepa-rately and put them on again.
Refitting: first attach the baking sheet guides at therear, then place on the threaded pin at the front andscrew tight with the knurled nut.
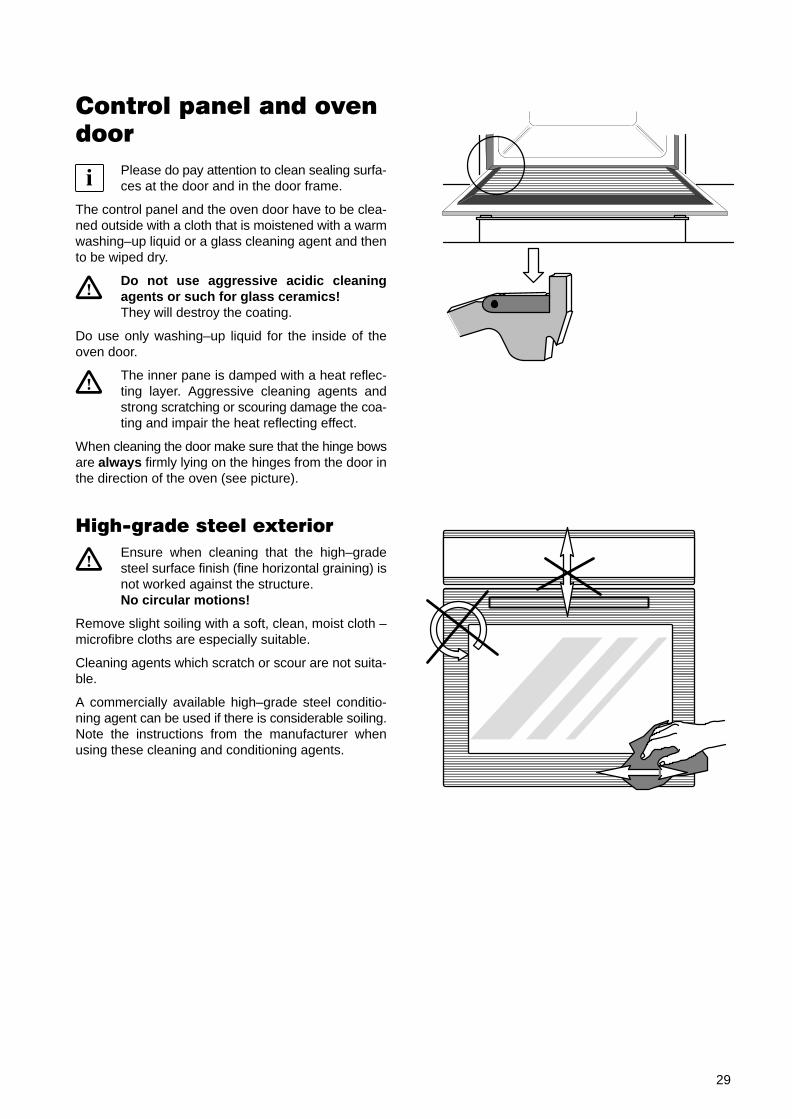
Steam generationsystem
Water inlet and steamgenerator
It is important that the steam generator is rub-bed dry after every use . Soak the water upwith a sponge and possibly wipe dry with somedrops of vinegar.
In order to reduce limestone deposits only decalcifiedwater should be used, e.g. from a commercial water fil-tering device.
Possible limestone residues can be removed with amixture of pure water and vinegar.
Caution! Chemical descalers can destroy theclean–enamel of the oven. Do absolutely fol-low the specifications by the manufacturer.
1. Pour a mixture of pure water and vinegar (approx.2 dl) into the steam generator by the water dra-wer.
2. Let take it effect on the steam generator during ap-prox. 10 minutes.
The oven interior may be wiped out with themixture of pure water and vinegar which isavailable in the steam generator as well.
3. Remove the mixture of pure water and vinegar witha non–scratchy absorbent sponge.
4. Flush the steam generation system with clear anddecalcified water (1–2 dl) by the water drawer.
5. Remove the water with a sponge from the steamgenerator and rub dry.
6. In order to dry the steam generator completelyleave the oven door approx. 2 cm open (wedge inwooden ladle).
29
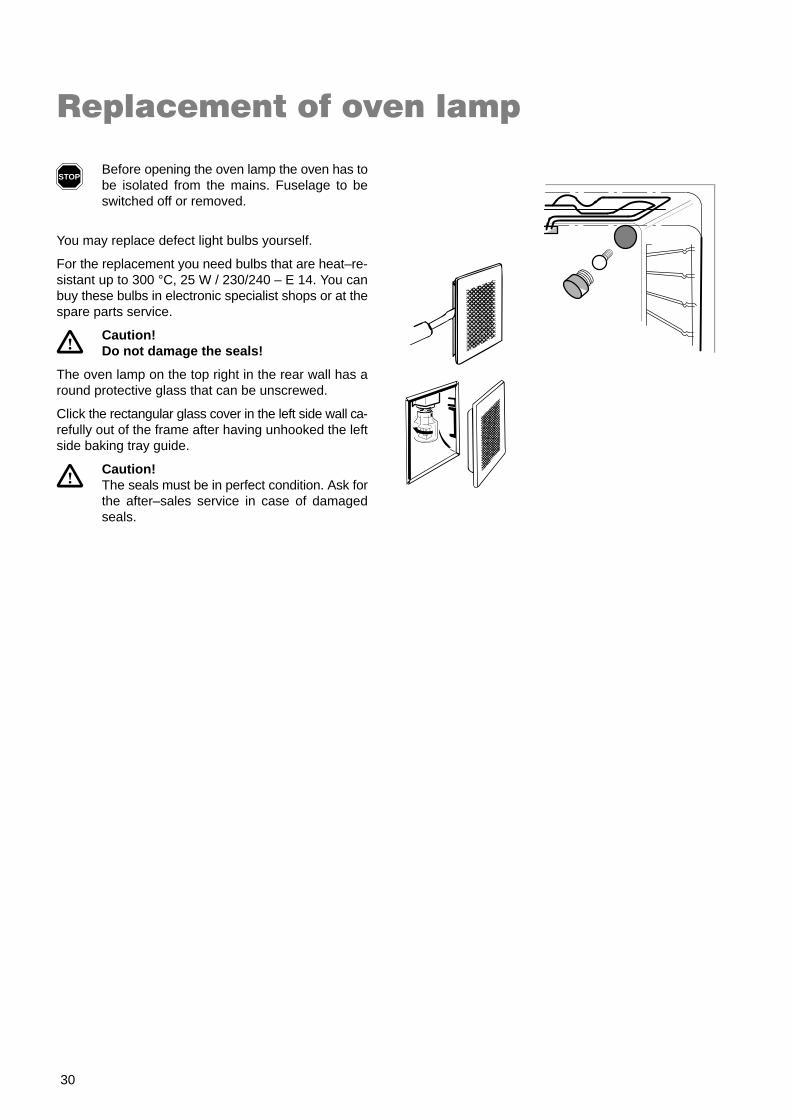
Control panel and ovendoor
Please do pay attention to clean sealing surfa-ces at the door and in the door frame.
The control panel and the oven door have to be clea-ned outside with a cloth that is moistened with a warmwashing–up liquid or a glass cleaning agent and thento be wiped dry.
Do not use aggressive acidic cleaningagents or such for glass ceramics!They will destroy the coating.
Do use only washing–up liquid for the inside of theoven door.
The inner pane is damped with a heat reflec-ting layer. Aggressive cleaning agents andstrong scratching or scouring damage the coa-ting and impair the heat reflecting effect.
When cleaning the door make sure that the hinge bowsare always firmly lying on the hinges from the door inthe direction of the oven (see picture).
High-grade steel exterior
Ensure when cleaning that the high–gradesteel surface finish (fine horizontal graining) isnot worked against the structure.No circular motions!
Remove slight soiling with a soft, clean, moist cloth –microfibre cloths are especially suitable.
Cleaning agents which scratch or scour are not suita-ble.
A commercially available high–grade steel conditio-ning agent can be used if there is considerable soiling.Note the instructions from the manufacturer whenusing these cleaning and conditioning agents.
ÔÔÔÔÔÔÔÔÔÔÔÔÔÔÔÔÔÔÔÔÔÔÔÔ
ÔÔÔÔÔÔÔÔÔÔÔÔÔÔÔÔÔÔÔÔÔÔÔÔÔÔÔÔÔÔÔÔÔÔÔÔÔÔÔÔÔÔÔÔÔÔÔÔÔÔÔÔÔÔÔÔÔÔÔÔÔÔÔÔÔÔÔÔÔÔÔÔÔÔÔÔÔÔÔÔÔÔÔÔÔÔÔÔÔÔÔÔÔÔÔÔÔÔÔÔÔÔÔÔÔÔÔÔÔÔÔÔÔÔÔÔÔÔÔÔÔÔÔÔÔÔÔÔÔÔÔÔÔÔÔÔÔÔÔÔÔÔÔÔÔÔÔÔÔÔÔÔÔÔÔÔÔÔÔÔÔÔÔÔÔÔÔÔÔÔÔÔÔÔÔÔÔÔÔÔÔÔ
30
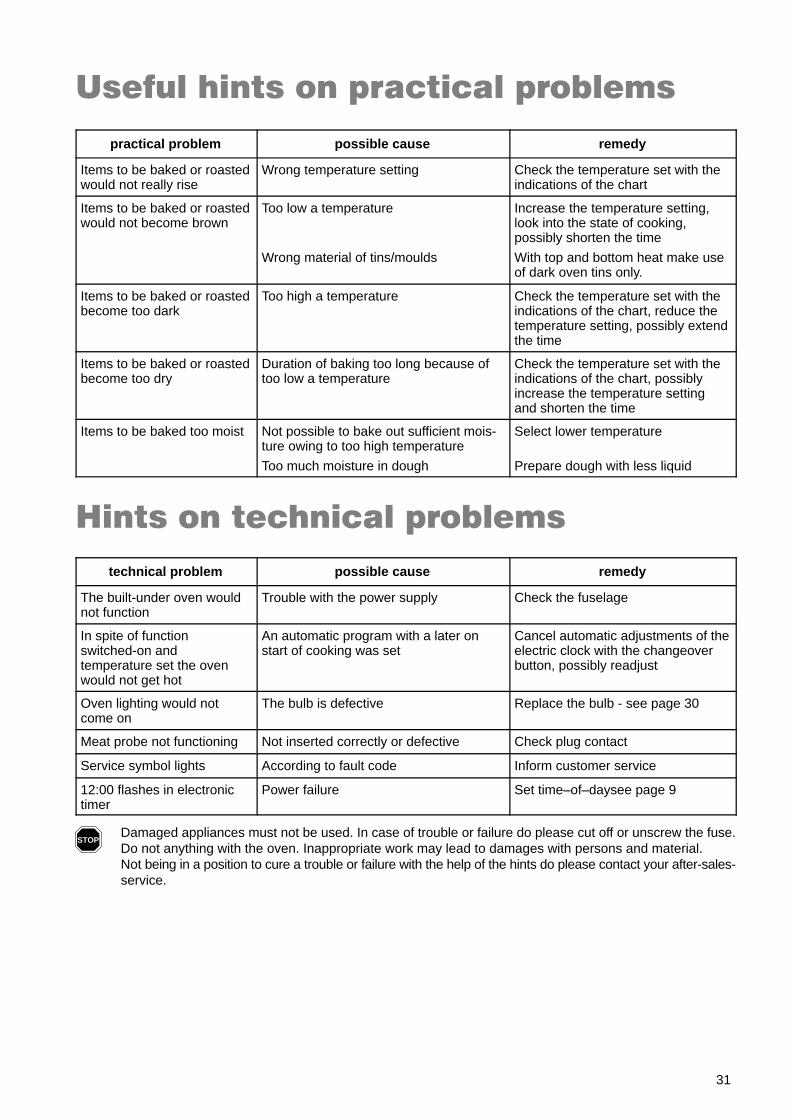
Replacement of oven lamp
Before opening the oven lamp the oven has tobe isolated from the mains. Fuselage to beswitched off or removed.
You may replace defect light bulbs yourself.
For the replacement you need bulbs that are heat–re-sistant up to 300 °C, 25 W / 230/240 – E 14. You canbuy these bulbs in electronic specialist shops or at thespare parts service.
Caution!Do not damage the seals!
The oven lamp on the top right in the rear wall has around protective glass that can be unscrewed.
Click the rectangular glass cover in the left side wall ca-refully out of the frame after having unhooked the leftside baking tray guide.
Caution!The seals must be in perfect condition. Ask forthe after–sales service in case of damagedseals.
STOP
31
Useful hints on practical problems
practical problem possible cause remedy
Items to be baked or roastedwould not really rise
Wrong temperature setting Check the temperature set with theindications of the chart
Items to be baked or roastedwould not become brown
Too low a temperature
Wrong material of tins/moulds
Increase the temperature setting,look into the state of cooking,possibly shorten the time
With top and bottom heat make useof dark oven tins only.
Items to be baked or roastedbecome too dark
Too high a temperature Check the temperature set with theindications of the chart, reduce thetemperature setting, possibly extendthe time
Items to be baked or roastedbecome too dry
Duration of baking too long because oftoo low a temperature
Check the temperature set with theindications of the chart, possiblyincrease the temperature settingand shorten the time
Items to be baked too moist Not possible to bake out sufficient mois-ture owing to too high temperature
Too much moisture in dough
Select lower temperature
Prepare dough with less liquid
Hints on technical problems
technical problem possible cause remedy
The built-under oven wouldnot function
Trouble with the power supply Check the fuselage
In spite of functionswitched-on andtemperature set the ovenwould not get hot
An automatic program with a later onstart of cooking was set
Cancel automatic adjustments of theelectric clock with the changeoverbutton, possibly readjust
Oven lighting would notcome on
The bulb is defective Replace the bulb - see page 30
Meat probe not functioning Not inserted correctly or defective Check plug contact
Service symbol lights According to fault code Inform customer service
12:00 flashes in electronictimer
Power failure Set time–of–daysee page 9
Damaged appliances must not be used. In case of trouble or failure do please cut off or unscrew the fuse.Do not anything with the oven. Inappropriate work may lead to damages with persons and material.Not being in a position to cure a trouble or failure with the help of the hints do please contact your after-sales-service.
STOP
�
,QVWDOODWLRQ LQVWUXFWLRQV
%XLOW� LQ RYHQ (XUR ZLGWK �� FP ���� 9�
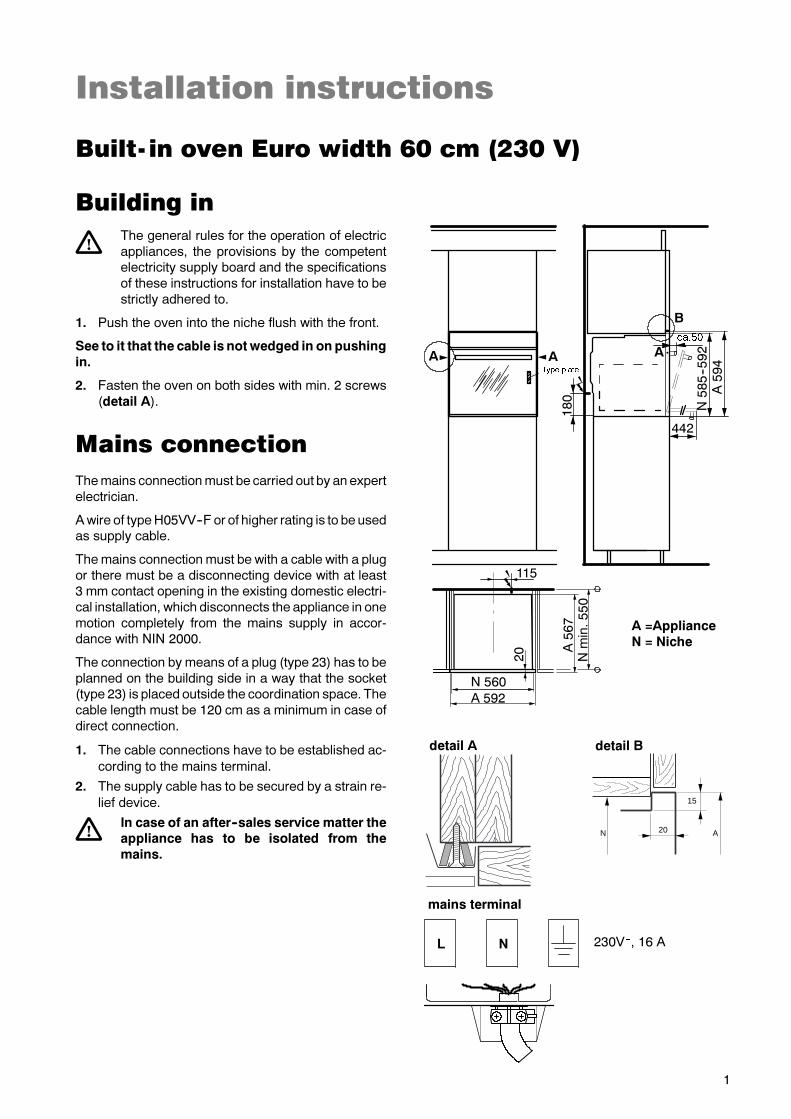
%XLOGLQJ LQ7KH JHQHUDO UXOHV IRU WKH RSHUDWLRQ RI HOHFWULFDSSOLDQFHV� WKH SURYLVLRQV E\ WKH FRPSHWHQWHOHFWULFLW\ VXSSO\ ERDUG DQG WKH VSHFLILFDWLRQVRI WKHVH LQVWUXFWLRQV IRU LQVWDOODWLRQ KDYH WR EHVWULFWO\ DGKHUHG WR�
�� 3XVK WKH RYHQ LQWR WKH QLFKH IOXVK ZLWK WKH IURQW�
6HH WR LW WKDW WKH FDEOH LV QRW ZHGJHG LQ RQ SXVKLQJLQ�
�� )DVWHQ WKH RYHQ RQ ERWK VLGHV ZLWK PLQ� � VFUHZV�GHWDLO $��
0DLQV FRQQHFWLRQ7KHPDLQV FRQQHFWLRQPXVW EH FDUULHG RXW E\ DQ H[SHUWHOHFWULFLDQ�
$ZLUH RI W\SH+��99��) RU RI KLJKHU UDWLQJ LV WR EH XVHGDV VXSSO\ FDEOH�
7KHPDLQV FRQQHFWLRQ PXVW EH ZLWK D FDEOH ZLWK D SOXJRU WKHUH PXVW EH D GLVFRQQHFWLQJ GHYLFH ZLWK DW OHDVW� PP FRQWDFW RSHQLQJ LQ WKH H[LVWLQJ GRPHVWLF HOHFWUL�FDO LQVWDOODWLRQ� ZKLFK GLVFRQQHFWV WKH DSSOLDQFH LQ RQHPRWLRQ FRPSOHWHO\ IURP WKH PDLQV VXSSO\ LQ DFFRU�GDQFH ZLWK 1,1 �����
7KH FRQQHFWLRQ E\ PHDQV RI D SOXJ �W\SH ��� KDV WR EHSODQQHG RQ WKH EXLOGLQJ VLGH LQ D ZD\ WKDW WKH VRFNHW�W\SH ��� LV SODFHG RXWVLGH WKH FRRUGLQDWLRQ VSDFH� 7KHFDEOH OHQJWK PXVW EH ��� FP DV D PLQLPXP LQ FDVH RIGLUHFW FRQQHFWLRQ�
�� 7KH FDEOH FRQQHFWLRQV KDYH WR EH HVWDEOLVKHG DF�FRUGLQJ WR WKH PDLQV WHUPLQDO�
�� 7KH VXSSO\ FDEOH KDV WR EH VHFXUHG E\ D VWUDLQ UH�OLHI GHYLFH�
,Q FDVH RI DQ DIWHU��VDOHV VHUYLFH PDWWHU WKHDSSOLDQFH KDV WR EH LVRODWHG IURP WKHPDLQV�
$ $SSOLDQFH1 1LFKH
7\SH SODWH
$$
���
%
���
1��
������
$��
�
1 ���$ ���
��
$��
�1PLQ��
��
$
���
FD���
GHWDLO $ GHWDLO %
20N
15
A
PDLQV WHUPLQDO
���9a� �� $/ 1
33
Technical data
Outer dimensions
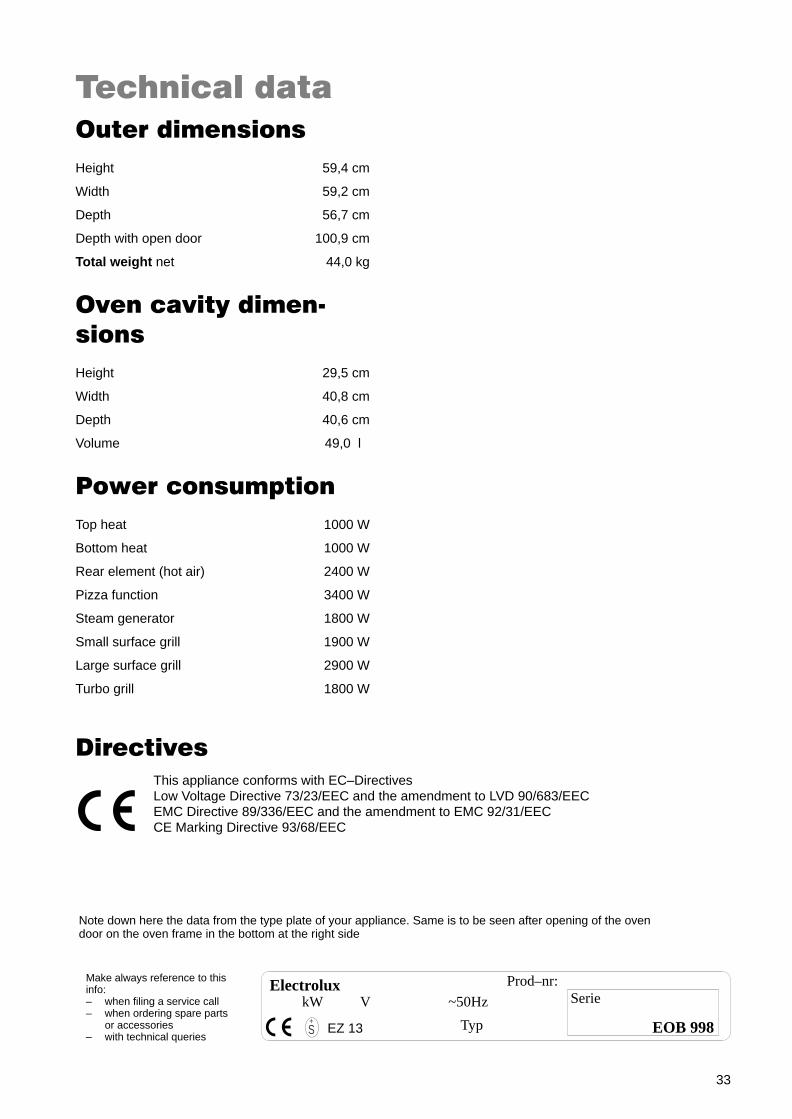
Height 59,4 cm
Width 59,2 cm
Depth 56,7 cm
Depth with open door 100,9 cm
Total weight net 44,0 kg
Oven cavity dimen�
sions
Height 29,5 cm
Width 40,8 cm
Depth 40,6 cm
Volume 49,0 l
Power consumption
Top heat 1000 W
Bottom heat 1000 W
Rear element (hot air) 2400 W
Pizza function 3400 W
Steam generator 1800 W
Small surface grill 1900 W
Large surface grill 2900 W
Turbo grill 1800 W
Directives
This appliance conforms with EC–DirectivesLow Voltage Directive 73/23/EEC and the amendment to LVD 90/683/EECEMC Directive 89/336/EEC and the amendment to EMC 92/31/EECCE Marking Directive 93/68/EEC
Note down here the data from the type plate of your appliance. Same is to be seen after opening of the ovendoor on the oven frame in the bottom at the right side
Make always reference to thisinfo: – when filing a service call– when ordering spare parts
or accessories– with technical queries
Prod–nr: Serie
EOB 998
kW V ~50Hz
Typ+S EZ 13
Electrolux
34
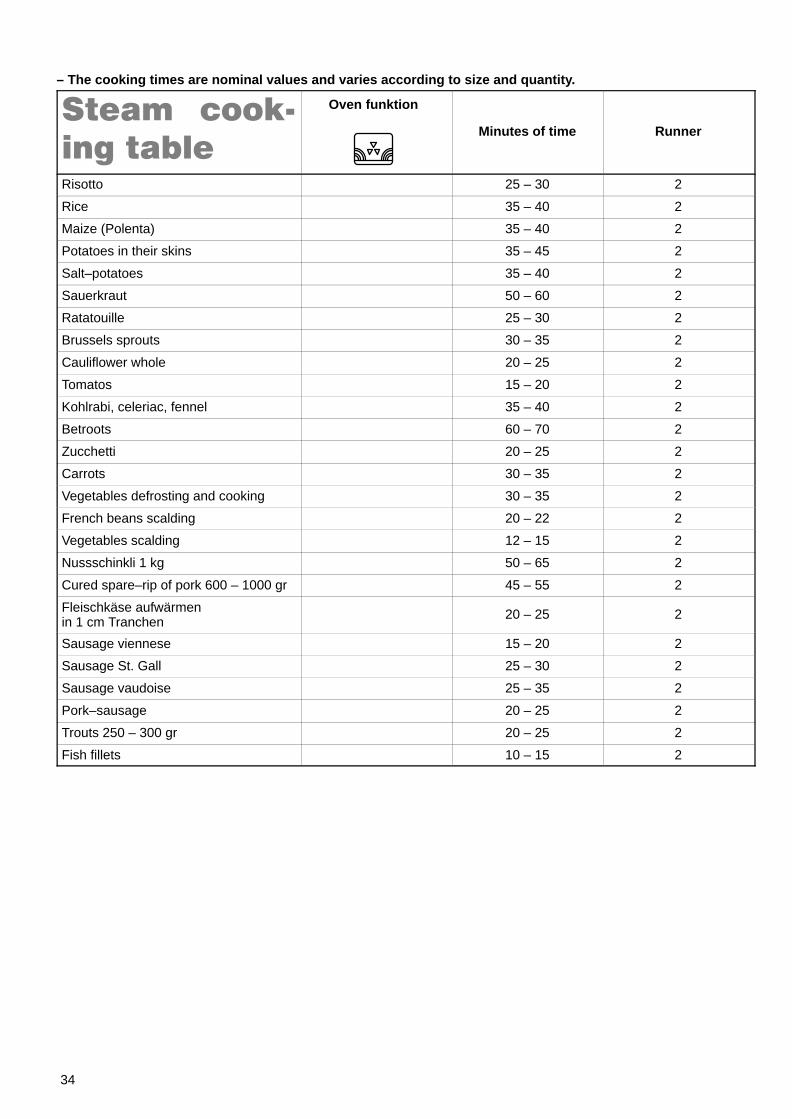
– The cooking times are nominal values and varies according to size and quantity.
Steam cook�
ing table
Oven funktion
Minutes of time Runner
Risotto 25 – 30 2
Rice 35 – 40 2
Maize (Polenta) 35 – 40 2
Potatoes in their skins 35 – 45 2
Salt–potatoes 35 – 40 2
Sauerkraut 50 – 60 2
Ratatouille 25 – 30 2
Brussels sprouts 30 – 35 2
Cauliflower whole 20 – 25 2
Tomatos 15 – 20 2
Kohlrabi, celeriac, fennel 35 – 40 2
Betroots 60 – 70 2
Zucchetti 20 – 25 2
Carrots 30 – 35 2
Vegetables defrosting and cooking 30 – 35 2
French beans scalding 20 – 22 2
Vegetables scalding 12 – 15 2
Nussschinkli 1 kg 50 – 65 2
Cured spare–rip of pork 600 – 1000 gr 45 – 55 2
Fleischkäse aufwärmenin 1 cm Tranchen
20 – 25 2
Sausage viennese 15 – 20 2
Sausage St. Gall 25 – 30 2
Sausage vaudoise 25 – 35 2
Pork–sausage 20 – 25 2
Trouts 250 – 300 gr 20 – 25 2
Fish fillets 10 – 15 2
35
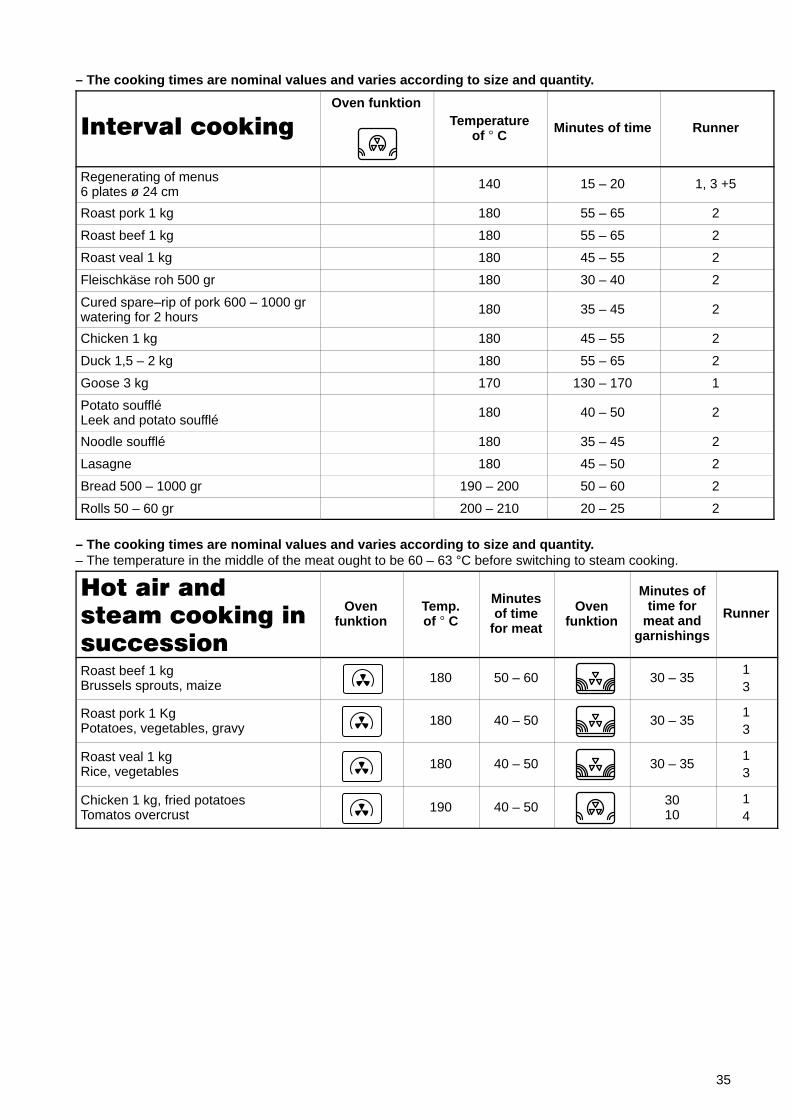
– The cooking times are nominal values and varies according to size and quantity.
Interval cookingOven funktion
Temperatureof � C
Minutes of time Runner
Regenerating of menus6 plates ø 24 cm
140 15 – 20 1, 3 +5
Roast pork 1 kg 180 55 – 65 2
Roast beef 1 kg 180 55 – 65 2
Roast veal 1 kg 180 45 – 55 2
Fleischkäse roh 500 gr 180 30 – 40 2
Cured spare–rip of pork 600 – 1000 grwatering for 2 hours
180 35 – 45 2
Chicken 1 kg 180 45 – 55 2
Duck 1,5 – 2 kg 180 55 – 65 2
Goose 3 kg 170 130 – 170 1
Potato souffléLeek and potato soufflé
180 40 – 50 2
Noodle soufflé 180 35 – 45 2
Lasagne 180 45 – 50 2
Bread 500 – 1000 gr 190 – 200 50 – 60 2
Rolls 50 – 60 gr 200 – 210 20 – 25 2
– The cooking times are nominal values and varies according to size and quantity.– The temperature in the middle of the meat ought to be 60 – 63 °C before switching to steam cooking.
Hot air and steam cooking insuccession
Ovenfunktion
Temp.of � C
Minutesof time
for meat
Ovenfunktion
Minutes oftime for
meat andgarnishings
Runner
Roast beef 1 kgBrussels sprouts, maize
180 50 – 60 30 – 3513
Roast pork 1 KgPotatoes, vegetables, gravy
180 40 – 50 30 – 3513
Roast veal 1 kg Rice, vegetables
180 40 – 50 30 – 3513
Chicken 1 kg, fried potatoesTomatos overcrust
190 40 – 50 3010
14
36
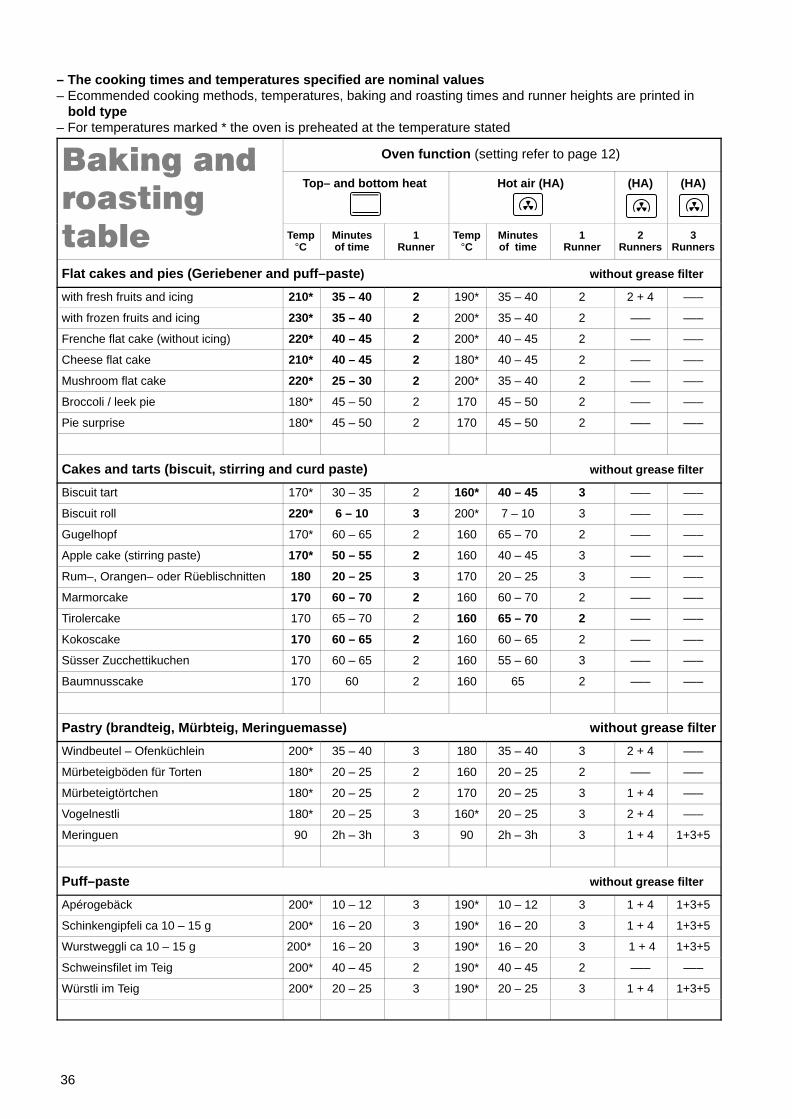
– The cooking times and temperatures specified are nominal values– Ecommended cooking methods, temperatures, baking and roasting times and runner heights are printed in
bold type– For temperatures marked * the oven is preheated at the temperature stated
Baking and Oven function (setting refer to page 12)Baking and
roastingTop– and bottom heat Hot air (HA) (HA) (HA)
table Temp°C
Minutesof time
1Runner
Temp°C
Minutesof time
1Runner
2Runners
3Runners
Flat cakes and pies (Geriebener and puff–paste ) without grease filter
with fresh fruits and icing 210* 35 – 40 2 190* 35 – 40 2 2 + 4 –––
with frozen fruits and icing 230* 35 – 40 2 200* 35 – 40 2 ––– –––
Frenche flat cake (without icing) 220* 40 – 45 2 200* 40 – 45 2 ––– –––
Cheese flat cake 210* 40 – 45 2 180* 40 – 45 2 ––– –––
Mushroom flat cake 220* 25 – 30 2 200* 35 – 40 2 ––– –––
Broccoli / leek pie 180* 45 – 50 2 170 45 – 50 2 ––– –––
Pie surprise 180* 45 – 50 2 170 45 – 50 2 ––– –––
Cakes and tarts (biscuit, stirring and curd paste) without grease filter
Biscuit tart 170* 30 – 35 2 160* 40 – 45 3 ––– –––
Biscuit roll 220* 6 – 10 3 200* 7 – 10 3 ––– –––
Gugelhopf 170* 60 – 65 2 160 65 – 70 2 ––– –––
Apple cake (stirring paste) 170* 50 – 55 2 160 40 – 45 3 ––– –––
Rum–, Orangen– oder Rüeblischnitten 180 20 – 25 3 170 20 – 25 3 ––– –––
Marmorcake 170 60 – 70 2 160 60 – 70 2 ––– –––
Tirolercake 170 65 – 70 2 160 65 – 70 2 ––– –––
Kokoscake 170 60 – 65 2 160 60 – 65 2 ––– –––
Süsser Zucchettikuchen 170 60 – 65 2 160 55 – 60 3 ––– –––
Baumnusscake 170 60 2 160 65 2 ––– –––
Pastry (brandteig, Mürbteig, Meringuemasse) without grease filter
Windbeutel – Ofenküchlein 200* 35 – 40 3 180 35 – 40 3 2 + 4 –––
Mürbeteigböden für Torten 180* 20 – 25 2 160 20 – 25 2 ––– –––
Mürbeteigtörtchen 180* 20 – 25 2 170 20 – 25 3 1 + 4 –––
Vogelnestli 180* 20 – 25 3 160* 20 – 25 3 2 + 4 –––
Meringuen 90 2h – 3h 3 90 2h – 3h 3 1 + 4 1+3+5
Puff–paste without grease filter
Apérogebäck 200* 10 – 12 3 190* 10 – 12 3 1 + 4 1+3+5
Schinkengipfeli ca 10 – 15 g 200* 16 – 20 3 190* 16 – 20 3 1 + 4 1+3+5
Wurstweggli ca 10 – 15 g 200* 16 – 20 3 190* 16 – 20 3 1 + 4 1+3+5
Schweinsfilet im Teig 200* 40 – 45 2 190* 40 – 45 2 ––– –––
Würstli im Teig 200* 20 – 25 3 190* 20 – 25 3 1 + 4 1+3+5
37
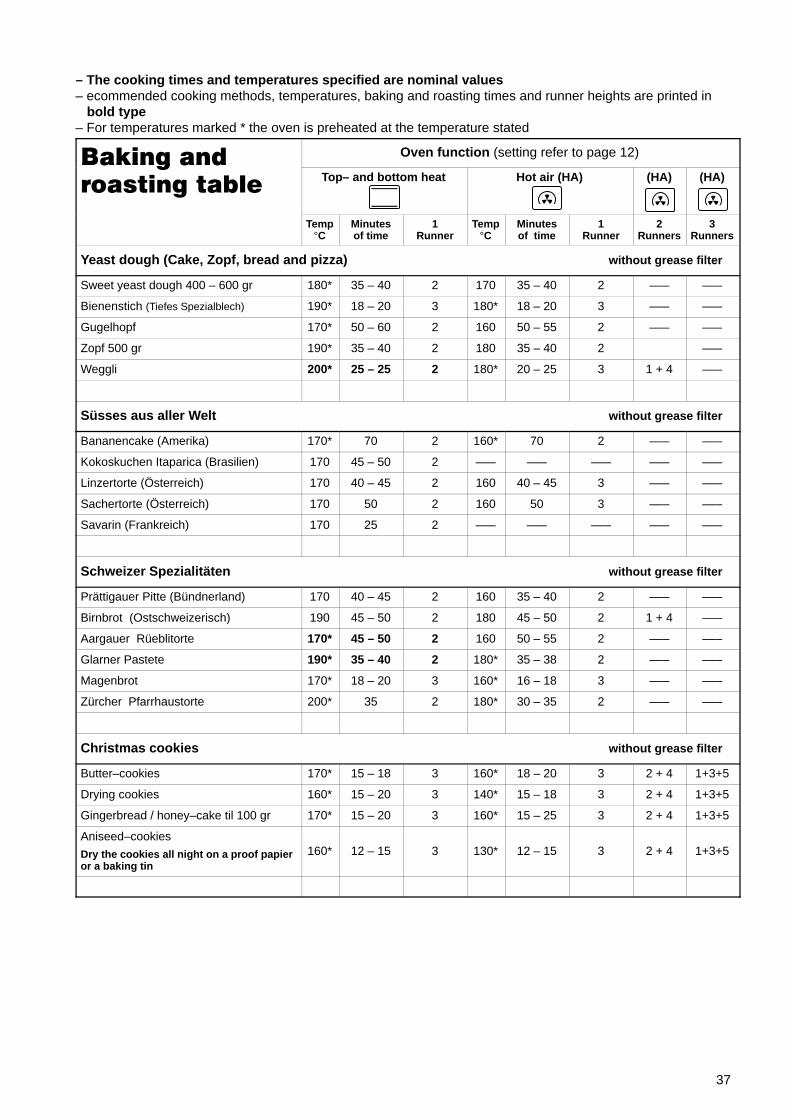
– The cooking times and temperatures specified are nominal values– ecommended cooking methods, temperatures, baking and roasting times and runner heights are printed in
bold type– For temperatures marked * the oven is preheated at the temperature stated
Baking and Oven function (setting refer to page 12)Baking androasting table
Top– and bottom heat Hot air (HA) (HA) (HA)
Temp°C
Minutesof time
1Runner
Temp°C
Minutesof time
1Runner
2Runners
3Runners
Yeast dough (Cake, Zopf, bread and pizza) without grease filter
Sweet yeast dough 400 – 600 gr 180* 35 – 40 2 170 35 – 40 2 ––– –––
Bienenstich (Tiefes Spezialblech) 190* 18 – 20 3 180* 18 – 20 3 ––– –––
Gugelhopf 170* 50 – 60 2 160 50 – 55 2 ––– –––
Zopf 500 gr 190* 35 – 40 2 180 35 – 40 2 –––
Weggli 200* 25 – 25 2 180* 20 – 25 3 1 + 4 –––
Süsses aus aller Welt without grease filter
Bananencake (Amerika) 170* 70 2 160* 70 2 ––– –––
Kokoskuchen Itaparica (Brasilien) 170 45 – 50 2 ––– ––– ––– ––– –––
Linzertorte (Österreich) 170 40 – 45 2 160 40 – 45 3 ––– –––
Sachertorte (Österreich) 170 50 2 160 50 3 ––– –––
Savarin (Frankreich) 170 25 2 ––– ––– ––– ––– –––
Schweizer Spezialitäten without grease filter
Prättigauer Pitte (Bündnerland) 170 40 – 45 2 160 35 – 40 2 ––– –––
Birnbrot (Ostschweizerisch) 190 45 – 50 2 180 45 – 50 2 1 + 4 –––
Aargauer Rüeblitorte 170* 45 – 50 2 160 50 – 55 2 ––– –––
Glarner Pastete 190* 35 – 40 2 180* 35 – 38 2 ––– –––
Magenbrot 170* 18 – 20 3 160* 16 – 18 3 ––– –––
Zürcher Pfarrhaustorte 200* 35 2 180* 30 – 35 2 ––– –––
Christmas cookies without grease filter
Butter–cookies 170* 15 – 18 3 160* 18 – 20 3 2 + 4 1+3+5
Drying cookies 160* 15 – 20 3 140* 15 – 18 3 2 + 4 1+3+5
Gingerbread / honey–cake til 100 gr 170* 15 – 20 3 160* 15 – 25 3 2 + 4 1+3+5
Aniseed–cookies
Dry the cookies all night on a proof papieror a baking tin
160* 12 – 15 3 130* 12 – 15 3 2 + 4 1+3+5
38
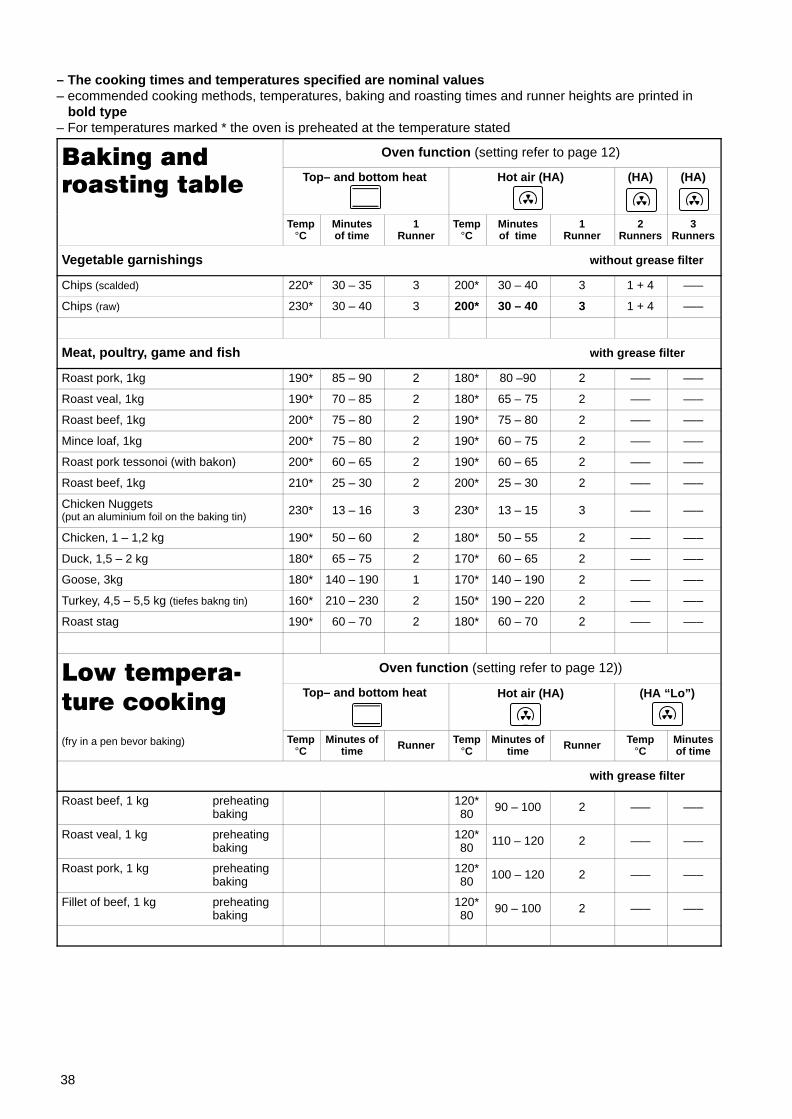
– The cooking times and temperatures specified are nominal values– ecommended cooking methods, temperatures, baking and roasting times and runner heights are printed in
bold type– For temperatures marked * the oven is preheated at the temperature stated
Baking and Oven function (setting refer to page 12)Baking androasting table
Top– and bottom heat Hot air (HA) (HA) (HA)
Temp°C
Minutesof time
1Runner
Temp°C
Minutesof time
1Runner
2Runners
3Runners
Vegetable garnishings without grease filter
Chips (scalded) 220* 30 – 35 3 200* 30 – 40 3 1 + 4 –––
Chips (raw) 230* 30 – 40 3 200* 30 – 40 3 1 + 4 –––
Meat, poultry, game and fish with grease filter
Roast pork, 1kg 190* 85 – 90 2 180* 80 –90 2 ––– –––
Roast veal, 1kg 190* 70 – 85 2 180* 65 – 75 2 ––– –––
Roast beef, 1kg 200* 75 – 80 2 190* 75 – 80 2 ––– –––
Mince loaf, 1kg 200* 75 – 80 2 190* 60 – 75 2 ––– –––
Roast pork tessonoi (with bakon) 200* 60 – 65 2 190* 60 – 65 2 ––– –––
Roast beef, 1kg 210* 25 – 30 2 200* 25 – 30 2 ––– –––
Chicken Nuggets(put an aluminium foil on the baking tin) 230* 13 – 16 3 230* 13 – 15 3 ––– –––
Chicken, 1 – 1,2 kg 190* 50 – 60 2 180* 50 – 55 2 ––– –––
Duck, 1,5 – 2 kg 180* 65 – 75 2 170* 60 – 65 2 ––– –––
Goose, 3kg 180* 140 – 190 1 170* 140 – 190 2 ––– –––
Turkey, 4,5 – 5,5 kg (tiefes bakng tin) 160* 210 – 230 2 150* 190 – 220 2 ––– –––
Roast stag 190* 60 – 70 2 180* 60 – 70 2 ––– –––
Low tempera� Oven function (setting refer to page 12))Low tempera
ture cookingTop– and bottom heat Hot air (HA) (HA “Lo”)
(fry in a pen bevor baking) Temp°C
Minutes oftime Runner Temp
°CMinutes of
time Runner Temp°C
Minutesof time
with grease filter
Roast beef, 1 kg preheatingbaking
120*80
90 – 100 2 ––– –––
Roast veal, 1 kg preheatingbaking
120*80
110 – 120 2 ––– –––
Roast pork, 1 kg preheatingbaking
120*80
100 – 120 2 ––– –––
Fillet of beef, 1 kg preheatingbaking
120*80
90 – 100 2 ––– –––
39
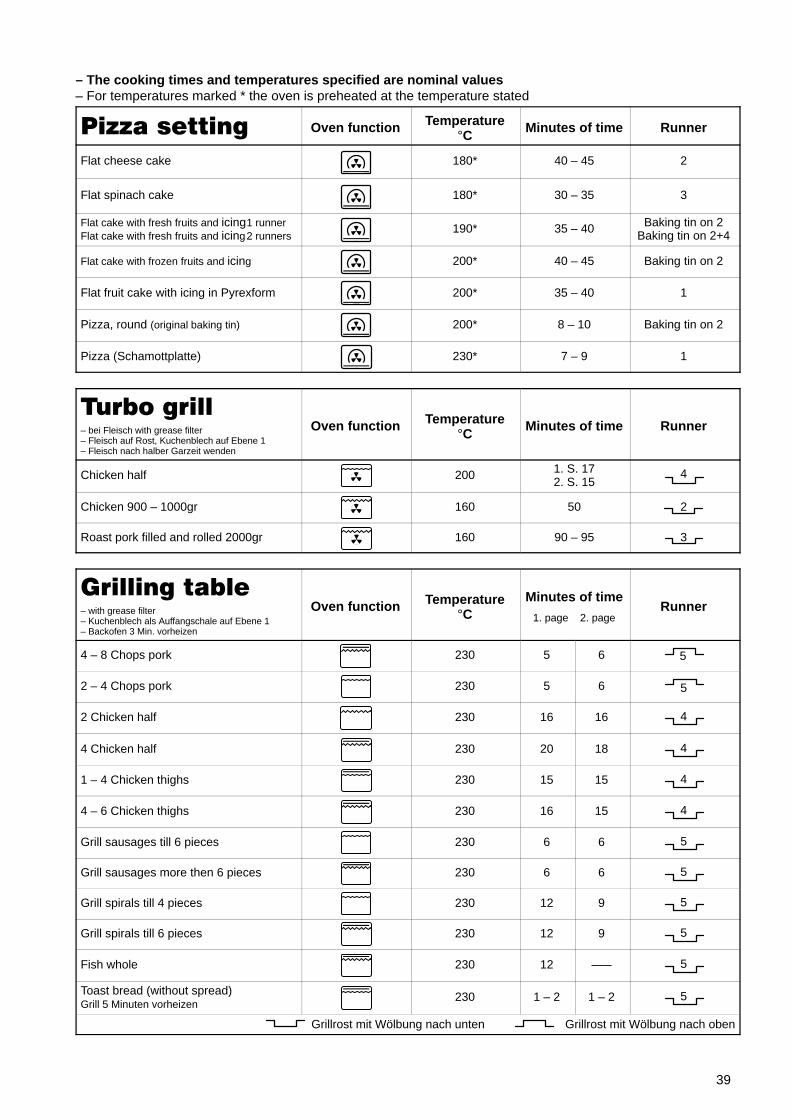
– The cooking times and temperatures specified are nominal values– For temperatures marked * the oven is preheated at the temperature stated
Pizza setting Oven function Temperature°C Minutes of time Runner
Flat cheese cake 180* 40 – 45 2
Flat spinach cake 180* 30 – 35 3
Flat cake with fresh fruits and icing1 runnerFlat cake with fresh fruits and icing2 runners
190* 35 – 40 Baking tin on 2Baking tin on 2+4
Flat cake with frozen fruits and icing 200* 40 – 45 Baking tin on 2
Flat fruit cake with icing in Pyrexform 200* 35 – 40 1
Pizza, round (original baking tin) 200* 8 – 10 Baking tin on 2
Pizza (Schamottplatte) 230* 7 – 9 1
Turbo grill– bei Fleisch with grease filter– Fleisch auf Rost, Kuchenblech auf Ebene 1– Fleisch nach halber Garzeit wenden
Oven function Temperature°C Minutes of time Runner
Chicken half 200 1. S. 172. S. 15
4
Chicken 900 – 1000gr 160 50 2
Roast pork filled and rolled 2000gr 160 90 – 95 3
Grilling table– with grease filter– Kuchenblech als Auffangschale auf Ebene 1– Backofen 3 Min. vorheizen
Oven function Temperature°C
Minutes of time
1. page 2. pageRunner
4 – 8 Chops pork 230 5 6 5
2 – 4 Chops pork 230 5 6 5
2 Chicken half 230 16 16 4
4 Chicken half 230 20 18 4
1 – 4 Chicken thighs 230 15 15 4
4 – 6 Chicken thighs 230 16 15 4
Grill sausages till 6 pieces 230 6 6 5
Grill sausages more then 6 pieces 230 6 6 5
Grill spirals till 4 pieces 230 12 9 5
Grill spirals till 6 pieces 230 12 9 5
Fish whole 230 12 ––– 5
Toast bread (without spread)Grill 5 Minuten vorheizen
230 1 – 2 1 – 2 5
Grillrost mit Wölbung nach unten Grillrost mit Wölbung nach oben
40
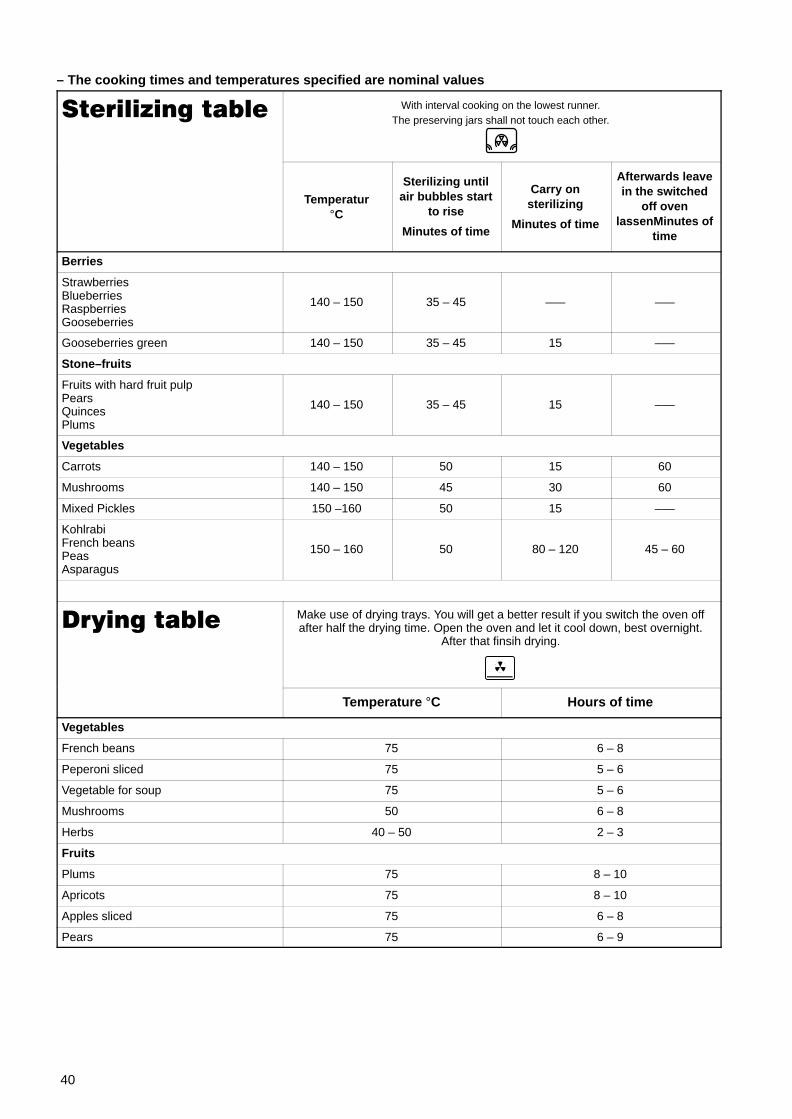
– The cooking times and temperatures specified are nominal values
Sterilizing table With interval cooking on the lowest runner.The preserving jars shall not touch each other.
Temperatur°C
Sterilizing untilair bubbles start
to rise
Minutes of time
Carry onsterilizing
Minutes of time
Afterwards leavein the switched
off ovenlassenMinutes of
time
Berries
StrawberriesBlueberriesRaspberriesGooseberries
140 – 150 35 – 45 ––– –––
Gooseberries green 140 – 150 35 – 45 15 –––
Stone–fruits
Fruits with hard fruit pulpPearsQuincesPlums
140 – 150 35 – 45 15 –––
Vegetables
Carrots 140 – 150 50 15 60
Mushrooms 140 – 150 45 30 60
Mixed Pickles 150 –160 50 15 –––
KohlrabiFrench beansPeasAsparagus
150 – 160 50 80 – 120 45 – 60
Drying table Make use of drying trays. You will get a better result if you switch the oven offafter half the drying time. Open the oven and let it cool down, best overnight.
After that finsih drying.
Temperature °C Hours of time
Vegetables
French beans 75 6 – 8
Peperoni sliced 75 5 – 6
Vegetable for soup 75 5 – 6
Mushrooms 50 6 – 8
Herbs 40 – 50 2 – 3
Fruits
Plums 75 8 – 10
Apricots 75 8 – 10
Apples sliced 75 6 – 8
Pears 75 6 – 9

41

42

43

44
From the Electrolux Group. The world’s No.1 choiceThe Electrolux Group is the world’s largest producer of powered appliances for kitchen, cleaning and outdoor use. More than 55 million Electrolux Group products (such as refrigerations, cookers, washing machines, vaccum cleaners, chain saws and lawn mowers) are sold each year for a value of approx. USD 14 billion in more than 150 countries around the world.