Embed Size (px)
Citation preview

BULLDOG
USA and CANADA: (888) 222-4346 | INTERNATIONAL: (510) 657-8747 | FAX: (510) 657-8748
corsair.com
© 2015 - 2016 Corsair Components, Inc. All rights reserved. Corsair and the sails logo are registered trademarks, and Professional Series is a trademark in the United States and/or other countries. All other trademarks are the property of their respective owners. Product may vary slightly from those pictured. Document Number: 49-001471 rev AC
47100 Bayside Parkway • Fremont • California • 94538 • USA
FORUM: forum.corsair.com
TWITTER: twitter.com/corsair BULLDOG PAGE: corsair.com/bulldog
EMAIL: [email protected]
FACEBOOK: facebook.com/corsair
BLOG: blog.corsair.com
5-year warranty covers case, cooling, and power supply only. Motherboards shipped pre-installed in the Bulldog kit are warranted for one year.
HIGH PERFORMANCE PC KIT
BULLDOG INSTRUCTION MANUAL

BULLDOG HIGH PERFORMANCE PC KITBULLDOG HIGH PERFORMANCE PC KIT
21
Table of Contents Thank you for purchasing the Corsair Bulldog!
Bulldog Case Specifications
Introduction ................................................................................................................................................2
Bulldog Case Specifications .................................................................................................................2
Bulldog Kit Contents ...............................................................................................................................3
Accessory Box Contents ........................................................................................................................4
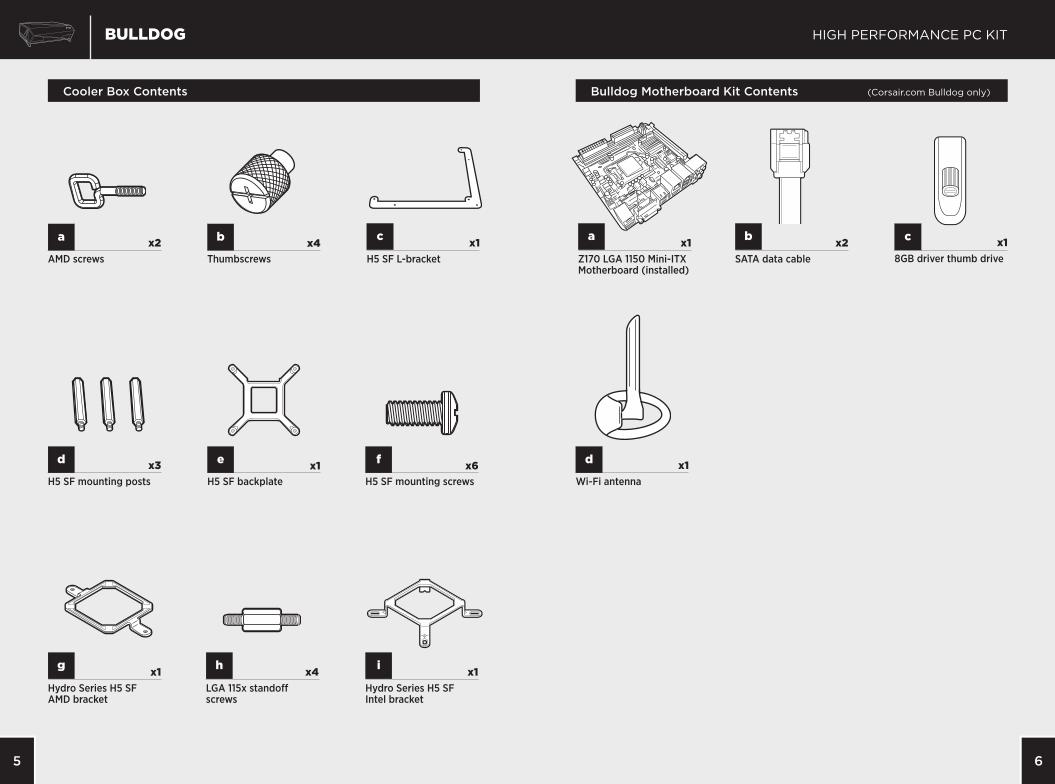
Cooler Box Contents ...............................................................................................................................5
Bulldog Motherboard Kit Contents ...................................................................................................6
SF600 Specifications ...............................................................................................................................7
Bulldog Features.......................................................................................................................................9
“How to Build Bulldog” Contents Removing the Back Bracket ...................................................................................................... 11
Removing the Top Panel ............................................................................................................. 11
Installing the Intel Backplate ..................................................................................................... 12
Installing the Standoff Screws .................................................................................................. 12
Installing the Motherboard and H5 SF Mounting System .............................................. 13
Installing the CPU, Memory, and Front Panel Headers ................................................... 15
Connecting the Motherboard Power Cables ...................................................................... 15
Mounting the H5 SF Block (Intel) ............................................................................................ 16
Mounting the H5 SF Block (AMD) ........................................................................................... 17
Connecting the Case Fans ......................................................................................................... 19
Mounting the H5 SF Cooler Unit .............................................................................................. 19
Removing the Drive Tray ............................................................................................................ 20
Installing a Graphics Card .......................................................................................................... 21
Mounting the Graphics Card Radiator ................................................................................... 22
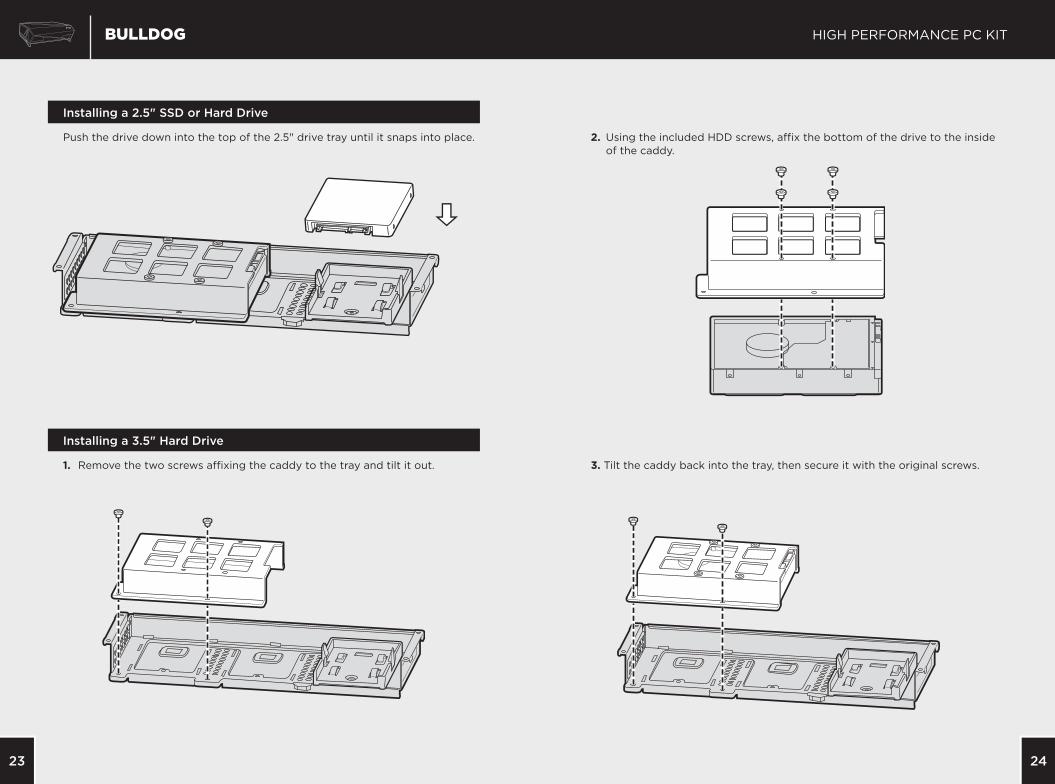
Installing a 2.5" SSD or Hard Drive......................................................................................... 23
Installing a 3.5" Hard Drive ........................................................................................................ 23
Connecting SSDs and Hard Drives ......................................................................................... 25
Connecting Additional Fans or Pumps ................................................................................. 27
Bulldog Placement ................................................................................................................................ 27
Additional Resources and Warranty .............................................................................................. 28
The Corsair Bulldog operates as the foundation for your high performance entertainment PC. It’s designed to be easy to build in while running quiet, fast, and cool. Whether it’s for the living room or the dorm room, Bulldog allows you to harness some of the most powerful graphics cards and processors on the planet, giving you the gaming experience of a full size desktop PC without the bulk.
DimensionsLength ...............................................................................................................................................381mmWidth .................................................................................................................................................457mmHeight ................................................................................................................................................133mm
Maximum GPU length .................................................................................................................300mm
Case Fan SpecificationsLength ................................................................................................................................................. 25mmWidth ................................................................................................................................................... 92mmHeight .................................................................................................................................................. 92mmRPM ...................................................................................................................................2400 RPM ± 10%Static Pressure ....................................................................................................................0.1 inch-H2OAir Flow ........................................................................................................................................ 39.5 CFMSound Level .................................................................................................................................28 dB(A)
Front Fan Mounts (Included) .................................................................................................... 92mmSide Fan Mounts (Included)....................................................................................................... 92mmBottom Fan Mounts (Not Included) .....................................................................................120mmBottom Liquid Cooling Mounts ..............................................................................................120mm

BULLDOG HIGH PERFORMANCE PC KIT
43 43
BULLDOG HIGH PERFORMANCE PC KIT
Bulldog Kit Contents
a x1Hydro Series H5 SF Liquid CPU Cooler
b
SF600 Power Supply (installed)
x1 c x1GPU support bracket (installed)
d x1Case fan Y-cable(installed)
Accessory Box Contents
c x1Graphics card riser ribbon
b x22.5" drive tray
d x1SF600 modular cable kit
SFX cable 24 pin (20+4)
SATA cable
EPS/SFX12V 8 pin (4+4) cable
PCIe 8 pin (6+2) cable
Peripheral cable (4-pin)
a x1Power cable
e x14Motherboard screws
f hx2 x2Foam graphics card support
Fan extension cable
g x1Fan hub power cable
BULLDOG HIGH PERFORMANCE PC KIT
65
Bulldog Motherboard Kit Contents (Corsair.com Bulldog only)Cooler Box Contents
a
d d
x2
x3 x1
AMD screws
H5 SF mounting posts Wi-Fi antenna
b
e f
Thumbscrews
H5 SF backplate H5 SF mounting screws
x4
x1 x6
c x1H5 SF L-bracket
g x1Hydro Series H5 SF AMD bracket
h ix4 x1LGA 115x standoff screws
Hydro Series H5 SF Intel bracket
c x18GB driver thumb drive
b x2SATA data cable
a x1Z170 LGA 1150 Mini-ITX Motherboard (installed)

BULLDOG HIGH PERFORMANCE PC KIT
87
Corsair SF600 DC Cable ListingSF600 SFX Power Supply Specifications
Max Load Max Output
Model RPS0026 +3.3V 20A120W
Part No. CP-9020105 / 75-011264 +5V 20A
AC input Rating 100-240V +12V 50A 600W
Input Current 10A-5A -12V 0.3A 3.6W
Frequency 47˜63Hz +5Vsb 2.5A 12.5W
Total Power: 600W @ 40C
Qty Description Total Length
1
SFX Cable 24 pin (20+4)
Connectors Per Cable
160mm
(± 10mm)
1
Total Connectors
1
1
EPS/SFX12V 8 pin (4+4) cable
Connectors Per Cable
400mm
(± 10mm)
1
Total Connectors
1
2
PCIe 8 pin (6+2) cable
Connectors Per Cable
400mm
(± 10mm)
1
Total Connectors
2
1
SATA cable (4 SATA)
Connectors Per Cable
610mm
(± 10mm)
4
Total Connectors
4
1
Peripheral cable (4-pin)
Connectors Per Cable
445mm
(± 10mm)
4
Total Connectors
4
450mm 100mm 100mm 100mm100mm 115mm 115mm 115mm
550mm 100mm 100mm 100mm105mm 150mm 150mm 205mm
650mm400mm
160mm
600mm400mm
Corsair SF600 power supply efficiency
Corsair SF600 power supply fan noise curve
input 115Vac input 230Vac
35
30
25
20
15
10
5
00 600120 240 360 480
93
91
89
87
85
83
81
79
77
75
10010 5020
35
30
25
20
15
10
5
00 600120 240 360 480
93
91
89
87
85
83
81
79
77
75
10010 5020
% EFFICIENCY
SYSTEM LOAD
Fan Noise (db)
Power Output - Watts

BULLDOG HIGH PERFORMANCE PC KIT
109
Bulldog Features
Power button
I/O panel (x2 USB 3.0, headphone/mic, and reset)
Drive tray
SSD tray
HDD tray
3-pin 92mm fan
SF600 power supply
Hydro Series H5 SF liquid CPU cooler
120mm radiator mount
GPU support bracket
A
E
B
F
C
G
D
H
I
J
D
E
C
J
I
B A
F
G
H
F

BULLDOG HIGH PERFORMANCE PC KIT
1211
Installing the Standoff Screws (Intel motherboard only)Removing the Top Panel
Install the provided LGA 115x standoff screws. Tighten the screws all the way, but note that the backplate may still be loose. This is normal.
Unscrew the two screws holding the top panel in place, then slide it off. Note that there is a cable connected to the panel that powers the LEDs; you’ll need to disconnect that as well.
Installing the Intel Backplate (Intel motherboard only)Removing the Back Bracket
Install the Intel backplate to the back of the motherboard, with the indentation wrapping around the two screws on the rear of the CPU socket.
Remove the four retaining screws near the corners of the bracket.
Before You Start: This manual will walk you through building a system in Bulldog, but you can also visit corsair.com/bulldog for a step-by-step video, or contact customer service for additional help. If your Bulldog has the motherboard already installed, you can skip to page 15.

BULLDOG HIGH PERFORMANCE PC KIT
1413
4. Install the three H5 SF mounting posts.2. Next, align your motherboard with the pre-installed standoffs inside the case, then align the included H5 SF L-bracket with the Mini-ITX motherboard mounting holes as shown.
Installing the Motherboard and H5 SF Mounting System
3. Use three of the included H5 SF mounting screws to secure the bracket and motherboard to the case, then use a single motherboard screw to secure the remaining corner of the motherboard to the case.
1. First, install your motherboard’s I/O shield in the back of the case.

BULLDOG HIGH PERFORMANCE PC KIT
1615
Connecting the Motherboard Power Cables
Connect the SFX 24-pin cable to the power supply and 24-pin connector on the motherboard.
Connect the EPS/SFX12V 8-pin cable to the power supply and 12V connector on the motherboard. If your motherboard’s 12V connector is 4-pin instead of 8-pin, the cable is designed to split into two 4-pins.
Mounting the H5 SF Block (Intel)Installing the CPU, Memory, and Front Panel Headers
1. Remove the protective cap from the block. Insert the top of the H5 SF water block into the Intel mounting bracket. Note that the tubes on the block swivel, and can be rotated back and forth to ease installation.
2. Align the bracket and pump over the standoff screws as shown and use the thumbscrews to secure all four corners.
Note: On motherboards with components (capacitors, etc.) next to the CPU socket, position the block away from them on the standoffs to ensure good contact with the CPU.
3. Connect the 3-pin cable from the block to the Bulldog fan splitter. Use a fan extension cable if necessary.
Please refer to your motherboard’s manual for instructions on how to install a CPU and memory, as well as where to connect the front panel headers (pictured here) if they’re not already connected.
USB 3.0
HD AUDIO
POWER SW
RESET SW
HDD LED
POWER LED +
POWER LED -

BULLDOG HIGH PERFORMANCE PC KIT
1817
Mounting the H5 SF Block (AMD)
3. Align the bracket with the stock AMD mounting clips as shown. Tighten the thumbscrews until they are secure.
1. Remove the protective cap from the block. Insert the top of the H5 SF’s water block into the AMD mounting bracket.
2. Insert the AMD screw clips and secure with the thumbscrews as shown; do not tighten them all the way.
4. Connect the 3-pin cable from the block to the Bulldog fan splitter. Use a fan extension cable if necessary.

BULLDOG HIGH PERFORMANCE PC KIT
2019
Connecting Case Fans
Connect the Y-cable for the case fans to a fan header on the motherboard.
Mounting the H5 SF Cooler Unit
1. Connect the unit’s 4-pin fan header to the CPU_FAN header on the motherboard.
2. Ensure the tubes coming out of the block are pivoted facing back and form a “U” shape in their connection to the cooler unit. Align the cooler with the L-bracket mounting posts and secure the cooler on the three posts as shown with the H5 SF mounting screws.
Note: For ease of assembly, users may wish to connect the SATA data cable(s) for their storage to the motherboard prior to installing the cooler. (See page 25.)
Undo the twist tie binding the cables to the drive tray, then remove the four screws holding the tray in place. Then, lift out the tray.
Removing the Drive Tray

BULLDOG HIGH PERFORMANCE PC KIT
2221
Installing a Graphics Card
1. Connect the included graphics card riser ribbon to the graphics card, then to the motherboard.
Optionally, you may also affix the riser ribbon to the installed PCIe bracket with two screws.
2. Unscrew the retaining clip on the rear of the case, to the right of the expansion slots, and remove the clip. Then remove the slot covers.
Optionally, you can also affix the two foam padding blocks included with Bulldog beneath the graphics card to support it. Be sure not to obstruct any fans on the card’s cooler.
3. Connect any power cables needed (marked PCIe in cable kit) to the graphics card, then connect those cables to the power supply. Align the graphics card’s bracket with the expansion slots in the rear of the case, screw it into the slots, then replace the retaining clip and thumbscrew.
If your graphics card has a 120mm radiator, you can affix it to the bottom of the interior of the chassis using the screws included with Bulldog. The radiator should be mounted with the fan blowing down and out of the case. Note that you may have to temporarily remove the graphics card and H5 SF cooler unit and/or compress the power cables on the power supply to ensure fitment.
Mounting the Graphics Card Radiator (Optional)
BULLDOG HIGH PERFORMANCE PC KIT
2423
Installing a 2.5" SSD or Hard Drive
Push the drive down into the top of the 2.5" drive tray until it snaps into place.
Installing a 3.5" Hard Drive
1. Remove the two screws affixing the caddy to the tray and tilt it out.
2. Using the included HDD screws, affix the bottom of the drive to the inside of the caddy.
3. Tilt the caddy back into the tray, then secure it with the original screws.
BULLDOG HIGH PERFORMANCE PC KIT
2625
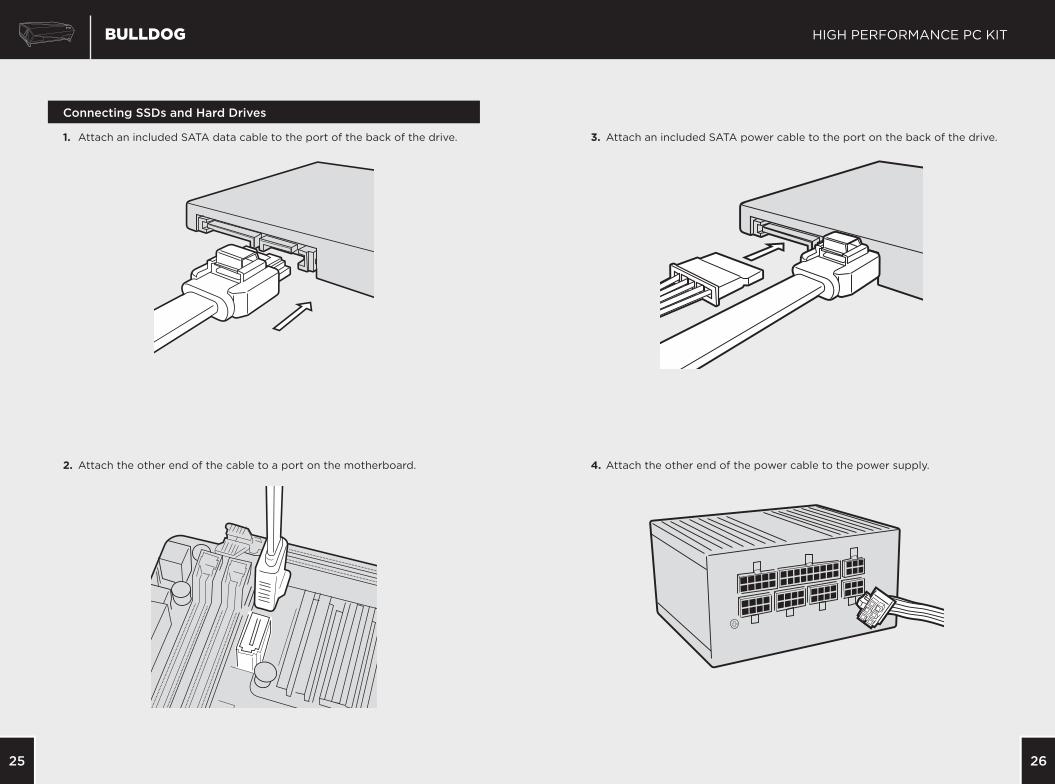
1. Attach an included SATA data cable to the port of the back of the drive.
2. Attach the other end of the cable to a port on the motherboard. 4. Attach the other end of the power cable to the power supply.
Connecting SSDs and Hard Drives
3. Attach an included SATA power cable to the port on the back of the drive.

BULLDOG HIGH PERFORMANCE PC KIT
2827
Bulldog Placement
Additional ResourcesConnecting Additional Fans or Pumps
Attach any additional pumps or fans to the included fan splitter, then connect the fan splitter to the fan hub power cable and that cable to a SATA power lead. Use included fan extension cables if necessary. Also, be sure to reconnect the LED cable from the top panel before closing up Bulldog.
For instructional videos on assembly, additional information about Bulldog, information about products compatible with Bulldog, or technical support, please visit our website at corsair.com/bulldog.
Corsair Limited WarrantyCorsair provides a warranty to the original purchaser only that any genuine Corsair hardware product purchased from an authorized Corsair reseller will be free from defects in material and workmanship for a specific length of time from the date of purchase. The warranty period will vary by specific product, as identified in your user documentation, or on the product package. In the event any of these warranty periods differ, the longest specified warranty period will apply.
Except where prohibited by applicable local law, this warranty is limited to the original purchaser and is non-transferable. This warranty provides you with specific legal rights, and you may have additional rights that vary under local laws.
In general, this warranty means your Corsair power supply is guaranteed to operate, as specified by its data sheet and/or product documentation, and in the operating environment for which it was intended, for the life of the product or the extent of the warranty.
RemediesCorsair’s entire liability and your exclusive remedy for any breach of warranty shall be, at Corsair’s exclusive discretion: 1) to repair or replace the hardware, or 2) to refund the price paid, provided that the hardware is returned to the original place of purchase, or another place as directed by Corsair, with the original sales receipt (or a valid copy thereof). You may be required to pay shipping and handling charges, as well as any applicable tariffs, duties, taxes, or other fees, except where prohibited by applicable local law. Corsair may, at its exclusive discretion, use new, or used/refurbished parts in good working condition, to repair or replace the hardware.Any repaired or replacement hardware will be warranted for the remainder of the original warranty period, or thirty (30) days, whichever is greater, or for any additional period of time that is specified by law in your local jurisdiction.
Obsolete or Discontinued ProductsWhenever possible, an obsolete or discontinued product will be replaced with the same product. If Corsair is unable to replace your obsolete or discontinued product with the same product, Corsair will replace that product with a new product of similar function and equal or greater value.
ExclusionsThis warranty does not cover problems or damage resulting from, but not limited to, any of the following: 1. Wear and tear associated with normal use 2. Any modification, abuse, accident, disassembly, misapplication, or unauthorized repair 3. Removal of any manufacturer label(s) or sticker(s) 4. Any improper operation, including any use not in accordance with any supplied product instructions 5. Connection to any improper voltage supply 6. Use of consumables, such as replacement batteries, not supplied by Corsair, except where such restriction is prohibited by
applicable local law. 7. Any other cause which does not relate to a product defect in materials or workmanshipAlso excluded from this warranty are counterfeit products; that is, products that Corsair, at its sole discretion, determines were not manufactured by Corsair or any of its authorized manufacturing partners.
Limitation of LiabilityCORSAIR SHALL NOT BE LIABLE FOR ANY SPECIAL, INCIDENTAL, INDIRECT, OR CONSEQUENTIAL DAMAGES WHATSOEVER, INCLUDING BUT NOT LIMITED TO LOSS OF PROFITS, REVENUE, OR DATA (WHETHER DIRECT OR INDIRECT) OR COMMERCIAL LOSS FOR BREACH OF ANY EXPRESS OR IMPLIED WARRANTY ON YOUR PRODUCT EVEN IF CORSAIR HAS BEEN ADVISED PREVIOUSLY OF THE POSSIBILITY OF SUCH DAMAGES. Some local laws do not allow the exclusion or limitation of special, indirect, incidental or consequential damages, so this limitation or exclusion may not apply in your jurisdiction.
Duration of Implied WarrantiesEXCEPT AS PROHIBITED BY APPLICABLE LAW, ANY IMPLIED WARRANTY OR CONDITION OF MERCHANTABILITY OR FITNESS FOR A PARTICULAR PURPOSE ON THIS HARDWARE PRODUCT IS LIMITED IN DURATION TO THE DURATION OF THE APPLICABLE LIMITED WARRANTY PERIOD FOR YOUR PRODUCT. Some local laws do not allow limitations on how long an implied warranty may last, so this limitation may not apply in your jurisdiction.
National Statutory RightsConsumers may have legal rights under applicable national legislation governing the sale of consumer goods. Such rights are not affected by the warranties in this Limited Warranty.
No Other WarrantiesNo Corsair employee, dealer, or other agent is authorized to make any modification, extension, or addition to this warranty.
How to Make a Warranty ClaimBefore submitting a warranty claim, we suggest you contact our technical support group or visit corsair.com and review the support section for technical assistance. A simple fix for your problem may be found there.
Generally, valid warranty claims should be processed through your original point of purchase during the first thirty (30) days after purchase. This period may vary depending on where you purchased your product; please verify the return policy with the retailer where you purchased your product. Any warranty claims that cannot be processed through your original point of purchase should be addressed directly to Corsair. Our customer service contact information can be found on the web at corsair.com/contact or in the documentation included with your product
Please see corsair.com/warranty for instructions for obtaining an RMA number.Make sure Bulldog is placed in an area where it can receive proper airflow, such as an open shelf.