Embed Size (px)
Citation preview

Upon registration with Morphy Richards(UK & ROI only)
CM47155 MUK Rev 3
* Register online for your 2 year guarantee. See back of this instruction book for details. (UK and Ireland customers only)
www.facebook.com/morphyrichardsuk
www.twitter.com/loveyourmorphywww.homeofthehouseproud.com
For competitions, product hints and tipsand more join us at
*
47155
Espresso Automatic
47155 rev3_Layout 1 02/09/2011 13:52 Page 1
2
Features
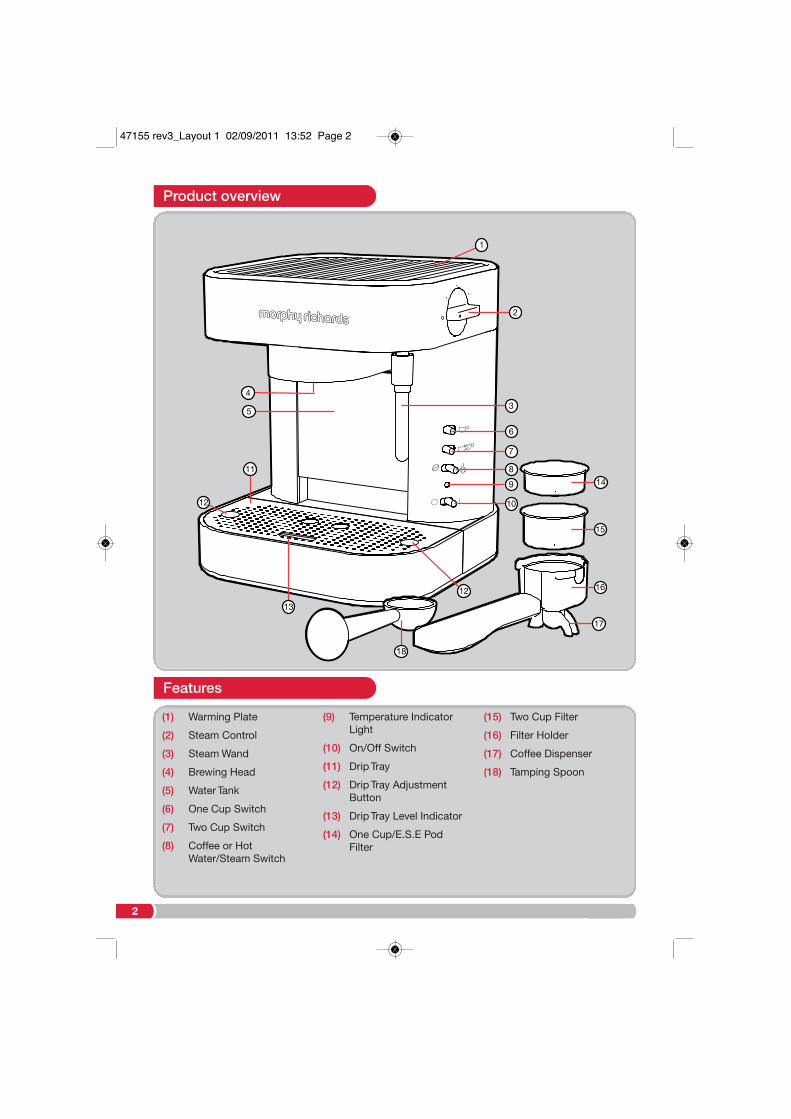
(1) Warming Plate
(2) Steam Control
(3) Steam Wand
(4) Brewing Head
(5) Water Tank
(6) One Cup Switch
(7) Two Cup Switch
(8) Coffee or HotWater/Steam Switch
(9) Temperature IndicatorLight
(10) On/Off Switch
(11) Drip Tray
(12) Drip Tray AdjustmentButton
(13) Drip Tray Level Indicator
(14) One Cup/E.S.E Pod Filter
(15) Two Cup Filter
(16) Filter Holder
(17) Coffee Dispenser
(18) Tamping Spoon
2
5
11
4
13
9
3
1
15
14
16
17
18
12
12
6
8
10
7
Product overview
47155 rev3_Layout 1 02/09/2011 13:52 Page 2

3
3
Plug the coffee maker into the mains.
2
Ensure the On/Off Switch (10),and Steam Control (2) are set to /Off. Select Coffee (8).
11
Fill the Water Tank (5) and place into the coffeemaker.
7
Slide and release the One (6) or Two Cup (7) Switchto start brewing the desired amount of coffee.
6
Slide the On/Off Switch (10) to On. The Temperature Indicator Light (9) will stop flashing when the coffee maker is ready.
55
Insert the Filter Holder into the Brewing Head (4)turning anti-clockwise until it locks fully into place.Place your cup(s) under the Coffee Dispenser (17).
4
Place the relevant Filter (14) or (15) into the FilterHolder (16). Fill with espresso coffee and tampwith Tamping Spoon (18), or use an E.S.E. pod.
Using your coffee maker
8
To stop or cancel the brewing process, slideand release the switch again.
47155 rev3_Layout 1 02/09/2011 13:52 Page 3

4
6
When done, Turn the Steam Control (2) to Off BEFORE removing the Steam Wand (3) fromthe Milk.
5
Place the Steam Wand (3) 10mm deep into ajug of milk. Turn the Steam Control (2) to On.
3
Plug the coffee maker into the mains.
2
Ensure the On/Off Switch (10),and Steam Control (2) are set to Off. Select Steam (8).
11
Fill the Water Tank (5) and place into the coffeemaker.
4
Slide the On/Off Switch (10) to On. The Temperature Indicator Light (9) will stop flashing when the coffee maker is ready.
WHEN FROTHING MILK ENSURE THE STEAMCONTROL IS OFF BEFORE REMOVING THEWAND FROM THE MILK.
WARNING
Using the Steam Wand to froth milk
47155 rev3_Layout 1 02/09/2011 13:52 Page 4

5
6
When the desired amount has been dispensed, turn the Steam Control to Off BEFORE removing the mug from underneaththe Steam Wand.
5
Place an empty mug under the Steam Wand(3). Turn the Steam Control (2) to On to start dispensing hot water.
Follow steps 1,2,3 of ‘Using your coffee maker’on page 3. Then refer to the following.
4
Slide the On/Off Switch (10) to On. The Temperature Indicator Light (9) will stop flashing when the coffee maker is ready.
• Take your coffee maker out of the box and remove the packaging.
• Wash the detachable parts of the machine inwarm soapy water.
• The first time you use your coffee maker,operate with water only.
• Occasionally air locks can be present before firstuse. Please refer to troubleshooting guide (page 8) to resolve.
The coffee maker can dispense two differentamounts of coffee. The coffee maker comes withthe following amounts set as the default settings.
One Cup - 50ml
Two Cup - 100ml
You can adjust these amounts for your own personal preference by following these steps, (Upto a maximum of 150ml for One Cup and 250mlfor Two Cup.)
1 Set up your coffee maker as normal followingsteps 1-6 of ‘Using your automatic espresso’ onpage 3. Then refer to the following.
2 Slide and hold the One Cup (6) or Two Cup (7)Switch and keep pressed until the coffee makerhas dispensed the desired amount of coffee.
3 Release the switch to set the new dispensing amount.
The new setting will be stored even if the coffeemaker is unplugged from the mains.
It is not possible to reset the amount back to theoriginal dispense amount. To adjust the amountof coffee dispensed, repeat the adjustmentprocess again to create a new dispense amount.
Before first use
Adjusting the espressomemory function
Using the Steam Wand to dispense hot water
47155 rev3_Layout 1 02/09/2011 13:52 Page 5

6
The Temperature Indicator Light (9) flashes slowlywhen the boiler is heating, this is normal.
The Temperature Indicator Light will flash fast andthe coffee maker will not work when there is aproblem. If this occurs check;
• The water tank is full and correctly installed.
• The steam control is set to off.
• Any air locks have been removed.
Please note your coffee maker has a sleep modeto save energy. If your coffee maker is not usedfor 15 minutes, your coffee maker will enter sleepmode. The Temperature Indicator Light (9) flashesslowly in this mode.
To wake the machine, slide and release either theone (6) or two cup (7) switch.
When making espresso coffee it is important touse the correct type of coffee grinds. Espressocoffee is a very fine grind which is designed towork with espresso filters. Using other types ofcoffee in an espresso filter (such as filter coffeegrinds,) will result in a poorer tasting coffee andcould clog the filter.
The coffee maker is compatible with both E.S.E.pods (a compact coffee pod with a paper filtercovering,) as well as ground espresso coffee.When making espresso with an E.S.E. pod, usethe One Cup/ E.S.E Pod Filter (14).
You can adjust the height of the Drip Tray to reduce splashing when dispensing coffee intosmaller cups such as espresso cups.
Press the two Drip Tray Adjustment Buttons (12)to release the spring catch and raise or lower thedrip tray.
When the water in the Drip Tray is full, the DripTray Level Indicator (13) will change colour.
1 Remove the Drip Tray (11) from the appliance andempty.
2 Clean the Grid and Drip Tray with a damp clothbefore replacing.
Temperature Indicator Light
E.S.E. Pods
Using the correct type ofcoffee grinds
Adjusting the height of theDrip Tray
Sleep mode
Emptying the Drip Tray
47155 rev3_Layout 1 02/09/2011 13:52 Page 6

1 Disconnect the appliance from the mains supply.
2 Make sure the appliance has completely cooleddown.
3 Simply wipe the Steam Wand (3) and exterior witha clean, damp cloth.
Do not use any abrasives or metal scourers asthis will damage the finish on the unit.
4 The Filter Holder (16) and Water Tank (5) shouldbe washed after each use by rinsing them underwater. To assist in keeping the Filter Holder cleanwe recommend you periodically run the machinewith the Filter Holder in place, without coffee,using water only.
Should the holes in the filter become blockedwith coffee grinds, use a fine bristled brush tohelp clean.
When your coffee maker is not being used, werecommend that you do not leave the filter holderattached to the machine as this will reduce the lifeof the gasket.
5 Remove the Drip Tray Grid and Drip Tray (11) fromthe appliance and remove any spilt coffee andwater then clean them with a damp cloth or adamp sponge.
6 You must clean the Steam Wand and cover immediately after each use, after it has cooleddown. Briefly use the steam setting to clear anyremaining milk out of the Wand and Cover. Remove the Steam Wand Cover, place underwarm running water to remove excess milk. If theSteam Wand becomes blocked, use a small pin toclean more thoroughly.
WARNING: Steam from the Steam Wand is extremely hot and can scald.
IMPORTANT: Never wash your coffee machine accessories in a dishwasher.
1 Disconnect the appliance from the mains supply.
2 Make sure the appliance has cooled downcompletely.
3 Remove the Water Tank (5) and Drip Tray (11) fromthe machine.
4 Fill the Water Tank with dissolved citric acid solution, up to the max level marked on the sideof the tank.
5 Re-fit the Water Tank and Drip Tray to the machine.
6 Place an empty container under the BrewingHead (4) to gather the descaled hot boiled water.
7 Connect the appliance to the mains supply.
8 Slide the On/Off Switch (10) and wait for the Indicator Light (9) to stop flashing.
9 Slide and release the Two Cup Switch (7), waterwill flow through the unit.
10 Slide the switch again, dispensing until the watertank is empty.
11 Repeat the process with cold water only to flushthe system.
Helpline
If you are having a problem with your appliance,please call our Helpline, as we are more likely tobe able to help than the store you purchased theitem from.
Please have the product name, model numberand serial number to hand when you call to helpus deal with your enquiry quicker.
UK Helpline: 0844 871 0960
IRE Helpline: 1800 409 119
Spares: 0844 873 0726
Talk To UsIf you have any questions or comments, or wantsome great tips or recipe ideas to help you getthe most out of your products, join us online:
Blog: www.homeofthehouseproud.com
Facebook: www.facebook.com/morphyrichardsuk
Twitter: www.twitter.com/loveyourmorphy
Website: www.morphyrichards.com
Contact us
DescalingCare and cleaning
7
47155 rev3_Layout 1 02/09/2011 13:52 Page 7

8
Troubleshooting
• Water is dispensing from theSteam Wand
• Steam Control is open • Rotate the Steam Control so its closed
Problem Reason Solution
• The coffee temperature is toocold
• Heater block is not hot enoughbefore dispensing
• Before dispensing Coffee,make sure the ready light is illuminated
• The coffee grinds are wet afteruse
• Coffee is not compact enough • Tamp the coffee before inserting
• Espresso is weak • Wrong coffee type • Always use espresso coffeegrinds
• Milk is not frothing • Air and steam are not gettinginto the milk
• Use a pin to clean the SteamWand nozzle and air holes inthe cleaner
• Coffee is too strong or weak • Wrong volume of coffee • Use the correct amount:1 person - 7g (1-level TampingSpoon)
2 person 14g (2-level TampingSpoon)
• Indicator light is flashingquickly
• There is not enough water inthe water tank
• The Steam Control is set tosteam
• Air lock in pipe
• Fill the water tank
• Turn the Steam Control to theoff position
• Switch to dispense from SteamWand to remove blockage(ensure cup is placed underneath)
47155 rev3_Layout 1 02/09/2011 13:52 Page 8

9
Notes
47155 rev3_Layout 1 02/09/2011 13:52 Page 9

10
Notes
47155 rev3_Layout 1 02/09/2011 13:52 Page 10

11
The use of any electrical appliance requires the followingcommon sense safety rules.
Primarily there is danger of injury or death and secondlythe danger of damage to the appliance. These areindicated in the text by the following two conventions:
WARNING: Danger to the person!
IMPORTANT: Damage to the appliance!
In addition, we offer the following safety advice.
Location• This appliance is intended to be used in household and
similar applications such as:
farm houses;
by clients in hotels, motels and other residential type environments;
bed and breakfast type environments.
It is not suitable for use in staff kitchen areas in shops,offices and other working environments.
• Remove all the packaging and retain for future reference.
• Ensure the coffee maker is used on a firm, flat surface.
• Do not use the coffee maker outdoors or in a bathroom.
• Do not place the coffee maker on a highly polishedwooden surface as damage may occur to the surface.
• Do not place the coffee maker on or near hot surfacessuch as a hot plate, radiant rings or near a naked flame.
• WARNING: Do not place the coffee maker onto a metaltray or metal surface whilst in use.
Other safety considerations• Disconnect the coffee maker from the mains supply when
filling, cleaning or not in use.
• When unplugging, switch the coffee maker off, then remove the plug from the wall socket.
• Keep the outside of the coffee maker area clean and dryat all times.
• Do not leave the appliance unattended, when it is connected to main supply
• Do not touch hot surfaces. Always use handles or knobson the coffee maker.
• Do not immerse the coffee maker itself in water and always ensure the electrical connections are kept dry.
• Do not operate any appliance with a damaged cable orplug or after the appliance malfunctions or has beendamaged in any manner. Ring the helpline number for advice on examination and repair.
• Disconnect the appliance from mains supply outlet underthe following conditions:
Before the water tank is filled with water
Before removing any parts from the appliance or refittingany parts on the appliance.
Before cleaning or maintenance
When the appliance is not working correctly
After using the appliance
• The use of attachments or tools not recommended orsold by Morphy Richards may cause fire, electric shockor injury.
• Do not use the coffee maker for anything other than itsintended purpose.
Mains cable• The mains cable should reach without straining from the
socket.
• Do not let the mains cable hang over the edge of a worktop where a child could reach it.
• Do not let the cable run across an open space e.g. between a low socket and table, or a cooker or toaster orother hot area which might damage the cable.
• If the supply cable is damaged, it must be replaced bythe manufacturer, its service agent or similarly qualifiedperson in order to avoid a hazard.
Product safety• Never use warm or hot water to fill the water tank.
• Ensure the filter holder is correctly located before makingcoffee.
• Do not remove the filter holder when the appliance isbeing operated.
• Do not overfill the water reservoir.
• Empty the water tank when the appliance is to be unused for long period.
• Do not touch any hot parts of appliance including coffeefilter, steam wand etc. when in use.
• Do not place on or near hot gas or electric burner, or inheated oven.
Personal safety• Do not touch metal parts until the unit has cooled.
• This appliance is not intended for use by persons (including children) with reduced physical, sensory ormental capabilities, or lack of experience and knowledge,unless they have been given supervision or instructionconcerning use of the appliance by a person responsiblefor their safety.
Children• Children do not understand the dangers associated with
operating electrical appliances. Never allow children touse this appliance.
• Children should be supervised to ensure that they do notplay with the appliance.
Treating scalds• Run cold water over the affected area immediately. Do
not stop to remove clothing, get medical help quickly.
Electrical requirementsCheck that the voltage on the rating plate of your appliance corresponds with your house electricity supplywhich must be A.C. (Alternating Current).
If the socket outlets in your home are not suitable for theplug supplied with this appliance the plug should be removed and the appropriate one fitted.
WARNING: The plug removed from the mains lead, if severed, must be destroyed as a plug with a bared flexible cord is hazardous if engaged into a live socketoutlet.
Should the fuse in the 13 amp plug require changing, a 13amp BS1362 fuse must be fitted.
WARNING: This appliance must be earthed.
Health and Safety
47155 rev3_Layout 1 02/09/2011 13:52 Page 11

CM47155 MUK Rev 3 09/11
The After Sales DivisionMorphy Richards LtdMexborough, South Yorkshire, England, S64 8AJ
Helplines (office hours)UK 0844 871 0960Spare Parts 0844 873 0726Republic of Ireland 1800 409 119www.morphyrichards.com
Your standard one year guarantee is extended for an additional 12 months when you register the product within28 days of purchase with Morphy Richards. If you do notregister the product with Morphy Richards within 28 days,your product is guaranteed for 1 year. To validate your 2 year guarantee register with us online atwww.morphyrichards.co.ukOr call our customer registration line UK 0844 871 0962IRE 1800 409 119
N.B. Each qualifying product needs to be registered withMorphy Richards individually.
Please note that the 2 year guarantee is only available inthe UK and Ireland. Please refer to the one year guaranteefor more information.
It is important to retain the retailer’s receipt as proof ofpurchase. Staple your receipt to this back cover for futurereference.
Please quote the following information if the product develops a fault. These numbers can be found on the baseof the product.
Model no.
Serial no.
All Morphy Richards products are individually tested beforeleaving the factory. In the unlikely event of any applianceproving to be faulty within 28 days of purchase, it shouldbe returned to the place of purchase for it to be replaced.
If the fault develops after 28 days and within 12 months oforiginal purchase, you should contact the Helpline numberquoting Model number and Serial number on the product,or write to Morphy Richards at the address shown.
You may be asked to return a copy of proof of purchase.
Subject to the exclusions set out below (see Exclusions),the faulty appliance will then be repaired or replaced asappropriate and dispatched usually within 7 working daysof receipt.
If, for any reason, this item is replaced or repaired duringthe 1 year guarantee period, the guarantee on the newitem will be calculated from original purchase date. Therefore it is vital to retain your original till receipt orinvoice to indicate the date of initial purchase.
To qualify for the 1 year guarantee, the appliance musthave been used according to the instructions supplied.For example, crumb trays should have been emptiedregularly.
Morphy Richards shall not be liable to replace or repair thegoods under the terms of the guarantee where:
1 The fault has been caused or is attributable to accidentaluse, misuse, negligent use or used contrary to the manufacturer’s recommendations or where the fault hasbeen caused by power surges or damage caused in transit.
2 The appliance has been used on a voltage supply otherthan that stamped on the products.
3 Repairs have been attempted by persons other than ourservice staff (or authorised dealer).
4 The appliance has been used for hire purposes or non domestic use.
5 The appliance is second hand.
6 Morphy Richards reserves the right not to carry out anytype of servicing under the guarantee at its discretion
7 Plastic filters for all Morphy Richards kettles and coffeemakers are not covered by the guarantee.
8 Batteries and damage from leakage are not covered bythe guarantee.
• This guarantee does not confer any rights other than thoseexpressly set out above and does not cover any claims forconsequential loss or damage. This guarantee is offeredas an additional benefit and does not affect your statutoryrights as a consumer. Morphy Richards products are intended for household use only. See usage limitationswithin the location safety instructions.
Morphy Richards has a policy of continuous improvementin product quality and design. The company, therefore reserves the right to change the specification ofit’s models at any time.
For electrical products sold within the European Community. At the end of the electrical products useful life, it should not bedisposed of with household waste.
Please recycle where facilities exist. Check withyour Local Authority or retailer for recycling advice in your country
ExclusionsRegistering your 2 year guarantee
Your 1 year guarantee
Disclaimer
IF YOU ARE HAVING A PROBLEMWITH ONE OF OUR PRODUCTS, CALLOUR HELPLINE:
UK: 0844 871 0960EIRE: 1800 409 119 SPARES: 0844 873 0726
47155 rev3_Layout 1 02/09/2011 13:52 Page 12