Embed Size (px)
Citation preview

4.2.10 Student Book © 2004 Propane Education & Research Council Page 1
4.2.10
Installing Corrosion Protection Systems for Underground Tanks & Metal Distribution
Lines
It is important for propane gas service personnel to understand the causes of corrosion on metal structures so that they can identify methods and apply procedures used to protect metal structures from corrosion.
In this module you will learn to identify:
(1) Causes of corrosion
(2) Methods and procedures used to protect metal structures from corrosion
(3) Procedures for installing anodes and testing cathodic protection systems

4.2.10 Student Book © 2004 Propane Education & Research Council Page 1
Identifying Causes of Corrosion
Corrosion is an electrochemical reaction between a metal and its environment.
This damaging reaction occurs between the metal surface on the underground ASME tank and the soil that surrounds it.
Corrosion will also affect buried metallic distribution piping.

4.2.10 Student Book © 2004 Propane Education & Research Council Page 1
Methods Used to Protect Buried Tanks
Coatings— Specially formulated coatings protect buried tanks and metal pipe against corrosion.
Manufacturers typically coat underground tanks as part of the manufacturing process to ensure a long and safe life of the buried tanks.
Because tanks may be damaged during transport or installation, additional coating may need to be done at the plant or customer location to repair “holidays”. (A holiday is a void in the protective coating that exposes the metal surface of the tank.)

4.2.10 Student Book © 2004 Propane Education & Research Council Pages 1 & 2
Methods Used to Protect Buried Tanks
Pipe and tank coatings provide the principle and most effective deterrent to underground tank and steel pipe corrosion. A properly manufactured and applied coating will serve to provide approximately 99% of the protective needs of buried metal structures.
• Properly Cleaned Surface
• Proper Priming and Coating Materials
• Proper Application of Coatings
• Proper Handling and Storing of Materials
• Proper Handling of Coated Surfaces
• Thorough Inspection and Repair of Holidays
Requirements for Properly Applying & Maintaining Tank Coatings
4.2.10 Student Book © 2004 Propane Education & Research Council Pages 1 & 2
Methods Used to Protect Buried Metallic Pipe
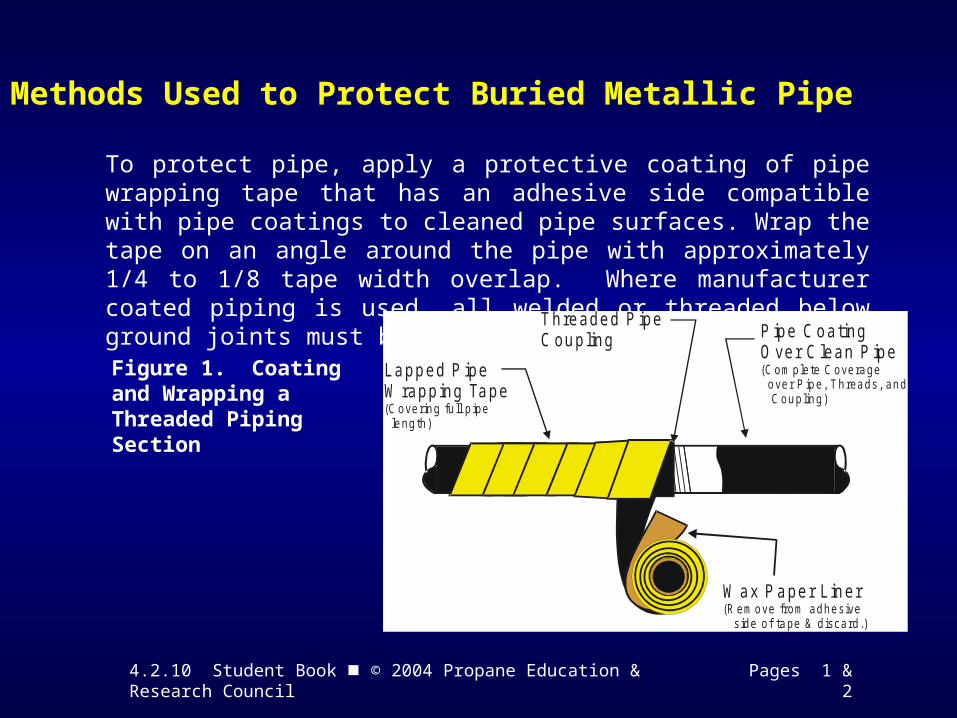
To protect pipe, apply a protective coating of pipe wrapping tape that has an adhesive side compatible with pipe coatings to cleaned pipe surfaces. Wrap the tape on an angle around the pipe with approximately 1/4 to 1/8 tape width overlap. Where manufacturer coated piping is used, all welded or threaded below ground joints must be coated and taped.
P ipe C oatingO ver C lean P ipe(Com plete Coverage over P ipe, Threads, and Coupling)
Threaded P ipeC oupling
Lapped P ipeW rapping Tape(Covering fu ll p ipe length)
W ax Paper L iner(Rem ove from adhesive side of tape & discard.)
Figure 1. Coating and Wrapping a Threaded Piping Section

4.2.10 Student Book © 2004 Propane Education & Research Council Page 2
Methods Used to Protect Buried Tanks
Insulating Fittings – Insulating fittings are used when buried metallic distribution lines (especially copper tubing) are connected to underground tanks to isolate various parts of the pipeline system and for quality control in cathodic protection systems.
Figure 2. Insulating Dielectric Union

4.2.10 Student Book © 2004 Propane Education & Research Council Page 3
Methods Used to Protect Buried Tanks
Sacrificial Anodes – Sacrificial anodes are used where
• Current requirements are low
• Metal structures to be protected are usually well-coated
• Localized protection is required, and
• Relatively low soils having low electrical resistance exist.

4.2.10 Student Book © 2004 Propane Education & Research Council Page 4
Methods Used to Protect Buried Tanks
Cad W eldLead W ire(to inside &top of dome)
SandTank SupportF ill Anode Bag
“S cotch-Lok” TwistW ire Connector(jo ins anode and cadweld leads; providesCuCuSO half cell testpoint)
4
Cad W eldon Tank M anufacturerSupplied Structure(Not on Tank Shell)
Anode LeadW ire (to inside& top of dom e)
“N ative” Soil Backfilled &Sloped Away from Topof Dome for D rainage
Figure 3. Sacrificial Anode Installation

4.2.10 Student Book © 2004 Propane Education & Research Council Page 4
Installing Anodes and Testing Cathodic Protection
In almost all areas, corrosion of underground tanks is a serious problem. Tank failure can occur within months if the tank is connected to a copper distribution line. To reduce this problem, sacrificial anodes are installed in the ground near the tank or piping system.
• The anodes are connected by a lead wire to a separate tank electrode installed on the tank by the tank manufacturer, a service technician at the bulk plant, or by the tank installer.
• The final connection of the two lead wires is made at the customer installation location.
• The practice of connecting the two lead wires near the inside top of the tank dome makes it easier to test the anode output on a periodic basis. This test ensures the tank is protected, and makes installation of additional sacrificial anode(s) possible without having to excavate and expose the tank.

4.2.10 Student Book © 2004 Propane Education & Research Council Page 5
Attaching the Tank Electrode Lead Wire
Thermit or “Cad” Welding
1. For the thermit weld process to be effective, the attachment surface must be cleaned to bright metal.
2. Thermit, or “cadwelds” must not be made directly on the heads or shell of the tank. Rather, cad welds are done on a flat surface directly attached to the tank by the tank manufacturer.
NOTE:Thermit weld cartridges should be of quality equal to or better than Cadweld CA15. CAUTION: Always wear gloves and goggles when igniting powder.

4.2.10 Student Book © 2004 Propane Education & Research Council Page 5
Attaching the Tank Electrode Lead Wire
Thermit or “Cad” Welding
Step 1: Clean the attachment surface thoroughly (Figures 4 and 5). It must be bright, clean, dry and slightly rough or gouged. Use a metal rasp for good bonding.
Figure 4. Cleaning the Attachment Surface
Figure 5. Cleaned Surface

4.2.10 Student Book © 2004 Propane Education & Research Council Page 6
Attaching the Tank Electrode Lead Wire
Thermit or “Cad” Welding
Step 2: Place a copper sleeve on the anode lead so the lead wire is flush with the end of the sleeve. Crimp the sleeve in place with pliers
Step 3: Dry the mold by heating before making the first weld (especially important if air humidity is high).
Figure 6. Attaching the
Copper Sleeve
Figure 7. Drying the Cadweld Mold

4.2.10 Student Book © 2004 Propane Education & Research Council Page 6
Attaching the Tank Electrode Lead Wire
Thermit or “Cad” Welding
Step 4: Place the sleeve in the mold so it comes just to the center of the tap hole under the thermit weld mold container. Do not push the sleeve all the way back and block the tap hole.
Step 5: Place the steel disc over the tap hole in the thermit weld mold container. Be sure the disc covers the tap hole so the powder cannot leak into the mold weld cavity.
Figure 8.
Figure 9.

4.2.10 Student Book © 2004 Propane Education & Research Council Page 7
Attaching the Tank Electrode Lead Wire
Thermit or “Cad” Welding
Step 6: Dump the cartridge (thermit charge) into the mold in one motion―do not pour it. Alternately mash and roll the charge cartridge, especially the bottom of the cartridge, between your thumb and fingers. This ensures the starting powder that may have “caked” on the bottom of the cartridge is released to cover the top of the metal and charge powder in the mold container.
Step 7: Spread the starting powder over the top of the weld powder and break up any lumps.
Figure 10.
Figure 11.

4.2.10 Student Book © 2004 Propane Education & Research Council Page 8
Attaching the Tank Electrode Lead Wire
Thermit or “Cad” Welding
Step 9: For ease of starting, place a small portion of the starting powder on the lip of the mold.
Wear heavy protective gloves when igniting the Cadweld.
Step 10: Ignite and snap the flint gun away to help prevent fouling of the flint gun.
Figure 13.
Figure 14.

4.2.10 Student Book © 2004 Propane Education & Research Council Page 8
Attaching the Tank Electrode Lead Wire
Thermit or “Cad” Welding
Step 11: Hold the mold square on the pipe to help prevent weld metal leakage out around the cavity. Hold the mold steady for approximately ten (10) seconds to allow the weld metal to solidify.
Step 12: Remove the slag from the mold using a cleaner blade. Be sure the slag is removed from the tap hole prior to making the next weld.
Figure 15.
Figure 16.

4.2.10 Student Book © 2004 Propane Education & Research Council Page 9
Attaching the Tank Electrode Lead Wire
Thermit or “Cad” Welding
Step 13: After the lead has been attached, tap the weld with a hammer to insure the wire is securely welded to the pipe. The weld must be cleaned, primed, and coated to protect the area from corrosion.
Figure 17. Cleaning and Coating the Tank Electrode Weld

4.2.10 Student Book © 2004 Propane Education & Research Council Page 10
Attaching the Tank Electrode Lead Wire
Thermit or “Cad” Welding
Step 14: Check the insulation on the full length of the tank electrode lead wire and repair any damage to lead wire insulation.
Step 15: Route the lead wire into the tank dome. Secure it to the valve riser near the top of the dome with an insulated wire connecting twist lock.
Figure 18. Securing the Tank Electrode Lead on the Riser

4.2.10 Student Book © 2004 Propane Education & Research Council Page 10
Attaching the Tank Electrode Lead Wire
Conductive Adhesive Process— Recent advances in chemical manufacturing have produced electrically conductive adhesives that can be used to attach electrode leads directly to underground tanks and piping without subjecting the metal to high temperatures. When using this method for attaching tank or pipe electrodes, it is very important to read and strictly follow manufacturer instructions to obtain a secure electrode bond to the metal.
Step 1: Following manufacturer instructions, clean the attachment surface thoroughly. It must be bright, clean, and dry.

4.2.10 Student Book © 2004 Propane Education & Research Council Pages 10 & 11
Attaching the Tank Electrode Lead Wire
Conductive Adhesive Process
Step 2: Trace the outside of the electrode sealing patch onto the tank’s surface.
Step 3: Remove the tank coating inside the traced area until you have bright metal.
Figure 19.
Figure 20.

4.2.10 Student Book © 2004 Propane Education & Research Council Page 11
Attaching the Tank Electrode Lead Wire
Conductive Adhesive Process
Step 4: Apply the electrode manufacturer supplied primer to the exposed metal.
Step 5: Trace the outline of the electrode boot.
Figure 21.
Figure 22.
4.2.10 Student Book © 2004 Propane Education & Research Council Page 12
Attaching the Tank Electrode Lead Wire
Conductive Adhesive Process
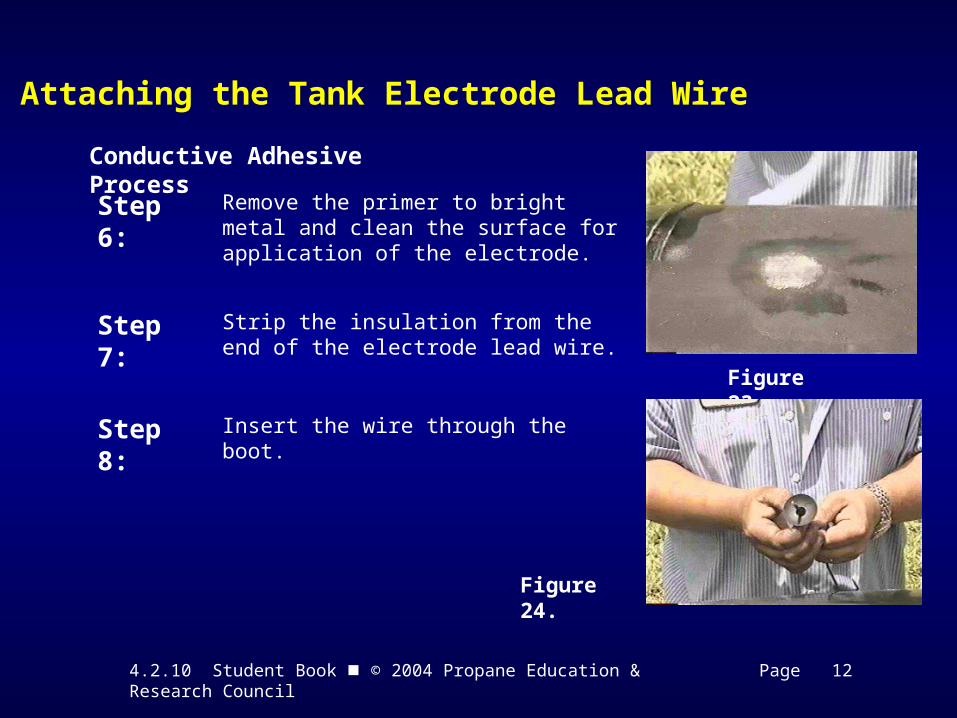
Step 6: Remove the primer to bright metal and clean the surface for application of the electrode.
Step 7: Strip the insulation from the end of the electrode lead wire.
Step 8: Insert the wire through the boot.
Figure 23.
Figure 24.

4.2.10 Student Book © 2004 Propane Education & Research Council Page 13
Attaching the Tank Electrode Lead Wire
Conductive Adhesive Process
Step 9: Crimp the copper electrode onto the lead wire.
Step 10: Coat the copper electrode, crimp, and lead wire end with manufacturer-supplied sealant.
Figure 25.
Figure 26.

4.2.10 Student Book © 2004 Propane Education & Research Council Page 13
Attaching the Tank Electrode Lead Wire
Conductive Adhesive Process
Step 11: Apply a bead of manufacturer supplied adhesive around the edge of the electrode boot.
Step 12: Secure the electrode boot on the prepared area of the tank.
Figure 27.
Figure 28.

4.2.10 Student Book © 2004 Propane Education & Research Council Page 14
Attaching the Tank Electrode Lead Wire
Conductive Adhesive Process
Step 13: Apply pressure around the electrode boot to assure complete bond to the tank. Slowly shape and bend the electrode lead wire until it is flush with the tank surface and running toward the tank dome.
Step 14: Remove the plastic wrap from the underside of the sealing patch and apply the sealing patch over the electrode boot and lead wire, with the lead wire seated in the channel provided in the sealing patch.
Figure 29.
Figure 30.

4.2.10 Student Book © 2004 Propane Education & Research Council Page 14
Attaching the Tank Electrode Lead Wire
Conductive Adhesive Process
Step 15: Apply pressure around and over all surfaces of the sealing patch to assure complete bond to tank, electrode boot, and lead wire.
Step 16: Run the electrode lead wire into the dome of the tank for later connection to the anode lead wire.
Figure 31. Routing LeadWire into Tank Dome

4.2.10 Student Book © 2004 Propane Education & Research Council Page 15
Attaching the Tank Electrode Lead Wire
Tank Manufacturer Installed Electrodes
Figure 32. Tank Manufacturer-Installed
Electrode
New underground tanks typically have manufacturer-attached tank electrodes that can be electrically connected to the anode lead. The lead wire and electrode weld must be inspected for proper insulation coverage and coating. The lead wire should be straightened and extended toward the top of the tank dome where its terminating end can be stripped of insulation and electrically connected to the anode lead wire.

4.2.10 Student Book © 2004 Propane Education & Research Council Page 15
Installing Underground Tank Anodes
Factors Important to the Installation of Underground Tank Anodes
• The anode performs best when placed in the ground at the bottom of tank depth.
• The anode should be placed at least two feet from the tank.
• The anode may be positioned either horizontally in a ditch, or vertically in an augured hole.
• After placing the anode unit in position, the surrounding soil should be moistened with water to start immediate action.
• The anode's connector lead wire should be inspected for damage and repaired prior to connection to the tank electrode lead wire.
• The tank electrode connection and wire must be coated after welding.

4.2.10 Student Book © 2004 Propane Education & Research Council Page 16
Attaching Anode Lead Wires to Pipe
Anode lead wires can be connected to buried metallic piping by
• Cad Welding• Conductive adhesive method
Figure 33. Cad Weld Process on Steel Pipe

4.2.10 Student Book © 2004 Propane Education & Research Council Pages 16 & 17
Preparing the Hole for Burying the Anode
The absence of a proper backfill can result in irregular consumption of the anode, thus providing erratic current output per pound of anode consumed.
Figure 34. Digging Hole for Anode Burial

4.2.10 Student Book © 2004 Propane Education & Research Council Page 17
Preparing the Hole for Burying the Anode
Some anodes are shipped in a paper and plastic wrapping filled with gypsum. The wrapping must be removed, while placing as much gypsum as possible in the bottom of the hole and surrounding the anode.
Figure 35. Remove the Anode Wrapping, Placing the Backfill
Material in the Hole
Figure 36. Placing the Anode Bag in the Burial Hole

4.2.10 Student Book © 2004 Propane Education & Research Council Pages 17 & 18
Repairing Underground Tank Coatings
Before setting the underground tank in the excavated hole, it should be thoroughly inspected for any damage, or abrasions to the protective coating material. After the tank is placed in the excavated hole, a final touch up to any area damaged during the installation should be done, paying special attention to the lifting lugs or any place where the lifting sling made contact.
Figure 38. Repairing Tank Coating Before Installation
Figure 39. Touching-Up Coating After Tank Placement

4.2.10 Student Book © 2004 Propane Education & Research Council Pages 18 & 19
Connecting Lead Wires
Figure 40. Strip the Lead Wire Ends
Figure 42. Sealing & Securing Lead Wires
& Connector
Figure 41. Twist Bare Ends and Install Electrical Twist Lock

4.2.10 Student Book © 2004 Propane Education & Research Council Pages 19 & 20
Testing Cathodic Protection Systems
Figure 43. Making a Tank-to-Soil Voltage Reading on a Buried
Tank
Pipe-to-Soil Potential Readings There are various criteria used to determine the effectiveness of a cathodic protection system. The test criteria typically used is a minimum -0.85 voltage measured between the tank and ground through a reference electrode, typically a copper-copper sulfate half cell.

4.2.10 Student Book © 2004 Propane Education & Research Council Pages 21 & 22
Time to See If You Got the Key Points of This Module…
• Complete the Review on page 21.
• See if you are ready for the Certification Exam by checking off the performance criteria on page 22.