Embed Size (px)
Citation preview
255-299 9/09
firstdata.com
© 2009 First Data Corporation. All rights reserved. All trademarks, service marks and trade names referenced in this material are the property of their respective owners.
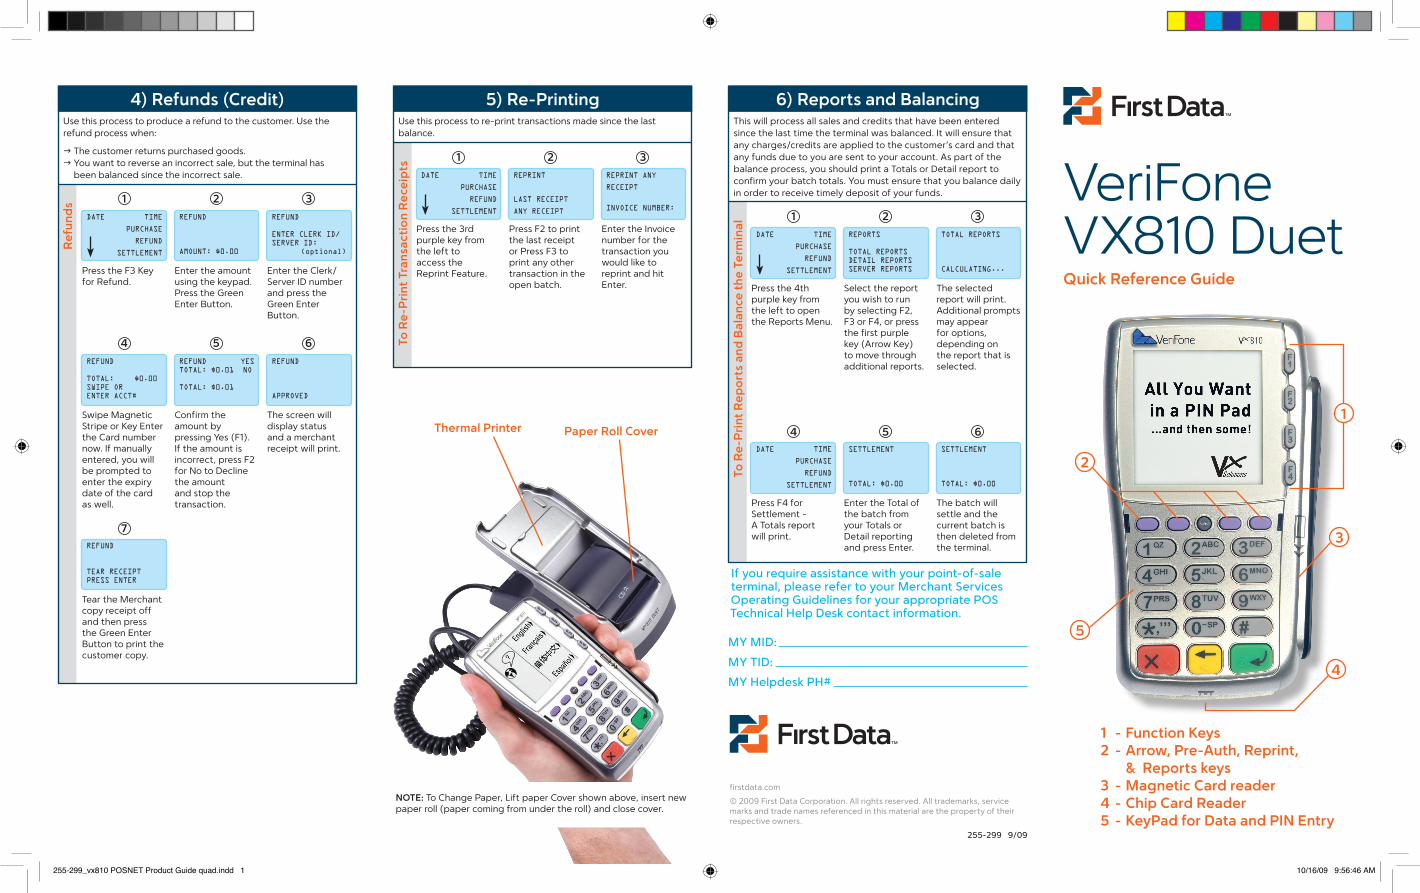
If you require assistance with your point-of-sale terminal, please refer to your Merchant Services Operating Guidelines for your appropriate POS Technical Help Desk contact information.
MY MID:
MY TID:
MY Helpdesk PH#
3
5
4
2
1 - Function Keys2 - Arrow, Pre-Auth, Reprint,
& Reports keys3 - Magnetic Card reader 4 - Chip Card Reader5 - KeyPad for Data and PIN Entry
1Thermal Printer Paper Roll Cover
NoTE: To Change Paper, Lift paper Cover shown above, insert new paper roll (paper coming from under the roll) and close cover.
Re
fun
ds
To R
e-P
rin
t Tr
ansa
ctio
n R
ece
ipts
To R
e-P
rin
t R
ep
ort
s an
d B
alan
ce t
he
Te
rmin
al
VeriFone VX810 Duet Quick Reference Guide
Use this process to produce a refund to the customer. Use the refund process when:
The customer returns purchased goods. You want to reverse an incorrect sale, but the terminal has
been balanced since the incorrect sale.
Use this process to re-print transactions made since the last balance.
This will process all sales and credits that have been entered since the last time the terminal was balanced. It will ensure that any charges/credits are applied to the customer’s card and that any funds due to you are sent to your account. As part of the balance process, you should print a Totals or Detail report to confirm your batch totals. You must ensure that you balance daily in order to receive timely deposit of your funds.
4) Refunds (Credit) 5) Re-Printing 6) Reports and Balancing
Press the F3 Key for Refund.
Swipe Magnetic Stripe or Key Enter the Card number now. If manually entered, you will be prompted to enter the expiry date of the card as well.
Press the 4th purple key from the left to open the Reports Menu.
Press the 3rd purple key from the left to access the Reprint Feature.
Date
refunD
total: $0.00swipe or enter acct#
Date
Date
time
purchase
refunD
settlement
time
purchase
refunD
settlement
time
purchase
refunD
settlement
Tear the Merchant copy receipt off and then press the Green Enter Button to print the customer copy.
Press F4 for Settlement - A Totals report will print.
refunD
tear receiptpress enter
Date
Enter the amount using the keypad. Press the Green Enter Button.
Confirm the amount by pressing Yes (F1). If the amount is incorrect, press F2 for No to Declinethe amountand stop thetransaction.
Select the report you wish to run by selecting F2, F3 or F4, or press the first purple key (Arrow Key) to move through additional reports.
Press F2 to print the last receipt or Press F3 to print any other transaction in the open batch.
Enter the Total of the batch from your Totals or Detail reporting and press Enter.
refunD
amount: $0.00
refunD yestotal: $0.01 no
total: $0.01
reports
total reportsDetail reportsserver reports
reprint
last receipt
any receipt
settlement
total: $0.00
1
4
1
1
7
4
2 3
5
2
2
5
6
3
3
6
Enter the Clerk/Server ID number and press the Green Enter Button.
The screen willdisplay statusand a merchantreceipt will print.
The selected report will print. Additional prompts may appear for options, depending on the report that is selected.
Enter the Invoice number for the transaction you would like to reprint and hit Enter.
The batch will settle and the current batch is then deleted from the terminal.
refunD
enter clerk iD/server iD:
(optional)
refunD
approveD
total reports
calculating...
reprint any
receipt
invoice number:
settlement
total: $0.00
time
purchase
refunD
settlement
255-299_vx810 POSNET Product Guide quad.indd 1 10/16/09 9:56:46 AM
Car
d In
sert
ed
or
Swip
ed
Th
rou
gh
Te
rmin
al
Co
rre
ctio
ns
To
Pre
-Au
tho
rize
a C
red
it C
ard
To C
aptu
re a
Pre
-Au
tho
rize
d C
red
it C
ard
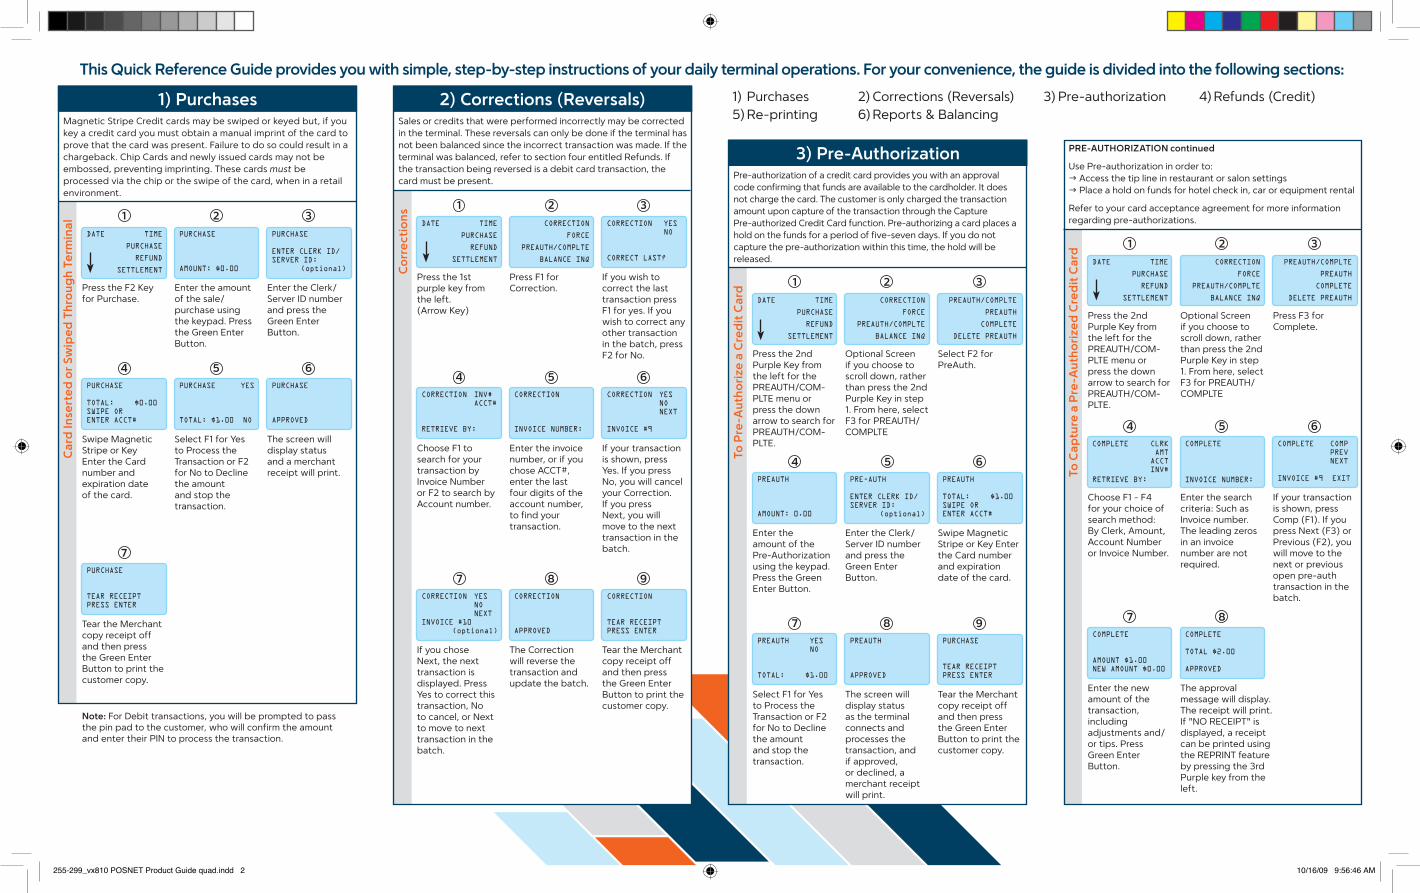
This Quick Reference Guide provides you with simple, step-by-step instructions of your daily terminal operations. For your convenience, the guide is divided into the following sections:
Magnetic Stripe Credit cards may be swiped or keyed but, if you key a credit card you must obtain a manual imprint of the card to prove that the card was present. Failure to do so could result in a chargeback. Chip Cards and newly issued cards may not be embossed, preventing imprinting. These cards must be processed via the chip or the swipe of the card, when in a retail environment.
Sales or credits that were performed incorrectly may be corrected in the terminal. These reversals can only be done if the terminal has not been balanced since the incorrect transaction was made. If the terminal was balanced, refer to section four entitled Refunds. If the transaction being reversed is a debit card transaction, the card must be present.
Pre-authorization of a credit card provides you with an approval code confirming that funds are available to the cardholder. It does not charge the card. The customer is only charged the transaction amount upon capture of the transaction through the Capture Pre-authorized Credit Card function. Pre-authorizing a card places a hold on the funds for a period of five-seven days. If you do not capture the pre-authorization within this time, the hold will be released.
PRE-AUTHoRIZATIoN continued
Use Pre-authorization in order to: Access the tip line in restaurant or salon settings Place a hold on funds for hotel check in, car or equipment rental
Refer to your card acceptance agreement for more information regarding pre-authorizations.
1) Purchases 2) Corrections (Reversals)
3) Pre-Authorization
1) Purchases 2) Corrections (Reversals) 3) Pre-authorization 4) Refunds (Credit)5) Re-printing 6) Reports & Balancing
Press the F2 Key for Purchase.
Press the 1st purple key from the left. (Arrow Key)
Date
Date
time
purchase
refunD
settlement
time
purchase
refunD
settlement
Swipe Magnetic Stripe or Key Enter the Card number and expiration date of the card.
Tear the Merchantcopy receipt offand then pressthe Green EnterButton to print thecustomer copy.
Choose F1 to search for your transaction by Invoice Number or F2 to search by Account number.
If you chose Next, the next transaction is displayed. Press Yes to correct this transaction, No to cancel, or Next to move to next transaction in the batch.
Note: For Debit transactions, you will be prompted to pass the pin pad to the customer, who will confirm the amount and enter their PIN to process the transaction.
purchase
total: $0.00swipe or enter acct#
purchase
tear receiptpress enter
correction inv# acct#
retrieve by:
correction yes no nextinvoice #10
(optional)
Enter the amount of the sale/ purchase using the keypad. Press the Green Enter Button.
Press F1 for Correction.
Select F1 for Yes to Process the Transaction or F2 for No to Decline the amount and stop the transaction.
Enter the invoice number, or if you chose ACCT#, enter the last four digits of the account number, to find your transaction.
The Correction will reverse the transaction and update the batch.
purchase
amount: $0.00
correction
force
preauth/complte
balance inq
purchase yes
total: $1.00 no
correction
invoice number:
correction
approveD
11
4
7
4
2 32
55
87
3
66
9
Enter the Clerk/Server ID number and press the Green Enter Button.
If you wish to correct the last transaction press F1 for yes. If you wish to correct any other transaction in the batch, press F2 for No.
The screen willdisplay statusand a merchantreceipt will print.
If your transaction is shown, press Yes. If you press No, you will cancel your Correction. If you press Next, you will move to the next transaction in the batch.
Tear the Merchantcopy receipt offand then pressthe Green EnterButton to print thecustomer copy.
purchase
enter clerk iD/server iD:
(optional)
correction yes no
correct last?
purchase
approveD
correction yes no next
invoice #9
correction
tear receiptpress enter
Press the 2nd Purple Key from the left for the PREAUTH/COM-PLTE menu or press the down arrow to search for PREAUTH/COM-PLTE.
Date time
purchase
refunD
settlement
Enter the amount of the Pre-Authorization using the keypad. Press the Green Enter Button.
Select F1 for Yes to Process the Transaction or F2 for No to Decline the amount and stop the transaction.
preauth
amount: 0.00
preauth yes no
total: $1.00
Optional Screen if you choose to scroll down, rather than press the 2nd Purple Key in step 1. From here, select F3 for PREAUTH/COMPLTE
Enter the Clerk/Server ID number and press the Green Enter Button.
The screen will display status as the terminal connects and processes the transaction, and if approved, or declined, a merchant receipt will print.
correction
force
preauth/complte
balance inq
pre-auth
enter clerk iD/server iD:
(optional)
preauth
approveD
1
4
7
2
8
3
65
9
Select F2 for PreAuth.
Swipe Magnetic Stripe or Key Enter the Card number and expiration date of the card.
Tear the Merchantcopy receipt offand then pressthe Green EnterButton to print thecustomer copy.
preauth/complte
preauth
complete
Delete preauth
preauth
total: $1.00swipe or enter acct#
purchase
tear receiptpress enter
Press the 2nd Purple Key from the left for the PREAUTH/COM-PLTE menu or press the down arrow to search for PREAUTH/COM-PLTE.
Date time
purchase
refunD
settlement
Choose F1 - F4 for your choice of search method: By Clerk, Amount, Account Number or Invoice Number.
Enter the new amount of the transaction, including adjustments and/or tips. Press Green Enter Button.
clrkamt
acctinv#
retrieve by:
complete
amount $1.00 new amount $0.00
Optional Screen if you choose to scroll down, rather than press the 2nd Purple Key in step 1. From here, select F3 for PREAUTH/COMPLTE
Enter the search criteria: Such as Invoice number. The leading zeros in an invoice number are not required.
The approval message will display. The receipt will print. If "NO RECEIPT" is displayed, a receipt can be printed using the REPRINT feature by pressing the 3rd Purple key from the left.
correction
force
preauth/complte
balance inq
complete
invoice number:
complete
total $2.00
approveD
1
4
7
2
5
8
3
6
Press F3 for Complete.
If your transaction is shown, press Comp (F1). If you press Next (F3) or Previous (F2), you will move to the next or previous open pre-auth transaction in the batch.
preauth/complte
preauth
complete
Delete preauth
complete comp prev next
invoice #9 exit
complete
255-299_vx810 POSNET Product Guide quad.indd 2 10/16/09 9:56:46 AM