Embed Size (px)
Citation preview

--—
-
ru
.
z
It. I:1
n — z
I
_,:
‘ k’
4.J
•7
.,••
.‘3
;

-
--• -..... .--:.. -.
—
-- -
‘‘. - OESCRIPTIVE LIST
OF
WHITE SEWING MACHiNES
o. 1. Plain table.
o. 2. Plain table, cover, lock and key and centre drawer.
To. 2 Plain table with cover, lock and key, center and two oth;drawers.
o. 3. Fancy cover, drop leaf, centre and two drawers at each ciof table.
o. 8 Drop. A finely finished drop head machine with two draweon each end of table, and large centre drawer.
o. . An elegantly finished drop head full cabinet.
o. 6. Fancy cover and drop leaf.
o. 6. Fancy cover, drop leaf and a nest of two drawers.o. 7. Is the same as No. 61 except that it has one drawer on eac
end of table.
io. 10. Artistically finished cover, drop leaf, centre and threedrawers on each end of table.
otary B. Tailoring machine with end and large rear sliding leaand one drawer at right hand end of table.
- otary B. 8. Dressmaking machine with cover, eud and large re:sliding leaf, large centre drawer and two drawers at eacte of. table. . . . . - -
— -
,. —
: I
j—
t-.s

•;
• :
-
FREE WITH EACH MACHINE.
$100- 100
1 00•
40
22510
•
- ;e’
II
22 ñ’
1 O• one
•1 o’:
Tucker, Ruffier and Set of Iicmmer, One Hemmer (which i.iso a Feller), Braider, QuiLer, Oil-can tilled with Oil, one Screw.driver , Gauge and Screv, six Bobbins and twelve Needles. Directionin English, German, Spanish, Portuguese, French, Bohemian. Swedish.
and iSorwegian.
ACCESSORIES.
Upon receipt of cash with order, we will send by mfl, or expreaall or either of the Attachments at the following prices:
Tucker, - - -
Ruffier, (which is also a Shirrer), -
Adjustable Binder, - -
Set Hemmers and Binder, -
Extra Braider, . - - -
Roller Presser-foot for Leather, -
One-sided Presser-foot for Tailor.s use,Short Presser-foot for Glovemakers’ use,Extra Quilter. - - -
Extra Bobbins, per (lOZ.. - -
Needles, Cloth or Leather, per doz.,Extra Hemmer and Feller. -
Extra Shuttle, - - -
Spool Cotton, per doz. Spools. -
Oil, per bott.ie, - -
Hem Stitch Attachment. - -
Embroidery Attachment, -
Arrasene Attachment, -
Etching Foot and Slide, -
Etching Attachment and Slide,Edge Braider, - - -
VE CAN NOT SEND OIL BY MAlL.
•

.XAOq1MU!LIDW.10pI4do.z
UtuIpinu.IflOAJO.1qLUflW1dUO!UtUosyA&opq
UA!siqwnuWOJJpa1p.IoqsnwpuusiTspusu!
•Jq-Jvq43!Pfl!JqIt!’108’Iói’IOLUOJJSU!tpEWITV—DLLOJ
I
To the Jobber and Export Trade.
For large jobbers, or for the export trade where orders are forone hundred or more machines at a time, we ship securely and compactly boxed, so that in transportation charges a large saving isobtained. In this manner of shipping, as before stated, alithe workis carefully inspected; the heads of the machines have each been tested in sewing, and are boxed by themselves, whilst the stands aretaken apart and shipped ir. as small and compact shape as possible.Consequently, for the information of this class of trade, we submitand call attention to our first illustration—THE STAND—and explanation as how to set it up properly.
In the first place, remove the nut 222 from the treadle rod 381and slide the treadle 3S2 on the rod with a cone on each side of thetreadle.
The stud and cones unon which the balance wheel revolves arfirmly secured to the right hand lea. Remove the end cone by bosenin the small set screw and unscrew the outside cone. Place tilebalance wheel in position as shown in illustration. page 2, then replace the end cone and turn it up until the baiance wheel revoiveseasily and steadily. Tighten the set screw, to keep it in place. (becareful not to get too tight or too loose): nextattachpitrnan3SSzobalance wheel, then the dress guard, 3S5, to right hand leg 386.
Having thus put together these disconnected parts, it is an easymatter for a beginner to determine their relative positions by reference to the cut. 384 represents the brace. The left hand and theright hand legs are connected to the brace by screws as shown in cut.
3S9 represents a wooden pin in table for machine to rest on whenturned back for oiling; this pin is taken out of the table and packedwith the stand when it is shipped in boxes.
To have the machine run extraordinarily light the greatest caremust be exercised in setting up the stand work. Everything musthe true and in line.
Be sure that you have the wood work placed upon the stand sothat the belt does not rub against it, and also sothatitdoesnot rubagainst the balance wheel of the machine.
If the stand rests upon the floor in an uneven manner, and thefloor is level, it is evident that the stand is not properly set up; inwhich case loosen the screws and nuts and place the stand in its proper position, and gradually tighten its connections.
Place the Rubber Head Tacks in marked places in front of thetable before you connect the machine head, by its hinges, to thetable.
To prevent noise, no part of the machine should touch the wood work,but the machine head should rest entirely upon the Rubber head Tacks.
—3---

-
INSTRUCTIONS— T’ -
FOR USING TIlE
WI’ite
4; ,‘
Sewing flachine,
THE. BEST. IN. THE . WORLD.’
Manufactured by the
White Sewing flachine Conipany
Cleveland, Ohio, U. S. A.
At a very large expense we have had the White Sewing
fachiue explicitly illustrated, and within the following pages we
ubrnit these illustrations with such explanations as will enable any.
e, ‘with little or no experience, to readily understand and satisfac
torily work the machine. All we asic is that you will carefully read
nd follow these directions, and you can confidently rest assured that
‘au will find yourself the possessor of the best Sewing Macliiize in the
Wrld.Before the machine leaves our factory it has undergone a minute
spection, and every mechanical defect corrected; it has been thor.
oughly tested as to its perfect sewing qualities, and found satisfactory
in every respect.It is a matter f ‘fact that any and all machinery will become
worn sooner or later by constant use, and while the wear in the
YHITE” will be imperceptible for many years, we have so constructed
our machine that any “lost motion” can be taken up in a few
moments, and the parts kept in their proper position for an indefinite
length of time.Operators are cautioned not to attempt to adjust the machine
iriless its sewing qualities are impaired, and not then unless they are
erftctZy familiar with its principles and mechanism.
Any unskilled person attempting to adjust or repair any machine
will often do greater injury than years of ordinary wear could.produce
—4 ..
‘
‘

V
THE TREADLE MOVEMENT.
The treadle niovement should be thoroughly learned, so that theoperator can readily revolve the balance-wheel by means of thetreadle with either foot.
V
Remove the belt from the balance-wheel and place your feet othe treadle directly over the treadle rod, then take hold of the balancewheel and turn it toward you, allowing th. feet to move freely withthe motion thus commenced, and continue this motion by an alternate pressure of the heel and toe until a regular and easy motion iaobtained. V
Do not attempt to learn anything else until you are proficient inthe use of the treadle, so that you can start it and stop it withoutever turnino it in the wrong direction.
TO OPERATE THE MACHINE.
Having become perfectly familiar with the treadle movement,now replace
V
the belt and connect the fly-wheel of the machine withthebalance wheel of the stand; raise the presser foot with the lever,remove the slide over the shuttle and take out the shuttle ; then startthe fly-wheel of the machine towards you and continue the motionthus imprted, with the feet, as per instructions given above.
After becoming expertly proficient in this motion and withoutthe shuttle in or the machine threaded, place a piece of cloth betweenthe feed and the presser foot; let the presser foot down upon it andoperate the machine in this way until you are accustomed to guidingthe mate:al in whatever direction you desire.
NOTE.—Do not run the machine with the presser foot clown olthe feed and no cloth between be two.
Do not pull the cloth to or from you in such a manner as to bendthe needle.
V
V
Do not undertake to do practical sewing, hut practice upon strijof cloth until you can produce a regular motion of the machine andguide the work as you wish.
VV•
V
V
VV
r

TO SET THE NEEDLE..Raise the needle bar to its highest point; loosen the thumb screw
and press it to the left to permit the shank of the needle to pass upbetween the clamp and needle bar a$far as it will go—flat side to thright—the needle being flattened on one side so it will set itself perfectly, then fasten securely by tightening thumb-screw.
The needle when descending, should pass central in the needl€bole from front to rear, but a little nearer to the right than to the Ieftof the hole, as it prevents the needle from glancing into the race andbeing caught by the shuttle; if properly set, the point of the shuttl€hould enterthe largest part of the loop formed with the thread.
NEEDLES AND THREAD TO BE USED.The most important consideration is to buy and use perfect
eedles—not bent, nor blunt points. WE PARTICULARLY REQUESOUR DEALERS AND THEIR CUSTOMERS TO BUY THEIR NEEDLES ANtOIL TROI US.
The size of the needle should conform to the size of the threadand both be suitable to the material sewed. ‘Use as fine a needle awill permit the thread to pass freely through the eye.A No. 1 needle may be used for all kinds of ordinary family sew
lug, where thread from numbers 50 to 60 is used; there is seldom anecessity for using a coarser cotton than No. 30, because every stitchmade by a sewing machine is just double as strong as one made byaand. In general sewing use the same size of thread above and below.The following index will show the size of needle, thread and silkto be used.
COTTON. TWIST. NEEDLE.150 to 300 00090to150 00 007Oto 90 0 0SOto 70 A&B 13Oto 50 C2Oto 30 D S8to 20 E&F
For Leather, use a twist pointed needle.For colored thread use needles one size larger than given inindex above.
SKIPPING STITCHES AND BREAKING THREAD IS an unheard complaint when the i’enuine “WHITE” needle is used. The market is fullof needles of an inferior quality—made to sell chap—and as an inducem cut for every owner of a WHITE to ue it satisfactorily, (whichan only he done by the use of a good needle) we will mail one dozenneedles, with postage prepaid. n receipt of 40 cents.
-.6-
I
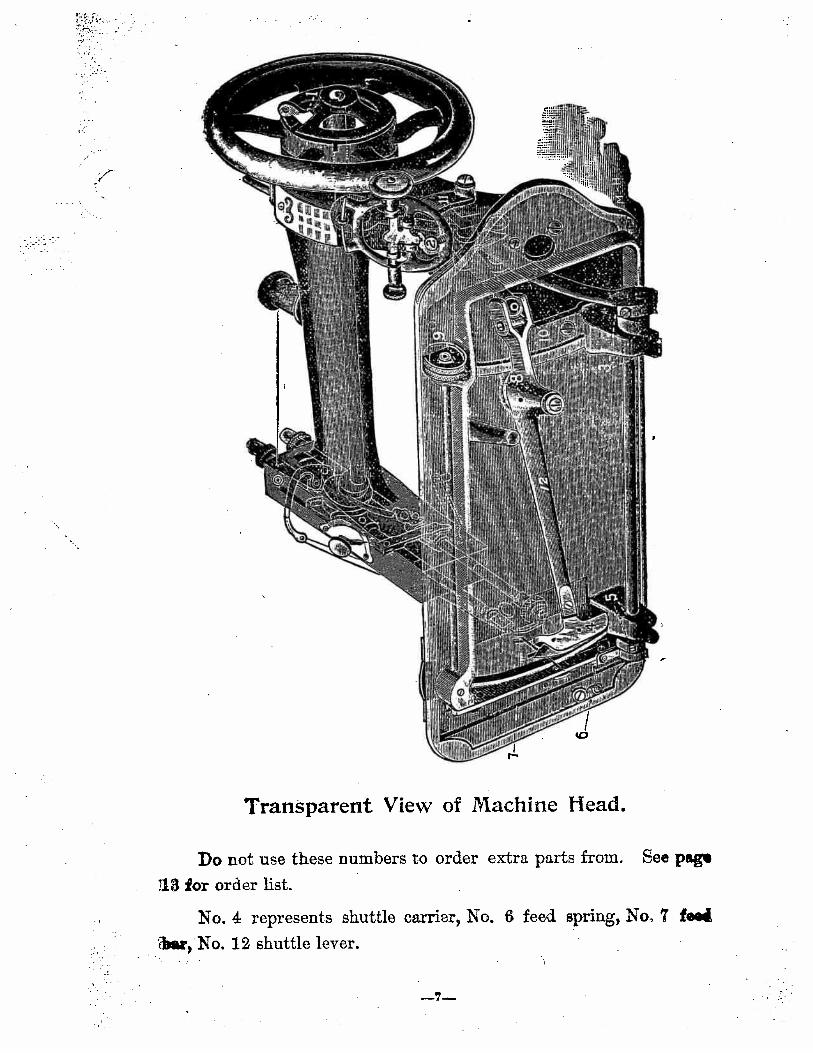
Transparent View of Machine Head.
Do not use these numbers to order extra parts from. See pag
18 for order list.
No. 4 represents shuttle carrier, No. 6 feed spring, No, feaE
r,No. 12 shuttle lever.
—7—
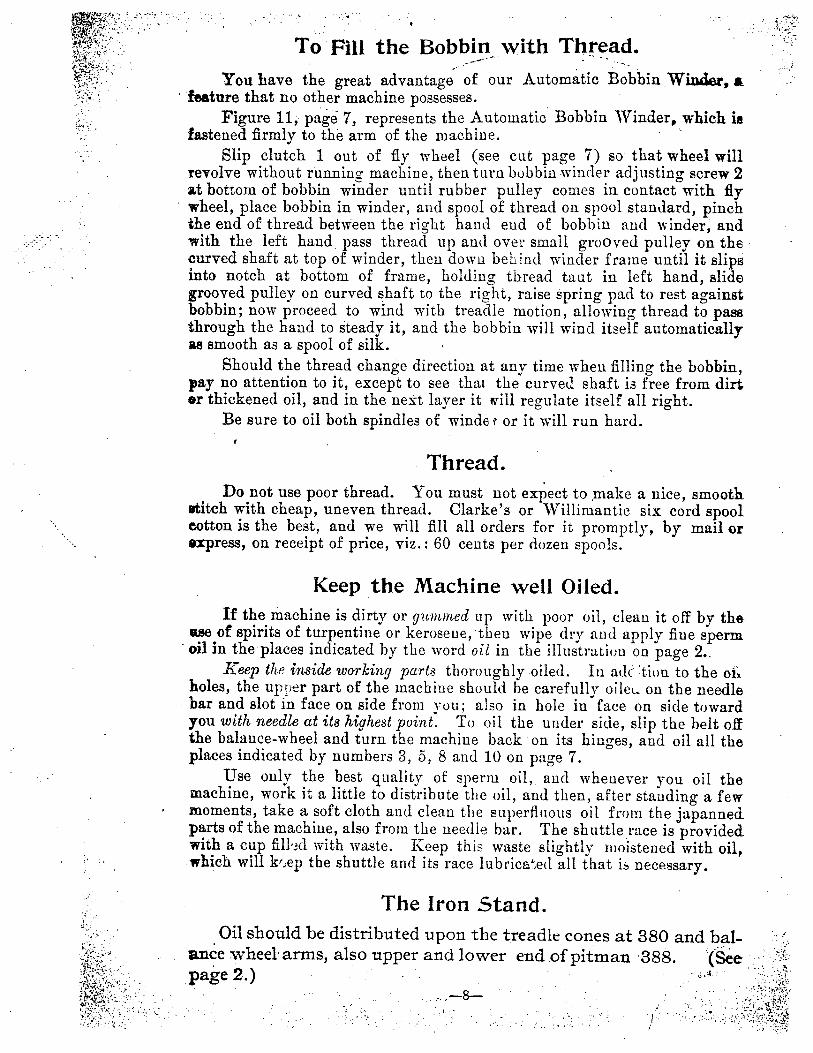
To Fill the Bobbin with Thread.
You have the great advantage of our Automatic Bobbin Wier, afeature that no other machine possesses.
Figure 11, page 7, represents the Automatic Bobbin ‘Vinder, which iafastened firmly to the arm of the machine.
Slip clutch 1 out of fly wheel (see cut page 7) so that wheel willrevolve without running machine, then turn bobbin winder adjusting screw 2at bottom of bobbin winder until rubber pulley comes in contact with flywheel, place bobbin in winder, and spool of thread on spool standard, pinchthe end of thread between the right hand end of bobbin and vinder, andwith the left hand pass thread p and over small grooved pulley on thecurved shaft at top of winder, then down beLind winder frame until it slipinto notch at bottom of frame, holding thread taut in left hand, slidegrooved pulley on curved shaft to the right, raise spring pad to rest againstbobbin; now proceed to wind with treadle motion, allowing thread to passthrough the hand to steady it, and the bobbin will wind itself automaticallyas smooth as a spooi of silk.
Should the thread change direction at any time when filling the bobbin,pay no attention to it, except to see that the curved shaft is free from dirt•r thickened oil, and in the next layer it will regulate itself all right.
Be sure to oil both spindles of winde r or it will run hard.
Thread.Do not use poor thread. You must not expect to make a nice, smooth
stitch with cheap, uneven thread. Clarke’s or Willimantic six cord spooicotton is the best, and we will fill all orders for it promptly, by mail or.xpress, on receipt of price, viz.: 60 cents per dozen spools.
Keep the Machine well Oiled.If the machine is dirty or gummed up with poor oil, clean it off by th
use of spirits of turpentine or kerosene, then wipe dry and apply flue spermoil in the places indicated by the word oil in the illustration on page 2..
Keep the inside working parts thoroughly oiled. In adc tion to the oiholes, the uper part of the machine should he carefully oile. on the needlebar and slot in face on side from you; also in hole in face on side towardyou with needle at its highest point. To oil the under side, slip the belt offthe balance-wheel and turn the machine back on its hinges, and oil all theplaces indicated by numbers 3, 5, 8 and 10 on page 7.
Use only the best quality of sperm oil, and whenever you oil themachine, work it a little to distribute the oil, and then, after standing a fewmoments, take a soft cloth and clean the superfluous oil from the japanned.parts of the machine, also from the needle bar. The shuttle race is providedwith a cup fihl’d with waste. Keep this waste slightly moistened with oil,which will k’.ep the shuttle and its race lubricated all that ls necessary.
• The Iron Stand.Oil should be distributed upon the treadle cones at 380 and bal
aiace wheel arms, also upper and lower end of pitman 388 (Seepage2.)
—8---

Place the spool of thread on standard No. 1pass the thread under pin and back of check springwasher No. 2. Now take the thread in your lefthand and pass it down under point No. 3, movingyour hand from you when passing under point 3.then up through slot in end of take-up No. 4; thenthrough slot No. 5 in end of needle bar to needlepassing the thread through eye of needle from leftto right, drawing two or three inches through.
The Tension.In illustration above, No. 6 represents the
Tension Regulator and Indicator for the upperthread, an eitirely new and useful device. Thehalf circle marked with a scale running from 1to 8, with tue word “loose” at figure 1 and “tight”at No. 8, No. 1 being the slack and No. 8 thetigntest tension.
To Regulate the Tension.To loosen the tension, turn the thumbscrew on dial No. 6 to the left, which will
aiove the pointer towards figure 1. To tighten it, turn to the right, moving thepointer towards No. 8. By this means the same tension can always be duplicated,thus obviating the necessity of experimental trials, as is the case with other machines.If a tight tension is desired, both upper and under threads must necessarily betight. If the upper thread is tight and the lower thread loose, the upper thread will
be drawn to the top, thus: If the lower thread is too tight, it will be
drawn straight on the bottom of goods, thus: When you desire the
goods to look alike on both sides, and be elastic, balance the tension, thus:
The Tension Releaser.The tension releaser is operated by the presser bar lifter. By means of it, all
tension is taken off the upper thread when the presser foot is raised, and the workan be taken out without pulling the thread down by hand.
PARTICULAR NOTICE.The tension cannot be regulated when the presser foot is up, beoaus.
he Releaser Is oper’ated by the presser bar lifter.
I
1
To Thread the Machine.
S.-
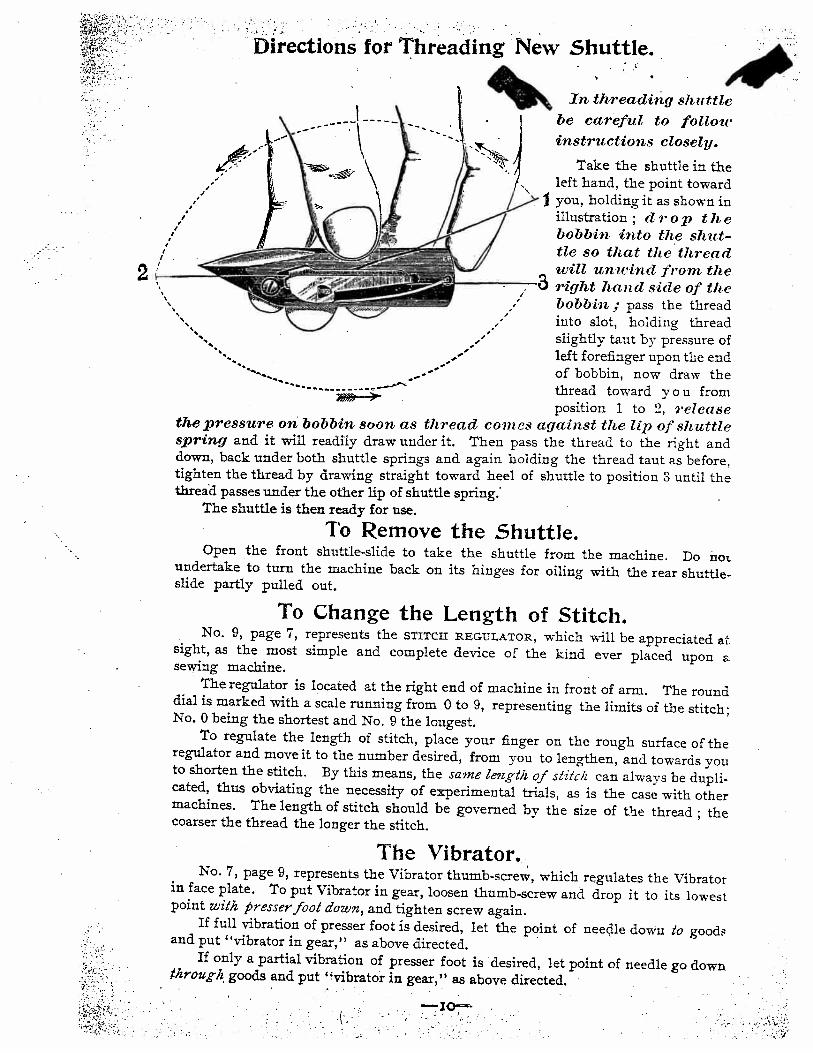
Directions for Threading New Shuttle.., ,*
instructions closely.
Take the shuttle in theleft hand, the point toward
j you, holding it as shown inillustration; d r op t h ebobbin into the shuttle so that the threadwill unwind from theright hand side of thebobbin; pass the thread
- into slot, holding thread/ slightly taut by pressure of
left forefinger upon the endof bobbin, now draw the
thread
toward you fromposition 1 to 2, release
the pressure on bobbin soon as thread comes against the lip of shuttlespring and it will readily draw under it. Then pass the thread to the right anddown, back under both shuttle springs and again holding the thread taut as before,tighten the thread by drawing straight toward heel of shuttle to position 3 until thethread passes under the other lip of shuttle spring.
The shuttle is then ready for use.
To Remove the Shuttle.Open the front shuttle-slide to take the shuttle from the machine. Do not.
undertake to turn the machine back on its hinges for oiling with the rear shuttle-slide partly pulled out.
To Change the Length of Stitch.No. 9, page 7, represents the STITCH REGULATOR, which will be appreciated at.
sight, as the most simple and complete device of the kind ever placed upon .
sewing machine.The regulator is located at the right end of machine in front of arm. The round
dial is marked with a scale running from 0 to 9, representing the limits of the stitch;No. 0 being the shortest and No. 9 the longest.
To regulate the length of stitch, place your finger on the rough surface of theregulator and move it to the number desired, from you to lengthen, and towards youto shorten the stitch. By this means, the same length of stitch can always be duplicated, thus obviating the necessity of experimental trials, as is the case with othermachines. The length of stitch should be governed by the size of the thread; thecoarser the thread the longer the stitch.
The Vibrator..No. 7, page 9, represents the Vibrator thumb-screw, which regulates the Vibrator
in face plate. To put Vibrator in gear, loosen thumb-screw and drop it to its lowest:point wi/Il j5resserfoot down, and tighten screw again.
If full vibration of presser foot is desired, let the point of neeale down 10 goodsand put “vibrator in gear,” as above directed.If only a partial vibration of presser foot is desired, let point of needle go down
Through goods and put “vibrator in gear,” as above directed.
In threading shuttlebe careful to follow
.5
.5
I
2
._Jof,.
-
S ••. . . -. . . .
.5

To Commence Work.• In thading the needle and shuttle respectively, you should leave
end of thnad about two inches in length to each. Hold the end of theupper thread loosely in the left hand, and with the right band gently revolvethe fly-wheel until the needle passes to its lowest point and returns, when ifit is set properly, a ioop will be formed through whuich the shuttle will passand, a the needle ascends, it will draw up the lower or shuttle thread.Now see that the shuttle slides are both closed over the shuttle, and thsmachine 4s ready for practical operation.
To Remove Work.Stop the machine with the needle at its highest point; raise the presserfoot with the lifter which slackens the upper thread; then take hold of yourwork with your left hand and pull it directly from you, keeping the topthread in the slot of the presser-foot, which will prevent bending the needleNow raise the work and draw the threads into the thread cutter on thepresser-bar and pull downward, which will cut the threads the proper lengtto commence work again.
Explanation of DifficultiesThat -Sometimes Occur With Beginners.
if the upper thread breaks, it may be caused by the needle not beingproperly set, or the machine not threaded correctly, or the upper tension tootight, or the thread uneven and the needle too small for it, or the needleeye too sharp, or the presser-foot attached to the machine so that the needlerubs it in passing.If the under thread breaks, it may be caused by the shuttle beingimproperly threaded, or too much tension upon it, or by the bobbin beingwound too full so that the thread slips over the ends of the bobbin in theshuttle, or by- the thread being caught in the shuttle slides.If the needle breaks, it is more than likely your own fault, caused bypulling the goods to or from you in such a manner that the needle strikesthe throat-plate and is bound to break. The needle may, however, break intrying to sew extraordinary heavy seams when the pressure on the presser-foot is not heavy enough.To create more pressure upon the goods turn the presser-bar nut on topof presser-bar to the right; to decrease the pressure turn it to the left.If it makes loop stitches, it is most sure to be caused by too loose tensionboth top and bottom.If the machine skips stitches, the needle is either bent or not in rightposition.If the stitches are not even, it may be caused by the presser-foot notresting evenly upon. the fabric sewed, or by the feed not being high enough,or by the stitch being too short, or by pulling the cloth, or by using too finea needle with too coarse or uneven thread.
• NOTICE.The leather band should always be tight enough not to slip. If it slips,or does not force the needle through thick goods, cut off a very short pieceand readju2t the ends. The belt should not be so tight as to prevent areasy motion of the machine
ti
1EU
.
*iL
QiL
.1C
)‘y;jji
‘‘::
D0
Ui
w ‘0N
N
iH
tj Lu
__
T
c%%
%%
%%
%
__
L1
__
E
—}
N&
wU
Um
O 0
Co
C.)
C) T
‘U Lu
Lu
Lu N
U,
LU
fl%
J
1It
N ‘.0
JL
hi
0 F’)
N 0e
‘0
,,o
fi3
1fw
télr (n
‘-I-
IpL
u
0
U,
______
-=
“I
—U
,C
1IL
uw
“—
‘L
u
II
9rL
U
0
JUT
Lu Lu
a)
r’.,
III
____
____
_

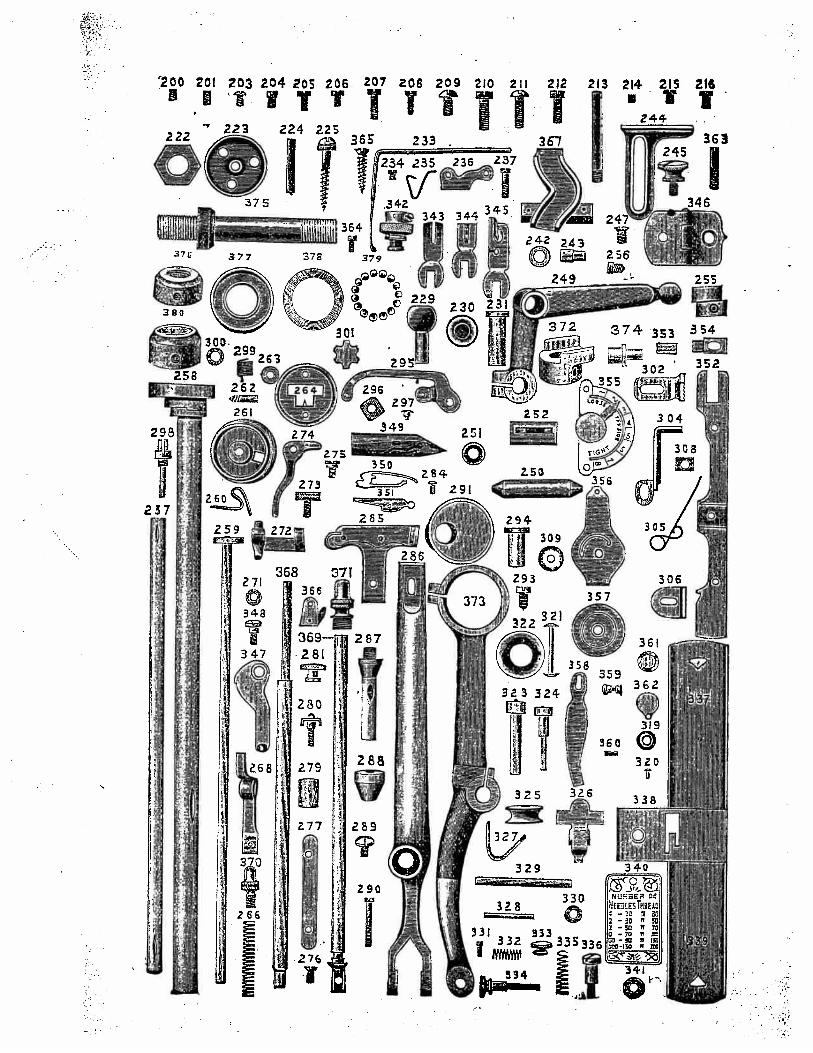
No.200 ‘Take up screw for needle bar bushing..201 Screw to adjust upper end offace plate203 Screwtofasten the following pieces:
heart cam to needle bar, 801 to 8rfl1,264tobed,840to arm and 355 toface plate
204 Screw to fasten attachment holder onpresser bar
205 Screw to fasten gib on inside of face....206 Screw to fasten feed spring to bed and
feed hook to feed bar arid feed bracket to bcd and shuttle can-icr to lever
207 Take-up screw on bearing to feed arbar and to middle bearing of eccentrie connection and to fasten 294 inelbow lever and to take-up bearingon lower end ofpitman
208 Take-up screw for uppcr end of 373209 Screw tofastencentreto elbow lever
and to fasten stud in treadle and tofasten 230 in treadle balance wheel..
210 Screw to fasten face plate to arm211 Screw to fasten arm to bed plate, and
to fasten dress guard and brace toleg of table
212 Screw to fasten socket in arm213 Spool standard214 Set screw to shuttle lever cone and to
268215 Screw to needle plate arid to fasten
feed and 354 to feed bar218 Screw to fasten clutch to upper arbor
and to fasten ball in upper end ofpitman and to fasten cone on treadlerod
222 Treadle rod nut223 Stand castor224 Thnitt 223225 Screw to fasten swing drawer to table229 Bali in treadle balance wheel230 Socketfor 229231 Stud in treadle233 Quilter234 Screw to fasten quilter235 Clutch spring236 Clutch latch237 Clutch latch screw242 Heart roller for lower end of 373243 Heart roller stud244 Gauge245 Gauge screw247 Screw to fasten hinge to bed249 Elbow lever250 Centrefor 249251 Washer on ball of 249252 Socketfor 250255 Feed cam256 Screw to fasten 255 and 372 on lower
arbor257 Lower arbor258 Upper arbor259 Stitch regulator shaft260 Friction springfor 250261 Stitch indicator wheel262 Screwtofasteu26lto 259263 Washer to go on 259 before 261264 Stitch indicator washer266 Presser spring26S Presser bar guide271 Presser bar lifter washer272 Vibrator block273 Vibrator thumb screw274 Vibrator lever275 Screw to fasten 274 to end ofarm276 Take-up screw in 268277 Gib on inside offace279 Needle bar bushing280 Needle screw and clamp281 Needle screw nut284 Shuttle tension screw285 Shuttle carrier286 Shuttle lever287 Shuttle lever stud288 Shuttle lever cone289 Screw in end of 287290 Take-up screw for shuttle lever291. Eccentric293 Eccentric screw24. Bearing in middle of 373
No.295 Take-up296 Take-up block 03297 Take-up rivet 02
298 Take-up stud 10299 Take-up spring 05300 Vasher on 298 01
301 Washer to adjust take-up spring 02302 Feed 25304 Feed hook 15305 Feed spring 03306. Feed bracket 1030 Feed barblock 05309 Rubber headed tack 02319 Check spring washer 02320 Check spring pin 01321 Bobbin 04322 Bobbin winder rubber 05323 Bobbin winder main centre 10324 Bobbin winder spring centre 10325 Bobbin winder pulley 08326 Bobbin winder presser pad OS327 Bobbin winder spring 04328 Bobbin winderpadpin 01329 Bobbin winder radius bar 06330 Radius bar roller 03331 Radius bar screw 02332 Springon 324 02333 Head on 324 05334 Srewto adjnstbnbbin winderto wheel 05335 Spring on 334 03336 Screw to fasten bobbin winder to arm OS337 Rear shuttle slide 10
1 338 Needle plate 20339 Front shuttle slide 10340 Thread number plate 10341 Washerfor nfl places not mentioned 01342 Attachment holder complete 40343 Presser foot 25344 Braider 40345 Hemmer and feller 40346 Hinge 06347 Presser bar lifter and tension releaser
cam 10348 Presser bar lifter screw 02349 Shuttle, complete 1 00350 Under shuttle tension spring 05351 Upper shuttle tension spring 05352 Feed bar 2533 Feedbarfelt 01334 Feed bar felt clamp 02355 Tension indicator complete 50356 Tension plate 30357 Tension diik 03358 :Tension spring on inside of face 05359 Screw and nut to connect 356 and 358 06360 Guide pin in slot of tension plate 01361 Check spring 02362 Check spring plate 02363 Screw to adjust lower end of face plate 02364. Set screw to 376 02365 Screw to fasten hinge to table 02366 Thread cutter 02367 Heartcam 25368 Presserbar 12369 Needle bar 25370 Presser screw 10371 Needlebarcap 10372 Crankonrearendoffeedarbor 15373 Eccentrieconnection 40374 Roller stud for lower end of eccentric
connection 10375 Balance wheel stud with back cone 15376 Prontconefor 375 05377 Ball race tbr balance wheeland treadle 10378 Ballrctainerfor balance wheel and trea
dle 03379 Balls for balance wheel and treadle per
100 50380 Treadle cone 05
Parts for Ball Bearing Stand illustrated on page 2.
381 Treadlerod 50382 Treadle 50383 Balancewheel 1 50384 Brace 1 00385 Dress guard 50388 Right leg 1 75387 Left leg 1 7588 Pitman 25389 Rest pin in table 05
0202
02
02.02
02
0302
0203
020305
02
02
0203050202121006100202020205100505023010031020
0212502005150201.0503120210050602020308100502203020060203400210
SPECIAL NOTICE.—Always order Parts by thes Numbers, and send Cashwith orders for Parts. In ordering Parts or edles, BE 5UE TOMENTWN PLATE NUflBER OF rlAçtiINE. .

DIRECTIONS FOR USING THE ATfACHMENTS.
Hemming.
Raise the needle to its highest point, remove the presser foot andn its place attach the hemmer. Trim the edge of cloth on a curve3nd insert in hemmer far enough to permit the needle to enter thecloth at its extreme edge., (See fig. 2 above), then proceed to sew,seeping the edge turned as it feeds through.
Felling.
J
The hemmer is also the feller. Sew together two pieces of clothwith the under edge projecting between and inch beyond theuppcr edge; then trim the edges if necessary and open the work flatswrong side up, and fold down the wider edge, toward the left, overthe narrow edge, and then pass the folded edgeS into the feller the3ame as in ordinary hemming.
Fig. 15 represents an opçrator in the act of completing a fell
Fig. x5.

*
1I
‘1-
Our hemmer and feller which accompanies each machine, is nowmade with a slot—6. (See illustration above.) In this slot, place theedge of the lace and sew it on at the same time as in ordinary hemming.
Hemming, Sewing on Lace and Inserting Bias Trim
ming at Head of the Hem—All in One Operation.
Cut a narrow piece of bias trimming out of colored goods (see 4inFig. 14). Pass the bias trimming into the tube near the mouth ot
hemmer; then place the edge of the lace in slot 6, then place thefabric to be hemmed into the mouth of the hemmer as for ordinaryhemming, and then proceed to sew, keeping the edge of the fabricturned as it feeds through, and at the same time holding the laceloosely in its proper position. It will require a little patience andexperience for an operator to become proficient in this work, but asit makes a most desirable style of trimming, it has come into generaluse by owners of WHITE machines
Wide Hemming.
Any width hem can be made with the hemmer and feller uponthin fabrics by simply folding -the goods the desired width of hemsud then passing the edge through as in narrow hemming.
Hemming and Sewing on Lace—One Operation.
4.
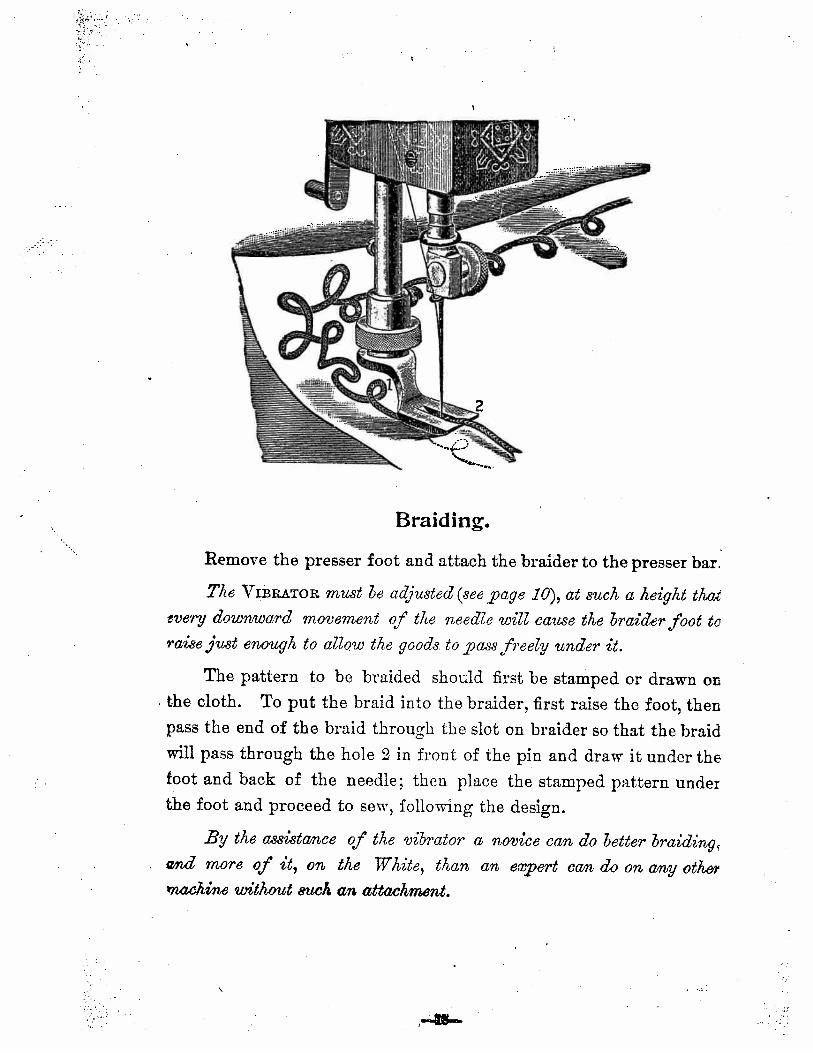
Remove the presser foot and attach the braider to the presser bar.
The VurnAT0R must be adjusted (see page .10), at suth a height thaievery downward movement of the needle will cause the braider foot torai8e just enough to allow the goods to pass freely under it.
The pattern to be braided should first be stamped or drawn onthe cloth. To put the braid into the braider, first raise the foot, thenpass the end of the braid through the slot on braider so that the braidwill pass through the hole 2 in front of the pin and draw it under thefoot and back of the needle; then place the stamped pattern underthe foot and proceed to sew, following the design.
By the assistance of the vibrator a novice caii do better braiding,and more of it, on the White, than an expert can do on. any other
machine without gucis. an attachment.
Braiding.
/
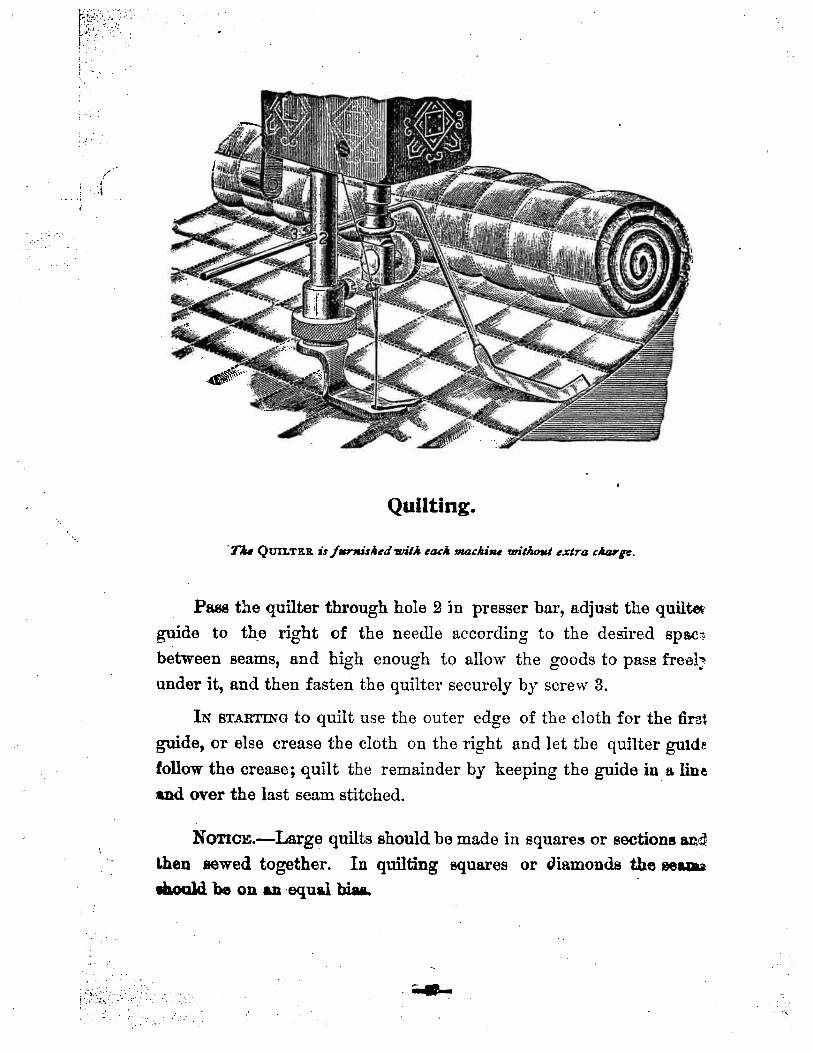
Quilting.
Th. Qun.rEa Isfuri.Js4edwit4 eack mackws wihow4 exira cka,-ge.
Pass the quilter through hole 2 in presser bar, adjust the quilteguide to the right of the needle according to the desired spacbetween seams, and high enough to allow the goods to pass freei’under it, and then fasten the quilter securely by screw 3.
IN STARTING to quilt use the outer edge of the cloth for the firnguide, or else crease the cloth on the right and let the quilter guithfollow the crease; quilt the remainder by keeping the guide in a 1iund over the last seam stitched.
NoTIci.—Large quilts should be made in squares or sections aiithen sewed together. In quilting squares or iamond the seaa.iäoadbeon#izequ1bia.
V..
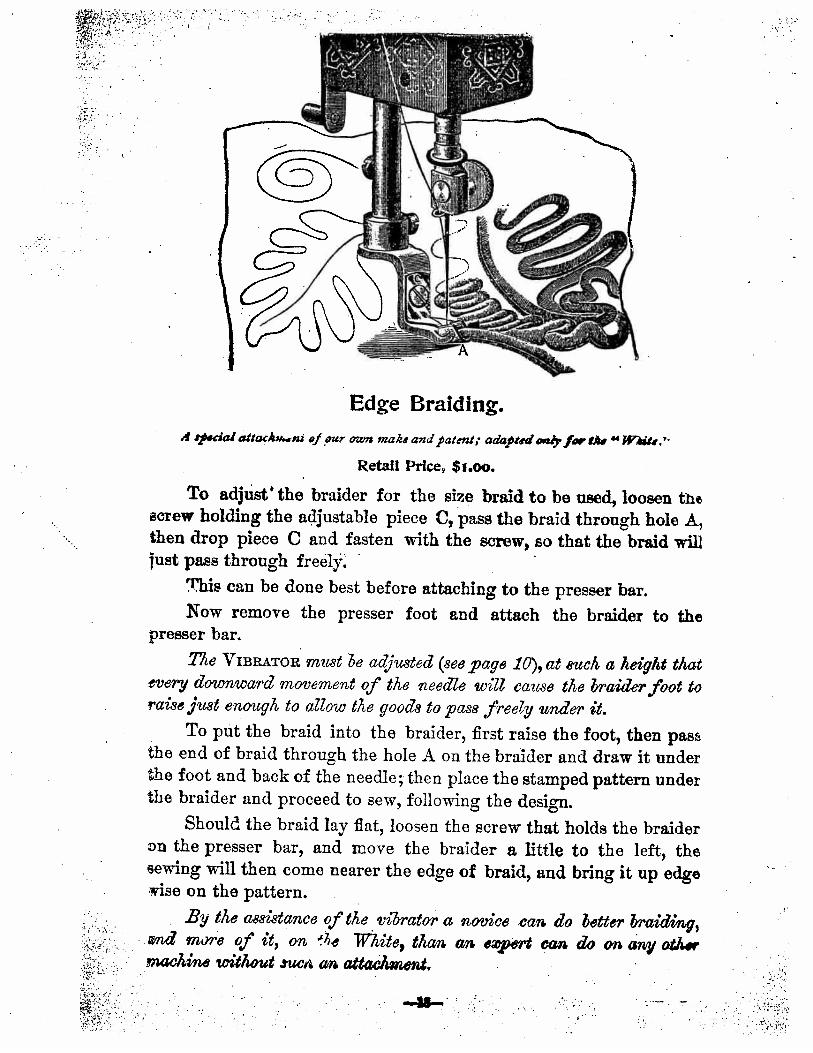
Edge Braiding.4 sp.€ial ,ggachn oz make andpatent; adaptsd cii4fir Aw “WV. .“
Retail Pr1ce $i.oo.
To adjust’ the braider for the size braid to be used, loosen thBcxew holding the adjustable piece C, pass the braid through hole A,then drop piece C and fasten with the screw, so that the braid williust pass through freely.
This can be done best before attaching to the presser bar.Now remove the presser foot and attach the braider to the
presser bar.T1e VIBn.&T0R must be adjusted (see page .10), at uc/ a heig1t t/at
every downward movement of the nee&e will cause t1e braülerfoot toraise just entluqlb to allow t1e goods to pass freely under it.
To put the braid into the braider, first raise the foot, then passthe end of braid through the hole A on the braider and draw it underthe foot and back of the needle; then place the stamped pattern underthe braider and proceed to sew, following the design.
Should the braid lay flat, loosen the screw that holds the braidern the presser bar, and move the braider a little to the left, thesewing will then come nearer the edge of braid, and bring it up edgewise on the pattern.
Bt the assistance of the vibrator a novice cam do 1.ietter braidin9,nd mere of it, on .e White, than am eaprt can do on ciny oth.rnacMn4 wiUeut all
V
—
::
• •. •:-
V
....) .-L
Tucking.
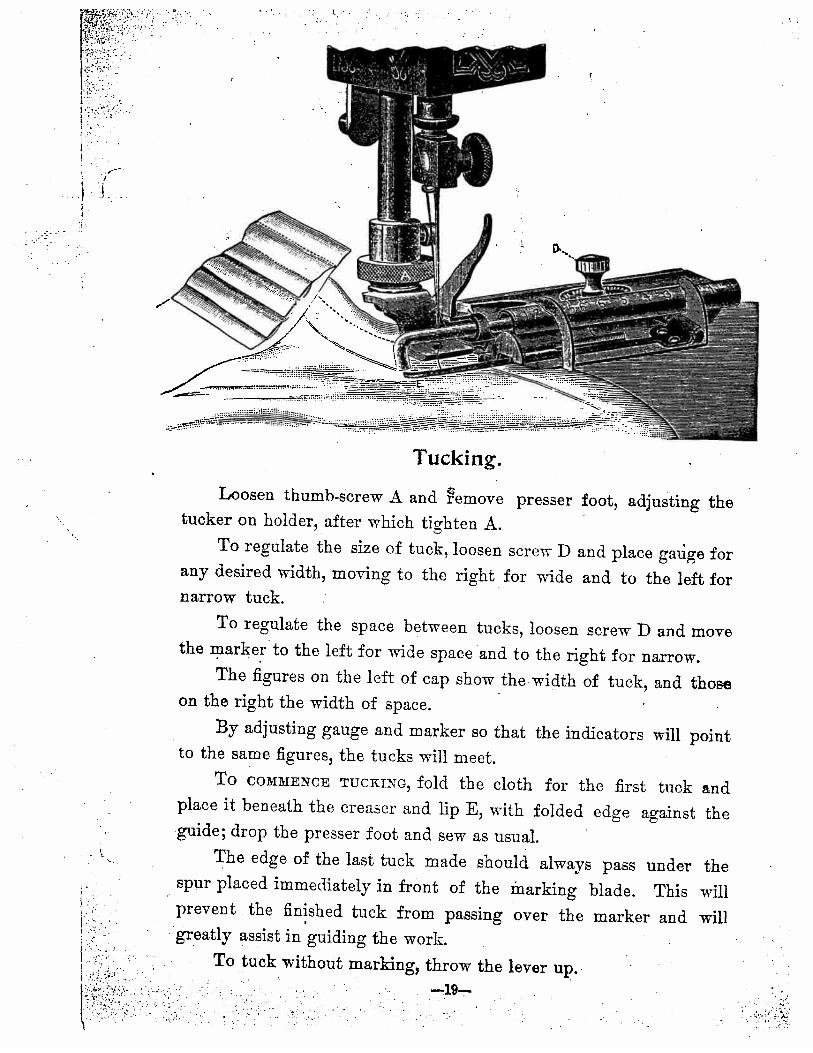
Loosen thumb-screw A and remove presser foot, adjusting thetucker on holder, after which tighten A.
To regulate the size of tuck, loosen screw D and place gauge forany desired width, moving to the right for wide and to the left fornarrow tuck.
To regulate the space between tucks, loosen screw D and movethe marker to the left for wide space and to the right for narrow.
The figures on the left of cap show the- width of tuck, and thoseon the right the width of space.
By adjusting gauge and marker so that the indicators will pointto the same figures, the tucks will meet.
To COMMENCE TUCKING, fold the cloth for the first tuck andplace it beneath the creaser and lip E, with folded edge against theguide; drop the presser foot and sew as usual.
• The edge of the last tuck made should always pass under thespur placed immediately in front of the marking blade. This willprevent the finished tuck from passing over the marker and willgreatly assist in guiding the work.
• To tuck without marking, throw the lever up.—19—-
_,_,,m,!?fl.;... -. -
—_ - -—
-
__
— — - - — - -—‘-
______
• -, - •

CMI:
CM
C p-
0•
CD
j.
CD
CM
oCD
_
-..
0V
CDC
t-
CDCD
CD
0
CDCD
CD CDCT
)
0
0
-
0 0
o’
CDCM
0
CDCD
CDCD
c-F
1Qo
:-t-
c-F
pCM
CDc-
Fc-
FC
)CJ
QCM
CDCD
CDCD
“•
CD Ti
CT)
CMC
FCM
CMc-
FCT
)CM
CT)
CDCD
o0
CDTi
.-L
C1
C
oCD
Cr)
CDp
CM
Ti
CDCD
0 0CD
Ti
c-F
CMcjq
c-p-
‘-
,C
DC
DT
i•
I I+1
c-F
CDH
oCD T
iCD
c-F
Ti
c-F
ciqCD
Ti
oCD
_
o•
CD
Ti-
0CJ
Q CMCD
H 0 p CD Ti
CD Ti
CD CM C c-F
CD Ti
CM c-F
I-”
c-F
CT)
0 C) Ti CD p Ti 0 CD
z
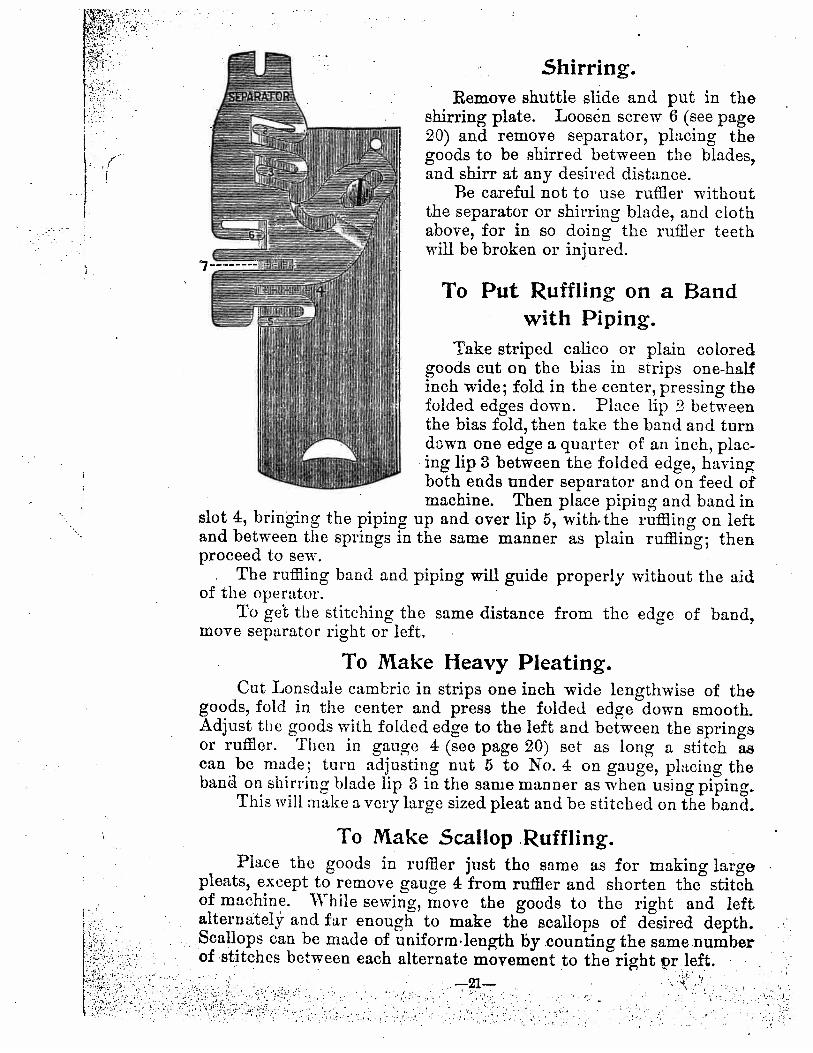
Remove shuttle slide and put in theshining plate. Loosen screw 6 (see page20) and remove separator, placing thegoods to be shirred between the blades,and shirr at any desired distance.
Be careful not to use ruffier withoutthe separator or shirring blade, and clothabove, for in so doing the ruffler teethwill be broken or injured.
To Put Ruffling on a Bandwith Piping.
Take striped calico or plain coloredgoods cut on the bias in strips one-hallinch wide; fold in the center, pressing thefolded edges down. Place lip 2 betweenthe bias fold, then take the band and turndown one edge a quarter of an inch, placing lip 3 between the folded edge, havingboth ends under separator and on feed ofmachine. Then place piping and band in
slot 4, bringing the piping up and over lip 5, with.the ruffling on leftand between the springs in the same manner as plain ruffling; thenproceed to sew.
The ruffling band and piping will guide properly without the aidof the operator.
To ge the stitching the same distance from the edge of band,move separator right or left.
To Make Heavy Pleating.Cut Lonsdale cambric in strips one inch wide lengthwise of the
goods, fold in the center and press the folded edge down smooth.Adjust the goods with folded edge to the left and between the springsor ruffler. Then in gauge 4 (see page 20) set as long a stitch ascan be made; turn adjusting nut 5 to No. 4 on gauge, placing theband on sl]irring blade lip 3 in the same manner as when using piping.
This vill make a very large sized pleat and be stitched on the band.
To Make Scallop Ruffling.Place the goods in ruffler just the same as for making large
pleats, except to remove gauge 4 from ruer and shorten the stitchof machine. While sewing, move the goods to the right and leftalternately and far enough to make the scallops of desired depth.Scallops can be made of uniform.length by counting the same numberof stitches between each alternate movement to the right r left.
Shirring.
1
-21-

A speial aftaczmen1 of our own make and patent; adatiedon?v for /7z “
Retail Price, $i.oo.
First remove the presser foot of the machine and place the hestitcher on presser bar same as presser foc , so needle will enter hoIin center of lower bar of attachment. Use strips of 1ine lawn ormuslin lengthwise of the goods of about 1- inches in width, creasedin center, for guide in stitching. Place one piece of cloth betweeE-the feed and lower bar of attachment, the other over the low bar-and beneath the foot of attachment; the ordinary tension is used fora medium space in the bern stitch; to increase the space, loosestension ; to diminish space, tigiten tension.
To make two or more rows, add the sameturning the work over and far enough to the leftthe foot will pass over the last line of stitching.the proper width of band.
Hem Stitcher.
size strip to feedso that the edge ofThis will give yo
—22---
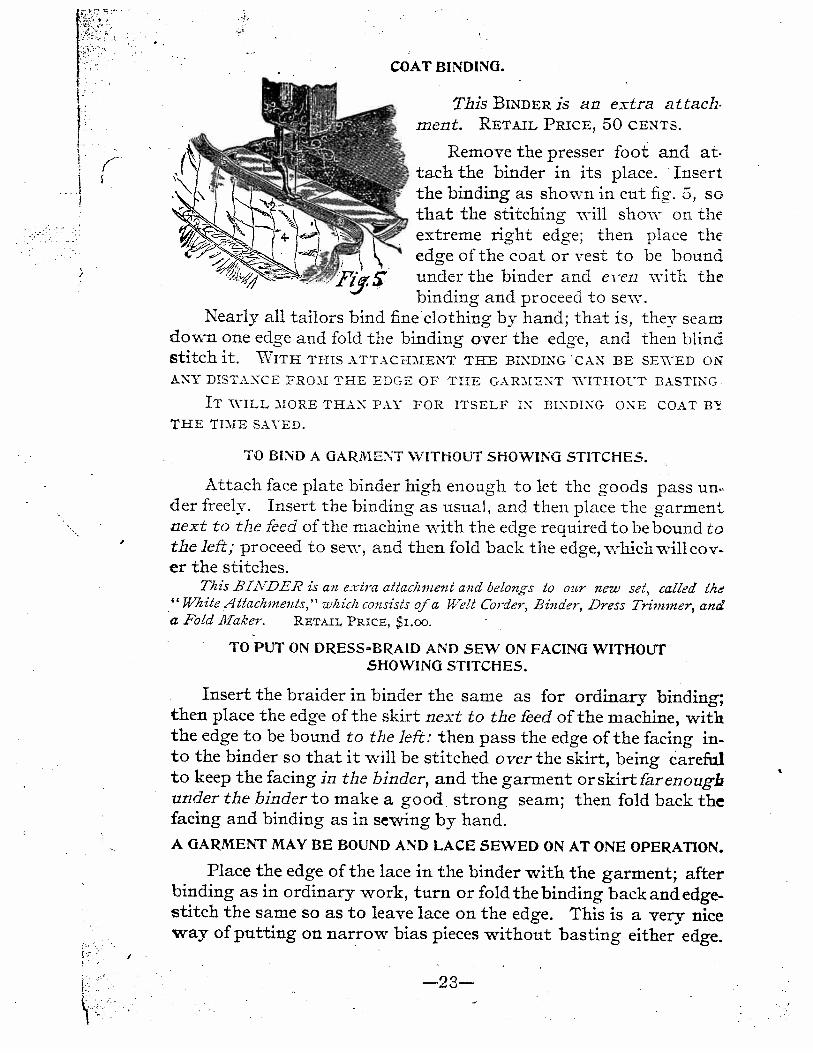
COAT BINDING
This BINDER is an extra attach.ment. RETAIL PRIcE, 50 CENTS.
Remove the presser foot and at.tach the binder in its place. Insertthe binding as shown in cut fig. 5, sothat the stitching will show on theextreme right edge; then place the
V edge of the coat or vest to be boundunder the binder and eVten with thebinding and proceed to sew.
Nearly all tailors bind fineclothing by hand; that is, they seamdown one edge and fold the binding over the edge, and then blindstitch it. \ITH THIS ATTACHIENT THE BINDING CAN BE SEWED ON
ANY DISTANCE FROI THE EDGE OF THE GARMENT WITHOUT BASTING.
IT WILL MORE THAN PAY FOR ITSELF IX BINDING ONE COAT B’
THE TIME SAVED.
TO BIND A GARMENT WITHOUT SHOWING STITCHES.
Attach face plate binder high enough to let the goods pass un.der freely. Insert the binding as usual, and then place the garmentnext to the feed of the machine with the edge required to be bound tothe left; proceed to sew, and then fold back the edge, which will cover the stitches.
V This BLzVDER is an extra attachment and belongs to our new set, called th“White Attachments,” which consists of a Well corder, Binder, Dress Trimmer, anda Fold Maker. RETAIL PRICE, $i.oo.
V
TO PUT ON DRES&.BRAID AND SEW ON FACING WITHOUTSHOWING STITCHES.
V Insert the braider in binder the same as for ordinary binding;then place the edge of the skirt next to the feed of the machine, withthe edge to be bound to the left: then pass the edge of the facing into the binder so that it will be stitched over the skirt, being carefulto keep the facing in the binder, and the garment orskirtfarenoughunder the binder to make a good strong seam; then fold back the
V facing and binding as in sewing by hand.A GARMENT MAY BE BOUND AND LACE SEWED ON AT ONE OPERATION.
Place the edge of the lace in the binder with the garment; afterV
binding as in ordinary work, turn or fold the binding back and edge-stitch the same so as to leave lace on the edge. This is a very niceway of putting on narrow bias pieces without basting either edge.
/
V23—
V
V
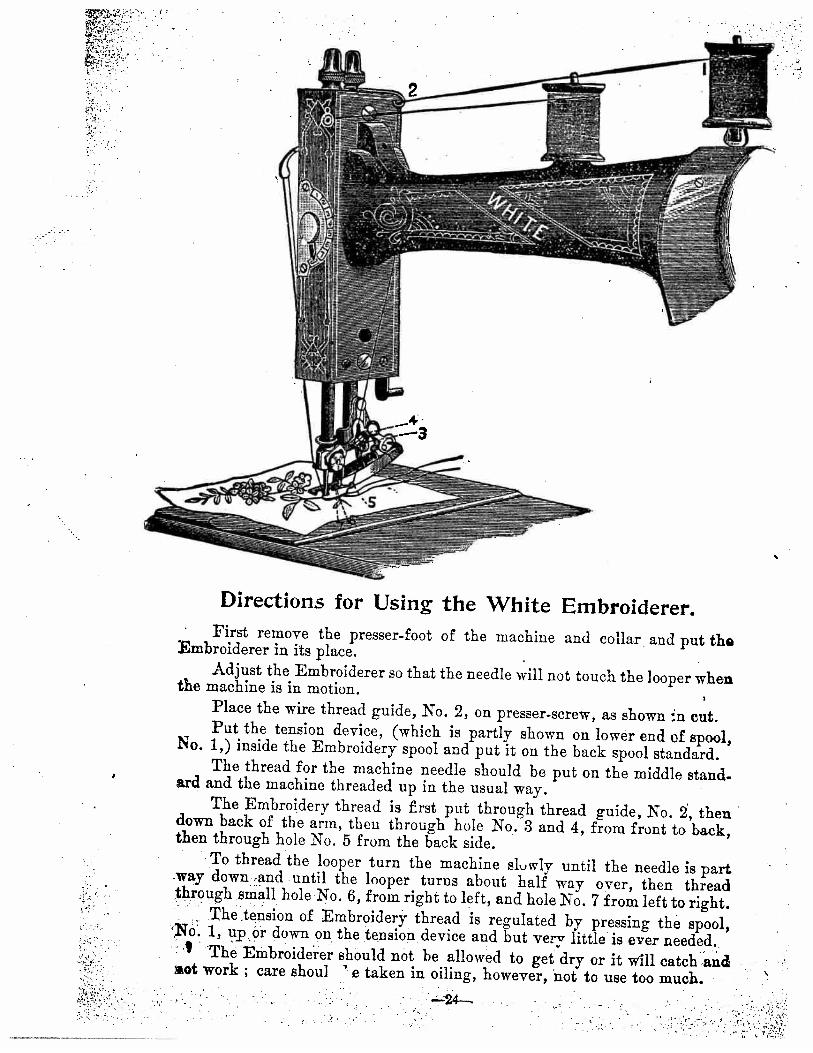
Directions for Using the White Embroiderer.First remove the presser-foot of the machine and collar, and put th.Embroiderer in its place.Adjust the Embroiderer so that the needle will not touch the looper whenthe machine is in motion.Place the wire thread guide, No. 2, on presser-screw, as shown n cut.Put the tension device, (which is partly shown on lower end of spool,No. 1,) inside the Embroidery spool and put it on the back spool standard.The thread for the machine needle should be put on the middle standard and the machine threaded up in the usual way.The Embroidery thread is rst put through thread guide, No. , thendown back of the arm, then through hole No. 3 and 4, from front to back,then through hole No. 5 from the back side.To thread the looper turn the machine slowly until the needle is part.way downrand until the looper turns about half way oyer, then threadthrough small hole No. 6, from right to left, and hole No. 7 from left to right.• : The tnsion of Embroidery thread is regulated by pressing the spool,‘To. 1, upor down on the tension device and but very little is ever needed.The tthbroicleer should not be allowed to get dry or it will catch anot work; care shoul ‘e taken in oiling, however, not to use too much.
-44-•
‘i.
I.
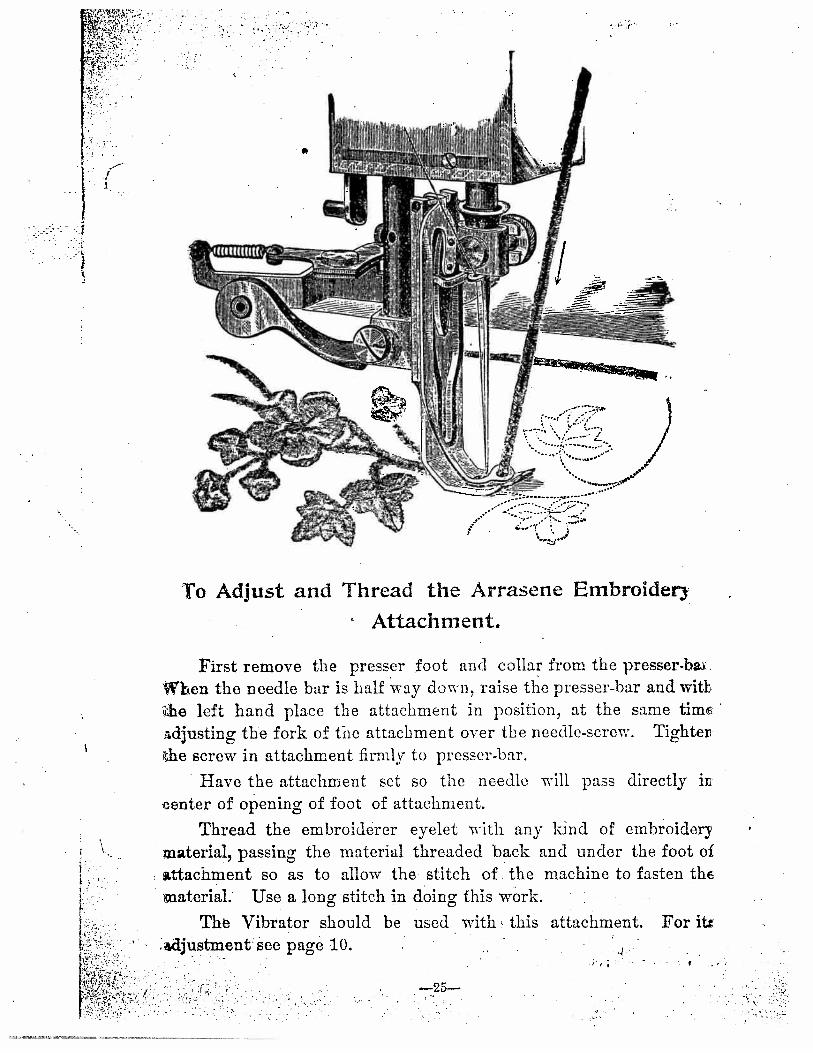
To Adjust and Thread the Arrasene Embroider
Attachment.
First remove the presser foot and collar from the presser-bay.When the needle bar is half way down, raise the presser-bar and with.he left hand place the attachment in position, at the same time.djusting the fork of tue attachment over the needle-screw. Tighterthe screw in attachment firmly to presser-bar.
Have the attachment set so the needle will pass directly incenter of opening of foot of attachment.
Thread the embroiderer eyelet with any kind of embroiderymaterial, passing the material threaded back and under the foot of.ttachrnent so as to allow the stitch of the machine to fasten thiateriaL Use a long stitch in doing this wrk.
Th Vibrator should be used with this attachment. For it.4djustment see page 10.
I
I.
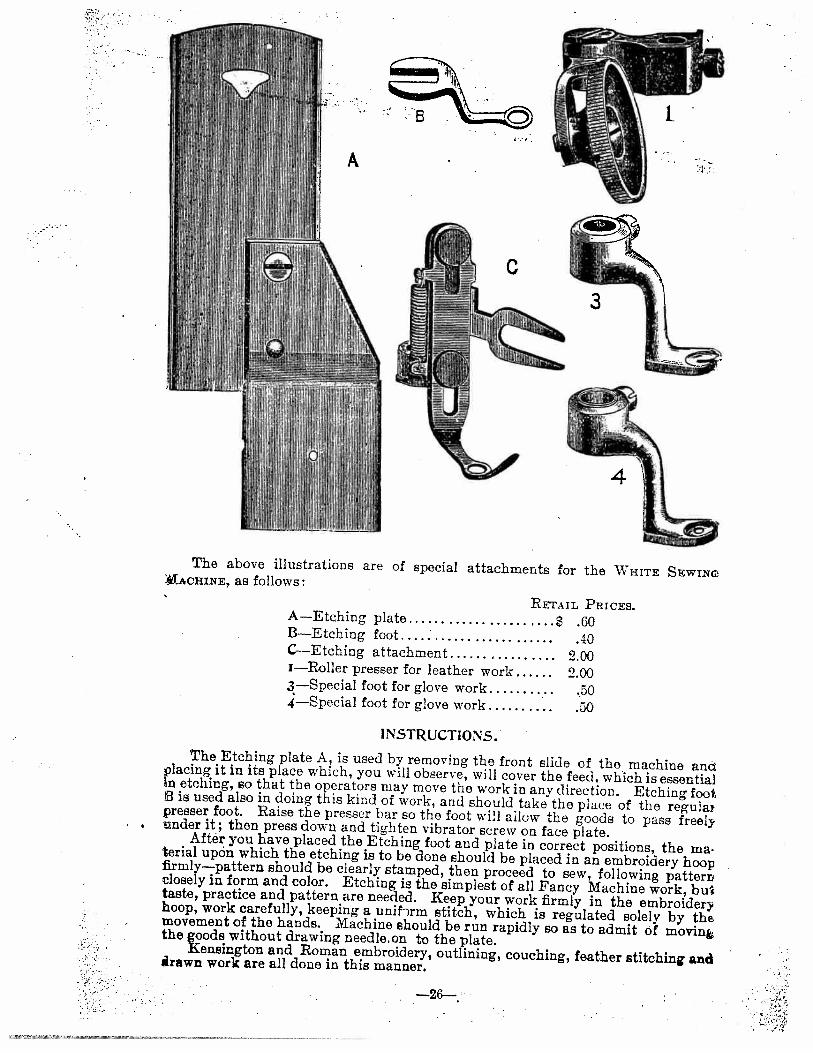
The above illustrations are ofL4crn, as follows:
A—Etching plate 60B—Etching foot .40C—Etching attachment 2.00i—Roller presser for leather work 2.003—Special foot for glove work .504—Special foot for glove work .50
I NSTRUCTIONS.The Etching plate A, is used by removing the front slide of the machine andplacing it in its place which, you will observe, will cover the feed, which is essentialrn etching, so that the operators may move the work in any direction. Etching footis used also in doing this kind of work, and should take the place of the regulaipresser foot. Raise the presser bar so the foot will allow the goods to pass freely• under it; then press down and tighten vibrator screw on face plate.After you have placed the Etching foot and plate in correct positions, the material upân which the etching is to be done should be placed in an embroidery hoopfirmly—pattern should be clearly stamped, then proceed to sew, following patternclosely in form and color. Etching is the simplest of all Fancy Machine work, butaste, practice and pattern are needed. Keep your work firmly in the embroideryhoop, work carefully, keeping a uaifrm stitch, which is regulated solely by th• uxovement of the hands. Machine should be run rapidly so as to admit of movingthe goods without drawing needleon to the plate.Kensington and Roman embroidery, outlining, couching, feather stitching anddrawn work are all done in this manner.
—26--—
•
V
A
I
C
3
4
special attachments for the WHITE SEwue
RrAIL PRIcES.

RoTARY CUTTER AND SELF-FOLDING A-rrACHflENT.
[PATENTED FEBRUARY 17TH, i88o]
Directions for Cutting.Turn the machine bead back on its hinges and fasten the attach
ment to the bed of a machine by a screw through the hole in the bed,that the, belt will pass between the wheels 1 and 2. Figs. 9 and
10 are blades of rotary shears; the blade 9 being fixed upon the uppershaft and driven by wheel 1, whilst blade 10 is fixed upon a parallelshaft. Upon each side of the upper blade are placed rubber rollers,which, in revolving, act as feeds to carry the goods to the cutters.
Figs. 7 and 8 represent two plates between which the fabric ispassed to the cutters, being a guide for the goods passing betweenthem, and they can be adjusted to the right or left so as to cut anydesired width of bias trimming.
Directions for Folding.Fig: 13 represents a roller; Figs. 5 and 6 are guides, adjustable.
to the right and left, through which the strips of bias goods arepassed into and between the rollers, whereby the edges are turned inupon each other and are pressed and retained in this folded condition;being thus prepared, the fabric is ready to be used as trimming orotherwise. Pulley wheel 2 revolves upon the end of a lever pivotedto the iron frame, which leyer may be drawn towards or pushed from.the operator so that it will stop or operate the cutter.
By using one of the guides 5 or 6, a narrow fold can be turned;.which can be used for pping.
To facilitate repairs or replacement, the cutters 9 and 10 withthe feeding rollers on each side are removable by taking off the nutswñch screw on the ends of the shafts.
—2?—
a