Embed Size (px)
Citation preview

InstallatIon & MaIntenance GuIdeInstallatIon & MaIntenance GuIde
w w w . a q u a t i c l i f e . c o m
3W led lIGHt FIXtuRes eXPeRt seRIesItem # Product Description
420278 Light 14IN 3W X 24 LED, 78W WHT BLU RBLU RED
420279 Light 34IN 3W X 48 LED, 156W WHT BLU RBLU RED
420280 Light 46IN 3W X 72 LED, 234W WHT BLU RBLU RED

2
WELCOME & table of contents
safety Instructions .............................................................3 Warnings ........................................................................3
Parts & specifications ........................................................4 Parts Diagram ................................................................4 Product Specifications ......................................................4
Installation .....................................................................5-9 Computer Requirements ...................................................5 Software Installation .................................................... 5 - 7 Power ............................................................................8 USB Connection ..............................................................8
operation .....................................................................9-22 Fixture Display and Remote ...............................................9 Using T-Time Software .................................................... 10
Main Menu ........................................................... 11Color Dashboard ..............................................11 -13Auto Dashboard ...............................................13 -15Functions Dashboard .........................................16 -18General Dashboard ...............................................19
Using the Remote Control............................................... 20 Suspension System ....................................................... 21 Aquarium Frame Mounts ................................................ 22 Fixture Placement & Adjustment ...................................... 22
acclimating corals ..........................................................23
Maintenance ....................................................................23
Warranty ........................................................................24
appendix a - Verify and Install .NET Framework Windows XP .......25-26
appendix b - Verify and Install .NET Framework Windows Vista ....27-29
appendix c - Creating a 24 Hour light cycle “Trace” ..................30-34
appendix D - LED Layout & Lenses ..........................................35
appendix e - Fixture Selection Guide .......................................36
This symbol indicates “Warnings” that are essential in order to protect against injury to people or damage to equipment.
This symbol indicates “notes” that are specific instructions on how to operate, control, adjust or maintain the units.
This symbol indicates “tiPs” that are intended to offer helpful advice for a better user experience.
thank you for purchasing an aquaticLife® Light Fixture for use with your aquarium!
We know you value quality and innovation and will be pleased with this product’s performance.
We encourage you to take a few minutes to become familiar with this manual and note items that apply to your particular model. Select parts and accessories can be purchased direct from Aquatic Life for customizing your fixture. For additional information, please visit www.aquaticlife.com.
1) Install Software before connecting Light Fixture to Computer.
2) Follow set-up instructions step-by-step.
Copyright © Aquatic Life, LLCAll rights reserved. No part of this document may be reproduced, stored in a retrieval system, or transmitted in any form or by any means without the prior written consent of Aquatic Life, LLC.
Aquatic Life, LLCCommerce, CA 90040Toll-Free US only: (888) 548-3480Outside the US: [email protected]
Check us out on...
taBLe oF Contents
WeLCoMe!
iMPortant:
3
safety INSTRUCTIONS
A) READ AND FOLLOW ALL SAFETY INSTRUCTIONS.
B) DANGER – To avoid possible electric shock, special care should be taken since water is employed in the use of aquarium equipment. For each of the following situations, do not attempt repairs by yourself; return the appliance to an authorized service facility for service or discard the appliance:
1) If the appliance falls into the water, DON’T reach for it! First unplug it and then retrieve it. If electrical components of the appliance get wet, unplug the appliance immediately. (Non-immersible equipment only)
2) If the appliance shows any sign of abnormal water leakage, immediately unplug it from the power source. (Immersible equipment only)
3) Carefully examine the appliance after installation. It should not be plugged in if there is water on parts not intended to be wet.
4) Do not operate any appliance if it has a damaged cord or plug, or if it is malfunctioning or has been dropped or damaged in any manner.
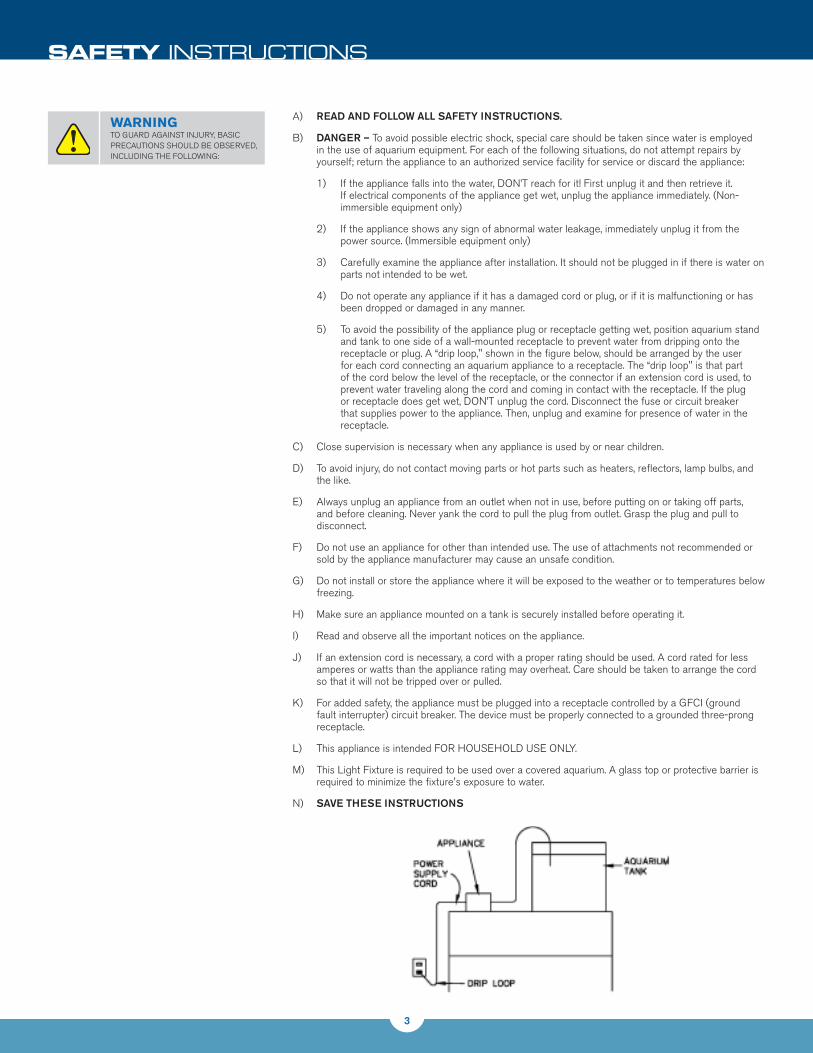
5) To avoid the possibility of the appliance plug or receptacle getting wet, position aquarium stand and tank to one side of a wall-mounted receptacle to prevent water from dripping onto the receptacle or plug. A “drip loop," shown in the figure below, should be arranged by the user for each cord connecting an aquarium appliance to a receptacle. The “drip loop" is that part of the cord below the level of the receptacle, or the connector if an extension cord is used, to prevent water traveling along the cord and coming in contact with the receptacle. If the plug or receptacle does get wet, DON’T unplug the cord. Disconnect the fuse or circuit breaker that supplies power to the appliance. Then, unplug and examine for presence of water in the receptacle.
C) Close supervision is necessary when any appliance is used by or near children.
D) To avoid injury, do not contact moving parts or hot parts such as heaters, reflectors, lamp bulbs, and the like.
E) Always unplug an appliance from an outlet when not in use, before putting on or taking off parts, and before cleaning. Never yank the cord to pull the plug from outlet. Grasp the plug and pull to disconnect.
F) Do not use an appliance for other than intended use. The use of attachments not recommended or sold by the appliance manufacturer may cause an unsafe condition.
G) Do not install or store the appliance where it will be exposed to the weather or to temperatures below freezing.
H) Make sure an appliance mounted on a tank is securely installed before operating it.
I) Read and observe all the important notices on the appliance.
J) If an extension cord is necessary, a cord with a proper rating should be used. A cord rated for less amperes or watts than the appliance rating may overheat. Care should be taken to arrange the cord so that it will not be tripped over or pulled.
K) For added safety, the appliance must be plugged into a receptacle controlled by a GFCI (ground fault interrupter) circuit breaker. The device must be properly connected to a grounded three-prong receptacle.
L) This appliance is intended FOR HOUSEHOLD USE ONLY.
M) This Light Fixture is required to be used over a covered aquarium. A glass top or protective barrier is required to minimize the fixture's exposure to water.
N) SAVE THESE INSTRUCTIONS
WarningTO GUARD AGAINST INJURY, BASIC pRECAUTIONS SHOULD BE OBSERvED, INCLUDING THE FOLLOwING:

4
3W leD lIGHt fIxtures PARTS / SPECS
Parts DiagraM
Product specifications
14 in (420278) 34 in (420279) 46 in (420280)
Lens Cover Acrylic 9000537 9000535 9000536
End Plate Exp LED 3W (universal) 9000594 9000594 9000594
End Plate Blue Accent LED 3W (universal) 9000595 9000595 9000595
Screws LED 3W End Plate/Accent Plate (14 PK) 9000596 9000596 9000596
Suspension Hardware 470281 470281 (Optional) 470281 (Optional)
Reflector LED 100 Deg (6 PK) XPG 9000573 9000573 9000573
Reflector LED 80 Deg (6 PK) XPE 9000574 9000574 9000574
Power Supply (complete w/switch & disconnect) 9000525 9000526 9000526
9 USB A Male to USB Mini Cable (3 meters) (not pictured) 9000531 9000531 9000531
10 Remote 9000587 9000587 9000587
Aquarium Frame Mounts 470262 (Optional) 470262 470262
Optional Reflector LED 60 Deg (6 PK) XPE (not pictured) 9000575 9000575 9000575
14 in (420278) 34 in (420279) 46 in (420280)
Rated Voltage: 115/230V 115/230V 115/230V
Rated Cycle: 50-60Hz 50-60Hz 50-60Hz
Power Cord: 1.8 Meter 1.8 Meter 1.8 Meter
Fixture Cord: 3 Meters 3 Meters 3 Meters
USB Connection: 3 Meters 3 Meters 3 Meters
8
7
6
11
5
4
3
2
1
Parts List
8
4
5
4
23
23
1
1110
6 & 7

5
3W leD lIGHt fIxtures INSTALLATION
requireMents: Computer Type: •PC(Macisnotsupportedatthistime)
Operating System: •WindowsXP(ServicePack3installed) •WindowsVista •Windows7 •Windows8
Internet Browsers: •MicrosoftInternetExplorer8or9(IE8orIE9) •Safari5 •Firefox12
1) IfyouarerunningWindowsXP,itisnecessarytohaveMicrosoft.NETFramework2.0ServicePack1or2(x86)installedonyourcomputer.IfyouarerunningWindowsVista,youwillneed.NETFramework 3.5 Service pack 1. If you have windows Update turned on, there is a good chance your computer already has the .NET component installed, but it is important to verify.
2) Windows XP users – See Appendix A (page 25) for instructions on how to verify you have the cor-rect .NET Framework installed and if not, how to install. proceed to Step 3.
Windows Vista users –SeeAppendixB(page27)forinstructionsonhowtoverifyyouhavethecorrect .NET Framework installed and if not, how to install. proceed to Step 3.
Windows 7 & 8 users – proceed to Step 3.
3) with your computer connected to the internet, go to www.aquaticlife.com and find your light fixture under the “+products” menu at the top of the website.
4) Select Software Download.
CoMPuter requireMents
soFtWare instaLLation
Your new Aquatic Life 3w LED Light Fixture includes electronic components that can be programmed to control the LED’s. This fixture was assembled in California and pre-programmed with three lighting cycles and18presetcolors.Thesoftwaredesignedtocustomizeyourfixtureisavailablefordownloadfromthe Aquatic Life website www.aquaticlife.com. At a minimum, it is necessary to install the software on your computer to set the time on the light fixture for proper operation. It is important to follow the set-up procedures step-by-step to ensure your fixture connects properly to the software.
WarningwARNING DO NOT CONNECT THELIGHTFIXTURETOTHE COMpUTER UNTIL THE SOFTwARE IS INSTALLED.
NOTE: .NET (pronounced “dot net”) is a programming framework created by Microsoft that developers can use to create applications more easily. If you are running windows XPorWindowsVista,the.NETframework is needed to use the Aquatic Life software to program your LED Light Fixture.
NOTE: To download the software needed to control your Light Fixture, you will be asked to register your Fixture and then you will receive a download “Key” by e-mail. The Key is a set of numbers and/or letters needed to obtain the software. The Key will be valid for seven days from the time you receive it. If the Key expires, you can request a new Key by re-registering your Light Fixture. The software used to operate your Aquatic Life 3w LED Light Fixture is called T-Time by Tiaojiou Limited.
PC required to operate fixture

6
3W leD lIGHt fIxtures INSTALLATION
On the Software Download Center webpage, you will be asked to register your Aquatic Life light fixture. You will need the unique nine digit serial number associated with your fixture to register the fixture and obtain the “Key” needed to download the software. The serial number is located on the back of the light fixture and contains nine digits.
After you complete the needed registration information, select the “Request Key” button and follow the instructions on the website.
when prompted, select “Save File”.
Double-click on the program and select “Run”.
Run the set-up wizard.
soFtWare instaLLation (ContinueD)

7
3W leD lIGHt fIxtures INSTALLATION
soFtWare instaLLation (ContinueD)
6) Whenthesoftwarehasfinishedinstalling,clickfinish.
5) Click Next.
NOTE: As part of the software installation, a USB Driver is installed on your computer to allow the Aquatic Life Light Fixture to communicate with the computer.

8
3W leD lIGHt fIxtures INSTALLATION
PoWer
usB ConneCtion
The Aquatic Life 3w LED Light Fixture is powered by a remote power Supply. The cUL Approved power Supplywillworkwith110Vand220Vwithnoextraadaptersorswitches.
1) plug the cord connected to the power supply into the back of the Light Fixture and secure by turning the outer ring on the cord in a clockwise direction until snug.
2) Connect the female end of the power cord into the power Supply and then the standard plug side into a grounded outlet (GFCI). Rock the power switch on the power Supply.
1) Remove the protective cap from the USB port on the back of the fixture. The cap is attached to the fixture and should not be removed from the fixture.
2) Use the included USB mini to USB A male wire to connect the fixture to the pC computer.
TIP: The cord is “KEYED” and can be placed into the fixture only one way.
Warning: DO NOT attach the fixture to the computer if you have not installed the software. If attached prior to software installation, the fixture may need to be shipped back to Aquatic Life for repair.
Warning: Do NOT leave the USB cable connected to the computer when not in use. Use the included protective cap to cover the USB connection on the back of the Light Fixture to prevent damage from water and salt.
TIP: USB Cables are capable of transmitting quality data over a maximum of sixteen feet of cable. To ensure proper operation, Aquatic Life recommends using the cable provided or installing a wireless USB Adapter.

9
3W leD lIGHt fIxtures OPERATION
FiXture DisPLay anD reMote
The Remote is powered by one 3v Lithium Battery (CR2025).TousetheRemoteforthefirsttime,install the battery and the contacts inside the Remote. The battery life depends on the usage.
when using the Remote, always point it toward the front of the Light Fixture. The Infrared Sensor is located on the front of the Light Fixture between the power and Lunar LED indicators.
Power ON/OFF
Auto Mode Power Adjustment
Demonstrate the existing Auto Selection
Color Mode Selection
Auto Mode Trace Selection
Lunar Mode ON/OFF
Cloud Mode ON/OFF
Storm Mode ON/OFF
+ CR2025
3V
power Lunar Cloud Storm
24-hour Individual Light programs

10
3W leD lIGHt fIxtures OPERATION
using t-tiMe soFtWare
The T-Time Software enables custom programming of the LED’s in the Aquatic Life Fixture. Included in this customizationistheabilitytocreate18differentlightcolorcombinations,three24hrcycles,controlcloudcover, lightning storms and lunar light. Once programmed, the Light Fixture is controlled with the handheld Remote.
There is a toolbar menu that remains at the top of the T-Time Screen and four dashboards available depending on the tab selected. The four dashboards are Color, Auto, Functions and General. Becoming familiar with the main menu and dashboards will make customizing your lighting easier.
new t-time - Allows you to start “fresh” with no Traces, Colors or other customizations. If you have customized T-Time already and select “New T-Time” you will be prompted to save what you have already created. The file format for T-Time is .TTD.
new trace – Opens a “fresh” Auto Dashboard where you can create a new Trace. The previous Trace can still be accessed using the drop-down menu on the Auto Dashboard. Creating a New Trace does not change the settings on the Color, Functions or General Dashboards. The file format for a Trace is .TTT.
open t-time – Allows you to open a previously saved .TTD file.
open trace – Allows you to open a previously saved .TTT file.
Close trace – Allows you to close a specific Trace so it does not appear on the Auto Dashboard drop-down menu. If you have not saved the changes to the Trace, you will be prompted to save before closing the Trace.
Close all trace – Allows you to close all open Traces so they do not appear on the Auto Dashboard drop-down menu. If you have not saved the changes to the Traces, you will be prompted to save all before closing the Traces.
save t-time – Allows you to save all of the customization you have made to the T-Time software. The file format for T-Time is .TTD.
save trace – Allows you to save a specific Trace for future reference or sharing with other users. The file format for a Trace is .TTT.
save t-time as – Similar to Save T-Time, but allows you to change the name prior to saving the .TTD file.
save trace as – Similar to Save Trace, but allows you to change the name prior to saving the .TTT file.
save all trace – Similar to Save Trace, but after the first Trace is saved, you will be prompted to save all open Traces one at a time.
save all – Allows you to save all open .TTD and .TTT files one-by-one.
trace Print Preview – Allows you to view the Trace as it will be printed prior to sending the file to your printer.
trace Print – Allows you to send a copy of the Trace to printer(s) connected to your computer.
exit – Closes the T-Time software. If you have not saved any changes, you will be prompted to save changes prior to exiting the software.
Main Menu
File
1
2
3
4
1 2 3 4 5 6

11
3W leD lIGHt fIxtures OPERATION
Copy trace – Allows you to copy a Trace from the Trace being viewed on the Auto Dashboard. The copy is stored on a special clipboard within the T-Time software, not in windows.
Paste trace – Allows you to transfer a Trace that has been copied to a different Trace screen on the Auto Dashboard. You can paste to a new Trace or an existing Trace. If you paste to an existing Trace, the pasted copy will overwrite whatever trace is currently being viewed on the Auto Dashboard.
Connect – Creates the connection between the T-Time software and Aquatic Life Expert Light Fixture. when connected, the word “Online” will be present at the bottom of each Dashboard.
Disconnect – Breaks the connection between the T-Time software and the Aquatic Life Expert Light Fixture. when disconnected, the word “Offline” will be present at the bottom of each Dashboard.
TheColorDashboardallowsyoutocreate18differentpresetcolorcombinationsandintensitiesoflightthat can be loaded into the Light Fixture and controlled by the handheld Remote. Use these colors when you want to view the aquarium under light that does not change according to the clock in the fixture.
For example, your fixture is operating throughout the day and you have created a sun-up, sun-down routine. Friends are visiting and you want to show them the aquarium, but only the moonlights are operating.YoucanusetheRemotetoaccessanyoneofthe18customizedcolors/intensitiesyouhavecreated and show your friends the aquarium. when you are finished, you can use the Remote to return to the programmed daily lighting cycle you have created.
Main Menu (ContinueD)
CoLor DashBoarD
edit
tools
5
6
TIP: when buttons are grayed-out, they are not active. Often, connecting the fixture to the T-Time software will activate the buttons.

12
3W leD lIGHt fIxtures OPERATION
There are four different colored LED’s in the Aquatic Life 3w Expert Light Fixture; Royal Blue, Blue, white and Red. The T-Time software allows you to create different combinations of these colors on the Color Dashboard. There are four ways to achieve the same results when creating custom colors.
1 Using your computer keyboard, enter the percent values for each color LED.
2 Click on the up and down arrows to increase or decrease the percent value for each color LED.
3 Slide the button to the right and left to adjust the percent values for each color LED.
4 Slide the vertical bar up and down to adjust the percent value for each color LED.
CoLor DashBoarD (ContinueD)
To save the combination of LED colors you have created, click on the disk icon in the top toolbar.
To proportionally adjust the percent values for all of the LED’s that are being used in one of the eighteen combinations, select the “All” button. Then use the mouse to drag the four vertical bars to the desired percentages.
1 2 3
4
Click on the block under the color combination you want to create or adjust.
TIP: Use the Import button to load the existing Aquatic Life Light Fixture Color, Auto and Functions dashboards settings into the T-Time Software.
Use the Export button to transfer your Color, Auto and Functions dashboards settings from the T-Time Software to the Aquatic Life Light Fixture.

13
3W leD lIGHt fIxtures OPERATION
You can customize the color on your computer screen that represents each of the four LED colors.
1 Click on the color you want to customize and a color palette will open.
In this example, we opened the color palette, selected a yellow color and now our screen uses yellow to represent the Royal Blue LED on the Dashboard.
CoLor DashBoarD (ContinueD)
1
auto DashBoarD
Some of the buttons on the Auto Dashboard are only active when the Aquatic Life Expert Light Fixture is connected to the T-Time software. If a button is grayed-out, the option is not available offline or the action cannot be completed.
The Auto Dashboard allows you to create daily light cycles, which are comprised of Traces. A “Trace” is the intensity of each color of LED over a 24 hour period. Lunar Light, Cloud Cover and Thunder Storms are not included in your Traces. These lighting options are managed on the Functions Dashboard.
NOTE: You are changing only the color that represents the LED color, not the actual LED color.

14
3W leD lIGHt fIxtures OPERATION
auto DashBoarD (ContinueD)
1 new – Opens a “fresh” Auto Dashboard where you can create a new Trace. The previous Trace can stillbeaccessedusingthedrop-downmenu(18)ontheAutoDashboard.CreatingaNewTracedoesnot change the settings on the Color, Function or General Dashboards. The file format for a Trace is .TTT.
2 open – Allows you to open a previously saved .TTT file.
3 Close – Allows you to close a specific Trace so it does not appear on the Auto Dashboard drop-down menu. If you have not saved the changes to the Trace, you will be prompted to save before closing the Trace.
4 Close all – Allows you to close all open Traces so they do not appear on the Auto Dashboard Trace Drop-Down Menu. If you have not saved the changes to the Traces, you will be prompted to save all before closing the Traces.
5 save – Allows you to save a specific Trace for future reference or sharing with other users. The file format for a Trace is .TTT.
6 save as – Similar to Save Trace, but allows you to change the name prior to saving the .TTT file.
7 save all – Allows you to save all open .TTD and .TTT files one-by-one.
8 Copy – Allows you to copy a Trace from the Trace being viewed on the Auto Dashboard. The copy is stored on a special clipboard within the T-Time software, not in windows.
9 Paste – Allows you to transfer a Trace that has been copied to a different Trace screen on the Auto Dashboard. You can paste to a new Trace or an existing Trace. If you paste to an existing Trace, the pasted copy will overwrite whatever trace is currently being viewed on the Auto Dashboard.
10 Demo start – when the T-Time software is connected to the Aquatic Life Light Fixture, you can use the Demo function to view the Traces you have created and are currently displayed on the active Dashboard. The Demo will take you through an entire 24 hour cycle between 15 seconds and 3 minutes depending on the time selected from the Speed (12) drop-down menu (page15).
11 repeat – when selected, the Repeat button is a green color. Used in conjunction with the Demo Start button, the Traces will continue to loop until stopped.
1
6
8
10
11
2
7
9
43
5
15
3W leD lIGHt fIxtures OPERATION
TIP: Refer to Appendix C (page30)forastep-by-stepexample of creating a 24 hour cycle with four Traces for a Marine Aquarium. visit www.aquaticlife.com to download ready-to-import 24 hour cycle Traces. Once downloaded, you can import into the T-Time software and use as is or modify before Exporting into your Aquatic Life Light Fixture.
auto DashBoarD (ContinueD)
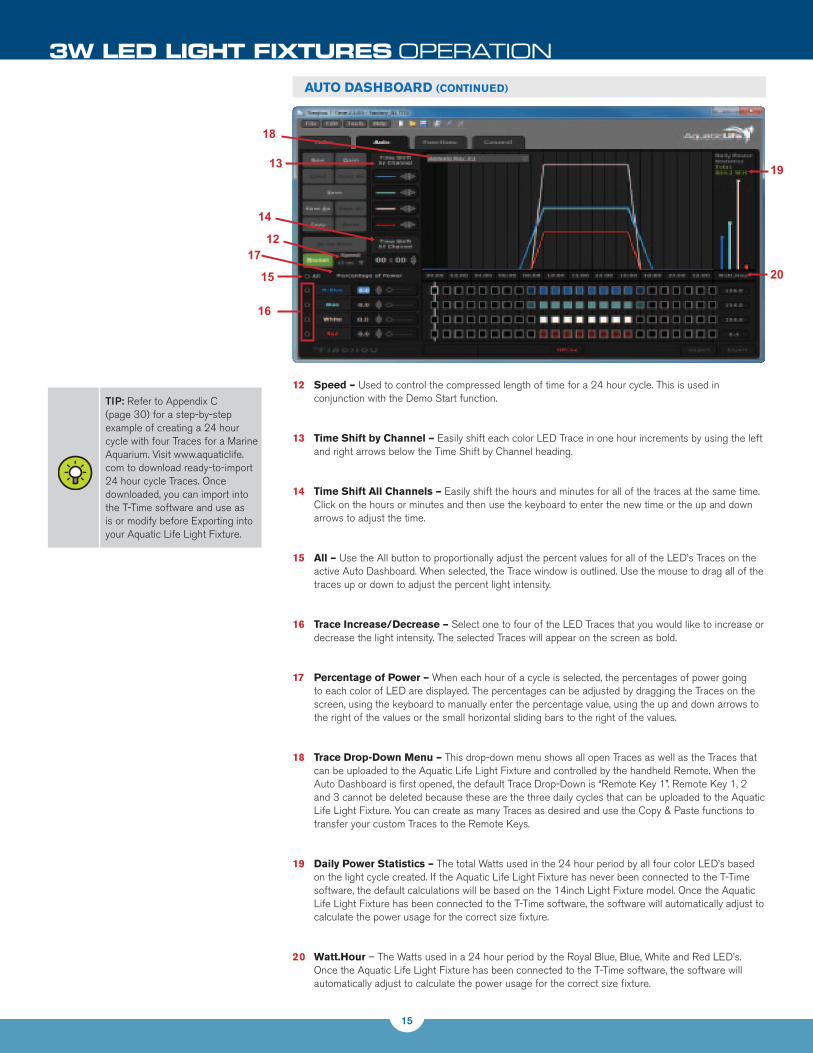
12 speed – Used to control the compressed length of time for a 24 hour cycle. This is used in conjunction with the Demo Start function.
13 time shift by Channel – Easily shift each color LED Trace in one hour increments by using the left and right arrows below the Time Shift by Channel heading.
14 time shift all Channels – Easily shift the hours and minutes for all of the traces at the same time. Click on the hours or minutes and then use the keyboard to enter the new time or the up and down arrows to adjust the time.
15 all – Use the All button to proportionally adjust the percent values for all of the LED’s Traces on the active Auto Dashboard. when selected, the Trace window is outlined. Use the mouse to drag all of the traces up or down to adjust the percent light intensity.
16 trace increase/Decrease – Select one to four of the LED Traces that you would like to increase or decrease the light intensity. The selected Traces will appear on the screen as bold.
17 Percentage of Power – when each hour of a cycle is selected, the percentages of power going to each color of LED are displayed. The percentages can be adjusted by dragging the Traces on the screen, using the keyboard to manually enter the percentage value, using the up and down arrows to the right of the values or the small horizontal sliding bars to the right of the values.
18 trace Drop-Down Menu – This drop-down menu shows all open Traces as well as the Traces that can be uploaded to the Aquatic Life Light Fixture and controlled by the handheld Remote. when the Auto Dashboard is first opened, the default Trace Drop-Down is “Remote Key 1”. Remote Key 1, 2 and 3 cannot be deleted because these are the three daily cycles that can be uploaded to the Aquatic Life Light Fixture. You can create as many Traces as desired and use the Copy & paste functions to transfer your custom Traces to the Remote Keys.
19 Daily Power statistics – The total watts used in the 24 hour period by all four color LED’s based on the light cycle created. If the Aquatic Life Light Fixture has never been connected to the T-Time software, the default calculations will be based on the 14inch Light Fixture model. Once the Aquatic Life Light Fixture has been connected to the T-Time software, the software will automatically adjust to calculate the power usage for the correct size fixture.
20 Watt.hour – The watts used in a 24 hour period by the Royal Blue, Blue, white and Red LED’s. Once the Aquatic Life Light Fixture has been connected to the T-Time software, the software will automatically adjust to calculate the power usage for the correct size fixture.
1720
1913
14
18
12
15
16

16
3W leD lIGHt fIxtures OPERATION
The Functions Dashboard is where you control the Lunar Cycle, Cloud Settings and Storm Settings.
The programmed Lunar Cycle, Cloud and Storm and activated using the handheld remote control when the fixture is operating in Auto Mode 1, 2 or 3.
Functions Dashboard overview
FunCtions DashBoarD
Lunar system settings
The Aquatic Life Expert Series Light Fixture includes a Lunar function that can be programmed independently of the three 24 hour light cycles .
1 start time – Select the Hour and Minutes with your mouse and then use the keyboard to enter the start time for the lunar lighting. You can also select the Hour and Minutes and use the up and down arrows to adjust the time.
2 stop time - Select the Hour and Minutes with your mouse and then use the keyboard to enter the end time for the lunar lighting. You can also select the Hour and Minutes and use the up and down arrows to adjust the time.
3 natural Distribution – when the Natural Distribution function is used, the lunar light will increase and decrease over a thirty day period. You can control the percent intensity of all LED’s or the four colors of LED’s independently; however, the thirty day cycle will remain.
To save your Functions Dashboard settings, click on the disk icon in the top toolbar
1
23
Power ON/OFF
Auto Mode Power Adjustment
Demonstrate the existing Auto Selection
Color Mode Selection
Auto Mode Trace Selection
Lunar Mode ON/OFF
Cloud Mode ON/OFF
Storm Mode ON/OFF
1
3
2
TIP: The Aquatic Life Light Fixture uses a 24 hour clock so there is no confusion between AM and pM.
aM / PM 24 hr. Clock
12:00AM 0:00
1:00AM 1:00
2:00AM 2:00
3:00AM 3:00
4:00AM 4:00
5:00AM 5:00
6:00AM 6:00
7:00AM 7:00
8:00AM 8:00
9:00AM 9:00
10:00AM 10:00
11:00AM 11:00
12:00PM 12:00
1:00PM 13:00
2:00PM 14:00
3:00PM 15:00
4:00PM 16:00
5:00PM 17:00
6:00PM 18:00
7:00PM 19:00
8:00PM 20:00
9:00PM 21:00
10:00PM 22:00
11:00PM 23:00
NOTE: The Lunar, Cloud and Storm functions do not work when the fixture is operating in oneofthe18ColorModes.

17
3W leD lIGHt fIxtures OPERATION
FunCtions DashBoarD (ContinueD)
4 average Distribution – when the Average Distribution function is used, the lunar light will be constant over a thirty day period. You can control the percent intensity of all LED’s or the four colors of LED’s independently.
5 LeD Color selection – Select one to four of the colored LED’s to be included in the Lunar System. Once selected, adjust the intensity of each color to the desired amount.
Cloud system settings
The Aquatic Life Expert Series Light Fixture includes a cloud function that can be programmed independently of the three 24 hour light cycles.
when a cloud setting is active, the feature will be highlighted yellow. The following cloud customization is available:
1Durationisthelengthoftimethatthecloudcoverlasts.Youcanselect1to250minutes(4hours)of cloud cover or have constant cloud cover. when any amount of duration is selected, the cloud cover will randomly move from lighter cover to darker cover.
2 Slide the button left to right to adjust the intensity of the cloud cover (Soft to Heavy).
3 Select which of the four colored LED’s are affected by the cloud cover.
4 with the fixture connected to the T-Time program, select “Export” to transfer your custom settings to the Aquatic Life light fixture.
when the fixture is disconnected from the computer, activate the cloud cover by pressing the Cloud button on the handheld Remote. The cloud indicator light on the front of the light fixture will illuminate. About one minute will pass before the cloud cover begins. The cloud cover will last as long as the duration is set and then will automatically turn off. To active again, press the cloud button on the handheld Remote.
In the example, the Duration is set for 15 minutes, with medium cloud cover. The cloud cover will not affect the 24 hour light cycle programming of the red LED’s on the fixture. Once the Cloud button is pressed on the handheld Remote, the cloud cover will begin and last for 15 minutes before ending. when the cloud cover ends, the indicator light on the front of the Light Fixture will turn off.
Power ON/OFF
Auto Mode Power Adjustment
Demonstrate the existing Auto Selection
Color Mode Selection
Auto Mode Trace Selection
Lunar Mode ON/OFF
Cloud Mode ON/OFF
Storm Mode ON/OFF
TIP: Select Duration: Always and Soft cloud cover to have the intensity of your 24 hour light cycle randomly change throughout the day.
1 2 3
4
4
5
NOTE: . For the Lunar, Cloud, and Storm functions to work, the Light fixture must be in Auto Mode 1, 2 and 3.
18
3W leD lIGHt fIxtures OPERATION
FunCtions DashBoarD (ContinueD)
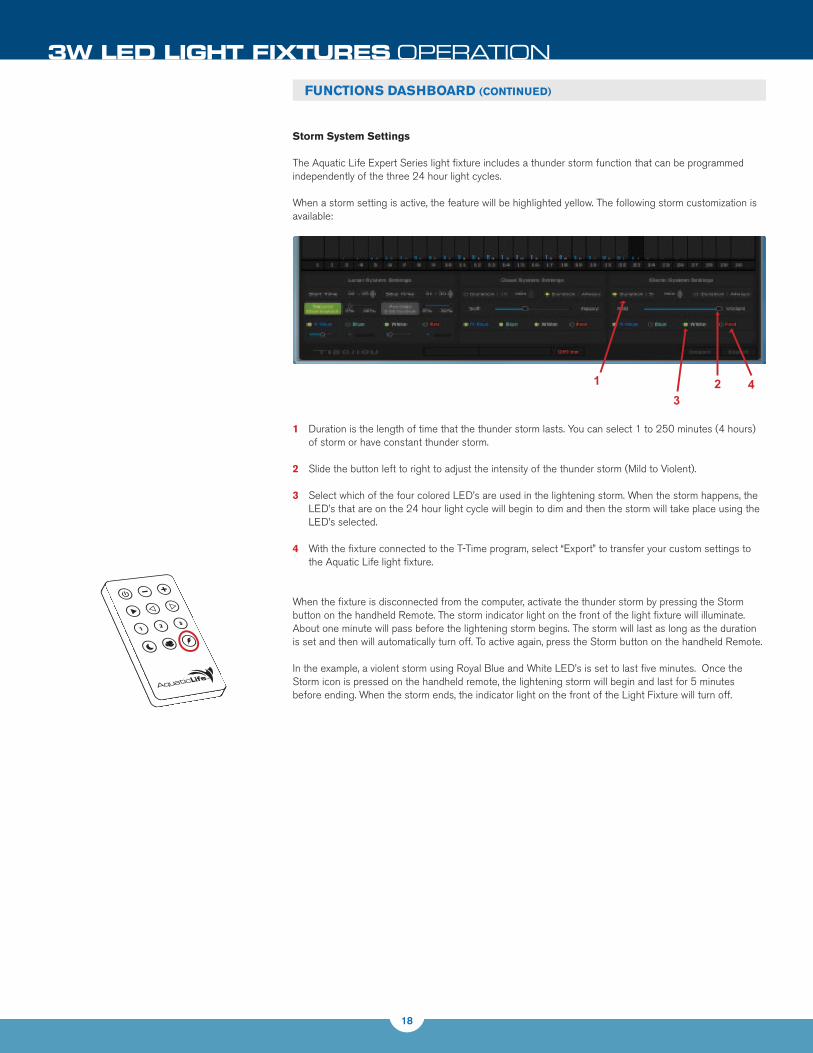
storm system settings
The Aquatic Life Expert Series light fixture includes a thunder storm function that can be programmed independently of the three 24 hour light cycles.
when a storm setting is active, the feature will be highlighted yellow. The following storm customization is available:
1 Durationisthelengthoftimethatthethunderstormlasts.Youcanselect1to250minutes(4hours)of storm or have constant thunder storm.
2 Slide the button left to right to adjust the intensity of the thunder storm (Mild to violent).
3 Select which of the four colored LED’s are used in the lightening storm. when the storm happens, the LED’s that are on the 24 hour light cycle will begin to dim and then the storm will take place using the LED’s selected.
4 with the fixture connected to the T-Time program, select “Export” to transfer your custom settings to the Aquatic Life light fixture.
when the fixture is disconnected from the computer, activate the thunder storm by pressing the Storm button on the handheld Remote. The storm indicator light on the front of the light fixture will illuminate. About one minute will pass before the lightening storm begins. The storm will last as long as the duration is set and then will automatically turn off. To active again, press the Storm button on the handheld Remote.
In the example, a violent storm using Royal Blue and white LED’s is set to last five minutes. Once the Storm icon is pressed on the handheld remote, the lightening storm will begin and last for 5 minutes before ending. when the storm ends, the indicator light on the front of the Light Fixture will turn off.
1 23
4
Power ON/OFF
Auto Mode Power Adjustment
Demonstrate the existing Auto Selection
Color Mode Selection
Auto Mode Trace Selection
Lunar Mode ON/OFF
Cloud Mode ON/OFF
Storm Mode ON/OFF

19
3W leD lIGHt fIxtures OPERATION
generaL DashBoarD
The General Dashboard is where you syncronize the time on your computer with the clock on the Light Fixture.
Date/time settings
1 Date and Time of your computer. If your computer does not have the correct date or time, you will need to set your computer to be able to set the correct time on your Aquatic Life light fixture.
2 when the fixture is connected to the T-Time software (Online), the fixture’s date and time will be visible.
3 Select, Auto to synchronize the date and time between your computer and Aquatic Life Light Fixture.
View/hide graph
4 when selected, the graphs are visible on the Color and Auto Dashboards.
5 Buzzer, can be turned on or off.
1
2
3
45
20
3W leD lIGHt fIxtures OPERATION
using the reMote ControL
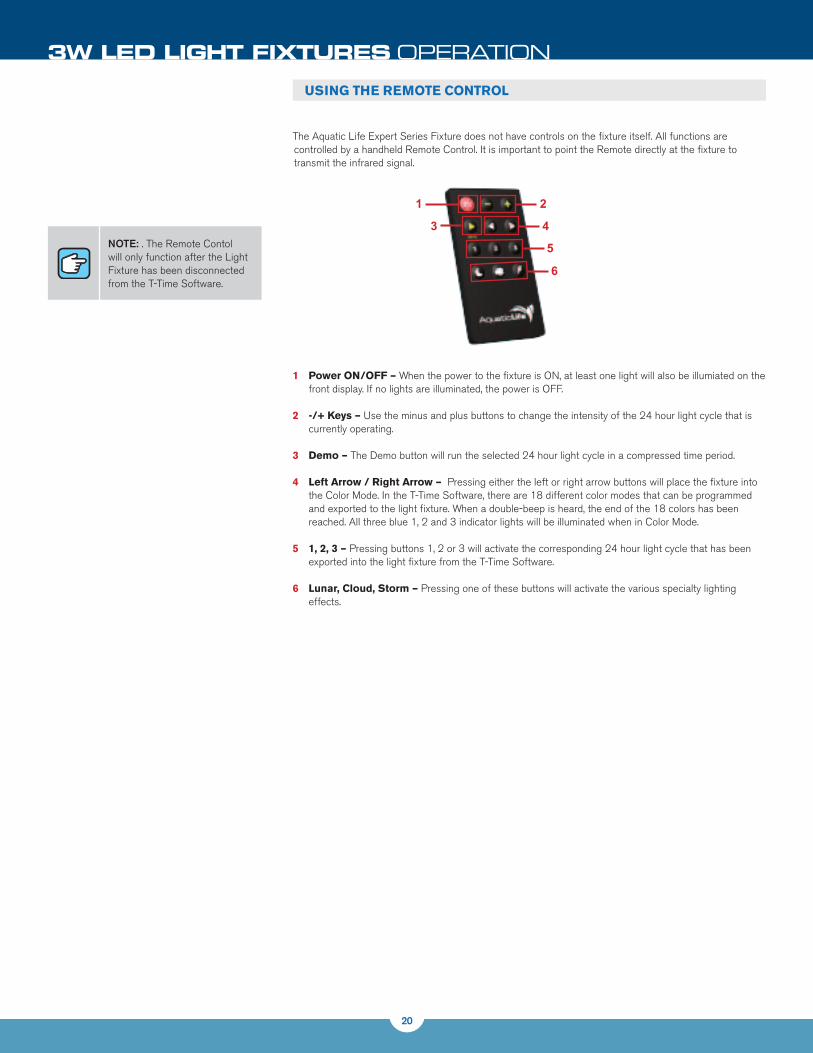
The Aquatic Life Expert Series Fixture does not have controls on the fixture itself. All functions are controlled by a handheld Remote Control. It is important to point the Remote directly at the fixture to transmit the infrared signal.
1 Power on/oFF – when the power to the fixture is ON, at least one light will also be illumiated on the front display. If no lights are illuminated, the power is OFF.
2 -/+ Keys – Use the minus and plus buttons to change the intensity of the 24 hour light cycle that is currently operating.
3 Demo – The Demo button will run the selected 24 hour light cycle in a compressed time period.
4 Left arrow / right arrow – pressing either the left or right arrow buttons will place the fixture into theColorMode.IntheT-TimeSoftware,thereare18differentcolormodesthatcanbeprogrammedandexportedtothelightfixture.Whenadouble-beepisheard,theendofthe18colorshasbeenreached. All three blue 1, 2 and 3 indicator lights will be illuminated when in Color Mode.
5 1, 2, 3 – pressing buttons 1, 2 or 3 will activate the corresponding 24 hour light cycle that has been exported into the light fixture from the T-Time Software.
6 Lunar, Cloud, storm – pressing one of these buttons will activate the various specialty lighting effects.
NOTE: . The Remote Contol will only function after the Light Fixture has been disconnected from the T-Time Software.
1
3
2
4
5
6

21
3W leD lIGHt fIxtures OPERATION
susPension systeM
The Aquatic Life 14 in Expert Series Fixture includes suspension cables and attachments for easy placement abovetheaquarium(optionalfor34inand46in).
Parts List
(Quantity 2) Suspension wire & Connectors
(Quantity 4) Suspension Connector Nuts
FiXture attaChMent
1) Remove the metal and blue Endplates from one side of the Light Fixture by removing the seven phillips Head screws.
Tools required for installation: Phillips #2 Screwdriver
TIP: Use optional Universal Fixture Hangers on your aquarium stand.(Item#370210)
2) Loosen each of the four Connector Nuts on the base of the Connectors.
3) Slide the Connector with Nut into the channels as shown.
4) when the Connectors are in the desired location, twist the top of each of the four Connectors clockwise to lock the Suspension System into place.
5) Reattach the metal and blue Endplates.
Warning: If mounting to the ceiling, suspension hardware should be mounted into a secure surface only. Do not mount hardware directly into drywall/gypsum board or any similar material. Mounting hardware MUST be attached securely and into wood supports thatcanhandle100lbsormore.

22
G H
I J
K L
3W leD lIGHt fIxtures OPERATION
To adjust the height of the fixture above the aquarium, first make sure the wire anchor is tight to the wire and that there is a loop that can be placed over the hook in the ceiling or light fixture hanger.
place the wire loop onto the hook and allow the wire to suspend from the hook.
pull any excess wire through the Adjustment Hardware located above the fixture. Level the fixture and measure the amount of extra wire pulled through the Adjustment Hardware. You will need the measurement for the next step in installation.
Remove the suspension wires from the hooks. Loosen the two screws located in the wire Anchor so that the wire can slide freely in the anchor. The amount of extra wire pulled through the Adjustment Hardware should now be pulled through the wire anchor.
After the extra wire is pulled through the wire Anchor, secure the two screws in the anchor. place the loop in the suspension wire back over the hooks in the ceiling.
To loosen the wire pulled through the Adjustment Hardware, press the small button that is positioned around the wire at the top of the Adjustment Hardware. Gently pull down on the Adjustment Hardware until the fixture is back to where originally measured.
Button used to loosen wire in Adjustment Hardware
G H
I J
K L
G H
I J
K L
Adjustment Hardware
G H
I J
K L
wire Anchor
User supplied ceiling hook
A B
C D
FiXture PLaCeMent anD aDjustMent
Warning: It is extremely important to make sure the anchor is tight and cannot move, this is the part that keeps the fixture secure to the ceiling.
Warning: If mounting to the ceiling, suspension hardware should be mounted into a secure surface only. Do not mount hardware directly into drywall/gypsum board or any similar material. Mounting hardware MUST be attached with hooks and into wood supports that can handle 100lbsormore.
NOTE: If using a fixture hanger to suspend your Light Fixture, place the loop of the wire around the fixture hanger.
aquariuM FraMe Mounts
TheAquaticLife34inand46inExpertSeriesFixtures include Frame Mounts for easy placement above the aquarium (optional for 14 in).
1) with the End plates removed, attach the four Aquarium Frame Mounts. Slide the metal anchors into the channel located on the bottom side of the light fixture. place two anchors per channel; two for the front and two for the back.
2) place each Aquarium Frame Mount over a metal Anchor and insert the included screw through the Mount and into the Anchor. Tighten the screw until the Anchor pulls against the inside of the channel and secures the Mount. Reattach the end plates to the fixture.
3) place the fixture over a covered aquarium and adjust (slide) the Aquarium Frame Mounts so that the base of each Mount is firmly resting on the aquarium frame. Tighten the screws to secure the Mounts to the fixture.
NOTE: The metal Anchors ship attached to the Aquarium Frame Mounts.
NOTE: Not all of the Aquar-ium Frame Mounts are the same. position the Mounts so that they angle away from the fixture to provide a wide stable base.
23
3W leD lIGHt fIxtures ACCLIMATING CORALS • MAINTeNANCe
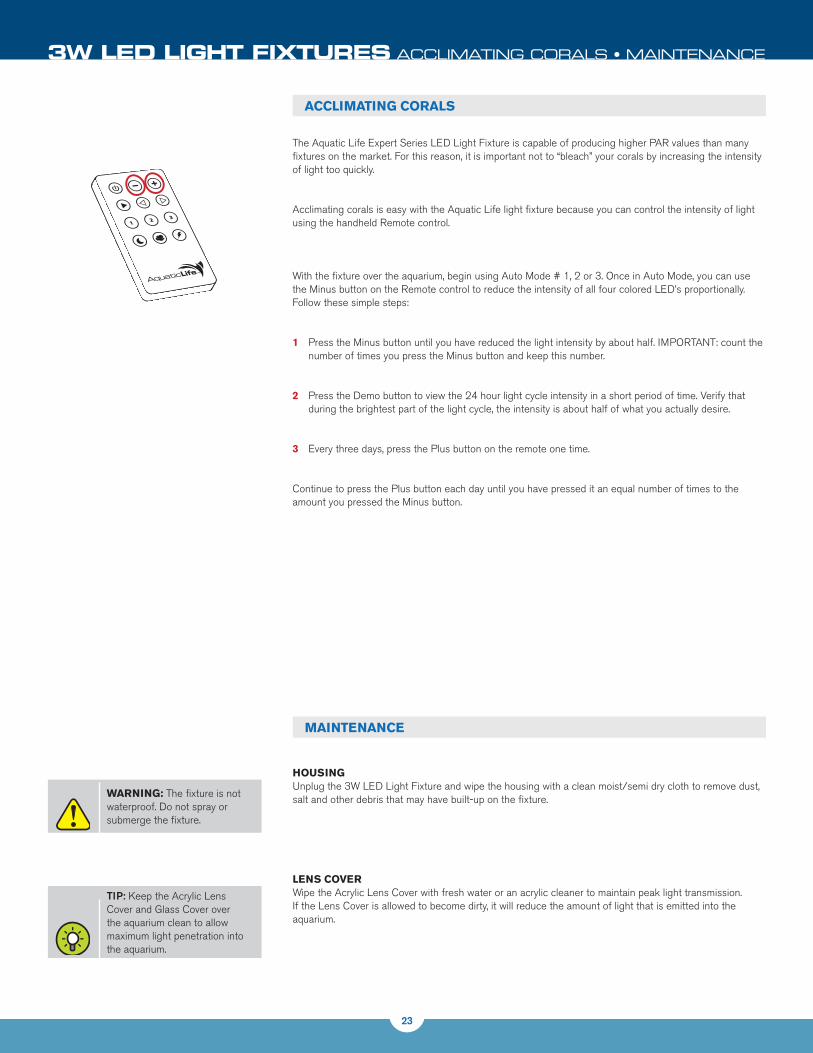
The Aquatic Life Expert Series LED Light Fixture is capable of producing higher pAR values than many fixtures on the market. For this reason, it is important not to “bleach” your corals by increasing the intensity of light too quickly.
Acclimating corals is easy with the Aquatic Life light fixture because you can control the intensity of light using the handheld Remote control.
with the fixture over the aquarium, begin using Auto Mode # 1, 2 or 3. Once in Auto Mode, you can use the Minus button on the Remote control to reduce the intensity of all four colored LED’s proportionally. Follow these simple steps:
1 press the Minus button until you have reduced the light intensity by about half. IMpORTANT: count the number of times you press the Minus button and keep this number.
2 press the Demo button to view the 24 hour light cycle intensity in a short period of time. verify that during the brightest part of the light cycle, the intensity is about half of what you actually desire.
3 Every three days, press the plus button on the remote one time.
Continue to press the plus button each day until you have pressed it an equal number of times to the amount you pressed the Minus button.
Power ON/OFF
Auto Mode Power Adjustment
Demonstrate the existing Auto Selection
Color Mode Selection
Auto Mode Trace Selection
Lunar Mode ON/OFF
Cloud Mode ON/OFF
Storm Mode ON/OFF
housingUnplug the 3w LED Light Fixture and wipe the housing with a clean moist/semi dry cloth to remove dust, salt and other debris that may have built-up on the fixture.
Lens CoVerwipe the Acrylic Lens Cover with fresh water or an acrylic cleaner to maintain peak light transmission. If the Lens Cover is allowed to become dirty, it will reduce the amount of light that is emitted into the aquarium.
MaintenanCe
aCCLiMating CoraLs
Warning: The fixture is not waterproof. Do not spray or submerge the fixture.
TIP: Keep the Acrylic Lens Cover and Glass Cover over the aquarium clean to allow maximum light penetration into the aquarium.

24
3W leD lIGHt fIxtures WARRANTy
LiMiteD Warranty
Aquatic Life, LLC warrants that this Light Fixture shall be free from defective electrical components and leaks or cracks due to defects in materials or workmanship for a period of twelve (12) months from the date of purchase. If a defect is shown, Aquatic Life, LLC will, at Aquatic Life’s sole discretion, either repair or replace the product without charge. No cash refunds will be made. This warranty is provided solely to the original consumer purchaser of the product and may not be transferred or assigned.
This warranty does not apply to damage resulting from accident, misuse, abuse, lack of reasonable care, failure to follow safety and installation instructions, use of the product with non-standard electrical service, or any other defect not resulting from defects in the electrical components of the product or defects in materials or workmanship. This warranty will not be effective unless and until the Aquatic Life product is shown to have been used in accordance with the safety and installation instructions accompanying the product.
THIS CONSTITUTES AQUATIC LIFE’S ENTIRE wARRANTY AND AQUATIC LIFE MAKES NO OTHER WARRANTIES,WHETHEREXPRESSORIMPLIED,WITHRESPECTTOTHEPRODUCT.AQUATICLIFE, LLC SpECIFICALLY DISCLAIMS ANY AND ALL IMpLIED wARRANTIES, INCLUDING, wITHOUT LIMITATION, wARRANTIES OF MERCHANTABILITY AND FITNESS FOR A pARTICULAR pURpOSE. IF AQUATIC LIFE, LLC CANNOT LAwFULLY DISCLAIM IMpLIED wARRANTIES UNDER THIS LIMITED wARRANTY, ALL SUCH wARRANTIES, INCLUDING wARRANTIES OF MERCHANTABILITY AND FITNESS FOR A pARTICULAR pURpOSE ARE LIMITED IN DURATION TO THE DURATION OF THIS wARRANTY.
AQUATIC LIFE IS NOT RESpONSIBLE FOR DIRECT, SpECIAL, INCIDENTAL OR CONSEQUENTIAL DAMAGES RESULTING FROM ANY BREACH OF wARRANTY OR CONDITION, OR UNDER ANY OTHERLEGALTHEORY.AQUATICLIFE,LLCEXPRESSLYDISCLAIMSALLALLEGEDDAMAGESFOR LOSS OF MARINE LIFE, pERSONAL INJURY, AND/OR pROpERTY DAMAGE.
Some states and provinces do not allow the exclusion or limitation of incidental or consequential damages or exclusions or limitations on the duration of implied warranties or conditions, so the above limitations or exclusions may not apply to you. This warranty gives you specific legal rights, and you may also have other rights that vary by state or province.
Aquatic Life, LLC shall not have any obligations under this warranty unless the owner notifies Aquatic Life, LLCinwritingofanyallegeddefect(s)within30daysofdiscoveryofthedefect(s).AnynoticetoAquaticLife, LLC must be delivered by United States or electronic mail to the following address:
U.S. Mail Aquatic Life, LLC 2416 W. Victory Blvd, #136Burbank, CA 91506
Electronic Mail: [email protected]
Aquatic Life, LLC shall be allowed a reasonable period of time to investigate any warranty claim and to perform any testing Aquatic Life, LLC deems necessary to determine the cause of the defect. This warranty shall be interpreted under the laws of the State of California.

25
3W leD lIGHt fIxtures APPENDIX A
TheT-Timesoftwarerequiresa.NETFramework2.0tooperatecorrectlyonyourcomputerrunningWindowsXP.Ifyouhavepreviouslyinstalledservicepackupdates,itislikelythatyoualreadyhavethecorrectFramework2.0installed.
VeriFy .net FraMeWorK
1) Click Start then Control panel.
2) Click Add or Remove programs
VeriFy anD instaLL .net FraMeWorK WinDoWs XP
NOTE: .NET (pronounced “dot net”) is a programming framework created by Microsoft that developers can use to create applications more easily. If you are running windows XPorWindowsVista,the.NETframework is needed to use the Aquatic Life software to program your LED Light Fixture.

26
3)Onceallofthecurrentlyinstalledprogramsaredisplayed,locatetheMicrosoft.NETFramework2.0asintheexamplebelow.Ifyoucannotlocatethe.NETFramework2.0,proceedtoStep4todownloadandinstall the .NET Framework.
VeriFy .net FraMeWorK
4) Download the .NET files from the Microsoft website.http://download.microsoft.com/download/0/8/c/08c19fa4-4c4f-4ffb-9d6c-150906578c9e/NetFx20SP1_x86.exe
5) when prompted, select Run.
6)YourcomputerisnowreadytoinstalltheT-Timesoftware.
3W leD lIGHt fIxtures APPENDIX A
VeriFy anD instaLL .net FraMeWorK WinDoWs XP (ContinueD)

27
The T-Time software requires a .NET Framework 3.5 to operate correctly on your computer running windows vista. If you have previously installed service pack updates, it is likely that you already have the correct Framework 3.5 installed.
VeriFy .net FraMeWorK
1) Click Start then Control panel.
2) Double Click programs and Features
3W leD lIGHt fIxtures APPENDIX B
VeriFy anD instaLL .net FraMeWorK WinDoWs Vista
NOTE: .NET (pronounced “dot net”) is a programming framework created by Microsoft that developers can use to create applications more easily. If you are running windows XPorWindowsVista,the.NETframework is needed to use the Aquatic Life software to program your LED Light Fixture.

28
3) Once all of the currently installed programs are displayed, locate the Microsoft .NET Framework 3.5 as in the example below. If you can not locate the .NET Framework 3.5, proceed to Step 4 to download and install the .NET Framework.
instaLL .net FraMeWorK
4) Download the .NET files from the Microsoft website. http://www.microsoft.com/en-us/download/details.aspx?id=22
3W leD lIGHt fIxtures APPENDIX B
VeriFy anD instaLL .net FraMeWorK WinDoWs Vista (ContinueD)

29
5) when prompted, select Run
6)YourcomputerisnowreadytoinstalltheT-Timesoftware.
3W leD lIGHt fIxtures APPENDIX B
VeriFy anD instaLL .net FraMeWorK WinDoWs Vista (ContinueD)

30
The following example shows step-by-step instructions on how to create a 24 hour light cycle using the Blue, Royal Blue, white and Red LED’s. The four Traces are then saved and copied to one of the Remote Keys.
1) with the T-Time Software Open, Click New on the Auto Dashboard. The Traces can be created with or without the Light Fixture connected to the software
2) Click on one of the squares across from the R-Blue. Then using your mouse and pointer, drag R-Blue graph into the desired location.
3W leD lIGHt fIxtures APPENDIX C
Creating a 24 hour Light CyCLe “traCe”

31
3) when finished with the R-Blue, click on one of the boxes across from the Blue and form the light graph as desired. Repeat for the white and Red Traces.
4) when finished, you will be able to see the daily power usage for each of the four LED’s along with a total. Now you have decided you would like the Red LED’s to begin a little earlier, but you like the graph created. You can Time Shift the RED graph to start one hour earlier by pressing the left arrow. Notice, the RED LED’s will now start earlier.
3W leD lIGHt fIxtures APPENDIX C
Creating a 24 hour Light CyCLe “traCe” (ContinueD)

32
5) To view your light cycle, connect the Aquatic Life Light Fixture to the T-Time Software. when Online is displayed, click the Demo Start button on the dashboard. You can control the speed of the Demo using the drop-down menu. As the Demo is running, a line will indicate which lights are on according to your graph.
6)TheLightCyclethatyouhavecreatedcannowbesavedtotheLightFixture.TheAquaticLifeExpertSeries Light Fixture can store three separate 24 hour Light Cycles (Traces). The Light Cycles that are exported to the Fixture are labeled Remote Key #1, Remote Key #2 and Remote Key #3. First, save your newly created Light Cycle to your computer
3W leD lIGHt fIxtures APPENDIX C
Creating a 24 hour Light CyCLe “traCe” (ContinueD)

33
7)SelectSaveAs,anddesignatethelocationonyourcomputerwhereyouwouldliketostoreyourLightCycle. In this example, we called our new light cycle, FijiSummer.
8)TosavetheFijiSummerLightCycletooneoftheRemoteKeys,usetheCopyandPastefunctions.with the FijiSummer displayed, click on the Copy button. Change the display on the Auto Dashboard to the Remote Key #1. Then click on the paste button.
3W leD lIGHt fIxtures APPENDIX C
Creating a 24 hour Light CyCLe “traCe” (ContinueD)

34
9)ThenewFijiSummerLightCycleisnowtheRemoteKey#1.WiththeLightFixturestillconnected(Online) with the software, select Export.
10)TheLightFixturecannowbedisconnectedfromthesoftwarebypressingtheDisconnectFixtureicononthetoptoolbar.Refertopage20fordetailsonhowtousetheRemoteControltocontroltheLight Fixture.
3W leD lIGHt fIxtures APPENDIX C
Creating a 24 hour Light CyCLe “traCe” (ContinueD)
NOTE: The names of the Remote Key’s cannot be changed because they are what can be Exported into the Aquatic Life Light Fixture. Use the Copy and paste functions to transfer your Traces to the Remote Keys.

35
Much planning went into the placement and colors of the CREE LED’s in the Aquatic Life Expert Series Light Fixtures to provide the optimum lighting for a marine aquarium.
LeD sCheMatiC:
rePLaCing or Changing Lenses
1) Remove the seven phillips Head screws from the metal and blue acrylic Endplates on one side of the fixture.
2) Slide the Acrylic Lens Cover out the end of the fixture.
3) Carefully, pull the Lens on the LED straight-up. DO NOT TwIST or damage could occur to the LED.
4) Remove paper from back of lens.
5) Install the new Lens over the LED by pressing it straight down onto the LED. Friction and tape will hold the Lens in place over the LED.
6)ReinstalltheAcrylicLensCoverandEndplates.
3W leD lIGHt fIxtures APPENDIX D
LeD Layout & Lenses
LeD tyPe CoLor quantity Lens
CREE XPE Royal Blue 6 80 degree
CREE XPE Blue 8 80 degree
CREE XPG White 8 100 degree
CREE XPE Red 2 no lens
Royal Blue
Royal BlueRoyal Blue
Royal Blue
Royal Blue Royal Blue
Red Red
White
White
White
WhiteWhite
White
White
White
Blue
Blue
Blue
Blue
Blue
Blue
Blue
Blue

36
YourAquaticLifeExpertSeriesLEDLightFixtureisdesignedtogrowCoralsatdepthsupto30inches,while using the least amount of power. This is achieved by the placement of the LED’s and Lenses on the LED’s. The following guide will help you determine which corals can grow at various depths in your aquarium.
3W leD lIGHt fIxtures APPENDIX E
FiXture seLeCtion guiDe
14 in (420278) 34 in (420279) 46 in (420280)
24” x 24” Footprint 24” x 36” Footprint 24” x 48” Footprint
12"
18"
24"
30"
36"
SPS(High Light Corals)
SPS(High Light Corals)
FISH
SPS(High Light Corals)
FISH
FISH
LPS(Medium Light Corals) FISH
Low Light Corals FISH
Medium Light Corals - Large Polyp Stony (LPS)
Frogspawn, Torch, Bubble, Hammer, Candy, Duncan, Galaxea, Pagoda Chalice, Acanthastrea, Favia, Favites, Elegance, Blastomussa, Scolymia
High Light Corals - Small Polyp Stony (SPS)
Acroporas, Monitpora, Millepora, Pocillopora, Seriatopora
Low Light Corals - Soft Corals
Mushrooms, Polyps, Zoanthid Polyp, Xenia, Toadstool, Kenya Trees,Green Star Polyps, Button Polyps

37
Bringing the Ocean to You, Wherever You May Be and Life Rewards are trademarks of Aquatic Life LLCCommerce, CA 90040www.aquaticlife.com
© Copyright Aquatic Life LLC
P/N 9000627 9/12