Embed Size (px)
Citation preview
3VR OpCenter Quick Start Guide 1
3VR OpCenter Quick Start Guide
3VROC-QSG606-R1
Support: 415.513.4572
2008
support3VR Security, Inc. 475 Brannan Street, Suite 430, San Francisco, CA 94107 Tel: 415.495.5790 • Sales: 415.513.4611 • Fax: 415.495.5797 • Email: [email protected] • www.3VR.com
3VR and the 3VR logo are either trademarks or federally registered trademarks of 3VR Security, Inc. © 2009 3VR Security, Inc.
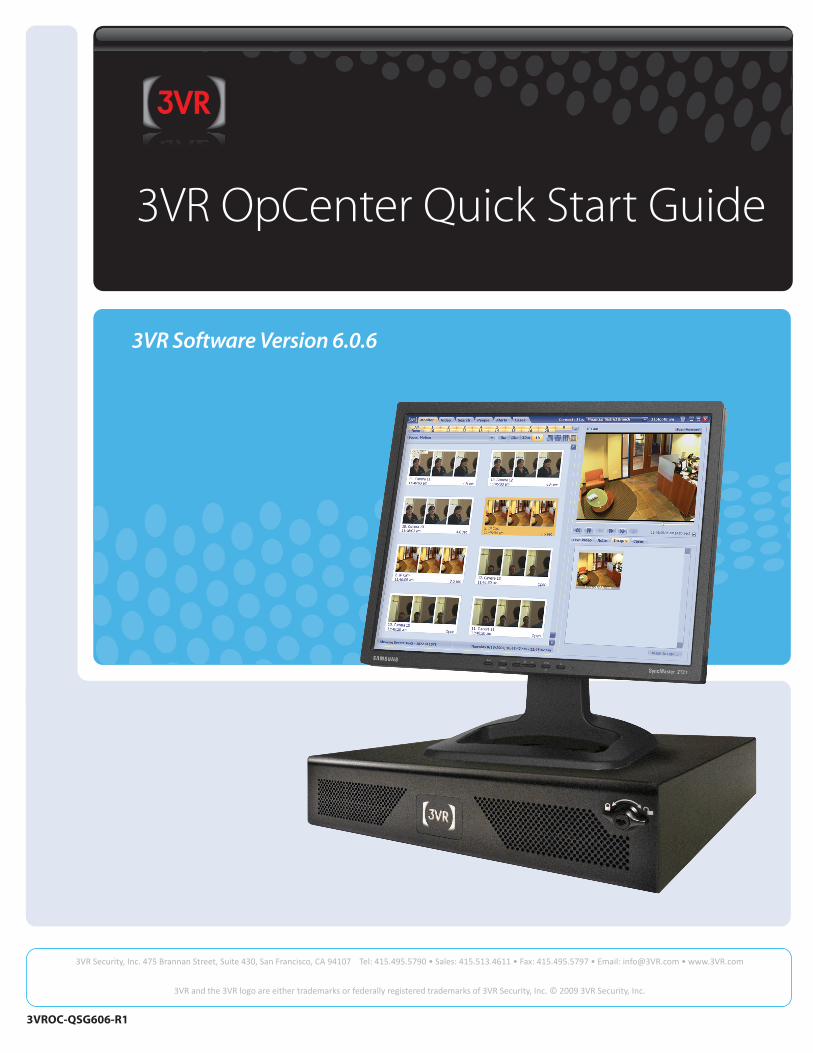
3VR Software Version 6.0.6
2 3VR OpCenter Quick Start Guide
Getting StartedLogging in 3
Logging in to a SmartRecorder on an Enterprise 4
Viewing Events in ProgressViewing Recent Events in the Monitor Panel 5
Viewing Live Video in the Monitor Panel 6
Viewing Live Video in the Video Panel 7
Viewing Stored VideoSearching for Events 8
Searching for Associated Events 9
Viewing Event Search Results 10
Loading Stored Video in the Video Panel 11
Sharing SurveillanceSaving Frames From Motion Events 12
Printing and Emailing Images 13
Exporting Events 15
Exporting Video from the Video Panel 16
Viewing Exported SurveillanceViewing Exports in a Web Browser 17
3VR EvidenceViewer Overview 18
Using 3VR EvidenceViewer 19
3VR OpCenter Quick Start Guide
Contents

3VR OpCenter Quick Start Guide 3
Getting Started
Logging in
Click the 5. Sign In button.
Select your 4. Connection type.
If you connect to the 3VR server over a Local Area Network (LAN), select High-speed LAN/WAN.
If you connect to the 3VR server over a connection with speeds between 384 Kb/s and 5 Mb/s, select Medium-speed DSL/Cable/WAN.
If you connect to the 3VR server using a low-speed connection below 384 Kb/s, select Low-speed Dialup/DSL/Cable/WAN.
At the sign in screen, type in your user name and 2. password.
Select the SmartRecorder you will be logging in to 3. from the Server dropdown menu.
If your SmartRecorder is not displayed, type the IP address or host name into the Server box.
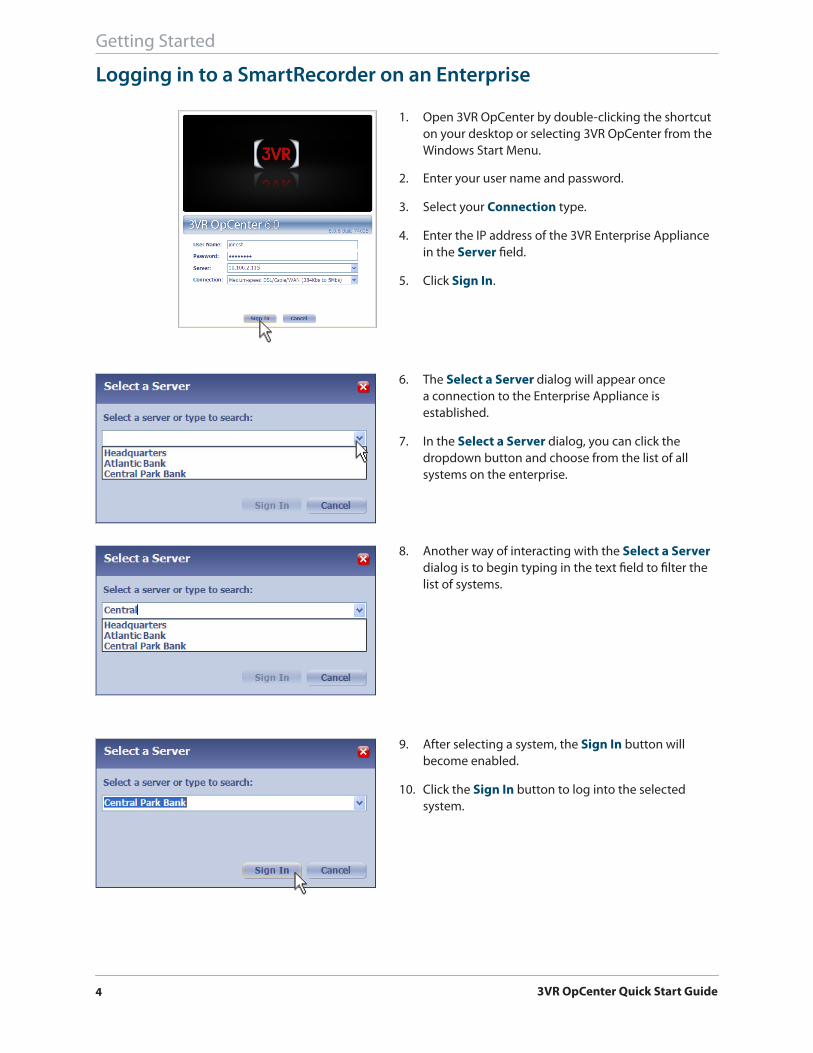
Open 3VR OpCenter by double-clicking the shortcut 1. on your desktop or selecting 3VR OpCenter from the Windows Start Menu.
3VR OpCenter™ client software allows you to access a 3VR system from any desktop computer on your network that meets the minimum system requirements.
If you are logging in to a SmartRecorder that is connected to an Enterprise Appliance, you should sign in using the instructions on the following page.
4 3VR OpCenter Quick Start Guide
After selecting a system, the 9. Sign In button will become enabled.
Click the 10. Sign In button to log into the selected system.
Another way of interacting with the 8. Select a Server dialog is to begin typing in the text field to filter the list of systems.
The 6. Select a Server dialog will appear once a connection to the Enterprise Appliance is established.
In the 7. Select a Server dialog, you can click the dropdown button and choose from the list of all systems on the enterprise.
Enter your user name and password.2.
Select your 3. Connection type.
Enter the IP address of the 3VR Enterprise Appliance 4. in the Server field.
Click 5. Sign In.
Open 3VR OpCenter by double-clicking the shortcut 1. on your desktop or selecting 3VR OpCenter from the Windows Start Menu.
Getting Started
Logging in to a SmartRecorder on an Enterprise
3VR OpCenter Quick Start Guide 5
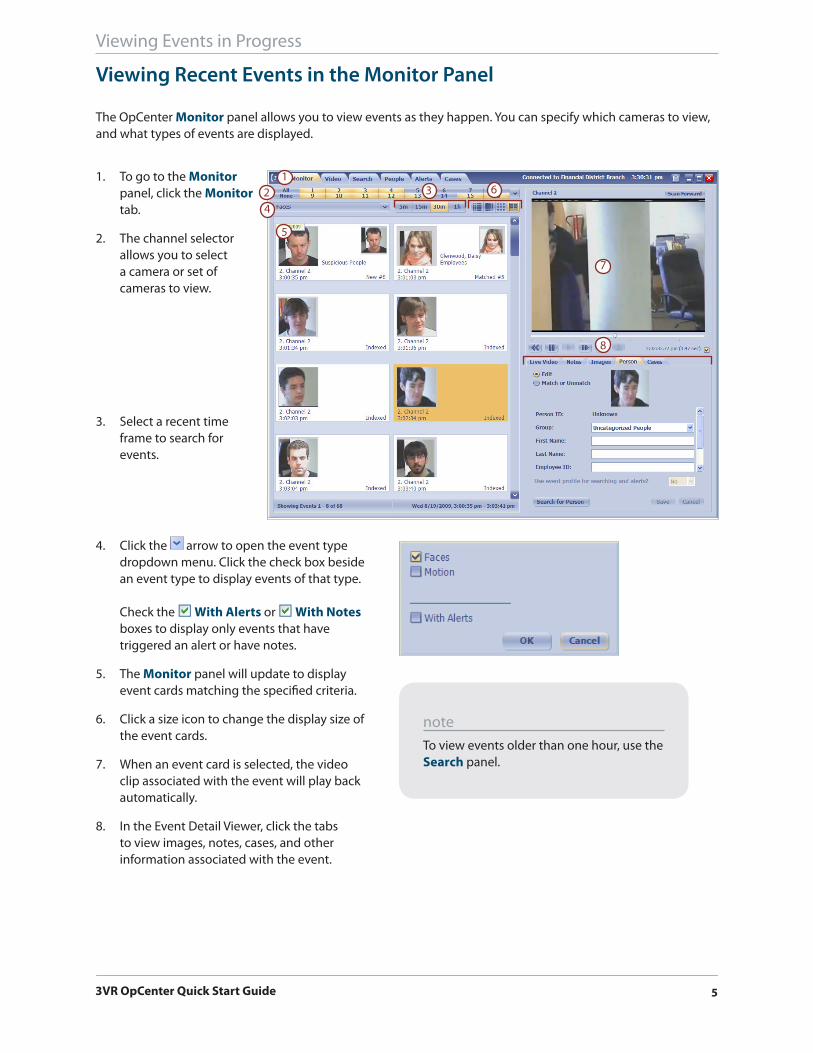
To go to the 1. Monitor panel, click the Monitor tab.
The channel selector 2. allows you to select a camera or set of cameras to view.
The OpCenter Monitor panel allows you to view events as they happen. You can specify which cameras to view, and what types of events are displayed.
124
3 6
5
7
8
Select a recent time 3. frame to search for events.
Click the 4. arrow to open the event type dropdown menu. Click the check box beside an event type to display events of that type. Check the With Alerts or With Notes boxes to display only events that have triggered an alert or have notes.
The 5. Monitor panel will update to display event cards matching the specified criteria.
Click a size icon to change the display size of 6. the event cards.
When an event card is selected, the video 7. clip associated with the event will play back automatically.
In the Event Detail Viewer, click the tabs 8. to view images, notes, cases, and other information associated with the event.
noteTo view events older than one hour, use the Search panel.
Viewing Events in Progress
Viewing Recent Events in the Monitor Panel

6 3VR OpCenter Quick Start Guide
Viewing Events in Progress
Viewing Live Video in the Monitor Panel
To turn off live video, select 4. None from the menu at the bottom right of the video. The live video feed will stop.
Click the arrow on the dropdown menu at the 2. bottom right of the video and select a channel from the list.
To view live video from a different channel, click the 3. arrow on the dropdown menu at the bottom right of the video and choose a different channel from the list.
Click the 1. Live Video tab in the Event Detail Viewer.
To keep an eye on one important camera while viewing incoming event cards, the Live Video tab allows you to monitor one live video feed in the Monitor panel.
To change the live video channel:

3VR OpCenter Quick Start Guide 7
moreWhen you are viewing stored video, the time is highlighted in yellow.
The timeline across the top of the Video panel displays a 15 minute time range. The time when the video you are viewing took place is displayed above the timeline.
When you are watching live video, the current video time is highlighted in green, and the indicator moves forward along the timeline as time passes.
Select 2. Display live video.
Click the 1. Video tab to go to the Video panel.
Viewing Events in Progress
Viewing Live Video in the Video Panel

8 3VR OpCenter Quick Start Guide
Use the Search panel to find events that were recorded hours, days, weeks, or months ago.
To go to the Search panel, click 1. the Search tab.
Define the dates, days of the 2. week, and time ranges to search for events.
Choose the channels to 3. include in the search. You must select at least one channel.
Check the event types you 4. wish to search for. Only the event types present on your system will be listed.
The selected search criteria 5. will be displayed under Search Description.
Click the 6. Search button.
1
2
3
4
6
5
Viewing Stored Video
Searching for Events

3VR OpCenter Quick Start Guide 9
Viewing Stored Video
Searching for Associated Events
When you search for any specific type of event, you can choose to search for related events of a different type that occurred around the same time. Conduct a cross-analytic search by setting up primary and secondary searches that will run simultaneously:
Specify search criteria for the 1. main type of event to search for as described on the previous pages. In this example, we’ve specified face events similar to person 1, George Smith, on all cameras over the past day.
Check 2. Search for related events to load the secondary search window.
Specify the period of time 3. you wish to search around each event that meets the first set of search criteria By default, the 3 minutes before and after each event matching the first set of criteria will be searched for events that meet the second set of criteria.
Specify the type of related 4. event you wish to search for. In this example, we’ve chosen to search for motion events.
Click 5. Search.
1
2
34
5
10 3VR OpCenter Quick Start Guide
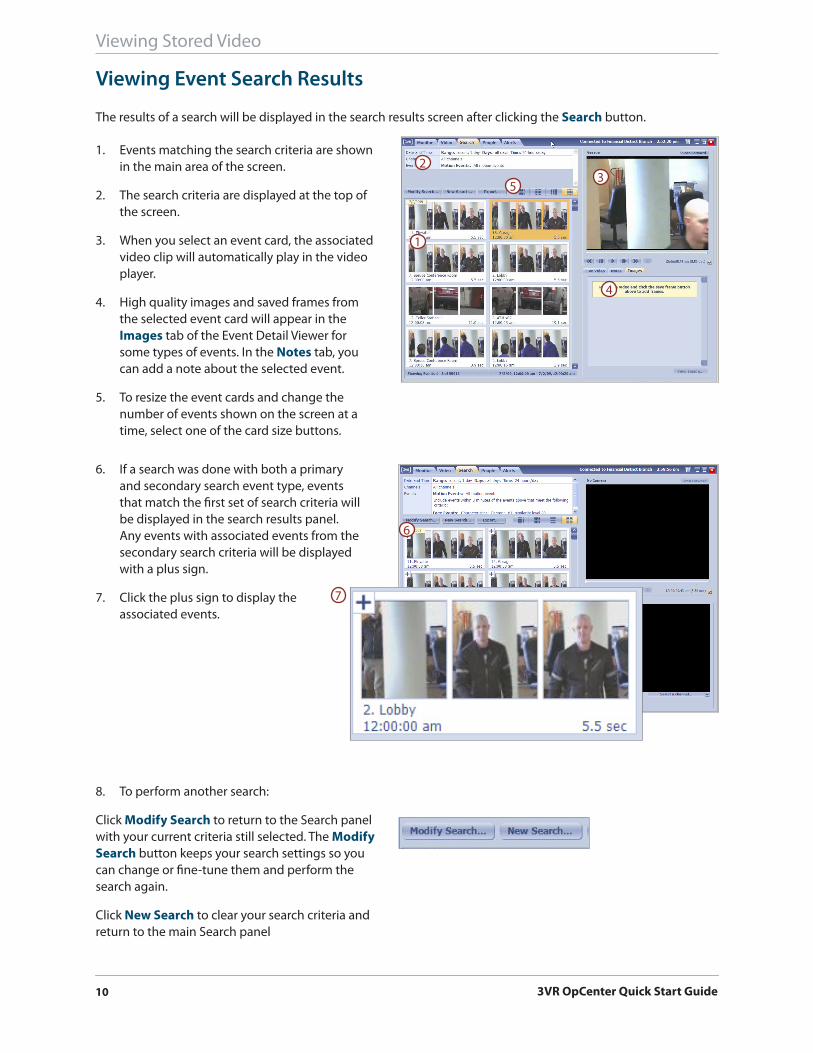
The results of a search will be displayed in the search results screen after clicking the Search button.
To perform another search:8.
Click Modify Search to return to the Search panel with your current criteria still selected. The Modify Search button keeps your search settings so you can change or fine-tune them and perform the search again.
Click New Search to clear your search criteria and return to the main Search panel
1
23
4
5
If a search was done with both a primary 6. and secondary search event type, events that match the first set of search criteria will be displayed in the search results panel. Any events with associated events from the secondary search criteria will be displayed with a plus sign.
Click the plus sign to display the 7. associated events.
Events matching the search criteria are shown 1. in the main area of the screen.
The search criteria are displayed at the top of 2. the screen.
When you select an event card, the associated 3. video clip will automatically play in the video player.
High quality images and saved frames from 4. the selected event card will appear in the Images tab of the Event Detail Viewer for some types of events. In the Notes tab, you can add a note about the selected event.
To resize the event cards and change the 5. number of events shown on the screen at a time, select one of the card size buttons.
6
7
Viewing Stored Video
Viewing Event Search Results

3VR OpCenter Quick Start Guide 11
To load video from a specific date and b. time, or to load video that occurred more than 12 hours ago, choose Specify.
Use the calendar to select a start date and time for the video stream.
Click the • and arrows to move back and forth between months
Click on a number to select a •specific date within a month.
Specify the time in the time box •below the calendar. Click OK.
The timeline at the top of the c. Video panel is 15 minutes long, and shows the time when the video you are viewing took place.
When you are watching stored video, the current d. video time is highlighted in yellow, and moves forward along the timeline as time passes.
To load stored video from up to 12 hours a. ago, choose Recent, select an amount of time from the list, and click OK.
A dropdown menu will open:2.
Choose 1. Display stored video starting at.
You can use the Video panel to view stored video from one or more channels.
Viewing Stored Video
Loading Stored Video in the Video Panel
noteIf a channel is not configured to store all video, only video associated with events on that channel will be displayed.

12 3VR OpCenter Quick Start Guide
To view the saved video frame, select the d. Images tab of the Event Detail Viewer.
When the video is paused, a picture icon c. is displayed to the right of the video controls.
Click the picture icon to save the frame.
Click the frame backb. and frame forward buttons to display the frame you wish to save.
In the video player, clicka. to pause the video.
While video is playing:
To save a frame from a motion event to the image tab:
Click on an event card to play the video.
Sharing Surveillance
Saving Frames from Motion Events
3VR OpCenter Quick Start Guide 13
Sharing Surveillance
Printing and Emailing Images
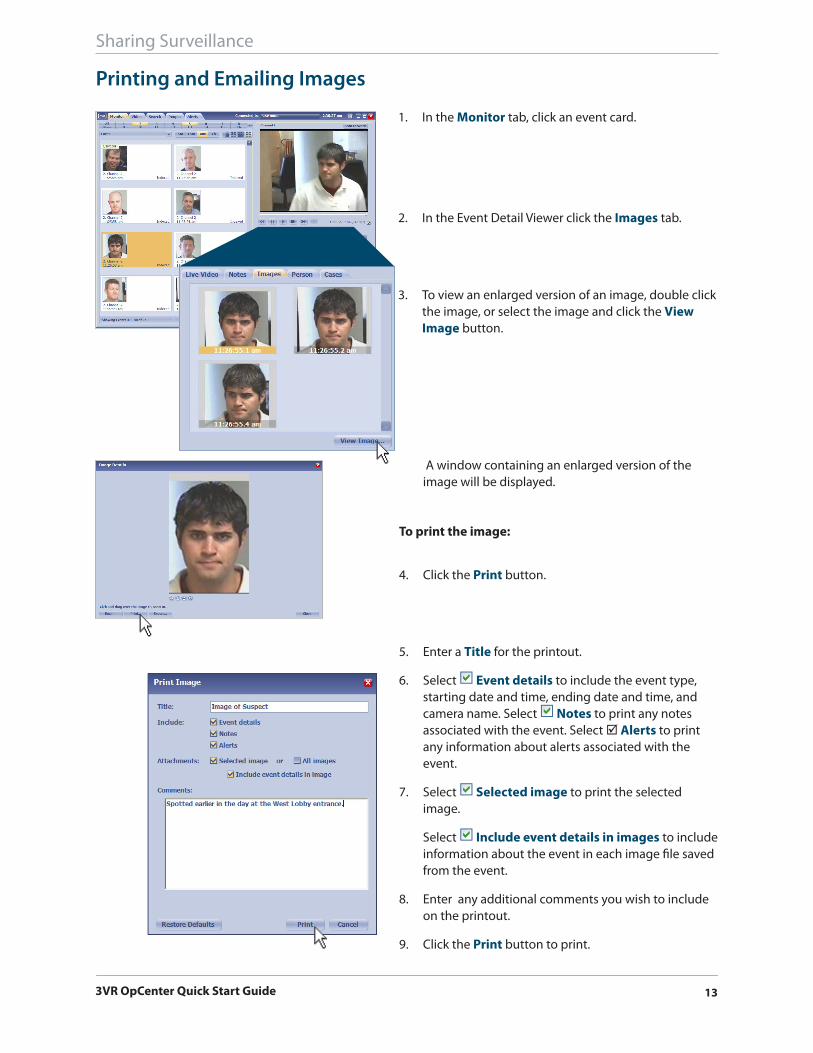
To view an enlarged version of an image, double click 3. the image, or select the image and click the View Image button.
In the Event Detail Viewer click the 2. Images tab.
In the 1. Monitor tab, click an event card.
A window containing an enlarged version of the image will be displayed.
Enter a 5. Title for the printout.
Select 6. Event details to include the event type, starting date and time, ending date and time, and camera name. Select Notes to print any notes associated with the event. Select Alerts to print any information about alerts associated with the event.
Select 7. Selected image to print the selected image.
Select Include event details in images to include information about the event in each image file saved from the event.
Enter any additional comments you wish to include 8. on the printout.
Click the 9. Print button to print.
Click the 4. Print button.
To print the image:

14 3VR OpCenter Quick Start Guide
In the 3. Select Recipients box, click the names of the desired recipients. A is displayed beside selected recipients.
Click 4. Done.
Click the 2. To button to choose email recipients.
Type in the subject line for the email.5.
Select the information you want to include with the 6. email: Event details Notes Alerts
Choose which items to attach to the email: Selected image or All images.
To include information about the event in each image file saved from the event check Include event details in images. Check if you wish to include Video from the event with your email.
Type in any additional comments to be sent with the 7. email.
Click the 8. Send button.
To email the image:
Click the 1. Email button below the image.
Sharing Surveillance

3VR OpCenter Quick Start Guide 15
Sharing Surveillance
Exporting Events
If you have identified several events you wish to share with other investigators or law enforcement, exporting events allows users without access to a 3VR SmartRecorder to view a useful storyboard summary of events, images, and associated video using Mozilla Firefox, Internet Explorer or Safari. Investigators can view, print, copy and save event images, video and information directly from their web browser.
Exporting Events for Viewing in a Web Browser
Right-click one of the selected event cards and select 2. Export Event(s).
Select specific events by holding down the Ctrl key 1. and clicking the event cards for those events you wish to export.
To export selected events, including associated video, images and event information in a format that can be viewed in a web browser or imported into another 3VR system:
Click 3. next to Location to select the directory or drive where you wish to save exported events.
To create a new folder for exported events, check 4. Create new folder and enter a folder name.
Select 5. All images, video and details so that images, video and details from exported events can be viewed in a web browser. This format is ideal for sharing with law enforcement or other investigators, and also allows you to import events into another SmartRecorder.
Check 6. Include event details in images to embed details about the event in exported images.
Click the 7. Export button.
When exporting has completed, click 8. Close.

16 3VR OpCenter Quick Start Guide
Sharing Surveillance
Exporting Video from the Video Panel
noteExported video files are large. For channels using the default resolution, frame rate and quality settings*, for each channel included in the export, each minute of video will be about 1 MB.
For example, if you are exporting 15 minutes of video from 16 channels, the folder containing exported video will be around 250 MB in size if video is recorded at the default settings. If the frame rate is increased to 10 fps, or if the video resolution is increased to 2-CIF, the folder containing the exported video will be 500 MB.
To preserve system resources, it is recommended that you only export video of interest when exporting video from the video panel.
* Default analog camera settings: Resolution = CIF, Frame Rate = 5 fps, Quality = Medium
To export all stored video over a specified time range from the Video panel:
Click 1. Export.
If continuous recording is not enabled on a channel, only video associated with events will be available for export from that channel.
Select the 2. Start and End time for the video export.
Select the channels to export by clicking the 3. checkbox beside each channel name.
Select the location where you wish to save the 4. exported video from the Location dropdown menu. To create a new folder, select Create new folder and enter the new folder name.
To include 3VR EvidenceViewer, select 5. Include 3VR EvidenceViewer Application.
Click 6. Export to export all available video from the selected channels over the specified time range.
When exporting is complete, click 7. Close to return to the video panel.

3VR OpCenter Quick Start Guide 17
Viewing Exported Surveillance
Viewing Exports in a Web Browser
People, Cases and Events exported to XML can be viewed in a web browser.
To view exported people using Internet Explorer:
Open the browser.1.
Select 2. File, and select Open from the dropdown menu.
Click 3. Browse and navigate to your exported folder.
Select 4. 3VR_people.xml, 3VR_cases.xml, or 3VR_events.xml and click Open.
To view exported people using Mozilla Firefox:
Open Mozilla Firefox.1.
Select 2. File, and select Open file from the dropdown menu.
Navigate to your exported folder. 3.
Select 4. 3VR_people.xml, 3VR_cases.xml, or 3VR_events.xml and click Open.
Alternatively, navigate to the exported xml file in Windows Explorer. Right-click the file and select to open the file with your web browser of choice.

18 3VR OpCenter Quick Start Guide
Viewing Exported Surveillance
3VR EvidenceViewer Overview
3VR EvidenceViewer is a powerful tool that allows you to simultaneously view one or more channels of video exported from the 3VR OpCenter Video panel without requiring the purchase of additional software. 3VR EvidenceViewer is ideal for sharing exported video with law enforcement or other investigators.
With 3VR EvidenceViewer you can:
Simultaneously view up to 36 •channels of exported video
Select which channels to •display in the current view
Scan video using a video timeline•
Automatically verify the integrity of •the video being viewed, displaying a warning if the exported video or associated information has been tampered with or modified in any way.
EvidenceViewer is fully supported in Windows XP and Vista.
Obtaining 3VR EvidenceViewer:
3VR EvidenceViewer is included with 3VR OpCenter. If you are connecting to a SmartRecorder over a network using OpCenter, you can opt during a video export to include the application in the folder containing exported video.
However, if you will be emailing the exported video or transferring the export folder via a slow network connection, it is recommended that you do not include the 20MB EvidenceViewer application in the exported folder; instead, advise the recipient to download EvidenceViewer from www.3VR.com/downloads/EvidenceViewer.
Instructions for obtaining 3VR EvidenceViewer are included with every video export.
Using 3VR EvidenceViewer:
Instructions for using EvidenceViewer are included in the EvidenceViewer Readme file (EvidenceViewer_ReadMe.html)

3VR OpCenter Quick Start Guide 19
If 3VR EvidenceViewer was exported along with video from a 3VR SmartRecorder, it will be found in the exported video folder.
Double-click the 3VREvidenceViewer file to launch the EvidenceViewer application. The video contained in that folder will automatically play when EvidenceViewer is launched from that folder. If video is located in a different folder, drag the EvidenceViewer file to that location to play the video.
You can create a custom view to suit your investigation needs in EvidenceViewer in the following ways:
To change the number of video panes displayed, select the number of channels you wish to view in the a. upper right of the EvidenceViewer window.
To view a channel, drag the channel name b. from the list of channels on the left onto a video pane. If video is already being played on that pane, it will be replaced by video from the new channel.
To view video from all channels, click c. .
To focus on video from one d. camera while viewing video from
additional cameras, click
To hide the video e. timeline, click the button at the top of the video panes.
To hide the channel selector, click the f. button to the left of the video panes.
You can control video playback in EvidenceViewer using either the video timeline or the playback controls found in the upper left, which behave similarly to those found on most DVD players.
Play, pause and fast-forward video playback in EvidenceViewer using the controls displayed above the list of channels.
To play video, press • .
To pause video, press • .
To play video in slow motion, press • . Click the button multiple times to decrease the video speed. Click play to resume playing video at regular speed.
To fast forward, press • . Click the button multiple times to increase the video speed. Click play to resume playing video at regular speed.
Sharing Surveillance
Using 3VR EvidenceViewer
a
bc d
e
f
To rewind, drag the video position indicator • to the left (see following page).

20 3VR OpCenter Quick Start Guide
Scan forward and backward with the video timeline:
The yellow cursor below the video •timeline displays the date and time of video currently displayed.
Click and drag the cursor to scan forward •or backward to a different point in time. Use the time points above the timeline as guides for selecting a time.
Select the location where you wish to save the image file. 4.
Specify if you wish to include details about the channel in the saved 3. image.
To save a video frame as an image:
Click 1. to pause the video on the frame you are interested in saving.
Right-click over the video pane and select 2. Save Image.
Click 5. Save to save the image. You then can print, email and use the saved file in other applications as you would use any image file.