Embed Size (px)
Citation preview

312185ZAAEN
Instructions - Parts
MD2 Valve
For use with disposable mixers to dispense a variety of sealants and adhesives. Forprofessional use only.
120 psi (0.84 MPa, 8.4 bar) Maximum Air Inlet Pressure
See page 2 for model information, including maximum working pressure and approvals.
Important Safety InstructionsRead all warnings and instructions in thismanual. Save these instructions.
TI9964A
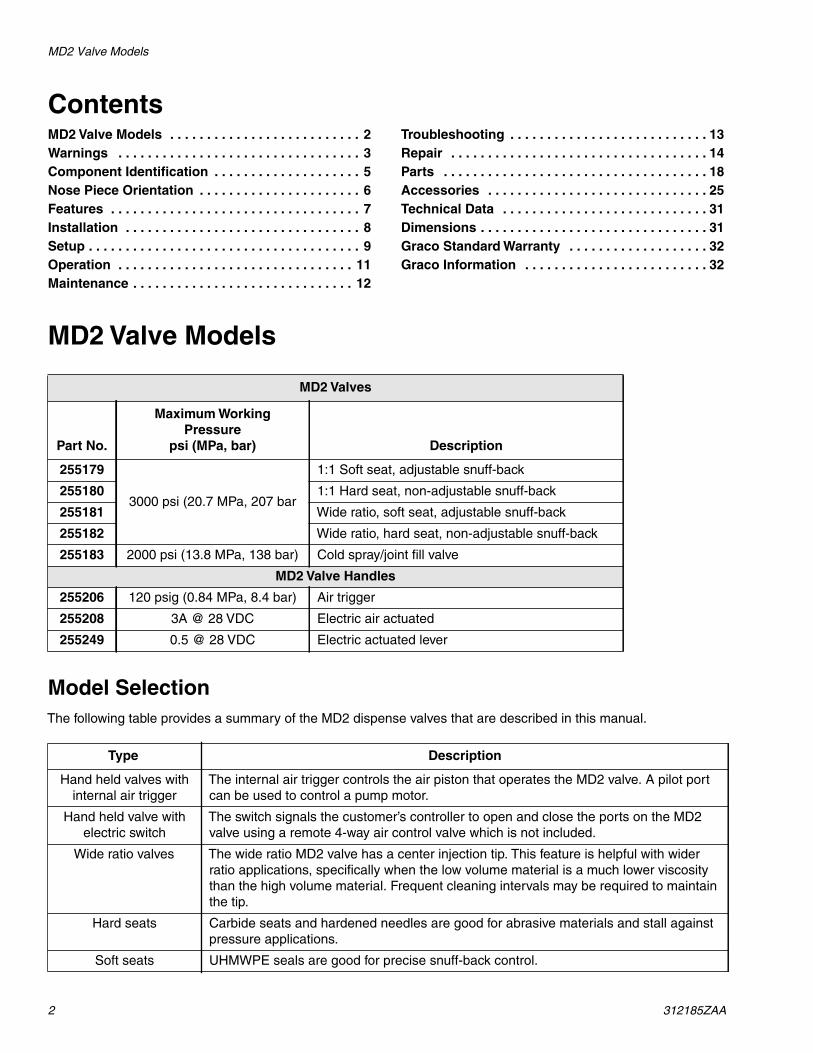
MD2 Valve Models
2 312185ZAA
ContentsMD2 Valve Models . . . . . . . . . . . . . . . . . . . . . . . . . . 2Warnings . . . . . . . . . . . . . . . . . . . . . . . . . . . . . . . . . 3Component Identification . . . . . . . . . . . . . . . . . . . . 5Nose Piece Orientation . . . . . . . . . . . . . . . . . . . . . . 6Features . . . . . . . . . . . . . . . . . . . . . . . . . . . . . . . . . . 7Installation . . . . . . . . . . . . . . . . . . . . . . . . . . . . . . . . 8Setup . . . . . . . . . . . . . . . . . . . . . . . . . . . . . . . . . . . . . 9Operation . . . . . . . . . . . . . . . . . . . . . . . . . . . . . . . . 11Maintenance . . . . . . . . . . . . . . . . . . . . . . . . . . . . . . 12
Troubleshooting . . . . . . . . . . . . . . . . . . . . . . . . . . . 13Repair . . . . . . . . . . . . . . . . . . . . . . . . . . . . . . . . . . . 14Parts . . . . . . . . . . . . . . . . . . . . . . . . . . . . . . . . . . . . 18Accessories . . . . . . . . . . . . . . . . . . . . . . . . . . . . . . 25Technical Data . . . . . . . . . . . . . . . . . . . . . . . . . . . . 31Dimensions . . . . . . . . . . . . . . . . . . . . . . . . . . . . . . . 31Graco Standard Warranty . . . . . . . . . . . . . . . . . . . 32Graco Information . . . . . . . . . . . . . . . . . . . . . . . . . 32
MD2 Valve Models
Model SelectionThe following table provides a summary of the MD2 dispense valves that are described in this manual.
MD2 Valves
Part No.
Maximum WorkingPressure
psi (MPa, bar) Description
255179
3000 psi (20.7 MPa, 207 bar
1:1 Soft seat, adjustable snuff-back
255180 1:1 Hard seat, non-adjustable snuff-back
255181 Wide ratio, soft seat, adjustable snuff-back
255182 Wide ratio, hard seat, non-adjustable snuff-back
255183 2000 psi (13.8 MPa, 138 bar) Cold spray/joint fill valve
MD2 Valve Handles
255206 120 psig (0.84 MPa, 8.4 bar) Air trigger
255208 3A @ 28 VDC Electric air actuated
255249 0.5 @ 28 VDC Electric actuated lever
Type Description
Hand held valves withinternal air trigger
The internal air trigger controls the air piston that operates the MD2 valve. A pilot portcan be used to control a pump motor.
Hand held valve withelectric switch
The switch signals the customer’s controller to open and close the ports on the MD2valve using a remote 4-way air control valve which is not included.
Wide ratio valves The wide ratio MD2 valve has a center injection tip. This feature is helpful with widerratio applications, specifically when the low volume material is a much lower viscositythan the high volume material. Frequent cleaning intervals may be required to maintainthe tip.
Hard seats Carbide seats and hardened needles are good for abrasive materials and stall againstpressure applications.
Soft seats UHMWPE seals are good for precise snuff-back control.

Warnings
312185ZAA 3
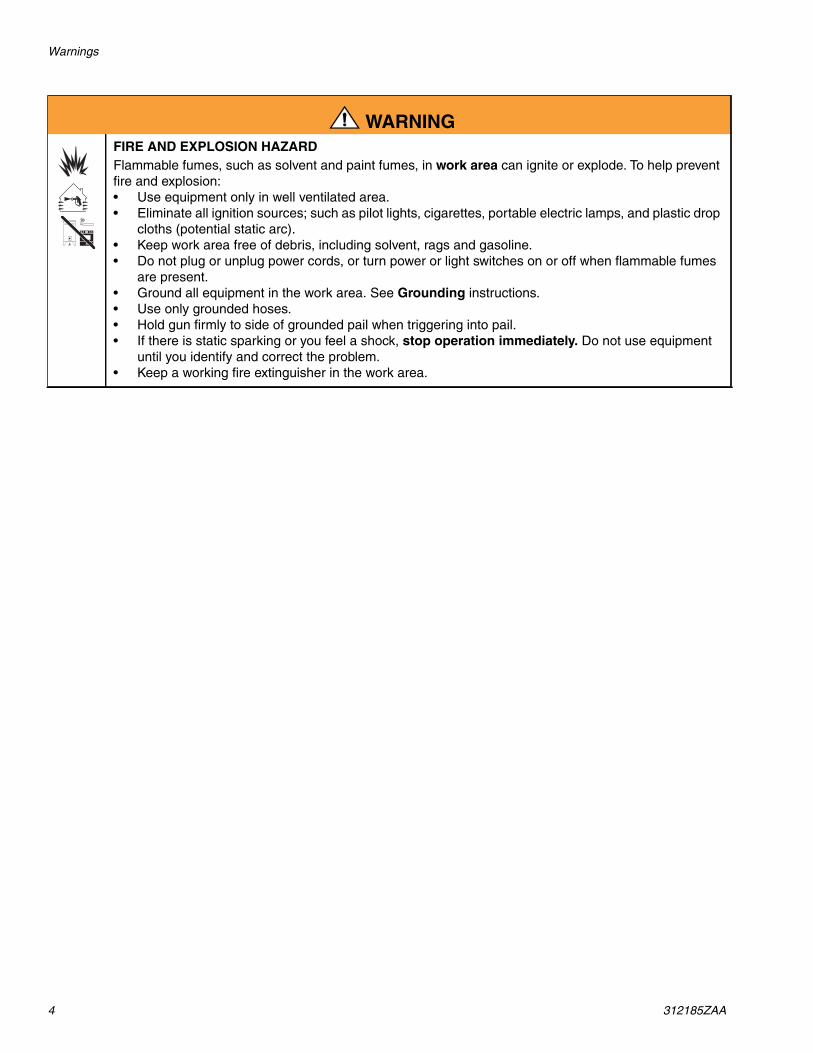
WarningsThe following warnings are for the setup, use, grounding, maintenance, and repair of this equipment. The exclama-tion point symbol alerts you to a general warning and the hazard symbol refers to procedure-specific risk. Refer backto these warnings. Additional, product-specific warnings may be found throughout the body of this manual whereapplicable.
WARNINGSKIN INJECTION HAZARDHigh-pressure fluid from dispense valve, hose leaks, or ruptured components will pierce skin. This maylook like just a cut, but it is a serious injury that can result in amputation. Get immediate surgicaltreatment.• Do not point dispense valve at anyone or at any part of the body.• Do not put your hand over the end of the dispense nozzle.• Do not stop or deflect leaks with your hand, body, glove, or rag.• Follow Pressure Relief Procedure in this manual, when you stop spraying and before cleaning,
checking, or servicing equipment.
EQUIPMENT MISUSE HAZARDMisuse can cause death or serious injury.• Do not operate the unit when fatigued or under the influence of drugs or alcohol.• Do not exceed the maximum working pressure or temperature rating of the lowest rated system
component. See Technical Data in all equipment manuals.• Use fluids and solvents that are compatible with equipment wetted parts. See Technical Data in all
equipment manuals. Read fluid and solvent manufacturer’s warnings. For complete informationabout your material, request MSDS forms from distributor or retailer.
• Check equipment daily. Repair or replace worn or damaged parts immediately with genuine manu-facturer’s replacement parts only.
• Do not alter or modify equipment.• Use equipment only for its intended purpose. Call your distributor for information.• Route hoses and cables away from traffic areas, sharp edges, moving parts, and hot surfaces.• Do not kink or over bend hoses or use hoses to pull equipment.• Keep children and animals away from work area.• Comply with all applicable safety regulations.
TOXIC FLUID OR FUMES HAZARDToxic fluids or fumes can cause serious injury or death if splashed in the eyes or on skin, inhaled, orswallowed.• Read MSDS’s to know the specific hazards of the fluids you are using.• Store hazardous fluid in approved containers, and dispose of it according to applicable guidelines.• Always wear impervious gloves when spraying or cleaning equipment.
PERSONAL PROTECTIVE EQUIPMENTYou must wear appropriate protective equipment when operating, servicing, or when in the operatingarea of the equipment to help protect you from serious injury, including eye injury, inhalation of toxicfumes, burns, and hearing loss. This equipment includes but is not limited to:• Protective eyewear• Clothing and respirator as recommended by the fluid and solvent manufacturer• Gloves• Hearing protection
Warnings
4 312185ZAA
FIRE AND EXPLOSION HAZARDFlammable fumes, such as solvent and paint fumes, in work area can ignite or explode. To help preventfire and explosion:• Use equipment only in well ventilated area.• Eliminate all ignition sources; such as pilot lights, cigarettes, portable electric lamps, and plastic drop
cloths (potential static arc).• Keep work area free of debris, including solvent, rags and gasoline.• Do not plug or unplug power cords, or turn power or light switches on or off when flammable fumes
are present.• Ground all equipment in the work area. See Grounding instructions.• Use only grounded hoses.• Hold gun firmly to side of grounded pail when triggering into pail.• If there is static sparking or you feel a shock, stop operation immediately. Do not use equipment
until you identify and correct the problem.• Keep a working fire extinguisher in the work area.
WARNING

Component Identification
312185ZAA 5
Component Identification
Key:A Snuff-back adjustment knob (soft seat versions only)B 1/8 in. npt (f) air to close (O).C 1/8 in. npt (f) air to open (I).D 9/16 straight thread o-ring boss “B” fluid inlet (low volume)E 9/16 straight thread o-ring boss “A” fluid inlet (high
volume)F Zerk grease fittingG Nose piece with 7/8-9 bell outletH Air cylinder
FIG. 1: Component Identification
E
D
G
F
BC
A
BC
H
TI10391A
Nose Piece Orientation
6 312185ZAA
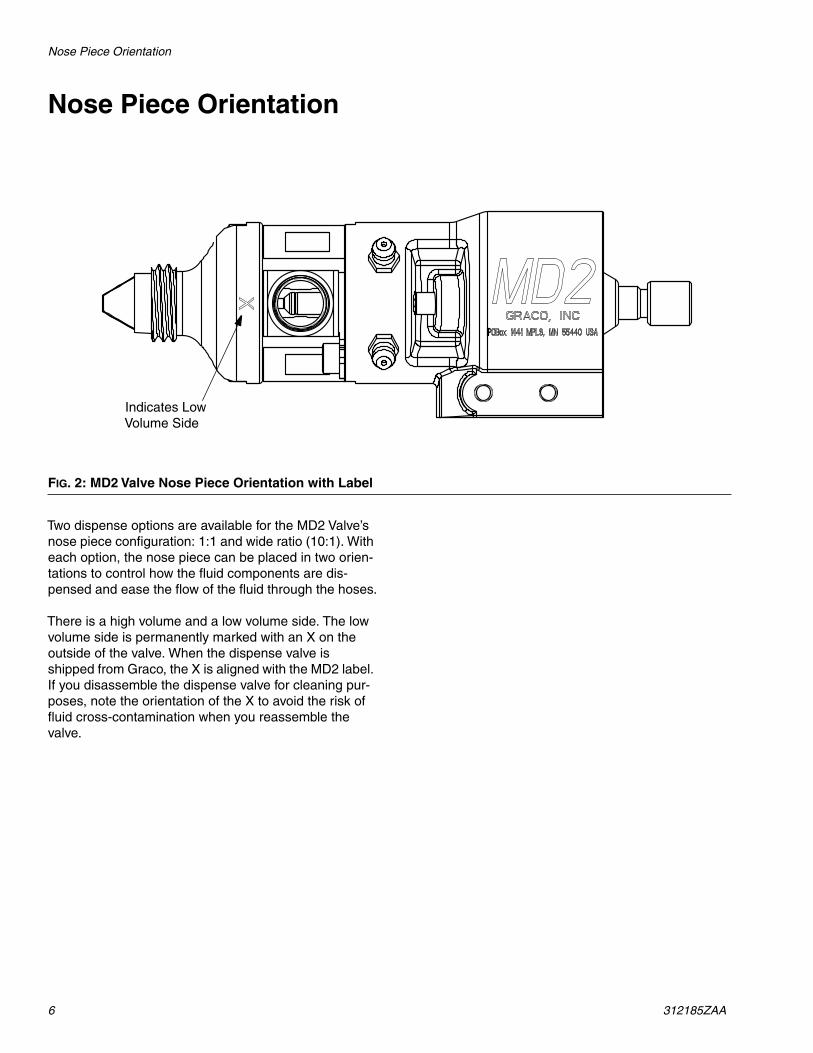
Nose Piece Orientation
Two dispense options are available for the MD2 Valve’snose piece configuration: 1:1 and wide ratio (10:1). Witheach option, the nose piece can be placed in two orien-tations to control how the fluid components are dis-pensed and ease the flow of the fluid through the hoses.
There is a high volume and a low volume side. The lowvolume side is permanently marked with an X on theoutside of the valve. When the dispense valve isshipped from Graco, the X is aligned with the MD2 label.If you disassemble the dispense valve for cleaning pur-poses, note the orientation of the X to avoid the risk offluid cross-contamination when you reassemble thevalve.
FIG. 2: MD2 Valve Nose Piece Orientation with Label
Indicates LowVolume Side
Features
312185ZAA 7
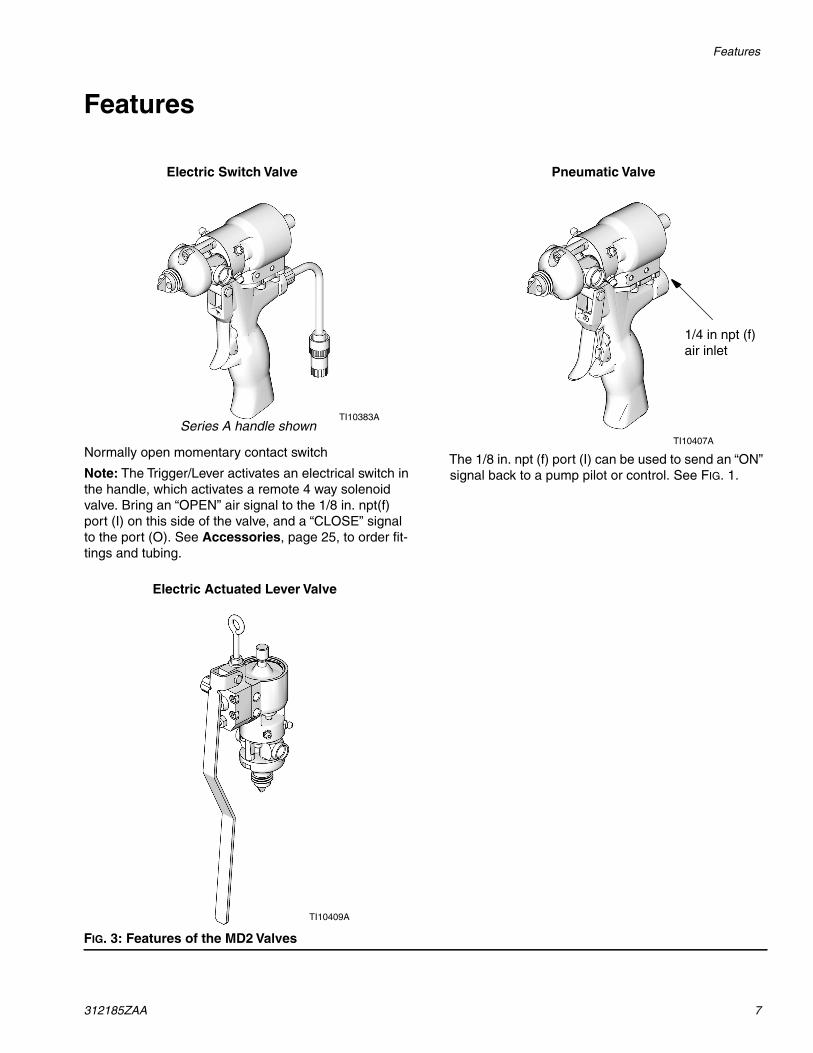
Features
FIG. 3: Features of the MD2 Valves
Note: The Trigger/Lever activates an electrical switch inthe handle, which activates a remote 4 way solenoidvalve. Bring an “OPEN” air signal to the 1/8 in. npt(f)port (I) on this side of the valve, and a “CLOSE” signalto the port (O). See Accessories, page 25, to order fit-tings and tubing.
Normally open momentary contact switch The 1/8 in. npt (f) port (I) can be used to send an “ON”signal back to a pump pilot or control. See FIG. 1.
Pneumatic Valve
Electric Actuated Lever Valve
Electric Switch Valve
TI10409A
TI10407A
TI10383A
1/4 in npt (f)air inlet
Series A handle shown
Installation
8 312185ZAA
Installation
Grounding
The following grounding instructions are minimumrequirements for a basic dispensing system. Your sys-tem may include other equipment or objects which mustbe grounded. Check your local electrical code fordetailed grounding instructions for your area and type ofequipment. Your system must be connected to atrue-earth ground.
• Pump: ground the pump by connecting ground wireand clamp as described in your separate pumpinstruction manual.
• Air compressors and hydraulic power supplies:ground the equipment according to the manufac-turer's recommendations.
• Fluid hoses: use only grounded fluid hoses with amaximum of 500 feet (150 m) combined hose lengthto ensure grounding continuity. Check the electricalresistance of your fluid hoses at least once a week.If your hose does not have a tag on it which speci-fies the maximum electrical resistance, contact thehose supplier or manufacturer for the maximumelectrical resistance limits, replace the hose immedi-ately.
• Dispensing valve: ground the valve by connectingit to a properly grounded fluid hose and pump.
• Fluid supply container: ground according to yourlocal code.
• Flammable liquids in the dispense area: must bein approved, grounded containers. Do not storemore than the quantity needed for one shift.
• All solvent pails used when flushing: groundaccording to local code. Use only metal pails, whichare conductive. Do not place the pail on a non-con-ductive surface, such as paper or cardboard, whichinterrupts the grounding continuity.
• To maintain grounding continuity when flushing orrelieving pressure, hold a metal part of the valvefirmly to the side of a grounded metal pail, then trig-ger the valve.
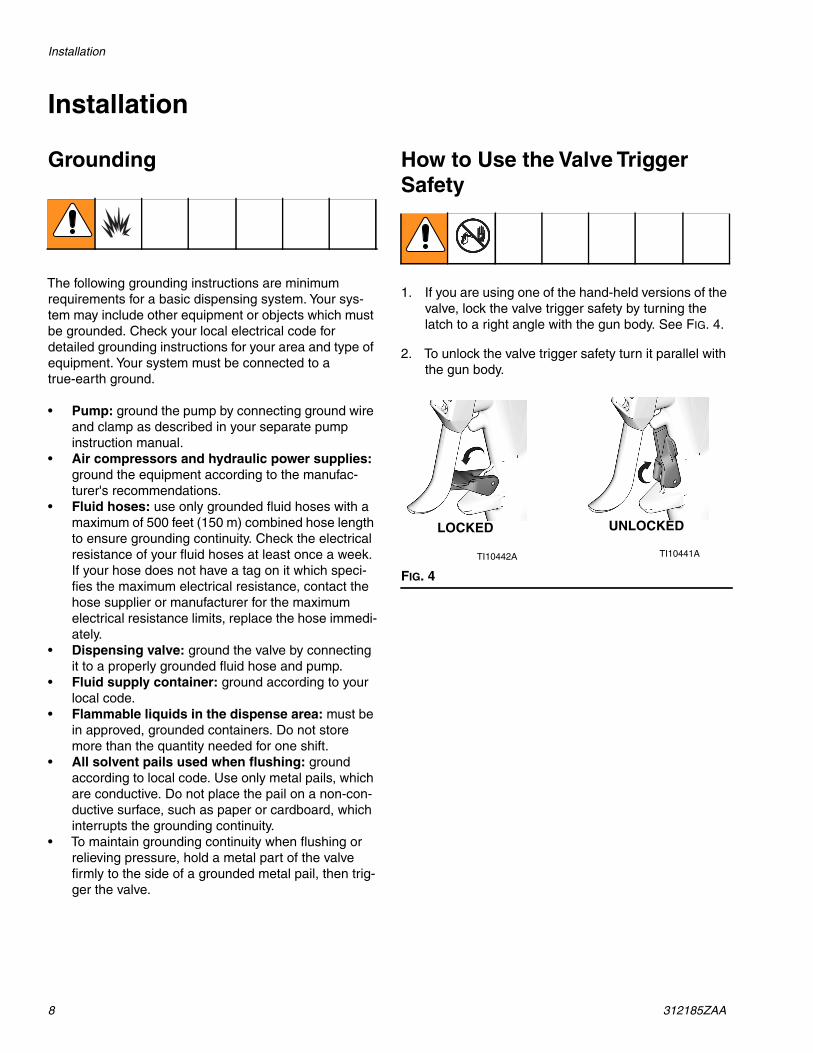
How to Use the Valve TriggerSafety
1. If you are using one of the hand-held versions of thevalve, lock the valve trigger safety by turning thelatch to a right angle with the gun body. See FIG. 4.
2. To unlock the valve trigger safety turn it parallel withthe gun body.
FIG. 4
LOCKED UNLOCKED
TI10442A TI10441A
Setup
312185ZAA 9
Setup
Fluid and Air Connections
9/16 Straight Thread O-Ring Boss FluidInlets
There is one fluid inlet on the A-side and one fluid inleton the B-side. The fluid inlets are located on the side ofthe valve and swivel to permit various mounting andhose configurations.
1/8 npt(f) Air Inlets
The machine mount valves and the electric switchhand-held valves have an on port (I) and off port (O),which are operated by a remote 4-way air control valve.Use one of the two air inlets located on the bottom andon the back of the valve.
The air switch hand-held valves have a single air inletwith an internal 4-way spool which operates the air pis-ton.
See Accessories on page 21, to order air control valvesand tubing.
Inlet Check ValvesInlet check valves are recommended on the fluid inletswhere viscosity allows. An inlet check valve preventsback-flow or crossover when the mixer is plugged or onefluid is much lower viscosity than the other. Whenrequired, a high crack pressure check valve is installedto maintain back-pressure on low viscosity fluids.
See Accessories on page 21 for a list of check valves.
Balancing the SystemA proportioner is used to feed the two-component dis-pense valve. The system must be pressure balanced toavoid “lead-lag” ratio errors when starting and stoppingthe flow.
Balancing is done by hose sizing or inlet check restric-tion. A properly balanced system has near equalback-pressure on the gauges when flowing without amixer installed.
Selecting HosesHoses between your proportioner and the MD2 valveshould be selected carefully. Many factors effect hoseselection.
1. Fluid Compatibility: Fluid must not degrade thecore material or end fittings of the hose. Nylon orPTFE cores are commonly used for chemical com-patibility. If your fluid is moisture sensitive youshould use PTFE or Moisture-Lok hoses.
2. Pressure Rating: Be sure hoses have a workingpressure rating above the pressure capability of thesystem.
3. Compressibility: Hoses, especially nylon painthoses, expand with an increase in pressure. A pres-sure change in the system may cause a volumechange, which can appear as a ratio error with widemix ratios. Compressible hoses absorb pressurespikes which is helpful to the operator during anapplication, such as trying to lay a bead.
4. Internal Diameter: Small I.D.'s create higher backpressures, lower flows, and small retained volume.Typically hose I.D.'s are selected for:
a. System Pressure Balance. “A” pressure dropvs. “B” pressure drop.
b. Volume Balance. A:B volume ratio vs. Hoseretained volume.
c. Flexibility and weight for operator or robot.
d. Overall Pressure Drop. Pressure drop shouldbe minimum possible within the above guide-lines.
5. Length: Hoses normally are kept as short as practi-cal to minimize pressure drop and compressible vol-ume. 10 ft (3.1 m) is recommended for reciprocatingpump systems.

Setup
10 312185ZAA
System Start-upNOTE: See Nose Piece Orientation on page 6.
When initially loading the fluids through the system,leave the mixer off until both fluids flow freely from thenose piece without any air. This prevents cross contam-ination from having fluid on one side pushing back upthe other side.
Mixer SelectionDisposable mixers are available from 3/16 in. I.D. to 1/2in. I.D. in lengths from 12 elements to 36 elements. Ingeneral, wide viscosity or mix ratios require more mixelements. Small I.D. mixers produce lower flow, higherback-pressure, and waste little material. Large I.D. mix-ers produce higher flow, lower back-pressure, and fewerlead-lag ratio errors. Different mixers can have differingsnuff-back characteristics.
Setting the Amount ofSnuff-backNOTE: For Models 255179 and 255181 only
The MD2 valves with hard seats use two snuff-backrestrictor rings (27) to set the amount of snuff-back.These two rings are trapped between the main valvebody and the nose piece. When the fluid valve pullsback to close, it enters the restrictions, stops flow, andpulls the fluid back until the needle reaches its carbideseat.
Maximum snuff-back results when both restrictors areused. Some snuff-back is still achieved without therestrictors because of the pull-back action of the nee-dles.
When dispensing wide mix ratios, it is best to use asnuff-back restrictor only on the high volume side. Thiskeeps the high volume side from being pulled back intothe low volume side.
The MD2 valves with soft seats have an adjustablesnuff-back. Turn the knob on the back of the soft seatMD2 valve to adjust the amount of snuff-back.
In general, use only as much snuff-back as necessary togive a good cut-off of flow. Too much snuff-back pulls anair bubble into the mixer. This can cause a drip, orcause the mixer to spit when the valve is re-opened.

Operation
312185ZAA 11
Operation
Pressure Relief Procedure
1. Shut off the air to the supply pumps.
2. Close the bleed-type master air valve (required inyour system).
3. Hold a metal part of the valve firmly to the side of agrounded metal pail, and trigger the dispense valveto relieve pressure.
4. Shut off the air to the dispense valve, if applicable.
If you suspect that the dispense needle or hose is com-pletely clogged, or that pressure has not been fullyrelieved after following the steps above, very slowlyloosen the hose end coupling and relieve pressure grad-ually, then loosen completely. Now clear the needle orhose.
Lever Actuated Valve andElectric Switch Hand-held Valve• Be sure the air supply lines are connected correctly
to the (I) and (O) valve air ports.• To open or close the valve and maintain the open or
closed status, a minimum of 40 psi (280 kPa, 2.8bar) air pressure must be supplied and maintainedat the (I) or (O) port.
• The trigger and lever only activates the electricalswitch in the handle, which turns the remote sole-noid on and off. See page 22 for electrical diagram.
• Trigger the gun or pull the lever to turn the solenoidon. Release the trigger or lever to turn the solenoidoff.
Machine Mount Valve• Be sure the air supply lines are connected correctly
to the ON (I) and OFF (O) valve air ports.• To open or close the valve and maintain the open or
closed status, a minimum of 40 psi (280 kPa, 2.8bar) air pressure must be supplied and maintainedat the ON (I) or OFF (O) port.
• Apply and maintain air pressure to the ON (I) air porton the valve, and remove air pressure from the OFF(O) air port on the valve to open the valve.
• Apply and maintain air pressure to the OFF (O) airport on the valve, and remove air pressure from theON (I) air port on the valve to close the valve.
Pneumatic Hand-held ValveThe valve operation is such that it is either fully open orfully closed.
The valve is opened and closed by the internal air con-trol valve. Trigger the gun to open the valve. Releasethe trigger to close the valve.
Ratio CheckingThe output mix ratio of your proportioner can bechecked by dispensing the two fluids separately out ofthe nose piece into tared cups. The cups can then beweighed and the weights divided to get the mix ratio byweight.
Use ratio check nozzles 255247 with 15K688 retainingnut for 1:1 models, or 24P850 for 10:1 models to makeratio checks.
Ratio checks provide information on the ratio of an over-all sample. Transient problems (soft spots) caused bystarting and stopping the flow (lead-lag) may not showup in this kind of ratio check. Physical tests of the mixedfluid are the best check of correct ratio and mix quality.

Maintenance
12 312185ZAA
Maintenance
Daily ShutdownWhen you are through using the MD2 valve, the outlet tothe mixer should be cleaned and protected from dryingor crystallization.
1. Remove and properly dispose of the static mixer.
2. Dispense a shot of material into a waste containerto clear any crossover in the nose piece.
3. Wipe the nose piece with a clean rag being carefulnot to let the materials contact each other.
4. Install the PTFE night cap (1:1 valves - 15K652,10:1 valves - 15V628) and retaining nut (15K688).
Preventive MaintenanceThere is a grease filled secondary seal/bearing area oneach valve shaft. Every 10,000 cycles, or twice eachmonth, new grease should be flushed across this area.
To grease the valve:
1. Remove the zerk grease fitting from each side of thefront or back of the valve.
2. Pump grease (115982) with grease gun (117792)across the valve until clean grease comes out of theother side.
3. Reinstall the zerk grease fitting.

Troubleshooting
312185ZAA 13
Troubleshooting
Problem Cause Solution
Valve does not open. Insufficient air pressure. Turn on air or increase air pressure.
Air not exhausted from the front sideof air cylinder piston.
Use 4-way, relieving type air valve.
Valve does not close and leaks. Insufficient air pressure. Turn on air or increase air pressure.
Air not exhausted from the back sideof air cylinder piston.
Use 4-way, relieving type air valve.
Blockage between needle and seat. Remove and clean needle and seat.
Damaged or missing gasket betweenseat and housing (hard seat only).
Replace gasket (38).
Damaged or worn needle or seat. Replace both the needle and seat.
Too little snuff-back. Unscrew snuff-back adjustment nee-dle (25) 1/4 turn at a time.
Higher than normal back pressure. Nose piece is clogged. Remove and clean.
Mixer is curing. Replace mixer.
Soft spots in mixed material. Nose piece is clogged on one side. Remove and clean.
System is not properly balanced. Balance system with hoses, checkvalves, restrictors.
High static pressures build whenvalve shuts off.
Turn off proportioner pump whenvalve closes.
Low flow rate. Snuff-back rings (13) are installed(hard seat only).
Remove snuff-back rings if they arenot required for maximum snuff-back.
Repair
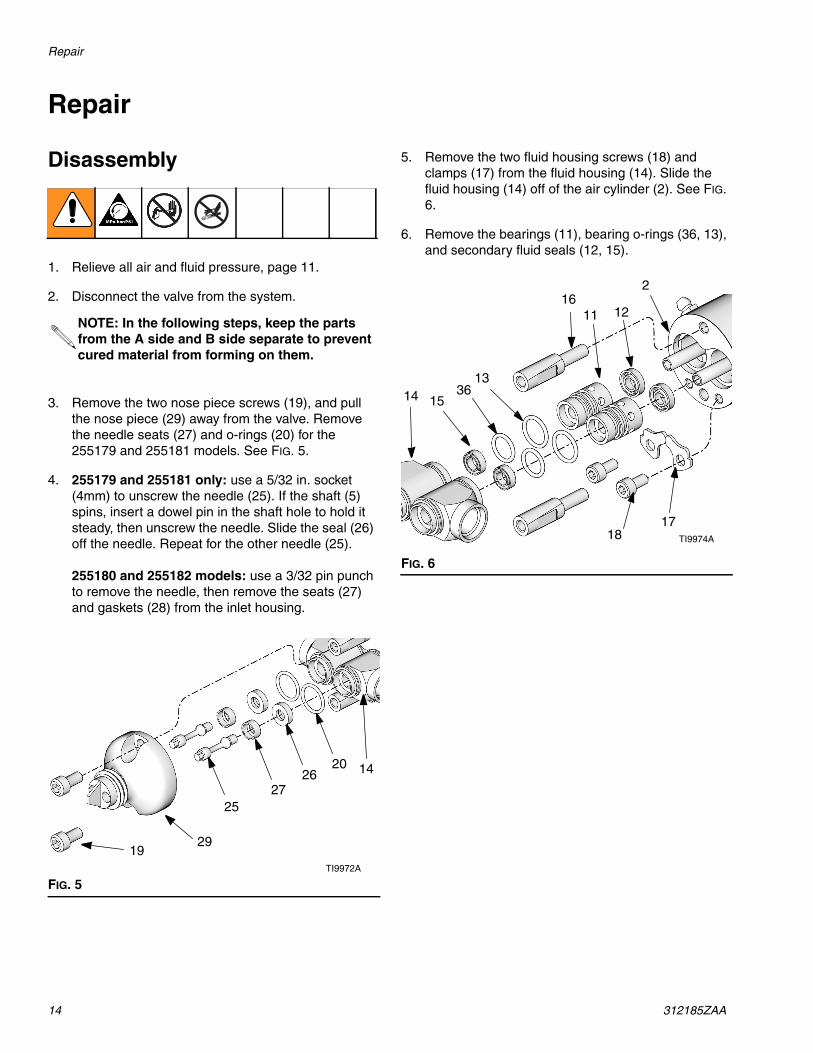
14 312185ZAA
Repair
Disassembly
1. Relieve all air and fluid pressure, page 11.
2. Disconnect the valve from the system.
3. Remove the two nose piece screws (19), and pullthe nose piece (29) away from the valve. Removethe needle seats (27) and o-rings (20) for the255179 and 255181 models. See FIG. 5.
4. 255179 and 255181 only: use a 5/32 in. socket(4mm) to unscrew the needle (25). If the shaft (5)spins, insert a dowel pin in the shaft hole to hold itsteady, then unscrew the needle. Slide the seal (26)off the needle. Repeat for the other needle (25).
255180 and 255182 models: use a 3/32 pin punchto remove the needle, then remove the seats (27)and gaskets (28) from the inlet housing.
5. Remove the two fluid housing screws (18) andclamps (17) from the fluid housing (14). Slide thefluid housing (14) off of the air cylinder (2). See FIG.6.
6. Remove the bearings (11), bearing o-rings (36, 13),and secondary fluid seals (12, 15).
NOTE: In the following steps, keep the partsfrom the A side and B side separate to preventcured material from forming on them.
FIG. 5
1929
2527
2620 14
TI9972A
FIG. 6
14 1536
13
11
18
1612
TI9974A
17
2

Repair
312185ZAA 15
7. Remove the retaining ring (1) from the back of theair cylinder (2). Push the two shafts (5) into the aircylinder (2) to dislodge the air cylinder cap (22). SeeFIG. 7.
8. Push the two shafts (5) to dislodge the piston (9)assembly from the air cylinder (2).
9. Use an o-ring pick to remove the o-rings (23) anduse a screwdriver to remove the sleeve bearings (7)from the air cylinder (2).
10. Remove the o-rings (6) from the piston (9) and aircylinder cap (22).
11. Remove the screw (24) and snuff-back adjustmentknob (21) from the cap (22). Use an o-ring pick toremove the o-ring (23).
12. Remove the lock nuts (3), the pin (8), o-rings (4),and piston o-ring (6) from the shaft (5).
Pneumatic Handle (if equipped)
1. Remove the four screws (214). Pull the handle (205)and gasket (204) away from the air cylinder (2).
2. Unscrew air valve plug (211) and remove spring(213). Using a small diameter tool, push spool (202)out from front. Inspect o-rings (203).
Electric Switch Handle (if equipped)
1. Disconnect the power from the gun.
2. The switch and cable are not repairable. Replacethese parts as a complete assembly. Use kit 255463for series A handles. Use kit 24D049 for series Bhandles.
3. Loosen the relief connector (112) and remove theair valve plug (111).
4. Remove the wire which will take the electricswitch (114) and spacer (115) with it.
FIG. 7
237
58
69
4
3
226
1
2423
21
39
TI9975B
2
FIG. 8
FIG. 9
202203
213211
203
TI10408A
204
212
210
214
206201
205
104
101
113116
114115 111
112
TI10384B
120

Repair
16 312185ZAA
Reassembly
Air Cylinder Section
1. Lubricate the shaft o-rings (23) and the bearings (7).Insert o-rings into the air cylinder (2) and air cap(22) cavities.See FIG. 7.
2. 255179 and 255182 only: Insert the snuff-backadjustment knob (21) in the cap (22). Tighten thescrew (24) on the end of the snuff-back adjustmentknob (21). Torque to 25-30 in.-lb (2.8-3.4 N•m).
3. Press the bearings (7) flush into the air cylinderhousing (2) and air cap (22), trapping the o-rings(23).
4. Lubricate and reassemble the piston assembly: pis-ton (9), o-ring (6), dowel pin (8), nuts (3), o-ring (4),and air cylinder shafts (5). Tighten nuts (3) to 25-30in-lb (2.8-3.4 N•m). The shafts (5) should hang withsome play to be self-aligning in the bearing.
5. Lubricate the air cylinder (2) ID. Push the piston (9)assembly into the air cylinder.
6. Lubricate and assemble the o-ring (6) onto cap (22).Push cap (22) into cylinder (2).
7. Install the outside retaining ring (1).
Fluid Section
1. Lubricate the bearings (11), o-rings (13, 36) andseals (12, 15). Put the o-rings (13, 36) on the bear-ings. Carefully insert the seals (12) into the bearingrecess, with the lips of the seals facing into the bear-ing. Insert the seals (15) into the bearing with thespring facing out of the housing. Be careful not todamage the seal lips. See FIG. 6.
2. Push the bearings (11) into the air cylinder (2).
3. Grease the fluid housing (14) and install over thebearings (11). Install the clamps (17) and screws(18). Tighten to 25-30 in-lb (2.8-3.4 N•m).
4. For 255180 and 255182, insert the gaskets (28) andseats (27).
5. Screw in the needle (25) and tighten it to 25-30 in.-lb(2.8-3.4 N•m). See FIG. 5.
6. 255179 and 255181, Insert the seals (26) with thesprings facing into the fluid housing (14).
7. See Nose Piece Orientation on page 6. Install thenose piece (31) with the o-rings (20), seats (27),and nose piece screws (19). Tighten the nose piecescrews to 115-120 in-lb (14-15 N•m).
8. 255181 and 255182, Install injector tube (30) withassembly tool (48). Torque to 40-50 in-lb (4.5-5.6N•m).
9. 255181 and 255182, Install injector tip (47) andtorque to 25-30 in-lb (2.8-3.4 N•m).
10. Remove zerk grease fitting (39). Fill grease in thegrease port below until grease begins to exit wherethe zerk grease fitting (39) was located. Repeat forthe other zerk grease fitting (39). See FIG. 7.
Pneumatic Handle (if equipped)
1. Liberally lubricate o-rings (203) and reassemble.Install spool (202) and spring (213). Torque plug(211) to 125-135 in-lb (14-15 N•m). See FIG. 8.
2. Align the gasket (204) and dispense valve on thetop of the handle (205). Torque the four screws(214) evenly to 15-20 in-lb (1.7-2.2 N•m).
Electric Switch Handle (if equipped)
1. Install the plunger (113) and spring (116). See FIG.9.
2. Insert the switch assembly (255463) while routingthe ground lug (108) through the hole in the top ofthe handle.
3. Torque plug (111) to 125-135 in-lb (14-15 N•m).
4. Tighten the strain relief (112).
5. Install the ground screw (110) through the lockwasher (109) and ground lug (108). Torque to 15-20in-lb (1.7-2.2 N•m).
6. Align the dispense valve on the top of the handle(101). Torque the four screws (120) evenly to 15-20lb (1.7-2.2 N•m).
NOTE: The snuff-back adjustment knob (21),shaft o-rings (23), and screw (24) are not pres-ent in models 255180, 255182, and 255183.

Repair
312185ZAA 17
Notes:

Parts
18 312185ZAA
Parts
255179 and 255181
TI21240A
2124
23❖
23❖
6
1
6❖3
392
8
4❖✖
7❖
29
25*
17
1816
2919
15✖
1420*†
26*
27*
13✖
1112✖
36✖
5✖
22
9
3047
1
Torque to 25-30 in-lb (2.8-3.4 N•m).
Torque to115-120 in-lb (14-15 N•m).
1
2
1
1
2
2
255181
1

Parts
312185ZAA 19
MD2 ValveThe parts listed below are common to all MD2 Dispensevalves. Parts which vary are found in the table at thebottom of this page.
❖ Parts included in Valve Air Cylinder Repair Kit255217 (purchase separately).
✖ Parts included in Valve Lube Seal Repair Kit 255218(purchase separately).
* Parts included in Front Valve Repair Kit 255219 (pur-chase separately).
† Parts included in Front Valve Repair Kit 255220 (pur-chase separately).
Ref Part Description Qty1 120762 RING, retainer 12 24X839 KIT, housing, air cylinder 13 102920 NUT, lock 24❖✖ 157628 O-RING, buna-n 25✖ 15K421 SHAFT, primary 26❖ 156593 O-RING, buna-n 27❖ 551181 BEARING, sleeve 1/4, 3/8, 1/4,
nylon2
8 551183 PIN, dowel 1/8 x 1.25 18-8 sst 19 626067 PISTON, air cylinder 111 15K422 BEARING, seal 212✖ 551191 PACKING, u-cup, nitrile 213✖ 113746 O-RING 214 15K441 HOUSING, inlet 215✖ 120768 SEAL, UHMWPE 216 15K442 SPACER, valve 217 15K444 CLAMP, adapter, inlet 2
18 121224 SCREW, cap, socket head, M5 x0.8 x 8 mm
2
19 107530 SCREW, cap, socket head, highstrength
2
20*† 117517 O-RING, fluoroelastomer 232 15K688 NUT, mixer; not shown 133 104765 PLUG, pipe, headless; not shown 236✖ 118594 O-RING, fluoroelastomer 239 120892 FITTING, grease 4
Ref Part Description Qty
Ref.No. Description
1:1 10:1
Qty255179 255181
21 KNOB, snuff-back, adjust 15K419 15K419 1
22a CAP, air cylinder, snuff-back 15K420 15K420 1
❖23 O-RING, buna-n 156454 156454 3
24 STOP, snuff-back 15V627 15V627 1
25 NEEDLE, snuff-back *15K428 *15K428 2
26 SEAL, UHMWPE *120784 *120784 2
27 SEAT, needle *15K460 *15K460 2
29 HOUSING, nose 15K445 15K649 1
30 TUBE, injector, sst 15V624 1
31 CAP; not shown 15K652 15V628 2
40 ADAPTER, ratio check 255247 256794 147 TIP, injector 15V623 148 TOOL, assembly aid; not shown 256793 1

Parts
20 312185ZAA
255180, 255182, and 255183
TI21241A
23❖
22
6
1
6❖
3
392
8
4❖✖
7❖
29
17
1816
29
1915✖
1420*†
13✖
1112✖
36✖
5✖25†
27†26†
28†
9
3047
Torque to 25-30 in-lb (2.8-3.4 N•m).
Torque to115-120 in-lb (14-15 N•m).
1
2
1
2
2 1
255182

Parts
312185ZAA 21
MD2 ValveThe parts listed below are common to all MD2 Dispensevalves. Parts which vary are found in the table at thebottom of this page.
❖ Parts included in Valve Air Cylinder Repair Kit255217 (purchase separately).
✖ Parts included in Valve Lube Seal Repair Kit 255218(purchase separately).
* Parts included in Front Valve Repair Kit 255219 (pur-chase separately).
† Parts included in Front Valve Repair Kit 255220 (pur-chase separately).
Ref Part Description Qty1 120762 RING, retainer 12 24X840 KIT, housing, air cylinder 13 102920 NUT, lock 24❖✖ 157628 O-RING, buna-n 25✖ 15K421 SHAFT, primary 26❖ 156593 O-RING, buna-n 27❖ 551181 BEARING, sleeve 1/4, 3/8, 1/4,
nylon2
8 551183 PIN, dowel 1/8 x 1.25 18-8 sst 19 626067 PISTON, air cylinder 111 15K422 BEARING, seal 212✖ 551191 PACKING, u-cup, nitrile 213✖ 113746 O-RING 214 15K441 HOUSING, inlet 215✖ 120768 SEAL, UHMWPE 216 15K442 SPACER, valve 217 15K444 CLAMP, adapter, inlet 2
18 121224 SCREW, cap, socket head, M5 x0.8 x 8 mm
2
19 107530 SCREW, high strength 220*† 117517 O-RING, fluoroelastomer 232 15K688 NUT, mixer; not shown 133 104765 PLUG, pipe, headless; not shown 236✖ 118594 O-RING, fluoroelastomer 239 120892 FITTING, grease 442 299518 CAP, plug; not shown 2
Ref Part Description Qty
Ref.No. Description
1:1 1:1 10:1
Qty255180 255183 255182
22 CAP, air cylinder 15K447 15K447 15K447 1
❖23 O-RING, buna-n 156454 156454 156454 2
25 NEEDLE, snuff-back † 626062 † 626062 † 626062 2
26 SEAL, UHMWPE † 185467 † 185467 † 185467 2
27 SEAT, needle † 626060 † 626060 2
28 GASKET, seat † 171860 † 171860 † 171860 2
29 HOUSING, nose 15K445 16T648 15K649 1
30 TUBE, injector, sst 15V624 15V624 1
31 CAP; not shown 15K652 15K652 15V628 2
40 ADAPTER, ratio check 255247 255247 24P850 147 TIP, injector 15V623 148 TOOL, assembly aid 256793 1
Parts
22 312185ZAA
Electric Switch Handle, 255208
NOTE: Extension cable 123660 is available.
* Parts included in Series A Handles Kit 255463 andSeries B Handles Kit 24D049 (purchase separately).
101
113116
114*115*
111*
112*
106
TI10384B
TI14761A
105
104
120
Series B handle shown
119*
Torque to 25 in-lb (2.8 N•m).
Torque to 125-135 in-lb (14-15 N•m).
1
2
21
1
Ref Part Description Qty101 15K666 HANDLE, 2K, dispense valve,
electric1
104 15B209 TRIGGER, gun 1105 192272 PIN, pivot 1106 203953 SCREW, cap, hex hd, 10-24
UNC-3A x 3/81
111* PLUG, air valve 1112* CONNECTOR, relief 1/4 npt 1113 15K668 PLUNGER, trigger, 2K handle 1114* SWITCH, elect mini snap action 1115* SPACER, switch 1116 551396 SPRING, 0.26X, 0.37X, 0.51 music
wire1
119* CABLE, trigger, female, 3-pin con-nector (Series A Handles Only)
1
CABLE, trigger, male, 4-pin con-nector (Series B Handles Only)
1
120 117026 SCREW, cap, sch, M5 x 0.80 x12 mm
4

Parts
312185ZAA 23
Pneumatic Handle, 255206
* Parts included in Kit 246354 (purchase separately).
201206
212
203202
203213
211
204
205
210
207
214
TI21242A
215
216
Torque to 35 in-lb (4 N•m).
Apply lubricant on seals.
Apply thread sealant. Torque to 130 in-lb (15 N•m).
Torque to 25 in-lb (2.8 N•m).
1
2
3
41
2
3
4
2
3
3
Ref Part Description Qty201 100721 PLUG, pipe 1202 15B202 VALVE, spool 1203* O-RING, chemically resistant fluorocarbon 3204 15K661 GASKET, handle 1205 15K658 HANDLE, 2K dispense valve, air 1206 119626 PLUG, breather 1207 192272 PIN, pivot 1210 203953 SCREW, cap hex hd, 10-24 UNC-3A x 3/8 1211 15B208 PLUG, air valve, 1/4 npt 1212 15B209 TRIGGER, gun 1213 117485 SPRING, compression 1214 117026 SCREW, cap, sch, M5 x 0.80 x 12 mm 4215 117509 COUPLER, line, air, 1/4 npt 1216 117510 FITTING, line, air, 1/4 npt 1

Parts
24 312185ZAA
Actuated Lever, 255249
TI10410B
302
303
304
306
301
309
303
310
308
307
305
319
Torque to 25 in-lb (2.8 N•m).1
1
1
Ref Part Description Qty301 15K922 BLOCK, mounting lever, 2K 1302 121191 BOLT, eye, 1/4-20 x 2 in. (51 mm) 1303 100015 NUT, hex, 1/4-20 UNC 2-B 2304 100016 WASHER, lock 1305 192272 PIN, pivot 1306 203953 SCREW, cap, hex, hd 1307 551318 CONNECTOR, relief, 1/4 npt 1308 121192 SWITCH, pushbutton 1309 121193 PLUNGER, spring, 1/4-20 1310 15M479 LEVER, actuator, valve 1311 121194 SCREW, socket head cap, M5 - 0.8 x
30 mm (not shown)4
319 123619 CABLE, trigger 1
Accessories
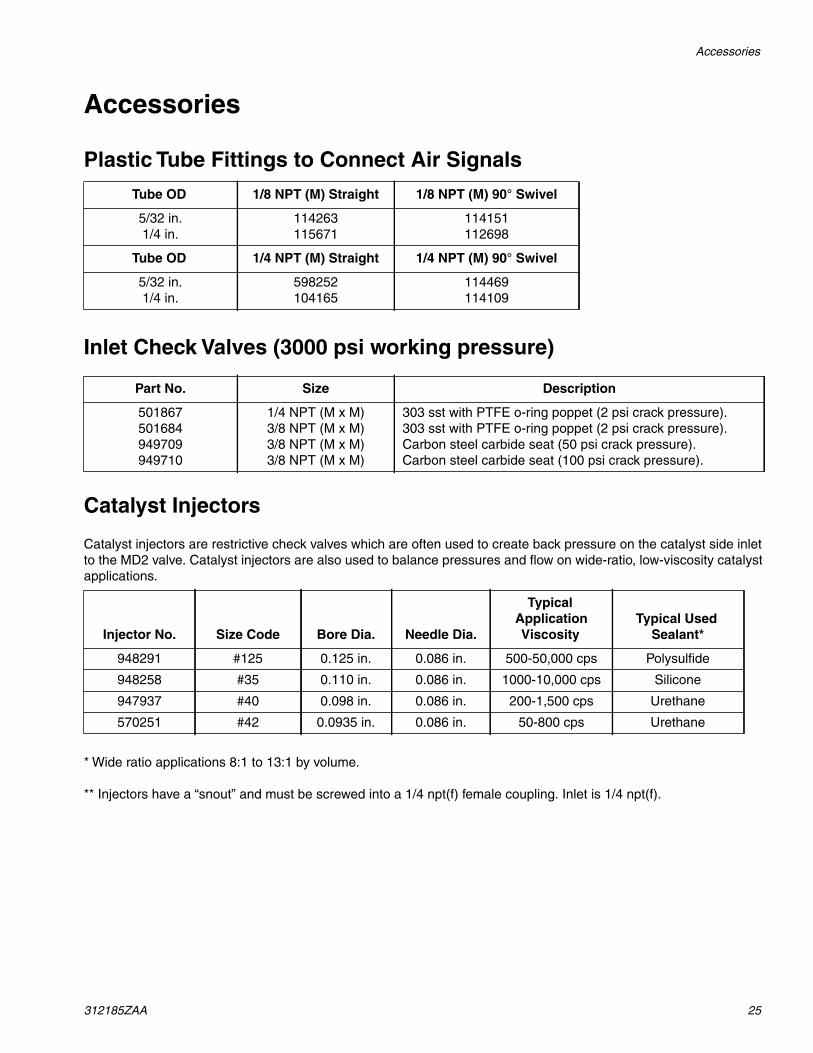
312185ZAA 25
Accessories
Plastic Tube Fittings to Connect Air Signals
Inlet Check Valves (3000 psi working pressure)
Catalyst Injectors
Catalyst injectors are restrictive check valves which are often used to create back pressure on the catalyst side inletto the MD2 valve. Catalyst injectors are also used to balance pressures and flow on wide-ratio, low-viscosity catalystapplications.
* Wide ratio applications 8:1 to 13:1 by volume.
** Injectors have a “snout” and must be screwed into a 1/4 npt(f) female coupling. Inlet is 1/4 npt(f).
Tube OD 1/8 NPT (M) Straight 1/8 NPT (M) 90° Swivel
5/32 in.1/4 in.
114263115671
114151112698
Tube OD 1/4 NPT (M) Straight 1/4 NPT (M) 90° Swivel
5/32 in.1/4 in.
598252104165
114469114109
Part No. Size Description
501867501684949709949710
1/4 NPT (M x M)3/8 NPT (M x M)3/8 NPT (M x M)3/8 NPT (M x M)
303 sst with PTFE o-ring poppet (2 psi crack pressure).303 sst with PTFE o-ring poppet (2 psi crack pressure).Carbon steel carbide seat (50 psi crack pressure).Carbon steel carbide seat (100 psi crack pressure).
Injector No. Size Code Bore Dia. Needle Dia.
TypicalApplicationViscosity
Typical UsedSealant*
948291 #125 0.125 in. 0.086 in. 500-50,000 cps Polysulfide
948258 #35 0.110 in. 0.086 in. 1000-10,000 cps Silicone
947937 #40 0.098 in. 0.086 in. 200-1,500 cps Urethane
570251 #42 0.0935 in. 0.086 in. 50-800 cps Urethane

Accessories
26 312185ZAA
Plastic Tubing for Air Signal Lines
Mixers and Shroud
*Mixers can be trimmed as needed.
Nose Piece Accessories
Part No. Description
514607 5/32 in. O.D. Nylon
C12509 1/4 in. O.D. Nylon
ID x # elements 50 pack 250 pack Shroud
3/16 x 32 LC0077 LC0084 LC0063
1/4 x 24 LC0078 LC0085 LC0057
3/8 x 24 LC0079 LC0086 LC0058
3/8 x 36 LC0080 LC0087 LC0059
3/8 Combo LC0081 LC0088 LC0060
3/16 x 32 Luer Lock LC0082 LC0089 LC0061
1/4 x 24 Luer Lock LC0083 LC0090 LC0062
Part No. Description Notes
15K652 1:1 nightcap PTFE cap to protect the 1:1 outlet when not in use
15V628 10:1 nightcap PTFE cap to protect the 10:1 outlet when not in use
255247 1:1 ratio check nozzle Splits the flow on 1:1 valves to facilitate ratio checks
24P850 10:1 ratio check nozzle Splits the flow on 10:1 valves to facilitate ratio checks
11151610:1 ratio check nozzle
o-ring, smallReplacement o-ring for 24P850
11676810:1 ratio check nozzle
o-ring, largeReplacement o-ring for 24P850
258687 10:1 check tip Assembly for low volume side material that is very thin
256793 Tool Assembly tool to aid in the installation and removal ofinjector tube 15V623
15K688 7/8-9 retaining nut Use to hold 15K652, 255247 and 255245 on to valve

Accessories
312185ZAA 27
Orifice Kits
In the following table, shaded rows indicate “Super Standard” items that are typically stocked and provide the bestdelivery dates.
† Parts included in kit 24D321.
‡ Parts included in kit 248130 (pack of 6).
◆ Part included in kit 248128 (pack of 6).
ImpingementPort Size
Kit Type and Kit Number
250 Model PolyolOrifice Kit
250 Model IsoOrifice Kitin. mm
0.016 0.41 24C805 24D229
0.020 0.51 24C751 24D223
0.024 0.61 24C806 24D230
0.028 0.71 24C807 24D231
0.031 0.79 24C752 24D224
0.035 0.89 24C808 24D232
0.039 0.99 24C809 24D233
0.042 1.07 24C810 24D234
0.047 1.19 24C753 24D225
0.052 1.32 24C811 24D235
0.055 1.40 24C812 24D236
0.060 1.52 24C754 24D226
0.063 1.60 24C813 24D237
0.067 1.70 24C755 24D227
0.073 1.85 24C815 24D238
0.086 2.18 24C756 24D228
ImpingementPort Size
Kit Type and Kit Number
250 Model PolyolOrifice Kit
250 Model IsoOrifice Kitin. mm
Orifice Kit
509506
507
505501
502
503
Apply a light coating of lubricant to seals and surfacesspecified.
Fasten stem (505) into housing (501). Fastencap (509) onto housing (501) and torque to 60-70 in-lb(6.8-7.9 N•m). Unscrew stem (505) until it bottoms outagainst cap (509).
3
4
3
3
3
4
504
ti21829a2
Ref. Part DescriptionQty
.501 --- HOUSING, orifice 1502†‡ --- O-RING, 0.63 in. diameter 1503† --- O-RING, 0.44 in. diameter 1504†◆ --- O-RING, 0.37 in. diameter 1505 --- STEM, valve 1506† --- RING, backup, PTFE 1507† --- O-RING, 0.28 in. diameter 1509 --- CAP, orifice 1510 --- TOOL, cleanout; #78 drill bit
(not shown)1

Accessories
28 312185ZAA
24E505 Orifice Block Kit
24E505 does not include an MD2 valve. See MD2Valve Models on page 2.
24E505 does not include swivel adapters. Swiveladapters 122961 and 122737 must be purchasedseparately.
See manual 3A0861 for ratio check assembly24F227.
Lubricate all o-rings and specified surfaces.
Torque to 20-30 in-lb (2.2-3.4 N•m).
1
2
401
401a
401d401b
401c
402b
1
ti21829a1
MD2 Valve not included
402a 2
Part 122737, Swivel Adapter - JIC 6 x 1/4 npt,not included in kit
Part 122961, Swivel Adapter - JIC 5 x 1/4 npt,not included in kit
Ref. Part DescriptionQty
.401 HOUSING, orifice, assy;
includes 401a-401d1
401a HOUSING, orifice 1401b WASHER 1401c NUT 1401d 123886 O-RING 1402 KIT, orifice block plug; includes
402a and 402b1
402a PLUG, orifice 1402b 117724 O-RING 1

Accessories
312185ZAA 29
Valve Accessories
551351 Short Throw Spacer
A spacer under the air piston that limits how far the fluidneedles push open. It reduces the amount of materialsurge when the valve opens, and reduces the amount ofsnuff-back available. Used for dispensing low flow smalldiameter beads. For 255180 and 255182 only.
123660 Extension Cable, 6.0 m (19.7 ft)
For locating the valve further from the base system thanallowed with the original cable provided. For use withthe electric handle 255208 and actuated lever 255249.
Conversion Kits
Part No. Description Notes
255206 Pneumatic Handle Convert any valve to a hand held valve with an internalpneumatic 4-way valve. See page 23.
255208 Electric Handle Convert any valve to a hand held valve with an internal nor-mally open switch. See page 22.
255249 Electric Lever Switch Convert any valve to a hanging valve with an internal nor-mally open switch. See page 24.
255273 Hanger Adapter Add to any hand held valve to allow it to be hung.
123902 Cable Replaces trigger cable included with electric handle 255208and actuated lever 255249. For converting handle/lever to
connect to systems previously connected to a TwinMixer®
gun. Use pins 1 (brown) and 3 (blue).
Hanger Adapter
255273
TI10512A
Accessories
30 312185ZAA
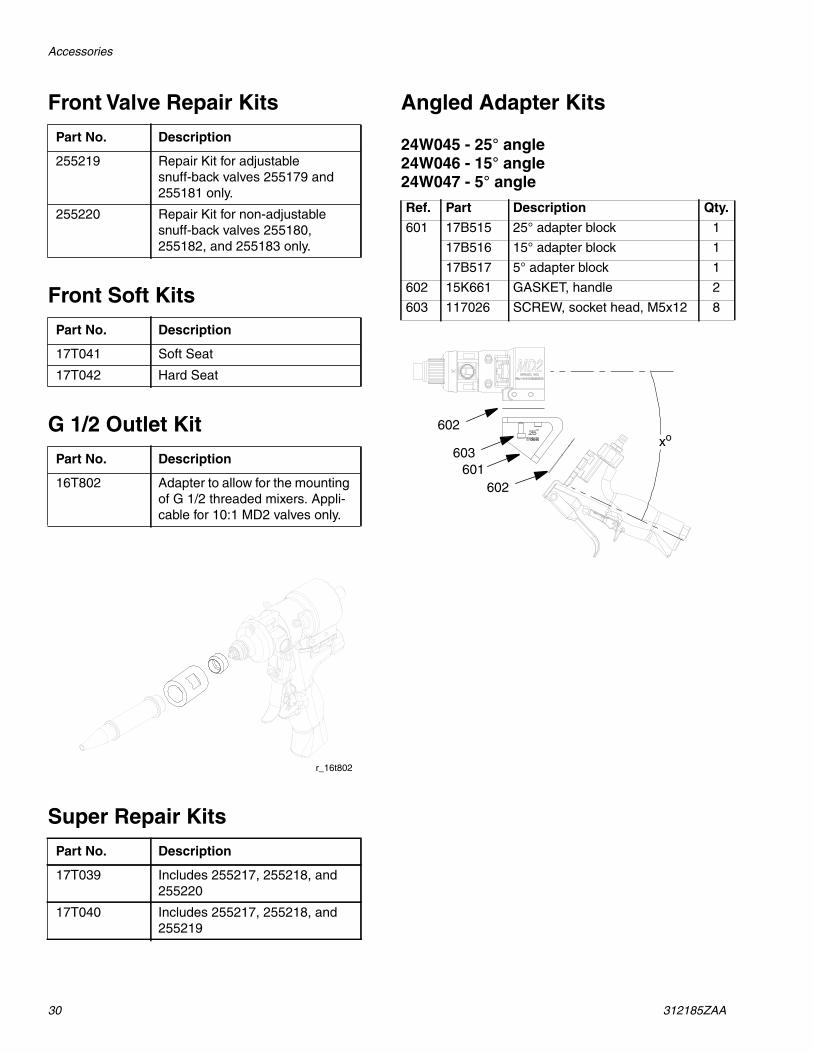
Front Valve Repair Kits
Front Soft Kits
G 1/2 Outlet Kit
Super Repair Kits
Angled Adapter Kits
24W045 - 25° angle24W046 - 15° angle24W047 - 5° angle
Part No. Description
255219 Repair Kit for adjustablesnuff-back valves 255179 and255181 only.
255220 Repair Kit for non-adjustablesnuff-back valves 255180,255182, and 255183 only.
Part No. Description
17T041 Soft Seat
17T042 Hard Seat
Part No. Description
16T802 Adapter to allow for the mountingof G 1/2 threaded mixers. Appli-cable for 10:1 MD2 valves only.
Part No. Description
17T039 Includes 255217, 255218, and255220
17T040 Includes 255217, 255218, and255219
r_16t802
Ref. Part Description Qty.
601 17B515 25° adapter block 1
17B516 15° adapter block 1
17B517 5° adapter block 1
602 15K661 GASKET, handle 2
603 117026 SCREW, socket head, M5x12 8
602
603601
602
xo

Technical Data
312185ZAA 31
Technical Data
Dimensions
Maximum Fluid Pressure 255179-255182: 3000 psi (20.7 MPa, 207 bar)255183: 2000 psi (13.8 MPa, 138 bar)
Maximum Cylinder Air Pressure 120 psi (0.84 MPa, 8.4 bar)Air Inlets (open (I) and close (O) ports) 1/8 npt(f)Fluid Inlets 9/16 straight thread o-ring boss “A” and “B”Fluid Outlet 7/8-9 bell outletFluid Viscosity RangeSoft Seats 1-1 million cpsHard Seats 20-1 million cpsFluid Section Sealing Isolation chamber with zerk fittings and dual seals.Divorced Air Cylinder Double acting, buna-n o-ringsWeight255179 / 255180 (1:1 valves) 1.45 lb (0.66 kg)255181 / 255182 (10:1 valves) 1.50 lb (0.68 kg)255206 (pneumatic handle) 0.85 lb (0.39 kg)255208 (electric handle) 0.90 lb (0.41 kg)255249 (electric lever) 0.75 lb (0.34 kg)Wetted PartsStainless Steel Valve 303 sst, 17-4 SS, UHMWPE, PEEK, Chemical Resistant
o-rings. 440C SS and C2 carbide with cobalt binder (hardseat only)
TI9977A TI10654A
0.73in.(18.5
mm
)
0.28 in. (7.1 mm)
5.64
in.(
143.
3m
m)
6.64
in.(
168.
7m
m)
1.06 in. (26.9 mm)
4.29in.(109
mm
)
4.60
in.(
116.
8m
m)
0.73in.(18.5
mm
)
M5 x 0.8 mounting holes (2)
M5 x 0.8 mountingholes (4)
All written and visual data contained in this document reflects the latest product information available at the time of publication.Graco reserves the right to make changes at any time without notice.
Original instructions. This manual contains English. MM 312185
Graco Headquarters: MinneapolisInternational Offices: Belgium, China, Japan, Korea
GRACO INC. AND SUBSIDIARIES • P.O. BOX 1441 • MINNEAPOLIS MN 55440-1441 • USACopyright 2001, Graco Inc. All Graco manufacturing locations are registered to ISO 9001.
www.graco.comRevision ZAA, March 2018
Graco Standard WarrantyGraco warrants all equipment referenced in this document which is manufactured by Graco and bearing its name to be free from defects inmaterial and workmanship on the date of sale to the original purchaser for use. With the exception of any special, extended, or limited warrantypublished by Graco, Graco will, for a period of twelve months from the date of sale, repair or replace any part of the equipment determined byGraco to be defective. This warranty applies only when the equipment is installed, operated and maintained in accordance with Graco’s writtenrecommendations.
This warranty does not cover, and Graco shall not be liable for general wear and tear, or any malfunction, damage or wear caused by faultyinstallation, misapplication, abrasion, corrosion, inadequate or improper maintenance, negligence, accident, tampering, or substitution ofnon-Graco component parts. Nor shall Graco be liable for malfunction, damage or wear caused by the incompatibility of Graco equipment withstructures, accessories, equipment or materials not supplied by Graco, or the improper design, manufacture, installation, operation ormaintenance of structures, accessories, equipment or materials not supplied by Graco.
This warranty is conditioned upon the prepaid return of the equipment claimed to be defective to an authorized Graco distributor for verification ofthe claimed defect. If the claimed defect is verified, Graco will repair or replace free of charge any defective parts. The equipment will be returnedto the original purchaser transportation prepaid. If inspection of the equipment does not disclose any defect in material or workmanship, repairswill be made at a reasonable charge, which charges may include the costs of parts, labor, and transportation.
THIS WARRANTY IS EXCLUSIVE, AND IS IN LIEU OF ANY OTHER WARRANTIES, EXPRESS OR IMPLIED, INCLUDING BUT NOTLIMITED TO WARRANTY OF MERCHANTABILITY OR WARRANTY OF FITNESS FOR A PARTICULAR PURPOSE.
Graco’s sole obligation and buyer’s sole remedy for any breach of warranty shall be as set forth above. The buyer agrees that no other remedy(including, but not limited to, incidental or consequential damages for lost profits, lost sales, injury to person or property, or any other incidental orconsequential loss) shall be available. Any action for breach of warranty must be brought within two (2) years of the date of sale.
GRACO MAKES NO WARRANTY, AND DISCLAIMS ALL IMPLIED WARRANTIES OF MERCHANTABILITY AND FITNESS FOR APARTICULAR PURPOSE, IN CONNECTION WITH ACCESSORIES, EQUIPMENT, MATERIALS OR COMPONENTS SOLD BUT NOTMANUFACTURED BY GRACO. These items sold, but not manufactured by Graco (such as electric motors, switches, hose, etc.), are subject tothe warranty, if any, of their manufacturer. Graco will provide purchaser with reasonable assistance in making any claim for breach of thesewarranties.
In no event will Graco be liable for indirect, incidental, special or consequential damages resulting from Graco supplying equipment hereunder, orthe furnishing, performance, or use of any products or other goods sold hereto, whether due to a breach of contract, breach of warranty, thenegligence of Graco, or otherwise.
FOR GRACO CANADA CUSTOMERSThe Parties acknowledge that they have required that the present document, as well as all documents, notices and legal proceedings entered into,given or instituted pursuant hereto or relating directly or indirectly hereto, be drawn up in English. Les parties reconnaissent avoir convenu que larédaction du présente document sera en Anglais, ainsi que tous documents, avis et procédures judiciaires exécutés, donnés ou intentés, à la suitede ou en rapport, directement ou indirectement, avec les procédures concernées.
Graco InformationSealant and Adhesive Dispensing Equipment
For the latest information about Graco products, visit www.graco.com.For patent information, see www.graco.com/patents.
TO PLACE AN ORDER, contact your Graco distributor, go to www.graco.com and select“Where to Buy” in the top blue bar, or call to find the nearest distributor.
If calling from the US: 800-746-1334If calling from outside the US: 0-1-330-966-3000www.metermixdispense.com
866 967 4660