Embed Size (px)
Citation preview

1
30° Cordless Framing NailerCleaning Procedure
Tool Degreaser Cleaner Paslode Cordless Lubricating Oil
Part No. 401482Part No. 219086Part No. 401331
5/32" Hex Key Wrench
This procedure provides a simple but effective way toclean your Paslode Cordless Framing Nailer andmaintain reliable operation. Regular cleaning andlubrication will also extend part life and providemaximum nail driving power.
Only one tool is necessary to disassemble the PaslodeCordless Framing Nailer in preparation for cleaning:the 5/32" hex key wrench provided with the PaslodeCordless Framing Nailer.
Paslode recommends that an aerosol "DegreaserCleaner," such as Paslode® Degreaser Cleaner (PartNo. 219086), be used for cleaning. This cleaner isavailable through your local Paslode Dealer.
If a different type of degreaser cleaner is selected,make sure that it will not damage rubber. Both of theO-Ring seals in the area that will be cleaned are madeof a rubber compound. Chemical damage to these O-Ring seals may result in the tool being madeinoperable.
Although "safety" cleaners generally provide reducedrisk of fire and are more stable than other cleaners,they cannot be handled carelessly. Always follow themanufacturer's instructions and never spray cleaner onthe Paslode Cordless Framing Nailer, unless the toolhas been allowed to cool down.
To begin, you will need the following items:
405659-11/07

2
Step 3
Carefully tilt the Handle-Magazine Assembly awayfrom the Motor Assembly and gently pull the twoassemblies apart. CAUTION: Use care to ensure thatthe fan does not scratch the combustion chamber.Also be careful when setting the Handle-MagazineAssembly down so that you do not damage the fanblades or bend the fan motor shaft.
You have now separated the tool into two majorassemblies, allowing access to the areas that requireperiodic cleaning and lubrication.
Handle-Magazine Removal
DANGERRemove all fasteners, fuel, and battery prior to servicing tool.
Step 1
Using the 5/32" Hex Key Wrench (# 401331) removethe Handle-Magazine Assembly by removing thethe two #10-24 x 1-1/8" long Socket Head CapScrews from the nose piece of the tool and pivot theHandle-Magazine Assembly away from the MotorAssembly .
Step 2
Remove the cap and air filter by unscrewing the four#10-24 Socket Head Cap Screws.
DANGERNever operate the Paslode Cordless Framing nailer unless allfour Socket Head Cap Screws are firmly tightened on thecylinder head. Failure to do this could result in tool damage,fire and personal injury.
Screws

3
Cylinder Head
Step 1
Grasp the Cylinder Head O-Ring with the thumb andindex finger of one hand, and pull the O-Ring out ofthe groove slightly by applying light pressure whilepulling.
Step 2
Grasp the protruding portion of the O-Ring with theother hand, and gently pull the O-Ring out of thegroove and over the fan. Wipe the O-Ring clean witha soft, lint-free cloth. Spray degreaser cleaner on thecloth to help remove any sticky residue from theO-Ring.
Step 3
Spray the Cylinder Head with degreaser cleaner.Allow the dirt and debris to drip off. DO NOT LETOVER SPRAY OR DIRTY CLEANER RUN INTOTHE HANDLE!
4
Step 4
Using a clean, lint-free rag, wipe off any remainingcleaner or dirt. Make sure the O-Ring Groove andSpark Plug are completely clean and clear of debris.Repeat Step 3 to remove any heavy deposits orremaining residue.
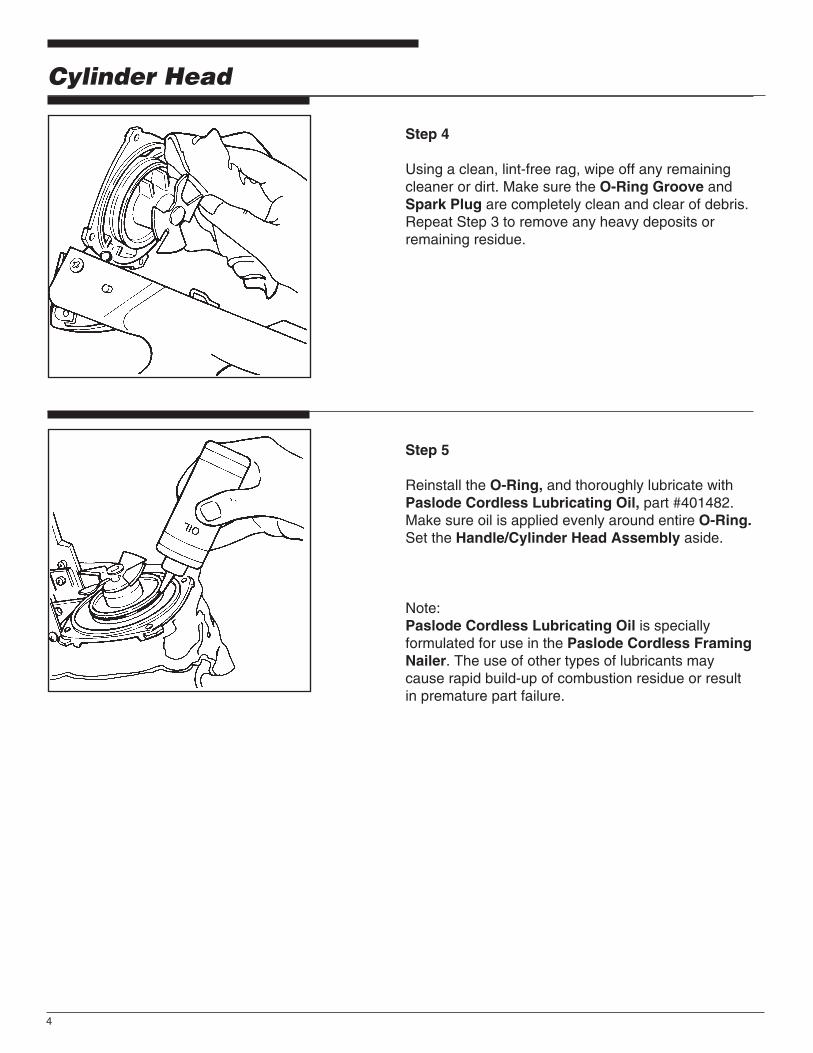
Step 5
Reinstall the O-Ring, and thoroughly lubricate withPaslode Cordless Lubricating Oil, part #401482.Make sure oil is applied evenly around entire O-Ring.Set the Handle/Cylinder Head Assembly aside.
Note:Paslode Cordless Lubricating Oil is speciallyformulated for use in the Paslode Cordless FramingNailer. The use of other types of lubricants maycause rapid build-up of combustion residue or resultin premature part failure.
Cylinder Head

5
Motor Assembly
Step 1
Push the Piston Assembly to the "down" positionusing the handle portion of the screwdriver or a cleanpiece of wood.
Step 2
Spray a liberal amount of degreaser cleaner intoinside of Sleeve and Combustion Chamber. InvertMotor Assembly, and let excess cleaner and dirtdrain out.
Step 3
Using a clean area of a lint-free rag, wipe off anyremaining cleaner or dirt. Repeat Step 2 to removeany heavy deposits or remaining residue.

6
Motor AssemblyStep 4
With Motor Assembly tilted up, squeeze 4-5 dropsof oil into Sleeve (Area "A") and 5-6 drops onto lowerlip of Combustion Chamber (Area "B"). RotateMotor Assembly while oiling to ensure oil is evenlydistributed around Sleeve and lip. See Tool CutawayIllustration, page 7.
Step 5
Hold Motor Assembly upright, and push down andrelease several times to allow oil on lower lip ofCombustion Chamber to be evenly distributed.
Step 6
Manually push the Driver Blade up and down todistribute the oil in the Sleeve evenly.

7
Motor Assembly
Step 7
Tilt the Motor Assembly upright, and apply 3-4drops of Paslode Cordless Lubricating Oil evenlyspaced around the top of the Combustion Chamber(Area "C"). Spread the oil using your fingertip.
Step 8
Reassemble the Paslode Cordless Framing Nailerfollowing disassembly Steps 1-3, page 2 inReverse order.
DANGERDo not attempt to operate the tool unless the headscrews, filter and cap are securely attached to thehousing. Operating the Paslode Cordless Framingnailer with loose or missing head screws can resultin the escape of burning gases, tool damage, andinjury to tool user and property.
NOTE: After the tool is completelyassembled and all screws aretightened, test the tool for properoperation. Some smoke may benoticeable from the exhaust portson the first few cycles as excessoil is burned off. Consult theOperating Manual for instructions ifthe tool malfunctions.
CombustionChamber
Sleeve
PistonAssembly
"Mid-Check"Area
8
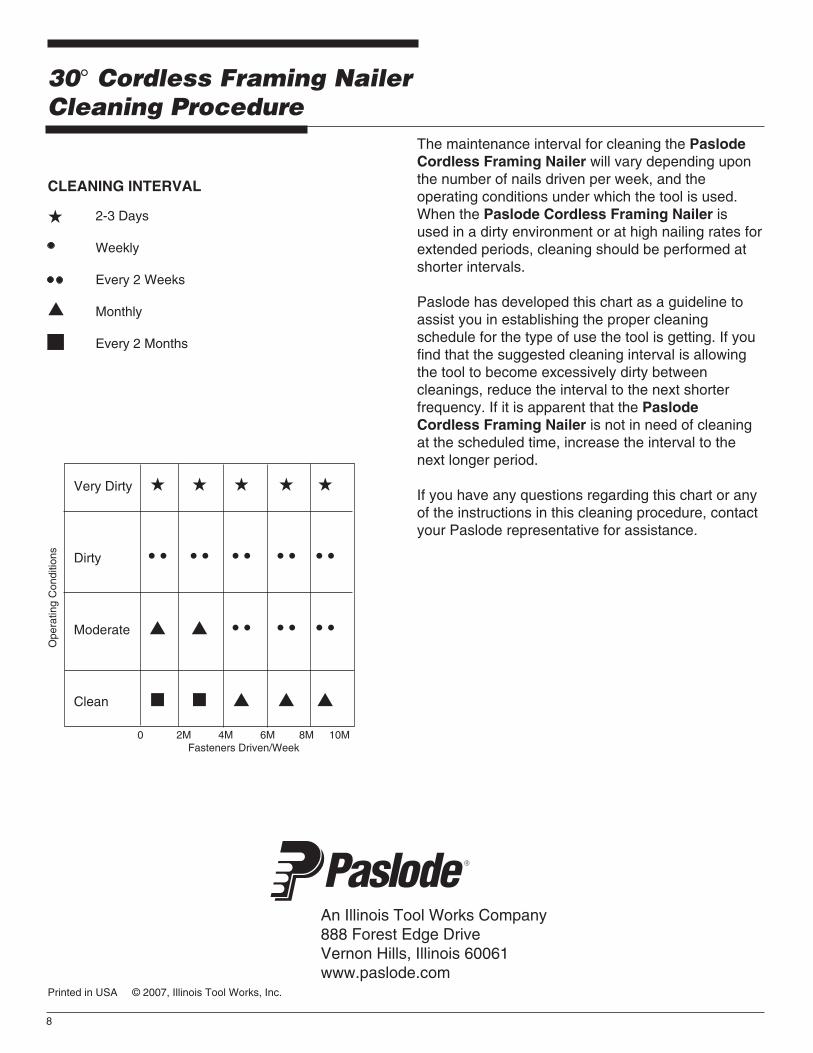
Very Dirty ★ ★ ★ ★ ★
Dirty • • • • • • • • • •
Moderate ▲ ▲ • • • • • •
Clean ■ ■ ▲ ▲ ▲
The maintenance interval for cleaning the PaslodeCordless Framing Nailer will vary depending uponthe number of nails driven per week, and theoperating conditions under which the tool is used.When the Paslode Cordless Framing Nailer isused in a dirty environment or at high nailing rates forextended periods, cleaning should be performed atshorter intervals.
Paslode has developed this chart as a guideline toassist you in establishing the proper cleaningschedule for the type of use the tool is getting. If youfind that the suggested cleaning interval is allowingthe tool to become excessively dirty betweencleanings, reduce the interval to the next shorterfrequency. If it is apparent that the PaslodeCordless Framing Nailer is not in need of cleaningat the scheduled time, increase the interval to thenext longer period.
If you have any questions regarding this chart or anyof the instructions in this cleaning procedure, contactyour Paslode representative for assistance.
30° Cordless Framing NailerCleaning Procedure
An Illinois Tool Works Company888 Forest Edge DriveVernon Hills, Illinois 60061www.paslode.com
CLEANING INTERVAL
2-3 Days
Weekly
Every 2 Weeks
Monthly
Every 2 Months
★
▲
Printed in USA © 2007, Illinois Tool Works, Inc.
P
0 2M 4M 6M 8M 10MFasteners Driven/Week
Ope
ratin
g C
ondi
tions

9
Clavadora Paslode 30°CordlessProcedimiento de limpieza
Este procedimiento representa una forma sencilla peroeficiente de limpiar su clavadora para que mantengaun funcionamiento confiable. La limpieza y lalubricación regulares de la clavadora tambiénprolongan la duración de las piezas que la forman ypermiten una máxima potencia para clavar.
Para poder limpiar su clavadora, sólo necesita unaherramienta, la llave Allen (llave de cabeza hexagonal)de 5/32 plg. que se entrega junto con su clavadoraImpulse®.
Paslode recomienda que use un limpiador en aerosol,tal como el "limpiador de seguridad" Paslode (No.219086). Este limpiador está disponible a través de surepresentante Paslode.
Si selecciona un tipo distinto de limpiador, asegúresede que no dañe el caucho. Los dos "O rings" queactúan como sellos en el área a limpiar son de caucho.Si el limpiador daña estos "O rings", la herramientapuede malograrse.
Aunque limpiadores de seguridad generalmentereducen el riesgo de fuego y son mas estable queotros limpiadores, no deben ser usados sin cuidaado.
Siempre sigua las instrucciones de la fabrica y no useel limpiador en la clavadora hasta que la herramientaeste enfriada.
Para comenzar, necesita lo siguiente:
Herramienta Limpiador Aceite lubricante Paslode®
Pieza N° 401482Pieza N° 219086Pieza N° 401331
5/32" Hex Key Wrench
1

10
Paso 3
Tire suavemente del mango y el mecanismo dealimentacion alejándolo del conjunto del motor ylevántelo hasta que el ventilador libre el conjunto dela cámara de combustión. PRECAUCION: Trabajecon cuidado para asegurarse de que el ventilador noraspe la cámara de combustión. Además, tengacuidado al colocar el conjunto del mango sobre lamesa de trabajo para que no se dañen las aspas delventilador ni se doble el eje del motor del ventilador.
Ahora ha separado la herramienta en las tresprincipales conjuntos que la forman, permitiendo elacceso a las áreas que requieren limpieza ylubricación periódicas.
PELIGROSe deben guitar todos los sujetadores, el cartucho de gas y tabatería antes de reparar la herramienta.
Paso 1
Usando la llave Allen de 5/32 plg. (#401331) quite elconjunto del mango y el mecanismo de alimentacion:destornille los dos tornillos de casquete de bocatubular #10-24 x 1-1/8 plg. y tire suavemente elconjunto del mango y el mecanismo de alimentacionalejándolo del conjunto del motor.
Paso 2
Quite la tapa y el filtro y destornille los cuatro tornillosde casquete de boca tubular #10-24.
PELIGRONunca se debe hacer funcionar la clavadora a menos que loscuatro tornillos de cabeza hueca estén apretados firmementeen la tapa del cilindro. Si no se observa esta advertencia,pueden ocasionarse daños a la herramienta, incendio yheridas personales.
Conjunto del mango y el mecanismo de alimentacion
2
Tornillos

11
Tapa del cilindro
Paso 1
Tome el "O-Ring" de la tapa del cilindro con losdedos pulgar e indice de una mano y saque el " O-Ring" de la ranura aplicando una ligera persión altirar de él.
Paso 2
Tome la parte que sobrsale del "O-Ring" con la otramano y sáquelo cuidadosamente del la ranura ypáselo sobre el ventilador. Limpie el "O-Ring" conun trozo del tela suave y sin borra. Aplique limpiadorde seguridad en la tela para quitar cualquie residuopegajoso que puede tener el "O-Ring".
Paso 3
Aplique limpiador de seguridad a la tapa delcilindro. Permita que se escurran la suciedad y losdepósitos. ¡NO PERMITA QUE EL LIMPIADORSUCIO SE META EN EL MANGO!
3

12
Paso 4
Limpie el limpiador o la suciedad que qieden con untrapo limpio y sin borra. Asegúrese de que la bujiade encendido y la ranura del "O-Ring" esténcompletamente limpios y sin depósitos. Repita elpaso 3 para eliminar cualquier depósito o residuoque aún estén presentes.
Paso 5
Vuelva a instalar el "O-Ring", y lubrique ligeramentecon aceite lubricante Paslode CordlessN° 401482. Asegúrese de aplicar el aceite lubricantede manera uniforme alrededor del "O-Ring".Coloque el conjunto de la tapa del cilindro y elmango a un lado.
Nota: El aceite lubricante Paslode Cordless estáespecialmente formulado para usarse con laclavadora. El uso de otros tipos de lubricantespuede causar una acumulación rápidade residuos de la combustión o la descomposturaprematura de las piezas.is
Tapa del cilindro
4

13
Paso 1
Oprima el conjunto del pistón hasta la posiciónabajo con el mango de un martillo o con un pedazolimpio de madera.
Paso 2
Aplique una buena cantidad de limpiador deseguridada dentro de la manga y de la cámara decombustión. Voltee hacia abajo el conjunto delmotor y permita que se escurran el exceso delimpiador y la suciedad.
Paso 3
Con un trapo limpie y sin borra, limpie el limpiador ola suciedad que aún queden. Repita el paso 2 paraquitar cualquier depósito o residuo.
Conjunto del motor
5

14
Conjunto del motor
Paso 4
Con el conjunto del motor hacia arriba, ponga entre4y 5 gotas de aceite lubricante en la manga (Area"A") y des 5 a 6 gotas en el labio inferior de lacámara de combustión (Area "B"). Gire elconjunto del motor mientras aplica las gotas deaceite para asegurarse de que el aceite se distribuyepor la camisa y el labio. Consulte la illustración delinterior del la herramienta, en la pagina 7.
Paso 5
Sostenga el conjunto del motor hacia arriba yoprima y suelte varias veces para permitir que elaceite se distribuye uniformemente per el labioinferior de la cámara de combustión.
Paso 6
Empuje con la mano la hoja del impulsador haciaarriba y hacia abajo para distribuir el aceiteuniformemente por la camisa.
6

15
Conjunto del motor
Paso 7
Incline el conjunto del motor y aplique entre 3 y 4gotas de aceite lubricante Paslode Cordlessuniformemente alrededor de la parte superior de lacamara de combustión (area "C"). Disperse elaceite con el dedo.
Paso 8
Vuelva a armar la clavadora siguiendo, enorden Inverso, los pasos del 1 al 3 en la página 2.
PELIGRO No trate de usar la clavadora menos que el conjunto de la tapa esté sujeto firmente al bastidor. Si usa la clavadora cuando el conjunto de la tapa esté suelto, o cuando no lo tenga instalado, los gases de combustión pueden escapar, la herramienta se puede dañar, puede causar daños a la propiedad y lesiones a quien la usa.
NOTA: Después de que haya vuelto a armarcompletamente laherramienta y de que hayaapretado todos los tornillos,compruebe si la herramientafunciona correctamente. Esposible que vea salir algo de humode los puertos de escape durantelos primeros ciclos, mientras sequema el exceso de aceite. Reviseel manual del propietario paraconsultar las instrucciones deavenias en la herramienta.
Camisa
Conjuntodel pistón
Areaintermedia
Cámarade combustión
7

16
El intervalo de mantenimiento para limpiar laclavadora Paslode Cordless varia dependiendo delnúmero de clavos instalados por semana y de lascondiciones de operación en las que se use laherramienta. Si usa la clavadora Paslode Cordlessen un ambiente sucio o durante largos períodos,debe limpiarla a intervalos más cortos.
Paslode desarrolló esta tabla como una guía paraayudarlo a establecer el programa de limpiezeapropiado según el uso que le dé a la herramienta.Si se da cuenta de que el intervalo de limpiezasugerido permite que la herramienta se ensuciedemasiado entre las limpiezas programadas,reduzca el intervalo a la frecuencia menor sugerida.Si es aparente que la clavadora Paslode Cordlessno necesita limpieza en el momento sugerido,aumente los intervalos al siguiente período.
Si tiene alguna pregunta con respecto a esta tabla oa cualquier instrucción en este procedimiento delimpieza, póngase en contacto con su representantede Paslode.
An Illinois Tool Works Company888 Forest Edge DriveVernon Hills, Illinois 60061www.paslode.com
Clavadora Paslode 30° CordlessProcedimiento de limpieza
Muy sucias ★ ★ ★ ★ ★
Sucias • • • • • • • • • •
Moderadas ▲ ▲ • • • • • •
Limpias ■ ■ ▲ ▲ ▲
INTERVALOS DE LIMPIEZA
2-3 Dias
Semanalmente
Cada 2 Semenas
Mensualmente
Cada 2 Meses
★
▲
P
0 2M 4M 6M 8M 10MSujetadores instalados por semana
Con
dici
ones
de
oper
ació
n