Embed Size (px)
Citation preview

3 Overview of BuildPlus
BuildPlus is used to build your system's configuration, graphics and databases into a Snapshot file that canbe viewed using the Hyperview browser, providing a read-only snapshot of your process control system.Once you have configured the first build for your system, you can rebuild very easily, and even run buildsautomatically from the command line.
3.1 Getting Started with BuildPlus
For information about installing DBDOC (including BuildPlus), see the DBDOC Installation and Setupsection of this manual.
3.1.1 DBDOC dongle
A USB dongle (security key) is required to run a build to completion with BuildPlus. A warning will appear ifthe dongle is not present when you start BuildPlus, and also if you get to the Hyperlink compile stage. Thebuild will not continue and run Hyperlink until the dongle is present.
Note:
As of DBDOC 11.0, new Sentinel dongles are required. The old MicroDog dongles used with earlierversions of DBDOC will not work and BuildPlus will just give the dongle not installed warnings shownhere.
The left-hand box will appear (probably twice), and after you click OK (enough times), the right-hand box willappear. Plug the dongle into your USB port, and click OK.
Please contact GMCL for assistance with dongle-related issues.
3.1.2 About your DBDOC license and computer key
On the Help menu, click DBDOC License or on the Tools menu, click DBDOC License....
96

3.2 Adding or changing license information
See Licensing DBDOC.
3.2.1 Opening BuildPlus
BuildPlus can be opened using the Start menu - under Programs look for a GMCL DBDOC folderand click BuildPlus.
•
BuildPlus can be opened from DBDOC program file, located by default at C:\Program Files(x86)\GMCL\DBDOC\Programs, with the file BuildPlus.exe.
•
If the project is already open in another copy of BuildPlus, the following dialog will appear. Once youclick OK, BuildPlus will start and allow you to open a different project.
•
97

3.2.2 About BuildRoots
Creating a BuildRoot actually creates a new working directory, where projects will be stored.
The first time BuildPlus is run, it will automatically ask you to create a BuildRoot. BuildPlus createsseveral fairly large working files, so put your BuildRoot on a disk with plenty of space.
•
On running BuildPlus for the first time, BuildPlus will suggest a BuildRoot for you –X:\DBDOC_BUILDS, where X: is the local disk with the most free space. You may also browse tochoose a different directory, or type in the directory of your choice.
•
The code page for the BuildRoot is the same encoding that is used for your INFI 90 files. The defaultalready selected is the code page your system uses, and is usually correct.
•
Clicking on the Options button allows you to change BuildRoot Options.•
Changing BuildRoot options
BuildRoot Options apply to all projects in the BuildRoot. (Global options apply to all projects on the buildcomputer, and Project Options apply only to the open project.)
Other than the Create BuildRoot dialog above, to access BuildRoot options, on the Tools menu click onBuildRoot Options.
98

Usually the default selections should be used. For information about each option, look in BuildPlus helpdocumentation under BuildRoot, changing options, and select the link for that option.
If a project has not been created yet, BuildPlus will launch the System File Specifications dialog. SeeDoing Your First Build to continue.
3.2.3 Getting Help with BuildPlus
There are many ways to access DBDOC help from BuildPlus.
Contacting GMCL
E-mail [email protected]
Phone 866 438-2101 Toll Free in North America
Phone (+1) 780 438-2101
Fax (+1) 780 437-3367
Web http://gmcl.comWe provide virtually 24x7 support coverage.
99

Choosing Help from the BuildPlus main menu
On the Help menu, click Contents to go to the contents (or first) page of the help file.•
On the Help menu, click Index to go to the index page of the help file.•
On the Help menu, click Search for Help on to go to the search page of the help file.•
On the Help menu, click Go to GMCL help website to launch your default browser and go to theHelp page on the GMCL website.
•
On the Help menu, click Display BuildPlus .nod file location... to display the location of crucialfiles pertaining to projects and BuildRoots. This is also the location of DBDOC_Components.txt,when the Tool Enumerate DBDOC Components is applied.
•
Using ? button on dialog boxes
At any time it is available, contextual help can be obtained by clicking on the ? box in the top right corner ofthe dialog box, and then clicking on the subject you are wondering about.
Using "What's This" from the toolbar
On the BuildPlus toolbar, click on , then click on the item you need help with.
3.2.4 About your DBDOC version
When contacting GMCL for assistance or updates, you may be asked for the versions of your DBDOCcomponents.
To find the BuildPlus version, on the Help menu, click About BuildPlus. This displays the currentversion of BuildPlus as well as the version of the currently installed kit.
•
To find other DBDOC component versions in the project directory, use the Tools menu to LaunchWindows Explorer to the project directory and open the file named DBDOC_Components.txt
•
To create a file listing all DBDOC components in the Application Data folder, on the Tools menu,click Enumerate DBDOC Components. This creates text file DBDOC_Components.txt in one of the
•
100

following locations:C:\Documents And Settings\All Users|Application Data\GMCL\Projects, for users who havewrite privileges to this location, or
♦
C:\Documents And Settings\<Local_Username>\Application Data\GMCL\Projects.♦
or equivalent directories depending on the operating system. The file lists the versions of all DBDOCprograms and any mismatches relative to the kit version of DBDOC installed.
101

3.3 Doing Your First Build
To configure your project in preparation for a build, the following steps will be completed:
Naming Your Project and Choosing Database Files to Build1. Choosing Configuration, Graphics and Other File Locations with the Configuration Wizard2. Changing Project Options, if desired3. Resolving any other questions asked by BuildPlus4.
3.3.1 Naming Your Project and Choosing Database and 800xA Files to Build In
The System File Specifications dialog is launched automatically for the first build.
At other times, it can be retrieved from the Build menu, by selecting System File Specifications, or by
clicking the button on the BuildPlus toolbar, to change the databases and/or 800xA graphics included inthe build.
At any time, contextual help can be obtained by clicking on the ? box in the top right corner of the dialog box,and then clicking on the subject you are wondering about.
Naming your project
In the System File Specifications dialog, enter a unique and meaningful name for your project (e.g. a fewwords that identify the function, location, plant or company).
Choosing database (and 800xA graphics) types
Check the boxes that apply to database (and 800xA graphics) types in your project:
Composer systems – .EBP databases•
102

Access .MDB databases – Process Portal B / Operate IT / Conductor NT systems / 800xA. (See alsoinstructions to extract an Operate IT Database for 800xA and for PPB)
•
Process Portal .XML Databases – for some Process Portal B systems• WinCAD/WinTools systems – .PTT Relational databases• Generic tag and trend databases: .DBF, .TTG, .TTR and .UCF, also OPC-90 .CSV, Citect ConsoleDatabases, plus any other database types that you can export into .DBF format.
•
S+, PI, generic - .XLS and .XLSX Excel Workbooks - This reads in data stored in spreadsheets,including OSISoft PI configuration documents and Symphony Plus graphics databases
•
800xA .AFW Backup Folders (non-ASSYST .AFW dir) - .AFW directories (VB Version 5 graphicshave file names starting with 0_) Contact GMCL for information about ASSYST extraction of yourgraphics. (See also instructions to extract 800xA VB graphics.)
•
800xA (ASSYST .png dir) - (directory that contains .png graphics files in folder AssystSnapshot) (Seealso Extracting 800xA graphics using the Assyst tools.)
•
ABB Function Code PDF Files (any form) can be built in by ensuring this box is checked.•
Specifying where to search for your database, 800xA graphics and Function Code files
(Note that the databases, graphics and function code files do not have to be located on the same computer,or on the build computer, and DBDOC access is read-only. But if you don't have access through a network tothe computer that contains the source files, you may have to copy them to your local computer. In this case,leave the directory structure the same. Use UNC naming convention when possible.)
Either: Enter the folder name in which the file(s) reside, and BuildPlus will find the files, or you may includethe name of the file.
Or: Click on Browse to select a directory or file. (This choice will be appended to the end of any search pathsalready entered.) You can Browse for the directory in which the database file(s) reside and BuildPlus will findthe files, or you may include the name of the database file.
Once a path has been entered, the drop-down arrow can be used to select the same location forother database types, or you can copy and paste from one box to another.
•
More than one path will be searched if multiple paths are listed for a database type, separated with a"|" character
•
After specifying the locations of your files, click Next so BuildPlus can find your files.
Selecting specific databases and 800xA graphics locations
The left panel displays "databases to select from"; all databases of the specified type found byBuildPlus in the specified search paths. If you wish to change the search path to find additionaldatabases, use the Back button.
•
The right panel displays "databases to be included in the build", including any database namesentered previously (provided they were located in the search). If only one database was found duringthe search, it will be automatically moved into the final list.
•
Move a database from one list to another by selecting it from the initial list and clicking the enabledAdd or Remove button as required. Using the CTRL or SHIFT key in combination with the mousecan make multiple database selections.
•
If a database has "Unimplemented Type" listed for the file size, BuildPlus has identified that it cannotprocess the file, and that file cannot be selected.
•
103

The Next/Finish button will be enabled when there is at least one database in the final list•
To proceed with the build without selecting any databases of a given type, use the checkbox Checkhere to continue without selecting any databases. You may also use the Back button to omit thattype of database from the build.
•
Composer EBP databases are each shown with a checkbox in the final selection list. Unchecking thebox means that databases extracted from EBP file will not be used or included in your finalSnapshot. Generally, you would only uncheck the EBP database if it is unused, obsolete or in someother way invalid, and a better database can be built in.
•
Locations of Function Code .pdf files are listed for information, and BuildPlus will select theappropriate files. To change which locations of Function Code .pdf files are included, use the Backbutton to the System File Specifications box, find your preferred file location and check the Redobox, then click Next to proceed.
•
System File(s) Chosen lists all your selections so far. If corrections need to be made, press the Back buttonto review the system file selection panels. Otherwise, press the Finish button to continue. After somedatabase processing, the Configuration Wizard dialog will appear.
3.3.2 Specifying Configuration, Graphics and Other Files with Configuration Wizard
For a new project, the Wizard is only accessible after the project name and databases have beenselected in the System File Specifications dialog.
•
Some Wizard selections may be made automatically based on Database types already chosen.• The Wizard only needs to be run once unless file selections need to be changed. To access Wizard
later to make changes, on the Build menu of BuildPlus, click Project Wizard, or click the button on the toolbar.
•
At any time, contextual help can be obtained by clicking on the ? box in the top right corner of thedialog box, and then clicking on the subject you are wondering about.
•
104

Within the Wizard,
Choose one configuration type with a round checkbox, or choose Other/None and select other typesof configuration documents: Batch (.b90), Ladder (.lad) or .AB and .RTU files.
•
Choose one type of SODG graphics with a round checkbox, or choose Other/No SODG Graphicsand specify S+/PGP, 800xA (ASSYST Files), 800xA PG2, 800xA VB, Process Portal B and/orConductor NT graphics as appropriate. (To ensure 800xA PG2 files are processed completely, theyshould be included in System File Specifications. (You may also choose a type of SODG graphicsplus 800xA, Conductor NT and/or Process Portal B graphics in the same build.)
•
As of DBDOC 10.7, you may specify a location for .jpg, .jpeg, .png, or .gif images to be included inS+ or PGP graphics. If your project already included S+/PGP graphics, a S+/PGP GraphicsDetected dialog may appear, allowing you to specify the location of these images. These selectionscan also be modified when rebuilding from Wizard.
•
Specify other file types to be included in the build by checking appropriate optional squarecheckboxes.
•
As of DBDOC 10.7, it is possible to have pdf files built-in for display within the Snapshot file. If yourproject previously included externally-linked pdf files, a PDF Documents Detected dialog mayappear, allowing you to build-in any or all of your folders of pdf files. These selections can also bemodified when rebuilding from Wizard.
•
If you have AutoCAD .PRO format files, check the box for AutoCAD (.DWG). The text box to theright of this will open, allowing you to enter .PRO.
•
ORCAD files saved with extension .dxf can be built in by selecting Exported CAD (.DXF only)• C-programs with a .txt etension can be included by selecting Text• Click Next to continue once all selections have been made.•
105
"Please specify the directory where most of your project source files are located, then press theApply button"
When most directory paths are empty, specifying one directory where most files are located, thenpressing Apply fills in all directory search paths with that one choice as a starting point
•
Otherwise, the Disable box should be checked.•
Entering paths to files
Enter the folder name in which the file(s) reside, and the wizard will find the files•
Once a path has been entered, the drop-down arrow can be used to select the same location forother files OR you can copy and paste from one box to another.
•
Browsing to choose paths
Clicking on Browse will bring up the Windows "Browse for Folder" dialog, where a directory can beselected, or a folder name can be copied in. This choice will be appended to the end of any searchpaths already entered.
•
Adding more than one path
More than one path will be searched if multiple paths are listed, separated with a "|" character•
Multiple paths can be quickly added by clicking the Browse button and selecting additional paths.•
Red arrow alert
When you see a red arrow there may be invalid path information, which must be corrected to proceed.
(If files are located on a remote machine you can't access, it may be necesary to copy them to your localcomputer. If you do, don't change the directory structure as it helps BuildPlus make some automaticassociations.)
When DECOMPOSER folders within the DBDOC_BUILDS directory are listed, they contain files•
106

created by DBDOC and should usually be left as the directory for Wizard to search.
The CAD user libraries are usually omitted. For Composer projects, BuildPlus extracts aMACROS.LBR file. To specify a different user library, uncheck this Omit checkbox. This allows youto build with what you consider to be the master copy. (WinCAD systems often have multiple copiesthat must eventually be consolidated and united.)
•
After specifying the locations of files on each page, click Next to have Wizard find your files.
Confirming File Selections
The left panel lists folders identifed within the specified directory which contain each file type, withthe currently selected folders highlighted. The right panel lists files contained in the last selectedfolder.
•
To assist with choosing files, the lists can be sorted alphabetically or numerically by directory name,size or date modified by clicking on each heading.
•
Using the CTRL or SHIFT key in combination with the mouse can make multiple file selections.• The Explore button opens the specified directory to view the folders and files within.• If the expected files aren't listed in the left panel, use Back to change where the Wizard should lookfor files, and ensure the Redo box is checked for a new Wizard search.
•
Checkbox Non-Optional: You should select an item. Otherwise, check box can be checked toskip certain files or groups. This is not a recommended practice since your build results may not bevalid.
•
Single MHD: Only one MHD has been selected, check to continue should be checked if you wishto proceed with only one module in the build.
•
To see which .ebp database file was used for extraction into each DECOMPOSER folder, move theuse over the name of the folder and a datatip will be displayed.
•
For unit console graphics, to see which console is involved with each EBYxxx.TMP folder, move theuse over the name of the folder and a datatip will be displayed.
•
After selections have been made, click Finish to proceed with the build.
The Run Project Options dialog may appear next, giving you an opportunity to change project•
107

options. Click Yes, edit settings now if you wish to build error files into your Snapshot and/or buildin settings for live data. (See below.) For information about other project options, see BuildPlusHelp:project options, changing. Click No to continue with the build using default project options.
108
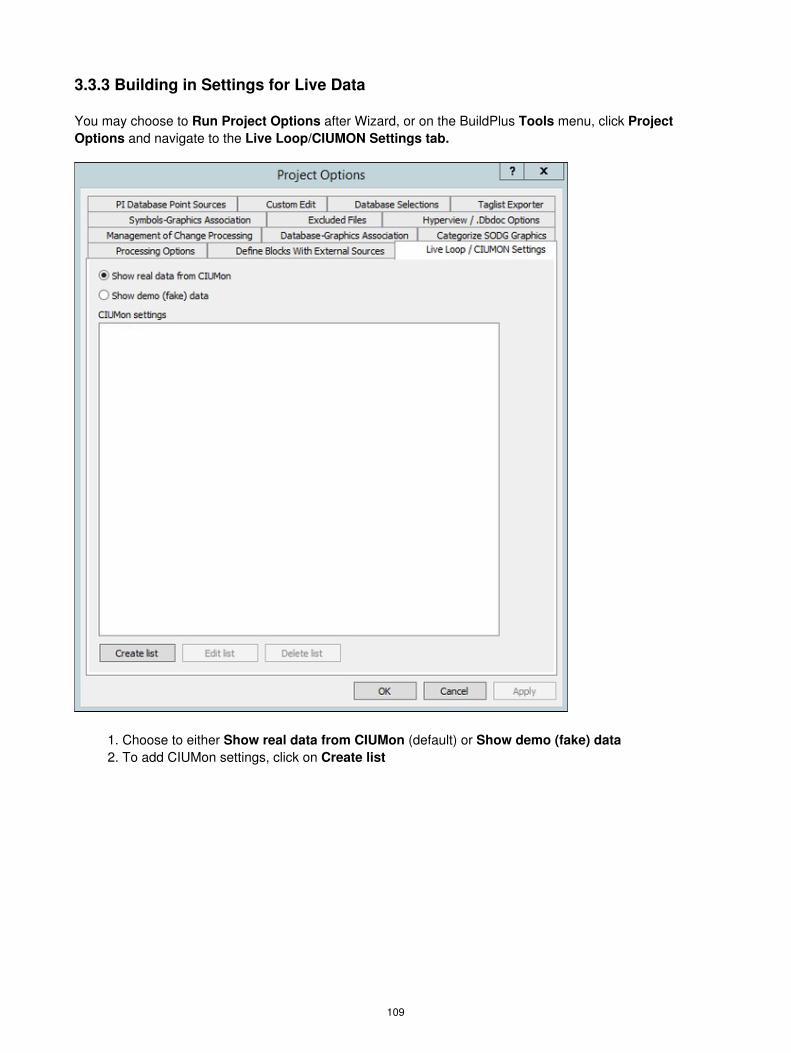
3.3.3 Building in Settings for Live Data
You may choose to Run Project Options after Wizard, or on the BuildPlus Tools menu, click ProjectOptions and navigate to the Live Loop/CIUMON Settings tab.
Choose to either Show real data from CIUMon (default) or Show demo (fake) data1. To add CIUMon settings, click on Create list2.
109
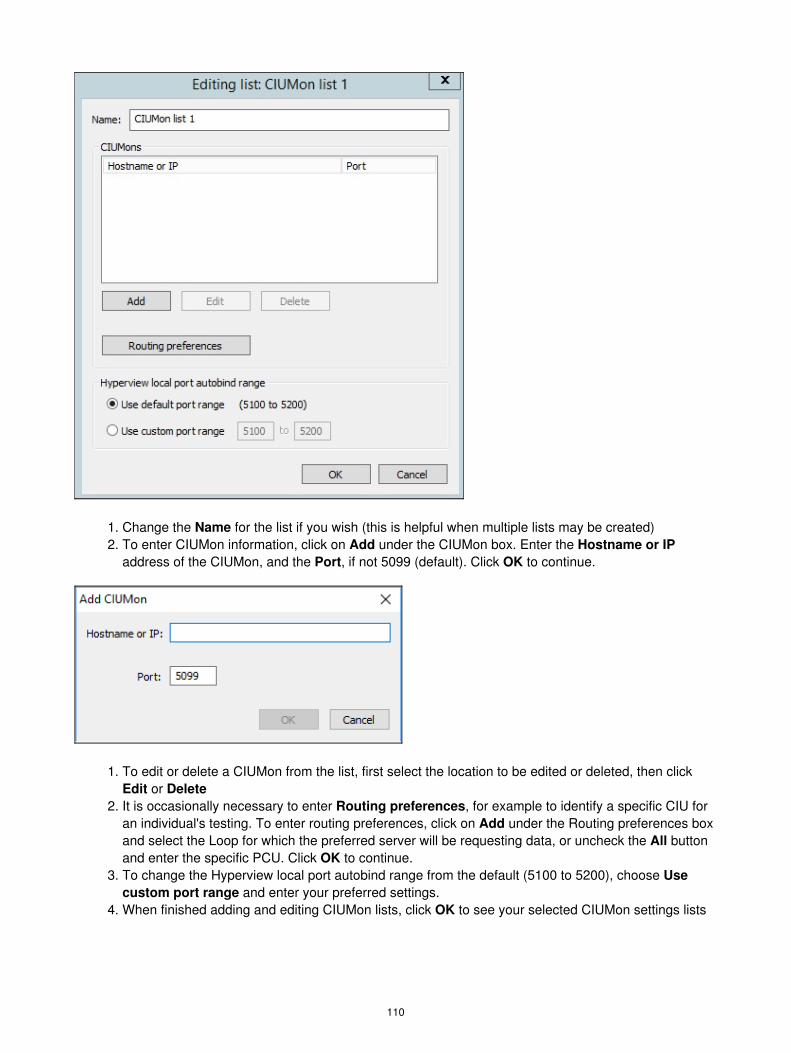
Change the Name for the list if you wish (this is helpful when multiple lists may be created)1. To enter CIUMon information, click on Add under the CIUMon box. Enter the Hostname or IPaddress of the CIUMon, and the Port, if not 5099 (default). Click OK to continue.
2.
To edit or delete a CIUMon from the list, first select the location to be edited or deleted, then clickEdit or Delete
1.
It is occasionally necessary to enter Routing preferences, for example to identify a specific CIU foran individual's testing. To enter routing preferences, click on Add under the Routing preferences boxand select the Loop for which the preferred server will be requesting data, or uncheck the All buttonand enter the specific PCU. Click OK to continue.
2.
To change the Hyperview local port autobind range from the default (5100 to 5200), choose Usecustom port range and enter your preferred settings.
3.
When finished adding and editing CIUMon lists, click OK to see your selected CIUMon settings lists4.
110

To create another list, click on Create list. To edit or delete a list, select the list, then Edit list orDelete list.
1.
Click on Apply if you wish to save your lists and chance other project options. Click on OK tocontinue.
2.
If you are adding CIUMon settings after a build is complete, choose OK in the CIUMon settingschanged dialog.
3.
111
3.3.4 Resolving Other BuildPlus Dialogs
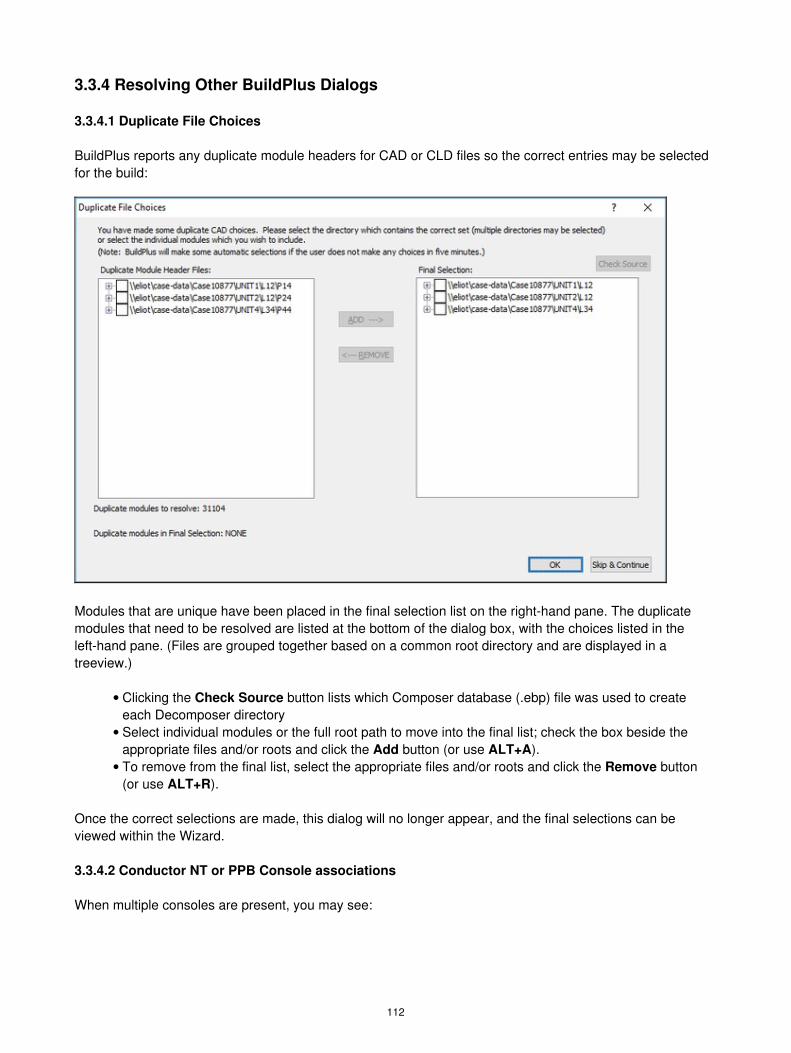
3.3.4.1 Duplicate File Choices
BuildPlus reports any duplicate module headers for CAD or CLD files so the correct entries may be selectedfor the build:
Modules that are unique have been placed in the final selection list on the right-hand pane. The duplicatemodules that need to be resolved are listed at the bottom of the dialog box, with the choices listed in theleft-hand pane. (Files are grouped together based on a common root directory and are displayed in atreeview.)
Clicking the Check Source button lists which Composer database (.ebp) file was used to createeach Decomposer directory
•
Select individual modules or the full root path to move into the final list; check the box beside theappropriate files and/or roots and click the Add button (or use ALT+A).
•
To remove from the final list, select the appropriate files and/or roots and click the Remove button(or use ALT+R).
•
Once the correct selections are made, this dialog will no longer appear, and the final selections can beviewed within the Wizard.
3.3.4.2 Conductor NT or PPB Console associations
When multiple consoles are present, you may see:
112

When you click OK you will have the chance to review and change associations made by BuildPlus. Tocheck associations at other times, on the Tools menu, click Conductor NT/PPB Console Associations.
In this dialog, BuildPlus presents a list of the consoles that were created for the project.
Check the boxes to choose which consoles to include in the build• Check the box to define an additional console if required.• If you click Skip and Continue, the build will continue without saving any of the changes so far.• Pressing the Cancel button will cause BuildPlus to exit out of the associations and stop the build.• Click Next to continue, to change a console name or change associations for a console.•
The Conductor NT/PPB Console Associations window will appear for the first console:
113

To change the console name from the default Console1, select the console name and enter a moremeaningful one. (Each console must have a unique name.)
To change Databases associated with this console, click Change Database Selections, and thedatabase selection window will appear:
In this window, BuildPlus presents all of the databases that are included in the project, along with databasesthat may have been extracted from the original choices (e.g. Relational .PTT, Composer .EBP). BuildPlus willalso show the number of records contained within each database. Select all databases required for theconsole; you may also select no databases if that is applicable for your case. Press OK when you aresatisfied with the selections.
114
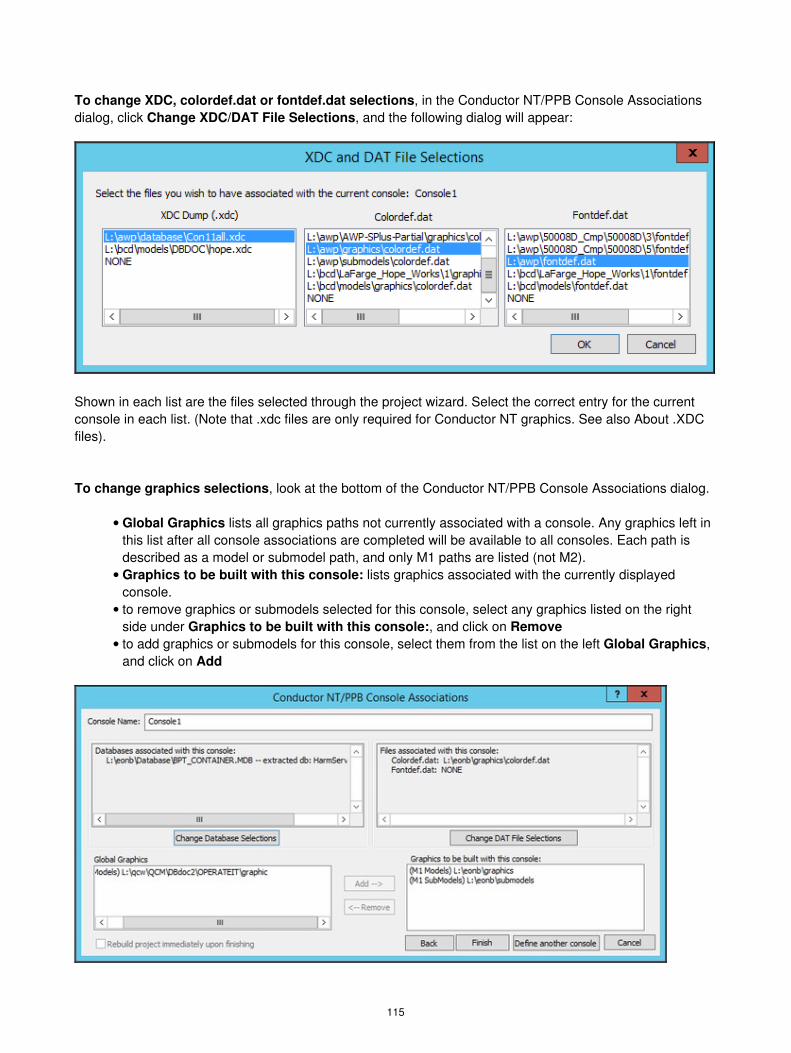
To change XDC, colordef.dat or fontdef.dat selections, in the Conductor NT/PPB Console Associationsdialog, click Change XDC/DAT File Selections, and the following dialog will appear:
Shown in each list are the files selected through the project wizard. Select the correct entry for the currentconsole in each list. (Note that .xdc files are only required for Conductor NT graphics. See also About .XDCfiles).
To change graphics selections, look at the bottom of the Conductor NT/PPB Console Associations dialog.
Global Graphics lists all graphics paths not currently associated with a console. Any graphics left inthis list after all console associations are completed will be available to all consoles. Each path isdescribed as a model or submodel path, and only M1 paths are listed (not M2).
•
Graphics to be built with this console: lists graphics associated with the currently displayedconsole.
•
to remove graphics or submodels selected for this console, select any graphics listed on the rightside under Graphics to be built with this console:, and click on Remove
•
to add graphics or submodels for this console, select them from the list on the left Global Graphics,and click on Add
•
115

Once the correct database, graphics, and other files are selected for the current console, click Next to moveonto the next console. Clicking on Back at any time allows you to check selections for a previous console.
On the last console to be defined, the button Define another console at the bottom of the association panelwill become available. Click this to create another console.
When these associations are done in-line with a build, the build with automatically continue on untilcompletion. If the console associations were triggered from the Tools menu option then on the last panel, theRebuild project immediately upon finishing checkbox will become enabled. If this is checked when youclick Finish, BuildPlus will immediately start the build of the project again to incorporate any changes thatmay have been made in the associations. If this option is left unchecked, any changes made will not be seenin the Snapshot until the next time the you build the project.
3.3.4.3 Symbols-Graphics Association
This dialog may appear during the build if automatic associations cannot be made, or
On the Tools menu, click Project Options and navigate to the Symbols-Graphics Association tab.
When a build contains multiple SODG graphics and symbols directories, it may be necessary tospecify which set(s) of symbols to use for each graphics directory. This tool allows you to check andchange any automatic associations that BuildPlus has made or to make manual associations.
•
Launch Windows Explorer button: If you want to check out what graphics are contained in a particularfolder, select the path from the list and click the button. A Windows Explorer window will be launched,
116

automatically opened to the folder in question.
The Skip and Continue button will only appear if this option was launched during an in-line build. Pressingthis button will tell BuildPlus to discard any changes the user has made and continue on with the build. TheCancel button will exit the dialog and stop the build.
To see all of the manual user associations and automatic BuildPlus associations, select Tools | ProjectOptions from the menu and click on the Symbols-Graphics Associations tab. If you make changes to theassociations, rebuild the project after closing the Project Options to see your changes in the Snapshot. Theassociations are stored in the registry for future builds.
117

3.3.4.4 Database-Graphics Association
This dialog may appear during the build if associations cannot be made using console.cfg files, or
On the Tools menu, click Project Options and navigate to the Database-Graphics Association tab, byclicking on the tab or using Alt D.
Any graphics or symbol paths that require association appear in the Graphics Path list at the top of thedialog. Symbols paths will be prefaced by "(Symbols)".
To associate databases with a graphics path:
Click on a graphics path in the Graphics Path list to select it.1. Select the correct tag and trend databases in the Tag Database and Trend Database lists. Multipletag database selections can be made (click-and-drag, CTRL or SHIFT with mouse click) but only onetrend database selection.
2.
Modify the "Description" (optional) for the Table of Contents entry in the finished Snapshot.3. Click Add to List.4.
To view an existing association:
118

Expand the entry for the graphics path in the Final Selections list.•
To edit an existing association:
Select the graphics path in the Final Selections list.1. Click Edit Selection.2. Make the changes.3. Click Add to List.4.
Note that if this dialog was automatically launched during a build, it will time-out after 5 minutes of inactivityand
Any user made associations in the final list will be retrieved and stored to the registry.1. Any graphics paths left unassociated at the timeout will have some automatic associations made:
If a path was originally matched up with a console.cfg file, then the databases listed in thefile will be used.
1.
If it is a symbols path, BuildPlus will look for a graphics path that uses that symbols path anduse the databases specified for the graphics path.
2.
If it is a GLOBAL graphics path, BuildPlus will use databases in a console.cfg file that is inthe same directory path as the global graphics.
3.
Use the first valid pair of tag and/or trend databases listed in the console.cfg files or the usermade associations.
4.
Use the largest tag and/or trend databases that have been built.5.
2.
A message will displayed in the main message window stating that default associations have beenmade and the associations will be shown for the graphics paths that were done automatically.
3.
3.3.4.5 Database Selections - Changing included databases
This dialog may appear during the build if there are multiple tag and/or trend lists, or
On the Tools menu, click Project Options and navigate to the Database Selections tab.
119

Check those databases that you wish to have included in your build and deselect those that are not relevantto your build.
Check the Don't show this during the build again box to prevent the appearance of this dialog.
120

3.4 After Your First Build
Each time a project is successfully built, you will have
A DBDOC file, which will open automatically using the Hyperview browser• Build reports or error files• Other project files•
3.4.1 About Your DBDOC File
A project file is created from each successful build, and can be opened with DBDOC Hyperview.
To open a Snapshot file from BuildPlus, on the Build menu, click View .DBDOC Document, or click the
button on the Toolbar.
If there is only one Snapshot, Hyperview is launched to display it, or• A list of Snapshot files is displayed for the current project. When one Snapshot file is selected,Hyperview is launched to display it.
•
If you do not have a project open in BuildPlus, this option will be unavailable.•
Alternatively, on the Tools menu, select Launch Hyperview
Hyperview will open the most recent Snapshot file, whether or not a project is open.•
For more information, please refer to the Hyperview Browser section of this manual.
To share Hyperview and the project file over a network refer to the DBDOC Installation and Setup section ofthis manual.
A number of options are available within BuildPlus related to Snapshot files, as listed below:
3.4.1.1 Changing how the Snapshot file will be named (BuildRoot option)
On the Tools menu, click Build Root Options.
121

Automatic rename of SNAPSHOT.DBDOC
When unchecked, the file will be named SNAPSHOT.DBDOC. When checked, the Snapshot file will beautomatically renamed at the end of the build so that it will not be overwritten by future builds. The default isto rename it <Project_name>_<Build_date>.DBDOC.
Omit Project Name (use build date only): With the main renaming option checked, you can choose to leaveoff the <project_name> and use the date for the *.DBDOC name.
Use Hyperlink version in name: If you are building with different versions of the DBDOC programs, youmay want to indicate in the Snapshot filename which version of Hyperlink was used to build it. This will helpto clarify which features/fixes were built into that Snapshot when switching between different Hyperlinkversions.
Select the date format: This option changes the date format used when creating Snapshot file names.
Default: automatic rename on, with project name and build date but no Hyperlink version
3.4.1.2 Choosing locations for copying the Snapshot after the build
On the Tools menu, click Project Options and navigate to the Processing Options tab.
Copy the final Snapshot to the following location
122

At the completion of a successful build, BuildPlus can automatically transfer a copy of the newly builtSnapshot to locations of your choice. Click Browse to add each destination directory. To remove adestination, select it from the list, then click Delete.
3.4.1.3 Renaming a Snapshot from BuildPlus
On the Tools menu, click Rename .DBDOC/.M14 Document.
Existing Snapshot files are listed at the top. Choose the file you wish to rename by clicking it, and makechanges to the name in the bottom box.
It is recommended that you use this tool when you rename Snapshot files, so that the associated files(including Management of Change and error files) will be updated to refer to the new name.
3.4.2 Launching Windows Explorer to Your Project Files
To access these files from BuildPlus:
On the Tools menu, click Launch Windows Explorer.•
This will launch Windows Explorer in your project directory, if you have a project open. If no project isopen, the directory containing DBDOC_Builds will be opened.
To find the most recent .ERR files, open the ERROR_Files folder, then the MOST RECENT folder.•
3.4.3 Help with Error Files
After a build, open your ERROR_FILES folder, then MOST RECENT.
For assistance understanding your build reports, please email the error.7z file to GMCL for analysis.
123

If you have any questions, please don't hesitate to contact us!
Email: [email protected] Toll Free: 1-866-438-2101 in U.S. and Canada Phone: +1 780 438 2101 outsideU.S. and Canada
3.4.4 Sending an Error.7z File to GMCL
After completing a new build, you can email us your zipped files - we'll interpret the files and let you know ifDBDOC has identified any potential problems in your system. Since we are constantly refining andexpanding DBDOC's error checking capabilities, we strongly encourage our clients to send us a file at leastonce a year. The lastest DBDOC can detect system issues undetectable with earlier versions, and notchecked by ABB tools.
After a build, launch BuildPlus, and follow the following steps:
On the Tools menu, choose Launch Windows Explorer.• In the ERROR_FILES folder, find "error.7z".• Attach the file to an email and send it to [email protected]•
3.4.5 Exiting BuildPlus
On the File menu, click Exit. You can also click the Close button (X) in the upper right-hand corner of thewindow.
If a build is underway, an Exit Query will appear, and you can choose if you wish to exit or let the build finish.
3.5 Rebuilding
You may choose to rebuild your project
when you know your files have been modified• to change the data files you build in• after a DBDOC update, or with new versions of some DBDOC components• with different BuildPlus options• regularly, using scheduled builds•
To prevent multiple simultaneous builds of the same project, you may see the following dialog when youopen BuildPlus to rebuild. Click OK, then find the original BuildPlus window or open a new project.
After rebuilding, you may want to compare builds to see the effects of the changes. This can be done using
124

Winmerge, as described below.
3.5.1 When your files have been modified
When you want to rebuild your project just click the Build button and BuildPlus will detect any changesin your databases and find any new files in your existing search directories.
If new module header files and CAD or CLD files are detected, they will be listed for you and you will beasked if you wish to include them in your present build.
All new files/folders will be automatically checked for inclusion in the build. Uncheck the box to the left of theselection to exclude them from the build.
If no action is taken within five minutes, all newly found modules folders will be automatically included in thebuild. For new CAD or CLD modules, BuildPlus will again check for any duplicate module headers that mayconflict with previous module choices and ask that they be resolved before the build continues.
BuildPlus will also check for new graphics folders. If new files or folders are detected, they will be listed foryou and you will be asked if you wish to include them in your present build.
125

All new files/folders will be automatically checked for inclusion in the build. Uncheck the box to the left of theselection to exclude it from the build.
If no action is taken within five minutes, all newly found graphics folders will be automatically included in thebuild. If you wish to make changes to your MHD or SODG graphics selections after finishing theAuto-Detection process, you will need to restart the build from the Wizard stage.
When new 800xA folders have been extracted, you may choose to include them in the build and whetherthey are graphics or submodels:
126

The top window lists any 800xA folders found, that need to be categorized as graphics or submodels. Thebottom two windows list BuildPlus automatic choices about graphics and submodels folders.
To modify the choices in the lower two boxes, select a folder by clicking on it, and click Remove tomove it temporarily to the top box.
•
To move a folder from the top box, select it, then you may Explore to the source of the folder, orAdd as a Graphic or Add as a Submodel.
•
This box will time out after 5 minutes of inactivity, and proceed with the build. 800xA folders may be selectedor deselected later using Project Wizard.
3.5.2 Changing Your Data File Sources
To modify your database selections or the location of database or 800xA graphics files, use the GO button
on the toolbar or System File Specification under the Build menu.
To change or add other files that you have chosen to include in your build, use the Wizard button onthe toolbar or Project Wizard under the Build menu.
If your data files have been moved to a new computer, go to the Tools menu, and choose Revise SourceLocations...
Choosing to Revise Source Locations opens a dialog listing the current (original) paths to each of your filetypes.
127

To change the location of one file type, click on the path, then choose Modify. This opens the New SourcePath dialog where you can enter the new source path, or browse to it, then choose OK. Once a newsource path is specified, it is added to the drop-down list in case you'd like to use it for another pathreplacement. To change the locations of all file types, right-click on one path, and choose to Select all, andModify. The New Source Path dialog will open, attempting to list the common prefix of the path to bereplaced. If all paths are to be replaced with the new source path specified, you may check the box Replacethe entire path with this one. Once some changes have been initiated, they are listed under New Path, withgreen text for valid paths and red for paths that do not exist. To remove entries in the New Path column,select those paths then click Clear Changes and to keep all new paths, click Apply to apply the changes.
3.5.3 After a DBDOC Update
To rebuild when you have received newer versions of DBDOC program components, on the Build menu,
click Build, or click the button on the toolbar. This starts a complete build of your project, withoutchanging any of the files or options already selected.
3.5.4 Changing Options
Within BuildPlus, there are
Project options, that are applied to the current project;• BuildRoot options, that apply to all the projects in the BuildRoot, and• Global options, that apply to all projects in all BuildRoots.•
Each set of options can be accessed from BuildPlus under the Tools menu. For more information seeBuildPlus help.
128

3.5.5 Scheduled Builds
Running scheduled builds allows builds to occur during your off hours. Automated builds on a regular basisensure that the most recent files are included. Interactive message boxes are suppressed on scheduledbuilds and files are cleaned up automatically. To learn about scheduled builds, see BuildPlus Help or contactGMCL.
3.5.6 Command line builds
To learn about building from the command line, see BuildPlus Help or contact GMCL.
3.5.7 Comparing Build Results with Winmerge
WinMerge is an open-source tool that allows you to specify two files or two directories and do a byte-for-bytefile comparison. The result of the comparison is displayed in a window, showing you any changes that mayexist between the two files or directories. This is a useful tool to compare differences in your error filesbetween builds.
If you have WinMerge installed on your computer, BuildPlus will enable this option for you. You are given thechoice to either Compare Files or Compare Directories. In either case, a dialog will appear where you caneither type in or browse for the appropriate files/directories for comparison.
Note: Earlier versions of BuildPlus use WinDiff instead of WinMerge.
To compare files, on the Tools menu, select Compare with WinMerge and click Compare Files.•
(The default selections are the DBDOC_SUMMARY.ERR files of the two most recent builds.) For each fileyou wish to compare, click Browse, navigate to the file, and click OK. Once both file paths have beenentered, click OK. This will launch WinMerge to show differences between the files.
To compare directories, on the Tools menu, select Compare with WinMerge and click CompareDirectories.
•
(The default selections are the error file folders for the two most recent successful builds.) For each directoryyou wish to compare, click Browse, navigate to the folder, and click OK. Once both directory paths havebeen entered, click OK. This will launch WinMerge and show which files are different within this folder.Double-clicking on the file name will show the differences within individual files.
3.6 More About BuildPlus
3.6.1 Opening a recent project
On the File menu, click Recent Projects
This lists your 20 most recent projects, so you can click on your project name.
Note that when BuildPlus starts, it opens the last project you had open. If you only have one project, it willalways be opened automatically.
129

3.6.2 Renaming a project
On the Tools menu, click Rename Current Project.
This allows you to rename the current project, and move it to a different build root if you choose.
Enter the changed name and build root (the same or different) for the project. The current build root will beselected when the window opens.
A project can also be renamed by pressing the GO button and in the System File Specificationdialog type in the new name of the project in the Enter name of the project edit box. Click the Nextbutton (or Finish, if applicable) when you are satisfied with your new name. You will then see thefollowing dialog: To rename the project, select I want to rename my existing project to the newname I entered and click OK.
•
3.6.3 Moving a project
On the Tools menu, click Move Current Project.
This allows you to move the current project to a different build root, and rename it if you choose.
130
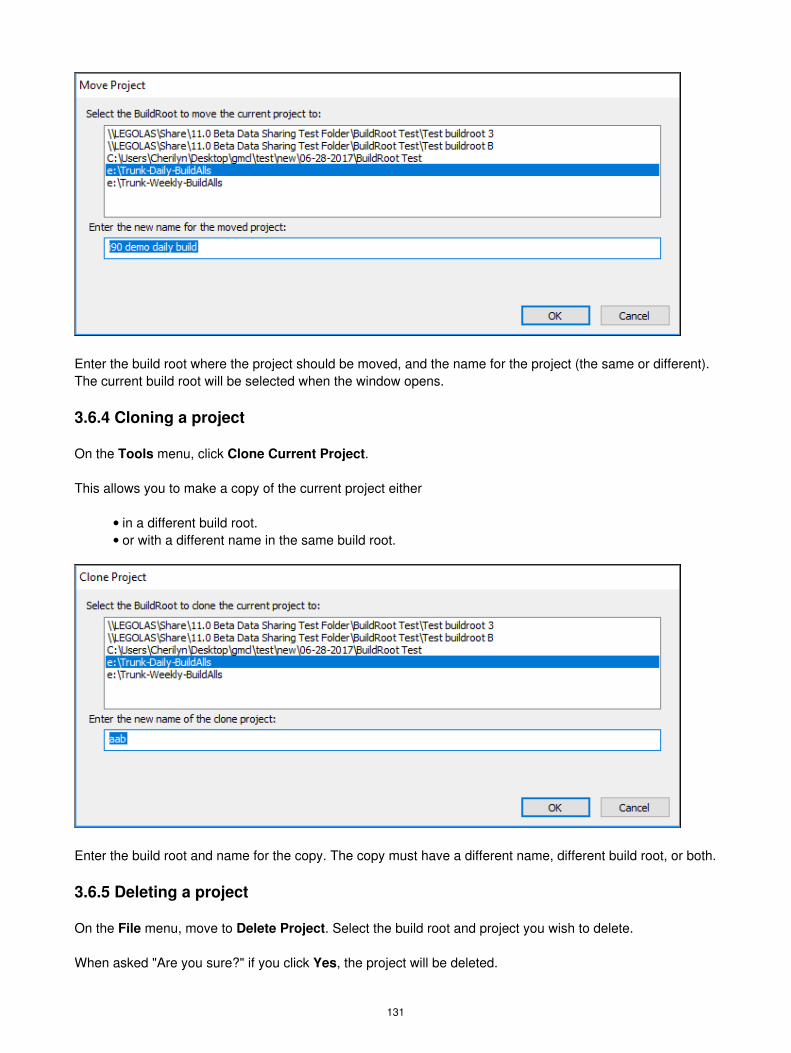
Enter the build root where the project should be moved, and the name for the project (the same or different).The current build root will be selected when the window opens.
3.6.4 Cloning a project
On the Tools menu, click Clone Current Project.
This allows you to make a copy of the current project either
in a different build root.• or with a different name in the same build root.•
Enter the build root and name for the copy. The copy must have a different name, different build root, or both.
3.6.5 Deleting a project
On the File menu, move to Delete Project. Select the build root and project you wish to delete.
When asked "Are you sure?" if you click Yes, the project will be deleted.
131

Most of the files created by BuildPlus will be deleted, and the project will be removed from the BuildPlusmenu. A message will appear in BuildPlus advising you to manually delete the project folder and remainingfiles.
3.6.6 Exporting a project
On the Tools menu, click Export Project.
This option allows you to export the current project so it can be imported into another installation ofBuildPlus, for example on another computer.
A BuildPlus import file (.bpi) is created for the current project. The import file will be named <projectname>.bpi and it will be created in the project's working folder.
This works best if the search paths used when creating the project were in UNC form (eg\\datacomputer\sharedfolder), so that the other installation will be able to find the files, even if you import theproject on another computer. (A message will appear explaining this the first time you export a project.)
3.6.7 Importing a project
On the Tools menu, click Import Project.
This option creates a new project from a BuildPlus import file (.bpi), as created with Export Project.
You will need to enter the location of the import file, the build root to create the project in, and a name for theproject.
If the project that was exported used UNC paths (eg \\datacomputer\sharedfolder), then you should be ableto build the new project without any problems by opening it and clicking the Build button.
3.6.8 Reverting to a previous build
On the Tools menu, click Revert to a Previous Build.
This allows you to load file choices and project options used in a previous build.
Choosing one of the folders named <project name_date> allows BuildPlus to find the <project_name>.nodfile within that folder, and revert the project to file choices and project options from that date.
132

BuildPlus will find the .nod file within that folder (or notify you if it doesn't exist).
3.6.9 Cleaning up temporary/intermediate files
By default, BuildPlus deletes temporary, intermediate files at the completion of each build.
To change this default setting, you can choose whether to automatically clean up temporary files forall projects in a build root: On the Tools menu, click Build Root Options, and select Automaticallyclean up files upon completion of build. When this option is on, BuildPlus deletes temporary filesautomatically when the build finishes. If this option is off, BuildPlus will ask whether to delete the filesafter each build.
•
If files were not cleaned up by default, you can clean up temporary/intermediate files for the current
project: On the Build menu, click Clean Intermediate Files, or click the button on the toolbar.This deletes temporary files that are not needed after the DBDOC build is complete. (Typically, thetemporary files will exceed the size of the Snapshot file, so this is worthwhile.)
•
3.6.10 Sibling Projects
If you have more than one project in a BuildRoot, the Sibling Projects dialog may appear, where you canselect related projects to check their databases for additional sources for tags.
133

Check or uncheck the boxes beside the project names to include or exclude those projects as sibling projectsfor future builds of the current project.
If you prefer to no longer be asked about sibling projects during a build, check the box for Don't show thisagain. To change sibling project choices at another time, on the Tools menu, click Project Options andnavigate to the Define Blocks With External Sources tab. More information is also available in BuildPlushelp documentation at Sibling Projects (Global option).
3.6.11 BuildPlus User Interface
BuildPlus has two sub windows:
The Main Message Window (usually on top): Displays information about processes BuildPlus isexecuting or has just completed and any errors that may have occurred. Text appearing in red mayindicate problems with the build.
•
The Sub-Process Message Window (usually on the bottom): Displays the messages generated byan external program that has been launched by BuildPlus.
•
134

To change how the windows are displayed, click on: Window on the BuildPlus main menu. To reopen aclosed or minized window, click on: View on the BuildPlus main menu. Your settings (viewing preference,size and position) are stored in the registry for the next time BuildPlus is opened.
The BuildPlus status bar shows basic information about what BuildPlus is doing:
BP Active: BuildPlus is running an internal process.• EXT Active: BuildPlus is running an external process.•
135