Embed Size (px)
Citation preview

1Ukraine ‘43 — 2nd Edition
© 2015 GMT Games, LLC
RULES OF PLAY
© 2015 GMT Games, LLC • P.O. Box 1308, Hanford, CA 93232-1308 • www.GMTGames.com
Living Rules 7-4-15
1. Introduction ......................................................... 2 2. Contents .............................................................. 2 3. Sequence of Play ................................................. 3 4. Stacking ............................................................... 4 5. Movement ........................................................... 4 6. Zones of Control ................................................. 6 7. ZOC Bonds ......................................................... 6 8. Combat ................................................................ 7 9. Combat Modifiers ............................................... 7 10. Combat Results ................................................... 9 11. Determined Defense ............................................ 9 12. Retreats ............................................................... 10 13. Disruption and Recovery .................................... 11 14. Advance After Combat ....................................... 11 15. Mobile Assaults ................................................... 12 16. Supply and Isolation ........................................... 13 17. Railheads and Railroad Repair ............................ 14 18. Soviet Artillery Divisions ................................... 14
19. Fortifications ....................................................... 15 20. German Security Divisions ................................. 15 21. Leader Units ........................................................ 15 22. Soviet Tank and Shock Armies ........................... 16 23. Reinforcements and Replacements ..................... 16 24. Off Map Boxes & Central Front ......................... 17 25. VPs and Automatic Victory................................. 18 26. The Weather Table .............................................. 18 27. Disengagement .................................................... 18 28. Soviet Airborne Brigades .................................... 19 S1. Scenario #1: Zhukov’s Assault............................ 19 S2. Scenario #2: Scorched Earth ............................... 19 S3. Scenario #3: Crisis on the Dnieper ..................... 20 S4. Scenario #4: The Campaign Game ..................... 20 Designer’s Notes & Hints on Play ............................. 21 Extended Example of Play ......................................... 22 Counter scans ............................................................. 26 Index .......................................................................... 27
TABLE OF CONTENTS
2N D EDITION

2 Ukraine ‘43 — 2nd Edition
© 2015 GMT Games, LLC
2.3 The Counters(2.3.1) How to Read the Combat UnitsAttack Strength: The strength of the unit when attacking.Defense Strength: The strength of the unit when defending.Movement Allowance (MA): Is the maximum number of Movement Points (MPs) the unit may expend for movement and still attack in the Combat Phase.Unit I.D.: The actual name or number of the unit.Troop Quality (TQ): Units with their Defense Strength in a red box are Elite. Those with their Defense Strength in a white box are of Low quality. All others are normal. This rating is used for the following purposes:• For the TQ Shift on the Combat Result Table (9.4).• As a DRM on the Determined Defense Table (11.0).• As a DRM in a Combat Zone Recovery die roll (13.3.2)Support Units: Units with a line along the edge of their counter are considered Support Units. Support Units have no ZOC (6.1) and one of these units may stack for free in each hex (4.2).
See this
Think this
1. INTRODUCTIONUkraine ’43 is a game covering events in southern Russia from August to October, 1943. One player controls the German and Axis forces, the other the Soviet forces. Each player attempts to take and hold territorial objectives and to destroy the opposing enemy forces.2ND EDITION NOTE: While there are many similarities to the 1st edition, this 2nd edition is an entirely new game.
2. CONTENTS2.1 InventoryA complete game of Ukraine ‘43 contains the following:• 2 Maps• 2 Counter sheets• This rule booklet• Two 6-sided dice• 2 identical CRT/TEC Player Aid cards• 3 Axis/Soviet At Start cards
2.2 The Map(2.2.1) Scale and Terrain: Each hex represents an area approxi-mately 10 miles across. Consult the Terrain Effects Chart (TEC) for a complete list of the map’s terrain and how it affects movement and combat. (2.2.2) Rivers Inside Hexes: Ignore rivers that flow through the middle of a City or Marsh hex. The importance of the river as a barrier to movement and an aid to defense has been mitigated by the surrounding terrain.
Unit SizeUnit I.D.
Attack Strength
Set Up InformationUnit TypeMovement Allowance(MA)
Defense Strength
Defense Strength in a red box indi-cates an Elite Unit (2.3.1 & 9.4)
Sample Combat Unit
Unit I.D.Outline around
counter indicates unit is a Support
Unit (2.3.1).
Yellow indicates Tiger tanks
(9.2.4)
The Großdeutschland Division is an elite unit with Tiger tanks
Turn of Arrival and Map Edge (23.1)SilhouetteMovement Allow-anceAssault Gun
Indicator (9.2.5)
Sample Support Unit
Yellow box indi-cates unit provides
a column Shift to the CRT
White box indicates an “At Start” unit.Black box MA indicates the unit may not use Ex-tended Movement (5.3).
Sample Artillery Division
Leader Units
Range of Leader’s SpecialAbility (21.3.2)
Sample Soviet Tank Army HQ
Sample GermanPanzergrenadier Division
Out ofSupply (16.1)
Isolated(16.5)
Weather(26.1)
Track Markers
VictoryPoints(25.1)
Game Turn
Full Retreat (13.3)
Disrupted(13.1)
RailMovement
(5.6)
Automatic DS
(5.7)
Fortifica-tion (19.1)
Railhead(17.3)
Control(16.3.2)
Sample Markers
Tiger Units
Leader’s NameMovementAllowance
Triangle indicates unit starts at reduced strength.

3Ukraine ‘43 — 2nd Edition
© 2015 GMT Games, LLC
(2.3.2) Unit SizeII = Battalion X = Brigade XXXX = ArmyIII = Regiment XX = Division
(2.3.3) Summary of Unit Types: All units are either Mechanized or non-Mechanized. This is important for determining the cost to move into each hex. Non-Mechanized Mechanized Infantry† Tank/Panzer • Security† Soviet Mechanized • Jäger Infantry† German Panzergrenadier • • Airborne Infantry† Artillery Mountain Infantry† Army HQ Fortified Regions† T-34 • Cavalry KV-1 • Tiger I • Sturmgeschütz • SU-100 •
†=Infantry Type • = Tank units (9.2.1) • = Assault Gun units (9.2.5) • • = see 23.2.2 (German Panzergrenadier)Tank and Assault Gun units are collectively called Armored Type.
(2.3.4) Unit Colors: The background color of a unit denotes its nationality or branch of service.• Light Brown . . . . Soviet regular army and air force• Dark Brown . . . . . Czechoslovakian• Red . . . . . . . . . . . Soviet Guards• Gray . . . . . . . . . . . German Wehrmacht• Dark Gray . . . . . . German SS• Medium Blue . . . . German Luftwaffe• Medium Green . . Romanian• Light Green . . . . . Hungarian• Dark Blue . . . . . . Slovakian• Yellow Ocher . . . . Turks
(2.3.5) Steps: Units have either 1, 2 or 3 steps. Three step units are indicated with a thin stripe across the reverse side of their counter (units on their last step are indicated with a much thicker stripe). When a 3-step unit takes a second step loss it is replaced with a Remnant (10.4, 23.2.2) of the appropriate type.
Shown above are the three steps of the 7th Panzer Division and the two steps of the 167th Infantry Division.
2.4 AcronymsThe following acronyms are used in these rules:CRT: Combat Result TableDRM: Die Roll ModifierEZOC: Enemy Zone of ControlLOS: Line of SupplyMA: Movement AllowanceMPs: Movement PointsOOS: Out of SupplyTEC: Terrain Effects ChartVP: Victory PointZOC: Zone of Control
3. SEQUENCE OF PLAY OUTLINEUkraine ’43 is played in Game Turns. A Game Turn is composed of two Player Turns. Each Player Turn is subdivided into several Phases. Each Game Turn is played in the following order:
A. WEATHER PHASEEach Turn one player rolls a single die and consults the Weather Table to determine the weather for that Game Turn and the number of Air Units each side receives (26.0). At this time the Manstein and Zhukov leader counters are flipped to their Ready side if not already.
B. SOVIET PLAYER TURN1. INITIAL PHASEThe following activities are performed in any order:• The Soviet player places his Reinforcements on friendly controlled
Entry Hexes (23.1).• The Soviet player uses his Replacements to restore units (23.2).• The Soviet player may flip up to three Artillery Divisions to their
Ready side (18.4). Alternatively, for each artillery flip he forgoes he may place an Emergency Supply marker (16.3.3).
• The Soviet player may transfer Guards Artillery Divisions on their Ready side to the map (18.5.3).
2. MOVEMENT PHASEThe Soviet player may move some, none or all his units. In addi-tion, the following activities are performed during this phase (in no particular order):• Conduct Rail Movement (5.6)• Resolve Automatic DS (5.7)• Build Fortifications (19.1)
3. COMBAT PHASE (8.0)The Soviet player may attack adjacent enemy units. Retreats (12.1), Advance After Combat (14.1), and Mobile Assaults (15.1) occur at the time.
4. RECOVERY PHASE (13.4)• The Soviet player removes or attempts to remove Disrupted
markers from his units.• All Replacement markers are removed (23.4).
5. SUPPLY PHASE (16.0)Perform the following activities in the order listed:1. The Soviet Player moves his Railhead markers (17.0).2. The Soviet Player rolls on the Central Front Table (24.3).3. Check the supply status of all Soviet units (16.0).4. Roll for Isolation Attrition (16.5) of all Soviet units that are Isolated
and adjacent to an enemy unit.
C. GERMAN PLAYER TURNThe German player now performs his turn, which is identical to the Soviet turn, except substitute the word German for Soviet (and Soviet for German) in the appropriate paragraphs above. Note that the German player does not have any Artillery Divisions, Railheads, Central Front or a Stavka Box so skips those actions.
D. VICTORY DETERMINATION VPs are counted at this time. If either player has enough VPs to win an Automatic Victory (25.2), the game ends. If not, the Turn marker is advanced one space and another turn is begun.
4 Ukraine ‘43 — 2nd Edition
© 2015 GMT Games, LLC
4. STACKING4.1 Stacking LimitsStacking refers to the placing of more than one playing piece in a hex. In general, the stacking limit for each side is:• SOVIETS: 2 combat units per hex• GERMAN: 3 combat units per hexHQs, Leaders and all markers have no stacking value and may freely stack in a hex without limit. In addition, one “Support Unit” may also be placed in the hex over and above the limit.
4.2 Support UnitsIn each hex, one unit with a no-ZOC line around the edge of their counter can stack for free. All other Support Units in the hex count as a full unit towards the stacking limit.
4.3 Soviet Tank and Shock Army HQs These HQs allow the Soviet player to stack three combat units (plus one Support Unit) in a hex (see 22.1 for full details).
Examples of stacking. Note that each of these stacks could also have one Support Unit.
4.4 Stacking RestrictionsThe stacking limit can never be exceeded except during the course of Movement, Retreat, and Advance After Combat. The stacking limit must be strictly observed by the Phasing Player at the completion of each Movement Phase and after an Advance After Combat. The Phasing Player must correct all stacking violations at these times by eliminating enough units from the hex to satisfy the stacking limit.
5. MOVEMENT5.1 The BasicsEach unit has a Movement Allowance (MA) that is the normal number of Movement Points (MPs) it may expend for movement during the Movement Phase (this MA can be increased by 3 MPs if the unit uses Extended Movement [5.3]). Each hex entered costs a certain number of MPs to enter as determined on the TEC. Movement may be made by individual unit or by stack. If units are moved as a stack, they move at the rate of the slowest unit in the stack. You must complete the movement of one unit or stack before starting to move another. A unit or stack may not enter a hex occupied by an enemy unit.
5.2 Road MovementThere are two types of roads—Primary and Secondary. Both are identical except secondary roads lose much of their value during Rain turns. A unit that follows the path of a road may use the reduced rate of the road. Whenever a road crosses a river, a bridge is assumed to exist. Whenever a road enters a Town or City hex, units are assumed to be utilizing the Road Movement rate if following the path of the road. The road rate may be used when moving into and out of an enemy ZOC (6.2). During turns when the weather is Rain (26.0), Secondary Roads cost all units 1 MP per hex.
5.3 Extended MovementUnits may use Extended Movement to increase their MA by 3 MPs. Units that use Extended Movement may not move adjacent to an enemy unit. A unit is allowed to start adjacent to an enemy unit and still use Extended Movement as long as the first hex is to exit that EZOC. Units with their MA in a black box may not use Extended Movement.
EXAMPLES: The cost to enter each hex is indicated with a number in a circle. Blue circles are river crossing cost, red circles are exiting an EZOC cost. Unit A exits an EZOC, moves two hexes and then crosses a Major River hexside at a Pontoon Bridge, then moves one additional hex—a total of 9 MPs, possible using Extended Move-ment. Unit B also uses Extended Movement and moves six hexes paying 1 MP for each hex. Unit C uses Tactical Movement (2 hexes)
because it would need 5 MPs otherwise. Unit D moves from EZOC to EZOC, it must stop in the first EZOC. Unit E takes advantages of roads spending 6 MPs to arrive adjacent to the German unit; note that there is no additional cost to cross Minor Rivers, or Major Rivers at Road Bridges. Unit F cannot cross the Major River at this spot since it did not start adjacent to the hexside, nor is there a bridge located at that location.

5Ukraine ‘43 — 2nd Edition
© 2015 GMT Games, LLC
5.4 Tactical MovementTactical Movement allows a unit to ignore all MP costs for terrain and exiting EZOCs and move one or two hexes. Units that use Tactical Movement may attack in the Combat Phase. Units that use Tactical Movement may not use Extended Movement. Units using Tactical Movement must abide by all the other rules of movement, specifically:• Must stop upon entering an EZOC (6.2).• May not cross or enter enemy ZOC Bonds (7.0).• Must start adjacent to a Major River hexside in order to cross it,
unless using a Road or Pontoon Bridge (5.5.4). • May not cross a prohibited hexside.
5.5 Movement and Rivers and Marsh(5.5.1) Minor Rivers: There is no extra cost to cross Minor Rivers during Clear or Overcast weather. If the weather is Rain it cost all units +1 MP to cross unbridged Minor River hexsides. (5.5.2) Major Rivers: Units must start adjacent to an unbridged Major River hexside in order to cross it (exception: Pontoon Bridges [5.5.4]). It cost non-Mechanized units +2 MP to cross, and Mechanized units +3 MPs to cross. Units may move normally after crossing. Units crossing at a bridge site use the rate of the road. (5.5.3) Marsh: Cost non-Mechanized units 2 MPs and Mechanized units 4 MPs per hex. Use the road rate if entering a Marsh hex via a road. Wooded Marsh is treated like Marsh for all game purposes.(5.5.4) Pontoon Bridges: There are no Pontoon Bridge markers. Pontoon Bridges are assumed to exist at every Major River hex-side where both hexes tangent to the river hexside are occupied by friendly combat units. The pontoon bridge is built the instant this occurs and disassembled the instant the condition no longer occurs. A Pontoon Bridge allows a unit to cross a non-bridged Major River hexside (at the +2 or +3 rate) without having to start its move ad-jacent to the Major River hexside. Units using Tactical Movement may also benefit from Pontoon Bridges.
EXAMPLE: If Soviet Unit A moves back one hex it will create a Pontoon Bridge for Unit C to cross. Unit B starts adjacent to the Major River hexside so it may cross normally. Unit D could use Tactical Movement and the Pontoon Bridge that Unit B has created to cross the river into Unit B’s new hex.
5.6 Rail Movement(5.6.1) Rail Movement occurs during the Movement Phase. The Phasing Player may move any one unit that is not Disrupted or in Full Retreat, plus all Reinforce-ments that arrived that turn, an unlimited distance along
a Railroad. Units using Rail Movement must start and end their movement on a rail hex, follow a path of friendly controlled and connected rail hexes, and may not start in or enter an enemy ZOC. Place a Train marker on units that use Rail Movement.(5.6.2) Train Marker Effects: A unit under a Train marker has no ZOC and a Defense Strength of 1 and may not qualify for any defensive benefits from terrain.(5.6.3) Detraining: To detrain, simply remove the Train marker at the start of a friendly Movement Phase—the unit may move normally that turn. A unit may not detrain in the same Movement Phase it used Rail Movement. A unit may detrain in any rail hex—it does not need to be in a Town or City. A unit also detrains if it is attacked while marked with a Train marker. (5.6.4) Rail Ferry: For purposes of Rail Movement and Line of Supply (16.3), the rail line is considered unbroken at the ferry site near Cherson. For regular movement and Advance After Combat (14.5) purposes it is not a bridge.
5.7 Automatic DSDefending units can suffer an Automatic Defender Shattered (Auto DS) result during a Movement Phase when the Phasing Player has moved enough units adja-cent to the defender’s hex to ensure 10-1 odds against
it. Tank and TQ shifts (9.2 and 9.4) may be used but not Air or Artillery Division shifts (which are only allocated in the Combat Phase). At that point the defending unit(s) immediately suffer a DS result and survivors are retreated 4 hexes by the defender abiding by the Retreat Guidelines (12.1.3). All units that made the 10-1 possible are marked with “Auto DS” markers—they cannot move any further that Movement Phase nor take part in regular combat in the upcoming Combat Phase. The Phasing Player can move other units into and through the hex where the Auto DS result oc-curred. The units marked with Auto DS markers may, at any time in the subsequent Combat Phase, conduct their Advance After Combat (at the appropriate Breakthrough Advance rate (14.2), at which time the markers are removed.
EXAMPLE: The three German units marked “A” are moved adjacent to Soviet unit “B”. The odds are 26 to 3 = 8-1, with CRT column shifts right for Tank (9.2) and TQ (9.4) that make it a 10-1. At this point the Soviet unit is immediately eliminated by the DS result and the three German units are marked with Auto DS markers. Their movement is over and they may not advance until the Combat Phase. Nor may they make a regular attack in the Combat Phase. German unit C now moves through the hole created by the Auto DS.
6 Ukraine ‘43 — 2nd Edition
© 2015 GMT Games, LLC
6. ZONES OF CONTROL6.1 General RuleThe six hexes immediately surrounding a hex occupied by one or more combat units constitute the Zone of Control (ZOC) of those units. ZOCs extend across all hexsides except All Sea hexsides. HQs, Leaders, Artillery Divisions and silhouetted armored units do not have ZOCs—units without a ZOC are indicated with a line along the edge of their counter. Combat units without a ZOC still impede Extended Movement (5.3).
6.2 ZOCs and MovementAll units must stop upon entering an enemy Zone of Control (EZOC). It costs no additional Movement Points (+0 MPs) to enter an EZOC; it costs two additional Movement Points (+2 MPs) to exit an EZOC. A unit that starts its move in an EZOC may move directly into another EZOC and stop, as long as it does not cross or enter an enemy ZOC Bond (7.0).
6.3 ZOC NegationWhen determining retreats and supply paths, units negate EZOCs in the hex they occupy (12.1.3 and 16.3.1).
6.4 Other Effects of ZOCs• EZOCs and Retreats: see 12.2-12.4.• EZOCs and Advance After Combat: see 14.4.• EZOCs and Lines of Supply: see 16.3.
7. ZOC BONDS7.1 How to form a ZOC BondAny unit or stack that exerts a ZOC and is not Disrupted (13.2) can form a ZOC Bond. When two such units (or stacks) are two hexes apart (with one vacant intervening hex) they create a bond between them that no enemy unit may enter or cross. Due to the pattern of a hex grid, there are two types of ZOC Bonds—Hex Bonds and Hexside Bonds.
7.2 Effects of ZOC Bonds:• Units may neither enter an enemy Hex Bond nor cross an enemy
Hexside Bond during the Movement Phase.• Units forced to Retreat into an enemy Hex Bond or across an
enemy Hexside Bond are eliminated.• Units may not Advance After Combat into an enemy Hex Bond
or across an enemy Hexside Bond, unless they are entering the defender’s vacated hex.
• Supply can never be traced into an enemy Hex Bond or across an enemy Hexside Bond.
7.3 Negating ZOC BondsA Hexside Bond is negated when enemy units are located on each side of the intervening hexside (as between units D and E in the diagram below). A Hex Bond is negated when the intervening hex contains an enemy unit (as between units E and F in the same diagram).
7.4 Intersecting ZOC BondsIf both players have intersecting ZOC Bonds, then neither player may cross the other’s ZOC Bond until it is negated.
7.5 Hexside Bonds with the Map Edge and the Coast(7.5.1) Map Edge: A unit can form a ZOC Hexside Bond (but not a Hex Bond) with a Friendly Map Edge (24.2). (7.5.2) The Coast: A unit can form a ZOC Hexside Bond (but not a Hex Bond) with an All-Sea hex vertex, unless the Bond crosses a Major or Minor River hexside (see example below).
7.6 ZOC Bonds and TerrainA ZOC Bond cannot extend:• across an all Sea hex or hexside,• across two river hexsides (as in a loop of a river). It does not
matter if the river is Major or Minor. When determining if a river breaks a ZOC Bond, push the Hexside Bond to one side or the other of the river, but it may not be pushed into a hex occupied by an enemy unit as in the following examples.
Broken Broken
A B C D E
EnemyUnit
EnemyUnit
Examples: A-B is broken because the bond crosses two river hex-sides. B-C crosses only one river hexside. C-D doesn’t cross any river hexsides. D-E is broken because the bond has to be pushed to a hex that crosses two river hexsides.
Unit
A
EnemyUnit
Unit
G
EnemyUnit
Unit
B
Unit
DUnit
E
Unit
C
EnemyUnit
EnemyUnit
Unit
FEnemy
Unit
EnemyUnit
HEXBOND HEXSIDE
BOND
Unit
H
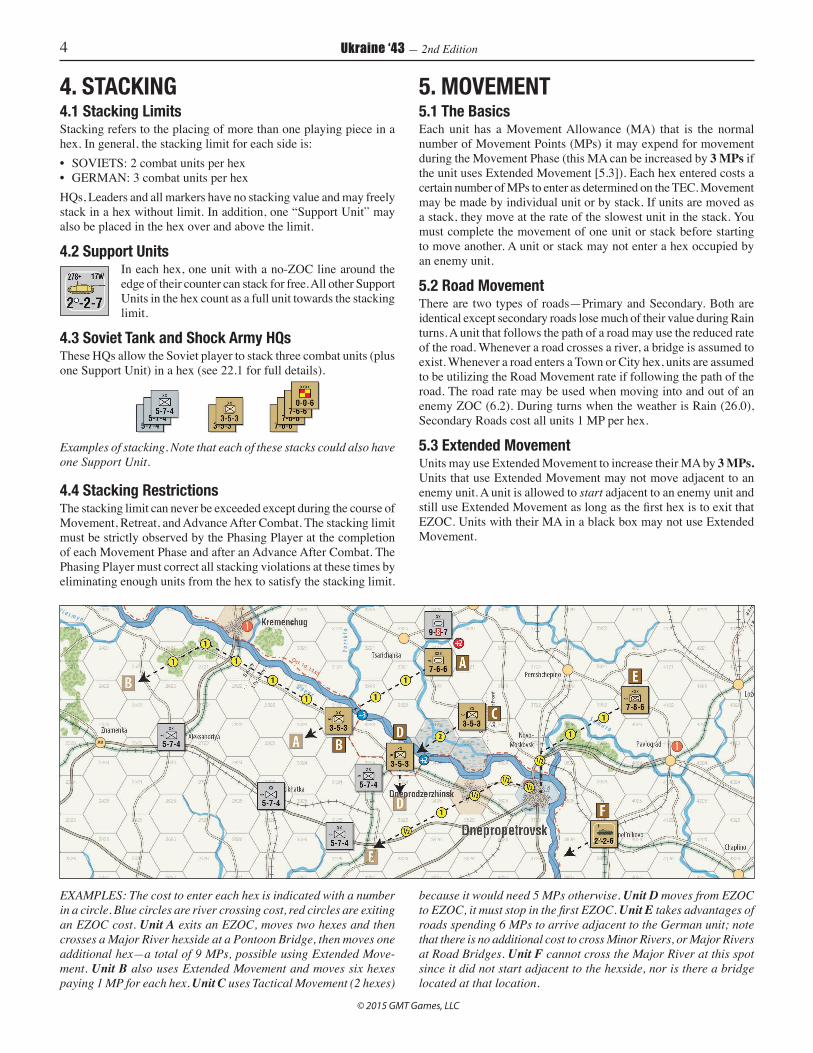
EXAMPLES OF ZOC BONDS: Black lines indicate friendly ZOC Bonds, red lines indicate enemy ZOC Bonds, thin dashed lines indicate broken ZOC Bonds. Note that there is no Hexside Bond between units D and E—it has been negated; likewise the Hex Bond between units E and F. The ZOC Bond between units
C and D has been broken by the two river hexsides. Units F and G still have a ZOC Bond even though it is intersected by the enemy ZOC Bonds. Unit H has a Hexside Bond with the map edge and a Hexside Bond with the coast where it does not cross a river hexside.

7Ukraine ‘43 — 2nd Edition
© 2015 GMT Games, LLC
8. COMBAT8.1 The BasicsPhasing units may attack adjacent enemy units in the Combat Phase. Attacking is voluntary; no unit or stack is forced to attack. No unit may attack or be attacked more than once per Combat Phase. Some units in a stack may attack while the others don’t attack or attack different hexes. All defending units in a hex must be attacked as one combined Defense Strength. The attacker may conduct his attacks in any order and need not predesignate them. A unit may not attack into a hex or across a hexside it is prohibited from entering or crossing in the Movement Phase.
8.2 Multi-Hex Combat• The attacker may attack only one hex
at a time; he may not target two hexes in a single combat.
• A defending unit or stack can be attacked from up to six different adjacent hexes.
• Units in the same hex may attack adjacent defenders in different hexes as long as each attack is conducted separately.
• No unit may split its Attack Strength to attack a second hex in a separate attack.
Unlike some other game systems, attack-ing units are not required to attack all adjacent defending units.
8.3 Combat ProcedureFollow these steps for each combat:STEP 1: Compare the combined Attack Strength of the participating attacking units against the total Defense Strength of the involved defending units and express the comparison as a numerical odds ratio (attacker to defender). Round off the odds ratio downward to conform to one of the odds ratio columns found on the Combat Result Table (CRT).EXAMPLE: A 15 to 4 would be a 3-1. 11 to 12 would be a 1-2.
STEP 2: The attacker must declare whether he will use Air Support (9.3) and/or Artillery Divisions (18.0). Next the defender states if he will use Air Support. The attacker then determines CRT column shifts for Tank (9.2) and/or TQ (9.4).STEP 3: After taking column shifts into account, a 6-sided die is rolled, and the results are implemented. Players immediately remove any step losses (10.2), perform Retreats (12.0), and Advance After Combat (14.0).
8.4 Minimum and Maximum Odds(8.4.1) Combat at odds less than 1-3 are not allowed. Combat at odds greater than 7-1 is resolved on the 7-1 column. (8.4.2) Column Shifts: Apply the minimum and maximum restric-tion after column shifts. When applying column shifts beyond the 7-1 column assume that 8-1, 9-1, etc., columns exist. For example, odds of 6-1 with two shifts right (8-1) and one shift left, would be resolved on the 7-1 column.
8.5 Major River AssaultsIn order to attack across a Major River hexside at least one unit participating in the attack must have started the friendly Movement Phase adjacent to the Major River and did not move. Place a River Assault marker on any unit/stack that forgoes its movement as a reminder that attacking from that hex is possible. Only one marker is necessary for each attack—attacking units in other hexes may participate in that same attack if adjacent to both the defender and the unit with the River Assault marker.
EXAMPLE: Soviet unit A starts adjacent to the river so can place a River Assault marker. Units B, C and D can move up to the river and attack with unit A.
9. COMBAT MODIFIERS9.1 Halving & DoublingEach attacking unit can never be halved more than once and each defending unit can never be doubled more than once. When halving, always halve by individual unit (not stack) and round any fractions up to the next higher whole number. A factor of 1 that is halved always rounds back up to 1. Units are halved for the following reasons:• Attacking across a Major River (9.5.2)• Attacking out of a Marsh hex or from one Marsh hex to another
(see 9.5.3).• Disrupted units have their Defense Strength halved (13.2).• Attacking when marked Out of Supply (16.4).
EXAMPLES: Two units with an Attack Strength of 5 would have a combined strength of 6 after halving [3 + 3 = 6]). A defender in a City hex defending behind a river is only doubled—not tripled or quadrupled.
9.2 The Tank Shift(9.2.1) Tank Units: Terrain permitting, the attacker gains a column shift right on the CRT if he has an Tank unit participating in the attack and the defender’s hex contains neither a Tank or Assault Gun unit (9.2.5). The following unit types are Tank units:
3-2-5
2-2-6 3-2-5
XXX
7-6-6
XXX
7-8-6
XX
15-12-7
XX
9-8-7
XX
12-10-7
X
3-3-6
3N
17
3
1 Cze
ch
GD
REM
3-3-7
REM
4-3-7
REM
2-4-6
3-2-5
2-2-6 3-2-5
XXX
7-6-6
XXX
7-8-6
XX
15-12-7
XX
9-8-7
XX
12-10-7
X
3-3-6
3N
17
3
1 Cze
ch
GD
REM
3-3-7
REM
4-3-7
REM
2-4-6
NOTE: All Mechanized and Panzergrenadier units are classified as Tank units—except for Wehrmacht Panzergrenadier divisions (9.2.5).
EnemyUnit
EnemyUnit A
No
EnemyUnit
EnemyUnit
AB
EnemyUnit
EnemyUnitA
NoNo
EnemyUnitA
B C
D
8 Ukraine ‘43 — 2nd Edition
© 2015 GMT Games, LLC
(9.2.2) Defender Shift: Terrain permitting, the attacker suffers a column shift left if he has no Tank or Assault Gun unit participating and the defender has a Tank unit.(9.2.3) Where the Tank Shift is Prohibited: The Tank Shift cannot be gained by the attacker or defender if the defender is in a Rough, Woods, Marsh, City (both types), or any hex containing a Fortifi-cation (19.0). Tank units attacking across a river hexside (Major or Minor), or out of a Marsh hex cannot be used to gain the Tank Shift but their presence is enough to prevent the defender from getting the Tank Shift (unless the defender has Tiger tanks).
(9.2.4) Tiger Tanks: Tiger tank units (including the Großdeutschland Division) are indicated with their Attack Strength in a yellow box. Terrain permitting, if a Tiger tank unit is involved in a combat (attack or
defense), the Axis player always receives the Tank Shift regardless of the presence of an enemy Tank unit in the combat. Tiger units must still abide by the terrain restrictions of 9.2.3.DESIGN NOTE: The year 1943 was the heyday of the Tiger tank. It could out-gun all existing Soviet tanks, and anti-tank warfare had not progressed to the level it would later in the war.
(9.2.5) Assault Guns: Units with a white dot next to their Attack Strenght are equipped with Assault Guns. They cannot earn the Tank Shift but do deny the Tank Shift to any enemy units attacking them or defending against them.
2•-2-62•-2-7
XX
6•-7-7
SU-2
Shown above are the three types of Assault Gun units.
9.3 Air SupportAdding an Air Unit to a combat gives the attacker or defender a favorable shift of one column on the CRT. The attacker must de-clare whether he will commit an Air Unit to
the battle before the defender need declare. Both must declare before the die is rolled. Each player may commit no more than one Air Unit to each battle. After the Air Unit is used it is flipped to its Used side and may no longer be used that turn. There are no terrain, range, or other restraints upon the use of an Air Unit in an attack—it may be placed anywhere on the map.
9.4 Troop Quality ShiftIn each combat compare the best TQ rating in the attacker’s force against the best TQ rating in the defending stack. If the attacker has the better rating, then the attacker receives a favorable shift of one column right on the CRT. If the defender has the better TQ rating, then the attacker suffers a column shift left.
9.5 River and Marsh Hexsides(9.5.1) Defender Doubled: The defender is doubled if all partic-ipating attacking units are attacking across a river hexside (Major or Minor), out of a Marsh hex, or any combination of those two. If just one attacking unit is not attacking across one of those hexsides, the defender is not doubled.(9.5.2) Major Rivers: All units are halved attacking across a Major River hexside. This combat effect is cumulative with 9.5.1.(9.5.3) Marsh Hexes: Units are halved attacking out of a Marsh hex or from one Marsh hex to another. Units are not halved attacking into such hexes.(9.5.4) The Izium Bend (Hex 4718): The river flows inside this hex. Treat the river along the four hexsides normally, but ignore the river inside the hex. Note that this makes this hex a good place for the Soviet player to breach the river line (as the Soviets did historically).
9.6 Heavy CasualtiesAny time the attacker attacks a hex containing a Fortification the defender rolls one die for additional attacker step losses. A die roll of 1-3 has no effect, a die roll of 4-6 causes one additional step loss to the attacker (the attacker may select his step loss).
9.7 Other Combat Modifiers• Train marker (5.6.2)• Defender Disrupted (13.2) • Attacker is Out of Supply (16.4)• Soviet Artillery Divisions (18.0)• Fortifications (19.0)• Rain (26.2)• See TEC
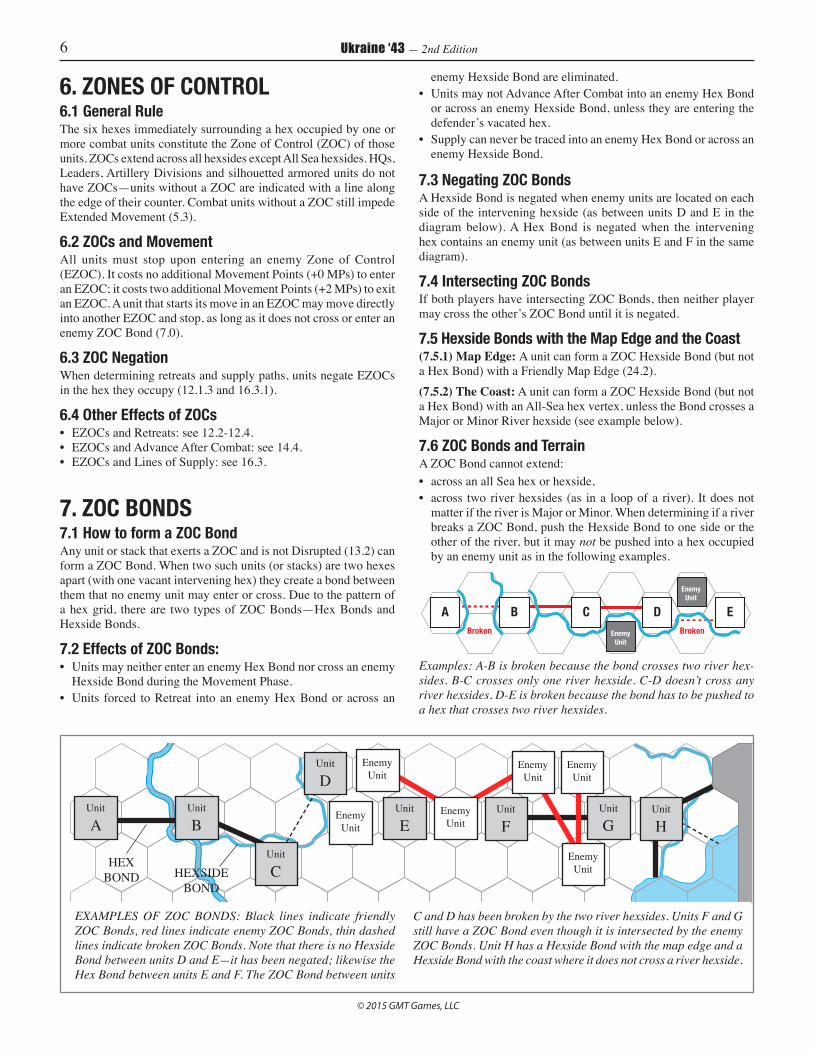
EXAMPLES OF THE TANK SHIFT: In examples A, B and C the attacker gains the Tank Shift. In examples D, E and F neither side earns the shift. In G, H, and I the defender earns the Tank Shift.
EXAMPLES OF ATTACKING ACROSS RIVER HEXSIDES: Units A, B and C attack unit X. Units A and B are halved for attacking across a Major River hexside, while the units in hex C attack at full strength. Unit X is doubled because all attacking units are attacking across river hexsides. Odds are 11 to 10 = 1-1. Next, units D, E and F attack unit Y. Units D and E are halved attacking across a Major River hexside. Unit Y is NOT doubled because unit F is not attacking across a river hexside. Odds are 11 to 5 = 2-1.

9Ukraine ‘43 — 2nd Edition
© 2015 GMT Games, LLC
10. COMBAT RESULTS10.1 Explanation of Combat ResultsThe words “attacker” and “defender” refer only to the units par-ticipating in the combat in question—not to the strategic situation.
DS = DEFENDER SHATTERED: The defender loses 1 step. Sur-viving defenders must Retreat and are marked in Full Retreat—no Determined Defense (11.0) is possible. The attacker receives a Break-through Advance (14.2).DRM = The defender Retreats, the attacker receives a Bonus Ad-vance. No Determined Defense is possible.D1 = The defender loses 1 step. Surviving defenders must either Retreat and become Disrupted or conduct a Determined Defense. If the defender Retreats, the attacker receives a Bonus Advance.A1/D1 = Both sides lose 1 step. Surviving defenders must either Retreat and become Disrupted or conduct a Determined Defense. If the defender Retreats, the attacker may Advance After Combat at the normal rate.DR = The defender must either Retreat and become Disrupted or conduct a Determined Defense. If the defender Retreats, the attacker may Advance After Combat at the normal rate.A1/DR = The attacker loses 1 step. The defender must either Re-treat and become Disrupted or conduct a Determined Defense. If the defender Retreats, the attacker may Advance After Combat at the normal rate.DRX = Both sides lose 1 step—the unit selected is determined by the opposing player. The defender must either Retreat and become Disrupted or conduct a Determined Defense. If the defender Retreats, the attacker may Advance After Combat at the normal rate.EX = Exchange: Each side loses 1 step—the unit selected is deter-mined by the opposing player. No Retreat for the defender. If the defender had only 1 step involved, then the attacker may enter the vacated hex and stop (a normal Advance is not permitted).A1 = The attacker loses 1 step. No Retreat or Advance.* = Some results have asterisk which denotes the defender may only do a Determined Defense if the units face elimination if they retreat.
10.2 Selecting Step LossesThe owning player selects the unit that will take the step loss unless an EX or DRX was rolled. When an EX or DRX result is rolled the opposing player selects the step loss. When selecting your oppo-nent’s step loss, you may select any unit that was involved except Leaders or Artillery Divisions.
10.3 Indicating Step LossesFlipping a unit over indicates the unit has suffered a step loss. If it is a 1-step unit, or a 2-step unit that is already flipped, then it is eliminated. Any 3-step unit on its reduced side forms a Remnant (10.4) when it takes its second step loss. The Remnant unit must abide by any Retreats of the CRT result.
10.4 Remnants and the Remnant DisplayWhen a 3-step unit takes a 2nd step loss they are replaced with a Remnant of the appropriate type. Place the division or corps in the Remnant Display printed on the map and place the Remnant on the map where the unit was. If a Remnant is eliminated, then the unit it was representing is placed in the Eliminated Box and the Remnant is placed back in the display and may be used again for another unit.
11. DETERMINED DEFENSE11.1 In General(11.1.1) The defender may attempt to reduce the Retreat portion of a DR, A1/D1, DRX and D1 CRT result by using the Determined Defense Table provided at least one step survived the combat. A Determined Defense is not allowed on a DRM or DS result or any result with an asterisk where the defender has a safe retreat route. Step losses from the CRT are implemented before resolving the Determined Defense. A successful result on this table cancels the Retreat and the associated Advance After Combat. (11.1.2) Lead Unit: If there are two or more surviving units in the defending stack, the defender picks one as the Lead Unit. If there is only one unit, then that unit must be the Lead Unit. The Lead Unit determines any DRMs and will be the unit to suffer the step loss if one is called for. Disrupted units, entrained units, Artillery Divisions, Leaders and HQs may not be the Lead Unit in a Determined Defense.(11.1.3) Determine Column to Use: The terrain of the defender’s hex determines the column to use on the table. Use the Major City column for defending units in Major Cities, use the Minor City column for Minor Cities, use the “Clear” column for units in Clear hexes, and use the “Other” column for all other hexes (including Clear hexes with Towns or friendly Fortifications). Ignore enemy Fortifications printed on the map when determining the column to use (for example Soviet units defending on German Fortifications).(11.1.4) Defensive Air Support: The Determined Defense die roll can be modified by Air Support which must be declared before the Determined Defense die is rolled. Only Air Units on their Ready side may be used. No more than one Air Unit may be used in each Determined Defense. After using the Air Unit, it must be flipped over.
(11.1.5) Summary of Die Roll Modifiers: +1 Lead Unit’s TQ is Elite–1 Lead Unit’s TQ is Low+1 Defensive Air Support (11.1.4)All modifiers are cumulative.
11.2 Explanation of Results– = The Determined Defense fails. However, a Desperation Defense (11.3) is allowed if the units face elimination if they Retreat.• = The Determined Defense is successful—the Retreat is canceled. (–1) = Defender’s Lead Unit loses one step.(1/1) = Defender’s Lead Unit takes a step loss and any one attacking unit takes a step loss. The attacker selects his own step loss.SINGLE STEP DEFENDERS: If the defender had only one step, and that step was lost in a successful Determined Defense, the attacker may advance into the defender’s vacated hex (only) and stop—a normal Advance After Combat is not allowed.
11.3 Desperation DefenseNormally each combat is allowed only one Determined Defense. However, if the stack or unit faces elimination if it retreats, then it is allowed to roll again and again until the retreat is canceled or all the defending units are eliminated. Treat no effect results “-” as “(–1)” results in this situation. Apply step losses before rolling again. A new Lead Unit may be selected after each roll (this is required if the previous Lead Unit is eliminated). A Desperation Defense is not allowed on DRM and DS results.EXAMPLE: A stack of 5 steps is defending in a Major City hex and the CRT result is A1/D1. Both sides remove a step for the A1/D1

10 Ukraine ‘43 — 2nd Edition
© 2015 GMT Games, LLC
result and then the defender rolls a 2 on the DD Table which is a fail. He removes 1 step and rolls again getting a 4 which is a •1/1 result. Both sides remove another step and the Retreat is canceled. The defender lost a total of 3 steps and the attacker lost 2 steps.
12. RETREATS12.1 Retreat Procedure(12.1.1) The Basics: When called upon to retreat by the CRT, de-fending units must be retreated the appropriate number of hexes by the owning player. 4 hexes on a DS result, 3 hexes on a D1 or DRM result, 2 hexes on a DR, A1/D1, A1/DR, and DRX result. Any unit that retreats 2 or more hexes becomes Disrupted (13.1). A retreat can stop short in some situations (12.3).(12.1.2) Stacks: A stack of retreating units may split up and retreat to different hexes. Units can retreat through friendly units without disturbing the non-retreating units.(12.1.3) Retreat Direction Guidelines: All retreats must follow the guidelines below. The guidelines are listed in order of priority (#1 takes priority over #2, etc.)1. If possible, a unit must end 2, 3 or 4 hexes (as appropriate) away
from the battle hex.2. Units may never end a retreat in an EZOC and may never enter two
consecutive vacant hexes in an EZOC. Units must avoid entering EZOCs whenever possible. Friendly units that have not retreated in the current combat negate EZOCs in the hex they occupy for purposes of retreats. See also 12.2, 4th bullet.
3. If possible, avoid ending the retreat in a hex that contains friendly units that are adjacent to enemy units.
4. If possible, retreat to a hex that can trace a LOS (16.3).5. If possible, avoid ending the retreat in violation of stacking
restrictions (see 12.1.4 for more details).6. Retreat to any hex that does not cause elimination (12.2).
(12.1.4) Over-Stacking: Units may end their retreat in violation of stacking restrictions. However, the over-stacking must be corrected before the end of the owning player’s next Movement Phase when all units in excess of the limit must be eliminated (4.4). See 12.5 if the overstacked hex is attacked again. If the hex is the target of a Mobile Assault (15.0) then all units in excess of the stacking limit (defender’s choice) contribute no Defense Strength but must still
retreat if the Mobile Assault is successful.(12.1.5) Attacker Retreats: The attacker never retreats unless he has conducted a successful Disengagement (27.0).
12.2 Elimination Due to a RetreatUnits are eliminated if they retreat:• off the map through an enemy controlled map edge (24.2).• into a hex occupied by an enemy unit.• across or into an enemy ZOC Bond.• into two consecutive vacant hexes in an EZOC or end their retreat
in an EZOC. A unit may retreat an additional hex if the next hex will save it from elimination.
• across an unbridged Major River hexside. This applies even if the unit started its retreat adjacent to the river hexside. Units may retreat across bridged Major River hexsides (including Pontoon Bridges) without restrictions.
• into a hex or across a hexside they are prohibited from entering or crossing in the Movement Phase.
Important: Units facing elimination if they retreat are eligible for Desperation Defense (11.3).
12.3 Rearguard ActionsAt the cost of additional step losses, a retreat can end short of the required number of hexes if all of the following conditions are met:• The unit or stack has retreated at least one hex.• The units retreat into a Major or Minor City, a friendly Fortified
hex, or a hex containing friendly units that have not retreated.• The units do not end their retreat in an EZOC unless a friendly
non-Disrupted unit is already in that hex.
For each hex of the retreat that the stack ignored, it must lose one step from any unit in the retreating stack. A Rearguard Action does not reduce the attacker’s Advance After Combat rate.
12.4 Elimination Does Not Reduce the Advance If the defender is eliminated by the combat result or eliminated during the retreat, the attacker still receives his full Advance After Combat. In an EX result where the defending unit is eliminated, the attacker may occupy the defender’s vacated hex (10.1).
12.5 Combat Against Previously Retreated UnitsIf a unit or stack is retreated into a friendly occupied hex and that hex undergoes an attack (not Mobile Assault) in the same Combat Phase, the retreated units do not add their Defense Strength to the
EXAMPLES OF RETREAT: Units A and B must retreat two hexes. Unit A has only one retreat path—into the hex containing unit “C”. This is allowed since unit C cancels EZOCs in the hex it occupies for purposes of retreats. In the case of unit B, retreating into a vacant hex must take priority over retreating into the hexes containing unit’s “D” and “E” since those two units are adjacent to enemy units.
MORE EXAMPLES OF RETREAT: Units A and B must retreat two hexes. Unit A is eliminated because it enters two consecutive hexes in an EZOC. Unit B avoids elimination by retreating through unit C and then retreating an additional hex (12.2 4th bullet).
11Ukraine ‘43 — 2nd Edition
© 2015 GMT Games, LLC
combat, may not be selected to satisfy a step loss from the CRT and if required to retreat again are eliminated.
13. DISRUPTION AND RECOVERY13.1 How Units Become Disrupted• Any unit that retreats 2 or more hexes in a single combat becomes
Disrupted.• Any Artillery Divisions on its Ready side (18.2) which moves
more than one hex in the Movement Phase becomes Disrupted.
13.2 Effects of Disruption• MOVEMENT: It may only use Tactical Movement (2 hexes).
If it starts in an EZOC, it cannot stay or end its movement in an EZOC—it must move away, if possible. If not possible, it may remain in the hex or move to another hex in an EZOC.
• ZOC BONDS: Disrupted units have ZOCs but cannot be used to form a ZOC Bond.
• COMBAT: It may not attack or Mobile Assault. Disrupted units have their Defense Strength halved (rounded up).
• REPLACEMENTS: It cannot receive Replacements (23.2).• ARTILLERY: Disrupted Artillery Divisions may not flip to their
Ready side (18.3).
ABILITIES: Disrupted units retain their ZOC, TQ and Tank Shift abilities. Other units may enter or pass through friendly Disrupted units without becoming Disrupted.
13.3 Full Retreat(13.3.1) Full Retreat is a form of Disruption that allows units to move their full MA. Units can go into Full Retreat either voluntarily or involuntarily:
• Voluntary: During a friendly Movement Phase, a player may replace any number of Disrupted markers on his units with Full Retreat markers in order to move those units their full MA.
• Involuntary: Units are involuntarily put into Full Retreat if: ◊ they suffer a DS result, ◊ any Disrupted unit that is forced to retreat again has its Disrupted
status upgraded to Full Retreat.
(13.3.2) Units in Full Retreat suffer all the penalties of Disruption with the following exceptions:• They may ignore the 2-hex movement restriction and move their
full MA (but may not use Extended Movement).• They have a Defense Strength of 0. If stacked with other units they
contribute nothing to the defense (Tank, TQ or Defense Strength). If not stacked with other units they must immediately Retreat 2 hexes if an enemy unit moves or advances adjacent to it. Follow all retreat guidelines of 12.1.3.
• They take longer to recover (13.4.1).
13.4 The Recovery Phase(13.4.1) Removing Disrupted Markers: During the Phasing Player’s Recovery Phase all friendly Disrupted units that are not adjacent to an enemy unit automatically recover one level—Disrupted markers are removed and markers on their Full Retreat side are flipped to their Disrupted side. (13.4.2) Combat Zone Recovery: If a Disrupted unit is adjacent to an enemy unit (remember, a unit must move away if possible),
then the unit must make a Recovery die roll. On a modified die roll of 4-6 the unit recovers. On a modified die roll of 1-3 it remains Disrupted. The die roll is modified by the unit’s TQ: +1 if the unit’s TQ is Elite–1 if the unit’s TQ is Low
14. ADVANCE AFTER COMBAT14.1 The BasicsIf the defender is eliminated or retreats, then all non-artillery units that participated in the attack may Advance After Combat. Advance After Combat expends no MPs, you just count the hexes. Stacking limits must be observed at the end of each advance.
14.2 Advance RatesThe Advance After Combat rate is determined by the CRT result as listed below:
2
NormalAdvance
Non-MechanizedInfantry Type 2
BonusAdvance
22Cavalry 3 32Mechanized 3 4
BreakthroughAdvance
• Normal Advance: All units may advance 2 hexes.• Bonus Advance: The advance rate of Non-Mechanized infantry
class units is 2 hexes; and the rate of all other types is 3 hexes.• Breakthrough Advance: Same as Bonus Advance except all
Mechanized units may advance 4 hexes.
Limited Advance: If all defending units are eliminated in an EX result, or the defender lost his last step in a successful Determined Defense, then the attacking units may only advance into the defend-er’s vacated hex and stop.
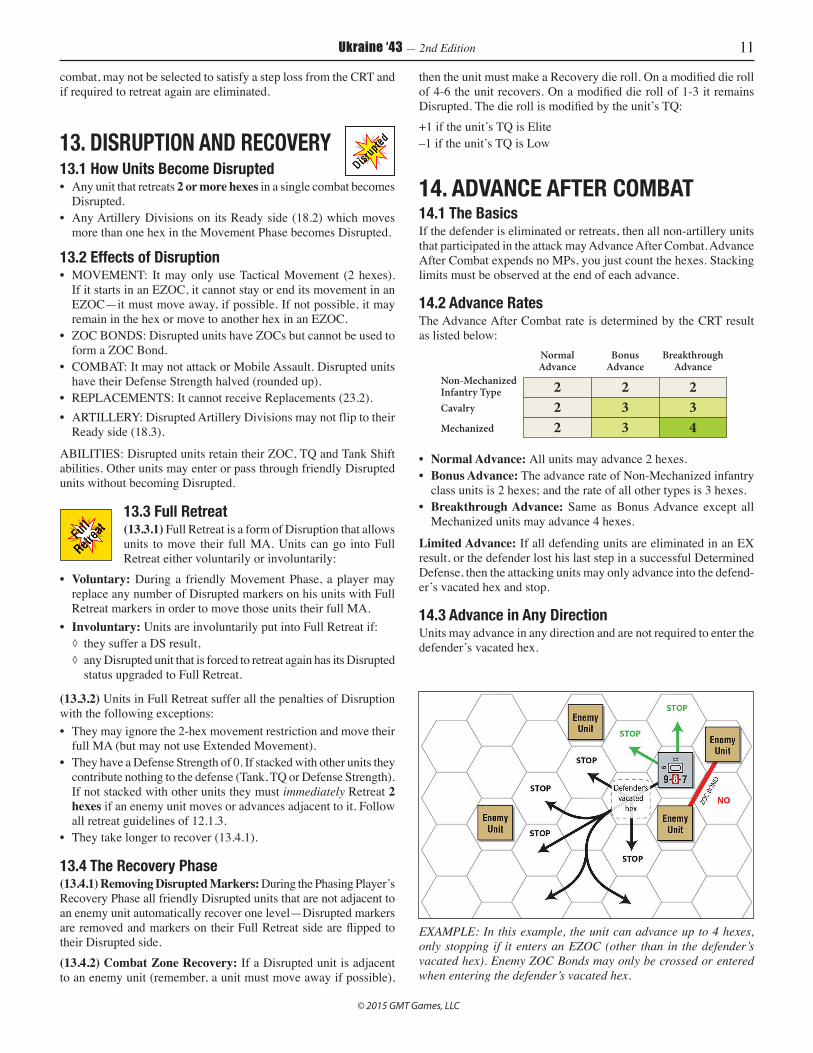
14.3 Advance in Any DirectionUnits may advance in any direction and are not required to enter the defender’s vacated hex.
EXAMPLE: In this example, the unit can advance up to 4 hexes, only stopping if it enters an EZOC (other than in the defender’s vacated hex). Enemy ZOC Bonds may only be crossed or entered when entering the defender’s vacated hex.

12 Ukraine ‘43 — 2nd Edition
© 2015 GMT Games, LLC
14.4 Advance and Enemy ZOCs(14.4.1) Enemy ZOC Bonds: These may never be entered or crossed during an Advance After Combat except when entering the defender’s vacated hex. (14.4.2) EZOCs: Units must stop upon entering an EZOC (even if the hex contains a friendly unit) with two exceptions:• units may pass through the defender’s vacated hex without the
need to stop for EZOCs. Once beyond the defender’s vacated hex they must stop if they enter an EZOC.
• units that are stopped by an EZOC may conduct a Mobile Assault (15.0) and, if successful, may advance into the defender’s vacated hex. If the outcome of the Mobile Assault frees it from EZOCs it may continue its Advance After Combat.
14.5 Terrain and Advance• No unit may advance into a hex or across a hexside that is
prohibited to it in regular movement.• MAJOR RIVERS: Units may only cross an unbridged Major River
hexside during the first hex of their advance in a Major River Assault. Units may cross at a bridge hexside (including Pontoon [5.5.4] and Railroad Bridges) at any point in their advance.
• MARSH: Units must stop and end their advance if they enter a Marsh hex unless they entered the hex along a road.
NO EFFECT: Minor Rivers, Woods, Cities and Towns, have no effect on an Advance After Combat.
15. MOBILE ASSAULTS15.1 In GeneralMobile Assaults allow units that are advancing after combat to attack again. Each Mobile Assault cost the attacking stack one hex from their Advance After Combat rate. So a mechanized stack that can Advance After Combat four hexes could conduct four Mobile Assaults. Mobile Assaults are resolved like a normal attack using the Combat Results Table.
15.2 Procedure(15.2.1) One Stack at a Time: Mobile Assaults may only be con-ducted during Advance After Combat with no more than one stack
at a time. If the attacker had more than one stack in the battle then each stack may conduct Mobile Assaults. Finish advancing one stack before advancing another. A stack may drop off units as it advances but it may not pick up units except as noted in 15.2.2.(15.2.2) Forming a Stack: If the first hex the attacker advances into is the defender’s vacated hex, then the attacker may form a stack in that hex with other units that participated in the same at-tack and have not yet advanced. Stacking Limits must be followed. From there, the stack may finish its advance (and conduct Mobile Assaults) as one stack.(15.2.3) Cost: A Mobile Assault costs the advancing units one hex from their Advance After Combat allowance. (15.2.4) Eligible Targets: Mobile Assaults can target any enemy units, including those that retreated in the regular combat. If a Mo-bile Assault fails, the same hex can be Mobile Assaulted again by a different stack. (15.2.5) Failed Mobile Assault: If a Mobile Assault does not dislodge the defender from the hex, or if the result of the Mobile Assault calls for the attacker to take a step loss (A1, A1/DR, A1/D1, EX, DRX, or Heavy Casualty step loss), then the stack must end its advance in the hex it attacked from or (if the defender retreated) enter the defender’s vacated hex and stop. (15.2.6) Successful Mobile Assault: If the Mobile Assault did not fail, then the stack may continue its Advance After Combat. The own-ing player has the choice of continuing the advance from the defend-er’s vacated hex or from the hex the Mobile Assault was launched from. If continued from the defender’s vacated hex the movement into that hex does not cost another hex of the advance—that price was already paid for by the 1-hex cost of the Mobile Assault.(15.2.7) Restrictions: • ROAD CONGESTION: A Mobile Assaulting stack may not
conduct a Mobile Assault from a hex containing other friendly units.• Mobile Assaults are prohibited across Major Rivers and All-Sea
hexsides.• Air unit and Artillery Division shifts are not allowed in a Mobile
Assault, all other Combat Modifiers apply (including Terrain, TQ and Tank Shifts).
(15.2.8) Ignore Additional Advances: The attacker never earns addi-tional hexes by successful Mobile Assaults—always use the Advance After Combat rate of the initial combat.
15.3 Mobile Assaults Against Previously Retreated UnitsUnlike retreats from Combat (12.5), units are not eliminated if forced to retreat again from a Mobile Assault. Any unit that retreats a
EXAMPLE OF MOBILE ASSAULTS: In the initial attack the result was a DS which allows the attacker to advance 4 hexes. The first hex moves the stack into the defender’s vacated hex, the second hex is used to conduct a Mobile Assault at X. The third hex is spent conduct-ing a Mobile Assault at Y (movement into Y after the Mobile Assault is free), and the last hex is spent conducting a Mobile Assault at Z.
EXAMPLE OF ADVANCE AFTER COMBAT: Attacks at A and B both resulted in the elimination of the defending unit and an advance of 4 hexes. Arrows indicate possible advance paths and green arrows are shown as a reminder that units can advance in any direction. Note how ZOC Bonds and EZOCs stop both advances from gaining no more than 2 hexes.

13Ukraine ‘43 — 2nd Edition
© 2015 GMT Games, LLC
second time goes into Full Retreat (13.3.2). While in Full Retreat it may not be attacked again and is only eliminated if it has no retreat path. Units in Full Retreat automatically retreat if an enemy unit moves adjacent.
16. SUPPLY AND ISOLATION16.1 The Supply Phase
Units are checked for supply during the owning player’s Supply Phase. Units able to trace a Line of Supply (LOS) to a Supply Source (16.2) are ‘In Supply.’ If any unit or stack cannot trace a LOS, it receives an Out of Supply
marker. If the unit was already marked Out of Supply from the previous turn, and cannot trace a LOS of any length, (16.5.1) flip the Out of Supply marker over to its yellow side. If any friendly unit or stack bearing an Out of Supply marker can now trace a LOS, the marker is removed.
16.2 Supply SourcesSupply originates at either:A. Certain Map Edge Hexes: German map edge Supply Sources are indicated with the German balkenkreuz while Soviet ones are indicated with a Soviet star. Only map edge Supply Sources that are friendly controlled may be used.B. Connecting Rail Hex: A Connecting Rail Hex is considered a Supply Source. A Connecting Rail Hex is a rail hex that is con-nected by a contiguous line of rail hexes, of any length, to a map edge Supply Source. The rail line must be free of enemy units and their ZOCs, and for the Soviet player must be repaired (17.0). For the purposes of this rule, friendly units negate enemy ZOCs in the hexes they occupy.
16.3 Line Of Supply(16.3.1) A Line of Supply (LOS) is a path of contiguous hexes traced from a unit to a Supply Source (A or B above). The path can be up to 5 Supply Path MPs long using the following rates:• Tracing supply from one hex to another along a road cost 1/2
MP. (Exception: during Rain turns this is reduced to 1 MP for Secondary Roads.)
• Tracing supply into all other land hexes is 1 MP (this includes Marshes, Woods, crossing Major Rivers, etc.).
• It must stop after crossing an unbridged Major River hexside unless a Pontoon Bridge exist at that location.
• Ignore the +2 MP cost for exiting any EZOC.
The path may not:• Cross an All Sea hexside.• Enter an enemy occupied hex.• Cross or enter an enemy ZOC Bond.• Enter two consecutive hexes in an EZOC. Friendly units negate
EZOCs in the hex they occupy.• Enter an enemy controlled Major or Minor City hex (16.3.2).
(16.3.2) City Hexes and Supply Paths: An enemy controlled Major or Minor City hex blocks a LOS through the City hex (assume the city is garrisoned by enemy units not represented by a counter). Indi-cate captured cities with a Control marker. All other vacant hexes free of ZOCs are friendly to both players when tracing a Line of Supply.
(16.3.3) Emergency Supply Markers: Players use these markers at the start of their turn to put units that are currently Out of Supply back in Supply. The German player has one Emergency Supply marker he may use
each turn for free; while the Soviet player has three but each cost one of his (three) artillery flips to use. Emergency Supply markers are placed during the Phasing Player’s Initial Phase and must be placed in a hex that is in Supply. The Emergency Supply marker immediate-
EXAMPLE: All four Soviet units (A, B, C and D) are in Supply. Their Line of Supply does not cross or enter an enemy ZOC Bond, nor enter two consecutive hexes in an EZOC.
EXAMPLE: The red area shows the hexes that are in supply from the Connecting Rail Hex. To put the Soviet Tank Corps at “A” in supply the Soviet player must use all three Emergency Supply mark-ers, each extends the supply path by 3 Supply Path MPs. Note that
the first marker must be placed in a hex in supply; and to cross the unbridged Major River requires the presence of a Pontoon Bridge. The shaded hexes indicate the additional hexes put into supply by the Emergency Supply markers.
14 Ukraine ‘43 — 2nd Edition
© 2015 GMT Games, LLC
ly puts all friendly units within 3 Supply Path MPs of its location in Supply (remove the Out Of Supply marker immediately). Essentially an Emergency Supply marker extends a Supply Path. Two or three Emergency Supply markers may be placed in a daisy-chain method to extend a Supply Path 6 or 9 Supply Path MPs. The Emergency Supply markers are removed at the end of the Initial Phase.
16.4 Out of Supply PenaltiesA unit bearing an Out of Supply marker (white or red) suffers the following penalties:• MOVEMENT: It may only use Tactical Movement (5.4).• COMBAT: Its Attack Strength is halved (fractions are rounded
up so 1 halved is still 1).• ADVANCE AFTER COMBAT: It is limited to 2 hexes.• REPLACEMENTS: It cannot receive Replacements (23.2).
ABILITIES: Out of Supply units retain their full Defense Strength, ZOCs, TQ and Tank effects.
16.5 Isolation Attrition(16.5.1) During each friendly Supply Phase all friendly units (except HQs and Leaders) which were marked Out of Supply from a previous turn and are currently Isolat-ed, suffer Isolation Attrition. Flip the white-color OOS
marker to its yellow side when this happens. Isolation Attrition occurs each friendly Supply Phase the unit(s) remain Isolated.DEFINITION OF ISOLATED: A unit is Isolated if it cannot trace a LOS of any length, across any type of terrain that a non-Mechanized unit could enter, to a friendly Supply Source. DESIGN NOTE: A unit that becomes Isolated always has one turn where it only has the white-colored OOS marker and does not suffer the Isolation Attrition die roll. The yellow-colored marker is only earned if the unit has been Out of Supply for more than one turn AND is Isolated.
(16.5.2) Procedure: Roll one die for each Isolated unit. If the mod-ified die roll is 1-4 the unit is reduced one step. A modified result of 5 or 6 has no effect. A unit can lose its last remaining step due to Isolation Attrition. If a stack is Isolated, roll for each unit in the stack. Leaders and HQs are exempt from Isolation Attrition.(16.5.3) Die Roll Modifiers:+1 CITY HEX: if the unit can trace a LOS of any length to at least
one friendly controlled Major or Minor City hex.+1 AIRFIELD: if the unit can trace a LOS of any length to at least
one Town, Major City or Minor City hex that is not adjacent to any enemy units. This is cumulative with the City hex modifier above. This represents a functioning airfield inside the pocket. Airfields adjacent to enemy units are not usable.
+1 All German Units–1 All Axis Allied Units
17. RAILHEADS & RAILROAD REPAIR17.1 The Basics
Rail hexes that initially start west of the Soviet August 6th starting line must be repaired before the Soviet player may use them as Supply Sources and for Rail Movement. Only rail hexes highlighted in green need
to be repaired. All other rail hexes are automatically repaired if each end of the line is repaired (for example when Soviet Railheads reach Krasnograd (hex 3818) and Losovaya (hex 4321) the rail line be-tween 3818 and 4321 is instantly repaired. Rail lines that dead-end are automatically repaired when a Railhead reaches their branch. Example, the 5030-to-Mariupol line is instantly repaired when a Railhead reaches 5030.
17.2 Indicating RepairThe Soviet player has six Railhead markers to indicate the progress of his repair. Moving a Railhead marker forward indicates repairing those hexes. Railhead markers may only move along rail hexes highlighted in green. During each Soviet Supply Phase the Soviet player may move each Railhead marker forward up to two hexes. The Railhead may not enter enemy occupied hexes or vacant hexes in an EZOC. Repaired rail hexes may be used in that Supply Phase.
17.3 Railheads and Axis UnitsGerman units may not destroy rail lines; they may only push back or stall the Soviet Railhead markers.
(17.3.1) Push Back: To push back a Railhead marker a German unit must enter the hex occupied by the Railhead or put it in its ZOC. If that happens, the Railhead is immediately pushed back (down the rail line towards the east) until it reaches a hex clear of Axis units and their ZOCs (which is usually one hex). Soviet combat units negate EZOCs in the hex they occupy for this purpose.(17.3.2) Stall: A Railhead that is not on a Connecting Rail Hex (16.2.B) cannot be moved forward and cannot be used as a Supply Source. Flip the Railhead marker to its Inoperative side until the tracks behind it have been cleared of enemy units and their ZOCs, and the Railhead is once again on a Connecting Rail Hex.
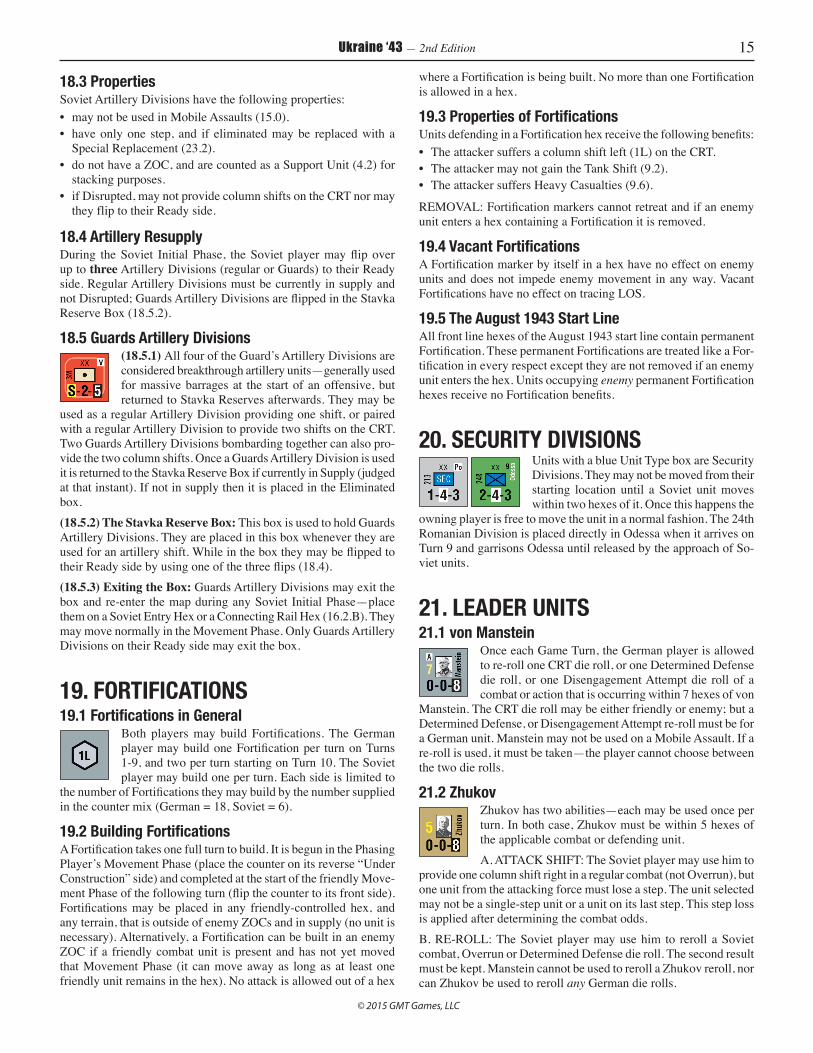
18. SOVIET ARTILLERY DIVISIONS18.1 Purpose
Each Soviet Artillery Division on its Ready side may be used to provide one shift right on the CRT in an attack. The Soviet player can receive two shifts if he uses two Artillery Divisions, but one of them must be a Guards
Breakthrough Artillery Division. The Artillery Division must be within 2 hexes of the defender’s hex. Flip it to its “Used” side once it has provided this benefit. It may not be used again until it is flipped back to its Ready side in the Soviet Initial Phase.
18.2 Movement and Artillery DivisionsArtillery Divisions are considered Mechanized units but may not use Extended Movement. Soviet Artillery Divisions on their Ready side that move more than one hex in a Movement Phase become Disrupted. The Disrupted marker is likely to be removed at the end of the turn but serves to prevent the unit from supporting an attack in the upcoming Combat Phase.
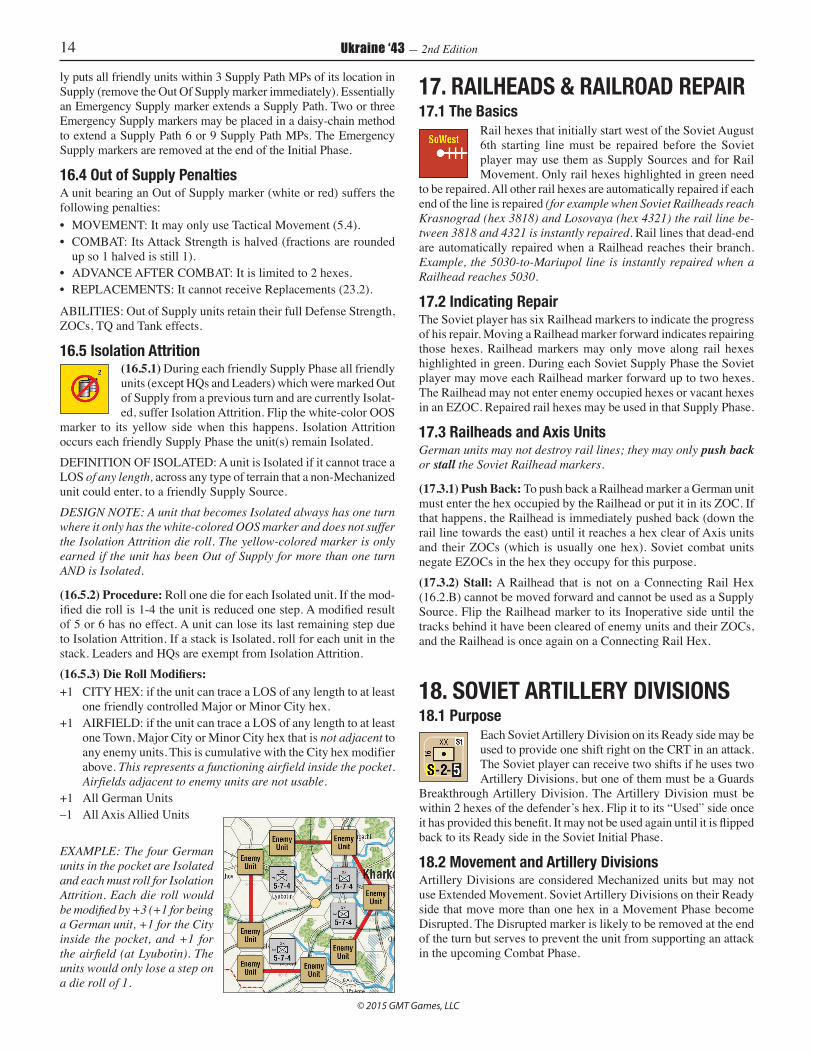
EXAMPLE: The four German units in the pocket are Isolated and each must roll for Isolation Attrition. Each die roll would be modified by +3 (+1 for being a German unit, +1 for the City inside the pocket, and +1 for the airfield (at Lyubotin). The units would only lose a step on a die roll of 1.
15Ukraine ‘43 — 2nd Edition
© 2015 GMT Games, LLC
18.3 PropertiesSoviet Artillery Divisions have the following properties:• may not be used in Mobile Assaults (15.0).• have only one step, and if eliminated may be replaced with a
Special Replacement (23.2).• do not have a ZOC, and are counted as a Support Unit (4.2) for
stacking purposes.• if Disrupted, may not provide column shifts on the CRT nor may
they flip to their Ready side.
18.4 Artillery ResupplyDuring the Soviet Initial Phase, the Soviet player may flip over up to three Artillery Divisions (regular or Guards) to their Ready side. Regular Artillery Divisions must be currently in supply and not Disrupted; Guards Artillery Divisions are flipped in the Stavka Reserve Box (18.5.2).
18.5 Guards Artillery Divisions(18.5.1) All four of the Guard’s Artillery Divisions are considered breakthrough artillery units—generally used for massive barrages at the start of an offensive, but returned to Stavka Reserves afterwards. They may be
used as a regular Artillery Division providing one shift, or paired with a regular Artillery Division to provide two shifts on the CRT. Two Guards Artillery Divisions bombarding together can also pro-vide the two column shifts. Once a Guards Artillery Division is used it is returned to the Stavka Reserve Box if currently in Supply (judged at that instant). If not in supply then it is placed in the Eliminated box.(18.5.2) The Stavka Reserve Box: This box is used to hold Guards Artillery Divisions. They are placed in this box whenever they are used for an artillery shift. While in the box they may be flipped to their Ready side by using one of the three flips (18.4).(18.5.3) Exiting the Box: Guards Artillery Divisions may exit the box and re-enter the map during any Soviet Initial Phase—place them on a Soviet Entry Hex or a Connecting Rail Hex (16.2.B). They may move normally in the Movement Phase. Only Guards Artillery Divisions on their Ready side may exit the box.
19. FORTIFICATIONS19.1 Fortifications in General
Both players may build Fortifications. The German player may build one Fortification per turn on Turns 1-9, and two per turn starting on Turn 10. The Soviet player may build one per turn. Each side is limited to
the number of Fortifications they may build by the number supplied in the counter mix (German = 18, Soviet = 6).
19.2 Building FortificationsA Fortification takes one full turn to build. It is begun in the Phasing Player’s Movement Phase (place the counter on its reverse “Under Construction” side) and completed at the start of the friendly Move-ment Phase of the following turn (flip the counter to its front side). Fortifications may be placed in any friendly-controlled hex, and any terrain, that is outside of enemy ZOCs and in supply (no unit is necessary). Alternatively, a Fortification can be built in an enemy ZOC if a friendly combat unit is present and has not yet moved that Movement Phase (it can move away as long as at least one friendly unit remains in the hex). No attack is allowed out of a hex
where a Fortification is being built. No more than one Fortification is allowed in a hex.
19.3 Properties of FortificationsUnits defending in a Fortification hex receive the following benefits:• The attacker suffers a column shift left (1L) on the CRT.• The attacker may not gain the Tank Shift (9.2).• The attacker suffers Heavy Casualties (9.6).
REMOVAL: Fortification markers cannot retreat and if an enemy unit enters a hex containing a Fortification it is removed.
19.4 Vacant FortificationsA Fortification marker by itself in a hex have no effect on enemy units and does not impede enemy movement in any way. Vacant Fortifications have no effect on tracing LOS.
19.5 The August 1943 Start LineAll front line hexes of the August 1943 start line contain permanent Fortification. These permanent Fortifications are treated like a For-tification in every respect except they are not removed if an enemy unit enters the hex. Units occupying enemy permanent Fortification hexes receive no Fortification benefits.
20. SECURITY DIVISIONS
Units with a blue Unit Type box are Security Divisions. They may not be moved from their starting location until a Soviet unit moves within two hexes of it. Once this happens the
owning player is free to move the unit in a normal fashion. The 24th Romanian Division is placed directly in Odessa when it arrives on Turn 9 and garrisons Odessa until released by the approach of So-viet units.
21. LEADER UNITS21.1 von Manstein
Once each Game Turn, the German player is allowed to re-roll one CRT die roll, or one Determined Defense die roll, or one Disengagement Attempt die roll of a combat or action that is occurring within 7 hexes of von
Manstein. The CRT die roll may be either friendly or enemy; but a Determined Defense, or Disengagement Attempt re-roll must be for a German unit. Manstein may not be used on a Mobile Assault. If a re-roll is used, it must be taken—the player cannot choose between the two die rolls.
21.2 ZhukovZhukov has two abilities—each may be used once per turn. In both case, Zhukov must be within 5 hexes of the applicable combat or defending unit.A. ATTACK SHIFT: The Soviet player may use him to
provide one column shift right in a regular combat (not Overrun), but one unit from the attacking force must lose a step. The unit selected may not be a single-step unit or a unit on its last step. This step loss is applied after determining the combat odds.B. RE-ROLL: The Soviet player may use him to reroll a Soviet combat, Overrun or Determined Defense die roll. The second result must be kept. Manstein cannot be used to reroll a Zhukov reroll, nor can Zhukov be used to reroll any German die rolls.

16 Ukraine ‘43 — 2nd Edition
© 2015 GMT Games, LLC
21.3 Properties Common to Both Leaders(21.3.1) Flip the Leader over when any reroll ability is used, and flip the Leader to his front side at the start of each Game Turn. Zhukov may be used for his combat shift even if flipped from a reroll earlier in the Soviet Combat Phase.(21.3.2) Combat: Leaders are not combat units and do not have a step to lose in combat. If caught alone in a hex by an enemy unit they are immediately flipped to their used side and displaced by the owner to any friendly controlled Town or City hex. They can never be eliminated. They have no ZOC, no stacking value, are never effected by Disruption. Leaders may Advance After Combat if stacked with other friendly units.(21.3.3) Movement: Leaders move like mechanized units and may use the 1/2 MP road rate. They may not use Extended Movement. In lieu of normal movement, they may be repositioned to any friendly controlled hex on the map but must be flipped to their used side. (21.3.4) Range: When counting range, measure from the Leader to one of the friendly units involved in the attack or defense. Count hexes only, ignoring terrain and enemy units.
22. SOVIET TANK AND SHOCK ARMIES22.1 Purpose
The Soviet player has three Tank Army HQs and one Shock Army HQ. These HQs allow the Soviet player to increase his stacking limit to three units per hex. A Tank Army HQ allows the Soviet player to stack one
additional Tank or Mechanized Corps in the hex, while the Shock Army HQ allows the Soviet player to stack one additional infantry unit in the hex. The Soviet player may use the off-map boxes for these armies if he wishes. Units in these boxes are considered stacked with the HQ for all purposes. RESTRICTION: The Shock Army may contain no more than one Tank or Mech Corps.DESIGN NOTE: Players wishing to duplicate the Soviet doctrine at the time, should put 2 Tank corps and 1 Mechanized corps in their Tank Armies, and 3 infantry units in their Shock armies.
22.2 Movement and Advance After CombatTank Army HQs use the “Mech” rate on the TEC while the Shock Army HQ uses the “Non-Mech” rate. HQs may freely pick up and drop off units during movement. HQs may Advance After Combat like other combat units, and are not required to remain with the stack they started the combat with. The Tank Army HQs Advance After Combat at the Mechanized rate, while the Shock Army HQ advances at the Non-motorized Infantry rate.
22.3 PropertiesHQs units have the following properties:• Have no ZOC and may not form ZOC Bonds.• Never count towards stacking limits but having more than one in
a hex provides no additional benefit.• When alone in a hex they do not stop or slow enemy movement
in any way. If an enemy unit moves adjacent (including when advancing after combat) to an HQ that is alone in a hex the HQ is immediately eliminated and placed in the Cadre Box.
• May never be selected for a step loss by either side.• Are considered Special Units for Replacement purposes.
23. REINFORCEMENTS & REPLACEMENTS23.1 ReinforcementsEach player’s Reinforcements are listed on the Reinforcement Schedule. Reinforcements are placed on the map during the friendly Initial Phase at a friendly controlled map edge Supply Source (hence-forth called an Entry Hex). This placement does not cost any MPs. Reinforcements may move normally during the Movement Phase and are eligible for Rail Movement if they start on a rail hex. Axis units must be placed on the map edge Entry Hex specified on their counter (N=north, S=south, W=west), Soviet units may be placed on any friendly Entry Hex. If all available Entry Hexes are enemy controlled, they may be delayed until an Entry Hex is available. North and west edge Axis Reinforcements may be shifted to a dif-ferent entry location by entering the German Off Map Box (24.1). DESIGN NOTE: The south map edge has only one Entry Hex—Per-ekop. If that hex is Soviet controlled, no Axis Reinforcements from the south may enter the map.
23.2 Replacements(23.2.1) Soviet and German replacement rates are listed on the Turn Record Track. Replacements are received during each player’s Initial Phase. Each Replacement can restore a reduced unit one step or bring a unit out of the Eliminated Box on its lowest step. Replacements may not be saved, and those not used are forfeited. Soviet Replacements may be used interchangeably for regular or Guards units. German Replacements may be used interchangeably for any German or German allied unit. There are three types of Replacements and they may be used thusly:• Armor Replacements may be used for any Tank or Assault Gun
unit. Remember, Soviet Mechanized units and SS Panzergrenadier Divisions are Tank Units (9.2.1).
• Infantry Replacements may be used for any Infantry Type unit.• Special Replacements may be used for Cavalry units, Security
Divisions, Artillery Divisions, HQs, Support Units or any unit with a white dot next to their Attack Strength including Wehrmacht Panzergrenadier Divisions (not SS Panzergrenadier divisions).
(23.2.2) Panzergrenadier Divisions: By the Spring of 1943 the SS Panzergrenadier divi-sions were essentially Panzer divisions and would be renamed as such in October of that
year—they are Tank units (9.2.1) and require Armor Replacements to restore. The Wehrmacht Panzergrenadier divisions were motorized infantry divisions with a Sturmgeschütz battalion attached—they are Assault Gun units (9.2.5) and require Special Replacements to restore.
NOTE: Silhouetted Armored units are both a Support unit and an Armored unit, so they can be replaced with either an Armor Replacement or a Special Replacement.
(23.2.3) Remnants: If a Remnant receives a Replace-ment of the appropriate type, the Remnant is placed back in its display (10.4), and the division/corps it was rep-resenting is brought back into the game on its reduced
side. Please be careful that the 3-step unit and the Remnant are not both in play at the same time—there should always be a unit in the Remnant Display, either the Remnant or the unit it is representing. (23.2.4) Restoring 3-step Units: To bring a 3-step unit out of the Eliminated Box, move it to the Remnant Display (10.4) and then place the Remnant onto the map.

17Ukraine ‘43 — 2nd Edition
© 2015 GMT Games, LLC
23.3 Restrictions on Replacements• For a unit on the map to receive a Replacement, it must be in
supply (judged at that moment) and not Disrupted.• Units that come out of the Eliminated Box must be placed in
a friendly controlled Major or Minor City hex that is also a Connecting Rail Hex (16.2.B).
• No unit may receive more than one Replacement per turn.• Both German and Soviet units can receive a Replacement while
in an EZOC.
23.4 Replacement MarkersIndicate each unit that receives a Replacement (including those that come out of the Eliminated Box) with a Re-placement marker. That unit may move a maximum of one hex in the Movement Phase and may not attack in
the Combat Phase. The Replacement marker is removed in the Re-covery Phase. A unit with a Replacement marker prevents ALL combat out of the hex—not just the unit receiving the Replacement. As soon as the marker is removed in the Recovery Phase the restric-tion is lifted.DESIGN NOTE: This rule allows units to remain in the front line and take replacements in a quiet sector.
24. OFF MAP BOXES AND FRIENDLY MAP EDGES24.1 The Basics(24.1.1) In General: Each player has an Off Map Box to place units that have moved or retreated off the north, west, or east map edge. The south edge has its own box (24.2.3). There is no limit to the number of units that may be placed in these boxes. Players may only move or retreat off a friendly map edge (24.2)—units that move or retreat off an enemy map edge are eliminated (exception: 24.4.1). Units that move into an Off Map Box may not reenter the map until the next turn. Units that retreat into the box are marked as Disrupted and may not reenter the map until they recover. When units from an Off Map Box enter the map, it must be through a friendly map edge. (24.1.2) Movement Cost: It cost 1 MP for a unit to exit off the map from the map edge. Units entering the map pay the cost of the first hex entered and may move normally from there.(24.1.3) Entry Location: Units that start their turn in the Off Map Box may reenter the map through any friendly north, west, or east map edge (Entry Hexes are used for Reinforcements).(24.1.4) Enemy ZOCs: Units may enter the map directly into an enemy ZOC, but may not cross or enter an enemy ZOC Bond as they enter. A unit can anchor a ZOC Hexside Bond with a friendly map edge—but not an enemy map edge.
EXAMPLES: Red and blue lines show ZOC Bonds. Soviet units A, B, and C prevent any German units in the Off Map Box entering the
two hexes marked “No”. Note that Soviet Unit A and German unit F cannot form a ZOC Bond with the enemy map edge (determined by the location of the Central Front marker [24.3.2]).
(24.1.5) Combat: Units may not attack units in an Off Map Box from the map edge, nor may units on the map edge attack units in an Off Map Box.(24.1.6) Reinforcements: Reinforcements may be placed in the Off Map Box box instead of arriving on the map, but they may not move onto the map until the following turn.
24.2 Friendly Map Edges(24.2.1) Soviet Map Edges: The entire east edge and all north edge hexes up to and including the Central Front marker half-hex (24.3) is considered friendly to the Soviet player.(24.2.2) German Map Edges: The entire west edge, the small sec-tion on the south edge at Perekop, and all north edge hexes west of the Central Front marker are friendly to the German player.(24.2.3) Perekop: The only hex that leads off the map on the south edge is the hex of Perekop. German units that move or retreat off the map through this hex are placed in the Crimea Box; Soviet units are eliminated if they do so. Axis units in the Crimea Box may only enter the map if Perekop is not occupied by a Soviet unit. The Crimea Box and the Off Map Box are not connected—German units may not move between the two.
24.3 Central Front(24.3.1) Procedure: To reflect the Central Front’s progress off the north map edge, the Soviet player rolls a die during his Supply Phase beginning on Turn 6. If he rolls a 1 or 2 then the Central Front is stalled and
does not move. If he rolls a 3-5 he receives one Half Hex and if he rolls a 6 he receives two. The Soviet player acquires Half Hexes in alphabetical order. Keep track of the western-most Half Hex with the Central Front marker(24.3.2) Properties: These Half Hexes are not playable, they serve only to show which hexsides the Soviet player controls. Specifically, the Soviet player controls all three hexsides congruent to the half hex containing the Central Front marker plus all hexsides to the east.(24.3.3) Supply Sources: German Supply Sources on the north map edge become Soviet Supply Sources once the Central Front marker reaches their location. These hexes may not be used as Soviet Entry Hexes, Soviet Reinforcements must enter at Soviet Entry Hexes.(24.3.4) Rail Hexes: Rail lines that exit the north map edge through a Half Hex are instantly repaired when the Soviet Player has repaired the hex along the Central Front line and he controls the Half Hex the rail line exits the map through.EXAMPLE: The small rail line from Konotop to Central Front Half Hex D would be repaired when the Railhead marker reaches Konotop and the Central Front marker reaches Half Hex D.
24.4 Soviet West Map Exit(24.4.1) In General: Soviet units may exit off the west map edge to gain VPs and to force the German player to match him in Attack Strength factors (Attack Factors). Once a Soviet unit exits off this map edge it may never renter the map. When Soviet units exit through the west edge, the German player must respond during his player turn by removing German (not Axis) units from the map and placing them in the same sector. The number of German Attack Factors in each sector must always match or exceed the number of

18 Ukraine ‘43 — 2nd Edition
© 2015 GMT Games, LLC
Soviet Attack Factors in that sector. Players may have more than 30 Attack Factors in a sector, but only 30 are counted.(24.4.2) German Removal: German units are placed in the west map sectors in the German Initial Phase. The German player may pick any friendly units currently on the map that are in supply (judged at that instant). The units are simply picked up and placed in the sector.(24.4.3) Friendly Status: Once a Soviet unit enters a west map edge sector, all the map edges of that sector become friendly to the Soviet player and enemy to the German player.(24.4.4) Soviet Supply Required: If the Soviet player cannot trace a LOS into the west map edge sector during a Soviet Supply Phase, then the Attack Factors of all Soviet units in that sector are halved (rounded up). This may release German units in that sector who may then reenter play in the upcoming German Movement Phase. These German units must reenter the map through a west map edge hex that is still friendly. The Soviet units remain in the sector and their Attack Factors will be counted at full value again if a LOS is reestablished.
25. VPS AND AUTOMATIC VICTORY25.1 Victory Points(25.1.1) In General: Only the Soviet player earns VPs and the accumulation of VPs is recorded on the VP Track. VPs are awarded for the capture of objective hexes and for exiting Soviet units off the west map edge (25.1.2). Each objective hex has a red circle with the number of VPs the hex is worth. Surrounding or isolating an objective hex does not earn the Soviet player VPs. (25.1.2) West Map Edge Exit: The Soviet player earns 1 VP for every sector along the west map edge he occupies with one or more combat units and if those combat units are in supply. The number of Soviet units in a sector has no bearing on the number of VPs earned.(25.1.3) Subtraction of VPs: The Soviet player must subtract 2 VPs from his total for each Soviet Supply Source (excluding Central Front Half Hexes) occupied by an Axis unit. Note that this could mean his VP total is a negative number.
25.2 Automatic VictoryThe Soviet player is under pressure to achieve success quickly. The German player is under pressure to hold his ground as long as pos-sible. Each space of the Turn Record Track has a benchmark (those numbers in the colored bands at the bottom) which indicates the number of VPs the Soviet player should have achieved by that turn. The Soviet player wins automatically if he has six more points than the benchmark at the end of any Game Turn (the Victory Determi-nation Phase). The German player wins automatically if the Soviet player is at least six points short of his benchmark at the end of any game turn. Play continues if neither player has an Automatic Victory.EXAMPLE: If the Benchmark was 8, the Soviet player would win if the VP count was 14 or more, and the Axis player would win if the VP count was 2 or less.
26. THE WEATHER TABLE26.1 General RuleDuring each Weather Phase, determine the weather for the turn by rolling one die and consulting the Weather Table. That same die roll determines the number of Air Units each side receives for that game turn.
26.2 Explanation of ResultsCLEAR: No effect.OVERCAST: Modify any Airborne Drop (28.2) die rolls by +1.RAIN: Neither player receives Air Units this turn. In addition, Rain has the following effects on Movement and Combat:• Movement: The road rate of Secondary Roads is increased to 1
MP for Mechanized units. Crossing a non-bridged Minor River cost +1 MP for all units.
• Supply: The Supply Path MP rate of Secondary Roads is increased to 1 per hex.
• Combat: All attacks made during Rain turns suffer a penalty of one shift to the left on the CRT.
27. DISENGAGEMENT27.1 The BasicsDuring the Combat Phase a unit (or stack of units) may conduct a Disengagement Attempt instead of a regular combat. If successful the unit/stack may be retreated 1-3 hexes in any direction, following all rules of Retreats (12.0) except a unit using Disengagement may not retreat into an EZOC unless the hex contains a friendly unit.
27.2 ProcedureAny non-Disrupted unit that does not attack in the Combat Phase can attempt Disengagement. Disengagement can be resolved at any time in the friendly Combat Phase (before or after any number of combats). To resolve the attempt, consult the Disengagement Table and roll a die. The owning player can either roll once for each unit in the stack or roll once for the entire stack—his choice. The Phasing Player may see the result of each attempt before deciding to do the next Disengagement Attempt. Combat Factors and CRT shifts are ignored. There is only one possible modifier to the die roll: +1 if the unit is Cavalry or Mechanized. (If disengaging as a stack,
this modifier applies only if all units in the stack are Cavarly and/or Mechanized)
Results: A “No” result means the disengagement fails and the unit remains in place. A “Yes” result allows the unit to retreat 1-3 hexes in any direction. If the unit retreats it becomes Disrupted, but recovers normally in the upcoming Recovery Phase. If the result is “Yes –1” then the unit loses a step before it retreats 1-3 hexes.
EXAMPLE: It is the Axis player’s turn and he tries to free units B and C. Unit A moves to hex X and breaks the enemy ZOC Bond allowing unit B to move into hex X. Unit C moves to hex Y. During the Combat Phase all three units (A, B and C) conduct Disengage-ment Attempts to try to retreat. Unit D is trapped by enemy ZOC Bonds and can neither move nor conduct a Disengagement Attempt.

19Ukraine ‘43 — 2nd Edition
© 2015 GMT Games, LLC
28. SOVIET AIRBORNE BRIGADES28.1 General Rule
These units become available on Turn 8. They may only enter play if air dropped. If eliminated they may not be replaced.
28.2 Airborne DropsAirdrops may occur during any Soviet Initial Phase during Clear or Overcast weather turns. The Soviet player may drop all three in one turn or split them up between several turns. The Airborne Bri-gades must be placed in a vacant hex within 7 hexes of any Soviet non-Airborne combat unit. The drop hex may not be in a Marsh, Wooded Marsh, or Major or Minor City hex. If two or more are dropped in the same turn, then the target hexes for each must be pre-designated before any Airborne Drop die rolls are made. Once dropped, an Airborne Brigade may not be re-dropped.LANDING IN A COMBAT ZONE: An Airborne brigade may land in a hex that is adjacent to an enemy unit or stack, but it may not drop in a hex that is adjacent to two or more hexes containing enemy units (see illustration). Dropping adjacent to an enemy unit incurs a +2 DRM on the Airborne Drop Table.
28.3 Airborne Drop TableAfter placement, roll one die for each Airborne unit: 1-3 = No effect—unit lands safely 4-6 = Airborne unit Disrupted 7+ = Airborne unit eliminatedDRMs:• +2 if dropped in a hex adjacent to an enemy occupied hex.• +1 if Air drop occurs in Overcast Weather (26.2).
28.4 Airborne Movement and SupplyThe brigades may not be moved on the turn it is dropped nor is it required to exit an EZOC if it is Disrupted. Airborne units are auto-matically in full supply on their first turn on the ground. On the turn after they land they are treated as regular infantry units.
EXAMPLE: The Soviet player drops two Airborne units (A and B) during his Initial Phase. The five shaded hexes indicate hexes where Airborne Drops are not allowed—they are adjacent to two enemy occupied hexes. Unit A drops in an EZOC so a +2 DRM applies to its Airborne Drop roll. If Airborne Unit A survives the drop, then the Tank Corps (Unit C) can move up to the Major River and cross all in the same turn.
S C E N A R I O S
S1. ZHUKOV’S ASSAULTThis scenario covers the first month of the great Soviet Summer of-fensive in the Ukraine. The initial assault (code named Rumiantsev) began on August 3rd with the aim of destroying 4th Panzer Army and 8th Army and recapturing Kharkov. In planned sequence, other sectors of the front from Izium to Taganrog joined the offense and soon the entire German front began to be pushed back. The month of August 1943 saw one of the most titanic struggles of the war in Russia as German forces poured in from north and south to try to stem the tide of the Soviet advance.
S1.1 Set Up and Scenario Data• Game Length: 7 turns. Starts on Turn 1 and ends in the Victory
Check Phase of Turn 7 (these turns are color coded yellow on the Turn Record Track).
• First Player: Soviet • Maps: Both maps are used• Setup: Use the Campaign Game At Start Cards• Supply Sources: See 16.2
S1.2 Special Rules• The game starts with the Soviet Initial Phase, however, no
additional Artillery Divisions may be flipped. The Soviet player receives Replacements in that first Initial Phase.
• The Guards Artillery Division in Southwest Front must start in Kupyanks (5015) but may move normally on Turn 1.
• During the Movement Phase of Turn 1 Soviet units must remain in the same Front (Voronezh, Steppe, etc.) they started in.
• Each side has one Air Unit on the first turn. Use the Weather Table for Turns 2-7.
• Do not use the Soviet Airborne Brigade rules.
S1.3 Victory ConditionsThe Soviet player wins by having at least 8 VPs in the Victory De-termination Phase of the last game turn (Turn 7). The German player wins if he prevents the Soviet player from winning.
S2. SCORCHED EARTHIt is September 7th, 1943. The Germans have recently pulled back to reorganize their lines. 6th Army has withdrawn into prepared positions. The Soviets are on the verge of attacking due west from Konotop and launching a major push against the German 6th Army in the south. Hitler is preoccupied with the Italian situation (Italy surrenders the following day) and holding as much ground as pos-sible. The Soviet attacks in the next week rip open 6th Army and slowly push back 4th Panzer Army creating a crisis in Army Group South. Finally, on September 15th, Hitler gives von Manstein per-mission to fall back to the Dnieper and destroy everything of use to the advancing Soviets.
S2.1 Set Up and Scenario Data• Game Length: 7 turns. Starts on Turn 8 and ends on the End
Phase of Turn 14 (these turns are color coded green on the Turn Record Track).
• First Player: Soviet • Maps: Both maps are used

20 Ukraine ‘43 — 2nd Edition
© 2015 GMT Games, LLC
• Setup: Use the Scenario #2 At Start Cards. German units are set up first, followed by the Soviet units. Units must be placed on or within two hexes of their Army (Axis) or Front (Soviet) front line hexes as indicated on the map. Axis units must be placed on the German side and Soviet units on the Soviet side of the Sept 7th, 1943 At Start Line. Note that some Soviet units that started on their reduced side in the 1st Scenario are now at full strength.
• Additional Step Losses: The German player must reduce a number of divisions as indicated on his setup card before play begins. This is in addition to those already indicated as reduced on the setup card.
• Supply Sources: The Central Front marker is now in Half Hex D. Soviet Railheads are in hexes: 2905 (Central), 3914 (Voronezh), 4115 (Steppe), 5021 (Southwest), 5425 (South 1), and 5428 (South 2).
S2.2 Special Rules• The game starts with the Soviet Initial Phase—the Soviet
player may flip over any three Artillery Divisions. If a Guards Artillery Division is flipped, it may be placed on an Entry Hex or Connecting Rail Hex in the normal fashion on the first turn.
• At least one German Fortification must be placed with a German unit of the 6th Army.
• The weather is Clear on the first turn and each side receives one Air Unit. Begin rolling for weather on the second turn of the scenario.
• All three Soviet Airborne Brigades are available and may be used.
S2.3 Victory ConditionsThe Soviet player starts with 10 VPs and wins by having at least 20 VPs in the Victory Determination Phase of the last game turn (Turn 14). Besides the VPs printed on the map, the Soviet player earns 2 VPs for having at least one non-Airborne unit across the Dnieper and the unit is able to trace a Line of Supply. For the purpose of this rule, do not count hex 1205 near Chernobil as across the Dnieper. The German player wins if he prevents the Soviet player from winning.
S3. CRISIS ON THE DNIEPERHISTORICAL SITUATION: It is mid-October, 1943. The Soviet bridgeheads over the Dnieper are contained but the German line is stretched thin. The Soviets go on the offensive in the south to seal off the Perekop Isthmus and trap Army Group A in the Crimea, and in the center to expand their Dnieper bridgehead and drive on Kirovograd. By November 3rd they also attack out of the Lyutezh bridgehead north of Kiev. By 6 November, Kiev, the crown jewel of the Ukraine is once again in Soviet hands.
S3.1 Set Up and Scenario Data• Game Length: 7 turns. Starts on Turn 15 and ends on the End
Phase of Turn 21 (color coded blue on the Turn Record Track).• First Player: Soviet • Maps: Both maps are used• Setup: Use the Scenario #3 At Start Cards. German units are set
up first, followed by the Soviet units. Units must be placed on or within two hexes of their Army (Axis) or Front (Soviet) front line hexes as indicated on the map. Axis units must be placed on the German side and Soviet units on the Soviet side of the Oct 10th, 1943 At Start Line. Note that some units that started on their reduced side in the 1st Scenario are now at full strength.
• Additional Step Losses: The German player must reduce a number of divisions as indicated on his setup card before play begins. This is in addition to those already indicated as reduced on the setup card.
• 24 Pz Div: The German 24 Panzer Divison enters as a turn 15 reinforcement even though marked as a turn 14 reinforcement.
• Supply Sources: The Central Front marker is now in Half Hex I. Soviet Railheads are in hexes: 1906 (Central), 2514 (Voronezh), 3019 (Steppe), 4123 (Southwest), 4326 (South 1), and 4731 (South 2).
S3.2 Special Rules• The game starts with the Soviet Initial Phase—the Soviet player
may flip over any three Artillery Divisions. If a Guards Artillery Division in Stavka Reserve is flipped, it may be placed on an Entry Hex or Connecting Rail Hex in the normal fashion on the first turn.
• The weather is Clear on the first turn and each side receives 1 Air Unit. Begin rolling for weather on the second turn of the scenario.
• All Soviet Airborne Brigades are eliminated—they may not be rebuilt.
S3.3 Victory ConditionsThe Soviet player starts with 20 VPs. If neither player has achieved an Automatic Victory before Turn 21, then the Soviet player wins by having at least 30 VPs at the end of the game. The German player wins if he prevents the Soviet player from winning.
S4. THE CAMPAIGN GAMES4.1 Set Up and Scenario Data• Game Length: 21 turns. Starts on Turn 1 and ends on the End
Phase of Turn 21.• First Player: Soviet • Maps: Both maps are used• Setup: Use the Campaign Game At Start Cards. All Axis units
start in a specific hex. One Soviet unit starts in a specific hex and the others start within the Front specified. The units must start on or adjacent to the front line and may not start on the German Fortification line.
• Sequence of Setup: German units are setup first, followed by the Soviet units.
• Supply Sources: See 16.2.
S4.2 Special Rules• The game starts with the Soviet Initial Phase, however, no
additional Artillery Divisions may be flipped.• The weather is Clear on the first turn. Begin rolling for weather
on the second turn of this scenario.• Each side receives 1 Air Unit. Use the Weather Table for all other
turns.• During the Movement Phase of Turn 1 Soviet units must remain
in the same Front (Voronezh, Steppe, etc.) they started in.• All 3 Soviet Airborne Brigades are available, but may not be used
until turn 8.
S4.3 Campaign Game VictoryIf neither player has achieved an Automatic Victory before turn 21, then the Soviet player wins by having at least 30 VPs at the end of the game. The German player wins if he prevents the Soviet player from winning.

21Ukraine ‘43 — 2nd Edition
© 2015 GMT Games, LLC
DESIGNER’S NOTESWhy a New Edition?Two years ago when I started to prepare this game for a reprint, I figured it would it would go pretty quickly. I wanted to simplify it and incorporate some of the ideas I developed in France ‘40. As I went through the old rules I realized I’ve come a long way from the complicated systems I used to enjoy in the past. I began to dread the idea of playtesting the game and even working on it. If I was going to spend 100+ hours on the project, I had to change it so I would gladly play the game. So this game became an entirely new game.
What is New?Everything. The order of battle is still there and many of the core concepts but a lot of unnecessary complexity was deleted. I dou-bled the number of examples of play and was still able to cut down on the length of the rules. The biggest change is the sequence of play—before it was Move-Fight-Reaction-Move-Fight; now it is just Move-Fight.
Core System RulesExtended Movement, ZOC Bonds, Determined Defense, the CRT are systems I’ve used before in previous games. Some modifications had to be made to account for a game turn that was representing five days instead of one. I’ll briefly go through each.Extended Movement: Same rule as in France ‘40 but it is now +3 MPs.ZOC Bonds: Same as in France ‘40 except Disrupted units can no longer form ZOC Bonds—but they still have ZOCs. This minor change helps prevent situations where a unit retreats in an arc and the ZOC Bond it forms prevents the attacker from using his full advance after combat potential.Pontoon Bridges: I wanted a rule to prevent the Soviet player from crossing the Dniepr too easily, but I also didn’t want pontoon counters and lots of pontoon bridge rules. The solution was to just assume a pontoon bridge exists if a friendly unit is on the far side. Once you get use to it, it works quite nicely.Combat Modifiers: These went from Terrain Combat Bonuses in the first edition to the very straight-forward doubling and halving. I’ve come to prefer the doubling and halving since it works nicely with my tendency to put rivers through the middle of cities.Troop Quality Shift: This rule replaces the old Panzer Corps shift in the first edition. While other units in the order of battle could be classified as elite, I wanted the TQ shift to only apply to the divi-sion-size German Panzer and Panzergrenadier divisions to reflect the lethal combined arms value of those formations. Automatic DS, Tank Shift, Air Support Shift, Disruption & Recovery, Isolation Attrition, and Fortifications: Same as in France ‘40.The CRT: To better simulate a 5-day turn I adjusted the CRT so there are more retreat results. The defender will almost always give ground when confronted by an attacker with 3-1 advantage. The attacker can guarantee an advance at 5-1 odds.Determined Defense: This rule always causes me problems, I love some of the results it can cause but often pull my hair out when it is too effective. The rule works good when turns represent a day as in France ‘40 or Normandy ‘44, but not so good with the 5 day turns of Ukraine ‘43. After a lot of tinkering I finally realized I had to prevent Determined Defenses at attacks at odds of 5-1 or greater.
Emergency Supply: When I simplified the supply rules it made it impossible for the Soviets to supply a deep breakthrough, especially one across the Dnepr. This rule allows the Soviet player to extend his supply line but at the price of losing an artillery flip.
First Edition NotesThe following notes are from the first edition but still apply:
Sudden Death Victory: This represents the unending pressure from both Hitler and Stalin. Manstein wanted to immediately withdraw to the Dnieper to shorten his line and allow him to create a large reserve for counterattacks. In hindsight this would have been a very good idea. Stalin was constantly pressuring his generals for progress which often led to high casualty assaults.Order of Battle: To keep the number of counters to a manageable size a few under-strength German infantry divisions were amalgam-ated into one unit. Soviet rifle divisions are paired together (but many of the pairings reflect actual two-division Rifle Corps). Replacements: The Ukraine in the summer and fall of 1943 was a bloodbath. Soviet casualties between Kursk and Kiev were some-where around 1,500,000 men. German casualties were not much better. Both the Soviets and Germans poured reinforcements and replacements into the area. Due to counter limitations, I made no attempt to portray all units—none-the-less, all large mechanized reinforcements are shown. Many Soviet infantry divisions and tank brigades are not shown, but are represented by the replacement system. Rather than print another 50 or so counters, players can use those from the dead pile. If you don’t have units in the dead pile or reduced units on map, then you don’t get to save the replacements for later. Stalin or Hitler would not send forces to a front that didn’t absolutely need them. Air Units: Air units are serving a duel purpose in this game. Not only are they representing ground support but the shift also reflects the allocation of attack supply and army level assets committed to that attack. Mobile Assaults: Keeping Mobile Assaults out of the Movement Phase was to prevent infantry units pouring through a small hole in the front made by a Mobile Assault. Exploitation of those types of opportunities should be for only mechanized units. I also wanted stability in the Movement Phase so that it represented the planning and preparation stage of the turn.
HINTS ON PLAYSOVIETKeep attacking and stretching the German line so the German player cannot mass his panzer divisions. The best place to stretch the line is west of Sumy. Odds as low as 2-1 are often worthwhile. The key to the game is momentum—keep his strong units disrupted and retreating. Use the Airborne brigades to help you cross the Dnepr.
GERMANOn turn 1 you should probably send two or three mechanized units from the south to the Kharkov area. If you can manage to mass three panzer divisions together in a stack you can really cause the Soviet player trouble. The same comment about momentum applies to you too—if you can disrupt his powerful stacks, the momentum may shift and he will have a hard time recovering. Aim for 4-1 attacks, but a 3-1 attack that puts a Soviet mechanized stack out of service for a turn is a good attack. Unless you need to retreat, you should be attacking every turn.

22 Ukraine ‘43 — 2nd Edition
© 2015 GMT Games, LLC
EXTENDED EXAMPLE OF PLAYThe following is an example of the first turn in the Campaign Game. While the opening setup, moves, and attacks shown were often used in playtesting, they should not be considered to represent the best possible moves.
SOVIET TURN 1Initial PhaseNo artillery flips are allowed in the first turn but the Soviet player can take his 4 Replacements—2 Infantry, 1 Armor and 1 Special. All go to the South Front in preparation for an attack on Turn 2.
Soviet Movement PhaseMost units are in position from the setup so only minor movement has been made to get units in position.
Soviet Combat PhaseThe target unit is indicated with a letter in a square box, while support units providing a shift are indicated with a letter in a circle.Combat A: Odds are 28 to 7 = 4-1. One CRT column shift right for the artillery and one shift left for the Fortification. No Tank Shift is allowed since the defender is in a Fortification. Final odds remain at 4-1. The CRT die roll is 2 = DR and the Heavy Casualty die roll is a 4 = +1 step loss. The German player can try to conduct a Determined Defense but he elects to preserve his strength and retreats 2 hexes. The Soviet player reduces one of his infantry units for the Heavy Casualties and may Advance After Combat 2 hexes.Combat B: Odds are 21 to 7 = 3-1. The Soviet player uses his Air
Unit plus two Artillery Divisions (a Guards and a regular) for 3 shifts. The Fortification cancels one shift. Final odds are 5-1. The CRT die roll is 5 = D1* and the Heavy Casualty die roll is 3 = no effect. The result is a mandatory D1 and the German unit is retreated 3 hexes. The Soviet units receive a Bonus Advance.Combat C: The 1st Tank Army contains the units shown in the display above the battle. Only the Tank Corps (7-6-6) in stack Z participates in the attack. Starting odds are 36 to 7 = 5-1. The shifts for artillery and Fortifications cancel each other out. Final odds remain at 5-1. A CRT die roll of 3 = A1/D1* and a Heavy Casualty
The situation after the resolution of combats A, B, and C showing the location of retreats and Advance After Combat. Front line ZOC Bonds are shown that block advance and retreats.

23Ukraine ‘43 — 2nd Edition
© 2015 GMT Games, LLC
die roll of 5 = +1 step loss. The German unit is reduced 1 step and must retreat 2 hexes. The Soviets lose 2 steps and receive a normal Advance After Combat.Combat D: Due to the Advance After Combat in B and C, German unit D is now surrounded and will be eliminated if it retreats. Starting odds are 42 to 7 = 6-1. The artillery shift cancels the fortification shift, so final odds remain at 6-1. The Soviet player rolls a 1 on the CRT but uses Zhukov to do a reroll. The 2nd roll is a 4 = D1*, and a Heavy Casualty die roll of 4 = +1 step loss (the Soviet player removes the rifle brigade). The German unit is eliminated in the retreat and the Soviet units receive a Bonus Advance.In a Bonus Advance the Soviet Mechanized units can advance 3 hexes, so the Soviet player advances the 5th Tank Army 2 hexes and then does a Mobile Assault against the 7th Panzer Division. Odds are 26 to 8 = 3-1. The German elite unit shifts it to a 2-1 (TQ Shift). A CRT die roll of 3 = A1/DR. The German player decides to retreat 2 hexes rather than do a Determined Defense. The 5th Tank Army is reduced 1 step, and advances into the vacated hex.
The situation after the Mobile Assault and the advance of the other two stacks involved in Combat D.
Combat E: Starting odds are 24 to 7 = 3-1. The artillery shift and the Fortification shift cancel each other out, so final odds remain at 3-1. A CRT die roll of 2 = DRX, and a Heavy Casualty die roll of 4 = +1 step loss. The German player could do a Determined Defense but again decides to preserve his strength and retreats his now reduced unit 2 hexes. Since the result is a DRX the German player selects the Soviet Mech Corps for the step loss. The Soviet player selects a rifle division for his other step loss. The surviving Soviet units receive a normal Advance After Combat (2 hexes).
The situation at the end of combat E—the German unit lost a step and was retreated 2 hexes; the Soviets lost 2 steps and advanced. Notice how the German ZOC Bond blocked the advance.
Southwest and South Fronts: I usually hold off attacking in these two Fronts until Turns 2 or 3. Hopefully by that time the Fronts will be stronger and the German player will have moved some of the Panzer and Panzergrenadier divisions in this area north to help out near Kharkov.The one exception is a possible attack at F where the Soviet player could get starting odds of 28 to 12 = 2-1, but the Fortification will
The South Front is quite on Turn 1 while the Soviet player uses all four Soviet Replacements to restore units.
In the Southwest Front the Soviet player could muster 28 Attack Factors to get a 1-1 at F.

24 Ukraine ‘43 — 2nd Edition
© 2015 GMT Games, LLC
bring it down to a 1-1. However, 1-1 odds are not that bad and so can be considered; and an advance here on turn 1 will cause the German player a headache. The flip side is wait one turn until you have two artillery shifts.
Soviet Recovery PhaseThe only Soviet unit Disrupted is the Guards Artillery Division in the Southwest Front that moved more than one hex—it recovers. The Replacement markers are also removed at this time.
Soviet Supply PhaseThe Soviet player can move forward all his Railheads two hexes but the front line has not moved forward enough to make this
worthwhile. All Soviet units are within 5 Supply Path MPs of a Connecting Rail Hex so all Soviet units are in supply. There is no Isolation Attrition and the Central Front is not activated until Turn 6.
GERMAN TURN 1German Initial PhaseThe German player receives an Infantry Replacement and a Special Replacement. He uses the infantry to bring back the eliminated division in the dead pile on its reduced side and a StuG brigade. Both are placed in Poltava with a REPL marker. His Turn 1 rein-forcement (a Security Division) is placed in a friendly Entry Hex on the north map edge.
German movement in the north half of the map.

25Ukraine ‘43 — 2nd Edition
© 2015 GMT Games, LLC
The situation after the Advance After Combat of the 5th SS and Tiger unit. Also shown is the Supply Path of the German unit partially surrounded in Belgorod.
German Movement PhaseA. The German reinforcement placed in the Entry Hex and the Hungarian Division are both moved forward to cover the hole in the line near Sumy. They each can move 6 hexes when using Extended Movement.B. The disrupted infantry division must move out of an enemy ZOC (if possible) so it is moved one hex.C. The two German units in this sector are both moved back to avoid being encircled. They pay +2 MPs to exit an EZOC.D. The 6th Panzer Division comes over from 8th Army and the StuG brigade comes from Kharkov to join with the 19th Panzer Division to set up an attack in the Combat Phase.E. The 5th SS Division is moved up from 1st Panzer Army and the Tiger battalion is brought over from Kharkov to set up an attack.F. A Fortification is started in Kharkov to turn it into a fortified city. Defenders in this hex would be doubled, the attacker would suffer a CRT column shift, and it would cause a Heavy Casualty die roll. G. The German unit in the loop of the river backs up one hex. Note there is no Soviet ZOC Bond to prevent this since a ZOC Bond cannot extend across two river hexsides.
H. The two units that received replacements can move one hex so they exit Poltava and are moved north.I. Coming up from the south are the two SS divisions (2nd & 3rd) from 6th Army.J. The reduced 23rd Panzer Division is placed in Makeyevka in order to be in a central location to react to whatever Soviet breakthrough occurs. This unit could be placed in the front line to make that hex much stronger but you reduce its mobility and risk it becoming disrupted in a retreat.K. The 2nd and 3rd SS Divisions move north to help out in the Kharkov sector. They can use the road rate of 1/2 MP per hex to travel 20 hexes (a MA of 7 plus 3 for Extended Movement).L. The 16th Panzergrenadier strengthens a favorite target hex that the Soviet player often hits on Turn 2. Note that this unit coud have received the Special Replacement to bring it to full strength but I think a StuG brigade in Poltava will be more useful.
German Combat PhaseCombat D. Odds are 20 to 10 = 2-1. The German player receives a shift for Tank and a shift for TQ. Final odds are 4-1. A die roll of 2 = DR. The Soviet player retreats the units two hexes and the stack of German units receive a normal Advance After Combat. The German player seeing no reason to stick his neck out and no easy Mobile Assault targets declines to advance.Combat E. The 5th SS Division and the Tiger unit attack hex E. The Tiger unit allows for the Tank Shift even though the Soviet hex contains two armor units. Odds are 15 to 11 = 1-1. Tank, TQ and Air shifts make the final odds 4-1. A die roll of 5 = D1. The Soviet player removes his tank brigade to satisfy the step loss and then does a Determined Defense in order to avoid becoming Disrupted and out of action for a turn. A die roll of 3 on the Clear column is a fail and so the unit is retreated 3 hexes. The two German units receive a Bonus Advance (3 hexes). Keep in mind that units are not required to enter the defender’s vacat-ed hex during an Advance After Combat, so the German player could move the stack backwards, forwards or sideways three hexes and conduct a Mobile Assault in each hex. In this example the German player is conservative and moves forward one hex and stops. The stack could Mobile Assault the 5th Guards Tank Army at odds of
Continued on page 26
26 Ukraine ‘43 — 2nd Edition
© 2015 GMT Games, LLC
15 to 21 = 1-2. With shifts for Tank and TQ the final odds would be 2-1, but a Mobile Assault at those odds is not usually worth the risk.
German Recovery PhaseAll German Disrupted units that are not in an EZOC automatically recover one level. Since all Disrupted units are on the first level the markers are removed. The replacement marker on the two units near Poltava is also removed.
German Supply PhaseAll German units are easily within 5 Supply Path MPs of a Con-necting Rail Hex so all are in supply. Note that the German infantry division in Belgorod can trace a supply line through one hex in a Soviet EZOC so its supply path can reach the Connecting Rail Hex north of Kharkov.
End of TurnThis concludes the turn and the Extended Example of Play. The Soviet Voronezh Front has been blunted somewhat, but they still have both Tank Armies in good order and a massive amount of strength. In Turn 2 the Soviet player should start the offensive in the Southwest Front or the South Front, or both.
UNIT I.D. ABBREVIATIONS:SOVIETA: AirborneCzech: CzechslovakianK–1, 2, 3: The K is for Katashuka. These units each represent
a host of Guards rocket and mortar units.KV-1: Composite of the 28 and 57 Gds Hv Tank Regts.KV-2: Composite of the 5, 9 and 10 Gds Hv Tank regts.KV-3: Composite of the 1 and 7 Gds Hv Tank regts.3M: 3d Guards Heavy Mortar Artillery DivisionSU-1: Composite of the 1549, 1529 SU regimentsSU-2: Composite of the 1547, 1440 and 1902 SU regimentsSU-3: Composite of the 1548, 1438 SU regimentsT34-1: Composite of the 39, 59, 202, and 245 Tank regimentsT34-2: Composite of the 34, 35, 148, and 167 Tank regimentsT34-3: Composite of the 52, 141, and 243 Tank regimentsTk: Tank6S: 6th Assault Engineer-Sapper Brigade7S: 7th Assault Engineer-Sapper Brigade
GERMANDR: Das ReichH: HungarianGD: GroßdeutschlandLAH: Leibstandarte SS Adolf HitlerR: RumanianRem: RemnantSec: SecuritySlov: SlovakianT: TotenkopfTurk: Turkoman (Ostruppen)W: Wiking
CREDITSGame Design: Mark Simonitch
Developer: Tony Curtis
Order of Battle Research: SOVIET: Charles Sharp, AXIS: Henry Lowood and Mark Simonitch
Art Director, Cover Art & Package Design: Rodger B. MacGowan
1st Edition Playtesting: Geoff Noble, John Grant Jr., Randy Heller, Raymond Lopez, Bob Ryan, Lew Ritter, Richard Simon, and Ken Thurston.
2nd Edition Playtesting: Rob Bottos, Krzysztof Chadaj, John Charbonneau, Christian Diedler, Pablo Garcia, Rich Hamel, John Holden, Michael Johnson, Chuck Krueger, Jim Lauffenburger, Bill Lawson, John Leggat, Brian Moore, and Henrik Reschreiter.
Map, Counters & Rulebook: Mark Simonitch
Proofreading: Hans Korting and Kevin Thomason
Production Coordination: Tony Curtis
Producers: Tony Curtis, Rodger MacGowan, Andy Lewis, Gene Billingsley and Mark Simonitch
OPTIONALTiger Tank Assets in the 2nd SS Panzer CorpsThe idea for this rule came after playtesting was completed so it should be used only as a handicap for a German player.
RULE: If a player has at least two SS Divisions in an attack, or at least two SS Divisions are stacked together in defense (do not count SS Remnant units in either case), then the German player can claim the Tiger Tank bonus (9.2.4) for that attack or defense.COMMENTARY: Each SS division usually had a company of Tiger tanks which was husbanded by the SS Panzer Corps in that area. If two SS Divisions are together than the 2nd SS Panzer Corps is considered taking part.
DESIGN NOTE: While I worry about its affect on playbalance, I do like how this rule provides an incentive for the German player to keep two SS Panzer Divisions working together as they often did.

27Ukraine ‘43 — 2nd Edition
© 2015 GMT Games, LLC
3-Step Units . . . . . . . . . . . . . . . . . . . . . . . 2.3.6, 23.2.3Advance After Combat . . . . . . . . . . . . . . . . . . . . . . 14.0Airborne Brigades (Soviet) . . . . . . . . . . . . . . . . . . . 28.0Airborne Drops . . . . . . . . . . . . . . . . . . . . . . . . . . . . 28.2Air Support . . . . . . . . . . . . . . . . . . . . . . . . . . . . . . . . 9.3Artillery Divisions . . . . . . . . . . . . . . . . . . . . . . . . . 18.0Assault Guns . . . . . . . . . . . . . . . . . . . . . . . . . . . . . 9.2.5Automatic DS . . . . . . . . . . . . . . . . . . . . . . . . . . . . . . 5.7Automatic Victory . . . . . . . . . . . . . . . . . . . . . . . . . . 25.2Bonus Advance . . . . . . . . . . . . . . . . . . . . . . . . . . . . 14.3Breakthrough Advance . . . . . . . . . . . . . . . . . . . . . . 14.2Central Front Marker . . . . . . . . . . . . . . . . . . . . . . . 24.3Combat Modifiers . . . . . . . . . . . . . . . . . . . . . . . . . . . 9.0Combat . . . . . . . . . . . . . . . . . . . . . . . . . . . . . . . . . . . 8.0Combat Results . . . . . . . . . . . . . . . . . . . . . . . . . . . . 10.0Combat Zone Recovery . . . . . . . . . . . . . . . . . . . 13.3.2Connecting Rail Hex . . . . . . . . . . . . . . . . . . . . . . .16.2BCrimea Box . . . . . . . . . . . . . . . . . . . . . . . . . . . . . 24.2.3Defensive Air Support . . . . . . . . . . . . . . . . . . . . . .11.1.4Desperation Defense . . . . . . . . . . . . . . . . . . . . . . . . 11.3Determined Defense . . . . . . . . . . . . . . . . . . . . . . . . 11.0Disengagement . . . . . . . . . . . . . . . . . . . . . . . . . . . . 27.0Disruption . . . . . . . . . . . . . . . . . . . . . . . . . . . . . . . . 13.0Emergency Supply . . . . . . . . . . . . . . . . . . . . . . . 16.3.3Extended Movement . . . . . . . . . . . . . . . . . . . . . . . . . 5.3Friendly Map Edges . . . . . . . . . . . . . . . . . . . . . . . . 24.2Fortifications . . . . . . . . . . . . . . . . . . . . . . . . . . . . . . 19.0Full Retreat . . . . . . . . . . . . . . . . . . . . . . . . . . . . . . . 13.2Guards Breakthrough Artillery . . . . . . . . . . . . . . . . 18.5Halving & Doubling . . . . . . . . . . . . . . . . . . . . . . . . . 9.1Heavy Casualties . . . . . . . . . . . . . . . . . . . . . . . . . . . . 9.6Isolation Attrition . . . . . . . . . . . . . . . . . . . . . . . . . . 16.5Izium Bend . . . . . . . . . . . . . . . . . . . . . . . . . . . . . . 9.5.4Leader Units . . . . . . . . . . . . . . . . . . . . . . . . . . . . . . 21.0Lead Unit . . . . . . . . . . . . . . . . . . . . . . . . . . . . . . .11.1.2Limited Advance . . . . . . . . . . . . . . . . . . . . . . . . . . . 14.2Line of Supply . . . . . . . . . . . . . . . . . . . . . . . . . . . . . 16.3Manstein (von Manstein) . . . . . . . . . . . . . . . . . . . . 21.1Marsh . . . . . . . . . . . . . . . . . . . . . . . . . 5.5.3, 9.5.3, 14.5Mechanized . . . . . . . . . . . . . . . . . . . . . . . . . . . . . . 2.3.3Minimum and Maximum Odds . . . . . . . . . . . . . . . . . 8.4Mobile Assaults . . . . . . . . . . . . . . . . . . . . . . . . . . . . 15.0Movement . . . . . . . . . . . . . . . . . . . . . . . . . . . . . . . . . 5.0Multi-Hex Combat . . . . . . . . . . . . . . . . . . . . . . . . . . 8.2Non-Mechanized . . . . . . . . . . . . . . . . . . . . . . . . . . 2.3.3
Off Map Boxes . . . . . . . . . . . . . . . . . . . . . . . . . . . . 24.0Overcast . . . . . . . . . . . . . . . . . . . . . . . . . . . see weatherPerekop . . . . . . . . . . . . . . . . . . . . . . . . . . . . . . . . 24.2.3Pontoon Bridges . . . . . . . . . . . . . . . . . . . . . . . . . . 5.5.4Railheads . . . . . . . . . . . . . . . . . . . . . . . . . . . . . . . . . 17.0Railroad Repair . . . . . . . . . . . . . . . . . . . . . . . . . . . . 17.2Rail Movement . . . . . . . . . . . . . . . . . . . . . . . . . . . . . 5.6Rail Ferry . . . . . . . . . . . . . . . . . . . . . . . . . . . . . . . 5.6.4Rain . . . . . . . . . . . . . . . . . . . . . . . . . . . . . . . see weatherRearguard Actions . . . . . . . . . . . . . . . . . . . . . . . . . . 12.3Recovery . . . . . . . . . . . . . . . . . . . . . . . . . . . . . . . . . 13.3Reinforcements . . . . . . . . . . . . . . . . . . . . . . . . . . . . 23.1Remnants . . . . . . . . . . . . . . . . . . . . . . . . . . . 10.4, 23.2.2Replacements . . . . . . . . . . . . . . . . . . . . . . . . . . . . . 23.2Replacement Markers . . . . . . . . . . . . . . . . . . . . . . . 23.4Retreats . . . . . . . . . . . . . . . . . . . . . . . . . . . . . . . . . . 12.0Rivers Inside hexes . . . . . . . . . . . . . . . . . . . . . . . . . . . . 2.2.2 Major River Assaults . . . . . . . . . . . . . . . . . . . . . . . 8.5 Rivers and Movement . . . . . . . . . . . . . . . . . . . . . . 5.5 River Hexsides (Combat) . . . . . . . . . . . . . . . . . . . 9.5 Rivers and Retreat . . . . . . . . . . . . . . . . . . . . . . . . 12.2Road Congestion . . . . . . . . . . . . . . . . . . . . . . . . . 15.2.3Road Movement . . . . . . . . . . . . . . . . . . . . . . . . . . . . 5.2Security Divisions . . . . . . . . . . . . . . . . . . . . . . . . . . 20.0Shock Armies . . . . . . . . . . . . . . . . . . . . . . . . . 4.3, 22.1Stacking . . . . . . . . . . . . . . . . . . . . . . . . . . . . . . . . . . . 4.0STAVKA Reserve Box . . . . . . . . . . . . . . . . . . . . 18.5.2Steps . . . . . . . . . . . . . . . . . . . . . . . . . . . . . . . . . . . 2.3.6Supply Phase . . . . . . . . . . . . . . . . . . . . . . . . . . . . . . 16.1Supply Sources . . . . . . . . . . . . . . . . . . . . . . . . . . . . 16.2Support Units . . . . . . . . . . . . . . . . . . . . . . . . . . . . . . 4.2Tactical Movement . . . . . . . . . . . . . . . . . . . . . . . . . . 5.4Tank Armies . . . . . . . . . . . . . . . . . . . . . . . . . . 4.3, 22.1Tank Shift . . . . . . . . . . . . . . . . . . . . . . . . . . . . . . . . . 9.2Tank Type Units . . . . . . . . . . . . . . . . . . . . . 2.3.3, 9.2.1Tiger Tanks . . . . . . . . . . . . . . . . . . . . . . . . . . . . . . 9.2.4Troop Quality Shift . . . . . . . . . . . . . . . . . . . . . . . . . . 9.4Unit Size . . . . . . . . . . . . . . . . . . . . . . . . . . . . . . . . 2.3.2Victory Points . . . . . . . . . . . . . . . . . . . . . . . . . . . . . 25.1Weather Table . . . . . . . . . . . . . . . . . . . . . . . . . . . . . 26.0West Map Exit (Soviet) . . . . . . . . . . . . . . . . . . . . . . 24.4Zhukov . . . . . . . . . . . . . . . . . . . . . . . . . . . . . . . . . . 21.2Zones of Control . . . . . . . . . . . . . . . . . . . . . . . . . . . . 6.1ZOC Bonds . . . . . . . . . . . . . . . . . . . . . . . . . . . 7.0, 14.4
INDEX

28 Ukraine ‘43 — 2nd Edition
© 2015 GMT Games, LLC
SEQUENCE OF PLAY OUTLINEA. WEATHER PHASEB. SOVIET PLAYER TURN1. INITIAL PHASEThe following activities are performed in any order:• Place Reinforcements (23.1).• Use Replacements (23.2).• Flip up to three Artillery Divisions or use one or more flips
for Emergency Supply markers (18.4).• Transfer Guards Artillery Divisions to the map (18.5.3).• From Turn 8 on, Soviet Air Drops possible (28.1).
2. MOVEMENT PHASE• Move units• Conduct Rail Movement (5.6)• Place Automatic DS markers in 10-1 attacks (5.7)• Build Fortifications (19.1)
3. COMBAT PHASE (8.0)• Combat, Mobile Assaults and Disengagements occur at the
time (8.0, 15.0, 27.0).
4. RECOVERY PHASE (13.3)• Removes or attempt to remove Disruption markers (13.4).• Remove Replacement markers (23.4).
5. SUPPLY PHASE (16.0)1. Move Railhead Markers (17.0).2. Central Front Table (24.0).3. Check supply of Soviet units (16.0).4. Isolation Attrition of Soviet units (16.5).
C. GERMAN PLAYER TURND. VICTORY DETERMINATION (30.0)
SPECIAL UNITS
GMT Games, LLC P.O. Box 1308, Hanford, CA 93232-1308
www.GMTGames.com
Manstein Allows one reroll in an attack, defense, or Determined Defense.
Zhukov Provides a CRT column shift in an attack at the cost of 1 step. Allows one reroll in an attack or DD.
ArtilleryDivision
Provides a CRT column shift in an attack.
GuardsArtillery
Combined with an Artillery Di-vision provides two CRT column shifts for an attack.
Tiger Unit Allows the Tank Shift against So-viet Armored units.
Airborne Brigade
May Air Drop
SecurityDivision
Those with a blue unit type box may not move from their starting hex until released.
Army HQ Allows the Soviet player to stack 3 units in a hex plus one Support Unit.
Air Unit Provides a CRT column shift in an attack or defense.
August September Oct. & Nov.Weather
Overcast
Overcast
Clear
Clear
Clear
Clear
Weather Table
GE
1
1
2
2
1
1
RU
1
1
1
2
2
2
GE
0
1
1
2
1
1
RU
1
1
1
2
2
2
GE
0
0
0
1
2
1
RU
0
0
1
1
2
2
# = German Air Units # = Soviet Air Units
Weather
Rain
Rain
Overcast
Overcast
Clear
Clear
Weather
Clear
Clear
Clear
Clear
Clear
Clear
DieRoll
1
2
3
4
5
6
28.3 Airborne Drop TableAfter placement, roll one die for each Airborne unit: 1-3 = No effect—unit lands safely 4-6 = Airborne unit Disrupted 7+ = Airborne unit eliminated
DRMs:• +2 if dropped in a hex adjacent to an enemy occupied hex.• +1 if Air drop occures in Overcast Weather (26.2).