Embed Size (px)
Citation preview
*24156804*24156804
Thick Door Kit Installation InstructionsTouchscreen DeaDbolT wITh alarm | moDel be469 connecTeD Touchscreen | moDel be468
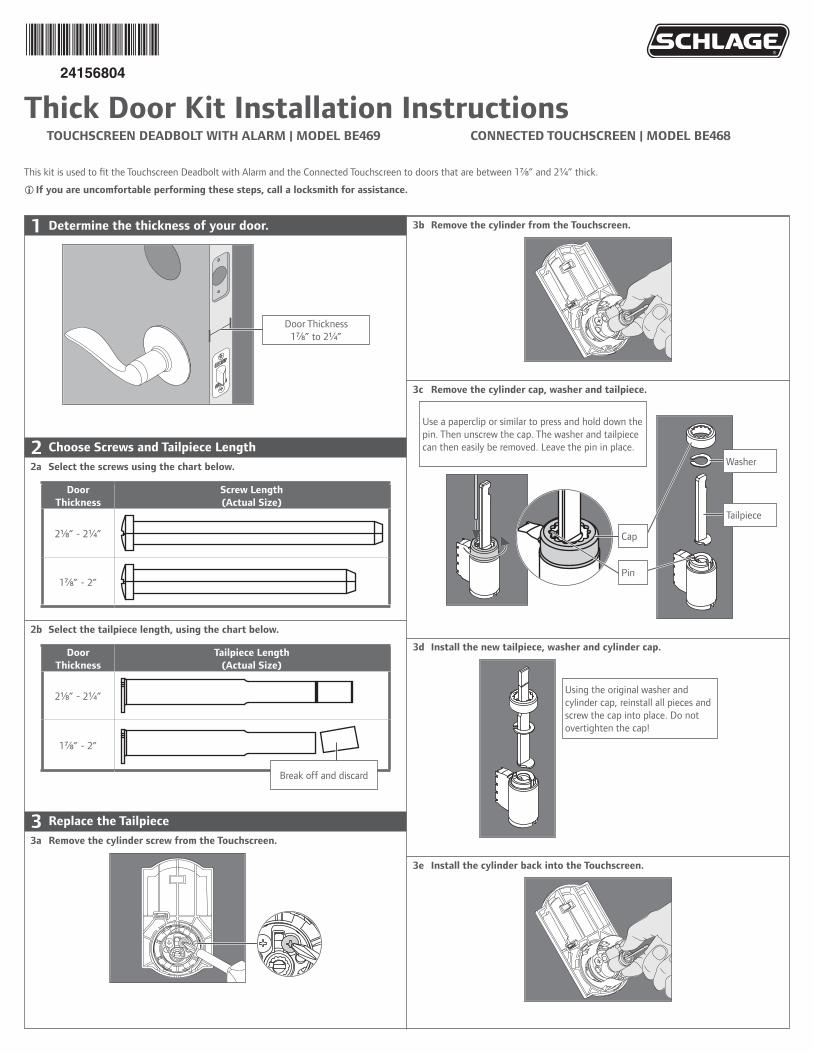
1 Determine the thickness of your door.
Door Thickness 1M\,” to 2Z\v”
2 choose screws and Tailpiece length
2a select the screws using the chart below.
Door Thickness
screw length (actual size)
2Z\,” - 2Z\v”
1M\,” - 2”
2b select the tailpiece length, using the chart below.
Door Thickness
Tailpiece length (actual size)
2Z\,” - 2Z\v”
1M\,” - 2”
3 replace the Tailpiece
3a remove the cylinder screw from the Touchscreen.
3b remove the cylinder from the Touchscreen.
3c remove the cylinder cap, washer and tailpiece.
Use a paperclip or similar to press and hold down the pin. Then unscrew the cap. The washer and tailpiece can then easily be removed. Leave the pin in place.
Cap
Pin
Washer
Tailpiece
3d Install the new tailpiece, washer and cylinder cap.
Using the original washer and cylinder cap, reinstall all pieces and screw the cap into place. Do not overtighten the cap!
3e Install the cylinder back into the Touchscreen.
Break off and discard
This kit is used to fit the Touchscreen Deadbolt with Alarm and the Connected Touchscreen to doors that are between 1M\,” and 2Z\v” thick.
L If you are uncomfortable performing these steps, call a locksmith for assistance.

3f replace the cylinder screw.
4 replace the cable and the spacer.
4a remove the spacer screw from the Touchscreen.
4b rotate the spacer so the notch is aligned with the tab, then remove the spacer from the Touchscreen.
4c remove the existing cable from the Touchscreen and replace it with the longer cable.
NOTE: If you are installing the lock on a door with a 1Z\x” (38 mm) hole, stop here; do not reinstall the spacer. Do replace the spacer screw.
4d Feed the cable through the spacer, as shown.
4e Press the cable into the groove.
4f replace the spacer as shown and rotate back into place.
4g replace the spacer screw.
You will know the spacer is in the right place when the hole in the spacer lines up with the hole in the Touchscreen.
5 Install the lock.
Install the lock as detailed in the Installation Guide, using the longer screws you selected in step 2a.
neeD helP?Please call customer support before returning the product to the store.
Toll-Free Calling From:
U.S.A.: (888) 805-9837
Canada: (800) 997-4734
Mexico: 018005067866
Visit our web site for videos, FAQs and more: answers.schlage.com
*24156804*24156804
Instrucciones de instalación del equipo de puerta gruesacerrojo De PanTalla TácTIl con alarma | moDelo be469PanTalla TácTIl conecTaDa | moDelo be468
Instructions d’installation de la trousse pour porte épaissePêne DormanT avec écran TacTIle munI D’une alarme | moDèle be469PanTalla TácTIl conecTaDa | moDèle be468
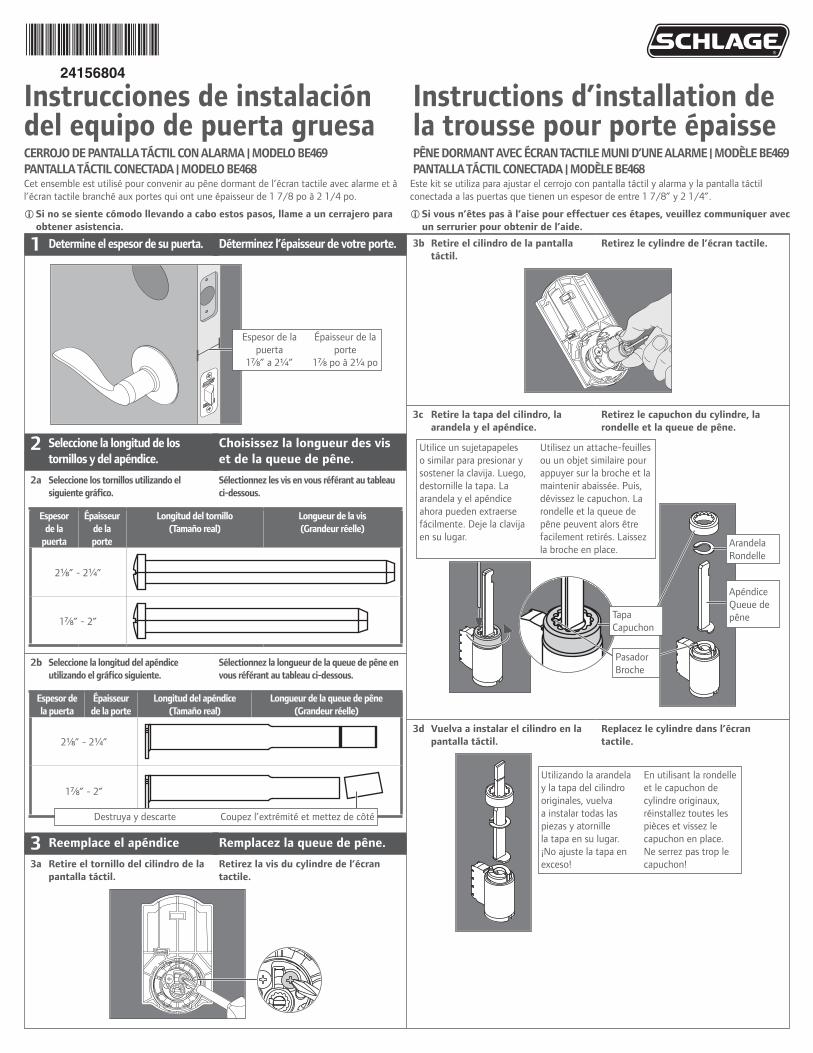
1 Determine el espesor de su puerta. Déterminez l’épaisseur de votre porte.
Espesor de la puerta
1M\,” a 2Z\v”
Épaisseur de la porte
1M\, po à 2Z\v po
2 seleccione la longitud de los tornillos y del apéndice.
2a seleccione los tornillos utilizando el siguiente gráfico.
choisissez la longueur des vis et de la queue de pêne.
sélectionnez les vis en vous référant au tableau ci-dessous.
espesor de la
puerta
épaisseur de la porte
longitud del tornillo (Tamaño real)
longueur de la vis (Grandeur réelle)
2Z\,” - 2Z\v”
1M\,” - 2”
2b seleccione la longitud del apéndice utilizando el gráfico siguiente.
sélectionnez la longueur de la queue de pêne en vous référant au tableau ci-dessous.
espesor de la puerta
épaisseur de la porte
longitud del apéndice (Tamaño real)
longueur de la queue de pêne (Grandeur réelle)
2Z\,” - 2Z\v”
1M\,” - 2”
3 reemplace el apéndice
3a retire el tornillo del cilindro de la pantalla táctil.
remplacez la queue de pêne.
retirez la vis du cylindre de l’écran tactile.
3b retire el cilindro de la pantalla táctil.
retirez le cylindre de l’écran tactile.
3c retire la tapa del cilindro, la arandela y el apéndice.
retirez le capuchon du cylindre, la rondelle et la queue de pêne.
Utilice un sujetapapeles o similar para presionar y sostener la clavija. Luego, destornille la tapa. La arandela y el apéndice ahora pueden extraerse fácilmente. Deje la clavija en su lugar.
Utilisez un attache-feuilles ou un objet similaire pour appuyer sur la broche et la maintenir abaissée. Puis, dévissez le capuchon. La rondelle et la queue de pêne peuvent alors être facilement retirés. Laissez la broche en place.
TapaCapuchon
PasadorBroche
ArandelaRondelle
ApéndiceQueue de pêne
3d vuelva a instalar el cilindro en la pantalla táctil.
replacez le cylindre dans l’écran tactile.
Utilizando la arandela y la tapa del cilindro originales, vuelva a instalar todas las piezas y atornille la tapa en su lugar. ¡No ajuste la tapa en exceso!
En utilisant la rondelle et le capuchon de cylindre originaux, réinstallez toutes les pièces et vissez le capuchon en place. Ne serrez pas trop le capuchon!
Destruya y descarte Coupez l’extrémité et mettez de côté
Cet ensemble est utilisé pour convenir au pêne dormant de l’écran tactile avec alarme et à l’écran tactile branché aux portes qui ont une épaisseur de 1 7/8 po à 2 1/4 po.
Lsi no se siente cómodo llevando a cabo estos pasos, llame a un cerrajero para obtener asistencia.
Este kit se utiliza para ajustar el cerrojo con pantalla táctil y alarma y la pantalla táctil conectada a las puertas que tienen un espesor de entre 1 7/8” y 2 1/4”.
Lsi vous n’êtes pas à l’aise pour effectuer ces étapes, veuillez communiquer avec un serrurier pour obtenir de l’aide.
© Allegion 2013Printed in Country
24156804 Rev. 12/13-b
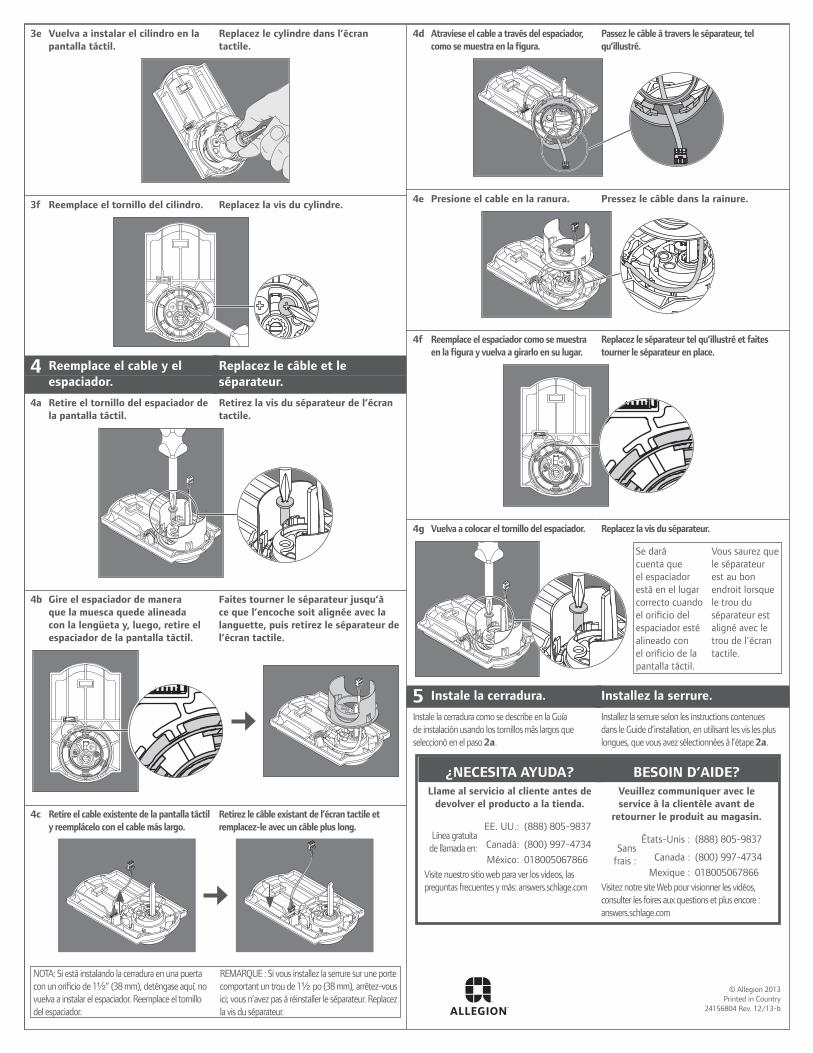
3e vuelva a instalar el cilindro en la pantalla táctil.
replacez le cylindre dans l’écran tactile.
3f reemplace el tornillo del cilindro. replacez la vis du cylindre.
4 reemplace el cable y el espaciador.
4a retire el tornillo del espaciador de la pantalla táctil.
replacez le câble et le séparateur.
retirez la vis du séparateur de l’écran tactile.
4b Gire el espaciador de manera que la muesca quede alineada con la lengüeta y, luego, retire el espaciador de la pantalla táctil.
Faites tourner le séparateur jusqu’à ce que l’encoche soit alignée avec la languette, puis retirez le séparateur de l’écran tactile.
4c retire el cable existente de la pantalla táctil y reemplácelo con el cable más largo.
retirez le câble existant de l’écran tactile et remplacez-le avec un câble plus long.
NOTA: Si está instalando la cerradura en una puerta con un orificio de 1Z\x” (38 mm), deténgase aquí, no vuelva a instalar el espaciador. Reemplace el tornillo del espaciador.
REMARQUE : Si vous installez la serrure sur une porte comportant un trou de 1Z\x po (38 mm), arrêtez-vous ici; vous n’avez pas à réinstaller le séparateur. Replacez la vis du séparateur.
4d atraviese el cable a través del espaciador, como se muestra en la figura.
Passez le câble à travers le séparateur, tel qu’illustré.
4e Presione el cable en la ranura. Pressez le câble dans la rainure.
4f reemplace el espaciador como se muestra en la figura y vuelva a girarlo en su lugar.
replacez le séparateur tel qu’illustré et faites tourner le séparateur en place.
4g vuelva a colocar el tornillo del espaciador. replacez la vis du séparateur.
Se dará cuenta que el espaciador está en el lugar correcto cuando el orificio del espaciador esté alineado con el orificio de la pantalla táctil.
Vous saurez que le séparateur est au bon endroit lorsque le trou du séparateur est aligné avec le trou de l’écran tactile.
5 Instale la cerradura.
Instale la cerradura como se describe en la Guía de instalación usando los tornillos más largos que seleccionó en el paso 2a.
Installez la serrure.
Installez la serrure selon les instructions contenues dans le Guide d’installation, en utilisant les vis les plus longues, que vous avez sélectionnées à l’étape 2a.
¿necesITa ayuDa?llame al servicio al cliente antes de
devolver el producto a la tienda.
Línea gratuita de llamada en:
EE. UU.: (888) 805-9837
Canadá: (800) 997-4734
México: 018005067866Visite nuestro sitio web para ver los videos, las preguntas frecuentes y más: answers.schlage.com
besoIn D’aIDe?veuillez communiquer avec le service à la clientèle avant de
retourner le produit au magasin.
Sans frais :
États-Unis : (888) 805-9837
Canada : (800) 997-4734
Mexique : 018005067866Visitez notre site Web pour visionner les vidéos, consulter les foires aux questions et plus encore : answers.schlage.com

4.25
5.500
Front
Additional notes: revision History revision Description:B > Updated artwork
1. none A B C D E F
032181 042894
MaterialWhite Paper
Edited By Approved By EC number release Date
D. Myers P. Bockelman 042894 12-12-13
notes1. printed two sides2. printed black3. tolerance ± .134. printed in country may vary5. drawings not to scale6. folded so barcode shows on front
title
BE469 thick Door Kit ISCreation Date01-03-13
number
24156804revision
BCreated ByM. Sasso
Activity3899 Hancock Expwy
Security, Co 80911 © Allegion 2013Software: InDesign CS6
17.000
11.000
BEGInnInG SHEEt
FolDED SHEEt
Front Front Back Back
Page 1 Page 2 Page 3 Page 4


![Capteur intelligent à ˜bre E3X-HD Présentation du …...tel qu’illustré ci-dessous. Relâcher le bouton lorsque [ ] s’affiche. L’affichage numérique en rouge est modifié](https://img.dokumen.tips/doc/110x75/5f7c6d3415f43d2b1820ea15/capteur-intelligent-oebre-e3x-hd-prsentation-du-tel-quaillustr-ci-dessous.jpg)