Embed Size (px)
Citation preview

2.3 CNC Milling with BoXZYThis is where you learn how to CNC mill using BoXZY's Milling Head.
Written By: Joel Johnson
2.3 CNC Milling with BoXZY
© 2017 boxzy.dozuki.com/ Page 1 of 13

INTRODUCTION
By beginning this manual we assume you have read andunderstood the following manuals and wiki. If you have notread them, please do so now.
Preparing to use BoXZY1.0 BoXZY Safe Use1.1 Un-Boxing Your BoXZY1.2 Setting Up Your BoXZY1.3 Using Your BoXZY
A NOTE TO ADVANCED USERS:
Click HERE for an advanced user wiki to speed up your understanding of BoXZY. Beginners, werecommend against reading this until you have followed through all active instructions and milledsome of your own files.
2.3 CNC Milling with BoXZY
© 2017 boxzy.dozuki.com/ Page 2 of 13

Step 1 — Milling on BoXZY: From Start to Finish
Safety is your top concern whenusing BoXZY. BoXZY makes CNCmilling easier, but there’s always achance that something can gowrong. Taking proper care andprecautions when milling canprevent damage to yourself or yourmachine. Make sure you understandall instructions andrecommendations to avoidunwanted behavior from yourmachine.
These steps summarize how to millon BoXZY. Each step is a link to amini-manual that expands on thetopic in more detail. Before movingon, please read each mini-manualand then complete theinstructions on this page formilling a test file.
Verify that BoXZY is connected tothe BoXZY Interface and that youhave homed your empty machinebefore beginning these steps.
Step 1: Create a file for theobject you wish to mill.
Step 2: Mount your rawmaterial blank or part.
Step 3: Set your Z offset andrun an air pass.
Step 5: Execute your file andmill your creation!
2.3 CNC Milling with BoXZY
© 2017 boxzy.dozuki.com/ Page 3 of 13
The rest of this manual will guideyou through milling a sample file. It'simportant that you follow thisentire manual before attemptingto mill your own file.
Step 2 — Prepare BoXZY for Milling the Test File
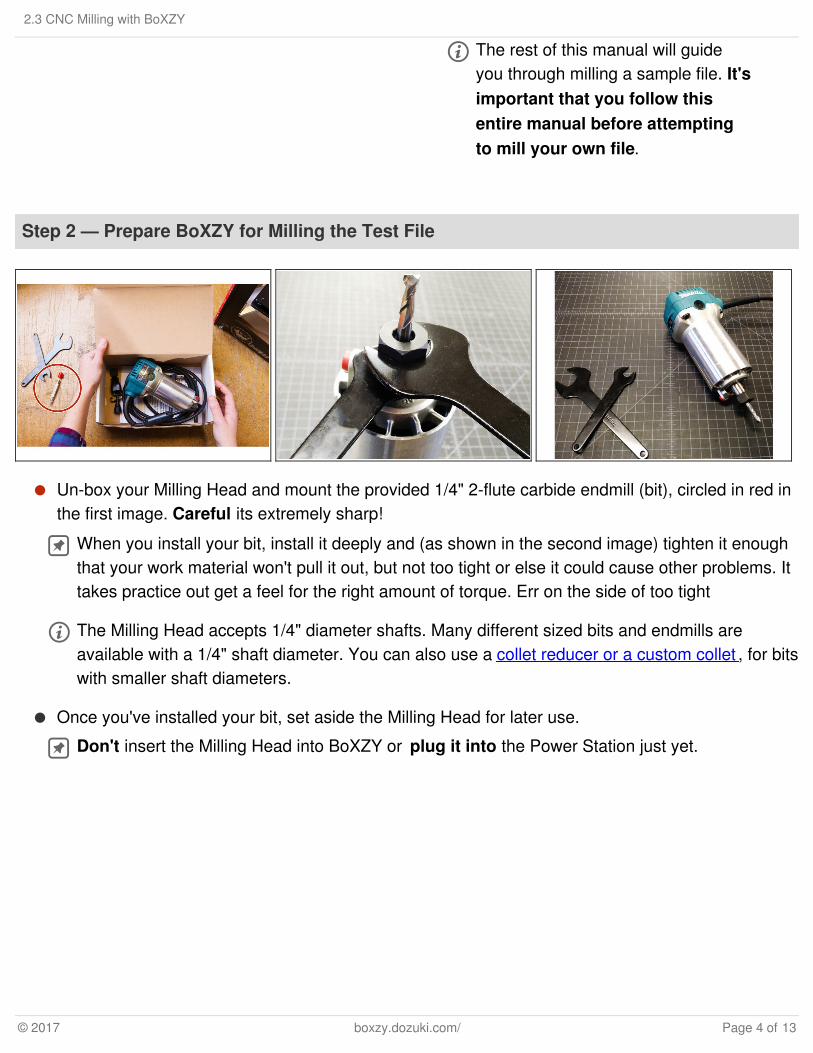
Un-box your Milling Head and mount the provided 1/4" 2-flute carbide endmill (bit), circled in red inthe first image. Careful its extremely sharp!
When you install your bit, install it deeply and (as shown in the second image) tighten it enoughthat your work material won't pull it out, but not too tight or else it could cause other problems. Ittakes practice out get a feel for the right amount of torque. Err on the side of too tight
The Milling Head accepts 1/4" diameter shafts. Many different sized bits and endmills areavailable with a 1/4" shaft diameter. You can also use a collet reducer or a custom collet , for bitswith smaller shaft diameters.
Once you've installed your bit, set aside the Milling Head for later use.
Don't insert the Milling Head into BoXZY or plug it into the Power Station just yet.
2.3 CNC Milling with BoXZY
© 2017 boxzy.dozuki.com/ Page 4 of 13

Step 3 — Keep Your E-Stop Within Reach Every Time You Mill
Keep your e-stop easily accessibleevery time you mill with BoXZY.When executing a milling file,whether an air pass or actuallycutting into material, keep your handon the e-stop. Don't be afraid to useit if you see the mill do somethingyou don't like.
Refer to Step 8 in this manual torefresh yourself on the e-stop andhow it works, including how to usethe software e-stop to clearcommands that were sent to BoXZYwhen the physical e-stop wasactivated.
2.3 CNC Milling with BoXZY
© 2017 boxzy.dozuki.com/ Page 5 of 13

Step 4 — Use the Milling Head as an Alignment Tool
Throughout this guide, we'llfrequently suggest setting yourMilling Head into the AttachmentMount so you can use your bit as atool to align your material to theMilling Platform.
Instead of finding the center of yourbit you can use a bit with a sharppoint to align to an edge, as shownin the image. Use the pointed bit foralignment and then swap your workbit back into the Milling Head, beforesetting your Z0.
Remember: These are temporarysteps: You will still need to properlyset up the Z User Home and lockthe Attachment Mount prior torunning the file.
2.3 CNC Milling with BoXZY
© 2017 boxzy.dozuki.com/ Page 6 of 13

Step 5 — Mount Your Material
Lower the Milling Platform using the positive Z manual controls (shown in the red box in the firstimage) to create the clearance you need to mount your material. Move the platform down farenough so that you can temporarily set in the Milling Attachment to use the bit for alignment.
The upcoming Milling Test file does not cut all the way through the material, so you do not need touse the sacrificial board for the following steps.
Place a piece of wood that is at least 3.5" x 8" x 0.5" in dimension onto your Milling Platform. Alignthe 8" length so it's parallel with the movement of the Y axis.
Firmly secure the wood to the platform. We used nuts and bolts, as shown in the third image, butyou can clamp your material instead.
Make sure your clamps or bolts are outside of BoXZY's range of travel.
2.3 CNC Milling with BoXZY
© 2017 boxzy.dozuki.com/ Page 7 of 13

Step 6 — Insert the Milling Head
If necessary, lower the Milling Platform to create enough space in order to install the Milling Headand still leave space between the material and the bit.
Insert the Milling Head into the Attachment Mount so that its base is nearly flush with the bottom ofthe Attachment mount. Then temporarily clamp it in place. Do not connect the Milling Head topower at this time.
Now move the Milling Platform back up toward the bit until you’re within roughly 1” of it, but notclose enough to touch the bit, as shown in the second image.
2.3 CNC Milling with BoXZY
© 2017 boxzy.dozuki.com/ Page 8 of 13

Step 7 — Set the Z Start Point
Until you set the Z Start Point,BoXZY does not know where thebit is in relationship to the material.It’s extremely important that BoXZYknows this position in order to millcorrectly.
Enter G1 X0 Y0 into the G-codeinput line to send the machine backto its X0, Y0 position.
Do not use home buttons or aG28 command. They will undoyour User Home position andpotentially lead to a crash ifanything is inside the machine.
Unclamp the Attachment Mount andallow the Milling Head to gentlyslide down until the bit touches yourmaterial, as shown by the redarrows in the first image.
Move the platform upwards, allowingit to push the Milling Head up with ituntil the base of the its outer body isflush or slightly below the base ofthe Attachment Mount, as shown bythe purple arrow in the secondimage.
Type G92 Z0 into your G-code inputline and hit Send. This will set thecurrent position of your Z axis as 0
Verify your current Z position hasbeen set to 0 by entering G1 Z0.It should not move.
2.3 CNC Milling with BoXZY
© 2017 boxzy.dozuki.com/ Page 9 of 13
Clamp your Attachment Mount. Ifthe attachment can rotate withcareful but firm pressure, the clampshould be tightened. Check that theclamp is completely pushed inwhenever you're milling.
Step 8 — Run an Air Pass
Your milling files won't always execute the way you expect them to. An air pass will let you knowwhat you're in for.
Performing an air pass before every milling file will help you prevent unwanted behavior like thebit cutting your clamps, cutting the file in the wrong location, or moving too fast or too slow.
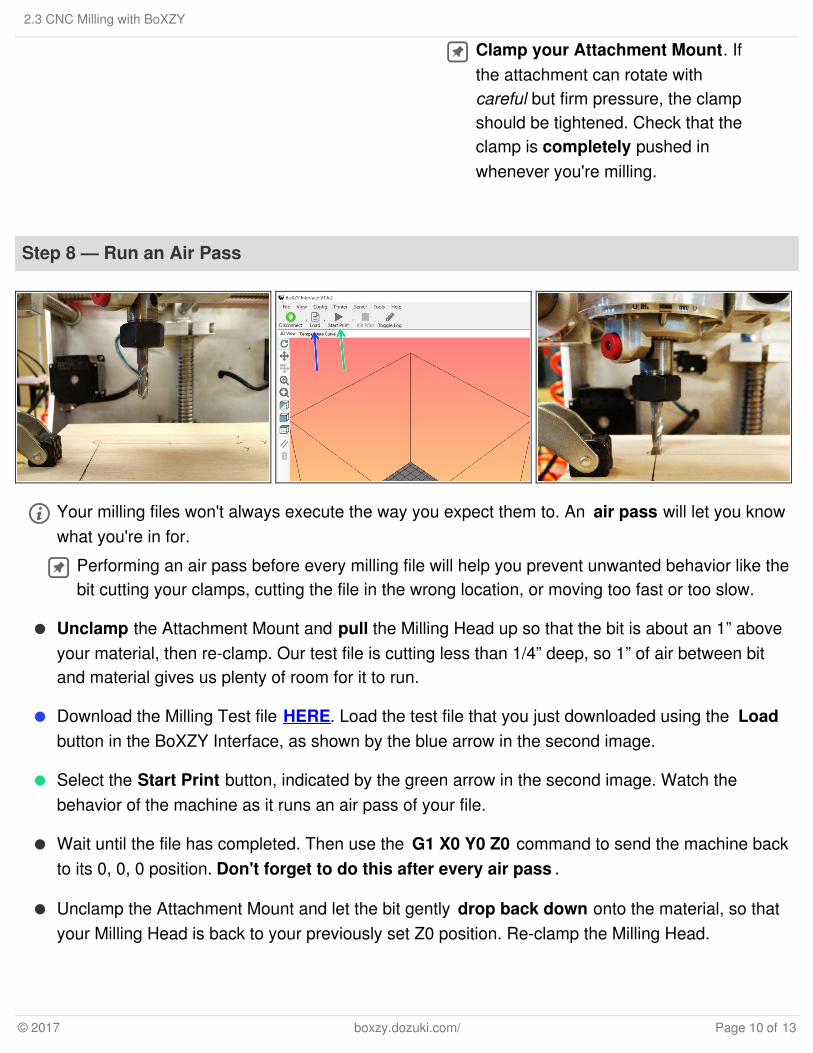
Unclamp the Attachment Mount and pull the Milling Head up so that the bit is about an 1” aboveyour material, then re-clamp. Our test file is cutting less than 1/4” deep, so 1” of air between bitand material gives us plenty of room for it to run.
Download the Milling Test file HERE. Load the test file that you just downloaded using the Loadbutton in the BoXZY Interface, as shown by the blue arrow in the second image.
Select the Start Print button, indicated by the green arrow in the second image. Watch thebehavior of the machine as it runs an air pass of your file.
Wait until the file has completed. Then use the G1 X0 Y0 Z0 command to send the machine backto its 0, 0, 0 position. Don't forget to do this after every air pass .
Unclamp the Attachment Mount and let the bit gently drop back down onto the material, so thatyour Milling Head is back to your previously set Z0 position. Re-clamp the Milling Head.
2.3 CNC Milling with BoXZY
© 2017 boxzy.dozuki.com/ Page 10 of 13

Step 9 — Plug In and Turn On the Milling Head
Press the physical e-stop down before plugging in the Milling Head. Verify that the Milling Head isswitched to the OFF position. The Milling Head is powered off when the circle icon, shown by thered arrow in the first image, is pressed down.
Plug the Milling Head into the BoXZY Power Station, as shown in the second image. Always usethe outlet on the Power Station so you can cut power to the Milling Head with the e-stop.
You and anyone else around you should be wearing eye protection.
Never put your hands in BoXZY when it the Milling Head is powered on and the bit is spinning.
Adjust the spindle speed to the 4 setting using the dial at the top of the Milling Head, indicated bythe red arrow in the third image.
Flip the Milling Head power switch to the ON position, indicated by the yellow arrow in the firstimage. Then twist the e-stop to power up BoXZY and the Milling Head. Your bit will begin to spin.
The Milling Head's spindle has 6 speed settings going up to 30,000 RPM. Here are the actualmeasured RPMs for each setting: 1 = 9470, 2 = 12280, 3 = 16870, 4 = 22175, 5 = 27035, 6 =29800.
2.3 CNC Milling with BoXZY
© 2017 boxzy.dozuki.com/ Page 11 of 13

Step 10 — Run the Milling Test File
Your Milling Test file G-code will stillbe loaded from when you ran the airpass.
Verify one last time that yourmachine is in the correct 0, 0, 0position and that your bit is restingon the material.
Press the Start Print button andwatch the Milling Test execute ontoyour material.
When the machine comes to acomplete stop (or if an error occurs)press the e-stop on the powerstation and then turn the MillingHead power switch to OFF.
You should now have the word“BoXZY!” cut into your piece of wood, as seen in the image!
2.3 CNC Milling with BoXZY
© 2017 boxzy.dozuki.com/ Page 12 of 13

This document was last generated on 2017-11-22 11:57:25 AM.
Step 11 — Using Other Attachment Heads
Congratulations, you've now gainedsome BoXZY CNC Millingexperience! Take some time toabsorb what you've learned and re-read all the information we'veprovided, now that you have somecontext for it all. Be safe and havefun!
Laser Etching with BoXZY
2.1 3D Printing with BoXZY
2.3 CNC Milling with BoXZY
© 2017 boxzy.dozuki.com/ Page 13 of 13


![CNC Milling[1]](https://img.dokumen.tips/doc/110x75/55cf9cd7550346d033ab3f24/cnc-milling1.jpg)
