Embed Size (px)
Citation preview
2018
ICT Guide for the University of Tsukuba筑波大学ICTガイド2018
Authors:Organization for Information Infrastructure; Division of Risk Management; Division of Educational Promotion; Division of Student Welfare; Academic Computing and Communications Center; Office of Educational Cloud; General Foundation Subjects "Information Literacy" Management Office;
April 2018
著者:情報環境機構;総務部リスク・安全管理課;教育推進部教育推進課;学生部学生生活課;学術情報メディアセンター;教育クラウド室;「情報」推進室;
2018. 4.
20
18
ICT
Guide for the U
niversity of Tsukuba
筑波大学ICTガイド2018

問い合わせ / Contacts
1, 2: 情報環境機構 / Organization for Information Infrastructure
3: 総務部リスク・安全管理課 /Division of Risk Management, Department of General Affairs
4, 9: 学術情報メディアセンター /Academic Computing and Communications Centerhttp://www.cc.tsukuba.ac.jp/wp_e/contact/
5, 6: 教育推進部教育推進課 / Division of Educational Promotion
7: 教育クラウド室 / manaba Help Desk, Office of Educational Cloud, ACCC
8: 共通科目「情報」推進室 / General Foundation Subjects "Information Literacy" Management Office
問い合わせ /Contacts
1, 2:情報環境機構 /Organization for Information Infrastructure☎ 029-853-2070; メール[email protected]
3:総務部リスク・安全管理課 /Division of Risk Management, Department of General Affairs☎ 029-853-2195; メール [email protected]
4, 9:学術情報メディアセンター /Academic Computing and Communications Center☎ 029-853-2452; (J) http://www.cc.tsukuba.ac.jp/wp/support/
(E) http://www.cc.tsukuba.ac.jp/wp_e/contact/
5, 6:教育推進部教育推進課 /Division of Educational Promotionメール [email protected]
7:教育クラウド室 /manaba Help Desk, Office of Educational Cloud, ACCC☎ 029-853-6892; メール [email protected]
8:共通科目「情報」推進室 / General Foundation Subjects "Information Literacy" Management Officeメール [email protected]

Contents
1 Safe and Secure Use of the Information Systems2 Taking the “INFOSS Information Ethics” course3 Emergency E-mail Notifications from the University4 Overview of ICT Systems at University of Tsukuba4.1 Unified Authenticaion System 4.2 Connecting to the On-Campus Network4.2.1 On-Campus Wi-Fi System 4.2.2 Zengaku Information Outlet and Network System4.2.3 Other Networks 4.3 Zengaku Computer System 4.3.1 Satellite Computer Rooms 4.3.2 Accounts of the Zengaku Computer System 4.3.3 E-mail 4.3.4 Publishing Web pages 4.3.5 Structure of File System and quota (upper limit) 4.3.6 Printing 4.4 VPN Connection Service 4.5 International Academic Roaming Service “eduroam” 4.6 Other Network Services 4.7 Available Software on Individual PC 5 TWINS Operation Guide for Students 5.1 Login / Logout 5.2 Confirmation of Contact Details 5.3 How to View Your Own Student Information 5.4 “Course Registration” and “Cancellation” 5.5 Confirm Grades 5.6 Inquiry/ Survey 5.7 Tsukuba Information Portal Site(TIPS) 6 Viewing of the Syllabus by using the Curriculum Scheduling Support System (KdB) 6.1 Search for the course 6.2 Browsing the Syllabus of the Search results 6.3 About [The official version] and [The latest version] of Syllabus
1567899
101111121313141515191920202121212222242424
29293030
( i )
7 Learning Management System (manaba) 7.1 Login, Logout 7.2 User Support 7.3 Initial Settings 7.4 Course Page 7.5 Course Registration 7.6 Tests, Assignments, Grades, Resources, and Attendance8 Zengaku Computer System 8.1 Powering Up a Personal Computer (PC) 8.2 Starting Up and Closing Windows 10 8.3 Starting Up and Closing Linux OS 8.4 Japanese Language Input Method on Windows 10 8.4.1 Typing Words 8.4.2 Getting Ready to Type in Japanese 8.4.3 Entering the Japanese Reading 8.4.4 Converting to Kanji 8.4.5 Converting to Katakana and Hiragana 8.4.6 How to Type in Romaji Input (Alphabets) 8.4.7 Entering Symbols 8.4.8 Typing Other Symbols 8.4.9 Punctuation Marks(「。」 and「、」or「.」and「,」) 8.4.10 Recording words 8.5 USB memory stick 9 Internet and E-mail 9.1 Warning when you are using Internet 9.1.1 Be careful when registering 9.1.2 Do not accept requests from strangers 9.2 Using E-mail 9.3 Manners when writing an E-mail 9.4 How to write sentences on E-mail
313131323334353737373940404141424344444445464749494949495050
( ii )

1
I never duplicate any copyrighted materials or make them available to a third party on the network. (A revised copyright law took effect in October 2012 and a penalty was
introduced for downloading digital audio or visual recordings which infringe copyright.)
I do not have any file exchange software program installed. - Examples of file exchange programs: Xunlei, BitTorrent, μTorrent, LimeWire, Cabos,WinMX, Share, Winny, etc.
I regularly update Windows and use all software programs in their most recent version.
I have installed an antivirus software program. In addition, I frequently update the virus definition files to protect the computer from viruses.
I never give my password to anyone.
I never use other people’s passwords and user names.
I have set up a password which is hard to break.
I always manage personal information carefully and I always take measures to prevent information leakage.
As a member of the University of Tsukuba, I act responsibly and ethically when posting information on social networking sites and the Internet in general.
When I use the Internet, I pay close attention to fraud (phishing or one-click fraud).
I am careful not to open suspicious e-mails.
Safe and Secure Use of The Information Systems
When using the information systems in the University of Tsukuba (networks, computers etc.), there are some guidelines you must follow. Before using these systems, you need to read the checklist below. If there are items that do not apply, please read the brochure carefully and follow the guidelines for using the information systems. For more details regarding this brochure, please go to: http://www.oii.tsukuba.ac.jp/oii-security/ .
RCheck!
Organization for Information Infrastructure
□
□
□
□
□
□
□
□
□
□
□
( ii )

2
To avoid further infection, remove the infected computer from the network (remove the network cable or the external wireless LAN card; if you use an internal wireless LAN card, turn its switch off) and contact us at the address on the last page of this brochure.
I never duplicate any copyrighted materials or make them available to a third party on the network. (A revised copyright law took effect in October 2012 and a penalty was introduced for downloading digital audio or visual recordings which infringe copyright.)
The purpose of the copyright law is “to provide for, and to secure protection of, the rights of authors, etc. and the rights neighboring thereto with respect” to “[copyrightable] works as well as performances, phonograms, broadcasts and wire-broadcasts, while giving due regard to the fair exploitation of these cultural products, and by doing so, to contribute to the development of culture.” If you duplicate copyrighted works illegally and make them available to a third party without the author’s permission, you are subject to punishment. You may also be punished for downloading digital audio or visual recordings when you are aware that they have been uploaded infringing copyright.
I do not have any file exchange software program installed.
Using file exchange software is very dangerous because some people distribute files with bad intentions. Moreover, the file you have downloaded is automatically uploaded for a third party. The University of Tsukuba forbids the use of any file exchange software program inside the campus network, including on the users’ personally owned computers. There is a system in place that blocks the use of file exchange software 24 hours a day and if you violate these rules, you may be punished by the authorities of the university. However, if you have a legitimate reason to use a file exchange software program on campus, please contact us. (Our contact address is shown on the last page of this brochure.)
I regularly update Windows and use all software programs in their most recent version.
Computer viruses can spread maliciously through the operating system (Microsoft Windows, macOS (former Mac OS X), etc)and can take advantage of defects in popular software programs (Microsoft Office, Adobe Flash Player, Adobe Reader, Java, etc). For Microsoft Windows, you need to perform Windows Update or Microsoft Update; for macOS (former Mac OS X), you need to regularly do software updates to maintain the software in its latest version. It is also important to update all other software programs regularly.
I have installed an antivirus software program. In addition, I frequently update the virus definition files to protect the computer from viruses.
When a computer is infected with a virus, not only data on the computer are destroyed but also the computer itself is taken over by the virus, and it might be used to send spam e-mails and attack other computers. Infection routes have diversified and using e-mails is not the only way a computer virus can spread. Actions such as browsing the Web or simply inserting a USB memory into the computer may cause infection. To avoid being infected with a virus, it is important to install an antivirus software program and update the virus definition files on a regular basis. The University of Tsukuba has purchased a site license of an antivirus software program. With the new license, the antivirus can be installed on up to three personal devices. The devices can be a combination of Windows machines, Macintosh machines and mobile terminals, such as iOS or Android. The total number of installations must be less than 4. For more details, please go to http://www.oii.tsukuba.ac.jp/oii-security/ .
Anti Virus
Copyright
authorauthor
What if the
computer is infected
with a virus?

3
If a password is easy to break (your name, user name, birthday, phone number, repeating the same characters, using an English word more than once, using the alphabet in sequence on a keyboard, like “qwerty”, or using the above in reverse), a third party may gain illicit access to your account. It is important to set a password which is difficult to break (more than 6 characters, combination of capital letters, small letters, symbols and numbers) and change it regularly. Even if a password is difficult to break, it is not advisable to write it down and make it available to a third party. Furthermore, it is not advisable to use the same password on different Internet services. Incidents have occurred where passwords were leaked from an Internet service; the same passwords were used to gain illegal access to a university computer and send spam emails. If you need passwords for many different online services, you can use a password management software.
I never give my password to anyone.
Usernames and passwords used for the information systems in the University of Tsukuba are important information to identify the users. If you give your username and password to a third party and he/she causes trouble while using the information systems of the university, you are also responsible for the problem because you gave away your password. Furthermore, you must not use a username and password given to you by somebody else.
I never use other people’s passwords and user names.
It is against Act on the Prohibition of Unauthorized Computer Access to acquire somebody else’s username and password and log in as that person, or to take advantage of a security hole (flaw in a software program) for avoiding the username and password confirmation, and log into a computer.
I have set up a password which is hard to break.
I always manage personal information carefully and I always take measures to prevent information leakage.
As a member of the University of Tsukuba, I act responsibly and ethically when posting information on social networking sites and the Internet in general.
Faculty members as well as students may handle personal and medical information collected through surveys and so on during lectures and practice classes, but that information must not be released on the network. It is also forbidden to take the information outside the university. If you need to take part of the information out of the campus, you need to obtain permission from an administrator of the respective information, or a person designated by the administrator (an instructor of a class, or a supervisor of a laboratory, in case of a lecture or practice class) and take measures to secure the information (e.g. encrypt it), before carrying it away from the campus. You are not allowed to keep personal information on your own computer. If this is unavoidable, you must encrypt the information first.
Everything you post on the internet can be seen by anyone. If posting carelessly, you may get into trouble and your actions may affect the reputation of our university. You should be very careful not to post confidential, inappropriate or offensive information on the Internet.
4
Please contact us immediately if you find security vulnerabilities and defects in the information systems of the University of Tsukuba, infringement of copyright, leaking of classified or personal information, release of classified information or personal information about faculty members of the University of Tsukuba through the information systems outside the university, and unauthorized use of contents owned by the University of Tsukuba.
This brochure has been created by the Office for Information Infrastructure Planning, Organization for Information Infrastructure at the University of Tsukuba.
Issued in March, 2018
Contact information
Organization for Information Infrastructure (Division of Information Infrastructure Management, Department of Academic Information) Phone: 029-853-2070 (Japanese only) e-mail: [email protected]
When I use the Internet, I pay close attention to fraud (such as phishing or one-click fraud).
While it is convenient to use the Internet, it is also possible to face unexpected troubles. The following will show you some tips to carefully observe fraud when using the Internet. This information is obtained from “Safe Living: How to Live a Pleasant Student Life”, published by the Student Office.If you are in trouble and cannot handle the situation, do not attempt an easy solution. Please contact your friends or faculty members or contact a consumer center first.
Phishing is the fraudulent practice that steals personal information of users (credit card numbers, personal identification numbers for banks, passwords). The tactics of this type of fraud is that one masquerades as a reputable company such as a bank, credit card company, mobile phone company, portal website etc. and sends false advertisements via e-mail. False messages will direct users to a website which is very similar to the company’s website. The bank will never ask you to input and confirm personal information via e-mail. If you receive a suspicious mail, do not provide your information immediately. In such a case, do not contact the address you find in your e-mail, but contact the company directly.
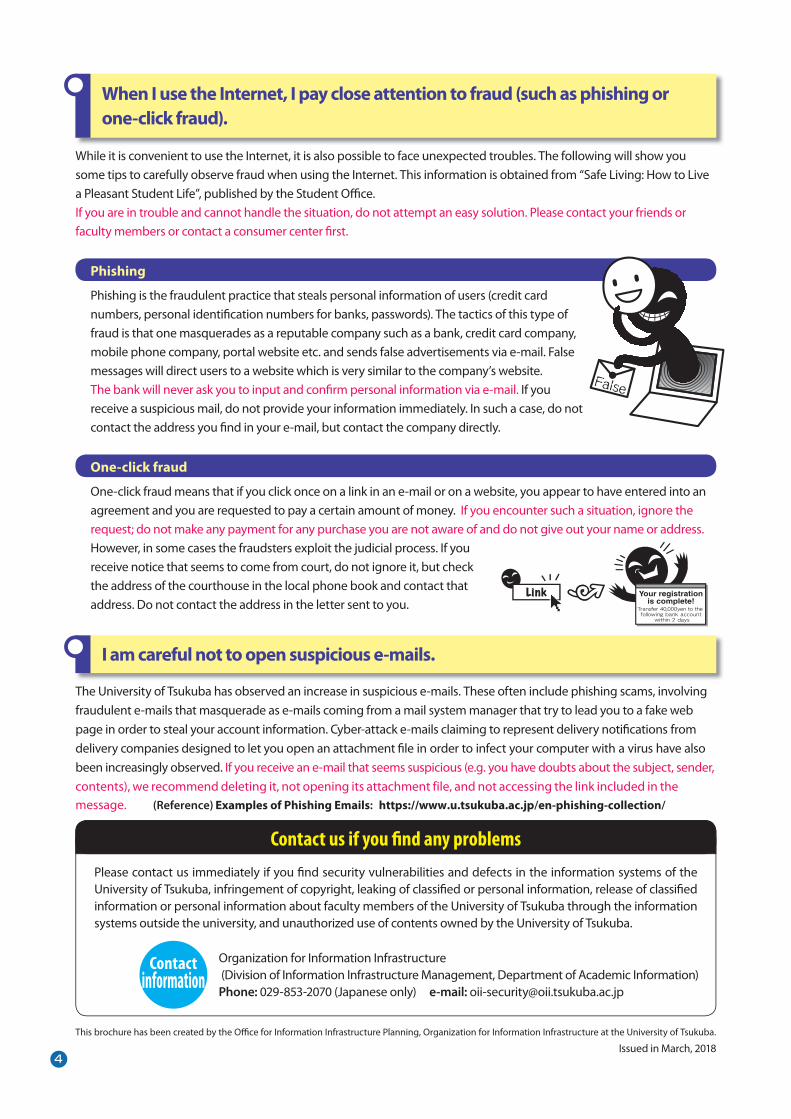
One-click fraud means that if you click once on a link in an e-mail or on a website, you appear to have entered into an agreement and you are requested to pay a certain amount of money. If you encounter such a situation, ignore the request; do not make any payment for any purchase you are not aware of and do not give out your name or address. However, in some cases the fraudsters exploit the judicial process. If you receive notice that seems to come from court, do not ignore it, but check the address of the courthouse in the local phone book and contact that address. Do not contact the address in the letter sent to you.
Phishing
One-click fraud
The University of Tsukuba has observed an increase in suspicious e-mails. These often include phishing scams, involving fraudulent e-mails that masquerade as e-mails coming from a mail system manager that try to lead you to a fake web page in order to steal your account information. Cyber-attack e-mails claiming to represent delivery notifications from delivery companies designed to let you open an attachment file in order to infect your computer with a virus have also been increasingly observed. If you receive an e-mail that seems suspicious (e.g. you have doubts about the subject, sender, contents), we recommend deleting it, not opening its attachment file, and not accessing the link included in the message. (Reference) Examples of Phishing Emails: https://www.u.tsukuba.ac.jp/en-phishing-collection/
Contact us if you find any problems
I am careful not to open suspicious e-mails.
False
Link Your registrationis complete!
Transfer 40,000yen to the fol lowing bank account
within 2 days
- 5 -

AY2018
“INFOSS Information Ethics” is an e-Learning course intended for self-study. It was introduced as a part of the educational program on information security provided by the University of Tsukuba. This course will provide you with necessary information on how to use the university network and information systems and also how to behave in today’s information-oriented society
<Taking the course> 1. Access the university’s e-learning system manaba(https://manaba.tsukuba.ac.jp)
by entering your Unified Authentication ID (UTID-13:the 13 digits number on the back of your Student ID) or Unified User Account(UTID-NAME:"s" followed by the last 7 digits of the student ID number)and password. You can study anywhere as long as you can use Internet.
2. Click on “INFOSS Information Ethics Students Course AY2018” on My Courses.
3. Study in the course and pass the examination. Choose the version you would like to use from the
two available: [Japanese Version], and [English Version]. From the menu on the left side of the screen, click the chapter you want to study and you will start your lesson.
Please answer the tests in order from 1 to 5. You will have passed the examination if you score 60 or above in all tests.
4. After you have passed the examination, please nswer “A Check for the Prevention from Theft etc.”. You need to pass the examination to answer this check.
Contact information:Organization for Information Infrastructure
(Division of Information Infrastructure Management)
Email: [email protected]
■Web site : Organization for Information Infrastructure - Registration for the “INFOSS Information Ethics” e-Learning Course
<http://www.oii.tsukuba.ac.jp/notice/infoss-eng.html>
2 Taking the “INFOSS Information Ethics” course ~ necessary information in information-oriented society ~
【Caution】
Freshmen and all students who have not attend the renewal edition of FY 2017 required to
attend this cource.
- 5 -
3 Emergency E-mail Notifications from the University
-Using e-mail on the Zengaku Computer System-
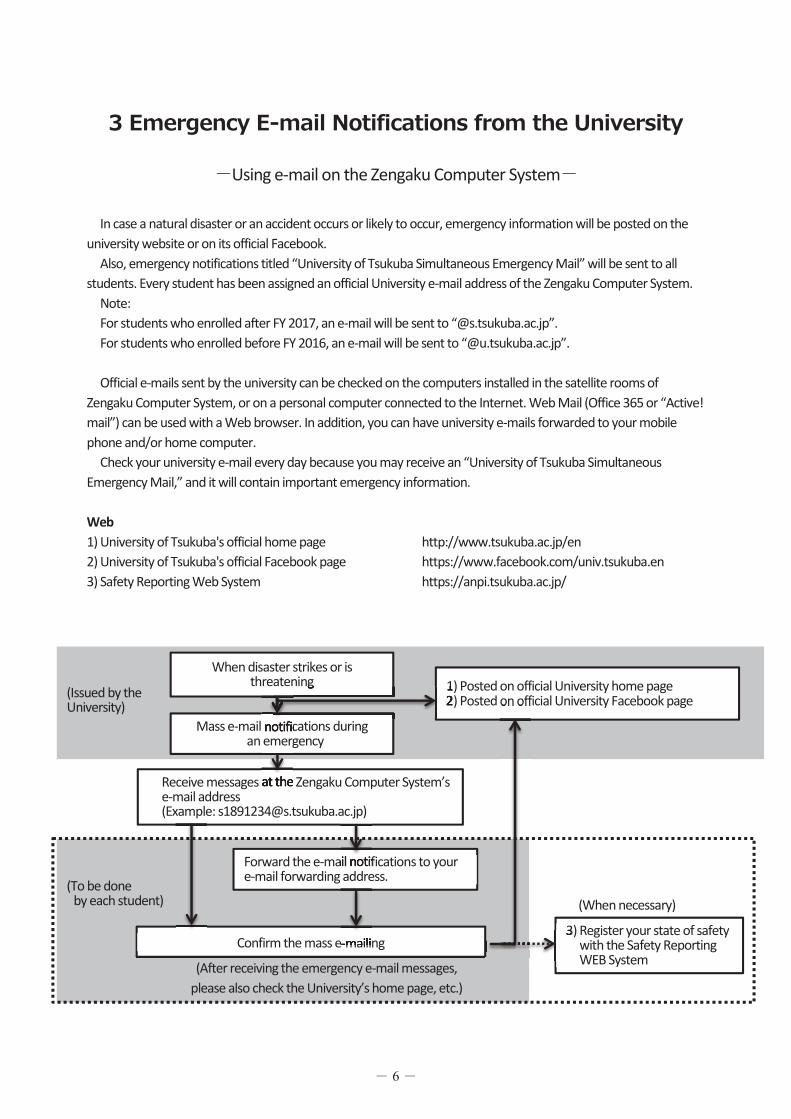
In case a natural disaster or an accident occurs or likely to occur, emergency information will be posted on the university website or on its official Facebook.
Also, emergency notifications titled “University of Tsukuba Simultaneous Emergency Mail” will be sent to all students. Every student has been assigned an official University e-mail address of the Zengaku Computer System.
Note: For students who enrolled after FY 2017, an e-mail will be sent to “@s.tsukuba.ac.jp”. For students who enrolled before FY 2016, an e-mail will be sent to “@u.tsukuba.ac.jp”. Official e-mails sent by the university can be checked on the computers installed in the satellite rooms of
Zengaku Computer System, or on a personal computer connected to the Internet. Web Mail (Office 365 or “Active! mail”) can be used with a Web browser. In addition, you can have university e-mails forwarded to your mobile phone and/or home computer.
Check your university e-mail every day because you may receive an “University of Tsukuba Simultaneous Emergency Mail,” and it will contain important emergency information.
Web 1) University of Tsukuba's official home page http://www.tsukuba.ac.jp/en 2) University of Tsukuba's official Facebook page https://www.facebook.com/univ.tsukuba.en 3) Safety Reporting Web System https://anpi.tsukuba.ac.jp/
Confirm the mass e-mailing
Forward the e-mail notifications to your e-mail forwarding address.
3) Register your state of safety with the Safety Reporting WEB System
(When necessary)
(After receiving the emergency e-mail messages, please also check the University’s home page, etc.)
Confirm the mass e-mailing
(To be done by each student)
3
When disaster strikes or is threatening 1) Posted on official University home page
2) Posted on official University Facebook page
Mass e-mail notifications during an emergency
Receive messages at the Zengaku Computer System’s e-mail address (Example: [email protected])
(Issued by the University) mail notifications during
threatening 1) Posted on official University home page2) Posted on official University Facebook page2) Posted on official University Facebook page
Receive messages at the
mail notifications to your
- 6 - - 7 -

1
4 Overview of ICT Systems at University of Tsukuba
There are systems such as On-Campus Network System, Zengaku Computer System, Educational Information System (TWINS), Library System (Tulips), Learning Management System (manaba), and Unified Authentication System that manages passwords of these systems at University of Tsukuba.
You can connect your PC, tablets etc. to the On-Campus Network by Wi-Fi or by wire. The Zengaku Computer System serves about 1100 PCs in total at satellite computer rooms in about 30 locations in the university, and all students can use them. In this system, each PC works on both Windows and Linux, and users can use e-mails, publish Web pages, and use Office products. Important notices from the university are supposed to be sent to your e-mail address managed by the Zengaku Computer System. Members of the university can use Trend Micro Anti-Virus software, Microsoft Office, SPSS, Mathematica, ArcGIS etc. on your PC (but there are usage restrictions on each product). Moreover, a discount service, Apple On Campus, is available.
TWINS is used for registration of classes and checking grades, manaba is used for e-learning, and KdB is used for viewing syllabus.
In every case, the ID and password of the Unified Authentication System are required.
- 6 - - 7 -

2
4.1 Unified Authenticaion System http://www.cc.tsukuba.ac.jp/wp_e/service/unified-authentication-system/
This system manages the ID and password of students (Undergraduate and Graduate students, Credited Auditors, Non-degree Research students, etc.) and staffs, and they can log in with the same password to multiple systems. Please be careful not to let other people know your ID and password. There are two types of IDs which are used in the Unified Authentication System: Unified Authentication ID (UTID-13) and Unified Authentication User Account (UTID-NAME). It depends on each system which of the two IDs is used. On some systems both IDs can be used. ●Unified Authentication ID(UTID-13)
The Unified Authentication ID consists of a 13 digit number shown on the back of Student or Staff ID card. This ID is also written as “UTID-13”.
●Unified Authentication User Account(UTID-NAME)
The Unified Authentication User Account is the user name assigned to each user, and ・ for students, it is “s” followed by the last 7 digits of Student ID, ・ for staffs, it is a character string like “familyname.firstname.zz”. This ID is also written as “UTID-NAME”.
●Registered users
Accounts of the system will be issued to Undergraduate and Graduate students, Credited Auditors, Non-degree Research students, Exchange students, Non-degree Research students affiliated with Int’l Student Center and trainees in the intensive Japanese program, Post-J.D. trainees, Visiting students, and staffs (but there are some exceptions). If you are unsure of the 13-digit Unified Authentication ID (UTID-13) and initial password, consult with the office of Academic Computing and Communications Center (ACCC).
●Password
The Unified Authentication ID (UTID-13) and initial password will be issued along with Student or Staff ID card. Keep the (piece of paper of) initial password so as not to lose it. Be sure to change the initial password. You can change the password on the Unified Authentication System Web Server (https://account.tsukuba.ac.jp/). Note that it might take some time before the change takes effect. You can also review the registered personal information on the Unified Authentication System Web Server. Carefully manage your ID and password so as not to leak to others. Users can obtain a new Unified Authentication password in case they forget their password. Bring your Student or Staff ID card and come to one of the offices below:
・Academic Computing and Communications Center, Office (Phone: 029-853-2452) ・Kasuga Satellite, Office ・Central Library, Reference Desk (Phone: 029-853-2784) ・Art and Physical Education Library, Reference Desk (Phone: 029-853-2878) ・Medical Library, Main Counter (Phone: 029-853-3256) ・Library on Library and Information Science (Phone: 029-859-1232) ・Otsuka Library, Service Counter (Phone: 03-3942-6818)
☆ Inquiries about the Unified Authentication System: http://www.cc.tsukuba.ac.jp/wp_e/contact/
(Select “Unified authentication system” for the Category.)
- 8 - - 9 -

3
Systems where the Unified Authentication is required (as of Jan 2018)
Name of the system ID Unified Authentication System UTID-13 On-Campus Access Points
UTID-13 (Zengaku Information Outlet and Network System, On-Campus Wi-Fi System, VPN Connection Service)
Zengaku Computer System (including @u and @s e-mails) UTID-NAME
Center for Education of Global Communication CALL System Library System (Tulips)
UTID-13 or UTID-NAME Learning Management System (manaba)
Educational Information System (TWINS) UTID-13, UTID-Name, or Student ID
Please note that eligibility varies on the system. Thus registration with the Unified Authentication System does not necessarily ensure that the user will be eligible to use any particular system. Check notices and the Web site etc. of each system when using.
4.2 Connecting to the On-Campus Network You can connect your PC or tablet etc. to the On-Campus Network using information outlets in lecture
rooms, or Wi-Fi access points. You must install anti-virus software in your PC etc. To connect, you need to have a Unified Authentication ID (UTID-13) and a password. Please obtain the latest information from the Web page below: http://www.cc.tsukuba.ac.jp/wp_e/service/notice
Notes on using the Access Point Connections: ・ Users should observe the University of Tsukuba Academic Computing and Communications Center
Access Point Usage Regulations. http://www.cc.tsukuba.ac.jp/wp_e/wp-content/uploads/accessE.pdf
・ Please install anti-virus software on the computers connected to the university network. Our university provides a Trend Micro anti-virus software product at no additional cost.
・ Use of peer-to-peer file sharing software (such as Xunlei, BitTorrent, µTorrent, Limewire, Cabos, WinMX, Share, Winny, etc.) is prohibited. If you want to use it for legitimate reasons such as research, you need to apply to the Network Management Committee.
・ A firewall system is set up for the safety and security of the access point users in order to screen and detect virus-infected computers or inappropriately used terminals. The system records information regarding the sender, the receiver, the time the communication began, the duration of the communication, and the volume of information transmitted, and utilizes the information to detect unauthorized use. The content of communication is never recorded.
☆ Inquiries about Access Points: http://www.cc.tsukuba.ac.jp/wp_e/contact/ (Select “Network systems (including Access Points)” for the Category.)
4.2.1 On-Campus Wi-Fi System http://www.cc.tsukuba.ac.jp/wp_e/service/wireless/
Users who have personal computers equipped with Wi-Fi connectivity (compatible with IEEE802.11a/b/g) can get connected with the on-campus network system at almost all lecture rooms and cafeterias. If the driver software of the network device is old, you may not be able to connect the access point.
- 8 - - 9 -

4
Presetting ・ Set to obtain an IP address automatically.
How to get connected 1. Use a web browser to access the following URL and find the passphrase which is necessary for
connection. To view the passphrase, you are required to enter your Unified Authentication ID (UTID-13) and password. If you can only connect to the on-campus Wi-Fi system, first connect to “utwlan-pub”, then access the following URL with a web browser, and obtain the passphrase. https://www.cc.tsukuba.ac.jp/network/access/member_only/pass.html
2. Search available wireless networks and select “utwlan-w”. Use the following Wi-Fi security settings. Security: WPA2 personal Encryption: AES Passphrase: Use the passphrase obtained in 1.
3. When you start a web browser, it is redirected to a page where you will select a language. Follow a link to the English or Japanese page.
4. Read the note carefully and click the “I agree” button. 5. In the dialog box, enter your Unified Authentication ID (UTID-13) and password, and click the “login”
button. You will get connected with the On-Campus Network System.
In addition to the above, you can also connect to utwlan-x (via 802.1X authentication, this is on a test operation). Please refer to http://www.cc.tsukuba.ac.jp/wp_e/service/wireless-x/ for details.
Room 207 at the Academic Computing and Communications Center (ACCC) building is open for users of On-Campus Wi-Fi System, also accepting questions about how to get connected on the system.
4.2.2 Zengaku Information Outlet and Network System http://www.cc.tsukuba.ac.jp/wp_e/service/wired/ Some of information outlets in the lecture rooms etc. are operated as the Zengaku Information Outlet and
Network System. Your PC needs to be equipped with 10Base-T/100Base-TX/1000Base-T wired LAN interface. The following table shows locations of information outlets. Area Location Central Area Lecture rooms at 1E Building, 2C Building, 2D Building, 3A Building and 3B Building,
Lecture Hall at Laboratory of Advanced Research A, Lecture Hall at Laboratory of Advanced Research B and Lecture Hall at Laboratory of Advanced Research D
South Area Lecture rooms at 5C Building, 30th Anniversary Hall Kasuga Area
Union of Library and Information-media Studios, Welfare Facilities, Lecture rooms at 7A Building, Kasuga Auditorium
Otsuka Area Lecture rooms, Lounges, Student Hall at Bunkyo School Building (Green Outlet) Presetting ・ Set to obtain an IP address automatically.
How to get connected 1. Connect one end of the LAN cable to your PC’s LAN interface and the other end to the information outlet. 2. When you start a web browser, it is redirected to a page where you will select a language. Follow a link
to the English or Japanese page. 3. Read the note carefully and click the “I agree” button.
- 10 - - 11 -

5
4. In the dialog box, enter your Unified Authentication ID (UTID-13) and password, and click the “login” button. You will get connected with the On-Campus Network System.
4.2.3 Other Networks There are numerous Wi-Fi access points on campus. For information on how to use Wi-Fi access points
other than utwlan-pub, utwlan-w, and utwlan-x, please ask the respective administrators. For information on how to use information outlets installed at laboratories etc, please ask the staffs of each
laboratory, or Sub-network Administration Committee (SAC). For more information on SAC, please refer to the chart of the Organization for Information Infrastructure (OII) on the OII website (http://www.oii.tsukuba.ac.jp/). Use the left-side menu as follows: 「情報セキュリティ関係 (Information Security)」 > 「情報セキュリティ組織・体制 (Information Security Organization Chart)」 > 「全学及び部局等の情報セキュリティ関係委員会等 (Information Security Committee Chart)」.
4.3 Zengaku Computer System Both Windows and Linux are available on about 1100 PCs at satellite computer rooms in about 30 locations
in the university. Users can use e-mails, publish Web pages, and use Office products on the Zengaku Computer System. Users’ files are managed centrally and can be accessed from any PC in any satellite computer room. Users can send print requests to printers from everywhere and output it. To make a print-out you must place your Student or Staff ID card over an authentication PC (on-demand terminal).
Opening hours depend on satellite computer rooms. Each room is basically available when not being used in class. Some rooms require a Student or Staff ID card to enter.
For more information on how to use the Zengaku Computer System, please refer to the Chapter 8 of this guide or the Zengaku Computer System website (https://www.u.tsukuba.ac.jp/) etc.
☆ Inquiries about the Zengaku Computer System: https://www.u.tsukuba.ac.jp/en-contact/
- 10 - - 11 -

6
4.3.1 Satellite Computer Rooms https://www.u.tsukuba.ac.jp/en-satellites/
Area of Location Satellite
[Opening Hours] Room
Number of
terminals
Area of
Location
Satellite
[Opening Hours] Room
Number of
terminals
Central
Area
2D Satellite
[24 hours]
2D201 20 Central 1C Satellite
[08:00-22:00 (WD)] 1C206 45
2D202
101
Area 1D Satellite
[08:00-22:00] 1D301 81
2D203
South
Area
Academic
Computing and
Communications
Center Satellite*1
[08:20-22:00 (WD)]
A203 51
2D204 A207 10
2A Satellite
[07:00-21:00 (WD)
07:00-19:00
(WE&PH)]
2A303 15 B205 61
2A304 23 B206 51
Bunshu Satellite
[24 hours] 8B201 28 Art and Physical
Education
Library Satellite
[Library's opening
hours]
Audio-visual
room 41 (1)
3K Satellite
[24 hours] 3K203 40
3D Satellite
[24 hours] 3D207 46
Central Library
Satellite
[Library's opening
hours]
2F Communication 17
West
Area
Medical Satellite
[24 hours]
4A402 26
room 4B212 62
2F Reading
room 66 (1)
Medical Library
Satellite
[Library's opening
hours]
Computer room 42(1)
3F Reading
room 6
Kasuga
Area
Kasuga Satellite
[08:00-22:00 (WD)
08:00-19:00
(WE&PH)
7C202: 24 hours]
7C102(LabⅠ) 76 7C103(Lab Ⅱ) 28
4F Reading
room 6
7C202(Lab Ⅲ) 69
Library on Library
and Information
Science Satellite
[Library's opening
hours]
1F Reading room
Kasuga Learning
Commons
17 (1) 5F Reading
room 6
Numbers in ( ) in the “Number of terminals” indicates the number of terminals for people with visual and hearing disabilities.
Tokyo
Campus
Tokyo Satellite 4F 454 20
Opening hours in the table are as of January 17, 2018. WD = Weekdays, WE&PH = Weekend and Public Holidays
Otsuka Library
Satellite
[Library's opening
hours]
B1 11(1)
*1 In the Academic Computing and Communications Center (ACCC) Satellite, computer room users must leave the ACCC building before 22:05, as the entrance to the building closes automatically at this time.
- 12 - - 13 -
7
Notes on satellite computer rooms: ・ Drinking and eating in computer rooms are prohibited. ・ Please do not bring wet umbrella into computer rooms. ・ Except for permitted devices such as satellite terminals and projectors, do not use power taps and
outlets in computer rooms. Do not remove connected plugs etc. without permission. ・ Computer rooms may be unavailable during maintenance. Maintenance schedule will be informed
on the Zengaku Computer System website.
4.3.2 Accounts of the Zengaku Computer System Users of the Zengaku Computer System are required to have the Unified Authentication User Account
(UTID-NAME) and Unified Authentication Password. Almost all students and faculty members can use the system without applying for it, while for other staffs accounts are issued only if a necessity is confirmed. Users cannot use the system after graduation, completion of studies, or retirement. When you advance to a graduate school from a college, your UTID-NAME will change and you will not be able to log in with the previous account, therefore you will need to backup your data and make e-mail forwarding setup before the graduation (the e-mail forwarding will be performed for up to 180 days after graduation).
Eligibility Category Remarks Undergraduate students Graduate students Credited Auditors Non-degree Research students Exchange students Non-degree Research students affiliated with Int’l Student Center Trainees in the intensive Japanese program Post-J.D. trainees Visiting students
Eligible from entrance until graduation without applying for it. 8 digits UTID-NAME, consisting of “s” and the last 7 digits of the Student ID Number, and Unified Authentication Password are required.
Short-term students (e.g. short-term study program participants etc.)
It is necessary to apply at the office of Academic Computing and Communications Center (ACCC).
Faculty members (Full-time) Researchers (Full-time)
Eligible without applying for it. Unified Authentication User Account (UTID-NAME) and Unified Authentication Password are required.
Educational staffs (Non-Full-time) (e.g. Specially Appointed Professors, Cooperative Graduate School Program, Non-Full-time Lecturers, Non-Full-time Researchers, etc.) Professors Emeriti
It is necessary to apply. Please refer to the following. https://www.u.tsukuba.ac.jp/en-account/#form
4.3.3 E-mail https://www.u.tsukuba.ac.jp/en-email/
The university sends official and important messages to the e-mail address described below. Please check your e-mail box regularly. You can set up forwarding e-mails from this e-mail address to another e-mail address.
E-mail address The rule of e-mail address depends on the user, and then available software and settings depend on the e-
- 12 - - 13 -

8
mail address. Students enrolled in or after FY 2017 are supposed to use e-mail addresses of the form [email protected] (student’s UTID-NAME is “s” + last 7 digits of the Student ID Number).
○Students enrolled in or after FY 2017 ⇒ “UTID-NAME @s.tsukuba.ac.jp” (e-mails sent to …@u.tsukuba.ac.jp are automatically redirected to …@s.tsukuba.ac.jp) ○Students enrolled in or before FY 2016 ⇒ “UTID-NAME @s.tsukuba.ac.jp”, and
“[email protected]” (both addresses are available) ○Others (Faculty, etc.) ⇒ “[email protected]”
E-mail usage and mailbox quota (upper limit) Users can use e-mail anywhere through Web mailer with a web browser. If you want to use e-mail from an
e-mail software such as Outlook or Thunderbird or other web mailer (Gmail etc.), please refer to https://www.u.tsukuba.ac.jp/en-email-s-client/ for @s address, or https://www.u.tsukuba.ac.jp/en-email-u-client/ for @u address.
E-mail address Web mailer URL E-mail tool Quota
@s address (…@s.tsukuba.ac.jp)
https://cloudmail.u.tsukuba.ac.jp Office 365 Exchange
Online 100 GB
@u address (…@u.tsukuba.ac.jp)
https://wmail.u.tsukuba.ac.jp Active! mail 5 GB
To check your mailbox usage, please refer to the “Confirming mailbox usage / How to move your e-mail data to another location” page (https://www.u.tsukuba.ac.jp/en-email-backup/).
Notes on using e-mail: ・ Since an e-mail is sent through various networks, there is an inherent possibility of it being snooped
or being lost in the process. You should not exchange individual information such as your bank account number, credit card number, and password through e-mails.
・ Your e-mail should have a simple title or subject so that its content can be understood at a glance. ・ It is not possible to delete an e-mail you sent to the wrong address. Check the destination and make
sure to spell the e-mail address correctly before posting. ・ Since various types of terminals are connected to the Internet, some symbols such as Roman
numbers or non-alphabet characters are not correctly displayed, depending on environment. Thus, do not use such characters when writing an e-mail. For similar reasons, avoid using half-width character.
4.3.4 Publishing Web pages https://www.u.tsukuba.ac.jp/en-publishing/
To publish Web pages on the Web server (www.u.tsukuba.ac.jp), please apply from the “Publishing Web Content” page (https://www.u.tsukuba.ac.jp/en-publishing/) on the Zengaku Computer System website. You need to agree with the guidelines displayed during the application procedure. You can also see the guidelines on the “System Guideline” page (https://www.u.tsukuba.ac.jp/en-guideline/).
When you put Web contents in the www or wwws directory under your home directory, the contents will be published. For details on the specific location of www and wwws directories and URL, please refer to the “Publishing Web Content” page (https://www.u.tsukuba.ac.jp/en-publishing/). Once files are placed in the www or wwws directory, those files will be released to the whole world and can be viewed by anyone (except for access restricted parts). Please only put files that you certainly want to publish.
- 14 - - 15 -

9
For access restriction make a directory named local_only somewhere in www or wwws. Content placed in local_only directory can be viewed only from terminals of the Zengaku Computer System (including remote desktop). Note that it is difficult to prohibit browsing of the contents placed in the www or wwws directory. 4.3.5 Structure of File System and quota (upper limit)
Mailbox and user home area have different capacity restrictions in the Zengaku Computer System. User home area https://www.u.tsukuba.ac.jp/en-disk/
The upper limit of the home area which consists of user data and Web content is 2 GB, and can be increased to 5 GB by applying for it. To check your disk usage and how to apply for increasing, please refer to the “Disk Usage/Extension” page (https://www.u.tsukuba.ac.jp/en-disk/). It may be possible to recover deleted data by mistake in the Zengaku Computer System. For details please refer to the “Recovery of Deleted Data” page (https://www.u.tsukuba.ac.jp/en-snapshot/).
Besides home area, there is a temporary bulk storage which is about 55 GB and can temporarily be used as an area shared by all users. For more information please refer to the “Temporary Bulk Storage” page (https://www.u.tsukuba.ac.jp/en-pool/).
Users can install an online storage client software such as OneDrive (Microsoft)、iCloud (Apple)、Google Drive (Google)、Dropbox (Dropbox), but when synchronizing on the Zengaku Computer System, you should be careful for the capacity difference. When data on online storage are synchronized with your home area of the Zengaku Computer System, the usage may reach the upper limit without noticing it, and causes trouble such as losing your files. We recommend that you do not use it synchronously on the Zengaku Computer System but only upload and download through a browser.
Object Appearance on Windows Appearance on Linux Quota
User data Z: drive /home/UTID-NAME/ 2 GB
(can be increased to 5 GB)
Web content http://www.u.tsukuba.ac.jp/~UTID-NAME/ https://www.u.tsukuba.ac.jp/~UTID-NAME/
www and wwws folders under W: drive
/home/UTID-NAME/www → /www/UTID-NAME/www /home/UTID-NAME/wwws → /www/UTID-NAME/wwws
4.3.6 Printing
Satellite computer rooms have printers which can perform both color printing and monochrome printing. When you print, start the printing job from a PC and operate an authentication PC (on-demand terminal) near a printer to output. You need to have your Student or Staff ID card to print. Those who are not entitled to a Student or Staff ID are able to substitute this with the Zengaku Computer System Satellite User Card. (Please contact Academic Computing and Communications Center.)
You can print from any satellite computer room printer regardless of where you requested printing. For example, it is possible to send a print request from a PC in Central Library Satellite and go to another satellite (eg. 1D Satellite) and print it.
You can also send a PDF file to the Zengaku Computer System from your PC which is connected to the Internet, and print it by operating an authentication PC (on-demand terminal) in a satellite computer room. For details please refer to the “Web print service” page (https://www.u.tsukuba.ac.jp/en-pdfupload/).
- 14 - - 15 -

10
Print Quota (upper limit) (one year from April to next March) Basically, students can print 1200 monochrome-sheets per year. But one color print is counted as five
monochrome prints. Remaining pages are displayed when logging in to a satellite terminal, and can also be confirmed from the “Print Management” page (https://www.u.tsukuba.ac.jp/en-print-limit/).
However, the limit on the number of print sheets might change depending on your affiliation. If you are out of print sheets, consult with the head of your affiliation. Keep in mind that you can save print sheets by using printout preview, print only the page you need, use layout printing and so on. How to use a printer
When you send a print job from an application, it will show you the print menu (Figure 1).
Figure 1 Print Menu
Click the pulldown-menu with printer name displayed, choose the printer and set printing range and
number of copies. If necessary, change settings such as one side/ both sides, “2 in 1”, etc., by clicking “properties.” The print job is sent to the printer by clicking “print (P).” After you click, move to an authentication PC (on-demand terminal) installed near a printer (Figure 2). In the case the printer is not available due to some trouble, you can use a different printer by using another authentication PC (on-demand terminal) in another satellite computer room.
Figure 2 Authentication PC (On-demand Terminal)
- 16 - - 17 -

11
When you touch the screen of the authentication PC (on-demand terminal), the initial screen like below (Figure 3) appears. You can select the language with the button on the upper right.
Figure 3 Initial Screen
Hold your Student or Staff ID card on the card reader beside the screen (Figure 4). There is no need
for typing your username or password.
Figure 4 Card Reader
If you succeed in authenticating, you will see a list of print jobs (Figure 5). Printing starts by touching
the [Print] button at the same height as the jobs you want to print.
Figure 5 List of Print Jobs
- 16 - - 17 -

12
In addition, the settings such as the number of copies, color or monochrome, single-sided or double-sided can be changed from the screen of the authentication PC. If you touch the [Setting] button instead of touching the [Print] button, the setting screen will be displayed (Figure 6). You can change the settings or number of copies by touching the items that you want to change.
Figure 6 Changing Settings
After changing the settings, touch the [Setting] button, then it will return to the previous screen (Figure 5). To start the printing process, touch the [Print] button.
- 18 - - 19 -

13
4.4 VPN Connection Service http://www.cc.tsukuba.ac.jp/wp_e/service/vpn When the user attempts to connect a personal computer to a “university-only” (or accessible only from on-
campus network) websites from an off-campus location via an internet provider, generally the web pages cannot be viewed. There are other services operated by a server at the university that cannot be used from an off-campus location. By using the VPN connection service, you can use same services as in the university by making a connection from an off-campus location look like a connection within the university network virtually.
Since the usage of the VPN connection service depends on the equipment and the operating system, please refer to the "Manual" on the following Web page: http://www.cc.tsukuba.ac.jp/wp_e/service/vpn
4.5 International Academic Roaming Service “eduroam” http://www.cc.tsukuba.ac.jp/wp_e/service/eduroam/ Eduroam is a world-wide roaming service which provides wireless LAN network access for the
international research and education community. The University of Tsukuba has joined eduroam since August 2014., so members of the university can use local wireless networks with their own devices when visiting other participating institutions.
To be eligible to use eduroam, you need to obtain “eduroam ID” and “eduroam password” before visiting a participating institution.
・ Obtaining an eduroam account: before visiting Obtain “eduraom ID” and “eduroam password” from the Web page of the eduroamJP Federated ID Service (https://federated-id.eduroam.jp/). Set an expiration date of the account up to 12 months. In addition, we do not allow issuing visitor ID (acquiring IDs of people other than yourself).
・ When accessing eduroam when visiting a participating institution (http://www.cc.tsukuba.ac.jp/wp_e/service/eduroam/)
1) The SSID is “eduroam”. 2) Set “WPA2-Enterprise” for Security, “AES” for Encryption Method, and “PEAP” for
Authentication Method. 3) Set not to validate server certificate. 4) Select “eduroam” from the list of connectable networks, input “eduroam ID” for Username,
and input “eduroam password” for Password. The above is the standard settings of eduroam, but it may be different depending on the environment of the visiting institution.
・ When visitors use eduroam within the University of Tsukuba (http://www.cc.tsukuba.ac.jp/wp_e/service/visitor/)
1) The SSID is “eduroam”. 2) Set “WPA2-Enterprise” for Security and “AES” for Encryption Method. 3) Set not to validate server certificate. 4) Select “eduroam” from the list of connectable networks, input “eduroam ID” for Username,
and input “eduroam password” for Password.
- 18 - - 19 -

14
4.6 Other Network Services Academic Computing and Communications Center (ACCC) operates an NTP server to provide accurate
timing reference, and offers a DNS cache service for network devices connected at the University of Tsukuba to enable name retrieval on the internet.
The NTP server for users to synchronize clocks is as follows: Host name: timeserver.cc.tsukuba.ac.jp
The IP addresses for the DNS cache service are as follows: IP address: 130.158.68.25, 130.158.68.26
Please note that if the user’s setting is “Automatically acquire DNS server address” in the Access Point Connections of 4.2.1 or 4.2.2, the above is set automatically as the DNS server.
4.7 Available Software on Individual PC http://www.cc.tsukuba.ac.jp/wp_e/service/software-license/ Members of the University of Tsukuba can use Trend Micro anti-virus software and software such as
Microsoft Office at no additional cost on individual PCs (but there are some restrictions depending on each). Students and faculty and staffs can usually purchase academic versions when purchasing software, moreover you can also use a discount service, Apple On Campus, offered for members of the university only. The following are representative examples: ・ Trend Micro anti-virus software ・ Microsoft Office ・ SPSS ・ Mathematica ・ ArcGIS ・ Apple On Campus (discounts on Apple products)
Please check the terms of use from the Web page below: http://www.cc.tsukuba.ac.jp/wp_e/service/software-license/
- 20 - - 21 -

5 TWINS Operation Guide for Students TWINS is a nickname of the educational information system of the University of Tsukuba. Its official name is "Tsukuba Web-based Information Network System". Students can register courses and confirm their academic assessment via this system. 5.1 Login / Logout
In order to access the system, please type in the following URL onto a web browser (e.g. Internet Explorer).
https://twins.tsukuba.ac.jp/ Login Screen
At the screen below, you can choose to view the webpage in Japanese or English. Enter your ID number for the username, and for the password enter your password for the Unified Authentication System password, then click on the "Login" button. If you do not know your password, visit an Academic Computing and Communications Center or the Library, and ask them to reset it. You will need your student ID card when you go to the office.
To view page in Japanese To view page in English 5.2 Confirmation of Contact Details
When the next contact details confirmation screen appears, look over your contact information to make sure it is correct, then click on the "Confirm" button at the bottom of the screen. Until it is confirmed, the automated certificate issuing machine will reject any issuance of certificate. You will be able to update your contact details any time on the personal contact information screen. The university will contact you using the information. Therefore, please keep your personal information current at all times.
For changes in emergency contacts or permanent address in your home country, please go to the Student Support counter in the Academic Service Office. Among Undergraduate students, the grade notification will be sent out after the C module's semester ends to your home country's address (ONLY in Japan). If it is not necessary to send the notification to your home country, or under special circumstances you would like to send the notification to a different address, please contact the Academic Record Management Section in Division of Educational Promotion, or the related Academic affairs counter in the Academic Service office.
- 20 - - 21 -

5.3 How to View Your Own Student Information. To view your various records on TWINS, follow the procedures as shown on the screen below. Select the menu "Student Information" → "Student Information". Records such as your transfer information (e.g. leave of absence), or scholarship / tuition waiver will also be displayed there.
5.4 "Course Registration" and "Cancellation"
Select "Menu" → "Course registration"→"Course registration・Registration status" →"Course registration" to get to the Course registration page. Note: Please keep in mind that you have to meet the deadlines for the registration. (Functions of self-evaluation for graduation / qualifications are not available in the current programs.)
On the module that shows the dates and times a course is offered, click on the "None" button. When course registration screen appears, enter the course code (course number), and click on the "Register" button. If you do not know the course code (number), click on the "Course Search" link.
If you switch between tabs you can view different information. .
These tabs show modules.
- 22 - - 23 -

"Course Search" is as follows: You can search for classes by entering the first 2~4 alphanumeric characters of a subject code, or by entering the middle 2~4 consecutive alphanumeric characters of a subject name or professor's name. When you click on the "Search" button, the search results will be displayed near the bottom, click on the course title you want to register.
Cancel registered courses: When the registration is completed, the course title, the course code (number), and the main instructor's name will be displayed on the time schedule.
To cancel the registration, click on the course number you want to cancel. The confirmation screen will appear. Click on "Delete" button to complete the cancellation.
Note: Please conduct the course cancellation within the given period of each course registration.
Intensive course registration:
To register for intensive courses, or to register after the standard period of registration for any subject, click the module tab labeled "Register for intensive courses". To register for intensive courses, held in the summer / spring recess, select the appropriate tabs. The registered intensive courses will appear beneath the time schedule.
- 22 - - 23 -

5.5 Confirm Grades
To confirm your grades, select "Grades"→"grade inquiry" / "Finalized Grade Inquiry" GPA section is available only for undergraduate students who were admitted to the University from 2013.
5.6 Inquiry/ Survey
TWINS has a function that you will use to take surveys regarding your courses. When the survey becomes available, the list of surveys will appear as shown on the screen below. At that time, please provide your feedback and evaluations.
5.7 Tsukuba Information Portal Site(TIPS)
TIPS is a nickname of the web bulletin board system of the University of Tsukuba. Its official name is "Tsukuba Information Portal Site".
Cancelled class information, class bulletin board, or announcement bulletin board can be viewed on the screen, and moreover it is possible for students to confirm their registered class information as well as to manage their schedule by registering personal events in the system.
You can go to TIPS from "Portal On" button on the top of the page.
- 24 - - 25 -

<<Home Screen>>
In home screen, targeted information can be found in ① . Notice about TIPS, ②What’s New (indicating new notice posted in Class Bulletin board, particular genres inside Announcement bulletin board, and Cancelled Class Information), ③ MY Schedule and ④ News for Current Students. By clicking "Show Twins Menu" button on the top bar of the page, you can move to TWINS. Also "Smartphone page", "Japanese" and "Logout" button are available.
<<Schedule Screen>>
When you click on Schedule Management (A button), registered class schedule (including cancelled classes) can be viewed. Also by clicking "+" button on the calendar, personal schedule can be registered or deleted.
①
②
③
④
A
- 24 - - 25 -

When you click on Reference of Class Cancellation and Make-up Class (B button), class schedule including cancelled classes are shown and detailed information can be confirmed by selecting an item.
<<Bulletin Board Screen>> University of Tsukuba considers that all notice posted on TIPS are received by students. For this reason, students do not have a right to object later with the reason that they did not see the notice. Therefore please do not forget to check TIPS at least twice a day (in the morning and the evening etc.) during semesters. When you click on Newly Arrived (C button), new information for each genre of bulletin board is displayed up to 5 cases. Displayed period of new notice is 7 days including the posted day. To see the past notice, click "Reads more" shown on the right side of the screen. Keyword search in the simple search box is also available.
B
C
- 26 - - 27 -
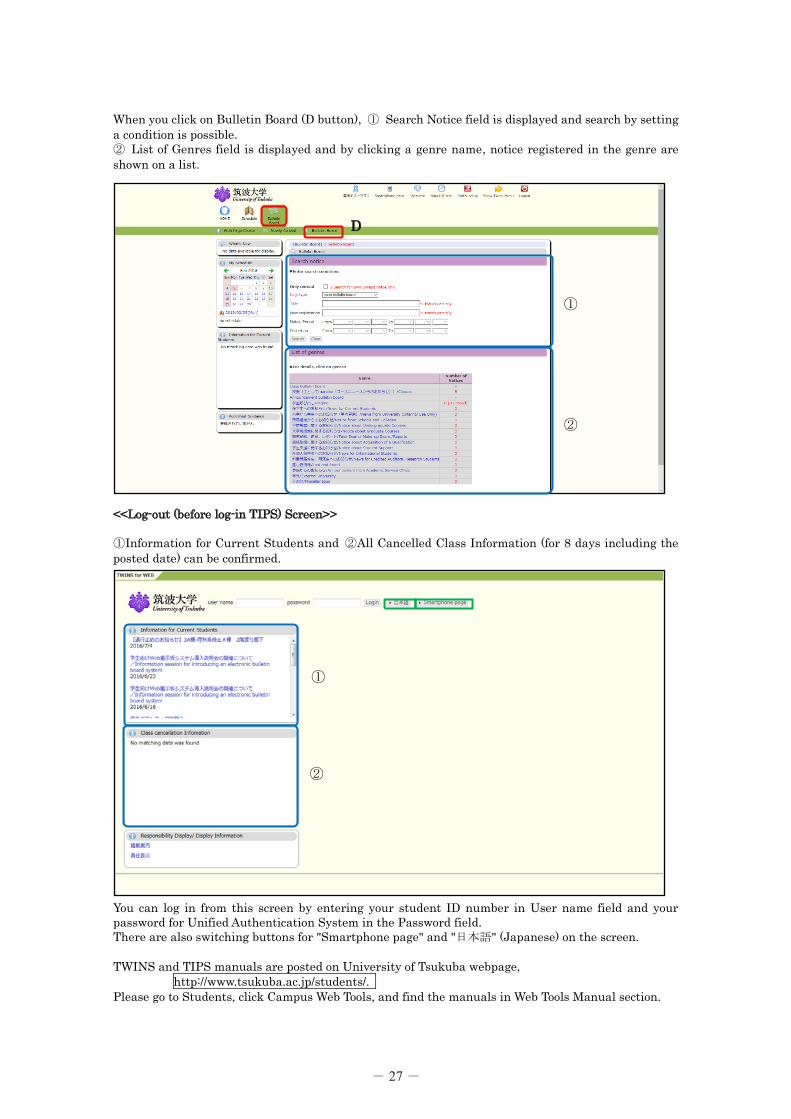
When you click on Bulletin Board (D button), ① Search Notice field is displayed and search by setting a condition is possible. ② List of Genres field is displayed and by clicking a genre name, notice registered in the genre are shown on a list.
<<Log-out (before log-in TIPS) Screen>> ①Information for Current Students and ②All Cancelled Class Information (for 8 days including the posted date) can be confirmed.
You can log in from this screen by entering your student ID number in User name field and your password for Unified Authentication System in the Password field. There are also switching buttons for "Smartphone page" and "日本語" (Japanese) on the screen. TWINS and TIPS manuals are posted on University of Tsukuba webpage,
http://www.tsukuba.ac.jp/students/. Please go to Students, click Campus Web Tools, and find the manuals in Web Tools Manual section.
①
②
D
①
②
- 26 - - 27 -

- 29 -

6 Viewing of the Syllabus by using the Curriculum Scheduling Support System (KdB) URL https://kdb.tsukuba.ac.jp/
6.1 Search for the course
By using the KdB (the Curriculum Scheduling Support System), you can search for the course offered by the University of Tsukuba in a variety of conditions.
About “Requisite” A set of courses with a common position in a certain curriculum is called “Requisite”.In KdB, Requisite will be displayed hierarchically as the picture below.
(The case of refined in the requisite) If you would like to refine the subject within [Foundation/Major Subjects] in [School of Humanities and Culture College of Humanities], follow [requisites] as the picture above and select [College of Humanities].
Click [Search] button to search for the course
Refine in Term/Module, Day, Period Refine in the classroom Refine in Requisite
The example of Search Result [Search for the course by using the keyword “Robot”]
The courses that start with number “0” are for graduate students, and the courses that start with other numbers and alphabets are for undergraduate students.
Check the box if you would like to include the description of Remarks, course overview, syllabus in your search.
Supplementation of Term/Module, Day, Period
In regard to the basic information, please refer to [1 General Guidelines] in [Course Catalog]. http://www.tsukuba.ac.jp/education/
ug-courses/
About the special notation for day and period.・intensive
This is a type of course that does not depend on a specific time period, but is conducted with irregular dates.
・by appointment This is a type of course that the instructor in charge and the student perform irregularly while adjusting the schedule.
・by request This is a type of course that students can
receive guidance (at any time) according to their needs when they perform long-term experiments and others.
Input the keyword
- 29 -

6.2 Browsing the Syllabus of the Search results
You can browse the syllabus of the course displayed as search results.
6.3 About [The official version] and [The latest version] of Syllabus
In regard to the courses that published the syllabus in the booklet of the beginning of the year, their contents may change due to circumstances during the year. In such case, you can refer to both the same version as the Syllabus official version published in the booklet and [the latest version] that reflects the changes in the content in KdB. When you click on the link on [Course Name] after search the course in KdB, the official version of the
syllabus is displayed first. Then, click on the link [Display the latest version] at the top left of the screen, you can see the latest version of the syllabus. Also, if you click on the link [Display the official version] at the top left of the screen of the latest version of the syllabus, return to the syllabus official version.
And there are courses that unpublished the latest syllabus in KdB.
For more detailed information about the way of using KdB, please refer to [the Manual of Curriculum Scheduling Support System Course catalog].
http://www.tsukuba.ac.jp/students/pdf/kdb_manual.pdf
Click on the link of [Course Name], you can browse the syllabus for that course.
Click on [Download Syllabus], you can download the syllabus of all courses that you selected in the search results together in PDF file.
Go to [The latest version]
[The official version] [The latest version]Go to [The official version]
・Learning objectives and attainable goals of each course
・Lesson plan for each session ・Assessment of Academic Achievement ・References, Study methods not discussed
in the class ・Working hours of offices, Contacts ・Message for students
…etc.
- 30 - - 31 -

7.1 Login, Logout
To log in to the system, you need your ID and password of theUnified Authentication System. The login steps are as follows.
1. visit manaba's login page by clicking on the banner on thetop page of the support site or entering the following URLdirectly into the browser.
2. When the login screen of the unified authentication systemis displayed, enter the unified authentication ID (UTID-13:13 digits on the back of the student ID card) or UTID-NAME and password.
3. When login is successful, “my page” of manaba isdisplayed.
https://manaba.tsukuba.ac.jp
Support Site for manaba
!
The system does not provide the function to log out. Close all the windows and tabs of the browser completely andexit the application.
If you do not log out properly on a shared PC, your account may be used by other users without authentication.
(1) Login
(2) Logout
7 Learning Management System (manaba)
7.2 User Support
(1) Inquiry via Email
• Contact email address: [email protected]• Please do not forget your affiliation and contact address in the inquiry.• When inquiring about a problem please also specify the usage environment (operating system, web browser,
etc.).
(2) Support Website
https://www.ecloud.tsukuba.ac.jp/manaba
- 30 - - 31 -

7.3 Initial Settings
When using manaba for the first time, be sure to make thefollowing settings.
"Reminder" is a function to send update information to a mailaddress registered by the user when new notifications or writesare made in manaba.
(1) Reminder Settings
(2) Profile Settings
Reminders
Individual Settings
1. Click Settings in the upper right corner and select Changereminder settings.
2. Select Receive or Do not receive.3. Enter in the Email address 1 your PC Email address that you
want reminders to be sent to.4. Enter in the Email address 2 your cellphone Email address
that you want reminders to be sent to.
1. Select Receive or Do not receive a message whenevercourse news is posted.
2. Select Receive or Do not receive a message when a newassignment is published. A reminder for a new project willbe sent only to members who are assigned to teams.
3. You may choose from one of three options when a newcomment is posted on a thread:
! Your own comments will not be sent as reminders.
• Receive a message when a comment is made.• Receive all new comments at a certain time of a day.
(→ Select a preferred time from the dropdown menu.)• Do not receive a message.
4. Select Receive or Do not receive a message when a projectis published. This reminder is only sent to the coursemembers who belong to the team.
5. Select Receive or Do not receive a message when a newcomment is made in a thread of your project.
6. Click Save and send test email and confirm reminders are sent to the email address you registered.
! You will not receive messages if you choose Do not receive in the Reminders menu, even if you choose Receive in Individual Settings.
1. Click Settings on the upper right corner, and select ChangeProfile.
2. Upload an image of your choice.
Settings page
Change Reminder Settings page
Change Profile
My Page
- 32 - - 33 -

7.4 Course Page
When you log in to manaba, "My Page" as shown on theright appears.
In manaba, a space called “course page" is prepared foreach course. Through the course page, you can downloadcourse materials, submit reports, and so on. On “MyPage”, the course page list of the courses you arecurrently taking is displayed.
User’s Manuals can be downloaded from the link writtenas “Manual" at the bottom of My Page (surrounded by redsquare in the right figure).
A special course page called “Course Page forInformation” is displayed on My Page (surrounded byblue square in the right figure). Various information fromthe Office of Educational Cloud is uploaded to this coursepage.
(1) My Page
Course Page
Manual Download
Course Page for Information
My Page
In order to view a list of courses you have been registeredfor, click Courses at the top of the screen. Click thecourse title and the main page of the course will bedisplayed.
Four icons in each course indicate the latest status of the course (icons will turn red if there is a new action).
There is unread course news.
There are unsubmitted assignments or tests.
Grades have been distributed.
There are unread comments.
Number of unsubmitted tests or assignments will be displayed.
Select a course
Course page
! Click on the course name to go back to the course top page.
(2) Access to Course Pages
My Page
- 32 - - 33 -

7.5 Course Registration
Normally, students do not have to register on their own coursepage in manaba by themselves. However, depending on theinstruction of the teacher in charge, you may register byyourself. This is called "self-registration". There are two waysto self-register as follows.
1. Click Search and register course from My Page.2. Search the course and select the course you want to
register. (Here, if registration key is necessary, it will shift to registration key input screen.)
3. Check the course and click Register.
In order to access the course pages of the courses you are taking, you need to be registered in manaba. Usually,registration and cancellation will be automatically done in manaba by just doing the following operations.
• When you register a course in TWINS, the course page that you registered is displayed on My Page on the next day,and you will be able to access it.
• If you cancel your course registration in TWINS, the registration in manaba will be also canceled the next day, andyou will not be able to access the course page.
! If the course page is not displayed on My Page even if you register for the course in TWINS, please contact the Office ofEducational Cloud.
(1) Course Registration on manaba
(2) Self Registration
Registration by searching for courses
Registration Using “Registration Key”1. Click Register using registration key from My Page.2. Enter the registration key.3. Check the course and click Register.
If you accidentally register for the course registration, you can cancel the course registration at the course top by clicking Cancellation of Course.
- 34 - - 35 -

7.6 Tests, Assignments, Grades, Resources, and Attendance
In manaba, you can answer online tests and drills from theteacher of the course. Answer can be done by the followingsteps.
In manaba, you can submit the report assignment from theteacher via the course page. There are two types of submissionmethods, “Browser-Based" and "File-Based".
Browser-Based Assignments
File-Based Assignments
(1) Tests
(2) Assignments
Browser-Based Assignments
File-Based Assignments
1. In Tests page, select a test you would like to take.2. Confirm that the test is open for submission. Click Start to
enter the test room.3. Enter your answers to the questions.4. Click Next to display the next page. It is also possible to
display the preferred page by clicking the navigation buttonsabove the question.
5. In the final page, you will be able to click Confirm.6. Click Confirm to display the submission confirmation page.
Once the confirm button is clicked, you will always be able to click Confirm in any previous pages.
7. Click Submit to finish taking the test. If you need to checkor fix your answers, click Back.
! If there are required, yet unanswered questions, the question page will be displayed instead.
Select a testTests page
Answer questions
1. In Assignments page, select an assignment you would liketo answer.
2. View the details of the assignment and enter your answers.3. Check your answers and click Preview after you have
answered all the questions.
! The assignment has not been submitted to the instructor yet.
4. Check your answers. If there are no revisions to make, clickSubmit to submit your answers. If you need to revise youranswers, click Back.
! The assignment has not been submitted to the instructor yet.
1. In Assignments page, select an assignment you would liketo answer.
2. View the details of the assignment and put together yourresponse.
3. Locate the file and click Upload to upload the file intomanaba.
4. To add more files, repeat 3.5. If there are no mistakes, click Submit to submit your files.
- 34 - - 35 -
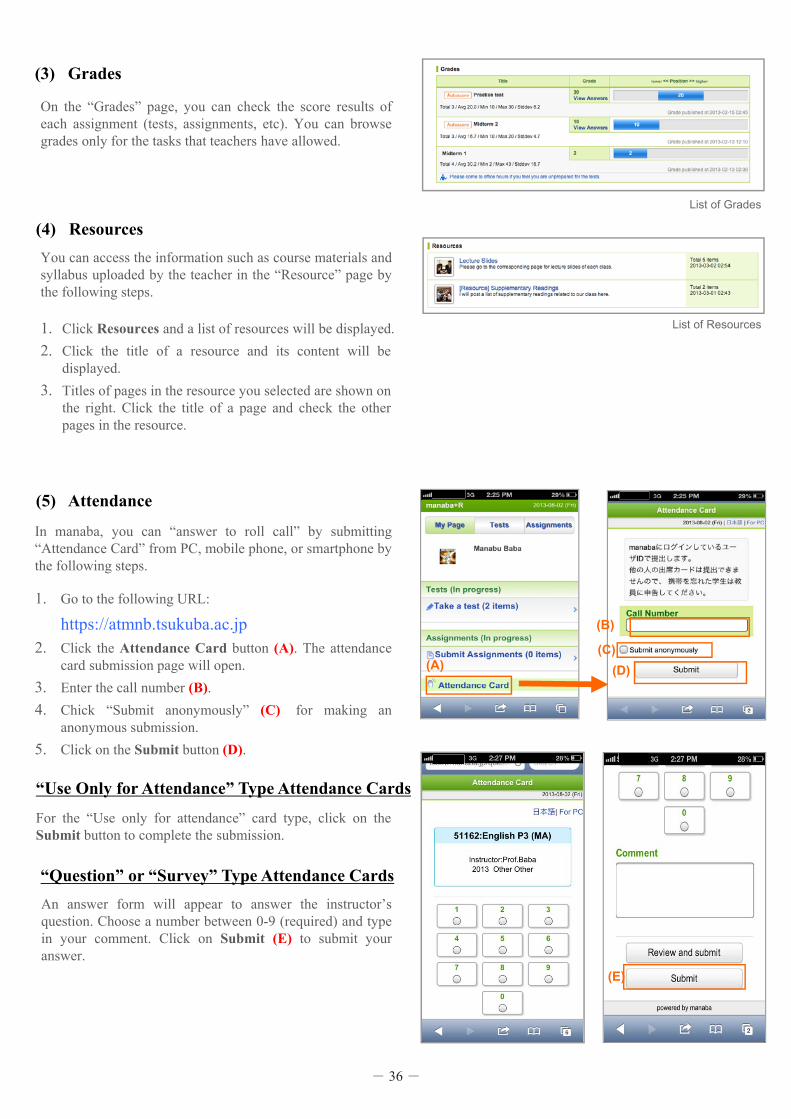
On the “Grades” page, you can check the score results ofeach assignment (tests, assignments, etc). You can browsegrades only for the tasks that teachers have allowed.
List of Grades
List of Resources
You can access the information such as course materials andsyllabus uploaded by the teacher in the “Resource” page bythe following steps.
In manaba, you can “answer to roll call” by submitting“Attendance Card” from PC, mobile phone, or smartphone bythe following steps.
(3) Grades
(4) Resources
(5) Attendance
“Use Only for Attendance” Type Attendance Cards
“Question” or “Survey” Type Attendance Cards
1. Click Resources and a list of resources will be displayed.2. Click the title of a resource and its content will be
displayed.3. Titles of pages in the resource you selected are shown on
the right. Click the title of a page and check the otherpages in the resource.
1. Go to the following URL:
https://atmnb.tsukuba.ac.jp2. Click the Attendance Card button (A). The attendance
card submission page will open.3. Enter the call number (B).4. Chick “Submit anonymously” (C) for making an
anonymous submission.5. Click on the Submit button (D).
For the “Use only for attendance” card type, click on theSubmit button to complete the submission.
An answer form will appear to answer the instructor’squestion. Choose a number between 0-9 (required) and typein your comment. Click on Submit (E) to submit youranswer.
(A)
(B)
(C)(D)
(E)
- 36 - - 37 -

37
8 Zengaku Computer System 8.1 Powering Up a Personal Computer (PC)
Press the power button to turn on the computer. After waiting for about 10 seconds, Figure 8.1 will show up.
Figure 8.1 Operating System Selection Screen
Zengaku Computer System supports Windows 10 and Linux OS. To access Windows 10 select “Windows 10 – 共通教育” using the arrow key and enter key. To access Linux press the right key and then press the enter key when Figure 8.1 is shown.
8.2 Starting Up and Closing Windows 10
● Starting Up and Sign-in to Windows 10 After selecting Windows 10 in Figure 8.1, the screen below appears.
Figure 8.2 Sign-in Screen
To sign-in follow the directions below:
⑤ click on the [→] button
② enter username
④ enter your password
- 36 - - 37 -
38
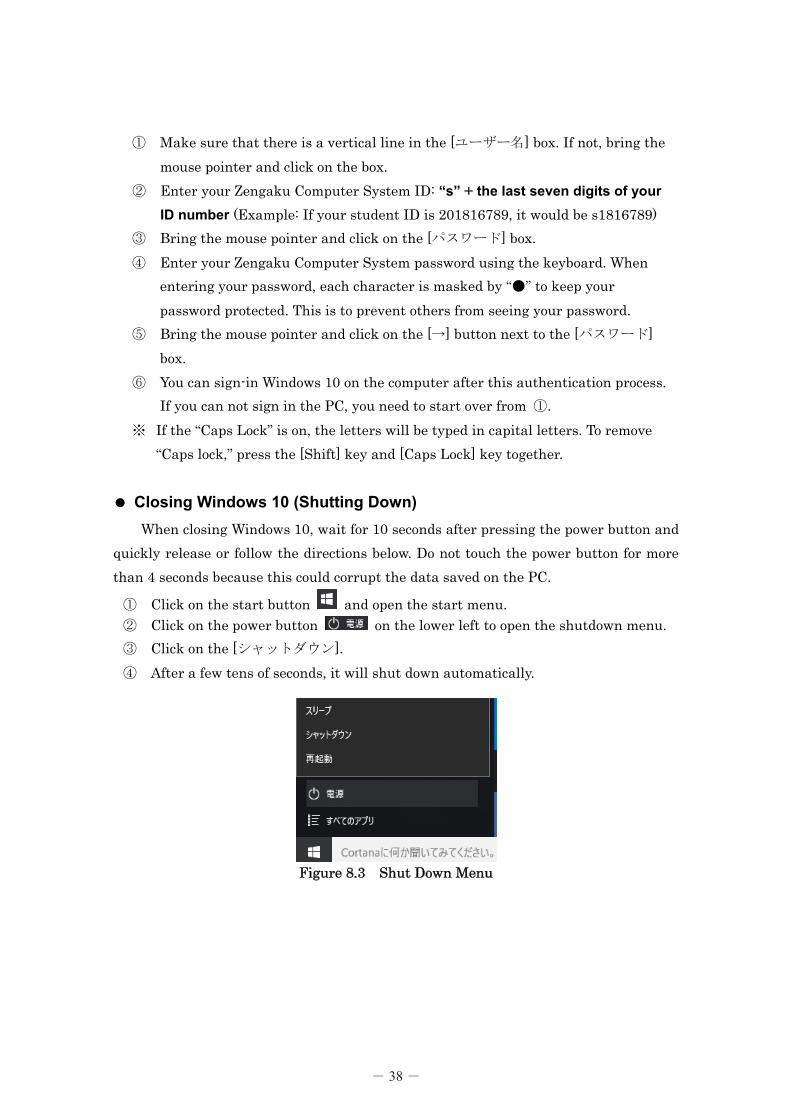
① Make sure that there is a vertical line in the [ユーザー名] box. If not, bring the mouse pointer and click on the box.
② Enter your Zengaku Computer System ID: “s” + the last seven digits of your ID number (Example: If your student ID is 201816789, it would be s1816789)
③ Bring the mouse pointer and click on the [パスワード] box. ④ Enter your Zengaku Computer System password using the keyboard. When
entering your password, each character is masked by “●” to keep your password protected. This is to prevent others from seeing your password.
⑤ Bring the mouse pointer and click on the [→] button next to the [パスワード] box.
⑥ You can sign-in Windows 10 on the computer after this authentication process. If you can not sign in the PC, you need to start over from ①.
※ If the “Caps Lock” is on, the letters will be typed in capital letters. To remove “Caps lock,” press the [Shift] key and [Caps Lock] key together.
● Closing Windows 10 (Shutting Down)
When closing Windows 10, wait for 10 seconds after pressing the power button and quickly release or follow the directions below. Do not touch the power button for more than 4 seconds because this could corrupt the data saved on the PC.
① Click on the start button and open the start menu. ② Click on the power button on the lower left to open the shutdown menu. ③ Click on the [シャットダウン]. ④ After a few tens of seconds, it will shut down automatically.
Figure 8.3 Shut Down Menu
- 38 - - 39 -

39
8.3 Starting Up and Closing Linux OS ● Starting Up and Logging into Linux OS
After selecting Linux at Figure 8.1, Figure 8.4 would appear on the screen
Figure 8.4 Linux OS Log-In Screen
Enter your Zengaku Computer System ID in the [ユーザー名] box, and then press the [Enter] key. It would turn to a new screen asking for your password. After entering your password there, you can log in to Linux OS.
If you power off the PC on this screen, click on [停止] at the lower left. Then, a dialogue “本当にシステムを停止してもよろしいですか?” would appear. By clicking on [停止], you can turn off the PC. ● Logging Out of Linux OS(Shutting Down)
By clicking on the icon at the higher right corner of the desktop, a pull-down menu shown in Figure 8.5 will appear and click on [シャットダウン].
Figure 8.5 [システム] Pull Down Menu
A dialogue “本当にすべてのプログラムを終了し、コンピュータをシャットダウンしま
すか?” would appear and then click on [シャットダウン]. The computer turns off.
Figure 8.6 Linux Shut Down Confirmation Dialogue Box
- 38 - - 39 -

40
8.4 Japanese Language Input Method on Windows 10 Japanese language input requires the Japanese input system. By typing the
“reading of Kanji,” the system converts the characters into “Kanji.” It is possible to convert to Hiragana, Katakana, and symbols as well. This instruction will explain how to input the Japanese languages by Microsoft Input Method Editor (MS-IME). 8.4.1 Typing Words
The key layout of a Japanese keyboard is displayed in Figure 8.7.
Figure 8.7 Key Layout of a Japanese Keyboard
There are two ways to enter words: “romaji input (alphabets)” and “kana input (readings).” For example, the key circled in Figure can enter “s” in the romaji input and can also enter “と” in the kana input. This instruction will explain on the romaji input.
The first principle of typing is always to return your fingers to the home position composed of eight keys with “●”in Figure 8.7. The home position is the reference place for your fingers. The “F” and “J” keys have a small bump to help you find the home position quickly. To practice your blind typing, please refer the webpages such as - P 検フリータイピング練習: https://manabi.benesse.ne.jp/gakushu/typing/nihongonyuryoku.html - イータイピング: https://www.e-typing.ne.jp/ - 寿司打: http://typing.sakura.ne.jp/sushida/ - 皿打: http://neutralx0.net/sarada/
- 40 - - 41 -

41
8.4.2 Getting Ready to Type in Japanese The MS-IME Japanese input must be turned on during Japanese language input.
On the low right corner of the screen, the MS-IME language bar (Figure 8.8) can be found. Make sure “あ” is seen there.
Figure 8.8 MS-IME language bar When there is no “あ” shown in the MS-IME bar, press the [半角/全角] key or click
on the “A” character on the MS-IME bar and select [ひらがな] shown in the input mode list (Figure 8.9). Pressing the [半角/全角] key when the Japanese input mode is turned on will turn off the Japanese input mode.
Figure 8.9 MS-IME Input Mode List
8.4.3 Entering the Japanese Reading Here we will try typing the reading “つくばだいがく” using romaji input.
① Type tsukuba. It would be entered as つくば. ② Type daigaku. It would show つくばだいがく on the screen.
The line under the reading shows that the text is not converted to any other characters such as Hiragana, Katakana, and Kanji. (Figure 8.10)
Figure 8.10 unconverted reading with a wavy line
In case of pressing the wrong key by mistake, move the vertical line to the position of the mistaken character using the [←] key and [→] key. Then, press the [Backspace] key to delete the wrong character and type in the correct character. Note that pressing the [Esc] key when the reading is still unconverted will remove the whole set of words that are unconverted.
You can type romaji as a sonant sound such as dull sound, syllabic nasal, and choked sounds. To type「ん」enter [NN]. To type “ぁぃぅぇぉゃゅょっ” press [X] before the romaji. For example, pressing [XTU] will enter “っ.”
- 40 - - 41 -

42
To enter long tone press key, to enter comma press key, to enter
period press key, to enter quotation marks use and keys.
8.4.4 Converting to Kanji After typing the reading and the characters are unconverted pressing, the [変換] key
or the [space] key will convert the characters to kanji. For example, つくばだいがく shown in Figure 8.10 would change to 筑波大学 shown in Figure 8.11.
Figure 8.11 筑波大学
When the candidate by MS-IME is a homonym, press the [変換] key or [space] key a
couple of times to seek the correct one. You can select the proper set of characters using [↑][↓] keys and number keys. A book helps you to confirm the meaning and examples of the candidates (Figure 8.12). When the correct set of characters is shown up, press the [Enter] key to convert.
Figure 8.12 words comment function
When MS-IME makes a mistake to segment the reading you entered, you can change the phrase as follows. You can change the phrase length by using the [←][→] keys and the [Shift] key together at the unconverted state (Figure 8.10). After the proper length of a phrase is selected, press the [変換] key or [space] key again to convert.
- 42 - - 43 -

43
Here, we will try to type「息子には知ってほしかった」as an example.
Figure 8.13 息子には知ってほしかった (unconverted)
① After typing the reading「むすこにはしってほしかった」it will convert as the characters shown in Figure 8.14. This case is one example because this could differ when the dictionary remembers what was typed on the computer in the past.
Figure 8.14 息子には知ってほしかった(uncorrect conversion)
② The phrase that says「息子に」is selected. Press [Shift] and [→] to select「むす
こには」.
Figure 8.15 息子には知ってほしかった (after changing the breakpoint of the phrase)
③ Reconvert the reading by pressing the [変換] key or the [space] key.
Figure 8.16 息子には知ってほしかった(correct conversion)
To readjust the phrase segment of reading before confirming the conversion, select the section of the phrase and press the [Backspace] key. This will make the readings back to the unconverted state. 8.4.5 Converting to Katakana and Hiragana
By using [F6] ~ [F9] keys, the readings can be converted to Katakana or Hiragana. The phrase can be converted to Hiragana by [F6], Katakana by [F7], half-width character by [F8], and alphabets by [F9]. These keys can be used by pressing some of them together. For example, pressing the [F8] and [F9] keys together will convert the characters to alphabets in half-width.
表 2. 1 function key conversion list キー 変換機能 例 変換前 変換後 F6 全角ひらがな ツクバ つくば F7 全角カタカナ つくば ツクバ
F8 半角 ツクバ ツクバ tsukuba tsukuba
F9 全角英数 つくば tsukuba F10 半角英数 つくば tsukuba
- 42 - - 43 -

44
8.4.6 How to Type in Romaji Input (Alphabets) When typing in English, get into half-width English mode or full-width English
mode or direct input (turning off Japanese input). The typing mode can be changed by clicking the button on the left end and select mode from the mode list or press the [半角
/全角] key.
8.4.7 Entering Symbols Pressing the keys while holding the [Shift] key the symbols illustrated on the top
left of each key can be entered. “(“ or “~” can be typed by holding the [Shift] key and
pressing or .
8.4.8 Typing Other Symbols
Symbols that are frequently used such as ◎(まる), or ☆(ほし)can be converted from readings(Figure 8.17、Figure 8.18).
Figure 8.17 converting to symbols(まる) Figure 8.18 converting to symbols(ほし)
- 44 - - 45 -

45
8.4.9 Punctuation Marks(「。」 and「、」or「.」and「,」)
When writing in Japanese (。) and (、) or (.) and (,) must be used together. One of the combinations needs to be picked and to do this follow the directions below.
① Click [ツール] then [プロパティ] in the language bar.(Figure 8.19) ② Click [詳細設定] in the Microsoft IME settings.(Figure 8.20) ③ Click the [全般] tab then [入力設定] then [句読点] and pick one of the
combinations.(Figure 8.21)
Figure 8.19 Select [プロパティ] Figure 8.20 Select [詳細設定]
Figure 8.21 Advanced settings of Microsoft IME
④ Click [OK].
- 44 - - 45 -

46
8.4.10 Recording words When the conversion of the characters does not work well, it is better to record the
words on the computer. For example, 「がくるい」will usually convert to 「が狂い」. This can be fixed and be converted to 「学類」. To do this follow the directions below:
① Select [ツール] in the IME language bar then [単語の登録]. (Figure 8.22) ② The [単語の登録] dialogue will appear. Type in the reading and the characters
then click on [登録]. (Figure 8.23)
Figure 8.22 select [単語の登録] in the language bar
Figure 8.23 [単語の登録] dialogue box
- 46 - - 47 -

47
8.5 USB memory stick ● How to Use the USB Memory Stick
The USB memory stick can be used by inserting it into the computer port (USB port). Find the USB mark shown in Figure 8.24.
Figure 8.24 USB mark
After inserting the memory stick, a balloon comes up and says「新しいハードウエア
が見つかりました」will appear from the taskbar. Then [リムーバブルディスク] will be added to [コンピュータ]. Note that there are times when a message that says 「再起動
する必要があります」appears. Follow the message and restart the computer.
● How to Eject the USB Memory Stick
The data and the USB memory stick may be damaged if you remove it from PC
incorrectly. Before the remove your USB stick, first, click on the icon in the notification area as shown in Figure 8.25. The icon could be hidden in Windows 10, in this case, click on the triangle to find the icon.
Figure 8.25 “safely remove USB” icon (task tray)
Then click on [Flash Disk の取り出し]. After this a dialogue box that says「ハード
ウエアの取り外し'USB 大容量記憶装置デバイス'は安全に取り外すことができます」will appear from the icon. After following these directions, the USB memory stick can finally be ejected safely.
If you forget these directions or the icon does not show up, eject the USB memory stick after shutting down Windows 10. This is a safe way to remove the USB memory stick as well.
- 46 - - 47 -

- 49 -
49
9 Internet and E-mail 9.1 Warning when you are using Internet 9.1.1 Be careful when registering
Sites will often require a username and password. Avoid using the same password on multiple sites, since the leaking of a single password puts all your accounts with the same password at risk. Also, passwords registered with websites that do not use SSL are easily discovered. However, even if the website uses SSL, there is a chance that it is a fake website. Extra care is needed when registering your bank number of credit card number. 9.1.2 Do not accept requests from strangers
Do not accept requests from strangers. It is possible that such requests are sent to an unspecified number of people who use e-mail. Such claims can show the recipient’s connection sources and operating system (OS) in an attempt to threaten. Such claims are to be ignored. 9.2 Using E-mail
This section shows the matters of caution related to using e-mail. In this reference shall be made to the “Rules & Manners on using the Internet,” published by IAJapan (http://www.iajapan.org/rule/rule4general/).
● Security
It is difficult to assure the reliability and security of an E-mail. Since e-mail is sent through various networks, there is an inherent possibility of it being snooped or being lost in the process. You should not exchange individual information such as your bank account number, credit card number, and password through e-mail. ● E-mail title or subject Your e-mail should have a simple title or subject so that its content can be understood at a glance. ● Confirmation of address
It is impossible to delete an e-mail you sent. At the University of Tsukuba, the e-mail address of students is based on the students’ ID number. Thus, a single misspelling can cause the e-mail to be sent to someone else. Make sure to spell the e-mail address correctly before posting.
● Symbols to use
Since various types of PC are connected to the Internet, some symbols such as non-alphabet characters and half-width katakana are not correctly displayed, depending on PC. Do not use such characters when writing an e-mail. ● E-mail content
Do not impersonate someone else. Do not edit someone’s e-mail and forward it.
- 49 -

50
9.3 Manners when writing an E-mail Though e-mail is a favorite medium, it is important to not forget about proper manners
when writing an e-mail.
● Language Unlike face-to-face conversation, where facial expressions or tone of voice are
transmitted along with the message, this is not the case with e-mail, which consists only of letters. Therefore, it is necessary to think about how the message will be received by the recipient. Avoid using aggravating or antagonizing language, be tolerant, and do not respond to provocative messages.
● Emoticons/emoji
Though emoticons are commonly used on cell-phone chats, avoid using them with people whom you are not close with. Avoid using emoticons toward superiors, strangers or informal e-mails. Also, note that PCs often do not support emoji, so avoid using them when writing e-mails. ● About the reply from addressees
Do not expect an immediate response from the person you have sent an e-mail to. It is possible that the addressee is not using a computer presently, and there is always a chance that your e-mail was not correctly received.
9.4 How to write sentences on E-mail
When writing e-mails, it is important to consider readability. In contrast to books, text displayed digitally tends to be harder to read. It is therefore important to improve readability by leaving space between paragraphs and starting on a new line when appropriate. Make sure your text is concise and on-point. Only quote when necessary and keep your sentences short Example of proper E-mail writing
Similar to writing letters, there are rules for writing an e-mail. Subject(メール件名) : 面接のお願い
山田先生
情報科学類の筑波太郎です。
今月31日に大学対抗プログラミングコンテンテストに出場することになりました。書類
にサインをいただきたいので、××日あるいは××日にお伺いしたいのですが、先生のご
都合の良いお時間をお教えいただけないでしょうか。
----------------------------------
情報学群情報科学類
学籍番号 2017xxxxx
筑波 太郎
----------------------------------
Capture the main point of the e-mail in the subject line
Put the name of addressee at the top. Don’t abbreviate the addressee’s company name, organization, or belonging. Ex.) Incorrect: XYZ Corp. Correct: XYZ Corporation
Write your name and affiliation.
- 50 -