Embed Size (px)
DESCRIPTION
"How to arrive in Portland with a smile on your face"
Citation preview

“How to arrive in Portland with a smile on your face”
Rider Seminar Information Guide
�
July 14 - 15, 2012

Welcome To The Group healTh STp 3
hoW IT happenS 3
WhaT Do I neeD To pack 4
WhaT WIll I neeD WITh me on The BIke 4
BeInG an amBaSSaDor of cyclInG 5
Group healTh STp TraInInG anD SafeTy TIpS 6
TRAINING PLANS FOR ONE AND TWO-DAY RIDERS 7
SuGGeSTeD TraInInG mIleS 8
nIce recoVery - The four r’s 9
your BIke �0
RIDE IT RIGhT: ROAD BIkE ��
RIDE IT RIGhT: MOuNTAIN BIkE �2
fIXInG ThaT flaT �3
ImporTanT ThInGS To rememBer �4
STarTInG The SeconD Day – SunDay �4
frequenTly aSkeD Group healTh STp queSTIonS �5
The Three o’clock In The mornInG checklIST �6
Group healTh STp parTnerS �7
Table of Contents
2www.cascade.org

Welcome To Group HealTH SeaTTle To porTland Bicycle claSSic!Whether you’re already registered, plan to register or simply want more information before you decide, the
Group Health STP Organizing Committee and the Cascade Bicycle Club thank you for your support and inter-est. If you are going to ride in July, we want to do everything we can to insure you have a fun and safe week-end of cycling.
WHaT iS Group HealTH STp?The Group Health Seattle to Portland Bicycle Classic (“Group Health STP”) is the premier cycling
event in the Pacific Northwest, rated by Bicycling magazine as one of the very best anywhere. It’s an annual, one- or two-day, very-big-group bike ride from Seattle, Washington, to Portland, Oregon. Most participants ride the event in two days, but historically between 20 percent and 25 percent ride in one day. Proceeds from the event go to support the Cascade Bicycle Club’s mission of Creating A Better Community Through Bicy-cling.
WHo rideS Group HealTH STp?Roughly half of each year’s riders are first timers. Group Health STP has introduced tens of thousands of
cyclists to cross-country cycling. Whether done in one day or two, the sense of accomplishment crossing the Finish Line for the first time is outstanding! Ask anyone who’s done it.
The youngest riders on their own bikes are generally 10 or 11 years old, although younger children may ride as tandem stokers or in Burley® trailers. The oldest known cyclist was 85.
In between the ages of 10 and 85 is a wide spectrum of cyclists and cycles, some amusingly costumed and adorned, from many states and a few foreign countries. Many groups of two or more, organize themselves as “teams,” wearing common attire and/or helmet decorations. Unicyclists and roller-bladers have been known to make the trip. Very high-end bikes as well as thrift shop classic single-speed, friction-brake bikes are seen on the ride. Lean, no-or-one-percent body fat teens and athletes and wide-bodied baby- and non-baby boomers ride.
Virtually all Group Health STP riders have the following in common: they know cycling is fun, they’ve trained, their bikes have been tuned up and all have a good time pedalin’ to Portland.
HoW iT HappenSA planning committee and hundreds more Cascade Bicycle Club volunteers produce the event with “a
little help from our friends”: The Portland Wheelmen set up the Finish Line Festival, and civic and school groups help out all along the route. The Washington State Patrol, Oregon State Police and local Police De-partments provide needed assistance for the safe passage of thousands of cyclists. Group Health Medics and EMTs provide medical attention if needed. On-road support is performed by volunteers in cars, the men and women of the GoldWing Motorcycle Touring Association perform on road support and many bicycle shops provide free (except for parts) bicycle repair at rest stops. After the ride volunteers will watch over your bike in Seattle until you pick it up. Volunteers who cycle have bib numbers under 100. Corporate sponsor logos adorn event publications and the ride souvenirs you’ll receive at Packet Pickup.
Group Health STP happens, however, when thousands of fun-loving cyclists just like you make the com-mitment to turn a well-run cycling event into a great bike ride.
3
WHaT do i need To pack?Pack light! Remember, you’ll need to transport your luggage from the baggage drop to where you’re staying, so… not only light, but in something you can carry on a bike. It’s not like you’re gonna’ attend a Debutante Ball on Saturday or Sunday night. DO NOT pack any valuables or breakable items. Cascade Bicycle Club is NOT responsible for any lost, stolen or damaged luggage.
Packing hint: Whether riding in one or two days, gather items and pack the Thursday evening before the ride. You won’t feel rushed, and you’ll still have Friday to pick up anything you realize is missing.
THe BaSicS
A set of clean cycling clothes, if you are riding two days, especially shorts. A few cyclists like to carry a pair of clean cycling socks to change into halfway each day..
After Cycling clothing for one or two evenings. Some items will be able to work both nights.Whatever toiletries (and analgesics?) you’ll require. Remember contact lens care and emergency lenses.Camping gear if needed. Don’t forget earplugs: Who is that snoring?A couple of extra tire tubes (in case you use or “loan” your on-bike one(s) on Saturday).Rain gear, no matter the forecast, if you do not need it on the bike when you leave Seattle. (If you pack it, you won’t
need it?) At least a rain jacket. Booties and pants if you have ‘em.
WHaT Will i need WiTH me on THe Bike?Mostly, your alertness and common sense, bicycle etiquette and sense of fun! As far as “real” stuff…
required
Your CPSC approved helmet, squarely on your round head! Helmets are not sunbonnets!
real Good ideaS
Cycling gloves and glasses.Water bottles (Two large ones are recommended.) or a Camelbak®
A tire pump for your bike, tire levers, a spare tubes, a patch kit with glue that hasn’t dried out.A mini-tool kit.A cycling mirror.Your favorite energy bars.Cash, not just plastic. If you have to pay for any parts, you may need cash though most bike shops now take plastic. Your number bib pinned so it is visible from behind. Remember to complete the emergency contact information on
the back of your bib. Your bike and helmet numbers visible from the front for the photographers on the route.Personal ID.Note: All on-bike items can fit easily on you or the bike, or in a jersey or an under-seat pack.
opTionally
Extra sunscreen is an excellent idea, even on cloudy days.Depending on the day at least some rain gear. An emergency first aid kit for cyclists. Again, you won’t need it if you have it? But you’ll be glad you do if you do.A cell phone - best to have with you on the ride.Finally, you probably won’t really need your Route Guide, but....
4

BeinG an amBaSSador of cyclinG
“Etiquette! Schmetiquette! I’m on my bike! All they gotta’ do is get outta’ my way. Scheese!” We’ve all seen this char-acter. He or she is a Bicycle Bozo who gives all cyclists a bad name. Don’t be a BOZO!
Because Group Health STP’s thousands of cyclists can add a lot of good, or bad, to cycling’s reputation, it is important to ride courteously and safely. The route STP uses is open to ALL trafiic. Here are some good rules for the ride or anytime you’re on a bike (or in car for some of them):
leGally: oBey THe laWS of THe road! Remember you are a vehicle on the road (Just smaller and far more vunerable than a car).STOP at all Stop Signs and Red Lights (except as directed by the police).Ride on the right side of the road, and no more than two abreast, single file is recommended and safer.Signal physically and verbally all turns, slow downs and stops. Move right before you stop, and completely far right
after you stop.Safely: pracTice Safe Group ridinG TecHniqueS!Communicate with those around you when slowing, stopping or changing direction. Point out road hazards such as
glass, potholes, railroad tracks, etc. to riders behind you. On narrow roads let riders ahead know when a car or truck is passing from the rear by calling out, “Car back!” or “Truck back!” Remember: It’s unlikely you’ll ever be riding alone.
Pass only on the left, and warn people when you do: Use voice (preferable), bell or horn. Learn to love hearing and saying, “On your left. ”It’s simple courtesy, and simply prevents accidents!
Pull completely off the road, or as far right as possible, whenever you stop.Ride single file as much as possible, especially when the road shoulders are narrow or non-existent.Keep pacelines to a maximum of seven riders. Stay out of unfamiliar pacelines; getting in one is very dangerous to
you and all other riders in and around that line. If you’ve never ridden in a paceline STAY OUT OF THEM.Cross railroad tracks at a right angle. Check behind for car and bike traffic. Call out “Tracks!”, motion with an up
and down arm sweep behind your back and be prepared for slowing bikes ahead when you hear or see those signals. Be especially careful if it’s wet.
Wear a CPSC certified bike helmet. It’s required and a very smart thing to do. (Helmets save lives!)Do not use headphones: They’re illegal and dangerous.Leave your personal support vehicle at home or on I-5. The ride is extremely well supported, and its route already is
crowded enough with cyclists, official vehicles and local traffic.courTeSy: reSpecT THe people WHo live and Work alonG THe rouTe.Think as though thousands of cyclists and support vehicles were riding past your home.
Share the road! Minimize the impact of so many riders. Open breaks in long lines of riders for people to enter and exit driveways or move into turning lanes. Motion trailing cars past when the road ahead is clear. Ride single file when vehicles are present on narrow roads.
Pack your trash out!!! Keep a plastic bag in your pocket or pack to store banana peels, food wrappers, etc., and dispose of them properly. They do not belong on lawns or roadsides. Remember: It’s not just your banana peel… and they’re not very biodegradable.
Use Sani-Cans® not the roadside or someone’s bushes. Think ahead, and use provided facilities when they’re avail-able.
road SupporT: GoldWinG moTorcyleS and STp SupporT carS!ON ThE ROuTE STP WILL hAvE 200 GOLDWING MOTORcYcLES AND 12 SuPPORT vEhIcLES. ThEIR FuNcTION IS TO PROvIDE ASSISTANcE TO RIDERS AND ENFORcE ThE RuLES OF ThE ROAD. PLEASE OBEY ALL ThEIR INSTRucTIONS. ThE SuPPORT cARS WILL TRANSPORT RIDERS TO ThE NEAREST SERvIcE LOcATION - ThEY ARE NOT PERSONAL "TAxIS". IF YOu cANNOT cONTINuE, YOu NEED TO MAkE ARRANGEMENTS FOR TRANSPORTATION TO YOuR FINAL DESTINATION.
STP MoTorcycle SafeTy PaTrolAGAIN ThIS YEAR - WE WILL hAvE A MOTORcYcLE SAFETY PATROL ThAT WILL BE ISSuING cITATIONS FOR RIDERS NOT FOLLOWING ThE RuLES OF ThIS EvENT, INcLuDING: RIDING MORE ThAN TWO ABREAST, PASSING ON ThE RIGhT, NOT OBEYING TRAFFIc SIGNALS, cROSSING A SOLID cENTERLINE, NOT WEARING A hELMET, AND RIDING ThAT ENDANGERS FEL-LOW RIDERS. PLEASE RIDE SAFE, AND RIDE SINGLE FILE AS Much AS POSSIBLE. 5
6
WASHINGTON STATE BICYCLE TRAFFIC LAWS(The laws that STP riders must follow)
�) obey all traffic laws: cyclists have all the rIGhTS anD re-SponSIBIlITIeS of vehicle drivers. rcW46.6�.755
2) ride no more than two abreast. rcW 46.6�.770
3) ride as far to the right as is Safe, except when preparing to turn or when passing another ve-hicle. rcW 46.6�.770
4) cyclists may occupy the cen-ter of a lane when traveling at the speed of traffic or when it would be unsafe to ride to the right. rcW 46.6�.770
5) always wear a helmet. helmets are required by law in king county and many other jurisdictions. king county Board of health Title 9.
6) Do not use headphones –they are illegal for all vehicle operators and may obstruct your hearing. rcW 46.37.480
7) use hand signals (and look) be-fore turning. rcW 46.6�.758
Training TipsGroup health STp in one day or two? That depends on your physical condition and the goals you set for yourself. riders can set their own pace and test their own personal limits. most of the �0,000 participants choose to ride in two days while about 2,500 take the challenge of one day.
Training• attend a Group health STp training and information class and get expert advice on every aspect of the event. • Two-day riders need to ride two days in a row on several weekends.• long distance training equals speed and endurance; gradually build up your time in the saddle.• ride at least one �50-mile weekend before the big day.• consistent training is the key to building endurance.• have fun and train with friends who have similar riding abilities.• use the “Sample Training miles” to help structure your training.• flying Wheels Summer century in June. It has been said: “If you can do the 45 or 65-mile flying Wheels loops you will have no problem doing STp in two days.” If your goal is STp in one day then the �00-mile loop is perfect training. The flying Wheels 45-, 65- and �00-mile loops have more hills than STp.
Pace• riding pace for a comfortable two-day ride is about 8 hours per day at �4 - �6 miles per hour (mph).• pace for a brisk one-day ride is �2 to �6 hours at �5 - �8 mph. • lightning fast pace in one day is 9 to �2 hours at 20 - 22 mph.• ride with friends who ride at a similar pace.• Develop a pace that you can maintain and enjoy, and avoid bicycle burnout.
Food & Water• Determine on training rides which food and sports drink work for you. What gives you energy and what doesn’t?• eat and drink small amounts frequently. This is easier for your body to process.• DrInk lots of water. There are portable toilets at all the food stops and mini-stops.• a general rule is to drink one 20-oz. water bottle every hour. • food stops will have foods high in carbohydrates to keep you going. The food is not meant to be a meal, and if you have special dietary needs you will need to make your own arrangements. General rule is to eat small amounts frequently.
Clothing • Determine on training rides which clothing works for you. Bike shorts with a chamois are a very good investment.• use chamois Butt’r or Bodyglide to reduce friction in the groin area. • ask an experienced cyclist or your favorite bike shop owner for clothing advice.
Equipment• riders do STp on all types of bikes. choose the type you are most comfortable riding for 200+ miles.• make sure to test out all new equipment well in advance.• have your bike checked and tuned months in advance. Bike shops are very busy prior to STp.• you must wear a helmet that meets cpSc certification.
Fun• make sure to enjoy the scenery and the people on this extraordinary cycling experience.
ride SMART TipsStay alert–watch for obstacles, other cars, and other riders.Move off the road when stopping –pull completely off the road to let cars and riders pass; do not block driveways or intersections.Act like a car –obey all traffic laws and stop at stop signs.Retain space between yourself and others – leave enough room to dodge obstacles.Tell others when passing and pass on left.
Remember, Single File is Safer!
7
Group Health STP 2012 Training for One or Two-Day Riders By Craig Undem, Dean of Cycle University www.CycleU.com
Time to get ready for the STP and this is the place to start. There are a few key things to focus on in preparing for a big ride like the STP: #1 ride your bike. #2 ride your bike and you can probably guess #3. There are people who show up and ride the STP with little training and they barely finish and have trouble walking for a week after the ride (or worse) and then there are those who prepare and have a fantastic ride, enjoy all the thrill and satisfaction of a great ride and dance the night away in Portland. The purpose of this training guide is to help you become the later and enjoy the lifetime benefits of cycling. As most of you know, to become a good cyclist you need to pay some dues! Like learning to snow ski or play tennis it takes practice, good skills and more practice. To help you train the right way Cascade offers the Cascade Training Series (CTS) space is limited so register early. The Cascade Training Series begins in March and gradually increases distance and is lead by experienced Ride Leaders for all ability levels. If CTS does not fit your schedule, Cascade Bicycle Club also offers an extensive Free Daily Rides program. You can design your own personal training program by selecting the daily rides that fit your schedule and ability. Find all the details to get you up to speed on our Daily Rides web pages. If you want a more personal training program check out www.CycleU.com for more training program options.
How to prepare for the Group Health STP - If you read no further in this article, these are the three simplest ways to insure a great time on the STP: 1. Ride with others. Take a cycling skills class at Cycle University and do the Cascade Training Series to learn the language of group cycling and get comfortable riding with other people.2. Don’t ride as hard as you can on every training ride. This is the most common rookie mistake! Ride steady and aim to add more miles each week to go longer and longer. Make some days hard, but most of them steady and moderate.3. Apply Chamois Butt’r or Bodyglide (found at all good bike shops) to your shorts to reduce friction where you meet the saddle, and don’t wear underwear (this is pretty basic but can make a huge difference if you don’t know about it!) The most important part of any cycling training plan are the miles you will ride on a daily and weekly basis in the months leading up to a big ride like the STP. These training rides are the building blocks that will prepare your body and mind to ride long and hard on the day of the event. There are many other factors that will influence your enjoyment on the big day, such as how your bike fits you, nutrition, hydration, clothing, equip-ment, mental preparation, skill level, riding with other people etc…This overview covers only the riding mileage. If you haven’t ridden a bike in 10 years, start with a 5-mile ride to get the hang of it. Your goal may be simply to have fun and stop when you are tired. If you had a good summer of riding last year and haven’t ridden since October, go out for a nice flat 20-miler and get back into it. From here build up your mileage gradually and challenge yourself a bit more every few weeks. Remember why you are doing this. No one does the STP as a professional cyclist, we are all regular people having a good time on our bikes. Although there is a lot to learn when you are new to cycling, keep it fun by learning from more experienced riders, asking a couple friends to join you, or making it a challenge with some co-workers to see who will finish first (or dance the latest after the ride!). Although having fun may seem like child’s play, if you aren’t having fun you will probably find something else to do, so find a way to make it enjoyable! Take your time and work at a level your body will allow. Depending on your conditioning and riding experience, you may need more or less miles than this program presents. Feel free to consult Cycle University to outline a custom program to fit your level of riding and athletic background, and be sure and get an OK from your doctor if you are over the age of 30 and new to cycling. Start your training with moderate to easy miles and add an occasional hard day once every week or two where you push the hills. After the first half of the training, start looking at your average speeds during your midweek and Saturday rides. Increase the midweek rides to move toward your target average miles per hour pace. (to complete the 204-mile STP in one day under 12 hours you will need to average 17.5 mph and only take one 30-minute break. Two-day riders will need to average 10 mph to finish each 103-mile day under 11 hours, with 55 minutes of breaks each day.) Aim to get your average speed near your target ride level or higher as the event approaches on shorter rides. June should be your hardest month. Plan to take good care of yourself between rides. Eat right, stay hydrated and get consistent sleep. Use Flying Wheels as your final rehearsal. Test out the energy foods, equipment and clothing you will use on the STP (be warned, Flying Wheels is a hilly challenge!) During the final two weeks you will rest more because the mileage is much less, but keep your rides at or above event speeds.
Special note for One-Day Riders Most people think that they can just ride lots of miles and get fast enough to do the STP in one day, but what many find is that even though they get strong and increase their average speed they still can’t meet their goal. Why? Drafting. They need the shelter of other people to help them achieve their finishing goal. The wind often blows from the south, which means that much of the ride from Seattle to Portland is into a head wind, and if you ride behind a group or even a single rider, you can save 30% or more of your energy and still go the same speed. It is something that takes practice and good coaching to do it safely. The best place to learn this is from a Cycle University Road 101 Class or another experienced rider. Drafting helps for 2-day riders too.
Consult your doctor before beginning and kind of endurance training program.
Ride smart and learn good safe riding habits. Make it a great ride and we hope to see you on the dance floor in Portland!

Basic Training Schedule
Consult your doctor before beginning any kind of endurance training program. 8
TWO - DAY RIDERS WEEK OF: Goal MON TUE WED THUR FRI SAT SUN Weekly Total feb. �3 – �9 40 �0 �0 20 feb. 20 – 26 54 �0 �0 *34 feb. 27 - march 4 80 20 30 30 march 5 – �� �00 20 40 40 march �2 –�8 80 20 30 30 march �9 – 25 �00 20 40 40 march 26 – april � �20 20 50 50 april 2 – 8 �30 30 50 50 april 9 – �5 90 20 50 20 april �6 – 22 �30 30 50 50 april 23 – 29 �40 20 60 60 april 30 - may 6 �70 30 70 70 may 7 – �3 ��0 30 50 30 may �4 – 20 �70 30 70 70 may 2� – 27 �80 20 80 80 may 28 - June 3 �40 20 60 60 June 4 – �0 �80 45 **65 or �00 70 or 30 June �� – �7 �20 30 50 40 June �8 – 24 �40 30 �00 20 June 25 – July � �20 30 50 40 July 2- July 8 �00 20 50 30 July 9 – July �5 224 20 �02 �02 * chilly hilly ride and ** flying Wheels Summer century ONE - DAY RIDERS WEEK OF: Goal MON TUE WED THUR FRI SAT SUN Weekly Total feb. �3 – �9 60 20 20 20 feb. 20 – 26 74 20 20 *34 feb. 27 - march 4 80 20 40 20 march 5 – �� 70 20 30 20 march �2 –�8 90 30 50 �0 march �9 – 25 ��0 20 70 20 march 26 – april � ��0 30 50 30 april 2 – 8 �30 40 70 20 april 9 – �5 �20 20 80 20 april �6 – 22 �40 40 70 30 april 23 – 29 �90 50 80 60 april 30 - may 6 �60 50 90 20 may 7 – �3 �70 30 �00 40 may �4 – 20 �60 40 70 50 may 2� – 27 �90 50 ��0 30 may 28 - June 3 �30 30 �0 70 20 June 4 – �0 2�0 40 20 **�00 50 June �� – �7 �40 40 70 30 June �8 – 24 200 50 �00 50 June 25 – July � �60 40 70 50 July 2- July 8 �20 40 60 20 July 9 – July �5 234 20 �0 204 0 * chilly hilly ride and ** flying Wheels Summer century flying Wheels offers the STp rider a chance to test your equipment, skills and fitness on a fantastic course at the perfect time to peak for the STp. The hilly and scenic 25, 45, 65 and �00 mile routes begin and end in redmond. Information on-line at: www.cascade.org or call (206) 522-BIke. Training related question please contact cycle university www.cycleu.com. check out a cycle u Training center and bike shop at Sand point near magnuson park, West Seattle on fauntleroy or online at www.cycleu.com. �-800-476-068�.

nice recoveryThe Four R’s plan - Restore, Replenish, Reduce and Rebuild.
There’s more to recovery than water and carbohydrates. The academic community has had a paradigm shift in the last few years. They’re beginning to recognize the importance of protein to help rebuild muscle cells damaged by exercise and rebuild the immune system. Also, antioxidants like vitamins C, E and beta-carotene fight cell damage caused by intense exercise. As a starting point, this program assumes you have just done a fast hour-long ride or a slower ride of more than 90 minutes that has depleted the glycogen supply in your legs.
RestoRe fluids and electRolytes• You can start the recovery process even before the ride begins by drinking as much as 12 ounces of a sports
drink 15 minutes prior. Then consume 4-8 oz. every 10-15 minutes during the ride.• Consume electrolytes (sodium, potassium and magnesium). Find a sports drink containing at least 40 mil-
ligrams of sodium per 8 oz of fluid, or add extra salt to food.
Replenish glycogen stoRes Rapidly• In the two hours after exercise, a 150-pound cyclist should eat 68-102 grams of carbohydrate (which is
converted to glycogen for use by the muscles), with some protein. Energy bars contain about 45 grams of carbos.
• Protein in sports drinks makes glycogen replenishment more effective, but too much protein slows stomach emptying—not good during exercise. The best ratio of carbohydrate to protein is four to one, so check the nutritional labeling on any sports drink you’re considering.
• In the 24 hours following exercise, eat about 5 grams of carbohydrate per pound of bodyweight. (A 150 pounder should consume about 750 grams.) Incidentally, your daily diet should contain 60-65% carbohy-drate, 20-25% fat and 15% protein.
Reduce cellulaR damage and muscle stRess• Eat 8-10 servings of fruits and vegetables every day to support the immune system. Citrus fruits provide
vitamin C; dark green vegetables such as spinach and broccoli supply beta-carotene; and wheat germ, nuts and sweet potatoes are a good source of vitamin E.
• Supplement these foods with a multivitamin.Rebuild muscle pRotein
• Protein consumption above the Recommended Daily Allowance (RDA) is controversial. Some research in-dicates that athletes get enough protein from a conventional diet, while other studies suggest that high-inten-sity exercise requires twice the RDA of four grams per 10 pounds of bodyweight. Burke favors additional protein (up to twice the RDA), in the form of food or supplements, if you’re training or riding every day during a demanding tour.
The Four R’s What You Need Where to Get it
REPLENISH glycogen stores rapidlyCarbohydrate, protein and other nutritive
agents to stimulate transport of glucose into cells and aid the synthesis of glycogen.
Sports drinks, carbo-rich foods such as fruit, veggies, whole grains.
REDUCE cellular damage/muscle stressAnti oxidants, glutamine and other natural
and minimize post-exercise muscle damage.products to prevent formation of free radicals such as vitamins C and E.
Sports drinks, fruits, veggies, supplements
REBUILD muscle cellsAmple protein and branched-chain amino Sports drinks, food, meat and supplements.
9
acids to repair protein damage.
RESTORE fluid and electrolytes Sodium, potassium, magnesium, water Sports drinks, veggies, fruit, water
your Bike
You probably don’t drive the same model car or have a house painted the same color as your neighbors. Likewise your bike is likely to be singular if not unique. You’d not be likely to start on a cross-country motor trip without getting your car serviced if not completely tuned up. Likewise your bike deserves some service before a ride like Group Health STP, if not regularly.
Just as training gets you into shape for the big day, you’ll have a much better time if your bike is in shape too. Your bike will have a lot to do with your enjoyment of the ride, and cycling in general. The following few pages are an expert’s views about how you should fit on a road or mountain bike. Suffice to say, you ought to be able to go quite a ways before squirming or rearranging your position.
During training if you often, have a sore neck or sore shoulders, if your feet go to sleep or burn, if your hands be-come numb, or if one or both knees hurt for a little while afterwards, your bike fit needs adjustment. It doesn’t matter if you ride a $8,000 racing bike or a $149 cross bike from a discount store. Also, it probably doesn’t have anything to do with your type of seat, although that can be a factor. (If one or both knees hurt for more than a little while, stay off the bike and see a doctor.)
Adjustments to how you sit and pedal on your bike can be made at almost any bike shop. They may be as simple as raising or lowering your seat. They are not likely to be more complicated or cost more than a new stem ($40-100). A bike shop professional can make an assessment in just a few minutes; however, you may need to schedule a time to be sure the right staff is working.
Do you know how many miles your chain has on it? Or your tires? When was the last time your shifting or brake cables were lubricated? Is your rim strip rubber or cloth? A bike "check up" should be done every 1,500 to 2,000 miles.
After flat tires, the number one mechanical failure is broken spokes. If you have experienced two broken spokes on one wheel, you probably should get a new wheel or have the wheel rebuilt. It's also possible that you may ride for years and never have a spoke break.
Many bicycles come with wheels that have thin, flimsy rubber rim strips between the tire’s tube and the head of the wheel’s spokes. If you ever get a flat with the hole on the inside of the tube, it’s a rim strip failure. Replacing rubber rim strips with a Velox® or tough synthetic strip is inexpensive and an easy way to help prevent flats.
Many cyclists work on their own bikes, and that’s fine but the night before the ride is not the time to make adjust-ments. Always get a test ride in after changes to your bike.
The rest of us, however, like to have bike service done by proffessionals. If you do, it is strongly suggested to sched-ule a bike shop appointment well (as in months) in advance of the ride, or sooner. If you do not already have a working relationship with a shop, choose one that’s convenient for you or one a friend recommends. Consider yourself warned, tho’: bike shops’re very busy prior to the ride.
Let the bike shop know you’re planning to ride Group Health STP. They will be better able to advise you on what your bike needs. Don’t make major changes such as from toe clips to clipless pedals or add triathlon handlebar exten-sions without sufficient time to train with them.
Also, keeping a tuned bike clean makes it more fun to ride. Gentle soap and drizzle water will do most of the trick. (Even semi-high-pressure water might get in some places it’s not supposed to be.) Some shop rags, a chain cleaning tool, chain degreaser and a good lubricant will do the rest.
Having a well tuned bike will make your ride to Portland much more pleasurable!
�0
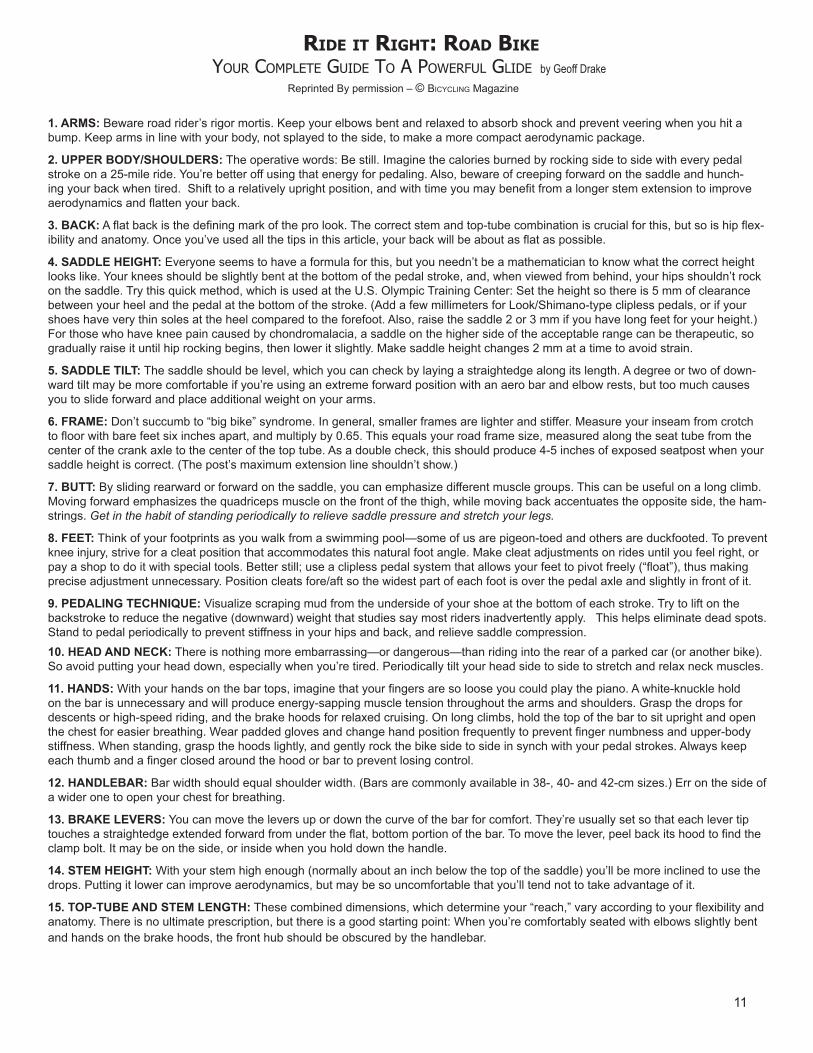
ride iT riGHT: road BikeYour Complete Guide to A powerful Glide by Geoff Drake
reprinted By permission – © BIcYcLING magazine F
1. ARMS: Beware road rider’s rigor mortis. keep your elbows bent and relaxed to absorb shock and prevent veering when you hit a bump. keep arms in line with your body, not splayed to the side, to make a more compact aerodynamic package.
2. UPPER BODY/SHOULDERS: The operative words: Be still. Imagine the calories burned by rocking side to side with every pedal stroke on a 25-mile ride. you’re better off using that energy for pedaling. also, beware of creeping forward on the saddle and hunch-ing your back when tired. Shift to a relatively upright position, and with time you may benefit from a longer stem extension to improve aerodynamics and flatten your back.
3. BACK: a flat back is the defining mark of the pro look. The correct stem and top-tube combination is crucial for this, but so is hip flex-ibility and anatomy. once you’ve used all the tips in this article, your back will be about as flat as possible.
4. SADDLE HEIGHT: everyone seems to have a formula for this, but you needn’t be a mathematician to know what the correct height looks like. your knees should be slightly bent at the bottom of the pedal stroke, and, when viewed from behind, your hips shouldn’t rock on the saddle. Try this quick method, which is used at the u.S. olympic Training center: Set the height so there is 5 mm of clearance between your heel and the pedal at the bottom of the stroke. (add a few millimeters for look/Shimano-type clipless pedals, or if your shoes have very thin soles at the heel compared to the forefoot. also, raise the saddle 2 or 3 mm if you have long feet for your height.) for those who have knee pain caused by chondromalacia, a saddle on the higher side of the acceptable range can be therapeutic, so gradually raise it until hip rocking begins, then lower it slightly. make saddle height changes 2 mm at a time to avoid strain.
5. SADDLE TILT: The saddle should be level, which you can check by laying a straightedge along its length. a degree or two of down-ward tilt may be more comfortable if you’re using an extreme forward position with an aero bar and elbow rests, but too much causes you to slide forward and place additional weight on your arms.
6. FRAME: Don’t succumb to “big bike” syndrome. In general, smaller frames are lighter and stiffer. measure your inseam from crotch to floor with bare feet six inches apart, and multiply by 0.65. This equals your road frame size, measured along the seat tube from the center of the crank axle to the center of the top tube. as a double check, this should produce 4-5 inches of exposed seatpost when your saddle height is correct. (The post’s maximum extension line shouldn’t show.)
7. BUTT: By sliding rearward or forward on the saddle, you can emphasize different muscle groups. This can be useful on a long climb. moving forward emphasizes the quadriceps muscle on the front of the thigh, while moving back accentuates the opposite side, the ham-strings. Get in the habit of standing periodically to relieve saddle pressure and stretch your legs.
8. FEET: Think of your footprints as you walk from a swimming pool—some of us are pigeon-toed and others are duckfooted. To prevent knee injury, strive for a cleat position that accommodates this natural foot angle. make cleat adjustments on rides until you feel right, or pay a shop to do it with special tools. Better still; use a clipless pedal system that allows your feet to pivot freely (“float”), thus making precise adjustment unnecessary. position cleats fore/aft so the widest part of each foot is over the pedal axle and slightly in front of it.
9. PEDALING TECHNIQUE: Visualize scraping mud from the underside of your shoe at the bottom of each stroke. Try to lift on the backstroke to reduce the negative (downward) weight that studies say most riders inadvertently apply. This helps eliminate dead spots. Stand to pedal periodically to prevent stiffness in your hips and back, and relieve saddle compression. 10. HEAD AND NECK: There is nothing more embarrassing—or dangerous—than riding into the rear of a parked car (or another bike). So avoid putting your head down, especially when you’re tired. periodically tilt your head side to side to stretch and relax neck muscles.
11. HANDS: With your hands on the bar tops, imagine that your fingers are so loose you could play the piano. a white-knuckle hold on the bar is unnecessary and will produce energy-sapping muscle tension throughout the arms and shoulders. Grasp the drops for descents or high-speed riding, and the brake hoods for relaxed cruising. on long climbs, hold the top of the bar to sit upright and open the chest for easier breathing. Wear padded gloves and change hand position frequently to prevent finger numbness and upper-body stiffness. When standing, grasp the hoods lightly, and gently rock the bike side to side in synch with your pedal strokes. always keep each thumb and a finger closed around the hood or bar to prevent losing control.
12. HANDLEBAR: Bar width should equal shoulder width. (Bars are commonly available in 38-, 40- and 42-cm sizes.) err on the side of a wider one to open your chest for breathing.
13. BRAKE LEVERS: you can move the levers up or down the curve of the bar for comfort. They’re usually set so that each lever tip touches a straightedge extended forward from under the flat, bottom portion of the bar. To move the lever, peel back its hood to find the clamp bolt. It may be on the side, or inside when you hold down the handle.
14. STEM HEIGHT: With your stem high enough (normally about an inch below the top of the saddle) you’ll be more inclined to use the drops. putting it lower can improve aerodynamics, but may be so uncomfortable that you’ll tend not to take advantage of it.
15. TOP-TUBE AND STEM LENGTH: These combined dimensions, which determine your “reach,” vary according to your flexibility and anatomy. There is no ultimate prescription, but there is a good starting point: When you’re comfortably seated with elbows slightly bent and hands on the brake hoods, the front hub should be obscured by the handlebar.
��
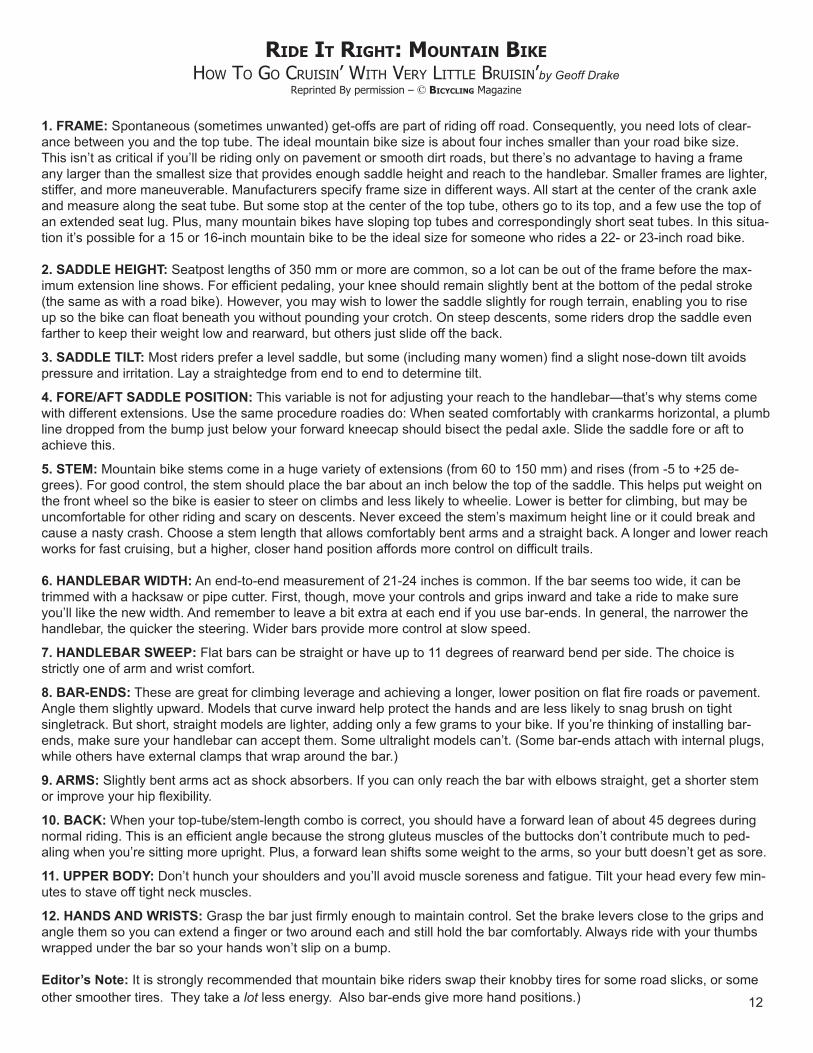
ride iT riGHT: mounTain BikeHow to Go Cruisin’ witH VerY little Bruisin’by Geoff Drake
Reprinted By permission – © BicyclinG Magazine
1. FRAME: Spontaneous (sometimes unwanted) get-offs are part of riding off road. consequently, you need lots of clear-ance between you and the top tube. The ideal mountain bike size is about four inches smaller than your road bike size. This isn’t as critical if you’ll be riding only on pavement or smooth dirt roads, but there’s no advantage to having a frame any larger than the smallest size that provides enough saddle height and reach to the handlebar. Smaller frames are lighter, stiffer, and more maneuverable. manufacturers specify frame size in different ways. all start at the center of the crank axle and measure along the seat tube. But some stop at the center of the top tube, others go to its top, and a few use the top of an extended seat lug. plus, many mountain bikes have sloping top tubes and correspondingly short seat tubes. In this situa-tion it’s possible for a �5 or �6-inch mountain bike to be the ideal size for someone who rides a 22- or 23-inch road bike.
2. SADDLE HEIGHT: Seatpost lengths of 350 mm or more are common, so a lot can be out of the frame before the max-imum extension line shows. for efficient pedaling, your knee should remain slightly bent at the bottom of the pedal stroke (the same as with a road bike). however, you may wish to lower the saddle slightly for rough terrain, enabling you to rise up so the bike can float beneath you without pounding your crotch. on steep descents, some riders drop the saddle even farther to keep their weight low and rearward, but others just slide off the back.
3. SADDLE TILT: most riders prefer a level saddle, but some (including many women) find a slight nose-down tilt avoids pressure and irritation. lay a straightedge from end to end to determine tilt.
4. FORE/AFT SADDLE POSITION: This variable is not for adjusting your reach to the handlebar—that’s why stems come with different extensions. use the same procedure roadies do: When seated comfortably with crankarms horizontal, a plumb line dropped from the bump just below your forward kneecap should bisect the pedal axle. Slide the saddle fore or aft to achieve this.
5. STEM: mountain bike stems come in a huge variety of extensions (from 60 to �50 mm) and rises (from -5 to +25 de-grees). for good control, the stem should place the bar about an inch below the top of the saddle. This helps put weight on the front wheel so the bike is easier to steer on climbs and less likely to wheelie. lower is better for climbing, but may be uncomfortable for other riding and scary on descents. never exceed the stem’s maximum height line or it could break and cause a nasty crash. choose a stem length that allows comfortably bent arms and a straight back. a longer and lower reach works for fast cruising, but a higher, closer hand position affords more control on difficult trails.
6. HANDLEBAR WIDTH: an end-to-end measurement of 2�-24 inches is common. If the bar seems too wide, it can be trimmed with a hacksaw or pipe cutter. first, though, move your controls and grips inward and take a ride to make sure you’ll like the new width. and remember to leave a bit extra at each end if you use bar-ends. In general, the narrower the handlebar, the quicker the steering. Wider bars provide more control at slow speed.
7. HANDLEBAR SWEEP: flat bars can be straight or have up to �� degrees of rearward bend per side. The choice is strictly one of arm and wrist comfort.
8. BAR-ENDS: These are great for climbing leverage and achieving a longer, lower position on flat fire roads or pavement. angle them slightly upward. models that curve inward help protect the hands and are less likely to snag brush on tight singletrack. But short, straight models are lighter, adding only a few grams to your bike. If you’re thinking of installing bar-ends, make sure your handlebar can accept them. Some ultralight models can’t. (Some bar-ends attach with internal plugs, while others have external clamps that wrap around the bar.)
9. ARMS: Slightly bent arms act as shock absorbers. If you can only reach the bar with elbows straight, get a shorter stem or improve your hip flexibility.
10. BACK: When your top-tube/stem-length combo is correct, you should have a forward lean of about 45 degrees during normal riding. This is an efficient angle because the strong gluteus muscles of the buttocks don’t contribute much to ped-aling when you’re sitting more upright. plus, a forward lean shifts some weight to the arms, so your butt doesn’t get as sore.
11. UPPER BODY: Don’t hunch your shoulders and you’ll avoid muscle soreness and fatigue. Tilt your head every few min-utes to stave off tight neck muscles.
12. HANDS AND WRISTS: Grasp the bar just firmly enough to maintain control. Set the brake levers close to the grips and angle them so you can extend a finger or two around each and still hold the bar comfortably. always ride with your thumbs wrapped under the bar so your hands won’t slip on a bump.
Editor’s Note: It is strongly recommended that mountain bike riders swap their knobby tires for some road slicks, or some other smoother tires. They take a lot less energy. also bar-ends give more hand positions.) �2

don’T panic, don’T freT... fiX THaT flaTIf you do not know how to fix a flat, practice changing tubes in the privacy and comfort of your home. Flats actually can be welcome respites if you know how to fix them. If you don’t you’ll only be mad at yourself, not to mention a little embarrassed.
Courtesy of R&E Cycles in Seattle’s U-District
I. Remove The WheelA. Open the brake’s quick release and wheel’s Qwik Release spindle or loosen spindle bolt.B. If it’s a rear flat (Isn’t it always?), shift into biggest front gear and smallest rear cog, and pivot rear
derailleur back for clearance.II. Remove One Bead Of The TireA. Starting opposite the valve, use the “spoon” end of the lever to pry up one edge of the tire. Hook
the hooked end of the lever onto the nearest spoke.B. Insert a second lever to pry out more bead. Slide it along the rim until the tire is free from the rim. C. Pulloutthetube.III. Check The Tube and Tire For The Cause Of The FlatA. Inflate the tube to locate the leak; don’t be alarmed how big it gets. Correlate the leak to a tire
location. (Hint: Always mount a tire with its label split by the stem.)B. Remove glass, staple, thorn, etc. from tire if still there. Carefully check both the inside and outside
of the tire for debris. Check the rim strip to ensure it’s intact and in place.C. If your tire has a large hole or gash, insert a dollar bill between the tube and the torn portion of
tire.IV. Install The New TubeA. Put a little air into the tube so it will hold its shape. Push the valve stem through its rim hole, insur-
ing it’s in straight, not slanted.B. Tuck the tube into the tire proceeding in both directions from the valve.V. Re-Install The Bead Of The TireA. Start at the valve and proceed in both directions until you are opposite the valve.B. Fully deflate the tube.C. Check for tire / tube seating.1) Starting again at the valve, hold the tire near the bead and work it back and forth all the way around
using both hands if necessary. Be sure no tube is showing under/outside the tire bead.2) Persist!VI. Inflate Your TireA. Start by inflating it to about 1/2 max pressure; check for tire seating!!B. If seated correctly, finish inflating.C. If any tube is protruding anywhere, release air and repeat VII. Re-Install WheelA. If rear wheel, place chain on small cog and pull into dropouts and between brake pads.B. Pick up debris and shift into easier gear before re-mounting bike to ride again.
SUGGESTED TOOL LIST1. Two spare tubes 2. pump with proper valve setting3. Set of three tire levers 4. If your wheels are not qwik release a wrench for loosening axle nuts.5. a patch kit for if you run out of new tubes (i.e. - have multiple flats)6. a seat pack to carry it all in.
�3
imporTanT THinGS To rememBer packeT pickupGroup Health STP Rider Packet Pickup is where you’ll receive your rider number bib, bike and helmet numbers and your souvenirs. packet pickup is held at reI in Seattle and portland before the event and at the Start line. Information about the where and when is in the Official Group Health STP Ride Guide and will be included in your confirmation email. (To avoid delays please try to pick up your packet in advance. packets may be picked up at the Start line between 4:30 a.m. and 7:30 a.m.) you can print your registration confirmation any time from your online account. If you pay extra for packet mailing they start going out in late June.
regardless of where you pick up your rider packet bring your registration confirmation or Picture ID at packet pickup. regsitrations are non Transferable. for the refund policy please chcke the website at www.cascade.org for details.
packets can be mailed to participants for a fee; see the registration form for details. you can pick up someone else’s packet as long as you have their registration confirmation print out.
BaGGaGe ServiceGroup health STp provides trucks to carry your gear on the route. limit your baggage to a light (20 lbs.) and small, distinctively colored bag, sleeping bag and tent. Do not pack breakables or valuables. cascade Bicycle club is NOT re-sponsible for any lost, stolen or damaged luggage. DO NOT tie pieces together or use plastic garbage bags. Since your gear may be out in the rain when it is unloaded, it is helpful to put your clothing inside a plastic bag before packing.
Before you leave Home· Detach the official baggage tag from your number bib, completely fill it out and securely attach to your baggage.· pin on your bib number. It needs to be visible from behind. This bib number will get you access to the free food stops.· attach your adhesive helmet number to the front of your helmet. used for the photographers on route.· affix the cardboard bike number to the front of your bike. used for the photographers and bike return.· note: photographers on the route need your rider number on the front in order to match you with your pictures.
aT THe STarT lineYou are responsible for placing your gear into the truck or pile labeled for your destination.
aT THe major food STopS food is included with your registration and is for registered riders only, not their friends and family in personalsupport vehicles. your rider bib number is your meal ticket. you muST have your bib number. your bike and helmetnumber will not get you access to the free food. The food at these stops is very generic 'ride food" that is designed to keep you going and is not meant to be a meal. If you have special dietary needs you will need to plan accordingly. you may be required to show your bib number to access the food.
HouSinG on Group HealTH STpThere’s simply not much to say about this… here. If you’re riding in two days, where you stay Saturday night is yourresponsibility. (and in portland too.)
centralia college is the halfway point. riders stay everywhere from north of centralia to kelso/longview. manyrepeat riders have favorite places. check out the housing inforamation at www.cascade.org for lots ofinformation about Saturday night and portland accommodations. Bear in mind that motel rooms fill up early – many ifnot most are reserved now! camping is free at some locations. Some locations, including many if not most privateresidences, will pick up and drop off your luggage for you. It’s not a bad idea to start making your overnight plans as soonas you register. It’s almost never too early.
STarTinG THe Second day – Sundayplace your gear aboard the truck at any of the designated pickup sites by the designated time. (If you do not know whereor when, ask when you pick up your luggage the night before.) Some, but not all, overnight venues will provide luggagetransport to the truck for you.
aT THe finiSH lineall riders will need to pick up their luggage from the bag corral located in the DoubleTree hotel expo room.If you do not finish the ride, your baggage will be sent to lost and found at the cascade Bicycle club in Seattle, (206) 522-3222. you may retrieve your items from the office from during normal business hours. call for exact times. youhave up to one week after the event to claim your lost property. after that time it is donated to charity.
�4

�5
Frequently asked questions and answersq: If I register to do the ride in two days but decide to do it one day what do I have to do? a: all that you need to do is put your bags on the portland truck at the start line instead of the midpoint trucks. now you are committed and it is on to portland. q: can a minor ride STp unaccompanied? a: riders under the age of �8 are welcomed. however, cascade Bicycle club and Group health STp recommend to parents that they provide constant adult supervision for riders under the age of �8. minors must have the “consent to medical care and Treatment of a minor² form on the back of their number bib signed by a parent or legal guardian. q: When will I get my registration confirmation email? a: Group health STp registration confirmation emails will start going out the week of June 18. you will need to bring this email to packet pickup. you can pick up packets for other people as long as you have their confirmation email.q: can I get a refund after I register for Group health STp? a: a 75% refunds is available up to 30 days before the event. 29 days and less before the event there are no refunds for any reasons. registrations are non Transferable. check the web site for more details. www.cascade.org.q: What do I do if I don’t get my registration confirmation email or I loose it? a: come to packet pickup with picture ID and you can get your packet. q: can I pick up a packet for another person? a: yes, as long as you have their confirmation email. q: Is there a special rate for families? a: riders or passengers ages �-to-�2 years old pay a $55 registration fee, which includes the Group health STp souvenirs. age is determined based on the event date. a separate registration form must be completed for each person. q: Do cascade Bicycle club members get a discount on Group health STp? a: yes, members get a $�0 discount on Group health STp. q: What is the registration fee for tandem riders? a: each rider must complete a registration form and pay the entry fee to get a registration packet, food at food stops, baggage services, souvenirs - the full STp package of services and support. q: Do I have to make my own arrangements for midpoint housing? a yes, see the helpful information on the housing pages. q: I see riders with really low numbers. how can I get a number lower than �00? a: Volunteers who donate their time to STp can earn a free or discounted registration with a bib number of �00 or lower. q: Where can I get additional information about Group health STp? a: email [email protected] or call the office at (206) 522-3222 or the web site www.cascade.org.q: can I park my car or camper at the start line on friday night? a: yes, you can park in the north end of the e-� parking lot at the university of Washington. for friday night parking you will need to buy a parking pass via the registration form or at packet pickup. lot opens at 5 pm friday night.q: how do I get my bags to the midpoint and then to the finish line? a: a maximum of two bags per rider will be transported from the start line to the listed midpoint locations or to the finish line (one-day riders). locations and times are listed under baggage services section. your bib number comes with two bag tags that must be attached to your bags. q: I am flying out of portland after the ride, can you transport my bike box to portland? a: yes, your bike box can be transported directly to the finish line on the portland baggage truck for a $20 fee. you can buy a bike box ship ping tag via the registration form or at packet pick up. at the start line put the box on the portland truck and it will be waiting for you when you arrive in either one or two days.q: how do I get back from portland. a: you may choose return transportation for you (by bus) and for your bike (by truck) for an additional fee of $62. Bicycle only tickets can be purchased for $3�. you must sign up for this service in advance and space is limited. q: What if I can’t make it to portland? Will Group health STp support vehicles give me a ride home or to the finish line. a: no, The support vehicles are on the road to provide emergency services to those riders in need. They will transport stranded riders to the nearest STp food stop or mini-stop for mechanical or medical assistance. If the rider is unable to continue he or she will need to make their own arrangements to get to their final destination. q: What happens to my bags if I don’t make it to the finish line? a: all unclaimed bags at the finish line will be brought back to the cascade Bicycle club offices in Seattle. See the lost and found section.q: can I pick up my packet at the start line? a: yes, you can, but it not recommended due to the hectic nature of the starting line. q: how hilly is the route? a: for 204 miles the route is pretty flat with the “Big hill” coming at the 45-mile mark. It’s a mile long with about a 7 percent grade. other climbs of note are the hills up and over the lewis and clark bridge. The majority of the ride is on beautiful, rolling rural roads. q: What kind of food is served at the official STp food Stops? a: The food that is served is high carbohydrate and high energy types of foods. It is not meant to be a meal but is designed to keep you going. If you need a meal or have special dietary needs you should plan accordingly. Typical food at the stops include clif bars, bagels, fruits, cookies, and small sandwiches or wraps.q: Will I have to pay for food on the ride? a: at the official STp food Stops the food is part of your registration. These stops are located at Spanaway, centralia (for one-day riders only), lexington and St. helens. There are many other ministops that are fundraisers for local community groups that have food for sale.q: Why am I given numbers for the front of my bike and helmet? a: The bike numbers and helmet numbers are used by the photographers to take event pictures. If these numbers are not visible they will not be able to match you with your picture. proofs and an order form for these pictures will be mailed to riders shortly after the event.q: how can I locate another rider during the event? a: With �0,000 riders on the road it is virtually impossible for Group health STp staff to track down riders. We suggest that riders with these concerns carry cell phones or personal radios to keep in touch.q: Do the medical stations give out over the counter drugs? (aspirin, ibuprofen, allergy medicine, etc.) a: The aids stations provide basic first aid to get you back on the road and have limited medical supplies. please carry your own medication to cover known conditions and plan ahead for common occurrences such as muscle fatigue, saddle sores, sun burn, and chapped lips.q: can I get my packet mailed to me? a: yes, you can for an additional fee. See the registration form for details. q: Is there a map of the route? a: yes, one will be included in your rider packet and when it is ready a pDf will be posted on the STp details page at www.cascade.org.

�6
THe THree o’clock in THe morninG
“oH! my God, did i forGeT anyTHinG?”Registration materials
printed registration confirmation email for packet pickup rider numbers. Bib number (with the back side filled in) on jersey. Bike number on front of handle bars and helmet number on the front of the helmet.
Bicycle and suppliesBike (go ahead and laugh - it has happened!)key to unlock your bike from the rackhelmet (adjusted to fit properly), mirrorpump (your pump that fits your bike. Did you pump your tires already?)pack (under-the-seat, stem, pannier, handlebar, – whatever works for you)Tool kit (patch kit with fresh glue and patches, hex wrenches, chain tool, spokes, etc.)Spare tubes (two to carry with you and one in your overnight bag)
Water and foodWater bottles or hydration pack (filled… why start out waiting in line for water?)energy foods, bananas, bread, potatoes, electrolyte tablets, caffeine, etc.Start with your pockets filled with the ride food that works for you.
Clothing, comfort and personalWallet (with cash, ID, medical insurance card, aTm/Visa card, etc.)cell phone, GpS, bike computer, etc. (did you charge them?)cycling shoes, inserts, toe warmers, booties…Socks and a spare pair or three (your feet will appreciate it)Shorts and a spare in luggage for day two. chamois Butt’r®, BodyGlide®, etc.Jersey or shirt(s), and a spare (in luggage)ear band, head scarf, arm / knee / leg warmers, etc.Jacket, wind vest, reflective vest, etc.rain gear (jacket, booties, rain pants) – if not on your bike, in your luggage for day 2cycling glovesSunglasses, alternate lenses, mirror, prescription eyewear, eye drops…Sun screen and lip protector (even if it’s going to be cloudy), aloe…medications (aspirin, ibuprofen, inhaler, insulin, contact lens care, etc.)camera (and a baggie to keep the camera dry)notepad and pen
Overnight bagStreet clothes, street shoes, personal hygiene items, towel, additional medications…Day 2 stuff: clean jersey/shirt, shorts, socks, jacket, spare parts, sunscreen, food, rain gear, etc.extra batteries or chargers for phone, GpSTent (with rain fly), sleeping bag, pad, pillow, teddy bear, ear plugsluggage tagged (tags are on the bottom of your bib number)noTe: all luggage items should be protected from rain and sun. Do not pack valuables or anything break-able.
Before Leaving homeDetach the official baggage tag from your number bib, completely fill it out and securely attach to your bag-gage.pin on your bib number. It needs to be visible from behind. This bib number will get you access to the free food stops.attach your adhesive helmet number to the front of your helmet. used for the photographers on route.affix the cardboard bike number to the front of your bike. used for the photographers and bike return.photographers on the route need your rider number on the front in order to match you with your pictures.
Leaving homekeys (car, house, bike rack…)Transportation and contacts (bus tickets, housing, friends…)food and water for the cat / fish / hamster…light timers, empty trash / compost…
••
•••••••
•••
•••••••••••••••
••••••
•
•
•••
••••

• Altrusa International• Gold Wing Touring Association• Portland Wheelmen• Spanaway Junior High• St. Helens High School Band• Centralia College• Centralia/Chehalis Chamber
�7
www.cascade.org
ParTnerS