Embed Size (px)
Citation preview

1
90558 Installation Manual
For #60250 2003-2005
Cummins 5.9L Common Rail Diesel 1st Edition March 2008
Copyright © 2008 by Perfect Performance Products, LLC

2
Painless Performance Products, LLC
2501 Ludelle St.
Fort Worth, TX 76105-1036
PHONE: 800-423-9696 FAX: 817-244-4024
EMAIL: [email protected]
If you have any questions concerning the installation of this harness, feel free to call Painless Performance Products' Tech Line at 1-800-423-9696. The Tech Line can be reached from 8 A.M. to 5 P.M. central time, Monday through Thursday, and 8 A.M. to 4:30 P.M. on Fridays.
We have attempted to provide you with as accurate of instructions as
possible and are always concerned about corrections or improvements that can be made. If you have found any issues or omissions, or simply have comments or suggestions concerning these instructions, please write us at the above address, send us a fax at (817) 244-4024, or email us at [email protected]. We sincerely appreciate your business.
Painless Performance Products, LLC shall in no event be liable in
contract or tort (including negligence) for special, indirect, incidental, or consequential damages, such as but not limited to, loss of property damage, or any other damages, costs or expenses which might be claimed as the result of the use or failure of the goods sold hereby, except only the cost of repair or replacement.

3
TABLE OF CONTENTS
1.0 INTRODUCTION.......................................................................................................................... 3
2.0 TOOLS NEEDED ......................................................................................................................... 3 3.0 PRE-INSTALLATION AND HARNESS ROUTING GUIDELINES........................................................... 4
4.0 ADDITIONAL COMPONENTS NEEDED…………………………………………………………………………………………4 4.1 ENGINE SENSOR PARTS LIST………………...................................................................................... 5
4.2 GROUNDING THE VEHICLE……………………………………………………………............................................ 5
4.3 YEAR SPECIFIC CONNECTORS……………………………………………………………………………………………………5 5.0 ROUGH INSTALLATION… ……………………………...........................................................................6-9
6.0 ENGINE SPECIFIC CONNECTIONS...........................................................................................10-19 7.0 FUSE BLOCK………………………………............................................................................................. 20
7.1 RELAYS……..………………………………............................................................................................ 20 7.2 FUSES……………………………………………………….………………….......................................................... 20
8.0 FIRE WALL….………………………………………………………….................................................................21
9.0 OPEN ENDED WIRES……….………………………………................................................................... 21-25 10.0 FINAL NOTES.......................................................................................................................... 26
WARRANTY.................................................................................................................................... 27 NOTES........................................................................................................................................... 28
LIST OF PICTURES ENGINE COMPONENTS DRIVER SIDE ................................................................................................ 6
ENGINE COMPONENTS PASSENGER SIDE .......................................................................................... 7 HARNESS ROUTING ON ENGINE..................................................................................................... 8-9
ECM……………………………………….. .....................................................................................................10
FUEL HEATER…………………………………………… .................................................................................. 10 WATER IN FUEL SENSOR………………................................................................................................ 10
OIL PRESSURE SENSOR……………. ................................................................................................... 11 FUEL CONTROL ACTUATOR…….. ..................................................................................................... 12
CAM POSITION SENSOR……….......................................................................................................... 13
CRANK POSITION SENSOR……………….............................................................................................. 13 RADIATOR FAN DRIVE.....................................................................................................................13
INJECTOR 1&2………………………………................................................................................................14 INJECTOR 3&4…………….. ................................................................................................................15
INECTOR 5&6…………… ...................................................................................................................15 MAP/IAT SENSOR ...........................................................................................................................15
FUEL PRESSURE SENSOR.................................................................................................................16
EARLY APPS……………………...............................................................................................................17 COOLANT TEMPERATURE SENSOR....................................................................................................18
ALTERNATOR .................................................................................................................................18 WASTEGATE...................................................................................................................................19
PRE-TURBO IAT/PRESSURE..............................................................................................................19
BATTERY TEMPERATURE SENSOR.....................................................................................................19 FUSEBLOCK/ RELAYS/ FUSES....……………..........................................................................................20
FIREWALL.......................................................................................................................................21 LATE APPS......................................................................................................................................21
PARK/NEUTRAL SAFETY...................................................................................................................22 CRUISE CONTROL………...................................................................................................................23
BATTEY.....…..................................................................................................................................24
INTAKE AIR HEATER RELAYS.......................................................................................................24-25

4
1.0 INTRODUCTION We at Painless Performance Products believe you have purchased the most up-to-date and easiest to
install Cummins common rail engine swap harness on the market. All components of this harness are new. All harnesses are tested for faults before they leave the factory floor. This harness is designed for
easy installation, even if you have no electrical experience. Please read entire manual before installation.
Download a color version of this manual from www.painlessperformance.com.
The 60250 harness is a complete wiring system for the turbo diesel injection systems on 2003-2005 Cummins 5.9L engines. Only the factory ECM is to be used with this harness. This harness includes all
wiring that is needed by the computer to run and control the turbo diesel injection system. It is recommended that you have the computer reprogrammed to remove anything in the original factory
programming that relates to a device or devices that are not being used in your particular vehicle.
NOTE 1: Most remanufactured computers come without any programming and must be programmed
before they can be used. Call our tech line and we can refer you to someone with this capability.
NOTE 2: Factory 2006-2007 Cummins’ ECMs have an anti-theft feature programmed into them. They
are also pinned out incorrectly for this harness. Do not use a 2006 or 2007 ECM with this harness.
NOTE 3: The program in your computer must match the transmission that you plan on using. For
instance, you cannot run a 48RE transmission with a computer programmed for a G56 standard transmission. If you are not using a transmission that originally came behind the Cummins
engine, it is suggested that you flash the ECM for a standard shift transmission and purchase an
aftermarket controller for the transmission.
NOTE 4: 2003-2004 Cummins engines with 47RE automatic transmissions have the throttle position sensor mounted on a bell crank located towards the front of the intake manifold. 2004 Cummins
engines with standard transmissions and 2005 both automatic and standard have an APPS
mounted to the accelerator pedal. This harness supports the 2003-2004 bell crank or 2004-2005 accelerator pedal mounted APPS. Your ECM will need to be flashed accordingly. Do not try to
use a 2005 or later accelerator pedal mounted APPS with an ECM flashed for 2003 to 2004. You must purchase the correct pedal to match the ECM programming. The ECM pin outs change
from 2003-2005 which makes the APPS sensors non-interchangeable. See page 17 and 21 for
more information.
NOTE 5: Up until 2004.5 the factory lift pump was mounted to the back of the water/fuel separator and heater. This harness does not include this connector. If you wish to use this lift pump keep the
connector from your old factory harness and splice it to this one. Otherwise, use the supplied fuel pump relay output wire to power a factory fuel tank mounted lift pump or any aftermarket
fuel pump. The fuel pump relay is rated for continuous 30 amps.
2.0 TOOLS NEEDED You will need the following tools in order to install this wire harness:
Crimping tool NOTE: USE A QUALITY TOOL TO AVOID OVER-CRIMPING. Wire stripper
Volt/Ohm Meter
Electric drill with 1 1/4” hole saw Screw drivers
SAE and Metric sockets w/ratchet/extensions and wrenches OBD II code reader
Allen wrenches

5
3.0 PRE-INSTALLATION AND HARNESS ROUTING GUIDELINES
If you plan to loom this harness, do so before you install it onto the engine/vehicle. Looming your harness is definitely recommended. Painless Performance Powerbraid is a great way to protect your
harness from the elements and it makes the harness look great and the installation look professional. Look online at www.painlessperformance.com for more information.
The ECM is pre-mounted to the driver side of the engine block. If you move the ECM anywhere from the factory position, the 60250 harnesses will not properly fit. The fuse block is weather proof by design and
should be mounted in the engine compartment. Most of the wiring in the harness has been pre-terminated to the proper connector and all wire has been factory color-coded.
The installation with of your harness kit will consist of two parts:
• The physical routing, positioning, and securing of the harness, wire groups, and individual wires
and connectors. Many of the factory harness clips can be reused to install this aftermarket harness. When you remove the factory harness make sure to keep the factory clips and retainer
bolts.
• The proper electrical connection of the individual circuits. Most circuits are pre-terminated with a factory style connector. Please look carefully at the connector and its intended component you
are connecting to. Each connector is specifically keyed and can only be pushed onto its mate
one way. Forcing the connector on the wrong way will damage it and its terminals. Trouble shooting damaged connectors is not as fun as driving your re-powered Cummins vehicle. So
please take care when making connections, double check you are following these instructions.
4.0 ADDITIONAL COMPONENTS NEEDED The 60250 harness fits 2003-2005 Cummins common rail engines. You will need the following components in addition to this harness for a successful installation.
1. ECM- This must be a factory ECM flashed for a manual transmission. This harness only fits
ECMs from 2003-2005 Dodge trucks with the 5.9L Cummins engine.
2. IAT heater relays- This harness provides ECM output wires in order to turn on factory style
IAT heater relays. You must purchase these relays or get them from a salvaged vehicle. See
page 25 for a schematic on how to wire these relays.
3. APPS- This harness supports the 2003 early Accelerator Pedal Position Sensor that was
mounted on the front of the engine to the intake, the 2004 APPS mounted under the battery box
and the 2005 late model Accelerator Pedal Position Sensor that was mounted on the accelerator pedal. You must use which ever APPS your ECM is programmed for. All APPS units are available
from your local Chrysler dealer.
4. CTS- This harness only supports the late model style coolant temperature sensor. See page 18
for more details.
5. LIFT PUMP- There are several options when choosing a lift pump. This harness provides a 30
amp power wire. It is relayed and ECM controlled.
A. Use a factory style lift pump; this may be a good budget minded option if this Cummins
motor is transplanted into a vehicle that already had a diesel engine. Be sure to check volume and pressure from your factory lift pump if going with this option.
B. 2003-2004.5 Cummins engines had lift pumps mounted to the back of the fuel filter/water separator.
C. Use an aftermarket lift pump.
6. RADIATOR FAN DRIVE- This is factory mounted to the fan shroud and controls the speed
of the mechanical radiator cooling fan. This part can be taken from the donor vehicle or
purchased new. If you choose to use aftermarket radiator fans, tie wrap this connector up and out of the way from water, debris, heat or any moving parts on the vehicle.

6
7. VSS SIGNAL WIRE- This wire needs to receive a 5 Volt square wave signal from an ABS
module or VSS signal modification module. See page 23 for more details.
4.1 Engine Sensor Parts List All parts listed below are available through your local Chrysler dealer.
Fuel Pressure Sensor - 5093112AA
Crank Position Sensor – 5093101AA
Cam Position Sensor – 5093101AA
Fuel Heater – 5015586AA
Water in Fuel Sensor – 5093128AA
Oil Pressure Sensor – 5083366AA
Battery Temperature Sensor – 56041053
2003 Intake Mounted/Bell Crank Accelerator Pedal Position Sensor – 53031575AH 2004 Under Battery Tray Mounted APPS – 53031576AD
2005 Pedal Mounted Accelerator Pedal Position Sensor – 53032753AC
Intake Air Temperature and Pressure Sensor – 53032649AA
2005 Coolant Temperature Sensor – 5114413AA
MAP/IAT Sensor – 5139278AA
Intake Air Heater Relays – 472737AA
4.2 GROUNDING THE VEHICLE
A perfectly and beautifully wired automobile will nevertheless have problems if everything is not properly
grounded. Don't go to the effort of installing this quality wire harness only to neglect proper grounding.
Note: The installer of this harness is responsible for all ground wires not provided with this part.
Note: Disconnect the positive and negative battery cables during the installation of this harness.
• Connect a ground strap or cable (minimum of a 0 Ga. wire) from the negative battery terminal to the chassis (frame).
• Connect a ground strap (minimum of a 00 Ga. wire) from the engine to the chassis (frame). DO
NOT RELY UPON THE MOTOR MOUNTS TO MAKE THIS CONNECTION.
• Connect a ground strap from the engine to the body.
4.3 YEAR SPECIFIC INLINE CONNECTORS There are two inline connector selections to be made before you install this harness. Remove the
harness from the box and lay it out on a table. On the harness 10 inches from the fuse block you will find two female and one male black connector. Plug the male connector labeled FP RELAY into the
either the female connector labeled 03-04 FP DRIVE (2003-2004 fuel pump drive) or 2005 FP DRIVE (2005 fuel pump drive) depending upon which year of ECM programming and components you are using.
Tie off the unused connector. 2003 and 2004 ECMs use pin 45 of the 60 pin connector to power the lift
pump. We use this fuel pump drive wire to turn on the fuel pump relay. 2005 ECMs use pin 7 of the 50 pin connector to activate the lift pump relay.
The second inline connector selection to be made is located at the harness breakout with the crank, cam
and fan drive connectors. Plug the male connector labeled CTS SIGNAL into the female connector
labeled EARLY CTS if you are using an ECM and components from 2003. Plug the male connector into the female connector labeled LATE CTS if you are using an ECM and components from 2004 or 2005.
Tie off the unused connector.

7
5.0 ROUGH INSTALLATION Pictured below is the driver side of a common rail Cummins 5.9L diesel engine. Each numbered
component has a description below the picture. The component descriptions with bolded/parenthesis portions are labeled as such on the 60250 harness.
1. (CTS) ENGINE COOLANT TEMPERATURE SENSOR
2. INTAKE MANIFOLD AIR HEATER/ELEMENTS
3. (FPS) FUEL RAIL PRESSURE SENSOR
4. FUEL PRESSURE LIMITING VALVE 5. HIGH PRESSURE FUEL LINES 6. (FUEL HEATER) 7. HIGH PRESSURE FUEL RAIL 8. FUEL HEATER TEMPERATURE
SENSOR 9. FUEL FILTER/WATER SEPARATOR 10. CYLINDER HEAD FUEL RETURN
LINE
11. WATER SEPARATOR DRAIN VALVE 12. FUEL TANK FUEL RETURN LINE 13. FUEL SUPPLY LINE FROM LIFT
PUMP 14. DRAIN TUBE 15. (OIL PRES) OIL PRESSURE
SWITCH 16. (ECM) ENGINE CONTROL MODULE 17. HIGH PRESSURE FUEL INJECTION
PUMP 18. (CKS) CRANK POSITION SENSOR 19. (CMP) CAM POSITION SENSOR 20. (FUEL ACT) FUEL CONTROL
ACTUATOR 21. CASCADE OVERFLOW VALVE

8
1. (PRETURBO IAT/P) PRETURBO INTAKE AIR TEMPERATURE AND PRESSURE SENSOR
2. (ALT) ALTERNATOR REGULATOR 3. (CTS) COOLANT TEMPERATURE
SENSOR 4. WIRE HARNESS RETAINER CLIP
5. (EARLY APPS) EARLY STYLE APPS 6. (WASTEGATE) WASTEGATE
CONTROL SOLENOID 7. A/C PRESSURE TRANSDUCER 8. A/C COMPRESSOR CLUTCH
CONTROL
Pictured to the right is the 60250 harness installed
onto a 2003 Cummins. This harness routes and
attaches to the engine just
as the factory harness did. Reuse the factory harness
clips and bolt retainers when installing this
harness.
9
From the back of the driver side of the engine, feed the two ECM and all other front engine connectors through the space between the intake manifold and the fuel filter/water separator.
Behind the fuel filter there is a threaded stud. Use this and a harness retainer to secure the harness.
10
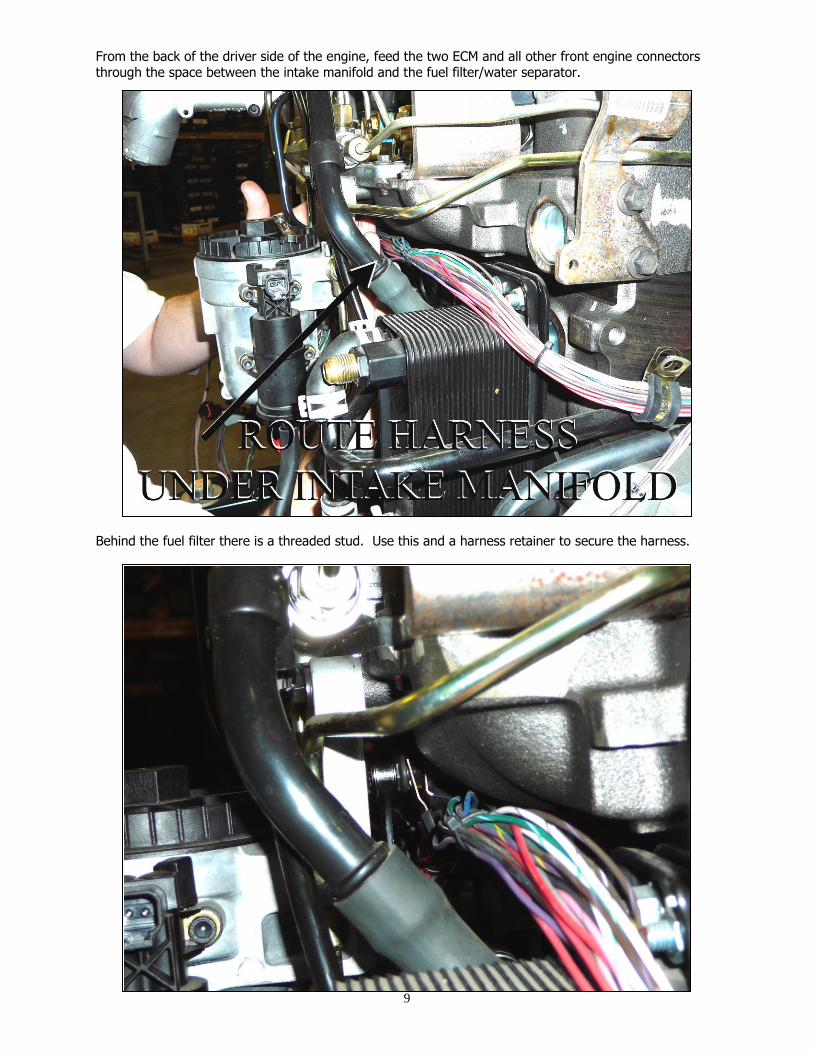
Use another retainer to attach the harness to the rear of the engine. Make sure you have the harness facing towards the direction of where you will mount the fuse block. When routed as pictured below, the
fuse block would be mounted on the passenger side of the vehicle. Leave the retainer bolt loose.

11
6.0 ENGINE SPECIFIC CONNECTIONS Pictures in this section show specific harness to component connections. Each connector is keyed
specifically to its intended component. Take care when connecting the two because if the connector is
damaged, it will eventually cause electrical problems. Don’t force the connector onto its component.
The two (ECM)
connectors are
keyed and cannot
be inserted incorrectly. Each
has an Allen screw retainer
bolt in the middle of the connector.
Use an Allen
wrench to thread the retainer bolt
into the ECM while inserting
the connector.
Plug in the
(FUEL HEATER) and
(WIF) sensor
connectors.
These connectors
are keyed and only plug in one
way.

12
Plug in the (OIL PRES) (oil
pressure) switch
connector. Once
you have the connector pushed
onto the switch, push the
protruding orange
tab towards the center of the
connector. This orange connector
position assurance (CPA)
should click into
place. In order to remove this
connector this CPA will have to
be pried back out
with a flat screw driver.
Take the section
with the (CKS, CPS, RAD FAN DR and FUEL ACT)
connectors and
route it to the lower front driver
side of the
engine. Gently
push the (CKS, CPS and RAD FAN DR)
connectors behind
the CPS fuel pump and
towards the lower
front driver side of the engine.
Leave the
(FUEL ACT)
connector out in
front of the fuel pump.

13
Plug in the fuel
control actuator
(FUEL ACT)
connector into the
fuel control actuator solenoid.
See the picture to
the right in order to identify it. This
connector is specifically keyed
to this solenoid. Even so, if
enough force is
applied, this connector can be
pushed on inverted. See
above diagram for
more information about the proper
installation of this connector.

14
Plug the connector labeled (CPS) into the cam position sensor. The sensor is located just below the
CP3 high pressure
fuel pump. Use the picture to the
right as a guide.
Once the connector is
seated to the cam position sensor,
push the orange
CPA towards the center of the
connector. This locks the
connector into place. In order to
remove the
connector this CPA will need to
be pried back out to its original
position.
Plug the connector labeled (CKS) into the crank position sensor. The sensor is located towards the
bottom of the driver side, front of the engine. Use the picture to the right as a guide. Once the connector is seated to the crank position sensor, push the orange CPA towards the center of the
connector. This
locks the connector into
place. In order to remove the
connector this
CPA will need to be pried back out
to its original position.
Also pictured to the right is the
(RAD FAN DR) radiator fan
drive connector.
Plug this
connector into the mating male
connector from the radiator fan
drive mounted in
the fan shroud. Secure the
harness with a retainer just as shown above.

15
Route the section
of harness with
the (INJ 1&2, INJ 3&4, INJ 5&6, EARLY APPS MAP AND FPS) connectors up
over the intake manifold. Use a
harness retainer to attach the
harness to the
back of the intake elbow.
Plug connector
labeled (INJ 1&2) into the
1&2 injector
connector on the engine. Make
sure an audible click is noticed
otherwise the connector may
not be seated
completely.

16
Plug in the
connector labeled
(INJ 3&4) and
(INJ 5&6) into
their
corresponding mates on the
engine. Make sure an audible
click is noticed otherwise the
connectors may
not be seated completely.
Plug the
connector labeled
(MAP/IAT)
into the MAP/IAT
sensor located in the top of the
intake manifold,
just to the rear of the 3&4 injector
connector. This connector is
keyed to insert only one way into
the sensor. Do
not force it.

17
Plug in the fuel pressure sensor
(FPS) connector
into the fuel pressure sensor.
See the picture to the right in order
to identify it. This
connector is specifically keyed
to this sensor. Even so, if
enough force is applied, this
connector can be
pushed on inverted. See
below for more information about
the proper
installation of this connector.

18
Pictures are of the 2003 bell crank type throttle
APPS. The 60250 harness incorporates the proper wiring and connector for this style of
accelerator pedal position sensor. These
pictures depict the component taken apart to better show you where its connector plugs in.
On the harness the connector for this is
labeled (EARLY APPS). Only use this
connector if your Cummins ECM is
programmed for the 2003 standard transmission. If you are not going to use this
early style APPS, tape up and stow this connector.
Route the
remainder of the harness around
the front of the
engine. Use harness retainer
clips to secure it as shown to the
right.

19
Plug the connector labeled
(CTS) into the
coolant temperature
sensor at the front of the
engine head. If
you have a 2003 or 2004 engine,
you will need to change out the
coolant temperature
sensor to the
newer style. See page 5 for more
information. This connector is
keyed and can
only be plugged in one way.
Plug the
connector labeled
(ALT) into the
alternator
regulator. This connector is
keyed and can only be plugged in
one way. Push the connector on
until an audible
click is heard.

20
If the engine
receiving this transplant harness
has an electronic
waste gate solenoid, plug the
connector labeled
(WASTEGATE) into it. If the
engine has a non-electronic waste
gate, tie up this connector, or cut
off the connector and seal the wire
ends.
Plug the connector
labeled
(PRETURBO IAT/P) into the
pre-turbo intake air temperature and
pressure sensor.
This sensor is located in the fresh air ducting that leads from the air filter to the intake of the compressor side of the turbo. This connector is keyed and only plugs in one way.
This harness includes the
connector for a battery temperature
sensor. The
connector is labeled
(BATT TEMP).
See below for a picture of this
sensor. Mount this
sensor in your battery box.

21
7.0 FUSEBLOCK The fuse block is designed to be mounted in the engine compartment. Included with this kit is a fuse
block mounting bracket and screws. See page 22 for mounting instructions. Below is a diagram of the
fuse block incorporated into this harness. This fuse block is water proof as long as the front cover is installed. Keep the front cover installed at all times unless replacing the relays or fuses.
7.1_Relays Fuel pump relay- this relay is activated by the Engine Control Module. When the ECM commands this
fuel pump relay on, the gray FUEL PUMP wire will have power. Power for this relay originates from
the #4 fuse. As you can see in the diagram above the #4 fuse is rated for 30 amps. 30 amps are more
than enough to power any stock and many aftermarket lift pumps.
Fuel heater relay- this relay is key-on ignition activated. When the 12VOLT KEY ON wire is given
12 volts, this relay will then activate. Power for this relay originates from the #5 fuse. As you can see in
the diagram above the #5 fuse is rated for 30 amps. Factory fuel heaters incorporated into the water/fuel separators of Cummins engines use a maximum of 26 amps. Amperage use depends strictly
on fuel temperature. The colder the fuel, the more amperage is used by the fuel heater in order to bring the fuel up to an acceptable temperature.
Ignition relay- this relay is key-on ignition activated. When the 12 VOLT KEY ON wire is given 12
volts, this relay will then activate. This relay supplies power for the #7, #8 and #9 fuses.
7.2 Fuses 1. ECM B+ power to pin 20 of ECM B connector 2. ECM B+ power to pin 30 of ECM B connector
3. ECM B+ power to pin 40 of ECM B connector
4. Fuel pump relay B+ power 5. Fuel heater relay B+ power
6. DLC B+ power 7. ECM ignition hot to pin 32 of ECM B connector
8. Waste gate solenoid and radiator fan drive (ignition hot) 9. Key-on accessory power wire (ignition hot)
10. Ignition switch key-on wire (ignition hot). This fuse supplies activation power for the fuel pump, fuel
heater and ignition relays.

22
Twelve inches down the harness from the fuse block is a harness breakout. The late model accelerator pedal, DLC, battery temp sensor connectors and many open ended wires protrude from this breakout.
We suggest you loosely route all of these
connectors and open
ended wires to their destination before
permanently mounting the fuse block.
Determine where the fuse block will mount
and still allow for easy
access of the fuses and relays. Once the
mounting place is determined use the two
black self tap screws in
the parts kit to permanently mount it.
The harness install pictured below allowed
us to mount the fuse block onto the firewall.
8.0 FIREWALL Determine where the 1 ¼” hole for the DLC and late model APPS connectors can be drilled through the
firewall and into the passenger compartment. Drill a 1 ¼” hole into the firewall using a 1 ¼” hole-saw and drill. Push the DLC, late model APPS connector, brake switch wires, cruise control wires, 12Volt key-
on wire, and the park/neutral safety wire into the passenger compartment. If you are using an automatic transmission, the park/neutral safety switch may be located on the side of it. Check if this is the case
and route the park/neutral safety wire down to it instead of inside to the passenger compartment if this is
true. Install the rubber grommet from the parts kit into the hole. Mount the DLC in an easily accessible area using two of the self tap screws from the parts kit.
Pictured to the right is a
2005 Accelerator Pedal
Position Sensor and pedal assembly. If your
swap requires this pedal assembly, plug the 6 pin
(LATE APPS)
connector into it. If
your swap is using 2004
standard transmission programming, unplug
this connector pigtail from the harness and
plug in the (2004 APPS) pigtail and then
plug it into your 2004
pedal. If your swap is using the early APPS
mounted on the intake
manifold then tie wrap this connector up and
out of the way.

23
9.0 OPEN ENDED WIRES
PARK/NEUTRAL SAFETY WIRE This wire needs to receive ground
when the vehicle is in park or neutral. If your vehicle is using an
automatic transmission, locate the park/neutral switch on the side of
the transmission or the steering
column. Use a Volt/Ohm meter and check for continuity to ground on
each of the wires coming from it with the shifter in park and neutral.
If your vehicle is using a standard transmission, you will need to
connect this wire to a clutch pedal
position switch that connects to ground with the clutch depressed.
See picture to the right.
BRAKE SWITCH WIRES There are two brake switch wires in this harness. Both wires may be connected to the same brake switch.
1. (BRAKE SWITCH #1) GREEN/WHITE wire must see ground from the normally closed side of
a brake switch. Grounded when brake is not applied (Must be grounded permanently when running a manual transmission) (TCC unlock w/Automatic).
2. (BRAKE SWITCH #2) PURPLE/WHITE wire must see ground from the normally closed side
of a brake switch. Grounded when brake is not applied (Must be grounded permanently if
not using the factory cruise control).
12 VOLT KEY ON WIRE This orange 18 gauge wire activates this harness. Using a Volt/Ohm meter, test for a wire from the ignition switch that receives 12 volts with the ignition key in run and start. HINT: At this point your
batteries are still unhooked so do the following to find this wire. Find the largest gauge wire leading to
your ignition switch. Test for continuity between this wire and any of the other wires when the ignition switch is in the run and start position. You have found the correct wire to tap if continuity is seen
between it and the main battery wire to the ignition switch with the ignition switch in the run and start positions. There should not be continuity when the ignition switch is in the off or accessory positions. 20 AMP OUTPUT WIRE This pink 16 gauge wire can be used to power any additional components on your vehicle. An example would be a water methanol injection system such as the 65001 Cold Shot which Painless Performance

24
also manufacturers. Be sure the Amperage requirements of any component connected to this wire does not exceed 20 Amps.
VEHICLE SPEED SIGNAL WIRE This green/yellow wire must see a 5 Volt square wave when the vehicle is in motion. This square wave
must be directly proportional to the speed of the vehicle (frequency increases as vehicle speed increases). From the factory this wire was a connection between the Cummins engine control module
and the Dodge anti-lock brake system control module. The Dodge anti-lock brake control module read
the front/rear wheel speed sensor signals, then converted the AC sign wave signals into a DC square wave and sent it to the Cummins engine controller. If you have chosen to transplant your Cummins
engine into a late model Dodge or Ford vehicle with an anti-lock brake system control module, then do the following.
Dodge: Locate the anti-lock brake control module schematics for your vehicle. Call us if you don’t have
the schematics. The Green/Yellow wire labeled as (VSS SIGNAL) on the Painless harness must be
tapped onto the wire labeled vehicle speed signal on the schematic and coming from the ABS controller to the PCM/ECM.
Ford: Locate the anti-lock brake control module schematics for your vehicle. Call us if you don’t have
the schematics. The green/yellow wire labeled as (VSS SIGNAL) on the Painless harness must be
tapped onto the wire labeled vehicle speed signal on the schematic and coming from the ABS controller to the PCM. Most 1999-2007 Ford trucks have this as a grey/black wire.
Other: If you are unable to locate a 5 volt square wave from an ABS module on the vehicle then do the
following. Call Dakota Digital or go to www.dakotadigital.com to purchase their part number SGI-5. This
module can be used to convert a wheel speed sensor AC sign wave into a DC square wave that can be used by the ECM. Their tech line will assist you in this process.
CRUISE CONTROL WIRES This harness provides you two cruise
control wires. If you wish to use the
cruise control function you must mount Dodge/Cummins factory style cruise
control buttons out of a same style truck your transplant engine came
from. See right for a schematic of how these two wires and the cruise control
buttons wire up.
The BLUE/GREEN wire is common low
reference from the ECM to the cruise control switches. The PURPLE wire is
the signal wire from the switches to the
ECM. Each switch incorporates a resistor with different Ohm ratings.
The ECM knows which switch is being pushed by detecting what resistance it
is seeing between the BLUE/GREEN and PURPLE wires.
25
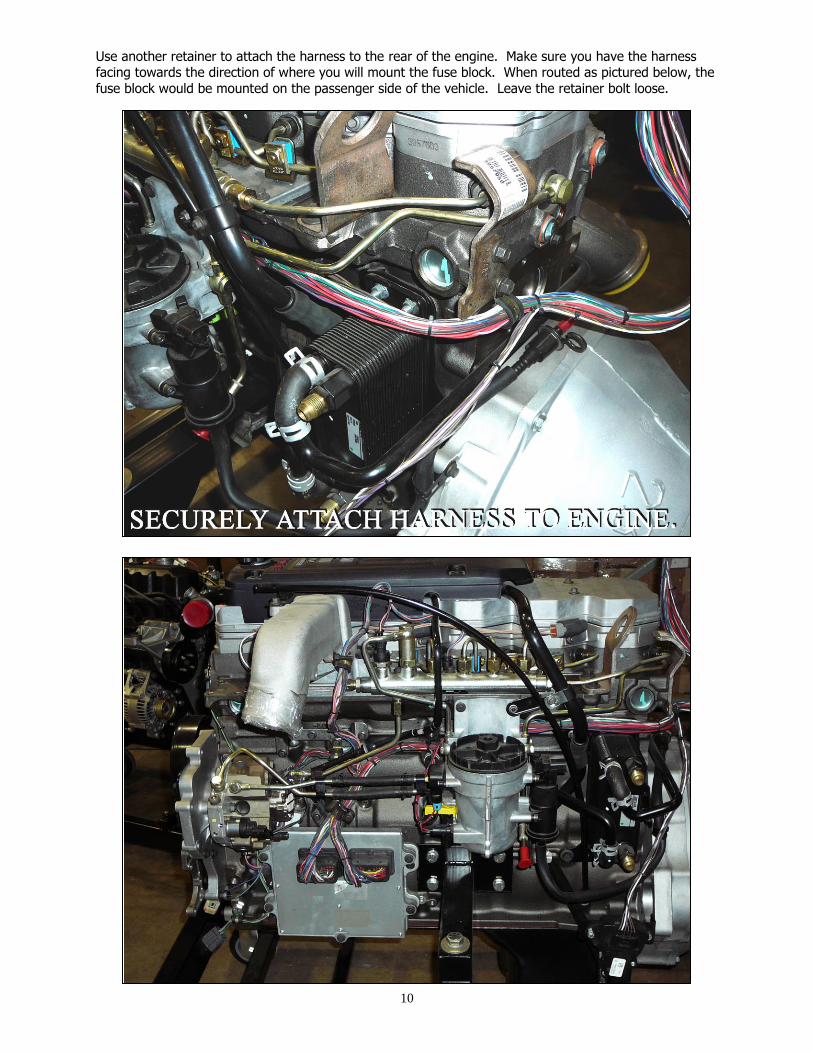
BATTERY This harness incorporates
two battery positive and two battery negative
wires. Included in the parts kit are two #6 3/8”
ring terminals and two 1
½” lengths of waterproof heat shrink. Route the
positive and negative wires to the battery. Strip
3/8” of insulation from each wire. Put one piece
of heat shrink onto each
set of wires. Crimp both battery positive wires into
one of the terminals and both battery negative
wires into the other
terminal. Use a heat gun or lighter and shrink the heat shrink around the ends of the terminals. See picture to the right. Connect the negative (black) wires to the negative battery cable. Connect the
positive (red) wires to the positive battery cable. Do not connect the battery cables to the battery at this time.
INTAKE AIR HEATER RELAYS
Activation wires are included
for both the #1 and #2 intake
air heater relays. To the right is a picture of the relays and
a on the next page is a diagram of how to wire these
two relays to this harness.
1. Battery 2. IAT HEATER RELAY #2 3. Control Wires 4. IAT HEATER RELAY #1

26
Crimp a female bullet connector to each of the IAT heater relay wires. Connect them as shown below.

27
10.0 FINAL NOTES
BATTERY
Connect the positive and negative battery cables to both batteries on the vehicle.
FUSES AND RELAYS The parts kit provides several extra fuses. If more fuses are needed, most local auto parts stores carry
mini ATC fuses. Relays are available through Painless Performance.
THE "CHECK ENGINE" LIGHT
The Cummins ECM does not have a check engine light driver. The malfunction indicator (check engine) lights on 2003-2007 Dodge trucks are controlled through either a Chrysler Collision Detection Network
CCD+/- or a Programmable Communications Interface (PCI) data bus depending on the year of the truck. Since the vehicle you are transplanting this Cummins engine into does not have an instrument cluster
with this type of communication protocol, you will have to rely on a diagnostic trouble code scanner to
recognize and diagnose any problems from this Cummins engine. Most large auto parts stores will have a cheap code reader available for purchase or possible loan.
RETRIEVING TROUBLE CODES FROM THE COMPUTER
In order to retrieve the trouble codes stored in the Engine Control Module, a scanner must be connected
to the Assembly Diagnostic Link (DLC) connector. Follow the instructions provided with the scanner to read the codes set in the computer. Write any codes down for reference. Take the codes one at a time
and match them to the codes listed in a factory manual. This will tell you what circuit the ECM has detected a problem with. If a factory manual is not available, call our tech line at 1-800-423-9696 and
they will assist you with your diagnostics.
Turn the key on and check to see if any codes are present. If codes are present, reset them
once and see if they come back. These initial codes may be from the previous vehicle this Cummins engine was installed in. Reread the codes, diagnose any that are present. If no
codes are present, start the engine.
Note: A code indicates a problem in a specific circuit, not that a particular part is bad.
Before taking more extensive corrective actions for any trouble codes make sure that all connections on
the indicated circuit are clean and tight. Inspect the wiring in the circuit for any broken, shorted, or exposed wires. Finally, insure all ground and power wires are clean and secure.

28
Painless Performance Products, LLC
Limited Warranty and Return Policy
Chassis harnesses, fuel injection harnesses, and Trail Rocker units are covered under a lifetime warranty.
All other products manufactured and/or sold by Painless Performance are warranted to the original purchaser to be free from defects in material and workmanship under normal use. Painless Performance will repair or replace defective products without charge during the first 12 months from the purchase date. No products will be considered for warranty without a copy of the purchase receipt showing the sellers name, address, and date of purchase. You must return the product to the dealer you purchased it from to initiate warranty procedures.

29
NOTES ________________________________________________________________________________________________________________________________________________________________________________________________________________________________________________________________________________________________________________________________________________________________________________________________________________________________________________________________________________________________________________________________________________________________________________________________________________________________________________________________________________________________________________________________________________________________________________________________________________________________________________________________________________________________________________________________________________________________________________________________________________________________________________________________________________________________________________________________________________________________________________________________________________________________________________