Embed Size (px)
Citation preview

Quick Tips Mazda 626 page 20page 1
Revised January 14, 2002
M A I N T E N A N C E S C H E D U L E
©2002 Calcar, Quick Tips® is a trademarkof Calcar, made in USA 12/01 34.104M GLMazda North American Operations reservesthe right to change product specifications at
any time without incurring obligations.
Normal maintenance notesRotate tires every 3,750 miles
A. Change: Engine oil/replace filter
B. Inspect: Drive belts, fuel lines and hoses, idle speed, brake lines and hoses, disc and drum brakes, steering operation and linkages, front suspension ball joints, driveshaft dust boots, chassis and body bolts, exhaust system and heat shields
Replace: Air filter, spark plugs (2.0L)
C. Inspect: Engine valve clearance,hoses and tubes for emission system
Replace: Spark plugs (2.5L)
D. Inspect: Engine timing belt
* See Owner’s Manual
This Quick Tips® guide is providedby Mazda North American
Operations to make your Mazdaownership experience more
convenient. It is not intended toreplace your Owner’s Manual.
If you have any questions about your vehicle, you are invited to
contact your local dealer. Or if you need additional help,
feel free to call our Customer Assistance Center
at 1-800-222-5500Monday through Friday,
9 a.m.- 4 :45 p.m., Pacific9 a.m.-5:45 p.m., Eastern/Central
Unique driving conditions*Every 5,000 miles change oil/filter,inspect coolant level, lights, brake/clutch fluid, tire pressure/wear,power steering fluid, locks/hingesand washer fluid
7,500 miles
15,000 miles
22,500 miles
30,000 miles
37,500 miles
45,000 miles
52,500 miles
60,000 miles
67,500 miles
75,000 miles
82,500 miles
95,000 miles A B
A
A
A
A B C D
A
A
A
A B
A
A
A
Reference
Guide for
Controls and
Functions
20
02
Quick Tips®
®

D R I V E R ’ S V I E W
1. Power window switches,see Switches
2. Power door locks,see Locks
3. Dual power mirrors,see Switches
4. Air vents 5. Turn signal/lighting
control lever,see Driver Controls
6. Horn/Air bag 7. Wiper/washer control
lever, see Driver Controls8. Swing
Press to activate/deactivatecenter air vent oscillation
9. Climate control panel,see Climate Controls
10. Audio system,see Audio Systems
11. Accessory socket*12. Gearshift lever (A/T)*,
see Transmission13. Parking brake lever,
see Console/Trunk14. Console,
see Console/Trunk15. Rear window
defogger* Press on/off; shuts off withignition; also operates heatedside mirrors*
16. Hazard warningswitchPress on/off
17. Cruise control, see Cruise Control
18. Tilt steering-wheel leverPull lever down to unlock column, position wheel, pushlever up to lock
Tip: If lever does not lock,move wheel up/downslightly until lever clicks into recess
19. Traction Control System*,see Under Hood
20. Instrument panel lightingTo brighten/dim turn thumb-wheel up/down
21. Fog lights*Press on/off
22. Fuse panel23. Hood release handle24. Remote fuel-door
release25. Remote trunk-lid
releasePush to open trunk
Driver’sView
Quick Tips Mazda 626 page 2page 3
Revised January 14, 2002
KeyOperates ignition and all locksTip: Use key numberplate to purchase newkey; store in safe placeImmobilizer systemPrevents engine fromrunning unless coded keyused; see Owner’s Manual
Remote keylessentry system,see Locks
25
2021
2223
1516
9
24
5 7432 4 481
10
1112
13
14
17 1718
6
19
*Denotes optional equipment
Always check the Owner’s Manual for more operating information and safety features

I N S T R U M E N T C L U S T E R
Always check the Owner’s Manual for more operating information and safety features
InstrumentCluster
InstrumentCluster
Quick Tips Mazda 626 page 4page 5
Revised January 14, 2002
12
11
13 20
22
14 19km/h
MPHX1000r/min
20
00
1
2
34
5
6
7
8
40
6080
100
120
140 C H E F20
40
60
80100
120 140160
180
200
220
2400TCS
OFF
TRIPODO
TCS
2 15 16 18151 17
67810 9 23245 4 3
21
15. Turn signals/hazardwarning on
16. Door ajar17. Air bag readiness
Front or side air bag malfunction,dealer inspection required
18. Low fuel19. Always fasten
safety belts20. Cruise control on21. Low washer fluid22. Rear window
defogger on23. Immobilizer system on,
see Driver’s View24. Anti-lock Brake System
(ABS)*ABS malfunction, normal brakesonly, dealer inspection required
8. Check engineDealer inspection required
9. Engine oil pressure warning light
10. Charging system warning lightDealer inspection required
11. Overdrive off indicator*,see Transmission
12. Traction ControlSystem* off,System turned off manually or malfunctioning; dealerinspection required
13. TCS Traction ControlSystem*,Light flashes when in use;dealer inspection required iflight remains on
14. High beams on
GAUGES1. Tachometer 2. Speedometer3. Fuel gauge 4. Engine coolant
temperature gaugeIf above normal range, stopvehicle and turn off engine,check coolant level when safe
5. Odometer/trip odometerselectorPress to select among trip A,trip B, and odometerPress and hold to reset selectedtrip meter
6. Odometer/trip odometer
WARNING LIGHTS7. Brake system
Parking brake on/low fluid level
*Denotes optional equipment
D R I V E R C O N T R O L S
Always check the Owner’s Manual for more operating information and safety features
DriverControls
CruiseControl
Quick Tips Mazda 626 page 6page 7
Revised January 14, 2002
RESUME
ACCEL
SET
COAST
CRUISE
MAIN
OFF
14
23
OFF
1
2
MISTOFF
INT1
PULL
F
S
INT
2
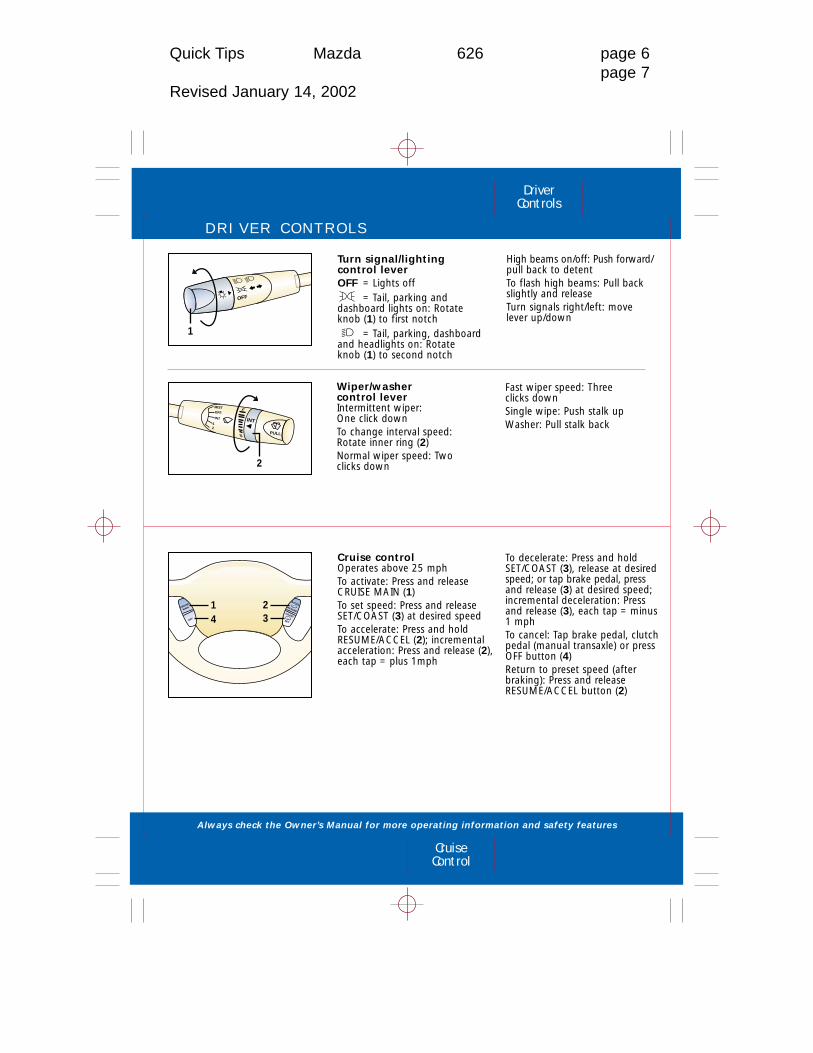
Wiper/washer control leverIntermittent wiper: One click down To change interval speed:Rotate inner ring (2)Normal wiper speed: Two clicks down
Cruise controlOperates above 25 mphTo activate: Press and releaseCRUISE MAIN (1)To set speed: Press and release SET/COAST (3) at desired speedTo accelerate: Press and holdRESUME/ACCEL (2); incrementalacceleration: Press and release (2),each tap = plus 1mph
To decelerate: Press and hold SET/COAST (3), release at desiredspeed; or tap brake pedal, pressand release (3) at desired speed;incremental deceleration: Pressand release (3), each tap = minus1 mph To cancel: Tap brake pedal, clutchpedal (manual transaxle) or pressOFF button (4)Return to preset speed (after braking): Press and releaseRESUME/ACCEL button (2)
Turn signal/lighting control leverOFF = Lights off
= Tail, parking and dashboard lights on: Rotate knob (1) to first notch
= Tail, parking, dashboardand headlights on: Rotate knob (1) to second notch
High beams on/off: Push forward/pull back to detentTo flash high beams: Pull backslightly and releaseTurn signals right/left: move lever up/down
Fast wiper speed: Three clicks downSingle wipe: Push stalk upWasher: Pull stalk back

S W I T C H E S
Always check the Owner’s Manual for more operating information and safety features
Switches
Locks
Quick Tips Mazda 626 page 8page 9
Revised January 14, 2002
Lock
Unlock
AUTO
1
2
3
Power window switchesIgnition switch must be in ONpositionAll windows controlled from thedriver’s armrest; passenger doorshave separate switches
Dual power mirrorsIgnition switch must be in ACC or ON positionSwitch is on left side of dashTo adjust left/right mirror: Rotate dash knob left/right, tilt knob in direction of desiredmirror movementTip: To lock mirrors in place,rotate knob to center position
1. Driver’s window One-touch-down: Push downfirmly and release, windowgoes down all the way; pullswitch back briefly to stop;press lightly and hold for normal operation
2. Passenger windowswitchesPush down and hold to open;pull back and hold to close
3. Power window lockoutswitchPress down until clicks, only driver’s window operates; pressagain and passenger windowsfunction again
*Denotes optional equipment
DOORLOCK
AUTO
5
Remote keyless entrysystemFunctions onlywith ignition inOFF positionTo lock doors:
Press (1); pressing again within 5seconds causes doors to relock andhorn to beepTo unlock: Press (2) for driver’sdoor; press again within 5 secondsto unlock other doorsTo open trunk: Press (3)
1 2
3
Manual doorlocks4. Lock buttonTo lock: Press front of button towarddoor handle
To unlock: Pull front of buttonaway from door handle
4
Child-safety locksLocated at the edge of rear doorsTo activate: Push tab towardLOCK; door opens from outside onlyTo cancel: Push tab towardUNLOCKWARNING: Since children may access either rear door,child-safety locks for both reardoors should be activated
Power door locks5. Master front door lock
switches To lock/unlock all doors: Press left/right side of switchTo lock doors without key:With door open, press left side of door switch, exit car,close doorsTo unlock: Use key to unlockdriver’s front door, open doorand press right side of switchto unlock other three doorsTip: Doors can be lockedwith key in ignition (chimesounds to alert you to keyin ignition)

I N T E R I O R L I G H T S
Always check the Owner’s Manual for more operating information and safety features
InteriorLights
Transmission
Quick Tips Mazda 626 page 10page 11
Revised January 14, 2002
ON DOOR OFF2
1
4 3 3 4 56 7 443 3 5
Automatic transmission*P = ParkTo move gearshift from Park: Pressfirmly on brake pedal, then pressrelease button (1) on gearshiftR = ReverseN = Neutral No gear engaged
D (Overdrive)For normal driving: Shifts throughfour forward gears automaticallyTip: Torque converter lock-upimproves fuel economy andcan feel like an additional gear changeD (Overdrive Off)Press (2) to disengage/engageoverdriveProvides extra power andincreased engine braking, stops3rd-4th gear cycling2 = SecondProvides extra power andincreased engine braking Use to reduce wheel spin whenstarting on slippery surfaces1 = LowUse for engine braking when second gear is not sufficient
Manual transmission*Depress clutch pedal to startengine and change gearsWARNINGS: Do not shift into1st above 20 mph or clutchfailure could occurResting your foot on clutchpedal while driving and usingthe clutch to hold your vehicleat a stand still while waitingon a hill may reduce clutch life
12
1. Interior light2. Interior light switch
ON = light always onDOOR = light on when door openOFF = light always off
Illuminated visor mirrorsMirrors lighted when covers open;off when closed
3. Map/reading light4. Map/reading light switch
Press on/off5. Storage
Press lip forward to open
6. Sunroof tilt switch*Press rear of switch to tilt rearof sunroofPress front of switch to close
7. Sunroof slide switch*Press rear of switch to opensunroofPress front of switch to close
*Denotes optional equipment

S E A T S
Always check the Owner’s Manual for more operating information and safety features
Seats
Seats
Quick Tips Mazda 626 page 12page 13
Revised January 14, 2002
6
1
4
5
2
3
Dual locking modelap/shoulder belt retractor(front passenger and rearsafety belts only)Emergency locking mode: Belt locks only on hard braking/cornering or impacts of about 5 mph or moreAutomatic locking mode: Must be used when installingchild-safety seatTo activate: Pull webbing fully outof retractor until click is heard;belt will only tighten To disengage: Unbuckle belt andallow webbing to retract fullyWARNING: Tether is to be used only for securing child-safety seats
Manual controls1. Fore-aft adjustment
Lift lever and hold, slide seat, release lever
2. Raise/lower front of seat Rotate knob
3. Seatback angleTo adjust: Lift and hold lever,lean forward or backward,release lever
4. Head restraintTo raise/lower: Pull up/push in release button (5) and push down
Shoulder belt height adjustmentTo raise/lower belt: Push releasebutton (1) and slide to desiredlocationWARNING: Make sure adjusterlocks in one of its positions
WARNINGS: Always wear yoursafety belt and properly securechildren 12 and under in therear seatIf you choose to install a forward-facing child-safety seat in the frontseating positions, move vehicleseat as far back as possibleDo not place rear-facing child- safety seat in front seatAll air bags are supplemental and do not replace safety belt usageDo not adjust seat while driving
Power driver’s seat*6. Raise/lower front of seat
Pull/push front of switch verticallyFore/aft adjustmentSlide switch horizontally Raise/lower rear of seatPull/push rear of switch verticallyRaise/lower seat cushionPull/push center of switch verticallyTip: Side-impact air bags*deploy from outboard side of driver and front passenger seatbacks
Folding rear seatbacks,see Console/Trunk
Child-safety seatUse dual locking mode retractorsafety belt; see Owner’s Manualfor proper installation and child-safety seat tether instructionsWARNINGS: You are requiredby law to use safety restraintsfor children in U.S. and Canada,check your local and state orprovincial laws for specificrequirements regarding thesafety of children in your vehicleDo not place rear-facing child-safety seat in front seat *Denotes optional equipment
1

C L I M A T E C O N T R O L S
Always check the Owner’s Manual for more operating information and safety features
ClimateControls
Console/Trunk
Quick Tips Mazda 626 page 14page 15
Revised January 14, 2002
1. Console2. Parking-brake lever
To engage: Pull upTo release: Pull up slightly whiledepressing button at front oflever, lower hand brake lever
3. Cup holder4. Storage binTip: Accessory socket located in center console under coin holder
TrunkTo open: Use key or remote keyless entry fobRemote trunk release,see Driver’s View5. Trunk security switch
OFF = trunk only opens with primary key
= trunk unlocked; normal operation
6. Spare tire/tool bagStored under panel in trunkTemporary spare tireDo not exceed 50 mphTo change flat tire: Followinstructions in Owner’s Manual
7. JackStored behind right rear panel
8. Rear seatback lockTo disable/enable folding seatsmove knob to lock/unlockSplit rear folding seatback*To fold: Unfasten the lap portion of the rear center seatbelt, pull release knob, pushseatback downTo return and lock: Push seatback firmly until latched,re-attach center belt
1 23
4
5
8
76
1. Fan controlRotate knob between (OFF)and 4 (HIGH)
2. Temperature controlCooler/warmer = rotate knobcounterclockwise/clockwise
3. = air to dash
4. = air to dash and floor
5. = air to floor
6. = air to floor andwindshield
7. = air to windshield(defrost)
8. A/C*= air conditionerPress to turn on/off
9. = recirculated airPress on/off; use for maximum heating/cooling orto keep outside odors out
Warning: Do not useposition in cold weather, windows may fog and hamper visionOscillating center air vents,see Driver’s ViewControl positions for maximum defrostFan to maximum, temperature tomaximum hot, selected
Tips: To help prevent windshield fogging in humidweather, select before starting engineTo prevent moisture buildup,never drive with system offObjects placed under the front seats may interfere with air flow to the rear
MAX A/C
0 1 23
4
A/C
1 2 3 4 5 6
987
*Denotes optional equipment
Interior luggage compartment release*Allows you to escapeshould you becomelocked in trunk
To open: Pull “T” handle; “T” handle will glow if it has beenexposed to light
PULL

A M / F M S T E R E O / C A S S E T T E / C D
Always check the Owner’s Manual for more operating information and safety features
AudioSystems
AudioSystems
Quick Tips Mazda 626 page 16page 17
Revised January 14, 2002
3. SEEK/TRACK/APCRadio: Press to automatically seek higher/lower frequencyCD: Press to selectnext/previous trackTape: Press to automatically advance tape tobeginning of next selection/replay selection; to stop this operation, press button again
4. FM1/2Press to select between FM1/FM2station preset buttons (2)
5. AMPress to select AM frequency band
6. CDPress to play CD
7. MD*/Tape*Press to play Mini-disc Player/ cassette tape
1. Power/VolumePress to turn on/off; rotate to increase/decrease volume
2. Memory preset buttonsTo set: Tune to station, press and hold until beep is heard
10. Scan/Auto-MemoryPress to briefly sample next listenable selections; functionsin all modesRadio: Press and hold until abeep is heard; system auto-matically scans and temporarilystores six strong stations in eachband; press again to cancel
11. Tuning/Audio ControlTune: Rotate counterclock-wise/clockwise for lower frequency/higher frequencyAudio control: Press to selectBASS/MID/TREBLE/FADE/BALANCE; rotate right/left to adjust selected feature
12. Fast forwardPress to fast forward through a track
13. ReversePress to reverse through a track
8. ClockTo set: Press (8) and hold untilbeep is heard; press upper/lower portion of (10) to advanceHours/Minutes; press (8) againto set
9. CD eject button
17. Disc down †
Press to skip back to beginningof previous CD
18. CD slot*19. LOAD*
To load multiple discs: Press andhold LOAD (19) until beep is heard;insert CD when “In” is displayedTo eject disc: Press Eject (9) To eject specific disc: Press andhold Eject (9) until beep is heard;within five seconds press thedesired tray number 1-6 (2)
20. Mini Disc slot*21. DISP*22. Mini Disc display*23. Dolby® Noise Reduction*
Reduces tape noise and hiss;press to activate/deactivate
24. Cassette door*25. Eject button*
14. Program Random†
Press to enable/cancel random play
15. RepeatPress to replay current CD/tape selection
16. Disc up †
Press to skip forward to beginning of next CD
*Denotes optional equipment†For use with cassette tape player,MD player, or CD changer*
SEEKTRACK
APC
1 DISC 2 DISC 3 RPT 4 PROGRDM
5 6
FM1/2 AM CD MD/TAPE CLOCK
H SCAN
M AUTO-M
TUNEPRESS AUDIO CONT
VOLPUSH POWER
DISC IN
RPT RDMMTL AFM12ST MCD CH
CD INMD IN AUTO-M
1 2 3 4 5 6
DSP
DISC IN
DISC IN
LOAD
. . . . . . . . . .
. . . . . . . . . . . . .
141517 1316 1220 22 21 25
23 24 25
4 5 6 7 8 18 9
19 18
32
1 11
9
10
9
U N D E R H O O D
Always check the Owner’s Manual for more operating information and safety features
Under Hood
Quick Tips Mazda 626 page 18page 19
Revised January 14, 2002
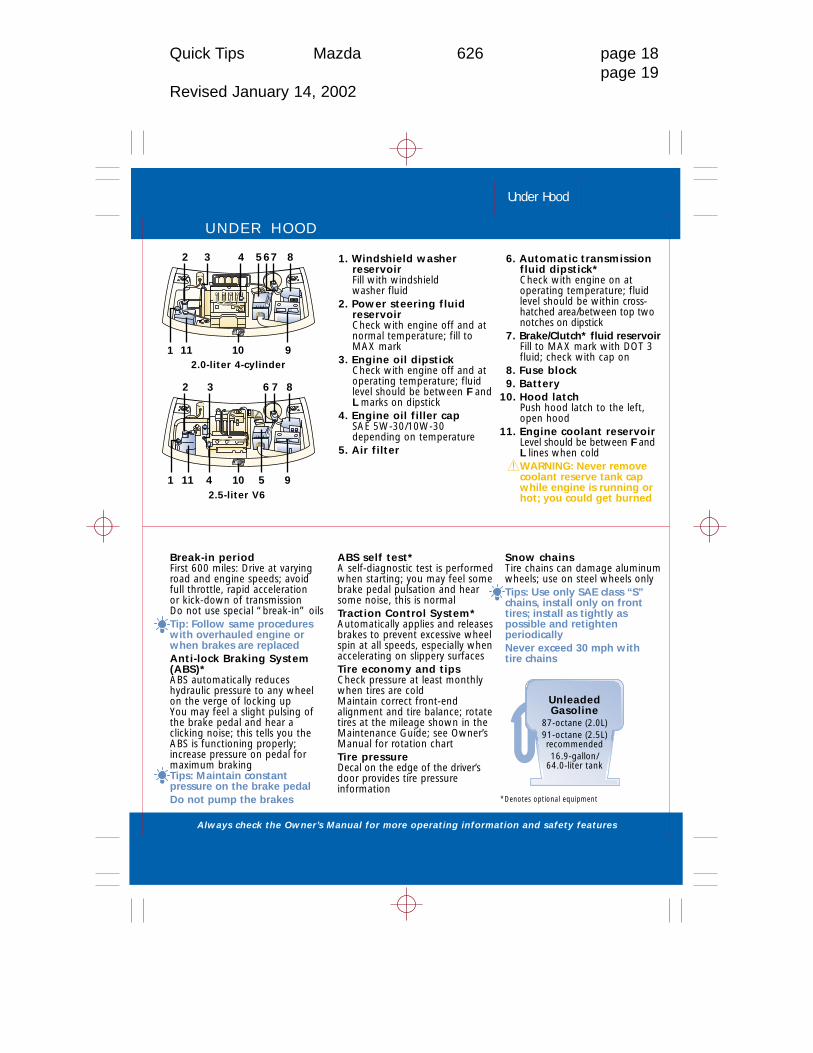
1. Windshield washer reservoirFill with windshield washer fluid
2. Power steering fluidreservoirCheck with engine off and atnormal temperature; fill toMAX mark
3. Engine oil dipstickCheck with engine off and atoperating temperature; fluidlevel should be between F andL marks on dipstick
4. Engine oil filler capSAE 5W-30/10W-30 depending on temperature
5. Air filter
6. Automatic transmissionfluid dipstick*Check with engine on at operating temperature; fluidlevel should be within cross-hatched area/between top twonotches on dipstick
7. Brake/Clutch* fluid reservoirFill to MAX mark with DOT 3fluid; check with cap on
8. Fuse block9. Battery
10. Hood latchPush hood latch to the left,open hood
11. Engine coolant reservoirLevel should be between F and L lines when coldWARNING: Never removecoolant reserve tank cap while engine is running or hot; you could get burned
10 911
32 7 8654
1
10111 5 94
2 3 7 86
Break-in periodFirst 600 miles: Drive at varyingroad and engine speeds; avoid full throttle, rapid acceleration or kick-down of transmissionDo not use special “break-in” oilsTip: Follow same procedures with overhauled engine or when brakes are replacedAnti-lock Braking System(ABS)*ABS automatically reduceshydraulic pressure to any wheelon the verge of locking upYou may feel a slight pulsing ofthe brake pedal and hear a clicking noise; this tells you theABS is functioning properly;increase pressure on pedal formaximum braking Tips: Maintain constant pressure on the brake pedalDo not pump the brakes
ABS self test*A self-diagnostic test is performedwhen starting; you may feel somebrake pedal pulsation and hearsome noise, this is normalTraction Control System*Automatically applies and releasesbrakes to prevent excessive wheelspin at all speeds, especially whenaccelerating on slippery surfacesTire economy and tipsCheck pressure at least monthlywhen tires are cold Maintain correct front-end alignment and tire balance; rotatetires at the mileage shown in theMaintenance Guide; see Owner’sManual for rotation chartTire pressureDecal on the edge of the driver’sdoor provides tire pressure information
Snow chainsTire chains can damage aluminumwheels; use on steel wheels onlyTips: Use only SAE class “S”chains, install only on fronttires; install as tightly as possible and retighten periodicallyNever exceed 30 mph with tire chains
2.5-liter V6
2.0-liter 4-cylinder
*Denotes optional equipment
UnleadedGasoline
87-octane (2.0L) 91-octane (2.5L) recommended16.9-gallon/
64.0-liter tank