Embed Size (px)
Citation preview

Ammo is scArce: Ammunition is in far shorter supply during these coop missions than it was in the campaign. It’s important that you scavenge all you can from the bodies of your enemies and resist getting too attached to any one particular weapon. You must be willing to swap weapons for whatever is available.
The sTeAdy AdvAnce: The biggest difference between single player campaign and these coop missions is that enemies continue to respawn unless you push forward. Take cover, clear any present enemies, then advance again before a new batch respawns. These coop missions are a constant tug-of-war for territory and the only way to gain the upper hand is to push forward.
no collecTibles: There are no pieces of collectible Intel during these coop missions so don’t spend any time searching for hidden items. Keep moving, soldier!
FighT beFore heAling: Do not rush immediately to your teammate’s aid when-ever he’s been injured. An injured player can remain DBNO for roughly 20 seconds before bleeding out. Use this time to eliminate any immediate threats before setting about healing him. Then, once you’re both back on your feet, retreat to previous cover to reset for the attack.
communicATe oFTen: Communication is vital during coop play, not only in calling out enemies and letting one another know when you’ve been injured, but for sharing ammo and grenades as well. Work together to take out the Heavy Troopers, discuss who gets to pick up the M249 SAW (always take the SAW!), and make sure to alert one another whenever an Edged Weapon Expert is on the field, as they are likely to be your biggest threat.
This bonus chapTer includes sneak peek aT The upcoming expansion pack conTaining four unique Two-player cooperaTive missions. seT during The period beTween The damned 33rd’s refusal To leave dubai and The arrival of capTain walker and his men, These missions place you in The role of soldiers, exiles, and even The refugees as They each sTruggle for a chance To survive againsT The unrelenTing sand—and one anoTher…
This mission pack shares a lot in common with the single player campaign. In fact, each of the locations are recognizable (but not identical) to areas visited by Captain Walker. Locations aside, there are several very important differences that must be kept in mind if you and your partner are to be successful. Keep these following points in mind at all times:
200 201
Achievements
CArpArK ExTrACTIONReach the extRaction choppeR befoRe the sandstoRm aRRives.
hosT
w1300
ump 45
guesT
ak-47
w1300
playeR loadouts
A Timed AffAirCarpark Extraction is the only mission that is timed. A timer appears on-screen as soon as you fire your first bullet or are spotted by the enemy. The timer’s duration is dependent on the difficulty setting you select: the harder the difficulty, the less time you will have to reach the extraction point. The timer isn’t of much concern for those playing on the lower two difficulty settings, provided you make steady progress. The countdown plays a much bigger role on the Suicide Mission and F.U.B.A.R settings.
coop stRategyAttack the enemy soldiers outside the stairwell and have one player sprint for cover near the box of grenades by the vehicle while the other advances alongside the columns. It’s important early on to advance quickly so as to not get bogged down at the start. The host may also want to swap the UMp 45 for one of the M4A1 assault rifles dropped by the first enemies.
The player behind the vehicle should provide cover for his battle buddy as he advances from column to column. Once the player near the columns has neared the corner in the parking garage, the other player should sprint for the upturned car in the distance. Grab the additional grenades there and ready them for the Heavy Trooper marching towards your position in the distance. The two of you should hold this position—one at the corner column and the other behind the upturned car—until the Heavy Trooper has been defeated.
eliminate the first batch of enemies then sprint for cover against the vehicle.
Have a Sticky Grenade ready to throw at the Heavy Trooper as he makes his way towards the cars.
Sneak through the hallway on the left, grab the m1014, then silence the turret!
Stay behind cover when fighting the Heavy Trooper and hit him from both sides.
With the Heavy Trooper defeated, the player near the columns should advance to the white limousine while his partner advances to the green convertible. From there, this second player can slip through the red-lit hallway on the right to flank the enemies being drawn towards the limousine.
The ramp slopes upwards to the next level of the parking garage, but the enemy has a turret positioned at the top of the ramp—charging it head-on is suicide! One player should take cover at the base of the ramp while the other crosses from the hallway on the right to the one on the left. Ascend the stairs to the upper level and equip the M1014 shotgun. Exit the stairwell and quickly shoot the soldier manning the turret on the right. The second player can then sprint up the ramp, flip the turret, and open fire on the enemies in the blue area.
Heal up behind the barrier near the turret while your partner opens fire on the approaching enemies.
The blue level of the parking garage has a split in it that allows one player to flank to the right while the other heads left, at least at first. Sweep through the area just above the ramp and join one another at the left-hand corner column. Use the cars for cover and gradually push forward in a leap-frog pattern until the next Heavy Trooper appears. Focus your firepower on the Heavy Trooper then take his M249 SAW for the final push up the ramp in the distance.
Take cover at the base of the ramp leading to the roof and lob a grenade up at the enemies set to be filing in from the helipad. Follow the grenade by sprinting into cover on the roof and put the M249 SAW to use against any remaining soldiers. Continue to use the heavy weapon while your partner sprints for the chopper, then follow behind.
Use the m249 SAW to eliminate the remaining enemies near the chopper before making a sprint for it.
202 203
Intro
Basic Training
Weapons
Intel Database
Multiplayer
Map Recon
Ranks, TiTles, and Unlocks
Campaign
Achievements
bonus coverage

Surround the Heavy Trooper by having one player on the roof and another near the grenades pick-up on the walkway.
GOrGETOpassassinate the taRget and get to the zipline.
Use the fAmAS to drop the enemy on the roof and the one near the red doors then sprint to the roof and start sniping.
Use the Scout Tactical from the rooftop to provide cover fire for your partner while he advances along the lower area.
hosT
famas
m9
guesT
417
micro 9mm
playeR loadouts
execUTe And fleeGorgeTop builds on the extraction theme of Carpark Extraction by adding a target that must first be assassinated. This mission takes place along the rooftops, just beyond where you first get the Scout Tactical in the Campaign. Your goal is to fight your way into the enemy headquarters, assassinate the high value target, then make your way to the helicopter.
coop stRategyQuickly kill the patrolling soldier and take cover behind the wall near the stairs. The majority of the enemies are attacking from the lower area directly ahead, but you’ll also be taking fire from a couple of gunman on the roof to the left, one of whom has a Scout Tactical sniper rifle. Use the 417 or FAMAS to drop the sniper as soon as possible—try to shoot him when he’s not leaning over the ledge so that the rifle stays on the roof. Decide who should go high and snipe and who wants to stay low. The player who is going to snipe should sprint up the stairs inside the building on the left, equip the fallen Scout Tactical, and set to sniping from above.
The player on the lower level should advance along the walkway on the right, but not until the sniping player kills the enemy manning the turret. Once the turret has been neutralized, maneuver into position in the far back corner, beyond the stairs and beneath the turret. Several additional soldiers will arrive, followed by a Heavy Trooper. Try to maintain your current positions to catch the Heavy Trooper in crossfire. Consider using a single Frag Grenade to clear out any groups of enemies.
204 205
Intro
Basic Training
Weapons
Intel Database
Multiplayer
Map Recon
Ranks, TiTles, and Unlocks
Campaign
15
Achievements
bonus coverage

regroup atop the stairs and cautiously round the corner to the right. Beware an Edged Weapon Expert that is set to approach—kill him quickly then advance so a second doesn’t spawn in its place. Advance in leapfrog fashion down the stairs towards the flares in the distance. These flares will be extremely important as a sandstorm should arrive as you reach this point. Fight your way up the exterior stairs and down through the stairwell to the target. Don’t hesitate; shoot him before he turns around.
Now it’s time to escape! Have one player rush up the stairs and man the turret on the balcony outside—open fire on the Heavy Trooper and any other enemies dropping from the helicopter! The other player should grab the AA12 lying on the floor, and then head back the same way. Sprint across the rooftop towards the extraction point—the zip-line in the corner—while the other player provides cover fire with the turret. put the AA12 to use against any enemies who get in your way, otherwise keep moving. Use the AA12 to cover your partner as he makes his way to the zip-line.
The assassination target isn’t far from the flare atop those stairs, but there are still several enemies between you and him.
Sprint across the rooftop to the extraction point as your partner provides cover fire with the turret.
rEFUGEESfight thRough the safehouse and escape.
hosT
ak-47
micro 9mm
guesT
ak-47
micro 9mm
playeR loadouts eScApe THe BUildinG!This mission brings you back to the shopping mall beyond the CIA safehouse. The mall is filled with both innocent refugees and members of the Damned 33rd. You and your partner are part of the resistance, fighting the Damned 33rd in attempt to get them to leave Dubai for good. You must escape the mall by fighting your way to the far end and shooting out the wall of glass in the distance.
coop stRategyThis is a fairly straightforward mission in terms of strategy with much of the success riding instead on player skill level and patience. There are two main paths that lead through the mall, one on either side of the large opening in the center. It’s dangerous to have both players together as it simply gives the enemy a single place to focus their fire. Instead, send one player up the left-hand path while the other proceeds along the right. Take turns advancing from cover to fire in an alternating pattern so that you gradually push the front lines into enemy territory.
Use cover and blind-fire around turns to avoid being shot by enemies from the other side of the mall.
206 207
Intro
Basic Training
Weapons
Intel Database
Multiplayer
Map Recon
Ranks, TiTles, and Unlocks
Campaign
Achievements
bonus coverage

The advancing player will typically draw most if not all of the enemy’s attention. This frees the other player to safely offer cover fire, gather up any dropped ammo and grenades, and seek out cover of their own. Don’t advance towards the turret in the distance until you’ve put down the Heavy Trooper that commonly approaches from the right.
don’t hesitate to lob a grenade across the map to offer some explosive support for your teammate, especially as the Heavy Trooper approaches.
look for the edged Weapon expert’s telltale vest and mohawk haircut and open fire right away.
Blast the barricaded doors at the bottom of the stairs with the turret to escape the mall and complete the mission.
The enemy has a turret mounted near the end of the first section of the mall. Take cover on opposing sides and focus your fire on the gunner if there’s one present. Collect any available ammo, reload your weapons, and do not advance through the shops to the right until both players are ready. An Edged Weapon Expert will attack just as you enter the second area of the mall. Call him out and open fire before he gets too close! The Edged Weapon Expert is particularly lethal in a congested area like this.
Continue through the second half of the mall just as you did the first. Coordinate movements to provide cover for one another and gradually work your way towards the turret in the distance. You’ll likely encounter multiple W1300 shotguns from deceased enemies—put them to use by waiting behind cover and blasting enemies on the other side of food stalls and other kiosks and counters. Use the turret in the distance to shatter the glass and create your escape.
SHIp GrAvEYArDdeactivate all the teRminals.
hosT
ump 45
micro 9mm
guesT
ak-47
micro 9mm
playeR loadouts
TerminAl deAcTivATionThe ship graveyard is littered with the computer terminals of the 33rd and it’s up to you and your resistance teammate to disable them one by one. The terminals are heavily guarded by snipers, Heavy Troopers, turrets, and multiple Edged Weapon Experts amongst scores of Footsoldiers. You and your teammate must work to deactivate the half-dozen computer terminals as you fight your way to the refugee camp in the distance.
coop stRategyThe mission begins under the temporary cover of a sandstorm. The first terminal is directly ahead—open fire on the soldiers to the left then have your or your teammate sprint to the terminal straight ahead to deactivate it. Make sure to not advance beyond this terminal until it has been deactivated.
make sure your teammate is covering you while you deactivate the first terminal, else you might fail the mission before it even gets fully underway.
208 209
Intro
Basic Training
Weapons
Intel Database
Multiplayer
Map Recon
Ranks, TiTles, and Unlocks
Campaign
15
Achievements
bonus coverage
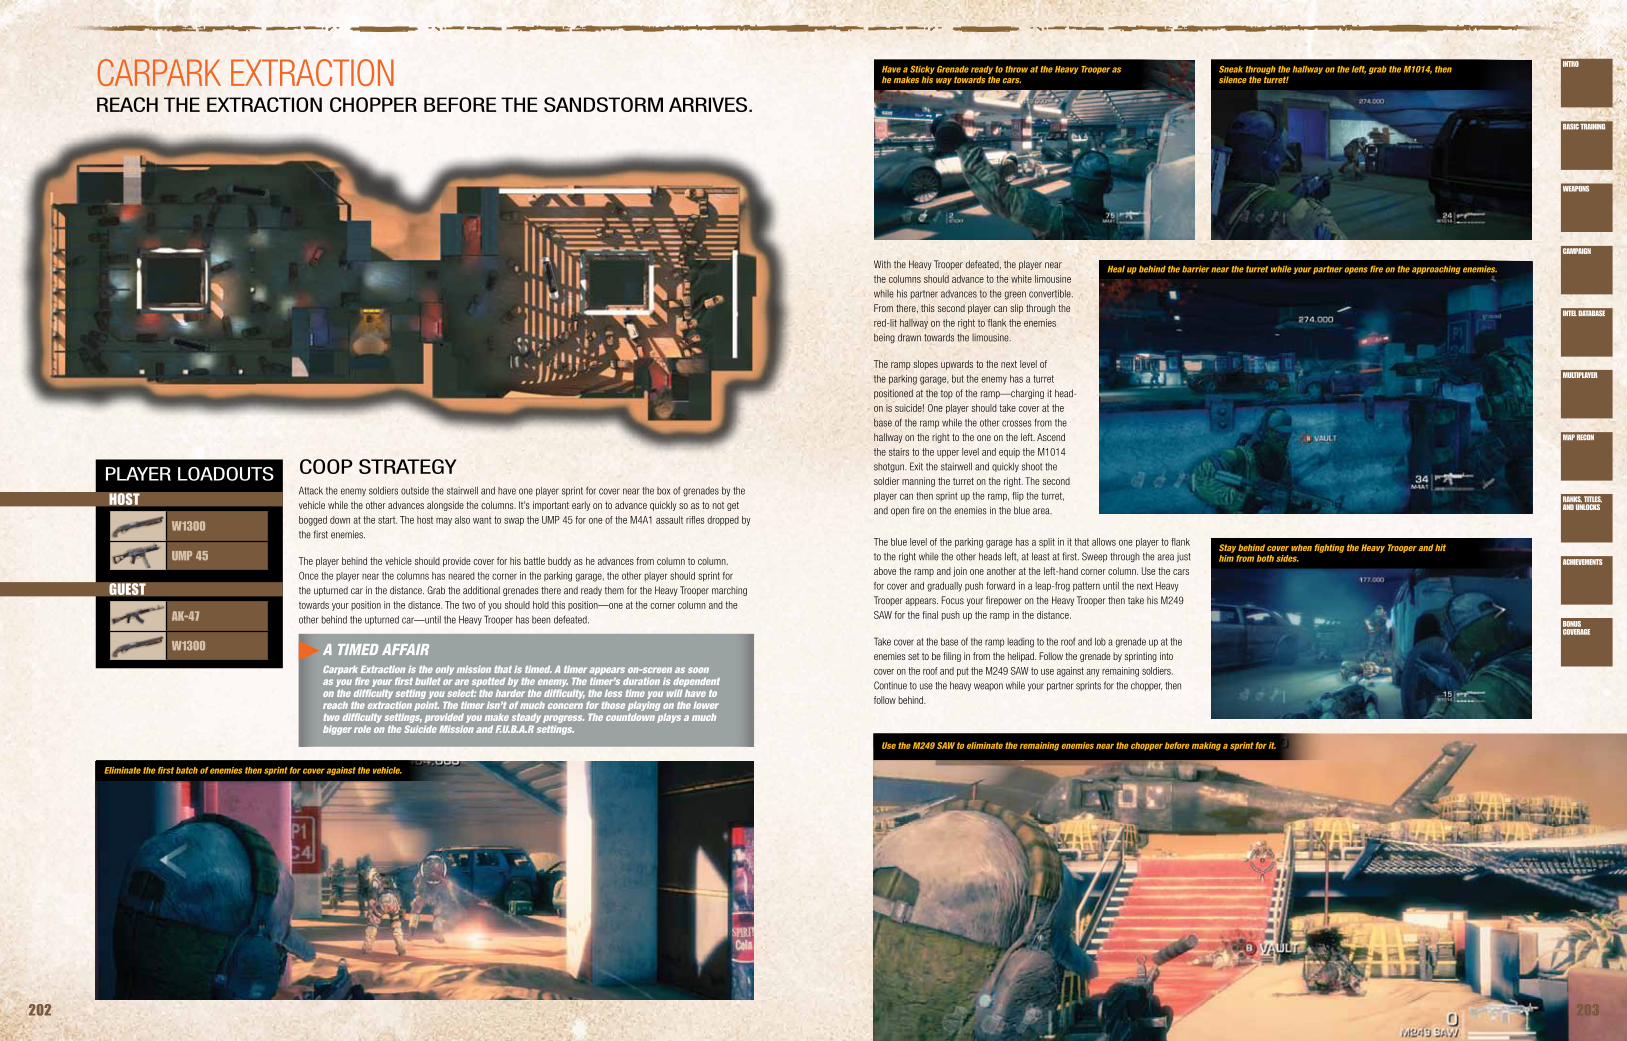
The second terminal is inside the yacht to the far right. Take cover beyond the first terminal and instruct your partner to stay near the left while you make your way to cover on the right. Take out the sniper on the upper deck of the yacht (and any soldiers on the sand) while you gradually move to the right of the ship. Be sure to pick up the Sticky Grenades en route and avoid getting too far ahead of your teammate, as it’s important that he reach the yacht at the same time.
A Heavy Trooper will descend the interior stairs of the yacht and make his way through the ship towards the stern. The player moving up from the left should advance straight towards the yacht to draw the Heavy Trooper’s attention while the other player moves in through the hole on the starboard hull and tosses a Sticky Grenade at the distracted Heavy Trooper. This plan has been proven to work time and again and makes it much easier to deactivate the second computer terminal.
Ascend the spiral staircase to the yacht’s upper deck and have the player without the M249 SAW equip the Scout Tactical. Set to sniping the enemies beyond the third computer terminal while the other surveys the scene. The path to the computer terminal may look clear, but there’s a turret pointed straight at it from within the boat to the right. Have the player with the M249 SAW drop down and skirt around the perimeter of the boat on the right to get the drop on the turret from the rear. Quickly kill the Edged Weapon Expert that appears, then use the turret to cover the teammate who was previously sniping from atop the Accetta.
resist the urge to sprint for the computer terminals until after you’ve laid waste to the final Heavy Trooper.
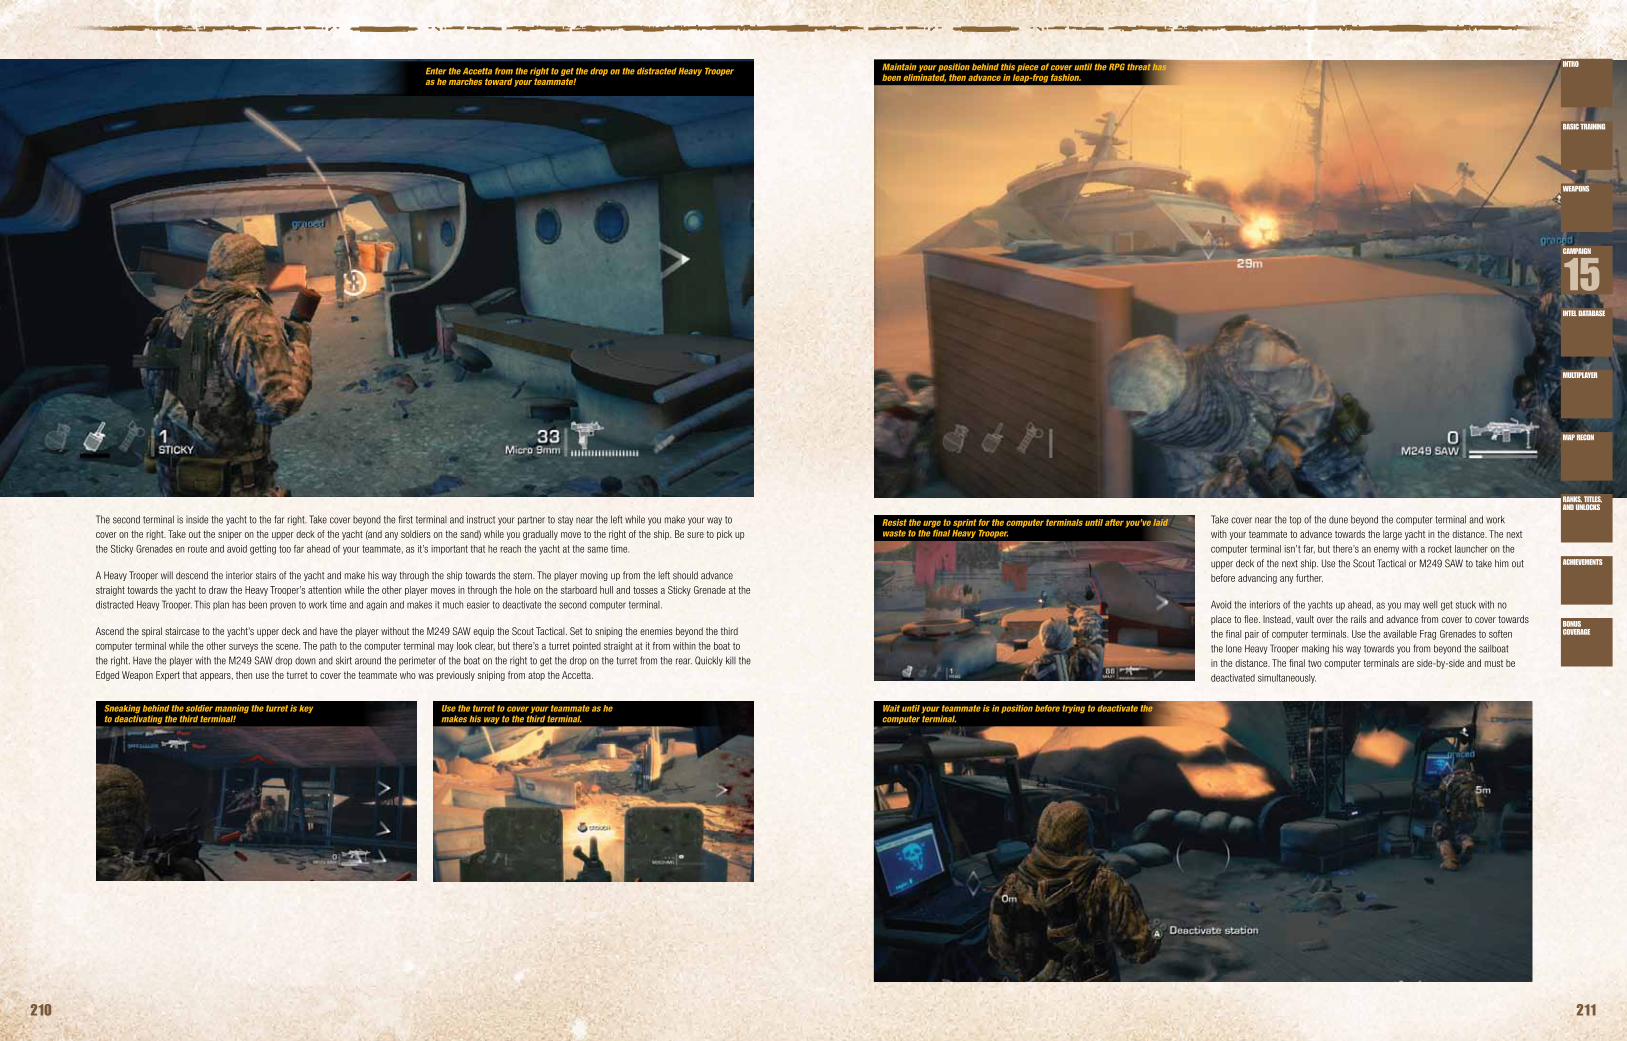
maintain your position behind this piece of cover until the rpG threat has been eliminated, then advance in leap-frog fashion.
Use the turret to cover your teammate as he makes his way to the third terminal.
Sneaking behind the soldier manning the turret is key to deactivating the third terminal!
Wait until your teammate is in position before trying to deactivate the computer terminal.
enter the Accetta from the right to get the drop on the distracted Heavy Trooper as he marches toward your teammate!
Take cover near the top of the dune beyond the computer terminal and work with your teammate to advance towards the large yacht in the distance. The next computer terminal isn’t far, but there’s an enemy with a rocket launcher on the upper deck of the next ship. Use the Scout Tactical or M249 SAW to take him out before advancing any further.
Avoid the interiors of the yachts up ahead, as you may well get stuck with no place to flee. Instead, vault over the rails and advance from cover to cover towards the final pair of computer terminals. Use the available Frag Grenades to soften the lone Heavy Trooper making his way towards you from beyond the sailboat in the distance. The final two computer terminals are side-by-side and must be deactivated simultaneously.
210 211
Intro
Basic Training
Weapons
Intel Database
Multiplayer
Map Recon
Ranks, TiTles, and Unlocks
Campaign
15
Achievements
bonus coverage
![[XLS]ptgmedia.pearsoncmg.comptgmedia.pearsoncmg.com/imprint_downloads/merrill_professional... · Web viewInstitute of Education Sciences ... NCTE National Council Teachers of English](https://img.dokumen.tips/doc/110x75/5ab9b0c77f8b9ad3038e5ccf/xls-viewinstitute-of-education-sciences-ncte-national-council-teachers-of.jpg)