Embed Size (px)
Citation preview

15-1
15 Reporting Alarm by E-mail
15.1 Try to Report Alarm by E-mail .....................................................................................15-2
15.2 Setting Guide ............................................................................................................15-27
15.3 Restrictions ...............................................................................................................15-30
Try to Report Alarm by E-mail
Pro-Server EX Reference Manual 15-2
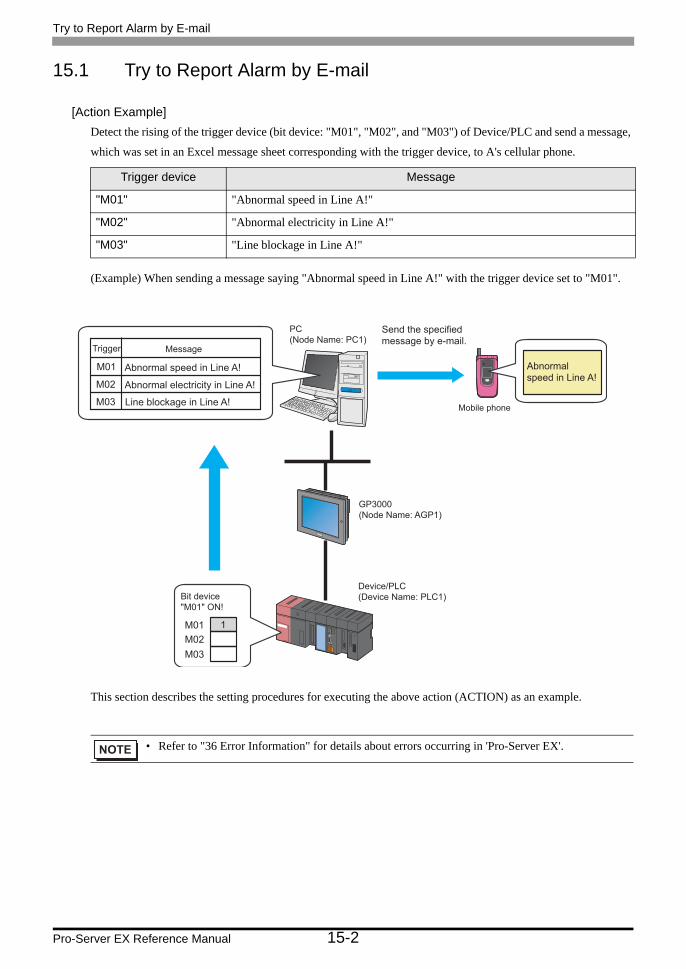
15.1 Try to Report Alarm by E-mail
[Action Example]
Detect the rising of the trigger device (bit device: "M01", "M02", and "M03") of Device/PLC and send a message,
which was set in an Excel message sheet corresponding with the trigger device, to A's cellular phone.
(Example) When sending a message saying "Abnormal speed in Line A!" with the trigger device set to "M01".
This section describes the setting procedures for executing the above action (ACTION) as an example.
Trigger device Message
"M01" "Abnormal speed in Line A!"
"M02" "Abnormal electricity in Line A!"
"M03" "Line blockage in Line A!"
• Refer to "36 Error Information" for details about errors occurring in 'Pro-Server EX'.
Send the specified
message by e-mail.
Mobile phone
Abnormal
speed in Line A!
Device/PLC
(Device Name: PLC1)
GP3000
(Node Name: AGP1)
PC
(Node Name: PC1)
M01
M02
M03
1
Bit device
"M01" ON!
Abnormal speed in Line A!
Line blockage in Line A!
Abnormal electricity in Line A!
M01
M02
M03
Trigger Message

Try to Report Alarm by E-mail
Pro-Server EX Reference Manual 15-3
[Setting Procedure]
13 Executing ACTION (page15-26) This step verifies that an e-mail is sent to a specified email address when the preset trigger condition has become effective.
12 Transferring a Network Project File (page15-25)
This step transfers a saved network project file to the display unit.
11 Saving a Network Project File (page15-25) This step saves the current settings as a network project file and reloads.
10 Verifying Setting Result (page15-23) This step verifies setting results on the setting content list screen.
9 Setting Data Received by ACTION (Trigger Condition 2 and 3)
This step sets constant values to be keycords of trigger condition 2 and 3.
8 Setting ACTION Node/Process Completion Notification (page15-19)
This step sets the name of an ACTION node and the alert setting whether it should be tuned on or off when the ACTION is completed.
7 Setting Data Received by ACTION (Trigger Condition 1) (page15-18)
This step sets a constant value to be a keycord of trigger condition 1.
6 Setting Trigger Conditions (page15-12) This step sets conditions (trigger) for e-mailing.
5 Parameter Setting for Feature (ACTION) (page15-7)
This step sets the following items:• Login Information• Mail Contents• Message Sheet Specification
3 Registering Entry Nodes (page15-5) This step registers the PC and the display units as entry nodes.
1 Creating a Message Sheet (page15-4) This step creates a message sheet containing messages to send in 'Microsoft Excel'.
2 Starting 'Pro-Studio EX' (page15-5) This step starts 'Pro-Studio EX'.
4 Registering Symbols (page15-6) This step registers as a symbol the device of Device/PLC which serves as a trigger condition (trigger).

Try to Report Alarm by E-mail
Pro-Server EX Reference Manual 15-4
15.1.1 Creating a Message Sheet
This step executes the "Key_Code" row corresponding with transfer data.
For details about transfer data, refer to "15.1.7 Setting Data Received by ACTION (Trigger Condition 1)" later
mentioned.
1 Start 'Microsoft Excel' and create the message sheet below in Sheet 1.
[Creation Example]
You can register data of the same keycode up to 5 units.
2 Save it on PC desktop with the file name "mailmessage.xls" after creating.
• You can send not only those prepared in Excel for each case but also a fixed message or data in the
device of Device/PLC as a message.
Send the specified message by e-mail.
Mobile phone
Abnormal speed in Line A!
PC(Node Name: PC1)Message Sheet
Send the message of key code "1".

Try to Report Alarm by E-mail
Pro-Server EX Reference Manual 15-5
15.1.2 Starting 'Pro-Studio EX'
This step starts 'Pro-Studio EX'.
Refer to "3 Trial of Pro-Server EX" for details about starting method.
15.1.3 Registering Entry Nodes
This step registers as entry nodes the PC and the display units which serve as trigger conditions (trigger).
Refer to "31 Node Registration" for details about entry nodes.
Entry node Setting item Setting example
PCNode Name PC1
IP Address 192.168.0.1
Display Unit
Type GP3000 series
Node Name AGP1
IP Address 192.168.0.100
Node Name :PC1
IP Address :192.168.0.1
Node Name :AGP1
IP Address :192.168.0.100
Device/PLC Information
Try to Report Alarm by E-mail
Pro-Server EX Reference Manual 15-6
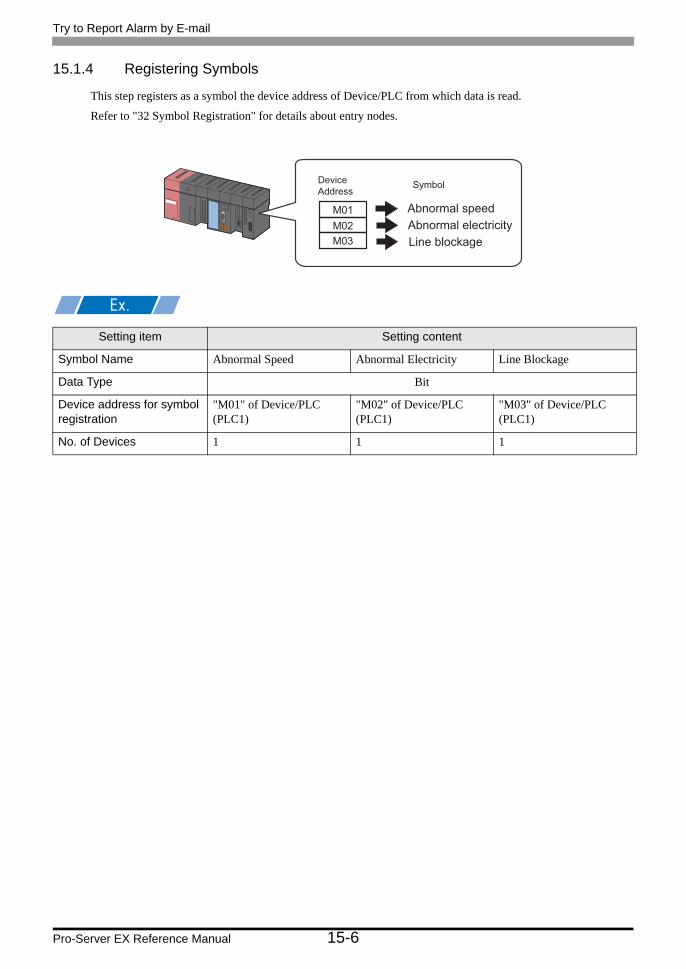
15.1.4 Registering Symbols
This step registers as a symbol the device address of Device/PLC from which data is read.
Refer to "32 Symbol Registration" for details about entry nodes.
Setting item Setting content
Symbol Name Abnormal Speed Abnormal Electricity Line Blockage
Data Type Bit
Device address for symbol registration
"M01" of Device/PLC (PLC1)
"M02" of Device/PLC (PLC1)
"M03" of Device/PLC (PLC1)
No. of Devices 1 1 1
Device
Address
M01
M02
M03
Abnormal speed
Symbol
Abnormal electricity
Line blockage
Try to Report Alarm by E-mail
Pro-Server EX Reference Manual 15-7
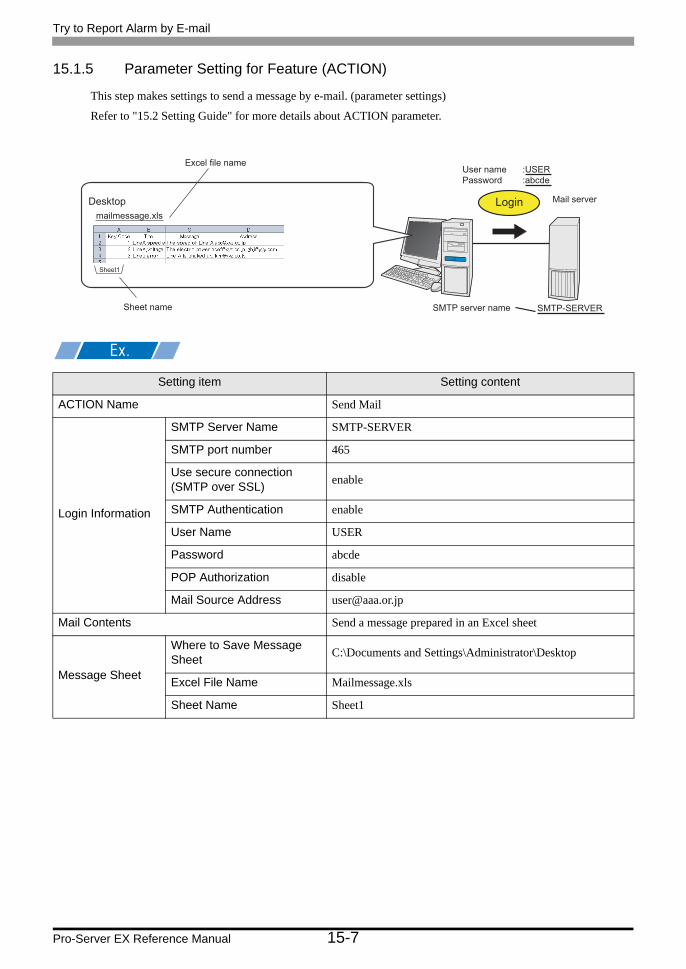
15.1.5 Parameter Setting for Feature (ACTION)
This step makes settings to send a message by e-mail. (parameter settings)
Refer to "15.2 Setting Guide" for more details about ACTION parameter.
Setting item Setting content
ACTION Name Send Mail
Login Information
SMTP Server Name SMTP-SERVER
SMTP port number 465
Use secure connection (SMTP over SSL)
enable
SMTP Authentication enable
User Name USER
Password abcde
POP Authorization disable
Mail Source Address [email protected]
Mail Contents Send a message prepared in an Excel sheet
Message Sheet
Where to Save Message Sheet
C:\Documents and Settings\Administrator\Desktop
Excel File Name Mailmessage.xls
Sheet Name Sheet1
Desktopmailmessage.xls
Sheet1
Excel file name
Sheet name SMTP-SERVERSMTP server name
User name :USERPassword :abcde
Login Mail server

Try to Report Alarm by E-mail
Pro-Server EX Reference Manual 15-8
1 Click the [Feature] icon on the status bar.
2 Select [ACTION] from the tree display on the left of the screen, then click the [Add] button.
3 Click the [ACTION Type] list button, and select "Writes Data to E-Mail".
Then, enter the name of ACTION to set in the [ACTION Name] field. In this example, enter "Send Mail".
• [ACTION Name] can be an arbitrary name.

Try to Report Alarm by E-mail
Pro-Server EX Reference Manual 15-9
4 Click the [Click here to set the ACTION parameter] button.
5 Set login information.
1) Enter "SMTP-SERVER" as the connecting SMTP server name in [SMTP server name].
2) Select the [Use secure connection (SMTP over SSL)] check box.
• For more details about login information setting, contact with your network administrator.
What is SMTP server?
Refers to a server for delivering e-mail messages complying with SMTP (Simple Mail Transfer Protocol), a mail transfer protocol (standard for data communication). E-mail messages are sent or received through a computer called "Server" that is always on the Internet. There are two types of servers: for sending and for receiving. SMTP server is typically used to send messages. SMTP server receives an e-mail sent by a user, searches for SMTP server operating on the network of the user to receive the message, and transfers it there.
• Make sure your SMTP server supports the encryption method "SMTP over SSL". If you are
planning to use an SMTP server that does not support the encryption method, you will not be able
to send encrypted mail.

Try to Report Alarm by E-mail
Pro-Server EX Reference Manual 15-10
3) Select the [SMTP Authentication] check box..
4) Enter "USER" in [User name] as a user name for SMTP authorization, and "abcde" in [Password] as a user set
password.
5) In the [SMTP port number] field, enter "465".
6) Enter the sender's email address "[email protected]" in [Sender's Mail address].
7) Set [Send Mail address].
6 Make settings regarding mail contents.
Check [Send a message prepared in an Excel sheet].
• Make sure your SMTP server supports the SMTP authentication method "AUTH-LOGIN". If you
are planning to use an SMTP server that does not support the encryption method, you will not be
able to send encrypted mail.
• "*****" appears when entering a password.
• If [Use secure connection (SMTP over SSL)] or [SMTP Authentication] is enabled, you can enter
multiple addresses by separating each with a comma (,).
• In the [Mail Contents], if you select [Send a message prepared in an Excel sheet] and the
destination addresses are defined in the Excel worksheet, contents of the [Send Mail address] field
are ignored.

Try to Report Alarm by E-mail
Pro-Server EX Reference Manual 15-11
7 Make settings regarding a message sheet.
Select "C:\desktop" to save the message sheet, and select "mailmessage.xls" in [Excel file name] as the message
sheet file name, and then "Sheet1" in [Sheet name] as a reference sheet in the message sheet .
8 Click the [OK] button.
This is the end of the feature (ACTION) settings.
Try to Report Alarm by E-mail
Pro-Server EX Reference Manual 15-12
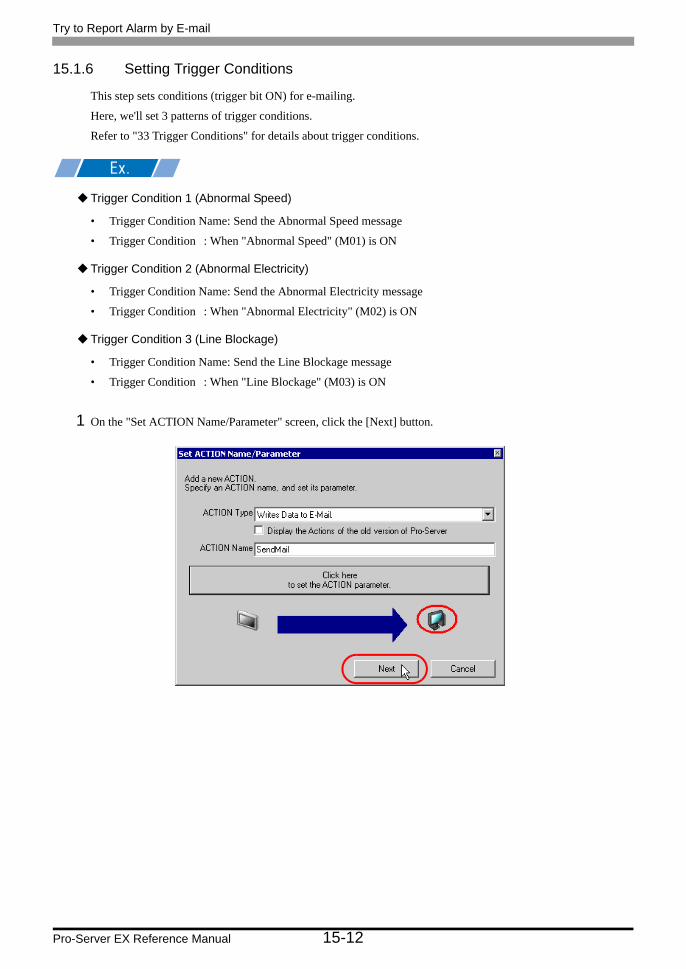
15.1.6 Setting Trigger Conditions
This step sets conditions (trigger bit ON) for e-mailing.
Here, we'll set 3 patterns of trigger conditions.
Refer to "33 Trigger Conditions" for details about trigger conditions.
Trigger Condition 1 (Abnormal Speed)
• Trigger Condition Name: Send the Abnormal Speed message
• Trigger Condition : When "Abnormal Speed" (M01) is ON
Trigger Condition 2 (Abnormal Electricity)
• Trigger Condition Name: Send the Abnormal Electricity message
• Trigger Condition : When "Abnormal Electricity" (M02) is ON
Trigger Condition 3 (Line Blockage)
• Trigger Condition Name: Send the Line Blockage message
• Trigger Condition : When "Line Blockage" (M03) is ON
1 On the "Set ACTION Name/Parameter" screen, click the [Next] button.

Try to Report Alarm by E-mail
Pro-Server EX Reference Manual 15-13
2 Click the [New Trigger Condition] button.
3 Enter the trigger condition name "SendTheAbnormalSpeedMessage" in [Trigger Condition Name], and select
"AGP1" in [Node Name] which has the device to serve as the trigger condition (trigger).
• Here, you are to specify the node having the device to be the trigger condition or having data to
transfer.
"33 Trigger Conditions"

Try to Report Alarm by E-mail
Pro-Server EX Reference Manual 15-14
4 Click the [When Device ON] button in the [Condition 1] tab and select "PLC1" for the device name.
5 Click the [Device Address] list button and select "Abnormal Speed" for the symbol name of the device which
serves as the trigger.

Try to Report Alarm by E-mail
Pro-Server EX Reference Manual 15-15
[Data Type] automatically appears after selection, too.
6 Click the [OK] button.
7 Click the [New Trigger Condition] button to add trigger condition 2.
• You can also set trigger conditions by combining 2 different types of conditions ("And" condition
or "Or" condition).
"33 Trigger Conditions"

Try to Report Alarm by E-mail
Pro-Server EX Reference Manual 15-16
8 Set the items below in the same way as condition 1 and click the [OK] button.
• Trigger Condition Name: SendTheAbnormalElectricityMessage
• Node Name: AGP1
• Trigger Condition: When the device is ON
• Device Name: PLC1
• Device Address: Abnormal Electricity

Try to Report Alarm by E-mail
Pro-Server EX Reference Manual 15-17
9 Click the [New Trigger Condition] button to add trigger condition 3, set the items below in the same way as
trigger condition 1, and then click the [OK] button.
• Trigger Condition Name: SendTheLineBlockageMessage
• Node Name: AGP1
• Trigger Condition: When the device is ON
• Device Name: PLC1
• Device Address: Line Blockage
This is the end of trigger condition settings.
Try to Report Alarm by E-mail
Pro-Server EX Reference Manual 15-18
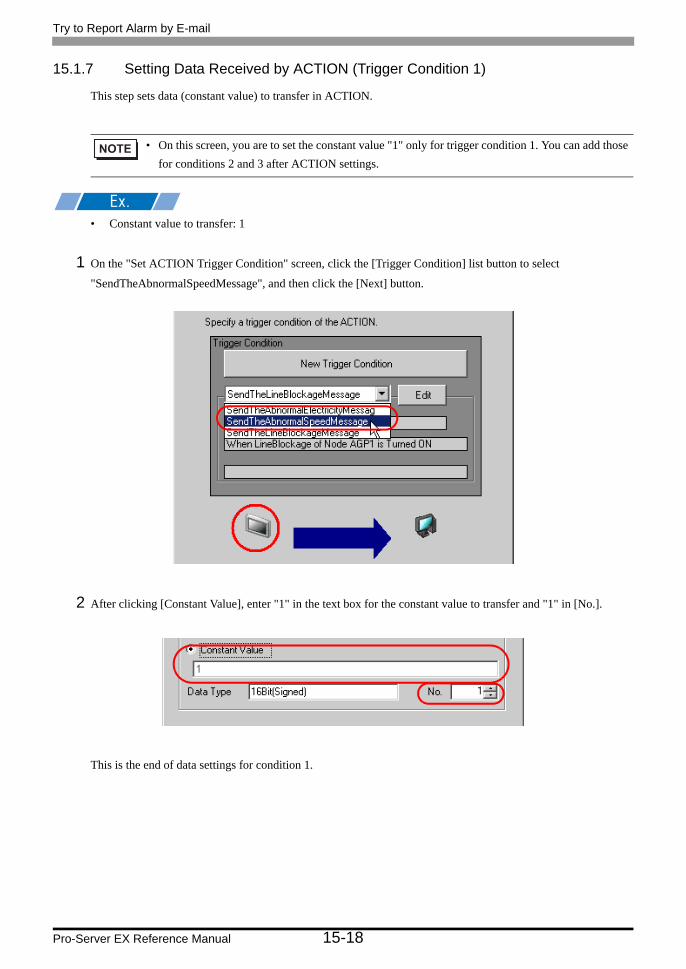
15.1.7 Setting Data Received by ACTION (Trigger Condition 1)
This step sets data (constant value) to transfer in ACTION.
• Constant value to transfer: 1
1 On the "Set ACTION Trigger Condition" screen, click the [Trigger Condition] list button to select
"SendTheAbnormalSpeedMessage", and then click the [Next] button.
2 After clicking [Constant Value], enter "1" in the text box for the constant value to transfer and "1" in [No.].
This is the end of data settings for condition 1.
• On this screen, you are to set the constant value "1" only for trigger condition 1. You can add those
for conditions 2 and 3 after ACTION settings.

Try to Report Alarm by E-mail
Pro-Server EX Reference Manual 15-19
15.1.8 Setting ACTION Node/Process Completion Notification
This step sets the name of an ACTION node and the alert setting whether it should be tuned on or off when the
ACTION is completed.
• ACTION Node : PC1
• Receive Notification: OFF
1 On the "Data settings to be received by ACTION" screen, click the [Next] button.
2 Click the list button of [ACTION Node] and select "PC1" as a node where ACTION operates. Also, clear the
check if [Receive Notification Exists] has been checked.
• When "Receive Notification Exists" is turned on, the specified bit device will be turned on when
the ACTION is completed. This can be used as the trigger condition (trigger) of the subsequent
ACTION when you want to execute two or more ACTIONs sequentially.
"33 Trigger Conditions"

Try to Report Alarm by E-mail
Pro-Server EX Reference Manual 15-20
3 Click the [Complete] button.
The "Set ACTION Node/Process Completion Notification" screen will disappear. On the left of the screen, the
ACTION and trigger condition names you set will appear.
This is the end of the settings of the ACTION node and process completion notification.

Try to Report Alarm by E-mail
Pro-Server EX Reference Manual 15-21
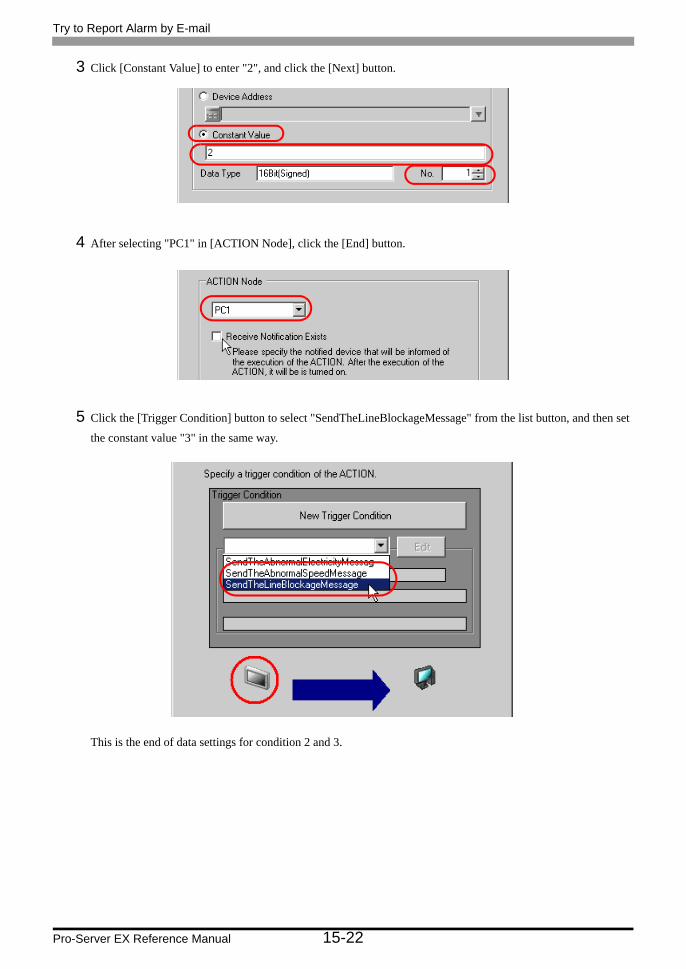
15.1.9 Setting Data Received by ACTION (Trigger Condition 2 and 3)
This step sets the constant values of trigger condition 2 and 3.
• Device name as transfer source PLC1
• Constant value to transfer of trigger condition 1: 2
• Constant value to transfer of trigger condition 2: 3
1 Click the [Add] button.
2 Click the [Trigger Condition] list button to select "SendTheAbnormalElectricityMessage", and then click the
[Next] button.
Try to Report Alarm by E-mail
Pro-Server EX Reference Manual 15-22
3 Click [Constant Value] to enter "2", and click the [Next] button.
4 After selecting "PC1" in [ACTION Node], click the [End] button.
5 Click the [Trigger Condition] button to select "SendTheLineBlockageMessage" from the list button, and then set
the constant value "3" in the same way.
This is the end of data settings for condition 2 and 3.
Try to Report Alarm by E-mail
Pro-Server EX Reference Manual 15-23
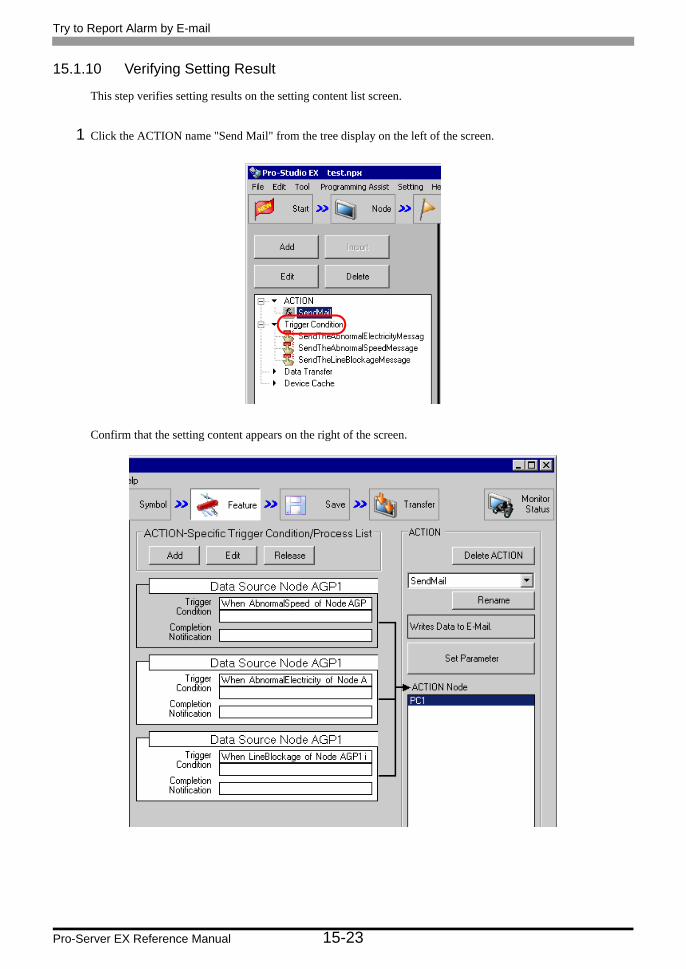
15.1.10 Verifying Setting Result
This step verifies setting results on the setting content list screen.
1 Click the ACTION name "Send Mail" from the tree display on the left of the screen.
Confirm that the setting content appears on the right of the screen.
Try to Report Alarm by E-mail
Pro-Server EX Reference Manual 15-24
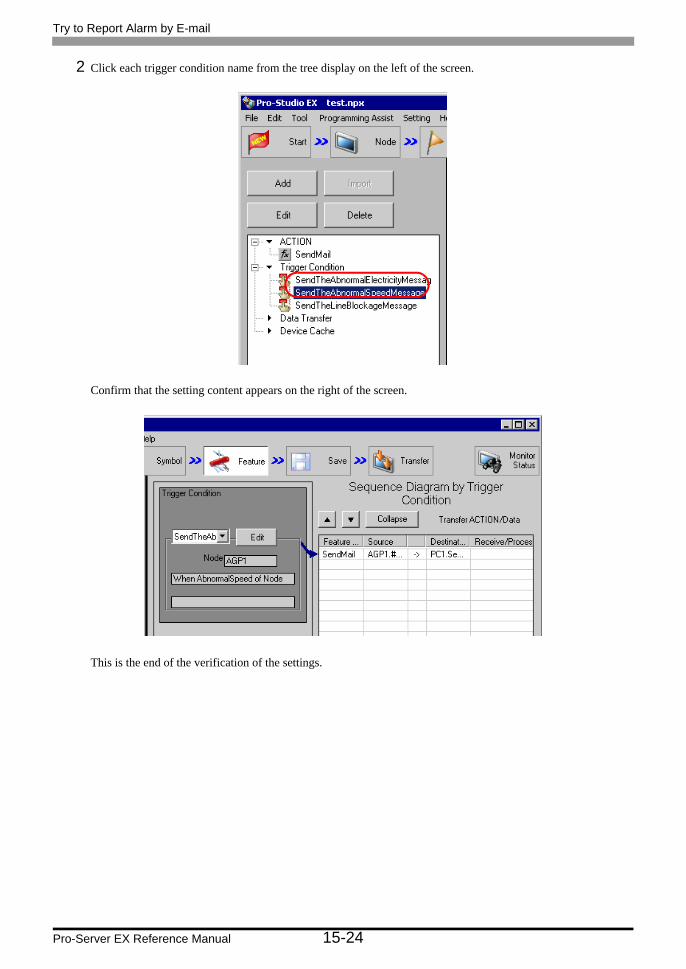
2 Click each trigger condition name from the tree display on the left of the screen.
Confirm that the setting content appears on the right of the screen.
This is the end of the verification of the settings.

Try to Report Alarm by E-mail
Pro-Server EX Reference Manual 15-25
15.1.11 Saving a Network Project File
This step saves the current settings as a network project file and reloads to 'Pro-Server EX'.
Refer to "25 Saving" for details about saving a network project file.
• Path of network project file : Desktop\Mail_send.npx
• Title : Send Mail ACTION
15.1.12 Transferring a Network Project File
This step transfers a saved network project file to entry nodes.
Refer to "26 Transferring" for details about transferring a network project file.
• 'Pro-Server EX' reads a created network project file, and then executes ACTION according to the settings in the file. The settings therefore need be saved in the network project file.
• Be sure to reload the network project file to 'Pro-Server EX'. If not, ACTION will not work.
• Be sure to transfer a network project file. If not, ACTION will not work.
Try to Report Alarm by E-mail
Pro-Server EX Reference Manual 15-26
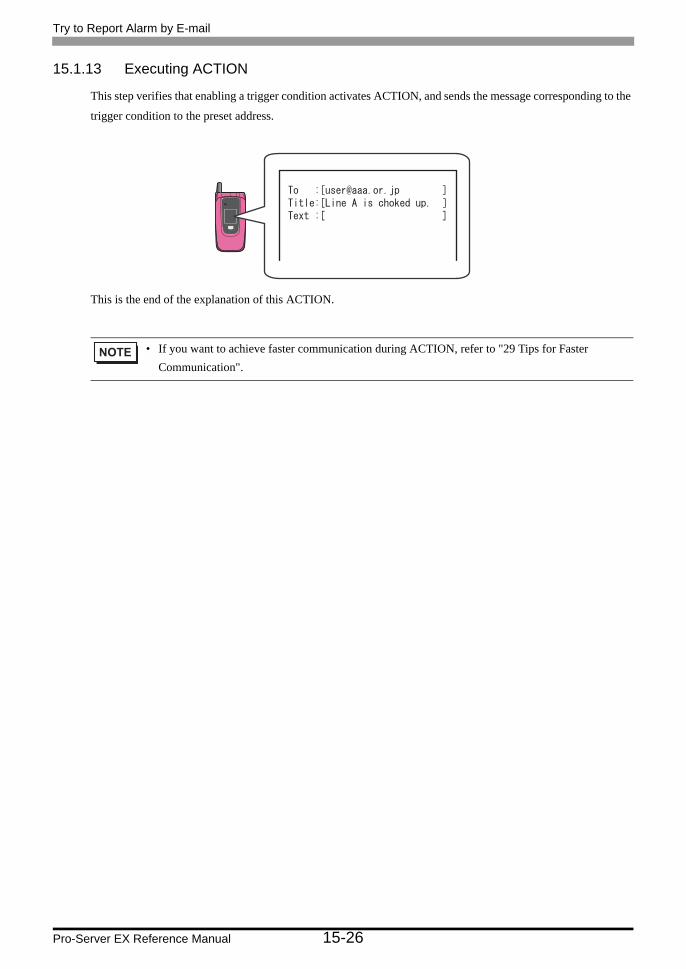
15.1.13 Executing ACTION
This step verifies that enabling a trigger condition activates ACTION, and sends the message corresponding to the
trigger condition to the preset address.
This is the end of the explanation of this ACTION.
• If you want to achieve faster communication during ACTION, refer to "29 Tips for Faster
Communication".

Setting Guide
Pro-Server EX Reference Manual 15-27
15.2 Setting Guide
This section explains how to set the parameters of ACTION.
Setting item Setting content
SMTP server nameEnter the address of the connected SMTP server (Mail Sending Server) with single-byte alphabet or numerical values.
SMTP port number
Enter the port number of the SMTP server in use.If the [Use secure connection (SMTP over SSL)] check box is selected, usually set this field to "465". If the [SMTP Authentication] check box is selected, usually set this field to "587". If neither is selected, usually set this field to "25".
Use secure connection (SMTP over SSL)
Sends mail using the "SMTP over SSL" encryption method.
SMTP Authentication Sends mail using SMTP authentication. The authentication method is "AUTH-LOGIN".
User name Set the user name for logging in to the SMTP server.
PasswordUse single-byte alphanumeric characters and symbols to set the password for logging in to the SMTP server.
POP before SMTP Select this check box to perform POP authentication before sending mail.
POP3 server nameEnter the server (POP3 server) address for POP authorization with single-byte alphabet or numerical values.
POP3 port numberDefine the port number of the POP3 server in use.Normally set to "110". Normally enter "110".
User name Enter the user name for POP authorization.

Setting Guide
Pro-Server EX Reference Manual 15-28
Password Enter the password set by the user who performs POP authorization.
Sender's Mail address Enter the mail source address with single-byte alphabet or numerical value.
Send Mail address
Use single-byte alphanumeric characters to define the destination mail address.If [Use secure connection (SMTP over SSL)] or [SMTP Authentication] is enabled, you can enter multiple addresses by separating each with a comma (,). The limit for the number of addresses depends on the SMTP server in use.
• If [Use secure connection (SMTP over SSL)] and [SMTP Authentication] are both disabled, you can set one address only.
• In the [Mail Contents], if you select [Send a message prepared in an Excel sheet] and the destination addresses are defined in the Excel worksheet, contents of the [Send Mail address] field are ignored.
Mail Contents
• Always send the same message]Sends the message entered in [Outgoing Message:].
• The content of [Outgoing Message:] is sent as the title (subject) of the message.
Setting item Setting content
To :[[email protected] ]
Title :[Abnormal speed in Line A!]
Text :[ ]

Setting Guide
Pro-Server EX Reference Manual 15-29
Mail Contents
• Send the data sent from the trigger NODE as a messageSends Device/PLC data transferred in "Set ACTION data" as a message. Date type of "String" only can be transferred as a message.
• The content of the outgoing message (Device/PLC data) is sent as the title (subject) of the message. (Example) When the character string data of "ALART" is stored in Device "50"
• Send a message prepared in an Excel sheetSends a preset message in a message sheet.
Message format prepared in Excel
• To enter more than one destination, separate addresses with a comma (,).• When e-mail addresses are not set up on the message sheet, a message is sent to the
address defined in the [Send Mail Address] field only.
Folder Sets the location where a message sheet is stored.
Excel file name Selects a message sheet file from the Excel file list in a specified folder.
Sheet name Selects a sheet name to refer in a message sheet.
Setting item Setting content
To :[[email protected] ]Title :[ALART ]Text :[ ]

Restrictions
Pro-Server EX Reference Manual 15-30
15.3 Restrictions
■ Encryption method
• If your SMTP server does not support the "SMTP over SSL" encryption method, you cannot send encrypted
mail.
■ Authentication method
• If your SMTP server does not support "AUTH-LOGIN" SMTP authentication, you cannot send SMTP
authenticated mail.
■ If mail cannot be sent
If the "Unable to send portion of mail." error message appears, it may be due to one of the following.
• Incorrect settings
Check that [SMTP server name], [SMTP port number], [Use secure connection (SMTP over SSL)], [SMTP
Authentication], [User name], and [Password] settings are correct.
• Connections to the SMTP server and port number are not allowed in the network environment
Change the firewall and security settings so that connections are allowed to the SMTP server and port number
in use.
• Sending mail was refused by the mail server
Check the [Sender's Mail address], [Send Mail address], and the subject and body of the mail.