Embed Size (px)
Citation preview
5015T
15” FLAT PANEL INDUSTRIAL MONITOR
FLAT PANEL INDUSTRIA
Hardware Guide
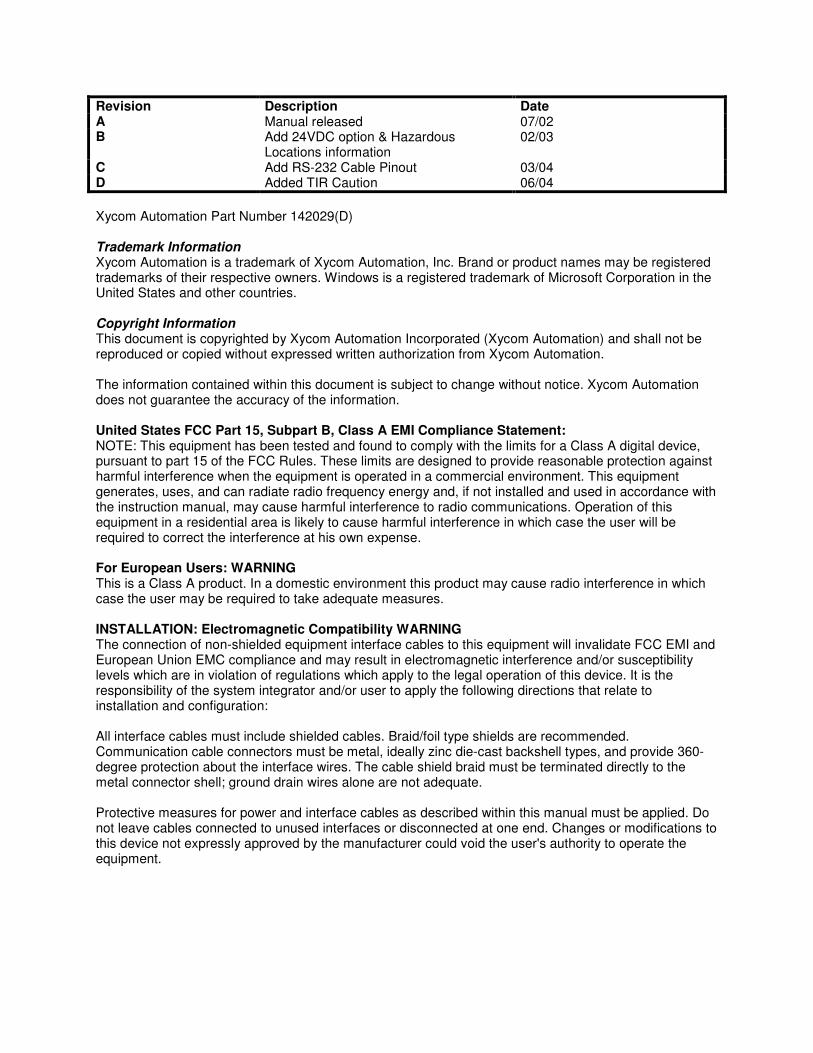
Revision Description Date A Manual released 07/02 B Add 24VDC option & Hazardous
Locations information 02/03
C Add RS-232 Cable Pinout 03/04 D Added TIR Caution 06/04 Xycom Automation Part Number 142029(D) Trademark Information Xycom Automation is a trademark of Xycom Automation, Inc. Brand or product names may be registered trademarks of their respective owners. Windows is a registered trademark of Microsoft Corporation in the United States and other countries. Copyright Information This document is copyrighted by Xycom Automation Incorporated (Xycom Automation) and shall not be reproduced or copied without expressed written authorization from Xycom Automation. The information contained within this document is subject to change without notice. Xycom Automation does not guarantee the accuracy of the information. United States FCC Part 15, Subpart B, Class A EMI Compliance Statement: NOTE: This equipment has been tested and found to comply with the limits for a Class A digital device, pursuant to part 15 of the FCC Rules. These limits are designed to provide reasonable protection against harmful interference when the equipment is operated in a commercial environment. This equipment generates, uses, and can radiate radio frequency energy and, if not installed and used in accordance with the instruction manual, may cause harmful interference to radio communications. Operation of this equipment in a residential area is likely to cause harmful interference in which case the user will be required to correct the interference at his own expense. For European Users: WARNING This is a Class A product. In a domestic environment this product may cause radio interference in which case the user may be required to take adequate measures. INSTALLATION: Electromagnetic Compatibility WARNING The connection of non-shielded equipment interface cables to this equipment will invalidate FCC EMI and European Union EMC compliance and may result in electromagnetic interference and/or susceptibility levels which are in violation of regulations which apply to the legal operation of this device. It is the responsibility of the system integrator and/or user to apply the following directions that relate to installation and configuration: All interface cables must include shielded cables. Braid/foil type shields are recommended. Communication cable connectors must be metal, ideally zinc die-cast backshell types, and provide 360-degree protection about the interface wires. The cable shield braid must be terminated directly to the metal connector shell; ground drain wires alone are not adequate. Protective measures for power and interface cables as described within this manual must be applied. Do not leave cables connected to unused interfaces or disconnected at one end. Changes or modifications to this device not expressly approved by the manufacturer could void the user's authority to operate the equipment.
i 142029 (D)
Table of Contents
Chapter 1 Product Overview .......................................................................................................................................1 Product Features .......................................................................................................................................................................... 1 Standard 5015T Features ............................................................................................................................................................ 1
Parts List....................................................................................................................................................................................... 2 Standard 5015T Parts List ........................................................................................................................................................... 2
Manual Overview .......................................................................................................................................................................... 2 Text Conventions Used in this Manual .......................................................................................................................................... 2 Product Dimensions...................................................................................................................................................................... 3 External Features.......................................................................................................................................................................... 4 Product Specifications and Ratings............................................................................................................................................... 5 Environmental.............................................................................................................................................................................. 5 Electrical...................................................................................................................................................................................... 5 Front Panel/Enclosure ................................................................................................................................................................. 5 Regulatory Compliance................................................................................................................................................................ 5 Safety Agency Approvals............................................................................................................................................................. 5
Chapter 2 Installation...................................................................................................................................................6 Environmental Considerations ...................................................................................................................................................... 6 Power Management..................................................................................................................................................................... 6 System Power ............................................................................................................................................................................. 6 Excessive Heat............................................................................................................................................................................ 7 Electrical Noise............................................................................................................................................................................ 7 Line Voltage Variation.................................................................................................................................................................. 8 Location and Enclosure ............................................................................................................................................................... 8
Panel Installation .......................................................................................................................................................................... 9 Panel Mounting Dimensions ........................................................................................................................................................ 9 Hazardous Locations Installations.............................................................................................................................................. 11
Definitions...................................................................................................................................................................................................... 12 Power Switch.................................................................................................................................................................................................. 13 Cable Connections.......................................................................................................................................................................................... 14 Operation and Maintenance............................................................................................................................................................................ 14 Safety Agency Approval ................................................................................................................................................................................ 15
Chapter 3 Monitor Settings .......................................................................................................................................16 Mode and Image Adjustment ...................................................................................................................................................... 16 On Screen Display Select Switch............................................................................................................................................... 16 Analog RGB Interface................................................................................................................................................................ 16 Video Modes Supported ............................................................................................................................................................ 17 Adjusting the Backlight .............................................................................................................................................................. 17 Setting Color Mode.................................................................................................................................................................... 17 Adjustment Menu Reset............................................................................................................................................................. 18
Automatic Screen Adjustment ..................................................................................................................................................... 18 Adjusting.................................................................................................................................................................................... 18
Manual Screen Adjustment ......................................................................................................................................................... 19 OSD Menus............................................................................................................................................................................... 19 Menu Options ............................................................................................................................................................................ 19
Adjustment Menu........................................................................................................................................................................................... 19 Gain Control Menu......................................................................................................................................................................................... 20 White Balance Menu ...................................................................................................................................................................................... 20 User ................................................................................................................................................................................................................ 20 Mode Select Menu.......................................................................................................................................................................................... 20
Chapter 4 Operator Input...........................................................................................................................................22 Touchscreen............................................................................................................................................................................... 22 Installing the Touchscreen Driver............................................................................................................................................... 22 Calibrating the Touchscreen ...................................................................................................................................................... 22
Chapter 5 Hardware ...................................................................................................................................................23 VGA Input Connector Pin Out ..................................................................................................................................................... 23 Analog Signal Input Connector Pin ............................................................................................................................................ 23
Serial Interface............................................................................................................................................................................ 23 Serial Signal Input Connector Pin .............................................................................................................................................. 23
RS-232 Cable ............................................................................................................................................................................. 24 Appendix A: Technical Support................................................................................................................................25
Reaching Technical Support ....................................................................................................................................................... 25

1 142029 (D)
Xycom Automation industrial monitors meet the rigorous requirements of the plant floor with high-resolution flat panel displays in a rugged housing with a resistive membrane touchscreen. The 5015T flat panel monitor delivers crisp, bright text and graphics with a low current draw, and it fits into panels that CRTs cannot.
The 5015T and the 5015T-24V units are self-contained, requiring only to be panel mounted in an appropriate enclosure and connected to 100-240 VAC and VGA source or to a 24 VDC and VGA source accordingly.
Product Features
Standard 5015T Features 15" diagonal bright (300 Nit) with TFT active matrix color LCD, easy-to-read, high contrast (400:1), color (6 bit/16.7 million colors) TFT flat panel display with XGA (1024x768) resolution Large viewing area: 12.13 x 9.14 in. [308.2 x 232.1mm]; dot pitch: 0.012 x 0.012in. [0.287 x 0.287 mm] Operator input through integrated high-performance touchscreen 1024 x 1024 resistive film (analog) touch panel Front panel controls with onscreen menus (lock switch on rear of units) Long-lasting (50,000 hour) backlight Analog RGB interface and SIO interface (touch interface) Die-cast aluminum front bezel Simple mounting Shallow mounting depth Up to 50 foot cables NEMA 4/4x/12 front panel, when properly mounted UL/cUL Recognized to UL 60950 and Listed to Hazardous Location Standards CE marked Units ship with all necessary I/O cables and software
Caution Leaving your TFT LCD display on constantly can result in temporary image
retention (TIR). TIR can be avoided by using a screen saver, enabling the idle/doze timeout feature, or by turning off the display when it is not in use.
5015T Flat Panel Industrial Monitor Chapter 1 Product Overview
2 142029 (D)
Parts List
When you remove the 5015T from its shipping carton, verify that you have the parts listed below. Save the box and inner wrapping in case you need to reship the unit.
Standard 5015T Parts List 5015T unit. Installation Fasteners (12) Installation Gasket Analog RGB Cable (10 ft.) RS-232C Cable (10 ft.) Documentation and Support Library CD-ROM. In addition to containing this manual, the
DOC CD contains all drivers required by this unit (touchscreen drivers in the case of 5015T and 5015T-24VDC units).
Manual Overview
The manual is divided in the following chapters:
Chapter 1 – Product Overview
Chapter 2 – Installation
Chapter 3 – Monitor Settings
Chapter 4 – Operator Input
Chapter 5 – Hardware
Text Conventions Used in this Manual
Throughout this manual, certain terms are formatted in ways that indicate what type of object is being described. Some information is also segregated to draw attention quickly.
Titles, labels, and messages are indicated by italic text. Computer filenames and text to be entered by the user will appear in a monospace font. Operator interfaces (such as the Start menu button) and keyboard keys (such as Enter) appear in a narrow bold typeface. Other text (such as the word Note) is bold to emphasize it and draw your attention to it.

5015T Flat Panel Industrial Monitor Chapter 1 Product Overview
3 142029 (D)
Product Dimensions

5015T Flat Panel Industrial Monitor Chapter 1 Product Overview
4 142029 (D)
External Features
A TFT type color LCD The 5015T unit’s LCD display. Data from the host is displayed.
B Touch Panel Allows you to perform touch operations.
MENU 1 This button is used to open, select, and close the On Screen Display (OSD) Menu.
SELECT 2 When the OSD Menu is displayed, this button selects the menu option to be adjusted.
3
When the OSD Menu is displayed: These buttons are used to increase or decrease the value of a selected option. When the OSD Menu is not displayed: These buttons are used to adjust backlight brightness.
C
Front Key
Switch
POWER (LED) 4 Indicates whether the monitor is on or off. The LED is lit
green when in use. D Power input terminal block Used to connect the power supply cable. E Analog RGB I/F connector Analog RGB interface connector. This receives image data
from the Host. F Serial I/F Connector
(RS-232C) Serial RS-23C interface. This connects a serial cable to the 5015T, and sends the 5015T touch panel data to the host.
Position
3
All Front buttons are in an operable state. OSD can be started.
2 All Front buttons are locked. OSD cannot start.
G OSD SELECT Switch
This slide switch can lock some or
all of the Front Key Switch.
1 Menu and Select are locked. Only backlight adjustment is possible.

5015T Flat Panel Industrial Monitor Chapter 1 Product Overview
5 142029 (D)
Product Specifications and Ratings
Environmental Operating Non-operating Thermal 0°C to 50°C (32°F to 122°F) -20°C to 60°C (-4°F to 140F) Humidity 20% to 80% RH, non-condensing 20% to 80% RH, non-condensing
Shock 15 g peak acceleration, 11 msec duration
30 g peak acceleration, 11 msec duration
Vibration, 5-2000 Hz
0.006" peak-to-peak displacement 1.0 g maximum acceleration
0.015" peak-to-peak displacement 2.5 g maximum acceleration
Altitude Sea level to 10,000 ft. (3,000 m) Sea level to 40,000 ft. (12,000 m)
Electrical AC power: 100-240 VAC, 0.8 – 0.4A, 50/60 Hz
DC power: 18 - 32 VDC, 1 A maximum
Front Panel/Enclosure NEMA 4/4X/12
Regulatory Compliance CE
EN 55022: Class A
EN 61000-6-2
EN 60950
EN 61000-3-2
EN 61000-3-3
FCC
47 CFR, Part 15, Class A
Safety Agency Approvals UL
UL 60950
UL 1604*
CUL
CSA-C22.2, #950
CSA-C22.2, #213*
* Suitable for use in Class I, Division 2, Groups A, B, C and D and Class II, Division 2, Groups F and G Hazardous Locations or Non-Hazardous Locations only. Temperature Codes: T4 (5015T), T4A (5015T-24V)
6 142029 (D)
Environmental Considerations
The rugged design of the 5015T allows it to be installed in most industrial environments. Refer to the electrical and environmental specifications and tolerances in the Product Specifications and Ratings section for more detailed information.
Power Management The monitor is based on the VESA DPMS and the DVI DMPM standards.
To activate the monitor's Power Management function, both the video card and the computer must conform to the VESA DPMS standard and the DVI DMPM standard.
System Power It is a good practice to use isolation transformers on the incoming AC power line to the
system. An isolation transformer is especially desirable in cases in which heavy equipment is likely to introduce noise onto the AC line. The isolation transformer can also serve as a step-down transformer to reduce the incoming line voltage to a desired level. The transformer should have a sufficient power rating (units of volt-amperes) to supply the load adequately.
Proper grounding is essential to all safe electrical installations. Refer to the relevant federal, state/provincial, and local electric codes, which provide data such as the size and types of conductors, color codes and connections necessary for safe grounding of electrical components. The code specifies that a grounding path must be permanent (no solder), continuous, and able to safely conduct the ground-fault current in the system with minimal impedance (minimum wire required is 18 AWG, 1 mm).
Observe the following practices: Separate the power and ground (P. E., or Protective Earth) cable from signal cables at the point of entry to the enclosure. To minimize the ground wire length within the enclosure, locate the ground reference point near the point of entry for the plant power supply.
All electrical racks or chassis and machine elements should be Earth Grounded in installations where high levels of electrical noise can be expected. The rack/chassis should be grounded with a ground rod or attached to a nearby Earth structure such as a steel support beam. Connect each different apparatus to a single Earth Ground point in a "star" configuration with low impedance cable. Scrape away paint and other nonconductive material from the area where a chassis makes contact with the enclosure. In addition to the ground connection made through the mounting bolt or stud, use a one-inch metal braid or size #8 AWG wire to connect between each chassis and the enclosure at the mounting bolt or stud.
5015T Flat Panel Industrial Monitor Chapter 2 Installation
7 142029 (D)
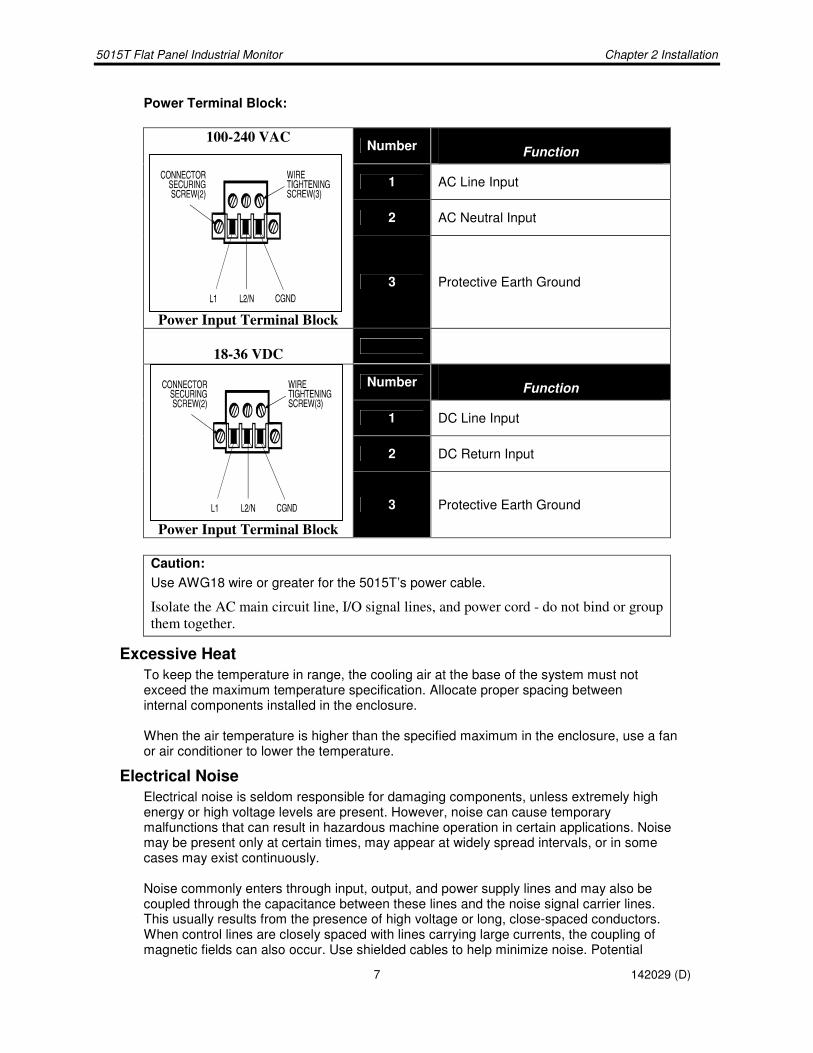
Power Terminal Block:
Number Function
1 AC Line Input
2 AC Neutral Input
100-240 VAC
Power Input Terminal Block
3 Protective Earth Ground
18-36 VDC
Number Function
1 DC Line Input
2 DC Return Input
Power Input Terminal Block
3 Protective Earth Ground
Caution: Use AWG18 wire or greater for the 5015T’s power cable.
Isolate the AC main circuit line, I/O signal lines, and power cord - do not bind or group them together.
Excessive Heat To keep the temperature in range, the cooling air at the base of the system must not exceed the maximum temperature specification. Allocate proper spacing between internal components installed in the enclosure.
When the air temperature is higher than the specified maximum in the enclosure, use a fan or air conditioner to lower the temperature.
Electrical Noise Electrical noise is seldom responsible for damaging components, unless extremely high energy or high voltage levels are present. However, noise can cause temporary malfunctions that can result in hazardous machine operation in certain applications. Noise may be present only at certain times, may appear at widely spread intervals, or in some cases may exist continuously. Noise commonly enters through input, output, and power supply lines and may also be coupled through the capacitance between these lines and the noise signal carrier lines. This usually results from the presence of high voltage or long, close-spaced conductors. When control lines are closely spaced with lines carrying large currents, the coupling of magnetic fields can also occur. Use shielded cables to help minimize noise. Potential

5015T Flat Panel Industrial Monitor Chapter 2 Installation
8 142029 (D)
noise generators include switching components, relays, solenoids, motors, and motor starters. Refer to the relevant Federal, State/Provincial, and local electric codes, which provide data such as the size and types of conductors, color codes and connections necessary for safe grounding of electrical components. It is recommended that high- and low-voltage cabling be separated and dressed apart. In particular, AC cables and switch wiring should not be in the same conduit with all communication cables.
Line Voltage Variation The power supply section of the unit is built to sustain the specified line fluctuations and still allow the system to function in its operating margin. As long as the incoming voltage is adequate, the power supply provides all the logic voltages necessary to support the monitor unit.
Unusual AC line variations may cause undesirable system shutdowns. As a first step to reduce line variations, correct any possible feed problems in the distribution system. If this correction does not solve the problem, use a constant voltage transformer. The constant voltage transformer stabilizes the input voltage to the systems by compensating for voltage changes at the primary in order to maintain a steady voltage at the secondary. When using a constant voltage transformer, check that the power rating is sufficient to supply the unit.
Location and Enclosure Place the unit to allow easy access to the system ports. Account for the unit dimensions when selecting an installation location or enclosure. You can maintain the NEMA 4 seal by mounting the unit in an approved enclosure
that has a 14 gauge (0.075 in./1.9 mm thick) steel or (0.125 in./3.2 mm thick) aluminum front face.
Place the unit at a comfortable working level. Mount the unit in an upright position, if possible. Consider locations of accessories such as AC power outlets and lighting (interior
lighting and windows) for installation and maintenance convenience. Prevent condensation by installing a thermostat-controlled heater or air conditioner. Avoid obstructing the airflow to allow for maximum cooling. Place any fans or blowers close to the heat-generating devices. If using a fan, make
sure that outside air is not brought inside the enclosure unless a fabric or other reliable filter is used. This filtration prevents conductive particles or other harmful contaminants from entering the enclosure.
Do not select a location near equipment that generates excessive electromagnetic interference (EMI) or radio frequency interface (RFI) (equipment such as high-power
welding machines, induction heating equipment, and large motor starters). Do not place incoming power line devices (such as isolation or constant voltage
transformers, local power disconnects, and surge suppressers) near the system. The proper location of incoming line devices keeps power wire runs as short as possible and minimizes electrical noise transmitted to the unit.
Make sure the location does not exceed the unit's shock, vibration, and temperature specifications, as outlined in the Product Specifications and Ratings section.
Install the unit so it does not cause a hazard from uneven mechanical loading. Incorporate a readily accessible disconnect device in the fixed wiring on permanently
connected equipment. Avoid overloading the supply circuit.

5015T Flat Panel Industrial Monitor Chapter 2 Installation
9 142029 (D)
Panel Installation
This monitor should be mounted in and used where NEMA 4 and NEMA 12 type enclosures are employed. When mounted properly, the monitor meets or exceeds the sealing requirements set forth in the NEMA 4 and NEMA 12 specifications. The monitor uses "U"-shaped clips and a special gasket to achieve the proper seal.
To install the monitor, make a cutout per the diagram below in one of the walls of your NEMA enclosure. Enclosures made of heavier gauge metal work better in that they won't deform or bend as easily when the monitor's sealing gasket is compressed. Next hold the monitor in place while you install the mounting clips. Tighten the clips in a cross pattern. This will help to develop an even pressure on the sealing gasket. Tighten the clips to the point were the back of the monitor's front bezel just begins to contact the front of the NEMA enclosure.
Caution: Do not over-tighten because it can cause damage to the monitor, which can result in loss of seal integrity.
Panel Mounting Dimensions
12.87 +.04/-0[327 +1/-0]
in. [mm]
5015T Flat Panel Industrial Monitor Chapter 2 Installation
10 142029 (D)
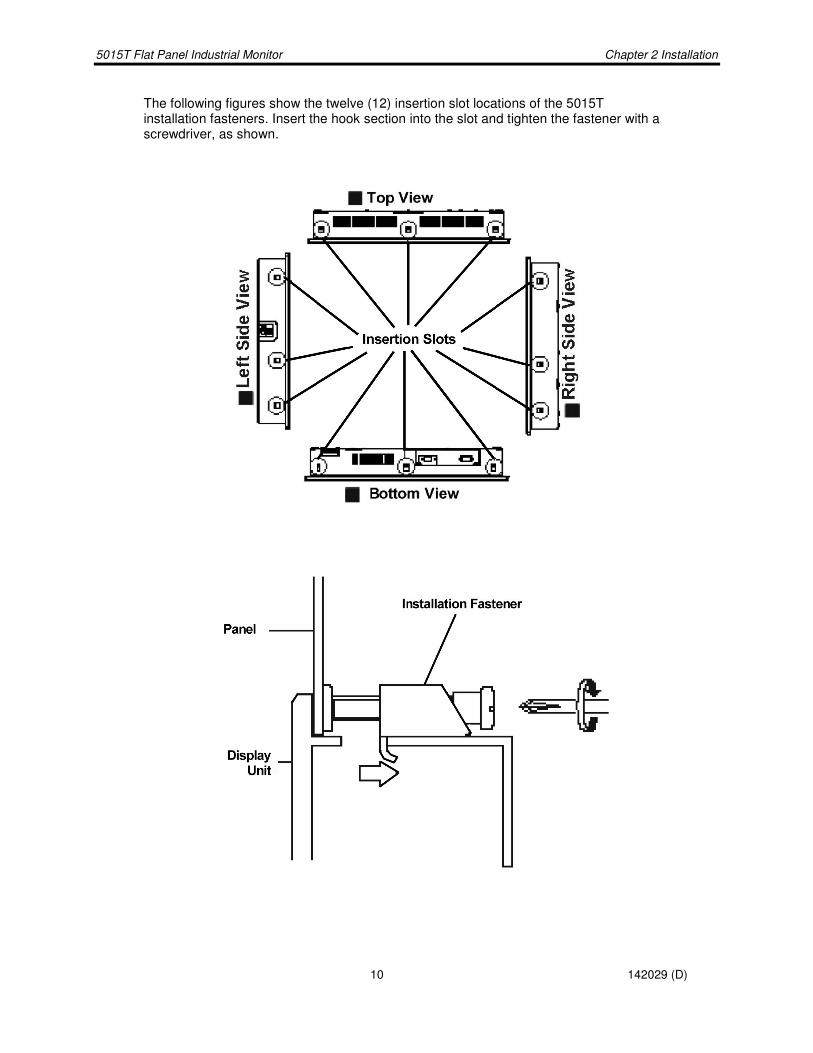
The following figures show the twelve (12) insertion slot locations of the 5015T installation fasteners. Insert the hook section into the slot and tighten the fastener with a screwdriver, as shown.

5015T Flat Panel Industrial Monitor Chapter 2 Installation
11 142029 (D)
Hazardous Locations Installations Xycom Automation designed the systems with the intention of meeting the requirements of Class I, Division 2 Hazardous Locations applications. Division 2 locations are those locations that are normally non-hazardous, but potentially hazardous should an accident expose the area to flammable vapors, gases or combustible dusts.
These systems are non-incendiary devices. They are not intrinsically safe and should never be operated within a Division 1 (normally hazardous) location when installed as described here. Nor should any peripheral interface device attached to these systems be located within Division 1 locations unless approved and/or certified diode barriers are placed in series with each individual signal and DC power line. Any such installations are beyond the bounds of Xycom Automation design intent. Xycom Automation accepts no responsibility for installations of this equipment or any devices attached to this equipment in Division 1 locations.
NOTE: It is the customer’s responsibility when adding additional cards that they met operating conditions for Class I, Division 2 hazardous locations.
It is the responsibility of the customer to ensure that the product is properly rated for the location. If the intended location does not presently have a Class, Division, and Group rating, then users should consult the appropriate authorities having jurisdiction in order to determine the correct rating for that Hazardous Location.
In accordance with Federal, State/Provincial, and Local regulations, all hazardous location installations should be inspected by the appropriate authority having jurisdiction prior to use. Only technically qualified personnel should install, service, and inspect these systems.
Warning Suitable for use in Class I, Division 2 Groups A, B, C, and D, and Class II, Division 2, Groups F and G hazardous locations or non-hazardous locations only. Temperature Codes: T4A (5015T-24V), T4 (5015T)
Warning - Explosion Hazard Substitution of components may impair suitability for Class I, Class II, Division 2.
Advertissement Risque D’ Explosion La substitution de composants peut rendre ce materiel inacceptable pour les emplamements de classe I, II, Division 2.
Warning - Explosion Hazard Do not disconnect equipment unless the power has been switched off or the area is known to be non-hazardous.

5015T Flat Panel Industrial Monitor Chapter 2 Installation
12 142029 (D)
Advertissement Risque D’ Explosion Avant de deconnecter l’equipment, coupler le courant ou s’assurer que l’emplacement est designe non dangereux.
Warning - Explosion Hazard When in hazardous locations, turn off power before replacing or wiring modules.
Advertissement Risque D’ Explosion Dans les situations hasardees, couper la courant avant de remplacer ou de cabler les modules.
Warning To maintain a safe condition, do not use an external keyboard or mouse or USB port devices when the unit is operating in a hazardous environment.
Definitions
The following Class and Division explanations are derived from Article 500 (Sections 5 and 6) of the United States National Fire Protection Agency National Electric Code (NFPA 70, 1990). They are not complete and are included here only for a general description for those not familiar with generic hazardous locations’ requirements.
Persons responsible for the installation of this equipment in Hazardous Locations are responsible for ensuring that all relevant codes and regulations related to location rating, enclosure, and wiring are met.
Class I Locations
Class I locations are those in which flammable gases or vapors are or may be present in the air in quantities sufficient to produce explosive or ignitable mixtures.
Class II Locations
Class II locations are those that are, or may become, hazardous because of the presence of combustible dust.
Division 1 Locations
A Division 1 location is one in which flammable or ignitable gasses, vapors, or combustible dusts and particles can exist due the following conditions:
• Normal operating conditions. • Because of repair, maintenance conditions, leakage, or where mechanical failure or
abnormal operation of machinery or equipment might release or cause explosive or ignitable mixtures to be released or produced.
• Combustible dusts of an electrically conductive nature may be present in hazardous quantities.

5015T Flat Panel Industrial Monitor Chapter 2 Installation
13 142029 (D)
NOTE Xycom Automation 5015T, 5015T-24V systems are not suitable for installation within Division 1 locations.
NOTE Electrical equipment cannot be installed in Division 1 locations unless they are intrinsically safe, installed inside approved explosion-proof enclosures, or installed inside approved purged and pressurized enclosures.
Division 2 Locations
• Class I volatile flammable liquids or flammable gasses are handled, processed, or used, but confined within closed containers or closed systems from which they can escape only in cases of accidental rupture or breakdown of such enclosures or systems, or in case of abnormal operation of equipment.
• Ignitable concentrations of Class I vapors or gasses are normally prevented by positive mechanical ventilation, but which may become hazardous due to mechanical failure of those ventilation systems.
• Location is adjacent to a Division 1 location. • Class II combustible dust is not normally in the air in quantities sufficient to produce
explosive or ignitable mixtures. Dust accumulations are normally insufficient to interfere with normal operation of electrical equipment or other apparatus. Combustible dust may be in suspension in the air as a result of the following: infrequent malfunctioning of handling or processing equipment; combustible dust accumulations on, or in the vicinity of electrical equipment; may be ignitable by abnormal operation or failure of electrical equipment.
Groups
All electrical equipment that is approved for use in hazardous locations must include a group rating. Various flammable and combustible substances are divided into these groups as a function of their individual maximum experimental safe gap (MESG), explosion pressure, and ignition temperature.
Component temperatures and the potential for spark based upon voltage, current, and circuit characteristics, within electrical equipment, will determine what the equipment group rating will be. A device approved for installation within Class I, Group A locations may also be used in Groups B, C, or D. NOTE: Approved Class I equipment may not be suitable for Class II installations. Class I includes Groups A, B, C, and D. Class II includes Groups F, and G.
Power Switch
The systems do not have a power switch. The amount of input power required by these systems classifies a power switch as an incendiary device because the voltage and current across the make/break device are capable of creating a spark.
Hazardous locations’ regulations require that a power switch rated for ordinary locations may be used if it is located in an area specified as non-hazardous. However, limits in

5015T Flat Panel Industrial Monitor Chapter 2 Installation
14 142029 (D)
cable length between the workstation and the power switch may apply. Otherwise the switch must be compliant with Class I, Division 1 requirements (intrinsically safe). These switches are built in a manner that prevents the possibility of a spark when contacts are made or broken.
Use suitable UL listed and/or CSA Certified Class I, Division 1 switches in hazardous locations. These switches are available from a wide number of sources. It is the responsibility of the customer to ensure that the power switch selected for their installation has the correct hazardous locations rating for the location in which it is installed.
Cable Connections
Division 2 hazardous locations’ regulations require that all cable connections be provided with adequate strain relief and positive interlock. USB connections can never be used in hazardous location installations, because USB connectors do not provide adequate strain relief. Never connect or disconnect a cable while power is applied at either end of the cable.
All communication cables should include a chassis ground shield. This shield should include both copper braid and aluminum foil. The D-sub style connector housing should be a metal conductive type (e.g., molded zinc) and the ground shield braid should be well terminated directly to the connector housing. Do not use a shield drain wire.
The outer diameter of the cable must be suited to the inner diameter of the cable connector strain relief in order to ensure that a reliable degree of strain relief is maintained.
Warning Never connect or disconnect the communication cables while power is applied at either end of the cable. This may result in an incendiary spark. Permanent damage to the workstation communication components may occur.
Operation and Maintenance
The systems have been designed for compliance with relevant spark ignition tests. However, please note that the workstation front panel contrast adjustment tactile switches and keyboard connector are the only make/break components intended to be exercised by the operator in the course of normal operation.
Warning To maintain a safe condition, never use an external keyboard or mouse or USB port devices when the unit is operating in a hazardous environment.
Always observe the following rules with respect to hazardous location installations:
1. Always install the workstations within an enclosure suitable for the specific application. General-purpose enclosures may be acceptable for Class I applications but are never acceptable for Class II applications. Type 4 (IP 65) enclosures are recommended even when not required by regulations.
5015T Flat Panel Industrial Monitor Chapter 2 Installation
15 142029 (D)
2. If present, keep enclosure doors or openings closed at all times, to avoid the accumulation of foreign matter inside the workstation.
3. Never subject the unit to any installation or service procedures unless power is removed and the area is known to be non-hazardous. This includes the installation or removal of power cables, communication cables, or removal of the rear cover of the unit.
Only technically qualified service personnel should perform all installation and service. These workstations are designed to require no service in the course of normal operation by an operator.
Safety Agency Approval
The Xycom Automation systems are designed to meet the following standards:
• Underwriters Laboratories Inc., UL 1604 Standard for Safety Electrical equipment for use in Class I and Class II, Division 2, locations
• Underwriters Laboratories Inc., UL 60950, Information Technology Equipment • Canadian Standard Association, Specification C22.2 No. 213-M1987
Non-incendiary electrical equipment for use in Class I, Division 2 hazardous locations
• Canadian Standards Association, Specification C22.2 No. 950 Information Technology Equipment
• EN 60950, Information Technology Equipment

16 142029 (D)
Caution Leaving your TFT LCD display on constantly can result in temporary image
retention (TIR). TIR can be avoided by using a screen saver, enabling the idle/doze timeout feature, or by turning off the display when it is not in use.
Mode and Image Adjustment
Not all video controllers produce exactly the same video output levels or the same timing. The 5015T uses onscreen programming to make setup and adjustment easy. The menus are selected and the menu items are adjusted using the buttons located on the monitor front panel. These buttons can be enabled or disabled by the OSD Select Switch.
On Screen Display Select Switch The OSD Select switch is a sliding switch on the left-hand side of the unit, towards the front. Some or all of a front key switch is locked by the position of the OSD Select switch. Incorrect starting of the OSD can be prevented.
Caution: Please use OSD after confirming the position of the OSD Select Switch. Touch data is transmitted to host while OSD menu is displayed.
Analog RGB Interface
Specification Based on VESA standard, separate analog RGB 0.7Vp-p positive true typically Input range: 0.5 to 1.0Vp-p typical with terminal resistance of 75Ω H sync signal input: TTL level, negative true or positive true V sync signal input: TTL level, negative true or positive true
Position 3
All Front Key switches are in the state that can be operated. OSD can always be started.
Position 2
All keys are locked. OSD will not start. Incorrect starting can be prevented.
Position 1
Menu and Select are locked. Only backlight adjustment is possible.
5015T Flat Panel Industrial Monitor Chapter 3 Monitor Settings
17
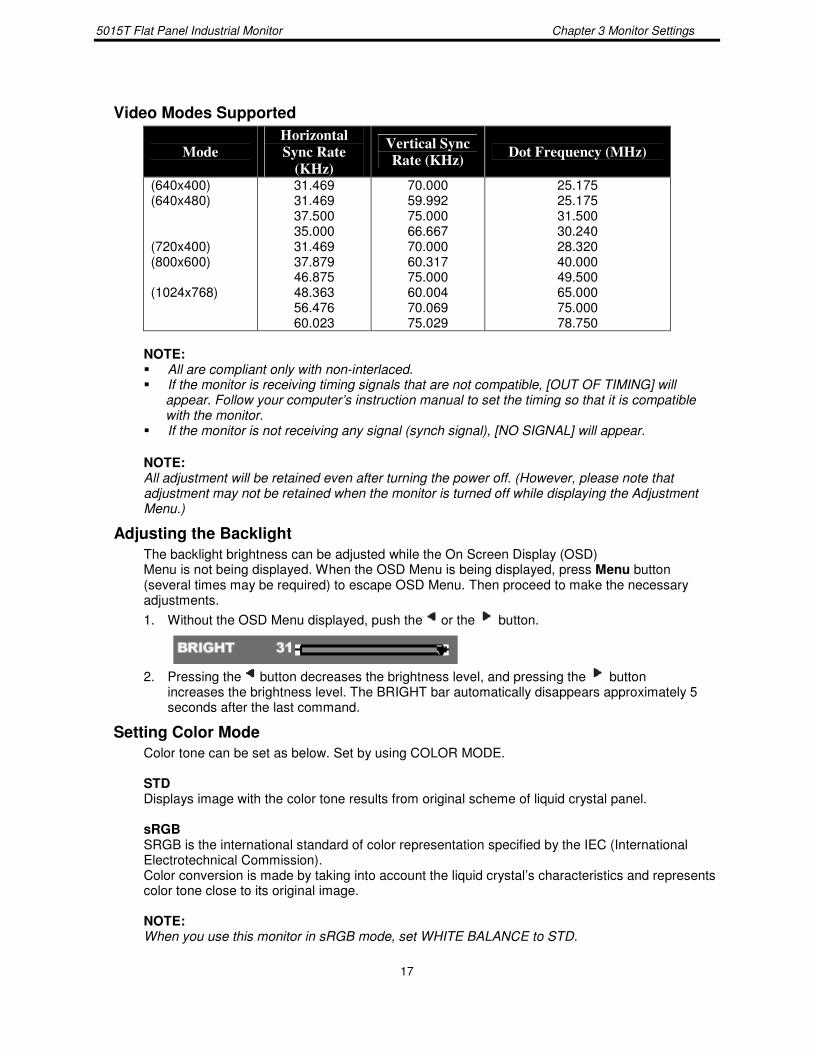
Video Modes Supported
Mode Horizontal Sync Rate
(KHz)
Vertical Sync Rate (KHz) Dot Frequency (MHz)
(640x400) (640x480) (720x400) (800x600) (1024x768)
31.469 31.469 37.500 35.000 31.469 37.879 46.875 48.363 56.476 60.023
70.000 59.992 75.000 66.667 70.000 60.317 75.000 60.004 70.069 75.029
25.175 25.175 31.500 30.240 28.320 40.000 49.500 65.000 75.000 78.750
NOTE: All are compliant only with non-interlaced. If the monitor is receiving timing signals that are not compatible, [OUT OF TIMING] will appear. Follow your computer’s instruction manual to set the timing so that it is compatible with the monitor. If the monitor is not receiving any signal (synch signal), [NO SIGNAL] will appear.
NOTE: All adjustment will be retained even after turning the power off. (However, please note that adjustment may not be retained when the monitor is turned off while displaying the Adjustment Menu.)
Adjusting the Backlight The backlight brightness can be adjusted while the On Screen Display (OSD)
Menu is not being displayed. When the OSD Menu is being displayed, press Menu button (several times may be required) to escape OSD Menu. Then proceed to make the necessary adjustments. 1. Without the OSD Menu displayed, push the or the button.
2. Pressing the button decreases the brightness level, and pressing the button increases the brightness level. The BRIGHT bar automatically disappears approximately 5 seconds after the last command.
Setting Color Mode Color tone can be set as below. Set by using COLOR MODE.
STD
Displays image with the color tone results from original scheme of liquid crystal panel.
sRGB SRGB is the international standard of color representation specified by the IEC (International Electrotechnical Commission). Color conversion is made by taking into account the liquid crystal’s characteristics and represents color tone close to its original image. NOTE: When you use this monitor in sRGB mode, set WHITE BALANCE to STD.
5015T Flat Panel Industrial Monitor Chapter 3 Monitor Settings
18
Adjustment Menu Reset The values in the OSD Adjustment menu can be returned to their original factory values.
When the OSD is not being displayed, press the Menu and buttons simultaneously. When [RESET] appears on the screen, the reset is complete.
Automatic Screen Adjustment
Before connecting the 5015T to your computer, make sure your computer’s VGA card is set to one of the supported modes listed in the “Video Mode Supported” table on page 15. It is important not to exceed the vertical refresh rate listed in the table. Screen adjustments can be made both automatically and manually. When setting up the monitor for the first time or after any changes to the system, perform the Automatic Screen Adjustment before use. First, display an image that makes the entire screen light. If you are using Windows, you can use the Adjustment Pattern from the Xycom Automation CD. Opening the Adjustment Pattern (for Windows only)
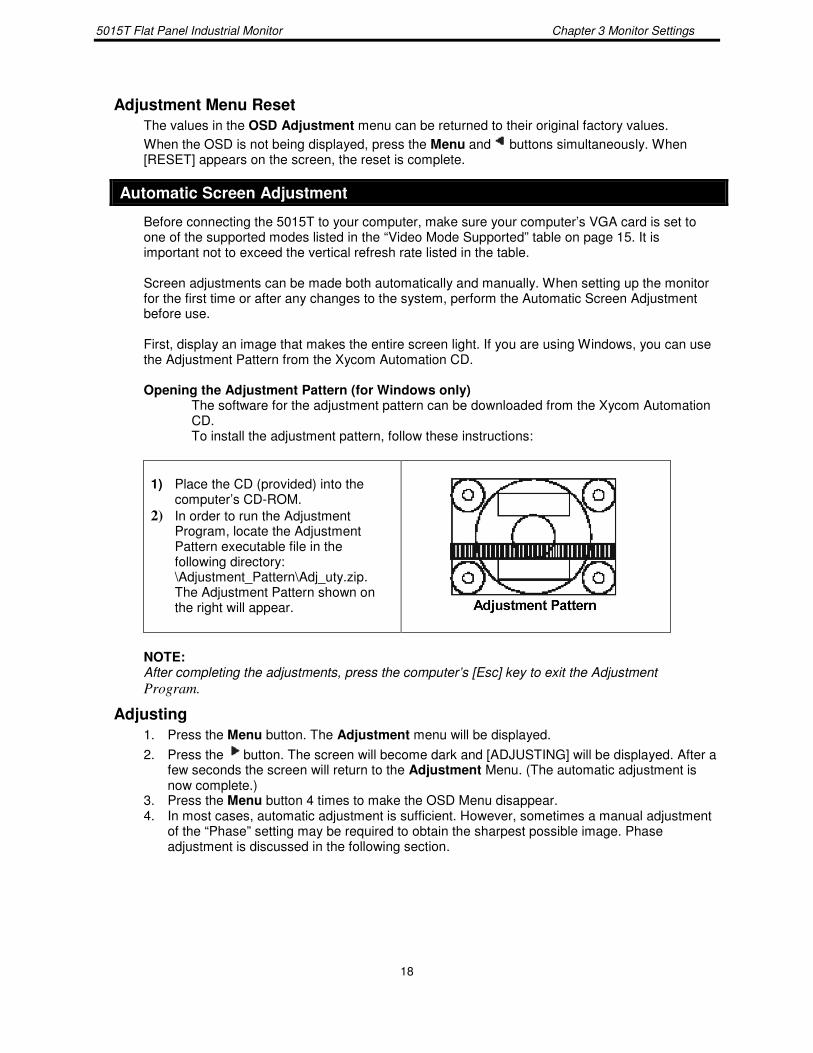
The software for the adjustment pattern can be downloaded from the Xycom Automation CD. To install the adjustment pattern, follow these instructions:
1) Place the CD (provided) into the
computer’s CD-ROM. 2) In order to run the Adjustment
Program, locate the Adjustment Pattern executable file in the following directory: \Adjustment_Pattern\Adj_uty.zip. The Adjustment Pattern shown on the right will appear.
NOTE:
After completing the adjustments, press the computer’s [Esc] key to exit the Adjustment Program.
Adjusting 1. Press the Menu button. The Adjustment menu will be displayed. 2. Press the button. The screen will become dark and [ADJUSTING] will be displayed. After a
few seconds the screen will return to the Adjustment Menu. (The automatic adjustment is now complete.)
3. Press the Menu button 4 times to make the OSD Menu disappear. 4. In most cases, automatic adjustment is sufficient. However, sometimes a manual adjustment
of the “Phase” setting may be required to obtain the sharpest possible image. Phase adjustment is discussed in the following section.
5015T Flat Panel Industrial Monitor Chapter 3 Monitor Settings
19
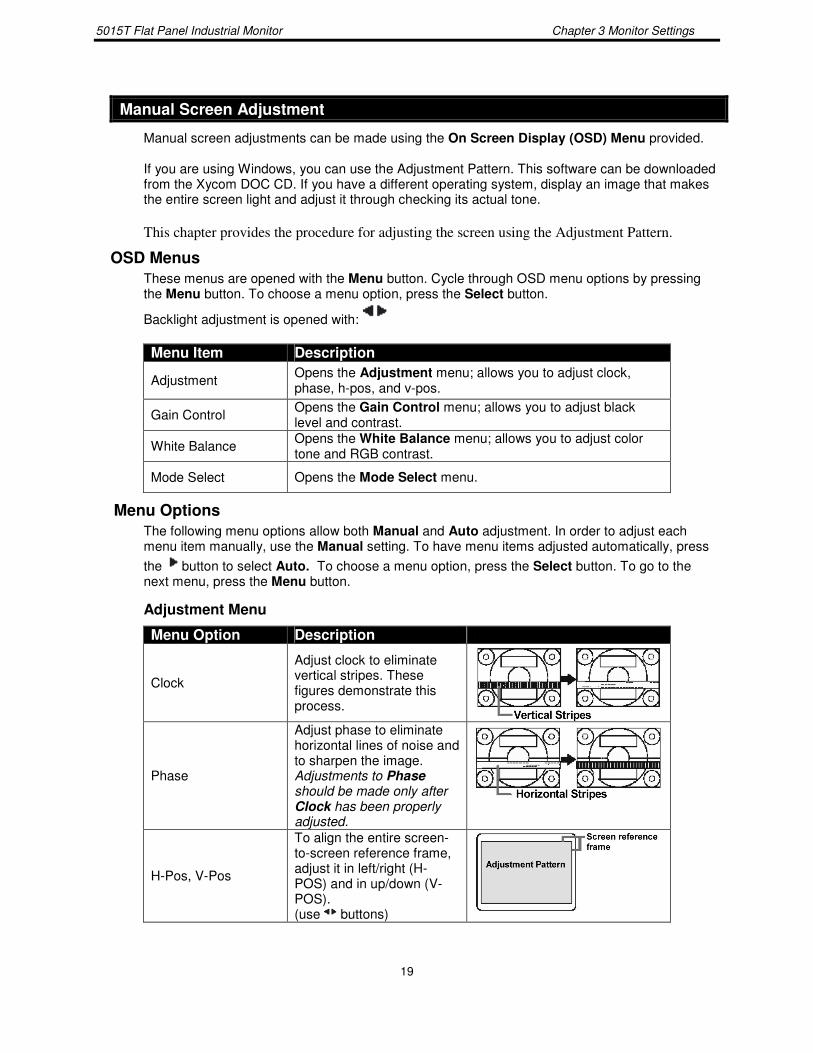
Manual Screen Adjustment
Manual screen adjustments can be made using the On Screen Display (OSD) Menu provided.
If you are using Windows, you can use the Adjustment Pattern. This software can be downloaded from the Xycom DOC CD. If you have a different operating system, display an image that makes the entire screen light and adjust it through checking its actual tone. This chapter provides the procedure for adjusting the screen using the Adjustment Pattern.
OSD Menus These menus are opened with the Menu button. Cycle through OSD menu options by pressing the Menu button. To choose a menu option, press the Select button.
Backlight adjustment is opened with: Menu Item Description
Adjustment Opens the Adjustment menu; allows you to adjust clock, phase, h-pos, and v-pos.
Gain Control Opens the Gain Control menu; allows you to adjust black level and contrast.
White Balance Opens the White Balance menu; allows you to adjust color tone and RGB contrast.
Mode Select Opens the Mode Select menu.
Menu Options The following menu options allow both Manual and Auto adjustment. In order to adjust each menu item manually, use the Manual setting. To have menu items adjusted automatically, press the button to select Auto. To choose a menu option, press the Select button. To go to the next menu, press the Menu button.
Adjustment Menu
Menu Option Description
Clock
Adjust clock to eliminate vertical stripes. These figures demonstrate this process.
Phase
Adjust phase to eliminate horizontal lines of noise and to sharpen the image. Adjustments to Phase should be made only after Clock has been properly adjusted.
H-Pos, V-Pos
To align the entire screen-to-screen reference frame, adjust it in left/right (H-POS) and in up/down (V-POS). (use buttons)

5015T Flat Panel Industrial Monitor Chapter 3 Monitor Settings
20
Gain Control Menu
Menu Option Description
Black Level Total screen brightness can be adjusted while viewing the color pattern using the buttons.
Contrast While viewing the color pattern, adjustments can be made using the buttons so that all graduations appear.
White Balance Menu
COOL • STD • WARM Color tone bluer than
STD.
Color tone slightly bluer than STD.
Color tone standard setting.
Color tone slightly redder
than STD.
Color tone redder than
STD.
User
Menu Option Description
R-Contrast blue-green red
G-Contrast purple green
B-Contrast yellow blue
Mode Select Menu NOTE: Depending on the resolution of the input signal, even if menu options can be selected, the display may not change. Menu Option Description
OSD H-Position The horizontal position of the OSD display can be adjusted using the buttons.
OSD V-Position The vertical position of the OSD display can be adjusted using the buttons.
400 Lines
Apply the horizontal resolution at 400 line for US TEXT using the buttons. 640: 640 x 400 dot mode 720: 720 x 400 dot mode (US TEXT) Every input except 400 line is detected automatically, therefore no setting is required.
Expand
For display modes of less than 1024 x 768 pixels, the screen display size can be adjusted using the buttons. ON1: enlarges the while maintaining aspect ratio ON2: enlarges the screen to the full display area If a resolution of 1024 x 768 pixels cannot be achieved even after expansion is attempted, the screen’s perimeter will display black. This is not a malfunction.

5015T Flat Panel Industrial Monitor Chapter 3 Monitor Settings
21
Menu Option Description
Scaling Adjusts the image to optimum sharpness when screen is expanded ( buttons).
Color Mode
Set color tone: STD: Displays image with the color tone results from original scheme of liquid crystal panel. sRGB: sRGB is international standard of color representation specified by IEC (International Electrotechnical Commission). Color conversion is made after taking account of liquid crystal’s characteristics and represents color tone close to its original image. When you use this monitor in sRGB mode, set White Balance to STD.
Language
Choose the language used in the OSD menu display: 1) Press the button. Language selection menu will
appear. 2) Choose the desired language using the Select
Button. 3) Press the Menu or button to exit Language Selection
Menu.
22 142029 (D)
Touchscreen
Installing the Touchscreen Driver
1. Insert the Xycom Automation CD in the CD-ROM.
2. Navigate to the UTP_touch_panel_Driver folder.
3. Run setup.exe*
4. When you get to the Select Controller window during the installation process, select the Gunze AHL Serial driver.
5. After driver installation is complete, the computer must be restarted. After restart, the 4-point calibration will automatically run.
*It is recommended that you keep all default settings when installing the driver.
Calibrating the Touchscreen
If you need to recalibrate the touchscreen, run the Pointer Device Properties applet. Select Help for details about calibrating. For best results, use the 25-point calibration setting with Start In At set to 0, under the Calibration tab.
You need to calibrate the touchscreen if:
The cursor does not follow the movement of your finger or pen.
You adjust the size of the video image or change the video mode.
23 142029 (D)
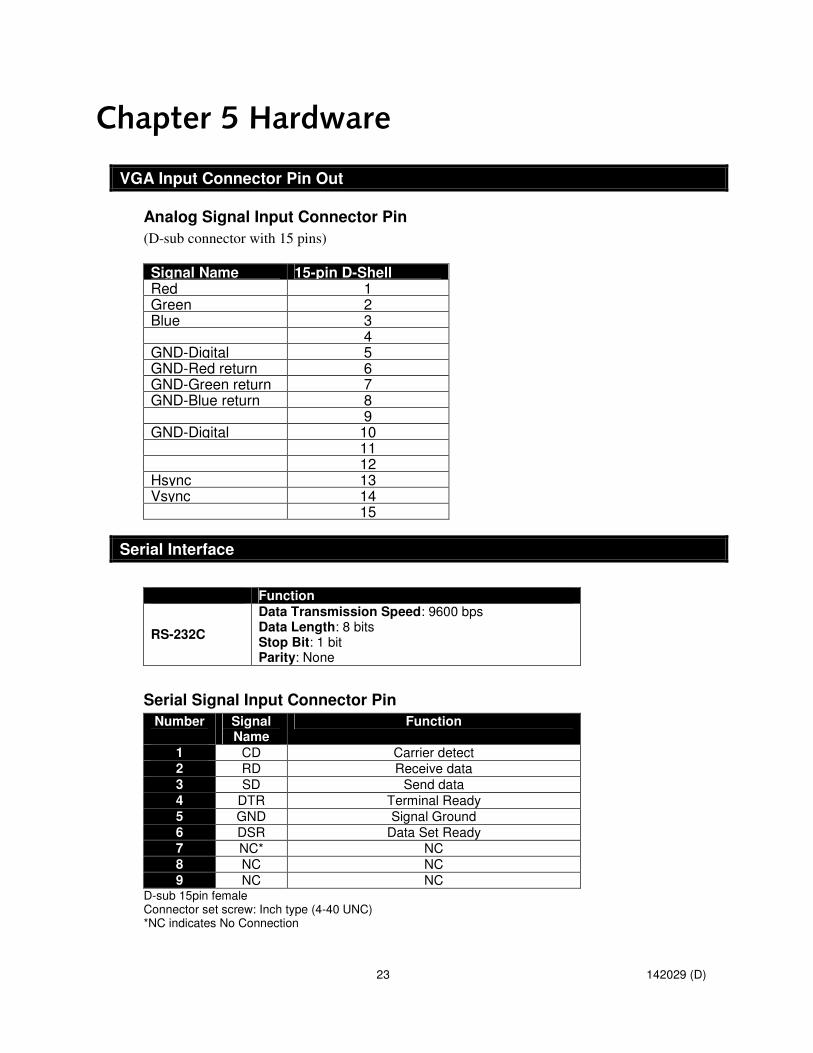
VGA Input Connector Pin Out
Analog Signal Input Connector Pin (D-sub connector with 15 pins)
Signal Name 15-pin D-Shell Red 1 Green 2 Blue 3 4 GND-Digital 5 GND-Red return 6 GND-Green return 7 GND-Blue return 8 9 GND-Digital 10 11
12 Hsync 13 Vsync 14 15
Serial Interface
Function
RS-232C
Data Transmission Speed: 9600 bps Data Length: 8 bits Stop Bit: 1 bit Parity: None
Serial Signal Input Connector Pin Number Signal
Name Function
1 CD Carrier detect 2 RD Receive data 3 SD Send data 4 DTR Terminal Ready 5 GND Signal Ground 6 DSR Data Set Ready 7 NC* NC 8 NC NC 9 NC NC
D-sub 15pin female Connector set screw: Inch type (4-40 UNC) *NC indicates No Connection

5015T Flat Panel Industrial Monitor Chapter 5 Hardware
24
RS-232 Cable
The RS-232 cable is shipped with both the 5015T and 5015-24V flat panel monitors. Should you decide to assemble your own RS-232 cable, it is highly recommended that you use parts equivalent to those listed below.
Description Quantity Vendor Part No.
9-pin female connector 2 AMP 205203-3 9-pin hood 2 AMP 745171-2
Cable 1, up to 50’ Belden 9925 3-conductor Sockets 12 AMP 66504-4
Follow the diagram below when assembling the cable. Please note that the braided shield must be folded back and pinched by the D-shell hoods on both ends of the cable.
1 1 2 2 3 3 4 4 5 5 6 6 7 7 8 8 9 9
Pinout Detail showing braid

25 142029 (D)
!"
Reaching Technical Support
Xycom Automation Technical Support offers a variety of support options to answer any questions on Xycom Automation products and their implementation. Refer to the relevant chapter(s) in your documentation for a possible solution to any problem you may have with your system. If you find it necessary to contact Technical Support for assistance, please have the following information at your fingertips:
1. Serial number and model number.
2. The operating system type and version (i.e., Microsoft Windows NT version 4.0).
3. Exact wording of system error messages encountered.
4. Any relevant output listing from the Microsoft Diagnostic utility (MSD) or other diagnostic applications.
5. Details of attempts made to rectify the problem(s) and results.
6. The log number assigned from Xycom Automation Technical Support if this is an ongoing problem.
7. The name of the Technical Support Engineer with whom you last spoke, if known.
Internet Access
Xycom Automation provides both World Wide Web and e-mail access via the Internet. To access the Xycom Automation Home Page, use http://www.xycom.com. This page contains the newest product datasheets, references by industrial sector, and application notes.
To reach Xycom Automation Technical Support via email: [email protected]
Phone
You can reach Xycom Automation Technical Support via phone: 734/944-0482.
Fax
You can fax your questions to Xycom Automation Technical Support at: 734/429-1010

142029(C)
Xycom Automation, Inc.
750 North Maple Drive
Saline, MI 48176
734-429-4971 •••• Fax: 734-429-1010
http://www.xycom.com