Embed Size (px)
Citation preview

Dear Valued Customer,
Thank you for purchasing the 14′ x 20′ CHAPEL TENT. This unit, when
assembled properly, will provide years of service with very little maintenance.
It is vital to remember that the unit should never be towed without the
stringers and tow bar assembly in place. Also, remember to tighten the hardware
periodically. We have included assembly instructions to assure a solid and safe
structure.
Thanks again for purchasing from Holland Supply. We greatly appreciate
your business. If you have any questions about this tent or are interested in any
other products, please don’t hesitate to call us at 800-527-8818, or visit our web-
site at www.hollandsupplyinc.com
Sincerely,
Holland Supply, Inc.
1326 LINCOLN AVENUE • HOLLAND MI 49423
(616) 396-4678 • (800) 527-8818 • FAX: (616) 396-9543
[email protected] • www.hollandsupplyinc.com

14′ x 20′ CHAPEL TENT ASSEMBLY INSTRUCTIONS Please read completely through instructions before starting assembly
1. Lay out the (8) 10′ beams so you can connect the centers together in order to create (4) beams
20′ in length. The (4) 10′ beams with the angle on, will be connected together (angle on top side,
facing toward perimeter), to make the (2) INSIDE, 20′ beams. The (4) 10′ beams without the
angle will be connected together, to make the (2) perimeter 20′ beams. Use the ⅜″ x 1″ HEX
HEAD BOLTS to connect the beams.
2. Use ⅜″ x 2½″ HEX HEAD BOLTS to attach the 30″ long connector bars to the bottom side of
the (4) 20′ beams for reinforcement in the center. There will be 4 holes for each connector bar, 2
on each side of the center.
3. Use ⅜″ x 1″ HEX HEAD BOLTS to connect the (4) 7′ end pieces into (2) 14′ ends. Make sure
the 7′ end pieces match before assembling. Use ⅜″ x 2½″ HEX HEAD BOLTS to attach (1) 30″
CONNECTOR BAR to the bottom side of each 14′ end to add extra reinforcement in the center.
There will be holes for each CONNECTOR BAR , 2 on each side of center.
4. Use ⅜″ x 2½″ HEX HEAD BOLTS to connect the 20′ beams to the 14′ end pieces. Note: the
beams with the angle will be in the center and the angle will be pointed toward the outside so
the 6′ fiberglass panels will lay on it. The top should now be completely assembled.
5. It is easier to put the fiberglass panels on next, while the top frame is still on the ground. Make
sure the frame is on a level (flat) area and square as possible.
6. Lay out the 6′ fiberglass panels down each 20′ side, with an approximate 2 groove overlap.
Then drill pilot holes through the panels and attach to frame with the roof screws. Next, put the
4′ fiberglass panels across the top using the same method.
7. Raise up one end and install the (2) corners, using the Use ⅜″ x 2½″ HEX HEAD BOLTS.
Keep the end flat to ensure no pressure is put on the fiberglass panels.
8. Raise up the other end and install the other (2) corners.
9. Lastly, one side at a time, attach the 14″ wheels using the ½″ x 1½″ CARRIAGE BOLTS, NUTS
and LOCK WASHERS.
Note: Use (2) WASHERS per ⅜″ HEX HEAD BOLT. Put flat washer next to head and lock washer
next to nut. All holes should line up well enough to insert bolts and attach frame pieces. If the hole
is not lined up and the bolt will not fit through, please use a ½″ bit and drill to clean up the hole and
allow the bolt to slide through. -This will not jeopardize the overall strength of the Chapel Tent.
Thanks again for your business.
Please call our Customer Service Team with any questions 800-527-8818
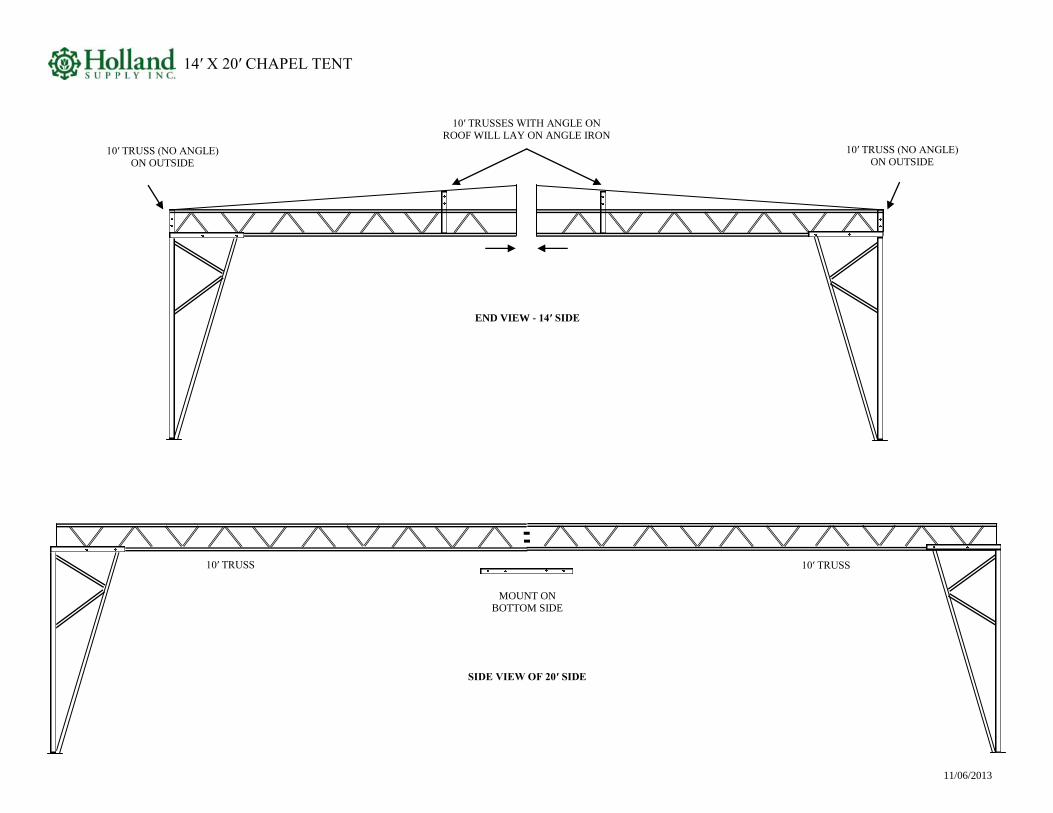
10′ TRUSS (NO ANGLE) ON OUTSIDE
10′ TRUSS (NO ANGLE) ON OUTSIDE
10′ TRUSSES WITH ANGLE ON ROOF WILL LAY ON ANGLE IRON
END VIEW - 14′ SIDE
14′ X 20′ CHAPEL TENT
11/06/2013
MOUNT ON BOTTOM SIDE
SIDE VIEW OF 20′ SIDE
10′ TRUSS 10′ TRUSS
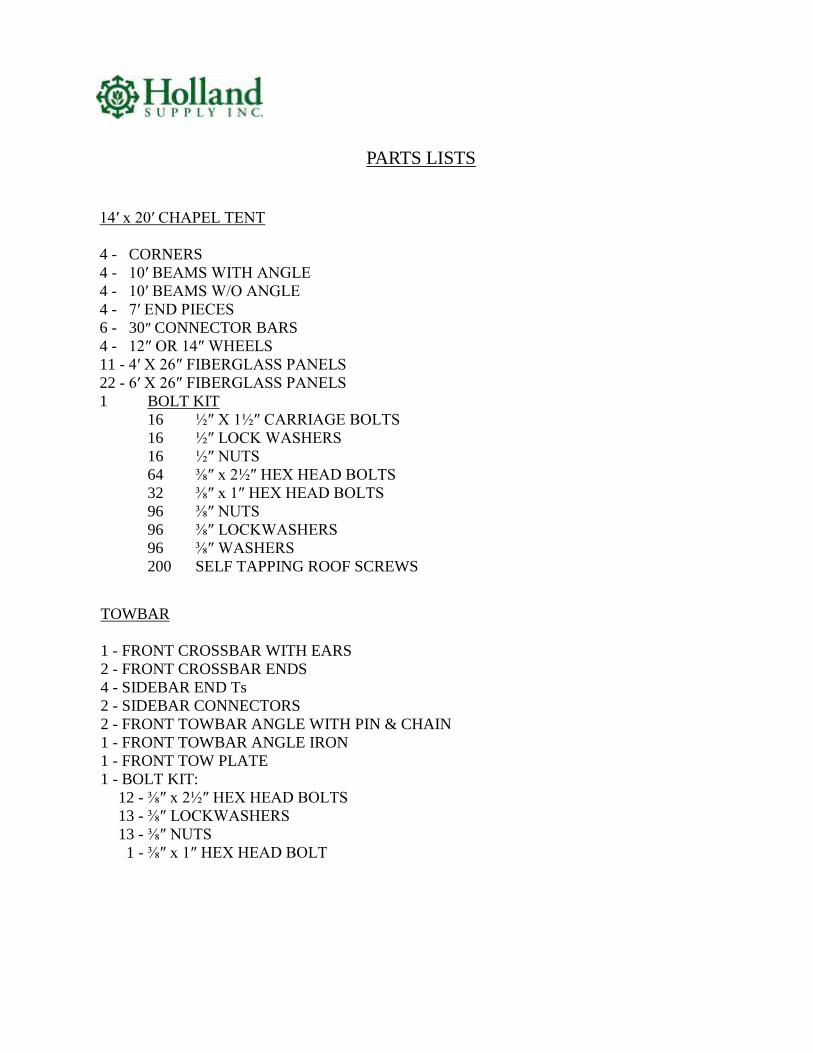
PARTS LISTS
14′ x 20′ CHAPEL TENT
4 - CORNERS
4 - 10′ BEAMS WITH ANGLE
4 - 10′ BEAMS W/O ANGLE
4 - 7′ END PIECES
6 - 30″ CONNECTOR BARS
4 - 12″ OR 14″ WHEELS
11 - 4′ X 26″ FIBERGLASS PANELS
22 - 6′ X 26″ FIBERGLASS PANELS
1 BOLT KIT
16 ½″ X 1½″ CARRIAGE BOLTS
16 ½″ LOCK WASHERS
16 ½″ NUTS
64 ⅜″ x 2½″ HEX HEAD BOLTS
32 ⅜″ x 1″ HEX HEAD BOLTS
96 ⅜″ NUTS
96 ⅜″ LOCKWASHERS
96 ⅜″ WASHERS
200 SELF TAPPING ROOF SCREWS
TOWBAR
1 - FRONT CROSSBAR WITH EARS
2 - FRONT CROSSBAR ENDS
4 - SIDEBAR END Ts
2 - SIDEBAR CONNECTORS
2 - FRONT TOWBAR ANGLE WITH PIN & CHAIN
1 - FRONT TOWBAR ANGLE IRON
1 - FRONT TOW PLATE
1 - BOLT KIT:
12 - ⅜″ x 2½″ HEX HEAD BOLTS
13 - ⅜″ LOCKWASHERS
13 - ⅜″ NUTS
1 - ⅜″ x 1″ HEX HEAD BOLT

CHAPEL TENT ROOF REINFORCEMENT KIT
Qty Item
2 118¼″ x 1⅜″ GALVANIZED STEEL TUBING WITH SWEDGED END
2 118¼″ x 1⅜″ GALVANIZED STEEL TUBING WITHOUT SWEDGED END
2 34″ x 1⅜″ GALVANIZED STEEL TUBING WITH SWEDGED END.
2 34″ x 1⅜″ GALVANIZED STEEL TUBING WITHOUT SWEDGED END
4 ⅜″ x 1″ HEX HEAD BOLTS
4 ⅜″ x 1½″ HEX HEAD BOLTS
4 ⅜″ x 2½″ HEX HEAD BOLTS
16 ⅜″ LOCK WASHERS
16 ⅜″ NUTS
50 SELF-TAPPING SCREWS WITH RUBBER WASHERS
2 PLASTIC TIES
Adding to an existing Chapel Tent...
Begin with the 34″ pieces. These wills serve as a cross beam for the (2) 118¼″ pieces. Take (2) 34″
pieces (one with swedged end and one without) and slide them together. This 65″ cross beam can be
bolted (using the existing bolts or the 1½″ bolts supplied) between the current 10′ beam sections -use
the top bolt. Now, slide (2) 118¼″ pieces together (one with the swedged end and one without), place
over the 65″ cross beam and bolt to the tabs on each 14′ end using the 1″ bolts. Use plastic ties to se-
cure beams at point of intersection, so they won’t slide around. If desired, 50 self-tapping screws with
rubber washers are included to secure the fiberglass top to the new support beams. - This will keep the
fiberglass from rattling against the beams when windy.
Please call our Customer Service Team with any questions (800-527-8818).
Thanks for your business.
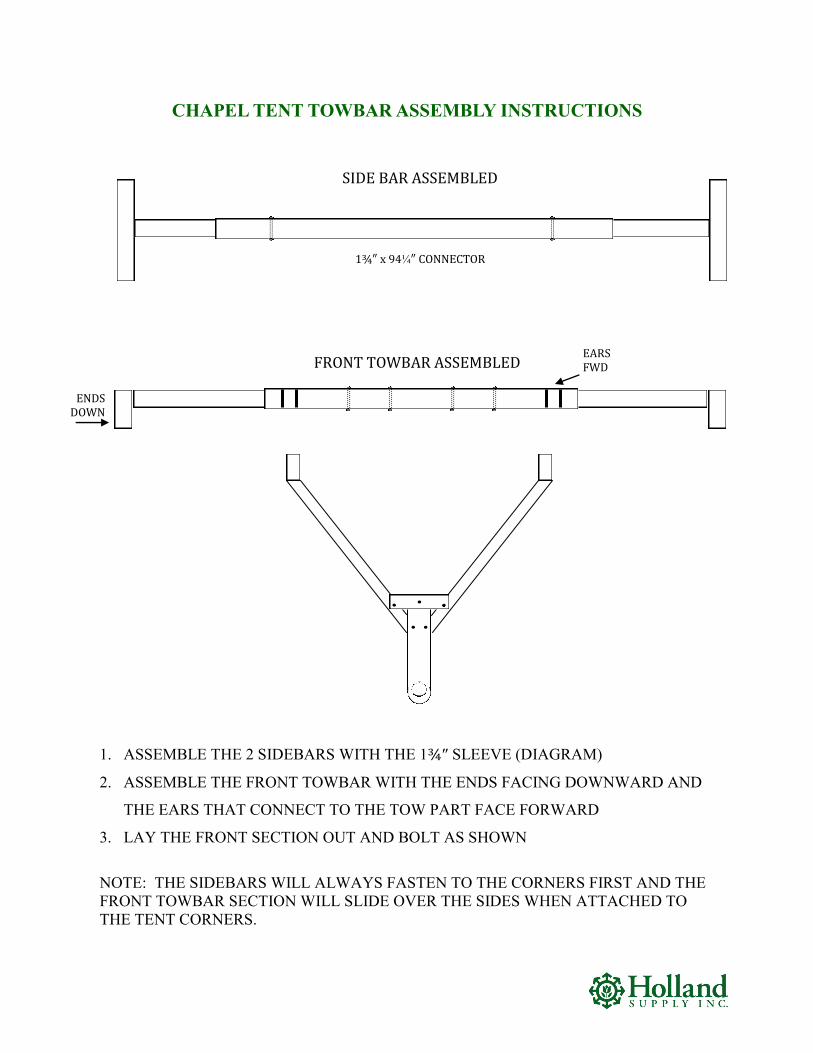
CHAPEL TENT TOWBAR ASSEMBLY INSTRUCTIONS
SIDE BAR ASSEMBLED
1¾″ x 94¼″ CONNECTOR
FRONT TOWBAR ASSEMBLED
ENDS DOWN
EARS FWD
1. ASSEMBLE THE 2 SIDEBARS WITH THE 1¾″ SLEEVE (DIAGRAM)
2. ASSEMBLE THE FRONT TOWBAR WITH THE ENDS FACING DOWNWARD AND
THE EARS THAT CONNECT TO THE TOW PART FACE FORWARD
3. LAY THE FRONT SECTION OUT AND BOLT AS SHOWN
NOTE: THE SIDEBARS WILL ALWAYS FASTEN TO THE CORNERS FIRST AND THE
FRONT TOWBAR SECTION WILL SLIDE OVER THE SIDES WHEN ATTACHED TO
THE TENT CORNERS.

TOW BAR PARTS LIST (14 X 20 CHAPEL TENT) 1CTCBE (1) CHAPEL TENT FRONT CROSSBAR W/ EARS 1¾″ sq. x 94¼″ long 2CTFCE (2) CHAPEL TENT FRONT CROSSBAR ENDS 1½″sq. x 54½″ long with 3¾″ end piece 4CTS (4) CHAPEL TENT SIDEBAR 1½″ sq. x 88½″ long with 1¼″ sq x 9″ end piece 2CTSC (2) CHAPEL TENT SIDEBAR CONNECTORS 1¾″sq. x 94¼″ long 2CTTA (2) CHAPEL TENT TOWBAR ANGLE 1½″sq. x 70¼″ long with 3″ end piece w/ pin & chain 1CTA1 (1) CHAPEL TENT ANGLE IRON 23½″ long 1CTTP (1) CHAPEL TENT TOWBAR PLATE 34″ long x 4″ wide
3¾″
9″
3″
BOLT KIT: 12 - ⅜″ x 2½″ HEX HEAD BOLTS 13 - ⅜″ LOCKWASHERS 13 - ⅜″ NUTS 1 - ⅜″ x 1″ HEX HEAD BOLT 2013

Did you know that Holland Supply is the leading Manufacturer and Distributor of Burial Vault, Cemetery and Funeral Equipment in the United States? Thanks to all of our customers, we can offer more competitively priced, quality products than anyone else. Holland Supply, Inc. MANUFACTURES 15′ x 15′ and 15′ x 20′ Hillside Tops and Frames (manufactured of galvanized steel, aluminum or stainless steel), Walls, Slant Mounds, Sun Ex-tension Tops and Frames, Portable Frames (15′ x 15′ and 14′ x 20′) with Fiberglass or Sunbrella tops. All sizes of Oval (Steril) tops and aluminum Frames. Graveside Grass, Lowering Device Stands, Chair Covers, Device Straps, Hand Straps, Crypt drapes, Chair Bags, Dump Trailers, Lot Markers, Casket Roller Bars, Cremation Stands, Urn Vaults, Heavy Duty Rammer Probes, and more… Holland Supply, Inc. DISTRIBUTES Frigid Lowering Devices, D2 Solution (for cleaning monuments), Folding Chairs, Vases, Mausoleum Lifts, Lawn boards, Flags and Flag Poles, Church Trucks, Casket Carts, Mortuary Cots, Mausoleum Trays, Slings, Trash Con-tainers, Cemetery Signs, Umbrellas, Cremation Supplies and Chapel/Funeral Equipment… We GUARANTEE we will outperform our competition! Customer Service Quality Products Best Value in the industry One call does it all! If you can’t find the product on our website or in our catalog, Holland Supply can assist you in finding the products you need. We pride ourselves in offering the best priced, quality products. Thanks again for your business!
(800) 527-8818 www.hollandsupplyinc.com