Embed Size (px)
Citation preview

ELECTRIC OVENSInstructions for the use - Installation advice
2
Dear Customer,
Thank you for having purchased andgiven your preference to our product.
The safety precautions and recom-mendations reported below are for yourown safety and that of others. They willalso provide a means by which to makefull use of the features offered by yourappliance.
Please preserve this booklet carefully.It may be useful in future, either toyourself or to others in the event thatdoubts should arise relating to its ope-ration.
This appliance must be used only forthe task it has explicitly been designedfor, that is for cooking foodstuffs. Anyother form of usage is to be consideredas inappropriate and therefore dange-rous.
The manufacturer declines allresponsibility in the event of damagecaused by improper, incorrect or illo-gical use of the appliance.
IMPORTANT PRECAUTIONS AND RECOMMENDATIONS FOR USE OFELECTRICAL APPLIANCES
Use of any electrical appliance impliesthe necessity to follow a series of fun-damental rules. In particular:
– Never touch the appliance with wethands or feet;
– do not operate the appliancebarefooted;
– do not allow children or other inca-pable people to use the appliancewithout your supervision.
The manufacturer cannot be heldresponsible for any damages causedby improper, incorrect or illogical useof the appliance.
IMPORTANT PRECAUTIONSAND RECOMMENDATIONS
After having unpacked the appliance,check to ensure that it is not dama-ged.In case of doubt, do not use it andconsult your supplier or a professio-nally qualified technician.Packing elements (i.e. plastic bags,polystyrene foam, nails, packing stra-ps, etc.) should not be left aroundwithin easy reach of children, as thesemay cause serious injuries.– Do not attempt to modify the tech-
nical characteristics of the applian-ce as this may become dangerousto use.
– Do not carry out cleaning or main-tenance operations on the applian-ce without having previouslydisconnected it from the electricpower supply.
– If you should decide not to use thisappliance any longer (or decide tosubstitute an older model), beforedisposing of it, it is recommendedthat it be made inoperative in anappropriate manner in accordanceto health and environmental protec-tion regulations, ensuring in particu-lar that all potentially hazardousparts be made harmless, especiallyin relation to children who couldplay with unused appliances.
USING THE OVEN FOR THE FIRSTTIME
You are advised to carry out the fol-lowing operations:
– Clean the inside of the oven with acloth soaked in water and neutraldetergent and dry thoroughly.
– Switch the oven on empty at maxi-mum temperature to eliminate tra-ces of grease from the heating ele-ments.

3
Oven models:
CONVECTION OVENSEB 1722 EBO 9722
FAN OVENSEB 4921
MULTIFUNCTION OVENSEB 4821
MULTIFUNCTION OVENSvariable grill and rotisserie
EB 4820
INDEX OF CHAPTERS
Hints for the user
1 - Conventional oven...............” 4
2 - Fan oven .............................” 8
3 - Multifunction oven ...............” 13
4 - Programming timer..............” 20
5 - Electro mechanical
programmer .........................” 21
6 - Electronic programmer ........” 23
7 - Cleaning and maintenance .” 27
Advice for the installer
8 - Installation............................” 30
9 - Electrical part.......................” 31

4
CONTROL PANEL1. Oven thermostat knob2. Oven switch knob 3. Oven temperature warning light 4. 120’ cut-off timer knob
1 324
Fig. 1.1a
mod. EB 1722 WH - EB 1722 BN - EB 1722 BLK - EB 1722 GY - EBO 9722 SS
Conventional ovens 11
10
20
30
40
50607080
90
100
110
120
00
150
50
75
100
125
175200
225
1 324
Fig. 1.1b
mod. EB 1722 WHITE - EB 1722 BROWN - EB 1722 BLACK
SAFETY GUARDThe glass on the oven door reaches hightemperatures during operation.For child safety, a door guard can be fitted to preventcontact with the hot glass.The door guard is supplied as an accessory onrequest (against payment):✓ White model cod. 6306108✓ Brown model cod. 6306109✓ Stainless steel oven cod. 6306126
Contact our Service Centre and indicate the relevantappliance model.

5
Conventional ovens
GENERAL FEATURESAs the name implies, this oven featuresa number of special characteristics fromthe functional point of view. 2 different thermostatic control functionsare available to satisfy all cooking requi-rements, provided by 3 heating ele-ments:
The input of the elements is: – Upper element, 1000 W – Lower element, 1400 W – Grill element, 2000 W
NOTE:When using for the first time, you areadvised to run the oven at maximumtemperature (thermostat knob set to225) for approximately one hour in the
mode and for another 15 minutes inthe mode in order to eliminate anytraces of grease from the electrical resi-stances.
Attention: the oven door becomesvery hot during operation.Keep children away.
Fig. 1.2 Fig. 1.3
OPERATING PRINCIPLES
Heating and cooking in the conventionaloven are obtained:
a. by natural convection The heat is produced by the upper andlower heating elements.
b. by radiationhe heat is radiated by the infrared grillresistance.
FUNCTION SELECTOR KNOB (Fig. 1.2)
Rotate the knob clockwise to set theoven for one of the functions described.
THERMOSTAT KNOB (Fig. 1.3)
This only sets the cooking temperaturebut does not switch the oven on. Rotate clockwise until the required tem-perature is reached (from 50 to 225 °C).
SWITCHING THE OVEN ONTo switch the oven on, set the functionknob (Fig. 1.2) to one of the cookingmodes and the thermostat knob (Fig. 1.3)to the required temperature.
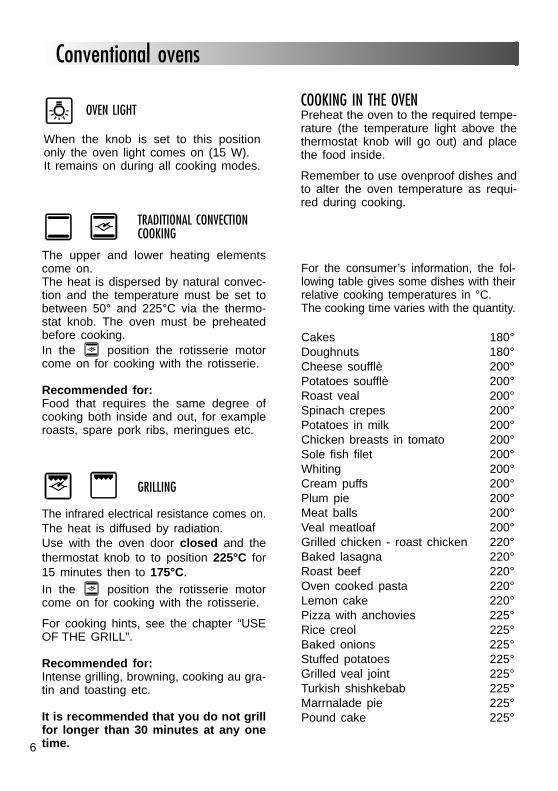
For the consumer’s information, the fol-lowing table gives some dishes with theirrelative cooking temperatures in °C.The cooking time varies with the quantity.
Cakes 180°Doughnuts 180°Cheese soufflè 200°Potatoes soufflè 200°Roast veal 200°Spinach crepes 200°Potatoes in milk 200°Chicken breasts in tomato 200°Sole fish filet 200°Whiting 200°Cream puffs 200°Plum pie 200°Meat balls 200°Veal meatloaf 200°Grilled chicken - roast chicken 220°Baked lasagna 220°Roast beef 220°Oven cooked pasta 220°Lemon cake 220°Pizza with anchovies 225°Rice creol 225°Baked onions 225°Stuffed potatoes 225°Grilled veal joint 225°Turkish shishkebab 225°Marrnalade pie 225°Pound cake 225°
6
Conventional ovens
OVEN LIGHT
When the knob is set to this positiononly the oven light comes on (15 W). It remains on during all cooking modes.
TRADITIONAL CONVECTION COOKING
The upper and lower heating elementscome on. The heat is dispersed by natural convec-tion and the temperature must be set tobetween 50° and 225°C via the thermo-stat knob. The oven must be preheatedbefore cooking. In the position the rotisserie motorcome on for cooking with the rotisserie.
Recommended for:Food that requires the same degree ofcooking both inside and out, for exampleroasts, spare pork ribs, meringues etc.
GRILLING
The infrared electrical resistance comes on.The heat is diffused by radiation. Use with the oven door closed and thethermostat knob to to position 225°C for15 minutes then to 175°C.In the position the rotisserie motorcome on for cooking with the rotisserie.
For cooking hints, see the chapter “USEOF THE GRILL”.
Recommended for:Intense grilling, browning, cooking au gra-tin and toasting etc.
It is recommended that you do not grillfor longer than 30 minutes at any onetime.
COOKING IN THE OVENPreheat the oven to the required tempe-rature (the temperature light above thethermostat knob will go out) and placethe food inside.
Remember to use ovenproof dishes andto alter the oven temperature as requi-red during cooking.

7
ROTISSERIE The oven is equipped with a rotisseriefor cooking on the spit using the grill.This device is made up of: – an electrical motor mounted on the rear
part of the oven– a stainless steel rod, equipped with a
detachable athermic grip and 2 recor-dable forks
– a rod support to be inserted into thecentral rack holders of the oven.
Conventional ovens
USE OF THE ROTISSERIE– Insert the dripping pan into the lowest
rack holders of the oven and insert therod support into the intermediate rackholders.
– Put the meat to be cooked onto therod, being careful to secure it in thecenter with the special forks.
– Insert the rod into the motor openingand rest it onto the support of the spitcollar; then remove the grip by turningit to the left.
The rotation direction of the rotisseriecan be either clockwise or counter-clockwise.
Fig. 1.3
USE OF THE GRILLSwitch the grill on, setting the two knobs:– Function selector to or posi-
tion. – Thermostat selector to position 225°C
for 15 minutes then to 175°C.
Leave to warm up for approximately 5minutes with the door closed. Place the food inside positioning the rackas near as possible to the grill. Insert the drip pan under the rack to col-lect the cooking juices.Grilling with the oven door closed anddo not for longer than 30 minutes atany one time.

8
CONTROL PANEL
1. Oven thermostat knob2. Oven switch knob 3. Oven temperature warning light 4. Programmer
98
7
4 1
3
2
Fig. 2.1
mod. EB 4921 WH - EB 4921 BN - EB 4921 BK - EB 4921 GY
Fan ovens 22
SAFETY GUARDThe glass on the oven door reaches hightemperatures during operation.For child safety, a door guard can be fitted to preventcontact with the hot glass.The door guard is supplied as an accessory onrequest (against payment):✓ White model cod. 6306116✓ Brown model cod. 6306117
Contact our Service Centre and indicate the relevantappliance model.

9
The heating and cooking in electrical hotair ovens take place by forced convec-tion.The two elements which make this pro-cess take place are:
- Circular element 2500 W- Grill element 2500 W
NOTE:Upon first use, it is advisable to operatethe oven at the maximum temperature(thermostat knob on position 250) for 60minutes in the position and the ther-
mostat in the position , to eliminatepossible traces of grease on the heatingelements.
Attention: the oven door becomesvery hot during operation.Keep children away.
OPERATING PRINCIPLESHeating and cooking in the FAN ovenare obtained in the following ways:
a. by forced convectionA fan sucks in the air contained in theoven muffle, which sends it throughthe circular heating element and thensends it back through the muffle.Before the hot air is sucked backagain by the fan to repeat the descri-bed cycle, it envelops the food in theoven, provoking a complete and rapidcooking.It is possible to cook several dishessimultaneously.
b. by radiation The heat is irradiated by the infra redgrill element.
THERMOSTAT KNOBTo turn on the heating elements of theoven, set the switch knob on the desiredprogram and the thermostat knob ontothe desired temperature.To set the temperature, it is necessaryto make the knob indicator meet the cho-sen number.The elements will turn on or off automa-tically according to the energy needwhich is determined by the thermostat.
Fan ovens

10
FUNCTION SELECTOR KNOB Rotate the knob clockwise to set theoven for one of the following functions:
OVEN LIGHT
By turning the knob onto this setting (seepicture aside) we light the oven cavity(15 W).The oven remains alight while any of thefunctions is on.
Fig. 2.3
DEFROSTING FROZEN FOODS
Only the oven fan is on. To be used with the thermostat knob on“0” because the other positions have noeffect.The defrosting is done by simple venti-lation without heat.
RECOMMENDED USE:To rapidly defrost frozen foods; 1 kilo-gram requires about one hour. The defrosting times vary according tothe quantity and type of foods to bedefrosted.
HOT AIR COOKING
The circular element and the fan are on. The heat is diffused by forced convec-tion and the temperature must be regu-lated between 50° and 250 °C withthe thermostat knob. It is not necessary to preheat the oven.
RECOMMENDED USE: For foods that must be well done on theoutside and tender or rare on the inside,i. e. lasagna, lamb, roast beef, wholefish, etc.
Fan ovens
Fig. 2.2

11
ROASTINGTo obtain classical roasting, it is neces-sary to remember:– that it is advisable to maintain a tem-
perature between 180 and 200 °C. – that the cooking time depends on the
quantity and the type of foods.
COOKING ADVICE
STERILIZATIONSterilization of foods to be conserved, infull and hermetically sealed jars, is donein the following way:
a. Set the switch to position . b. Set the thermostat knob to position
185 °C and preheat the oven. c. Fill the dripping pan with hot water. d. Set the jars onto the dripping pan
making sure they do not touch eachother and the door and set the ther-mostat knob to position 135 °C.
When sterilization has begun, that is,when the contents of the jars start to bub-ble, turn off the oven and let cool.
REGENERATIONSet the switch to position and thethermostat knob to position 150° C. Bread becomes fragrant again if wet witha few drops of water and put into theoven for about 10 minutes at the highesttemperature.
SIMULTANEOUS COOKING OF DIFFERENT FOODSThe FAN consents a simultaneous hete-rogeneous cooking of different foods.Different foods such as fish, cake andmeat can be cooked together withoutmixing the smells and flavors together.This is possible since the fats and vaporsare oxidized while passing through theelectrical element and therefore are notdeposited onto the foods.
The only precaution to follow are:– The cooking temperatures of the diffe-
rent foods must be as close to as pos-sible, with a maximum difference of20° - 25 °C.
– The introduction of the different dishesin the oven must be done at differenttimes in relation to the cooking timesof each one.
The time and energy saved with this typeof cooking is obvious.
Fan ovens
TRADITIONAL GRILLING
The infrared electrical resistance comeson. The heat is diffused by radiation. Use with the oven door closed and thethermostat knob to to position 175°C formax 30 minutes.For cooking hints, see the chapter “USEOF THE GRILL”.
Recommended for:Intense grilling, browning, cooking augratin and toasting etc.
It is recommended that you do notgrill for longer than 30 minutes at anyone time.
12
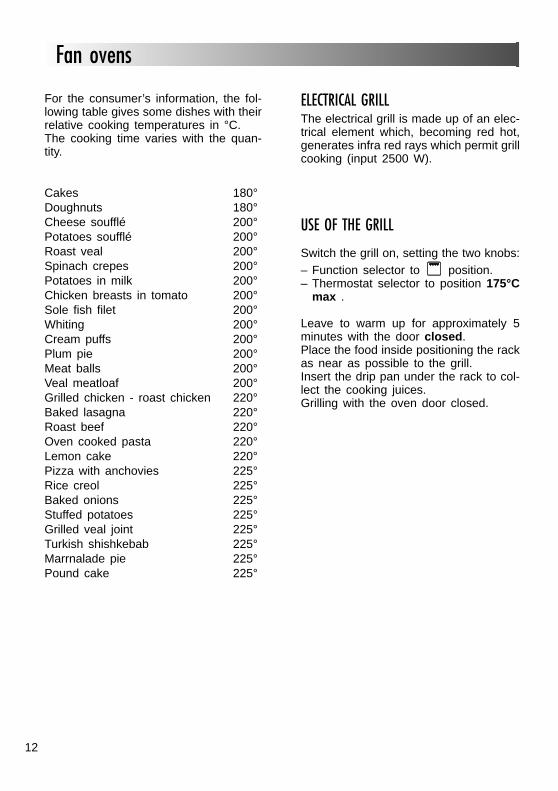
For the consumer’s information, the fol-lowing table gives some dishes with theirrelative cooking temperatures in °C.The cooking time varies with the quan-tity.
Cakes 180°Doughnuts 180°Cheese soufflé 200°Potatoes soufflé 200°Roast veal 200°Spinach crepes 200°Potatoes in milk 200°Chicken breasts in tomato 200°Sole fish filet 200°Whiting 200°Cream puffs 200°Plum pie 200°Meat balls 200°Veal meatloaf 200°Grilled chicken - roast chicken 220°Baked lasagna 220°Roast beef 220°Oven cooked pasta 220°Lemon cake 220°Pizza with anchovies 225°Rice creol 225°Baked onions 225°Stuffed potatoes 225°Grilled veal joint 225°Turkish shishkebab 225°Marrnalade pie 225°Pound cake 225°
ELECTRICAL GRILLThe electrical grill is made up of an elec-trical element which, becoming red hot,generates infra red rays which permit grillcooking (input 2500 W).
USE OF THE GRILL
Switch the grill on, setting the two knobs:– Function selector to position. – Thermostat selector to position 175°C
max .
Leave to warm up for approximately 5minutes with the door closed. Place the food inside positioning the rackas near as possible to the grill. Insert the drip pan under the rack to col-lect the cooking juices.Grilling with the oven door closed.
Fan ovens

13
CONTROL PANEL1. Oven thermostat knob2. Oven switch knob 3. Oven energy regulator4. Rotisserie push-button 5. Oven temperature warning ligft 6. Electronic programmer7. Digital electric programmer
AUTO M
6 12
5
34Fig. 3.1
mod. EB 4820 WH - EB 4820 BN - EB 4820 BK - EB 4820 GY - EB 4820 SS
98
7
7 12Fig. 3.2
mod. EB 4821 WH - EB 4821 BN - EB 4821 BK - EB 4821 GY - EB 4821 SS
Multi-function ovens
5
33

14
As its name indicates, this is an oventhat presents particular features from anoperational point of view.In fact, it is possible to insert 4 differentprograms to satisfy every cooking need.The 7 positions, thermostatically con-trolled, are obtained by 4 heating ele-ments which are: - Lower element 1400 W - Upper element 1000 W - Grill element 2500 W - Circular element 2500 W
NOTE:Upon first use, it is advisable to operatethe oven at the maximum temperature(thermostat knob on position 250) for 60minutes in the position and toeliminate possible traces of grease onthe heating elements.Repeat the operation for another 15minutes with the grill element by turn onit as explained in the chaptersGRILLING and USE OF THE GRILL.
Attention: the oven door becomesvery hot during operation.Keep children away.
OPERATING PRINCIPLESHeating and cooking in the MULTI-FUNCTION oven are obtained in the fol-lowing ways:
a. by normal convection The heat is produced by the upperand lower heating elements.
b. by forced convectionA fan sucks in the air contained in theoven muffle, which sends it throughthe circular heating element and thensends it back through the muffle.Before the hot air is sucked backagain by the fan to repeat the descri-bed cycle, it envelops the food in theoven, provoking a complete and rapidcooking. It is possible to cook severaldishes simultaneously.
c. by semi-forced convectionThe heat produced by the upper andlower heating elements is distributedthroughout the oven by the fan.
d. by radiation The heat is irradiated by the infra redgrill element.
e. by radiation and ventilationThe irradiated heat from the infra redgrill element is distributed throughoutthe oven by the fan.
Multi-function ovens
SAFETY GUARDThe glass on the oven door reaches hightemperatures during operation.For child safety, a door guard can be fitted to preventcontact with the hot glass.The door guard is supplied as an accessory onrequest (against payment):✓ White model cod. 6306116✓ Brown model cod. 6306117
Contact our Service Centre and indicate the relevantappliance model.

15Fig. 3.5
Fig. 3.4
Fig. 3.3
THERMOSTAT KNOBTo turn on the heating elements of theoven, set the switch knob on the desiredprogram and the thermostat knob ontothe desired temperature.To set the temperature, it is necessary tomake the knob indicator meet the chosennumber.The elements will turn on or off automa-tically according to the energy needwhich is determined by the thermostat.The operation of the heating elements issignalled by a light found on the controlpanel.
GRILL ENERGY REGULATORmod. EB 4820 WH - EB 4820 BN - EB 4820 BK
EB 4820 GY - EB 4820 SSThe control selects the temperature ofthe grill by turning the knob (fig. 3.4)clockwise to increase the heat. The position 0 switches the grill off. To use the grill you must also select oneof the grill positions on the oven selector(fig. 3.5)
FUNCTION SELECTOR KNOB Rotate the knob clockwise to set theoven for one of the following functions:
OVEN LIGHT
By turning the knob onto this setting (seepicture aside) we light the oven cavity(15 W).The oven remains alight while any of thefunctions is on.
Multi-function ovens

16
TRADITIONAL CONVECTION COOKING
The upper and lower heating elements areswitched on. The heat is diffused by natu-ral convection and the temperature mustbe regulated between 50° C and 250° Cwith the thermostat knob. It is necessaryto preheat the oven before introducing thefoods to be cooked.
RECOMMENDED USE: For foods which require the same cookingtemperature both internally and externally,i. e. roasts, spare ribs, meringue, etc.
GRILLING
The infra-red heating element is switchedon. The heat is diffused by radiation.Use with the oven door closed and thethermostat knob to to position 175°C formax 30 minutes.In the models with energy regulator turnthe regulator knob from 1 to 5. For correct use see chapter “USE OF THEGRILL”.
RECOMMENDED USE: Intense grilling action for cooking with thebroiler; browning, crisping, “au gratin”, toa-sting, etc.
It is recommended that you do notgrill for longer than 30 minutes at anyone time.
DEFROSTING FROZEN FOODS
Only the oven fan is on. To be used with the thermostat knob on“0” because the other positions have noeffect. The defrosting is done by simpleventilation without heat.
RECOMMENDED USE:To rapidly defrost frozen foods; 1 kilogramrequires about one hour. The defrosting times vary according to thequantity and type of foods to be defrosted.
HOT AIR COOKING
The circular element and the fan are on. The heat is diffused by forced convectionand the temperature must be regulatedbetween 50° and 250 °C with the ther-mostat knob. It is not necessary to preheat the oven.
RECOMMENDED USE: For foods that must be well done on theoutside and tender or rare on the inside,i. e. lasagna, lamb, roast beef, whole fish,etc.
VENTILATED GRILL COOKING
The infra-red ray grill and the fan are on. The heat is mainly diffused by radiationand the fan then distributes it throughoutthe oven. The temperature must be regu-lated between 50° and 175 °C max. withthe thermostat knob; in the models withenergy regulator turn the regulator knobfrom 1 to 5.
RECOMMENDED USE: For grill cooking when a fast outside brow-ning is necessary to keep the juices in, i.e. veal steak, steak, hamburger, etc.
Multi-function ovens

17
CONVECTION COOKING WITH VENTILATION
The upper and lower heating elementsand the fan turn on. The heat coming from the top and bot-tom is diffused by forced convection. The temperature must be regulatedbetween 50° and 250 °C with the ther-mostat knob.
RECOMMENDED USE: For foods of large volume and quantitywhich require the same internal andexternal degree of cooking; for ex: rolledroasts, turkey, legs, cakes, etc.
GRILLING AND “AU GRATIN” Grilling may be done without the roastingjack on position of the switch,because the hot air completely envelopsthe food that is to be cooked.Set the thermostat to position 175 °Cand after having preheated the oven,simply place the food on the rack. Close the door and let the oven operatewith the thermostat on position 50 and175 °C, until grilling is done. Adding a few dabs of butter before theend of the cooking time gives the golden“au gratin” effect.
COOKING ADVICESTERILIZATIONSterilization of foods to be conserved, infull and hermetically sealed jars, is donein the following way:
a. Set the switch to position . b. Set the thermostat knob to position
185 °C and preheat the oven. c. Fill the dripping pan with hot water. d. Set the jars onto the dripping pan
making sure they do not touch eachother and the door and set the ther-mostat knob to position 135 °C.
When sterilization has begun, that is,when the contents of the jars start to bub-ble, turn off the oven and let cool.
REGENERATIONSet the switch to position and thethermostat knob to position 150° C. Bread becomes fragrant again if wet witha few drops of water and put into theoven for about 10 minutes at the highesttemperature.
Multi-function ovens
MAINTAINING TEMPERATURE AFTER COOKING OR SLOWLY HEATING FOODS
The upper element and the circular ele-ment connected in series, are switched on;also the fan is on. The heat is diffused by forced convectionwith the most part being produced by theupper element.The temperature must be regulatedbetween 50° and 150 °C with the thermo-stat knob.
RECOMMENDED USE: To keep foods hot after cooking. To slowly heat already cooked foods.

18
For the consumer’s information, the fol-lowing table gives some dishes with theirrelative cooking temperatures in °C.The cooking time varies with the quan-tity.
Cakes 180°Doughnuts 180°Cheese soufflé 200°Potatoes soufflé 200°Roast veal 200°Spinach crepes 200°Potatoes in milk 200°Chicken breasts in tomato 200°Sole fish filet 200°Whiting 200°Cream puffs 200°Plum pie 200°Meat balls 200°Veal meatloaf 200°Grilled chicken - roast chicken 220°Baked lasagna 220°Roast beef 220°Oven cooked pasta 220°Lemon cake 220°Pizza with anchovies 225°Rice creol 225°Baked onions 225°Stuffed potatoes 225°Grilled veal joint 225°Turkish shishkebab 225°Marrnalade pie 225°Pound cake 225°
Multi-function ovens
SIMULTANEOUS COOKING OF DIFFERENTFOODSThe MULTI-FUNCTION oven set onposition consents a simultaneousheterogeneous cooking of differentfoods. Different foods such as fish, cakeand meat can be cooked togetherwithout mixing the smells and flavorstogether. This is possible since the fatsand vapors are oxidized while passingthrough the electrical element and the-refore are not deposited onto the foods.The only precaution to follow are:– The cooking temperatures of the diffe-
rent foods must be as close to as pos-sible, with a maximum difference of20° - 25 °C.
– The introduction of the different dishesin the oven must be done at differenttimes in relation to the cooking timesof each one.
The time and energy saved with this typeof cooking is obvious.
ROASTINGTo obtain classical roasting, it is neces-sary to remember:– that it is advisable to maintain a tem-
perature between 180 and 200 °C. – that the cooking time depends on the
quantity and the type of foods.

19
ROTISSERIEmod. EB 4820 WH - EB 4820 BN - EB 4820 BK
EB 4820 GY - EB 4820 SSThe four is equipped with a rotisserie forcooking on the spit using the grill.This device is made up of (fig. 3.7): – an electrical motor mounted on the rear
part of the oven– a stainless steel rod, equipped with a
detachable athermic grip and 2 recor-dable forks
– a rod support to be inserted into therack holders of the oven.
The rotisserie motor is operated by theswitch (fig. 3.6).
USE OF THE ROTISSERIEmod. EB 4820 WH - EB 4820 BN - EB 4820 BK
EB 4820 GY - EB 4820 SS– Insert the dripping pan into the lowest
rack holders of the oven and insert therod support into the intermediate rackholders.
– Put the meat to be cooked onto therod, being careful to secure it in thecenter with the special forks.
– Insert the rod into the hole of anglegear R and then remove the grip byturning it to the left.
– Insert the rod P into the motor openingF by insert the rod support completelyin the oven.
The rotation direction of the rotisseriecan be either clockwise or counter-clockwise.
F
R
P
Fig. 3.6 Fig. 3.7
Multi-function ovens
USE OF THE GRILLSet the switch to position and thethermostat to position 175 max.In the models with energy regulator turnthe regulator knob from 1 to 5 (the posi-tion 0 of switches the grill off; the grillheat is increased by turning the knobclokwise from 1 to 5).Leave to warm up for approximately 5minutes with the door closed.Introduce the food to be cooked, positio-ning the rack as close to the grill as pos-sible.The dripping pan should be placedunder the rack to catch the cooking jui-ces and fats.Grilling with the oven door closed.

20Fig.4.1
The function of the timer runs the ovenfor a preset time.
1) Starting up.After setting the function selector andthermostat to the required mode andtemperature, rotate the timer knobclockwise until you reach the requiredcooking time (max 120 minutes). Once this time has elapsed, the timerwill return to the “0” position and theoven will automatically switch off.
2) Manual position.If the cooking time is longer than twohours or if you wish to use the ovenmanually, switching it off as required,the knob must be turned to position
.
Programming timer 44

21
87
6
C
FFig. 5.3
98
78.00
A B C
D FG
9.30
A
DFig. 5.2
Fig. 5.1
The programmer is a device which grou-ps together the following functions: 1) Electrical clock 2) Automatic oven cooking 3) Semi-automatic oven cooking.
ELECTRICAL CLOCKThe programmer is equipped with a nor-mal digital electrical clock. The hours and minutes are seen in win-dow “A”. To regulate the hours, it is sufficient toslightly press knob “D” and turn it rightuntil the exact hour is reached (fig. 5.2).
NORMAL OVEN COOKINGTo use the oven without the programmer(only with the switch/thermostat), it isnecessary to cancel the programmeroperation by turning knob “G” clockwiseto make the indicator meet with symbol
in window “B” (fig. 5.1).Having done this, regulate in window“C” the same hour as clock “A”.This is the necessary position of the pro-grammer for normal use of the ovenwithout the auxiliary programmer.
AUTOMATIC OVEN COOKINGTo use the automatic oven cooking it isnecessary to:1) set the cooking starting hour2) set the cooking time (maximum 3
hours and 30 minutes)3) set the oven program and temperatu-
re.
Electro mechanical programmer 55

22
B
G
2
Fig. 5.4
These operations are done in the fol-lowing way:
1) To set the starting hour, lightly pushknob “F” clockwise so that the houryou wish the cooking to start appearsin window “C” (in correspondancewith the indicator) (fig. 5.3).
2) To set the cooking time, turn knob “G”clockwise so that the desired cookingtime appears, in correspondance withthe indicator, in window “B” (whichadded to the starting time will giveyou the hour that the cooking will becompleted) (fig. 5.4).
3) To start the program and the desiredcooking temperature, use the specialoven knobs (see specific chapters).
Now the oven is programmed andeverything will work automatically, thatis, when clock.“A” indicates the starting hour, set in win-dow “C” the oven will turn on automati-cally.When the cooking time set in window “B”has elapsed, and that is, when the “0”in window “B”, corresponds with the indi-cator, the oven will turn off automaticallyand the buzzer will operate to signal thatthe cooking is done.To turn off the buzzer, it is necessary toturn knob “G” clockwise to make symbol
coincide with the indicator in win-dow “B”.
SEMI-AUTOMATIC COOKINGThis served to turn the oven off automa-tically after a desired cooking time.To do so, turn knob “G” clockwise tomake the desired cooking time appear inwindow “B”, in correspondance with theindicator (fig. 5.5).Now, turn on the oven, setting the pro-gram and the desired temperature (seethe specific chapters).The oven will immediately start to ope-rate and will turn off automatically at theend of the set cooking time and this willbe signalled by the buzzer.Attention: the oven will only work if thehour in window “C” corresponds with thehour of clock “A”.
76
5 6.00
A B C
G
2
Fig. 5.5
98
78.00
B
GFig. 5.6
Electro mechanical programmer

23
AUTO
Description of the buttons:
Timer
Cooking time
End of cooking time
Manual position and cancellation ofthe inserted cooking program
Advancement of the numbers of allprograms
Turning back of the numbers of alprograms and changing the fre-quency of the audible signal.
Fig. 6.1 Fig. 6.2
Description of the lighted sym-bols:
AUTO - flashing - Programmer in auto-matic position but not program-med
AUTO - always lighted - Programmer inautomatic position with programinserted.
Automatic cooking taking place
Timer in operation
and AUTO - flashing - Programerror.(The time of day lies between thecalculated cooking start and endtime).
Nota: Select a function by the respec-tive button and, in 5 seconds, set therequired time with th / buttons(“one-hand” operation).An energy black-out makes the clockgo to zero and cancels the set pro-grams.
The electronic programmer is a devicewhich groups together the following func-tions:– 24 hours clock with illuminated display– Timer (up to 23 hours and 59 minutes) – Program for automatic oven cooking– Program for semi-automatic oven
cooking.
Electronic programmer 66

24
ELECTRONIC CLOCK (fig. 6.2)The programmer is equipped with anelectronic clock with lighted numberswhich indicates hours and minutes. Upon immediate connection of the ovenor after a blackout, three zeros will flashon the programmer panel. To set the hour it is necessary to pushthe button and then the orbutton until you have set the exact hour(fig. 6.2).In another way push simultaneously the
two buttons and at the same timepush the or button.
Nota: The hour setting delete any pro-gram.
Fig. 6.3
AUTO
Fig. 6.4
ELECTRONIC TIMER
The timer program consists only of abuzzer which may be set for a maximumperiod of 23 hours and 59 minutes. If the AUTO flashing push the but-ton.To set the time, push the button andthe or until you obtain the desiredtime in the panel (fig. 6.4). Having fini-shed the setting, the clock hour willappear on the panel and the symbolwill be lighted. The countdown will start immediatelyand may be seen at any moment on thepanel by simply pressing the button . At the end of the time, the symbolwill be switched off and an intermittentbuzzer will go off; this can be stoppedby pressing one of any of the buttons.
SETTING THE FREQUENCY OF THE AUDIBLESIGNALThe selection from 3 possibilities ofsound can be made by pressing the button.
NORMAL COOKING WITHOUT THE USE OFTHE PROGRAMMERTo manually use the oven, that is, withoutthe aid of the programmer, it is necessaryto cancel the flashing AUTO by pushing thebutton (AUTO will be switched off andthe symbol will go on - Fig. 6.3).
Attention: If the AUTO is steady lighted(which means a cooking program hasalready been inserted), by pushing the but-ton you have the cancellation of the pro-gram and the switching to manual.If the oven is switch on, you must switchoff manually.
Electronic programmer

25
AUTO
AUTO
AUTOMATIC OVEN COOKINGTo cook food automatically in the oven,it is necessary to:1. Set the length of the cooking time 2. Set the end of the cooking time 3. Set the temperature and the oven
cooking program.
These operations are done in the fol-lowing way: 1. Set the length of the cooking time by
pushing the button and the button to advance, or to go backif you have passed thedesired time (fig. 6.5). The AUTO andthe symbol will be on.
2. Set the end of the cooking time bypressing the button (the cookingtime already added to the clock timewill appear), and the button (fig.10.6); if you pass the desired timeyou may get back by pushing the button. After this setting, the symbol willgo off. If after this set-ting, the AUTO flash on the panel anda buzzer gives off, it means there wasan error in the programming, that isthat the cooking cycle has been supe-rimposed on the clock. In this case,modify the end of cooking time or thecooking time itself by following againthe above mentioned instructions.
3. Set the temperature and the cookingprogram by using the switch and ther-mostat knobs of the oven (see specificchapters).
Now the oven is programmed and every-thing will work automatically, that is theoven will turn on at the right moment toend the cooking at the established hour. During cooking, the symbol remainson. By pushing the button you can seethe time that remains until the end ofcooking.
The cooking program may be cancel-led in any moment by pushing .
At the end of the cooking time the ovenwill turn off automatically, the symbolwill turn off, AUTO will flash and a buz-zer will be released, which can be tur-ned off by pushing any of the bottons.
Turn the switch and thermostat knobs tozero and put the programmer onto“manual” by pressing the button.
Attention: An energy blackout makesthe clock go to zero and cancels the setprograms. After a blackout, three zeros will flashon the panel.
Fig. 6.6Fig. 6.5
Electronic programmer
26
AUTO
AUTO
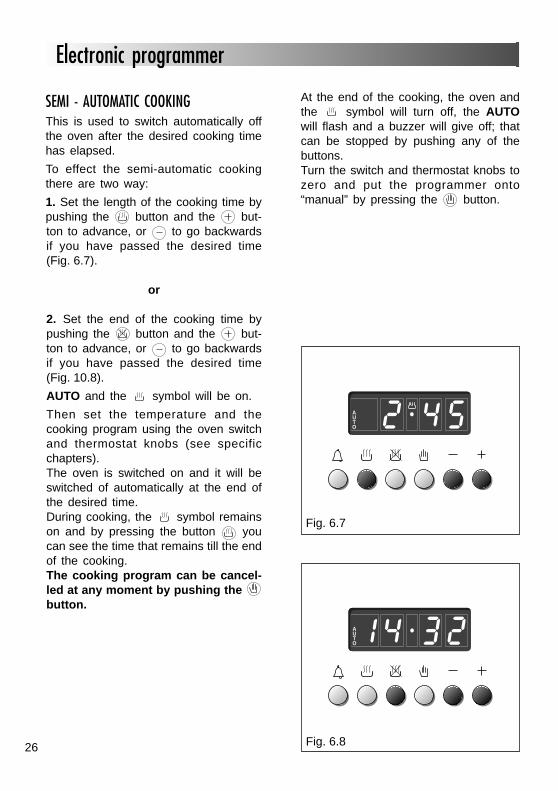
SEMI - AUTOMATIC COOKINGThis is used to switch automatically offthe oven after the desired cooking timehas elapsed.
To effect the semi-automatic cookingthere are two way:
1. Set the length of the cooking time bypushing the button and the but-ton to advance, or to go backwardsif you have passed the desired time(Fig. 6.7).
or
2. Set the end of the cooking time bypushing the button and the but-ton to advance, or to go backwardsif you have passed the desired time(Fig. 10.8).
AUTO and the symbol will be on.
Then set the temperature and thecooking program using the oven switchand thermostat knobs (see specificchapters). The oven is switched on and it will beswitched of automatically at the end ofthe desired time. During cooking, the symbol remainson and by pressing the button youcan see the time that remains till the endof the cooking. The cooking program can be cancel-led at any moment by pushing the button.
Fig. 6.7
Fig. 6.8
Electronic programmer
At the end of the cooking, the oven andthe symbol will turn off, the AUTOwill flash and a buzzer will give off; thatcan be stopped by pushing any of thebuttons.Turn the switch and thermostat knobs tozero and put the programmer onto“manual” by pressing the button.

27
Fig. 7.1
Fig. 7.2
GENERAL ADVICEIt is advisable to clean when the applian-ce is cold and especially for cleaning theenamelled parts. Avoid leaving alcaline or acidic substan-ces (lemon juice, vinegar, etc.) on thesurfaces. Avoid using cleaning products with achlorine or acidic base.The oven must always be cleaned afterevery use, using suitable products andkeeping in mind that its operation for 30minutes on the highest temperature eli-minates most grime reducing it to ashes.
OVEN FITTING OUT– Hang up the wire racks on the oven
walls (Fig. 7.1).– Slide in, on the guides, the shelf and
the tray etc. (Fig. 7.2).
Cleaning and maintenance 77STAINLESS STEEL SURFACESCAUTION:The stainless steel used in this oven isprotected with a Special Lacquer toreduce finger-print marks.To avoid damaging this lacquer, do notclean the stainless steel with abrasivecleaners or abrasive cloths or scouringpads. ONLY SOAP/WARM WATER MUST BEUSED TO CLEAN THE STAINLESSSTEEL SURFACES.

28
OVEN DOORThe oven door is to be cleaned in thesame way that it is advisable for the ena-melled surfaces.The internal glass of the oven door canbe easily removed for cleaning byunscrewing the two lateral fixing screws(fig. 7.3).
SUBSTITUTION OF THE OVEN LIGHTThe light bulb must be a type resistantto high temperatures (300° C).
Fig. 7.3
Cleaning and maintenance

29
Advice for the installer

30
The oven must be built-in in a standardmodule of furniture of 60 cm width anddepth. It is to be fit up in a module having theclearance as shown in the picture 8.1. On the lower side, the oven must lay onsupports standing the oven weight. The 4 fore screws serve as fixing. Even if the oven has an interior ventila-tion, intrinsic to its execution, it is neces-saly that the furniture module providesfor a ventilation column, as shown onpicture.
560
550 min
600
594
594
540
20
555
500
80
560
600
500
80
50
Fig. 8.1
The walls adjacent to the ovenmust be of material resistant toheat.
Installation 88

31
GENERAL
– The connection to the electricalnetwork must be carried out by quali-fied personnel and must be accordingto existing norms.
– The appliance must be connected tothe electrical network verifying aboveall that the voltage corresponds to thevalue indicated on the specificationsplate and that the cables section of theelectrical plant can bear the loadwhich is also indicated on the plate.
– The bi-polar plug must be connectedto an outlet connected to the groun-ding unit in conformity to securitynorms.
– If the oven is to be connected directlyto the mains, it must be placed withan omnipolar switch with minimumopening between the contacts of 3 mmbetween the appliance and the mains.
– The power supply cable must nottouch the hot parts and must be posi-tioned so that it does not exceed 75°Cat any point.
– Once the oven has been installed, theswitch or socket must always beaccessible.
– If the power supply cable is damagedit must be substituted by a suitablecable available in the after sales servi-ce.
– Voltage: 230 V ~ 50 HZ
The connection of the appliance tothe grounding unit is mandatory. The manufacturer declines everyresponsability for any inconve-nience resulting from the inobser-vance of this condition.
Electrical section 99
SUBSTITUTION OF THE OVENAND GRILL ELEMENTSThe substitution of the electrical ele-ments of the oven and the grill are donein the following way:
– Dismount the back panel of theappliance
– Unhook the electrical connections ofthe broken elements
– Unscrew the screw that fasten the ele-ment
– Remove the element from the insideof the muffle. For the lower elementlift the bottom entrance of the oven
– Effect the substitution – Re-mount, being particularly careful of
the grounding of all the electrical com-ponents.
FEEDER CABLE SECTION TYPE HO5RR-F
230 V 3 x 1,5 mm2
Before effecting any interventionon the electrical parts the applian-ce must be disconnected from thenetwork.
Descriptions and illustrations in this booklet are given as simply indicative. The manufacturer reserves the right, considering the characteristics of the models described here,at any time and without notice, to make eventual necessary modifications for their construction orfor commercial needs.
Cod. 1101215.1 ß2
rif.1
408.
17