Embed Size (px)
DESCRIPTION
Residual Stress
Citation preview

Rev 1 January 2010 Residual Stress and Distortion Copyright © TWI Ltd 2010
1 What Causes Distortion? Because welding involves highly localised heating of joint edges to fuse the material, non-uniform stresses are set up in the component because of expansion and contraction of the heated material. Initially, compressive stresses are created in the surrounding cold parent metal when the weld pool is formed due to the thermal expansion of the hot metal (heat affected zone (HAZ)) adjacent to the weld pool. However, tensile stresses occur on cooling when the contraction of the weld metal and immediate HAZ is resisted by the bulk of the cold parent metal. The magnitude of thermal stresses induced into the material can be seen by the volume change in the weld area on solidification and subsequent cooling to room temperature. For example, when welding C-Mn steel, the molten weld metal volume will be reduced by approximately 3% on solidification and the volume of the solidified weld metal/HAZ will be reduced by a further 7% as its temperature falls from the melting point of steel to room temperature. If the stresses generated from thermal expansion/contraction exceed the yield strength of the parent metal, localised plastic deformation of the metal occurs. Plastic deformation causes a permanent reduction in the component dimensions and distorts the structure.
2 What Are the Main Types of Distortion?
Distortion occurs in several ways: • Longitudinal shrinkage • Transverse shrinkage • Angular distortion • Bowing and dishing • Buckling Contraction of the weld area on cooling results in both transverse and longitudinal shrinkage. Non-uniform contraction (through thickness) produces angular distortion as well as longitudinal and transverse shrinking. For example, in a single V butt weld, the first weld run produces longitudinal and transverse shrinkage and rotation. The second run causes the plates to rotate using the first weld deposit as a fulcrum. Therefore balanced welding in a double side V butt joint can be used to produce uniform contraction and prevent angular distortion.
Rev 1 January 2010 Residual Stress and Distortion Copyright © TWI Ltd 2010
Similarly, in a single-sided fillet weld, non-uniform contraction will produce angular distortion of the upstanding leg. Double-sided fillet welds can therefore be used to control distortion in the upstanding fillet but because the weld is only deposited on one side of the base plate, angular distortion will now be produced in the plate. Longitudinal bowing in welded plates happens when the weld centre is not coincident with the neutral axis of the section so that longitudinal shrinkage in the welds bends the section into a curved shape. Clad plate tends to bow in two directions due to longitudinal and transverse shrinkage of the cladding. This produces a dished shape. Dishing is also produced in stiffened plating. Plates usually dish inwards between the stiffeners, because of angular distortion at the stiffener attachment welds. In plating, long range compressive stresses can cause elastic buckling in thin plates, resulting in dishing, bowing or rippling, see below.
Examples of distortion
Examples of distortion. Increasing the leg length of fillet welds, in particular, increases shrinkage.

Rev 1 January 2010 Residual Stress and Distortion Copyright © TWI Ltd 2010
3 What Are the Factors Affecting Distortion? If a metal is uniformly heated and cooled there would be almost no distortion. However, because the material is locally heated and restrained by the surrounding cold metal, stresses are generated higher than the material yield stress causing permanent distortion. The principal factors affecting the type and degree of distortion are:
• Parent material properties • Amount of restraint • Joint design • Part fit-up • Welding procedure
3.1 Parent material properties Parent material properties, which influence distortion, are coefficient of thermal expansion, thermal conductivity, and to a lesser extent, yield stress and Young’s modulus. As distortion is determined by expansion and contraction of the material, the coefficient of thermal expansion of the material plays a significant role in determining the stresses generated during welding and, hence, the degree of distortion. For example, as stainless steel has a higher coefficient of expansion and lesser thermal conductivity than plain carbon steel, it generally has significantly more distortion.
3.2 Restraint If a component is welded without any external restraint, it distorts to relieve the welding stresses. So, methods of restraint, such as strongbacks in butt welds, can prevent movement and reduce distortion. As restraint produces higher levels of residual stress in the material, there is a greater risk of cracking in weld metal and HAZ especially in crack-sensitive materials.
3.3 Joint design Both butt and fillet joints are prone to distortion, but it can be minimised in butt joints by adopting a joint type, which balances the thermal stresses through the plate thickness. For example, double- in preference to a single-sided weld. Double-sided fillet welds should eliminate angular distortion of the upstanding member, especially if the two welds are deposited at the same time.
3.4 Part fit-up Fit-up should be uniform to produce predictable and consistent shrinkage. Excessive joint gap can also increase the degree of distortion by increasing the amount of weld metal needed to fill the joint. The joints should be adequately tacked to prevent relative movement between the parts during welding.

Rev 1 January 2010 Residual Stress and Distortion Copyright © TWI Ltd 2010
3.5 Welding procedure This influences the degree of distortion mainly through its effect on the heat input. As welding procedures are usually selected for reasons of quality and productivity, the welder has limited scope for reducing distortion. As a general rule, weld volume should be kept to a minimum. Also, the welding sequence and technique should aim to balance the thermally induced stresses around the neutral axis of the component.
4 Distortion - Prevention By Pre-Setting, Pre-Bending or Use of Restraint Distortion can often be prevented at the design stage, for example, by placing the welds about the neutral axis, reducing the amount of welding and depositing the weld metal using a balanced welding technique. In designs where this is not possible, distortion may be prevented by one of the following methods: • Pre-setting of parts • Pre-bending of parts • Use of restraint The technique chosen will be influenced by the size and complexity of the component or assembly, the cost of any restraining equipment and the need to limit residual stresses.
Pre-setting of parts to produce correct alignment after welding
a) Pre-setting of fillet joint to prevent angular distortion b) Pre-setting of butt joint to prevent angular distortion
4.1 Pre-setting of parts
The parts are pre-set and left free to move during welding (see above). In practice, the parts are pre-set by a pre-determined amount so that distortion occurring during welding is used to achieve overall alignment and dimensional control. The main advantages compared with the use of restraint are that there is no expensive equipment needed and there will be lower residual stress in the structure.

Rev 1 January 2010 Residual Stress and Distortion Copyright © TWI Ltd 2010
Unfortunately, as it is difficult to predict the amount of pre-setting needed to accommodate shrinkage, a number of trial welds will be required. For example, when MMA or MIG/MAG welding butt joints, the joint gap will normally close ahead of welding; when submerged arc welding; the joint may open up during welding. When carrying out trial welds, it is also essential that the test structure is reasonably representative of the full size structure in order to generate the level of distortion likely to occur in practice. For these reasons, pre-setting is a technique more suitable for simple components or assemblies.
Pre-bending, using strongbacks and wedges, to accommodate angular distortion in thin plates.
4.2 Pre-bending of parts
Pre-bending, or pre-springing the parts before welding is used to pre-stress the assembly to counteract shrinkage during welding. As shown above, pre-bending by means of strongbacks and wedges can be used to pre-set a seam before welding to compensate for angular distortion. Releasing the wedges after welding will allow the parts to move back into alignment. The figure shows the diagonal bracings and centre jack used to pre-bend the fixture, not the component. This counteracts the distortion introduced though out-of-balance welding.
4.3 Use of restraint Because of the difficulty in applying pre-setting and pre-bending, restraint is the more widely practised technique. The basic principle is that the parts are placed in position and held under restraint to minimise any movement during welding. When removing the component from the restraining equipment, a relatively small amount of movement will occur due to locked-in stresses. This can be cured by either applying a small amount of pre-set or stress-relieving before removing the restraint. When welding assemblies, all the component parts should be held in the correct position until completion of welding and a suitably balanced fabrication sequence used to minimise distortion. Welding with restraint will generate additional residual stresses in the weld, which may cause cracking. When welding susceptible materials, a suitable welding sequence and the use of preheating will reduce this risk.

Rev 1 January 2010 Residual Stress and Distortion Copyright © TWI Ltd 2010
Restraint is relatively simple to apply using clamps, jigs and fixtures to hold the parts during welding.
4.3.1 Welding jigs and fixtures Jigs and fixtures are used to locate the parts and ensure that dimensional accuracy is maintained whilst welding. They can be of a relatively simple construction, as shown in a) below but the welding engineer will need to ensure that the finished fabrication can be removed easily after welding.
4.3.2 Flexible clamps A flexible clamp (b) below) can be effective in applying restraint and also setting-up and maintaining the joint gap (it can also be used to close a gap that is too wide). A disadvantage is that as the restraining forces in the clamp will be transferred into the joint when the clamps are removed, the level of residual stress across the joint can be quite high.
a) Welding jig
b) Flexible clamps
c) Strongbacks with wedges
d) Fully welded strongbacks
Restraint techniques to prevent distortion.
4.3.3 Strongbacks (and wedges)
Strongbacks are a popular means of applying restraint especially for site work. Wedged strongbacks (c)) above), will prevent angular distortion in plate and help prevent peaking in welding cylindrical shells. As these types of strongback will allow transverse shrinkage, the risk of cracking will be greatly reduced compared with fully welded strongbacks.

Rev 1 January 2010 Residual Stress and Distortion Copyright © TWI Ltd 2010
Fully welded strongbacks (welded on both sides of the joint) (d) above) will minimise both angular distortion and transverse shrinkage. As significant stresses can be generated across the weld, which will increase any tendency for cracking, care should be taken in the use of this type of strongback.
4.4 Best practice Adopting the following assembly techniques will help to control distortion: • Pre-set parts so that welding distortion will achieve overall alignment and
dimensional control with the minimum of residual stress. • Pre-bend joint edges to counteract distortion and achieve alignment and
dimensional control with minimum residual stress. • Apply restraint during welding by using jigs and fixtures, flexible clamps,
strongbacks and tack welding but consider the risk of cracking which can be quite significant, especially for fully welded strongbacks.
• Use an approved procedure for welding and removal of welds for restraint techniques, which may need preheat to avoid forming imperfections in the component surface.
5 Distortion - Prevention by Design
Design principles At the design stage, welding distortion can often be prevented, or at least restricted, by considering: • Elimination of welding • Weld placement • Reducing the volume of weld metal • Reducing the number of runs • Use of balanced welding
5.1 Elimination of welding As distortion and shrinkage are an inevitable result of welding, good design requires that not only the amount of welding is kept to a minimum, but also the smallest amount of weld metal is deposited. Welding can often be eliminated at the design stage by forming the plate or using a standard rolled section, as shown below.

Rev 1 January 2010 Residual Stress and Distortion Copyright © TWI Ltd 2010
Elimination of welds by: a) Forming the plate; b) Use of rolled or extruded section.
If possible, the design should use intermittent welds rather than a continuous run, to reduce the amount of welding. For example, in attaching stiffening plates, a substantial reduction in the amount of welding can often be achieved whilst maintaining adequate strength.
5.2 Weld placement Placing and balancing of welds are important in designing for minimum distortion. The closer a weld is positioned to the neutral axis of a fabrication, the lower the leverage effect of the shrinkage forces and the final distortion. Examples of poor and good designs are shown below.
Distortion may be reduced by placing the welds
around the neutral axis. As most welds are deposited away from the neutral axis, distortion can be minimised by designing the fabrication so the shrinkage forces of an individual weld are balanced by placing another weld on the opposite side of the neutral axis. When possible, welding should be carried out alternately on opposite sides, instead of completing one side first. In large structures, if distortion is occurring preferentially on one side, it may be possible to take corrective actions, for example, by increasing welding on the other side to control the overall distortion.

Rev 1 January 2010 Residual Stress and Distortion Copyright © TWI Ltd 2010
5.3 Reducing the volume of weld metal To minimise distortion, as well as for economic reasons, the volume of weld metal should be limited to the design requirements. For a single-sided joint, the cross-section of the weld should be kept as small as possible to reduce the level of angular distortion, as illustrated below.
Reducing the amount of angular distortion and lateral shrinkage. Ways of reducing angular distortion and lateral shrinkage: • Reducing the volume of weld metal; • Using single pass weld • Ensure fillet welds are not oversize. Joint preparation angle and root gap should be minimised providing the weld can be made satisfactorily. To facilitate access, it may be possible to specify a larger root gap and smaller preparation angle. By cutting down the difference in the amount of weld metal at the root and face of the weld, the degree of angular distortion will be correspondingly reduced. Butt joints made in a single pass using deep penetration have little angular distortion, especially if a closed butt joint can be welded (see above). For example, thin section material can be welded using plasma and laser welding processes and thick section can be welded, in the vertical position, using electrogas and electroslag processes. Although angular distortion can be eliminated, there will still be longitudinal and transverse shrinkage. In thick section material, as the cross-sectional area of a double V joint preparation is often only half that of a single V preparation, the volume of weld metal to be deposited can be substantially reduced. The double V joint preparation also permits balanced welding about the middle of the joint to eliminate angular distortion. As weld shrinkage is proportional to the amount of weld metal both poor joint fit-up and over-welding will increase the amount of distortion. Angular distortion in fillet welds is particularly affected by over-welding. As design strength is based on throat thickness, over-welding to produce a convex weld bead does not increase the allowable design strength but will increase the shrinkage and distortion.

Rev 1 January 2010 Residual Stress and Distortion Copyright © TWI Ltd 2010
5.4 Reducing the number of runs There are conflicting opinions on whether it is better to deposit a given volume of weld metal using a small number of large weld passes or a large number of small passes. Experience shows that for a single-sided butt joint, or fillet weld, a large single weld deposit gives less angular distortion than if the weld is made with a number of small runs. Generally, in an unrestrained joint, the degree of angular distortion is approximately proportional to the number of passes. Completing the joint with a small number of large weld deposits results in more longitudinal and transverse shrinkage than a weld completed in a larger number of small passes. In a multi-pass weld, previously deposited weld metal provides restraint, so the angular distortion per pass decreases as the weld is built up. Large deposits also increase the risk of elastic buckling particularly in thin section plate.
5.5 Use of balanced welding Balanced welding is an effective means of controlling angular distortion in a multi-pass butt weld by arranging the welding sequence to ensure that angular distortion is continually being corrected and not allowed to accumulate during welding. Comparative amounts of angular distortion from balanced welding and welding one side of the joint first are shown below. The balanced welding technique can also be applied to fillet joints.
Balanced welding to reduce the amount of angular distortion. If welding alternately on either side of the joint is not possible, or if one side has to be completed first, an asymmetrical joint preparation may be used with more weld metal being deposited on the second side. The greater contraction resulting from depositing the weld metal on the second side will help counteract the distortion on the first side.

Rev 1 January 2010 Residual Stress and Distortion Copyright © TWI Ltd 2010
5.6 Best practice The following design principles can control distortion: • Eliminate welding by forming the plate and using rolled or extruded
sections • Minimise the amount of weld metal • Do not over-weld • Use intermittent welding in preference to a continuous weld pass • Place welds about the neutral axis • Balance the welding about the middle of the joint by using a double V
joint in preference to a single
Adopting best practice principles can have surprising cost benefits. For example, for a design fillet leg length of 6mm, depositing an 8mm leg length will result in the deposition of 57% additional weld metal. Besides the extra cost of depositing weld metal and the increase risk of distortion, it is costly to remove this extra weld metal later. However, designing for distortion control may incur additional fabrication costs. For example, the use of a double V joint preparation is an excellent way to reduce weld volume and control distortion, but extra costs may be incurred in production through manipulation of the workpiece for the welder to access the reverse side.
6 Distortion - Prevention by Fabrication Techniques 6.1 Assembly techniques
In general, the welder has little influence on the choice of welding procedure but assembly techniques can often be crucial in minimising distortion. The principal assembly techniques are: • Tack welding • Back-to-back assembly • Stiffening
6.1.1 Tack welding Tack welds are ideal for setting and maintaining the joint gap but can also be used to resist transverse shrinkage. To be effective, thought should be given to the number of tack welds, their length and the distance between them. With too few, there is the risk of the joint progressively closing up as welding proceeds. In a long seam, using MMA or MIG/MAG, the joint edges may even overlap. It should be noted that when using the submerged arc process, the joint might open up if not adequately tacked.

Rev 1 January 2010 Residual Stress and Distortion Copyright © TWI Ltd 2010
The tack welding sequence is important to maintain a uniform root gap along the length of the joint. Three alternative tack-welding sequences are shown below: • Tack weld straight through to the end of the joint a). It is necessary to
clamp the plates or to use wedges to maintain the joint gap during tacking. • Tack weld one end and then use a back stepping technique for tacking
the rest of the joint b). • Tack weld the centre and complete the tack welding by back stepping c).
Alternative procedures used for tack welding to prevent transverse shrinkage.
Directional tacking is a useful technique for controlling the joint gap, for example closing a joint gap which is (or has become) too wide. When tack welding, it is important that tacks which are to be fused into the main weld, are produced to an approved procedure using appropriately qualified welders. The procedure may require preheat and an approved consumable as specified for the main weld. Removal of the tacks also needs careful control to avoid causing defects in the component surface.
6.1.2 Back-to-back assembly By tack welding or clamping two identical components back-to-back, welding of both components can be balanced around the neutral axis of the combined assembly (see a) on next page). It is recommended that the assembly is stress-relieved before separating the components. If stress-relieving is not done, it may be necessary to insert wedges between the components (b) on next page) so when the wedges are removed, the parts will move back to the correct shape or alignment.

Rev 1 January 2010 Residual Stress and Distortion Copyright © TWI Ltd 2010
Back-to-back assembly to control distortion when welding two identical components: a) Assemblies tacked together before welding; b) Use of wedges for components that distort on separation after welding.
6.1.3 Stiffening
Longitudinal stiffeners prevent bowing in butt welded thin plate joints.
Longitudinal shrinkage in butt welded seams often results in bowing, especially when fabricating thin plate structures. Longitudinal stiffeners in the form of flats or angles, welded along each side of the seam (see above) are effective in preventing longitudinal bowing. Stiffener location is important: they must be at a sufficient distance from the joint so they do not interfere with welding, unless located on the reverse side of a joint welded from one side.
6.2 Welding procedure A suitable welding procedure is usually determined by productivity and quality requirements rather than the need to control distortion. Nevertheless, the welding process, technique and sequence do influence the distortion level.

Rev 1 January 2010 Residual Stress and Distortion Copyright © TWI Ltd 2010
Welding process General rules for selecting a welding process to prevent angular distortion are: • Deposit the weld metal as quickly as possible • Use the least number of runs to fill the joint Unfortunately, selecting a suitable welding process based on these rules may increase longitudinal shrinkage resulting in bowing and buckling. In manual welding, MIG/MAG, a high deposition rate process, is preferred to MMA. Weld metal should be deposited using the largest diameter electrode (MMA), or the highest current level (MIG/MAG), without causing lack-of-fusion imperfections. As heating is much slower and more diffuse, gas welding normally produces more angular distortion than the arc processes. Mechanised techniques combining high deposition rates and welding speeds have the greatest potential for preventing distortion. As the distortion is more consistent, simple techniques such as pre-setting are more effective in controlling angular distortion. Welding technique General rules for preventing distortion are: • Keep the weld (fillet) to the minimum specified size • Use balanced welding about the neutral axis • Keep the time between runs to a minimum
Angular distortion of the joint as determined by the number of runs in the fillet weld.

Rev 1 January 2010 Residual Stress and Distortion Copyright © TWI Ltd 2010
In the absence of restraint, angular distortion in both fillet and butt joints will be a function of the joint geometry, weld size and the number of runs for a given cross-section. Angular distortion (measured in degrees) as a function of the number of runs for a 10mm leg length fillet weld is shown above. If possible, balanced welding around the neutral axis should be done, for example on double-sided fillet joints, by two people welding simultaneously. In butt joints, the run order may be crucial in that balanced welding can be used to correct angular distortion as it develops.
Use of welding direction to control distortion: a) Back-step welding; b) Skip welding. Welding sequence The welding sequence, or direction, of welding is important and should be towards the free end of the joint. For long welds, the whole of the weld is not completed in one direction. Short runs, for example using the back-step or skip welding technique, are very effective in distortion control (see above) • Back-step welding involves depositing short adjacent weld lengths in the
opposite direction to the general progression (see above). • Skip welding is laying short weld lengths in a pre-determined, evenly
spaced, sequence along the seam (b) in above figure). Weld lengths and the spaces between them are generally equal to the natural run-out length of one electrode. The direction of deposit for each electrode is the same, but it is not necessary for the welding direction to be opposite to the direction of general progression.
6.3 Best practice The following fabrication techniques are used to control distortion: • Using tack welds to set-up and maintain the joint gap • Identical components welded back-to-back so welding can be balanced
about the neutral axis

Rev 1 January 2010 Residual Stress and Distortion Copyright © TWI Ltd 2010
• Attachment of longitudinal stiffeners to prevent longitudinal bowing in butt welds of thin plate structures
• Where there is choice of welding procedure, process and technique should aim to deposit the weld metal as quickly as possible; MIG/MAG in preference to MMA or gas welding and mechanised rather than manual welding
• In long runs, the whole weld should not be completed in one direction; back-step or skip welding techniques should be used.

Rev 1 January 2010 Residual Stress and Distortion Copyright © TWI Ltd 2010
7 Distortion - Corrective Techniques Every effort should be made to avoid distortion at the design stage and by using suitable fabrication procedures. As it is not always possible to avoid distortion during fabrication, several well-established corrective techniques can be employed. Reworking to correct distortion should not be undertaken lightly as it is costly and needs considerable skill to avoid damaging the component. General guidelines are provided on best practice for correcting distortion using mechanical or thermal techniques.
7.1 Mechanical techniques The principal mechanical techniques are hammering and pressing. Hammering may cause surface damage and work hardening. In cases of bowing or angular distortion, the complete component can often be straightened on a press without the disadvantages of hammering. Packing pieces are inserted between the component and the platens of the press. It is important to impose sufficient deformation to give over-correction so that the normal elastic spring-back will allow the component to assume its correct shape.
Use of press to correct bowing in T butt joint.
Pressing to correct bowing in a flanged plate is shown above. In long components, distortion is removed progressively in a series of incremental pressings; each one acting over a short length. In the case of the flanged plate, the load should act on the flange to prevent local damage to the web at the load points. As incremental point loading will only produce an approximately straight component, it is better to use a former to achieve a straight component or to produce a smooth curvature.
Rev 1 January 2010 Residual Stress and Distortion Copyright © TWI Ltd 2010
7.1.1 Best practice for mechanical straightening The following should be adopted when using pressing techniques to remove distortion: • Use packing pieces which will over correct the distortion so that spring-
back will return the component to the correct shape. • Check that the component is adequately supported during pressing to
prevent buckling. • Use a former (or rolling) to achieve a straight component or produce a
curvature. • As unsecured packing pieces may fly out from the press, the following
safe practice must be adopted: - Bolt the packing pieces to the platen - Place a metal plate of adequate thickness to intercept the missile - Clear personnel from the hazard area
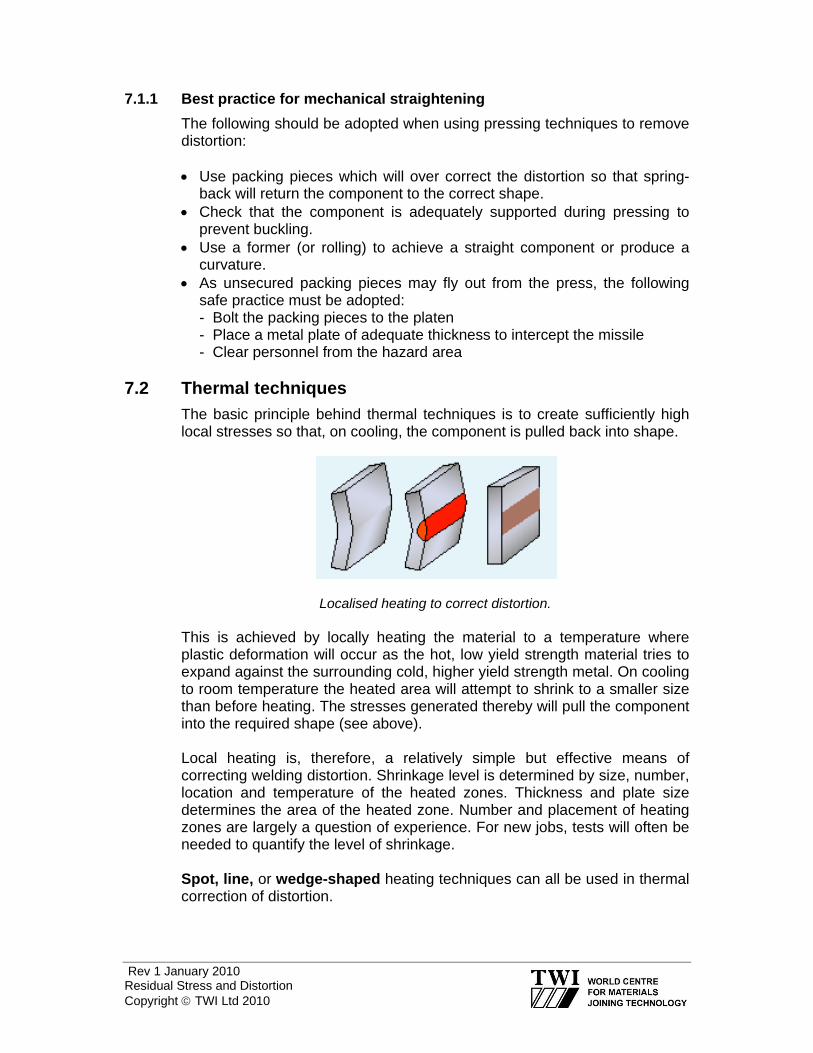
7.2 Thermal techniques
The basic principle behind thermal techniques is to create sufficiently high local stresses so that, on cooling, the component is pulled back into shape.
Localised heating to correct distortion. This is achieved by locally heating the material to a temperature where plastic deformation will occur as the hot, low yield strength material tries to expand against the surrounding cold, higher yield strength metal. On cooling to room temperature the heated area will attempt to shrink to a smaller size than before heating. The stresses generated thereby will pull the component into the required shape (see above). Local heating is, therefore, a relatively simple but effective means of correcting welding distortion. Shrinkage level is determined by size, number, location and temperature of the heated zones. Thickness and plate size determines the area of the heated zone. Number and placement of heating zones are largely a question of experience. For new jobs, tests will often be needed to quantify the level of shrinkage. Spot, line, or wedge-shaped heating techniques can all be used in thermal correction of distortion.

Rev 1 January 2010 Residual Stress and Distortion Copyright © TWI Ltd 2010
7.2.1 Spot heating
Spot heating for correcting buckling. Spot heating is used to remove buckling, for example when a relatively thin sheet has been welded to a stiff frame. Distortion is corrected by spot heating on the convex side. If the buckling is regular, the spots can be arranged symmetrically, starting at the centre of the buckle and working outwards.
7.2.2 Line heating
Line heating to correct angular distortion in a fillet weld. Heating in straight lines is often used to correct angular distortion, for example, in fillet welds. The component is heated along the line of the welded joint but on the opposite side to the weld so the induced stresses will pull the flange flat.
7.2.3 Wedge-shaped heating To correct distortion in larger complex fabrications it may be necessary to heat whole areas in addition to employing line heating. The pattern aims at shrinking one part of the fabrication to pull the material back into shape.

Rev 1 January 2010 Residual Stress and Distortion Copyright © TWI Ltd 2010
Use of wedge shaped heating to straighten plate.
Apart from spot heating of thin panels, a wedge-shaped heating zone should be used from base to apex and the temperature profile should be uniform through the plate thickness. For thicker section material, it may be necessary to use two torches, one on each side of the plate.
As a general guideline, to straighten a curved plate wedge dimensions should be: • Length of wedge - two-thirds of the plate width. • Width of wedge (base) - one sixth of its length (base to apex). The degree of straightening will typically be 5mm in a 3m length of plate. Wedge-shaped heating can be used to correct distortion in a variety of situations, (see below): • Standard rolled section, which needs correction in two planes a) • Buckle at edge of plate as an alternative to rolling b) • Box section fabrication, which is distorted out of plane c)
a) Standard rolled steel section
b) Buckled edge of plate c) Box fabrication
Wedge shaped heating to correct distortion.

Rev 1 January 2010 Residual Stress and Distortion Copyright © TWI Ltd 2010
7.2.4 General precautions The dangers of using thermal straightening techniques are the risk of over-shrinking too large an area or causing metallurgical changes by heating to too high a temperature. As a general rule, when correcting distortion in steels the temperature of the area should be restricted to approximately to 600-650°C - dull red heat. If the heating is interrupted, or the heat lost, the operator must allow the metal to cool and then begin again.
7.2.5 Best practice for distortion correction by thermal heating The following should be adopted when using thermal techniques to remove distortion: • Use spot heating to remove buckling in thin sheet structures. • Other than in spot heating of thin panels, use a wedge-shaped heating
technique. • Use line heating to correct angular distortion in plate. • Restrict the area of heating to avoid over-shrinking the component. • Limit the temperature to 600-650°C (dull red heat) in steels to prevent
metallurgical damage. • In wedge heating, heat from the base to the apex of the wedge, penetrate
evenly through the plate thickness and maintain an even temperature.