Embed Size (px)
Citation preview

Lesson 10: PowerPoint Presentations Beyond the Basics
281
10 POWERPOINT BEYOND THE BASICS Making interactive, non-linear slide shows and enhancing formatting
LEARNING OUTCOMES In the first PowerPoint tutorial you learned how to create and save a new presentation (the
Screenbeans slide show). You saw a sample slide show (The Tudor Monarchs). You learned how
to prepare an outline, typed text for each slide, added clip art, and set timings. You added an
effect to enhance the slide transition, selected a color scheme, and may have even created a new
background effect. You chose preset text animation, hid slides, and used Action Buttons. Finally,
you changed the printer settings so that you can print out handouts rather than just individual
slides of your shows.
For many classrooms and for most K-6 students, what you learned in chapter 8 is just fine.
But, if you're ready to take the next step and learn some advanced tricks with PowerPoint, or if
you teach computer-savvy students who want more challenging skills to master, this chapter's for
you.
Most PowerPoint presentations you see in school or at work are what are called linear
presentations. That is, each slide is designed to move one right after another. The first slide
transitions to the second, which transitions to the third, and so forth. For many educational tasks,
this is enough.
But, what if...
What if you want your middle school students to create an interactive story, where younger
kids could read about a dragon on Slide One, then choose, on Slide Two, any one of three
possible places that the dragon could go. By clicking on the word "desert," the show would move
to a slide describing what happens to the dragon in the desert. If the student clicks the word
"forest," another slide appears with another ending. The learner thus participates by not simply
clicking in one direction but makes choices that affect what slide comes next: making the
presentation interactive and non-linear.
A more common application of non-linear PowerPoint presentations is in reviewing
knowledge. With just a little practice, teachers (and even older students) can create quizzes using
PowerPoint. In these slide shows, students are asked questions and then click on what they think
is the answer. If the answer is correct, the show moves to the next question. If the student
answers incorrectly, the show moves the student back to re-answer the question or, if the

ESSENTIAL MICROSOFT OFFICE 2003: Tutorial for Teachers Copyright © Bernard Poole, Lorrie Jackson, Rebecca Randall, 2004. All rights reserved
282
question is of the True/False variety, explains why the answer was incorrect before moving them
on to the next step in the show.
Once again, the movement between slides is not one-way, not linear, but rather non-linear,
the pathway through the show determined by the student's interaction with it.
In this tutorial you will be introduced to the basics of non-linear interactive PowerPoint slide
shows, along with some more advanced formatting and impact-enhancing tools. Amongst the
skills you will learn are:
� Using hyperlinks and Action Buttons � Formatting tricks such as using design templates, replacing fonts, and enhancing graphics � Inserting sounds, clip art, movies, and hyperlinks (including E-mail links) � Balancing style and substance in presentations
A caveat before you begin : If you have not completed the tutorial in Chapter 8 but feel fairly comfortable with the basics of
PowerPoint, feel free to tackle this chapter. If you are not certain you know the basics of this
program, however, skim Chapter 8 to make sure you're ready to begin. Good luck!
10.1 INTERACTIVE POWERPOINT AT WORK Let’s start by looking at an example of an interactive PowerPoint presentation.
Turn on your computer and open the Microsoft Office PowerPoint presentation program
Showing the Full menus and organizing the Toolbars
In case you're using a computer in a lab or some computer other than your own, you should set
the options to Always show full menus, Show the Standard and formatting toolbars on two rows,
List font names in their own font, and Show ScreenTips on toolbars.
You’ll recall doing this at the beginning of all the previous lessons. If the computer you're
using doesn't already have these settings, here's what you do.
In the Tools menu, select Customize…, and in the dialog box that pops up, select the Options tab (Fig. 10.1)
Fig. 10.1 The Customize dialog box

Lesson 10: PowerPoint Presentations Beyond the Basics
283
Make sure there is a check mark next to the item to Always show full menus
Check the box next to Show Standard and Formatting toolbars on two rows, List font names in their font, and Show ScreenTips on toolbars
Click the Close button when you're ready
On with the tutorial…
Put your Work Files for Office 2003 Tutorials disk in the disk drive
When PowerPoint opens, you should see a blank title slide and two panes, one on the left of the
blank slide and one on the right.
The left pane allows you to select either of two tabs: Outline and Slides. You'll use both of
these in a moment to create and order your slide show. The right pane, common to all the
applications in Office 2003, is called the task pane (Fig. 10.2).
Fig. 10.2 New Presentation Task Pane
Think of the task pane as your "guide at the side"—like a good teacher. You know what you want
to do, but sometimes you'd appreciate a little help in how to proceed.

ESSENTIAL MICROSOFT OFFICE 2003: Tutorial for Teachers Copyright © Bernard Poole, Lorrie Jackson, Rebecca Randall, 2004. All rights reserved
284
PowerPoint tries to guess which tasks you want to do at a certain point, then offers them as
options in this easy-to-use task pane. Since you just opened the program, the task you want to
start off with is Create a new presentation. You want to find an already made presentation, not
create your own just yet.
So, in the Open section of the task pane click on Create a new presentation (Fig. 10.2 above)
In the Open dialog box, select your 3½” floppy drive, click on Mammal Test.ppt, then click Open
Go to Slide Show > View Show to view the presentation (a direction such as this is shorthand for "From the Slide Show menu select View Show")
Use the mouse (or space bar or right arrow) to move through the beginning slides. Be sure to
click on the Action Buttons or answers when indicated. Answer at least one question incorrectly
so you can see how the presentation takes you back to re-answer a question should you get it
wrong.
Notice also the sound, clip art, and movie/video clip that are added to this show.
Features to look out for in the demonstration presentation General Layout of an Interactive PowerPoint Used for Assessing Knowledge
Think of a test in your classroom. You start with a title on your test, so the students know what
the test is on and who wrote it. Then you have an introduction, which might define the subject
matter for the test. Alternatively, if used as a review, the introduction might summarize the
concept being tested. A good interactive slide show thus begins with a title and an introduction
slide (Fig. 10.3).
Fig. 10.3 Title and Introduction Slides
You then move to the directions which tell the user how to complete the test, with the test
questions following.

Lesson 10: PowerPoint Presentations Beyond the Basics
285
An effective interactive slide show must also have a directions slide (never assume your
audience knows how to take your test) and question slides, which contain the questions
themselves and the options for answers (See Fig. 10.4).
Fig. 10.4 Directions and Question One Slide
The interactive PowerPoint presentation has the same elements, with one significant addition:
the feedback slides. In your class, you grade papers and return them, giving the students
feedback on their answers. Here, we have "You're Right" or "Sorry. Try Again" slides that give
students feedback (see Fig. 10.5).
Fig. 10.5 Question Two and its Feedback Slides
Lastly, in any PowerPoint, it's appropriate to have an ending slide for the test, followed by an
acknowledgements slide (see Fig. 10.6).
Fig. 10.6 Ending and Acknowledgment Slides

ESSENTIAL MICROSOFT OFFICE 2003: Tutorial for Teachers Copyright © Bernard Poole, Lorrie Jackson, Rebecca Randall, 2004. All rights reserved
286
Not only do you set good precedent for citing sources, but you also clue your audience to the fact
that it's over! We'll talk more about the layout of an interactive PowerPoint as you begin creating
your own.
Action Buttons and Hyperlinks
In order to move outside the linear box of traditional PowerPoints, we've used Action Buttons
and Hyperlinks. Action Buttons are the square boxes with arrows in them that let you either
move on to the next question or re-answer the previous one. These were discussed briefly in the
previous chapter, but we'll pay special attention to them in the subsequent activities.
A hyperlink (also called a bookmark) simply takes you from one place to another: perhaps
from one Web site to another, from a Web page to your E-mail program to contact the page's
webmaster, or from one part of a document to another.
Absence of Transitions and Animation
Notice the simple, clean style of the Mammal Test slide show. In the previous lesson, you
learned how to use the Custom Animation feature to make text and graphics move on slides.
You also learned how to use different effects for Slide Transitions.
These are certainly valuable tools that engage your viewers and can keep their interest. But
everything has a time and a place, and in a testing situation, the bells and whistles aren't needed.
They may, indeed, be an unwanted distraction.
So much for an overview of using an interactive PowerPoint show. It's time to create your
own interactive quiz.
One final word, though, before we begin: if you are a practicing teacher using this tutorial,
and you consider yourself an experienced user of the computer, you might like to create a quiz
based on your own grade level or subject matter by adapting the upcoming steps. Expert users
should have little trouble doing this. But if you're even the least bit fuzzy on how an interactive
show works, stick with the mock test below for your first try. Then practice it later on your own
curriculum!
Hit ESC and close the Mammal Test presentation when you are ready to continue with the tutorial
10.2 BUILDING THE PRESENTATION Preparation of the outline
You are going to prepare a simple test about the U.S. states and capitals which will give you the
experience to prepare more detailed interactive tests on your own.
First, go to File > New... (or CTRL-N) and in the New Presentation task pane on the right of your screen, click on the Blank Presentation icon (see Fig. 10.7 on the next page)
Notice that you have the option (see again Fig. 10.7 next page) to click on From Design
Template if you wished to start out by selecting a background image, color schemes, and fonts
before typing your show's text.
However, it is usually best to wait to select a design template (or background and so forth if
you wish to design your own slides) until you have typed in all your text. This is because

Lesson 10: PowerPoint Presentations Beyond the Basics
287
different templates have different slide layouts (bigger title boxes, less room for bulleted lists,
and so on).
Fig. 10.7 New Presentation task pane
This reminds us of a good rule of thumb when creating anything that is designed to inform:
Substance Before Style! Or, put it another way, Content counts! Keep this in mind when
developing any PowerPoint presentation.
To create the U.S. States and Capitals outline, here are the steps to follow.
Click on the Outline tab at the top of the left hand pane on your screen
Let's start typing. Figure 10.8 illustrates the content you need for the first three slides.
Fig. 10.8 First Three Slides

ESSENTIAL MICROSOFT OFFICE 2003: Tutorial for Teachers Copyright © Bernard Poole, Lorrie Jackson, Rebecca Randall, 2004. All rights reserved
288
The Title Slide is tricky when using the Enter and Tab keys, so follow these directions carefully.
Click inside the Title box on the slide itself and type U.S. States and Capitals Quiz, then hit CTRL-Enter
Now type, By ______ (type your name in the blank)
The sub-title By _______ (your name) should now be in the sub-title box of your first slide.
Hit Enter and go to Insert > Date and Time, then double-click on the date format of your choice
Hit CTRL-Enter to automatically insert the next slide (if you choose to click in the title and subtitle boxes instead of using the keyboard, that's fine too)
Continue to type the information for the next 2 slides (see Fig. 10.8 above)
Get to know the Keyboard Shortcuts
You'll quickly learn that hitting Enter moves you to the next line within a text box.
As you just did for the two slides, press CTRL-Enter to move from one text box to the next (for example, from a slide's title to its bulleted list, or from one slide's bulleted list to the next slide's title box)
Get used to using these keyboard shortcuts rather than reaching for the mouse, clicking on
each slide, and then selecting New Slide from the toolbar or from the Insert menu.
Keyboard shortcuts are a faster way to go for the more experienced user!
Question and Feedback slides
In a moment you are going to type the Question and Feedback slides (see Fig. 10.10 on the next
page). If you are a relatively experienced user of Office programs such as Word, and since you
perhaps already completed the introductory PowerPoint tutorial (Lesson 9), you should be able to
complete the following tasks without step-by-step help. However, in case you need some help,
before you proceed here are a few useful hints:
• When you enter the information for each of the question slides (slides 4, 5, and 6 in Fig. 10.9), once you've typed the title in the Title Box (such as Question One),
hit CTRL-Enter to skip to the next box, then hit Backspace to get rid of the
bullet that is automatically inserted by PowerPoint.
• Before typing the first of the possible answers on each slide, click on the numbered list icon in the toolbar (Fig. 10.9) so that the program will
automatically number your answers.
Fig. 10.9 the Numbered List icon in the Formatting toolbar

Lesson 10: PowerPoint Presentations Beyond the Basics
289
• If you want to further modify the numbering, you can go to Format > Bullets and Numbering and double-click on the number format of your choice.
• After the question slides, type the two feedback slides in Fig. 10.10: You're Right (slide 7) and Sorry. Try Again (slide 8).
Wait, don't we need these after each question? Yes, we'll make duplicates of
them and move them to the right places later. We'll change the slide layout later as
well.
One thing at a time…
Now go ahead and type the five Question and Feedback slides (slides 4 through 8 of your show) illustrated in Fig. 10.10
Fig. 10.10 Question and Feedback Slides
For any PowerPoint show, it is important to have a slide that signals the end of the main body of
content (such as the end of testing in the case of our show). PowerPoint presentations that end
abruptly can be disconcerting to a viewer. Also, it is important to give credit where credit is due.
So, at the conclusion to most any slide show you should include an acknowledgements slide.
These are your next two tasks.

ESSENTIAL MICROSOFT OFFICE 2003: Tutorial for Teachers Copyright © Bernard Poole, Lorrie Jackson, Rebecca Randall, 2004. All rights reserved
290
Type the content for slides 9 and 10 as in Fig. 10.11
Fig. 10.11 Feedback, End of Test, and Acknowledgement Slides
Before you proceed to the next section of the tutorial
First, it is time to save all your hard work.
Make sure you have your Work Files for Office 2003 Tutorials disk in the disk drive
Got to File > Save As…, in the dialog box select the Work Files for Office 2003 Tutorials disk, open the PowerPoint Files folder, call the file States and Capitals, then click on Save
It is always wise to check your work as you proceed. So make sure you have 10 slides, in the
order shown in Table 10.1.
Slid
e
Content
1 Title Slide
2 Introduction
3 Directions
4 Question One
5 Question Two
6 Question Three
7 You're Right
8 Sorry. Try Again
9 Great Job, Class
10 Acknowledgements
Table 10.1 Order and content for the States and Capitals slide show

Lesson 10: PowerPoint Presentations Beyond the Basics
291
It is going to get tricky for a little while, so double-check your work before you proceed to the
next section. If any of the slides are missing, go back through the steps above.
10.3 MAKING THE PRESENTATION INTERACTIVE You are now going to tackle the three hardest steps in this lesson:
1. making duplicate feedback slides and sorting them correctly;
2. hyperlinking each possible answer to the appropriate feedback slide;
3. creating Action Buttons that send the viewer to the next question when right or the previous question when wrong.
Duplicating and Sorting the Feedback Slides
You now need to copy the You’re Right and Sorry. Try Again. slides twice each and place a
copy of both after each of the three Question slides.
How? Follow these steps.
Click the Slide Sorter view just above the Draw option at the bottom left of your screen (Fig. 10.12) so that thumbnails of all your slides are visible on the screen
Fig. 10.12 The PowerPoint Slide View tools
Click on the You’re Right slide (slide 7), and copy that slide (CTRL-C or Edit > Copy or the copy tool on the standard toolbar)
Now click just to the right of Question One (slide 4)
You should see a vertical line appear where you clicked. Note: if that slide is at the far right
margin, the line will appear in the far left margin of the next row.
Paste the You’re Right slide where the line appears (CTRL-V, Edit > Paste or use the paste tool on the standard toolbar)
Next, click to the right of the Question Two slide, then paste the You’re Right slide there as well
You should now have THREE You’re Right slides, each one following the Question One,
Question Two, and Question Three slides. Now here are the steps to repeat the process for the
Sorry. Try Again slide.
Click on Sorry. Try Again (slide 10 now), copy it, click to the right of slide 5 (the You’re Right slide next to Question One), and paste

ESSENTIAL MICROSOFT OFFICE 2003: Tutorial for Teachers Copyright © Bernard Poole, Lorrie Jackson, Rebecca Randall, 2004. All rights reserved
292
Click to the right of slide 8 (the You’re Right slide next to Question Two), and paste
Check your work
Do you have 14 total slides, with two feedback slides (You’re Right and Sorry. Try Again) to
the right of each question slide?
If so, pat yourself on the back. If not, reread the section above on Duplicating and Sorting
the Feedback Slides and try again.
Hyperlinking the Answers to the Appropriate Slides
Time for some fun. Let’s link each answer with the appropriate feedback slide so the students
will know if they got the answer right or not.
You are still in Slide Sorter view.
Double-click on slide 4 (Question One), highlight the word Houston, right click, and select Action Settings… from the pop up menu
You will see the Action Settings dialog box (Fig. 10.13).
Click on the down arrow in the Hyperlink to: box to drop down the menu of hyperlink options (Fig. 10.13)
Scroll down the menu till you see the option for Slide…
You’ll now see the full list of the slides in your States and Capitals slide show.
Fig. 10.13 Action Settings dialog box
If necessary, scroll down the list of slides and click on slide 6 (Sorry. Try Again) and click OK
Why? Because Houston, the answer we just converted into a hyperlink, is not the capital of
Texas. So we want the student to be presented with the feedback slide that says the answer is
wrong.
Repeat these steps for the answers Dallas and San Antonio by highlighting each city in turn, right click, and select Action Settings… from the pop up menu as you did just now for Houston
Now, highlight Austin
Lesson 10: PowerPoint Presentations Beyond the Basics
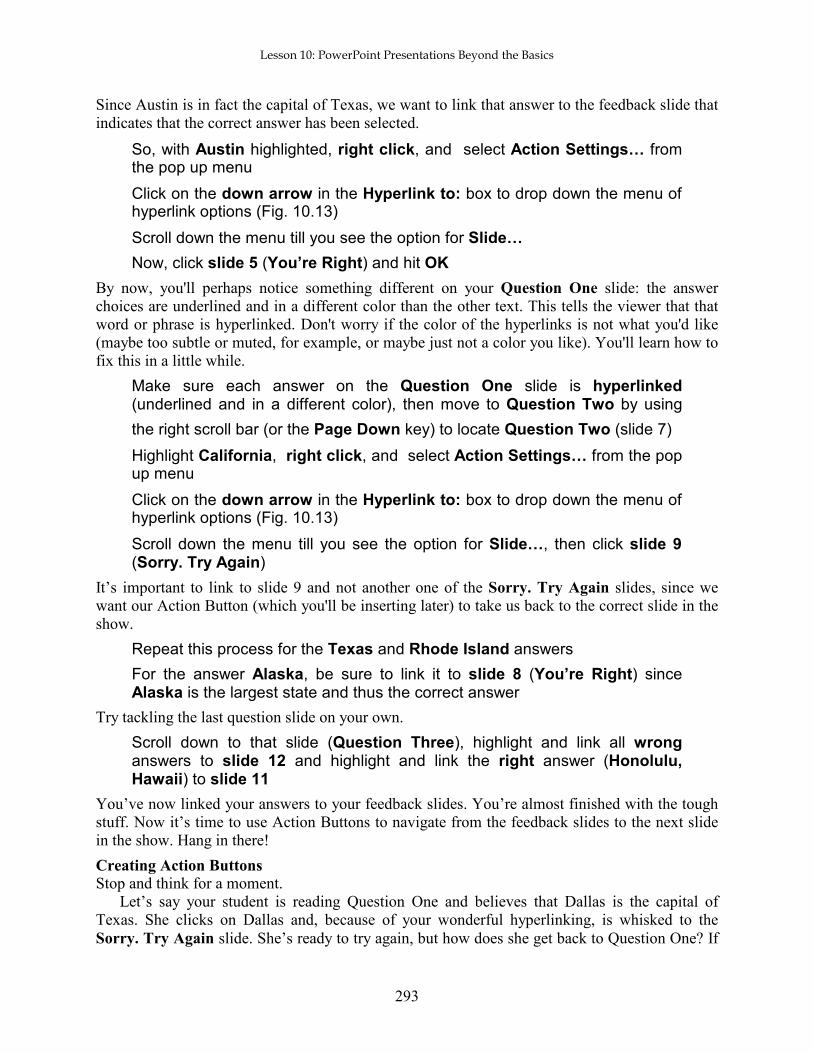
293
Since Austin is in fact the capital of Texas, we want to link that answer to the feedback slide that
indicates that the correct answer has been selected.
So, with Austin highlighted, right click, and select Action Settings… from the pop up menu
Click on the down arrow in the Hyperlink to: box to drop down the menu of hyperlink options (Fig. 10.13)
Scroll down the menu till you see the option for Slide…
Now, click slide 5 (You’re Right) and hit OK
By now, you'll perhaps notice something different on your Question One slide: the answer
choices are underlined and in a different color than the other text. This tells the viewer that that
word or phrase is hyperlinked. Don't worry if the color of the hyperlinks is not what you'd like
(maybe too subtle or muted, for example, or maybe just not a color you like). You'll learn how to
fix this in a little while.
Make sure each answer on the Question One slide is hyperlinked (underlined and in a different color), then move to Question Two by using
the right scroll bar (or the Page Down key) to locate Question Two (slide 7)
Highlight California, right click, and select Action Settings… from the pop up menu
Click on the down arrow in the Hyperlink to: box to drop down the menu of hyperlink options (Fig. 10.13)
Scroll down the menu till you see the option for Slide…, then click slide 9 (Sorry. Try Again)
It’s important to link to slide 9 and not another one of the Sorry. Try Again slides, since we
want our Action Button (which you'll be inserting later) to take us back to the correct slide in the
show.
Repeat this process for the Texas and Rhode Island answers
For the answer Alaska, be sure to link it to slide 8 (You’re Right) since Alaska is the largest state and thus the correct answer
Try tackling the last question slide on your own.
Scroll down to that slide (Question Three), highlight and link all wrong answers to slide 12 and highlight and link the right answer (Honolulu, Hawaii) to slide 11
You’ve now linked your answers to your feedback slides. You’re almost finished with the tough
stuff. Now it’s time to use Action Buttons to navigate from the feedback slides to the next slide
in the show. Hang in there!
Creating Action Buttons
Stop and think for a moment.
Let’s say your student is reading Question One and believes that Dallas is the capital of
Texas. She clicks on Dallas and, because of your wonderful hyperlinking, is whisked to the
Sorry. Try Again slide. She’s ready to try again, but how does she get back to Question One? If

ESSENTIAL MICROSOFT OFFICE 2003: Tutorial for Teachers Copyright © Bernard Poole, Lorrie Jackson, Rebecca Randall, 2004. All rights reserved
294
she clicks or presses the space bar, she moves on to the next slide in sequence and doesn’t get to
retest. So, what can we do?
Action Buttons, which you learned about in Lesson 9, are great tools to help us break the
linear (one slide after another) nature of PowerPoint presentations. With Action Buttons, you can
jump from slide to slide in any order you want.
We’ll insert an Action Button on each feedback slide to help the student get where they need
to go next.
Scroll to slide 5 (or click on slide 5 in the Outline pane on the left side of the screen)—this is the You’re Right slide, immediately after Question One
Now go to Slide Show > Action Buttons
You’ll see a menu appear with a variety of square buttons with graphics on them. Since we’re on
the You’re Right slide, we want to reward our smart student with an Action Button that moves
them forward in the show.
Click the Action Button with the arrow that points to the right (second from left in middle row).
Now, without pressing the mouse button yet, position the crosshair cursor on slide 5 any place where you want the button to appear (the bottom right corner is a common location for Action Buttons that send you forward in the show)
Hold down the left mouse button and drag down and to the right to draw the button (it can be as large or small as you wish)
You’ll now see a dialog window titled Action Settings (Fig. 10.14).
Fig. 10.14 Action Settings Window

Lesson 10: PowerPoint Presentations Beyond the Basics
295
Click the small black arrow at the right end of the white box with the words Next Slide to show the drop down menu of hyperlink options
Notice how easy it would be to link to the beginning (First Slide) or end (Last Slide) of a slide
show, even to Web sites (URLs…) or other PowerPoint presentations (see Fig. 10.14 above).
But you want to have the new Action Button send the user to a specific slide in the show.
In the drop down menu, scroll and click on the word Slide… to get a full listing of all the slides in your show
Now, since the student got the answer right, we want to move them to the next question:
Question Two.
Locate Question Two in the list of slides and click OK twice to close both the Hyperlink to Slide dialog box and the Action Settings dialog box.
Notice that your Action Button is a solid color now. To make the button bigger or smaller, or to
move it around, you need to select it first, by clicking on it.
Click once on the new Action Button
Hold down the left mouse button and drag down and to the right to enlarge the button (it can be as large or small as you wish, so feel free to use the handles around the Action Button to resize it to whatever shape you want)
Practice moving the Action Button by grabbing it with the mouse anywhere inside the border (NOT on the handles) and sliding it around on the screen
You also can double-click on any button to bring up a dialog box which will allow you to change
the color scheme to meet your design preferences. Right now, leave it the default color.
Next you're going to repeat the above steps to create an Action Button that moves the student
who incorrectly answered Question One back to Question One to try again.
Scroll to the next slide (slide 6—Sorry. Try Again), and go to Slide Show > Action Buttons
Click on the left arrow Action Button (on the left of the middle row)
Again, without pressing the mouse button yet, position the crosshair cursor on slide 6 near the bottom right corner of the slide
Hold down the left mouse button and drag down and to the right to draw the button (it can be as large or small as you wish)
Once again, you’ll now see a dialog window titled Action Settings (Fig. 10.14 above).
In the Action Settings dialog box, click the down arrow at the end of the Hyperlink box, in the drop down menu select Slide… and click on Question One
Finally, hit OK twice
This is a good time to save your work once again.
Go to File > Save or hit CTRL-S
This also is a good time to test your work to make sure it works the way you want it to.

ESSENTIAL MICROSOFT OFFICE 2003: Tutorial for Teachers Copyright © Bernard Poole, Lorrie Jackson, Rebecca Randall, 2004. All rights reserved
296
Go to Slide Show > View Show and pretend you’re a student using this presentation
Answer Question One incorrectly first and watch as the hyperlink takes you to the wrong answer
Click on the Action Button to return to Question One, and test all your answers and buttons to make sure they work appropriately
Now, go back and create Action Buttons for all four feedback slides for Questions Two and Three
Use the instructions above as your guide. Remember that if you’re on the You’re Right slide,
you need a right arrow Action Button and will want to select Question Three if they just
answered Question Two or Great Job, Class if they just answered Question Three.
If you’re on the Sorry. Try Again slide, make sure you use the left arrow Action Button that
gets them either back to Question Two or Question Three.
Save your work, and view the show again (Slide Show > View Show)
Give yourself a round of applause if everything worked correctly.
If, on the other hand, a hyperlink or Action Button doesn’t work, don’t panic. You can
remove an Action Button that doesn’t work the way you want by simply clicking on it and hitting
the DEL key. Or you can right-click on it and select Edit Hyperlink to change where a button
takes you.
Follow the steps above again carefully, and you should be able to straighten things out.
10.4 FORMATTING YOUR PRESENTATION Selecting a Design Template
Office 2003 makes it easy to select a background, font type and style, and color scheme for your
presentation. All these features are combined into what PowerPoint calls your Design Template.
Earlier we mentioned that you could start your new presentation by picking the design
template before even typing in the text. Well, sometimes it is best to wait to select a design
template until you have an idea of where text should be on the slides and how much text is on
each slide before making this decision. Some design templates, for example, have graphics that
take more space on the slide than others and might make it hard to read your text.
It's time to improve the appearance of your slide show. Let’s make your U.S. States and
Capitals quiz a bit more attractive. If you’ve followed this chapter step-by-step, you’ve just now
finished testing the interactive nature of your slide show.
Hit Esc to return to the Normal View
Now look at the top right corner of your screen. You’ll see two boxes on the Formatting toolbar
towards the top of the screen: Design and New Slide (Fig. 10.15).
Fig. 10.15 The Design and New Slide Buttons on the Formatting toolbar
Lesson 10: PowerPoint Presentations Beyond the Basics
297
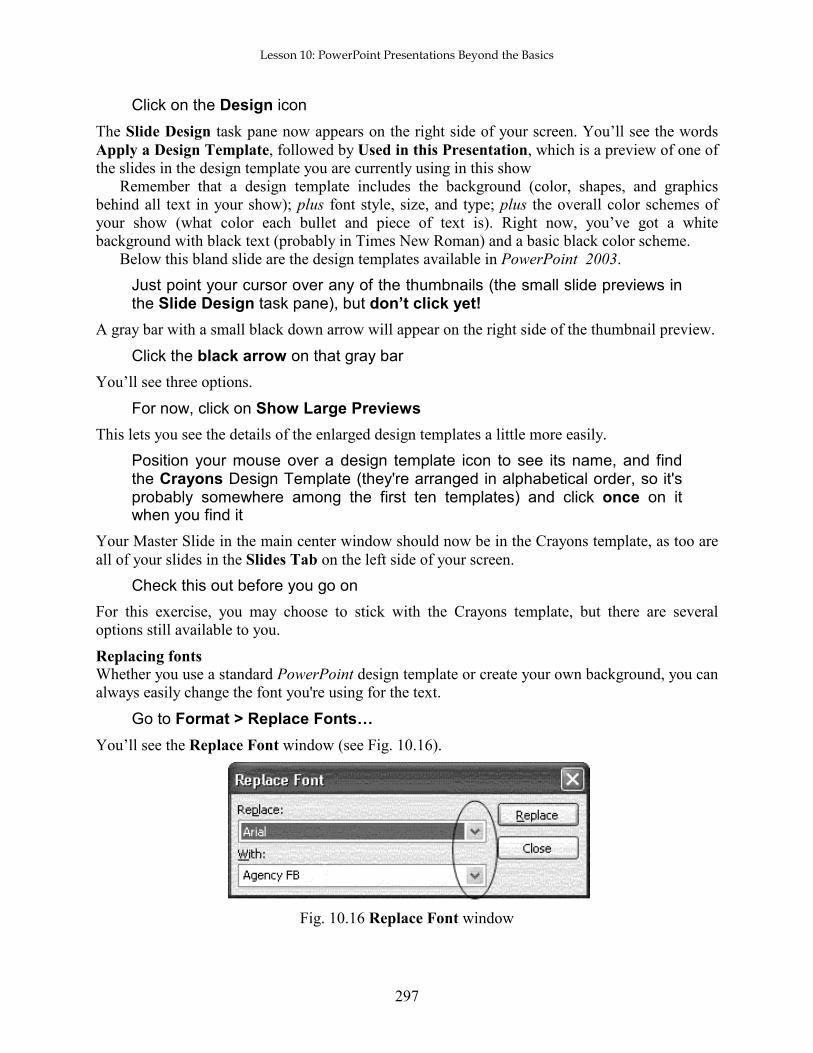
Click on the Design icon
The Slide Design task pane now appears on the right side of your screen. You’ll see the words
Apply a Design Template, followed by Used in this Presentation, which is a preview of one of
the slides in the design template you are currently using in this show
Remember that a design template includes the background (color, shapes, and graphics
behind all text in your show); plus font style, size, and type; plus the overall color schemes of
your show (what color each bullet and piece of text is). Right now, you’ve got a white
background with black text (probably in Times New Roman) and a basic black color scheme.
Below this bland slide are the design templates available in PowerPoint 2003.
Just point your cursor over any of the thumbnails (the small slide previews in the Slide Design task pane), but don’t click yet!
A gray bar with a small black down arrow will appear on the right side of the thumbnail preview.
Click the black arrow on that gray bar
You’ll see three options.
For now, click on Show Large Previews
This lets you see the details of the enlarged design templates a little more easily.
Position your mouse over a design template icon to see its name, and find the Crayons Design Template (they're arranged in alphabetical order, so it's probably somewhere among the first ten templates) and click once on it when you find it
Your Master Slide in the main center window should now be in the Crayons template, as too are
all of your slides in the Slides Tab on the left side of your screen.
Check this out before you go on
For this exercise, you may choose to stick with the Crayons template, but there are several
options still available to you.
Replacing fonts
Whether you use a standard PowerPoint design template or create your own background, you can
always easily change the font you're using for the text.
Go to Format > Replace Fonts…
You’ll see the Replace Font window (see Fig. 10.16).
Fig. 10.16 Replace Font window

ESSENTIAL MICROSOFT OFFICE 2003: Tutorial for Teachers Copyright © Bernard Poole, Lorrie Jackson, Rebecca Randall, 2004. All rights reserved
298
Click the small black arrow next to the Replace: data box to select the font you want to replace (some design templates only use one font, others use two or more), then click the black arrow next to the With: box, select the new font you want to use, and click Replace
It’s best to replace fonts only after you’ve finished adding all your text. Otherwise, your changes
may not be reflected in any new slides you create.
Changing the Color Scheme
The final formatting change you're going to make is to the show's Color Scheme. When you
choose a Design Template in PowerPoint, the program decides what colors to make the title,
bullets, hyperlinks, and so forth.
Depending on your taste, printing needs, and the lighting conditions of your room, you may
want to change these. For example, many colors schemes use light blue to highlight hyperlinks
that have been clicked, but if a viewer does click a link, then prints the show, that light blue will
be difficult if not impossible to see on paper.
To change the color scheme, go to the right task pane (if for some reason you do not have a right task pane showing, go to View > Task Pane) and select Color Schemes under Slide Design (see Fig. 10.17)
Fig. 10.17 Color Scheme in New Design Task Pane
You’ll see a number of color schemes you can choose from. These are pre-set color combinations
that make it easy for you to change the look of your presentation. You may well find some of the
combinations to be either boring or, worse, ugly! After all, everyone's taste is different. A word
to the wise, however: the color schemes have been designed by professionals, so think twice
before you go your own way!

Lesson 10: PowerPoint Presentations Beyond the Basics
299
If you want more control in choosing a color scheme of your own, simply go to the bottom of the
right task pane and click Edit Color Schemes. Do this now.
Click on Edit Color Scheme at the bottom of the right Task Pane
The Edit Color Scheme window will appear (see Fig. 10.18).
Fig. 10.18 Edit Color Scheme
Click on the Custom Tab and select an element you wish to change (for example Text and Lines or Accent), then click Change Color…
You’ll now see a window with two tabs for Standard or Custom color. These give you a
selection from a wide variety of colors, as you may recall from Lesson 3 (The Office Drawing
Tools). The Standard color palette is probably the one you'll see first (Fig. 10.19).
Fig. 10.19 The Standard Office Color Palette

ESSENTIAL MICROSOFT OFFICE 2003: Tutorial for Teachers Copyright © Bernard Poole, Lorrie Jackson, Rebecca Randall, 2004. All rights reserved
300
In the Standard palette you can choose from any one of 128 different colors, plus 16 shades of
gray. You select a color by simply clicking on it and then clicking on OK.
But if you have artistic flair, or your taste runs to the exotic, the out-of-the-ordinary, or you're
just real picky about shades of color, check out the Custom Color mixer where you have a choice
of over 16 million different colors!
Click on the Custom tab to show the Custom Color Mixer (Fig. 10. 20)
Fig. 10.20 The Office Custom Color Mixer
Use the two color mixing tools (Fig. 10.20 above) to choose a new color, then click OK
Notice that you can compare the color you're mixing with the color you already have for the
object you're working with.
Click Preview in the Edit Color Scheme to see how the color choices will look, then hit Apply to change the colors in your presentation
One last thought about formatting your presentation. Always, keep in mind your audience and
viewing formats. A first grade classroom learning about dinosaurs and a graduate education class
learning about Piaget will require different levels of sophistication and creativity in backgrounds,
fonts, and colors.
How the show will be viewed should also influence your design choices. Eye care
professionals recommend dark backgrounds and light text whenever a presentation is viewed on
a lighted surface (i.e. a computer screen or projected image on a board or wall). However, for
most viewers, this is a bit jarring since we are accustomed to dark text on light backgrounds. You

Lesson 10: PowerPoint Presentations Beyond the Basics
301
might want to test your presentation with a member of your future audience to make sure they are
comfortable with what you've done and can read the display.
Tips on color choices for printing
Lesson 8 covered the topic of printing PowerPoint presentations, but this is a good time to
mention editing your background for paper. While many of the design templates are attractive to
look at, when you print handouts or slides in black ink, the dark backgrounds make some text
hard to read. If you plan to print out your show, therefore, choose a lighter background. Then
when you are ready to print, hit CTRL-P or File > Print. In the Color/Grayscale box in the
Print window, click the black arrow and choose black and white. This reduces the background to
plain white with black text, making it easier to read than color or grayscale.
Applying different design templates to certain slides in a show
Most of the time, we want our show to look the same on every slide, but if you do need to vary
the design template you use on different slides, here's what you do. Let's say, for example, that
you want a different design template for the first slide and the last slide.
Change your view to Slide Sorter View, hold the CTRL button down as you click on both the first slide and the last slide to select just those two slides
In the Task Pane on the right side of your slide show, click Design Templates to open the Slide Design Task Pane where you'll see thumbnails of the various design templates available to you
Scroll to locate the template you prefer, then, without clicking, hold your cursor over that template to activate the design template's gray bar which has a small black arrow in it
Now, click on the black arrow to drop down the menu of choices (Fig. 10.21) and click on the option to Apply to Selected Slides
Fig. 10.21 Menu for applying Design Templates
Notice that only those slides you selected have that specific design template!
Applying customized backgrounds to the slides
For many users, the design templates provided by PowerPoint 2003 are more than sufficient to
meet their design needs. Other templates can be purchased online or on CDs. If you prefer to
create your own background, or wish to create a standard template for your school or class, you

ESSENTIAL MICROSOFT OFFICE 2003: Tutorial for Teachers Copyright © Bernard Poole, Lorrie Jackson, Rebecca Randall, 2004. All rights reserved
302
can use the Background, Replace Fonts, and Color Schemes options to customize your
presentation further.
You learned how to customize background colors and background effects in Lesson 3 when
you learned about the Office 2003 Drawing Tools. Here's a quick reminder.
Click on Format > Background
A Background window will appear (Fig. 10.22).
Fig. 10.22 Background Window
Click on the black arrow and a drop-down menu will appear with some choices for background colors (see Fig. 10.22 above)
To select a different background color, either click on one of the eight default color choices in the drop-down menu, or click More Colors… to get a much wider variety of colors.
To select a different background effect, choose Fill Effects….
The Fill Effects… option allows you to select a gradient (where one or more colors fades from
dark to light), texture (where the background resembles marble, paper, or some other texture),
pattern (where your background color is in stripes, dots, etc.), or picture (where you can use a
picture of your choice as your background).
After choosing the background color or effect you like best, hit Apply to All to make sure the new background goes onto each slide
10.5 INSERTING CONTENT PowerPoint 2003 has simplified inserting clip art, sound, tables, and charts into what it now
calls inserting content. Let's check this out.
In your U.S. States and Capitals show, click on Format > Slide Layout

Lesson 10: PowerPoint Presentations Beyond the Basics
303
Notice that the right task pane now becomes the Slide Layout pane (see Fig. 10.23).
Fig. 10.23 Slide Layout Pane
In previous versions of PowerPoint, there was a confusing variety of slide layouts to choose
from. One slide was for text and clip art, another for text and movie, and another for text and
chart. Office 2003 makes it easier by calling all non-text insertions Content and providing
simple categories of Text Layouts (when you want a slide to have only text), Content Layouts
(for content-only slides), and Text and Content Layouts (for a mix of both text and content).
If you preferred the former content-specific layouts of previous versions of PowerPoint,
never fear. Scroll down the right pane and you can see what it calls Other Layouts (the old text
and clip art slide, and so on).
Let’s practice inserting content into our U.S. States and Capitals quiz. In the next few pages
you’ll learn to:

ESSENTIAL MICROSOFT OFFICE 2003: Tutorial for Teachers Copyright © Bernard Poole, Lorrie Jackson, Rebecca Randall, 2004. All rights reserved
304
1. Insert clip art 2. Insert sounds 3. Insert movies 4. Insert E-mail (hyperlink)
Inserting Clip Art
Make sure you’re in Normal View, not Slide Sorter View, then scroll to slide two (Introduction)
In the Slide Layout pane (right side of your PowerPoint window), under Text and Content Layouts (scroll down if necessary to see them), click the left hand slide on the top row (if you hold your cursor on it for a few seconds before clicking, you’ll see the slide title Title, Text, and Content)
Slide two should now have the bulleted text on the left with a right box for content (see Fig.
10.24).
Fig. 10.24 Slide Two: Title, Text, and Content
See the square just above the words Click Icon to add Content? Click on the top right icon (the Insert Clip Art icon which looks like a picture of a man’s face in a white square)
This will tell the program you want to insert clip art. A Select Picture window will pop up
showing a selection of clip art and other pictures you have stored on your computer which you
may have used in your PowerPoint slides before. There's also a Search box into which you type a
keyword or phrase to find pictures related to a topic you have in mind.

Lesson 10: PowerPoint Presentations Beyond the Basics
305
Type Question in the Search box and click on Search or hit Enter
After a second or two you will see thumbnail sketches of Question Mark graphics appear.
Double-click the one of your choice
You may need to have with you your Office 2003 CD number two, which contains many of the
clip art choices listed in this window. Here’s how your slide may look now (see Fig. 10.25).
Fig. 10.25 Introduction Slide with Question Mark clip art
Sometimes you will need to resize your clip art if it appears too small or too large to fit into your
presentation. Click once on the clip art and white handles (small white circles) will appear on the
corners and midpoints of the perimeter of the clip art. In prior versions of PowerPoint, these
were white squares. Click on a corner white circle and drag diagonally to enlarge or shrink the
image. To rotate the image, click and drag the green handle immediately above the clip art.
If you wish to use clip art outside of the Clip Art Organizer (where PowerPoint stores your
clip art), click Clips Online at the bottom of the Insert Clip Art pane to the right of your screen.
Then follow the directions at Microsoft’s online Clip Art Gallery to import clip art back to your
presentation.
Inserting (importing) other pictures or pictures of your own
You are not limited to Microsoft clip art. Once you are comfortable locating and placing clip art
into your show, try finding pictures and other graphics, as well as clip art, to import. To insert a
digital picture that you’ve saved on your computer, simply go to Insert > Picture from File.
When the Insert Picture window appears, click the black arrow near the Look In: window to
find where you saved your picture, then double-click in the main window to insert the picture.
PowerPoint 2003 also gives you the option of importing pictures directly from a camera or
scanner or photo album onto a presentation. To do this, go to Insert > Picture, then select
Scanner or Camera or New Photo Album and follow the directions in the dialog windows that
follow.

ESSENTIAL MICROSOFT OFFICE 2003: Tutorial for Teachers Copyright © Bernard Poole, Lorrie Jackson, Rebecca Randall, 2004. All rights reserved
306
Inserting Sound
For some reason, inserting sound has a mysterious ring to it and appears daunting to new
PowerPoint users. But, in fact, it’s almost as simple as inserting clip art! In the U.S. States and
Capitals show, we want to give our students a reward for getting each answer correct. So, we’re
going to insert applause onto every You’re Right slide.
Scroll to slide 5 (the first You’re Right slide)
Because we used the Outline tab to quickly create our slides, all feedback slides have a text box
in the middle with the words Click to Add Text. We could go to Slide Layout and change the
layout, but we'll use a shortcut instead.
Click the text box so that the white handles appear around it, either click on the border of the text box, or click on any one of the handles, then hit Backspace or Delete
The box should disappear!
Now go to Insert > Movies and Sounds > Sound from Clip Organizer
Notice that the right pane now shows all sounds currently on your Clip Organizer.
In the right pane, click on the very first sound: Claps Cheers
You will see a blue icon of a speaker appear in the middle of your slide 5. You’ll also get an alert
asking if you want the sound to play automatically in the slide show.
First, click Yes, so that students will hear the clapping automatically
Now, feel free to grab the speaker with the mouse (not on the handles) and move it to wherever on the slide looks good to you—grab the handles if you want to resize it, too
Scroll to slides 8 and 11 and repeat the above steps (deleting the text box and inserting the sound)
You should now have applause on each of your positive feedback slides. Note that you cannot
hear sound on a slide while you edit the slides.
Go to Slide Show > View Show to hear the sound
After you've checked out the sound, either hit Esc or right click anywhere on the screen and, in the pop-up menu, select the last option to End Show
Also note that you can get sounds from other files or online. After a while you may have quite a
collection that you've saved on your disks. You would then insert a sound of your own into a
slide by going to Insert > Movies and Sounds > Sound from Files or by clicking Clips Online
at the bottom of the right pane.
One last warning about sound. Like any bell and whistle, it’s easy to get carried away with
sounds. Stay focused on the purpose of your show and your audience’s needs. A kindergarten
class will welcomes lots of sounds, for example, but the Board of Education might prefer a more
professional presentation.
Be especially careful that your negative feedback slide is LESS engaging than your positive
feedback slide. A sad face with an “aw shucks” sound will get the student’s attention, and she
may deliberately answer incorrectly to see and hear it again. Motivate your students to succeed

Lesson 10: PowerPoint Presentations Beyond the Basics
307
with the cool stuff only on the positive feedback slides. You may even want to vary the sounds so
students don’t know exactly what sound they’ll get when they answer correctly.
Inserting Video
Inserting movies (or video) is just as easy as inserting clip art or sounds. Whether it’s an
animated clip or a short video clip, the steps are the same.
Go to slide 13 (Great Job, Class)
Remove the text box as before by clicking on it, then click on the border of the text box, or click on any one of the handles, then hit Backspace or Delete
Go to Insert > Movies and Sounds > Movie from Clip Organizer
Scroll through the right pane to find an animated clip that you like
Click once on that clip (you may need the second Office 2003 CD if you're working through this tutorial at home and have the Office 2003 installation CDs)
It will appear on slide 13. You may want to resize the clip (see Fig. 10.26).
Fig. 10.26 Inserting Movies
Like sounds, the animation of movie clips is only visible when a show is viewed, not when
it’s edited.
Go to Slide Show > View Show to see your clip in action
Also, you should feel free to go to Clips Online or use other animated clips you may find
elsewhere.

ESSENTIAL MICROSOFT OFFICE 2003: Tutorial for Teachers Copyright © Bernard Poole, Lorrie Jackson, Rebecca Randall, 2004. All rights reserved
308
When you've finished checking out the video clip or animation, either hit Esc or right click anywhere on the screen and, in the pop-up menu, select the last menu option to End Show
Inserting E-mail
We discussed hyperlinks in detail several sections ago, but one other use of a hyperlink is to
connect a user to your E-mail account. Many schools now create E-mail accounts for students,
and many families now have E-mail accounts at home, so it is important that a teacher is
accessible electronically. For safety reasons or for personal preference, you may wish to open a
special web-based E-mail account (such as at Yahoo, Hotmail, or MSN) and use it for
communication with students and families. Here are the steps to add an e-mail hyperlink to one
of the slides in the show.
Scroll to the first slide (hit CTRL-Home for a shortcut!)
Highlight your name, then hit CTRL-K (or go to Insert > Hyperlink, or right click on your name and select Hyperlink… from the pop up menu)
Click Email Addresses
In the address blank, type your email address (like [email protected]) then hit OK
Now, students and families can click your name, then send an E-mail directly to you about the
quiz and any questions they may have. This is also good practice anytime you distribute
information electronically for faculty and staff.
Keep in mind as always that moderation with content such as clip art, sounds, and movies is
key. Your topic, not the style of your show, is the main focus.
10.6 SOME FINAL THOUGHTS ABOUT PRESENTATIONS Think you're ready to make some engaging and relevant interactive PowerPoint shows? Before
you jump in, consider the following suggestions.
Notice that no mention has been made of animation schemes (including slide transitions and
custom animation)? In interactive PowerPoint shows, you do not want slides to automatically
move nor do you want text in motion to interfere with the students' ability to read and complete
the quiz. Save the animation for other, non-interactive shows.
It's inevitable: PowerPoint is so easy to use and fun to play with that every beginning user
from ages 6 to 96 wants to use all the tricks and tools available. Yet, always remember the golden
rule: Substance Before Style. Nothing, no matter colorfully arrayed and beautifully orchestrated,
is still nothing.
Keep your focus on your content, then use only those tools that are appropriate for your
audience and task. Got a group of sleepy students that don't seem thrilled about photosynthesis?
Sure, throw in lots of sound and moving text. But for test-taking and concept review, make the
presentation simple, clean, and succinct.
Next, remember the four steps of creating a PowerPoint presentation from the previous
chapter: plan, plan, plan, and plan? This is even more vital in the interactive show, when one
bookmark linking the wrong answer (My teacher is NOT a mammal.) could have unexpected

Lesson 10: PowerPoint Presentations Beyond the Basics
309
consequences. Some of us learn better when we can visualize our task, so you may want to
sketch out your ideas on paper or on a Word document until you feel comfortable with this new
testing method.
Lastly, just because you've created your presentation doesn't mean you've finished. After
planning a presentation and creating the show, you need to spend time practicing using it. Take
the test yourself. Dummy-proof your show as much as your grade-level dictates (more Action
Buttons on the introductory slides for example for younger children).
LOOKING BACK You've viewed and created your own interactive PowerPoint presentation. You've mastered
hyperlinks and Action Buttons as a way to break free of the traditional linear nature of
PowerPoint shows. You've changed the design and inserted content into your presentation.
Finally, you've learned some tips on how to keep the focus on what the students need to learn, not
on how pretty the presentation is.
Creating interactive PowerPoints can be time-intensive, and for that reason, should be used
only occasionally. But, learning how to create such shows is not difficult, and numbers of
teachers are now using this strategy not just to make reviewing material more fun, but also as a
student activity.
Students in grades 5 and up at least can be taught how to create interactive PowerPoint
presentations in a fairly short amount of time. One Language Arts teacher in middle school has
her students create interactive novels using this strategy. The middle school students write stories
that have several options for plot, then have younger students read and play around with the
stories. For example, a dragon may have three caves he can go inside. Click on one cave, and the
dragon meets up with a knight with sword in hand. Click on another cave, and the dragon meets
his long lost mother.
Because hyperlinks do not have to be linked to text but can be linked to clip art or pictures,
interactive PowerPoint shows can be used with grades preK-2 with ease. The title of a slide
might be "What color is the ball?" An image of a red ball is on the slide, along with four squares,
each containing a different color. If the student clicks on the red square, the square's hyperlink
takes her to a slide with the word Red on it and the red square. Depending on the students'
computer skills, teachers can project such a show for the whole class to walk through together,
put the show on one computer in the classroom, or place the show on lab computers for whole
class instruction.
As you consider how to apply interactive shows in your classroom, make sure you take into
account when and how each student will access the show, and weigh time considerations against
learning benefit. These shows can be a great motivator during the winter doldrums or following a
particularly intense unit. Use them occasionally and perhaps have your students create some.
You'll be surprised at how much fun they have and how much learning takes place.
LOOKING FORWARD ESSENTIAL Microsoft Office 2003 has introduced you to many of the fundamental features of
the PowerPoint integrated software package. But there are many more advanced features for you
to learn. Your challenge now is to capitalize on your hard work in two ways.

ESSENTIAL MICROSOFT OFFICE 2003: Tutorial for Teachers Copyright © Bernard Poole, Lorrie Jackson, Rebecca Randall, 2004. All rights reserved
310
1. Use the Office programs as much as possible in order to consolidate your skills and sharpen them to the point where they become second nature.
2. Extend your knowledge by studying the software beyond what you know. Step out on the path that leads to your becoming a power user of productivity software such as this. Get
hold of the Microsoft Office 2003 reference manual. Discover what else the software can
do to improve the quality of your work and make you more productive. Knowledge is
power. You will be surprised to discover what else Office in particular, and the computer
in general, can do for you.
SKILL CONSOLIDATION
1. Prepare an interactive presentation that introduces yourself to your class at the start of a new
school year. Have three silly questions about your education, hobbies, family, etc. Students
will enjoy learning about you and will have a great introduction into your class.
2. Prepare an interactive presentation that reviews a basic concept that must be memorized in
your class (times tables, grammar rules, Spanish vocabulary, periodic table). Depending on
your class, have the show on a classroom computer, E-mail it to your students to study with
from home, or run it in the computer lab.
3. Modify the steps in this chapter and teach your students how to make an interactive
PowerPoint presentation. Have them create a quiz on a hobby or sport of their choosing. This
not only teaches them advanced computer skills, but it helps them synthesize and organize
information. The hyperlink and Action Button steps require clear organization skills and
logical thinking, great practice for real classroom learning.
4. Prepare a presentation that works like an Internet scavenger hunt. Follow each question with a
hyperlink to a Web site with the answer on it. Then follow the steps in this chapter to make
the presentation interactive. Students will have to search the linked sites for the information,
requiring more sophisticated thinking skills than simply memorizing facts.


![Interactive powerpoint[1]](https://img.dokumen.tips/doc/110x75/55860693d8b42a90638b495c/interactive-powerpoint1.jpg)