Embed Size (px)
Citation preview
1 Windows Forms Projects with C++ in Visual Studio 2019
[This is a preliminary version. It will be revised soon.]
The C++/CLR Windows Forms for Visual Studio 2019 extension available in Visual Studio
2019 under Extensions|Manage Extensions makes the book
also with Visual Studio 2019. All examples and projects can be created and compiled in
Visual Studio 2019 as in Visual Studio 2017. However, there are a few minor differences
between installing Visual Studio and creating projects. These are described here.
1.1 Windows Forms projects with C++
In Visual Studio up to version 2010 there are templates for Windows Forms projects
available, but not for Visual Studio 2012 or later. For these newer versions of Visual Studio
a project template can be installed (see section 1.1.2).

2
1.1.1 Installing Visual Studio for Windows Forms Projects
For Windows Forms projects to be created in Visual Studio, additional components must be
installed when installing Visual Studio.
If this was forgotten during the installation, start the Visual Studio Installer
-under Windows Start
-or in Visual Studio 2019 under File|New|Project|Create New Project
Here the .NET desktop development, the desktop development with C++ and the C++/CLI
support must be installed:
3
1.1.2 Installing the Visual Studio Extension for Windows Forms Projects
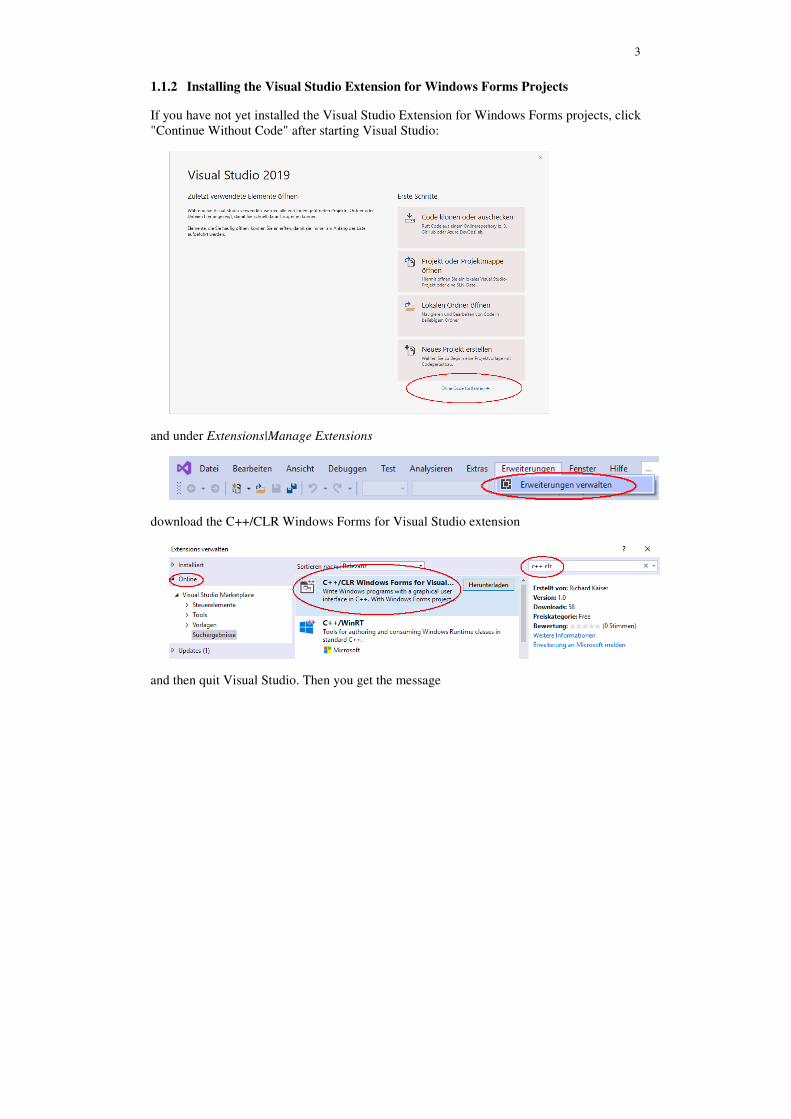
If you have not yet installed the Visual Studio Extension for Windows Forms projects, click
"Continue Without Code" after starting Visual Studio:
and under Extensions|Manage Extensions
download the C++/CLR Windows Forms for Visual Studio extension
and then quit Visual Studio. Then you get the message
4
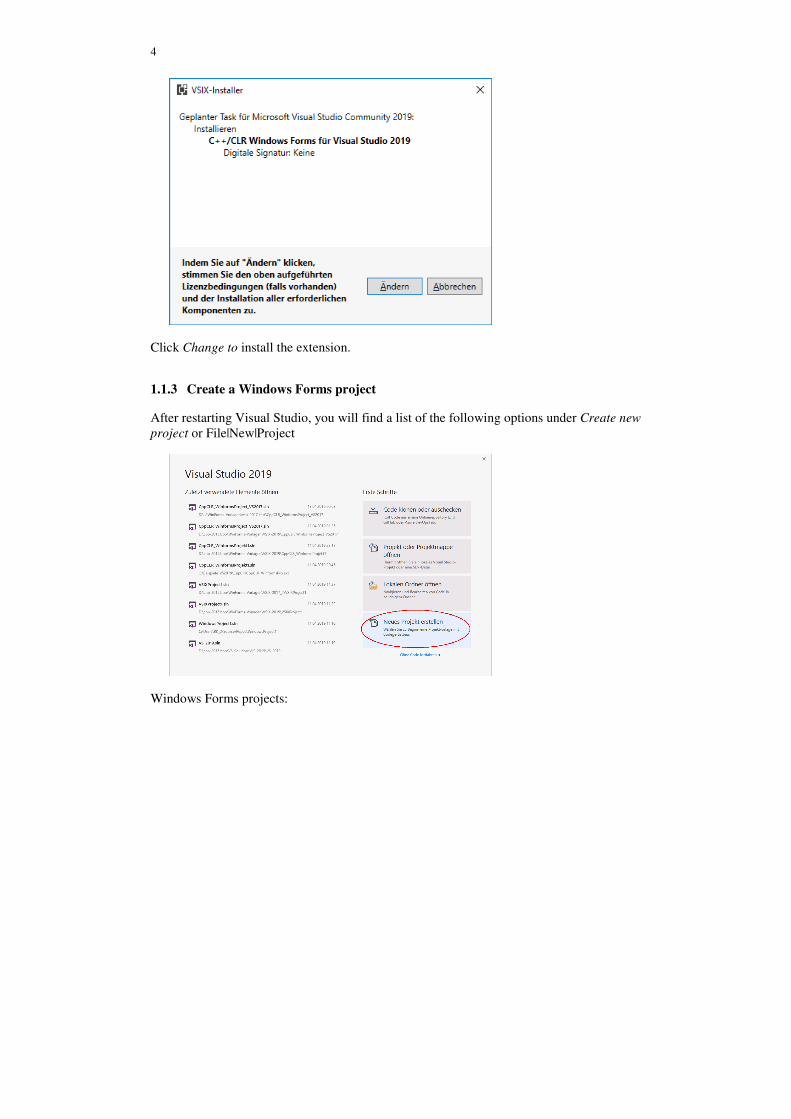
Click Change to install the extension.
1.1.3 Create a Windows Forms project
After restarting Visual Studio, you will find a list of the following options under Create new
project or File|New|Project
Windows Forms projects:
5
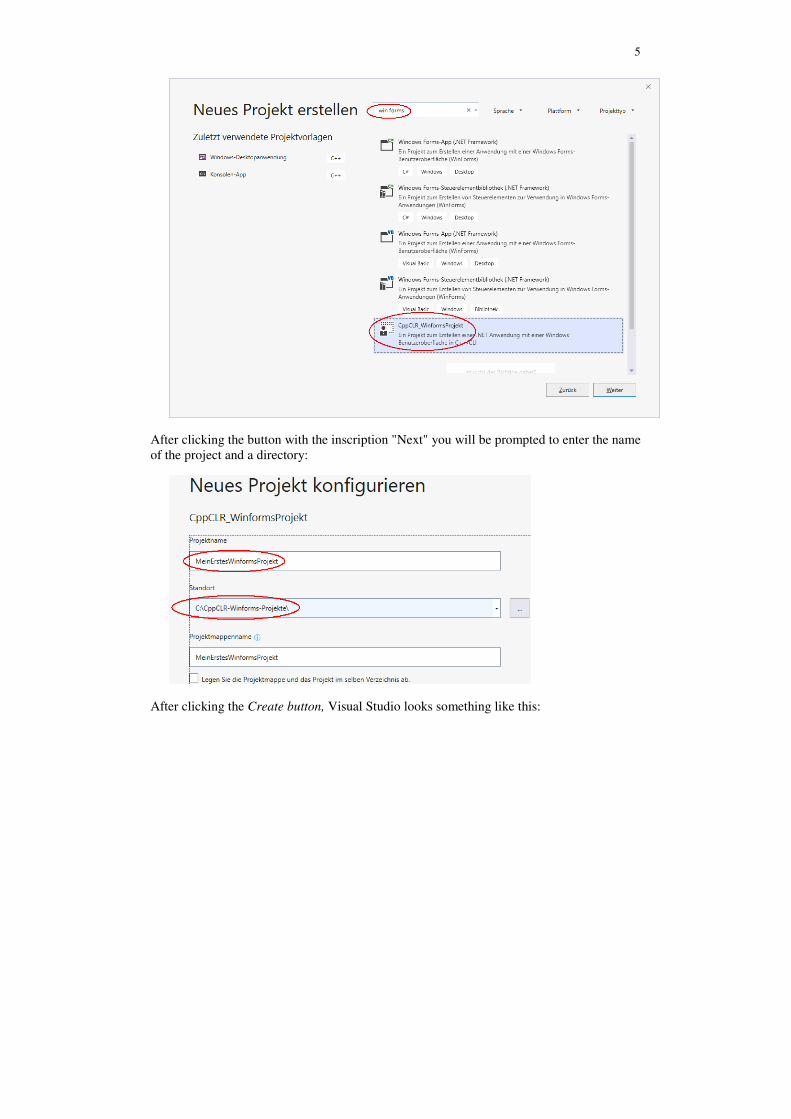
After clicking the button with the inscription "Next" you will be prompted to enter the name
of the project and a directory:
After clicking the Create button, Visual Studio looks something like this:

6
If you now click on Form1.h in the Solution Explorer, the form is displayed:
Normally everything is done and you can continue with section 1.2
1.2 Visual Programming: A First Small Program
After creating a Windows Forms project as described in Section 1.1.3

7
we will first change Visual Studio a bit and then write a first little program. The following
discussion applies to Visual Studio 2019, but is essentially the same for other versions of
Visual Studio (2017, 2015, and earlier).
The toolbox offered here on the left side is displayed when you click on it, or with
View|Toolbox. In some versions of Visual Studio, the Toolbox is also called the
Toolbox. When the form is displayed, the Toolbox displays the controls for the
form.
To prevent the Toolbox from obscuring the form, drag the Toolbox to the Solution
Explorer frame (press the left mouse button on the Toolbox title bar, then drag
and drop the mouse button on the Solution Explorer title bar). Analogous to the
properties window. As we only need the Toolbox, the Solution Explorer and the
Properties window, you can close all other windows (e.g. Team Explorer etc.)
here. Then the right frame looks like this:

8
The form (here Form1) is the starting point for all Windows Forms applications. It
corresponds to the window that appears when the program is started:
You can set controls from the Toolbox on a form. The Toolbox contains practically all the
usual Windows controls. These are divided into different groups (e.g. general controls,
containers, etc.) that can be opened and closed. Most of these controls (such as a button) are
displayed on the form while the program is running. If the mouse pointer remains briefly on
a line of the toolbox, a small message window appears with a short description:
To place an element from the toolbox on the form, simply drag it from the toolbox to the
form. Or you click with the mouse first on the toolbox line (it will be displayed as marked)
and then on the place in the form where you want the upper left corner to be.
Example: After you have set a label (line seven in General Controls, with the capital A),
a text box (fourth line from the bottom, inscription ab) and a button (second line
with the inscription ab) on the form, it looks like this:

9
These gimmicks have already made you a real Windows program - not a very useful one,
but at least. You can start it as follows:
-start debugging with Debuggen|Debugging from the menu bar, or
-with F5 from any window in Visual Studio, or
-by calling the executable file created by the compiler.
This program already has many features you would expect from a Windows program: You
can move, enlarge, reduce and close it with the mouse.
What is remarkable about this program is the low effort required to create it compared to a
non-visual development system. In his classic "Programming under Windows" (Petzold
1992, p. 33), for example, Petzold needs about 80 lines of non-trivial C instructions to write
the text "Hello Windows" in a window like in a label. And in each of these 80 lines you can
do something wrong.
Don't forget to quit your program before you continue editing it. As long as the program is
still running, you cannot restart the compiler or change the form.
This type of programming is called visual programming. Whereas in conventional
programming a program is developed exclusively by writing instructions (text) in a
programming language, in visual programming it is composed entirely or partially of
prefabricated graphic controlelements.
Visual Studio can be used to visually design the user interface of a program. This allows you
to see what the program will look like at runtime. The statements, which are to be made as
reactions to user input (mouse clicks, etc.), are written conventionally in a programming-
language (e.g. C++).
1.3 The Properties Window
The control last clicked on a form (or in the pull-down menu of the Properties window) is
called the currently selected control. One recognizes it by the small squares at its edge, the
so-called pull squares. You can drag them with the mouse to change the size of the control.
A form becomes the currently selected control by clicking with the mouse on a free space in
the form.
Example:In the last example button1 is the currently selected control.
10
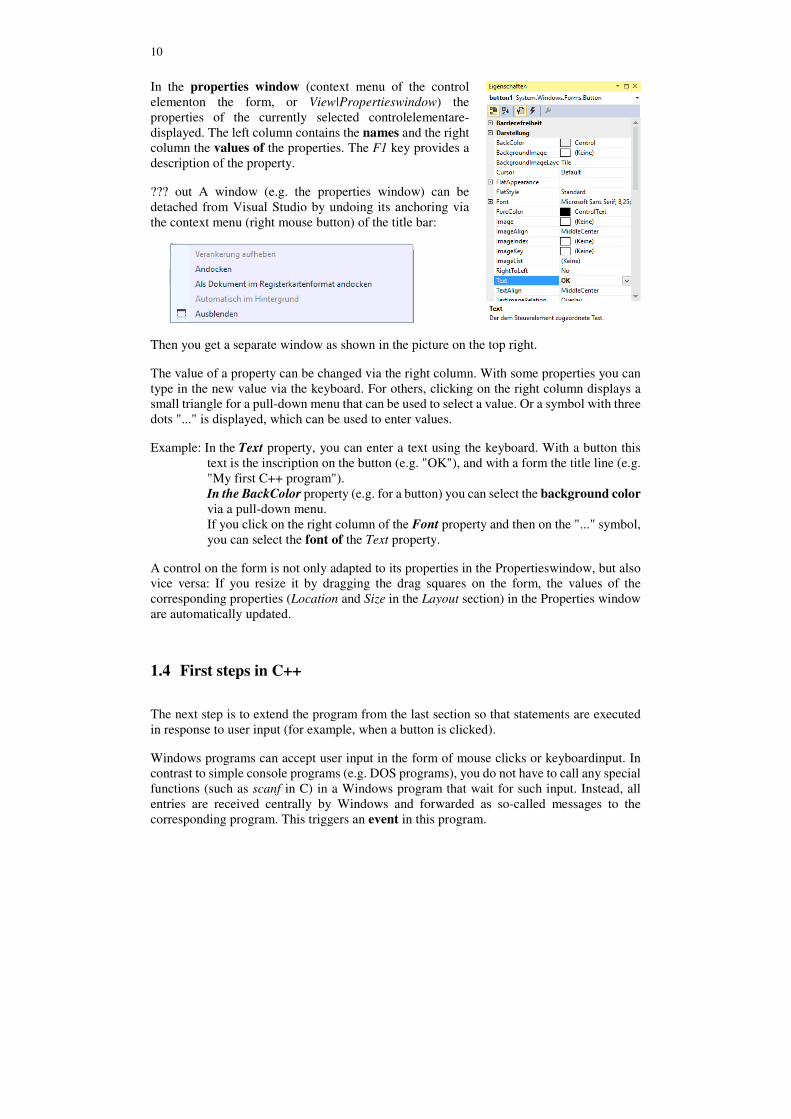
In the properties window (context menu of the control
elementon the form, or View|Propertieswindow) the
properties of the currently selected controlelementare-
displayed. The left column contains the names and the right
column the values of the properties. The F1 key provides a
description of the property.
??? out A window (e.g. the properties window) can be
detached from Visual Studio by undoing its anchoring via
the context menu (right mouse button) of the title bar:
Then you get a separate window as shown in the picture on the top right.
The value of a property can be changed via the right column. With some properties you can
type in the new value via the keyboard. For others, clicking on the right column displays a
small triangle for a pull-down menu that can be used to select a value. Or a symbol with three
dots "..." is displayed, which can be used to enter values.
Example: In the Text property, you can enter a text using the keyboard. With a button this
text is the inscription on the button (e.g. "OK"), and with a form the title line (e.g.
"My first C++ program").
In the BackColor property (e.g. for a button) you can select the background color
via a pull-down menu.
If you click on the right column of the Font property and then on the "..." symbol,
you can select the font of the Text property.
A control on the form is not only adapted to its properties in the Propertieswindow, but also
vice versa: If you resize it by dragging the drag squares on the form, the values of the
corresponding properties (Location and Size in the Layout section) in the Properties window
are automatically updated.
1.4 First steps in C++
The next step is to extend the program from the last section so that statements are executed
in response to user input (for example, when a button is clicked).
Windows programs can accept user input in the form of mouse clicks or keyboardinput. In
contrast to simple console programs (e.g. DOS programs), you do not have to call any special
functions (such as scanf in C) in a Windows program that wait for such input. Instead, all
entries are received centrally by Windows and forwarded as so-called messages to the
corresponding program. This triggers an event in this program.

11
The events that can occur for the currently selected control are displayed after clicking
the events icon in the Properties window.
The figure on the right shows some events for a button.
Click stands for the event that occurs when the button is
clicked. If you open the groups, you can see that a button
can react not only to clicking, but also to numerous other
events.
A function can be assigned to such an event, which is
called when the event occurs. This function is also known
as an event handler. It is created by Visual Studio by
double-clicking on the line of the event and displayed in
the source code editor. The cursor is then at the beginning
of the function.
For the time being, however, our program should only
react to clicking ona button. The function called during
this event is most easily obtained by double-clicking the
button in the form. Visual Studio creates the following
function and displays it in the editor:
Between the curly braces "{" and "}" you then write the instructions to be executed when
the Click event occurs.
Which instructions are possible here and how they have to be constructed is the main subject
of this book and is described in detail from chapter 3. In this introductory chapter, only a few
instructions will be presented, and only as far as is necessary for a basic understanding of
Visual Studio. If you are new to terms such as "variables", etc., continue reading anyway -
you will certainly get an intuitive idea from the context, which will initially suffice. Later,
these terms will be explained in more detail.
An instruction frequently used in programming is the assignment (with the operator "=")
with which you can assign a value to a variable. Only those properties of controls that are
also displayed in the properties window are to be used as variablesnext. These variables can
then be assigned the values that are also offered in the properties window in the right column
of the properties.
12
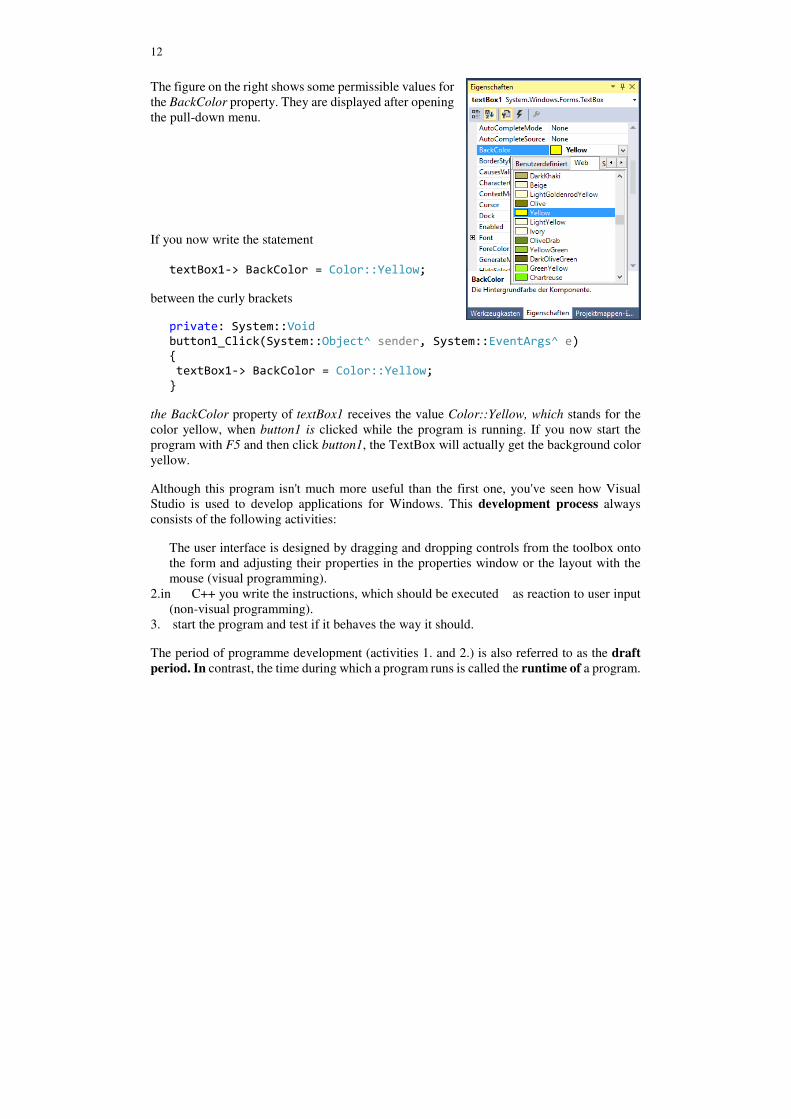
The figure on the right shows some permissible values for
the BackColor property. They are displayed after opening
the pull-down menu.
If you now write the statement
textBox1-> BackColor = Color::Yellow;
between the curly brackets
private: System::Void
button1_Click(System::Object^ sender, System::EventArgs^ e) {
textBox1-> BackColor = Color::Yellow;
}
the BackColor property of textBox1 receives the value Color::Yellow, which stands for the
color yellow, when button1 is clicked while the program is running. If you now start the
program with F5 and then click button1, the TextBox will actually get the background color
yellow.
Although this program isn't much more useful than the first one, you've seen how Visual
Studio is used to develop applications for Windows. This development process always
consists of the following activities:
The user interface is designed by dragging and dropping controls from the toolbox onto
the form and adjusting their properties in the properties window or the layout with the
mouse (visual programming).
2.in C++ you write the instructions, which should be executed as reaction to user input
(non-visual programming).
3. start the program and test if it behaves the way it should.
The period of programme development (activities 1. and 2.) is also referred to as the draft
period. In contrast, the time during which a program runs is called the runtime of a program.