Embed Size (px)
Citation preview

http://www.sapido.com.tw Quick Installation Guide v1.0.0 2
FCC CAUTION ................................................................................................................................................... 3
1 INTRODUCTION ............................................................................................................................ 5
1.1 LED INDICATORS ....................................................................................... 6
1.2 PRODUCT APPEARANCE ................................................................................ 7
2 INSTALLATION DIAGRAM ......................................................................................................... 7
3 SETTING .......................................................................................................................................... 9
3.1 USING LAPTOP ........................................................................................... 9
3.2 USING IPHONE/IPAD .................................................................................. 13
3.3 USING ANDROID MOBILE DEVICE ................................................................... 17

http://www.sapido.com.tw Quick Installation Guide v1.0.0 3
FCC Caution FCC Part 15.19 Caution: 1. This device complies with Part 15 of the FCC Rules. Operation is subject to the following
two conditions: (1) this device may not cause harmful interference and (2) this device must accept any interference received, including interference that may cause undesired operation
2. This device and its antenna(s) must not be co-located or operating in conjunction with any other antenna or transmitter.
3. Changes or modifications to this unit not expressly approved by the party responsible for compliance could void the user authority to operate the equipment.
IMPORTANT NOTE: FCC Radiation Exposure Statement: This equipment complies with FCC radiation exposure limits set forth for an uncontrolled environment. This equipment should be installed and operated with minimum distance 20cm between the radiator & your body. This transmitter must not be co-located or operating in conjunction with any other antenna or transmitter. The antennas used for this transmitter must be installed to provide a separation distance of at least 20 cm from all persons and must not be co-located or operating in conjunction with any other antenna or transmitter. FCC Statement in User’s Manual (for calss B) FCC Section 15.105 “Federal Communications Commission (FCC) Statement”
This equipment has been tested and found to comply with the limits for a lass B digital device, pursuant to Part 15 of the FCC Rules. These limits are designed to provide reasonable protection against harmful interference in a residential installation. This equipment generates uses and can radiate radio frequency energy and, if not installed and used in accordance with the instructions, may cause harmful interference to radio communications. However, there is no guarantee that interference will not occur in a particular installation. If this equipment does cause harmful interference to radio or television reception, which can be determined by turning the equipment off and on, the user is encouraged to try to correct the interference by one or more of the following measures:
http://www.sapido.com.tw Quick Installation Guide v1.0.0 4
-- Reorient or relocate the receiving antenna. -- Increase the separation between the equipment and receiver. -- Connect the equipment into an outlet on a circuit different from that to which the receiver
is connected. -- Consult the dealer or an experienced radio/TV technician for help. CE Statement of Conformity Our product has been tested in typical configuration by Ecom Sertech Corp and was found to comply with the essential requirement of “Council Directive on the Approximation of the Laws of the Member States relating to Electromagnetic Compatibility” (89/336/EEC; 92/31/EEC; 93/68/EEC)

http://www.sapido.com.tw/ Quick Installation Guide v1.0.0
5
1 Introduction BRF71n is an easy-to-setup and wireless device for various application and environment, especially for hotel, office, warehouse, hot-spot, and etc... The mail features of BRF71n: International Golden Award winning; MIT quality assurance: Glod Medal
CIGIF 2012 award. MIT quality assurance standards, and uses Green AP power saving technology.
The smallest device with built-in AC/DC adaptor; easy carrying along: One of the smallest built-in foldable adaptors both available for AC/DC power charges. Ideal for trvelers. Micro USB supports multiple power charges (e.g. laptop or car charger) without limits.
Super USB; friendly mobile APP: Connect webcam, USB drive, and USB speaker for cloud monitor. File sharing and wireless AirPlay via smart cloud APP.
Support 3G/4G(LTE); Plug and Play: Supports more than 300 3G/4G modems and smartphones. Plug and Play. Access Internet easily.
Provides a portable access point (AP) while travelling: Use this portable router to easily and quickly convert any wired connection (in a hotel or otherwise) into a Wi-Fi signal.
Supports Wi-Fi AP signal extension and one-touch WPS encryption: Wi-Fi AP hardware switch extends the existing wireless network. The best Wi-Fi range extender. One touch WPS button for wireless range extension to eliminate dead spot between floors.
http://www.sapido.com.tw Quick Installation Guide v1.0.0 6
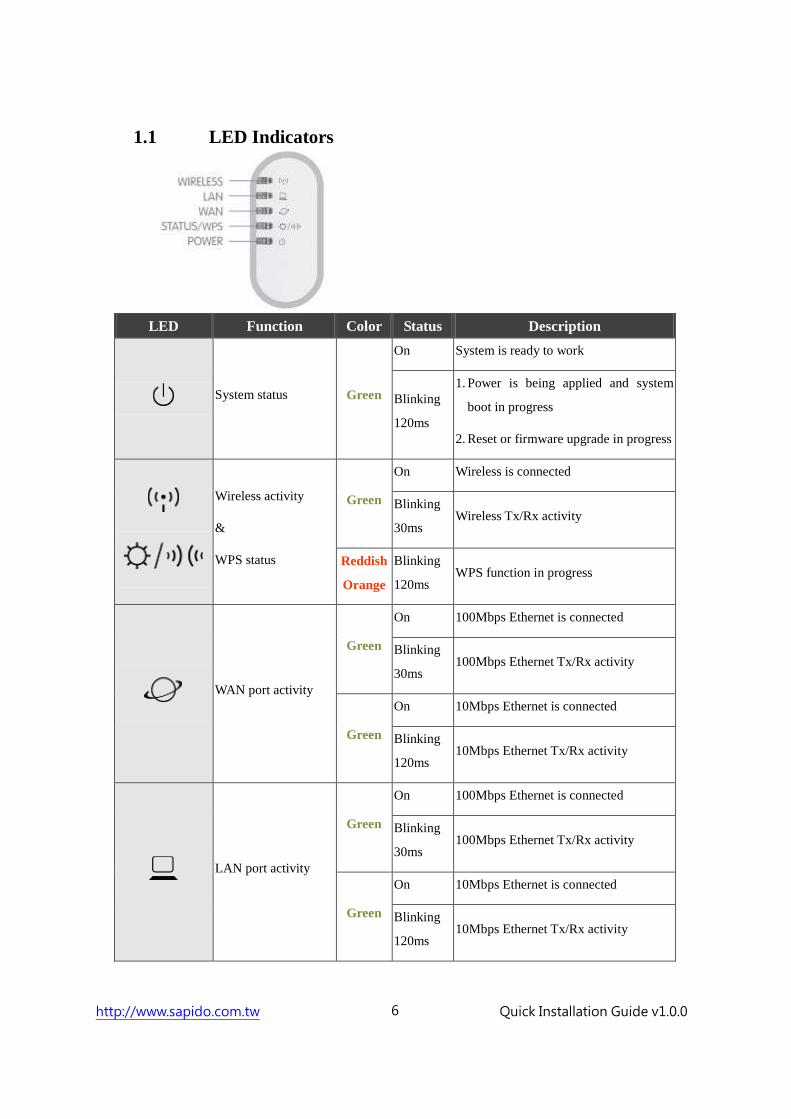
1.1 LED Indicators
LED Function Color Status Description
System status Green
On System is ready to work
Blinking
120ms
1. Power is being applied and system
boot in progress
2. Reset or firmware upgrade in progress
Wireless activity
&
WPS status
Green
On Wireless is connected
Blinking
30ms Wireless Tx/Rx activity
Reddish
Orange
Blinking
120ms WPS function in progress
WAN port activity
Green
On 100Mbps Ethernet is connected
Blinking
30ms 100Mbps Ethernet Tx/Rx activity
Green
On 10Mbps Ethernet is connected
Blinking
120ms 10Mbps Ethernet Tx/Rx activity
LAN port activity
Green
On 100Mbps Ethernet is connected
Blinking
30ms 100Mbps Ethernet Tx/Rx activity
Green
On 10Mbps Ethernet is connected
Blinking
120ms 10Mbps Ethernet Tx/Rx activity
http://www.sapido.com.tw Quick Installation Guide v1.0.0 7
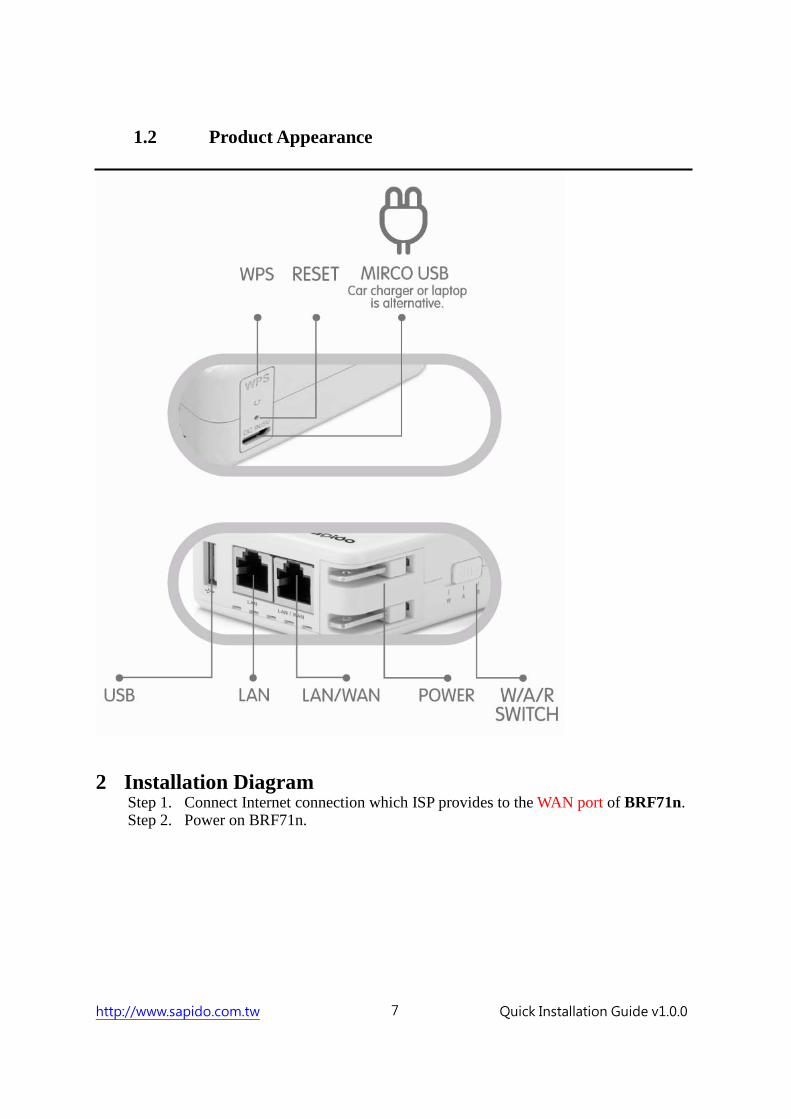
1.2 Product Appearance
2 Installation Diagram
Step 1. Connect Internet connection which ISP provides to the WAN port of BRF71n. Step 2. Power on BRF71n.
http://www.sapido.com.tw Quick Installation Guide v1.0.0 9
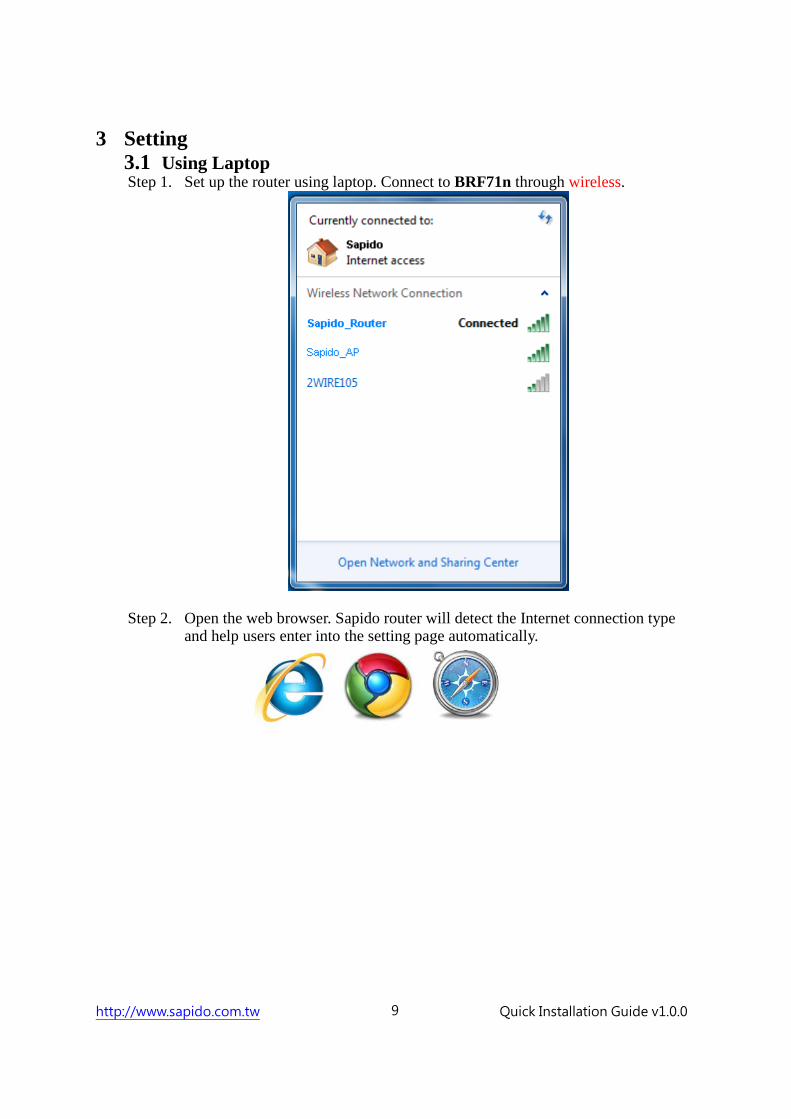
3 Setting 3.1 Using Laptop Step 1. Set up the router using laptop. Connect to BRF71n through wireless.
Step 2. Open the web browser. Sapido router will detect the Internet connection type and help users enter into the setting page automatically.

http://www.sapido.com.tw Quick Installation Guide v1.0.0 10
3.1.1 Internet Connection Type Sapido router will detect the Internet connection type and help users enter into
the setting page automatically. 3.1.1.1 ADSL/xDSL Modem
Step 1. Open the web browser. Sapido router will detect the Internet connection type and help users enter into the setting page automatically. Please enter in the username and password for ADSL/xDSL connection. Also, we recommend users set up the wireless security.
Step 2. Click Apply. Please do not power off the router or disconnect
the Internet while counting down.
Step 3. After the connection is successful, please download Sapido
Cloud to complete the setting.
3.1.1.2 Cable Modem
Step 1. Open the web browser. Sapido router will detect the Internet connection type and help users enter into the setting page

http://www.sapido.com.tw Quick Installation Guide v1.0.0 11
automatically.
Step 2. Click Apply. Please do not power off the router or disconnect
the Internet while counting down.
Step 3. After the connection is successful, please download Sapido
Cloud to complete the setting.
3.1.1.3 Static IP Address Step 1. Open the web browser. Sapido router will detect the Internet
connection type and help users enter into the setting page automatically.
Step 2. Enter in the IP address, subnet mask, gateway, and DNS for Internet connection. (Please use the correct connection data that ISP provided)

http://www.sapido.com.tw Quick Installation Guide v1.0.0 12
Step 3. Click Apply. Please do not power off the router or disconnect
the Internet while counting down.
Step 4. After the connection is successful, please download Sapido
Cloud to complete the setting.

http://www.sapido.com.tw Quick Installation Guide v1.0.0 13
3.2 Using iPhone/iPad Step 1. Set up the router using iPhone/iPad. Go to Settings → Wi-Fi → Enable Wi-Fi
→ Connect to BRF71n through wireless.
Step 2. Open the web browser. Sapido router will detect the Internet connection type and help users enter into the setting page automatically.

http://www.sapido.com.tw Quick Installation Guide v1.0.0 14
3.2.1 Internet Connection Type Sapido router will detect the Internet connection type and help users enter into
the setting page automatically. 3.2.1.1 ADSL/xDSL Modem
Step 1. Open the web browser. Sapido router will detect the Internet connection type and help users enter into the setting page automatically. Please enter in the username and password for ADSL/xDSL connection. Also, we recommend users set up the wireless security.
Step 2. Click Apply. Please do not power off the router or disconnect
the Internet while counting down.
Step 3. After the connection is successful, please download Sapido
Cloud to complete the setting.
3.2.1.2 Cable Modem
Step 1. Open the web browser. Sapido router will detect the Internet connection type and help users enter into the setting page
http://www.sapido.com.tw Quick Installation Guide v1.0.0 15
automatically.
Step 2. Click Apply. Please do not power off the router or disconnect
the Internet while counting down.
Step 3. After the connection is successful, please download Sapido
Cloud to complete the setting.
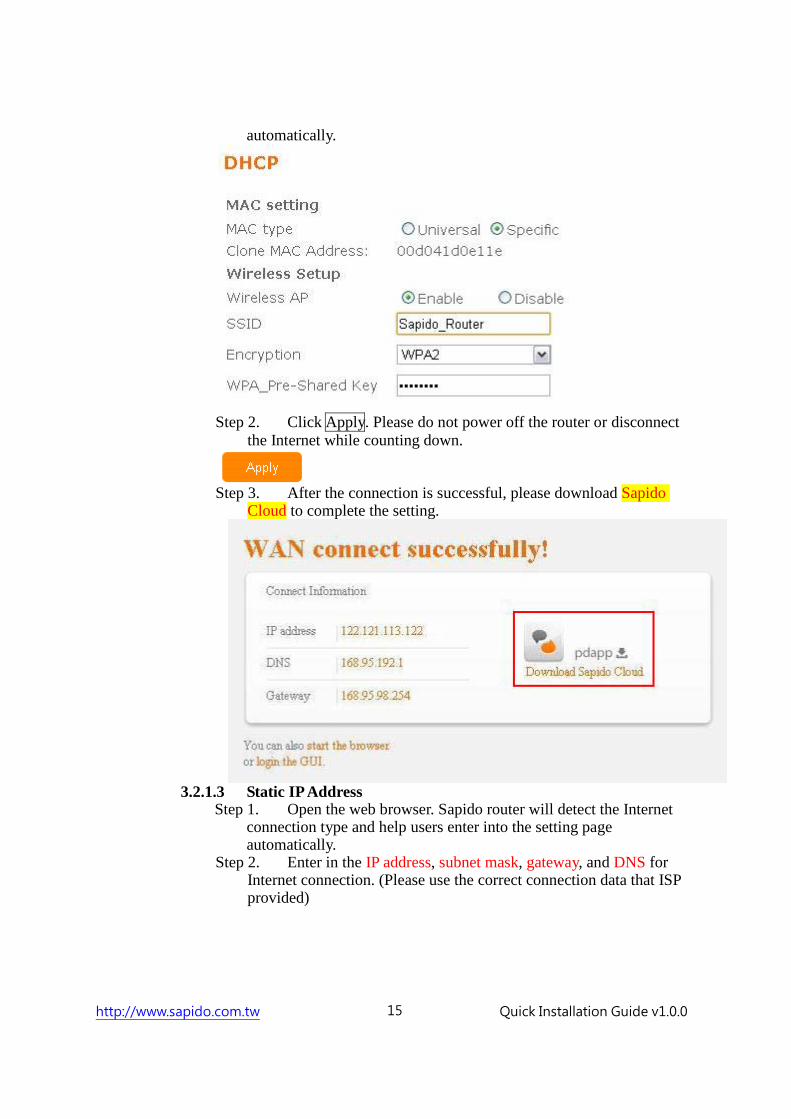
3.2.1.3 Static IP Address
Step 1. Open the web browser. Sapido router will detect the Internet connection type and help users enter into the setting page automatically.
Step 2. Enter in the IP address, subnet mask, gateway, and DNS for Internet connection. (Please use the correct connection data that ISP provided)

http://www.sapido.com.tw Quick Installation Guide v1.0.0 16
Step 3. Click Apply. Please do not power off the router or disconnect
the Internet while counting down.
Step 4. After the connection is successful, please download Sapido
Cloud to complete the setting.

http://www.sapido.com.tw Quick Installation Guide v1.0.0 17
3.3 Using Android Mobile Device Step 1. Set up the router using Android mobile device (smartphone/tablet). Go to
Settings → Wireless & Networks → Enable Wi-Fi → Wi-Fi settings → Connect to BRF71n through wireless.
Step 2. Open the web browser. Sapido router will detect the Internet connection type
and help users enter into the setting page automatically.

http://www.sapido.com.tw Quick Installation Guide v1.0.0 18
3.3.1 Internet Connection Type
Sapido router will detect the Internet connection type and help users enter into the setting page automatically.
3.3.1.1 ADSL/xDSL Modem Step 1. Open the web browser. Sapido router will detect the Internet
connection type and help users enter into the setting page automatically. Please enter in the username and password for ADSL/xDSL connection. Also, we recommend users set up the wireless security.
Step 2. Click Apply. Please do not power off the router or disconnect
the Internet while counting down.
Step 3. After the connection is successful, please download Sapido
Cloud to complete the setting.

http://www.sapido.com.tw Quick Installation Guide v1.0.0 19
3.3.1.2 Cable Modem
Step 1. Open the web browser. Sapido router will detect the Internet connection type and help users enter into the setting page automatically.
Step 2. Click Apply. Please do not power off the router or disconnect
the Internet while counting down.
Step 3. After the connection is successful, please download Sapido
Cloud to complete the setting.

http://www.sapido.com.tw Quick Installation Guide v1.0.0 20
3.3.1.3 Static IP Address Step 1. Open the web browser. Sapido router will detect the Internet
connection type and help users enter into the setting page automatically.
Step 2. Enter in the IP address, subnet mask, gateway, and DNS for Internet connection. (Please use the correct connection data that ISP provided)
Step 3. Click Apply. Please do not power off the router or disconnect
the Internet while counting down.
Step 4. After the connection is successful, please download Sapido
Cloud to complete the setting.

http://www.sapido.com.tw Quick Installation Guide v1.0.0 21
※Please refer to pdapp Guide on Sapido website for pdapp settings.
※Please refer to User Manual on Sapido website for advanced settings.


![Quick Installation Guide – PS107 - SEH Technology · @ support@seh.de Print Server PS107 Quick Installation Guide Overview [en] This Quick Installation Guide provides a description](https://img.dokumen.tips/doc/110x75/60636d0038f9905e874fdfb6/quick-installation-guide-a-ps107-seh-technology-supportsehde-print-server.jpg)