Embed Size (px)
Citation preview

1
Flash BasicsFlash Basicsby Dr SC Liby Dr SC Li

2
File TypesFile Types
In general, Flash 5.0 generates 3 types In general, Flash 5.0 generates 3 types of files:of files:
???.fla ???.fla Flash’s working file Flash’s working file ???.swf ???.swf Flash movie file ( usually Flash movie file ( usually
linked with an HTML file); can be viewed linked with an HTML file); can be viewed by Flash supported browsersby Flash supported browsers
???.exe ???.exe Flash standalone executable Flash standalone executable filefile

3
Flash Working EnvironmentFlash Working Environment
The Flash working environment The Flash working environment comprises of threecomprises of three
StageStage Layers Layers Symbols Symbols Instances (Actors) Instances (Actors) TimelinesTimelines ActionScriptsActionScripts

4
Setting the StageSetting the Stage
Configuring the movie's properties is a common first step in authoring. You use the Movie Properties dialog box to specify settings that affect the entire movie, such as the frames per second (fps) playback rate, and the Stage size and background color.

5
Setting the StageSetting the StageModify the default movie properties Choose Modify > Movie. In the Movie Properties dialog box, verify that 12 is
the number in the Frame Rate text box. The movie will play at 12 frames per second, an optimal frame rate for playing animations on the Web.
Click the Background Color box to display the pop-up window, and select a dark gray.
When you select a color, the hexadecimal value appears in a field along the top of the window. The completed tutorial uses gray with the hexadecimal value of #333333.

6
Setting the StageSetting the Stage

7
Flash Basic ElementsFlash Basic Elements
Drawing Symbols Layers Type Buttons Sound Animation

8
DrawingDrawing
The drawing tools in Flash let you create and modify shapes for the artwork in your movies.
Before you draw and paint in Flash, it is important to understand how Flash drawing tools work and how drawing, painting, and modifying shapes can affect other shapes on the same layer.

9
DrawingDrawing

10
Working with ColoursWorking with Colours
To select a transparent or solid colour fill, a gradient fill, or a bitmap fill, you can use the Fill panel. The Fill panel also allows you to create and edit gradient fills. You can apply bitmap fills using bitmaps that you have imported into the current file.

11
Working with ColoursWorking with Colours
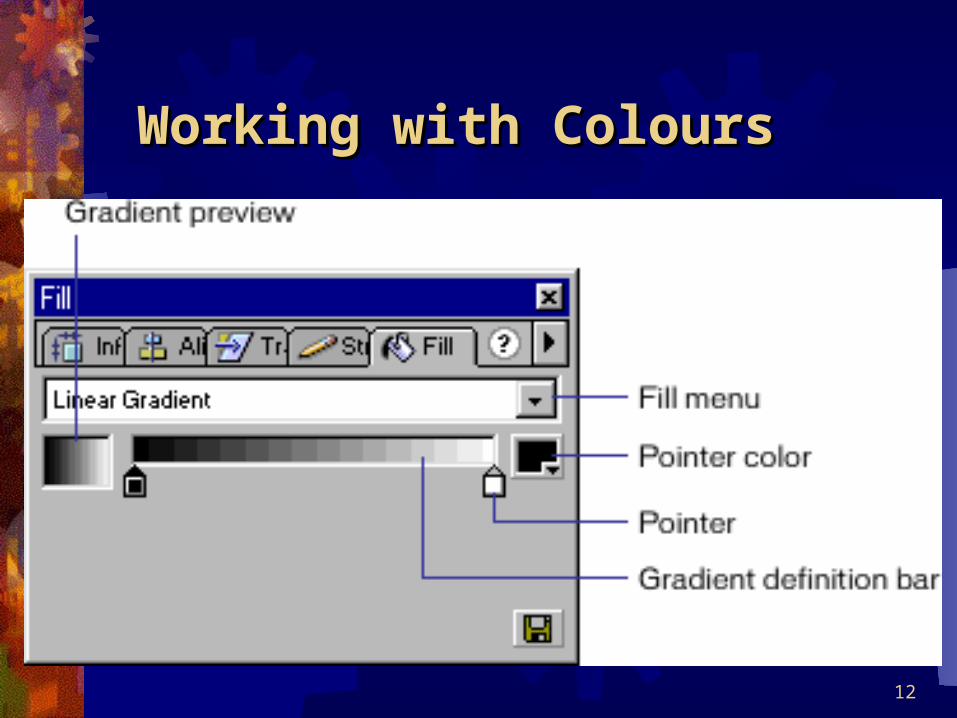
Example: To apply, create, or edit a gradient fill using the Fill panel: Choose Window > Panels > Fill. Choose one of the following from the Fill menu:
Linear Gradient creates a gradient that shades from the starting point to the ending point in a straight line
Radial Gradient creates a gradient that shades from the starting point to the ending point in a circular pattern
12
Working with ColoursWorking with Colours

13
Working with ColoursWorking with Colours
Click the Fill color box in the toolbox and select a gradient from the palette.
To change a color in the selected gradient, click one of the pointers below the gradient definition bar and click on the color box that appears next to the gradient definition bar to select a color.
To add a pointer to the gradient, click below the gradient definition bar. Select a color for the new pointer as described in step 4.

14
Working with ColoursWorking with Colours
To remove a pointer from the gradient, drag the pointer off of the gradient definition bar.
To save a gradient, click the triangle in the upper right corner of the Fill panel and choose Add Gradient from the pop-up menu. The gradient is added to the Swatches palette for the current document.
15
AnimationsAnimations
There are two methods for creating an animation sequence in Flash: frame-by-frame animation and tweened animation.

16
AnimationsAnimations
In frame-by-frame animation: you create the image in every frame.
In tweened animation: you create starting and ending frames and let
Flash create the frames in between. Flash varies the object's size, rotation, color, or other attributes evenly between the starting and ending frames to create the appearance of movement.

17
AnimationsAnimations
Tweened animation is an effective way to create movement and changes over time while minimizing file size. In tweened animation, Flash stores only the values for the changes between frames. In frame-by-frame animation, Flash stores the values for each complete frame.

18
AnimationsAnimations
Creating keyframes A keyframe is a frame where you define
changes in the animation. When you create frame-by-frame animation, every frame is a keyframe. In keyframe (tweened) animation, you define keyframes at important points in the animation and let Flash create the content of frames in between.

19
AnimationsAnimations
Creating keyframes Flash displays the interpolated frames of a
tweened animation as light blue or green with an arrow drawn between keyframes. Flash redraws shapes in each keyframe. You should create keyframes only at those points in the artwork where something changes.

20
AnimationsAnimations
Creating keyframes To create a keyframe, do one of the
following: Select a frame in the Timeline and choose
Insert > Keyframe. Right-click a frame in the Timeline and
choose Insert Keyframe.
21
AnimationsAnimations
Extending still images When you create a background for
animation, it's often necessary to make a still image span several frames. Adding new frames (not keyframes) to a layer extends the contents of the last keyframe in all the new frames.

22
AnimationsAnimations
To extend a still image through multiple frames: Create an image in the first keyframe of
the sequence. Select a frame to the right, at the end of
the span that you want to add. Choose Insert > Frame.
23
AnimationsAnimations
To extend a still image through multiple frames: To use a shortcut to extend still images:
Create an image in the first keyframe. Alt-drag the keyframe to the right. This
creates a new span, but without a new keyframe at the end point.

24
AnimationsAnimationsAbout tweened animation
Flash can create two types of tweened animation. In motion tweening, you define properties such as position, size, and rotation for an instance, group, or text block at one point in time, and then you change those properties at another point in time. In shape tweening, you draw a shape at one point in time, and then you change that shape or draw another shape at another point in time. Flash interpolates the values or shapes for the frames in between, creating the animation.
25
AnimationsAnimationsTo create a motion tween using the
Create Motion Tween command: Select an empty keyframe and draw an object on
the Stage, or drag an instance of a symbol from the Library window.
Choose Insert > Create Motion Tween. If you drew an object in step 1, Flash
automatically converts the object to a symbol and assigns it the name tween1. If you drew more than one object, additional objects are named tween2, tween3, and so on.

26
AnimationsAnimationsTo create a motion tween using the
Create Motion Tween command: Click inside the frame where you want the
animation to end, and choose Insert > Frame. Move the object, instance, or type block on the
Stage to the desired position. Adjust the size of the element if you want to tween its scale. Adjust the rotation of the element if you want to tween its rotation. Deselect the object when you have completed adjustments.
A keyframe is automatically added to the end of the frame range.

27
Exercise 1Exercise 1Creating animated text
Open the graphic tool box by click Window>Tools On the first layer, select or highlight the first frame Click the ‘A’‘A’ button of the tools box By clicking TextText on the top menu bar, choose an
appropriate font size, type etc., To extend the timeline, choose Insert>FrameInsert>Frame Drag the end of the timeline to frame 45 Then follow the instructions given above, for
creating Tween Animation

28
LayersLayers
Layers are like transparent sheets of acetate stacked on top of each other. When you create a new Flash movie, it contains one layer. You can add more layers to organize the artwork, animation, and other elements in your movie. You can draw and edit objects on one layer without affecting objects on another layer. Where there is nothing on a layer, you can see through it to the layers below.

29
LayersLayers
The number of layers you can create is limited only by your computer's memory, and layers do not increase the file size of your published movie. You can hide layers, lock layers, or display layer contents as outlines. You can also change the order of layers.
30
LayersLayers
In addition, you can use special guide layers to make drawing and editing easier, and mask layers to help you create sophisticated effects.
It's a good idea to use separate layers for sound files, actions, frame labels, and frame comments. This helps you find these items quickly when you need to edit them.

31
Exercise 2Exercise 2Creating Simple Text
Create 2 piece of texts with frame span between 60 - 65 and 70 - 75 respectively
32
Symbols and InstancesSymbols and Instances A symbolsymbol is a graphic, button, or movie clip
that you create once and then can reuse throughout your movie or in other movies. Any symbol you create automatically becomes part of the library.

33
Symbols and InstancesSymbols and Instances An instanceinstance is a copy of a symbol located
on the Stage or nested inside another symbol. An instance can be very different from its symbol in color, size, and function. Editing the symbol updates all of its instances. But editing an instance of a symbol updates only that instance.

34
Symbols and InstancesSymbols and Instances Using symbols in your movies dramatically
reduces file size; saving several instances of a symbol requires less storage space than saving a complete description of the element for each occurrence. For example, you can reduce the file size of your movies if you convert static graphics such as background images into symbols that you then reuse. Using symbols can also speed movie playback, because a symbol needs to be downloaded to a browser only once.

35
Creating InstancesCreating Instances
Once you've created a symbol, you can create instances of that symbol wherever you like throughout the movie, including inside other symbols.

36
Creating InstancesCreating Instances To create a new instance of a symbol:
Select a layer in the Timeline. Flash can place instances only in keyframes,
always on the current layer. If you don't select a keyframe, the instance will be added to the first keyframe to the left of the current frame.
Choose Window > Library to open the library. Drag the symbol from the library to the Stage. If you created an instance of a graphic symbol,
choose Insert > Frame to add the number of frames that will contain the graphic symbol.
37
Creating InstancesCreating Instances After creating an instance of a symbol, use
the Instance panel: Windows > Panels > InstanceWindows > Panels > Instance
to specify color effects, assign actions, set the graphic display mode, or change the behavior of the instance. The behavior of the instance is the same as the symbol behavior, unless you specify otherwise. Any changes you make affect only the instance and not the symbol. See Changing the color and transparency of an instance.

38
Creating ButtonsCreating Buttons Buttons are actually four-frame interactive
movie clips. When you select the button behavior for a symbol, Flash creates a Timeline with four frames. The first three frames display the button's three possible states; the fourth frame defines the active area of the button. The Timeline doesn't actually play; it simply reacts to pointer movement and actions by jumping to the appropriate frame.

39
Creating ButtonsCreating Buttons To create a button:
Choose Edit > Deselect All to ensure that nothing is selected on the Stage.
Choose Insert > New Symbol, or press Control+F8. To create the button, you convert the button
frames to keyframes. In the Symbol Properties dialog box, enter a name
for the new button symbol, and for Behavior choose Button.

40
Creating ButtonsCreating Buttons
To create a button: Flash switches to symbol-
editing mode. The Timeline header changes to display four consecutive frames labeled Up, Over, Down, and Hit. The first frame, Up, is a blank keyframe.
41
Create LayersCreate Layers
To create a layer, do one of the following: Click the Add Layer button at the bottom of
the Timeline. Choose Insert > Layer. Right-click on a layer name in the Timeline
and choose Insert Layer from the context menu.

42
Create LayersCreate Layers

43
Creating ButtonsCreating Buttons 1. To create the Up state button image,
use the drawing tools, import a graphic, or place an instance of another symbol on the Stage.
2. You can use a graphic or movie clip symbol in a button, but you cannot use another button in a button. Use a movie clip symbol if you want the button to be animated.
3. Click the second frame, labeled
Over, and choose Insert Keyframe. Flash inserts a keyframe that duplicates
the contents of the Up frame.

44
Creating ButtonsCreating Buttons 4. Change the button image for the Over state. 5. Repeat steps 5 and 6 for the Down frame and the
Hit frame. 6. The Hit frame is not visible on the Stage, but it
defines the area of the button that responds when clicked. Make sure that the graphic for the Hit frame is a solid area large enough to encompass all the graphic elements of the Up, Down, and Over frames. It can also be larger than the visible button. If you do not specify a Hit frame, the image for the Up state is
used as the Hit frame. .
45
Creating ButtonsCreating Buttons 7. You can create a disjoint rollover by placing the
Hit frame in a different location than the other button frames.
8. To assign a sound to a state of the button, select that state's frame in the Timeline, choose Modify > Frame to display the Frame panel, and then click the Sound tab in the Frame panel. See Adding sounds to buttons.
9. When you've finished, choose Edit > Edit Movie. Drag the button symbol out of the Library window to
create an instance of it in the movie.

46
ActionScriptsActionScripts
ActionScript: Flash's scripting language, adds
interactivity to a movie. You can set up your movie so that user events, such as button clicks and keypresses, trigger scripts that tell the movie what action to perform. For example, you can write a script that tells Flash to load different movies into the Flash Player depending on which navigation button a user chooses.

47
Exercise 3Exercise 3Creating three layers for three different
buttons with frame span between frame 45 - 75 Button 1: on release - go to the first piece of text
created in Ex2 Button 2: on release - go to the second piece of text
created in Ex2 Button 3: On release - go to
http://www.hkbu.edu.hk/ To STOP STOP playing the timelines for the two pieces of
texts and the buttons, add the ‘STOP’STOP’ action for the appropriate frames.

48
Adding sounds to a movie
To add a sound to a movie: Import the sound if it has not already been
imported. See Importing Sounds. Choose Insert > Layer to create a layer
for the sound. With the new sound layer selected, drag
the sound from the library onto the Stage. The sound is added to the current layer.
49
Adding sounds to a movie
To add a sound to a movie: You can place multiple sounds on one layer, or on
layers containing other objects. However, it is recommended that each sound be placed on a separate layer. Each layer acts like a separate sound channel. The sounds on all layers are combined when you play back the movie.
Choose Window > Panels > Sound.
50
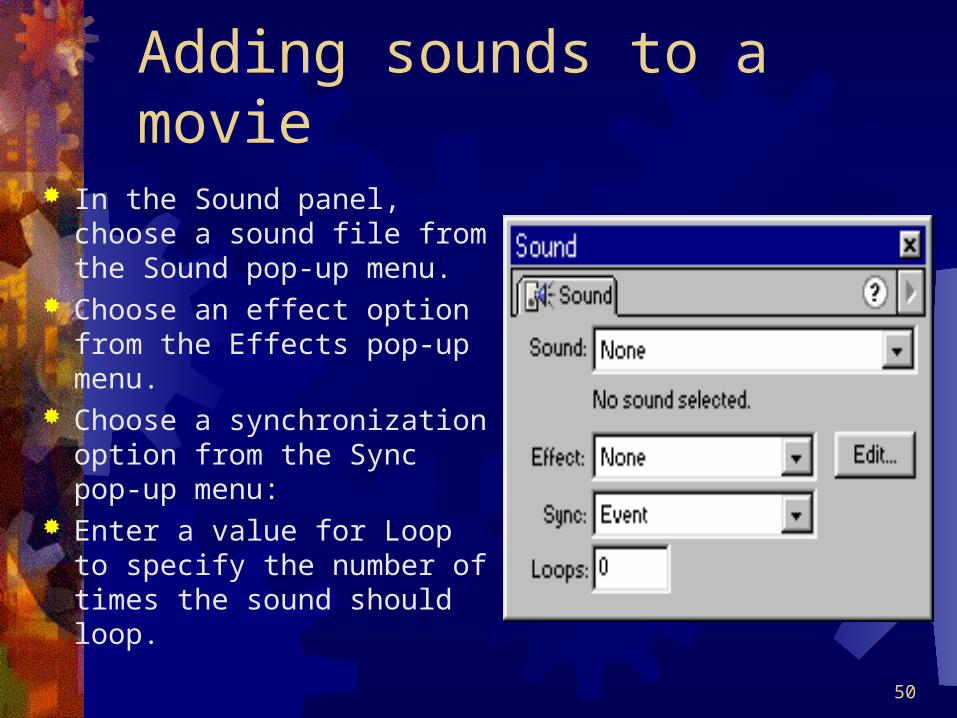
Adding sounds to a movie In the Sound panel, choose a
sound file from the Sound pop-up menu.
Choose an effect option from the Effects pop-up menu.
Choose a synchronization option from the Sync pop-up menu:
Enter a value for Loop to specify the number of times the sound should loop.
51
Exercise 4Exercise 4 Adding Sound to the movie
Create a new layer for the streamed sound track Select the sound track by clicking Window>Library Window>Library
and choose the sound track “Sound-technoloop” “Sound-technoloop” Then extend the timeline to frame 45

52
Adding sounds to a movie
To add a sound to a movie: 3. You can place multiple sounds on one layer, or
on layers containing other objects. However, it is recommended that each sound be placed on a separate layer. Each layer acts like a separate sound channel. The sounds on all layers are combined when you play back the movie.
4 Choose Window > Panels > Sound.