Embed Size (px)
Citation preview

1 BEDROOM FAMILY CAMPING TENT 4 PERSONS KDCMPTNT4PA


Ensure to read all instructions and warnings in this user guide prior to first use.
• This tent is designed to be a temporary structure. Do not use this tent as a permanent dwelling.
• Keep the tent away from all flames heat sources to avoid potential damage.
• Do not store flammable liquids inside the tent.
• Do not spray the tent with insecticides. They can be flammable and may damage the tent’s material.
• Ensure the area the tent is set up is clear of sharp objects and obstructions to avoid damage to the material.
• Do not pitch the tent under trees due to the potential of lightning strikes and falling tree branches.
• Do not pitch the tent near a cliff.
• Do not leave the tent pitched in the face of strong winds. Disassemble the tent before seeking refuge.
• Ensure all guy ropes and pegs are fully secured before using the tent.
• Do not cook inside the tent.
• Do not smoke inside the tent.
• If wet, always allow the tent to dry before storing in the carry bag to prevent the growth of mildew.
SAFETY & WARNINGS

• Tent body (x1) • Inner tent (x1) • Tent floor (x1) • 5.3m fibreglass pole (x2) • 4.8m fibreglass pole (x1) • Peg (x23) • 3m guy rope (x6) • 2.2m guy rope (x6) • Carry bag (x1)
Step 1: Ensure you are in a flat open area with sufficient space to set up the tent. Take out all components from the carry bag and lay the tent body out on the ground.
COMPONENTS LIST
ASSEMBLY

Step 2: Secure the tent body to the ground by inserting pegs through each loop on the tent body. Inserting the pegs at a 45° angle will ensure the tent body stays grounded.
Step 3: Unfold and connect the joints of one fibreglass pole. Repeat this process with the two remaining poles.
x3

Step 4: Insert one 5.3m fibreglass pole through one of the sleeves located over the width and at the back of the tent body.
Repeat this process with the other 5.3m fibreglass pole using the sleeve in the middle of the tent body.
Repeat the process again with the 4.8m fibreglass pole using the sleeve closest to the entrance of the tent.
Step 5: Secure the ends of each fibreglass pole with the pins located at the base of the tent body.
Attach the clips located on the tent body to the fibreglass poles.
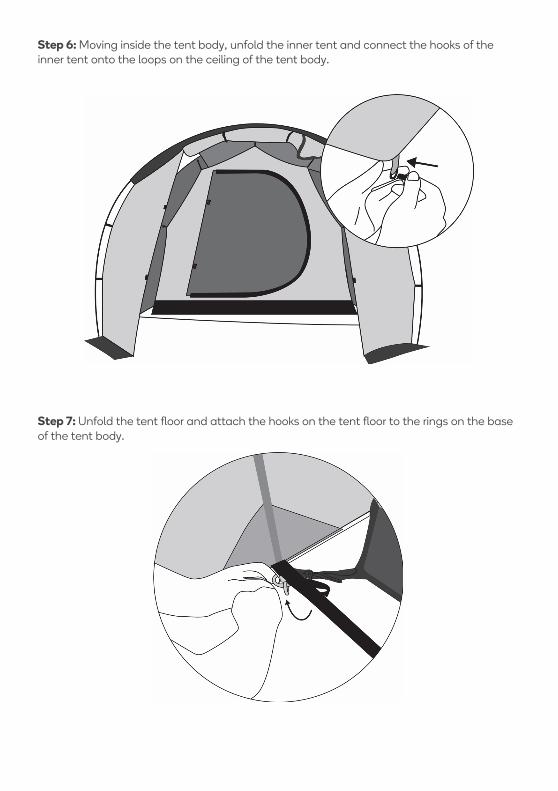
Step 6: Moving inside the tent body, unfold the inner tent and connect the hooks of the inner tent onto the loops on the ceiling of the tent body.
Step 7: Unfold the tent floor and attach the hooks on the tent floor to the rings on the base of the tent body.

Step 8: Moving back outside, thread the guy ropes through the loops located near the poles then secure them with the pegs.
Tent assembly is now complete.

Step 1: Remove all pegs and guy ropes.
Step 2: Detach the tent floor from the tent body.
DISASSEMBLY

Step 3: Disconnect the inner tent from the ceiling of the tent body. Fold the inner tent.
Step 4: Detach the clips on the tent body from the poles.

Step 5: Detach each pole end from the pins located at the base of the tent body.
Step 6: Remove each pole from the pockets.

Step 7: Fold the poles back to their original state.
Step 8: Place all components back into the carry bag.

Outer dimensions Rear panel (A): 118.5cm Front panel (E): 108cm Side back (B): 114.5cm Height (F): 188cm Side front (C): 129cm Front entrance (G): 259cm Side combined (D): 243.5cm
Inner dimensions Height: 188cm Width: 243cm Depth: 216cm
DIMENSIONS

NOTES


Need more information?
We hope that this user guide has given you the assistance needed for a simple set-up.
For the most up-to-date guide for your product, as well as any additional assistance you may require,
head online to help.kogan.com