Embed Size (px)
Citation preview

JAP & On Controls JAD Config Explanation Page � of �1 8
&On Controls has worked with the team at Just Add Power to bring you a very comprehensive guide on how to take advantage of everything that Just Add Power and On Controls has to offer and give your customers a very powerful system. In the document that follows you will see how to take a working Just Add Power system and control it and enhance it within the On Controls platform.
The first thing that we will explain is the JAD Config TXT file and what it all means in terms of On Controls Gateway configuration as well as other information you will need to know from this text file.
*NOTE - You MUST have your Just Add Power System correctly configured and operational and the JAD Config text file that was created when you used the JAD Config Tool.
JAD CONFIG FILE EXPLANATION
1.2.
3.
4.
1. Gateway IP Address - IP address to be used in the Gateway setup within the On Controls app (the basic switching device should be assigned to this gateway)
2. P2) - P?) - The port on the SG switch that the device is physically plugged into. Transmitter 1-…? - Input Devices (where Sources are connected to) Receiver 1-…? - Output Devices (where the Display devices are connected to)
3. Transmitter IP Address - IP Address needed for Image Pull (within the builder) of the Source connected to the Transmitter.
4. Receiver IP Address - IP Address needed for Image Pull (within the builder), Video Wall or CEC or RS232 command of the Display Devices gateway setup of devices. (each Receiver device will have its own Gateway within the On Controls app)
JAP & On Controls JAD Config Explanation Page � of �2 8
Within the On Controls system there are two main types of control for the Just Add Power system. However, within each of these types of control there are different things that can be controlled. The two main types of control are Basic Switching commands - for example basic Matrix Switching commands such as Transmitter 1 to Receiver 1 etc. The second type of control involves Video Wall systems. Each receiver device also has the ability to be controlled with either RS232 commands or CEC commands. We will cover each type of control in greater detail below.
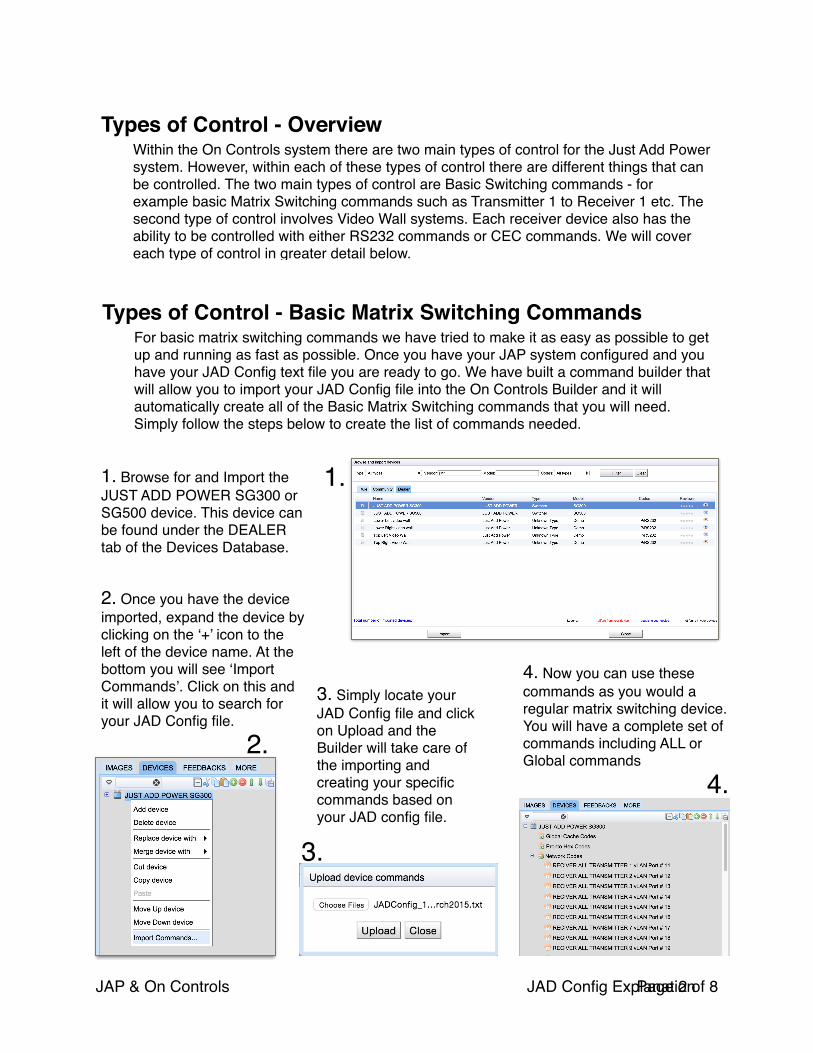
Types of Control - Overview
For basic matrix switching commands we have tried to make it as easy as possible to get up and running as fast as possible. Once you have your JAP system configured and you have your JAD Config text file you are ready to go. We have built a command builder that will allow you to import your JAD Config file into the On Controls Builder and it will automatically create all of the Basic Matrix Switching commands that you will need. Simply follow the steps below to create the list of commands needed.
Types of Control - Basic Matrix Switching Commands
1. Browse for and Import the JUST ADD POWER SG300 or SG500 device. This device can be found under the DEALER tab of the Devices Database.
2. Once you have the device imported, expand the device by clicking on the ‘+’ icon to the left of the device name. At the bottom you will see ‘Import Commands’. Click on this and it will allow you to search for your JAD Config file.
3. Simply locate your JAD Config file and click on Upload and the Builder will take care of the importing and creating your specific commands based on your JAD config file.
4. Now you can use these commands as you would a regular matrix switching device. You will have a complete set of commands including ALL or Global commands
1.
2.
3.
4.

JAP & On Controls JAD Config Explanation Page � of �3 8
For Video Wall systems these can become much more complicated very quickly. It all starts with specific information about the how the video wall is built. According to the Just Add Power Video Wall Documentation you should have the receivers in the following order as an example of a 3x3 video wall (1,2,3 across the top, 4,5,6 in the middle row and 7,8,9 on the bottom row all reading from Left to Right). Once you have those properly placed you will be able to import the correct Receiver devices from the Dealer Tab Database. These Receiver Devices will contain the following commands Video Wall Enable (when executed will setup the Receiver in the particular Video Wall mode); Disable Video Wall (will remove the Receiver from the Video Wall and return it to its normal operation); Tearing Delay (commands used to help align video wall panels); CEC Controls (commands that will turn the displays On, Off and Select HDMI Inputs).
These commands will be used in conjunction with the Basic Matrix Switching Commands to take control of the Video Wall. If you follow the steps below you will see how to take control of a 3x3 Video Wall. The first step is to follow the Basic Matrix Switch Command steps that were listed in the previous page.
Types of Control - Video Wall Commands
1. Browse for and Import the JUST ADD POWER Receiver 1-9 (3x3). This device can be found under the DEALER tab of the Devices Database.
2. If you expand the devices by clicking on the ‘+’ icon you will notice that all of the commands are not identical. This is due to the position in the wall of the particular receivers and their ability to parts of different configurations.
1.
2. 3. Now you are ready to build your video wall commands. In the following pages we will cover how to make your video wall commands so that you will be able to send a few different devices to all of the displays in a video wall format.
JAP & On Controls JAD Config Explanation Page � of �4 8
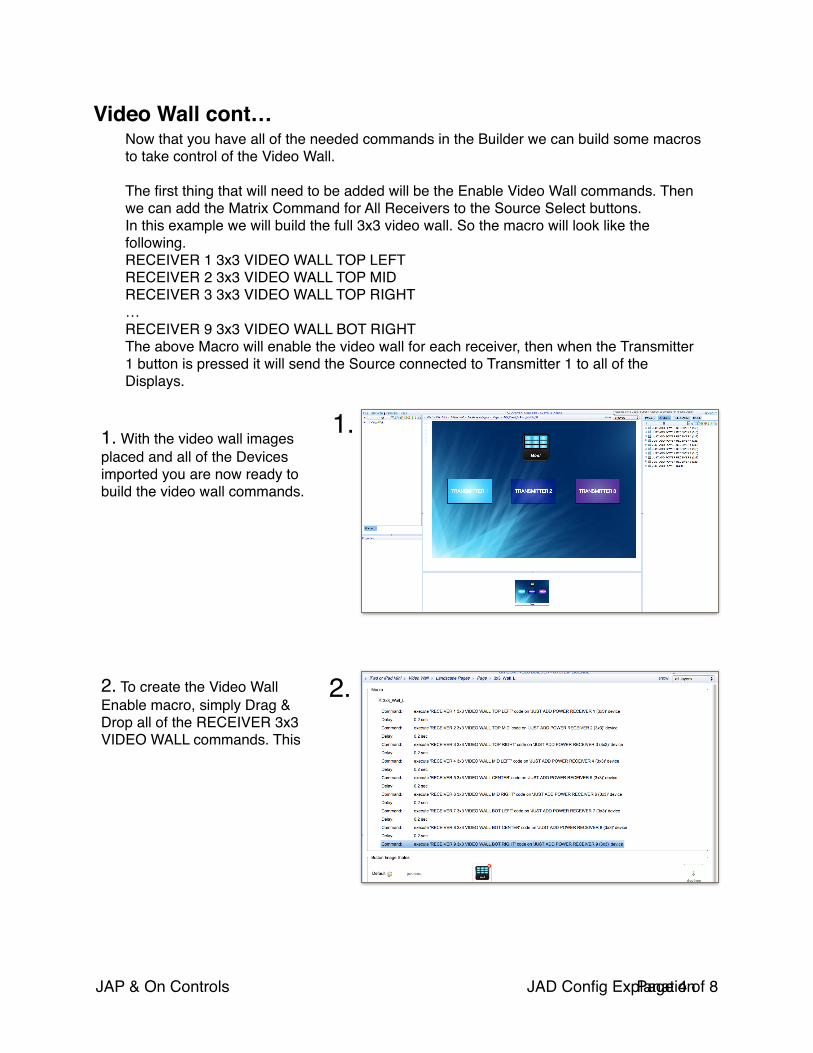
Now that you have all of the needed commands in the Builder we can build some macros to take control of the Video Wall.
The first thing that will need to be added will be the Enable Video Wall commands. Then we can add the Matrix Command for All Receivers to the Source Select buttons.In this example we will build the full 3x3 video wall. So the macro will look like the following. RECEIVER 1 3x3 VIDEO WALL TOP LEFTRECEIVER 2 3x3 VIDEO WALL TOP MIDRECEIVER 3 3x3 VIDEO WALL TOP RIGHT…RECEIVER 9 3x3 VIDEO WALL BOT RIGHTThe above Macro will enable the video wall for each receiver, then when the Transmitter 1 button is pressed it will send the Source connected to Transmitter 1 to all of the Displays.
Video Wall cont…
1. With the video wall images placed and all of the Devices imported you are now ready to build the video wall commands.
2. To create the Video Wall Enable macro, simply Drag & Drop all of the RECEIVER 3x3 VIDEO WALL commands. This
1.
2.

JAP & On Controls JAD Config Explanation Page � of �5 8
Video Wall cont…
3. In order to send the Transmitter source to the Video Wall you will need to Drag & Drop the RECEIVER ALL commands to each of the TRANSMITTER buttons.
3.
Now that the Video Wall commands are built you will need to add the Tearing delays so that all of the displays are displaying the content properly. This is initially configured within the Just Add Power software and there is some Trial & Error to figuring out what your Tearing Delays will be. They will be different depending upon each Source Device resolution. You can contact Just Add Power for more info on this. Once you know what your Tearing Delays are you can add them to each Receiver Device in the Builder, then they can be added to the macros so that everything looks proper.
Video Wall cont… Adding Tearing Delays
4. In this example the Tearing delays needed are ‘0’ and ‘10000’.
4.
5. As you can see below the Tearing Delays have been added to the Video Wall Enable button. They should be added at the end of the Macro.
5.

JAP & On Controls JAD Config Explanation Page � of �6 8
Because there are so many different configurations of the Video Walls you may find that your customer wishes to have the Video Wall display different configurations such as 2x2 video wall as part of the 3x3 video wall. For this example I will change to a 2x2 Video Wall in the Top Left with Receivers 3,6,7,8,9 all showing their own source.
Video Wall cont…Different Video Wall Configs
The first thing that will need to be added will be the Disable Video Wall commands. Then we can add the Video Wall Commands for All Receivers that will be part of the new configuration.In this example we will build the TOP LEFT 2x2 video wall. So the macro will look like the following. RECEIVER 3 DISABLE VIDEO WALLRECEIVER 6 DISABLE VIDEO WALL RECEIVER 7,8,9 DISABLE VIDEO WALLRECEIVER 1 2x2 VIDEO WALL TOP LEFTRECEIVER 2 2x2 VIDEO WALL TOP RIGHTRECEIVER 4 2x2 VIDEO WALL BOT LEFTRECEIVER 5 2x2 VIDEO WALL BOT RIGHT
The above Macro will enable the video wall for receivers 1,2,4,5 then when the Transmitter 1 button is pressed it will send the Source connected to Transmitter 1 to those Displays.
1. With the video wall images placed and all of the Devices imported you are now ready to build the video wall commands.
2. To create the Video Wall Enable macro, simply Drag & Drop the commands that are listed above. You will also need to send the appropriate Tearing Delays depending on the config of the Video Wall.
1.
2.
JAP & On Controls JAD Config Explanation Page � of �7 8
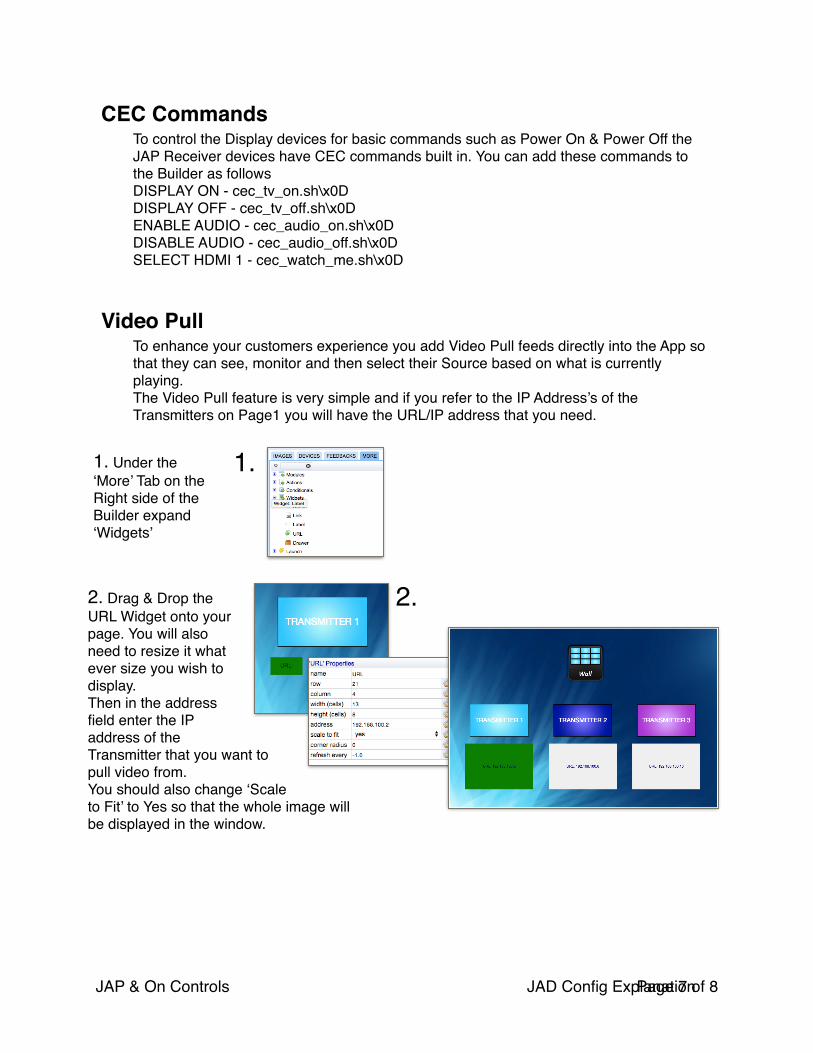
To control the Display devices for basic commands such as Power On & Power Off the JAP Receiver devices have CEC commands built in. You can add these commands to the Builder as follows DISPLAY ON - cec_tv_on.sh\x0DDISPLAY OFF - cec_tv_off.sh\x0DENABLE AUDIO - cec_audio_on.sh\x0DDISABLE AUDIO - cec_audio_off.sh\x0DSELECT HDMI 1 - cec_watch_me.sh\x0D
CEC Commands
To enhance your customers experience you add Video Pull feeds directly into the App so that they can see, monitor and then select their Source based on what is currently playing. The Video Pull feature is very simple and if you refer to the IP Address’s of the Transmitters on Page1 you will have the URL/IP address that you need.
Video Pull
1. Under the ‘More’ Tab on the Right side of the Builder expand ‘Widgets’
1.
2. Drag & Drop the URL Widget onto your page. You will also need to resize it what ever size you wish to display. Then in the address field enter the IP address of the Transmitter that you want to pull video from. You should also change ‘Scale to Fit’ to Yes so that the whole image will be displayed in the window.
2.
JAP & On Controls JAD Config Explanation Page � of �8 8
&
You should now be armed with necessary tools to build a Just Add Power Video Wall. Keep in mind that there are many different styles of video walls and that should you need some assistance we are always here to help you out.