Embed Size (px)
Citation preview

MDT technologies GmbH • 51766 Engelskirchen • Papiermühle 1 Tel.: +49-2263-880 • Fax: +49-2263-4588 • [email protected] • www.mdt.de
05/2013
Technical Manual
MDT DaliControl IP Gateway
w/ Webinterface
SCN-DALI64.02

Technical Manual Dali Control IP Gateway SCN‐DALI64.02
MDT technologies GmbH • 51766 Engelskirchen • Papiermühle 1 Tel.: +49-2263-880 • Fax: +49-2263-4588 • [email protected] • www.mdt.de
2
1Content1 Content ................................................................................................................................................. 2
2 Overview ............................................................................................................................................... 5
2.1 Operation Instructions .................................................................................................................. 5
2.2 Usage & Handling .......................................................................................................................... 6
2.3 Installation DaliControl IP Gateway............................................................................................... 7
2.4 Description DaliControl IP Gateway .............................................................................................. 8
2.5 Functions ....................................................................................................................................... 8
2.6 Commissioning DaliControl IP Gateway ........................................................................................ 9
3. General properties of the ETS application program: DALI IP Gateway Plug‐In ................................. 10
3.1 Installing the Plug‐In .................................................................................................................... 10
3.2 Principal structure of the Plug‐In ................................................................................................ 11
3.3 Operating modes of the Plug‐In: DALI commissioning ................................................................ 12
4. DALI commissioning .......................................................................................................................... 14
4.1 Commissioning the DaliControl IP Gateway via website or pushbuttons ................................... 15
4.2 The commissioning process with DaliControl IP Gateway via ETS Plug‐In .................................. 16
5 Display and push button control ........................................................................................................ 17
5.1 Main menu– Level 1 .................................................................................................................... 17
5.2 Sub‐menu DALI CONTROL – Level 2 ............................................................................................ 18
5.3 Sub‐menu NETWORK IP_ADDRESS – Level 2 and 3 ..................................................................... 18
5.4 Sub‐menu NEW INSTALLATION – Level 2 .................................................................................... 19
5.5 Sub‐menu POST‐INSTALLATION – Level 2 ................................................................................... 19
5.6 Sub‐menu ECG QUICK EXCHANGE – Level 2 ................................................................................ 20
5.7 Sub‐menu GROUP ASSIGNMENT – Level 2 and 3 ........................................................................ 20
5.8 Sub‐menu SCENE ASSIGNMENT – Level 2 and 3 ......................................................................... 21
5.9 Sub‐menu GROUP TEST – Level 2 and 3 ...................................................................................... 21
5.10 Sub‐menu SCENE TEST – Level 2 and 3 ..................................................................................... 22
5.11 Sub‐menu SYSTEM TEST – Level 2 and 3 ................................................................................... 22
5.12 Sub‐menu MAINTENANCE ECG/LAMP– Level 2 and 3 .............................................................. 23
5.13 Sub‐menu CONVERTER INHIBIT MODE – Level 2 ...................................................................... 23
6 Control via web browser .................................................................................................................... 24
6.1 Configuration buttons ................................................................................................................. 27
6.2 Control buttons ........................................................................................................................... 28
6.3 ECG fields ..................................................................................................................................... 30
6.4 Group fields ................................................................................................................................. 31
6.5 Information and status fields ...................................................................................................... 31

Technical Manual Dali Control IP Gateway SCN‐DALI64.02
MDT technologies GmbH • 51766 Engelskirchen • Papiermühle 1 Tel.: +49-2263-880 • Fax: +49-2263-4588 • [email protected] • www.mdt.de
3
7 ETS special and commissioning functions .......................................................................................... 34
7.1 Special functions in ‘Normal mode‘ ............................................................................................ 34
7.1.1 Synchronisation with the connected DALI segment ............................................................ 34
7.1.2 User‐friendly names for ECGs and groups ........................................................................... 36
7.2 Special functions in ‘Extended Mode‘ ......................................................................................... 37
7.2.1 Preparing and planning the DALI commissioning in ‘Extended Mode‘ ................................ 38
7.2.2 DALI commissioning in ‘Extended Mode‘ ............................................................................. 40
7.2.3 ECG and lamp faults during DALI commissioning in ‘Extended Mode‘ ................................ 43
7.2.4 Using dummy ECGs in ‘Extended Mode‘ .............................................................................. 44
7.3 General extra functions in the ETS .............................................................................................. 45
7.3.1 Using IP for plug‐in communication ..................................................................................... 45
7.3.2 Parameter templates ............................................................................................................ 46
7.3.3 DALI configuration data back‐up .......................................................................................... 47
8. DALI maintenance and expansion ..................................................................................................... 48
8.1 Quick exchange of individual ECGs .............................................................................................. 48
8.2 Extending the existing system – post‐installation ....................................................................... 49
9. Different operating modes ................................................................................................................ 50
9.1 Normal mode ............................................................................................................................... 50
9.2 Permanent mode ......................................................................................................................... 50
9.3 Staircase mode ............................................................................................................................ 50
9.4 Night‐time mode ........................................................................................................................ 50
9.5 Panic / emergency mode ............................................................................................................. 51
9.6 Test mode for central battery emergency luminaires ................................................................. 51
9.7 Burn‐in mode ............................................................................................................................... 51
9.8 Operating mode hierarchy .......................................................................................................... 53
10 Analysis and service functions .......................................................................................................... 54
10.1 Recording operating hours ........................................................................................................ 54
10.2 Individual fault recognition at ECG level ................................................................................... 54
10.3 Fault analysis at group level ...................................................................................................... 56
10.4 Fault analysis at device level ..................................................................................................... 57
11 Scenes and effects ............................................................................................................................ 58
11.1 The scenes module .................................................................................................................... 58
11.1.1 Scene programming via the scene website ........................................................................ 59
11.1.2 Scene programming via ETS in ‘Extended Mode‘ .............................................................. 60
11.2 The effect module ..................................................................................................................... 61
11.2.1 Effect programming using the effects website ................................................................. 62
11.2.2 Effect programming via ETS in ‘Extended Mode‘ .............................................................. 64

Technical Manual Dali Control IP Gateway SCN‐DALI64.02
MDT technologies GmbH • 51766 Engelskirchen • Papiermühle 1 Tel.: +49-2263-880 • Fax: +49-2263-4588 • [email protected] • www.mdt.de
4
12 Self‐contained battery emergency lamps ........................................................................................ 65
12.1 Features ..................................................................................................................................... 65
12.2 Converter inhibit mode ............................................................................................................. 66
12.3 Test mode .................................................................................................................................. 66
13 ETS communication objects overview .............................................................................................. 68
13.1 General communication objects ............................................................................................... 68
13.2 ECG‐related communication objects ......................................................................................... 74
13.3 Group‐related communication objects ..................................................................................... 77
14 ETS parameter overview .................................................................................................................. 79
14.1 Device: General Settings ........................................................................................................... 79
14.1.1 Parameter page: General Settings ..................................................................................... 80
14.1.2 Parameter page: IP Settings ............................................................................................... 81
14.1.3 Parameter page: Behaviour ................................................................................................ 82
14.1.4 Parameter page: Special Functions .................................................................................... 83
14.1.5 Parameter page: Analysis and service ................................................................................ 84
14.2 ECG No. xx ................................................................................................................................. 86
14.2.1 Parameter page: ECG No. xx .............................................................................................. 87
14.2.2 Parameter page: Emergency Settings ................................................................................ 89
14.2.3 Parameter page: Switching Behaviour ............................................................................... 90
14.2.4 Parameter page: Analysis and service ................................................................................ 92
14.3 Group No. xx .............................................................................................................................. 92
14.3.1 Parameter page: Group No. xx ........................................................................................... 93
14.3.2 Parameter page: Switching behaviour ............................................................................... 94
14.3.3 Parameter page: Analysis and service ............................................................................... 96
15. Firmware version and update ......................................................................................................... 97
16. Reset to conditions at delivery ........................................................................................................ 98
17 Attachment ....................................................................................................................................... 99
17.1 Statutory requirements ............................................................................................................. 99
17.2 Routine disposal ........................................................................................................................ 99
17.3 Assemblage ................................................................................................................................ 99
17.4 Datasheet ................................................................................................................................ 100
Technical Manual Dali Control IP Gateway SCN‐DALI64.02
MDT technologies GmbH • 51766 Engelskirchen • Papiermühle 1 Tel.: +49-2263-880 • Fax: +49-2263-4588 • [email protected] • www.mdt.de
5
2Overview
2.1OperationInstructions Danger High Voltage
Installation and commissioning of the device only be carried out by authorised electricans. The relevant standards, directives, regulations and instructions must be observed. Use in USA and Canada is prohibited.
After Installation and connecting mains power supply the outputs can be alive. The outputs can be switched OFF using the push buttons on top of the device.
After installation a KNX bus telegram can switch the outputs alive.
Disconnect the mains power supply prior to installation or disassembly.

Technical Manual Dali Control IP Gateway SCN‐DALI64.02
MDT technologies GmbH • 51766 Engelskirchen • Papiermühle 1 Tel.: +49-2263-880 • Fax: +49-2263-4588 • [email protected] • www.mdt.de
6
2.2Usage&Handling
1 ‐ KNX bus connection terminal 2 – Red programming LED 3 ‐ Programming Key 4 ‐ Connection terminal DALI bus 5 – DALI programming key 6 ‐ LED indicators 7 ‐ Main power supply terminal

Technical Manual Dali Control IP Gateway SCN‐DALI64.02
MDT technologies GmbH • 51766 Engelskirchen • Papiermühle 1 Tel.: +49-2263-880 • Fax: +49-2263-4588 • [email protected] • www.mdt.de
7
2.3InstallationDaliControlIPGateway 1. Place the DaliControl IP Gateway on DIN 35mm rail. 2. Connect the DaliControl IP Gateway to the KNX bus. 3. Wire up the Dali Gateway as descripted in the circuit diagram. 4. Switch on KNX power supply. 5. Switch up mains power supply.

Technical Manual Dali Control IP Gateway SCN‐DALI64.02
MDT technologies GmbH • 51766 Engelskirchen • Papiermühle 1 Tel.: +49-2263-880 • Fax: +49-2263-4588 • [email protected] • www.mdt.de
8
2.4DescriptionDaliControlIPGateway The MDT DaliControl IP Gateway receive KNX/EIB telegrams and enables the classic control of 16 DALI groups plus individual control of the ECG. An example is switching or dimming of 2x16 light in groups (advantage of synchronous switching inside the group) plus 32 individual lights. The MDT DaliControl IP Gateway detects light and ECG errors and releases telegrams in dependence of its parameterization. The commissioning after installation and group attribution of the DaliControl IP Gateway is done with the buttons on the device or with the integrated web interface. Quick identification and group attribution of the connected DALI segments can be done without connection to the KNX bus. The network connection is realized with an RJ45 interface.. The DaliControl IP Gateway is a modular installation device for fixed installation in dry rooms. It fits on 35mm rails in power distribution boards or closed compact boxes.
2.5Functions The cross‐functional DALI‐Bus (DALI = Digital Addressable Lighting Interface) is a system used to control electronic ballasts (ECGs) in lighting technology. The specifications of the DALI communications interface are set in the international norm IEC 60929. The DALI Bus enables the receipt of switch and dim commands. In addition, the DALI can be used for the notification of a fault status such as light or ECG failure or for other light status information. In line with the latest DALI standard, devices with emergency light function (EN 62386‐202) are also supported. Status and operating mode of emergency lights can be monitored and different prescribed testing procedures can be performed. Via the connected control device / gateway (Master), up to 64 individual DALI ECGs (Slaves) can be connected in a DALI segment. When the DALI is commissioned, the ECGs receive an automatically generated 3byte long address. Based on the long address a short address between 0 and 63 is assigned during the further commissioning process. As the address assignment is automatic, the device order is random. The individual ECGs/lights therefore need to be identified during the further commissioning process (see below). The addressing of individual ECGs in the system is either based upon the short address (individual addressing) or upon a DALI group address (group addressing). For this purpose, any number of ECGs within a segment can be assigned to up to 16 groups. The group addressing in the DALI system guarantees that switch and dim processes of different lights within a system are performed simultaneously without imposition of time delays. In addition to short and group addresses, the light values of individual DALI ECGs can also be merged into scenes and addressed via scene addresses. For a detailed description of the DALI system, please see the DALI handbook at www.dali‐ag.org

Technical Manual Dali Control IP Gateway SCN‐DALI64.02
MDT technologies GmbH • 51766 Engelskirchen • Papiermühle 1 Tel.: +49-2263-880 • Fax: +49-2263-4588 • [email protected] • www.mdt.de
9
The MDT DALI Gateway DaliControl IP Gateway is a device used to control ECGs with a DALI interface via the KNX installation bus. The device transforms switch and dim commands from the connected KNX system into DALI telegrams and status information from the DALI bus into KNX telegrams. The DaliControl IP Gateway is a Category 1 device (in accordance with EN 62386‐103). This means the device must only be used in DALI segments with connected ECGs and not with other DALI control devices within the segment (no multi‐master function). Power supply for the up to 64 connected ECGs comes directly from the DaliControl IP Gateway. An additional DALI power supply is not required and not permitted. The device comes in a 4TE wide DIN Rail casing so it can be directly integrated into the mains distribution box. In addition to the pure gateway functions, the DaliControl IP Gateway offers numerous additional features:
Addressing of 16 DALI groups and/or individual addressing of up to 64 ECGs
Flexible DALI commissioning concept: directly on the device or via the integrated web server
Different operating modes for groups and ECGs such as permanent mode, night‐time mode or staircase mode
Burn‐in mode for each individual light with specific burn‐in time settings
Integrated reader to count the operating hours of each light with an alarm to signify the end of its life span
Individual fault recognition with objects for each light/ECG
Complex fault analysis at group and device level with number of faults and calculation of fault rates
Fault threshold monitoring with individually adjustable threshold values
Scene module for extensive scene programming of groups and individual ECGs
Effect module for sequence control and light effects
“Quick exchange function“ for the quick and easy replacement of faulty ECGs
Test mode for centrally powered emergency light systems
Support of self‐contained emergency ballasts
Support of testing procedures for emergency lights with date and time stamp
Integrated web server with extensive commissioning and maintenance possibilities
Integrated “visualisation“ via web‐browser for direct control and display
2.6CommissioningDaliControlIPGateway Note: Before commissioning please download application software at www.mdtautomation.de\downloads.html 1. Assign the physical address and set parameters with the ETS3. 2. Upload the physical address and parameters into the Dali Gateway. After request press programming button. 3. After successful programming the red LED goes out.

Technical Manual Dali Control IP Gateway SCN‐DALI64.02
MDT technologies GmbH • 51766 Engelskirchen • Papiermühle 1 Tel.: +49-2263-880 • Fax: +49-2263-4588 • [email protected] • www.mdt.de
10
3.GeneralpropertiesoftheETSapplicationprogram:DALIIPGatewayPlug‐In
3.1InstallingthePlug‐In The application for the DaliControl IP Gateway is based on a powerful KNX communications stack of the System‐B type. It is designed as plug‐in for ETS‐3 and ETS‐4. The plug‐in design means that an additional installation process is necessary. All program files that are required are automatically set up when you import the corresponding ETS product file (vdx file). After the import the product can be integrated as usual into the ETS. It can be found under product family “Lighting“ and product type “Gateway“.
When you first load the product in the ETS, you need to start the installation of the required plug‐in files by pressing the ‘Next‘ button. Please check the IPAS software license conditions before you start the installation. With the installation you accept the conditions.

Technical Manual Dali Control IP Gateway SCN‐DALI64.02
MDT technologies GmbH • 51766 Engelskirchen • Papiermühle 1 Tel.: +49-2263-880 • Fax: +49-2263-4588 • [email protected] • www.mdt.de
11
If the installation has been successful, a notification window appears.
Attention: The PC must have .NET Version 4.0 as a requirement for the installation. Normally the framework exists on any modern PC. Should an older version of .NET be installed or no version at all, you need to update .NET first. Please see the Microsoft website for the required setup.
3.2PrincipalstructureofthePlug‐In The DaliControl IP Gateway is a high‐functionality product and accordingly offers many different setting options within the parameters. To make the overview of the parameters as simple and transparent as possible for the system integrator, there are more operating levels than with a standard ETS application.

Technical Manual Dali Control IP Gateway SCN‐DALI64.02
MDT technologies GmbH • 51766 Engelskirchen • Papiermühle 1 Tel.: +49-2263-880 • Fax: +49-2263-4588 • [email protected] • www.mdt.de
12
Unlike with the standard applications, there is not only a parameter page for each device within the main parameter directory on the left‐hand side but also several sub‐pages which can be selected via a register at the top of the page. Use the main directory to select the element you require “General ECG No XX, Group No XX“ and the sub‐pages to set the parameters of the selected element. This structure is different from a standard device. You can also use the three menus “Data, Tools and Help“ in the header of the plug‐in window to perform some of the main functions and settings.
3.3OperatingmodesofthePlug‐In:DALIcommissioning In principle, the plug‐in can be used in the two different operating modes “Normal mode“ and “Extended mode“. Depending on the concept needed for the DALI commissioning, you can select the required mode in the menu ‘Tools‘ ‘Options‘.
The choice of the commissioning concept depends on the preferences of the system integrator as well as the technical requirements of the project. If you choose option A ‘Normal Mode‘ the DALI configuration and commissioning must be performed via the website of the device. This means that all project gateways ‐ at least during the commissioning phase ‐ must be integrated into an IP network via the IP interface. (The network can also be a simple cross‐link cable connection between the gateway and the configuration PC.)

Technical Manual Dali Control IP Gateway SCN‐DALI64.02
MDT technologies GmbH • 51766 Engelskirchen • Papiermühle 1 Tel.: +49-2263-880 • Fax: +49-2263-4588 • [email protected] • www.mdt.de
13
If no IP network is available, only a limited commissioning process is possible via the display and push‐buttons on the device. However, if you choose commissioning option B “Extended Mode“ the whole commissioning process can be performed via ETS and KNX. No IP network is required in this case. Mode B also gives you the opportunity to configure individual ECGs ‘offline‘ in the ETS, i.e. before they are commissioned in the installation. However, in this case all objects and parameters are visible. The synchronisation that simplifies the ETS and brings it in line with the actual system is not possible. To decide which mode to use you should answer the following three questions:
Is the DALI gateway (at least temporarily during the commissioning process) integrated into an IP network?
o Yes Mode A or mode B
o No Mode B
Do you want to set the DALI configuration and parameters ‘offline‘ in the ETS prior to the commissioning of the installation?
o Yes Mode B
Do you want to perform the DALI configuration and set the parameters on the construction site and synchronise the ETS with the real installation to simplify it?
o Yes Mode A
Mode A: ’Normal Mode‘ ‐‐‐ Mode B: ’Extended Mode‘
If the conditions permit it, we recommend using ‘Normal Mode‘, especially for integrators who are not too familiar with the DALI system because the large number of possible parameter settings and objects can be automatically reduced to those elements that are actually required. The standard setting after the initial installation of the plug‐in is therefore mode A. Please remember that whichever operating mode you select, it applies to all gateways within a project and ETS. It is not possible to select mode A for some and mode B for others.

Technical Manual Dali Control IP Gateway SCN‐DALI64.02
MDT technologies GmbH • 51766 Engelskirchen • Papiermühle 1 Tel.: +49-2263-880 • Fax: +49-2263-4588 • [email protected] • www.mdt.de
14
4.DALIcommissioning
As explained above, the work flow for the commissioning of a DALI segment differs depending on the selected concept. The following chart shows the general procedure:

Technical Manual Dali Control IP Gateway SCN‐DALI64.02
MDT technologies GmbH • 51766 Engelskirchen • Papiermühle 1 Tel.: +49-2263-880 • Fax: +49-2263-4588 • [email protected] • www.mdt.de
15
4.1CommissioningtheDaliControlIPGatewayviawebsiteorpushbuttons
If you select option A, i.e. commissioning the device via the website or pushbuttons, please use the following procedure. Following the physical installation and wiring of the ECGs and lights and the electronic commissioning, the connected ECGs need to be taught‐in. During the teach‐in process, all DALI ECGs are automatically recognised and each ECG is assigned a short address between 0 and 63. You can start this process either via the pushbuttons and menu on the device display (see below display and push button control) or via the commissioning website (see below control via web browser). The order of the ECGs within a DALI segment is completely random. You therefore need to identify the ECGs and ‐ if required ‐ assign them to groups. Identification and group assignment can also be performed via the device itself (pushbuttons, display) or via the website. If you use the website for identification, you can give each ECG an individual name (e.g. office‐left). If you want to control an ECG as part of a DALI group rather than individually, you can at this point assign it to a group. Once you have identified all ECGs and, if required, named and assigned them, you need to synchronise the ETS application. During the synchronisation, the system properties of the connected DALI segment are transferred to the ETS and the parameters and communication objects are configured accordingly. This means that after the synchronisation only objects and parameters of actually existing ECGs are visible to the user. The application is thereby optimised and simplified. ECG and group names are also transferred to the ETS. To start the synchronisation, press the respective button on the ETS parameter page (see below ETS application program). Once the synchronisation is complete, you can configure the individual ECG or group parameters in the ETS and connect communication objects with group addresses. When you have finished the configuration, simply download the ETS application onto the device. In principle, the installation is now ready for operation and function testing. However, if you would also like to program scenes or effects, you can do so via the pushbuttons and display on the device (only scenes and with limited functionality) or via the web site (scenes and effects without limitation). For a complete description of the display and push‐button control required for the commissioning, please see chapter 5. For a description of the website function, please refer to chapter 6.

Technical Manual Dali Control IP Gateway SCN‐DALI64.02
MDT technologies GmbH • 51766 Engelskirchen • Papiermühle 1 Tel.: +49-2263-880 • Fax: +49-2263-4588 • [email protected] • www.mdt.de
16
4.2ThecommissioningprocesswithDaliControlIPGatewayviaETSPlug‐In
Instead of commissioning via web browser or push‐buttons, the DALI can also be entirely commissioned via KNX and the plug‐in. This mode B option enables a largely ‘off‐line configuration’ of the DALI installation. Parameters for ECGs and groups as well as communication objects can be completely configured before the electrical installation. Names can be assigned in advance and the setting of scenes and effects is also possible ‘offline‘. This means that the system integrator who uses the ETS and the electrician who works on the actual installation can work independently of each other. Once the electrical installation is complete, the actual DALI commissioning can also be performed with ETS. The first thing to do is to start the teach‐in process. During this process all connected DALI ECGs are automatically recognised and each ECG is assigned a random short‐address between 0 and 63. You can now identify the randomly ordered ECGs/lamps by selecting a respective operation (on/off/blinking) in the ETS. Use drag‐and‐drop to pull an ECG into the ECG position previously set in the ETS. The random order is thus ‘dissolved‘ and the installation is now well‐structured. When you download the DALI configuration, the configured data is downloaded onto the ECGs and if applicable the short‐addresses are amended in line with the pre‐configuration. Once you have programmed all DALI data, load the actual ETS application onto the gateway. For a detailed description of the ETS commissioning interface, please see chapter 7.

Technical Manual Dali Control IP Gateway SCN‐DALI64.02
MDT technologies GmbH • 51766 Engelskirchen • Papiermühle 1 Tel.: +49-2263-880 • Fax: +49-2263-4588 • [email protected] • www.mdt.de
17
5Displayandpushbuttoncontrol You can commission the connected DALI segment and set and change DALI functions via the three pushbuttons (MOVE, Set/Prg, ESC) and the 2x12 character display on the front of the device. The user concept is menu‐based. Depending on the menu position, you can select two sub‐levels. The current menu position is shown on the display. To navigate within the menu, press the pushbuttons briefly. Use the Move button to select the next menu item on the same level. Use the Prg/Set button to go to the next lower level. Press the ESC button to leave a level and return to the next higher level.
5.1Mainmenu–Level1
The main menu (Level 1) has the following structure:
The product name and firmware version are displayed. The sub‐menu can be used to set the display language.
The sub‐menu displays the IP address set in the ETS or assigned by the DHCP server.
When a DALI segment is newly installed, use the sub‐menu to reset the connected DALI devices and automatically search for ECGs.
Use the sub‐menu to start the automatic search process and possibly adjust the configuration following a post‐installation of DALI ECGs.
Use the sub‐menu to active the ECG quick exchange function and possibly program and integrate individually replaced ECGs into the system.
Use the sub‐menu to identify ECGs and assign them to DALI groups. .
Use the sub‐menu to assign groups to DALI scenes
Use the sub‐menu to switch both the whole installation (broadcast) and individual channels for test purposes. Use the sub‐menu to test individual scenes.
POST INSTALLATION
ECG QUICK EXCHANGE
GROUP ASSIGNMENT
SCENE ASSIGNMENT
GROUP TEST
SCENE TEST
NETWORK IP ADDRESS
DALI CONTROL IP Gateway
NEW INSTALLATION

Technical Manual Dali Control IP Gateway SCN‐DALI64.02
MDT technologies GmbH • 51766 Engelskirchen • Papiermühle 1 Tel.: +49-2263-880 • Fax: +49-2263-4588 • [email protected] • www.mdt.de
18
Use the sub‐menu to load any existing system faults.
Use the sub‐menu to start the burn‐in mode for ECGs and to re‐set operating hours.
Use the sub‐menu to activate the converter inhibit mode in the installation phase.
To perform a function or change a configuration within a sub‐menu, go to the respective position and change into programming mode. To change into programming mode, hold the Prg/Set button for
more than 2 seconds. Once the function is in programming mode, a symbol appears in the display. If the programming mode is active, use the Move button to change a parameter or setting. Briefly press the Prg/Set button again to complete the process and save the set parameter or activate the function.
5.2Sub‐menuDALICONTROL–Level2
Briefly press the Prg/Set button to change from the main menu DALI CONTROL to the sub‐menu LANGUAGE. The currently set display language is shown. Hold the Prg/Set button to change into programming mode. Use the MOVE button to choose from one of the following languages: GERMAN, ENGLISH, FRENCH, SPANISH, ITALIAN, DUTCH, SWEDISH, DANISH. Briefly press the Prg/Set button again to save the configuration. The display now works in the selected language.
5.3Sub‐menuNETWORKIP_ADDRESS–Level2and3
Briefly press the Prg/Set button to change from the main menu IP ADDRESS to the sub‐menu.
The sub‐menu displays the IP address currently set in the ETS or assigned by the DHCP‐Server.
MAINTANANCE ECG/LAMP
CONVERTER INHIBIT MODE
SYSTEM TEST
DALI CONTROL
NETWORK IP ADDRESS
LANGUAGE GERMAN
DHCP: 192. 168.004.101

Technical Manual Dali Control IP Gateway SCN‐DALI64.02
MDT technologies GmbH • 51766 Engelskirchen • Papiermühle 1 Tel.: +49-2263-880 • Fax: +49-2263-4588 • [email protected] • www.mdt.de
19
5.4Sub‐menuNEWINSTALLATION–Level2
Briefly press the Prg/Set button to change from the main menu NEW INSTALLATION to the sub‐menu SEARCH ECGs via PROG‐MODE. Hold the Prg/Set button to change into programming mode. Briefly press the Prg/Set‐button again to start the initialisation and search process. First, all ECGs connected to the DALI segment are automatically reset and any previously set parameters and group assignments are deleted. The device then searches for the connected ECGs via their random long address. The ECGs are automatically recognised in ascending order. Depending on the number of connected ECGs the search process may take a few minutes. Once the process is complete, the number of ECGs found is shown on the display. Press the ESC button (or wait for about 30 seconds) to return to the level above.
5.5Sub‐menuPOST‐INSTALLATION–Level2
Briefly press the Prg/Set button to change from the main menu POST‐ INSTALLATION to the sub‐menu SEARCH ECGs via PROG‐MODE. Hold the Prg/Set button to change into programming mode. Briefly press the Prg/Set‐button again to start the verification and search process. The device searches for the connected ECGs via their long address and automatically compares them to the previous configuration If ECGs have been removed from the DALI segment, the entries are deleted from the device. The number of deleted devices is displayed during the verification process
After that, the DALI segment is searched for newly installed devices. Newly added ECGs are automatically reset and any previously programmed parameters and group assignments are deleted. Depending on the number of connected ECGs the search process may take a few minutes. During the search process, the number of newly found devices is shown on the display. Once the whole process (verification and search) is complete, the display shows both the deleted and the newly found ECGs (deleted devices / new devices from left to right, see picture on the left). Press the ESC button (or wait for about 30 seconds) to return to the level above.
NEW- INSTALLATIO
POST INSTALLATIO
SEARCH ECGs via PROG-
DELETED ECGs: 3
NEW ECGs: 1
DEL./NEW ECGs: 3/1
SEARCH ECGs via PROG-
FOUND ECGs: 47

Technical Manual Dali Control IP Gateway SCN‐DALI64.02
MDT technologies GmbH • 51766 Engelskirchen • Papiermühle 1 Tel.: +49-2263-880 • Fax: +49-2263-4588 • [email protected] • www.mdt.de
20
5.6Sub‐menuECGQUICKEXCHANGE–Level2
Briefly press the Prg/Set button to change from the main menu ECG QUICK EXCHANGE to the sub‐menu SEARCH ECGs via PROG‐MODE. Hold the Prg/Set button to change into programming mode. Briefly press the Prg/Set‐button again to start the quick exchange. The device first checks if one or several ECGs in the system were faulty. It then automatically looks for newly connected ECGs in the segment. The quick exchange is only possible if just one ECG in the segment was faulty and one new ECG is found. If the process is successful, the number of the replaced ECG is shown. If the search process cannot be completed because the required conditions are not met, an error code appears in the display. The error codes have the following meaning: Error Type 7: No ECG failure Error Type 8: More than one ECG failure Error Type 9: No new ECG can be found Error Type 10: ECG has wrong device type Error Type 11: More than one new ECG Press the ESC button (or wait for about 30 seconds) to return to the level above.
5.7Sub‐menuGROUPASSIGNMENT–Level2and3
Briefly press the Prg/Set button to change from the main menu GROUP ASSIGNMENT to the sub‐menu. Within this menu the individual ECGS that were found during the search process can be assigned to 16 DALI groups and previous assignments can be modified. Briefly press the MOVE button to run through the different ECGs. The number of the selected ECG is shown in the first display line. As long as the ECG is selected, the connected lamp is flashing. The programmer can thereby determine which lamp is assigned to the number. If the selected device is a non‐switchable converter for emergency lights, the selection sets the device into function test mode and the display shows the word CONV. For identification purposes, the function LED on the converter flashes during the test (see user manual for the converter). Hold the Prg/Set button to change into programming mode. Briefly press the MOVE button again to select the group that you want to assign the ECG to. If the group is selected, briefly press the Prg/Set button to confirm and save the setting. You must repeat this process once for every ECG during the initial installation. Attention: non‐switchable converters for emergency lights cannot be assigned to a group. Press the ESC button (or wait for about 30 seconds) to return to the level above.
GROUP ASSIGNMENT
ECG No.: 12 GROUP: --
ECG QUICK EXCHANGE
SEARCH ECGs via PROG-
ECG 04 REPLACED
ERROR TYPE 07
CONV. No.: 13 GROUP: --
ECG No.: 12 GROUP: 1

Technical Manual Dali Control IP Gateway SCN‐DALI64.02
MDT technologies GmbH • 51766 Engelskirchen • Papiermühle 1 Tel.: +49-2263-880 • Fax: +49-2263-4588 • [email protected] • www.mdt.de
21
5.8Sub‐menuSCENEASSIGNMENT–Level2and3
Briefly press the Prg/Set button to change from the main menu SCENE ASSIGNMENT to the sub‐menu. Within the menu the DALI groups can be assigned to up to 16 possible scenes. Individually controlled ECGs cannot be assigned via the display. To assign individual ECGs, you must use the website. Briefly press the MOVE button to run through the individual scenes. The number of the selected scene is shown in the first display line. Behind the scene number, different characters show which of the 16 groups are assigned to the scene. An X means that a group is assigned to the scene. A – means the group is not assigned to the scene. The four characters directly behind the scene number in the first display line represent groups 1 ‐ 4 (from left to right). The 12 characters in the second display line represent groups 5 – 16 (from left to right). Hold the Prg/Set button to change into programming mode. A flashing cursor on the first X means that group 1 is selected. By briefly pressing the Move button you can toggle between X and – symbols to choose whether you would like to assign the group to the scene. Briefly press the Prg/Set‐button to move the cursor to the next group. Once you have run through all 16 groups, the setting is saved and used during further scene programming. After you have pressed the Prg/Set button a final time, the display automatically returns to the level above. Press the ESC button to return to the level above without saving the changes you have made.
5.9Sub‐menuGROUPTEST–Level2and3
Briefly press the Prg/Set button to change from the main menu GROUP TEST to the sub‐menu. Within the menu, groups can be switched either individually or all together (ALL GROUPS TEST) to test the installation. Briefly press the MOVE button to run through the individual groups. The number of the selected group is shown in the first display line. Hold the Prg/Set button to change into programming mode. Briefly press the Move button to select whether you would like to switch the group on or off. Briefly press the Prg/Set button to execute the selected command. Press the ESC button (or wait for about 30 seconds) to return to the level above.
SCENE ASSIGNMENT
SCENE01 XXXX
GROUP TEST
GROUP: 6 TEST
SCENE03 ----
GROUP: 6 ->off

Technical Manual Dali Control IP Gateway SCN‐DALI64.02
MDT technologies GmbH • 51766 Engelskirchen • Papiermühle 1 Tel.: +49-2263-880 • Fax: +49-2263-4588 • [email protected] • www.mdt.de
22
5.10Sub‐menuSCENETEST–Level2and3
Briefly press the Prg/Set button to change from the main menu SCENE TEST to the sub‐menu. Within the menu you can invoke all scenes for test purposes or program newly set light scenarios into the scene. Briefly press the MOVE button to run through the individual scenes. The number of the selected scene is shown in the first display line. Hold the Prg/Set button to change into programming mode. Briefly press the Move button to choose whether you would like to invoke or save a scene. Briefly press the Prg/Set‐Taste button to execute the selected command and either invoke or save the scene. Press the ESC button (or wait for about 30 seconds) to return to the level above.
5.11Sub‐menuSYSTEMTEST–Level2and3
Briefly press the Prg/Set button to change from the main menu SYSTEM TEST to the sub‐menu. Within the menu you can check for any potential faults. If there is no fault, this is shown in the display. The following faults can be recognised by the system. They are shown in the display and also simultaneously set off the red error LED:
DALI short‐circuit
Lamp fault with the lamp or ECG number being displayed
ECG fault with the ECG number being displayed
No KNX bus If there has been a DALI short‐circuit, no further faults can be recognised. For all other fault types, several faults can be recognised at the same time. Within the menu you can toggle between the different faults by briefly pressing the Move button. The number of the ECG is displayed for both lamp and ECG faults. This means that a fault can be easily localised. Press the ESC button (or wait for about 30 seconds) to return to the level above.
SCENE TEST
SYSTEM TEST
KNX No Fault
LAMP 17 Fault
ECG 34 Fault
SCENE: 2 TEST
SCENE: 2 ->invoke
DALI No fault
DALI Fault

Technical Manual Dali Control IP Gateway SCN‐DALI64.02
MDT technologies GmbH • 51766 Engelskirchen • Papiermühle 1 Tel.: +49-2263-880 • Fax: +49-2263-4588 • [email protected] • www.mdt.de
23
5.12Sub‐menuMAINTENANCEECG/LAMP–Level2and3
Briefly press the Prg/Set button to change from the main menu MAINTENANCE ECG/LAMP to the sub‐menu. Within the menu you can start the burn‐in of a lamp and reset the reader for its operating hours. Briefly press the MOVE button to run through the individual ECGs. The number of the selected ECG is shown in the first display line. Line 2 shows the number of operating hours since the last reset / burn‐in.
Hold the Prg/Set button to change into programming mode. Briefly press the Move button to toggle between the functions BURN‐IN, RESET, BURN‐IN/RESET. Briefly press the Prg/Set button to execute the selected command. Press the ESC button (or wait for about 30 seconds) to return to the level above.
5.13Sub‐menuCONVERTERINHIBITMODE–Level2
Briefly press the Prg/Set button to change from the main menu CONVERTER INHIBIT MODE to the sub‐menu. Within the menu you can turn on the Inhibit Mode for all connected self‐contained battery emergency lamps. If the mains power supply is turned off within 15 minutes from activating the Inhibit Mode, the lights do not change into emergency mode but remain switched off. Particularly during the initialisation phase of a building this operating mode may be required to prevent the emergency lights from being turned on constantly. Hold the Prg/Set button to change into programming mode. Briefly press the Prg/Set button again to activate the Inhibit Mode. Press the ESC button (or wait for about 30 seconds) to return to the level above.
MAINTANANCE ECG/LAMP
ECG No.: 01 368 h
CONVERTER INHIBIT
ECG No.: 01 BURNIN/RES.
ECG No.: 01 BURNIN
INHIBIT via PROG-
CONVERTER INHIBIT?

Technical Manual Dali Control IP Gateway SCN‐DALI64.02
MDT technologies GmbH • 51766 Engelskirchen • Papiermühle 1 Tel.: +49-2263-880 • Fax: +49-2263-4588 • [email protected] • www.mdt.de
24
6Controlviawebbrowser In addition to the pushbuttons, you can also easily commission the DALI via the integrated web server. For this purpose connect the DaliControl IP Gateway directly to the IP network. An RJ‐45 socket is located above the KNX bus connector at the bottom left‐hand side of the device.
Use a standard patch cable to connect the device to a switch, hub or router of the IP network. You can also use a WLAN access point as network coupler. This means you can commission the DALI via a portable note book, tablet PC or mobile phone. Once the network is physically connected, you need to assign an IP address to the DaliControl IP Gateway to enable access via the web browser. By default, all IPAS devices with an IP interface are set to DHCP address assignment. If there is a DHCP server in the network the device automatically receives an IP address after initialisation. This address is shown on the device display (see above). If no DHCP service is available or if you would rather use a fixed IP address, you must set the address either via ETS or the device display. You may also need to configure the sub‐net mask and standard gateway (for direct access via the Internet). Those two parameters can only be configured in the ETS. Once the IP address has been assigned, load the device website via any web browser (e.g. Microsoft Internet Explorer, Mozilla Firefox, Apple Safari). Simply enter the correct IP address (URL) in the browser. Please remember that the complete URL consists of the IP address and the prefix http:// To load a page enter, for example http://192.168.10.71.

Technical Manual Dali Control IP Gateway SCN‐DALI64.02
MDT technologies GmbH • 51766 Engelskirchen • Papiermühle 1 Tel.: +49-2263-880 • Fax: +49-2263-4588 • [email protected] • www.mdt.de
25
The following web site appears:
Use the log‐in‐page to assign either ‘User‘ or ‘Administrator‘ rights to a user. User rights mean that the website functions are restricted and configuration commands are disabled. Use this login if you would like to use the website only for visualisation and operational purposes. To commission the DALI via the website, administrator rights are required. The images and descriptions below are all based on the administrator display. Different passwords for user and administrator can be set in the ETS. The default setting for both users is ‘0‘.

Technical Manual Dali Control IP Gateway SCN‐DALI64.02
MDT technologies GmbH • 51766 Engelskirchen • Papiermühle 1 Tel.: +49-2263-880 • Fax: +49-2263-4588 • [email protected] • www.mdt.de
26
Log in as administrator to access the following configuration website:
The configuration page is divided into different sections. The section at the top of the page contains the configuration buttons that are required for the commissioning. (Some of these buttons are only visible if you log in as administrator). The fields underneath the configuration buttons are for the 16 group and 64 ECG functions. The bottom section contains the information and status area. The three tabs in the footer are used to change from general configuration to scene configuration and effect configuration.

Technical Manual Dali Control IP Gateway SCN‐DALI64.02
MDT technologies GmbH • 51766 Engelskirchen • Papiermühle 1 Tel.: +49-2263-880 • Fax: +49-2263-4588 • [email protected] • www.mdt.de
27
All operable buttons work with tool tips. This means a description of the function appears if the cursor hovers over the button.
6.1Configurationbuttons The icons in the website header are used for the different commissioning functions. They have the following meaning:
Refresh
This function refreshes the website content. On principle, the website is static. This means that the details on the page are only updated when the site is first loaded. Any faults or changes that are not made on the website itself, such as a light status adjustment via a KNX telegram are not automatically displayed.
New Installation
Press this button to start a new installation (reset and teach‐in process) of the connected DALI segment. Attention: During a new installation any previously existing configurations of the DALI segment are deleted.

Technical Manual Dali Control IP Gateway SCN‐DALI64.02
MDT technologies GmbH • 51766 Engelskirchen • Papiermühle 1 Tel.: +49-2263-880 • Fax: +49-2263-4588 • [email protected] • www.mdt.de
28
Post‐installation
Press this button to start a post‐installation within the DALI segment. Any ECGs that no longer exist are deleted during the post‐installation process. At the same time new devices are added.
ECG Quick Exchange
Press this button to start an ECG quick exchange within the DALI segment. The quick exchange is only possible when a single faulty ECG is replaced by a new one.
Device status
Press this button to display the device status of the gateway in the information and status area at the bottom of the page. Click on a group or ECG field to display the status information of the selected ECG or group.
Broadcast ON Broadcast OFF Broadcast Blink
Use these functions to simultaneously switch all ECG lights /lamps in the DALI segment off or on or set them to blink‐mode via a DALI Broadcast telegram.
6.2Controlbuttons
There are further control buttons above the ECG field. These are used to perform ECG or group‐specific operations. To carry out one of the operations, you must select the operation first and then click on the group or ECG concerned. The selected function appears in a white frame. Press the button again to cancel the selection.
No selection First button selected

Technical Manual Dali Control IP Gateway SCN‐DALI64.02
MDT technologies GmbH • 51766 Engelskirchen • Papiermühle 1 Tel.: +49-2263-880 • Fax: +49-2263-4588 • [email protected] • www.mdt.de
29
The individual buttons have the following meaning:
Remove assignment
Use this button to remove the assignment of an ECG. Select the button first. Then click on the ECG. If the ECG was assigned to a group, the group assignment is deleted. If the ECG was marked for individual control, it is now marked as ’not in use‘.
Assign a group
Use this button to assign an ECG to a group. First select the button. Then click on the group. To complete the process click on the ECG you want to assign to the group. If the ECG was previously assigned to a group, the previous assignment is automatically removed.
Mark ECGs for individual control
With this button an ECG is marked for individual control. ECGs that were found during the search process first appear with a question mark. This means that they are considered to be ‘not in use’. If you want to enable an ECG for individual control, select the button and then click on the ECG concerned. The ECG is marked with the letter ‘S‘ (Single) and is now in use.
ECG / group blink‐mode Use this button to set an individual ECG or a group to blink‐mode. To carry out this function, select the button first. If you now press an ECG or group field, the corresponding ECGs/lamps start blinking. The blink‐mode is used for identification purposes during the DALI commissioning process. If you press the same ECG or group field again, the blinking stops. If you press another ECG or group field with the button still selected, this element starts blinking and the previously blinking lamp is turned off.
Toggle light value Use this button to switch the value of a group on or off. First select the button. Then click on a group field to toggle between the light values of all lamps assigned to the group. The same process is used for ECG fields.
Swap ECG short addresses Use this button to swap the position and thereby the short address of two different ECGs. First select the button. Now click on two ECG fields one after the other to physically swap their short addresses and adjust their position in the list. This function is required to sort the random ECGS into a specific order after a new installation. You should only use this function directly after a new installation. Later use should be avoided as the parameters set in the ETS are not swapped in line with the addresses.

Technical Manual Dali Control IP Gateway SCN‐DALI64.02
MDT technologies GmbH • 51766 Engelskirchen • Papiermühle 1 Tel.: +49-2263-880 • Fax: +49-2263-4588 • [email protected] • www.mdt.de
30
6.3ECGfields
The ECG and group entries on the website mean that the user can see the complete function and failure status of a connected DALI segment at a glance. The ECG fields are numbered from 1 – 64. The number is shown in the bottom left‐hand corner of the field and corresponds to the ECG short address within the DALI segment. If an ECG is found during the search process (new and post‐installation), a lamp or battery icon is inserted in the field. The battery icon symbolises an ECG for self‐contained battery emergency lights (device type 1). All other device types (without battery) are shown with a lamp symbol. If in the ETS an ECG is configured as emergency luminaire with central battery, a separate icon is displayed. The following icons are available:
ECG
ECG for self‐contained battery emergency lamp non‐switchable
ECG for self‐contained battery emergency lamp switchable
ECG with central battery supply
The value and failure status of an ECG is symbolised by different icon and background colours.
ICON light grey => Lamp switched off
ICON yellow => Lamp switched on
ICON red => Lamp failure
Red background => ECG failure
The assignment of an ECG is also shown in the field. Newly found devices are marked as ‘not assigned‘ via a ‘?’ symbol above the icon. When an ECG is assigned to a group, the group number replaces the ‘?’ symbol. If an ECG is used for individual control, it is marked with the letter ‘S‘ (Single).
ECG not in use
ECG in use for individual control
ECG with group assignment (e.g. group 3)

Technical Manual Dali Control IP Gateway SCN‐DALI64.02
MDT technologies GmbH • 51766 Engelskirchen • Papiermühle 1 Tel.: +49-2263-880 • Fax: +49-2263-4588 • [email protected] • www.mdt.de
31
6.4Groupfields
As for the ECG fields, the group fields show the status of a group. However, the display is limited to the switch status. No failure status is graphically displayed.
ICON light grey => group switched off
ICON yellow => group switched on If you switch a group or ECG via the website, its status is automatically updated and displayed on the site. However, if the switch command was initiated externally via a KNX telegram, the status is not automatically updated. To display the correct status, press the refresh button or re‐load the web page.
6.5Informationandstatusfields The bottom section of the configuration website shows status information for the device as a whole or for a selected group or a selected ECG. When the website is first loaded, the status information always applies to the whole device giving you the opportunity to see the number of connected lamps, ECGs and converters, as well as faults and fault rate at a glance.
The green colour means that no fault has occurred. Otherwise the colour changes to red. This information can be displayed at any time by pressing the device status button in the configuration bar at the top of the site. To display the status information of a group, click on one of the 16 group fields.
Technical Manual Dali Control IP Gateway SCN‐DALI64.02
MDT technologies GmbH • 51766 Engelskirchen • Papiermühle 1 Tel.: +49-2263-880 • Fax: +49-2263-4588 • [email protected] • www.mdt.de
32
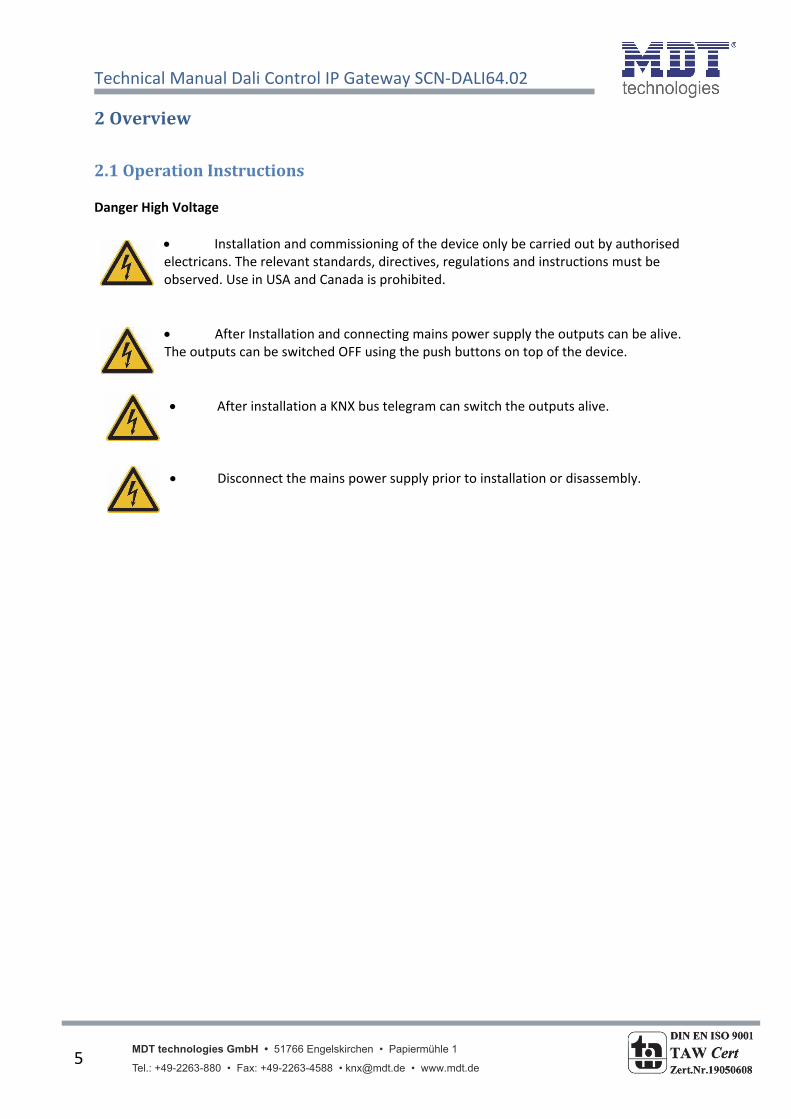
In addition to the number of devices and converters and the individual failure types, the total failure rate is shown. Please remember that the rate is calculated as a percentage of the total number of ECGs and converters in the group. Use the Name field to enter a user‐friendly name for the group. The maximum number of characters is 10. Press the √‐button to confirm your entry. The name is now saved on the gateway and loaded into the ETS during the next synchronisation. To display the status information of an ECG, click on one of the 64 ECG fields. Choose from one of the following options: General, Run Hours, Burn‐in and Test
Use the name field on the General page to enter a user‐friendly name for the ECG. The maximum number of characters is again 10. Press the √‐button to confirm your entry. The name is now saved on the gateway and loaded into the ETS during the next synchronisation. An ICON appears behind the word Alarm if a fault or alarm has occurred. The meaning of the icons is as follows:
Lamp failure
ECG failure
Converter failure
Life cycle exceeded An ICON appears behind the word Mode if the ECG is not in normal mode. The meaning of the icons is as follows:
Permanent mode
Panic mode
Central battery test mode
Burn‐in mode

Technical Manual Dali Control IP Gateway SCN‐DALI64.02
MDT technologies GmbH • 51766 Engelskirchen • Papiermühle 1 Tel.: +49-2263-880 • Fax: +49-2263-4588 • [email protected] • www.mdt.de
33
Click on the Run Hours tab in the header to see the accumulated operating hours of a lamp since its last reset as well as the maximum life span that was configured in the ETS. Use the button on the right to reset the counter to 0.
Click on the Burn‐in tab in the header to start and stop the burn‐in mode for the selected ECG.
The maximum burn‐in time that was configured in the ETS and the already completed burn‐in time are also displayed. If the selected ECG is a device for self‐contained battery emergency lights, you can also click on the Test tab.
This display shows the type of test, test result and date and time of the last test. The status bar shows the failure flags. A green bar means that the test was positive. A red bar signals a negative test result. You can use the buttons on this page to manually start a test (Execute Test). The icons underneath have the following meaning:
Battery Test
Functional Test
Long Duration Test Please remember that the website is static and is not automatically updated after the test has finished. If you would like to display the result of a manually activated test, please press the ’Update test result’ button first.

Technical Manual Dali Control IP Gateway SCN‐DALI64.02
MDT technologies GmbH • 51766 Engelskirchen • Papiermühle 1 Tel.: +49-2263-880 • Fax: +49-2263-4588 • [email protected] • www.mdt.de
34
7ETSspecialandcommissioningfunctions As previously described in chapter 4, you can choose eiher type A ‘Normal mode‘ or type B ‘Extended mode‘ for the DALI commissioning. Depending on the mode you choose, different special functions and pages are available in the ETS.
7.1Specialfunctionsin‘Normalmode‘
7.1.1SynchronisationwiththeconnectedDALIsegment When you first load the parameter page, the parameters and groups for all possible 64 ECGs and 16 groups are displayed. In ETS mode A it is possible to simplify the commissioning and to bring the application in line with the real conditions of the connected DALI segment. To do so, you need to synchronise the application with the installation first.
Start the synchronisation via the sync button in the bottom right‐hand corner of the main window. Depending on the size of the installation the synchronisation may take a few seconds. A bar at the bottom of the page shows how far the synchronisation has progressed. When the synchronisation is complete, only the objects and parameters of those ECGs that are physically connected to the device are shown.

Technical Manual Dali Control IP Gateway SCN‐DALI64.02
MDT technologies GmbH • 51766 Engelskirchen • Papiermühle 1 Tel.: +49-2263-880 • Fax: +49-2263-4588 • [email protected] • www.mdt.de
35
In addition, the device types and, if applicable, the group asignments are also automatically set. If during the synchronisation a device type is found that does not match with the current settings in the ETS, a warning message appears. Please acknowledge the message by pressing yes or no.
By default the synchronisation of the ETS is performed via the KNX network. If the gateway is already correctly integrated into the IP network and a corresponding IP address has been assigned, the synchronisation can also be performed via Ethernet. In this case, all you need to do is enter the correct IP address of the device into the tool bar at the top of the window and tick the check‐box in front of the bar. Alternatively, you can press the Read IP Address button to set the IP address of the selected device without manual entry.
The synchronisation compares the application to the data of the connected DALI segment. This means that you should always synchronise when you change the system structure or expand the system.
Technical Manual Dali Control IP Gateway SCN‐DALI64.02
MDT technologies GmbH • 51766 Engelskirchen • Papiermühle 1 Tel.: +49-2263-880 • Fax: +49-2263-4588 • [email protected] • www.mdt.de
36
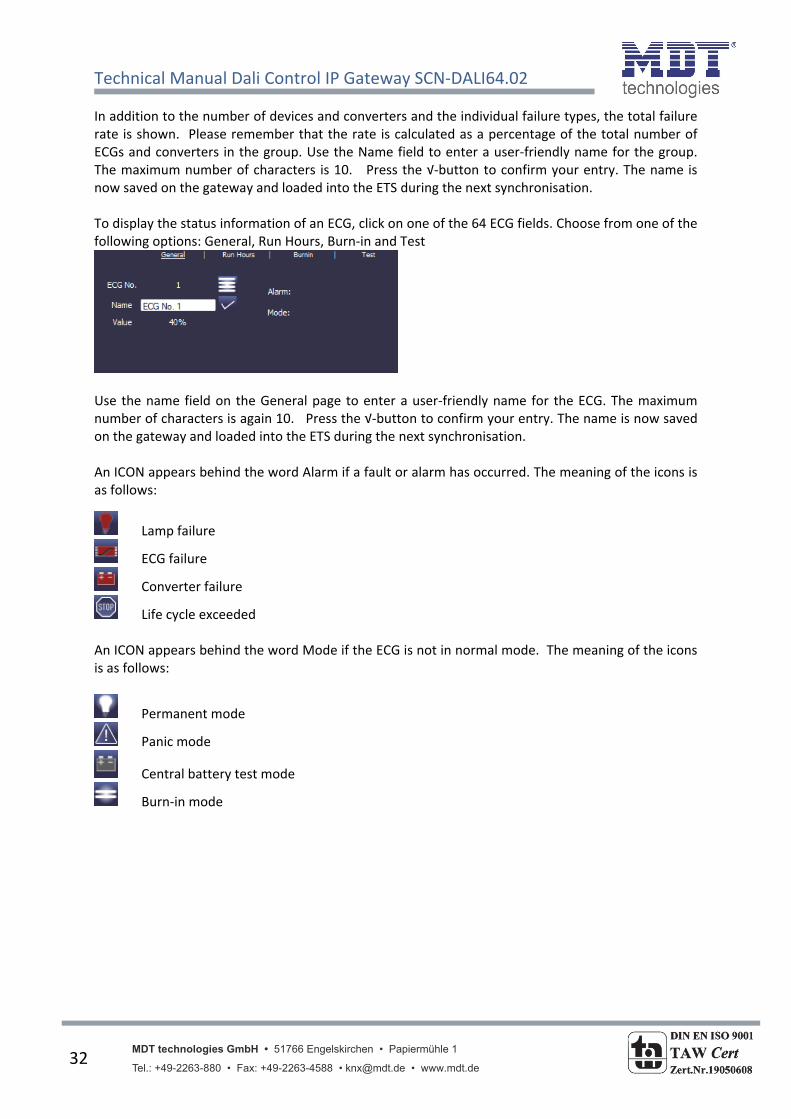
7.1.2User‐friendlynamesforECGsandgroups To make the configuration as easy as possible for the user, it makes sense to choose user‐friendly names for ECGs and groups. Any names need to be assigned on the website in ETS Mode A directly during the identification. Please remember to press the confirm button next to the entry field after entering a name.
Use the ‘Load Description’ command in the Tools menu to load the names directly into the ETS. The names are shown in brackets next to the corresponding device.
As loading the names via KNX can take quite some time, you should use the Ethernet connection for this process. Before starting the process, please make sure you set the right IP address and tick the check‐box in front of the address.

Technical Manual Dali Control IP Gateway SCN‐DALI64.02
MDT technologies GmbH • 51766 Engelskirchen • Papiermühle 1 Tel.: +49-2263-880 • Fax: +49-2263-4588 • [email protected] • www.mdt.de
37
7.2Specialfunctionsin‘ExtendedMode‘ If you select ‘extended Mode‘ (Mode B) for the DALI commissioning (see chapter 4), an additional menu appears underneath the main menu bar with the entries ’Parameter‘, ’Commissioning‘, ’Scenes‘ and ’Effects‘
Use the menu item ‘Parameter‘ to set the ETS parameters in the same way as in mode A. However, please remember that in mode B all parameters are visible because the parameter settings can be performed independently of the actual system. Simplifying the parameters and objects by synchronising with the system is not possible in this mode. The menu item ‘Commissioning‘ is described in more detail in the next chapter. For a description of menu items ‘Scenes‘ and ‘Effects‘, please see chapter 11.

Technical Manual Dali Control IP Gateway SCN‐DALI64.02
MDT technologies GmbH • 51766 Engelskirchen • Papiermühle 1 Tel.: +49-2263-880 • Fax: +49-2263-4588 • [email protected] • www.mdt.de
38
7.2.1PreparingandplanningtheDALIcommissioningin‘ExtendedMode‘ In Mode B, the menu item ‘Commissioning‘ opens an additional page which is not available in ‘normal mode‘. This page is used both to plan the installation in advance of the commissioning and to perform the actual DALI commissioning later on (identification and assignment of ECGs).
The structure of the commissioning page is as follows: The group configuration is displayed on the left‐hand side in a tree structure. The area in the middle shows the ECG configuration and names in a table format. On the right hand side is a list of all devices found in the system, which have not yet been identified. During the planning stage this part is empty as the ETS is not yet connected to the system. To start with you should plan and name the ECGs. Use the description field in the ECG configuration to enter a name (light number, room number, etc.)

Technical Manual Dali Control IP Gateway SCN‐DALI64.02
MDT technologies GmbH • 51766 Engelskirchen • Papiermühle 1 Tel.: +49-2263-880 • Fax: +49-2263-4588 • [email protected] • www.mdt.de
39
The maximum number of characters available for names in the ETS plug‐in is 30. Whilst, in principle, the names are also transferred to the device website, it is important to remember that the website will display no more than the first ten characters of the name entered in the plug‐in. If you confirm your entry with the return button, the cursor automatically jumps to the next ECG field. This makes the naming process easy and secure. Once you have planned the ECGS, you should assign the groups. There are two ways to assign groups via drag‐and‐drop:
1.) Use the mouse to select an ECG in the ECG configuration field in the middle and drag it to the left dropping it above the required group in the group tree.
2.) Use the mouse to select an ECG from the group directory’s top category ‘not assigned‘ and move it down the directory dropping it above the required group.
Once an ECG has been assigned to a group via drag and drop, the group number is automatically displayed in the ‘group number‘ field of the ECG configuration table. You can enter a user‐friendly name for the group in the ‘group description‘ field. ECG and group names are automatically shown in the group configuration directory (displayed in brackets) as well as in the description of the ETS communications objects. Having user‐friendly names makes linking the group addresses with the communications objects much easier for the system integrator.
As soon as an ECG has been assigned to a group, it is no longer available for individual control. The parameters and communication objects are adjusted accordingly following the group assignment. ECGs that have not been assigned to a group are automatically regarded as ECGs for individual control. Please see chapter 11 for the planning and setting of scenes and effects.

Technical Manual Dali Control IP Gateway SCN‐DALI64.02
MDT technologies GmbH • 51766 Engelskirchen • Papiermühle 1 Tel.: +49-2263-880 • Fax: +49-2263-4588 • [email protected] • www.mdt.de
40
7.2.2DALIcommissioningin‘ExtendedMode‘ Once the planning, parameter setting and linking of group addresses have all been completed the DALI segment can be commissioned. To do so, please connect the commissioning PC with the ETS to the KNX system via an interface (RS‐232, USB or IP). Once the connection is active, you need to program the physical address of the gateway. The communication between the plug‐in and the gateway is based on the physical address (or possibly on the IP address, see below). Use the ‘commissioning‘ page and the ‘tools‘ menu to start the teach‐in process of the connected DALI segment.
Please remember that the selection shown above is only visible in the ‘Tools‘ menu if you have selected the ‘commissioning‘ page. The elements displayed always depend on the setting selected in the menu bar. During the teach‐in process all ECGs are automatically recognised and each ECG is assigned a short address from 0 ‐ 63. Depending on the size of the connected DALI segment the process can take up to 3 minutes. A bar in the bottom right hand corner indicates how far this process has progressed. The number of ECGs that have so far been found is also shown (in brackets).
Once the teach‐in process is complete, all ECGs that have been found are displayed in the list of non‐identified devices on the right‐hand side.

Technical Manual Dali Control IP Gateway SCN‐DALI64.02
MDT technologies GmbH • 51766 Engelskirchen • Papiermühle 1 Tel.: +49-2263-880 • Fax: +49-2263-4588 • [email protected] • www.mdt.de
41
You can now identify the devices by switching the corresponding lamp on or off. If you select an ECG and press the right mouse button, a context menu appears from which you can select the required function.
Alternatively, you can also tick the box ‘Automatic blink mode‘. In this case, the blink mode starts by itself when a device is selected. The context menu is also available at group and gateway level. During the identification process it might be useful to switch certain groups or all connected lamps on or off. If you select the main item ‘group configuration‘, you can use the right mouse button to send broadcast commands for on, off and blinking. Once an ECG has been identified, you can drag and drop it onto the previously planned element in the ECG configuration table.
Once an ECG has been dragged into the ECG configuration table, it disappears from the list of non‐identified ECGs. The ‘PLAN‘ flag in the configuration table shows that the ECG has been assigned to the planned element.

Technical Manual Dali Control IP Gateway SCN‐DALI64.02
MDT technologies GmbH • 51766 Engelskirchen • Papiermühle 1 Tel.: +49-2263-880 • Fax: +49-2263-4588 • [email protected] • www.mdt.de
42
If an ECG has been wrongly assigned, it can be moved back to the list of non‐identified devices using the same drag& drop mechanism.
After the ECG has been moved back, the element in the configuration table is empty (Flag: ‘PLAN (E)‘ Empty) and the ECG re‐appears in the list of non‐identified devices from where it can now be moved to a different element if required. Please remember that at this point all operations that have been performed are only displayed in the work space. They are not immediately loaded onto the DALI gateway. To start the process of downloading the settings onto the gateway and the ECGs, you must press the ‘Download DALI‘ button. The download can take up to 2 minutes. The progress bar informs about the current status. Once the download is complete, all previously planned ECGs are programmed in the real system with the DALI configuration. The respective devices are marked with an ‘OK‘ flag in the ECG configuration table.
Non‐identified devices remain in the list on the right‐hand side.

Technical Manual Dali Control IP Gateway SCN‐DALI64.02
MDT technologies GmbH • 51766 Engelskirchen • Papiermühle 1 Tel.: +49-2263-880 • Fax: +49-2263-4588 • [email protected] • www.mdt.de
43
Attention: Please remember that the download on the ‘commissioning page‘ only programmes the DALI configuration data onto the gateway and ECGs. Following the DALI identification and commissioning the actual ETS application with parameter settings and group addresses still has to be downloaded onto the device. After leaving the parameter page, this is done via the usual ETS download process.
7.2.3ECGandlampfaultsduringDALIcommissioningin‘ExtendedMode‘ During the commissioning lamps/ECGs are identified visually (ON, OFF, blinking). It is therefore crucial that all lamps and ECGS operate correctly. If the gateway identifies a lamp or ECG fault during the installation process, the ECG concerned is highlighted in a different colour. A red flag indicates an ECG fault and a yellow flag a lamp fault.
Faults are displayed both for non‐identified devices (right table) and for ECGs that have already been assigned (middle table). As the table view is not automatically updated and as it may take a few minutes for the DALI gateway to recognise a fault, we recommend that you press the ‘Sync‘ button a short while after the installation. This ensures that the displayed status corresponds to the actual status and any faults that may have been detected in the meantime are displayed correctly. Attention: If an ECG fault already exists during the search process of the initial installation, the device may not be detected at all. This means that the number of ECGs found does not correspond to the number that was expected. ECG faults are only displayed in the manner described above if the ECG concerned has been previously programmed and is known to the gateway.

Technical Manual Dali Control IP Gateway SCN‐DALI64.02
MDT technologies GmbH • 51766 Engelskirchen • Papiermühle 1 Tel.: +49-2263-880 • Fax: +49-2263-4588 • [email protected] • www.mdt.de
44
7.2.4UsingdummyECGsin‘ExtendedMode‘ There may be cases in which a DALI installation or a DALI segment needs to be commissioned even if not all of the planned lights are yet physically present (e.g. if a room is not yet finished or a light has not been delivered). During the teach‐in process only the actually existing devices are detected and entered into the list of non‐identified devices. This means that only those devices can be moved into the configuration table and commissioned as a real device. Entries for devices that are planned but do not yet exist remain empty in the configuration table. These devices can be programmed, identified and assigned later on during a post‐installation (see below) once the whole installation is complete. As long as an entry remains empty, the gateway assumes that no ECG exists and does not generate an error message. However, it may be desirable that an error message for a planned device is generated, even if the device is not yet present (for example to visualise an incomplete installation). The plug‐in offers the possibility to add dummy ECGs to the list of non‐identified devices. This special option is not set up by default. To use this option, please go to ‘Tools‘ ‘Options‘ to activate it.
Once it has been activated, an additional ‘Dummy+‘button appears in the parameter window.
Use this button to add dummy ECGs to the list of non‐identified ECGs.
Dummy ECGs are marked with a symbol and can be dragged into the ECG configuration in the same way as normal ECGs. Once the DALI data has been downloaded, the gateway assumes that an ECG exists and therefore presents an ECG fault in the visualisation and the respective communication object.

Technical Manual Dali Control IP Gateway SCN‐DALI64.02
MDT technologies GmbH • 51766 Engelskirchen • Papiermühle 1 Tel.: +49-2263-880 • Fax: +49-2263-4588 • [email protected] • www.mdt.de
45
ECGs that have been created through a dummy entry are shown with a grey background in the ECG configuration list (see above). The dummy ECGs are only used as a temporary solution in an unfinished installation. The ‘post‐installation‘ that is required once the whole installation is complete, deletes all dummy entries from both the ECG configuration table and from the list of non‐identified devices.
7.3GeneralextrafunctionsintheETS The functions described in the following chapters can be used both in ‘Normal Mode‘ and in ‘Extended Mode‘.
7.3.1UsingIPforplug‐incommunication By default, the plug‐in communicates with the DALI gateways via the KNX‐Bus. However, if the gateway is integrated into an IP network and a correct IP address has been assigned (DHCP or fixed setting in the ETS) IP communication can also be used. This increases the speed of loading and communication processes greatly. To use IP communication, enter the correct IP address of the gateway in the IP field at the top and tick the box in front of the field.
You can also import the IP address via the ‘Read IP Address‘ button. If you press the button, the correct IP address of the current device is automatically entered in the address field. Please remember that when IP communication is enabled (by ticking the box), the plug‐in communicates with the gateway always via the address entered. A wrong manual entry may lead to a wrong gateway being contacted. Therefore please make sure that the IP address is correct. If the IP communications box is ticked but an IP connection is not possible (wrong IP address, no network connection), the plug‐in will still try to make the connection via IP. However, it recognises by itself that this is not possible and automatically changes to KNX communication. IP communication can be used both in ‘Normal Mode‘ and ‘Extended Mode‘.

Technical Manual Dali Control IP Gateway SCN‐DALI64.02
MDT technologies GmbH • 51766 Engelskirchen • Papiermühle 1 Tel.: +49-2263-880 • Fax: +49-2263-4588 • [email protected] • www.mdt.de
46
7.3.2Parametertemplates The DaliControl IP Gateway gives you the possibility to create your own parameter templates thereby making the time‐consuming parameter setting for individual groups or ECGs much easier. Parameter templates can be generated for all parameters of the entire gateway and for individual ECGs and groups. Once you have completely set the parameters for a standard ECG, simply press the Export function in the Files menu or click on the right mouse button to export them as an xml file.
If you would like another ECG to have the same parameter properties, simply select the ECG and import the exported file into the new ECG. The file serves as a template for other ECGs. You can also create templates at group level or for ‘General Properties‘. Creating templates for all ECG and group types and using this template library makes the configuration, especially in large installations, significantly easier. If you would like to re‐set individual ECG or group parameters or even a whole gateway to their original status, please use the files that have been provided with the product: ● default_device.xml ● default_ecg.xml ● default_group.xml
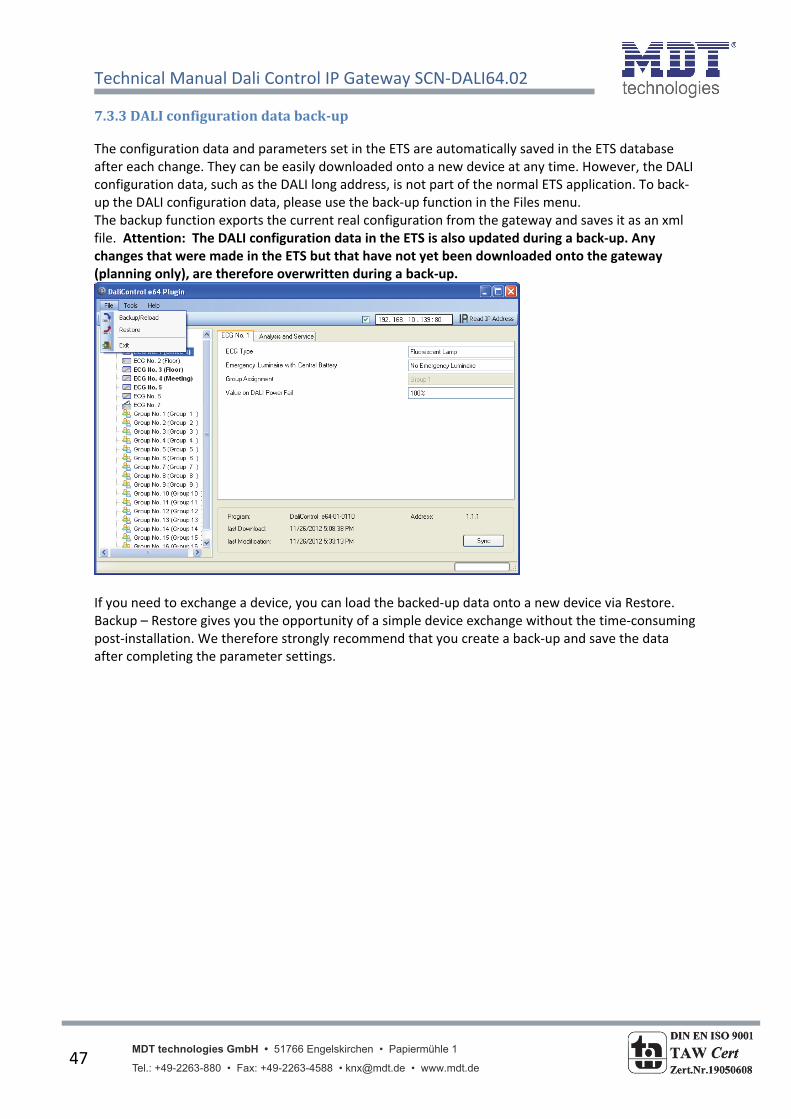
Technical Manual Dali Control IP Gateway SCN‐DALI64.02
MDT technologies GmbH • 51766 Engelskirchen • Papiermühle 1 Tel.: +49-2263-880 • Fax: +49-2263-4588 • [email protected] • www.mdt.de
47
7.3.3DALIconfigurationdataback‐up
The configuration data and parameters set in the ETS are automatically saved in the ETS database after each change. They can be easily downloaded onto a new device at any time. However, the DALI configuration data, such as the DALI long address, is not part of the normal ETS application. To back‐up the DALI configuration data, please use the back‐up function in the Files menu. The backup function exports the current real configuration from the gateway and saves it as an xml file. Attention: The DALI configuration data in the ETS is also updated during a back‐up. Any changes that were made in the ETS but that have not yet been downloaded onto the gateway (planning only), are therefore overwritten during a back‐up.
If you need to exchange a device, you can load the backed‐up data onto a new device via Restore. Backup – Restore gives you the opportunity of a simple device exchange without the time‐consuming post‐installation. We therefore strongly recommend that you create a back‐up and save the data after completing the parameter settings.

Technical Manual Dali Control IP Gateway SCN‐DALI64.02
MDT technologies GmbH • 51766 Engelskirchen • Papiermühle 1 Tel.: +49-2263-880 • Fax: +49-2263-4588 • [email protected] • www.mdt.de
48
8.DALImaintenanceandexpansion
8.1QuickexchangeofindividualECGs
When a DALI segment is commissioned, the short address, group assignment (if applicable) and other configuration data are programmed onto the ECG’s internal memory. If you had to replace an ECG because of a fault, you would normally need to program this data onto the new device. The DaliControl IP Gateway, however, offers a function that makes it possible to quickly and easily replace individual ECGs. You can start the “ECG quick exchange“ function either on the device itself (pushbuttons, display) or via the web browser if you log in as administrator (see above). The gateway first checks if any of the configured ECGs that are known to it have been reported as faulty. Then the segment is searched for new, unknown devices. If a new device is found, all configuration details of the old ECG are automatically programmed onto the new one and the installation is immediately ready for operation. However, the ECG quick exchange only works if just one ECG within a segment is faulty and replaced by a new one. If several devices are faulty, the ECGs have to be identified and you must use the post‐installation function. Please also remember that the quick exchange is only possible for devices of the same type. You cannot, for example, replace an ECG for self‐contained battery emergency lamps with a device for LEDs. If a quick exchange is not possible, the gateway terminates the process with an error code. The different error codes have the following meaning: Error type 7: No ECG failure Error type 8: More than one ECG failure Error type 9: No new ECG can be found Error type 10: ECG has wrong device type Error type 11: More than one new ECG

Technical Manual Dali Control IP Gateway SCN‐DALI64.02
MDT technologies GmbH • 51766 Engelskirchen • Papiermühle 1 Tel.: +49-2263-880 • Fax: +49-2263-4588 • [email protected] • www.mdt.de
49
8.2Extendingtheexistingsystem–post‐installation
If you would like to enlarge an already commissioned DALI segment with new ECGs or would like to replace several faulty ones, please use the „post‐installation“ function. You can carry out the post‐installation both on the device (pushbuttons, display) and via the web browser if you log in as administrator (see above). If you use the ETS in ‘Extended Mode‘ (Mode B), you can also load the post‐installation in the ETS via the menu ’Tool‘ ’post‐installation’. When you start the installation, the gateway first checks if all previously configured ECGs are still available in the segment. ECGs that no longer exist or cannot be found are deleted from the gateway’s internal memory. Then the segment is searched for new ECGs. Newly found devices are inserted into any existing gaps or added on at the end. (Attention: Please remember that the maximum number of ECGs within a segment is 64!) As the position (short address) of a newly found device is allocated randomly, you need to identify the lights and if required assign them to groups. If you are using the ETS in ‘Normal Mode‘, you need to re‐synchronise the ETS so that communication objects and parameters for the newly added ECGs are shown and the configuration can be completed. However, synchronising the ETS is only necessary if the structure of the segment has been changed by the post‐installation process (enlargement of the system or different device types). If the purpose of the post‐installation was merely re‐configuration after an ECG replacement, synchronisation is not required. In the ETS setting ‘Extended Mode‘ all parameters and objects are visible. This means that you only need to identify and assign the devices that were newly found during the post‐installation followed by a DALI download and possibly an ETS application download.

Technical Manual Dali Control IP Gateway SCN‐DALI64.02
MDT technologies GmbH • 51766 Engelskirchen • Papiermühle 1 Tel.: +49-2263-880 • Fax: +49-2263-4588 • [email protected] • www.mdt.de
50
9.Differentoperatingmodes
9.1Normalmode In normal mode, ECGs can be dimmed and switched without restrictions both via individual and group control. The control of each ECG and each group is based on three communication objects (switching, dimming, value setting). Please remember that ECGs, once they have been assigned to a group, are no longer available for individual control. An ECG can only be assigned to a single DALI group. The DaliControl IP Gateway does not support multi‐group assignments on DALI level. If such assignment is required, please use KNX communication objects for this purpose. At group level, an additional enable/disable object is available to disable the control via the three communication objects. Separate status objects inform about the switch and value status both at group and individual ECG level.
9.2Permanentmode If you would like to run an individual ECG or a whole group permanently with a certain light value, (e.g. a permanently lit corridor or workshop) you can choose the permanent mode option. The ECG or group are automatically set to the required value after you program or switch on the gateway. Switch and dim objects remain hidden. Light status, error and service functions, however, are also available in permanent mode. Should a device in this mode not be running at the pre‐set light level because of a special operation (e.g. identification process on the device display) or fault (e.g. ECG was without power when the gateway was started) the light level is automatically corrected after 60 seconds.
9.3Staircasemode The staircase mode is only available for groups. In this mode, the value set via a switch, dim or value telegram is automatically changed to the switch off value after a programmable time. The lights can be switched off immediately or in 2 steps (within a minute) or through dim‐down (within a minute). In staircase mode, each additionally received telegram re‐starts the internal timer. The lights switch off when the timer runs out after the most recently received telegram. The staircase mode can be disabled or enabled via an additional object. If the staircase mode is disabled, the group behaves like in normal mode and does not automatically switch off. If the mode is disabled whilst the switch‐off timer is already running, the timer stops and the group remains at the currently set value If the mode is enabled again, the timer starts again from the beginning.
9.4Night‐timemode Night‐time mode is available both at group and ECG level. The night‐time mode corresponds largely to the staircase mode. The only difference is that the automatic switch‐off is dependent on the central night object of the gateway. If the night object is not set (day), the group behaves as in normal mode. If the object is set (night), the ECG or group either switches off after a programmable time or it goes into permanent mode.

Technical Manual Dali Control IP Gateway SCN‐DALI64.02
MDT technologies GmbH • 51766 Engelskirchen • Papiermühle 1 Tel.: +49-2263-880 • Fax: +49-2263-4588 • [email protected] • www.mdt.de
51
9.5Panic/emergencymode The panic or emergency mode can be activated via a central object for the whole gateway. All ECGs/ groups that have been enabled for panic mode, permanently switch to a programmable panic light value on receipt of the object. They can no longer be controlled individually. When the panic mode is switched off, the devices return to the previous light value or the switch on / switch off value and can again be controlled individually.
9.6Testmodeforcentralbatteryemergencyluminaires Through its internal function the DaliControl IP Gateway supports installations with central battery emergency luminaires. Any ECG (except for those of the self‐contained battery type) can be configured as an emergency light. You can choose a test time between 15 minutes and 4 hours. If the gateway receives the central battery test object, the respective lights change to a programmable value for this time period. They can no longer be switched or dimmed via the corresponding objects. The discharge time and capacity of the central battery can thereby be tested under pre‐defined conditions. So that individual ECGs within a group can no longer be switched via group telegrams or scenes, the group assignment is dissolved for the duration of the test mode. When the test has finished, groups and scenes are automatically re‐programmed onto the ECGs. Should the gateway lose power during the test mode, the un‐programmed devices are marked and automatically programmed on return of the power supply. The test mode, however, does not continue. It has to be re‐started. When the test mode terminates normally, the devices return to the previous light value or the switch on / switch off value and can again be controlled individually.
9.7Burn‐inmode For optimum operation and to achieve the quoted life span, many lights require that a specific burn‐in time be adhered to during their first use. During the burn‐in phase lights must not be switched or dimmed but need to run continually at 100% capacity. This burn‐in phase can be carried out automatically with the DaliControl IP Gateway. Each ECG can be individually set to the burn‐in mode via a further object. During the burn‐in, switch and dim telegrams for the device are ignored. This also applies when the ECG is assigned to a group. So that individual ECGs within a group can no longer be switched via group telegrams or scenes, the group assignment is dissolved for the duration of the burn‐in mode. When the burn‐in has finished, groups and scenes are automatically re‐programmed onto the ECGs. Should the gateway lose power during burn‐in mode, the un‐programmed devices are marked and automatically programmed on return of the power supply. The burn‐in mode, however, does not continue. It has to be re‐started. When the burn‐in mode finishes normally, the devices return to the previous light value or the switch on / switch off value and can again be controlled individually.

Technical Manual Dali Control IP Gateway SCN‐DALI64.02
MDT technologies GmbH • 51766 Engelskirchen • Papiermühle 1 Tel.: +49-2263-880 • Fax: +49-2263-4588 • [email protected] • www.mdt.de
52
The burn‐in mode is usually started manually after each light change. This useful maintenance function can be operated via the device display to ensure that it can be performed by maintenance personnel independent of the ETS or KNX. Alternatively a burn‐in start is also possible via the integrated web server.

Technical Manual Dali Control IP Gateway SCN‐DALI64.02
MDT technologies GmbH • 51766 Engelskirchen • Papiermühle 1 Tel.: +49-2263-880 • Fax: +49-2263-4588 • [email protected] • www.mdt.de
53
9.8Operatingmodehierarchy Some of the individual operating modes described above have higher functions and roles for the operation of the system as a whole. A prioritisation or hierarchy of operating modes is therefore required. The burn‐in mode has the highest priority. If an ECG is in burn‐in mode, it cannot be changed into any other mode. The next hierarchy level is the central battery test mode. If the device is in this mode, it can only go into burn‐in mode but not into any subordinate operating modes. Below the test mode is the panic/emergency mode. From this mode the device can change to both the burn‐in mode and the test mode. The permanent, normal and night‐time modes have the same priority level at the bottom of the hierarchy.

Technical Manual Dali Control IP Gateway SCN‐DALI64.02
MDT technologies GmbH • 51766 Engelskirchen • Papiermühle 1 Tel.: +49-2263-880 • Fax: +49-2263-4588 • [email protected] • www.mdt.de
54
10Analysisandservicefunctions
10.1Recordingoperatinghours The DaliControl IP Gateway allows for the operating hours (burning time) of each lamp to be internally recorded to the second. The value is available externally (communication objects, web site, display on the device) in hours with the internal value in seconds always being rounded. (e.g. 7199 seconds 1 h, 7201 seconds 2h) The recording of operating hours is independent of the dim value. This means any light value > 0% contributes to an increase in the operating hours. The counter can be re‐set (when the light is changed). To reset the counter, the value 0 is written on the communication object or alternatively you can use the website or the display and pushbuttons on the device. A maximum value can be configured for each ECG (light life span), which activates an alarm object on the KNX bus or an entry on the website. This information can be used for maintenance purposes.
10.2IndividualfaultrecognitionatECGlevel
A major advantage of DALI technology is the individual recognition of light failure or ECG failure. The DaliControl IP Gateway supports this function completely and also offers numerous analytical possibilities. For the analysis, the DaliGateway scans all connected ECGs periodically for ECG, light and (in the case of self‐contained battery lamps) converter failures. The scanning time can be configured. If the time is 1 second (standard setting), and 64 ECGs are connected, the complete process of scanning for ECG and light failure takes 128 seconds (1 second per ECG and type of failure). It can therefore take up to about 2 minutes before a fault that has occurred is recognised. For each ECG a communication object is available to send the information to the KNX bus (1Bit or 1 Byte object). In addition, the failure status of all ECGs is displayed clearly on the gateway’s website.
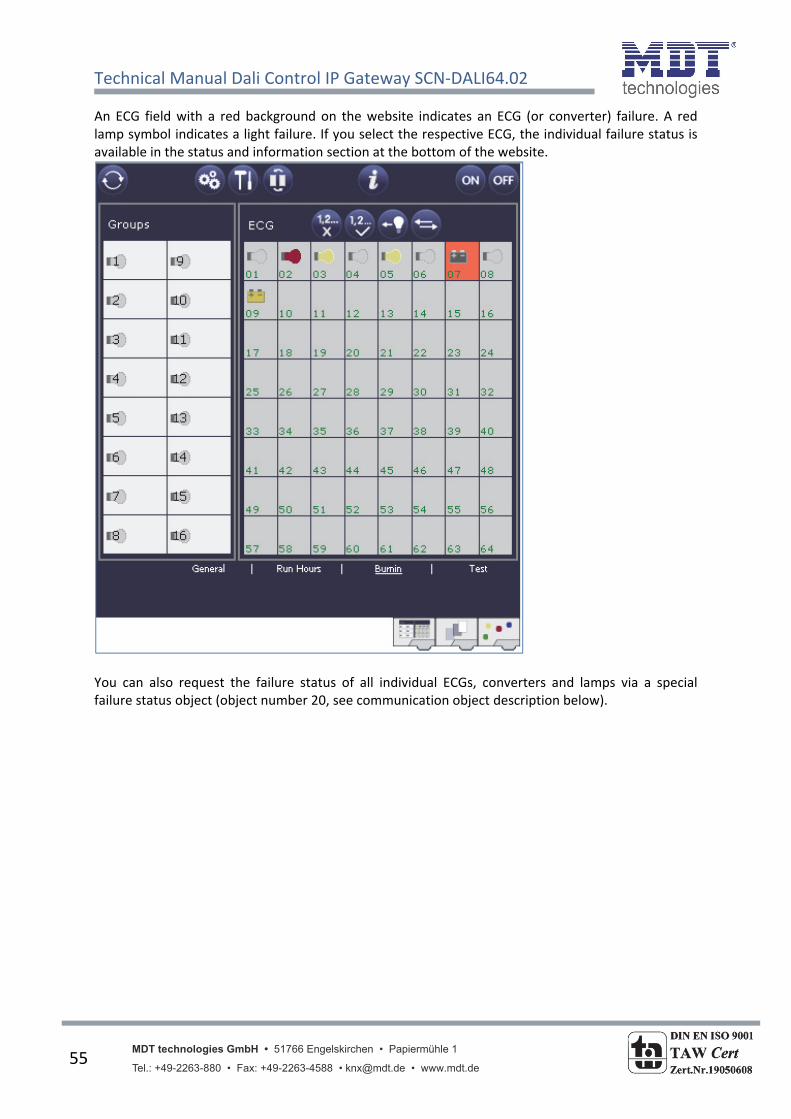
Technical Manual Dali Control IP Gateway SCN‐DALI64.02
MDT technologies GmbH • 51766 Engelskirchen • Papiermühle 1 Tel.: +49-2263-880 • Fax: +49-2263-4588 • [email protected] • www.mdt.de
55
An ECG field with a red background on the website indicates an ECG (or converter) failure. A red lamp symbol indicates a light failure. If you select the respective ECG, the individual failure status is available in the status and information section at the bottom of the website.
You can also request the failure status of all individual ECGs, converters and lamps via a special failure status object (object number 20, see communication object description below).

Technical Manual Dali Control IP Gateway SCN‐DALI64.02
MDT technologies GmbH • 51766 Engelskirchen • Papiermühle 1 Tel.: +49-2263-880 • Fax: +49-2263-4588 • [email protected] • www.mdt.de
56
10.3Faultanalysisatgrouplevel If ECGs and / or converters are merged into groups, numerous group‐specific fault data is available in addition to the (also still available) individual ECG data. For this purpose three different communication objects are available for each group. In addition to general information such as whether there is a failure within a group and of what type, the complete number of faulty devices within the group and the failure rate can be listed via a communication object. An alarm object is sent when a certain failure rate is exceeded. A complex object with a summary of the data further adds to the analysis options. For details of group‐specific communication objects, please see the communication objects description below. The group information is also displayed on the web site of the integrated web server:

Technical Manual Dali Control IP Gateway SCN‐DALI64.02
MDT technologies GmbH • 51766 Engelskirchen • Papiermühle 1 Tel.: +49-2263-880 • Fax: +49-2263-4588 • [email protected] • www.mdt.de
57
10.4Faultanalysisatdevicelevel Fault analysis objects similar to those at group level are also available at device level (i.e. for all ECGs connected to the gateway). The failure rate or number of ECG failures in the whole DALI segment can be made available via communication objects. Unlike at group level, at device level the percentage and number of failures can be broken down further according to type of failure. The alarm threshold for the failure rate can be individually set for ECG, light and converter failure. For further details regarding the communication objects, please see the communication objects description below. As before, the fault information for the entire gateway is displayed on the web site:

Technical Manual Dali Control IP Gateway SCN‐DALI64.02
MDT technologies GmbH • 51766 Engelskirchen • Papiermühle 1 Tel.: +49-2263-880 • Fax: +49-2263-4588 • [email protected] • www.mdt.de
58
11Scenesandeffects
11.1Thescenesmodule The DaliControl IP Gateway enables the programming and invoking of up to 16 internal light scenes. A scene is invoke via a 1Byte scene object. This object can also be used to save scenes (Bit 7 set). The currently set value is saved as scene value. In principle, a scene can consist of group and individual ECGs (as long as these have not been assigned to a group). To assign a group to a scene or to delete a group from a scene, use the pushbuttons and display on the device or the website. If you are using the ETS in ‘extended Mode‘, you can also set and assign scenes via ETS. You cannot assign individual ECGs to scenes only by using the pushbuttons and display. By default, the programmed scene is started immediately without dim time. If you want to dim into a scene, you can set a dim time for each scene. The time can only be set on the website. Please remember that the entry refers to the dim time from 0 to 100%. If invoking a scene leads to a change from 50% to 100% with a set time of 20 seconds, the dimming process takes only 10 seconds. Switching an individual group (or ECG) from the scene whilst a scene is already in the dimming process, only affects the particular group. The other groups continue the dimming process. Please remember to use the DALI command for scene addressing only when you invoke a scene without dimming. Dimmed scenes must be started at DALI level via short or group addresses. Scenes that have been assigned a large number of groups or ECGs should therefore be used without dim time to prevent irregular dimming.

Technical Manual Dali Control IP Gateway SCN‐DALI64.02
MDT technologies GmbH • 51766 Engelskirchen • Papiermühle 1 Tel.: +49-2263-880 • Fax: +49-2263-4588 • [email protected] • www.mdt.de
59
11.1.1Sceneprogrammingviathescenewebsite For full and easy scene programming, use the website of the server which can be accessed via the scene tab at the bottom:
To program a scene, select it first from the scene block at the bottom of the page. (If the scene has been previously programmed, the corresponding light value appears). Once you have selected a scene, you can use the assignment button to add or remove groups or individual ECGs to and from the scene. Click on the button first and then on the group or ECG. For already assigned groups or ECGs, the fields are highlighted in yellow and the dim value is displayed in percentages. You can only use individual ECGs in scenes if they have not been assigned to a group.

Technical Manual Dali Control IP Gateway SCN‐DALI64.02
MDT technologies GmbH • 51766 Engelskirchen • Papiermühle 1 Tel.: +49-2263-880 • Fax: +49-2263-4588 • [email protected] • www.mdt.de
60
Use the programming buttons to change the light value. The buttons have the following meaning:
On‐ Off‐ Up‐ Down‐ Switching Dimming As before, select the required programming button first and then the group or ECG. The dim values can only be changed in increments. The increment size varies according to the logarithmic dimming curve of the DALI ECG. You may also set the dim time and program a specific name for the selected scene. Use the programming button to save the set values on the gateway and ECG.
Scene programming Please remember that the set values are only saved if you press the button. If you change to another scene without saving, any changes you made are lost.
11.1.2SceneprogrammingviaETSin‘ExtendedMode‘ If you are using ETS in ‘extended Mode‘ (Mode B), you can program and assign scenes in ETS.
Go to the scenes page and select the required scene from the directory on the left‐hand side. Move the groups and individual ECGs which you would like to use for this scene from the directory on the right‐hand side into the field in the middle using drag‐and‐drop. Use the value fields to enter the light value for this scene.

Technical Manual Dali Control IP Gateway SCN‐DALI64.02
MDT technologies GmbH • 51766 Engelskirchen • Papiermühle 1 Tel.: +49-2263-880 • Fax: +49-2263-4588 • [email protected] • www.mdt.de
61
You can enter a user‐friendly name for each scene in the description field underneath the scenes. If you do not want a scene to start immediately but would prefer dimming it up to its final value (see above), you can set the dimming time individually for each scene.
Once all scene values have been set and assigned, you need to download the scene onto the DALI gateway. For this purpose, please press the download button in the bottom right‐hand corner. In principal you can also use ETS to plan individual scenes ‘offline‘, independently of the DALI system. The plug‐in only has to be connected to the gateway for the duration of the download.
11.2Theeffectmodule In addition to light scenes, the DaliControl IP Gateway also allows for the use of effects. An effect is a sequence control of light values in different groups or ECGs. The individual light values can be triggered immediately or dimmed via a dim value. Please remember that the entry relates to a dim time from 0 to 100% (see scene module above). With the DaliControl IP Gateway you can create 16 independent effects. A 1 Byte object is used to start and stop an effect. To start an effect, set Bit 7 in the object. If the object is received with Bit 7 being deleted, the effect stops. Altogether 500 effect steps can be programmed. They can be distributed arbitrarily across the 16 effects. A delay can also be programmed as an effect step.
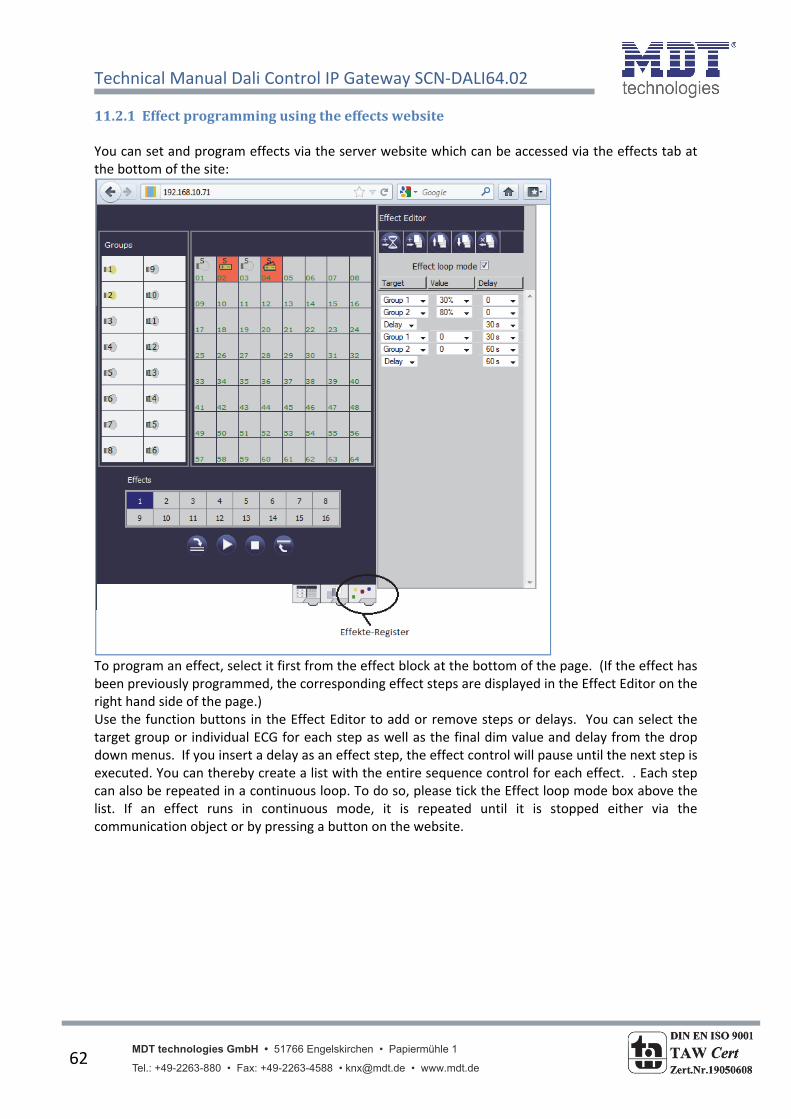
Technical Manual Dali Control IP Gateway SCN‐DALI64.02
MDT technologies GmbH • 51766 Engelskirchen • Papiermühle 1 Tel.: +49-2263-880 • Fax: +49-2263-4588 • [email protected] • www.mdt.de
62
11.2.1Effectprogrammingusingtheeffectswebsite You can set and program effects via the server website which can be accessed via the effects tab at the bottom of the site:
To program an effect, select it first from the effect block at the bottom of the page. (If the effect has been previously programmed, the corresponding effect steps are displayed in the Effect Editor on the right hand side of the page.) Use the function buttons in the Effect Editor to add or remove steps or delays. You can select the target group or individual ECG for each step as well as the final dim value and delay from the drop down menus. If you insert a delay as an effect step, the effect control will pause until the next step is executed. You can thereby create a list with the entire sequence control for each effect. . Each step can also be repeated in a continuous loop. To do so, please tick the Effect loop mode box above the list. If an effect runs in continuous mode, it is repeated until it is stopped either via the communication object or by pressing a button on the website.

Technical Manual Dali Control IP Gateway SCN‐DALI64.02
MDT technologies GmbH • 51766 Engelskirchen • Papiermühle 1 Tel.: +49-2263-880 • Fax: +49-2263-4588 • [email protected] • www.mdt.de
63
The individual buttons have the following functions:
Add delay
Add effect step
Move effect step up
Move effect step down
Delete effect step When the list is complete, download it onto the device.
Effect programming Please remember that the set values are only saved if you press the button. If you change to another effect without saving, any changes you made are lost. Use the Start and Stop buttons to activate and test the selected effect directly from the page.
Export effect list
Start effect
Stop effect
Program effect
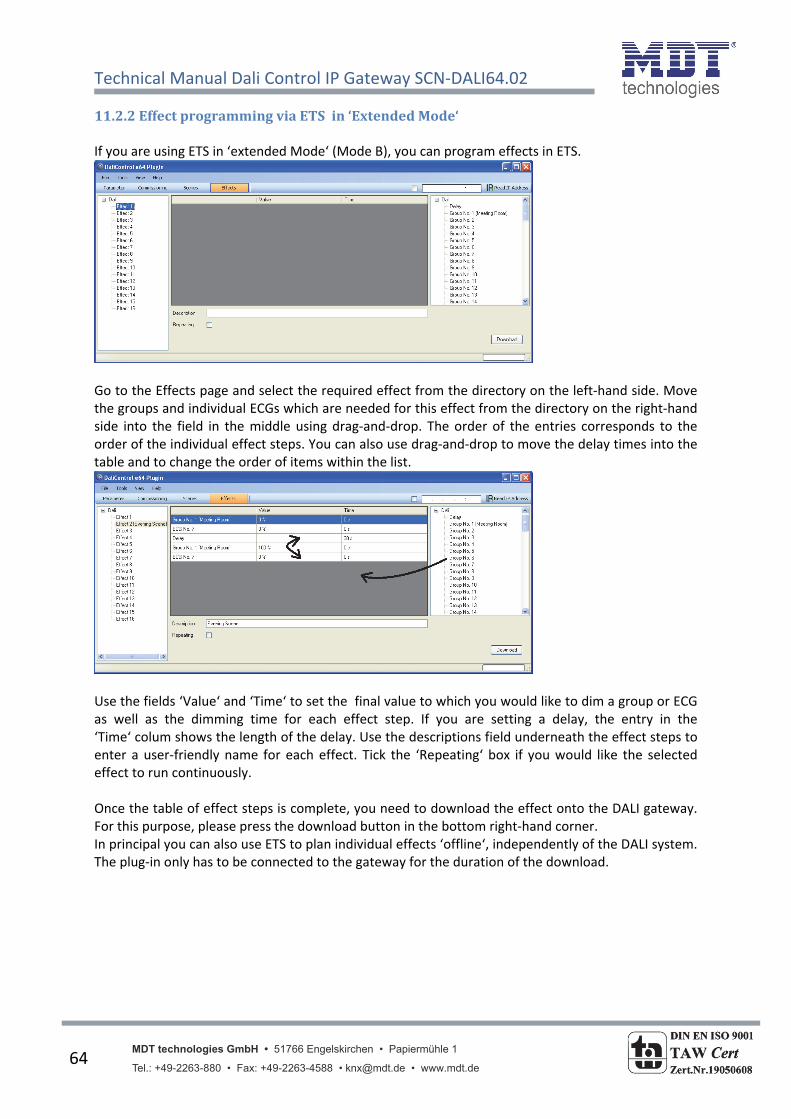
Technical Manual Dali Control IP Gateway SCN‐DALI64.02
MDT technologies GmbH • 51766 Engelskirchen • Papiermühle 1 Tel.: +49-2263-880 • Fax: +49-2263-4588 • [email protected] • www.mdt.de
64
11.2.2EffectprogrammingviaETSin‘ExtendedMode‘ If you are using ETS in ‘extended Mode‘ (Mode B), you can program effects in ETS.
Go to the Effects page and select the required effect from the directory on the left‐hand side. Move the groups and individual ECGs which are needed for this effect from the directory on the right‐hand side into the field in the middle using drag‐and‐drop. The order of the entries corresponds to the order of the individual effect steps. You can also use drag‐and‐drop to move the delay times into the table and to change the order of items within the list.
Use the fields ‘Value‘ and ‘Time‘ to set the final value to which you would like to dim a group or ECG as well as the dimming time for each effect step. If you are setting a delay, the entry in the ‘Time‘ colum shows the length of the delay. Use the descriptions field underneath the effect steps to enter a user‐friendly name for each effect. Tick the ‘Repeating‘ box if you would like the selected effect to run continuously. Once the table of effect steps is complete, you need to download the effect onto the DALI gateway. For this purpose, please press the download button in the bottom right‐hand corner. In principal you can also use ETS to plan individual effects ‘offline‘, independently of the DALI system. The plug‐in only has to be connected to the gateway for the duration of the download.

Technical Manual Dali Control IP Gateway SCN‐DALI64.02
MDT technologies GmbH • 51766 Engelskirchen • Papiermühle 1 Tel.: +49-2263-880 • Fax: +49-2263-4588 • [email protected] • www.mdt.de
65
12Self‐containedbatteryemergencylamps The DaliControl IP Gateway supports control gears used to run self‐contained battery emergency lights (device type 1 in accordance with EN 62386‐202). Such devices contain a battery which can supply the light with power in case of a general power failure.
12.1Features Principally a distinction is made between switchable and non‐switchable devices for self‐contained battery lamps. A switchable device can be directly connected to a lamp just like a ‘normal’ ECG. In normal mode the light (usually an LED) can be switched and dimmed via DALI. Emergency lights with switchable ECGs therefore require only 1 DALI device. The standard switch parameters and objects are available for these devices. In contrast to the ’switchable‘ device, a ’non‐switchable‘ device (converter) can only control the connected lamp in an emergency. To use the same lamp in normal mode (switching, dimming), a second, ‘normal‘ ECG is required. These lights are therefore called emergency lights with 2 DALI devices. The two ECGs make a device pair. ‘Non‐switchable‘ devices use the DALI communication to query the device status and to initiate mandatory test phases. As these devices cannot switch or dim themselves, there are no parameters or objects for switch behaviour available for these devices. During both new and post‐installation the DaliControl IP Gateway recognises automatically, whether the connected device is a ‘switchable’ or ‘non‐switchable’ ECG. However, because of the DALI structure with its random assignment of short addresses, the pairing of a ‘normal‘ device with a ’non‐switchable‘ device does not occur automatically. It has to be performed manually on the parameter page in ETS. The assignment is crucial for fault analysis purposes as ‘non‐switchable‘ devices usually share the connected lamp with a ‘normal’ device. Without the assignment, a lamp failure may be double‐counted. In addition, the ‘normal’ ECG in a pair is usually automatically disconnected from the power supply when the emergency light is tested. This loss of function generates an ECG failure. However, by making a pair, the gateway recognises automatically, whether a real ECG failure has occurred or whether the corresponding converter has simply been tested. Only real ECG failures are taken into consideration for alarm and analysis purposes. Please remember that both the pairing and the fact that the power of the ‘normal ECG’ is switched off by the emergency light ECG in test mode mean that any burn‐in mode of these ECGs is interrupted. To identify the converters after installation, a function test starts for ‘non‐switchable‘ ECGs. The process takes a few seconds. During this process the status LED on the converter flashes (see function description of the respective converter). As these devices cannot switch the connected lamp themselves, the normal identification process through switch on/ switch off is not possible. The identification therefore needs to occur via the LED.

Technical Manual Dali Control IP Gateway SCN‐DALI64.02
MDT technologies GmbH • 51766 Engelskirchen • Papiermühle 1 Tel.: +49-2263-880 • Fax: +49-2263-4588 • [email protected] • www.mdt.de
66
12.2Converterinhibitmode Self‐contained battery emergency lamps always change into emergency mode if there is a power supply failure. The lamp is now operated by the internal battery. However, it may become necessary at times to cut off the power supply, for example during maintenance work or the initialisation phase of a building. To prevent the lights from switching into emergency mode, the converters can be disabled via the pushbuttons and display on the device (see above). This converter inhibit mode is only available for all connected devices at the same time. If the power supply is turned off within 15 minutes after activating the mode, the connected lights do not change into emergency mode and the lights remain switched off. When the power resumes, the lights return to normal. If the 15 minutes run out without a power loss, all converters are automatically re‐set to normal mode.
12.3Testmode The DaliControl IP Gateway supports mandatory tests for self‐contained battery emergency lamps. Attention: The legal regulations and norms vary in different countries. Please make sure that you comply with all country‐specific requirements. The DaliControl IP Gateway supports functional tests, long duration tests and battery tests. Functional and long duration tests can be started externally via KNX telegrams (1 Byte telegrams, see below)or via the device website. Alternatively you may choose to set automatic test intervals. This means tests are performed automatically via the connected converters. (Please check the converter description for the exact function.) Battery tests can be performed individually at any time. However, they are also part of a functional or long duration test. After a test has been completed, the test results are available on the KNX bus via communication objects and they may be recorded in the visualisation. The corresponding 3 Byte object is updated with the test result and automatically sent after every new test. The object can be queried at any time. The object provides the result of the last test. In addition to the latest test result the object also displays the current status (test pending, test running). Attention: Please remember that the object is only updated with the latest test result once the test has been completed. If a test is started and the object is queried before the test is complete (which can be seen from the status flag “test pending” or “test running) the test result shown is that of the previously completed test.

Technical Manual Dali Control IP Gateway SCN‐DALI64.02
MDT technologies GmbH • 51766 Engelskirchen • Papiermühle 1 Tel.: +49-2263-880 • Fax: +49-2263-4588 • [email protected] • www.mdt.de
67
Alternatively, or in addition to reporting via communications objects to the bus, test results can be displayed on the website if you select the respective converter.
The website displays the most recently executed test with results and date/time of the test.

Technical Manual Dali Control IP Gateway SCN‐DALI64.02
MDT technologies GmbH • 51766 Engelskirchen • Papiermühle 1 Tel.: +49-2263-880 • Fax: +49-2263-4588 • [email protected] • www.mdt.de
68
13 ETScommunicationobjectsoverview The DaliControl IP Gateway communicates via the KNX bus based on powerful communication stacks. Altogether 871 communication objects are available for the communication.
13.1Generalcommunicationobjects The general communication objects 1 to 22 only exist once and apply to the gateway as a whole.

Technical Manual Dali Control IP Gateway SCN‐DALI64.02
MDT technologies GmbH • 51766 Engelskirchen • Papiermühle 1 Tel.: +49-2263-880 • Fax: +49-2263-4588 • [email protected] • www.mdt.de
69
Obj Object name Function Type Flags
1 Broadcast, Switching
On/Off 1 Bit DPT:
CW
This object is used to switch all connected lights on or off. However, any connected ECGs that are in special mode (Burn‐In, Emergency Test, Panic Mode) are not switched and the DALI bus is addressed sequentially. A delay between the switching off the first and last light may hence be visible. If none of the ECGs is in special mode, the switching is performed simultaneously via DALI Broadcast telegrams. The Broadcast function always switches to 0 or 100%. The ‘switch‐off value’ and ‘switch‐on value’ parameters are not considered.
2 Broadcast, Set Value
Value 1 Byte CW
This object is used to set all connected lights to a certain value. However, any connected ECGs that are in special mode (Burn‐In, Emergency Test, Panic Mode) are excluded and the DALI bus is addressed sequentially. A delay between the value setting of the first and last light may hence be visible. If none of the ECGs is in special mode, the value setting is performed simultaneously via DALI Broadcast telegrams.
3 Activate Emergency Mode
Activate / Stop 1 Bit CW
This object is used to activate or stop the emergency mode via the bus.
4 Activate Test Mode
Activate / Stop 1 Bit CW
This object is used to activate or stop the test mode for emergency lights with central battery via the bus. Self‐contained battery lamps are controlled individually.
5 Activate Night Mode
Activate / Stop 1 Bit CW
This object is used to activate or stop the night‐time mode via the bus.
6 Scene invoke / program
Scene No. 8 Bit CW
This object is used to invoke or program scenes. Up to 16 scenes are available on the DALI gateway. To program a scene, you must set the top bit: Start Program Scene 1 0 128 Scene 2 1 129 …………. Scene 15 14 142 Scene 16 15 143

Technical Manual Dali Control IP Gateway SCN‐DALI64.02
MDT technologies GmbH • 51766 Engelskirchen • Papiermühle 1 Tel.: +49-2263-880 • Fax: +49-2263-4588 • [email protected] • www.mdt.de
70
7 Effects start /
stop Effect No. 8 Bit CW
This object is used to start or stop effects. Up to 16 effects are available on the DALI gateway. To start an effect, set the top Bit. The effect stops when Bit 7 is deleted. This means: Effect Off Effect On Effect 1 0 128 Effect 2 1 129 …………. Effect 15 14 142 Effect 16 15 143
8 General Failure Yes/No 1 Bit CRT
This object is used to report the presence of a general failure in the connected DALI segment independent of its type.
9 DALI Failure Yes/No 1 Bit CRT
This object is used to report the presence of a DALI short‐circuit in the connected DALI segment.
10 General Failure Exceeds Theshold
Yes/No 1 Bit CRT
This object is used to report that the total of all lamp, ECG and converter failures exceeds the set threshold.
11a General Failure in Total
Value 1 Byte CRT
This object is used to report the total number of all lamp, ECG and converter failures recognised by the gateway. Please remember that for each connected device a fault is counted just once. A simultaneous lamp failure in case of an ECG or converter failure cannot be recognised or counted.
11b General Failure in %
Value 1 Byte CRT
Alternatively, this object is used to report the failure rate as a percentage of the total number of devices in the DALI segment. All lamp, ECG and converter failures are hereby taken into consideration Please remember that for each connected device a fault is counted just once. A simultaneous lamp failure in case of an ECG or converter failure cannot be recognised or counted.
12 Lamp Failure Exceeds Theshold
Ja / Nein 1 Bit CRT
This object is used to report that the total of all lamp failures recognised by the gateway exceeds the set threshold.
13a Lamp Failure in Total
Value 1 Byte CRT
This object is used to report the total amount of lamp failures recognised by the gateway.

Technical Manual Dali Control IP Gateway SCN‐DALI64.02
MDT technologies GmbH • 51766 Engelskirchen • Papiermühle 1 Tel.: +49-2263-880 • Fax: +49-2263-4588 • [email protected] • www.mdt.de
71
13b Lamp Failure in % Value 1 Byte CRT
This object is used to report the failure rate as a percentage of the total number of lamps in the DALI segment.
14 ECG Failure Exceeds Theshold
Ja / Nein 1 Bit CRT
This object is used to report that the total of all ECG failures recognised by the gateway exceeds the set threshold.
15a ECG Failure in Total
Value 1 Byte CRT
This object is used to report the total amount of ECG failures recognised by the gateway.
15b ECG Failure in % Value 1 Byte CRT
Alternatively, this object is used to report the failure rate as a percentage of the total number of ECGs in the DALI segment.
16 Converter Failure Exceeds Theshold
Yes/No 1 Bit CRT
This object is used to report that the sum of converter failures recognised by the gateway exceeds the set threshold.
17a Converter Failure in Total
Value 1 Byte CRT
This object is used to report the total amount of all converter failures recognised by the gateway
17b Converter Failure in %
Value 1 Byte CRT
Alternatively, this object is used to report the failure rate as a percentage of the total number of converters in the DALI segment.
18 Status Switching Lamp
Status 8 Bit CWT
This object is used to send the switch status of individual lamps in the DALI segment when the system is started or when a change has taken place. Bit 0 ‐ 5 refer to the number of the ECG. Bit 6 shows the corresponding status on/off. For example: Bit 7 6 5 4 3 2 1 0 ECG 5 / On 0 1 0 0 0 1 0 0 ECG 6 / Off 0 0 0 0 0 1 0 1 If a value is received where Bit 7 and Bit 6 are set, it is interpreted as a status query. For example: Bit 7 6 5 4 3 2 1 0 ECG 5 / Query 1 1 0 0 0 1 0 0 The gateway responds with the current status of the queried ECG. Bit 7 6 5 4 3 2 1 0 ECG 5 / On 0 1 0 0 0 1 0 0

Technical Manual Dali Control IP Gateway SCN‐DALI64.02
MDT technologies GmbH • 51766 Engelskirchen • Papiermühle 1 Tel.: +49-2263-880 • Fax: +49-2263-4588 • [email protected] • www.mdt.de
72
19 Status Value Lamp
Status 16 Bit CWT
This object is used to send the value status of individual lamps in the DALI segment when the system is started or when a change has taken place. Bit 8 to 13 refer to the number of the ECG. Bit 14 shows the switch status. Bit 0 to 7 represent the corresponding status 0..100%. For example: ECG 5 / On 0 1 0 0 0 1 0 0 Bit 15..8 Value 50% 1 0 0 0 0 1 0 0 Bit 7..0 If a value is received where Bit 14 and Bit 15 are set, it is interpreted as a status query. For example: ECG 5 / Query 1 1 0 0 0 1 0 0 Bit 15..8 0 0 0 0 0 0 0 0 Bit 7..0 The gateway responds with the current status of the queried ECG. ECG 5 / On 0 1 0 0 0 1 0 0 Bit 15..8 Value 50% 1 0 0 0 0 1 0 0 Bit 7..0
20 Failure Status Lamp/ECG
Status 8 Bit CWT
This object is used to send the failure status of lamp or ECG failures in the DALI segment when the system is started or when a change has taken place. Bit 0 to 5 refer to the number of the ECG. Bit 7 represents an ECG failure, Bit 6 a lamp failure. For example: Bit 7 6 5 4 3 2 1 0 ECG 5 / ECG failure 1 0 0 0 0 1 0 0 ECG 6 / Lamp failure 0 1 0 0 0 1 0 1 If a value is received where Bit 6 and Bit 7 are set, it is interpreted as a status query. For example: Bit 7 6 5 4 3 2 1 0 ECG 5 / Query 1 1 0 0 0 1 0 0 The gateway responds with the current failure status of the queried ECG. Bit 7 6 5 4 3 2 1 0 ECG 5 / ECG failure 1 0 0 0 0 1 0 0

Technical Manual Dali Control IP Gateway SCN‐DALI64.02
MDT technologies GmbH • 51766 Engelskirchen • Papiermühle 1 Tel.: +49-2263-880 • Fax: +49-2263-4588 • [email protected] • www.mdt.de
73
Time stamps are used for the analysis of self‐contained emergency ballast faults. This requires the current date and time which are made available via the Bus. Two objects are used for this purpose.
Obj Object name Function Type Flags
21 Time Time 3 Byte CWT
This object is used to set the time. The time must be provided by a central timer and updated at least twice a day.
22 Date Date 3 Byte CWT
This object is used to set the date. The date must be provided by a central timer and updated at least twice a day. Leap years and change‐over to and from daylight saving time are not taken into consideration during internal calculations of time and date. Therefore please pay attention that the timer sends the correct date on these occasions.

Technical Manual Dali Control IP Gateway SCN‐DALI64.02
MDT technologies GmbH • 51766 Engelskirchen • Papiermühle 1 Tel.: +49-2263-880 • Fax: +49-2263-4588 • [email protected] • www.mdt.de
74
13.2ECG‐relatedcommunicationobjects
A set of 11 communication objects is available for each one of the up to 64 connected ECGs / converters and corresponding lamps. The communication objects are only shown for those ECGs / converters that were found during system installation. The objects are also partly hidden when ECGs have been assigned to a group. Lamps can only be controlled individually if they have not been assigned to a group. The following objects are available (Example ECG 1):
Obj Object name Function Type Flags
167 ECG1, Switching On/Off 1 Bit CW
This object is used to switch an ECG on or off if it is not in special mode (burn‐In, test mode emergency lights, panic/ emergency mode).
168 ECG1, Dimming Brighter / Darker 4 Bit CW
This object is used for the relative dimming of an ECG that is not in special mode (burn‐in, test mode emergency lights, panic/ emergency mode). Bit 4 is set to dim up and deleted to dim down. Bits 0..3 refer to the increment size. Bit 0..3 deleted is interpreted as a stop telegram.
169 ECG 1, Set Value
Value 1 Byte CW
This object is used to set the value of ECG1 unless it is in special mode (burn‐in, test mode emergency lights, panic/ emergency mode).
170 ECG1, Burn In
On/Off 1 Bit CWT
This object is used to start or finish the automatic burn‐in of ECG1. During the burn‐in process all other switch, dim or value telegrams are ignored and the lamp runs at full light level. The burn‐in period normally finishes automatically after the configured burn‐in time. If you switch the burn‐in period off via this object, the timer stops and you need to re‐start the automatic burn‐in.
171 ECG1, Status On/Off 1 Bit CRT
This object is used to send the ECG switch status. Any value >0% is interpreted as ON.

Technical Manual Dali Control IP Gateway SCN‐DALI64.02
MDT technologies GmbH • 51766 Engelskirchen • Papiermühle 1 Tel.: +49-2263-880 • Fax: +49-2263-4588 • [email protected] • www.mdt.de
75
172 ECG1, Status Value 8 Bit CRT
This object is used to send the ECG value status.
173a ECG1, Failure Status
On/Off 1 Bit CRT
This object is used to send the failure status of lamp, ECG and converter failures.
173b Failure Status, ECG1
Status 1 Byte CRT
Alternatively this object is used to send the failure status for lamp, ECG and converter failures as a 1Byte object. Bit 0 Lamp failure Bit 1 ECG failure Bit 2 Converter failure
174 ECG1, Operating Hours
Value 4 Byte CRT
The operating hours of a lamp are sent via this object. The internal counter can be set to 0 (Reset) or another value via this object. Please remember: The “Write“ flag is switched off in the presetting.
175 ECG1, Life Time Exceeded
Yes/No 1 Bit CRT
This object is used to send a status message when the configured life time of a lamp is exceeded.

Technical Manual Dali Control IP Gateway SCN‐DALI64.02
MDT technologies GmbH • 51766 Engelskirchen • Papiermühle 1 Tel.: +49-2263-880 • Fax: +49-2263-4588 • [email protected] • www.mdt.de
76
If the connected DALI device is a converter for the control of self‐contained battery emergency lights, two further objects are shown:
Obj Object name Function Type Flags
176 Converter 1, Test Start
Start 1 Byte CW
This object is used to start a long duration test, functional test and battery test of the converter. The individual Bits have the following meaning: Bit 0 Start functional test Bit 1 Functional test pending Bit 2 Start duration test Bit 3 Duration test pending Bit 4 Query battery status Bit 5 Battery status query pending Bit 6 Bit 7
177 Converter 1, Test Result
Test 3 Byte CRT
This object is used to analyse the results of functional tests, long duration tests and battery tests. The individual Bits have the following meaning: Bit 23..16 If test is Function or Battery test: Battery status 0..100% If test is Duration test: Test time of Duration test in steps of 2 Minutes Bit 15 Fault during long duration test Bit 14 Fault during functional test Bit 13 Maximum time for long duration test exceeded Bit 12 Maximum time for functional test exceeded Bit 11 Emergency lamp faulty Bit 10 Battery faulty Bit 9 Battery operating hours too short Bit 8 Converter faulty Bit 7 Long duration test pending Bit 6 Function test pending Bit 5 Duration test running Bit 4 Function test running Bit 3 Test error during the last test Bit 2 Last test was battery query Bit 1 Last test was duration test Bit 0 Last test was function test
The objects described above for ECG 1 / converter 1 are available in the same format for the ECGs / converters 2 to 64. The object number always increases by 11 objects. For example, ECG 2: dimming object 179, etc.

Technical Manual Dali Control IP Gateway SCN‐DALI64.02
MDT technologies GmbH • 51766 Engelskirchen • Papiermühle 1 Tel.: +49-2263-880 • Fax: +49-2263-4588 • [email protected] • www.mdt.de
77
13.3Group‐relatedcommunicationobjects
A set of 8 communication objects is available for each one of the up to 16 possible groups. The communication objects are only shown for those groups that are in use. ECGs / that have been assigned to a group can no longer be controlled individually. The following objects are available (Example group 1):
Obj Object name Function Type Flags
23 Group 1, Switching
On/Off 1 Bit CW
This object is used to switch group 1 on or off.
24 Group 1, Dimming
Dimmen 4 Bit CW
This object is used for the relative dimming of group 1. Bit 4 is set to dim up and deleted to dim down. Bits 0..3 refer to the increment size. Bit 0..3 deleted is interpreted as a stop telegram.
25 Group 1, Set Value
Value 1 Byte CW
This object is used to set the value of group 1.
26a Group 1, Enable
Yes/No 1 Bit CW
This object is used to enable the operation of group 1: Object = 0 Disabled Object = 1 Enabled
26b Group 1, Disable
Yes/No 1 Bit CW
This object is used to disable the operation of group 1: Object = 0 Enabled Object = 1 Disabled
26c Group 1, Disable Staircase Function
Yes/No 1 Bit CW
This object is used to disable the staircase mode: Object = 0 Staircase mode enabled Object = 1 Staircase mode disabled

Technical Manual Dali Control IP Gateway SCN‐DALI64.02
MDT technologies GmbH • 51766 Engelskirchen • Papiermühle 1 Tel.: +49-2263-880 • Fax: +49-2263-4588 • [email protected] • www.mdt.de
78
27 Group 1, Status On/Off 1 Bit CRT
This object is used to send the switch status of the group. Any value >0% is interpreted as ON.
28 Group 1, Status Value 8 Bit CRT
This object is used to send the value status of the group.
29a Group 1, Failure Status
Yes/No 1 Bit CRT
This object is used to send the failure status of a lamp, ECG or converter failure within the group.
29b Group 1, Failure Status
Status 1 Byte CRT
This object is used to send the failure status for lamp, ECG and converter failures within the group as a 1Byte object. Bit 0 Lamp failure Bit 1 ECG failure Bit 2 Converter failure
30 Group 1, Failure Status
Status 4 Byte CRT
This object is used to report the total number of devices within the group and the failure status according to type of failure. The different Bits within the object have the following meaning: Bit 31 | Bit 30 | Bit 29..24 Norm. ECG |Emerg.ECG |Number of ECG + converter failures Bit 23 | Bit 22 | Bit 21..16 Norm. Lamp|Emerg.Lamp|Number of lamp failures Bit 15 | Bit 14 | Bit 13..8 Def.Conv. | idle | Number of converters Bit 7 | Bit 6 | Bit 5..0 idle | idle | Number of ECGs
31a Group 1, Failure Status
Failure Status 1 Bit CRT
This object is used to send a message when the total of all lamp, ECG and converter failures found within the group exceeds the threshold set by parameters.
31b Group 1, Failure Value 1 Byte CRT
This object is used to send the total of all lamp, ECG and converter failures within the group.

Technical Manual Dali Control IP Gateway SCN‐DALI64.02
MDT technologies GmbH • 51766 Engelskirchen • Papiermühle 1 Tel.: +49-2263-880 • Fax: +49-2263-4588 • [email protected] • www.mdt.de
79
31c Group 1, Failure
Rate Value 1 Byte CRT
This object is used to report the failure rate as a percentage of the total number of devices within the group.
14ETSparameteroverview The ETS parameters of the device are distributed across different parameter pages. To simplify the overview, only the parameter pages of the device selected in the function tree are displayed.
14.1Device:GeneralSettings
The ”General Settings“ item has 5 parameter pages. The parameters are described below:
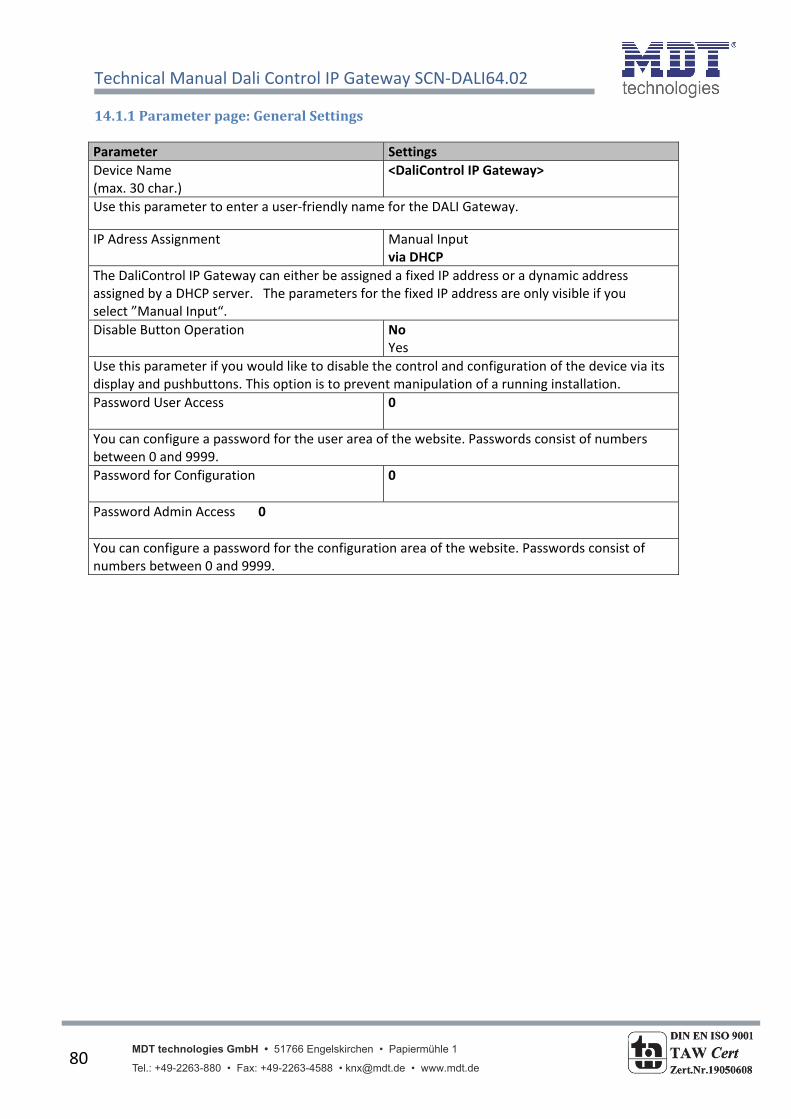
Technical Manual Dali Control IP Gateway SCN‐DALI64.02
MDT technologies GmbH • 51766 Engelskirchen • Papiermühle 1 Tel.: +49-2263-880 • Fax: +49-2263-4588 • [email protected] • www.mdt.de
80
14.1.1Parameterpage:GeneralSettings
Parameter Settings
Device Name (max. 30 char.)
<DaliControl IP Gateway>
Use this parameter to enter a user‐friendly name for the DALI Gateway.
IP Adress Assignment
Manual Input via DHCP
The DaliControl IP Gateway can either be assigned a fixed IP address or a dynamic address assigned by a DHCP server. The parameters for the fixed IP address are only visible if you select ”Manual Input“.
Disable Button Operation
No Yes
Use this parameter if you would like to disable the control and configuration of the device via its display and pushbuttons. This option is to prevent manipulation of a running installation.
Password User Access
0
You can configure a password for the user area of the website. Passwords consist of numbers between 0 and 9999.
Password for Configuration
0
Password Admin Access 0
You can configure a password for the configuration area of the website. Passwords consist of numbers between 0 and 9999.

Technical Manual Dali Control IP Gateway SCN‐DALI64.02
MDT technologies GmbH • 51766 Engelskirchen • Papiermühle 1 Tel.: +49-2263-880 • Fax: +49-2263-4588 • [email protected] • www.mdt.de
81
14.1.2Parameterpage:IPSettings
Parameter Settings
IP Address (byte 1) 0
IP Address (byte 2) 0
IP Address (byte 3) 0
IP Address (byte 4) 0
This sets the fixed IP address of the DaliControl IP Gateway if you do not select the DHCP mode.
Subnet Mask (byte 1) 255
Subnet Mask (byte 2) 255
Subnet Mask (byte 3) 255
Subnet Mask (byte 4) 0
This sets the subnet mask of the DaliControl IP Gateway if you do not select the DHCP mode.
Gateway Address (byte 1) 255
Gateway Address (byte 2) 255
Gateway Address (byte 3) 255
Gateway Address (byte 4) 0
This sets the address of a standard gateway for direct access via the Internet. The setting is only possible if you do not select the DHCP.

Technical Manual Dali Control IP Gateway SCN‐DALI64.02
MDT technologies GmbH • 51766 Engelskirchen • Papiermühle 1 Tel.: +49-2263-880 • Fax: +49-2263-4588 • [email protected] • www.mdt.de
82
14.1.3Parameterpage:Behaviour
Parameter Settings
Behaviour on KNX Failure No Action Switch to On‐Value Switch to Off‐Value Switch to Emergency Value
Use this parameter to set the behaviour of the connected ECGs/lamps on KNX failure.
Behaviour on KNX Voltage Recovery No Action Switch to Last Value Switch to On‐Value Switch to Off‐Value
Use this parameter to set the behaviour of the connected ECGs/lamps on KNX voltage recovery or bus reset.
Light Status Send Condition Send on Request Send on Change Send on Change and after Busreset
Use this parameter to determine the light status send conditions (switch status and value status) of the connected ECGs and groups.
Delay between Status Objects No Delay 1 Second 2 Seconds 3 Seconds 4 Seconds 5 Seconds 10 Seconds
Use this parameter to set a delay between individual status telegrams. This can help to prevent a large bus load, for example for broadcast switching.
Delay for Sending on KNX Recovery immediately 5 Seconds 10 Seconds 15 Seconds 20 Seconds 30 Seconds 40 Seconds 50 Seconds
Use this parameter to set a delay for sending status objects after KNX voltage recovery or a bus reset. In installations with more than one gateway different settings for this parameter can prevent all devices from sending at the same time.
Send Status Value During Dimming If Change > 2% If Change > 5% If Change > 10% If Change > 20% inactive
Use this parameter to set whether and when you would like a status value to be sent via a 4 bit dim telegram during dimming (relative dimming). If you use the setting inactive the value is only sent after the dimming process is complete.
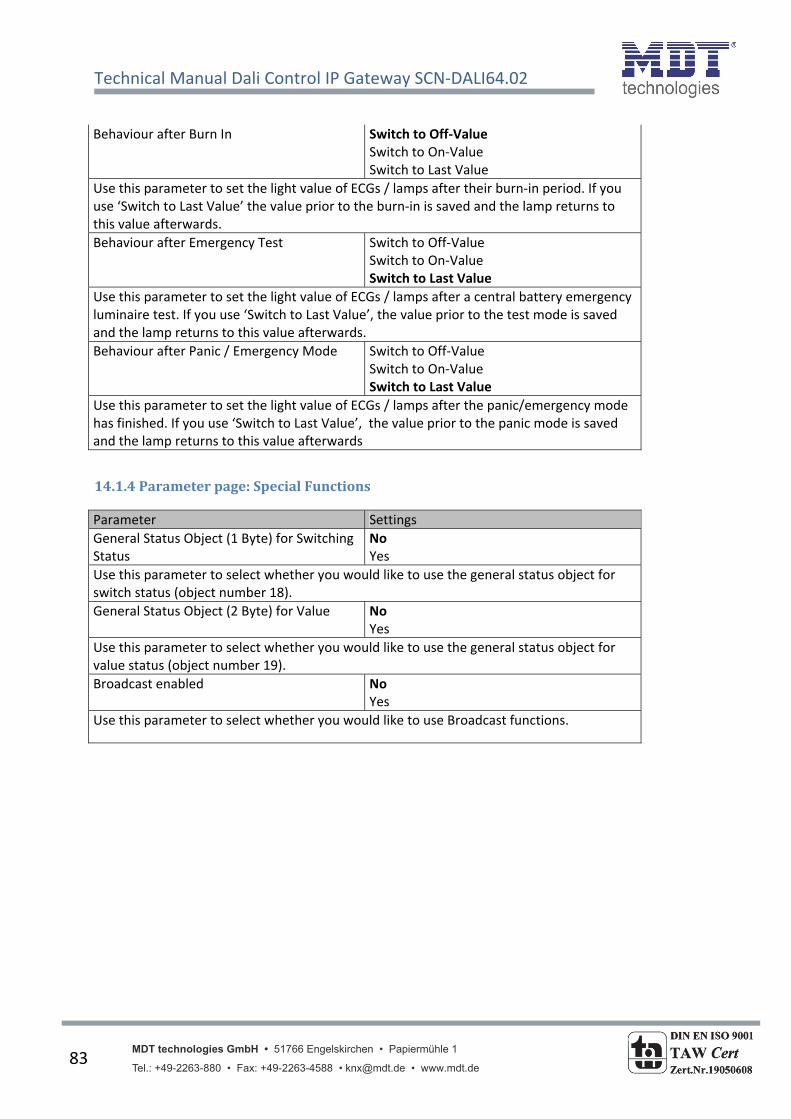
Technical Manual Dali Control IP Gateway SCN‐DALI64.02
MDT technologies GmbH • 51766 Engelskirchen • Papiermühle 1 Tel.: +49-2263-880 • Fax: +49-2263-4588 • [email protected] • www.mdt.de
83
Behaviour after Burn In Switch to Off‐Value
Switch to On‐Value Switch to Last Value
Use this parameter to set the light value of ECGs / lamps after their burn‐in period. If you use ‘Switch to Last Value’ the value prior to the burn‐in is saved and the lamp returns to this value afterwards.
Behaviour after Emergency Test Switch to Off‐Value Switch to On‐Value Switch to Last Value
Use this parameter to set the light value of ECGs / lamps after a central battery emergency luminaire test. If you use ‘Switch to Last Value’, the value prior to the test mode is saved and the lamp returns to this value afterwards.
Behaviour after Panic / Emergency Mode Switch to Off‐Value Switch to On‐Value Switch to Last Value
Use this parameter to set the light value of ECGs / lamps after the panic/emergency mode has finished. If you use ‘Switch to Last Value’, the value prior to the panic mode is saved and the lamp returns to this value afterwards
14.1.4Parameterpage:SpecialFunctions
Parameter Settings
General Status Object (1 Byte) for Switching Status
No Yes
Use this parameter to select whether you would like to use the general status object for switch status (object number 18).
General Status Object (2 Byte) for Value No Yes
Use this parameter to select whether you would like to use the general status object for value status (object number 19).
Broadcast enabled No Yes
Use this parameter to select whether you would like to use Broadcast functions.

Technical Manual Dali Control IP Gateway SCN‐DALI64.02
MDT technologies GmbH • 51766 Engelskirchen • Papiermühle 1 Tel.: +49-2263-880 • Fax: +49-2263-4588 • [email protected] • www.mdt.de
84
14.1.5Parameterpage:Analysisandservice
Parameter Settings
Failure Status Send Condition Send on Request
Send on Change
Send on Change and after Bus reset
Use this parameter to set the conditions under which you want the failure status of the connected ECGs and groups to be sent.
Delay between Sending of Failure Objects No Delay
1 Second
2 Seconds
3 Seconds
4 Seconds
5 Seconds
10 Seconds
Use this parameter to set a delay between individual failure objects. This can help to prevent a large bus load, for example when a DALI segment loses power.
Cycle Time for DALI Failure request No Delay
0,5 Seconds
1 Second
2 Seconds
3 Seconds
4 Seconds
5 Seconds
6 Seconds
To analyse ECG and lamp failures, a periodic request has to be sent to the ECGs via DALI telegrams. Use this parameter to set the time for these periodic requests. Attention: If you set ‘No request‘ ECG and lamp failures can no longer be recognised. You should therefore use this setting only for service or in special cases.
Central Failure Object 1 Byte existing No
Yes
Use this parameter to select whether you want to use the central failure object for ECG and lamp failures (object number 20).
Function of Failure Objects Total Number of Failures
Failure Rate 0..100%
Use this parameter to select whether you want to use the failure analysis objects (objects number 11, 13, 15 and 17) to report the total amount of failures or the failure rate in %.

Technical Manual Dali Control IP Gateway SCN‐DALI64.02
MDT technologies GmbH • 51766 Engelskirchen • Papiermühle 1 Tel.: +49-2263-880 • Fax: +49-2263-4588 • [email protected] • www.mdt.de
85
Threshold for Total Failures 1%
2%
3%
…..
100%
Use this parameter to configure a threshold value for the general failure alarm object (object 10). The threshold value takes all failures (ECG, lamp and converter failure) into consideration and relates them to the total number of connected ECGs and converters.
Threshold for Lamp Failures 1%
2%
3%
…..
100%
Use this parameter to set a threshold value for the lamp failure alarm object (object 12). The threshold value takes all lamp failures into consideration and relates them to the total number of connected lamps in the DALI segment.
Threshold for ECG Failures 1%
2%
3%
…..
100%
Use this parameter to set a threshold value for the ECG failure alarm object (object 14). The threshold value takes all ECG failures into consideration and relates them to the total number of connected ECGs in the DALI segment.
Threshold for Converter Failures 1%
2%
3%
…..
100%
Use this parameter to set a threshold value for the converter failure alarm object (object 16). The threshold value takes all converter failures into consideration and relates them to the total number of connected converters in the DALI segment.

Technical Manual Dali Control IP Gateway SCN‐DALI64.02
MDT technologies GmbH • 51766 Engelskirchen • Papiermühle 1 Tel.: +49-2263-880 • Fax: +49-2263-4588 • [email protected] • www.mdt.de
86
14.2ECGNo.xx To set the ECG parameters, use the parameter pages listed under the devices ECG 1 to ECG 64.
Please remember that after the synchronisation only those ECGs are displayed that were recognised during the installation. Accordingly there are fewer entries in the function tree and fewer parameters and objects. There are 4 parameter pages for ECG settings. The parameters are described below.

Technical Manual Dali Control IP Gateway SCN‐DALI64.02
MDT technologies GmbH • 51766 Engelskirchen • Papiermühle 1 Tel.: +49-2263-880 • Fax: +49-2263-4588 • [email protected] • www.mdt.de
87
14.2.1Parameterpage:ECGNo.xx
Parameter Settings
ECG Type Fluorescent Lamp Self Contained Battery Lamp Discharge Lamp Low Voltage Halogen Lamp Incandescent Lamp 0..10V Converter LED Module Relais Module
Use this parameter to set the type of ECG used. Normally the ECG type is recognised automatically during installation and set accordingly in the synchronisation. Some ECG manufacturers, however, do not support this function. In this case, you can set the ECG type manually. During the synchronisation process, the ETS compares the found value to the pre‐set value. If the two do not match, an alarm message appears that has to be acknowledged.
Emergency Luminaire with Central Battery No Emergency Luminaire Central Battery Emergency Luminaire
Use this parameter to set whether the ECG controls an emergency luminaire with central battery. Devices registered as emergency luminaires are specifically marked during status reports. A special test mode for such devices can also be activated via an object. This parameter is not visible if you select the type “self‐contained battery lamp”.
Value in Test Mode 1..100% [30]
Use this parameter to select the value of a lamp in ‘test mode‘. A lamp in this mode cannot be switched or changed. It remains at the set level. This parameter is only visible if you select ‘Central Battery Emergency Luminaire’.
Duration of Test Mode (in minutes) 5 Minutes 10 Minutes 15 Minutes …. 4 Hours
Use this parameter to set the duration of the test mode. A lamp in this mode cannot be switched or changed. It remains at the set level. This parameter is only visible if you select ‘Central Battery Emergency Luminaire’.
Type of Emergency Light Switchable Converter (1 DALI Device) Non Switchable Converter (2 DALI Devices)
Use this parameter to select whether an emergency light is used with a switchable or non‐switchable converter. This parameter is only visible if you select “self‐contained battery lamp” as ECG type. Normally the ECG type is recognised automatically during installation and set accordingly in the synchronisation. Some ECG manufacturers, however, do not support this function. In this case, you can set the ECG type manually. During the synchronisation process, the ETS compares the found value to the pre‐set value. If the two do not match, an alarm message appears that has to be acknowledged.

Technical Manual Dali Control IP Gateway SCN‐DALI64.02
MDT technologies GmbH • 51766 Engelskirchen • Papiermühle 1 Tel.: +49-2263-880 • Fax: +49-2263-4588 • [email protected] • www.mdt.de
88
Converter controls ECG 1
ECG 2 … ECG 64 not assigned
This parameter is only visible if you select a non‐switchable converter as type of emergency light. Non‐switchable converters are normally used for an emergency lamp with two DALI devices. Use the parameter to manually select the “normal ECG“ that is assigned to the converter. The assignment means that error messages that were caused by the converter test mode are suppressed and a lamp failure is not counted twice.
Operating Mode Normal Mode Permanent Mode Normal / Night Mode
Use this parameter to select the operating mode of the ECG.
Value in Permanent Mode 1..100% [50%]
Use this parameter to select the value of a lamp in ‘permanent mode‘. A lamp in this mode cannot be switched or changed. It remains at the set value. This parameter is only visible if you select ‘permanent mode’.
Behaviour in Night Mode Delayed Switch‐Off Delayed Switch‐Off in 2 Steps Delayed Dim‐Off Activate Permanent Mode and ignore telegrams
Use this parameter to set the behaviour of the ECG in night‐time mode. This parameter is only visible if you select ‘normal / night mode’.
Automatic Switch‐Off after 1 Minute 2 Minutes 3 Minutes 4 Minutes 5 Minutes 10 Minutes 15 Minutes 20 Minutes
Use this parameter to set the time after which an ECG in night time mode automatically switches off. This parameter is only visible if you select ‘normal / night mode’.
ECGs enabled for Panic Mode No Yes
Use this parameter to enable an ECG for panic mode.
Value on DALI Power Fail 1..100% [100]
Use this parameter to set the value of a lamp after a loss of DALI power. The value is saved on the ECG and the device automatically changes to the value when a power loss occurs.

Technical Manual Dali Control IP Gateway SCN‐DALI64.02
MDT technologies GmbH • 51766 Engelskirchen • Papiermühle 1 Tel.: +49-2263-880 • Fax: +49-2263-4588 • [email protected] • www.mdt.de
89
14.2.2Parameterpage:EmergencySettings
This page is only visible if you select ‘self‐contained battery lamp’ as ECG type.
Parameter Settings
Value in Emergency Mode 1..100% [50]
Use this parameter to select the light value of a self contained battery lamp in case of a mains supply failure or during a long duration test.
Delay on Mains Recovery No Delay 30 Seconds 1 Minute 2 Minutes 3 Minutes 4 Minutes 5 Minutes 10 Minutes
Use this parameter to set the delay till a self contained battery lamp returns to normal mode following mains recovery.
Interval of Long Duration Test No automatic testing 1 Week 2 Weeks …. 52 Weeks
Use this parameter to set the intervals at which the converter is to perform automatic long duration tests.
Interval of Functional Test
No automatic testing 1 day 2 days …. 28 days
Use this parameter to set the intervals at which the converter is to perform automatic functional tests.
Test Execution Timeout (Days) 0..255 [10]
If a functional or long duration test cannot be started immediately (for example because the battery was not full), the converter tries to execute the test later on. Use this parameter to set the length of time that the converter is to try to execute the test and after which a test execution timeout error is reported. If you select 0, the timeout occurs after 15 minutes.

Technical Manual Dali Control IP Gateway SCN‐DALI64.02
MDT technologies GmbH • 51766 Engelskirchen • Papiermühle 1 Tel.: +49-2263-880 • Fax: +49-2263-4588 • [email protected] • www.mdt.de
90
14.2.3Parameterpage:SwitchingBehaviour
Parameter Settings
Switch‐On Value 5% 10% … 95% 100% last Value
Use this parameter to set the switch‐on value. If you select ‘last value‘, the value is set to the dim value prior to the lamp being switched off.
Switch‐On Behaviour Set Value Immediately Dim to Value in 10s Dim to Value in 20s Dim to Value in 30s Dim to Value in 1 Minute Dim to Value in 2 Minutes Dim to Value in 5 Minutes Dim to Value in 10 Minutes
Use this parameter to set the switch‐on behaviour.
Switch‐Off Value 0% 5% 10% … 45% 50%
Use this parameter to set the switch‐off value.
Switch‐Off Behaviour Set Value Immediately Dim to Value in 10s Dim to Value in 20s Dim to Value in 30s Dim to Value in 1 Minute Dim to Value in 2 Minutes Dim to Value in 5 Minutes Dim to Value in 10 Minutes
Use this parameter to set the switch‐off behaviour.

Technical Manual Dali Control IP Gateway SCN‐DALI64.02
MDT technologies GmbH • 51766 Engelskirchen • Papiermühle 1 Tel.: +49-2263-880 • Fax: +49-2263-4588 • [email protected] • www.mdt.de
91
Value‐Set Behaviour Set Value Immediately
Dim to Value in 10s Dim to Value in 20s Dim to Value in 30s Dim to Value in 1 Minute Dim to Value in 2 Minutes Dim to Value in 5 Minutes Dim to Value in 10 Minutes
Use this parameter to value‐set the behaviour on receipt of a new dim value.
Time for Dimming 3 Seconds 4 Seconds 5 Seconds 6 Seconds 10 Seconds 20 Seconds 30 Seconds 60 Seconds
Use this parameter to set the dim time for relative dimming.
Max. Value for Dimming 50% 55% …. 100%
Use this parameter to configure the maximum dim value that can be set through relative dimming.
Min. Value for Dimming 0% 5% …. 50%
Use this parameter to configure the minimum dim value that can be set through relative dimming.
Switch‐On via Dimming No Yes
Use this parameter to select whether a switched off device can be switched on when receiving a relative 4 Bit dim command ‘dimming up‘.

Technical Manual Dali Control IP Gateway SCN‐DALI64.02
MDT technologies GmbH • 51766 Engelskirchen • Papiermühle 1 Tel.: +49-2263-880 • Fax: +49-2263-4588 • [email protected] • www.mdt.de
92
14.2.4Parameterpage:Analysisandservice
Parameter Settings
Operating Hour Calculation Yes No
Use this parameter if you would like to count the individual operating hours of an ECG. .
Operating Hour Limit (hours) 10..120.000h [4000h]
Use this parameter to set the limit of a lamp’s operating hours. An alarm is sent when the limit is reached.
Enable Burn In Feature Yes No
Use this parameter to enable the burn in feature.
Burn In Duration (hours) 1..100h [24h]
Use this parameter to set the duration of the burn‐in phase. During this phase the lamp cannot be switched off or dimmed.
Type of Failure Object 1 Bit 8 Bit
Use this parameter to select whether the failure object is to be sent as a 1 Bit object without differentiation according to type of failure or as an 8 Bit object with failure differentiation.
14.3GroupNo.xx To set the group parameters, use the parameter pages listed under group1 to group 16.
There are 3 parameter pages for group settings. The parameters are described below.

Technical Manual Dali Control IP Gateway SCN‐DALI64.02
MDT technologies GmbH • 51766 Engelskirchen • Papiermühle 1 Tel.: +49-2263-880 • Fax: +49-2263-4588 • [email protected] • www.mdt.de
93
14.3.1Parameterpage:GroupNo.xx
Parameter Settings
Operating Mode Normal ModePermanent Mode Normal / Night Mode Staircase Mode
Use this parameter to set the operating mode of the group.
Value in Permanent Mode 0..100% [100]
Use this parameter to select the value of all lamps in a group in ‘permanent mode‘. Lamps in this mode cannot be switched or changed. They remain at the set value.
Behaviour in Night Mode Delayed Switch‐Off Delayed Switch‐Off in 2 Steps Delayed Dim‐Off Activate Permanent Mode and ignore telegrams
Use this parameter to set the behaviour of the group in night‐time mode. This parameter is only visible if you select ‘normal / night mode’.
Automatic Switch‐Off after 1 Minute 2 Minutes 3 Minutes 4 Minutes 5 Minutes 10 Minutes 15 Minutes 20 Minutes
Use this parameter to set the time after which a group in night time mode automatically switches off. This parameter is only visible if you select ‘normal / night mode’.
Function of Additional Object No Object Disable Object Release Object Disable Staircase Function Object
Use this parameter to set the function of an additional object.
Enabled for Emergency / Panic Mode No Yes
Use this parameter to enable a group for panic/emergency mode.

Technical Manual Dali Control IP Gateway SCN‐DALI64.02
MDT technologies GmbH • 51766 Engelskirchen • Papiermühle 1 Tel.: +49-2263-880 • Fax: +49-2263-4588 • [email protected] • www.mdt.de
94
14.3.2Parameterpage:Switchingbehaviour
Parameter Settings
Switch‐On Value 1% 10% … 95% 100% Last value
Use this parameter to set the switch‐on value. If you select ‘last value‘, the value is set to the dim value prior to the lamps being switched off.
Switch‐On Behaviour Set Value Immediately Dim to Value in 10s Dim to Value in 20s Dim to Value in 30s Dim to Value in 1 Minute Dim to Value in 2 Minutes Dim to Value in 5 Minutes Dim to Value in 10 Minutes
Use this parameter to set the switch‐on behaviour.
Switch‐Off Value 0% 5% 10% … 45% 50%
Use this parameter to set the switch‐off value.
Switch‐Off Bahaviour Set Value Immediately Dim to Value in 10s Dim to Value in 20s Dim to Value in 30s Dim to Value in 1 Minute Dim to Value in 2 Minutes Dim to Value in 5 Minutes Dim to Value in 10 Minutes
Use this parameter to set the switch‐off behavior.
Value‐Set Behaviour Set Value Immediately Dim to Value in 10s Dim to Value in 20s Dim to Value in 30s Dim to Value in 1 Minute Dim to Value in 2 Minutes Dim to Value in 5 Minutes Dim to Value in 10 Minutes
Use this parameter to value‐set the behaviour on receipt of a new dim value.

Technical Manual Dali Control IP Gateway SCN‐DALI64.02
MDT technologies GmbH • 51766 Engelskirchen • Papiermühle 1 Tel.: +49-2263-880 • Fax: +49-2263-4588 • [email protected] • www.mdt.de
95
Time for Dimming 3 Seconds
4 Seconds 5 Seconds 6 Seconds 10 Seconds 20 Seconds 30 Seconds 60 Seconds
Use this parameter to set the dim time for relative dimming.
Max. Value for Dimming 50% 55% …. 100%
Use this parameter to configure the maximum dim value that can be set through relative dimming.
Min. Value for Dimming 0% 5% …. 50%
Use this parameter to configure the minimum dim value that can be set through relative dimming.
Switch‐On via Dimming No Yes
Use this parameter to select whether a switched off group can be switched on when receiving a relative 4 Bit dim command ‘dimming up‘.

Technical Manual Dali Control IP Gateway SCN‐DALI64.02
MDT technologies GmbH • 51766 Engelskirchen • Papiermühle 1 Tel.: +49-2263-880 • Fax: +49-2263-4588 • [email protected] • www.mdt.de
96
14.3.3Parameterpage:Analysisandservice
Parameter Settings
Type of Failure Status Object 1 Bit 8 Bit
Use this parameter to select whether you want the failure status object of the group to be sent as a 1 Bit object without type of failure information or as an 8 Bit object with failure differentiation.
Additional Failure Object for Failure Number / Rate Failure Threshold Exceeded
Use this parameter to select whether you would like to use the additional failure object as a 1 Byte object for failure number /rate or as a 1 Bit object for when the failure threshold is exceeded.
Failure Threshold for Failure Alarm Output 1%...100% [1%]
Use this parameter to enter the threshold value in %. The alarm object is sent when the value is exceeded. This parameter is only visible if you select “Failure Threshold Exceeded“ as additional failure object.
Function of Additional Failure Object Total Number of Failures Failure Rate 0..100%
Use this parameter to select whether you want the additional failure object to send the total amount of failures within the group or the failure rate in %. This parameter is only visible if you select “Failure Number / Rate“ as additional failure object.

Technical Manual Dali Control IP Gateway SCN‐DALI64.02
MDT technologies GmbH • 51766 Engelskirchen • Papiermühle 1 Tel.: +49-2263-880 • Fax: +49-2263-4588 • [email protected] • www.mdt.de
97
15.Firmwareversionandupdate
The firmware version of the DALI gateway is divided into main number, sub‐number and revision number (e.g. 1.0_10). The display on the device front only shows the main and sub‐number (Vers. 1.0). For full details regarding the current firmware (version and revision) please refer to the device website where the current version is visible in the bottom right‐hand corner of the information window. (1.0_10).
The DaliControl IP Gateway offers you the possibility of an easy firmware upgrade without having to demount the device. Future developments or any adjustments that may be required can be easily imported via the IP connection. If there is an update, an update file will be made available to you within an update tool. The update file can be directly downloaded onto the device via the tool. For more details regarding this process, please see the application note (pdf format) included with the update.

Technical Manual Dali Control IP Gateway SCN‐DALI64.02
MDT technologies GmbH • 51766 Engelskirchen • Papiermühle 1 Tel.: +49-2263-880 • Fax: +49-2263-4588 • [email protected] • www.mdt.de
98
16.Resettoconditionsatdelivery To reset the device to its original settings, press all three buttons on the front of the device and the programming button simultaneously whilst the power supply is connected. This leads to a factory reset. All device settings return to their status at delivery and the device has the physical address 15.15.255.

Technical Manual Dali Control IP Gateway SCN‐DALI64.02
MDT technologies GmbH • 51766 Engelskirchen • Papiermühle 1 Tel.: +49-2263-880 • Fax: +49-2263-4588 • [email protected] • www.mdt.de
99
17Attachment
17.1Statutoryrequirements
The above‐described devices must not be used with devices, which serve directly or indirectly the
purpose of human, health‐ or lifesaving. Further the devices must not be used if their usage can
occur danger for humans, animals or material assets.
Do not let the packaging lying around careless, plastic foil/ ‐bags etc. can be a dangerous toy for kids.
17.2Routinedisposal
Do not throw the waste equipment in the household rubbish. The device contains electrical devices,
which must be disposed as electronic scrap. The casing contains of recyclable synthetic material.
17.3Assemblage
Risk for life of electrical power!
All activities on the device should only be done by an electrical specialist. The county specific
regulations and the applicable EIB‐directives have to be observed.